- 投稿日:2019-05-27T19:45:55+09:00
postcss-jsxで React x CSSinJSを快適にする
自己紹介
- @otofu-square
- 外部登壇2回目の初心者です?
- JUBILEE WORKS, inc でフロントエンド業
- TimeTree というカレンダーアプリ
- React/Redux/TypeScript/hypernova...etc
- 最近 wasm(Rust), Web Components に興味あり
今日お話すること
今日お話すること
- postcss-jsx とは
- postcss-jsx で出来るようになったこと①
- postcss-jsx で出来るようになったこと②
- 所感
postcss-jsx とは
- https://github.com/gucong3000/postcss-jsx
- PostCSS の syntax プラグイン
- 様々なCSS in JSライブラリの記法をパース
- CSS in JS内のスタイルにPostCSSを適用可
- 様々な CSS in JS ライブラリをサポート
出来るようになったこと①
PostCSS プラグインを CSS in JS 内のスタイルに適用出来る
例えば autoprefixer
- styled-components や emotion などの CSS in JS は内部的に vendor prefix を付与する仕組みを持っている(stylis という CSS プロセッサ)
- しかし stylis には CSS Grid の IE11 向けサポートがない
- autoprefixer が持つGrid Autoplacementの機能が利用可能
どうやって PostCSS プラグインを適用するか
Webpack 上で使う
- emotion を使った CSS Grid のサンプルコード
- jsx,tsx の loader の前段に postcss-loader を挟んであげれば OK
webpack.config.js... rules: [{ test: /\.jsx?$/, exclude: /node_modules/, use: ["babel-loader", "postcss-loader"] }], ...
emotion の動的なスタイルに IE11 向けの Grid スタイルが適用されている
...
const StyledWrapper = styled.div`
  /* NOTE: & { ... } でスタイルを囲まないと autoprefixer がエラーを吐く */
  & {
    display: grid;
    grid-template-columns: repeat(3, 100px);
    grid-template-rows: repeat(2, 100px);
    grid-gap: 10px;
    ...
  }
`;
...
出来るようになったこと②
stylelint の
--fixが使える
- emotion x stylelint のサンプルアプリ
- stylelint は内部で PostCSS に依存している
- 昨年末あたりに
--syntax css-in-jsが追加され CSS in JS が標準サポートされるように- CSS in JS で autofix 可能
- stylelint-processor-styled-components はもう不要に
良いところ
- stylis のサポート外の vendor prefix も対応可能
- postcss-preset-env を使ってナウい CSS が書けるように
- stylelint の
--fixが使えることでようやく安心して CSS を書ける
- 個人的には stylelint-order の autofix が嬉しい
微妙なところ
- autoprefixer と stylis の vendor prefix が重複する
- Grid Autoplacement 使っても IE11 の Grid サポートは辛い...
- stylelint のエディタサポートが微妙
- Atom は linter-stylelint に一手間加える必要
- VSCode は format on save が出来ない ... ?
まとめ
- CSS in JSでもビルドタイムでスタイルを色々弄れるように
- stylelintで快適に CSS in JS を書けるように
- とはいえまだ全体的に洗練されてない印象
- 各方面に PR 出していきましょう ?
余談
- ゼロランタイムCSS in JSの動向が気になる
- 足早な発表だったため、何か質問や疑問があればお気軽に聞いてください!
おしまい
- 投稿日:2019-05-27T16:18:40+09:00
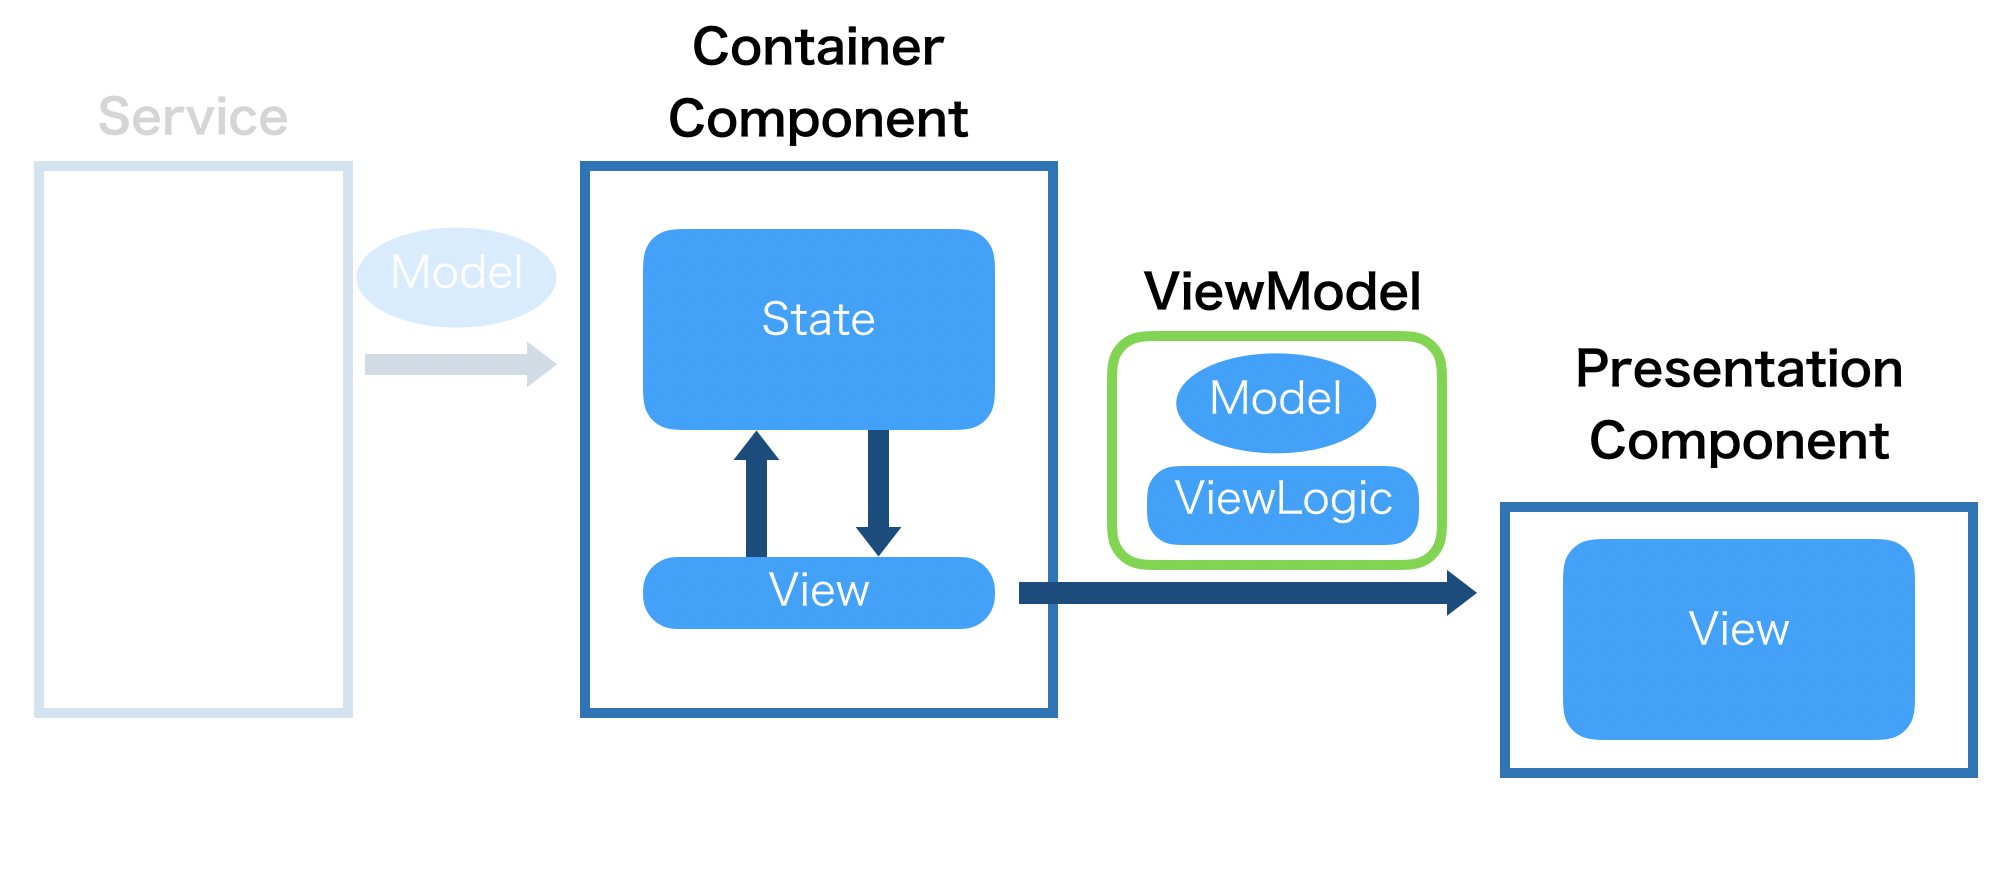
ViewModel / FormModelを使ったテスタブルなコンポーネント設計
AngularでもReactでも共通する話題ですが、フロントエンドでのコンポーネントをテストしやすい設計としてViewModelとFormModelを取り入れたらうまくいった話です。
コンポーネントテストの難しさ
そもそもフロントエンドでのコンポーネントの単体テストする難しさ(面倒さ)は何故なのか。それはinputの作りにくさとoutputの扱いづらさが起因してると考えられます。
・ inputとして値を与えるために、Serviceなどの外部モックを作る必要がある。(AngularであればDIの部分)
・ outputがDOMなので、DOM操作をしての検証が必要となる。
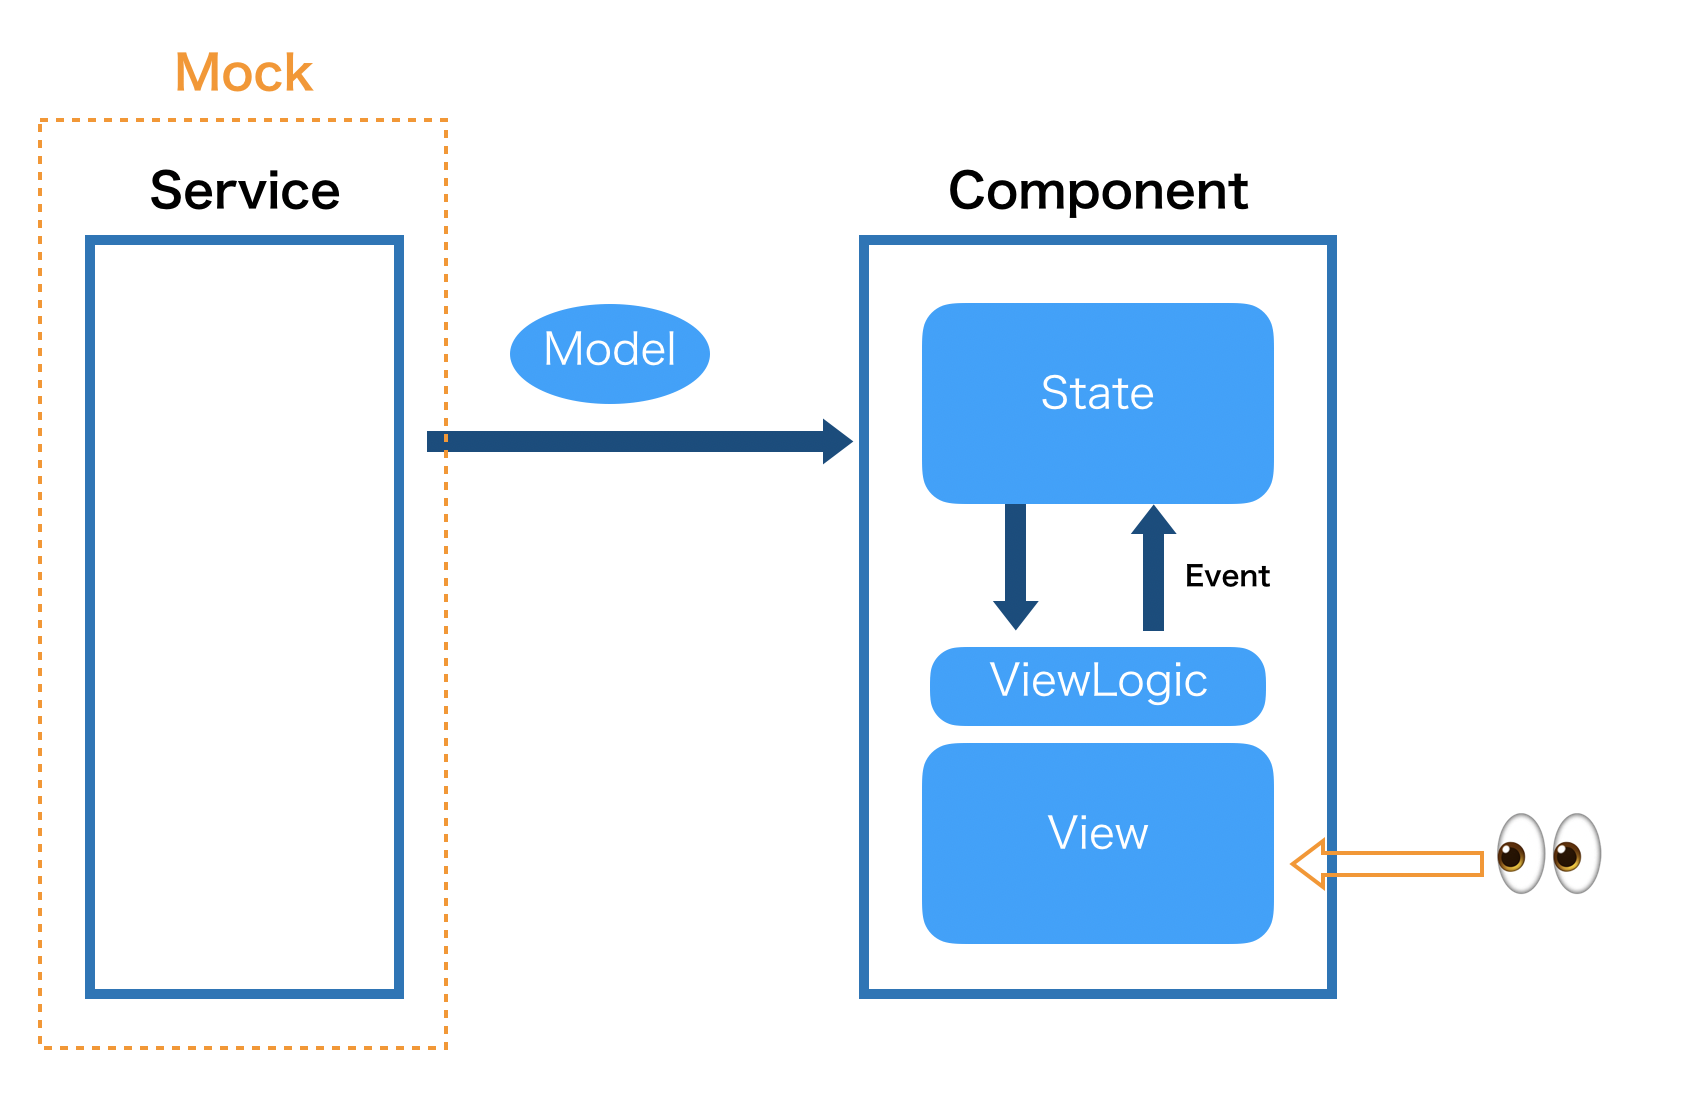
責務を分割したコンポーネント設計
テストがしやすいコンポーネントにするために、コンポーネントを責務ごとに分割しよう、というのが今回の趣旨です。
まず、単純にコンポーネントを作った際にコンポーネントがもつ責務の範囲は、
・ Service層またはStoreとのデータのやりとり
・ 自身のStateの管理
・ Viewの構築
が挙げられます。これを
・ Service層とのデータのやりとり & Stateの管理を行うコンポーネント(Container Component)
・ Viewのテンプレートとしてのコンポーネント(Presentation Component)
・ Viewの構築ロジックをもつ値オブジェクト(ViewModel/FormModel)
に分割します。商品情報を表示するコンポーネントを例にして、Reactで実装したケースで説明します。
以下は、データの取得、State管理、View構築を含んだComponentです。
product/product.component.tsxinterface Props { productId: number; } interface State { product: Product | null; } export class ProductComponent extends Component<Props, State> { constructor(props) { super(props); this.state = { product: null }; this.getProduct(); } async getProduct(){ const product: Product = await new ProductApiService().getProduct(this.props.productId); this.setState({...this.state, product}) } formatCurrency(price: number): string{ return `¥${(price || 0).toLocaleString()}`; } render() { return ( <div> {this.state.product ? ( <div> <h1>{this.state.product.name}</h1> <div> {this.formatCurrency(this.state.product.price)} </div> </div> ) : null} </div> ); } }1. Stateを持たないコンポーネントへ分離
Stateを持つ
ContainerComponentと、Stateを持たないPresentationComponentへ分離します。Redux関連でも割とよく使われるコンポーネントパターンです。
https://redux.js.org/basics/usage-with-react#presentational-and-container-components
ContainerComponent
ContainerComponentはView部分を子コンポーネントに移し、View部分を薄くします。
product/productContainer.component.tsxinterface ContainerProps { productId: number; } interface ContainerState { product: Product | null; } export class ProductContainerComponent extends Component<ContainerProps, ContainerState> { constructor(props) { super(props); this.state = { product: null }; this.getProduct(); } async getProduct(){ const product: Product = await new ProductApiService().getProduct(this.props.productId); this.setState({...this.state, product}) } render() { return ( <div> {this.state.product ? ( <ProductComponent product={this.state.product}></ProductComponent> ) : null} </div> ); } }PresentaionComponent
PresentationComponentはStateを持たないので、渡された値を元にViewを構築します。
ReactであればFunctionalComponentとしてViewのみを返す関数にします。product/components/product.component.tsxinterface Props { product: Product; } export const ProductComponent: React.FC<Props> = props => { const formatCurrency = (price: number): string => { return `¥${(price || 0).toLocaleString()}`; } return ( <div> <h1>{props.product.name}</h1> <div> {formatCurrency(props.product.price)} </div> </div> ); }2. ViewModelへのロジックの分離
本題です。
PresentationComponentでのModelからViewを構築するロジックをViewModelへ移します。
ViewModelは表示に特化したモデルクラスで、モデルをViewに合わせて整形します。値の変換、ifでの表示分岐ロジックなどを担います。
ViewModelはContainerComponent内で作成し、PresentationComponentにViewModelを渡すようにします。
PresentationComponentは受け取ったViewModelを表示するのみにします。
ViewModel
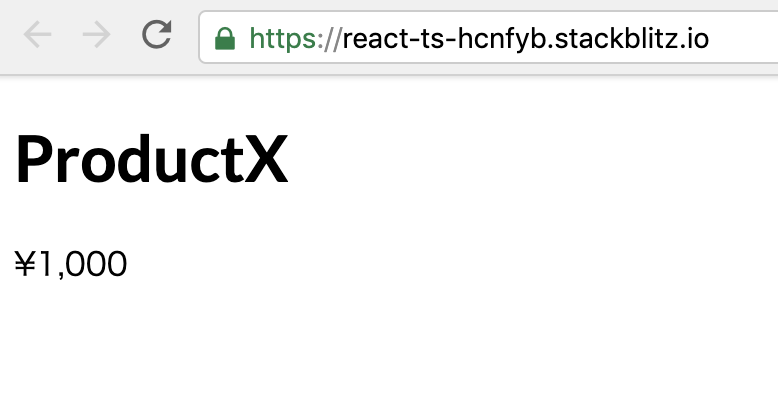
この例では、モデルの「名前」と「金額」を整形済みの形で返します。
product/components/productComponent.viewmodel.tsxexport class ProductComponentViewModel{ constructor(private product: Product){} get name(){ return this.product.name; } get price(){ return `¥${(this.product.price || 0).toLocaleString()}`; } }PresentationComponent
関数を持たず、受け取ったViewModelのプロパティを表示するのみになります。
product/components/product.component.tsxinterface Props { product: ProductComponentViewModel; } export const ProductComponent: React.FC<Props> = props => { return ( <div> <h1>{props.product.name}</h1> <div> {props.product.price} </div> </div> ); }ContainerComponent
ViewModelを作成し、子コンポーネントに渡します。
product/productContainer.component.tsx// ... (省略) render() { return ( <div> {this.state.product ? ( <ProductComponent product={new ProductComponentViewModel(this.state.product)}></ProductComponent> ) : null} </div> ); } // ... (省略)ViewModelの共通化
ViewModelは原則として1つのコンポーネントに対して作り、他のコンポーネントへの流用は行いません。
今回のようなProductの値を整形したい場合に、同じ整形ロジックを別のViewModelでも使いたいシチュエーションがあります。 その場合はmodelに対応した共通ViewModelをつくり、各ViewModel側で集約(aggregate)する形をとるとよいです。viewmodel/product.viewmodel.tsexport class ProductViewModel{ constructor(private product: Product){} get name(){ return this.product.name; } get price(){ return `¥${(this.product.price || 0).toLocaleString()}`; } }product/components/productComponent.viewmodel.tsxexport class ProductComponentViewModel{ product: ProductViewModel; constructor(private _product: Product){ this.product = new ProductViewModel(_product); } get name(){ return this.product.name; } get price(){ return this.product.price; } }FormModel
FormModelとは、Formに特化したViewModelです。Formに表示する値の整形や、Formのバリデーションを行います。
下の例は、フィールドとサブミットボタンだけの簡単なフォームで、フィールドに値がない場合はボタンを非活性にするバリデーションを行っています。
ContainerComponent
FormModelを作成して子コンポーネントに渡し、子コンポーネントからの変更のコールバックもFormModelで受け取ります。
form/formContainer.component.tsxexport class FormContainerComponent extends Component<ContainerProps, ContainerState> { constructor(props) { super(props); this.state = { name: '' }; } handleChange(form: FormModel){ const name = form.name; this.setState({...this.state, name: name}); } render() { const form = new FormModel({ name: this.state.name, onChange: this.handleChange.bind(this) }) return ( <FormComponent form={form}/> ); } }FormModel
フォームのバリデーションロジックを持ちます。また、フォームに変更があった場合に新しいFormModelを作成しコールバックを呼びます。
form/components/form.formmodel.tsinterface FormModelProps{ name: string; onChange: (form: FormModel) => void; } class FormModel implements FormModelProps{ readonly name: string; readonly onChange: (form: FormModel) => void; readonly isValid: boolean; constructor(private props: FormModelProps){ this.name = props.name; this.onChange = props.onChange; this.isValid = this.validate(); } validate(){ return this.name !== ''; } handleNameChange(name: string){ this.onChange(new FormModel({...this.props, name})); } }PresentationComponent
ViewModelと同様に、FormModelの値を表示するのみにします。
onChangeのイベントハンドリングは、値をとる部分がViewに依存するのでfunctionを持ちますが、取得した値をFormModelに渡して後の処理は移譲します。form/components/form.component.tsinterface Props{ form: FormModel } export const FormComponent: React.FC<Props> = props => { const handleNameChange = (event: React.ChangeEvent<HTMLInputElement>) => { const name = event.currentTarget.value; props.form.handleNameChange(name); } return ( <fieldset> <input value={props.form.name} onChange={handleNameChange.bind(props)}/> <button disabled={!props.form.isValid}>submit</button> </fieldset> ) }まとめ
・ Viewの構築ロジックをViewModelとしてピュアなJSクラスになるのでテストがしやすくなる
・ Formも同様に、FormModelにロジックを移すことでテストがしやすくなる
・ PresentationComponentはViewModelの値を表示をするのり、Snaoshotテストを行えば良い状態になる
(SnapshotテストはJestの機能なので、Jasmineを使用している場合はJestへの切り替えをおすすめします)


- 投稿日:2019-05-27T16:18:40+09:00
ViewModel / FormModelを用いたテスタブルなコンポーネント設計
AngularでもReactでも共通する話題ですが、フロントエンドでのコンポーネントをテストしやすい設計としてViewModelとFormModelを取り入れたらうまくいった話です。
コンポーネントテストの難しさ
そもそもフロントエンドでのコンポーネントの単体テストする難しさ(面倒さ)は何故なのか。それはinputの作りにくさとoutputの扱いづらさが起因してると考えられます。
・ inputとして値を与えるために、Serviceなどの外部モックを作る必要がある。(AngularであればDIの部分)
・ outputがDOMなので、DOM操作をしての検証が必要となる。
責務を分割したコンポーネント設計
テストがしやすいコンポーネントにするために、コンポーネントを責務ごとに分割しよう、というのが今回の趣旨です。
まず、単純にコンポーネントを作った際にコンポーネントがもつ責務の範囲は、
・ Service層またはStoreとのデータのやりとり
・ 自身のStateの管理
・ Viewの構築
が挙げられます。これを
・ Service層とのデータのやりとり & Stateの管理を行うコンポーネント(Container Component)
・ Viewのテンプレートとしてのコンポーネント(Presentation Component)
・ Viewの構築ロジックをもつ値オブジェクト(ViewModel/FormModel)
に分割します。商品情報を表示するコンポーネントを例にして、Reactで実装したケースで説明します。
以下は、データの取得、State管理、View構築を含んだComponentです。
product/product.component.tsxinterface Props { productId: number; } interface State { product: Product | null; } export class ProductComponent extends Component<Props, State> { constructor(props) { super(props); this.state = { product: null }; this.getProduct(); } async getProduct(){ const product: Product = await new ProductApiService().getProduct(this.props.productId); this.setState({...this.state, product}) } formatCurrency(price: number): string{ return `¥${(price || 0).toLocaleString()}`; } render() { return ( <div> {this.state.product ? ( <div> <h1>{this.state.product.name}</h1> <div> {this.formatCurrency(this.state.product.price)} </div> </div> ) : null} </div> ); } }1. Stateを持たないコンポーネントへ分離
Stateを持つ
ContainerComponentと、Stateを持たないPresentationComponentへ分離します。Redux関連でも割とよく使われるコンポーネントパターンです。
https://redux.js.org/basics/usage-with-react#presentational-and-container-components
ContainerComponent
ContainerComponentはView部分を子コンポーネントに移し、View部分を薄くします。
product/productContainer.component.tsxinterface ContainerProps { productId: number; } interface ContainerState { product: Product | null; } export class ProductContainerComponent extends Component<ContainerProps, ContainerState> { constructor(props) { super(props); this.state = { product: null }; this.getProduct(); } async getProduct(){ const product: Product = await new ProductApiService().getProduct(this.props.productId); this.setState({...this.state, product}) } render() { return ( <div> {this.state.product ? ( <ProductComponent product={this.state.product}></ProductComponent> ) : null} </div> ); } }PresentaionComponent
PresentationComponentはStateを持たないので、渡された値を元にViewを構築します。
ReactであればFunctionalComponentとしてViewのみを返す関数にします。product/components/product.component.tsxinterface Props { product: Product; } export const ProductComponent: React.FC<Props> = props => { const formatCurrency = (price: number): string => { return `¥${(price || 0).toLocaleString()}`; } return ( <div> <h1>{props.product.name}</h1> <div> {formatCurrency(props.product.price)} </div> </div> ); }2. ViewModelへのロジックの分離
本題です。
PresentationComponentでのModelからViewを構築するロジックをViewModelへ移します。
ViewModelは表示に特化したモデルクラスで、モデルをViewに合わせて整形します。値の変換、ifでの表示分岐ロジックなどを担います。
ViewModelはContainerComponent内で作成し、PresentationComponentにViewModelを渡すようにします。
PresentationComponentは受け取ったViewModelを表示するのみにします。
ViewModel
この例では、モデルの「名前」と「金額」を整形済みの形で返します。
product/components/productComponent.viewmodel.tsxexport class ProductComponentViewModel{ constructor(private product: Product){} get name(){ return this.product.name; } get price(){ return `¥${(this.product.price || 0).toLocaleString()}`; } }PresentationComponent
関数を持たず、受け取ったViewModelのプロパティを表示するのみになります。
product/components/product.component.tsxinterface Props { product: ProductComponentViewModel; } export const ProductComponent: React.FC<Props> = props => { return ( <div> <h1>{props.product.name}</h1> <div> {props.product.price} </div> </div> ); }ContainerComponent
ViewModelを作成し、子コンポーネントに渡します。
product/productContainer.component.tsx// ... (省略) render() { return ( <div> {this.state.product ? ( <ProductComponent product={new ProductComponentViewModel(this.state.product)}></ProductComponent> ) : null} </div> ); } // ... (省略)ViewModelの共通化
ViewModelは原則として1つのコンポーネントに対して作り、他のコンポーネントへの流用は行いません。
今回のようなProductの値を整形したい場合に、同じ整形ロジックを別のViewModelでも使いたいシチュエーションがあります。 その場合はmodelに対応した共通ViewModelをつくり、各ViewModel側で集約(aggregate)する形をとるとよいです。viewmodel/product.viewmodel.tsexport class ProductViewModel{ constructor(private product: Product){} get name(){ return this.product.name; } get price(){ return `¥${(this.product.price || 0).toLocaleString()}`; } }product/components/productComponent.viewmodel.tsxexport class ProductComponentViewModel{ product: ProductViewModel; constructor(private _product: Product){ this.product = new ProductViewModel(_product); } get name(){ return this.product.name; } get price(){ return this.product.price; } }FormModel
FormModelとは、Formに特化したViewModelです。Formに表示する値の整形や、Formのバリデーションを行います。
下の例は、フィールドとサブミットボタンだけの簡単なフォームで、フィールドに値がない場合はボタンを非活性にするバリデーションを行っています。
ContainerComponent
FormModelを作成して子コンポーネントに渡し、子コンポーネントからの変更のコールバックもFormModelで受け取ります。
form/formContainer.component.tsxexport class FormContainerComponent extends Component<ContainerProps, ContainerState> { constructor(props) { super(props); this.state = { name: '' }; } handleChange(form: FormModel){ const name = form.name; this.setState({...this.state, name: name}); } render() { const form = new FormModel({ name: this.state.name, onChange: this.handleChange.bind(this) }) return ( <FormComponent form={form}/> ); } }FormModel
フォームのバリデーションロジックを持ちます。また、フォームに変更があった場合に新しいFormModelを作成しコールバックを呼びます。
form/components/form.formmodel.tsinterface FormModelProps{ name: string; onChange: (form: FormModel) => void; } class FormModel implements FormModelProps{ readonly name: string; readonly onChange: (form: FormModel) => void; readonly isValid: boolean; constructor(private props: FormModelProps){ this.name = props.name; this.onChange = props.onChange; this.isValid = this.validate(); } validate(){ return this.name !== ''; } handleNameChange(name: string){ this.onChange(new FormModel({...this.props, name})); } }PresentationComponent
ViewModelと同様に、FormModelの値を表示するのみにします。
onChangeのイベントハンドリングは、値をとる部分がViewに依存するのでfunctionを持ちますが、取得した値をFormModelに渡して後の処理は移譲します。form/components/form.component.tsinterface Props{ form: FormModel } export const FormComponent: React.FC<Props> = props => { const handleNameChange = (event: React.ChangeEvent<HTMLInputElement>) => { const name = event.currentTarget.value; props.form.handleNameChange(name); } return ( <fieldset> <input value={props.form.name} onChange={handleNameChange.bind(props)}/> <button disabled={!props.form.isValid}>submit</button> </fieldset> ) }まとめ
・ Viewの構築ロジックをViewModelとしてピュアなJSクラスになるのでテストがしやすくなる
・ Formも同様に、FormModelにロジックを移すことでテストがしやすくなる
・ PresentationComponentはViewModelの値を表示をするのり、Snaoshotテストを行えば良い状態になる
(SnapshotテストはJestの機能なので、Jasmineを使用している場合はJestへの切り替えをおすすめします)
- 投稿日:2019-05-27T08:54:58+09:00
[Error]Absolute imports should come before relative imports in React + Redux
このエラーは
React momentをimportしようとした際に出たエラーです。
日本語での文献が見当たらなかったのでまとめます。error Absolute imports should come before relative imports直訳すると絶対的なimportは相対的なimportの前にこなきゃだめだよってことです。
ESLintのコーディング規約だと思われます。これを
import React from 'react';
import { Link } from 'react-router-dom';
import { Map } from 'immutable';
import * as Actions from '../../actions
import  moment from 'moment';
こうすると解消されます。
import React from 'react';
import  moment from 'moment';
import { Link } from 'react-router-dom';
import { Map } from 'immutable';
import * as Actions from '../../actions
- 投稿日:2019-05-27T08:54:58+09:00
[Eslint Error]Absolute imports should come before relative imports in React + Redux
このエラーは
React momentをimportしようとした際に出たエラーです。
日本語での文献が見当たらなかったのでまとめます。error Absolute imports should come before relative imports直訳すると絶対的なimportは相対的なimportの前にこなきゃだめだよってことです。
ESLintのコーディング規約だと思われます。これを
import React from 'react';
import { Link } from 'react-router-dom';
import { Map } from 'immutable';
import * as Actions from '../../actions
import  moment from 'react-moment';
こうすると解消されます。
import React from 'react';
import  moment from 'react-moment';
import { Link } from 'react-router-dom';
import { Map } from 'immutable';
import * as Actions from '../../actions
- 投稿日:2019-05-27T08:03:31+09:00
Fleur という Flux フレームワークが良い感じ
Pixiv のエンジニアの方が作った Fleur という Flux フレームワークを触ってみて、とても良いなという感触を得たので紹介したいと思います。
ra-gg/fleur: A new fully-typed Flux Framework inspired by Fluxible
Fleur とは
【SSRも】Fleur − 新しいFluxフレームワーク【イケる】
Fleur がどんなフレームワークか、というのは作者の方がブログで詳しく書いているので、この記事では実際に書いてみたコードと使い心地に焦点を当てます。
かいつまんで紹介すると、
- Fluxible を参考にしている
- SSR に対応している
- React Hooks に対応している
- 非同期処理に対応している
- Store は immer.js を組み込んでいる
- SSR に対応したルーターを持っている
こんな感じで、モダンな作りと幅広い対応範囲が特徴的です。
詳しい数値はブログの方に書いてありますが、パフォーマンス面も Redux + react-redux の性能に迫るようで、Pixiv 内のプロダクトで実際に使われているだけあってしっかりと作り込まれています。
作者の方からコメントをいただき、 Pixiv 内のプロダクトで使われているわけではなく、個人開発のプロダクト内の誤りでした。ただ実際に動いているプロダクト内でがっつり使われていることは間違いないです(19/05/27 18:03追記)
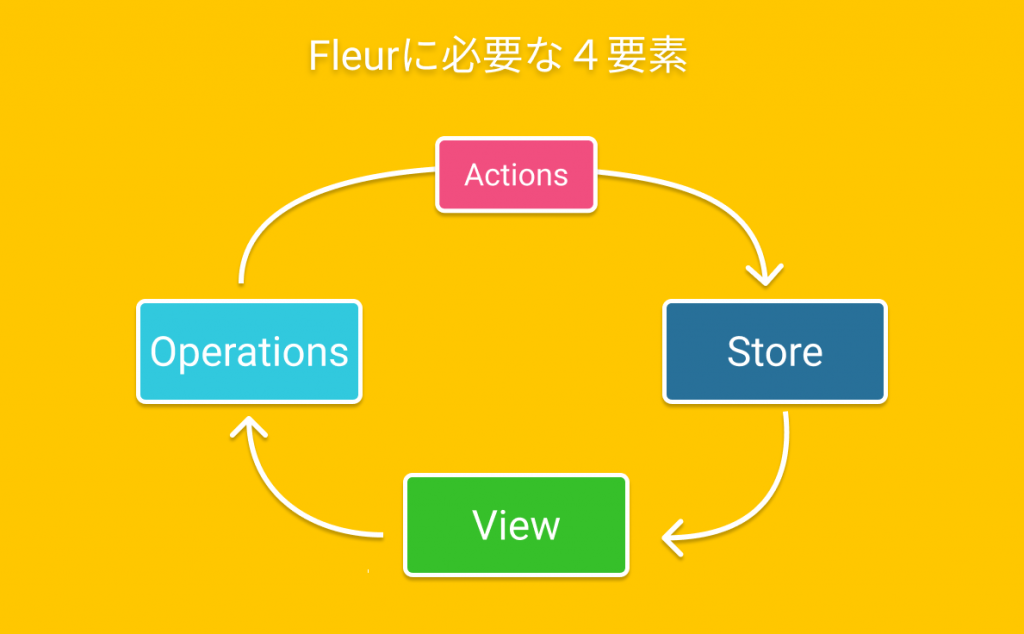
ブログ内で紹介されている画像を使わせていただきました。
各ドメインごとに Actions, Operations, Store を定義して Store をコンポーネントに繋げる仕組みになっています。
4つの要素を作るということでがっつり構造を分けることになるのですが、定義に必要な記述は少なく、 Redux のように多くの記述を必要とせずに作ることができます。OXゲームを作ってみた
React の公式チュートリアルでは、OXゲームを作るという課題を与えられるのですが、今回はそれを Fleur を使ってやってみました。
中大規模アプリ向けと言及されていたので、正直このレベルのゲームを作る程度だと恩恵を受けるのが難しいところではあるのですが、書き心地を確認するという意味ではまあいいかなと思います。Fleur の特徴である SSR や非同期処理やルーターなどの機能は使用していないのですが、まともなアプリケーションを作った際にまたそれらの機能の感想などは書ければなと。
実際に作ったゲームのソースコードはこちらに置いています。
nabeliwo/fleur-tic-tac-toe作っているゲームの機能などはチュートリアルの方を見ていただければ。
最近 React の公式が日本語化されたので一度見てみることをオススメします!Actions
まずは Action を定義します。
マス目をクリックした際に発行される、 setMark と履歴一覧のうちの好きなところに戻る jumpTo という2種類の Action を定義しています。gameActions.tsimport { actions, action } from "@fleur/fleur"; import { Mark } from "./gameStore"; export const GameActions = actions("GameAction", { setMark: action<{ order: number; mark: Mark }>(), jumpTo: action<{ step: number }>() });Operations
次に Operation を定義します。
ここに非同期処理を書くことができるので async を使用していますが、今回は非同期処理を必要としないためシンプルに Action を dispatch しているだけです。gameOperations.tsimport { operations } from "@fleur/fleur"; import { GameActions } from "./gameActions"; import { Mark } from "./gameStore"; export const GameOps = operations({ async setMark({ dispatch }, order: number, mark: Mark) { dispatch(GameActions.setMark, { order, mark }); }, async jumpTo({ dispatch }, step: number) { dispatch(GameActions.jumpTo, { step }); } });Store
次に Store を作ります。
ここで state を管理して dispatch した Action を受けて state を更新します。
updateWithで state を更新することができるのですが、 Redux 思考に慣れてしまった自分は新しい state を返すのではなく state を直接書き換えていることに最初「うっ…」となったのですが、実際にはこちらの方が記述が見やすくて良いですね。
特に配列の中身変更するような場面だと Redux の reducer だと配列回して該当部分だけ変更するみたいな記述になるのでちょっと見辛くなりがちでした。ここにロジックを押し込んだので Store が少し大きくなっています。
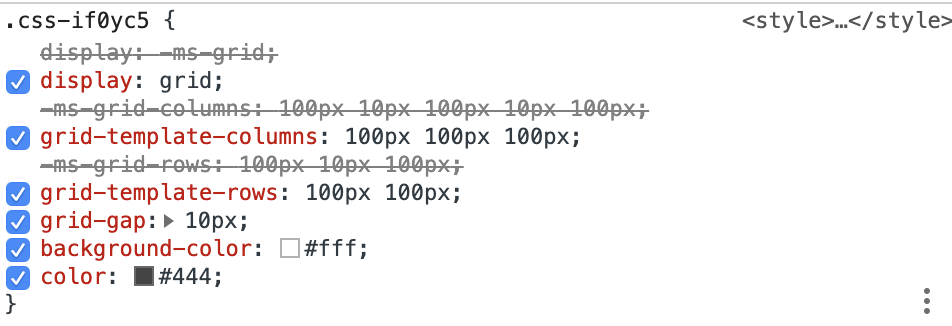
gameStore.tsimport { listen, Store } from "@fleur/fleur"; import { GameActions } from "./gameActions"; export type Mark = "O" | "X"; export type Matrix = (Mark | null)[][]; type State = { history: Array<{ squares: Array<Mark | null> }>; xIsNext: boolean; step: number; }; export class GameStore extends Store { static storeName = "GameStore"; public state: State = { xIsNext: true, history: [{ squares: Array(9).fill(null) }], step: 0 }; public get allHistory() { return this.state.history; } public get currentHistory() { const { history, step } = this.state; return history.slice(0, step + 1); } public get currenMatrix() { const squares = this.getCurrentSquares(); return [squares.slice(0, 3), squares.slice(3, 6), squares.slice(6, 9)]; } public get nextMark() { const nextMark: Mark = this.state.xIsNext ? "X" : "O"; return nextMark; } public get winner() { const lines = [ [0, 1, 2], [3, 4, 5], [6, 7, 8], [0, 3, 6], [1, 4, 7], [2, 5, 8], [0, 4, 8], [2, 4, 6] ]; const squares = this.getCurrentSquares(); for (let i = 0; i < lines.length; i++) { const [a, b, c] = lines[i]; if ( squares[a] && squares[a] === squares[b] && squares[a] === squares[c] ) { return squares[a]; } } return null; } private getCurrentSquares = () => { const currentHistory = this.currentHistory; const { squares } = currentHistory[currentHistory.length - 1]; return squares; }; private handleSetMark = listen(GameActions.setMark, ({ order, mark }) => { if (this.winner) return; this.updateWith((draft: State) => { const currentHistory = this.currentHistory; const squares = this.getCurrentSquares().slice(); squares[order] = mark; draft.history = currentHistory.concat([{ squares }]); draft.xIsNext = !draft.xIsNext; draft.step = currentHistory.length + 1; }); }); private handleJumpTo = listen(GameActions.jumpTo, ({ step }) => { this.updateWith((draft: State) => { draft.xIsNext = step % 2 === 0; draft.step = step; }); }); }まだ Fleur のソースコードを読んでいないので
handleSetMarkとhandleJumpToがどのように実行されるのかがわかっていないのですが、定義することで Action を listen します。このクラスの中で
storeNameを定義しないとエラーになってしまったので現状とりあえず書いているのですが、もうちょっと調べてみて解決したらこの記事を編集したいと思います。
作者の方からコメントをいただき、現状 Fleur 内部で storeName を使って管理をしているため storeName の定義は必須ということでした(19/05/27 18:07追記)View
次に Store をコンポーネントに繋ぎます。
Store から state を呼び出したり、 Operations を呼び出したりします。この繋ぎ込みを行うのを Redux で言う Container に当たる部分として考えて Component と切り分けると綺麗に分割できそう。Game.tsximport React, { useCallback } from "react"; import { useFleurContext, useStore } from "@fleur/fleur-react"; import { GameOps } from "../../domains/game/gameOperations"; import { GameStore } from "../../domains/game/gameStore"; import { Board } from "../Board"; import { Step } from "../Step"; import "./style.css"; export const Game = () => { const { allHistory, matrix, nextMark, winner } = useStore( [GameStore], getStore => { const store = getStore(GameStore); return { allHistory: store.allHistory, matrix: store.currenMatrix, nextMark: store.nextMark, winner: store.winner }; } ); const { executeOperation } = useFleurContext(); const handleClickSquare = useCallback( (order: number) => executeOperation(GameOps.setMark, order, nextMark), [executeOperation, nextMark] ); const handleClickStep = useCallback( (step: number) => executeOperation(GameOps.jumpTo, step), [executeOperation] ); return ( <div className="game"> <div className="game-board"> <Board matrix={matrix} onClick={handleClickSquare} /> </div> <div className="game-info"> <div>{winner ? `Winner: ${winner}` : `Next player: ${nextMark}`}</div> <ol> {allHistory.map((step, move) => { return ( <li key={move}> <Step move={move} onClick={handleClickStep} /> </li> ); })} </ol> </div> </div> ); };useFleurContext と useStore が
@fleur/fleru-reactの機能です。
定義した GameStore を useStore に渡すことで state を抽出することができます。useFleurContext から executeOperation を取り出して Operation を実行することができます。
最後にアプリケーションのルートで Fleur を繋ぎ込みます。
index.tsximport React from "react"; import ReactDOM from "react-dom"; import Fleur from "@fleur/fleur"; import { FleurContext } from "@fleur/fleur-react"; import { GameStore } from "./domains/game/gameStore"; import { Game } from "./components/Game"; import "./index.css"; const app = new Fleur({ stores: [GameStore] }); const context = app.createContext(); window.addEventListener("DOMContentLoaded", () => { const root = document.querySelector("#root"); ReactDOM.render( <FleurContext value={context}> <Game /> </FleurContext>, root ); });
new Fleurに定義した Store を渡すことで子孫コンポーネントで該当 Store を取り出すことができるようになっています。
Context API をうまく使っていて良い感じ。その他のコンポーネントは特に言うことはないので GitHub のリポジトリを見て確認していただければと思います。
まとめ
簡単なゲームを作ってみての感想として、とにかく書きやすいです。
最初ブログを見たときにフレームワークの特徴として「コードの書き心地が良い」というのがあって、「主観では・・・」となったのですが、書いてみると確かにこれまでやってきた Flux フレームワークと比べると個人的にとても書きやすく、少なくとも僕の書き心地の感覚とは一致しているようでした。
ブログの方でオススメのディレクトリ構成などについても詳しく記述されていて、今回のOXゲームを作るにあたって、一切手が止まることなくスラスラと書けました。
ここ最近の流れとして大事な部分である SSR やルーター部分の感想が言えないのが紹介記事としては不十分ではあると思うのですが、そちらはまた個人開発のアプリケーションで使ってみて何かあれば追記しようと思います。React 公式の方で SSR の対応が進んでいたり、 Google のクローラーが CSR を評価できるようになってきたりなど、フレームワーク側での対応が必要じゃなくなりつつあるかもしれない昨今ではありますが、現状ではやはり toC のアプリケーションを作る上では対応しなければならない問題だと思うのでやはりフレームワーク側で担保してくれるのは非常に助かります。
リリースしたばかりでまだまだ発展途上とのことですが、十分選択肢の一つとして考えることができるフレームワークかと思いますので、 Fleur をオススメさせていただきます。