- 投稿日:2019-05-27T23:02:08+09:00
Railsで基本情報技術者試験の過去問題サイトを作る(4:親子関係、参照編)
はじめに
ゆる〜く学ぶ。みんなのWeb勉強コミュニティー。 「にゅ〜ぶる会」を運用中です。
https://newburu.github.io/そこで、何か教育用のコンテンツが欲しいなぁ〜と思い立ち、今回の企画をスタートしました!
Railsで基本情報技術者試験の過去問題サイトを作ります!
最終目標
- 問題・回答の登録は、Scaffoldで簡易でOK
- APIを用意して、ランダムに問題を抽出する機能を追加する
- TwitterBOT、LINEBOT、SlackBOTが出来たら良いな
履歴
1:構築編
https://qiita.com/newburu/items/ed59f47ac645b19620f6
2:日本語化(i18n)編
https://qiita.com/newburu/items/4f12fdb61bf6cd601545/
3:親子関係、登録編
https://qiita.com/newburu/items/f2a20289be5ec1fc1b77
4:親子関係、参照編
本ページ今回やる事
- 登録した親子関係の情報を参照系の画面に表示します
※レイアウトをやろうと思いましたが、こちらの方が優先なので、予定を変更させて頂きました。
登録した親子関係の情報を参照系の画面に表示します
1. まずは、現状を確認しましょう。
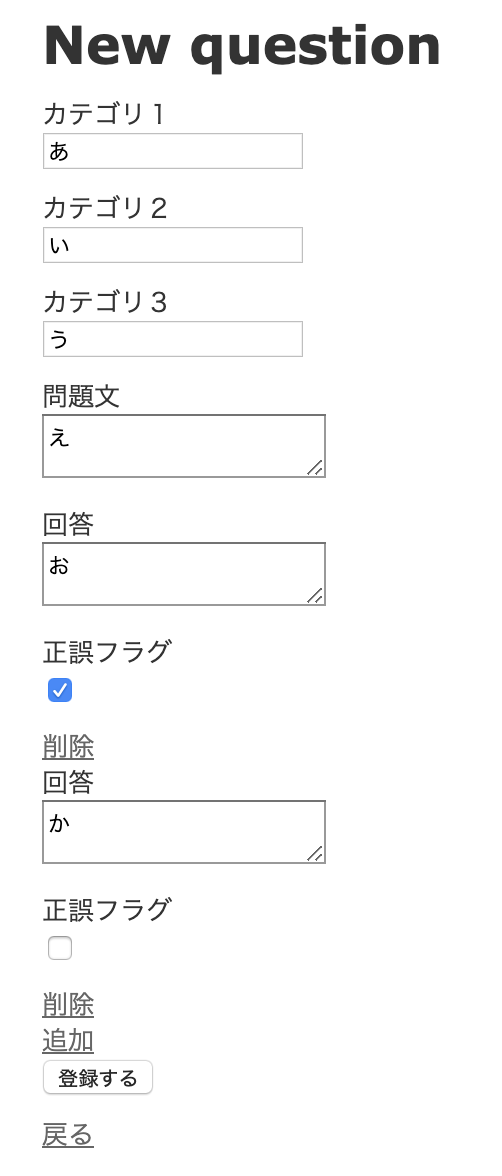
登録画面
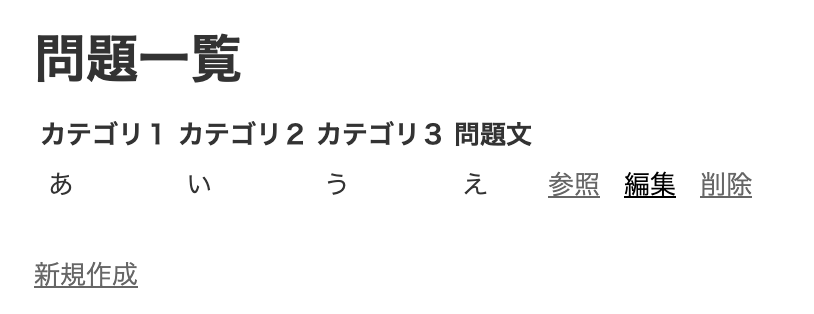
問題一覧画面
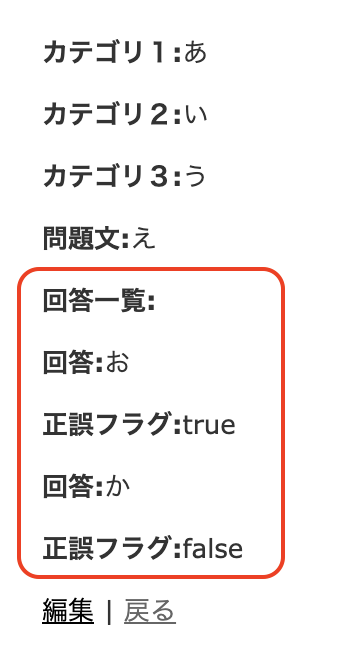
問題参照画面
2. 問題参照画面のViewを直します。
今回やる事は、ここ。
問題参照画面に、回答一覧を追加するよ!
元ソース
app/views/questions/show.html.slimp#notice = notice p strong = "#{Question.human_attribute_name(:category1)}:" = @question.category1 p strong = "#{Question.human_attribute_name(:category2)}:" = @question.category2 p strong = "#{Question.human_attribute_name(:category3)}:" = @question.category3 p strong = "#{Question.human_attribute_name(:msg)}:" = @question.msg // ここに回答一覧を足していきます。 => link_to t('btn.edit'), edit_question_path(@question) '| =< link_to t('btn.back'), questions_path修正後ソース
app/views/questions/show.html.slimp#notice = notice p strong = "#{Question.human_attribute_name(:category1)}:" = @question.category1 p strong = "#{Question.human_attribute_name(:category2)}:" = @question.category2 p strong = "#{Question.human_attribute_name(:category3)}:" = @question.category3 p strong = "#{Question.human_attribute_name(:msg)}:" = @question.msg // ここに回答一覧を足します。 p strong = "#{Question.human_attribute_name(:answers)}:" // 問題の子供として、has_manyしているanswersでループ(each)します。そして、その値(回答モデル)はanswerに渡します。 - @question.answers.each do |answer| p strong = "#{Answer.human_attribute_name(:msg)}:" = answer.msg p strong = "#{Answer.human_attribute_name(:correct)}:" = answer.correct => link_to t('btn.edit'), edit_question_path(@question) '| =< link_to t('btn.back'), questions_path完成した画面
追加されましたね!
今回はここまで
ありがとうございました!
画面周りは、まだまだ綺麗にする要素はいっぱいあるけど、
次回は、API化していこうかな。

- 投稿日:2019-05-27T22:19:43+09:00
Railsのindexページで、一つのフォームでcreateもupdateもする
先輩からの課題
皆さまはじめまして。
私はRuby on Railsを使ったシステム開発に携わらせていただいています。
と言っても、まだ1ヶ月の経験もないですが・・・今回、私は先輩から課題のようなものを出されました。
その課題というのは、
- id、group_no,group_nameというカラムを持ったtestsテーブルを作成しろ(group_noにはインデックス付与し、一意になるように。)
- TestモデルのCRUD操作を実装しろ
- ただし、CRUD操作はindexページだけで行えるようにしろ。また、新規投稿のためのフォームと、情報更新のためのフォームは一つとする。
というものでした。
要はrailsの標準機能で作成されるうな、index,new,editなどのページに遷移することなく、indexページで情報の一覧表示、作成、更新、削除を行えるようにしろということでした。1番目のテーブル周りの課題はグーグルで調べながら実装したので、何とか無事に終えることができました。
しかし2番目と3番目の課題、特に一つのフォームでcreateもupdateもするという実装をしたことがなかったので、何とか調べながら実装しました。
取った方法は以下のとおりです。
view
index.rb#デザイン部分は全く記載していません <%= form_for @test, url: test_index_path do |f| %> #group_noカラムのフィールド <%= f.label :group_no,'管理番号' %> <%= f.text_field :group_no %> #group_nameのフィールド <%= f.label :group_name,'所属グループ名称' %> <%= f.text_field :group_name %> #createもしくはupdateを行う <%= f.submit "保存" %> <% end %>コントローラー
tests_cotoroller.rbdef create #group_noは一意の番号。既にその番号が使われているのであれば、データの更新。そうで無ければ、データの作成。(test_paramsはストロングパラメーター) @test = Test.find_or_initialize_by(group_no: test_params[:group_no]) #新しいレコードの場合createのアクションを行う。 if @test.new_record? @test = Test.new(test_params) @test.save! #そうでなければ、送られてきたパラメーターの値に更新 else @test.update(test_params) end endとすることで、何とか同一のフォームで、createもupdateも行えるようになりました。
といっても、業務経験ほぼ0の筆者が実装したコードですので、かなり無駄も多いと思います。
是非、もっとこうすれば良いのに。とか、ご意見を教えていただければ嬉しいです。
- 投稿日:2019-05-27T21:04:17+09:00
【Rails】nestされたcontrollerへのform_withの書き方
namespaceでnestされたcontroller(Admin::Userなど)のアクション宛てformを
form_withで記述したい場合の雛形になります。書き方
例えば、newのviewから
Amin::Postのcreateアクションへ送りたい場合、new.html.erb<%= form_with scope: :post, url: admin_posts_path, local: true do |f| %> <%= f.text_field :title %> <% end %>
scope:とurl:により、htmlレベルでは以下のようになります。
↓<form action="/admin/posts" method="post" > <input type="text" name="post[title]"> </form>◆ちなみに、scope: :postをなくすと
new.html.erb<%= form_with url: admin_posts_path, local: true do |f| %> <%= f.text_field :title %> <% end %>↓
<form action="/admin/posts" method="post" >
  <input type="text" name="title">
</form>
controller側でストロングパラメーターを入れていれば↑は弾かれますね。
admin/posts_controller.rbprivate # ストロングパラメーター def post_params params.require(:post).permit(:title, :description) end最後に
…例を見直すと、
controllerのpostとmethodのpostという2つのpostが出てくるので、ややこしい構成になってた。。。
(最近の松本人志が怒るやつや・・・)
- 投稿日:2019-05-27T19:52:55+09:00
WSL上のUbuntu環境で chromedriver を使ってRSpecするとエラーが発生するので、その解決方法。
はじめに
WSLでUbutu環境を使いchromedriverでRSpecテストをしたらエラーが発生しましたが、無事に解決できたのでその方法をまとめます。
Railsで有名な参考書「現場で使える Ruby on Rails 5速習実践ガイド」をやっていてぶつかったエラーなので、参考になる方が多いのではと思いQiitaで記事にまとめようと思いました。
おそらく、Windows環境で参考書通りにWSLとUbuntuを使っている人だと、ほぼ確実にぶつかるエラーなので参考になれば嬉しいです。
環境とバージョン
- WSL
- Ubuntu 18.04.2 LTS
- Ruby 2.5.1
- Rails 5.2.3
- RSpec-rails 3.8.2
エラー内容と解決方法
RSpecを記述した後、テストを通すとエラーが発生しました。(現場Rails205p)
エラー内容としては「こちらの記事(teratail)」と全く同じものです。
テスト内容の記述や
spec_helper.rb、rails_helper.rbのソースコードもこちらの記事と同じなので、必要に応じて参考にしてみてください。エラー内容Failures: 1) タスク管理機能 一覧表示機能 ユーザーAがログインしているとき ユーザーAが作成したタスクが表示される Got 0 failures and 2 other errors: 1.1) Failure/Error: visit login_path Selenium::WebDriver::Error::WebDriverError: unable to connect to chromedriver 127.0.0.1:9515 # ./spec/system/tasks_spec.rb:12:in `block (4 levels) in <top (required)>' 1.2) Failure/Error: raise Error::WebDriverError, cannot_connect_error_text Selenium::WebDriver::Error::WebDriverError: unable to connect to chromedriver 127.0.0.1:9515エラーを読むと、どうやらwebdriverにエラーが発生しててchromedriverに接続できないみたいです。
Windows側とは別に、Ubuntu側にもchromeをインストールしないといけないみたいなので、こちらの記事「ubuntuにchromeを簡単にインストールしよう」を参考にchromeをインストールしました。
ちなみに、Ubuntu上で以下のコマンドを入力するとchromeがインストールされているか分かります。
$ google-chrome -version
Google Chrome 74.0.3729.169
さて、Ubuntu上にもchromeがインストールできたということで、もう一度テストを実行すると次は以下のエラーが...。
エラー内容Failures: 1) タスク管理機能 一覧表示機能 ユーザーAがログインしているとき ユーザーAが作成したタスクが表示される Got 0 failures and 2 other errors: 1.1) Failure/Error: visit login_path Net::ReadTimeout: Net::ReadTimeout # ./spec/system/tasks_spec.rb:12:in `block (4 levels) in <top (required)>' 1.2) Failure/Error: @io.to_io.wait_readable(@read_timeout) or raise Net::ReadTimeout Net::ReadTimeout: Net::ReadTimeoutどうやら、次はchromeに繋がらずにタイムアウトしてしまったようですね。
こちらの記事(WSL Ubuntu 上で chromedriver を使った System Spec を動かす)によれば、
ChromeがインストールされているのはWSLの外のWindows環境。 なのでパスが通っていないし、バイナリも不一致となってしまう。
そのため cannot find Chrome binary のようなエラーが出るなどして System Spec を実行できない。
以下の2種類の対策方法がありそうだ。
A. chromedriver-helper を使わずに、自分で chromedriver を設定する
B. chromedriver-helper を利用しつつ、ChromeをWSL環境にインストールする
対策A. chromedriver-helper を使わずに、自分で chromedriver を設定するとのこと。WSLでUbuntuを使うとパスが通ってないのでいろいろと設定が追加で必要なようです。
二つの対策方法があるみたいなので、記事を参考に僕もAの「自分でchromedriverを設定する」ことにしました。
結果、無事にテストを通すことができました。
めでたし、めでたし参考記事まとめ
- 投稿日:2019-05-27T19:17:38+09:00
Herokuデプロイ後のエラー
Cloud9上では、問題のなかったページ移行の動作ですが、
Herokuにデプロイ後、Heroku上で確認すると以下のエラーメッセージが出てきてしまいます。
(例えば、loginページからログインし、tasks(タスク一覧ページ)に行こうとすると以下のエラーになってしまう。)
We're sorry, but something went wrong.
If you are the application owner check the logs for more information.
行った対処
☆ マイグレーションの再実行
① rails db:migrate:reset
意味 : 一度DBを削除して、作成し直し、もう一度マイグレーションを実行。結果 : 一部動作はクリアしたが、まだエラーが生じる。
注: マイグレーションファイルの内容を大幅に変えていたので、Heroku側のデータベースは一旦リセットする。
① heroku pg:reset DATABASE
② To proceed, type xxxxxxxxxxxx or re-run this command with --confirm xxxxxxxxxxxxアプリ名を入力(xxxxxxxxxxxxの箇所)
③ heroku run rails db:migrate
意味 : テーブルを再作成する。
これでも改善できなかったら、、、
① heroku restart
意味 : herokuのサーバも再起動。これで何とかエラーは消滅しました。
これを解決するのに2日ほどかかりました。
初心者には結構キツイですね、、
- 投稿日:2019-05-27T19:02:55+09:00
モデルを継承して値を取得したい
IBeacon(子) < ShopTerminal(親)
モデル間の継承をしたいとする
継承とは
簡単に言うと、親のモデルに定義されている内容は全部子モデルでも使えるよ〜ってこと
値の取得
で、今回親のモデルの内容を子モデルを使って取得したい と言うこと
コントローラでいつものように値を取得したいけどなぜか
beacon = IBeacon.find_by_uuid(params[:uuid])でbeaconの値が[ ]に。
beacon = ShopTerminal.find_by_uuid(params[:uuid])だとちゃんと値はいってるのに。。。beacons_controller.rbclass Api::BeaconsController < Api::AbstractSystemController def show return render_error('Please set uuid', 400) unless params[:uuid].present? beacon = IBeacon.find_by_uuid(params[:uuid]) return render_error('beacon not found', 400) unless beacon.present? render json: beacon, serializer: IBeaconSerializer, root: nil end end解決策
親モデルのShopTerminalにtypeカラム(String型)を追加
そして追加されたtypeカラムの中に
IBeaconと書くことで上記のコード通り、子モデルでの値の取得ができるようになった!!今回やったことはSTIと言うらしい
typeという語はテーブルでSTI(Single Table Inheritance)を指定するために予約されている予約語で、この場合以外に使ったらエラーになるので気をつける。
STI(単一テーブル継承)はACtiveRecoredがサポートしている機能です。
- 投稿日:2019-05-27T18:58:32+09:00
Windows + VirtualBox + vagrant + Ubuntu + Docker + Docker Compose で Ruby on Rails + PostgreSQL の開発環境を構築する手順
タイトルにあるものを使って、Rails + PostgreSQL の環境を構築する手順を書きました。
Rails のソースコードは Windows のローカルにて管理する構成とします。
※Windowsのディレクトリを仮想環境へマウントし、Docker コンテナではそのマウント先を参照させる「Docker Community Edition for Windows を入れる前に確認すること」
(https://qiita.com/lmatsul/items/9f05e76e22d862eb8620)
で書きましたが、Windows 上での Docker 実行が出来なかったので、
仕方なく仮想環境上で Docker を試すことにしました。Windows 10 の Windows Subsystem for Linux (WSL) 上でも試そうかと思いましたが、
以下の記事のように出来ないこともあるようなので、無駄足を踏まないように最初から仮想環境を選びました…。
https://qiita.com/guchio/items/3eb0818df44fdbab3d14VirtualBox をインストールする
https://www.virtualbox.org/wiki/Downloads
※今回試したのは バージョン 5.0.26 r108824vagrant をインストールする
https://www.vagrantup.com/downloads.html
※今回試したのは バージョン 2.2.4今回の環境用のディレクトリを作成
C:\Users\(ユーザー名)\dev_rails で作成したとします
最終的な構成は以下のようになります
構成dev_rails ├ rails │ ├ src │ │ ├ Gemfile │ │ ├ Gemfile.lock │ │ └ (ここにRailsのソースコード一式が入る) │ ├ docker-compose.yml │ ├ Dockerfile │ └ entrypoint.sh └ vagrant └ VagrantfileRuby on Rails 環境構築用のディレクトリを作成
dev_rails 配下へ Ruby on Rails 環境構築用のディレクトリを作成します
今回は dev_rails\rails としますVagrantFile の作成
dev_rails 配下へ Vagrantfile を置くためのディレクトリを作成します
今回は dev_rails\vagrant としますコマンドプロンプトを起動し、作成したディレクトリへ移動して
vagrant initとコマンドを実行しますVagrantfile が作成されるので、以下のように修正して保存します
Vagrantfile# -*- mode: ruby -*- # vi: set ft=ruby : # All Vagrant configuration is done below. The "2" in Vagrant.configure # configures the configuration version (we support older styles for # backwards compatibility). Please don't change it unless you know what # you're doing. Vagrant.configure("2") do |config| # The most common configuration options are documented and commented below. # For a complete reference, please see the online documentation at # https://docs.vagrantup.com. # Every Vagrant development environment requires a box. You can search for # boxes at https://vagrantcloud.com/search. - config.vm.box = "base" + # Vagrant Box で 「ubuntu/bionic64(ubuntu-18.04)」を指定 + config.vm.box = "ubuntu/bionic64" # Disable automatic box update checking. If you disable this, then # boxes will only be checked for updates when the user runs # `vagrant box outdated`. This is not recommended. # config.vm.box_check_update = false # Create a forwarded port mapping which allows access to a specific port # within the machine from a port on the host machine. In the example below, # accessing "localhost:8080" will access port 80 on the guest machine. # NOTE: This will enable public access to the opened port - # config.vm.network "forwarded_port", guest: 80, host: 8080 + # Port転送(Ruby on Rails 用) + config.vm.network "forwarded_port", guest: 3000, host: 3000 # Create a forwarded port mapping which allows access to a specific port # within the machine from a port on the host machine and only allow access # via 127.0.0.1 to disable public access # config.vm.network "forwarded_port", guest: 80, host: 8080, host_ip: "127.0.0.1" # Create a private network, which allows host-only access to the machine # using a specific IP. - # config.vm.network "private_network", ip: "192.168.33.10" + # IPアドレスの固定 + config.vm.network "private_network", ip: "192.168.33.10" # Create a public network, which generally matched to bridged network. # Bridged networks make the machine appear as another physical device on # your network. # config.vm.network "public_network" # Share an additional folder to the guest VM. The first argument is # the path on the host to the actual folder. The second argument is # the path on the guest to mount the folder. And the optional third # argument is a set of non-required options. - # config.vm.synced_folder "../data", "/vagrant_data" + # Windows上の rails ディレクトリを /vagrant_data としてマウント + config.vm.synced_folder "../rails", "/vagrant_data" # Provider-specific configuration so you can fine-tune various # backing providers for Vagrant. These expose provider-specific options. # Example for VirtualBox: # # config.vm.provider "virtualbox" do |vb| # # Display the VirtualBox GUI when booting the machine # vb.gui = true # # # Customize the amount of memory on the VM: # vb.memory = "1024" # end # # View the documentation for the provider you are using for more # information on available options. # Enable provisioning with a shell script. Additional provisioners such as # Puppet, Chef, Ansible, Salt, and Docker are also available. Please see the # documentation for more information about their specific syntax and use. # config.vm.provision "shell", inline: <<-SHELL # apt-get update # apt-get install -y apache2 # SHELL end仮想環境の起動
コマンドプロンプトを起動し、Vagrantfile が置かれている場所で
vagrant upコマンドを実行して仮想環境を起動します$ cd dev_rails/vagrant $ vagrant up起動したらターミナルなどで
192.168.33.10へ SSH 接続します
ログインID はvagrant
秘密鍵はvagrant upを実行した配下の .vagrant\machines\default\virtualbox にある private_key を使用してくださいDocker CE のインストール
https://docs.docker.com/install/linux/docker-ce/ubuntu/#install-docker-ce
を参考にインストールしていきますDocker には
CE(コミュニティエディション)[無償版]
と
EE(エンタープライズエディション)[有償版]
があり、Docker-CE は無償版となります。Docker リポジトリの登録
apt-get で docker-ce をインストールできるようにするために、以下の手順でリポジトリの設定を追加します。
# パッケージの更新
$ sudo apt-get update
# HTTPS利用のためのパッケージをインストール
$ sudo apt-get install apt-transport-https ca-certificates curl software-properties-common
# Docker公式の GPG を追加
$ curl -fsSL https://download.docker.com/linux/ubuntu/gpg | sudo apt-key add -
# 追加されたことを確認
$ sudo apt-key fingerprint 0EBFCD88
# リポジトリの設定
$ sudo add-apt-repository \
   "deb [arch=amd64] https://download.docker.com/linux/ubuntu \
   $(lsb_release -cs) \
   stable"
Docker CE のインストール
以下のコマンドで Docker CE をインストールします
# パッケージの更新
$ sudo apt-get update
# Docker CE のインストール
$ sudo apt-get install docker-ce
# hello-world イメージを実行して動作確認
$ sudo docker container run hello-world
バージョンを指定してインストールしたい場合は、以下のようにバージョンを確認してから、バージョン指定してインストールする
# バージョン一覧を表示
$ apt-cache madison docker-ce
# バージョンを指定して Docker CE をインストール
$ sudo apt-get install docker-ce=<VERSION>
Docker Compose のインストール
https://docs.docker.com/compose/install/
を参考にインストールしていきますDocker Compose とは、複数のコンテナを使う Docker アプリケーションを定義・実行するためのツールです。
# Docker compose のダウンロード
sudo curl -L "https://github.com/docker/compose/releases/download/1.23.2/docker-compose-$(uname -s)-$(uname -m)" -o /usr/local/bin/docker-compose
# 実行権限の付与
sudo chmod +x /usr/local/bin/docker-compose
# 動作確認(バージョン情報が表示されればOK)
$ docker-compose --version
docker-compose version 1.23.2, build 1110ad01
Ruby on Rails 環境の構築
https://docs.docker.com/compose/rails/
を参考に進めますDockerfile の作成
以下の内容のファイルをWindows側で dev_rails\rails へ作成します
※文字コードはUTF-8、改行コードはLFで作成するDockerfile# ベースイメージを Ruby 2.5 へ指定 # ベースイメージは https://github.com/docker-library/official-images/tree/master/library を参照 FROM ruby:2.5 # apt-get を更新し、Node.js、PostgreSQLクライアント、bundler をインストール RUN apt-get update -qq && \ apt-get install -y nodejs postgresql-client && \ gem install bundler # ./src をコンテナ内の /vagrant_data/src として追加し、作業ディレクトリを指定して bundle install する ADD ./src /vagrant_data/src WORKDIR /vagrant_data/src RUN bundle install # entrypoint.sh をコピーし、最初に実行されるものとして登録する COPY entrypoint.sh /usr/bin/ ENTRYPOINT ["entrypoint.sh"] # ポートの公開 EXPOSE 3000 # Rails コマンドでWebサーバを起動(ENTRYPOINTで指定された entrypoint.sh へ引き渡される) CMD ["rails", "server", "-b", "0.0.0.0"]Rails のソースコード用のディレクトリを作成
今回は dev_rails\rails\src とします
Gemfile の作成
上記で作成したディレクトリに以下の内容のファイルを
Gemfileというファイル名で作成します
※文字コードはUTF-8、改行コードはLFで作成するGemfilesource 'https://rubygems.org' gem 'rails', '~>5'Gemfile.lock の作成
Gemfile と同じ階層に
Gemfile.lockというファイル名で空のファイルを作成します
※文字コードはUTF-8、改行コードはLFで作成するentrypoint.sh の作成
Rails固有の問題を修正するための entrypoint.sh を
Dockerfile と同じ階層へ作成します。
このスクリプトはコンテナが起動されるたびに実行されます。
※文字コードはUTF-8、改行コードはLFで作成するentrypoint.sh#!/bin/bash set -e # Rails 用の server.pid が存在する場合は削除する # (server.pid が存在したままだと起動中と判断されてしまうため) rm -f /vagrant_data/src/tmp/pids/server.pid # CMDで渡されたコマンドを実行 exec $@docker-compose.yml の作成
Docker Compose 用の設定ファイル(docker-compose.yml)を
Dockerfile と同じ階層へ作成します。
データベースとWebサーバの構成設定を記述しています。
※文字コードはUTF-8、改行コードはLFで作成するdocker-compose.ymlversion: '3' services: db: # 使用するイメージを postgres に指定 image: postgres # データベースのデータディレクトリを別のVolumeへ逃して永続化 volumes: - data:/var/lib/postgresql/data web: # ビルドパスの指定(Dockerfileのある位置を指定する) build: . # Railsのソースコードディレクトリをマウント volumes: - ./src:/vagrant_data/src # ポートの設定 ports: - "3000:3000" # dbが起動後に起動するように依存関係を設定する depends_on: - db volumes: # データベースのデータ保存用Volume data: external: true
- ハマった点 (T_T)
最初、以下のようにWindows上のディレクトリへPostgreSQLのデータディレクトリをマウントしようとしたが、
services:
  db:
    image: postgres
    volumes:
      - ./tmp/db:/var/lib/postgresql/data
とすると、以下のようなエラーにハマった。
FATAL:  data directory "/var/lib/postgresql/data" has wrong ownership
HINT:  The server must be started by the user that owns the data directory.
データの永続化のためには、今回のように Volume を作成してそこで保持するようにすることで対処可能でした。
Rails プロジェクトの作成(まだRailsのソースコードを作成していない場合)
sudo docker-compose run web rails new . --force --no-deps --database=postgresqlRails の設定ファイルを編集
dev_rails\rails\src\config\database.yml にある Rails のデータベース設定ファイルを以下のように編集します。
database.yml# PostgreSQL. Versions 9.1 and up are supported. # # Install the pg driver: # gem install pg # On OS X with Homebrew: # gem install pg -- --with-pg-config=/usr/local/bin/pg_config # On OS X with MacPorts: # gem install pg -- --with-pg-config=/opt/local/lib/postgresql84/bin/pg_config # On Windows: # gem install pg # Choose the win32 build. # Install PostgreSQL and put its /bin directory on your path. # # Configure Using Gemfile # gem 'pg' # default: &default adapter: postgresql encoding: unicode # For details on connection pooling, see Rails configuration guide # http://guides.rubyonrails.org/configuring.html#database-pooling pool: <%= ENV.fetch("RAILS_MAX_THREADS") { 5 } %> + host: db + username: postgres + password: development: <<: *default database: src_development # The specified database role being used to connect to postgres. # To create additional roles in postgres see `$ createuser --help`. # When left blank, postgres will use the default role. This is # the same name as the operating system user that initialized the database. #username: src # The password associated with the postgres role (username). #password: # Connect on a TCP socket. Omitted by default since the client uses a # domain socket that doesn't need configuration. Windows does not have # domain sockets, so uncomment these lines. #host: localhost # The TCP port the server listens on. Defaults to 5432. # If your server runs on a different port number, change accordingly. #port: 5432 # Schema search path. The server defaults to $user,public #schema_search_path: myapp,sharedapp,public # Minimum log levels, in increasing order: # debug5, debug4, debug3, debug2, debug1, # log, notice, warning, error, fatal, and panic # Defaults to warning. #min_messages: notice # Warning: The database defined as "test" will be erased and # re-generated from your development database when you run "rake". # Do not set this db to the same as development or production. test: <<: *default database: src_test # As with config/secrets.yml, you never want to store sensitive information, # like your database password, in your source code. If your source code is # ever seen by anyone, they now have access to your database. # # Instead, provide the password as a unix environment variable when you boot # the app. Read http://guides.rubyonrails.org/configuring.html#configuring-a-database # for a full rundown on how to provide these environment variables in a # production deployment. # # On Heroku and other platform providers, you may have a full connection URL # available as an environment variable. For example: # # DATABASE_URL="postgres://myuser:mypass@localhost/somedatabase" # # You can use this database configuration with: # # production: # url: <%= ENV['DATABASE_URL'] %> # production: <<: *default database: src_production username: src password: <%= ENV['SRC_DATABASE_PASSWORD'] %>Docker Compose
ビルド
192.168.33.10 へ SSH 接続しているターミナルで
docker-compose.ymlがあるディレクトリへ移動し、以下のコマンドでビルドします。$ cd /vagrant_data $ sudo docker-compose buildビルド
192.168.33.10 へ SSH 接続しているターミナルで
docker-compose.ymlがあるディレクトリへ移動し、以下のコマンドでビルドします。$ cd /vagrant_data $ sudo docker-compose buildデータベースのデータ保存用Volumeの作成
ビルドが完了したら以下のコマンドでデータベースのデータ保存用の Volume を作成をします
$ sudo docker volume create --name=dataデータベースとWebサーバを起動
Volume の作成が完了したら以下のコマンドで各サービスを起動します
# -d を付けることでバックグラウンドで実行されます
$ sudo docker-compose up -d
データベースとWebサーバの起動確認
$ sudo docker-compose ps
# 以下のような表示で State が Up となっていたら起動成功
       Name                     Command               State           Ports
------------------------------------------------------------------------------------
vagrant_data_db_1    docker-entrypoint.sh postgres    Up      5432/tcp
vagrant_data_web_1   entrypoint.sh rails server ...   Up      0.0.0.0:3000->3000/tcp
データベースの作成
sudo docker-compose run web rake db:createRails の起動確認
ブラウザで
http://192.168.33.10:3000へアクセスして Rails の画面が表示されれば、環境構築完了です。その他
- コンテナがうまく起動しない場合、
sudo docker-compose logsでログを確認する- コンテナを終了させたい場合、
sudo docker-compose downで終了させる- コンテナの中に入りたい場合、
sudo docker-compose exec web bashで入ることができる
(webのところは、docker-compose.yml で記述したサービス名)- Volume の一覧を確認したい場合、
sudo docker volume lsで確認ができる- 特定の Volume を削除したい場合、
sudo docker volume rm [volume name]で削除ができる
- 投稿日:2019-05-27T18:44:13+09:00
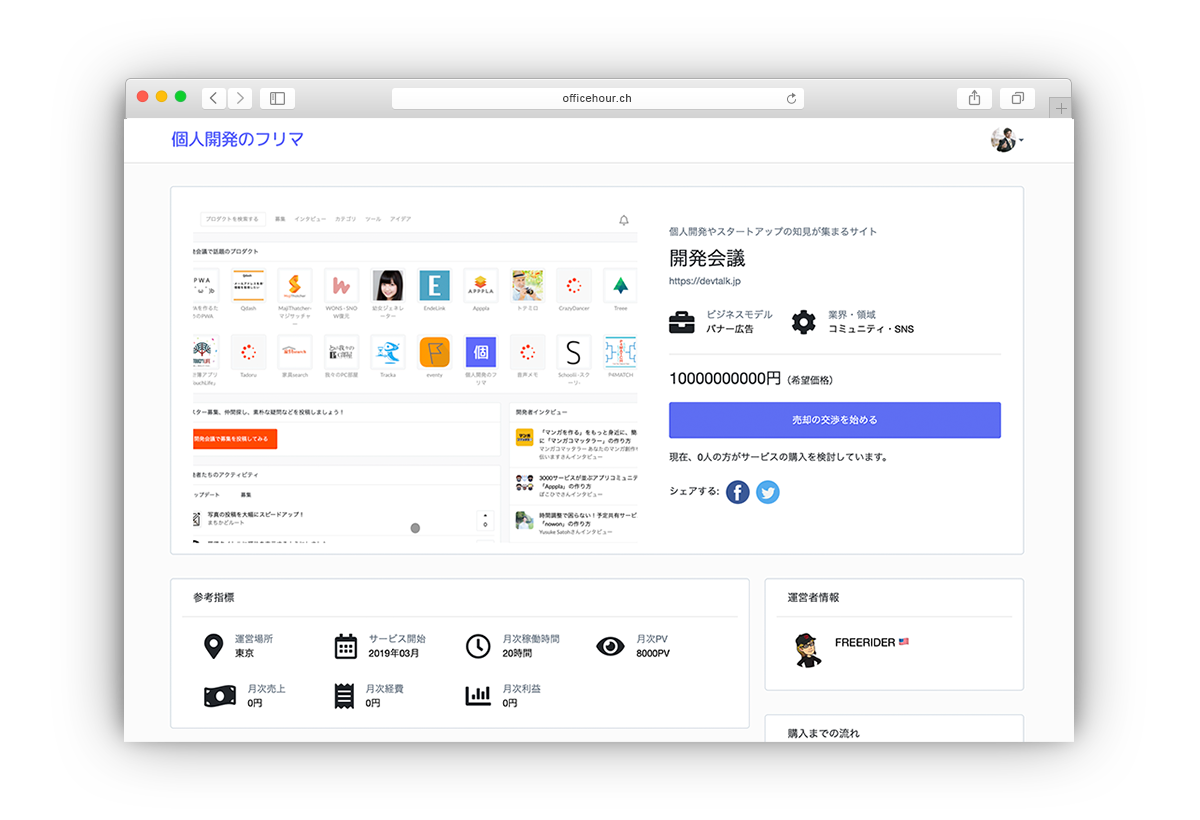
個人開発のサービスを売買できる「個人開発のフリマ」を作りました
個人開発のフリマは、個人開発やスタートアップで開発したプロダクトをフリマ感覚で売買できるサービスです。
個人開発のフリマ( https://t.co/pBm7hbuxOI )が始まります!個人開発で作ったサービスを売ったり、買ったりできるフリマサイトです。放置してるサービスなどある方、もしかしたら売れるかもしれませんよ‼️ ぜひ、登録してみてください☺️
— 個人開発のコミュニティ『開発会議』 (@devtalkjp) 2019年5月27日以前、個人開発者の知見を集めたい!「開発会議」を作りましたを投稿させていただき、200名以上の個人開発者の方々にご登録いただき、より良いサービスづくりをしていく為にインタビューを始めました。そのお話をお伺いする中で、自分のサービスで食べていく以外に「サービスの売却」という選択肢を視野に入れていることが分かりました。
また、私自身も以前、開発してバズったサービスを売却しようと考えた時がありました。しかし、従来のWebメディア売買を主要取引としたサイト群では審査に落ちてしまい、結果的に商機を逃してしまったのかなと思っています。
何ができるの
ズバリ、売ったり買ったりです。
開発環境
- Rails
- Heroku
- CloudFlare
- Amazon s3
- Amazon SES
売買スキームの実装
今回の売買では決済は実装していません。いずれ実装するかもしれませんが、まずは銀行口座によるマニュアルの振込も想定しています。交渉の申し込みから、契約内容の締結までを説明していきたいと思います。
交渉に関連するモデル
models/user.rbclass User < ApplicationRecord has_many :businesses, dependent: :destroy has_many :buy_negotiations, class_name: "Negotiation", foreign_key: "buyer_id", dependent: :destroy has_many :sell_negotiations, class_name: "Negotiation", foreign_key: "seller_id", dependent: :destroy has_many :buy_content, through: :buy_negotiations, source: :buyer has_many :sell_content, through: :sell_negotiations, source: :seller has_many :messages endmodels/business.rbclass Business < ApplicationRecord belongs_to :user has_many :negotiations endmodels/negotiation.rbclass Negotiation < ApplicationRecord before_create :set_slug belongs_to :business has_many :messages belongs_to :buyer, class_name: "User" belongs_to :seller, class_name: "User" validates :buyer_id, presence: true validates :seller_id, presence: true def to_param slug end private def set_slug loop do self.slug = SecureRandom.uuid break unless Negotiation.where(slug: slug).exists? end end endmodels/message.rbclass Message < ApplicationRecord belongs_to :user belongs_to :negotiation end交渉(negotiation)は、URLを念の為スラッグで作るようにしています。
1) 交渉の申し込み
views/businesses/show.html.erb<%= form_with model: @negotiation, url: negotiations_path, local: true do |f| %> <%= f.hidden_field :business_id, value: @business.id %> <%= f.hidden_field :seller_id, value: @business.user.id %> <%= f.hidden_field :buyer_id, value: current_user.id %> <%= f.submit "売却の交渉を始める", class: "btn btnPrimary btnStyle" %> <% end %>controllers/businesses_controller.rbdef show ・・・ @negotiation = @business.negotiations.build endBusinessに紐づいた、交渉(negotiation)を作っていきます。
controllers/negotiations_controller.rbdef create @negotiation = Negotiation.create(create_params) if @negotiation.save NegotiationMailer.send_notification_to_seller(@negotiation).deliver flash[:success] = "交渉が始まりました!" redirect_to @negotiation else flash[:alert] = "交渉の開始に失敗しました。" redirect_to root_path end end交渉が始まったら、売り手側にメールが飛ぶように設定しています。
2) 交渉
views/negotiations/show.html.erb・・・ <div class="chatBox"> <%= render partial: 'messages/form', locals: { message: @message, negotiation: @negotiation, negotiation_id: @negotiation.id } %> </div> <div id="comments_area"> <%= render partial: 'messages/index', locals: { messages: @messages } %> </div> ・・・views/messages/_form.html.erb<%= form_with(model: [negotiation, message] ) do |form| %> <div class="chatInput"> <%= form.text_area :content, rows: "3" %> </div> <div class="chatHead"> <%= form.submit "送信する" %> </div> <% end %>views/messages/_index.html.erb<ul> <% messages.each do |message| %> <% unless message.id.nil? %> <li> <div class="msg"> <div class="flexContainer"> <div class="icon"> <%= image_tag message.user.image.to_s %> </div> <div class="text"> <div class="name"> <span><%= message.user.username %></span> </div> <div class="content"> <p><%= message.content %></p> </div> </div> </div> </div> </li> <% end %> <% end %> </ul>views/messages/index.js.erb$("#comments_area").html("<%= j(render 'index', { messages: @message.negotiation.messages }) %>") $("textarea").val('')メッセージのやり取りはリアルタイム性を意識して、Firebaseなどの導入も考えたのですが、最初は実用最低限でいいかなと思って、普通のJSでやりました。
controllers/negotiations_controller.rbdef show @negotiation = Negotiation.find_by_slug(params[:slug]) @message = Message.new @messages = @negotiation.messages endcontrollers/messages_controller.rbdef create @message = @negotiation.messages.build(create_params) @message.user_id = current_user.id if @message.save MessageMailer.send_notification_to_receiver(@message).deliver render :index end end
negotiationの綴りを何回かタイポして、エラーが起こりました。
モデル名はもっと、なるべくシンプルな方がいいですね。サービスの使い方はCrieitさんに投稿したのでこちらを参考にしてください。
いずれ、誰かが作るサービスだなと思っていましたが、であれば気づいた自分がまずトライすべきだなと思って、見切りでリリースしていました。すぐに売れることはなくても、とりあえず登録しておけば、忘れた頃に売れるかもしれません!
まずは、自分が作ったサービスに「値付け」から始めてみませんか?

- 投稿日:2019-05-27T18:08:41+09:00
マイグレーション(migration)ファイルのupとdownとchangeについて
up
マイグレート(migrate)をした時に、実行される処理です。
down
ロールバック(rollback)した時に、実行される処理です。
ロールバックでまだ存在しないカラムを作ることも実はできる。
change
これは、upとdownの合体版です。
changeの中にテーブル構成を記述します。
migrateすると、記述を元にテーブル、カラムの作成等が行われます。rollbackは基本的にmigrate前の状態に戻してくれます。
取り消しではありません。
change一つでupとdownの両方ができるので便利です。
changeの注意点
既に存在するカラムを削除したい場合ちょっと注意です。
1, カラムを削除するためにマイグレーションファイルを作成
2, change内にテーブル名とカラム名の2つだけを記述して、migrateを実行し、カラムを削除。
3, 消すもの間違えた!ので、rollbackして今消したカラムを復活だ!
rollback!!
とするとエラーが出る可能性があります。理由はrollback時におけるカラム作成のための情報不足です。
どういうことかというと、rollbackは、基本的にmigrateの反転です。
migrateが削除なら、rollbackは作成になります。カラム作成の時にテーブル名とカラム名だけでは不十分ですよね。
なので、型も定義してあげなければいけません。
他にありがちなミス
1, マイグレーションファイルを作成する。
2, 間違えてdown()メソッドの中にカラム作成の記述をする。
3, 知らずにmigrateしテーブルを確認する。
4, テーブルにカラムがないことに気づき、rollbackする。
(この時点でテーブルにカラムが作成されるが大体気づかない。)
5, 記述を直して、再びmigrateする。
6, 記述はあっているはずなのに、既にそのカラムがあります的なエラーを吐かれて詰む。といったこともあります。
初心者の方は特に気をつけてください。
- 投稿日:2019-05-27T17:05:50+09:00
RubyのバージョンがHeroku未対応だった
はじめに
Rails初心者です。
主にBundlerの扱いにつまずいたのでメモします。
誤った点がありましたら、ご指摘いただけると勉強になります。補足
Rubyの
2.7.0は2019年5月の段階ではまだリリースされていませんでした。
最新バージョンは2.6.3でしたので修正しました。つまづいたところ
Rubyのバージョン
2.7.0を使ってHerokuにデプロイしたところ、
エラーが発生しました。調べてみると、
Heroku側がまだこのバージョンに対応していないとのことでした。
https://devcenter.heroku.com/articles/ruby-support#ruby-versions
対応しているのが
2.6.3までですね。
対応したバージョンが使えるように、Rubyのバージョンを変えていきます。ちなみに下の「MRI」のところには例として、
・Ruby2.6.14.4を入れたら、2.4.6になるよ
・2.7.6.2を入れたら、2.5.5だよ
・3.0.3を入れたら、2.6.3だよ
と書かれています。
Rubyのバージョンを変更します。
試しに今回は、2.6.0をインストールしてみます。解決策
①使うRubyのバージョンをインストール
こちらが参考になります。
②bundlerインストール
$ gem install bundler③Gemfileに記載
source 'https://rubygems.org'

ruby '2.6.0'

#省略
④Gemfile.lockファイルがあれば消す
Gemfile.lockはbundle installする度に新しく作られるので、
ファイルごと消しておきます。⑤インストール
$ bundle install⑥コミット
新しい
Gemfile.lockが作成されたのを確認し、
コミット→プッシュ$ git commit $ git push heroku無事、Herokuに反映されました!

- 投稿日:2019-05-27T16:28:44+09:00
【Rails】モデルのメソッドまとめ
モデルオブジェクト生成・保存
#モデルオブジェクト生成 new build
user = User.new
user = User.build

#モデルオブジェクト保存 save
user.save

#モデルオブジェクト生成・保存 create
User.create
new、buildの違いは特になし
データの存在確認 exist?
# モデル.exists?(条件)
user.stocks.exists?(post_id: post.id)
=>あるユーザのストックポスト一覧の中に、あるポストが含まれているか確認
検索件数を取得 count
# モデル.count(カラム名 [, オプション})
user.posts.count
=>あるユーザが投稿した件数を取得
検索条件に合ったデータを取得
find
モデルのidを検索キーとしてデータを取得するメソッド
該当データがない場合は、nilではなくActiveRecord::RecordNotFoundを返す。# モデル.find(値) Page.find(1)find_by
モデルから検索条件を指定して、最初の1件を取得するメソッド
該当データがない場合は、nilを返す。
返ってくる結果は、複数件あったとしても最初の1件のみ。# モデル.find_by(条件) page = Page.find_by(category: "カテゴリX") page.titlewhere
各モデルをid以外の条件で検索する場合
該当するデータを全件返す。
データ形式はActiveRecord::Relation。# モデル.where(条件) pages = Page.where(category: "カテゴリX") page.title => NoMethodError
- 投稿日:2019-05-27T12:29:16+09:00
ニートのプログラミング未経験者がRailsとVueでTodoアプリを作ってみた
はじめに
Vuejs と Rails API を使って Todo アプリを作りました。
まずは、ローカル環境で動かし
最終的に Heroku へデプロイするところまで書きました。最初に作ったものを載せておきます。
デモ
https://vue-rails-api-todo.herokuapp.com/
コード
https://github.com/youbeer/vue-rails-api-todo
ディレクトリ構成
frontend ディレクトリに Vue のファイルをまとめてあります
vue-rails-api-todo/
├── app
│   ├── channels
│   ├── controllers
│   ├── jobs
│   ├── mailers
│   ├── models
│   └── views
├── bin
├── config
├── db
├── docs
├── frontend
│   ├── dist
│   ├── node_modules
│   ├── public
│   └── src
├── lib
├── log
├── public
├── storage
├── test
├── tmp
└── vendor
対象読者(こんな方に読んでいただけたら)
Rails と Vue のチュートリアルを勉強してなにか作ってみたい方
事前準備
Rails と VueCLI3 のインストールを行なってください
自分の環境です
Mac MoJava
ruby 2.6.1
Rails 5.2.3
Vue 3.7.0【Rails】サーバーサイドの作成
Rails プロジェクトを API モードで作る
terminalrails new vue-rails-api-todo --apiGemfile を修正
Gemfilesource 'https://rubygems.org' git_source(:github) { |repo| "https://github.com/#{repo}.git" } ruby '2.6.1' gem 'bootsnap', '>= 1.1.0', require: false gem 'puma', '~> 3.11' gem 'rack-cors' gem 'rails', '~> 5.2.3' gem 'tzinfo-data', platforms: %i[mingw mswin x64_mingw jruby] group :development, :test do gem 'byebug', platforms: %i[mri mingw x64_mingw] gem 'sqlite3' end group :development do gem 'listen', '>= 3.0.5', '< 3.2' gem 'pry-byebug' gem 'pry-doc' gem 'pry-rails' gem 'pry-stack_explorer' gem 'spring' gem 'spring-watcher-listen', '~> 2.0.0' end group :production do gem 'pg' endGem をインストール
terminalbundle installModel を作る
フィールドは2つだけです
- title: タスクの内容
- completed: 完了・未完了
terminalrails g model Todo title:string completed:booleanmigration ファイルの修正
Not Null 制約 と デフォルト値を追記してます
db/migrate/20190525063511_create_tasks.rbclass CreateTodos < ActiveRecord::Migration[5.2] def change create_table :todos do |t| t.string :title, null: false t.boolean :completed, default: false, null: false t.timestamps end end endマイグレーション
terminalrails g model Task title:string completed:booleanModel にバリデーションを追加
app/models/todo.rbclass Todo < ApplicationRecord validates :title, presence: true endルーティングの修正
resources :todos, except: :show
以外に2つルーティングを追加しました
patch 'check_all', to: 'todos#check_all': タスクの完了・未完了delete 'delete_completed', to: 'todos#delete_completed': 完了タスクを全削除config/routes.rbRails.application.routes.draw do root 'api/v1/todos#index' namespace :api do namespace :v1, format: :json do patch 'check_all', to: 'todos#check_all' delete 'delete_completed', to: 'todos#delete_completed' resources :todos, except: :show end end endルーティングは詳細は、こんな感じです
terminalPrefix Verb URI Pattern Controller#Action root GET / api/v1/todos#index api_v1_check_all PATCH /api/v1/check_all(.:format) api/v1/todos#check_all api_v1_delete_completed DELETE /api/v1/delete_completed(.:format) api/v1/todos#delete_completed api_v1_todos GET /api/v1/todos(.:format) api/v1/todos#index POST /api/v1/todos(.:format) api/v1/todos#create api_v1_todo PATCH /api/v1/todos/:id(.:format) api/v1/todos#update PUT /api/v1/todos/:id(.:format) api/v1/todos#update DELETE /api/v1/todos/:id(.:format) api/v1/todos#destroy rails_service_blob GET /rails/active_storage/blobs/:signed_id/*filename(.:format) active_storage/blobs#show rails_blob_representation GET /rails/active_storage/representations/:signed_blob_id/:variation_key/*filename(.:format) active_storage/representations#show rails_disk_service GET /rails/active_storage/disk/:encoded_key/*filename(.:format) active_storage/disk#show update_rails_disk_service PUT /rails/active_storage/disk/:encoded_token(.:format) active_storage/disk#update rails_direct_uploads POST /rails/active_storage/direct_uploads(.:format) active_storage/direct_uploads#createcontroller の用意
terminalrails g controller api::v1::todoscontroller を修正
app/controllers/api/v1/todos_controller.rbclass Api::V1::TodosController < ApplicationController before_action :set_todo, only: %i[show update destroy] # GET api/vi/todos/ def index @todos = Todo.all.order(created_at: :asc) render json: @todos end # Post api/vi/todos def create @todo = Todo.new(todo_params) if @todo.save render json: @todo else render json: { status: 'error', data: @todo.errors } end end # Put api/vi/todos/:id def update if @todo.update(todo_params) render json: @todo else render json: { status: 'error', data: @todo.errors } end end # Delete api/vi/todos/:id def destroy @todo.destroy render json: @todo end # Delete api/vi/delete_completed def delete_completed todo = Todo.where(completed: true).delete_all render json: todo end # Put api/vi/check_all def check_all todo = Todo.update_all(completed: params['checked']) render json: todo end private def todo_params params.require(:todo).permit(:title, :completed) end def set_todo @todo = Todo.find(params[:id]) end endcors の設定ファイルを修正
Vue 側からのアクセスを許可するため追記
origins 'http://localhost:8080'config/initializers/cors.rbRails.application.config.middleware.insert_before 0, Rack::Cors do allow do origins 'http://localhost:8080' resource '*', headers: :any, methods: %i[get post put patch delete options head] end endseed ファイルを修正
テストデータ作成用
db/seeds.rb10.times do |i| Todo.create(title: "title No#{i + 1}", completed: i.even?) endpostman で確認してみる
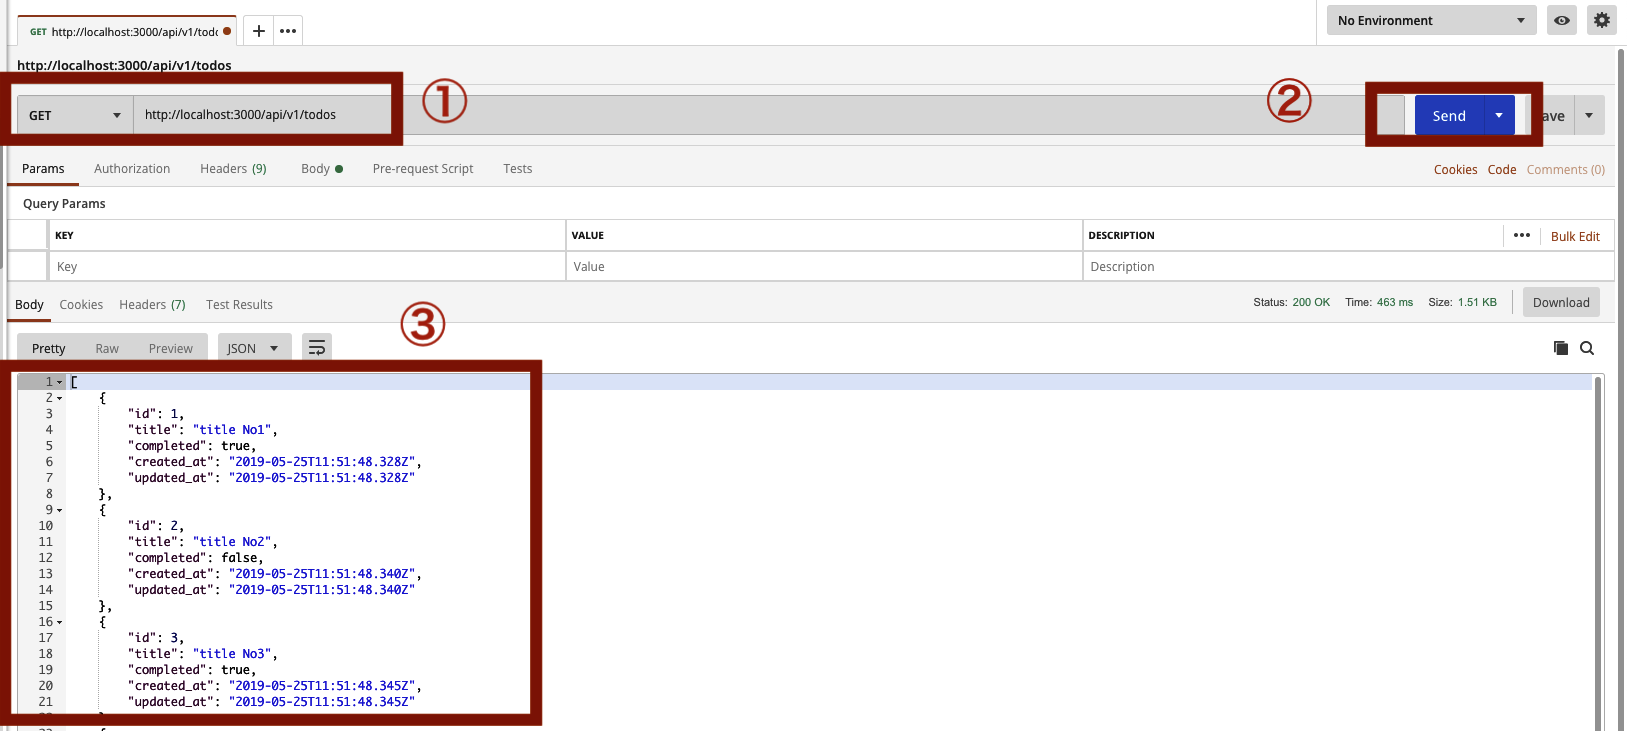
terminalrails s rails db:seedPostman をインストールされていない方は、こちらからインストールしてください
- プルダウンから GET を選択し http://localhost:3000/api/v1/todos を入力
- Send をクリック
- テストデータの json が返ってくることを確認
時間がある方はその他のアクションも試してみてください
やり方は、ここでは割愛します
【Vue】フロントエンドの作成
プロジェクトを作成
Rails プロジェクトの直下に frontend という名前で Vue プロジェクトを作成します
terminalvue create frontendいくつか質問がでてくるので
- Manually select features を選択肢し
- Vuex を追加してください
その他はお好みでどうぞ
terminal? Please pick a preset: default (babel, eslint) ❯ Manually select featuresterminal? Check the features needed for your project: ◉ Babel ◯ TypeScript ◯ Progressive Web App (PWA) Support ◯ Router ❯◉ Vuex ◯ CSS Pre-processors ◉ Linter / Formatter ◯ Unit Testing ◯ E2E Testingインストールが完了したら fronend へ移動しサーバを起動してみましょう
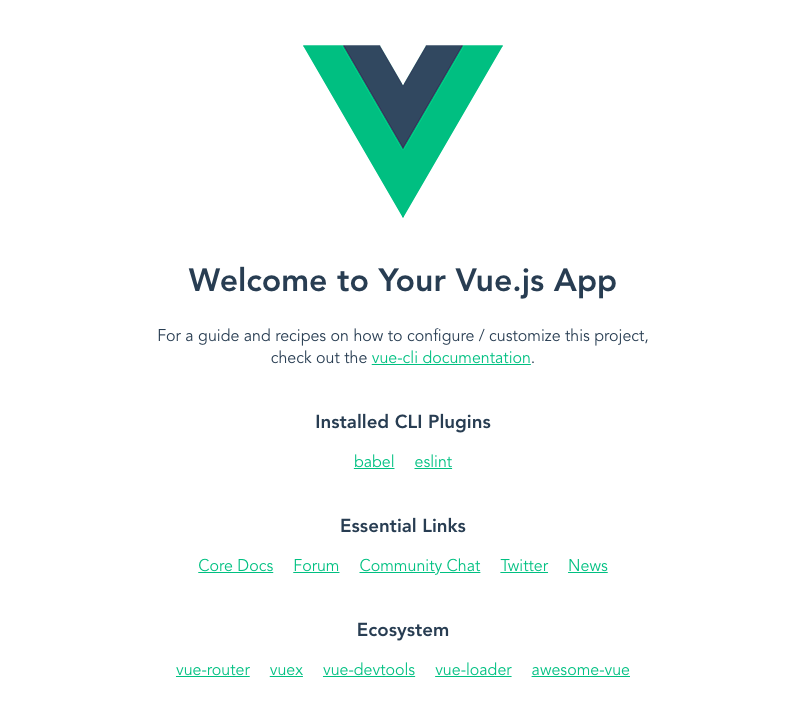
terminalcd frontend && yarn serveブラウザから http://localhost:8080/ へアクセスし
こんな画面が表示されたら成功です。
Bootstrap と axios を追加
- BootstrapVue: Vue 用の Bootstrap モジュール
- axios: 今時の ajax モジュール
terminalyarn add bootstrap-vue bootstrap axiosbootstrap の設定を追加
bootstrap を使うため main.js に追記
import BootstrapVue from "bootstrap-vue"; import "bootstrap/dist/css/bootstrap.css"; import "bootstrap-vue/dist/bootstrap-vue.css"; Vue.use(BootstrapVue);frontend/src/main.jsimport Vue from "vue"; import App from "./App.vue"; import store from "./store"; import BootstrapVue from "bootstrap-vue"; import "bootstrap/dist/css/bootstrap.css"; import "bootstrap-vue/dist/bootstrap-vue.css"; Vue.use(BootstrapVue); Vue.config.productionTip = false; new Vue({ store, render: h => h(App) }).$mount("#app");store を編集
frontend/src/store.jsimport Vue from "vue"; import Vuex from "vuex"; import axios from "axios"; Vue.use(Vuex); const http = axios.create({ baseURL: process.env.NODE_ENV === "development" ? "http://localhost:3000/" : "/", headers: { "Content-Type": "application/json", "X-Requested-With": "XMLHttpRequest" }, responseType: "json" }); export default new Vuex.Store({ state: { filter: "all", todos: [] }, getters: { remaining(state) { return state.todos.filter(todo => !todo.completed).length; }, completedAll(state, getters) { return getters.remaining === 0; }, todosFiltered(state) { if (state.filter === "all") { return state.todos; } else if (state.filter === "active") { return state.todos.filter(todo => !todo.completed); } else if (state.filter === "completed") { return state.todos.filter(todo => todo.completed); } return state.todos; }, showClearCompletedButton(state) { return state.todos.filter(todo => todo.completed).length > 0; } }, mutations: { addTodo(state, todo) { state.todos.push({ id: todo.id, title: todo.title, completed: false, editing: false }); }, clearCompleted(state) { state.todos = state.todos.filter(todo => !todo.completed); }, updateFilter(state, filter) { state.filter = filter; }, checkAll(state, checked) { state.todos.forEach(todo => { todo.completed = checked; }); }, deleteTodo(state, id) { const index = state.todos.findIndex(todo => todo.id === id); state.todos.splice(index, 1); }, updateTodo(state, todo) { const index = state.todos.findIndex(item => item.id === todo.id); state.todos.splice(index, 1, { id: todo.id, title: todo.title, completed: todo.completed, editing: todo.editing }); }, retrieveTodos(state, todos) { state.todos = todos; } }, actions: { retrieveTodos({ commit }) { http .get("/api/v1/todos") .then(response => { commit("retrieveTodos", response.data); }) .catch(error => { console.log(error); }); }, addTodo({ commit }, todo) { http .post("/api/v1/todos", { title: todo.title, completed: false }) .then(response => { commit("addTodo", response.data); }) .catch(error => { console.log(error); }); }, clearCompleted({ commit }) { http .delete("/api/v1/delete_completed") .then(response => { commit("clearCompleted", response.data); }) .catch(error => { console.log(error); }); }, checkAll({ commit }, checked) { http .patch("/api/v1/check_all", { checked }) .then(() => { commit("checkAll", checked); }) .catch(error => { console.log(error); }); }, deleteTodo({ commit }, id) { http .delete(`/api/v1/todos/${id}`) .then(response => { commit("deleteTodo", response.data.id); }) .catch(error => { console.log(error); }); }, updateTodo({ commit }, todo) { http .patch(`/api/v1/todos/${todo.id}`, { title: todo.title, completed: todo.completed }) .then(response => { commit("updateTodo", response.data); }) .catch(error => { console.log(error); }); } } });store は大きく5つのブロックに分かれています
axios のデフォルト通信設定
- baseURL: API 取得のための URL
- header:リクエスト時のヘッダの値
- responseType:レスポンスの形式
import axios from "axios";

Vue.use(Vuex);

const http = axios.create({
  baseURL:
    process.env.NODE_ENV === "development" ? "http://localhost:3000/" : "/",
  headers: {
    "Content-Type": "application/json",
    "X-Requested-With": "XMLHttpRequest"
  },
  responseType: "json"
});
state
アプリの状態管理をするための単一オブジェクトです
- todo: タスクの配列
- filter:全て ・ 完了 ・ 未完了 のフィルタ
state: {
  filter: "all",
  todos: []
},
getters
component でいう computed にあたります
- remaining: タスク完了の件数
- showClearCompletedButton: クリアボタンを 表示 ・ 非表示 の切替用
getters: {
    remaining(state) {
      return state.todos.filter(todo => !todo.completed).length;
    },

    /*************** 省略 ***************/

    showClearCompletedButton(state) {
      return state.todos.filter(todo => todo.completed).length > 0;
    }
}
mutaition
state を変更するためのメソッド群です
action を経由して state を更新するために使っています
- addTodo: 新しいタスクを追加しています
- retrieveTodos: ページに最初にアクセスしたとき、タスク一覧を作成しています
mutations: {
  addTodo(state, todo) {
    state.todos.push({
      id: todo.id,
      title: todo.title,
      completed: false,
      editing: false
    });
  },

  /*************** 省略 ***************/

  retrieveTodos(state, todos) {
    state.todos = todos;
  }
},
actions
非同期処理を行うためのメソッド群です
axios を使って Rails API を取得するために使っています
- retrieveTodos: Rails の API からタスク一覧を取得しています
- updateTodo: Rails の API からタスクの更新結果を取得しています
 actions: {
  retrieveTodos({ commit }) {
    http
      .get("/api/v1/todos")
      .then(response => {
        commit("retrieveTodos", response.data);
      })
      .catch(error => {
        console.log(error);
      });
  },

  /*************** 省略 ***************/

  updateTodo({ commit }, todo) {
    http
      .patch(`/api/v1/todos/${todo.id}`, {
        title: todo.title,
        completed: todo.completed
      })
      .then(response => {
        commit("updateTodo", response.data);
      })
      .catch(error => {
        console.log(error);
      });
  }
}
App を編集
frontend/src/App.vue<template> <div id="app" class="container"> <img alt="Vue logo" src="./assets/logo.png" class="logo" /> <h1>VueTODO</h1> <todo-list></todo-list> </div> </template> <script> import TodoList from "./components/TodoList.vue"; export default { name: "App", components: { TodoList } }; </script> <style lang="scss" scoped> .logo { margin: 0 auto; display: block; } </style>メインとなる TodoList コンポーネントを呼び出しています
import TodoList from "./components/TodoList.vue";

export default {
  name: "App",
  components: {
    TodoList
  }
};
TodoList コンポーネントを作成
新しいタスクの追加 と 子コンポーネントを束ねています
frontend/src/components/TodoList.vue<template> <div> <b-container class="bv-example-row"> <b-row> <b-col cols="12"> <b-form @submit.prevent="addTodo"> <b-form-group label="New todo" label-for="new-todo"> <b-form-input id="new-todo" v-model="newTodo" placeholder="What needs to be done?" ></b-form-input> </b-form-group> </b-form> <b-list-group> <transition-group name="fade"> <TodoItem v-for="(todo, index) in todosFiltered" :key="todo.id" :todo="todo" :index="index" class="todo-item" :check-all="completedAll" /> </transition-group> </b-list-group> <b-list-group class="mt-4"> <b-list-group-item class="flex-wrap d-flex justify-content-around align-items-center" > <TodoCheckAll /> <TodoItemsRemaining /> </b-list-group-item> <b-list-group-item class="flex-wrap d-flex justify-content-around align-items-center" > <TodoFiltered /> <TodoClearCompleted /> </b-list-group-item> </b-list-group> </b-col> </b-row> </b-container> </div> </template> <script> import TodoItem from "@/components/TodoItem"; import TodoItemsRemaining from "@/components/TodoItemsRemaining"; import TodoCheckAll from "@/components/TodoCheckAll"; import TodoFiltered from "@/components/TodoFiltered"; import TodoClearCompleted from "@/components/TodoClearCompleted"; import { mapGetters } from "vuex"; export default { name: "TodoList", components: { TodoItem, TodoItemsRemaining, TodoCheckAll, TodoFiltered, TodoClearCompleted }, data() { return { newTodo: "" }; }, computed: { ...mapGetters(["completedAll", "todosFiltered"]) }, created() { this.$store.dispatch("retrieveTodos"); }, methods: { addTodo() { if (this.newTodo.trim()) { this.$store.dispatch("addTodo", { id: this.idForTodo, title: this.newTodo }); } this.newTodo = ""; } } }; </script> <style lang="scss"> .fade-enter-active, .fade-leave-active { transition: opacity 0.5s; } .fade-enter, .fade-leave-to { opacity: 0; } </style>TodoItem コンポーネントを作成
親コンポーネントの TodoList から props を受け取り
個々のタスクの表示させていますfrontend/src/components/TodoItem.vue<template> <b-list-group-item class="flex-wrap d-flex justify-content-around align-items-center todo-item" > <b-col cols="2"> <b-form-checkbox v-model="completed" @input="doneEdit"></b-form-checkbox> </b-col> <b-col cols="8"> <label v-if="!editing" :class="{ completed: completed }" @dblclick="editing = true" >{{ title }}</label > <b-form-input v-else v-model="title" v-focus type="text" @blur="doneEdit" @keyup.enter="doneEdit" @keyup.escape="cancelEdit" /> </b-col> <b-col cols="2"> <button type="button" class="close" aria-label="Close" @click="deleteTodo(todo.id)" > <span aria-hidden="true">×</span> </button> </b-col> </b-list-group-item> </template> <script> import { mapActions } from "vuex"; export default { name: "TodoItem", directives: { focus: { inserted: function(el) { el.focus(); } } }, props: { todo: { type: Object, required: true }, index: { type: Number, required: true }, checkAll: { type: Boolean, required: true } }, data() { return { id: this.todo.id, title: this.todo.title, completed: this.todo.completed, editing: false }; }, watch: { checkAll() { this.completed = this.checkAll ? true : this.todo.completed; } }, methods: { ...mapActions(["deleteTodo", "updateTodo"]), doneEdit() { this.editing = false; this.updateTodo({ id: this.id, title: this.title, completed: this.completed, editing: this.editing }); }, cancelEdit() { this.title = this.todo.title; this.editing = false; } } }; </script> <style lang="scss" scoped> .todo-item { animation-duration: 0.3s; } .completed { text-decoration: line-through; color: grey; } </style>TodoItemsRemaining コンポーネントを作成
残りのタスク件数を表示させています
frontend/src/components/TodoItemsRemaining.vue<template> <b-col cols="6"> <span class="text-danger">{{ remaining }}</span> {{ remaining | pluralize("item") }} left </b-col> </template> <script> import { mapGetters } from "vuex"; export default { name: "TodoItemsRemaining", filters: { pluralize: (n, w) => (n === 1 ? w : w + "s") }, computed: { ...mapGetters(["remaining"]) } }; </script>TodoFiltered コンポーネントを作成
All(全て) ・ Active(未完了) ・ Completed(完了)
の値によってタスクにフィルタをかけていますfrontend/src/components/TodoFiltered.vue<template> <b-col cols="6"> <b-form-radio-group v-model="selected" :options="options" buttons button-variant="outline-primary" name="radio-btn-outline" @change="updateFilter" ></b-form-radio-group> </b-col> </template> <script> import { mapState, mapMutations } from "vuex"; export default { name: "TodoFiltered", data() { return { selected: "all", options: [ { text: "All", value: "all" }, { text: "Active", value: "active" }, { text: "Completed", value: "completed" } ] }; }, computed: { ...mapState(["filter"]) }, methods: { ...mapMutations(["updateFilter"]) } }; </script>TodoClearCompleted コンポーネントを作成
完了したタスクの一括クリアボタンを表示させています
frontend/src/components/TodoClearCompleted.vue<template> <b-col cols="6"> <div> <b-button v-if="showClearCompletedButton" variant="outline-primary" @click="clearCompleted" >Clear Completed</b-button > </div> </b-col> </template> <script> import { mapGetters, mapActions } from "vuex"; export default { name: "TodoClearCompleted", computed: { ...mapGetters(["showClearCompletedButton"]) }, methods: { ...mapActions(["clearCompleted"]) } }; </script>TodoCheckAll コンポーネントを作成
タスクを一括で完了 ・ 未完了に切り替えるための
チェックボックスを表示させていますfrontend/src/components/TodoCheckAll.vue<template> <b-col cols="6"> <b-form-checkbox :checked="completedAll" @change="checkAll" >Check All</b-form-checkbox > </b-col> </template> <script> import { mapGetters, mapActions } from "vuex"; export default { name: "TodoCheckAll", computed: { ...mapGetters(["completedAll"]) }, methods: { ...mapActions(["checkAll"]) } }; </script>ブラウザで確認
Rail のサーバを起動
terminalrails sVue のサーバを起動
terminalcd frontend yarn servelocalhost:8080 にアクセスしてこんな画面が表示されたら成功です
Heroku へデプロイしてみる
事前準備
Heroku のアカウントがない場合はこちらから作成してください
デプロイには heroku toolbelt が必要なのでこちらからインストールしてください
mac の場合は Homebrew でインストール可能です
terminalbrew install herokuプロジェクトを commit
プロジェクト直下へ移動し commit を行なってください
terminalgit init git add . git commit -m "init"vue.config.js を作成
frontend ディレクトリの直下に vue.config.js ファイルを作成し
build ファイルの出力先をプロジェクト直下の public ディレクトリへ変更しますfrontend/vue.config.jsmodule.exports = { outputDir: "../public" };Vue を build
terminalyarn buildプロジェクト直下の public ディレクトリに
build されたファイルが作成されていることを確認してくださいterminalpublic/ ├── css │ ├── app.27d4506b.css │ └── chunk-vendors.19588e8d.css ├── favicon.ico ├── img │ └── logo.82b9c7a5.png ├── index.html └── js ├── app.6635e2d3.js ├── app.6635e2d3.js.map ├── chunk-vendors.4ad97586.js └── chunk-vendors.4ad97586.js.mapHeroku にログイン
terminalheroku login上のコマンドを実行するとブラウザに切替わるのでボタンを押してログインしてください
Heroku にアプリを作成
アプリ名を入力すると URL にアプリ名が反映されます
https://アプリ名.herokuapp.com/
省略すると Heroku 側で自動的に割り振られますterminalheroku create アプリ名Heroku のリポジトリへ push
terminalgit push heroku masterデータベースの migration と テストデータを追加
terminalheroku run rails db:migrate heroku run rails db:seedブラウザで確認
terminalheroku openおわりに
最後まで読んでいただきありがとうございました。
おかしな部分がありましたら、ご指摘お願いします。


- 投稿日:2019-05-27T12:14:31+09:00
[初心者] CSSフレームワークで調子に乗ったヤツの話
はじめに
最近ようやく簡単なアプリが作れるようになって、「フロントをいじり倒したい!」という欲が出てきました。(笑)
そこで先輩エンジニアから伝授されたのが、CSSフレームワークです。
今回はそれについて書いていこうと思います。まずCSSフレームワークって何だ?
CSSフレームワークとは、あらかじめデザインやレイアウトが用意されていて、クラス名を指定するだけで簡単にCSSを反映させることができるとても便利なフレームワークです。
HTMLを組んで、CSSで肉付けして・・・のような地道な作業を簡略化させてくれて、なおかつ初心者では作れないようなものが簡単に使えるようになる優れものです!(笑)調子に乗った末・・・
これを知った僕は、案の定「すごい!楽!最高じゃん!」という感じで早速使いまくりました。
私が使用したフレームワークは「Materialize.css」です。
そして完成した、今の自分的には「めっちゃいいじゃん!」と思うアプリを他の人に見てもらうと、「Materiallize感すごいね(笑)」
「これMateriallize使ってるでしょ(笑)」
・・・・・・・。なんでバレるんだよ!!!!!!!!!!!!!!!!!!!!!!!
というより使っちゃダメなのかよ!!!!!!!!!!!!!!!!!!!となりました。(笑)
一体なぜ周りはこのような反応になったのでしょう・・・?フレームワークの落とし穴
これだけ便利なものがあれば、みんな使いますよね。(笑)
だからこそ、
「あー、これね」となってしまうようです。
確かに既存のデザインをみんなで使うという仕組みから考えれば、そうなっても仕方ないなと思います。
使うにしても、ベースのコードに自分で何かを書き加えたりして工夫することが大切なんですね・・・
作業スピードは早くなっても、楽している分このような落とし穴があると痛感させられました。(笑)おわりに
正直、プログラミングを勉強する前は、「システムさえ作れればデザインとかはサクっといけるでしょ!」と勝手に考えていました。
しかし勉強している中でやっと、エンジニアが「フロントエンド」と「バックエンド」に分けられている意味がわかるようになりました。
本当にまだまだ知識不足です。
今はまだ駆け出しで、基礎を学んでいる最中ですが、早く自分の思い描くようなアプリが作れるように日々頑張っていこうと思います!ありがとうございました^^

- 投稿日:2019-05-27T12:03:37+09:00
Rails Tutorial(2週目)-7-
3つの環境
Railsにはテスト環境 (test)、開発環境 (development)、そして本番環境 (production) の3つの環境がデフォルトで装備されています。Rails consoleのデフォルトの環境はdevelopmentです。
$rails console testでtest環境のコンソール立ち上げ
$rails server --environment productionrails serverを開発環境で立ち上げ
$rails db:migrate RAILS_ENV=prodctionで本番データーベースの作成Sassのmixinとextend
mixin
何度も使うスタイルを定義することが出来、引数が使える。呼び出し時には@includeが必要
@mixin box_sizing {
  -moz-box-sizing:    border-box;
  -webkit-box-sizing: border-box;
  box-sizing:         border-box;
}
.
.
.
/* miscellaneous */

.debug_dump {
  clear: both;
  float: left;
  width: 100%;
  margin-top: 45px;
  @include box_sizing;
}
extend
既に定義しているスタイルを継承する。クラスの継承に近い感覚。
コンパイル後、セレクタがグループ化される。(以下「Sass(SCSS)のmixin, extendなどまとめ」より引用(https://qiita.com/one-a/items/2758511326c09200fded).box { margin-top: 15px; padding: 10px; background-color: #ccc; p { line-height: 1.3; } } .contentsBox { @extend .box; background-color: #eee; }次のようにCSSファイルに変換される
.box, .contentsBox {
  margin-top: 15px;
  padding: 10px;
  background-color: #ccc;
}

.box p, .contentsBox p {
  line-height: 1.3;
}

.contentsBox {
  background-color: #eee;
}
.box, .contentsBoxのように同一の要素がグループ化されているのがわかる。
Usersリソース
route.rbにresources :usersと記述することでRESTfulなUsersリソースで必要となる全てのアクションが利用できるようになる。また、この行に対応するURLやアクション、名前付きルートは以下のようになる。
HTTPリクエスト URL アクション 名前付きルート 用途 GET /users index users_path すべてのユーザーを一覧するページ GET /users/1 show user_path(user) 特定のユーザーを表示するページ GET /users/new new new_user_path ユーザーを新規作成するページ (ユーザー登録) POST /users create users_path ユーザーを作成するアクション GET /users/1/edit edit edit_user_path(user) id=1のユーザーを編集するページ PATCH /users/1 update user_path(user) ユーザーを更新するアクション DELETE /users/1 destroy user_path(user) ユーザーを削除するアクション byebug
byebugというgemをインストールしていると、
メソッド内にdebuggerと記述するだけで、対話的にデバッグの処理を行う事ができる。Gravatar
Gravatarは無料のサービスで、プロフィール写真をアップロードして、指定したメールアドレスと関連付けることができます。その結果、 Gravatarはプロフィール写真をアップロードするときの面倒な作業や写真が欠けるトラブル、また、画像の置き場所の悩みを解決します。というのも、ユーザーのメールアドレスを組み込んだGravatar専用の画像パスを構成するだけで、対応するGravatarの画像が自動的に表示されるからです
app/helpers/users_helper.rbmodule UsersHelper # 引数で与えられたユーザーのGravatar画像を返す def gravatar_for(user) gravatar_id = Digest::MD5::hexdigest(user.email.downcase) gravatar_url = "https://secure.gravatar.com/avatar/#{gravatar_id}" image_tag(gravatar_url, alt: user.name, class: "gravatar") end endユーザー登録フォームの作成
Railsでform_forヘルパーメソッドを使います。このメソッドはActive Recordのオブジェクトを取り込み、そのオブジェクトの属性を使ってフォームを構築します。
<div class="col-md-6 col-md-offset-3"> <%= form_for(@user) do |f| %> <%= f.label :name %> <%= f.text_field :name %> <%= f.label :email %> <%= f.email_field :email %> <%= f.label :password %> <%= f.password_field :password %> <%= f.label :password_confirmation, "Confirmation" %> <%= f.password_field :password_confirmation %> <%= f.submit "Create my account", class: "btn btn-primary" %> <% end %>form_for(@user) do |f|となっている部分は、form_forヘルパが、変数を一つ持つブロックを引数に取り、そのブロック変数はHTMLのフォーム要素に対応するメソッドが自身に呼び出されると、form_forの引数となっているユーザーの属性を設定するために特別に設計されたHTMLを返す。
HTMLに変換後のコードを見てみると
<input id="user_name" name="user[name]" - - - />

.

.

.

<input id="user_password" name="user[password]" - - - />
inputには属性として代表的なものに、 name属性,value属性、type属性などがある。
name属性
入力コントロールの名前を指定する文字列です。この名前は
要素の elements オブジェクトで保持され、フォームデータが送信される時に、コントロールの値と共に送信されます。Railsにおいては、Railsはnameの値を使って、初期化したハッシュを (params変数経由で) 構成します。このハッシュは、入力された値に基づいてユーザーを作成するときに使われます。
つまり、user = {password: ##, email: ## ....}というuserを表すハッシュが存在し、params内に格納されるが、name属性を指定するとそのうち、passwordをキーとするuserハッシュの要素(入力された内容)がparamsに格納される。
この結果、name,email,password,password_confirmationで構成されるuserという名前のハッシュが、paramsというハッシュの中に格納される。
formタグ
<form action="/users" class="new_user" id="new_user" method="post">action属性はフォーム経由で送信された情報を処理するプログラムの URI。method属性は、HTTPメソッドの指定。
本格的なユーザー登録
paramsの送信先のcreateアクション内で
@user = User.new(params[:user])とすることで、フォーム内容に対応したユーザの作成が可能だが、paramsハッシュ全体を初期化してUser.newにわたすのは危険以前のバージョンのRailsでは、モデル層でattr_accessibleメソッドを使うことで上のような危険を防止していましたが、Rails 4.0ではコントローラ層でStrong Parametersというテクニックを使うことが推奨されています。Strong Parametersを使うことで、必須のパラメータと許可されたパラメータを指定することができます。さらに、上のようにparamsハッシュをまるごと渡すとエラーが発生するので、Railsはデフォルトでマスアサインメントの脆弱性から守られるようになりました。
params.require(:user).permit(:name, :email, :password, :password_confirmation)
上のコードはparamsハッシュのうち、:user属性を必須として、そのうち名前、メールアドレス、パスワード、パスワードの確認の属性をそれぞれ許可し、それ以外を許可しないようにしてある。
このコードの戻り値は、許可された属性のみが含まれたparamsのハッシュです (:user属性がない場合はエラーになります)。これらのパラメータを利用しやすくするために、user_paramsという外部メソッドを使うのが慣習化している。
エラーメッセージ
newページでエラーメッセージのパーシャルを出力する
<%= render 'shared/error_messages' %>
Rails全般の慣習として、複数のビューで使われるパーシャルは専用のディレクトリ「shared」によく置かれるapp/views/shared/_error_messages.html.erb<% if @user.errors.any? %> <div id="error_explanation"> <div class="alert alert-danger"> The form contains <%= pluralize(@user.errors.count, "error") %>. </div> <ul> <% @user.errors.full_messages.each do |msg| %> <li><%= msg %></li> <% end %> </ul> </div> <% end %>pluralizeヘルパ
pluralizeの最初の引数に整数が与えられると、それに基づいて2番目の引数の英単語を複数形に変更したものを返します。
>> helper.pluralize(1, "error")

=> "1 error"
Railsは、無効な内容の送信によって元のページに戻されると、CSSクラスfield_with_errorsを持ったdivタグでエラー箇所を自動的に囲んでくれます。
エラーメッセージの重複を防ぐ
allow_ nil: true で防げる
ユーザー登録成功
def create

    @user = User.new(user_params)

    if @user.save

      redirect_to @user

    else

      render 'new'

    end

  end
redirect_to @userは
redirect_to user_url(@user)と等価(Railsが自動で変換してくれる)flash
登録完了後に表示されるページにメッセージを表示し (この場合は新規ユーザーへのウェルカムメッセージ)、2度目以降にはそのページにメッセージを表示しないようにするというものです。
flashはハッシュのように扱う特殊な変数
flash変数に代入したメッセージは、リダイレクトした直後のページで表示できるようになります。(例)
flash[:success} = "welcome"SSL
ローカルのサーバからネットワークに流れる前に、大事な情報を暗号化する技術。
ユーザーから送られた情報を暗号化することで、セキュリティ上の欠陥をなくす。SSLの有効化
production.rbという本番環境の設定ファイルにsslを使用するように記述する
config/environments/production.rbRails.application.configure do . . . # Force all access to the app over SSL, use Strict-Transport-Security, # and use secure cookies. config.force_ssl = true . . . endWEBサーバーをWEBrickからPumaに変える
WEBrickは簡単にセットアップできたり動せることが特長ですが、著しいトラフィックを扱うことには適していない。
・puma gemをGemfileに追加する(rails5ではデフォルトの設定で使える)
・設定を書き込んでいくconfig/puma.rbworkers Integer(ENV['WEB_CONCURRENCY'] || 2) threads_count = Integer(ENV['RAILS_MAX_THREADS'] || 5) threads threads_count, threads_count preload_app! rackup DefaultRackup port ENV['PORT'] || 3000 environment ENV['RACK_ENV'] || 'development' on_worker_boot do # Worker specific setup for Rails 4.1+ # See: https://devcenter.heroku.com/articles/ # deploying-rails-applications-with-the-puma-web-server#on-worker-boot ActiveRecord::Base.establish_connection end・Procfileと呼ばれる、Heroku上でPumaのプロセスを走らせる設定ファイルを作成
web: bundle exec puma -C config/puma.rb本番環境へのデプロイ
$ rails test

$ git add -A

$ git commit -m "Use SSL and the Puma webserver in production"

$ git push

$ git push heroku

$ heroku run rails db:migrate
- 投稿日:2019-05-27T09:26:32+09:00
Rails6 のちょい足しな新機能を試す24(unfreeze_time 編)
はじめに
Rails 6 に追加されそうな新機能を試す第24段。 今回のちょい足し機能は、
unfreeze_time編です。
Rails 6.0 では、travel_backの alias として、unfreeze_timeが追加されました。Ruby 2.6.3, Rails 6.0.0.rc1 で確認しました。Rails 6.0.0.rc1 は
gem install rails --prereleaseでインストールできます。せっかくなので、RSpec をインストールして試してみたいと思います。
$  rails --version
Rails 6.0.0.rc1
Rails プロジェクトを作る
rspec を使うので、
-Tオプションをつけます。$ rails new rails6_0_0rc1 -T $ cd rails6_0_0rc1db:create をしておく
$ bin/rails db:createGemfile に
rspec-railsを追加するGemfile に
rspec-railsを追加します。 test 環境前提です。Gemfile... group :test do gem 'rspec-rails' end ...bundle を実行
$ bundleRSpec の初期設定をする
$ rails g rspec:installspec で
unfreeze_timeを使えるようにするspec で
unfreeze_timeを使えるように ActiveSupport::Testing::TimeHelpers を include します。spec/spec_helpers.rbRSpec.configure do |config| ... require 'active_support/testing/time_helpers' config.include ActiveSupport::Testing::TimeHelpers ... endunfreeze_time を使った spec を書く
本来は、model とか何かしらのクラスやメソッドをテストするための spec なのですが、今回は spec だけで完結させることにしました。
before内でfreeze_timeを実行し、after内でunfreeze_timeを実行する場合と、実行しない場合を書いてみました。spec/lib/unfreeze_time_spec.rbrequire 'rails_helper' RSpec.describe 'try to use unfreeze_time' do context 'when using freeze_time and unfreeze_time' do before :each do freeze_time end after :each do unfreeze_time end it 'time freezed' do t1 = Time.zone.now sleep 1 expect(Time.zone.now).to eq t1 end end context 'when without freeze_time and unfreeze_time' do it 'time not freezed' do t1 = Time.zone.now sleep 1 expect(Time.zone.now).to be > t1 end end endspec を実行する
spec を実行するとオールグリーンになります。
$ bundle exec rspec -fd

try to use unfreeze_time
  when using freeze_time and unfreeze_time
    time freezed
  when without freeze_time and unfreeze_time
    time not freezed

Finished in 2.01 seconds (files took 2.01 seconds to load)
2 examples, 0 failures
alias であることを確認する
オマケですが、
unfreeze_timeがtravel_backの別名であることを確認しておきます。$ irb -ractive_support/testing/time_helpers irb(main):001:0> ActiveSupport::Testing::TimeHelpers.instance_method(:unfreeze_time).original_name => :travel_back試したソース
試したソースは以下にあります。
https://github.com/suketa/rails6_0_0rc1/tree/try024_unfreeze_time参考情報
- 投稿日:2019-05-27T06:28:30+09:00
What is Ruby on Rails Used for: Tips from Back-End Developers
When you consider developing a new project, choosing the right technology stack is vital. For Back-End development, you have various options: Python, Java, PHP, Ruby, and many more.
The task of choosing between Ruby on Rails and other frameworks becomes easier if you know the pros and cons of this technology and what Ruby on Rails is used for.
Ruby on Rails has a few beneficial arguments that developers can't ignore. As soon as all of them are combined, they decrease the development time and make the process more efficient.
This back-end framework has a number of advantages for projects:
Extensive ecosystem
In comparison with many other frameworks, its ecosystem is what makes Ruby on Rails superior. RubyGems, a Ruby community’s gem hosting service, provides access to thousands of many gems, which can take the form of add-ons, libraries, or software snippets. Gems are ready-made solutions for different problems that streamline the development process.Ruby on Rails MVC
Another integral part of the Ruby on Rails framework is MVC. It means Model-View-Controller format. The approach divides the app work into three subsystems, each of which is responsible for a set of actions:Models handle data and business logic
Controllers handle the user interface and application
Views handle graphical user interface objects and presentation
Ruby on Rails MVC lets parallel development and allows programmers to speed up the engineering process three times. Ruby on Rails gives ready-to-use baskets for separation of the app business logic, in such a way a Ruby on Rails web development company can save time through its utilization.Consistency and clean code
The implementation of many features can be simplified by the fact that Ruby on Rails developers can utilize the ready-to-use parts of code. In such a way, the application code is clean and has high readability. As you have less code to read and sort through, all future updates are fast and seamless. This makes Ruby on Rails development time and cost efficient.DRY
DRY (Don’t Repeat Yourself) is one more of the principals Ruby on Rails is built on. If you have a repetitive task, in Ruby on Rails development, you can reuse them an unlimited number of times.High scalability
One more advantage is its scalability. An app built on RoR can be scaled to process thousands of requests per second sent by multiple users. This means that Ruby on Rails is a great solution for apps that are actively growing their audience.Security
Its security is one more benefit. Ruby on Rails has some security-centric features built in that make applications safe from SQL-injections and XSS attacks. Besides, there are a lot of gems that address other security threats.Time and cost efficiency
All of the features already mentioned make Ruby on Rails time and cost efficient.RAD
Rapid application development (RAD) is one more sphere Ruby on Rails is used for, which streamlines the process of change accommodation.Self-documentation
As mentioned above, Ruby code is highly readable and self-documenting (self-describing). It makes the development process quicker because the development team doesn’t have to write out separate documentation. New members in development teams should not have problems with understanding the concept and participating in existing projects.Test environment
This back-end framework has three default environments: production, development, and testing. The whole development cycle is optimized and you can test a product that is being developed at every stage. As a result, there are fewer bugs and errors that you should be aware of and debug. This is important to consider when you determine what is Ruby on Rails is used for.Here https://mlsdev.com/blog/what-is-ruby-on-rails-used-for you will find out more about when Ruby on Rails is best applied, what projects can be built with it, and which companies successfully use it already.

- 投稿日:2019-05-27T06:25:33+09:00
Ubuntu18.04にRuby、Rails、Postgresqlを簡単にインストールする手順とコマンド
Ubuntu18にRuby周り一式をスムーズに入れる手順。
# インストールする環境
Ubuntu 18.04
Ruby 2.5.1
Rails 5.2.3
PostgreSQL 9.5.16
git version 2.17.1
をスムーズにインストールします。
所要時間は30分ぐらい。
ひたすら(今は意味は考えず)このままコマンドを打つ。インストール手順コマンド
Rubyをインストール
$ curl -sL https://deb.nodesource.com/setup_8.x | sudo -E bash -
$ curl -sS https://dl.yarnpkg.com/debian/pubkey.gpg | sudo apt-key add -
$ echo "deb https://dl.yarnpkg.com/debian/ stable main" | sudo tee /etc/apt/sources.list.d/yarn.list

$ sudo apt-get update
$ sudo apt-get install git-core curl zlib1g-dev build-essential libssl-dev libreadline-dev libyaml-dev libsqlite3-dev sqlite3 libxml2-dev libxslt1-dev libcurl4-openssl-dev software-properties-common libffi-dev nodejs yarn
rbenv インストール
$ cd
$ git clone https://github.com/rbenv/rbenv.git ~/.rbenv
$ echo 'export PATH="$HOME/.rbenv/bin:$PATH"' >> ~/.bashrc
$ echo 'eval "$(rbenv init -)"' >> ~/.bashrc
$ exec $SHELL

$ git clone https://github.com/rbenv/ruby-build.git ~/.rbenv/plugins/ruby-build
$ echo 'export PATH="$HOME/.rbenv/plugins/ruby-build/bin:$PATH"' >> ~/.bashrc
$ exec $SHELL

$ rbenv install 2.5.1
$ rbenv global 2.5.1
$ ruby -v
ruby 2.5.1
Gemインストール
$ gem install bundlerRailsインストール
$ curl -sL https://deb.nodesource.com/setup_8.x | sudo -E bash -
$ sudo apt-get install -y nodejs
$ gem install rails -v 5.2.3
$ rbenv rehash
$ rails -v
Rails 5.2.3
Postgresqlインストール
$ sudo sh -c "echo 'deb http://apt.postgresql.org/pub/repos/apt/ xenial-pgdg main' > /etc/apt/sources.list.d/pgdg.list"
$ wget --quiet -O - http://apt.postgresql.org/pub/repos/apt/ACCC4CF8.asc | sudo apt-key add -
$ sudo apt-get update
$ sudo apt-get install postgresql-common
$ sudo apt-get install postgresql-9.5 libpq-dev
Postgresqlのユーザー作成
$ sudo -u postgres createuser vagrant -sこの時パスワードは設定しませんでした。
パスワードを設定したい場合は、$ sudo -u postgres psql $ postgres=# \password vagrantこの様にします。
Git設定(飛ばしても良い)
$ git config --global color.ui true
$ git config --global user.name "YOUR NAME"
$ git config --global user.email "YOUR@EMAIL.com"
$ ssh-keygen -t rsa -b 4096 -C "YOUR@EMAIL.com"
ここまでインストールされたか確認
$ ruby -v
ruby 2.5.1p57 (2018-03-29 revision 63029) [x86_64-linux-gnu]
$ rails -v
Rails 5.2.3
$ psql --version
psql (PostgreSQL) 9.5.16
$ git --version
git version 2.17.1
最後にアプリ作成できるかチェック
$ rails new testapp -d postgresql
$ cd testapp
$ rails db:create
$ rails g controller home index
$ rails db:migrate
$ rails s -b 192.168.xx.xx
# xxはあなたのサーバー番号