- 投稿日:2019-05-27T23:50:18+09:00
line-bot-sdk-goとngrokを使ってline-botのおうむ返しをローカルで作ってみた
line-bot-sdk-goとngrokを使用して爆速でおうむ返しbotを作ってみました。
初めにline-bot-sdk-goとngrokとは?
LINE Messaging API SDK for Goを使用すると、LINE Messaging APIを使用してボットを簡単に開発できます。また、サンプルボットを数分で作成できます。
nglok
ローカルPC上で稼働しているネットワーク(TCP)サービスを外部公開できるサービスです。例えば、ローカルPCのWebサーバを外部公開することができます。
httpsの通信も可能になっているので、ローカル環境でline-botの稼働確認ができます。作業手順
1.Line Developersに登録する
2.LineSDKのインストール
3.SDKのソースをLINE Developersの「Channel Secret」「アクセストークン」とngrokで指定する「ポート番号」に変更
4.ngrokのインストールと実行
5.LINE DevelopersのWebhookURLの設定各手順の説明をします
1.Line Developersに登録
2.LineSDKのインストール
$ go get github.com/line/line-bot-sdk-go/linebot
インストールするとGOPATHで指定しているパスにインストールされる。GOPATHの確認方法
$ echo $GOPATH3.SDKのソースをLINE Developersの「Channel Secret」「アクセストークン」とngrokで指定する「ポート番号」に変更
/Users/HOME/go/src/github.com/line/line-bot-sdk-go/examples/echo_bot/server.goの25行目-32行目にあるシークレットキーとトークンをLine Developersで準備したアカウントの情報に変更する。
修正前:
func main() {
    bot, err := linebot.New(
        os.Getenv("CHANNEL_SECRET"),
        os.Getenv("CHANNEL_TOKEN"),
    )
    if err != nil {
        log.Fatal(err)
    }
修正後:
func main() {
    bot, err := linebot.New(
        "6------------------d", // Channel Secret
        "To-----------------=", // アクセストークン(ロングターム)
    )
    if err != nil {
        log.Fatal(err)
    }
58行目のポートの指定をngrokで指定する想定のポートに変更する。
修正前:// This is just sample code. // For actual use, you must support HTTPS by using `ListenAndServeTLS`, a reverse proxy or something else. if err := http.ListenAndServe(":"+os.Getenv("PORT"), nil); err != nil { log.Fatal(err) }修正後:
    // This is just sample code.
    // For actual use, you must support HTTPS by using `ListenAndServeTLS`, a reverse proxy or something else.
    if err := http.ListenAndServe(":8080", nil); err != nil {
        log.Fatal(err)
    }
goファイルの実行
$ go run server.go4.ngrokのインストール
$ brew install ngrok上記コマンドでエラーとなる場合
$ brew cask install ngrokngrokの実行
$ ngrok http 8080ngrok by @inconshreveable (Ctrl+C to quit) Session Status online Session Expires 7 hours, 59 minutes Version 2.3.29 Region United States (us) Web Interface http://127.0.0.1:4040 Forwarding http://f29d8728.ngrok.io -> http://localhost:8080 Forwarding https://f29d8728.ngrok.io -> http://localhost:8080 Connections ttl opn rt1 rt5 p50 p90 0 0 0.00 0.00 0.00 0.005.LINE DevelopersのWebhookURLの設定
LINE DevelopersのWebhookURLにngrokを起動した際に作成された
https://f29d8728.ngrok.io/callbackを指定する。このときURLに/callbackの指定が漏れないようにすること。
Webhook送信は「利用する」にすること。完成
これでline-botの完成です!作ったアカウントを友達登録してお手持ちのスマートフォンからトークを送ってください。
まとめ
既に出ている色々な記事を参考にさせていただいて実装しました。この投稿が誰かの役にたてば嬉しいです。
- 投稿日:2019-05-27T23:11:11+09:00
googleapis/google-cloud-goライブラリを使って署名付きURLを発行する
概要
- 検証に必要なサービスアカウントを準備する
- Signed URLの発行
- 失効時にURLにアクセスしたときの挙動
- Signed URLの再発行
- gsutilでSigned URLを発行する
Signed URLとは
バケットとオブジェクトに対するクエリ文字列認証のためのメカニズムです。署名付き URLは、時間制限のある読み取りや書き込みのアクセス権を、Googleアカウントを持っているかどうかにかかわらず、URLを知っている全員に許可するための手段です。
署名付き URLより
GCSに置いたファイルをGoogleアカウントがないユーザーに提供したい。ただ、期間に制限を設けたい。
などに使いたくて調べました。ダウンロードURLだけでなく、アップロード用URLの生成も可能です。
Amazon S3ではこの辺(他ユーザーとのオブジェクトの共有)のお話です。
検証
検証に必要なサービスアカウントを準備する
GCSに限った話ではないですが、GCPのAPIを利用するには必要な権限を持ったサービスアカウントが必要です。
GCPの認証・認可全般のお話はこのドキュメントにまとまっています。
https://cloud.google.com/docs/authentication/production
プログラムからサービスアカウント情報を取得するにあたってはどこで実行するか、どう認証情報を保存しているかによって変わります。
ローカルで実行するにあたってはローカル実行用のサービスアカウントを用意し、必要な権限を付与しました。
# サービスアカウントの作成
# Service account name must be between 6 and 30 characters (inclusive), must begin with a lowercase letter, and consist of lowercase alphanumeric characters that can be separated by hyphens
$ gcloud iam service-accounts keys create cli-cred.json --iam-account test-cli@test-p-toshi0607.iam.gserviceaccount.com

# サービスアカウントに対する権限の付与
# roleはできる限り絞ってください
$ gcloud projects add-iam-policy-binding test-p-toshi0607 --member "serviceAccount:test-cli@test-p-toshi0607.iam.gserviceaccount.com" --role "roles/owner"

# 認証情報をファイルとして保存
$ gcloud iam service-accounts keys create cli-cred.json --iam-account test-cli@test-p-toshi0607.iam.gserviceaccount.com

# 環境変数にクレデンシャルの保存場所を設定
#
$ mv cli-cred.json $HOME/.config/gcloud/cli-cred.json
$ export GOOGLE_APPLICATION_CREDENTIALS=$HOME/.config/gcloud/cli-cred.json
認証情報を取得するための方法もライブラリでいくつか提供されています。
たとえば、
golang.org/x/oauth2パッケージのgoogle.FindDefaultCredentiralsなど。https://github.com/golang/oauth2/blob/master/google/default.go#L76
つぎの優先優先順位で認証情報を探してくれます。
上記のように環境変数に設定されたものが最優先されます。
実行環境やクレデンシャルの保存方法によって使い分けてください。
// FindDefaultCredentials searches for "Application Default Credentials".
//
// It looks for credentials in the following places,
// preferring the first location found:
//
//   1. A JSON file whose path is specified by the
//      GOOGLE_APPLICATION_CREDENTIALS environment variable.
//   2. A JSON file in a location known to the gcloud command-line tool.
//      On Windows, this is %APPDATA%/gcloud/application_default_credentials.json.
//      On other systems, $HOME/.config/gcloud/application_default_credentials.json.
//   3. On Google App Engine standard first generation runtimes (<= Go 1.9) it uses
//      the appengine.AccessToken function.
//   4. On Google Compute Engine, Google App Engine standard second generation runtimes
//      (>= Go 1.11), and Google App Engine flexible environment, it fetches
//      credentials from the metadata server.
https://github.com/golang/oauth2/blob/master/google/default.go#L61
Signed URLの発行
簡素なサンプルコードを載せます。
package main

import (
    "context"
    "fmt"
    "net/http"
    "time"

    "cloud.google.com/go/storage"
    "golang.org/x/oauth2/google"
)

const (
    bucketName = "surl"
    fileName   = "test1/cat_haru.jpg"
)

func main() {
    ctx := context.Background()

    // 必要最低限のスコープを指定してください。
    // ScopeFullControl grants permissions to manage your
    // data and permissions in Google Cloud Storage.
    // ScopeFullControl = raw.DevstorageFullControlScope

    // ScopeReadOnly grants permissions to
    // view your data in Google Cloud Storage.
    // ScopeReadOnly = raw.DevstorageReadOnlyScope

    // ScopeReadWrite grants permissions to manage your
    // data in Google Cloud Storage.
    // ScopeReadWrite = raw.DevstorageReadWriteScope
    creds, err := google.FindDefaultCredentials(ctx, storage.ScopeReadOnly)
    if err != nil {
    // サンプル用です。適切にエラーハンドリングしてください。
        panic(err)
    }
    conf, err := google.JWTConfigFromJSON(creds.JSON, storage.ScopeReadOnly)
    if err != nil {
    // サンプル用です。適切にエラーハンドリングしてください。
        panic(err)
    }

    expires, _ := time.Parse(time.RFC3339, "2019-05-27T09:33:00-00:00")
    // オプションの意味はこのドキュメントを参照してください。
    // https://cloud.google.com/storage/docs/access-control/signed-urls
    opts := &storage.SignedURLOptions{
        GoogleAccessID: conf.Email,
        PrivateKey:     conf.PrivateKey,
        Method:         http.MethodGet,
        Expires:        expires,
    }
    url, err := storage.SignedURL(bucketName, fileName, opts)
    if err != nil {
    // サンプル用です。適切にエラーハンドリングしてください。
        panic(err)
    }
    fmt.Println(url)
}
※
surlというバケットにtest1/cat_haru.jpgというオブジェクト名で画像ファイルを保存してある前提です。権限不足で作成したURLにアクセスしたときの挙動
URL付与対象のオブジェクトにアクセスする権限がなくてもそれっぽいURLは発行できますが、サービスアカウントにオブジェクトにアクセスする権限がない旨が表示されます。
test-cli@kouzoh-p-toshi0607.iam.gserviceaccount.comにroles/ownerを割り当てたあとにそのままroles/ownerを剥奪した状態で試せます。
$ gcloud projects remove-iam-policy-binding test-p-toshi0607 \
      --member='serviceAccount:test-cli@kouzoh-p-toshi0607.iam.gserviceaccount.com' --role='roles/owner'
最低限必要な権限は
roles/storage.adminです。roles/storage.objectViewerやroles/storage.objectAdminでもAccessDeniedエラーになります。失効時にURLにアクセスしたときの挙動
Signed URLの再発行
バケットのオブジェクトを指定し、新しい期限を設定して再度
storage.SignedURL()を実行します。同一設定のSigned URLを再発行しても発行されるURLは変わりません。
同一のオブジェクトに対して有効な複数のSigned URLも存在可能です。
指すオブジェクトは同じだが有効期限が異なるなど。
gsutilでSigned URLを発行する
コマンドでも発行できます。コマンドのヘルプで必要十分な情報が提供されているので実行結果をそのまま貼ります。
$ gsutil help signurl

NAME
  signurl - Create a signed url


SYNOPSIS

  gsutil signurl [-c <content_type>] [-d <duration>] [-m <http_method>] \
      [-p <password>] [-r <region>] keystore-file url...


DESCRIPTION
  The signurl command will generate a signed URL that embeds authentication data
  so the URL can be used by someone who does not have a Google account. Please
  see the `Signed URLs documentation
  <https://cloud.google.com/storage/docs/access-control/signed-urls>`_ for
  background about signed URLs.

  Multiple gs:// urls may be provided and may contain wildcards. A signed url
  will be produced for each provided url, authorized
  for the specified HTTP method and valid for the given duration.

  Note: Unlike the gsutil ls command, the signurl command does not support
  operations on sub-directories. For example, if you run the command:

    gsutil signurl <private-key-file> gs://some-bucket/some-object/

  The signurl command uses the private key for a service account (the
  '<private-key-file>' argument) to generate the cryptographic
  signature for the generated URL. The private key file must be in PKCS12
  or JSON format. If the private key is encrypted the signed url command will
  prompt for the passphrase used to protect the private key file
  (default 'notasecret'). For more information regarding generating a private
  key for use with the signurl command please see the `Authentication
  documentation.
  <https://cloud.google.com/storage/docs/authentication#generating-a-private-key>`_

  gsutil will look up information about the object "some-object/" (with a
  trailing slash) inside bucket "some-bucket", as opposed to operating on
  objects nested under gs://some-bucket/some-object. Unless you actually
  have an object with that name, the operation will fail.

OPTIONS
  -m           Specifies the HTTP method to be authorized for use
               with the signed url, default is GET. You may also specify
               RESUMABLE to create a signed resumable upload start URL. When
               using a signed URL to start a resumable upload session, you will
               need to specify the 'x-goog-resumable:start' header in the
               request or else signature validation will fail.

  -d           Specifies the duration that the signed url should be valid
               for, default duration is 1 hour.

               Times may be specified with no suffix (default hours), or
               with s = seconds, m = minutes, h = hours, d = days.

               This option may be specified multiple times, in which case
               the duration the link remains valid is the sum of all the
               duration options.

               The max duration allowed is 7d.

  -c           Specifies the content type for which the signed url is
               valid for.

  -p           Specify the keystore password instead of prompting.

  -r <region>  Specifies the `region
               <https://cloud.google.com/storage/docs/locations>`_ in
               which the resources for which you are creating signed URLs are
               stored.

               Default value is 'auto' which will cause gsutil to fetch the
               region for the resource. When auto-detecting the region, the
               current gsutil user's credentials, not the credentials from the
               private-key-file, are used to fetch the bucket's metadata.

               This option must be specified and not 'auto' when generating a
               signed URL to create a bucket.

USAGE
  Create a signed url for downloading an object valid for 10 minutes:

    gsutil signurl -d 10m <private-key-file> gs://<bucket>/<object>

  Create a signed url, valid for one hour, for uploading a plain text
  file via HTTP PUT:

    gsutil signurl -m PUT -d 1h -c text/plain <private-key-file> \
        gs://<bucket>/<obj>

  To construct a signed URL that allows anyone in possession of
  the URL to PUT to the specified bucket for one day, creating
  an object of Content-Type image/jpg, run:

    gsutil signurl -m PUT -d 1d -c image/jpg <private-key-file> \
        gs://<bucket>/<obj>

  To construct a signed URL that allows anyone in possession of
  the URL to POST a resumable upload to the specified bucket for one day,
  creating an object of Content-Type image/jpg, run:

    gsutil signurl -m RESUMABLE -d 1d -c image/jpg <private-key-file> \
        gs://bucket/<obj>
参考


- 投稿日:2019-05-27T21:43:07+09:00
RESTAPI WITH Go言語!
■はじめに
Go 言語で、RESTAPI を勉強している。
以下に備忘を残す。
■ Install Package
今回使うパッケージは、以下になる。
go get -u github.com/gorilla/mux
go get github.com/subosito/gotenv
go get github.com/lib/pq
■ ディレクトリ構成
シンプルに main.go のみ作成しておく。
$ tree . └── main.gomain.gopackage main func main() { }■ Model を作成
Go 言語では、struct と呼ばれる構造体で、Model を作成する。
Model は、データの元になるものだ。
main.gopackage main type Article struct { ID int `json:id` Title string `json:title` Author string `json:author` PostDate string `json:year` } func main() { }struct で、 Article モデルを作成した。
先に言っておくと、API サーバーを Go 言語で作るつもりなので、Google Chrome の Restlet Client というツールをインストールしておこう。
このツールは、クライアント(ここでは、筆者の PC)から Golang で作った API サーバーへリクエストを送り、データの受け渡しを行う。
データの受け渡しには、json を使用するので、
json:~で、json と関連づけている。■ エンドポイントの作成
次は、エンドポイントを作成する。
エンドポイントとは、あるプログラムが外部に公開している機能の所在を示す識別名。
main.gopackage main import ( "log" "net/http" "github.com/gorilla/mux" ) // type Article struct { ID int `json:id` Title string `json:title` Author string `json:author` PostDate string `json:year` } func getArticles(w http.ResponseWriter, r *http.Request) { log.Printf("Get all articles") } func getArticle(w http.ResponseWriter, r *http.Request) { log.Println("Get article is called") } func addArticle(w http.ResponseWriter, r *http.Request) { log.Println("Add article is called") } func updateArticle(w http.ResponseWriter, r *http.Request) { log.Println("Update article is called") } func removeArticle(w http.ResponseWriter, r *http.Request) { log.Println("Remove article is called") } func main() { // リクエストを裁くルーターを作成 router := mux.NewRouter() // エンドポイント router.HandleFunc("/articles", getArticles).Methods("GET") router.HandleFunc("/articles/{id}", getArticle).Methods("GET") router.HandleFunc("/articles", addArticle).Methods("POST") router.HandleFunc("/articles", updateArticle).Methods("PUT") router.HandleFunc("/articles/{id}", removeArticle).Methods("DELETE") // Start Server log.Println("Listen Server ....") // 異常があった場合、処理を停止したいため、log.Fatal で囲む log.Fatal(http.ListenAndServe(":8000", router)) }全部で 5 つのエンドポイントを設置した。
エンドポイントには、gorilla/mux の Router 機能を使用している。
この Router にて、クライアントのリクエストに該当する関数の呼び出しを行う。
getArticles だけ動作確認を行う。
# server 起動
go run main.go

2019/05/25 21:55:57 Listen Server ....
サーバーが起動した場合、:8000 番 port で処理を受け付けるようになっている。
Restlet Client を開き、METHOD を GET にし、SCHME に
http://localhost:8000/articlesを入力して、Send を押下する。200 OK が出れば、正常に起動している。
コンソール上でも以下のように出力される。
2019/05/25 21:57:08 Get all articles■ データの追加
あとで、ちゃんとしたデータベースを使用するが、とりあえず静的なデータを追加して、動作確認を行う。
main.gopackage main import ( "encoding/json" "log" "net/http" "github.com/gorilla/mux" ) type Article struct { ID int `json:id` Title string `json:title` Author string `json:author` PostDate string `json:year` } // スライスを用意 var articles []Article func getArticles(w http.ResponseWriter, r *http.Request) { // strct を json に変換 json.NewEncoder(w).Encode(articles) } func main() { // リクエストを裁くルーターを作成 router := mux.NewRouter() articles = append(articles, Article{ID: 1, Title: "Article1", Author: "Gopher", PostDate: "2019/1/1"}, Article{ID: 2, Title: "Article2", Author: "Gopher", PostDate: "2019/2/2"}, Article{ID: 3, Title: "Article3", Author: "Gopher", PostDate: "2019/3/3"}, Article{ID: 4, Title: "Article4", Author: "Gopher", PostDate: "2019/4/4"}, Article{ID: 5, Title: "Article5", Author: "Gopher", PostDate: "2019/5/5"}, ) ... }Article モデルにデータを追加した後、サーバーを再起動して動作確認を行う。
go run main.go
2019/05/25 22:11:16 Listen Server ....
うまくいった! 次!!
■ 単一データ取得
次は、Article の単一データを取得する。
main.gopackage main import ( "encoding/json" "log" "net/http" "reflect" "strconv" "github.com/gorilla/mux" ) func getArticle(w http.ResponseWriter, r *http.Request) { // get http://localhost:8000/books/hoge -> hoge を取得 params := mux.Vars(r) log.Println(params) // map[id:1] // /What's params type? log.Println(reflect.TypeOf(params["id"])) // -> Get String // Convert Type from String -> Int // Not handling err -> _ i, _ := strconv.Atoi(params["id"]) // URL に指定した ID の情報を取得 for _, article := range articles { if article.ID == i { json.NewEncoder(w).Encode(&article) } } }動作確認を行う。
main.go// サーバー再起動 go run main.go
http://localhost:8000/articles/1を指定して Send ボタンを押下する。
先ほどとは違い、今度は、指定した ID のデータのみ取得できた。
■ INSERT 機能
RESTAPI を介して、データの登録機能を作ろう。
main.gofunc addArticle(w http.ResponseWriter, r *http.Request) { var article Article // json -> struct json.NewDecoder(r.Body).Decode(&article) fmt.Println("article: ", article) articles = append(articles, article) // struct -> json json.NewEncoder(w).Encode(articles) } func main() { // リクエストを裁くルーターを作成 router := mux.NewRouter() // エンドポイント router.HandleFunc("/articles", getArticles).Methods("GET") router.HandleFunc("/articles/{id}", getArticle).Methods("GET") router.HandleFunc("/articles", addArticle).Methods("POST") router.HandleFunc("/articles", updateArticle).Methods("PUT") router.HandleFunc("/articles/{id}", removeArticle).Methods("DELETE") // Start Server log.Println("Listen Server ....") // 異常があった場合、処理を停止したいため、log.Fatal で囲む log.Fatal(http.ListenAndServe(":8000", router)) }もともと、静的データとして main 関数に記述していた articles を削除し、代わりに addArticle にて、データを挿入できるようにした。
Restlet Client からデータを挿入してみよう。
# サーバー再起動
go run main.go
成功すると 200 OK が表示される。
■ UPDATE 機能
続いて、データ更新機能を作ろう。
func updateArticle(w http.ResponseWriter, r *http.Request) {
    var article Article
    json.NewDecoder(r.Body).Decode(&article)

    for i, item := range articles {
        if item.ID == article.ID {
            articles[i] = article
        }
    }

    json.NewEncoder(w).Encode(article)
}
動作確認を行う。
$ go run main.go
2019/05/26 18:07:18 Listen Server ....
200 OK が出れば、OK。
■ DELETE 機能
続いて、データ削除機能を作ろう。
main.goparams := mux.Vars(r) fmt.Println("params: ", params) id, _ := strconv.Atoi(params["id"]) fmt.Println("id: ", id) fmt.Println("articles: ", articles) for i, item := range articles { if item.ID == id { articles = append(articles[:i], articles[i+1:]...) } } json.NewEncoder(w).Encode(articles) }動作確認を行う。
go run main.go
ひとまず、200 OK が出てるので、OKとする。
ちなみに、コンソールには、以下が出力された。
params:  map[id:1]
id:  1
articles:  []
■ elephantsql
データベースを導入しよう。
簡単に使える elephantsql を使用する。
* 無料枠を使うSign up をしたら DB を作成するページに移動する。
ひとまず、Article という DB を作成した。
Article をクリックすると下記の画面に飛ぶことができる。
この画面に出てくる URL は、あとで使用するので、メモしておくこと。
また、BROWSER メニューから SQL を発行できる画面に飛ぶことができるので、そこでテーブルを作成する。
# SQL 文
create table articles(id serial, title varchar, author varchar, postdate varchar);

insert into articles (title, author, postdate) values('Golang is great', 'Gophar', '2019');

select * from articles;
ひとまず、データベースの導入は、以上だ。
■ DB 接続
先ほど登録した DB に接続する。
接続先の URL を .env ファイルに書き込む
$ touch .env

ELEPHANTSQL_URL= "Here ELEPHANTSQL_URL"
URL は、先ほど DB を作成した時に確認した URL を入力する。
main.go に DB
main.gomport ( "database/sql" "encoding/json" "fmt" "log" "net/http" "os" "reflect" "strconv" "github.com/gorilla/mux" "github.com/lib/pq" "github.com/subosito/gotenv" ) var db *sql.DB func init() { // .env 読み込み gotenv.Load() } func logFatal(err error) { if err != nil { log.Fatal(err) } } func main() { pgURL, err := pq.ParseURL(os.Getenv("ELEPHANTSQL_URL")) logFatal(err) log.Println("pgUrl: ", pgURL) // Connect to postgres db, err = sql.Open("postgres", pgURL) logFatal(err) err = db.Ping() logFatal(err) // リクエストを裁くルーターを作成 router := mux.NewRouter() ... }サーバーを起動して、DB に接続できるか確認する。
$ go run main.go
2019/05/26 18:36:39 pgUrl:  xxxxxxx
2019/05/26 18:36:39 Listen Server ....
エラーが帰ってこなければ、OK。
■ Refactor - getArticles
getArticles 関数から SQL 文を発行できるように変更する。
main.gofunc getArticles(w http.ResponseWriter, r *http.Request) { var article Article articles = []Article{} rows, err := db.Query("SELECT * FROM Articles;") logFatal(err) defer rows.Close() for rows.Next() { err := rows.Scan(&article.ID, &article.Title, &article.Author, &article.PostDate) logFatal(err) articles = append(articles, article) } json.NewEncoder(w).Encode(articles) }動作確認のため、サーバーを再起動する。
go run main.goRestlet Client から
http://localhost:8000/articlesへリクエストを送る。
200 ok と データが返却されてきたら OK
一応、elephantsql からも確認する。
同一データが取得できたようだ。
■ Refactor - getArticle
getArticle 関数の単一データの取得を行う処理を DB 版に書き換える。
main.gofunc getArticle(w http.ResponseWriter, r *http.Request) { var article Article params := mux.Vars(r) rows := db.QueryRow("SELECT * FROM ARTICLES WHERE id=$1", params["id"]) err := rows.Scan(&article.ID, &article.Title, &article.Author, &article.PostDate) logFatal(err) json.NewEncoder(w).Encode(article) }サーバーを再起動する。
go run main.goRestlet Client から
http://localhost:8000/articles/1へリクエストを送る。
200 OK が帰ってきたので、OK!
■ Refactor - addArticle
addArticle 関数の INSERT 処理を DB 版に書き換える。
main.gofunc addArticle(w http.ResponseWriter, r *http.Request) { var article Article var articleID int // json -> struct json.NewDecoder(r.Body).Decode(&article) err := db.QueryRow("INSERT INTO ARTICLES (title, author, postdate) values($1, $2, $3) RETURNING id;", article.Title, article.Author, article.PostDate).Scan(&articleID) logFatal(err) json.NewEncoder(w).Encode(articleID) }サーバーを再起動する。
go run main.goRestlet Client から
http://localhost:8000/articles/へリクエストを送る。# 送信データ {"title":"Insert Data","author":"Gophar","year":"2019"}
ちゃんと値が帰ってきている。
elephantsql からも確認しよう。
Insert したデータが格納されていることがわかる。
■ Refactor - updateArticle
updateArticle 関数の UPDATE 処理を DB 版に書き換える。
main.gofunc updateArticle(w http.ResponseWriter, r *http.Request) { var article Article json.NewDecoder(r.Body).Decode(&article) result, err := db.Exec("UPDATE ARTICLES SET title=$1, author=$2, postdate=$3 WHERE id=$4 RETURNING id", &article.Title, &article.Author, &article.PostDate, &article.ID) logFatal(err) rowsUpdated, err := result.RowsAffected() logFatal(err) json.NewEncoder(w).Encode(rowsUpdated) }サーバーを再起動する。
go run main.goRestlet Client から
http://localhost:8000/articles/へリクエストを送る。{"id": 1,"title":"Update Data","author":"Gophar","year":"2019"}
200 OK なので、OK!
elephantsql からも確認しよう。
Update Data が確認できた。
■ Refactor - removeArticle
removeArticle 関数の DELETE 処理を DB 版に書き換える。
main.gofunc removeArticle(w http.ResponseWriter, r *http.Request) { params := mux.Vars(r) result, err := db.Exec("DELETE FROM ARTICLES WHERE id=$1", params["id"]) logFatal(err) rowsDeleted, err := result.RowsAffected() logFatal(err) fmt.Println("rowsDeleted", rowsDeleted) json.NewEncoder(w).Encode(rowsDeleted) }サーバーを再起動する。
go run main.goRestlet Client から
http://localhost:8000/articles/2へリクエストを送る。
200 OK なので、OK!
elephantsql からも確認しよう。
OK!
■ 誤り
postdate に値が入っていないことに気が付いた。
以下のデータで、INSERT / UPDATE 可能だ。
{"title":"Update Data","author":"Gophar","postdate":"2019"}year -> postdate の誤りだ。
■ まとめ
簡単ではあったが、RESTAPI で CRUD を実装した。
Go 言語に慣れたらもっと複雑なことをしよう。


- 投稿日:2019-05-27T20:48:16+09:00
Go言語でJavaScriptを使ってオリジナルなコマンドシェルを作る
概要
MongoDBのCLIツールであるmongoシェルを使っていると、JavaScriptをコマンドシェル(REPL)をとして使うのも良い思います。それならNode.jsでも良いかもしれませんが、Go言語はシングルバイナリなところが気に入っています。今回使用するJavaScriptエンジンはECMAScript 5.1の仕様かつNode.jsとは違いI/O関係など実装されていないので、実用的にするためにはかなりGo言語で拡張しなければなりません。しかし、いろいろ拡張することでGo言語の勉強にもなり、実用的なツールも手にすることも可能です。
環境
- Windows 10
- Go 1.12
- Go JavaScript パッケージ
- github.com/dop251/goja (ECMAScript 5.1)
- Javascriptエンジンはほかに
otto,go-duptakego-duktapeなどがある最低限の実装
- コマンドの入力・実行。実行結果の表示
- console.logもprintもないのでprintの実装
- exitコマンドで終了
- 継続行のサポート
- 継続行のpromptは
...>とします- 継続のキャンセルは
...と入力します実行例
go run main.go
> for(var i=0; i < 5; i++) {
...> print(i)
...> }
0
1
2
3
4
undefined
> doc={a:1, b:"xxxx"}
{"a":1,"b":"xxxx"}
> Object.keys(doc)
["a","b"]
> exit
実行例、特に実用的なものは実装していないので簡単なものしかできません。JavaScriptの仕様はECMAScript 5.1なので現在使わているのものより古いです。
ソースコード
main.gopackage main import ( "bufio" "fmt" "os" "strings" "github.com/dop251/goja" ) type jsRuntime struct { runtime *goja.Runtime stringify goja.Callable program *goja.Program } func scanCommand(scanner *bufio.Scanner, prompt string) bool { fmt.Print(prompt) return scanner.Scan() } func (js *jsRuntime) jsprint(vals ...goja.Value) { rt := js.runtime format := "%v" for _, val := range vals { str, ok := val.Export().(string) if ok { fmt.Printf(format, str) format = " %v" continue } v, err := js.stringify(goja.Undefined(), val) if err != nil { rt.Interrupt(rt.NewGoError(err)) return } fmt.Printf(format, v) format = " %v" } fmt.Println() } func (js *jsRuntime) setStringify() { rt := js.runtime json := rt.Get("JSON") jsonObj, ok := json.(*goja.Object) if !ok { panic("JSON not defined") } stringifyProp := jsonObj.Get("stringify") stringify, ok := goja.AssertFunction(stringifyProp) if !ok { panic("JSON.stringify not defined") } js.stringify = stringify } func initialSetting() *jsRuntime { rt := goja.New() js := &jsRuntime{runtime: rt} rt.Set("print", js.jsprint) js.setStringify() return js } func (js *jsRuntime) execute() (goja.Value, error) { return js.runtime.RunProgram(js.program) } const ( execInput = iota contInput errorInput ) func (js *jsRuntime) compile(cmd string) int { program, err := goja.Compile("console", cmd, false) if err != nil { idx := strings.Index(err.Error(), "Unexpected end of input") if idx == -1 { fmt.Println(err) return errorInput } return contInput } js.program = program return execInput } func main() { prompt := "> " js := initialSetting() scanner := bufio.NewScanner(os.Stdin) var cmds []string for scanCommand(scanner, prompt) { cmd := scanner.Text() if cmd == "exit" { break } else if cmd == "..." { cmds = nil prompt = "> " continue } cmds = append(cmds, cmd) switch js.compile(strings.Join(cmds, "\n")) { case execInput: ret, err := js.execute() if err == nil { js.jsprint(ret) } else { fmt.Println(err) } cmds = nil prompt = "> " case contInput: prompt = "...> " case errorInput: cmds = nil prompt = "> " } } }解説
- コンソールから入力されたTEXTを
scannerで取得してCompileしてエラーが無ければRunProgramで実行します。
exitが入力されたらプログラムを終了しますRunProgram()の戻り値あるいはエラーを表示します- 行を継続のためにはCompileしてみて
"Unexpected end of input"というエラーなら入力を継続する- 各関数で今実行中の
goja.Runtimeが必要なのでjsRuntime構造体を定義します。- Goの関数をJavaScriptで使えるようするには
*goja.RuntimeのSetを使いGlobalな関数として定義します。オブジェクトの関数として定義するには*goja.ObjectのSetを使います。
- 今回定義したのは
fmt.Printfなどを使うとJSONが正常に表示されないので、一度JavaScriptのJSON.stringify()を実行してからfmt.Printfで表示します- 文字列は
JSON.stringifyを使うと"引用符が付くので文字列だけ別処理にしました。setStringify()でJSON.stringifyをGo言語から使えるようにします。InterruptはJavaScriptでthrowのように働きます。(拡張1) load関数の実装
外部ファイルを実行するために
load(ファイル名)を実装します。
func initialSetting() *jsRuntimeに次のコードを追加しますrt.Set("load", js.jsload)
js.jsloadの実装jsloadfunc (js *jsRuntime) jsload(file string) goja.Value { rt := js.runtime f, err := os.Open(file) if err != nil { rt.Interrupt(rt.NewGoError(err)) return goja.Null() } defer f.Close() text, err := ioutil.ReadAll(f) if err != nil { rt.Interrupt(rt.NewGoError(err)) return goja.Null() } val, err := js.runtime.RunScript(file, string(text)) if err != nil { rt.Interrupt(err) return goja.Null() } return val }
import "io/ioutil"パッケージを使ってファイルを入力します。
入力したファイルの実行はRunScriptを使います。これは入力の継続の判定する必要がないためです。
test.jsを作って実行しますtest.jsfor(var i=0; i < 5; i++) { print(i) }go run main.go > load("test.js") 0 1 2 3 4 undefined >(拡張2) Go言語のオブジェクト(構造体とそのメソッド)をJavaScriptから使う
オブジェクト
exampleObjとします。これを構造体として定義し、そのメソッドも定義します。以下の例はMethod1,Method2として両方とも円の面積を計算する同じ処理ですが戻り値が型が異なっています。メソッドはgojaパッケージから参照されるのでメソッド名を大文字で始めます。またexampleObjを生成する関数createExampleObjをJavaScriptに設定します。initialSetting()に追加rt.Set("createExample", js.createExampleObj)type exampleObj struct { js *jsRuntime } func (js *jsRuntime) createExampleObj() *exampleObj { return &exampleObj{js: js} } func (o *exampleObj) Method1(r float64) float64 { return r * r * 3.14 } func (o *exampleObj) Method2(r float64) goja.Value { return o.js.runtime.ToValue(r * r * 3.14) }実行
go run main.go
> o=createExample()
{}
> o.Method1(1)
3.14
> o.Method2(1)
3.14
> o.Method2(2)
12.56
>
問題はないのですが、メソッド名が大文字で始まるのは入力コマンドとしては使いづらいです。そこでこれらのWrapperをJavaScriptで記述します。
initialSetting()に追加_, err := rt.RunString(builtin) if err != nil { panic(err) }const builtin = ` example = function() { return new ExampleObj() } ExampleObj = function () { var _obj = createExample() this.getObj = function() { return _obj } } ExampleObj.prototype.method1 = function (r) { return this.getObj().Method1(r) } ExampleObj.prototype.method2 = function (r) { return this.getObj().Method2(r) } `
_objをExampleObj外から直接アクセスできないようにthis._objにはしませんでした。
外部ファイルにしてloadで読み込むのも可能です。実行
go run main.go
> o=example()
{}
> o.method1(1)
3.14
> o.method1(2)
12.56
> o.method2(2)
12.56
>
参照
まとめ
いろいろ工夫すれば使いやすいツールが作れるのではないでしょうか。
問題点
- 基本的なものもGoで拡張しないと使いえない
- GCは実装されていないようです。
- JavaScriptの仕様が古い
- Proxyがない
- 可変長引数を次の可変長引数に渡すには配列にして
applyメソッドを使うAppnedix
試作の紹介
今、自分用に試作中のものを少し紹介します。
database/sqlパッケージを使用してSQLをJavaScriptのコマンドとして実装して、データの受け取りはなるべくJSON化しています。現時点ではsqlite3とPostgreSQLのドライバーを使って試作しています。これらはmongoシェルを参考にしています。
また、コマンドの入力用のパッケージとして https://github.com/chzyer/readline を使っていますさらに考えられるのは
- MongoDBのようにテーブルが存在しないときに自動的に作成する
- 最初に
insertするJSONを用いて、create tableを発行する。- データの型をどうするか。データベースごとにdefaultの設定を考える
- EXCELファイルやCSVファイルを読んでJavaScript上でJSONデータとして扱えるようにする
- これらのファイルをDBにストアできる
- MongoDB
- すでにmongoシェルがあるが、ここに実装すれば他のRDBと連携できる
- mongoシェルの実装(C++, SpiderMonkey)は複雑なので改造は難しい。
- I/O関係の実装
- RESTfulクライアント
- https://github.com/gizak/termui/ のパッケージをJavaScriptから使えるようにして監視モニター
sqlite3のコマンド例
$go run main.go
script> db=sqlite3("sample.db")
{"driver":"sqlite3","conn":"sample.db"}
script> db.exec("create table tbl1(a integer, b varchar)")
{}
script> db.exec("insert into tbl1 values(?,?)", 1, "string 1")
{}
script> db.exec("insert into tbl1 values(?,?)", 2, "string 2")
{}
script> db.query("select * from tbl1")
{"a":1,"b":"string 1"}
{"a":2,"b":"string 2"}
script>
テーブルオブジェクトを実装して次のように使う
script> t = db.table("tbl1")
{"driver":"sqlite3","name":"tbl1"}
script> t.insert({a:3, b:"string 3"})
{}
script> t.find()
{"a":1,"b":"string 1"}
{"a":2,"b":"string 2"}
{"a":3,"b":"string 3"}
script> t.find("a>1")
{"a":2,"b":"string 2"}
{"a":3,"b":"string 3"}
script> t.find().forEach(function(doc) {
...   if (doc.a > 1) {
...     print(JSON.stringify(doc))
...   }})
{"a":2,"b":"string 2"}
{"a":3,"b":"string 3"}
script>
modesql()でSQLモードにします。SQLモードを終わらせるにはexit;と入力します。script> modesql(db) sql> select * from tbl1 where a > 1; {"a":2,"b":"string 2"} {"a":3,"b":"string 3"} sql> create table tbl2(c real ,d varchar); sql> insert into tbl2 values(1.2, "string 1.2"); sql> select * from tbl2; {"c":1.2,"d":"string 1.2"} sql> exit; script> t2=db.table("tbl2") {"driver":"sqlite3","name":"tbl2"} script> t2.find() {"c":1.2,"d":"string 1.2"} script>
findにはlimit,skipオプションを実装しました。このほかにはsortやselectする項目名を指定するコマンドも実装可能でしょう。script> t.find().limit(2).skip(1) {"a":2,"b":"string 2"} {"a":3,"b":"string 3"}
sqlite3のtbl1のデータをPostgreSQLのpgtbl1にコピーするscript> pg = postgres() {"driver":"postgres","conn":"dbname=test sslmode=disable"} script> pg.exec("create table pgtbl1(a integer, b varchar)") {} script> pgt = pg.table("pgtbl1") {"driver":"postgres","name":"pgtbl1"} script> t.find().forEach(function(doc) { ... pgt.insert(doc) ... }) script> pgt.find() {"a":1,"b":"string 1"} {"a":2,"b":"string 2"} {"a":3,"b":"string 3"} script>PostgreSQLのpsqlコマンドで確認します
>psql test
psql (11.0)
"help" でヘルプを表示します。

test=# select * from pgtbl1;
 a  |     b
----+-----------
  1 | string 1
  2 | string 2
  3 | string 3

(3 行)


test=#
また、mongoシェル風なテーブルの記述にしたかったので
gojaパッケージを改造しました。script> t = db.table("tbl1") {"driver":"sqlite3","name":"tbl1"} script> t.insert({a:3, b:"string 3"}) {}としているものをmongoシェル風に
db.tbl1.insertとして使えるようになりました。通常はtbl1はundefinedになりますので、undefinedのプロパティが参照されたときに特定のメソッドを呼び出すように改造しました。script> db.tbl1.insert({a:4, b:"string 4"}) {} script> db.tbl1.find() {"a":1,"b":"string 1"} {"a":2,"b":"string 2"} {"a":3,"b":"string 3"} {"a":4,"b":"string 4"} script>
db.tbl1.fromExcel("Book1.xlsx", "Sheet1")やdb.tbl1.toExcel("Book1.xlsx", "Sheet1")なども実装出来たら有用かもしれない。
- 投稿日:2019-05-27T18:30:52+09:00
Go言語(Golang)のmap
Go言語 map関数について
Golangにおけるmapについてメモしておこうと思います.
基本文法
map.gopackage main import "fmt" func main() { m := map[string]int{"apple": 100, "banana": 200} fmt.Println(m) fmt.Println(m["banana"])とします.こうすることで出力として
map[apple:100 banana:200]
200
と出力されます.
mapの作成,および中身の取り出し方は以上です.要素の追加
さて,要素を追加したいときはどうするかですが
map2.gopackage main import "fmt" func main() { m := map[string]int{"apple": 100, "banana": 200} m["lemon"] = 500 fmt.Println(m)とすることによって出力が
map[apple:100 banana:200 lemon:500]
となるのがわかります.要素の有無の確認
mapが辞書型のように使われることがわかりました.
では,要素の有無を判断するにはどうしたらよいでしょうか.
返り値を2つ用意して中身とブール型の真偽を得ることが出来ます.map3.gopackage main import "fmt" func main() { m := map[string]int{"apple": 100, "banana": 200} v, ok := m["apple"] fmt.Println(v, ok)値(value)と,真理値(ok)を判断すると出力が以下のように得られます.
100
true
無事,appleの100,およびtrueが得られました.この指定された要素が存在しないときは0のみが返ってきます.また,補足ですが2つ目の返り値は必ずしも必要なく省略可能です.したがって
map3-0.gov := m["apple"] fmt.Println(v)としてもOKです.
- 投稿日:2019-05-27T18:27:40+09:00
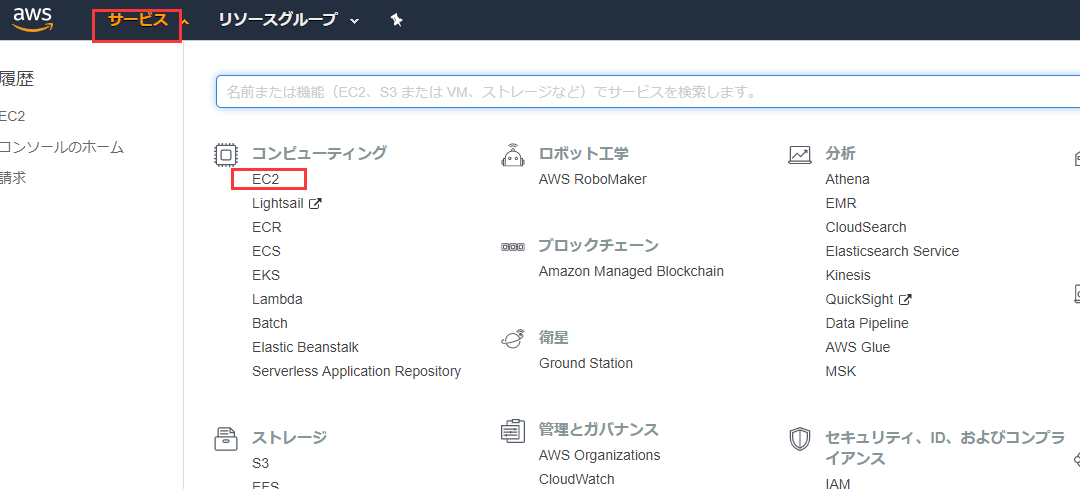
aws × Goサーバー環境構築:ゼロからのhelloworld
まずはAWSサーバーをゲットする
AWSには一年間の無料体験があるので、安心に登録できます。
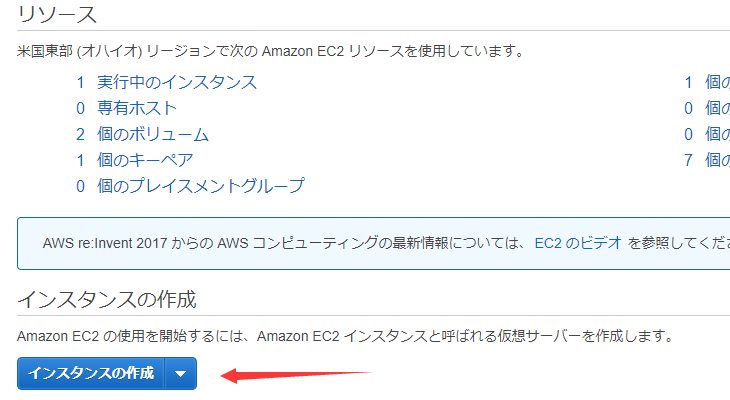
インスタンスを作成する
ここではAmazon Linuxを使いました。必要なパッケージが揃っているので使いやすいです。
僕も無料体験中なので、設定はディフォルトで作成しました。
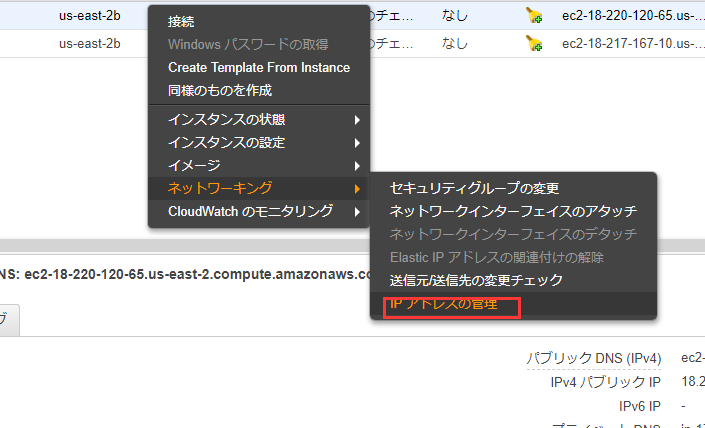
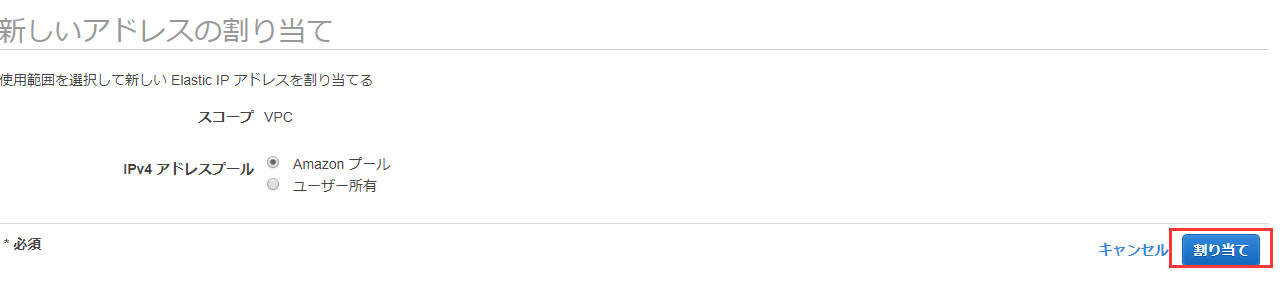
起動バタンを押すとキーの作成画面が出て、キーペア名を入力したら、.pemのファイルをダウンロードします。サーバーにアクセスにはキーが必要なの、これを大事に保存しましょう。IPをもらいます
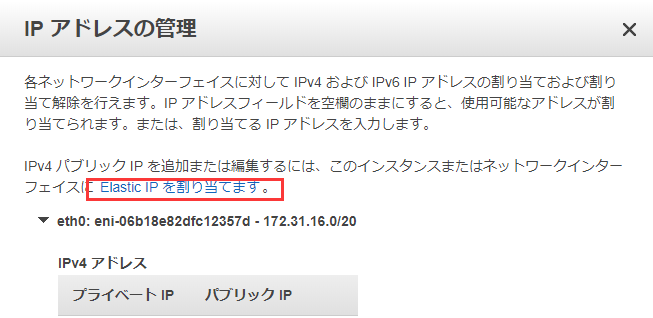
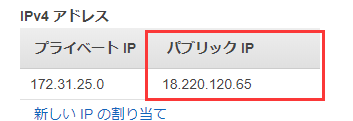
右ボタンを押せばこういうパネルが出ます。IPアドレス管理を選択。
こうすることでIPの割り当てが完了しました。それからセキュリティグループを設定する、テストとしてこのように設定します。
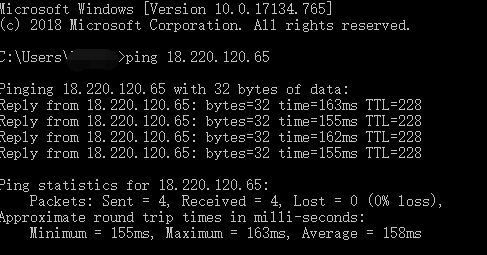
早速テストしましょう!
cmdを開いて、pingでテストします。
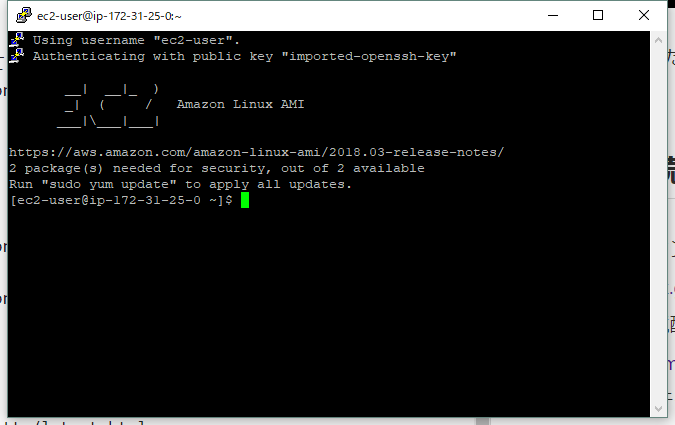
アクセス出来ました!Puttyで接続
まずはPuttyをダウンロード↓
https://www.chiark.greenend.org.uk/~sgtatham/putty/latest.html
続いてPuttyの環境配置を行います。↓
https://docs.aws.amazon.com/ja_jp/AWSEC2/latest/UserGuide/putty.html
↑公式ドキュメンテーションに詳しく記述してあります。GO環境の構築
では始めます~
公式サイトでlinkを取得します。
https://golang.org/dl/
https://dl.google.com/go/go1.12.5.linux-amd64.tar.gz
↑私が選択したバージョン
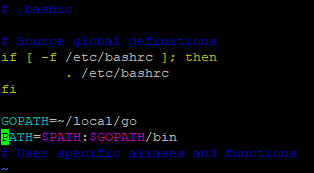
Linuxの下で//ダウンロード wget https://dl.google.com/go/go1.12.5.linux-amd64.tar.gz //フォルダーを作ります。 mkdir ~/local //内容を抽出 sudo tar -C ~/local -xzf go1.12.5.linux-amd64.tar.gz //PATHを設定 cd ~/ vim .bashrc //開いたテクストエディターにPATHを入れる GOROOT=~/local/go PATH=$PATH:$GOROOT/bin export GOPATH=$HOME/XXXXX/go //プロジェクトのディレクトリ export GOBIN=$GOPATH/XXXXXX/bin //プロジェクトのbinディレクトリ //shift+zz(二回押し)保存 //PATHを更新 sourse ~/.bashrc //テスト go version//
vim .bashrc でこんな感じです。↓
Helloworld
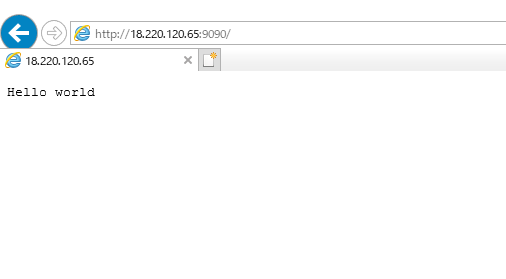
//goファイルを作る
vi HelloWorld.go
//以下のコードを中にコピーする package main import ( "fmt" "log" "net/http" ) func main() { http.HandleFunc("/", func(w http.ResponseWriter, r *http.Request) { fmt.Fprintf(w, "Hello world\n") }) err := http.ListenAndServe(":9090", nil) if err != nil { log.Fatal("ListenAndServe: ", err) } }//保存 shift+zz //実行 go run HelloWorld.goテスト
go run の後、puttyをそのまま放置
ブラウザに [自分のIP]:9090を入力 例:http://18.220.120.65:9090/
自分のIPはさっき取得した:
テスト成功!!!
もう一歩-------SupervisorでHelloWorldを管理する
//まずはSupervisorをインストール
sudo easy_install supervisor

//バージョン確認
supervisord -v
Supervisorの設定ファイルを作る↓
sudo mkdir /etc/supervisor

//権限を取得する
sudo chmod -R 777 /etc/supervisor

//ディフォルト配置ファイルを作る
 echo_supervisord_conf > /etc/supervisor/supervisord.conf
このように編集する
//後ろにこれを挿入
[include]
files = /etc/supervisor/config/*.conf
//ほかのpackageを導入、プロセスが多くなってもコントロールしやすい。

mkdir /etc/supervisor/config/
//HelloWorld.confをこう編集する
vim /etc/supervisor/config/HelloWorld.conf
[program:HelloWorld] command=go run /home/ec2-user/GoCode/hello/HelloWorld.go ;実行するコマンド autostart=true ;Supervisorと共に起動 autorestart=true ;自動再起動 startsecs=10 stdout_logfile=/var/log/HelloWorld.log ;ログファイルのディレクトリを設定 stdout_logfile_maxbytes=1MB stdout_logfile_backups=10 stdout_capture_maxbytes=1MB stderr_logfile=/var/log/HelloWorld.log ;うえと同じくディレクトリを設定 stderr_logfile_maxbytes=1MB stderr_logfile_backups=10 stderr_capture_maxbytes=1MBmkdir /var/log/ //ディレクトリの権限を取得する sudo chmod -R 777 /var/log/ //起動 supervisord -c /etc/supervisor/supervisord.conf //作動状態をチェック supervisorctl起動しプロセスはこんな感じ
よく使うsupervisord/supervisorctl コマンド
supervisord -c supervisor.conf                       配置ファイルでsupervisorを起動
supervisorctl -c supervisor.conf status              状態チェック
supervisorctl -c supervisor.conf reload              配置ファイルの再読み込み
supervisorctl -c supervisor.conf start [all]|[x]     すべて/指定のプロセスを起動
supervisorctl -c supervisor.conf stop [all]|[x]      すべて/指定のプロセスを中止


- 投稿日:2019-05-27T16:55:15+09:00
GAE/Goアプリをアップグレード(go1.9→go1.11)するときに必要だった変更や、参考になった記事
GAE/Goアプリをアップグレード(go1.9→go1.11)するときに必要だった変更や、参考になった記事をまとめておく。
app.yamlの変更点go1.9のapp.yamlruntime: go application: hogehoge version: 1 api_version: go1 handlers: - url: /admin/.* script: _go_app login: admin secure: always - url: /static static_dir: static - url: /.* script: _go_app secure: always threadsafe: true automatic_scaling: min_idle_instances: automatic # idle状態にあるインスタンスの最小値 max_idle_instances: 1 # idle状態にあるインスタンスの最大値 min_pending_latency: 3000ms # リクエストを処理するまでに許される待ち時間の最小 max_pending_latency: automaticgo1.11のapp.yamlruntime: go111 handlers: - url: /static static_dir: static - url: /.* script: auto secure: always automatic_scaling: min_idle_instances: automatic # idle状態にあるインスタンスの最小値 max_idle_instances: 1 # idle状態にあるインスタンスの最大値 min_pending_latency: 3000ms # リクエストを処理するまでに許される待ち時間の最小 max_pending_latency: automaticdiff
+ runtime: go111
- runtime: go
- application: hogehoge
- version: 1
- api_version: go1

- url: /admin/.*
-   script: _go_app
-   login: admin
-   secure: always

- threadsafe: true
ファイル、フォルダー構成の変更点
Before+---app | app.go | app.yaml | +---static | \---templatesAfter.gcloudignore app.go app.yaml go.mod go.sum +---static | \---templates
appディレクトリをなくし、ルートディレクトリにapp.yaml等を移動させた理由nouhau/app-engine/note/gaego19-migration-gaego111 at master · gcpug/nouhau
Go 1.9までは app.yaml の位置がWorking Dirでしたが、Go 1.11の場合、Productionはgo.modがある位置がWorking Dirになるようになります
app.goの変更点- func init() { + func main() { router := mux.NewRouter().StrictSlash(true) routerV1(router) http.Handle("/", router) + appengine.Main() }参考記事
1.9→1.11アップグレードについて
- GAE/Go アプリケーションを Go 1.11 に移行するためにやったこと - えいのうにっき
- nouhau/app-engine/note/gaego19-migration-gaego111 at master · gcpug/nouhau
Modulesについて
- 投稿日:2019-05-27T13:09:58+09:00
Golang 関数 まとめ (お勉強用)
Golangを覚え始めたのですが、某パブリッククラウドの某サーバレスサービスで、
Golangでファンクション作っている時にまとめたくなりここに記載します。基本形
func 関数名 (引数 型) {
    // 処理
}
引数はカンマで区切り複数指定できる。
func 関数名 (引数 型, 引数 型, 引数 型) {
    // 処理
}

例)
func ociComputeEventHandler(ctx context.Context, in io.Reader, out io.Writer) {
    処理
}
戻り値も定義できる。
とりあえずデータ型を指定。
func 関数名 (引数 型) 型 {
    // 処理
    return 値
}
戻り値を指定できるし、こちらもカンマで複数指定できる。
func 関数名 (引数 型) (戻り値 型, 戻り値 型) {
    // 処理
    return 値, 値
}

例) ※エラーハンドリングでよく使う。
func canStringBeRegion(stringRegion string) (region string, err error) {
    if blankRegex.MatchString(stringRegion) || stringRegion == "" {
        return "", fmt.Errorf("region can not be empty or have spaces")
    }
    return stringRegion, nil
}
スライスを関数で扱う。
fucn 関数名() スライス {
    // 処理

}

例)
func GetListInstancesSortByEnumValues() []ListInstancesSortByEnum {
    values := make([]ListInstancesSortByEnum, 0)
    for _, v := range mappingListInstancesSortBy {
        values = append(values, v)
    }
    return value
}
構造体の関数
関数名の前に「(変数名 構造体)」を付け加えます。
type 構造体 struct {
    // フィールド定義
}

func (変数名 構造体) 関数名(変数名 型) 型 {
    // 処理
    return 値
}

例)
type FailedResponse struct {
    Message string
    Error   string
}

func (response FailedResponse) toString() string {
    return response.Message + " due to " + response.Error
}
参考:
チュートリアル
https://go-tour-jp.appspot.com/basics/4
- 投稿日:2019-05-27T09:40:29+09:00
[TIPS]Golangでログ出力箇所のパスをログに追加する。
お題
表題の通り。 Goでは
runtime.Callerを使うと、その関数の呼び出し箇所の情報が取れるので、それを使う。実践
ソースは下記。
https://github.com/sky0621/tips-go/tree/master/try/log共通ロガー
[logger/logger.go]package logger import ( "fmt" "runtime" ) type AppLogger interface { Log(msg string) } type appLogger struct { } func NewAppLogger() AppLogger { return &appLogger{} } func (l *appLogger) Log(msg string) { fmt.Printf("[Path:%s] %s\n", fileWithLineNum(), msg) } func fileWithLineNum() string { _, name, line, ok := runtime.Caller(2) if !ok { return "-" } return fmt.Sprintf("%s:%d", name, line) }ドメイン層
呼び出し箇所が階層化されているケースでちゃんとログにパスが吐かれることの確認用に用意。
[domain/user.go]package domain import "tips-go/try/log/logger" type User interface { Hello() } type user struct { lgr logger.AppLogger } func NewUser(lgr logger.AppLogger) User { return &user{lgr: lgr} } func (u *user) Hello() { u.lgr.Log("Hello!") }メイン関数
[main.go]package main import ( "tips-go/try/log/domain" "tips-go/try/log/logger" ) func main() { lgr := logger.NewAppLogger() user := domain.NewUser(lgr) user.Hello() }実行結果
$ go run main.go
[Path:〜ルートからのフルパス〜/tips-go/try/log/domain/user.go:18] Hello!
- 投稿日:2019-05-27T09:40:29+09:00
【Tips】Golangでログ出力箇所のパスをログに追加する。
お題
表題の通り。 Goでは
runtime.Callerを使うと、その関数の呼び出し箇所の情報が取れるので、それを使う。実践
ソースは下記。
https://github.com/sky0621/tips-go/tree/master/try/log共通ロガー
[logger/logger.go]package logger import ( "fmt" "runtime" ) type AppLogger interface { Log(msg string) } type appLogger struct { } func NewAppLogger() AppLogger { return &appLogger{} } func (l *appLogger) Log(msg string) { fmt.Printf("[Path:%s] %s\n", fileWithLineNum(), msg) } func fileWithLineNum() string { _, name, line, ok := runtime.Caller(2) if !ok { return "-" } return fmt.Sprintf("%s:%d", name, line) }ドメイン層
呼び出し箇所が階層化されているケースでちゃんとログにパスが吐かれることの確認用に用意。
[domain/user.go]package domain import "tips-go/try/log/logger" type User interface { Hello() } type user struct { lgr logger.AppLogger } func NewUser(lgr logger.AppLogger) User { return &user{lgr: lgr} } func (u *user) Hello() { u.lgr.Log("Hello!") }メイン関数
[main.go]package main import ( "tips-go/try/log/domain" "tips-go/try/log/logger" ) func main() { lgr := logger.NewAppLogger() user := domain.NewUser(lgr) user.Hello() }実行結果
$ go run main.go
[Path:〜ルートからのフルパス〜/tips-go/try/log/domain/user.go:18] Hello!
- 投稿日:2019-05-27T09:09:17+09:00
【再実験】App Engine(Golang)からCloud SQLに接続する際の同時接続数制約
注記
この記事ではお題を満たす状況が実現できなかったため、結論は出ていません。
なので、何かしらの結論を求めている場合は参考にならないと思われます。お題
前回、1つのApp EngineインスタンスからCloud SQLインスタンスに接続できる数は「100」までという制限(※1)について、「100」を超えたらどうなるのか? そもそも超えることはできるのか? これらについて実験(※2)してみようとした。
※1:以下に記載
https://cloud.google.com/appengine/docs/standard/go/cloud-sql/pricing-access-limits?hl=ja#app_engine※2:
毎秒のリクエスト数を「100」として、App EngineインスタンスからCloud SQLへ接続する数を設定で制限しない場合に、そのまま毎秒「100」同時接続(対Cloud SQL)をもたらす想定。(結果としてこの想定がそもそも甘かった様子)が、結果は、毎秒
100であっても200であっても1000であっても、各回一定のリクエストタイムアウトが発生するものの、毎秒リクエストが「100」を超えたからといって急激にエラー率があがってリクエストが処理されなくなるといった事象は確認されなかった。その結果についてコメントをもらい、目的が以下の理由で満たせていない可能性を検討。
- SQL発行処理時間が短くコネクションが(新規に張られず)使いまわされ、同時接続数「100」を超えていない可能性
- App Engineがオートスケールによりインスタンスが増えたため、Cloud SQL上で同時接続数「100」を超えていても1App Engineインスタンスあたりでは超えていない可能性
各種ダッシュボードの内容から上記は確からしいので、今回は問題をシンプルにするよう条件を整えてみて再度トライしてみる。
前提
- GCPは知っている。
- Google App Engineのことも名前とどういったものかくらいは知っている。
- MySQL等、リレーショナルデータベースについて、ざっくりとはわかっている。
以下は済んだ上での作業。
- GCPプロジェクトの作成
- Cloud SDKのインストールと初期化・認証
開発環境
# OS
$ cat /etc/os-release
NAME="Ubuntu"
VERSION="18.04.2 LTS (Bionic Beaver)"
# Cloud SDK
$ gcloud version
Google Cloud SDK 247.0.0
# Golang
$ go version
go version go1.11.4 linux/amd64
# Vegeta
$ vegeta -version
Version: cli/v12.2.0
Commit: 65db074680f5a0860d495e5fd037074296a4c425
Runtime: go1.11.4 linux/amd64
Date: 2019-01-20T15:07:37Z+0000
実践
条件提示
App Engineは特に条件を指定しない場合、デフォルトでオートスケールする設定のため、1インスタンスからCloud SQLに接続する際の限界値を確認しようにも、負荷をかけると勝手にインスタンスが増えてしまう。
まずは、スケールしないように明示的に設定をしてみる。App Engineの設定
[app.yaml]runtime: go111 instance_class: F1 automatic_scaling: max_instances: 1 min_instances: 1 max_idle_instances: 1 min_idle_instances: 1 includes: - secret.yaml
instance_class部分は以下にあるように「CPU: 600 MHz」、「Memory: 128 MB」というスペック。
https://cloud.google.com/appengine/docs/standard/#instance_classes
automatic_scaling部分については以下を参考にしてみた。合っているのかな・・・。
https://cloud.google.com/appengine/docs/standard/go111/config/appref?hl=ja#scaling_elementsよくよく考えたら、オートスケールさせないのなら、manualスケールやbasicスケールの方を検討した方がよいかも。。。
WebAPIソース
「
SELECT sleep(?)」で「?」の部分にリクエスト時のパスに含んだ数値(単位は秒)をセットすることでDB接続時の処理時間を意図的に操作できるようにする。
数ミリ〜数10ミリくらいの処理時間であればコネクション使いまわされるかもしれないが、1つの処理に1秒かかれば(その間は別のリクエストはこのコネクションを使えないのだから)コネクションの使い回しは防げる想定。[main.go]package main import ( "fmt" "net/http" "os" "time" "github.com/jinzhu/gorm" "github.com/google/uuid" _ "github.com/go-sql-driver/mysql" "github.com/labstack/echo" ) func main() { db, err := gorm.Open("mysql", fmt.Sprintf("root:%s@unix(/cloudsql/%s)/fs14db01?parseTime=True", os.Getenv("PASS"), os.Getenv("CONN"))) if err != nil { panic(err) } defer func() { if err := db.Close(); err != nil { panic(err) } }() // -------------------------------------------------------------- // Pattern 1 db.DB().SetMaxIdleConns(0) db.DB().SetMaxOpenConns(0) // Pattern 2 //db.DB().SetMaxIdleConns(0) //db.DB().SetMaxOpenConns(95) // Pattern 3 //db.DB().SetMaxIdleConns(95) //db.DB().SetMaxOpenConns(95) // -------------------------------------------------------------- e := echo.New() e.GET("sleep/:s", func(c echo.Context) error { fmt.Printf("before: %v", time.Now()) s := c.Param("s") rows, err := db.Raw("SELECT sleep(?)", s).Rows() if err != nil { return c.JSON(http.StatusInternalServerError, http.StatusText(http.StatusInternalServerError)) } defer func() { if err := rows.Close(); err != nil { fmt.Println(err) } }() fmt.Printf("after: %v", time.Now()) return c.JSON(http.StatusOK, "OK") }) e.Logger.Fatal(e.Start(fmt.Sprintf(":%s", os.Getenv("PORT")))) }これで、想定としては、負荷がかかってもApp Engineはスケールせず1インスタンスのまま。1インスタンス内のWebAPIはリクエストを受けたら受けた分だけ際限なくCloud SQLへコネクションを張りにいくはず。
いざ、実験開始
■1■お試しで毎秒 10 リクエスト(各リクエストは1秒のSQL処理を含む)を5秒間流す
No. Success(%) Latencies-Mean 01 100 2.81388263s 02 100 1.114989947s 03 100 1.114687352s
AppEngine-Memory CloudSQL-ActiveConnection 23.4MB 4 ■2■続いて毎秒 50 リクエスト(各リクエストは1秒のSQL処理を含む)を5秒間流す
No. Success(%) Latencies-Mean 01 97.6 11.090699085s 02 98.8 10.97371648s 03 97.6 10.898812272s
AppEngine-Memory CloudSQL-ActiveConnection 26.0MB 46 既に、捌ききれない。。。
以下、3回分の詳細。1回目
$ vegeta report /tmp/vegeta_result.bin
Requests      [total, rate]            250, 50.20
Duration      [total, attack, wait]    28.14466916s, 4.979905969s, 23.164763191s
Latencies     [mean, 50, 95, 99, max]  11.090699085s, 10.263874159s, 20.857254022s, 24.000073269s, 25.041618113s
Bytes In      [total, mean]            3158, 12.63
Bytes Out     [total, mean]            0, 0.00
Success       [ratio]                  97.60%
Status Codes  [code:count]             200:244  500:6
Error Set:
500 Internal Server Error
2回目
$ vegeta report /tmp/vegeta_result.bin
Requests      [total, rate]            250, 50.20
Duration      [total, attack, wait]    26.176578335s, 4.980029453s, 21.196548882s
Latencies     [mean, 50, 95, 99, max]  10.97371648s, 10.242889379s, 21.413832478s, 24.136439179s, 24.169104238s
Bytes In      [total, mean]            1235, 4.94
Bytes Out     [total, mean]            0, 0.00
Success       [ratio]                  98.80%
Status Codes  [code:count]             0:3  200:247
Error Set:
Get https://i0o0-dot-【自分のプロジェクトID】.appspot.com/sleep/1: http2: timeout awaiting response headers
3回目
$ vegeta report /tmp/vegeta_result.bin
Requests      [total, rate]            250, 50.20
Duration      [total, attack, wait]    28.636641586s, 4.980049063s, 23.656592523s
Latencies     [mean, 50, 95, 99, max]  10.898812272s, 10.235065468s, 21.124616937s, 26.536301304s, 26.575871492s
Bytes In      [total, mean]            2189, 8.76
Bytes Out     [total, mean]            0, 0.00
Success       [ratio]                  97.60%
Status Codes  [code:count]             0:3  200:244  500:3
Error Set:
500 Internal Server Error
Get https://i0o0-dot-【自分のプロジェクトID】.appspot.com/sleep/1: http2: timeout awaiting response headers
■3■App Engineインスタンスのスペックを上げて、毎秒 50 リクエスト(各リクエストは1秒のSQL処理を含む)を5秒間流す
以下の通り、「F1」→「F2」に上げてみた。
が、結果としてはスペックの問題ではなかった様子。$ git diff app.yaml diff --git a/t04_to_cloudsql/app.yaml b/t04_to_cloudsql/app.yaml index 702baf7..328d3e0 100644 --- a/t04_to_cloudsql/app.yaml +++ b/t04_to_cloudsql/app.yaml @@ -1,6 +1,6 @@ runtime: go111 -instance_class: F1 +instance_class: F2 automatic_scaling: max_instances: 1
No. Success(%) Latencies-Mean 01 78.4 9.975848933s 02 96.8 11.481939996s 03 98.0 10.614662261s ■4■毎秒 110 リクエスト(各リクエストは1秒のSQL処理を含む)を5秒間流す
インスタンスタイプを上げてもエラーが減るわけではなかったので、リクエスト100%の成功は諦める。
1App Engineインスタンスであることはコンソールから確認できているので、負荷を上げてCloud SQL上の接続数が「100」を超える段階まで確認する。今回の実施結果。やはり一定の率でタイムアウト。
$ vegeta report /tmp/vegeta_result.bin
Requests      [total, rate]            550, 110.19
Duration      [total, attack, wait]    57.71304566s, 4.991186186s, 52.721859474s
Latencies     [mean, 50, 95, 99, max]  26.626566708s, 26.275790562s, 51.953338553s, 54.617067253s, 55.781333601s
Bytes In      [total, mean]            2660, 4.84
Bytes Out     [total, mean]            0, 0.00
Success       [ratio]                  96.73%
Status Codes  [code:count]             0:18  200:532
Error Set:
Get https://i0o0-dot-【自分のプロジェクトID】.appspot.com/sleep/1: http2: timeout awaiting response headers
最大同時接続数のカウントについては、Cloud SQLのダッシュボードにおける「」を見ていたが、そもそもここで見ている数値が目的と合致しているかわかっていないので、
直接MySQLインスタンスにログインしてこれまでの最大同時接続数がどれほどなのかを確認することにする。今回の負荷をかける前が以下の状態。
MySQL [fs14db03]> show global status like 'Max_used_connections';
+----------------------+-------+
| Variable_name        | Value |
+----------------------+-------+
| Max_used_connections | 7     |
+----------------------+-------+
1 row in set (0.04 sec)
今回、毎秒 110 リクエストを5秒間流した後が以下。
MySQL [fs14db03]> show global status like 'Max_used_connections';
+----------------------+-------+
| Variable_name        | Value |
+----------------------+-------+
| Max_used_connections | 50    |
+----------------------+-------+
1 row in set (0.04 sec)
そもそものお題は「
1つのApp EngineインスタンスからCloud SQLインスタンスに接続できる数は「100」までという制限について、「100」を超えたらどうなるのか?」なので、半分にしか至っていない。。。
毎秒 110 リクエスト(1リクエスト毎select sleep(1))では同時接続 100 が満たせていない様子。■5■毎秒 110 リクエスト(各リクエストは
2秒のSQL処理を含む)を5秒間流す結果、変わらず。
MySQL [fs14db03]> show global status like 'Max_used_connections';
+----------------------+-------+
| Variable_name        | Value |
+----------------------+-------+
| Max_used_connections | 50    |
+----------------------+-------+
1 row in set (0.04 sec)
他のパターンとして、下記も試したものの上記結果と同じく同時接続数は「
50」を超えなかった。
- 毎秒 110 リクエスト(各リクエストは
5秒のSQL処理を含む)を5秒間流す- 毎秒 300 リクエスト(各リクエストは
3秒のSQL処理を含む)を2秒間流すCloud SQLの対象インスタンスは下記の通り、
1030まで同時接続を許容しているので、Cloud SQL側の制約ではなさそう。MySQL [fs14db03]> show variables like 'max_connections'; +-----------------+-------+ | Variable_name | Value | +-----------------+-------+ | max_connections | 1030 | +-----------------+-------+ 1 row in set (0.04 sec)■6■App Engineを
2インスタンス起動して毎秒 110 リクエスト(各リクエストは2秒のSQL処理を含む)を3秒間流す下記の通り、2App Engineインスタンスに増やすと捌き切った。
App Engineの設定
[app.yaml]runtime: go111 instance_class: F1 automatic_scaling: max_instances: 2 min_instances: 2 max_idle_instances: 2 min_idle_instances: 2 includes: - secret.yaml実施結果。
$ vegeta report /tmp/vegeta_result.bin
Requests      [total, rate]            330, 110.37
Duration      [total, attack, wait]    40.37358696s, 2.990036079s, 37.383550881s
Latencies     [mean, 50, 95, 99, max]  20.822092054s, 20.367117704s, 35.883990081s, 37.727537881s, 38.566024081s
Bytes In      [total, mean]            1650, 5.00
Bytes Out     [total, mean]            0, 0.00
Success       [ratio]                  100.00%
Status Codes  [code:count]             200:330
Error Set:
Cloud SQL側の接続数は、1App Engineインスタンス数の時は
50を超えなかったが、今回は55。
ただ、2App Engineインスタンスで55なので1インスタンスあたりは当然もっと低い。MySQL [fs14db03]> show global status like 'Max_used_connections'; +----------------------+-------+ | Variable_name | Value | +----------------------+-------+ | Max_used_connections | 55 | +----------------------+-------+ 1 row in set (0.04 sec)念の為、同じ2App Engineで、以下の条件でも試してみた。
- ■4■毎秒 110 リクエスト(各リクエストは1秒のSQL処理を含む)を5秒間流す
その結果は下記。
MySQL [fs14db03]> show global status like 'Max_used_connections';
+----------------------+-------+
| Variable_name        | Value |
+----------------------+-------+
| Max_used_connections | 77    |
+----------------------+-------+
1 row in set (0.04 sec)
まとめ
軽い気持ちで、「
1つのApp EngineインスタンスからCloud SQLインスタンスに接続できる数は「100」までという制限について、「100」を超えたらどうなるのか?」を確認してみようと思ったものの、
そもそもその状況が作れないという事態に陥り頓挫。。。
自分の知識の無さが恨めしい。