- 投稿日:2019-02-11T23:25:11+09:00
Progate rails道場コースⅡ 個人的攻略メモ
ProgateのRails道場コースをやっていて、個人的に復習が必要だなーって感じたところをまとめていきます。
3/8 新規投稿ページを作ろう
ルーティングの注意点
  get "posts/index" => "posts#index"
  get "posts/:id" => "posts#show"
  get "posts/new" => "posts#new"
このような場合3行目のposts/newは2行目のpost/:idにマッチする。
そのため、以下のように変更が必要。get "posts/index" => "posts#index" get "posts/new" => "posts#new" get "posts/:id" => "posts#show":idとかは最後に置くべき。
/posts/:idだと、/posts/〇〇のような全てのURLに該当するため。4/8 投稿を保存しよう
<%= form_tag("/posts/create") do %>
 <textarea name="content">
 </textarea>
 <input type="submit" value="投稿">
<% end %>
2行目のtextareaにname属性を付与することで、コントローラ内でデータを受け取れる
#posts_controller.rb
  def create
    #textarea内のデータを受け取り、インスタンス変数@postへ保存
    @post = Post.new(content: params[:content])
    @post.save
    redirect_to("/posts/index")
  end
5/8 サクセス・エラーメッセージ
サクセス・エラーメッセージを表示する手順
保存に成功or不成功で処理を分岐
  def create
    @post = Post.new(content: params[:content])
    if @post.save
      # 投稿の保存に成功したときの処理
      flash[:notice] = "投稿を作成しました"
      redirect_to("/posts/index")
    else
      # 投稿の保存に失敗したときの処理
      render("/posts/new")
    end
  end
成功の場合
投稿内容を取得(textareaのname属性より)
@post = Post.new(content: params[:content])アクション内でflashという変数に文字列を代入することで、フラッシュメッセージとして使えるようになります。
flash[:notice] = "投稿を作成しました"不成功の場合
renderメソッドで新規投稿画面を再表示。
renderメソッドはredirect_toと違い、httpリクエストの送信を行わず、viewの出力のみを行います。URLではなく、ファイル名/フォルダ名での指定のため、先頭の/は不要です。#render("フォルダ名/ファイル名") render("posts/new")テキストエリア内に初期値を設定。
createアクション内で取得した内容が、renderメソッドにより値を保持したまま他のビュー(ここだとnew.html.erb)でも使えるようになってます。<!-- new.html.erbの投稿欄 --> <textarea name="content"><%= @post.content %></textarea>なお、new.html.erbでインスタンス変数@postを利用するようになりましたが、対応するnewアクションでは何も書いていません。そのため、/posts/newで新規投稿ページにアクセスしようとすると、テキストエリア内初期値の@post.contentが読み込めず、エラーを起こします。
これを防ぐために、newアクション内に空のインスタンスを用意してあげましょう。def new @post = Post.new endこれでよし。
6/8 投稿の編集ページを作ろう
編集ページへのルーティングとリンクを作成。
ルーティング
get "posts/:id/edit" => "posts#edit":idでURLに含まれるIDを取得できるようになりました。
(例:posts/1/edit post/2/edit)リンクの作成
投稿詳細ページに、上記のルーティングにマッチするリンクを作成します。
<%= link_to("編集", "/posts/#{@post.id}/edit") %>変数展開を用いて、現在見ている投稿のIDをURLに埋め込んで渡してあげます。
8/8 削除機能を作ろう
投稿詳細ページに削除リンクを追加
<%= link_to("削除", "/posts/#{@post.id}/destroy", {method: "post"}) %>link_toメソッドの第三引数に、{method: "post"}を指定するのを忘れずに!
コントローラー側
  def destroy
    #投稿データの取得
    @post = Post.find_by(id: params[:id])
    #dedtroyメソッドでデータの削除
    @post.destroy
    flash[:notice] = "投稿を削除しました"
    redirect_to("/posts/index")
  end
以上で完成!お疲れ様でしたー!!
- 投稿日:2019-02-11T22:25:06+09:00
macOS Mojave で rails s が起動しない
エラーログ
Puma caught this error: Error loading the 'sqlite3' Active Record adapter. Missing a gem it depends on? can't activate sqlite3 (~> 1.3.6), already activated sqlite3-1.4.0. Make sure all dependencies are added to Gemfile. (LoadError)
Gemfile の sqlite 箇所を以下のようにしたら治った
gem 'sqlite3', '~> 1.3.6'
- 投稿日:2019-02-11T21:12:11+09:00
Ruby on Rails, Vue.js で始めるモダン WEB アプリケーション入門
はじめに
この記事では Ruby on Rails と Vue.js を使って WEB アプリケーションを作成しながら、必要な技術について説明しています。
私自身は Rails を使う機会が多いのですが、Vue.js を勉強する目的で学んだことをまとめたものです。
そのため Rails は既に触ったことがあり、Vue.js を初めて使ってみたいという人に向けて入門となる情報です。ここで紹介したコードはGitHubに公開しています。
この記事で作成するアプリケーションについて
この記事では以下の環境で動作することを確認しました。
- Ruby on Rails: 5.2.2
- Ruby: 2.5.3
- Node.js: 8.14.0 (webpackerは 6.44+ が必要)
- npm: 6.4.1
- yarn: 1.12.3
- Vue.js: 2.6.2
Vue.js とは
Vue.js とは Javascript のフレームワークです。
以下の特徴があります。
- 親しみやすい
- HTML, CSS, JavaScript を知っている人は親しみやすい
- 融通が効く
- ライブラリから、完全な機能を備えたフレームワークまでの間でスケールできる
- 徐々に適用できるエコシステム
- 高性能
- 20KB min+gzip コンパクトなランタイム
- 猛烈に速い Virtual DOM
- 最小限の成果で最適化が可能
Ruby on Rails を初期化する(Vue.js 利用)
Rails を初期化する方法は
rails newです。
今回は Vue.js を使いたいので--webpack=vueオプションを追加します。
※ Rails 5.1 から Webpacker がサポートされ Rails で Webpack が利用できるようになりました。(参考)尚、既に作成した Rails で Vue を使いたい場合は
./bin/rails webpacker:install:vueを実行すればよい。Rails を初めて学ぶ方は、Ruby on Rails 事始め、Ruby on Rails 事始め - その2 も参考にしてみてください。
rails newコマンドを実行すると次のファイルとディレクトリが作成されます。
(開発を進める上で意識する必要があるディレクトリには説明文を載せました). ├── Gemfile ├── Gemfile.lock ├── README.md ├── Rakefile ├── app/ │ ├── assets/ │ ├── channels/ │ ├── controllers/ ... MVC の Controller 用のコードを配置するディレクトリ │ ├── helpers/ │ ├── javascript/ ... Sprocket を使ってコンパイルする Javascript を配置するディレクトリ │ ├── jobs/ │ ├── mailers/ │ ├── models/ ... MVC の Model 用のコードを配置するディレクトリ │ └── views/ ... MVC の View 用のコードを配置するディレクトリ ├── bin/ │ ├── bundle ... bundle コマンド用 stub ファイル │ ├── rails ... rails コマンド用 stub ファイル │ ├── rake │ ├── setup │ ├── spring │ ├── update │ ├── webpack ... webpack コマンド用 stub ファイル │ ├── webpack-dev-server ... webpack-dev-server コマンド用 stub ファイル │ └── yarn ... yarn コマンド用 stub ファイル ├── config/ │ ├── application.rb │ ├── boot.rb │ ├── cable.yml │ ├── credentials.yml.enc │ ├── database.yml │ ├── environment.rb │ ├── environments │ ├── initializers │ ├── locales/ │ ├── master.key │ ├── puma.rb │ ├── routes.rb │ ├── spring.rb │ ├── storage.yml │ ├── webpack/ ... webpacker 用の設定ファイルを配置するディレクトリ │ └── webpacker.yml ... webpacker 用の設定ファイル ├── config.ru ├── db/ ├── lib/ ├── log/ ├── node_modules/ ... バンドルする npm パッケージが保存されるディレクトリ ├── package.json ├── public/ ├── storage/ ├── test/ ├── tmp/ ├── vendor ├── yarn-error.log ... yarn コマンド実行時のエラーログが記述されるファイル └── yarn.lock ... yarn 用の npm パッケージのバージョンを管理するファイルWebpacker を使うよう指定して初期化したことで Rails が動作するために必要なファイルやディレクトリに加えて、npm を使うためのファイルやディレクトリが作成されているのが分かると思います。
npm パッケージを管理するためには yarn を使うことになります。
※ パッケージをインストールする方法や削除する方法は yarn の使い方(公式)を参照してください。アプリケーションの全体像
Vue.js は view に特化したアプリケーションです。
そこで DB の O/R マッピングは Rails で行い、Rails 側に API を用意し、Vue.js からは AJAX を使って API 経由でデータを取得して、ブラウザに表示するようにします。便宜上、Vue.js で実装する機能を Frontend と呼び、Rails で実装する機能を Backend と呼ぶことにします。
モデルを作成する
まずは Backend 側でモデルを作成していきます。
Employeeモデルを作成する$ ./bin/rails g model employee name:string department:string gender:integer birth:date joined_date:date payment:bigint note:text作成したモデルファイルは適宜 default 値や
null: falseを設定しておきます。db/migrate/20190205185733_create_employees.rbclass CreateEmployees < ActiveRecord::Migration[5.2] def change create_table :employees do |t| t.string :name, null: false, default: "" t.string :department, null: false, default: "" t.integer :gender, null: false, default: 0 t.date :birth, null: true t.date :joined_date, null: true t.bigint :payment, null: false, default: 0 t.text :note, null: false, default: "" t.timestamps t.integer :lock_version end end endgenerate が終わったらマイグレーションを行います。
$ ./bin/rails db:create db:migrateモデルにもバリデーションを追加しておくことにします。
app/models/employee.rbclass Employee < ApplicationRecord GENDERS = { other: 0, male: 1, female: 2 } enum gender: GENDERS validates :gender, inclusion: { in: GENDERS.keys.concat(GENDERS.keys.map(&:to_s)) }, exclusion: { in: [nil] } validates :name, exclusion: { in: [nil, ""] } validates :department, exclusion: { in: [nil] } validates :payment, numericality: true, exclusion: { in: [nil] } validates :note, exclusion: { in: [nil] } endActiveAdmin を導入する
モデル作成は終わりましたが、都度モデルを作成・編集するときに DB の操作が必要になるのは手間なので、開発がしやすくなるよう ActiveAdmin を導入しておくことにします。
ActiveAdmin を導入すると WEB でモデルを CRUD 操作できるようになり scaffold で用意しなくて済みます。
ActiveAdmin のインストール方法は公式を参照してください。ここでは user 認証無で導入します。(もし認証が必要になったらその時に追加してください)
Gemfilegem 'activeadmin'ActiveAdminをインストールする$ rails g active_admin:install --skip-users終わったらマイグレーションを行います。
$ ./bin/rails db:create db:migrateこれで
http://localhost:3000/adminにアクセスすると ActiveAdmin の Dashboard 画面が表示されます。
Employee モデルを ActiveAdmin を使って編集できるようにするためには次のコマンドを実行します。
EmployeeモデルをActiveAdminでCRUD出来るようにする$ ./bin/rails generate active_admin:resource Employee最後に ActiveAdmin 経由で操作を許可する attribute を設定します。
ID や lock_version 等の自動で設定される値以外は全て許可すればよいでしょう。app/admin/employees.rbActiveAdmin.register Employee do permit_params :name, :department, :gender, :birth, :joined_date, :payment, :note endAPI を作成する
API では作成した Employee モデルの一覧と詳細を取得できるようにします。
まずはActionController::APIを継承したApiControllerを定義してから Employee モデル用の API Controller を作成することにします。ApiControllerを定義する(app/controllers/api_controller.rb)class ApiController < ActionController::API endEmployeesController(app/controllers/api/v1/employees_controller.rb)class Api::V1::EmployeesController < ApiController before_action :set_employee, only: [:show] # ActiveRecordのレコードが見つからなければ404 not foundを応答する rescue_from ActiveRecord::RecordNotFound do |exception| render json: { error: '404 not found' }, status: 404 end def index employees = Employee.all render json: employees end def show render json: @employee end private def set_employee @employee = Employee.find(params[:id]) end endこれでひとまず API コントローラの設定は終わりです。
最後に API コントローラへのルーティングを追加します。config/routes.rbRails.application.routes.draw do : <snip> # APIコントローラへのルーティング namespace :api, {format: 'json'} do namespace :v1 do resources :employees, only: [:index, :show] end end endrails server を立ち上げたら ActiveAdmin で Employee モデルを追加してから
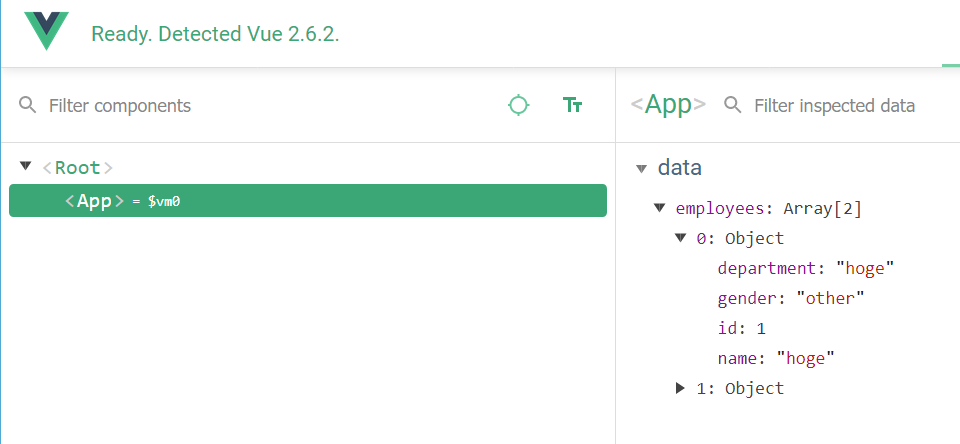
http://localhost:3000/api/v1/employeesにアクセスして一覧が JSON 形式で取得できること、http://localhost:3000/api/v1/employees/1等 Employee モデルの ID を指定すると該当するモデルデータが JSON 形式で表示できることを確認してみてください。Vue.js で Hello Vue! を表示する
backend 側で TOP ページに Vue.js を表示する
まずは
./bin/rails new又は./bin/rails webpacker:install:vueにより Vue がインストールされるとデフォルトで追加される hello_vue.js を表示させることにします。TOP 画面に hello_vue を表示することにします。
具体的には HomeController を追加し、HomeControlelr#index を root にします。app/controllers/home_controller.rbclass HomeController < ApplicationController def index end endconfig/routes.rbRails.application.routes.draw do root to: 'home#index' : <snip> endapp/views/home/index.html.erb<%= javascript_pack_tag 'hello_vue' %> <%= stylesheet_pack_tag 'hello_vue' %>HomeController と routes の内容は Rails を学んだことがあれば理解できるものだと思います。
ここで、
app/views/home/index.html.erbに書かれた<%= javascript_pack_tag 'hello_vue' %>が Webpacker を使うために必要な設定となります。(※)
javascript_pack_tagにより webpacker により生成された javascript が script タグにより読み込まれるようになります。※
javascript_pack_tagは内部的にjavascript_include_tagを呼び出しています。(参考)
※ webpacker は app/javascript/packs/ 配下に設置されたファイルをコンパイルします。(参考)frontend で Hello Vue! を表示する
frontend となる Vue 側のコードは hello_vue.js, app.vue です。
app/javascript/packs/hello_vue.jsimport Vue from 'vue' import App from '../app.vue' document.addEventListener('DOMContentLoaded', () => { const el = document.body.appendChild(document.createElement('hello')) const app = new Vue({ el, render: h => h(App) }) console.log(app) })app/javascript/app.vue<template> <div id="app"> <p>{{ message }}</p> </div> </template> <script> export default { data: function () { return { message: "Hello Vue!" } } } </script> <style scoped> p { font-size: 2em; text-align: center; } </style>app.vue が Vue.js で記述されたスクリプトファイルです。
ここで書かれた内容がhello_vue.jsのnew Vue({ el, render: h => h(App) })によりインスタンス化されて実行されることになります。app.vue は template, script, style の 3 つのセクションがあります。
template は仮想 DOM を構成する DOM を定義します。
つまりブラウザで表示させる内容です。script は仮想 DOM に関連する JavaScript を記述します。
詳細は Vue.js の公式を見て頂くことになりますが、dataが仮想 DOM が保持するデータです。
return されるハッシュがそのデータを表し、これにより key である message が Vue.js で利用できるようになります。(関数として定義するのは Vue.js のルールです)
template に書かれた{{ message }}はこのデータを指しています。style は仮想 DOM に適用するスタイルを css で定義します。
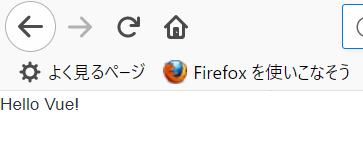
http://localhost:3000/ にアクセスしてみると、次のように
Hello Vue!が表示されたことが分かります。
※ FireFox addon - Vue.js devtoolsVue.js でモデルを表示する
frontend と backend を連携させていきます。
Vue.js で API を利用するための方法として、公式ページでも紹介されている axios を使うことにします。(参考)
これを参考にして、先ほど作成した Employee モデルの一覧を取得する API
http://localhost:3000/api/v1/employeesから一覧を取得し、それを列挙してみることにします。まずは axios をインストールします。
axiosをインストールする$ yarn add axios次に
app.vueで axios を使ってモデル一覧を取得するように修正します。app/javascript/app.vue<template> <div id="app"> <table> <tbody> <tr> <th>ID</th> <th>name</th> <th>birth</th> <th>department</th> <th>gender</th> <th>joined_date</th> <th>payment</th> <th>note</th> </tr> <tr v-for="e in employees" :key="e.id"> <td>{{ e.id }}</td> <td>{{ e.name }}</td> <td>{{ e.birth }}</td> <td>{{ e.department }}</td> <td>{{ e.gender }}</td> <td>{{ e.joined_date }}</td> <td>{{ e.payment }}</td> <td>{{ e.note }}</td> </tr> </tbody> </table> </div> </template> <script> import axios from 'axios'; export default { data: function () { return { employees: [] } }, mounted () { axios .get('/api/v1/employees.json') .then(response => (this.employees = response.data)) } } </script> <style scoped> p { font-size: 2em; text-align: center; } </style>script ではまず axios を import しています。これで script 内で axios を使えるようになります。
次に data を見てみると先と同様の書き方で仮想 DOM のデータとして employees が定義されていることが分かります。
初期値として空配列を設定しておき、AJAX を使ってモデル一覧が取得出来たら上書きすることにします。次に mounted を見てみます。
mounted は Vue.js におけるライフサイクル(参考)において、仮想 DOM が DOM に置き換わるタイミングを指します。
つまりまずは employees が空配列の状態で template を使って生成された DOM が表示されることになります。(table のヘッダ行のみが存在して、内容が空)
このタイミングで API にアクセスしてモデルの取得を試みます。(axios.get('/api/v1/employees.json')の部分)
そして正常に応答が返って来た場合に employees に受け取ったデータを格納します。(.then(response => (this.employees = response.data))の部分)
※ this は Vue コンポーネントのインスタンスを指します。this.employees により data で定義したデータを読み書き出来ます
※ response.data は JSON 形式の配列データが返る(そのようにAPIを定義したため)ため、配列として管理するための this.employees にそのまま代入しています最後に template を見てみます。
div, table, tbody, tr, th 等は通常の DOM ですが、v-forと:keyや、Hello Vue! と同様に{{ e.name }}のように{{ }}で括られた内容が書かれていることが分かると思います。
v-XXX,:YYYは Vue.js のディレクティブ(参考)です。
例えば v-for ディレクティブは配列を使って DOM 要素を繰り返し表示できるといった機能があります。
また、:YYYは省略記法でv-bind:YYYディレクティブの場合に使える書き方です。(参考)
:keyをv-forと組み合わせることにより、繰り返し作成される各 DOM 要素に一意の ID をつけています。では TOP ページを開いて見ましょう。次の画面のように取得したデータが table 形式で表示できていると思います。
アプリケーションをカスタマイズする
一覧画面でモデルが持つ全ての attributes を表示すると見づらいので、一覧画面は概要表示に留めて詳細を確認したい場合は詳細ページに遷移して、その画面内で全ての attributes を表示するようカスタマイズしていくことにします。
一覧画面では概要のみを表示させるようにする
frontend 側で表示する attributes を制限するには、先ほど作成した template から不要な項目を削除するだけです。
app/javascript/app.vue<template> <div id="app"> <table> <tbody> <tr> <th>ID</th> <th>name</th> <th>department</th> <th>gender</th> </tr> <tr v-for="e in employees" :key="e.id"> <td>{{ e.id }}</td> <td>{{ e.name }}</td> <td>{{ e.department }}</td> <td>{{ e.gender }}</td> </tr> </tbody> </table> </div> </template> : <snip>次に backend 側で frontend に一覧を返す API を修正して、必要な項目のみ渡すようにします。
app/controllers/api/v1/employees_controller.rbclass Api::V1::EmployeesController < ApiController : <snip> def index employees = Employee.select(:id, :name, :department, :gender) render json: employees end : <snip> end以上で、一覧画面を概要表示にするための修正は終わりです。
ブラウザで表示してみると、上記のように表示されている内容も、モデル一覧のデータ(frontendが受け取る
employeesの値)も修正されたことが分かると思います。詳細画面を作成して一覧画面から遷移する
詳細画面を作成していきます。
画面遷移には Vue.js 公式ルータの vue-router (参考)を使うことにしました。
まずは vue-router をインストールします。
vue-routerをインストールする$ yarn add vue-router次にこれまで app.vue に記述していた内容を EmployeeIndexPage.vue にコピーし、app.vue ではルーティング設定を書くことにします。
app/javascript/EmployeeDetailPage.vue<template> <dl> <dt>ID</dt> <dd>{{ employee.id }}</dd> <dt>Name</dt> <dd>{{ employee.name }}</dd> <dt>Department</dt> <dd>{{ employee.department }}</dd> <dt>Gender</dt> <dd>{{ employee.gender }}</dd> <dt>Birth</dt> <dd>{{ employee.birth }}</dd> <dt>Joined Date</dt> <dd>{{ employee.joined_date }}</dd> <dt>Payment</dt> <dd>{{ employee.payment }}</dd> <dt>Note</dt> <dd>{{ employee.note }}</dd> </dl> </template> <script> import axios from 'axios'; export default { data: function () { return { employee: {} } }, mounted () { axios .get(`/api/v1/employees/${this.$route.params.id}.json`) .then(response => (this.employee = response.data)) } } </script> <style scoped> </style>app/javascript/app.vue<template> <div> <router-view></router-view> </div> </template> <script> import Vue from 'vue' import VueRouter from 'vue-router' import EmployeeIndexPage from 'EmployeeIndexPage.vue' const router = new VueRouter({ routes: [ { path: '/', component: EmployeeIndexPage } ] }) // ref. https://jp.vuejs.org/v2/guide/plugins.html#%E3%83%97%E3%83%A9%E3%82%B0%E3%82%A4%E3%83%B3%E3%81%AE%E4%BD%BF%E7%94%A8 Vue.use(VueRouter) export default { router } </script> <style scoped> </style>vue-router を使うためには Vue component に VueRouter のインスタンスを引数とするコンポーネントを作成します。
また、コンポーネントが表示する内容はrouter-viewに書かれるので template に<router-view></router-view>を記述しておきます。ルーティング設定は VueRouter をインスタンス化する時の
routes設定に記述し、path, component をそれぞれ設定することになります。
(名前のとおりですが、path はルーティングにマッチする URL のパスを示し、component はそのパスにアクセスした時に利用する Vue コンポーネントを示します)また、CommonJS 環境では Vue.use を使って VueRouter を指定する必要があるとのことなので設定しておくことを忘れないようにしましょう。(参考)
次に、詳細ページを追加してルーティング設定まで行うことにします。
EmployeeIndexPage と同じ要領です。app/javascript/EmployeeDetailPage.vue<template> <dl> <dt>ID</dt> <dd>{{ employee.id }}</dd> <dt>Name</dt> <dd>{{ employee.name }}</dd> <dt>Department</dt> <dd>{{ employee.department }}</dd> <dt>Gender</dt> <dd>{{ employee.gender }}</dd> <dt>Birth</dt> <dd>{{ employee.birth }}</dd> <dt>Joined Date</dt> <dd>{{ employee.joined_date }}</dd> <dt>Payment</dt> <dd>{{ employee.payment }}</dd> <dt>Note</dt> <dd>{{ employee.note }}</dd> </dl> </template> <script> import axios from 'axios'; export default { data: function () { return { employee: {} } }, mounted () { axios .get(`/api/v1/employees/${this.$route.params.id}.json`) .then(response => (this.employee = response.data)) } } </script> <style scoped> </style>app/javascript/app.vue<template> <div> <router-view></router-view> </div> </template> <script> import Vue from 'vue' import VueRouter from 'vue-router' import EmployeeIndexPage from 'EmployeeIndexPage.vue' import EmployeeDetailPage from 'EmployeeDetailPage.vue' const router = new VueRouter({ routes: [ { path: '/', component: EmployeeIndexPage }, { path: '/employees/:id(\\d+)', // :id は数値のみに制限する component: EmployeeDetailPage } ] }) // ref. https://jp.vuejs.org/v2/guide/plugins.html#%E3%83%97%E3%83%A9%E3%82%B0%E3%82%A4%E3%83%B3%E3%81%AE%E4%BD%BF%E7%94%A8 Vue.use(VueRouter) export default { router } </script> <style scoped> </style>EmployeeDetailPage.vue に書かれた
this.$route.params.idは/employees/:idにおける:idとして設定された値を参照しています。(例:/employees/1の場合はthis.$route.params.idが 1 になる)
http://localhost:3000/#/とhttp://localhost:3000/#/employees/1にそれぞれアクセスしてみてください。一覧ページがこれまで通り表示され、詳細ページが表示できるようになっていることが確認できると思います。(/#/って何だ?と思った方は調べてみて下さい)
最後に一覧ページから詳細ページへ遷移するリンクを追加します。
app/javascript/app.vue<script> : <snip> const router = new VueRouter({ routes: [ { path: '/', component: EmployeeIndexPage }, { path: '/employees/:id(\\d+)', name: 'EmployeeDetailPage', // ルートに名前を付けている ref. https://router.vuejs.org/ja/guide/essentials/named-routes.html#%E5%90%8D%E5%89%8D%E4%BB%98%E3%81%8D%E3%83%AB%E3%83%BC%E3%83%88 component: EmployeeDetailPage } ] }) : <snip> </script>app/javascript/EmployeeIndexPage.vue<template> <table> <tbody> <tr> <th>ID</th> <th>name</th> <th>department</th> <th>gender</th> </tr> <tr v-for="e in employees" :key="e.id"> <td><router-link :to="{ name: 'EmployeeDetailPage', params: { id: e.id } }">{{ e.id }}</router-link></td> <td>{{ e.name }}</td> <td>{{ e.department }}</td> <td>{{ e.gender }}</td> </tr> </tbody> </table> </template> : <snip>
<router-link>によりルータを使って遷移できるリンクを作成できます。
to オプションで遷移先を指定するのですが、パラメータを渡したい時などは上記のように、ルートに名前を付けてパラメータを渡すようにします。ブラウザで表示させてみると、一覧画面の ID にリンクが付いており、クリックすると詳細ページに遷移できることが確認できると思います。
モデルの新規作成が出来るようにする
frontend にモデルの新規作成画面を作成する
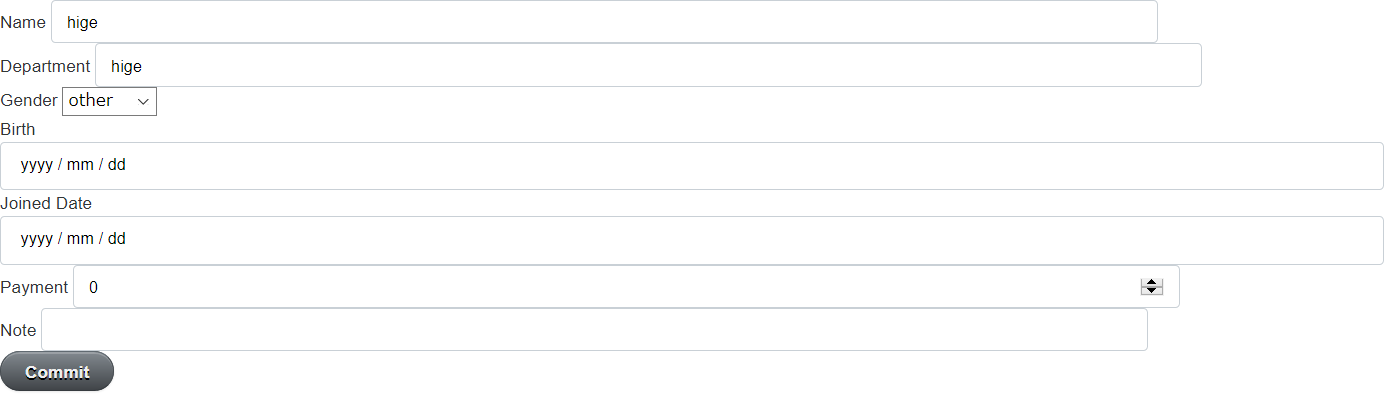
まずはモデルを新規作成する画面を作っていきます。
画面は上記のようにフォームと Commit ボタンがあるのみです。
Commit ボタンが押されたらモデルの登録を行い、作成したモデルの詳細画面に遷移するようにしてみます。作り方としてはこれまでと同様にモデルの新規作成画面用の .vue ファイルを作成して、app.vue に routing 情報を追加することになります。
app/javascript/EmployeeNewPage.vue<template> <form @submit.prevent="createEmployee"> <div v-if="errors.length != 0"> <ul v-for="e in errors" :key="e"> <li><font color="red">{{ e }}</font></li> </ul> </div> <div> <label>Name</label> <input v-model="employee.name" type="text"> </div> <div> <label>Department</label> <input v-model="employee.department" type="text"> </div> <div> <label>Gender</label> <select v-model="employee.gender"> <option>other</option> <option>male</option> <option>female</option> </select> </div> <div> <label>Birth</label> <input v-model="employee.birth" type="date"> </div> <div> <label>Joined Date</label> <input v-model="employee.joined_date" type="date"> </div> <div> <label>Payment</label> <input v-model="employee.payment" type="number" min="0"> </div> <div> <label>Note</label> <input v-model="employee.note" type="text"> </div> <button type="submit">Commit</button> </form> </template> <script> import axios from 'axios'; export default { data: function () { return { employee: { name: '', department: '', gender: '', birth: '', joined_date: '', payment: '', note: '' }, errors: '' } }, methods: { createEmployee: function() { axios .post('/api/v1/employees', this.employee) .then(response => { let e = response.data; this.$router.push({ name: 'EmployeeDetailPage', params: { id: e.id } }); }) .catch(error => { console.error(error); if (error.response.data && error.response.data.errors) { this.errors = error.response.data.errors; } }); } } } </script> <style scoped> </style>app/javascript/app.vue: <snip> <script> import Vue from 'vue' import VueRouter from 'vue-router' import EmployeeIndexPage from 'EmployeeIndexPage.vue' import EmployeeDetailPage from 'EmployeeDetailPage.vue' import EmployeeNewPage from 'EmployeeNewPage.vue' const router = new VueRouter({ routes: [ { path: '/', component: EmployeeIndexPage }, { path: '/employees/:id(\\d+)', // :idは数値のみに制限する name: 'EmployeeDetailPage', component: EmployeeDetailPage }, { path: '/employees/new', name: 'EmployeeNewPage', component: EmployeeNewPage } ] }) : <snip> </script> : <snip>ルーティングの設定は詳細画面を作成した時と同様です。
EmployeeNewPage.vue では template は form で構成されています。
form の attributes に
@submit.preventとありますが、@submitには form の submit イベントが発行されたときのイベントハンドラを処理するためのメソッドを設定します。
.preventと続いていることで、通常の submit で処理されるページリロードを行わないようにします。これはevent.preventDefault()と同じ効果です。(参考)form 内の要素は大半が input や select 等の入力フォームで、一番上にエラーメッセージを表示するための次の要素が設定されています。
app/javascript/EmployeeNewPage.vue(エラー表示部): <snip> <div v-if="errors.length != 0"> <ul v-for="e in errors" :key="e"> <li><font color="red">{{ e }}</font></li> </ul> </div> : <snip>ここでは Vue コンポーネントの errors データに要素が格納されている場合にそれらをリストアップしています。
そして、input や select 等の入力フォームでは
v-modelを指定しています。
これにより Vue コンポーネントのデータとフォームデータとの双方向データバインディングが行われます。例えば name に値を入力すると this.employee.name にその値が格納され、this.employee.name に値を入力すると name 用の input フォームにその値が表示されるといった具合です。最後に、submit ボタンが押されたときの処理として定義した createEmployee メソッドについて説明しますが、axios を使って AJAX 処理を行っている点はこれまでと同様です。ただ HTTP のリクエストメソッドが GET ではなく POST になっているだけです。
モデル作成用の API(まだ作成していない) にデータを送信し、失敗したらthis.errorsにエラー内容を格納するようにしています。(ここで this.errors に値が格納されたら、先に紹介した template のエラー表示部にエラーメッセージが表示されることになります)
そして、モデル作成が成功したら詳細画面に遷移します。詳細画面に遷移する処理は
this.$router.push({ name: 'EmployeeDetailPage', params: { id: e.id } });で行っています。
template で遷移先を定義する際は<router-link :to="...">でしたが、プログラム的に行う場合はrouter.push(location, onComplete?, onAbort?)を使います。
これにより router の history スタックに新しいエントリが追加されます。(参考)以上で新規作成画面は終わりです。
backend に新規作成用 API を作成する
ルーティングに create アクションを追加し、コントローラにアクションを処理するメソッドを追加することになります。(コントローラでは作成時に意図しないエラーが発生した時用に rescue_from の処理を追加しています)
config/routes.rbRails.application.routes.draw do : <snip> namespace :api, {format: 'json'} do namespace :v1 do resources :employees, only: [:index, :show, :create] end end endapp/controllers/api/v1/employees_controller.rbclass Api::V1::EmployeesController < ApiController before_action :set_employee, only: [:show] # 拾えなかったExceptionが発生したら500 Internal server errorを応答する rescue_from Exception, with: :render_status_500 # ActiveRecordのレコードが見つからなければ404 not foundを応答する rescue_from ActiveRecord::RecordNotFound, with: :render_status_404 def index employees = Employee.select(:id, :name, :department, :gender) render json: employees end def show render json: @employee end def create employee = Employee.new(employee_params) if employee.save render json: employee, status: :created else render json: { errors: employee.errors.full_messages }, status: :unprocessable_entity end end private def set_employee @employee = Employee.find(params[:id]) end def employee_params params.fetch(:employee, {}).permit(:name, :department, :gender, :birth, :joined_date, :payment, :note) end def render_status_404(exception) render json: { errors: [exception] }, status: 404 end def render_status_500(exception) render json: { errors: [exception] }, status: 500 end end以上でモデル作成用 API の作成は終わりです。
動作確認
frontend と backend が正常に動作するか見てみましょう。
http://localhost:3000/#/employees/newにアクセスすると次のようなフォームが表示されると思います。
入力値が不十分な状態で Commit ボタンを押すと上部にエラーメッセージが表示されること、必要な情報を入力してから Commit ボタンを押すとモデルが作成されてそのモデルの詳細画面に遷移することを確認してみて下さい。
モデルの編集が出来るようにする
モデルの編集画面を作成していくことにします。
やることはモデルの新規作成とほぼ同じです。必要となる画面がほぼ同じなのでまずは新規作成画面の form 部分をコンポーネントとして新規作成画面から分離して編集画面でも再利用できるようにしましょう。
新規作成画面の form 部分を再利用可能なコンポーネントとして分離する
app/javascript/EmployeeFormPane.vue<template> <form @submit.prevent="$emit('submit')"> <div v-if="errors.length != 0"> <ul v-for="e in errors" :key="e"> <li><font color="red">{{ e }}</font></li> </ul> </div> <div> <label>Name</label> <input v-model="employee.name" type="text"> </div> <div> <label>Department</label> <input v-model="employee.department" type="text"> </div> <div> <label>Gender</label> <select v-model="employee.gender"> <option>other</option> <option>male</option> <option>female</option> </select> </div> <div> <label>Birth</label> <input v-model="employee.birth" type="date"> </div> <div> <label>Joined Date</label> <input v-model="employee.joined_date" type="date"> </div> <div> <label>Payment</label> <input v-model="employee.payment" type="number" min="0"> </div> <div> <label>Note</label> <input v-model="employee.note" type="text"> </div> <button type="submit">Commit</button> </form> </template> <script> export default { props: { employee: {}, errors: '' } } </script> <style> </style>app/javascript/EmployeeNewPage.vue<template> <employee-form-pane :errors="errors" :employee="employee" @submit="createEmployee"></employee-form-pane> </template> <script> import axios from 'axios'; import EmployeeFormPane from 'EmployeeFormPane.vue'; export default { components: { EmployeeFormPane }, data() { return { employee: { name: '', department: '', gender: '', birth: '', joined_date: '', payment: '', note: '' }, errors: '' } }, methods: { createEmployee: function() { axios .post('/api/v1/employees', this.employee) .then(response => { let e = response.data; this.$router.push({ name: 'EmployeeDetailPage', params: { id: e.id } }); }) .catch(error => { console.error(error); if (error.response.data && error.response.data.errors) { this.errors = error.response.data.errors; } }); } } } </script> <style scoped> </style>コンポーネントとして再利用するためにまず form 部分を vue ファイルとして分離します。
分離するにあたって変更した点は次のとおりです。EmployeeFormPane 側の変更点
- form の attributes の
@submit.prevent="createEmployee"が@submit.prevent="$emit('submit')"へと変更された- Vue コンポーネントの data がなくなり、代わりに props へと変更された
EmployeeNewPage 側の変更点
<template>に記述していた form がなくなり、代わりに<employee-form-pane></employee-form-pane>へと変更された<script>にimport EmployeeFormPane from 'EmployeeFormPane.vue';とcomponents: { EmployeeFormPane },が追加されたEmployeeFormPane 側の
$emit('submit')では submit イベントを発行しています。これにより親コンポーネント側で submit イベントを処理することが出来ます。EmployeeNewPage 側の<employee-form-pane @submit="createEmployee"></employee-form-pane>は submit イベントを受け取って createEmployee メソッドを実行することを指しています。また、form の初期値であり、かつ入力された値を格納する employee と、登録時のエラーを表示する errors は EmployeeFormPane 側で親から受け取れるように props で指定しています。props では親コンポーネントから受け取れる値を設定します。EmployeeNewPage 側の
<employee-form-pane :errors="errors" :employee="employee"></employee-form-pane>は自身のデータ errors と employee を同名の props として子コンポーネントに渡しています。編集画面を作成する
編集画面は詳細画面と新規作成画面の両方を合わせたような内容になります。
コンポーネントの初期化時に AJAX でコンポーネントのデータを API 経由で取得し、その値を初期値として form を表示するといった内容になります。ルーティング設定も忘れずに行いましょう。
app/javascript/EmployeeEditPage.vue<template> <employee-form-pane :errors="errors" :employee="employee" @submit="updateEmployee"></employee-form-pane> </template> <script> import axios from 'axios'; import EmployeeFormPane from 'EmployeeFormPane.vue'; export default { components: { EmployeeFormPane }, data() { return { employee: {}, errors: '' } }, mounted () { axios .get(`/api/v1/employees/${this.$route.params.id}.json`) .then(response => (this.employee = response.data)) }, methods: { updateEmployee: function() { axios .patch(`/api/v1/employees/${this.employee.id}`, this.employee) .then(response => { this.$router.push({ name: 'EmployeeDetailPage', params: { id: this.employee.id } }); }) .catch(error => { console.error(error); if (error.response.data && error.response.data.errors) { this.errors = error.response.data.errors; } }); } } } </script> <style scoped> </style>app/javascript/app.vue: <snip> <script> import Vue from 'vue' import VueRouter from 'vue-router' import EmployeeIndexPage from 'EmployeeIndexPage.vue' import EmployeeDetailPage from 'EmployeeDetailPage.vue' import EmployeeNewPage from 'EmployeeNewPage.vue' import EmployeeEditPage from 'EmployeeEditPage.vue' const router = new VueRouter({ routes: [ { path: '/', component: EmployeeIndexPage }, { path: '/employees/:id(\\d+)', // :idは数値のみに制限する name: 'EmployeeDetailPage', component: EmployeeDetailPage }, { path: '/employees/new', name: 'EmployeeNewPage', component: EmployeeNewPage }, { path: '/employees/:id(\\d+)/edit', name: 'EmployeeEditPage', component: EmployeeEditPage } ] }) : <snip> </script> <style scoped> </style>backend 側にモデル更新用 API を作成する
ルーティングに create アクションを追加し、コントローラにアクションを処理するメソッドを追加する流れは新規作成用 API の時と同じです。
config/routes.rbRails.application.routes.draw do : <snip> namespace :api, {format: 'json'} do namespace :v1 do resources :employees, only: [:index, :show, :create, :update] end end endapp/controllers/api/v1/employees_controller.rbclass Api::V1::EmployeesController < ApiController before_action :set_employee, only: [:show, :update] : <snip> def update if @employee.update_attributes(employee_params) head :no_content else render json: { errors: @employee.errors.full_messages }, status: :unprocessable_entity end end private def set_employee @employee = Employee.find(params[:id]) end : <snip> end動作確認
frontend と backend が正常に動作するか見てみましょう。
http://localhost:3000/#/employees/1/edit にアクセスすると次のようなフォームが表示されると思います。
無効な値や入力が必要な項目を空にして Commit ボタンを押すとエラーが表示されること、正しく入力すると値が更新された状態で詳細画面に遷移することを確認しましょう。
モデルを削除できるようにする
最後にモデルを削除できるようにします。
frontend 側では新しい画面は用意せずにボタンを押したら削除できるようにします。
backend 側にモデル削除用 API を作成する
config/routes.rbRails.application.routes.draw do : <snip> namespace :api, {format: 'json'} do namespace :v1 do resources :employees, only: [:index, :show, :create, :update, :destroy] end end endapp/controllers/api/v1/employees_controller.rbclass Api::V1::EmployeesController < ApiController before_action :set_employee, only: [:show, :update, :destroy] : <snip> def destroy @employee.destroy! head :no_content end private def set_employee @employee = Employee.find(params[:id]) end : <snip> endupdate アクションと同様に作成しました。
@employee.destroy!では destroy! メソッドを使うことで削除に失敗した場合に Exception を発生させて、rescue_from Exception で拾うようにしています。続いて削除ボタンを用意します。
ここで、削除操作を行う場合は誤ってボタンを押してしまった場合に備えて確認モーダルを用意することにしましょう。
そこでまずは確認モーダルを作成することにします。
Vue 公式の sampleを参考にしました。app/javascript/Modal.vue<template> <transition name="modal"> <div class="modal-mask"> <div class="modal-wrapper"> <div class="modal-container"> <div class="modal-header"> <slot name="header"> </slot> </div> <div class="modal-body"> <slot name="body"> </slot> </div> <div class="modal-footer"> <slot name="footer"> <button class="modal-default-button" @click="$emit('ok')"> OK </button> <button class="modal-default-button" @click="$emit('cancel')"> Cancel </button> </slot> </div> </div> </div> </div> </transition> </template> <script> export default { } </script> <style scoped> .modal-mask { position: fixed; z-index: 9998; top: 0; left: 0; width: 100%; height: 100%; background-color: rgba(0, 0, 0, .5); display: table; transition: opacity .3s ease; } .modal-wrapper { display: table-cell; vertical-align: middle; } .modal-container { width: 300px; margin: 0px auto; padding: 20px 30px; background-color: #fff; border-radius: 2px; box-shadow: 0 2px 8px rgba(0, 0, 0, .33); transition: all .3s ease; font-family: Helvetica, Arial, sans-serif; } .modal-header h3 { margin-top: 0; color: #42b983; } .modal-body { margin: 20px 0; } .modal-default-button { float: right; } /* * The following styles are auto-applied to elements with * transition="modal" when their visibility is toggled * by Vue.js. * * You can easily play with the modal transition by editing * these styles. */ .modal-enter { opacity: 0; } .modal-leave-active { opacity: 0; } .modal-enter .modal-container, .modal-leave-active .modal-container { -webkit-transform: scale(1.1); transform: scale(1.1); } </style>次に削除ボタンと作成したモーダルを一覧画面に表示させてみます。
app/javascript/EmployeeIndexPage.vue<template> <div> <div v-if="errors.length != 0"> <ul v-for="e in errors" :key="e"> <li><font color="red">{{ e }}</font></li> </ul> </div> <table> <tbody> <tr> <th>ID</th> <th>name</th> <th>department</th> <th>gender</th> <th>actions</th> </tr> <tr v-for="e in employees" :key="e.id"> <td><router-link :to="{ name: 'EmployeeDetailPage', params: { id: e.id } }">{{ e.id }}</router-link></td> <td>{{ e.name }}</td> <td>{{ e.department }}</td> <td>{{ e.gender }}</td> <td> <button @click="deleteTarget = e.id; showModal = true">Delete</button> </td> </tr> </tbody> </table> <modal v-if="showModal" @cancel="showModal = false" @ok="deleteEmployee(); showModal = false;"> <div slot="body">Are you sure?</div> </modal> </div> </template> <script> import axios from 'axios'; import Modal from 'Modal.vue' export default { components: { Modal }, data: function () { return { employees: [], showModal: false, deleteTarget: -1, errors: '' } }, mounted () { this.updateEmployees(); }, methods: { deleteEmployee: function() { if (this.deleteTarget <= 0) { console.warn('deleteTarget should be grater than zero.'); return; } axios .delete(`/api/v1/employees/${this.deleteTarget}`) .then(response => { this.deleteTarget = -1; this.updateEmployees(); }) .catch(error => { console.error(error); if (error.response.data && error.response.data.errors) { this.errors = error.response.data.errors; } }); }, updateEmployees: function() { axios .get('/api/v1/employees.json') .then(response => (this.employees = response.data)) } } } </script> <style scoped> p { font-size: 2em; text-align: center; } </style>基本的には子コンポーネントを利用する方法でモーダルを利用することが出来ます。(v-ifは値がfalseの場合にはコンポーネントを非表示にし、trueの場合には表示するためのディレクティブです)
    <modal v-if="showModal" @cancel="showModal = false" @ok="deleteEmployee(); showModal = false;">
      <div slot="body">Are you sure?</div>
    </modal>
上記に書かれた通り、モーダルを呼び出す部分で slot という属性が出てきました。
スロットとは
<modal></modal>に含まれる DOM を Modal コンポーネントの template で<slot>として参照できるようにする機能で、<div slot="body"></div>のように記述すると<slot name="body">のように名前付きで呼び出すことが出来るようになります。
これによりモーダルの中身を呼び出し側で調整できるようになります。(参考)動作確認
http://localhost:3000/を表示すると Delete ボタンがモデルが表示された行ごとに表示されていること、ボタンを押すとモーダル画面が表示されてAre you sure?と表示されること、Cancelを押すとモーダルが閉じること、OKを押すとモデルが削除されることを確認してみて下さい。
※ ActiveAdmin を導入したことでスタイルがずれていますが、気になる方は上書きされないように設定してみて下さい。(参考)
最後に
backend に Ruby on Rails を使い、frontend に Vue.js を使って WEB アプリケーションを作りながら必要となる情報について紹介しました。
スタイルは全く考慮していないので気になる方は拡張してみて下さい。
おまけ
応用編
Runtime build を有効にする
config/webpack/environment.jsに alias をつける。config/webpack/environment.jsconst { environment } = require('@rails/webpacker') : <snip> const config = environment.toWebpackConfig() config.resolve.alias = { // Vue の runtime build を有効にする 'vue$': 'vue/dist/vue.esm.js' } environment.loaders.append('vue', vue) module.exports = environmentイベントバス
子孫関係のコンポーネント間でイベントの通知と受け取りを行いたい場合、親→子→孫へとイベントの受け取りと通知処理を記述してもよいが、イベントを仲介する役割を持つ Vue コンポーネント(イベントバス)を利用するのが公式で推奨されている。(参考)
尚、$emit を使っても、呼び出した関数の戻り値を呼び出し元が受け取ることは出来ない。(参考)


- 投稿日:2019-02-11T20:58:52+09:00
Active Storageをルートから削除する方法
なぜ、、、
rake routesをしてみたら/rails/active_storage/**というルートが勝手に追加されていた。
Active Storageとは
Active Storageが何かわからなかったため、軽く調べてみました。
Active Storageは、Rails5.2で追加された、ファイルアップロードを行うための機能です。これを使えば、フォームで画像の投稿機能などが簡単に作れます。また、Amazon S3, Google Cloud Storage, Microsoft Azure Storageなどのクラウドストレージサービスに対するファイルのアップロードを簡単に行うことができます。クラウドストレージの他に、ローカルディスクにファイルを保存することもできます。
Paperclip, Carrierwave, Dragonflyなどのgemの代わりになるとされていますが、現時点ではバリデーションとキャッシュ関連の機能は残念ながら備えていません。使うにはRails 5.2以上にアップグレードする必要があります。必要ないので削除したいと思います。
削除する方法
手順1
application.rbの記述を修正する。
require "active_storage/engine"が不要なのでコメントアウトする。
修正するべき部分だけ記述しています!修正前
config/application.rbrequire 'rails/all'修正後
config/application.rbrequire "rails" # Include each railties manually, excluding `active_storage/engine` require "active_model/railtie" require "active_job/railtie" require "active_record/railtie" # require "active_storage/engine" require "action_controller/railtie" require "action_mailer/railtie" require "action_view/railtie" require "action_cable/engine" require "sprockets/railtie" require "rails/test_unit/railtie"手順2
下記のコードを全てコメントアウトする。
config/environments/development.rbconfig.active_storage.service = :localconfig/environments/production.rbconfig.active_storage.service = :localconfig/environments/test.rbconfig.active_storage.service = :test手順3
下記のコードをコメントアウトする
app/assets/javascripts/application.js//= require activestorage参考記事
https://mikerogers.io/2018/04/13/remove-activestorage-from-rails-5-2.html
Active Storageについてもっと詳しく知りたい方は
https://qiita.com/hmmrjn/items/7cc5e5348755c517458a

- 投稿日:2019-02-11T20:44:59+09:00
RailsでControllerだけでアソシエーションがあるModelの結果をjsonの応答で返す方法
意外とバチっとハマる記事がなかったので、投稿。
JavascriptでAjax的な処理を書こうとするとviewを書くほどでもないActiveRecordの結果をjsonで返す処理はよく書くと思う。
特に自分の場合、複雑なGUIをJavascriptでやろうとすると必ずd3.jsを使って解決しようとしてしまうので、様々な処理をしながらもレスポンスは常にすべてのデータを返す、みたいな実装をしがちだ。
普通に検索すると以下のようなコードが見つかる。
@items = Model.all
render :json => @items
これはこれでいいのだが、belongs_toとか関連付けのあるModelの関連のModelまで取得しようと思うとなかなかピンポイントの記事がない。
結果としては、as_jsonを使うと思った通りの結果になった。
to_jsonはよくデータ出てくるのだが、いったん文字列になってしまうため、またjsonに戻さないといけない。
ということで相手のModelのidとtitleだけほしいみたいな場合は、以下のように書けばよかった。ars = Model1.eager_load(:model2) @items = ars.as_json(:include => {:model2 => {:only => [:id, :title]}}) render :json => @items
- 投稿日:2019-02-11T20:31:56+09:00
Rails で rubocop-rspec を使うときは、 rubocop-inflector も一緒に使うと便利
TL; DR
RSpec と Rails を一緒につかって開発するときは、
rubocop-inflectorを gem install した上で、以下のような.rubocop.ymlにすると、 Railsで利用している語形変化(ActiveSupport::Inflectorの設定)がそのまま rubocopにも適用されます。
.rubocop.ymlrequire: - rubocop-rspec # If you are using rubocop-rspec, this should come first. - rubocop-inflector - ./config/initializers/inflections # Your custom rule file
config/initializers/inflections.rbActiveSupport::Inflector.inflections(:en) do |inflect| inflect.acronym 'RuboCop' inflect.acronym 'PvP' endRuboCop とは?
Rubocop は、Rubyのコードを静的解析してくれて、フォーマットを整えてくれる君です。
とても便利なツールなので、常日頃お世話になっている方が多いのではないでしょうか?https://github.com/rubocop-hq/rubocop
RuboCop is a Ruby static code analyzer and code formatter. Out of the box it will enforce many of the guidelines outlined in the community Ruby Style Guide.
そして、
rubocop-rspecとは、RSpecに対しても、フォーマットを整えてくれる君です。https://github.com/rubocop-hq/rubocop-rspec
チーム開発でRailsを利用する場合は、フォーマットに対して不毛な時間を費やさないためにも、これらは是非導入しておきたいところです。
rubocop-rspecを単体で使った場合の問題点RuboCop は非常に良いツールです。そして
Rubocop::RSpecもそのとおりです。
しかし、Railsを使って開発していると、かゆいところに手が届きづらいということがあります。例:
RSpec/FilePathについてこのcopは、RSpecのファイルパスと、RSpec内でのテスト対象が一致しているかをチェックしてくれます。
https://www.rubydoc.info/gems/rubocop-rspec/RuboCop/Cop/RSpec/FilePath
例えば、以下のようなテストファイルに対して、ファイル名が不適切だと指摘してくれます。
# my_class_spec.rb describe MommyClass do # ファイル名も mommy_class_spec.rb にしろとおこられる endこれは内部的には、対象を snake_case にした結果がファイル名と一致しているかを確認しています。
しかし、単純に snake_case にするのではなく、例えば、RuboCopをrubocopに変換するように、いくつかの言葉は一つの言葉として snake_case にしなければなりません。rubocop-rspecを単体で利用する場合は、このような言葉は 設定値のCustomTransformに追加することで対応することが出来ます。例えば、
PvPという言葉を使っている場合は、以下のような設定値を書くことでこれを回避できます。RSpec/FilePath: CustomTransform: PvP: pvp SyncPvP: sync_pvp AsyncPvP: async_pvp PvPOverPvP: pvp_over_pvp PvPController: pvp_controllerしかし、
CustomTransformは完全一致であるため、利用しているパターンの数だけ書く必要があります。
そして、Railsを使っている方ならお気づきかもしれませんが、このような設定値ってどこかで見た記憶がありますよね?
rubocop-rspecも一緒に利用する場合そうです。
config/initializers/inflections.rbに記述しているActiveSupport::Inflectorの設定が、今回の問題を解消するための鍵になります。そして、この設定を簡単にrubocopに反映してくれるのが、以下のrubocop-inflectorになります。https://github.com/aeroastro/rubocop-inflector
これを導入することで、以下のような簡潔な設定を書くだけで、特殊な言葉への対応が完了します。そして、これらは Rails での inflector と同じ設定であるため、実際のコードと、Rubocopの設定が同期的にメンテナンスされるというメリットもあります。
require: - rubocop-rspec # If you are using rubocop-rspec, this should come first. - rubocop-inflector - ./config/initializers/inflections # Your custom rule fileActiveSupport::Inflector.inflections(:en) do |inflect| inflect.acronym 'PvP' endこの
rubocop-inflectorはリリースされたばかりですが、非常に薄いgemであり、これを導入することで、Rubocopの設定ファイルのメンテナンスが非常に楽になるので、rubocop-rspecを Rails で利用されている方は、是非利用してみることをおすすめします。
- 投稿日:2019-02-11T18:02:34+09:00
herokuで"We're sorry, but something went wrong."が出てアプリが開けなくなった
Herokuでアプリを公開したら
We're sorry, but something went wrong.というメッセージが出てアプリが開けなくなったので対処法を書きます。試した方法1
We're sorry, but something went wrong.で検索するとheroku run rails db:migrateを実行すれば解決すると出てきたので試したが解決できなかった。
試した方法2
heroku logs -t上記のherokuコマンドでログを確認したところ以下のエラーが出力されていました。
ActionView::Template::Error (The asset "<画像名>.png" is not present in the asset pipeline.)このエラーを調べたところ、本番環境でアセットパイプラインが正しく設定されていないため、
app/assets/images/以下にある画像が正しく読み込まれていないことが原因でした。
そこで、以下を実行して本番環境上でアセットパイプラインが自動で通るように設定を変更しました。$ rails assets:precompileconfig/environments/production.rbconfig.assets.compile = true #falseをtrueに変更もう一度デプロイし、
$ heroku run rails db:migrateを実行すると問題なくアプリを開くことができました。参考にした記事
- 投稿日:2019-02-11T17:56:59+09:00
【ときどき更新】50のおっさんが久しぶりにスクラッチで開発することになった時のRails学習メモ
はじめに
IT稼業は20数年に渡りますが、ここ数年はスクラッチで開発することはすっかりご無沙汰の50過ぎのオッサンです。
この度、ちょっとした業務システムを超久しぶりにスクラッチで開発することになりました。
開発言語などはお任せだったので、Ruby on Rails で開発することにしました。
Railsは数年前に触ったことがあったのですが、よくよく振り返ってみるともう10年近く前のことでした。つい数年前のことだと思っていたのに・・・
歳はとりたくないものです。というわけで、色々忘れていたり、変わっていたりするので、半ばイチから学び直しみたいな状態です。
折角なので、調べたりしたことをメモとして残しておこうと思います。基本的にはリンク集みたいな感じで、ちょこちょこ更新していこうと思います。
学習リソース
Rails Tutorial
まずはここでざっと復習しました。初めて学習する人と、私みたいに久しぶりにやる人の復習には超オススメRuby on Rails ソース
そして、Railsのソースそのもの。
あまり見ることはないが、物凄くハマって必要にかられるか、いつか探究心が芽生えた時のために記載。ちょっとしたこと
nil? empty? blank? present? の使い分け
意外とすぐ忘れちゃうので載せておきます。Railsのログをクリアするコマンド
rails5ではrails log:clearでもオッケーですね
- 投稿日:2019-02-11T17:13:36+09:00
RailsチュートリアルのサンプルにCircleCIを入れる
Railsチュートリアルの発展編としてCircleCIを導入し、Minitest & Rspecを実行するところまで設定しました。 Ruby2.6.1 & CircleCI 2(2.1)対応 & CircleCI Workflowに対応したものが見当たらなかったので、記録に残しておきます。
完全なファイルはHistory for railstutorial/.circleci/config.ymlを参照下さい。
1. Hello World
Dockerで実行し、
echo "hello world"を実行するところまで。.circleci/config.yamlversion: 2 jobs: build: docker: - image: circleci/ruby:2.6.1-node-browsers steps: - run: echo "hello world"2. bundle install -> rails test 実行まで
.circleci/config.yamlversion: 2 jobs: build: docker: - image: circleci/ruby:2.6.1-node-browsers steps: - checkout - run: bundle install - run: bundle exec rails db:create db:migrate RAILS_ENV=test - run: bundle exec rails test3. bundle installの結果をキャッシュ
bundle installの実行が長いので結果をキャッシュさせる・・・が実は下記は正しく動いていません。キャッシュ対象をvendor/bundleとしているが、インストールパスがvendor/bundleになっていないからです。4で修正します。
.circleci/config.ymlversion: 2 jobs: build: docker: - image: circleci/ruby:2.6.1-node-browsers steps: # コードのチェックアウト - checkout # bundle installのキャシュがあればそれを取ってくる - restore_cache: keys: - gem-cache-{{ arch }}-{{ .Branch }}-{{ checksum "Gemfile.lock" }} - gem-cache-{{ arch }}-{{ .Branch }} - gem-cache # bundle installの実行 - run: bundle install # bundle installのデータをキャッシュ - save_cache: key: gem-cache-{{ arch }}-{{ .Branch }}-{{ checksum "Gemfile.lock" }} paths: - ./vendor/bundle # 初期設定 - run: bundle exec rails db:create db:migrate RAILS_ENV=test # テストの実行 - run: bundle exec rails test4. bundle installのインストール先をvendor/bundleに変更
bundle install --path vendor/bundleに変えれば良いだけのはずなのですが、bundle exec rails testを実行すると下記のエラーが出て動きませんでした。結局bundle exec rails testをbundle exec rake testにして対処、納得はできていません。どなたか原因わかる方教えて欲しいです。合わせてDBセットアップとMinitestの実行をCircleCIで確認しやすいように名前をつけました。
#!/bin/bash -eo pipefail bundle exec rails test Could not find CFPropertyList-2.3.6 in any of the sources Run `bundle install` to install missing gems. Exited with code 1.circleci/config.ymlversion: 2 jobs: build: docker: - image: circleci/ruby:2.6.1-node-browsers environment: RAILS_ENV: test steps: # コードのチェックアウト - checkout # bundle installのキャシュがあればそれを取ってくる - restore_cache: keys: - gem-cache-{{ arch }}-{{ .Branch }}-{{ checksum "Gemfile.lock" }} - gem-cache-{{ arch }}-{{ .Branch }} - gem-cache # bundle installの実行 - run: name: Bundle Install command: bundle check --path=vendor/bundle || bundle install --path vendor/bundle --clean --jobs 4 --retry 3 # bundle installのデータをキャッシュ - save_cache: key: gem-cache-{{ arch }}-{{ .Branch }}-{{ checksum "Gemfile.lock" }} paths: - ./vendor/bundle # 初期設定 - run: name: Database setup command: | bundle exec rails db:create bundle exec rails db:migrate # テストの実行 - run: name: Rails Test command: bundle exec rake test5. Rubocop対応 & Reviewdog対応
Reviewdogはrubocopなどの静的解析ツールで指摘があった事項をpull requestにコメントしてくれるツールです。非常に便利なので合わせて入れました。
circleci/config.ymlversion: 2 jobs: build: docker: - image: circleci/ruby:2.6.1-node-browsers environment: BUNDLER_VERSION: 2.0.1 RAILS_ENV: test REVIEWDOG_VERSION: 0.9.11 steps: # コードのチェックアウト - checkout # Bundlerのバージョン確認 - run: name: Update bundler command: | sudo gem update --system sudo gem uninstall bundler sudo rm /usr/local/bin/bundle sudo rm /usr/local/bin/bundler sudo gem install bundler - run: name: Which bundler? command: bundle -v # bundle installのキャシュがあればそれを取ってくる - restore_cache: keys: - gem-cache-{{ arch }}-{{ .Branch }}-{{ checksum "Gemfile.lock" }} - gem-cache-{{ arch }}-{{ .Branch }} - gem-cache # bundle installの実行 - run: name: Bundle Install command: bundle check --path=vendor/bundle || bundle install --path vendor/bundle --clean --jobs 4 --retry 3 # Reviewdogのインストール - run: name: Install Reviewdog command: | curl -fSL https://github.com/haya14busa/reviewdog/releases/download/$REVIEWDOG_VERSION/reviewdog_linux_amd64 -o reviewdog && chmod +x ./reviewdog # bundle installのデータをキャッシュ - save_cache: key: gem-cache-{{ arch }}-{{ .Branch }}-{{ checksum "Gemfile.lock" }} paths: - ./vendor/bundle # 初期設定 - run: name: Database setup command: | bundle exec rails db:create bundle exec rails db:migrate # テストの実行 - run: name: Rails Test command: bundle exec rake test # Rubocop & Reviewdogの実行 - run: name: Rubocop & Reviewdog command: bundle exec rubocop | ./reviewdog -f=rubocop -reporter=github-pr-review6. Workflow対応
bundle install、Minitest、Rubocopの実行をそれぞれ定義し、実行順序を別途Workflowとして記述しました。circleci/config.ymlversion: 2 defaults: &defaults working_directory: ~/workspace docker: - image: circleci/ruby:2.6.1-node-browsers environment: BUNDLE_JOBS: 3 BUNDLE_RETRY: 3 BUNDLE_PATH: vendor/bundle RAILS_ENV: test REVIEWDOG_VERSION: 0.9.11 jobs: bundle_install: <<: *defaults steps: - checkout - attach_workspace: at: ~/workspace - restore_cache: keys: - gem-cache-{{ arch }}-{{ .Branch }}-{{ checksum "Gemfile.lock" }} - gem-cache-{{ arch }}-{{ .Branch }} - gem-cache - run: name: Bundle Install command: bundle check || bundle install --clean # bundle installのデータをキャッシュ - save_cache: key: gem-cache-{{ arch }}-{{ .Branch }}-{{ checksum "Gemfile.lock" }} paths: - ~workspace/vendor/bundle - persist_to_workspace: root: . paths: vendor/bundle rails_minitest: <<: *defaults steps: - checkout - attach_workspace: at: ~/workspace # 初期設定 - run: name: Database setup command: | bundle exec rails db:create bundle exec rails db:migrate - run: name: Rails Minitest command: bundle exec rake test rubocop: <<: *defaults steps: - checkout - attach_workspace: at: ~/workspace # Reviewdogのインストール - run: name: Install Reviewdog command: | curl -fSL https://github.com/haya14busa/reviewdog/releases/download/$REVIEWDOG_VERSION/reviewdog_linux_amd64 -o reviewdog && chmod +x ./reviewdog # Rubocop & Reviewdogの実行 - run: name: Rubocop & Reviewdog command: bundle exec rubocop | ./reviewdog -f=rubocop -reporter=github-pr-review workflows: version: 2 continuous-integration: jobs: - bundle_install - rails_minitest: requires: - bundle_install - rubocop: requires: - bundle_install
- 投稿日:2019-02-11T16:56:30+09:00
Railsチュートリアル3章 rails testをすると、エラーが出力される
起こったこと
$ rails test
Running via Spring preloader in process XXXXXX
/home/ec2-user/environment/Sample_Apps/sample_app/db/schema.rb doesn't exist yet. Run `rails db:migrate` to create it, then try again. If you do not intend to use a database, you should instead alter /home/ec2-user/environment/Sample_Apps/sample_app/config/application.rb to limit the frameworks that will be loaded.
Run options: --seed 4673

# Running:

..

Finished in 0.434520s, 4.6028 runs/s, 4.6028 assertions/s.

2 runs, 2 assertions, 0 failures, 0 errors, 0 skips
/usr/local/rvm/gems/ruby-2.4.1/gems/notiffany-0.1.1/lib/notiffany/notifier/tmux/client.rb:12:in `version': undefined method `[]' for nil:NilClass (NoMethodError)
        from /usr/local/rvm/gems/ruby-2.4.1/gems/notiffany-0.1.1/lib/notiffany/notifier/tmux.rb:69:in `_check_available'
        from /usr/local/rvm/gems/ruby-2.4.1/gems/notiffany-0.1.1/lib/notiffany/notifier/base.rb:59:in `initialize'
        from /usr/local/rvm/gems/ruby-2.4.1/gems/notiffany-0.1.1/lib/notiffany/notifier/detected.rb:100:in `new'
        from /usr/local/rvm/gems/ruby-2.4.1/gems/notiffany-0.1.1/lib/notiffany/notifier/detected.rb:100:in `_add'
        from /usr/local/rvm/gems/ruby-2.4.1/gems/notiffany-0.1.1/lib/notiffany/notifier/detected.rb:62:in `block (2 levels) in detect'
        from /usr/local/rvm/gems/ruby-2.4.1/gems/notiffany-0.1.1/lib/notiffany/notifier/detected.rb:60:in `each'
        from /usr/local/rvm/gems/ruby-2.4.1/gems/notiffany-0.1.1/lib/notiffany/notifier/detected.rb:60:in `detect'
        from /usr/local/rvm/gems/ruby-2.4.1/gems/notiffany-0.1.1/lib/notiffany/notifier/detected.rb:60:in `block in detect'
        from /usr/local/rvm/gems/ruby-2.4.1/gems/notiffany-0.1.1/lib/notiffany/notifier/detected.rb:59:in `each'
        from /usr/local/rvm/gems/ruby-2.4.1/gems/notiffany-0.1.1/lib/notiffany/notifier/detected.rb:59:in `detect'
        from /usr/local/rvm/gems/ruby-2.4.1/gems/notiffany-0.1.1/lib/notiffany/notifier.rb:180:in `_detect_or_add_notifiers'
        from /usr/local/rvm/gems/ruby-2.4.1/gems/notiffany-0.1.1/lib/notiffany/notifier.rb:198:in `_activate'
        from /usr/local/rvm/gems/ruby-2.4.1/gems/notiffany-0.1.1/lib/notiffany/notifier.rb:87:in `initialize'
        from /usr/local/rvm/gems/ruby-2.4.1/gems/notiffany-0.1.1/lib/notiffany/notifier.rb:42:in `new'
        from /usr/local/rvm/gems/ruby-2.4.1/gems/notiffany-0.1.1/lib/notiffany/notifier.rb:42:in `connect'
        from /usr/local/rvm/gems/ruby-2.4.1/gems/guard-2.13.0/lib/guard/notifier.rb:11:in `connect'
        from /usr/local/rvm/gems/ruby-2.4.1/gems/guard-2.13.0/lib/guard/notifier.rb:31:in `notify'
        from /usr/local/rvm/gems/ruby-2.4.1/gems/guard-compat-1.2.1/lib/guard/compat/plugin.rb:113:in `notify'
        from /usr/local/rvm/gems/ruby-2.4.1/gems/guard-minitest-2.4.4/lib/guard/minitest/notifier.rb:31:in `notify'
        from /usr/local/rvm/gems/ruby-2.4.1/gems/guard-minitest-2.4.4/lib/guard/minitest/reporter.rb:10:in `report'
        from /usr/local/rvm/gems/ruby-2.4.1/gems/minitest-5.10.3/lib/minitest.rb:687:in `each'
        from /usr/local/rvm/gems/ruby-2.4.1/gems/minitest-5.10.3/lib/minitest.rb:687:in `report'
        from /usr/local/rvm/gems/ruby-2.4.1/gems/minitest-5.10.3/lib/minitest.rb:141:in `run'
        from /usr/local/rvm/gems/ruby-2.4.1/gems/minitest-5.10.3/lib/minitest.rb:63:in `block in autorun'
        from /usr/local/rvm/gems/ruby-2.4.1/gems/spring-2.0.2/lib/spring/application.rb:171:in `fork'
        from /usr/local/rvm/gems/ruby-2.4.1/gems/spring-2.0.2/lib/spring/application.rb:171:in `serve'
        from /usr/local/rvm/gems/ruby-2.4.1/gems/spring-2.0.2/lib/spring/application.rb:141:in `block in run'
        from /usr/local/rvm/gems/ruby-2.4.1/gems/spring-2.0.2/lib/spring/application.rb:135:in `loop'
        from /usr/local/rvm/gems/ruby-2.4.1/gems/spring-2.0.2/lib/spring/application.rb:135:in `run'
        from /usr/local/rvm/gems/ruby-2.4.1/gems/spring-2.0.2/lib/spring/application/boot.rb:19:in `<top (required)>'
        from /usr/local/rvm/rubies/ruby-2.4.1/lib/ruby/site_ruby/2.4.0/rubygems/core_ext/kernel_require.rb:55:in `require'
        from /usr/local/rvm/rubies/ruby-2.4.1/lib/ruby/site_ruby/2.4.0/rubygems/core_ext/kernel_require.rb:55:in `require'
        from -e:1:in `<main>'
対処法
参照URL
https://yskoht.hatenablog.com/entry/2017/12/26/140450最初のエラー文は、
schema.rb doesn't exist yet. Run `rails db:migrate` to create it, then try again.とあるので、指示通りマイグレーションを行います。
$ rails db:migrateこれで最初の方のエラーが消えます。
後半のエラーは
$ sudo yum install -y tmuxと、tmuxをインストールすると消えます。
tmuxとは
tmux とは、Unixライクなオペレーティングシステム用の端末多重接続ソフトウェア
https://ja.wikipedia.org/wiki/Tmux画面一つで複数のターミナルを操作できるソフトのようです。
rails testの際に使われている?ということなんでしょうか。
- 投稿日:2019-02-11T16:47:13+09:00
Rubocop Airbnbの導入
はじめに
Rubocop Airbnbを導入したので、手順をメモします。
Rubocopとは
Rubocopは書かれたコードがRubyのコーディング規約に沿った書かれ方をしているかを自動的に確認してくれるgemです。
Rubocopではなく、Rubocop Airbnbを導入する理由
Rubocopはデフォルト設定だと自分で設定を変更する必要があるとのことなので、airbnbの開発で使用されているrubocopの設定をインストールできるRubocop Airbnbを導入することにしました。
Rubocop Airbnbの導入手順
基本的にRubocop Airbnbの手順に従いました。
Gemfileにgemを追加
gemを追加したら、bundle installします。
Gemfilegroup :development do gem 'rubocop-airbnb' endRubocop-airbnbを適用させるアプリファイルに、rubocop.ymlとrubocop-airbnb.ymlを作成し、それぞれ内容を記載
rubocop.ymlの内容は必要に応じて適宜変更してください。
rubocop.ymlinherit_from: - .rubocop_airbnb.yml # Rails用に最適化 Rails: Enabled: true # 文字数の上限を80文字から変更 LineLength: Max: 130 #rubocopで検証したくないフォルダを指定 AllCops: Exclude: - 以下省略rubocop-airbnb.ymlrequire: - rubocop-airbnb実行
設定が完了したら、
bundle exec rubocop --require rubocop-airbnbで実行します。以上で終了です。
- 投稿日:2019-02-11T16:41:54+09:00
rails options_from_collection_for_select
初めに
collection_check_boxesと似た感じで使えるのに
options_from_collectoin_for_selectというヘルパーメソッドがありました。
これは名前からわかるようにselectタグを使うときのメソッドで
例えば既存のタグの名前からセレクトタグを自動的に生成するやつです。
使い方
まずrails guidesにはoptions_from_collection_for_selectは
collectionを列挙した結果をoptionタグ化した文字列を返し、呼び出しの結果をvalue_methodにオプション値として割り当て、text_methodにオプションテキストとして割り当てます。
このように書いてありました。
例のごとく一回読んだだけでは理解できません.....
またこんなことも
返されるのはoptionだけです。従って、出力結果の外側を適切なHTML selectタグで囲む必要があります。
要は
<%= options_from_collection_for_select(:tag_ids, Tag.all, :id, :name) do |tag| %>
.....
<% end %>
みたいな使い方をするわけではなくこのoptions_from_collection_for_selectの外側にselectを使うなら
<%= select_tag :tag_id ..... %>みたいにしなくちゃいけない
実際の使い方としては
<%= select_tag :tag_id,
           options_from_collection_for_select(Tag.all, :id, :name, params[:tag_id]),
           {
                       prompt: 'タグで絞り込み',
                       class: 'form-control select_css_tag',
           }
%>
みたいな感じ
実際に使ってみる
rails g model article title
rails g model tag name
rails g model article_tags article:references tag:references
rails db:migrate
rails g controller articles
routesの設定はresourcesを使用
modelの設定は基本的な多対多の設定をする
controllerは
articles_controller.rbclass ArticlesController < ApplicationController def index @articles = Article.all end def new @article = Article.new end def create article = Article.new(article_params) tag = Tag.find(params[:tag_id]) if article.save article.tags << tag redirect_to articles_path else render :new end end private def article_params params.require(:article).permit(:title,:tag_id) end endまずcreateではarticleを保存してそのあと
article.tags << tagでarticle_tagsを作成しています。
viewは
<%= form_with model: @article, local: true do |f| %>
    <%= f.label :title %>
    <%= f.text_field :title %>

    <%= select_tag :tag_id,
         options_from_collection_for_select(Tag.all, :id, :name, params[:tag_id]),
            {
                prompt: 'タグを選択',
            }
    %>
    <%= f.submit %>
<% end %>
こんな感じ
ちなみに複数の値を保存できるようにしたい場合はこんな感じにmultiple: trueを指定してあげればよいです
<%= form_with model: @article, local: true do |f| %>
    <%= f.label :title %>
    <%= f.text_field :title %>

    <%= select_tag :tag_id,
         options_from_collection_for_select(Tag.all, :id, :name, params[:tag_id]),
            {
                prompt: 'タグを選択',
                multiple: true
            }
    %>
    <%= f.submit %>
<% end %>
これで複数保存できるようになります。
発見
これを作ってるときに気づいたんですけど
select_tagでmultipleがtrueのときはparams[:tag_id]が配列で来るんですけど
controllerのcreateアクションが
def create
    @article = Article.new(article_params)
    @tag = Tag.find(params[:tag_id])
    if @article.save
      @article.tags << @tag
      redirect_to articles_path
    else
      render :new
    end
  end
このままでも複数個を保存することができました。
binding.pryで調べてみたところ
Tag.find(params[:tag_id])
のところでtag_idが["1", "2"]となっているときに
    10: def create
    11:   @article = Article.new(article_params)
    12:   @tag = Tag.find(params[:tag_id])
    13:   binding.pry
 => 14:   if @article.save
    15:     @article.tags << @tag
    16:     redirect_to articles_path
    17:   else
    18:     render :new
    19:   end
    20: end

[1] pry(#<ArticlesController>)> @tag
=> [#<Tag:0x00007f36182a6d90
  id: 1,
  name: "Ruby",
  created_at: Mon, 11 Feb 2019 06:35:46 UTC +00:00,
  updated_at: Mon, 11 Feb 2019 06:35:46 UTC +00:00,
  article_id: nil>,
 #<Tag:0x00007f36182a6c50
  id: 2,
  name: "Ruby on Rails",
  created_at: Mon, 11 Feb 2019 06:35:58 UTC +00:00,
  updated_at: Mon, 11 Feb 2019 06:35:58 UTC +00:00,
  article_id: nil>]
[2] pry(#<ArticlesController>)>
こんな感じでちゃんとすべて取れてるんですよね。
Model.findって一個しか取ってこれないと思っていたので大発見でした。
またこれは基本的なことなのかもしてないですが@tagが配列の時
@article.tags << @tagも問題なく動いてくれるんですね
普通ならループ作って
@tag.each do |tag|
  @article.tags << tag
end
としてしまいます。
おわり
- 投稿日:2019-02-11T16:05:58+09:00
rails チェックボックスを自動的に作る collection_check_boxes
初めに
collection_check_boxesというとても便利なものがあると知ったので使ってみました。
例えばカテゴリを選択する際に既に登録されているカテゴリからチェックボックスで選択する場合に使える
使い方
collection_check_boxesについてはrails guidesで
objectが属するクラスのmethodの既存の戻り値をコレクションにしたcheck_boxタグを返します。
だそうです。
使い方としては
<%= collection_check_boxes(:article, :tag_ids, Tag.all, :id, :name) do |tag| %>

  <%= tag.label do %>
    <%= tag.check_box %>
    <%= tag.text %>
  <% end %>

<% end %>
みたいな感じで使えます。
これで既存のタグのチェックボックスが作られます。
実際に使ってみる
まず
rails new qiita_collection_check_boxes

rails g model article title
rails g model tag name
rails g model article_tags article:references tag:references
rails db:migrate

rails g controller articles
みたいにする
rails routes.rbを
resources :articlesとして
articles_controllerを
class ArticlesController < ApplicationController
  def index
    @articles = Article.all
  end

  def new
    @article = Article.new
  end

  def create
    @article = Article.new(article_params)
    if @article.save
      redirect_to articles_path
    else
      render :new
    end
  end

  private

  def article_params
    params.require(:article).permit(:title, tag_ids: [])
  end
end
こんな感じにする。
ここで重要なのがストロングパラメータの
tag_ids: []のところ
いまいち仕組みが分かっていないんですがcollection_check_boxesでtag_idsを取得してそれが複数の可能性があるから配列にしています。
ただなんでこれで自動的に中間テーブルの作成を行ってくれるのかはわかりません。
ですがとりあえずこれで中間テーブルまで自動的に作成されます。
modelファイルはこんな感じ
article_tag.rbclass ArticleTag < ApplicationRecord belongs_to :article belongs_to :tag endarticle.rbclass Article < ApplicationRecord has_many :article_tags has_many :tags, through: :article_tags endtag.rbclass Tag < ApplicationRecord has_many :article_tags has_many :articles, through: :article_tags endこれでOK
後はviewを作るのみ
new.html.erb<%= form_with model: @article, local: true do |f| %> <%= f.label :title %> <%= f.text_field :title %> <%= collection_check_boxes(:article, :tag_ids, Tag.all, :id, :name) do |tag| %> <%= tag.label do %> <%= tag.check_box %> <%= tag.text %> <% end %> <% end %> <%= f.submit %> <% end %>collection_check_boxesは
objectが属するクラスのmethodの既存の戻り値をコレクションにしたcheck_boxタグを返します。
ということでしたが
Tag.allをしてその一つ一つのid,nameというメソッドの戻り値を取得しています。
tag.labelの中にtag.textと書いていますがこれがtag.nameではうまく動きません。
このあたりもいまいち仕組みが分かってません。
ですがこれで実行すると
こんな感じで既存のタグが出てきてくれます。
おわり

- 投稿日:2019-02-11T15:40:01+09:00
Railsチュートリアル2章 学習ログ
続きです
Railsチュートリアル1章 学習ログ
https://qiita.com/KoDoKu77/items/12c1e7197ba69044b1aaScaffoldでなんやかんや
micropostsモデルを作った後でビューを確認していたら、変なフィールドができてしまいました。
schema.rbcreate_table "microposts", force: :cascade do |t| t.text "content" t.string "user_id" t.string "integer" t.datetime "created_at", null: false t.datetime "updated_at", null: false endinteger型を指定したつもりが、intergerというカラムを作ってしまっています...
どうやら、scaffoldで間違った引数を与えてしまったようです。rails g scaffold Micropost content:text user_id: integer空白一つ開けちゃってますね...
マイグレーションファイルを作って、間違った部分を修正します。$ rails g migration change_microposts_columnxxxxx_change_microposts_column.rbclass ChangeMicropostsColumn < ActiveRecord::Migration[5.1] def change change_column(:microposts, :user_id, integer) remove_column(:microposts, :integer) end enduser_idカラムの型をinteger型へ変更し、
integerというカラムを削除します。$ rails db:migrateマイグレーションを実行して、テーブルを変更します。
schema.rbcreate_table "microposts", force: :cascade do |t| t.text "content" t.integer "user_id" t.datetime "created_at", null: false t.datetime "updated_at", null: false end上手くいきました。
その他、各ビューを修正。Herokuへデプロイ

- 投稿日:2019-02-11T14:49:10+09:00
ActionCableで正しく実装してみた
緒言
ActionCableのサンプルはWeb上にたくさんあります。しかし、私は正しく動いているサンプルを見たことがありません。陥りがちなケースとしては次の二つがあります。
- Chatroom1において送信されたメッセージがChatroom1だけでなくChatroom2やChatroom3にまで送信される。
- Broadcastをbefore_saveコールバックで呼び出しているため、seedでデータを連続的に生成できない。
なのでしっかりと動くように実装しました。
方法
ここで紹介するサンプルでは上に2つを解決しました。1からサンプルを作るのが面倒だったのでHerokuのサンプルを改造しました。修正点はRailsとJavaScriptがわかる人ならコードを見ればすぐわかると思います。詳しくはサンプルのREADMEを見てください。つたない英語で書きました。英語のWritingはあまり得意ではないので勘弁してください。
参考文献
- 投稿日:2019-02-11T14:44:55+09:00
RailsとElasticsearchで検索機能をつくり色々試してみる - その1:サンプルアプリケーションの作成
はじめに
RailsアプリケーションでElasticsearchを使った検索機能を実装する機会があったため、その際に調査して試したことなどを複数回に分けてまとめていく予定です。
その1としてdocker-composeを使ったローカル環境構築と簡単な検索ができるサンプルアプリケーションを作成していきます。
その2以降で検索機能のカスタマイズや実運用を想定した実装などもう少し掘り下げたところを書いていく予定です。サンプルアプリケーション
登録した漫画の情報を検索して表示するアプリケーションを作成していきます。
環境
- Ruby 2.5.3
- Rails 5.2.2
- Mysql 5.7
- Elatsticsearch 6.5.4
- Kibana 6.5.4
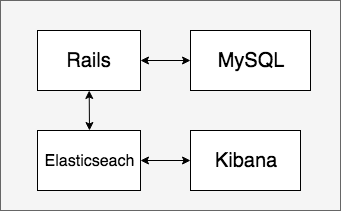
構成
docker-composeを使ってローカル環境を作成します。
Rails:アプリケーション本体
Mysql:データの永続化
Elasticsearch:検索で使用
Kibana:アプリケーションそのものとは無関係(Elasticsearchで色々試すときに使う)Rails newまでの流れ
docker-composeを使って環境をつくりRailsとElasticsearchを起動するまでの流れを書いていきます。(本題とはあまり関係ないので不要な人は読み飛ばしてください)
docker-compose.yml
プロジェクトのルートに以下のようにファイルを置きます。
. ├── Dockerfile ├── docker │ ├── es │ │ └── Dockerfile │ └── mysql │ └── my.cnf └── docker-compose.ymldocker-compose.ymlversion: '3' services: # Elasticsearch用のコンテナ es: build: ./docker/es container_name: es_sample environment: - cluster.name=rails-sample-cluster - bootstrap.memory_lock=true - "ES_JAVA_OPTS=-Xms512m -Xmx512m" ulimits: memlock: soft: -1 hard: -1 volumes: - es_sample_data:/usr/share/elasticsearch/data ports: - 9200:9200 # Kibana用のコンテナ kibana: image: docker.elastic.co/kibana/kibana:6.5.4 environment: SERVER_NAME: localhost:5601 ELASTICSEARCH_URL: http://es_sample:9200 ports: - 5601:5601 depends_on: - es # MYSQL用のコンテナ db: environment: - MYSQL_ROOT_PASSWORD=docker - MYSQL_PASSWORD=docker - MYSQL_USER=docker - MYSQL_DATABASE=rails_es_sample build: ./docker/mysql ports: - "3306:3306" # Rails用のコンテナ rails: build: . # 必要であればshなどに bundle install や rails s を実行してrailsを起動する処理を書く # command: scripts/start-server.sh volumes: - .:/app # 公式のDockerfile(ruby:2.5.3-stretch)では環境変数のBUNDLE_APP_CONFIGがデフォルトで # /usr/local/bundleに設定されているため、dockerのローカルvolumeでマウントしてそこにgemを入れている - vendor_bundle:/user/local/bundle ports: - "3003:3000" links: - db - es environment: - RAILS_DATABASE_USERNAME=root - RAILS_DATABASE_PASSWORD=docker - RAILS_DATABASE_NAME=rails_es_sample - RAILS_DATABASE_HOST=db tty: true stdin_open: true volumes: es_sample_data: driver: local vendor_bundle: driver: local./DockerfileFROM ruby:2.5.3-stretch ENV BUNDLE_GEMFILE=/app/Gemfile \ BUNDLE_JOBS=2 \ RAILS_ENV=development \ LANG=C.UTF-8 RUN apt-get update -qq RUN apt-get install -y build-essential RUN apt-get install -y libpq-dev RUN apt-get install -y nodejs # ワーキングディレクトリの設定 RUN mkdir /app WORKDIR /appdocker/es/Dockerfile# ElasticDocker FROM docker.elastic.co/elasticsearch/elasticsearch:6.5.4 # 日本語をあつかうときに使うプラグイン RUN bin/elasticsearch-plugin install analysis-kuromoji
./docker/mysql/my.cnfは本題ではないの割愛します。
一応こちらにのせておきます。imageのbuildと起動
# imageのbuildと起動
$ docker-compose up -d

# 起動確認
$ docker-compose ps
          Name                        Command               State                 Ports
-----------------------------------------------------------------------------------------------------
es_sample                  /usr/local/bin/docker-entr ...   Up      0.0.0.0:9200->9200/tcp, 9300/tcp
rails_es_sample_db_1       docker-entrypoint.sh mysqld      Up      0.0.0.0:3306->3306/tcp, 33060/tcp
rails_es_sample_kibana_1   /usr/local/bin/kibana-docker     Up      0.0.0.0:5601->5601/tcp
rails_es_sample_rails_1    irb                              Up      0.0.0.0:3003->3000/tcp
rails new
コンテナに入りrailsプロジェクトを作成していきます
# コンテナに入る
# 「rails_es_sample_rails_1」 は docker-compose ps の Name
$ docker exec -it rails_es_sample_rails_1 /bin/bash

# コンテナ内で実行
/app# bundle init
gemファイルを編集
./Gemfile# frozen_string_literal: true source "https://rubygems.org" git_source(:github) {|repo_name| "https://github.com/#{repo_name}" } # railsがコメントアウトされているので外す gem "rails"Railsのインストールとプロジェクト作成
# railsのコンテナ内
/app# bundle install
/app# bundle exec rails new .

# 以下のようにgemfileを上書きするか聞かれますが、まだ何も追加していない状態なので「Y」で上書き
# Overwrite /app/Gemfile? (enter "h" for help) [Ynaqdhm]
mysql用の設定
mysqlのアダプタ追加
Gemfile# gem 'sqlite3' gem 'mysql2'/app# bundle installdatabase.ymlがデフォルトのままになっているため修正
config/database.ymldefault: &default adapter: mysql2 encoding: utf8 pool: <%= ENV.fetch("RAILS_MAX_THREADS") { 5 } %> username: root password: docker host: db development: <<: *default database: rails_es_samplerails起動
/app# bundle exec rails s起動確認
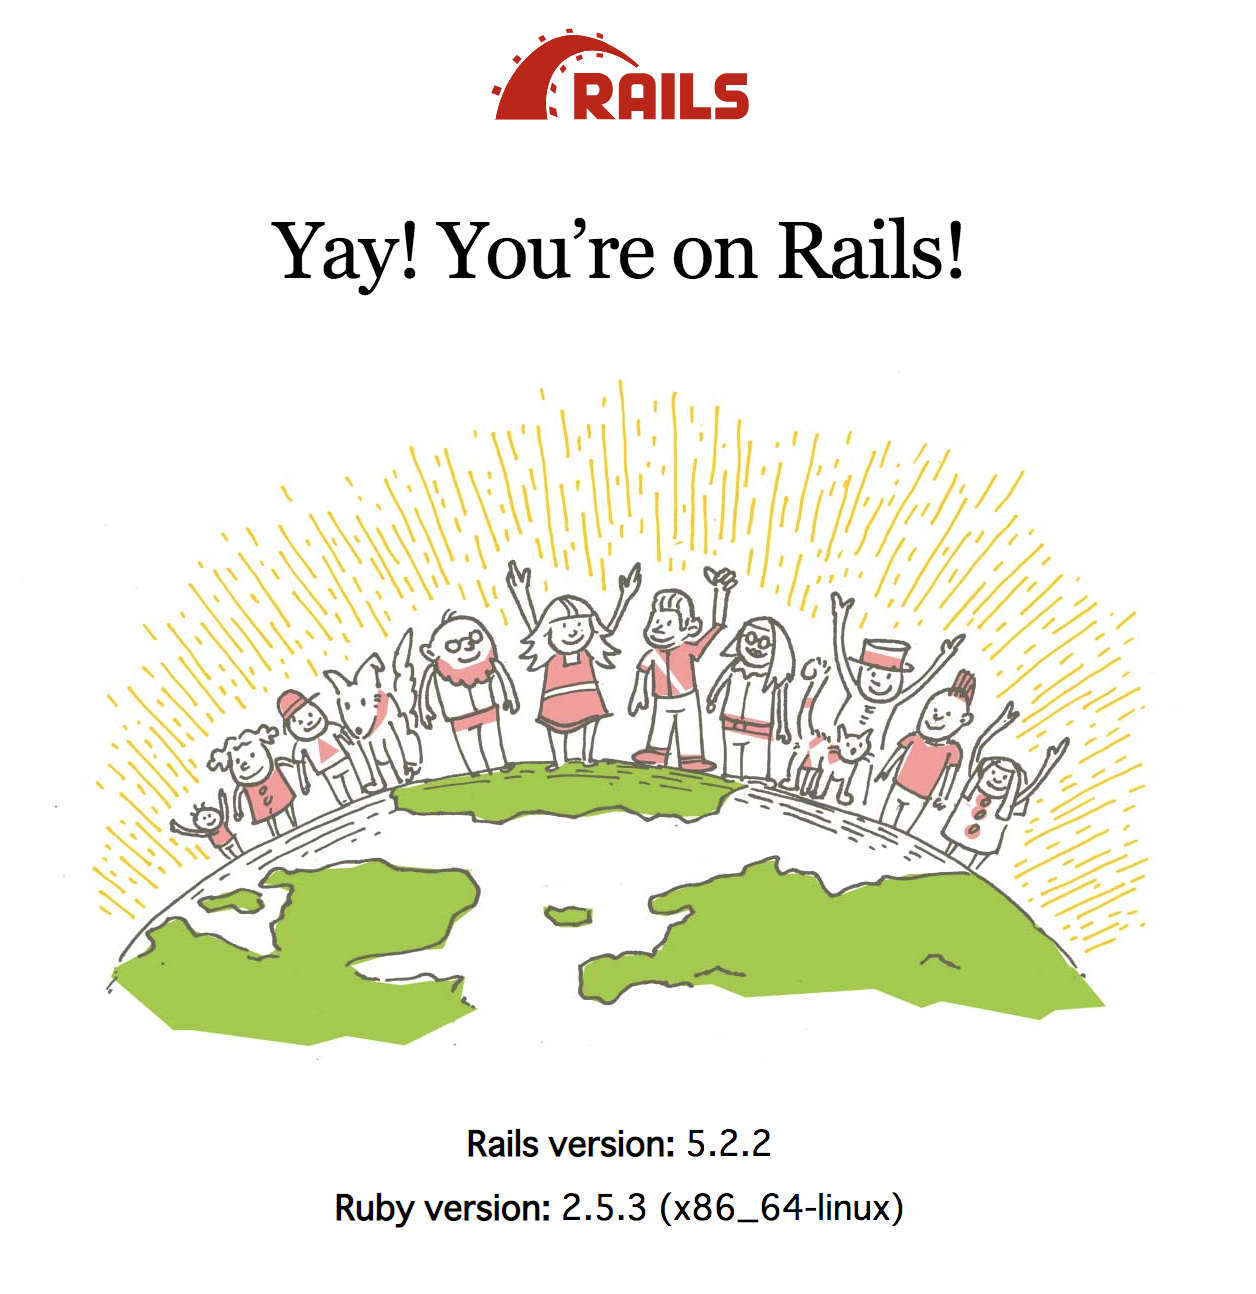
rails
ブラウザで
http://localhost:3003/にアクセスして、いつものやつが表示されることを確認
Elasticsearch
$ curl -XGET http://localhost:9200/
# 以下のようなクラスターやversionの情報が返ればOK
{
  "name" : "338gbNM",
  "cluster_name" : "rails-sample-cluster",
  "cluster_uuid" : "HphoN9CyQcmWeruBOQr1oQ",
  "version" : {
    "number" : "6.5.4",
    "build_flavor" : "default",
    "build_type" : "tar",
    "build_hash" : "d2ef93d",
    "build_date" : "2018-12-17T21:17:40.758843Z",
    "build_snapshot" : false,
    "lucene_version" : "7.5.0",
    "minimum_wire_compatibility_version" : "5.6.0",
    "minimum_index_compatibility_version" : "5.0.0"
  },
  "tagline" : "You Know, for Search"
}
kibana
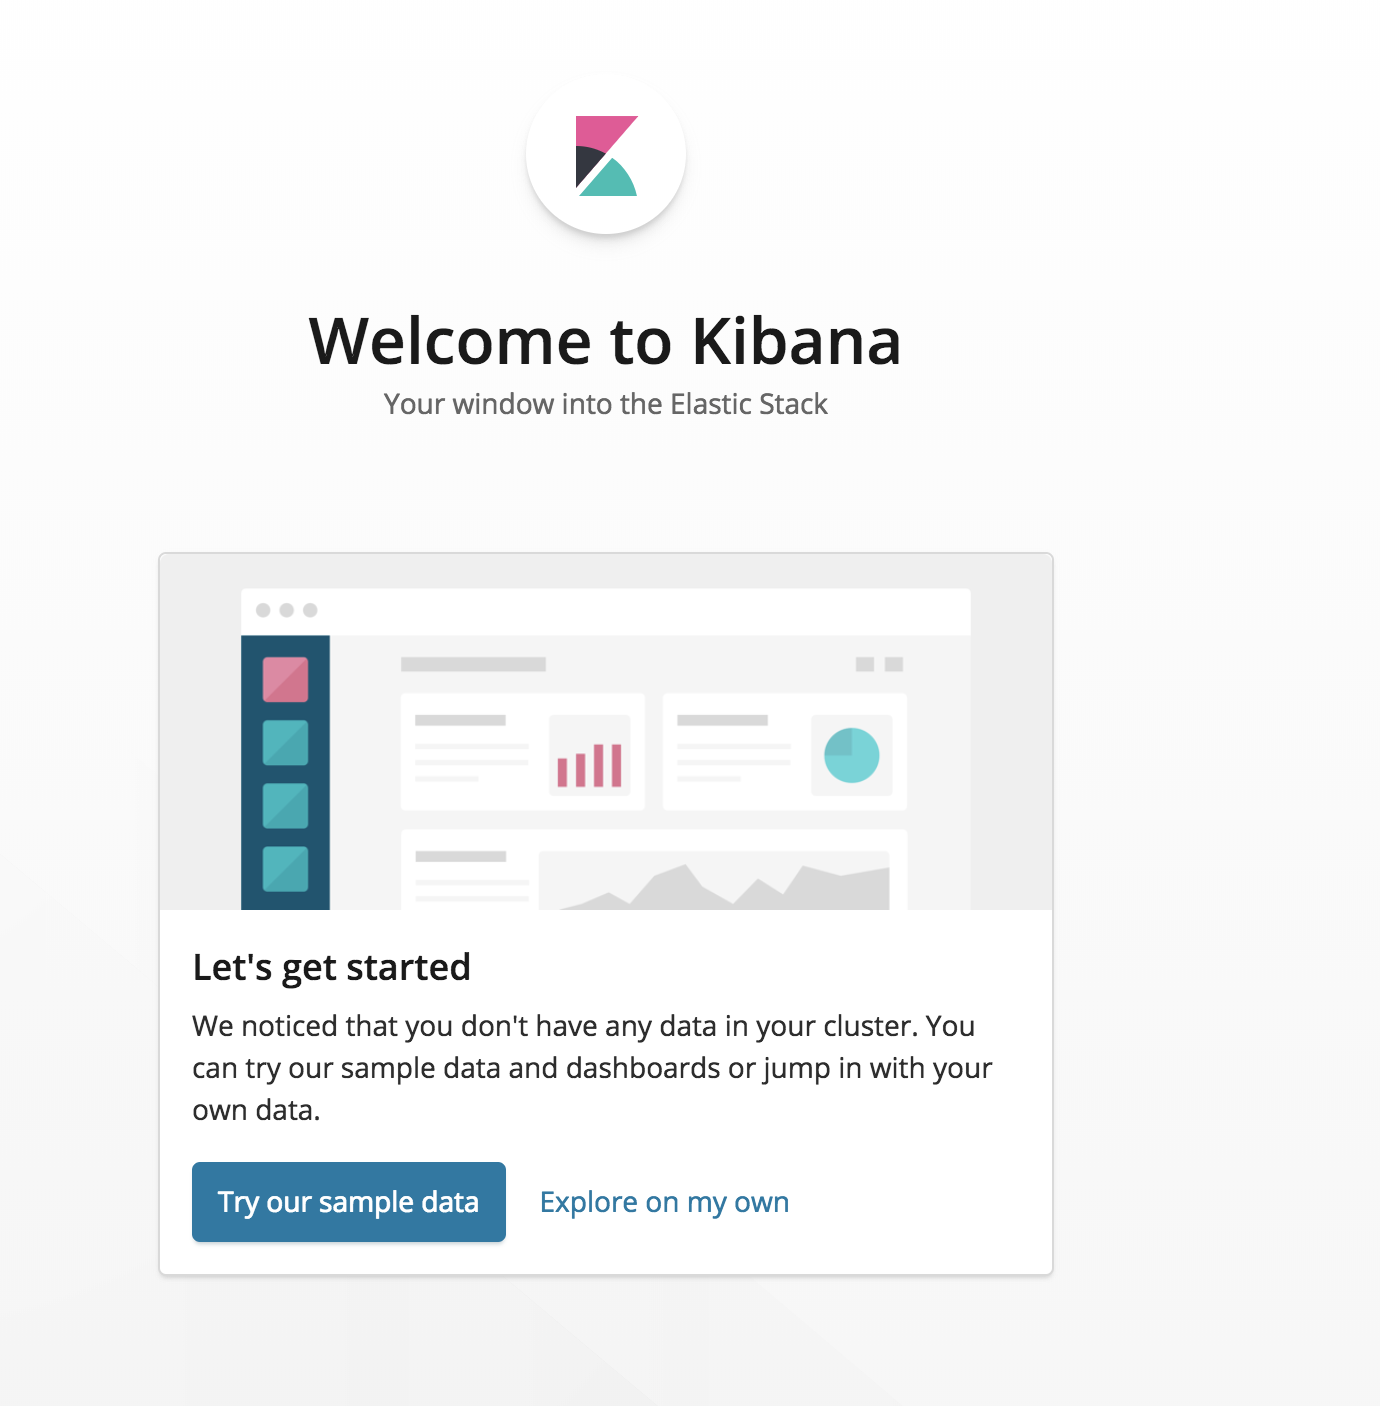
ブラウザで
http://localhost:5601/app/kibanaにアクセスして以下のような画面が表示されればOK
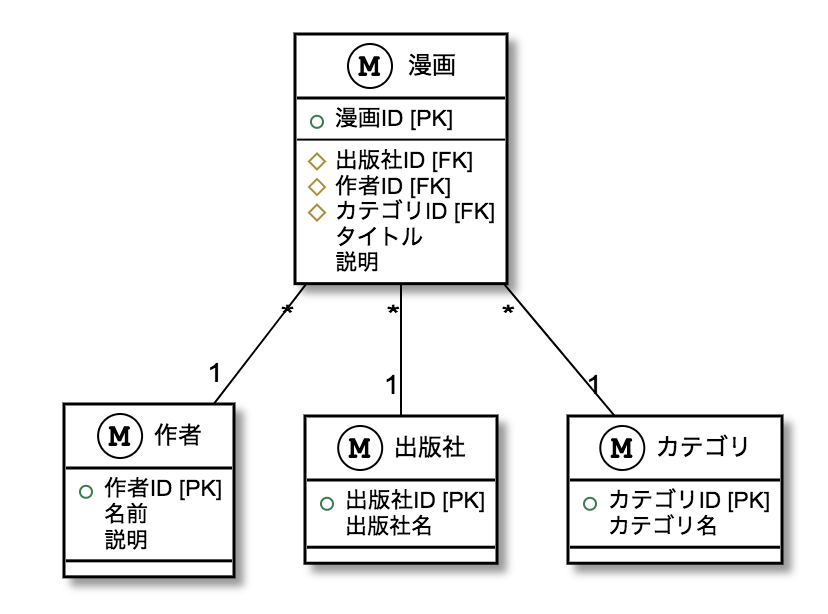
ER図
環境は整ったのでサンプルアプリケーションの作成に入っていきます。
ER図ように漫画の情報と関連する作者、出版社、カテゴリを格納するテーブルをを作成していきます。
モデルとテーブルの作成
migrationファイルを作成していきます。
# migrationファイルの作成
/app# bundle exec rails g model author name:string
/app# bundle exec rails g model publisher name:string
/app# bundle exec rails g model category name:string
/app# bundle exec rails g model manga author:references publisher:references category:references title:string description:text

# テーブルの作成
/app# bundle exec rails db:migrate
データの準備
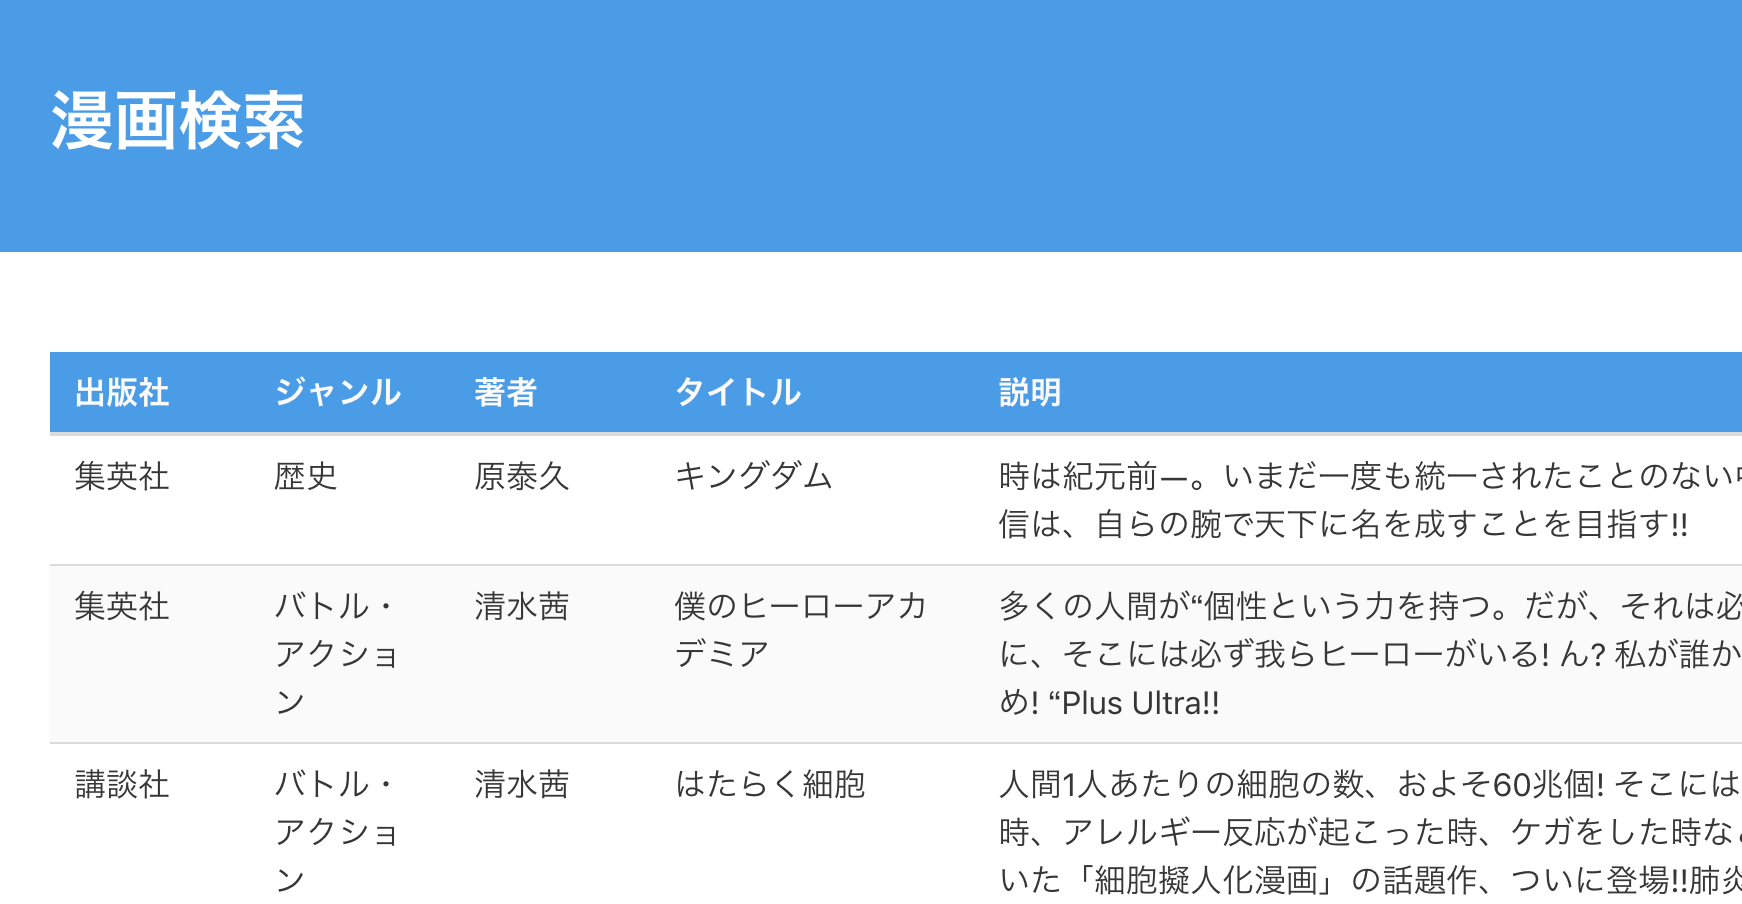
db/seeds.rbにデータを準備をしていきます。(追加するデータのサンプルをこちら)/app# db/seeds.rbを修正後に実行 bundle exec rails db:seedコントローラ、ビュー、ルーティングの追加
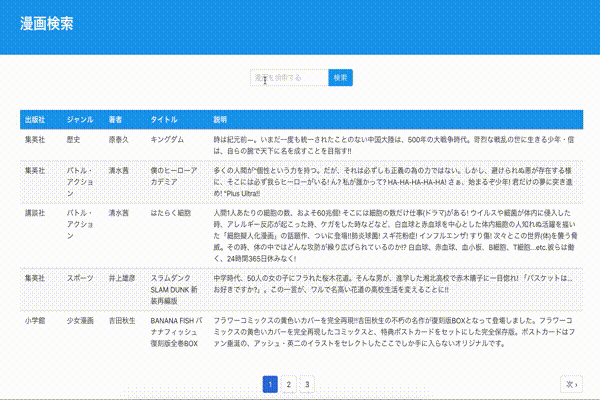
rails gでファイルを作成して修正していきます。/app# bundle exec rails g controller Mangas index --helper=false --assets=falseapp/controllers/mangas_controller.rbclass MangasController < ApplicationController def index @mangas = Manga.all end endconfig/routes.rbRails.application.routes.draw do resources :mangas, only: %i(index) endapp/views/mangas/index.html.erb<h1>Mangas</h1> <table> <thead> <tr> <th>Aauthor</th> <th>Publisher</th> <th>Category</th> <th>Author</th> <th>Title</th> <th>Description</th> <th colspan="3"></th> </tr> </thead> <tbody> <% @mangas.each do |manga| %> <tr> <td><%= manga.author.name %></td> <td><%= manga.publisher.name %></td> <td><%= manga.category.name %></td> <td><%= manga.author.name %></td> <td><%= manga.title %></td> <td><%= manga.description %></td> </tr> <% end %> </tbody> </table>Bulmaを使ったスタイルの修正
この時点で、
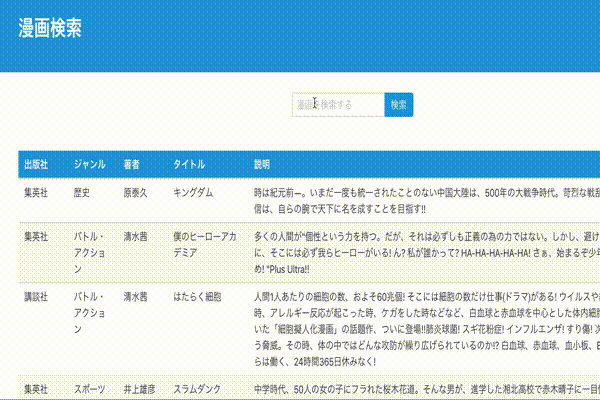
http://localhost:3003/mangasにアクセスすると登録したデータがリスト表示されるようになりますが、見た目がしょぼいので、BulmaというCSSフレームワークを使って少し見た目を整えます。Gem追加
gemを追加して
bundle installGemfilegem "bulma-rails", "~> 0.7.2"css -> scssに変更して、bulmaをimportする
app/assets/stylesheets/application.scss/ *= require_tree . *= require_self */ @import "bulma";styleの調整
修正後はこんな感じです。
Elasticsearch用のgem追加
前置きが長くなってしまいましたがここからElasticsearch関連の修正を加えていきます。
elasticの公式リポジトリにあるgemを使っていきます。
gem 'elasticsearch-model', github: 'elasticsearch/elasticsearch-rails', branch: '6.x'
gem 'elasticsearch-rails', github: 'elasticsearch/elasticsearch-rails', branch: '6.x'
elasticsearch-model
include Elasticsearch::Modelをモデルに追加することで様々なメソッドが使えるようになります。
ドキュメントelasticsearch-rails
Elasticsearchを使うためのrakeタスクやloggerのカスタマイズ、templateの提供などができるようです。
ドキュメントconfig設定
接続先の情報を設定します。
config/initializers/elasticsearch.rb# 「es」はdocker-composeのservicesに設定した名前 config = { host: ENV['ELASTICSEARCH_HOST'] || "es:9200/", } Elasticsearch::Model.client = Elasticsearch::Client.new(config)concernsの追加
Elasticsearch関連の処理をまとめるconcernを作成していきます。
concernのファイルを作成しmodelでincludeするようにします。
app/models/manga.rbclass Manga < ApplicationRecord include MangaSearchable belongs_to :author belongs_to :publisher belongs_to :category endapp/models/concerns/manga_searchable.rbmodule MangaSearchable extend ActiveSupport::Concern included do include Elasticsearch::Model # ①index名 index_name "es_manga_#{Rails.env}" # ②マッピング情報 settings do mappings dynamic: 'false' do indexes :id, type: 'integer' indexes :publisher, type: 'keyword' indexes :author, type: 'keyword' indexes :category, type: 'text', analyzer: 'kuromoji' indexes :title, type: 'text', analyzer: 'kuromoji' indexes :description, type: 'text', analyzer: 'kuromoji' end end # ③mappingの定義に合わせてindexするドキュメントの情報を生成する def as_indexed_json(*) attributes .symbolize_keys .slice(:id, :title, :description) .merge(publisher: publisher_name, author: author_name, category: category_name) end end def publisher_name publisher.name end def author_name author.name end def category_name category.name end class_methods do # ④indexを作成するメソッド def create_index! client = __elasticsearch__.client # すでにindexを作成済みの場合は削除する client.indices.delete index: self.index_name rescue nil # indexを作成する client.indices.create(index: self.index_name, body: { settings: self.settings.to_hash, mappings: self.mappings.to_hash }) end end end①index名を設定します。誤った操作防止のため環境名を含めるようにしています。
②登録していくドキュメントのマッピング情報を定義しています。ここでフィールドのタイプや、使用するアナライザーなどを指定できます。また、settingsの情報も定義できますが、今回の例ではデフォルトのままとしています。
③モデルの情報を登録するために、mappingで定義した情報に合わせてjsonに変換するためのメソッドです。
④indexを作成するメソッド。作成済みの場合は再作成するように一度削除処理を入れています。
動作確認
Elasticsearch::Modelをincudeすることでgemに追加されたメソッドなどが使えるようになります。
コンソールで動きを確認してみます。Elasticsearchとの接続確認
pry(main)> Manga.__elasticsearch__.client.cluster.health
=> {"cluster_name"=>"rails-sample-cluster",
 "status"=>"green",
 "timed_out"=>false,
 "number_of_nodes"=>1,
 "number_of_data_nodes"=>1,
 "active_primary_shards"=>1,
 "active_shards"=>1,
 "relocating_shards"=>0,
 "initializing_shards"=>0,
 "unassigned_shards"=>0,
 "delayed_unassigned_shards"=>0,
 "number_of_pending_tasks"=>0,
 "number_of_in_flight_fetch"=>0,
 "task_max_waiting_in_queue_millis"=>0,
 "active_shards_percent_as_number"=>100.0}
[5] pry(main)>
indexの作成
pry(main)> Manga.create_index!
=> {"acknowledged"=>true, "shards_acknowledged"=>true, "index"=>"es_manga_development"}
データの登録
importメソッドでmodelの情報を登録します。さきほど追加した
as_indexed_jsonの形式に変換してデータが登録されるます。pry(main)> Manga.__elasticsearch__.import (5.5ms) SET NAMES utf8, @@SESSION.sql_mode = CONCAT(CONCAT(@@sql_mode, ',STRICT_ALL_TABLES'), ',NO_AUTO_VALUE_ON_ZERO'), @@SESSION.sql_auto_is_null = 0, @@SESSION.wait_timeout = 2147483 Manga Load (3.0ms) SELECT `mangas`.* FROM `mangas` ORDER BY `mangas`.`id` ASC LIMIT 1000 Publisher Load (3.3ms) SELECT `publishers`.* FROM `publishers` WHERE `publishers`.`id` = 1 LIMIT 1 Author Load (0.5ms) SELECT `authors`.* FROM `authors` WHERE `authors`.`id` = 1 LIMIT 1検索機能の追加
Elasticsearchとの接続確認やデータの登録が完了したので、次は検索機能をつくっていきます。
検索用のメソッド追加
concernに検索用のメソッドを追加します。今回の例では複数のフィールドのいずれかにマッチするものを検索できるように、
multi_matchとcross_fieldsを指定しています。指定できるクエリなどはドキュメントに詳しくのっています。class_methods do # ... def es_search(query) __elasticsearch__.search({ query: { multi_match: { fields: %w(id publisher author category title description), type: 'cross_fields', query: query, operator: 'and' } } }) end end endcontrollerの修正
search_wordというパラメータを受けとってさきほど作成したes_searchメソッドで検索します。検索ワードが空の場合は全てのデータを取得します。
app/controllers/mangas_controller.rbclass MangasController < ApplicationController def index @mangas = if search_word.present? Manga.es_search(search_word).records else Manga.all end end private def search_word @search_word ||= params[:search_word] end endviewの修正
検索窓を追加します。
app/views/mangas/index.html.erb// ... </div> </div> </section> // ヘッダーとテーブルの間に検索窓を追加 <div class="container" style="margin-top: 30px"> <%= form_tag(mangas_path, method: :get, class: "field has-addons has-addons-centered") do %> <div class="control"> <%= text_field_tag :search_word, @search_word, class: "input", placeholder: "漫画を検索する" %> </div> <div class="control"> <%= submit_tag "検索", class: "button is-info" %> </div> <% end %> </div> <div class="container" style="margin-top: 50px"> <table class="table is-striped is-hoverable"> // ...動作確認
ページネーション
とりあえず検索は動くようになりましたが検索結果のデータを全て表示するのは微妙なので、ページネーションを追加していきます。
gem追加
Gemfilegem 'kaminari'注意点としてはElasticsearchのgemよりも上に追加する必要があります
https://github.com/elastic/elasticsearch-rails/tree/master/elasticsearch-model#paginationThe pagination gems must be added before the Elasticsearch gems in your Gemfile, or loaded first in your application.
コントローラ修正
Elasticsearchからのresponseに
pageとperを追加します。またElasticsearchを経由しない検索の場合にも追加します。app/controllers/mangas_controller.rbdef index @mangas = if search_word.present? Manga.es_search(search_word).page(params[:page] || 1).per(5).records else Manga.page(params[:page] || 1).per(5) end endviewの修正
bulmaのスタイルを適用できるようにkaminariのテンプレートを作成します。
/app# bundle exec rails g kaminari:views defaultを実行すると
app/views/kaminari以下にファイルが作成されるので、これらのファイルを修正していきます。
細かい修正が多いので割愛しますが、修正版はこちらにのせておきます。まとめ
少し長くなりましたが、docker-composeで環境をつくってrails newするところからElasticsearchで検索を行うサンプルアプリケーションを作成しました。
とりあえず動くものはできたという段階なので、次回はもう少し掘り下げたところを書いていきたいと思います。
- 投稿日:2019-02-11T14:44:38+09:00
[Devise] パスワードを入力せずにユーザー情報を編集する
はじめに
deviseを使ってユーザーの登録情報を編集する際にデフォルトのままだと
パスワードの入力を求められます。しかし、一々ユーザーにパスワードの入力を
求めるのはユーザーフレンドリーではないので、修正していきます。環境
ruby 2.5.3
rails 5.2.2
devise 4.6.0Deviseを使う準備
アプリの作成
rails new devisedeviseのインストール
GEMFILEgem 'devise'上記を追加したら
bundle installします。
次に、deviseのファイルを生成します。rails generate devise:installすると、次のメッセージが表示されますのでとりあえず
下記のメッセージ1~4の通りにセットアップしてみましょう。Running via Spring preloader in process 3919 create config/initializers/devise.rb create config/locales/devise.en.yml =============================================================================== Some setup you must do manually if you haven't yet: 1. Ensure you have defined default url options in your environments files. Here is an example of default_url_options appropriate for a development environment in config/environments/development.rb: config.action_mailer.default_url_options = { host: 'localhost', port: 3000 } In production, :host should be set to the actual host of your application. 2. Ensure you have defined root_url to *something* in your config/routes.rb. For example: root to: "home#index" 3. Ensure you have flash messages in app/views/layouts/application.html.erb. For example: <p class="notice"><%= notice %></p> <p class="alert"><%= alert %></p> 4. You can copy Devise views (for customization) to your app by running: rails g devise:views ===============================================================================セットアップ
(1)
config/environments/development.rb# 追記する config.action_mailer.default_url_options = { host: 'localhost', port: 3000 }(2)
localhost:3000/にアクセスした時のページの設定を行います。
今のままだと何もページが作成されていないので、ここではPagesControllerを作ります。ターミナルrails generate controller Pages indexroutes.rb# get 'pages/index' root 'pages#index'これでrootパスの設定は完了です。
(3)
フラッシュメッセージを表示するようにviewを修正します。application.html.erb<body> <p class="notice"><%= notice %></p> <p class="alert"><%= alert %></p> <%= yield %> </body>とりあえずこれでいいでしょう。
(4)
deviseのviewをカスタマイズするには以下のコマンドを実行して
viewファイルを作成する必要があります。rails generate devise:viewsRunning via Spring preloader in process 4256 invoke Devise::Generators::SharedViewsGenerator create app/views/devise/shared create app/views/devise/shared/_error_messages.html.erb create app/views/devise/shared/_links.html.erb invoke form_for create app/views/devise/confirmations create app/views/devise/confirmations/new.html.erb create app/views/devise/passwords create app/views/devise/passwords/edit.html.erb create app/views/devise/passwords/new.html.erb create app/views/devise/registrations create app/views/devise/registrations/edit.html.erb create app/views/devise/registrations/new.html.erb create app/views/devise/sessions create app/views/devise/sessions/new.html.erb create app/views/devise/unlocks create app/views/devise/unlocks/new.html.erb invoke erb create app/views/devise/mailer create app/views/devise/mailer/confirmation_instructions.html.erb create app/views/devise/mailer/email_changed.html.erb create app/views/devise/mailer/password_change.html.erb create app/views/devise/mailer/reset_password_instructions.html.erb create app/views/devise/mailer/unlock_instructions.html.erbこれでセットアップは完了です。
モデルの作成
登録情報を編集するユーザーを作成していきます。
まず、次のコマンドを実行します。rails generate devise UserRunning via Spring preloader in process 4296 invoke active_record create db/migrate/20190211043147_devise_create_users.rb create app/models/user.rb invoke test_unit create test/models/user_test.rb create test/fixtures/users.yml insert app/models/user.rb route devise_for :usersモデルとマイグレーションファイルは次のようになってます。
user.rbclass User < ApplicationRecord # Include default devise modules. Others available are: # :confirmable, :lockable, :timeoutable, :trackable and :omniauthable devise :database_authenticatable, :registerable, :recoverable, :rememberable, :validatable endmigration# frozen_string_literal: true class DeviseCreateUsers < ActiveRecord::Migration[5.2] def change create_table :users do |t| ## Database authenticatable t.string :email, null: false, default: "" t.string :encrypted_password, null: false, default: "" ## Recoverable t.string :reset_password_token t.datetime :reset_password_sent_at ## Rememberable t.datetime :remember_created_at ## Trackable # t.integer :sign_in_count, default: 0, null: false # t.datetime :current_sign_in_at # t.datetime :last_sign_in_at # t.string :current_sign_in_ip # t.string :last_sign_in_ip ## Confirmable # t.string :confirmation_token # t.datetime :confirmed_at # t.datetime :confirmation_sent_at # t.string :unconfirmed_email # Only if using reconfirmable ## Lockable # t.integer :failed_attempts, default: 0, null: false # Only if lock strategy is :failed_attempts # t.string :unlock_token # Only if unlock strategy is :email or :both # t.datetime :locked_at t.timestamps null: false end add_index :users, :email, unique: true add_index :users, :reset_password_token, unique: true # add_index :users, :confirmation_token, unique: true # add_index :users, :unlock_token, unique: true end endここでは、ユーザーのメールアドレスをパスワードの入力なしで、
変更することを目標とするので何も変更しないで、migrateします。rails db:migrateユーザー情報を登録
まず、ユーザーを登録します。
登録画面にアクセスするためにルーティングを確認しましょう。routes.rbdevise_for :user上記がdeviseのルーティングを提供しています。
rails routesPrefix Verb URI Pattern Controller#Action new_user_session GET /users/sign_in(.:format) devise/sessions#new user_session POST /users/sign_in(.:format) devise/sessions#create destroy_user_session DELETE /users/sign_out(.:format) devise/sessions#destroy new_user_password GET /users/password/new(.:format) devise/passwords#new edit_user_password GET /users/password/edit(.:format) devise/passwords#edit user_password PATCH /users/password(.:format) devise/passwords#update PUT /users/password(.:format) devise/passwords#update POST /users/password(.:format) devise/passwords#create cancel_user_registration GET /users/cancel(.:format) devise/registrations#cancel new_user_registration GET /users/sign_up(.:format) devise/registrations#new edit_user_registration GET /users/edit(.:format) devise/registrations#edit user_registration PATCH /users(.:format) devise/registrations#update PUT /users(.:format) devise/registrations#update DELETE /users(.:format) devise/registrations#destroy POST /users(.:format) devise/registrations#create root GET / pages#index rails_service_blob GET /rails/active_storage/blobs/:signed_id/*filename(.:format) active_storage/blobs#show rails_blob_representation GET /rails/active_storage/representations/:signed_blob_id/:variation_key/*filename(.:format) active_storage/representations#show rails_disk_service GET /rails/active_storage/disk/:encoded_key/*filename(.:format) active_storage/disk#show update_rails_disk_service PUT /rails/active_storage/disk/:encoded_token(.:format) active_storage/disk#update rails_direct_uploads POST /rails/active_storage/direct_uploads(.:format) active_storage/direct_uploads#createパスワードを入力せずにユーザー情報を編集する
まず、編集画面にアクセスして、パスワードを入力せずに更新すると
次のようなエラーメッセージが表示されるかと思います。Current password can't be blankこのpasswordのvalidationをスキップするためにdeviseをカスタマイズしていきます。
Controllerを生成する
deviseのcontrollerをカスタマイズするには、次のコマンドを実行して
自身のcontrollerを作成する必要があります。rails generate devise:controllers usersRunning via Spring preloader in process 4601 create app/controllers/users/confirmations_controller.rb create app/controllers/users/passwords_controller.rb create app/controllers/users/registrations_controller.rb create app/controllers/users/sessions_controller.rb create app/controllers/users/unlocks_controller.rb create app/controllers/users/omniauth_callbacks_controller.rb =============================================================================== Some setup you must do manually if you haven't yet: Ensure you have overridden routes for generated controllers in your routes.rb. For example: Rails.application.routes.draw do devise_for :users, controllers: { sessions: 'users/sessions' } end ===============================================================================routes.rbを修正する
先ほど生成したcontrollerを利用するため次のように修正してください。
routes.rbdevise_for :users, controllers: { registrations: 'users/registrations' }update_resourceメソッドをオーバーライドする
registrations_controller.rbclass RegistrationsController < Devise::RegistrationsController protected # 追記する def update_resource(resource, params) resource.update_without_password(params) end endcurrent_passwordフォームを削除する
views/devise/registrations/edit.html.erb<div class="field"> <%= f.label :current_password %> <i>(we need your current password to confirm your changes)</i><br /> <%= f.password_field :current_password, autocomplete: "current-password" %> </div>こちらのフォームを削除しましょう。
編集してみる
http://localhost:3000/users/editにアクセスして
メールアドレスを変更してみてください。
すると次のフラッシュメッセージが表示されるはずです。Your account has been updated successfully.これで、パスワードを入力しなくてもユーザーの登録情報を
編集することが可能になりました!最後に
deviseはとても便利なのですが、カスタマイズするには色々修正が必要です。
いつかdevise大辞典作りたいな〜参考
- 投稿日:2019-02-11T14:25:19+09:00
RailsのActiveRecord::FinderMethodsのSQLクエリ発行の有無について調べる
環境
Ruby 2.5
Rails 5.2.1目的
Railsでアプリケーションを書く時、このメソッドはクエリを発行するかどうか、度々調べていて、ちゃんと覚えきれていないので、ちょっと調べようと思い、まとめてみることにしました。
ActiveRecord::FinderMethodsに絞ったのは読みやすそうだなと思ったからです。思ったより長くなり完全には調べきれるには気力を消耗しすぎたので、間違っている点があればご指摘頂けると幸いです。参考
ActiveRecord::FinderMethods
Ruby on Rails APIまとめ表
記事本文はかなり長くなったので結果だけ見たい方はこちら。
(例外発生時のクエリ有無は含んでいません。)
メソッド名 一般的用途でのクエリ発行 例外的な(一般的な用途でない)クエリ発行しない条件 take 下記の場合ではクエリ発行しない。
1. loadedなインスタンスに対する、take/take!呼び出し。
2. 一度引数なしのtake/take!を呼び出したインスタンスへの、二度目のtake/take!呼び出し。exist? 基本的にはクエリ発行。 下記の場合はクエリを発行しない。(いずれもfalseが返る)
1. 引数にfalseを渡した場合
2. limit(0)をチェーンしていた場合。find 基本的にはクエリ発行。 下記の場合はクエリ発行しない。
1. loadedなのインスタンスに対して、blockつきで呼び出した場合(Enumerableのfindが呼ばれる)
2. 引数の先頭に空配列を渡した場合。(空配列が返る)find_by/find_by! 基本的にはクエリ発行。 例外的に下記の場合はクエリ発行しない。
1. loadedなインスタンスに対して、blank?がtrueになる引数を渡した場合
(ex: users.find_by(nil))first/first! 下記の場合ではクエリ発行しない。
1. loadedなインスタンスに対する、first/first!呼び出し。
2. 一度引数なしのfirst/first!を呼び出したインスタンスへの、二度目のfirst/first!呼び出し。下記の場合はクエリを発行しない。
(引数なしの場合はnilが、ありの場合は空配列が返る)
1. limit(0)をチェーンしていた場合。second/second!
third/third!
fourth!/fourth
fifth/fifth!
forty_two/forty_two!下記の場合ではクエリ発行しない。
1. loadedなインスタンスに対する、メソッド呼び出し。
2. 一度メソッドを呼び出したインスタンスへの、二度目の同一メソッド呼び出し。下記の場合はクエリを発行しない。
1. 内部で呼び出されている数値以下の引数のlimitをチェーンしていた場合。
(ex: forty_twoであれば、41以下の引数をもつlimitをチェーンしていた場合)last/last! 下記の場合ではクエリ発行しない。
1. loadedなインスタンスに対する、メソッド呼び出し。second_to_last/second_to_last!
third_to_last/third_to_last!下記の場合ではクエリ発行しない。
1. loadedなインスタンスに対する、メソッド呼び出し。ActiveRecord::FinderMethodsにはどんなメソッドがあるのか?
まず
ActiveRecord::FinderMethodsにどんなメソッドがあるか調べていきます。rails consoleで確認すると全部で25個のメソッドがあることがわかります。(読みやすいように並びを変更しています。)pry(main)> ActiveRecord::FinderMethods.instance_methods(false) => [:take, :take!, :exists?, :find, :find_by, :find_by!, :first, :first!, :second, :second!, :third, :third!, :fourth!, :fourth, :fifth, :fifth!, :forty_two, :forty_two!, :last, :last!, :second_to_last, :second_to_last!, :third_to_last, :third_to_last!, :raise_record_not_found_exception!] pry(main)> ActiveRecord::FinderMethods.instance_methods(false).count => 25
:raise_record_not_found_exception!は例外をあげるメソッドなので、実質24個です。ActiveRecord::Relationの
loaded?メソッド先のメソッドを一つずつ見ていこうと思うのですが、その前にActiveRecord::Relationの
loaded?メソッドについて少し触れておきます。なぜこのメソッドに触れるのかというと、クエリ発行の有無に関わる場合が多いものだからです。
loaded?メソッドはクエリ発行をし、オブジェクトを取得したかどうかを確認するメソッドです。
(参考:ActiveRecord::Relationとは一体なんなのか)
loaded?メソッドの実態は、@loadedインスタンスへのアクセサーのaliasで、@loadedのBooleanを返すものとなっています。module ActiveRecord class Relation attr_reader :table, :klass, :loaded, :predicate_builder alias :loaded? :loaded end endそれでは
@loadedにどのようにtrue/falseが設定されるかを見ていきます。まずinitialize時には、falseがセットされます。def initialize(klass, table: klass.arel_table, predicate_builder: klass.predicate_builder, values: {}) ~中略~ @loaded = false ~中略~ endその後、
loadが呼ばれるとloadedでない場合、内部的にはexec_queriesを呼び出しますが、この中で@loadedにtrueが代入されます。def load(&block) exec_queries(&block) unless loaded? self end private def exec_queries(&block) skip_query_cache_if_necessary do ~中略~ @loaded = true @records end endそのためloadedなものに対して、
loadをかけてもクエリは発行されません。一方、
reloadなどが呼ばれると内部的には、resetとloadが走りますが、resetでは@loadedにnilが代入されるので、次のloadでクエリが走り、再度@loadedにtrueが入ります。def reload reset load end def reset ~中略~ @to_sql = @arel = @loaded = @should_eager_load = nil ~中略~ endこのようにクエリ実行すべきかどうかの確認を行なっているのが
loaded?メソッドになります。それではこれから一つ一つメソッドを下記で見ていきます。
take/take!
take及びtake!メソッドは下記のようになっています。take!はtakeがnilの場合に例外をあげる以外、違いはありません。def take(limit = nil) limit ? find_take_with_limit(limit) : find_take end def take! take || raise_record_not_found_exception! end
takeは引数がある場合は、find_take_with_limitを、ない場合はfind_takeを呼んでいます。これらはどのようになっているかというと下記になります。def find_take if loaded? records.first else @take ||= limit(1).records.first end end def find_take_with_limit(limit) if loaded? records.take(limit) else limit(limit).to_a end end早速
loaded?が出てきましたね。loadedなインスタンスに対して、
・find_takeの場合は、recordsの最初のインスタンス
(records.firstはArray#firstなのでクエリ発行しない。)
・find_take_with_limitの場合は、recordsの先頭から引数個分の配列
(同じくArray#take)
を取り出すことがわかります。一方load済みでない場合は、
find_takeとfind_take_with_limitで異なります。
find_takeの場合は、@takeでキャッシュしており、キャッシュがあればそれを、ない場合はlimit(1)のクエリ発行することがわかります。
一方、find_take_with_limitの場合はいずれの場合も毎回limitを発行します。実際にテストデータで実験してみるとよくわかります。
pry(main)> users =  User.where(created_at: 2.months.ago..1.months.ago);
pry(main)> users.take;
[DEBUG] SELECT  `users`.* FROM `users` WHERE `users`.`deleted_at` IS NULL AND `users`.`created_at` BETWEEN '2018-12-10 15:04:02' AND '2019-01-10 15:04:02' LIMIT 1`
pry(main)> users.take;
pry(main)> users.take(2);
[DEBUG] SELECT  `users`.* FROM `users` WHERE `users`.`deleted_at` IS NULL AND `users`.`created_at` BETWEEN '2018-12-10 15:04:02' AND '2019-01-10 15:04:02' LIMIT 2`
pry(main)> users.take(2);
[DEBUG] SELECT  `users`.* FROM `users` WHERE `users`.`deleted_at` IS NULL AND `users`.`created_at` BETWEEN '2018-12-10 15:04:02' AND '2019-01-10 15:04:02' LIMIT 2
結果的にはクエリ発行されない条件は下記になります。
1. loadedなインスタンスに対する、take/take!呼び出し。
2. 一度引数なしのtake/take!を呼び出したインスタンスへの、二度目の引数なしのtake/take!呼び出し。
exist?
exists?メソッドは下記のようになっています。def exists?(conditions = :none) if Base === conditions raise ArgumentError, <<-MSG.squish You are passing an instance of ActiveRecord::Base to `exists?`. Please pass the id of the object by calling `.id`. MSG end return false if !conditions || limit_value == 0 if eager_loading? relation = apply_join_dependency(eager_loading: false) return relation.exists?(conditions) end relation = construct_relation_for_exists(conditions) skip_query_cache_if_necessary { connection.select_value(relation.arel, "#{name} Exists") } ? true : false rescue ::RangeError false end結構長いですが、自分なりに翻訳すると下記であろうと思います。
 def exists?(conditions = :none)
  if Base === conditions
    # ActiveRecordのインスタンスが渡されたらエラーを吐く。
  end

  # 条件にfalseもしくは、チェーンでlimit(0)を渡していた場合、falseが返る。
  return false if !conditions || limit_value == 0

  if eager_loading?
    # eager_loadしていた場合、eager_loadしたものに対して、exists?する。
    # (eager_load先のものを条件にすることが可能。)
  end

  # relationを構築する。
  relation = construct_relation_for_exists(conditions)

  # 必要であれば、クエリキャッシュをスキップする。(skip_query_cache_if_necessaryの内容をみる限り、block内は実行される。)
  skip_query_cache_if_necessary { connection.select_value(relation.arel, "#{name} Exists") } ? true : false
rescue ::RangeError
  false
end
そのため、
exists?において、例外が出る場合を除いて、クエリが発行されない条件は下記の二つになります。いずれも例外的で普段使わないと思うので、基本的にクエリ発行があると考える方が自然ですね。1. 引数にfalseを渡した場合 2. limit(0)をチェーンしていた場合。実際に実験してみると確かにSQLは発行されていません。
pry(main)> User.exists?;
[DEBUG] SELECT  1 AS one FROM `users` WHERE `users`.`deleted_at` IS NULL LIMIT 1`
pry(main)> User.exists?(false);
pry(main)> User.limit(0).exists?;
pry(main)> User.all.limit(1).exists?;
[DEBUG] SELECT  1 AS one FROM `users` WHERE `users`.`deleted_at` IS NULL LIMIT 1
find
findメソッドは下記のようになっています。def find(*args) return super if block_given? find_with_ids(*args) endfindはこの部分は結構シンプルです。findはblockが渡された場合、Enumerableのfindとして動作します。その他の場合は、
find_with_idsが呼ばれます。find_with_idsは下記のようになっています。def find_with_ids(*ids) raise UnknownPrimaryKey.new(@klass) if primary_key.nil? expects_array = ids.first.kind_of?(Array) return [] if expects_array && ids.first.empty? ids = ids.flatten.compact.uniq model_name = @klass.name case ids.size when 0 error_message = "Couldn't find #{model_name} without an ID" raise RecordNotFound.new(error_message, model_name, primary_key) when 1 result = find_one(ids.first) expects_array ? [ result ] : result else find_some(ids) end rescue ::RangeError error_message = "Couldn't find #{model_name} with an out of range ID" raise RecordNotFound.new(error_message, model_name, primary_key, ids) endこれもざっくり自分なりに翻訳すると下記になります。
def find_with_ids(*ids)
  # primary_keyがnilの場合、例外をあげる。

  # 渡されたidsのうち、先頭が配列かつ、空の場合に空配列を返す。
  expects_array = ids.first.kind_of?(Array)
  return [] if expects_array && ids.first.empty?
  # 配列を整理
  ids = ids.flatten.compact.uniq

  model_name = @klass.name

  case ids.size
  when 0
    # 整理した配列の中身が空だった場合、(ex: User.find(nil, nil)を渡した場合)例外をあげる。
  when 1
    # find_oneを呼び、引数が配列だった場合はインスタンス一つの配列で(ex: User.find([2]))、
    # 単数だった場合はインスタンスを返す。
    result = find_one(ids.first)
    expects_array ? [ result ] : result
  else
    # find_someを呼ぶ。
    find_some(ids)
  end
rescue ::RangeError
  # RangeErrorをrescue
end
find_oneでは、中でprimary_keyを条件としたwhereと引数なしのtakeが呼ばれており、条件ありのwhereをチェーンしているので、クエリが発行されます。
find_someでは、中でも同じく条件ありのwhereとto_aが呼ばれており、クエリが発行されます。
find_with_idsではメソッドの先頭部分で、渡されたidsのうち、先頭が配列かつ、空の場合に空配列を返すようになっています。そのためこの場合はクエリ発行前に空配列が返るので、クエリは発行されません。実際に実験してみると確認できます。pry(main)> User.find([1],2,3,4); [DEBUG] User Load (3.6ms) SELECT `users`.* FROM `users` WHERE `users`.`deleted_at` IS NULL AND `users`.`id` IN (1, 2, 3, 4)` pry(main)> User.find([],2,3,4); pry(main)> User.find([],2,3,4) => []結論として、
findにおいて、例外が出る場合を除いて、クエリが発行されない条件は下記になります。1. loadedなインスタンスに対して、blockつきで呼び出した場合(Enumerableのfind) 2. 引数の先頭に空配列を渡した場合。(空配列が返る)find_by/find_by!
find_by及びfind_by!メソッドは下記のようになっています。find_byとfind_by!の違いは例外時を除くとtakeかtake!かだけですね。def find_by(arg, *args) where(arg, *args).take rescue ::RangeError nil end def find_by!(arg, *args) where(arg, *args).take! rescue ::RangeError raise RecordNotFound.new("Couldn't find #{@klass.name} with an out of range value", @klass.name, @klass.primary_key) endこの場合は
whereに対してtakeをチェーンしているので、基本的にはクエリが発行されます。しかし、whereとtakeの性質からある場合についてはクエリが発行されません。
takeについては既に見たので、whereについて見てみましょう。whereは下記のようになっています。def where(opts = :chain, *rest) if :chain == opts WhereChain.new(spawn) elsif opts.blank? self else spawn.where!(opts, *rest) end end
whereは結構複雑なので深入りはしませんが、一点着目して欲しいポイントがあります。それはopts.blank?の場合、selfを返すということです。ここではselfを返すだけなのでもちろんクエリ発行はしません。そして、takeはロード済みである場合はクエリ発行しないのでした。つまり、load済みのものに対して、
find_byの引数にblank?なものを渡せばクエリ発行はされません。実際に実験したのが下記です。pry(main)> users = User.where(created_at: 2.months.ago..1.months.ago).load; pry(main)> users.find_by(nil); pry(main)> users.find_by([]);使い道は全くないですが、面白いです。
find_by/find_by!の場合、クエリが発行されない条件は下記です。1. loadedなインスタンスに対して、blank?がtrueになる引数を渡した場合(users.find_by(nil)など)first/first!
さて番号系メソッドの
first/first!です。他の番号系メソッドと違い、first/first!だけ引数に数値を取れます。内容的には下記のようになります。
first!はfirstがnilの場合に例外をあげるだけですね。def first(limit = nil) if limit find_nth_with_limit(0, limit) else find_nth 0 end end def first! first || raise_record_not_found_exception! end
firstは引数がある場合とない場合で呼び出すメソッドが異なっています。それらのメソッドは下記になります。def find_nth(index) @offsets[offset_index + index] ||= find_nth_with_limit(index, 1).first end def find_nth_with_limit(index, limit) if loaded? records[index, limit] || [] else relation = ordered_relation if limit_value limit = [limit_value - index, limit].min end if limit > 0 relation = relation.offset(offset_index + index) unless index.zero? relation.limit(limit).to_a else [] end end end
find_nthはfind_nth_with_limitを使用しており、なおかつ結果をインスタンス変数に格納していますね。find_nth_with_limitを自分なりに翻訳すると下記になります。def find_nth_with_limit(index, limit) if loaded? # loadedの場合、recordsから特定のindexから特定数取り出す。nilの場合は空配列。 else relation = ordered_relation if limit_value # limitメソッドを間に挟んでいた場合、limitメソッドの引数からindexを引いたものとfirstの引数の小さい方をlimitとして取る。 end if limit > 0 # offset_indexとindex数を足して、offsetする relation = relation.offset(offset_index + index) unless index.zero? relation.limit(limit).to_a else # limitが0以下の場合は空配列を返す end end end上記からfirstのクエリ発行しない条件は下記になります。
1. loadedなインスタンスに対する、first/first!呼び出し。
2. 一度引数なしのfirst/first!を呼び出したインスタンスへの、二度目の引数なしのfirst/first!呼び出し。
3. limit(0)をチェーンしていた場合。
second/second!/third/third!/fourth!/fourth/fifth/fifth!/forty_two/forty_two!
さて、first以外の番号系のメソッドですね。
forty_twoだけ少し謎いですね…
(今回初めて知った)こちらは基本的にはfirstと同じですが、引数は取れません。これらは内部的なメソッド呼び出しの引数が異なる以外は同じなので、サンプルにforty_two/forty_two!をみてみましょう。
def forty_two
  find_nth 41
end

def forty_two!
  forty_two || raise_record_not_found_exception!
end
やっていることは
find_nthに特定番号の引数を渡しているだけですね。ほとんとfirstと同じです。そのため、クエリ発行しない条件は下記になります。1. loadedなインスタンスに対する、メソッド呼び出し。 2. 一度メソッドを呼び出したインスタンスへの、二度目の同一メソッド呼び出し。 3. 内部で呼び出されている数値以下の引数のlimitをチェーンしていた場合。 (ex: forty_twoであれば、41以下の引数をもつlimitをチェーンしていた場合)last/last!
残りも少なくなってきました。お次は
last/last!です。メソッド内容は下記になります。last!はnilの場合に例外をあげるだけですね。def last(limit = nil) return find_last(limit) if loaded? || has_limit_or_offset? result = ordered_relation.limit(limit) result = result.reverse_order! limit ? result.reverse : result.first end def last! last || raise_record_not_found_exception! end
lastはloadedもしくはlimitかoffsetがある場合と、そうでない場合で挙動が異なります。まず、そうでない場合をみていきましょう。そうでない場合は内容的にはそれほど難しくなさそうですね。
lastに引数がある場合、引数をlimit数としてセットし、reverse_orderで内容を取得します。そして、引数なしの場合は、一つ目を、ありの場合は、reverse_orderで取得してきた内容をわざわざreverseメソッドで入れ替えています。おかげで、私たちはlast(2)と呼び出すと、最後から二つを順番通り(逆順ではなく)得ることができるということですね。そのためこの場合はクエリ発行されそうです。続いて、loadedもしくは
limitかoffsetがある場合を見ていきます。この場合は、find_lastメソッドを呼び出しています。def find_last(limit) limit ? records.last(limit) : records.last endたったこれだけです。超シンプルです。さて、loadedの場合は
Array#lastが呼ばれているのでクエリ発行はやはりされません。それではlimitやoffsetの場合はどうでしょうか?。この場合は、要するにクエリ発行の際に
DESCで取ったりせずに単純にoffsetやlimitで取ってきて、それを後ろから特定数取るということをしているだけなのです。実際のクエリを見るとわかりやすいです。[70] pry(main)> User.last; [DEBUG] SELECT `users`.* FROM `users` WHERE `users`.`deleted_at` IS NULL ORDER BY `users`.`id` DESC LIMIT 1` [71] pry(main)> User.offset(2).limit(3).last; [DEBUG] SELECT `users`.* FROM `users` WHERE `users`.`deleted_at` IS NULL LIMIT 3 OFFSET 2
offsetとlimitを使っている場合は、DESCが入っていませんよね。そのため、limitやoffsetがある場合はクエリが発行されます。これらを踏まえるとクエリを発行しない条件は下記になります。1. loadedなインスタンスに対する、メソッド呼び出し。
firstと違ってlastの場合は、インスタンス変数を保持していないので、二度目の呼び出しでもクエリは発行されますし、limit(0)をつけてもクエリ発行されます。second_to_last/second_to_last!/third_to_last/third_to_last!
ようやく最後のメソッドです。最後まで見てくださって頂き誠にありがとうございます。私もこの時点で既に記事を書き始めて調査含め、6時間が経過しておりそろそろ終わりたいです。笑
メソッド内容を見てみましょう。
second_to_last/second_to_last!とthird_to_last/third_to_last!は内部的には引数が異なるだけなので、second_to_last/second_to_last!を見ていきます。def second_to_last find_nth_from_last 2 end def second_to_last! second_to_last || raise_record_not_found_exception! endおなじみの
second_to_last!の場合は、second_to_lastがnilの場合に例外をあげるだけですね。それでは実態のメソッドのfind_nth_from_lastを見ていきます。def find_nth_from_last(index) if loaded? records[-index] else relation = ordered_relation if equal?(relation) || has_limit_or_offset? relation.records[-index] else relation.last(index)[-index] end end endloadedの場合はおなじみですね。普通に
recordsから特定インデックスの場所を取り出すだけですね。そのためクエリ発行はされません。問題は、loadedでない場合です、
ifの部分が少しややこしいですが、これは要するに、現状保持しているrelationの状態がordered_relationと同じかどうか判定しています。ordered_ralationでは、orderの指定がなく、primary_keyが存在する場合は、primary_keyのascでorderするように指定しています。それ以外の場合はインスタンスをそのまま返しています。def ordered_relation if order_values.empty? && primary_key order(arel_attribute(primary_key).asc) else self end endすなわち先の
ifの戻ると、何かしらのorderをしているもしくは、limitやoffsetをしている場合は、そのorderやlimit/offsetでクエリ発行をし、そこから特定インデックスの場所を取るということをしており、逆に指定がない場合は、primary_keyのascでレコードを引いてきて、それに対して、特定インデックス分の引数を与えたlastメソッドを呼び出して、そこからさらに特定インデックスで取り出すということをしています。relation = ordered_relation if equal?(relation) || has_limit_or_offset? relation.records[-index] else relation.last(index)[-index] end実際にクエリを見ると、
orderなしの場合は、特定インデックス分のlimitが入っており、orderがありlimitがない場合は一旦全て引いてきていることがわかります。pry(main)> User.second_to_last; [DEBUG] SELECT `users`.* FROM `users` WHERE `users`.`deleted_at` IS NULL ORDER BY `users`.`id` DESC LIMIT 2` pry(main)> User.order(id: :desc).second_to_last; [DEBUG] SELECT `users`.* FROM `users` WHERE `users`.`deleted_at` IS NULL ORDER BY `users`.`id` DESC全レコードを取ってきているため、レコード数が多いテーブルに対して、気軽に引くと痛い目にあいます。
lastはきちんとlimitをつけてくれるのですが、second_to_last等を使う場合は要注意です。結果として、クエリを発行しない条件は下記になります。
1. loadedなインスタンスに対する、メソッド呼び出し。
lastと同じですね。最後に
以上で終わりです。
想像以上にActiveRecordは奥深く、各メソッドの内部で呼び出されているメソッドは全然調べきれませんでした…
もし異なる点や実験してみたら違う結果が出たり他にクエリ発行しない条件があれば、ご指摘頂けると幸いです。
最後までお読み頂きありがとうございました。
- 投稿日:2019-02-11T13:58:26+09:00
rails ボタンを押しても画面遷移しない
/sample_app/app/assets/javascripts/application.js の
//= require turbolinks この行を削除
これでボタンが有効になる。
- 投稿日:2019-02-11T13:11:43+09:00
rails serverにまつわるportとGemfileに関するエラーへの対処
rails sができない
チュートリアルや記事を参考にしながら簡単なアプリケーションを作ろうとrailsを触っていました。
気がつくとrails sを行う際にエラーが出たりして実行できなくなっていました。
railsとrubyのversionがおかしくなっているのではないかと考えたため、以下の記事を参考にしてversionを整えようとしました。Homebrewのインストールとrbenvのインストールまで Mac編
無事にインストール・アップデートを行いましたが、以下のエラーが出現しました。
portの問題
`initialize': Address already in use - bind(2) for "0.0.0.0" port 3000 (Errno::EADDRINUSE)というエラーを得ました。
調べると、port 3000が既に使われているということです。$ lsof -wni tcp:3000これでportの状態を確認すると、
COMMAND PID   USER   FD   TYPE             DEVICE SIZE/OFF NODE NAME
ruby    878   name   19u  IPv4         number      0t0  TCP *:hbci (LISTEN)
このPID 878が使われているようなので、
$ kill -9 878で削除します。何もエラーが返ってこなかったら大丈夫です。次に進みます。
$ rails sをやっと行うことができました!
Gemfileの問題
$ rails new app
$ rails generate model Task date:date title:string
でアプリケーションの開発を開始しようとしたら以下のようなエラーが。
`block (2 levels) in replace_gem': Error loading the 'sqlite3' Active Record adapter. Missing a gem it depends on? can't activate sqlite3 (~> 1.3.6), already activated sqlite3-1.4.0. Make sure all dependencies are added to Gemfile. (LoadError)解決策としてはエラーメッセージ通りにGemfileにsqlite3のversionについて書き足してあげましょう。
Gemfile+ gem 'sqlite3', '~> 1.3.6'よし、これでいけるかと思い再びrails new コマンドを打ちましたが今回は以下のエラーが。
`search_for': Unable to resolve dependency: user requested 'did_you_mean (= 1.0.0)' (Gem::UnsatisfiableDependencyError)dependencyの問題ということで以下のコマンドを。無事に解決できました。
$ bundle updateupdateまで行う必要がありますね。
参考サイト
rails sしようとしたらAddress already in useと言われた
Homebrewのインストールとrbenvのインストールまで Mac編
- 投稿日:2019-02-11T12:21:26+09:00
Windows10からRuby環境をアンインストールするメモ
環境
- Windows 10 Home (ver.1803)
- RubyInstaller2を使ってRubyをインストール済み
Rubyのアンインストール
Windowsの
設定→アプリ→アプリと機能から「ruby」で検索。
バージョンは異なるかもしれませんが以下のようなアプリが見つかります。
クリックしてアンインストールを選びます。
インストール先のディレクトリを削除
デフォルトではCドライブの直下に以下のような
Ruby ***というディレクトリがあるので、これを削除します。
しかし、Rubyアンインストール直後だと「他のプロセスによって開かれています」みたいなメッセージが出て削除できないことがあるので、一度ログオフするか再起動するかしてから削除します。
これでRuby環境のアンインストールが完了です。
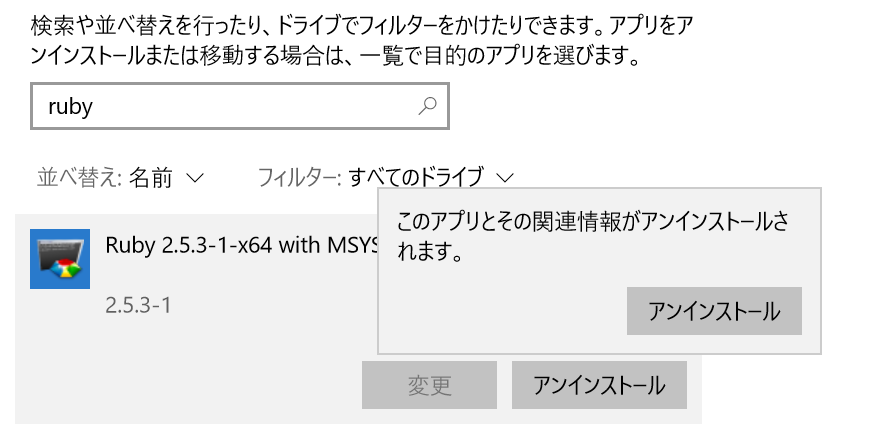
- 投稿日:2019-02-11T12:11:06+09:00
Railsチュートリアル一章 学習ログ
Railsチュートリアルをやっていきます
以前に途中までやって、ほったらかしになっていたので、復習がてら最初からやっていきます。
演習問題
1.Ruby on Railsで使うRuby gemはどのWebサイトにありますか?
https://rubygems.org/gems/rails
2.現時点でのRailsの最新バージョンはいくつですか?
5.2.2(2018年12月4日)
(2019年春にはRails6.0がリリース予定のようですね。)
3.Ruby on Railsはこれまでに何回ダウンロードされたでしょうか?
TOTAL DOWNLOADS
156,041,921
(2019年1月6日現在)1億5千...!?
ちなみにsinatraは、約7千万ダウンロードのようです。Railsインストール
学校はWin機、家ではMacで面倒くさいので、開発環境はAWS Cloud9を使っていきます。
$ printf "install: --no-rdoc --no-ri\nupdate: --no-rdoc --no-ri\n" >> ~/.gemrcこれはgemをインストールするときに、ドキュメントをインストールしないという設定を、gemの設定ファイルに追記するコマンドです。
反映されているかどうかチェックします。
 $ cat ~/.gemrc
install: --no-rdoc --no-ri
update:  --no-rdoc --no-ri
OKですね。
ただ、下記のような記事を見ると、--no-rdoc, --no-riはどうやらdeprecated(非推奨)の書き方のようでした。
https://qiita.com/kei_q/items/d13235157fcfc435489d今はこう書くのが正しいようです。
install: --no-document(又は -N)
update: --no-document(又は -N)
確認のため、gemの公式サイトを見たら、非推奨の欄にすら--no-rdoc, --no-riの書き方が載っていませんでした。
https://guides.rubygems.org/command-reference/#gem-installん?廃止されたのかな、思ったのでteratailで聞いてみましたら、
やっぱり廃止されたみたいです。(回答ありがとうございました)
https://teratail.com/questions/167348では、正しい設定を流しこみたいと思います。
$ printf "install: -N \nupdate: -N\n" > ~/.gemrc今度は上書きしたいので、リダイレクションは>>ではなく>を使います。
 $ cat ~/.gemrc
install: -N
update: -N
これで大丈夫ですかね。
ではRailsをインストールします。
バージョンはチュートリアルに合わせます。$ gem install rails -v 5.1.6いつもの
$ rails_5.1.6_new hello_appファイル群が作成され、bundle installが実行されます。
Bundleは、gemパッケージのバージョンを管理してくれるヤツです。そしてインストールが成功したみたいですが、色々なログが出たので少しずつ読んでいきます。
出力されたログ
HEADS UP! i18n 1.1 changed fallbacks to exclude default locale.
But that may break your application.
change A to B AをBに取り換える
(雑訳)
気をつけろ! i18n 1.1 ではデフォルトの国や地域の設定を除外するようにフォールバックが変更された。
もしかしたらあんたのアプリ壊れるかも。
(訳終わり)Please check your Rails app for 'config.i18n.fallbacks = true'. If you're using I18n (>= 1.1.0) and Rails (< 5.2.2), this should be 'config.i18n.fallbacks = [I18n.default_locale]'. If not, fallbacks will be broken in your app by I18n 1.1.x. For more info see: https://github.com/svenfuchs/i18n/releases/tag/v1.1.0(雑訳)
Railsアプリの'config.i18n.fallbacks = true'.
の部分をチェックしろ.
もしyouがI18n1.1.0以上を使っていて、Rails5.2.2以下を使っているなら、(~略~)に変更にしろ、そうじゃないなら、あんたのアプリはI18n 1.1.xによってフォールバック動作が上手く行かなくなる。
(訳終わり)今回はチュートリアルに合わせて、Rails5.1.6を使っているので、指摘された通りに直しておきます。
該当するコードは、config/environments/production.rbにあるようです。config/environments/production.rb#config.i18n.fallbacks = true config.i18n.fallbacks = [I18n.default_locale]これでいいですかね。
参考URL
http://midnight-engineering.hatenadiary.jp/entry/2019/01/02/181645i18nとは何か?
RubyのI18n (国際化・多言語化を意味する internationalization を短縮したもの) gemはRuby on Rails 2.2以降からRailsに同梱されています。このgemは、アプリケーションの文言を英語以外の 別の1つの言語に翻訳 する機能や 多言語サポート 機能を簡単かつ拡張可能な方式で導入するためのフレームワークを提供します。
RailsGuide https://railsguides.jp/i18n.html色々な言語に対応してくれるgemのようです。
Sassについても何かメッセージが出ていた
Post-install message from sass:

Ruby Sass is deprecated and will be unmaintained as of 26 March 2019.

* If you use Sass as a command-line tool, we recommend using Dart Sass, the new
  primary implementation: https://sass-lang.com/install

* If you use Sass as a plug-in for a Ruby web framework, we recommend using the
  sassc gem: https://github.com/sass/sassc-ruby#readme

* For more details, please refer to the Sass blog:
  http://sass.logdown.com/posts/7081811
(語句)
Post-install インストール後
deprecate とがめる、軽視する、見下す(雑訳)
sassからインストール後のメッセージRuby Sassは非推奨で、2019年3月26日にサポートが打ち切られる
もし、コマンドラインで使っているなら、Dart Sassを推奨
もし、プラグインで使っているなら、sassc gemを推奨
詳細はSassのblogを参照してね(訳終わり)
多分、gemとして使っていると思うので、sassc gemを代わりに入れておきます。
という訳で、gemfileを編集します。gemfile#gem 'sass-rails', '5.0.6' gem 'sassc-rails'$ bundle updateサーバー起動
$ rails sAWS Cloud9でアプリケーションを確認する時は、Previewタブから、Preview Running Applicationをクリックします。
そうすると、IDE内でタブが開かれますが、なぜかここではエラーとなるので、ブラウザの新規タブで開くボタンをクリックします。
そして、いつもの
演習問題
1.デフォルトのRailsページに表示されているものと比べて、今の自分のコンピュータにあるRubyのバージョンはいくつになっていますか? コマンドラインでruby -vを実行することで簡単に確認できます。
◯Railsページ
Ruby version: 2.4.1 (x86_64-linux)◯Cloud9のrubyバージョン
ruby 2.4.1p111 (2017-03-22 revision 58053) [x86_64-linux]2.同様にして、Railsのバージョンも調べてみましょう。調べたバージョンはリスト 1.1でインストールしたバージョンと一致しているでしょうか?
◯Railsページ
Rails version: 5.1.6◯Cloud9のrubyバージョン
Rails 5.1.6=> 一致を確認。
MVCについて、とてもテキトーな説明
Railsアプリでは、Controllerがブラウザからのリクエストを受け取り、データベースとのやりとりを担うModelと対話したりして、ブラウザにViewを返します。
Hello worldアプリ
application_controller.rbclass ApplicationController < ActionController::Base protect_from_forgery with: :exception def hello render html: "hello, world!" end endrenderで:htmlオプションを使用すると、HTML文字列を直接ブラウザに送信することができます。
https://railsguides.jp/layouts_and_rendering.html#html%E3%82%92%E5%87%BA%E5%8A%9B%E3%81%99%E3%82%8Broutes.rbRails.application.routes.draw do # For details on the DSL available within this file, see http://guides.rubyonrails.org/routing.html root 'application#hello' endルーターは、ブラウザから受け取ったURLを識別し、コントローラに振りわける機能をもちます。
/(root)が指定された時、先ほど定義したapplicationコントローラのhelloアクションを呼び出すようにします。これで画面上にhello,worldを表示させるだけのしょぼいアプリケーションができました。
演習問題
(省略)
Gitによるバージョン管理
(省略)
$ git checkout -fすべてのファイルを強制的に元の状態に戻す
GitHubへアップロード
GitHubへはSSHで接続します。
Using the SSH protocol, you can connect and authenticate to remote servers and services. With SSH keys, you can connect to GitHub without supplying your username or password at each visit.
https://help.github.com/articles/about-ssh/(語句)
authenticate 認証する(雑訳)
SSHプロトコルを使うと、リモートサーバに接続や認証ができます。SSHキーを使うことで、ユーザー名やパスワードの入力なしにGithubへ接続できます。
(訳終わり)公開鍵を作成します。
鍵を入れるフォルダへ移動
$ cd ~/.ssh鍵を生成します。
$ ssh-keygen -t rsa -b 4096 -C "hoge@hoge.com"各オプションの説明
-t 鍵の種類
rsaは桁がでかい数の素因数分解が困難であることを利用した公開鍵暗号方式。-b ビット数
基本的には2048bit以上が推奨されますが、GitHub公式ヘルプは、より強度の高い4096bitを推奨しているため、こちらに合わせます。-C コメント
GitHubに登録してあるEmailアドレスに置き換えてくれ、とのことでした。上記を実行すると、公開鍵と秘密鍵のセットが作成され、鍵ファイルの名前とパスフレーズを聞いてきます。
Enter file in which to save the key (/home/ec2-user/.ssh/id_rsa): id_git_rsa
Enter passphrase (empty for no passphrase):
何も押さずにEnter三回連打で、id_rsaとid_rsa.pubを作ることもできますが、ここではわかりやすい名前をつけて見ました。パスフレーズは、公式が、"type a secure passphrase. "とおっしゃっているので、入れておきます。
強度のある鍵が作られているか確認します。
$  ssh-keygen -l -f ~/.ssh/id_git_rsa
4096 SHA256: xxxxxxxxxxxxxxxxxxxxxxxxxxxxxxxxxxxxxxxxxxx  hoge@hoge.com (RSA)
(オプション)
-l 鍵の情報を確認する
-f 鍵ファイル指定公開鍵をGitHubへアップ
まず作成した公開鍵をクリップボードにコピーします。
#Mac
#$  pbcopy < ~/.ssh/id_rsa.pub

$  cat ~/.ssh/id_git_rsa.pub
ただ、pbcopyはMacしか使えないコマンドです。
しょうがないので、catで画面に出力し、コピペすることにします。これを、GitHubの設定画面のSSH keysへ登録します。
GitHubへ接続テスト
GitHubへ接続する際、先ほど指定した鍵を用いるように指定します。
$ vim configvimを使って、configファイルを作ります。
Host github github.com
  HostName github.com
  IdentityFile ~/.ssh/id_git_rsa
  User git
これで、GitHubへ接続して見ます。
$ ssh -T git@github.com
Bad owner or permissions on /home/ec2-user/.ssh/config
すると、configに対する権限がない、と怒られてしまいました。
では、権限について確認して見ます。$ ls -la -rw-rw-r-- 1 ec2-user ec2-user 86 Feb 10 09:23 config権限の設定の読み方がわからないので、調べます。
http://www.tku.ac.jp/~densan/local/permission/permission.html-rw-rw-r--=> これは、
所有者が、-rwの権限を持ち、
所有グループが、-rwの権限を持ち
他人が、r--がrの権限を持つという意味のようです。rは読み、wは書き、xは実行を表します。(-は権限なし)
また
所有者とはディレクトリを持つ自分自身、
所有グループとは、同じサーバをもつユーザー全体、
他人とは、第三者を指します。この./ssh/configについては、所有者(自分自身)に読み書きの権限(-rw)がついているため、一見問題がないように見えます。
ただし、セキュリティの関係上、自分以外の他者に権限を付与している場合は接続ができないようです。
http://d.hatena.ne.jp/someone620/20140406/1396758308そこで、パーミッションを変更するコマンド[chmod パーミッション 付与したいファイル名]を用いて、自分以外の所有グループ、他者の権限を無くします。
数値で指定するので、r(4),w(2),x(1),-(0)で計算します。
-rw --- ---を指定すれば良いので、2+4+0, 0+0+0, 0+0+0と計算し、600となります。$ chmod 600 ~/.ssh/config $ ls -la -rw------- 1 ec2-user ec2-user 86 Feb 10 09:23 configこれで良さそうですね。
では、GitHubへ再び接続を試みてみます。$ ssh -T git@github.com Enter passphrase for key '/home/ec2-user/.ssh/id_git_rsa': Hi Hoge! You've successfully authenticated, but GitHub does not provide shell access.上手くいったみたいです。
GitHubへPush
https://github.com/shocci1214/railsTutorial
再びpushするときに警告が出てきてしまいました。
Warning: Permanently added the RSA host key for IP address 'xxx.xxx.xxx.xxx' to the list of known hosts.(語句)
permanently 永久的に、恒久的に(google訳)
警告: IPアドレス 'xxx.xxx.xxx.xxx'のRSAホストキーを既知のホストのリストに恒久的に追加しました。
(訳終わり)known hostsは、接続したことのある各ホストの情報を保持しているファイルです。
どうやらGitHub.comの違うIPアドレスに接続するたびに設定を保存しているようです。この問題の解決法は以下で質問し、解決しました。(回答ありがとうございました)
https://teratail.com/questions/173702?whotofollow=このように、github.comに関する全てのサーバの公開鍵情報を一旦削除してリセットします。
$ ssh-keygen -R github.comHerokuへのデプロイ
(省略)
Herokuコマンドラインクライアントのインストール
$ source <(curl -sL https://cdn.learnenough.com/heroku_install)sourceコマンド
ファイルに書かれたコマンドを現在のシェルで実行する< 入力元ファイルを指定する
curlコマンド
HTTPやFTPを使って、ファイルをダウンロードしたりアップロードしたりする-s
進捗状況やエラーを表示しない-L
リダイレクトに対応する
(指定したページが遷移したら、それを追いかける)Heroku用の公開鍵作成
GitHubの例に習い、4096ビットの鍵を作成し、「id_heroku_rsa」のようなわかりやすい名前をつけておきます。
$ ssh-keygen -t rsa -b 4096 -C "hoge@hoge.com"
Generating public/private rsa key pair.
Enter file in which to save the key (/home/ec2-user/.ssh/id_rsa): id_heroku_rsa
Enter passphrase (empty for no passphrase):
そして、configファイルを編集します。
ssh/configHost github github.com HostName github.com IdentityFile ~/.ssh/id_git_rsa User git Host heroku.com HostName heroku.com IdentityFile ~/.ssh/id_heroku_rsa IdentitiesOnly yesこの設定は以下の公式リンクを参考にしました。
https://devcenter.heroku.com/articles/keys#fixing-problems-with-keys$ heroku keys:add ~/.ssh/id_heroku_rsa.pub Uploading /home/ec2-user/.ssh/id_heroku_rsa.pub SSH key... doneadd の後に今作った鍵のパスを指定します。何も書かないと、デフォルトで「id_rsa_pub」が検索されます。
登録した鍵を確認します。
$ heroku keys
=== hoge@hoge.com keys
ssh-rsa XXXXXXXXXXXXXXXX
上手くいったようです。
Herokuへの接続を検証
以下のコマンドを叩きます。
https://devcenter.heroku.com/articles/keys#validate-the-connection$ ssh -v git@heroku.com大量のログが出力されますが、以下のログが出ていたので、
接続は上手くいったようです。Authenticated to heroku.comデプロイ
デプロイ...作成したアプリをサーバにアップロードし、利用できる状態にすること
$ heroku create
$ git push heroku master
https://powerful-island-95849.herokuapp.com/
続きます
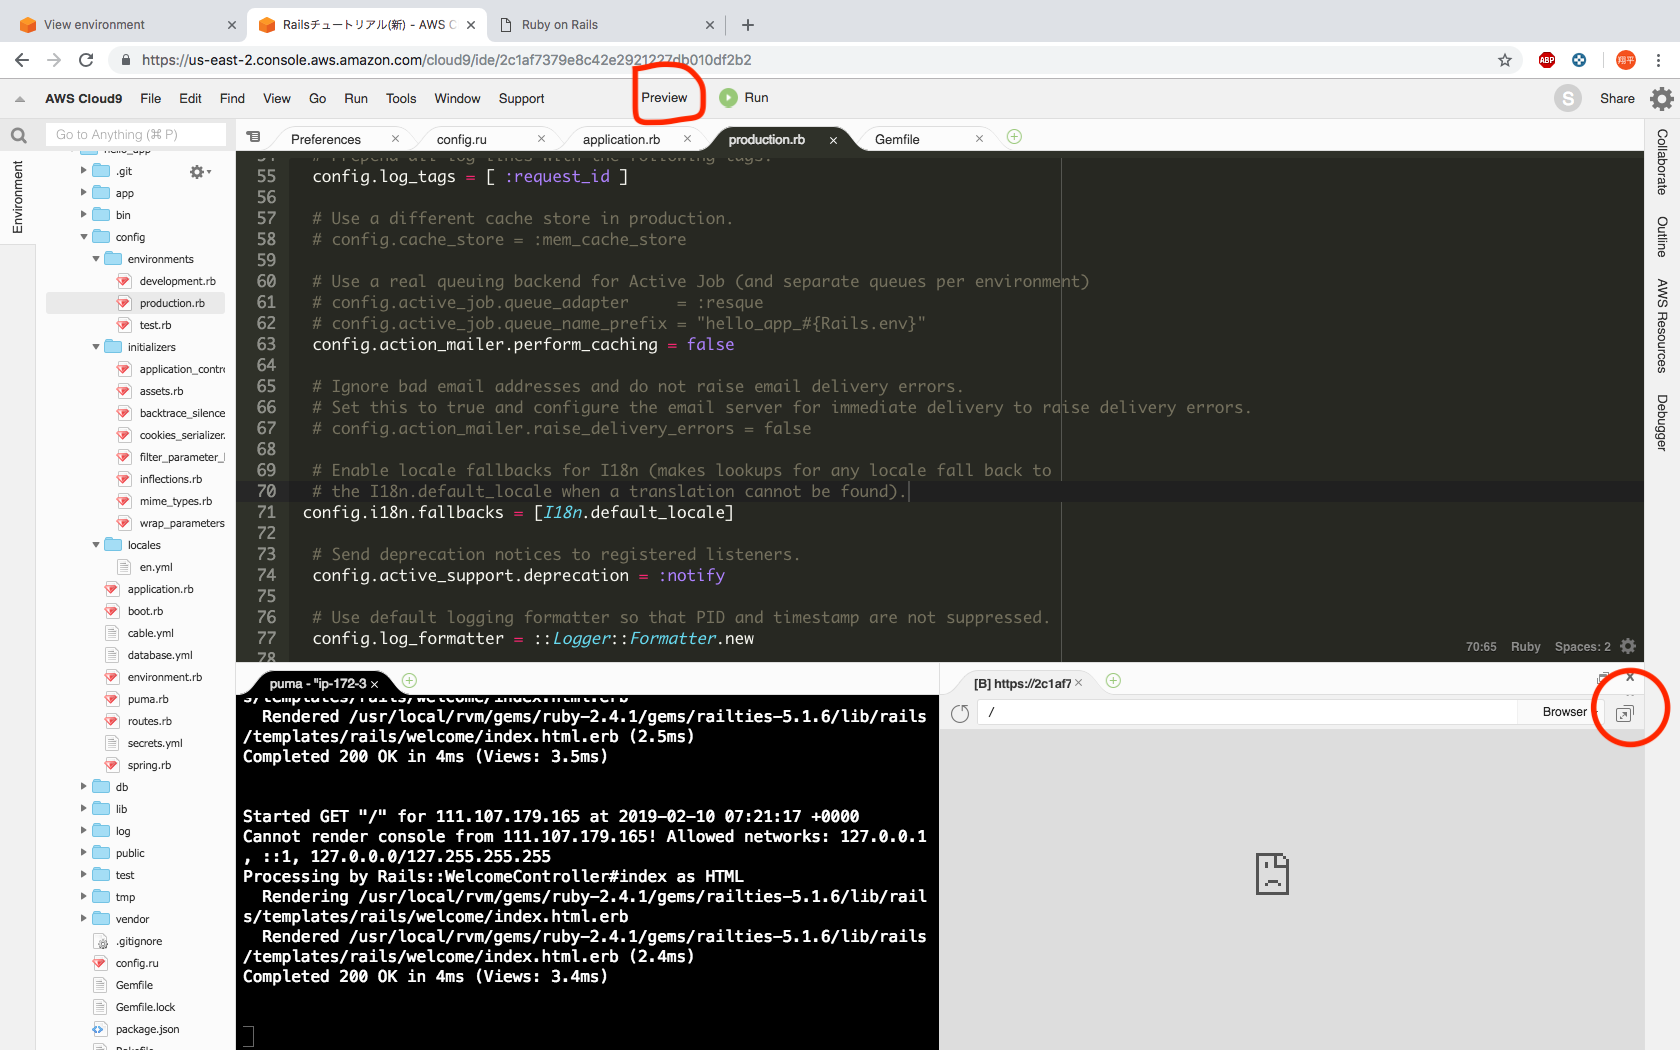
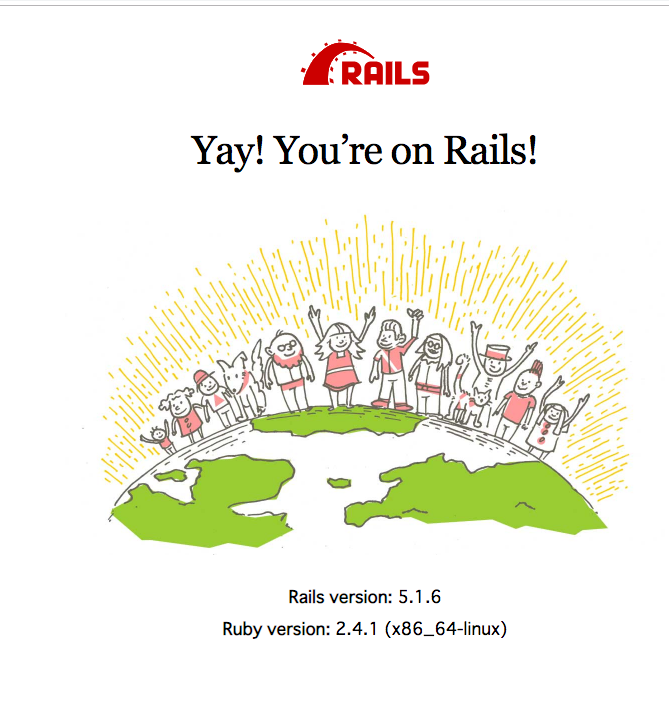
- 投稿日:2019-02-11T01:59:48+09:00
【ご教示ください!】Twitter Publish で作成される投稿内容を改行する方法
自作のRailsアプリで投稿した内容をTwitterでシェアしたい!
現在プログラミングスクールに通っている者ですが、スクールの課題で作成したアプリにTwitterシェア機能を加えたいと考えています。
そんな中、URLをHTMLに書くだけで簡単にTwitterシェアボタンが作成できる「Twitter Publish」なるものに出会いました。
参考文献に記載している記事を拝見し、エンコードとやらも行い「いざ呟かん!」とページ内に追加されたシェアボタンをクリックすると、、、
ま、まぁこれを投稿してタイムラインに並ぶと改行されてるのかな?と不安になりつつ投稿しタイムラインを確認してみると、、、
文字列そのまま、、、
この後も改行のエンコード文字列をいくつか見つけチャレンジしましたが、結局改行は叶っておりません、、、
・
・%0a
・%0d%0a
・%0A
この辺りを試していますが結果は変わらず。RailsのHTMLファイルに記載しているシェアボタンの記述は以下の通りです。
皆さんのお力をお借りし解決したいのでご協力よろしくお願いいたします!
参考文献
http://ganablo-games.blogspot.com/2013/11/twitterweb.html
https://whatsupguys.net/programming-school-dive-into-code-learning-71/


- 投稿日:2019-02-11T01:30:47+09:00
rails generateする時sqlite3の指定で躓いた話
環境
- cloud9
- Rails 5.2.2
controllerをgenerateしたかった
controlleを作ろうとrails generate。
$ rails generate controller search booksいやー、railsはこれがあるから良いですねー。
昔やってたStrutsなんて用意するファイルを全部手で作ってたから効率がぜんぜん違うわー。
さてさて、ズラズラっと出てきたから出来てー…/usr/local/rvm/rubies/ruby-2.4.1/lib/ruby/gems/2.4.0/gems/bundler-1.16.5/lib/bundler/rubygems_integration.rb:408:in `block (2 levels) in replace_gem': Error loading the 'sqlite3' Active Record adapter. Missing a gem it depends on? can't activate sqlite3 (~> 1.3.6), already activated sqlite3-1.4.0. Make sure all dependencies are added to Gemfile. (LoadError) : (以下スタックトレース) :ないじゃん。
おもくそエラーじゃん。答えはエラーに書いてある
ちゃんとしたフレームワークならちゃんとしたエラー文が出力されるので、まずはエラー文を眺めてみましょう。
すると、最後にこんな記載があるわけですな。Make sure all dependencies are added to Gemfile.英語が得意とは言えない人(=ぼく)でも「dependencies」を「Gemfile」でなんかしなきゃいけないことはなんとなーくわかりますね。
じゃあその直前に何が書いてあるかというと、Missing a gem it depends on? can't activate sqlite3 (~> 1.3.6), already activated sqlite3-1.4.0.ざっくり和訳すると、「Genfileのsqlite3周りちゃんと見ろ」。
わざわざバージョン指定まで入ってるので、Gemfileにコピペしときましょう。
現在のsqlite3をコメントアウトして、その下にコピってペーします。gemfile# Use sqlite3 as the database for Active Record # gem 'sqlite3' gem 'sqlite3', '~> 1.3.6'保存したのを確認して、rails generateを再実行。
$ rails generate controller search books
Running via Spring preloader in process 12947
      create  app/controllers/search_controller.rb
       route  get 'search/books'
      invoke  erb
      create    app/views/search
      create    app/views/search/books.html.erb
      invoke  test_unit
      create    test/controllers/search_controller_test.rb
      invoke  helper
      create    app/helpers/search_helper.rb
      invoke    test_unit
      invoke  assets
      invoke    coffee
      create      app/assets/javascripts/search.coffee
      invoke    scss
今度はちゃんと動きました。めでたしめでたし。
参考資料
- 投稿日:2019-02-11T00:37:28+09:00
ecs & rails & nginx環境 で sitemapを作り、s3にアップし利用する
やったこと
- sitemapをsitemap_generatorのgemを使って作っていたのだけれども、複数台環境 & ecs導入に伴ってs3上に置き場を変えた
sitemapの作成
gem sitemap_generatorを利用
https://github.com/kjvarga/sitemap_generator
詳しい記事がqiita上にたくさんあるので割愛ECS利用にともない、
rake sitemap:refreshを実行するタスクを新規作成sitemapのs3へのアップロード
SitemapGenerator::Sitemap.default_host = "https://yourhost.com"
SitemapGenerator::Sitemap.sitemaps_host = "https://your-s3-bucket.s3.amazonaws.com/"
SitemapGenerator::Sitemap.public_path = 'public/'
SitemapGenerator::Sitemap.sitemaps_path = 'sitemaps/'

SitemapGenerator::Sitemap.adapter = SitemapGenerator::S3Adapter.new({
  fog_provider: 'AWS',
  fog_directory: 'your-bucket-name',
  fog_region: '*******',
  aws_access_key_id: '*******',
  aws_secret_access_key: '*******',
})
nginx confの編集
sitemapだけs3だったので、file指定で変更
  location ~* ^/sitemap.xml.gz {
       set $s3_bucket        'your-bucket-name.s3.amazonaws.com';
       set $url_full         "sitemaps/sitemap.xml.gz";

       proxy_http_version     1.1;
       proxy_set_header       Host $s3_bucket;
       proxy_set_header       Authorization '';
       proxy_hide_header      x-amz-id-2;
       proxy_hide_header      x-amz-request-id;
       proxy_hide_header      Set-Cookie;
       proxy_ignore_headers   "Set-Cookie";
       proxy_buffering        off;
       proxy_intercept_errors on;

      resolver               10.0.0.2 valid=5s;
      resolver_timeout       3s;

      proxy_pass             http://$s3_bucket/$url_full;
  }