- 投稿日:2019-02-11T23:54:04+09:00
Go言語Marshal系インターフェースの拡張で使えるNoMethodイディオム
NoMethod
Go言語、例えばJSONで、特に構造体などの(Un)Marshalerインターフェースを実装するとき、
外部ライブラリのJSONパーサを利用したかったり、ちょっとした処理を追加したいだけで基本的な処理は標準ライブラリと同じ処理をしてほしいときがあります。
しかし単に呼び直すと再実装されたMarshalメソッドを呼び出すことになるのでループしてしまいます。
メソッドを持たない別の型を宣言しラップすることでこれを解決できます。type Gopher struct{} func (g *Gopher) MarshalJSON() ([]byte, error) { type NoMethod Gopher g.onJSONEncoding() //行いたい処理 raw := NoMethod(*g) return json.Marshal(raw) }応用
もう一つ、例えばTime型などjsonでサポートされていない型に対応させたいとき、Unmarshalメソッドを実装するために別の型を宣言しますがその型をそのままメンバにするとtime.Time型を直接使うのと比べていろいろと扱いづらいと思います。
これは元の型を埋め込んでいる冗長なメンバを持った一時的な構造体を定義することで解決できます。type Time time.Time func (t *Time) UnmarshalJSON(b []byte) error { var tt time.Time tt, err := time.Parse(`"2006-01-02"`, string(b)) *t = Time(tt) return err } type Gopher struct { Birthday time.Time } func (g *Gopher) UnmarshalJSON(data []byte) error { type NoMethod Gopher var gg struct { Birthday Time *NoMethod } gg.NoMethod = (*NoMethod)(g) if err := json.Unmarshal(data, &gg); err != nil { return err } g.Birthday = time.Time(gg.Birthday) return nil }GoPlayground
https://play.golang.org/p/lVSwnkJFDLv
- 投稿日:2019-02-11T22:32:08+09:00
[AWS SDK for Go] 異なる AWS アカウントの IAM ロールを使用する方法
はじめに
本格的に AWS の運用を行いたい場合、開発用 / 本番用 AWS アカウントなど、異なる用途の複数 AWS アカウントを使い分ける事が多いかと思います。
開発者が操作したい AWS アカウントを切り替えるとき、マネジメントコンソールでは一般的に IAM ロールの切り替えを行います。AWS CLI や AWS SDK を利用したプログラムでは、AWS STS で一時的なセキュリティ認証情報のリクエストを行う必要があります。
今回は AWS SDK for Go を使用して、一時的な認証情報を取得する方法を紹介します。
環境
- macOS Mojave 10.14.3
- go version go1.9.4 darwin/amd64
- aws-sdk-go: Release v1.16.29
事前準備
- 開発用/本番用などの AWS アカウントを 2 つ以上用意する。
- 開発用アカウントの IAM ユーザーのクレデンシャルを
aws configureコマンドから設定する。(~/.aws/credentialsが存在すること。)
- 開発用アカウントの IAM ユーザーには
sts:AssumeRoleのポリシーが許可されている状態にする。- 本番用アカウントの IAM ロールを任意の権限で作成し、
Principal句で開発用アカウントおよび IAM ユーザーからアクセスできる状態にする。サンプルコード
以下は AWS STS の AssumeRole を使用して、異なる AWS アカウントの EC2 インスタンス情報を取得するサンプルコードです。
コード中の
profile,region,roleArn変数はご利用の環境に合わせて変更してください。main.gopackage main import ( "fmt" "github.com/aws/aws-sdk-go/aws" "github.com/aws/aws-sdk-go/aws/credentials" "github.com/aws/aws-sdk-go/aws/credentials/stscreds" "github.com/aws/aws-sdk-go/aws/session" "github.com/aws/aws-sdk-go/service/ec2" ) var ( profile = "default" region = "ap-northeast-1" // FIXME: Rewrite your AWS Account ID and IAM Role Name. roleArn = "arn:aws:iam::<123456789012>:role/<Your-Role-Name>" ) // AssumeRoleWithSession returns switched role session from argument session and IAM role's arn in same region. func AssumeRoleWithSession(sess *session.Session, rolearn string) *session.Session { sCreds := stscreds.NewCredentials(sess, rolearn) sConfig := aws.Config{Region: sess.Config.Region, Credentials: sCreds} sSess := session.New(&sConfig) return sSess } func main() { // Get credentials from default(~/.aws/credentials) path. // 開発環境などで使用している認証情報を取得する。 creds := credentials.NewSharedCredentials("", profile) config := aws.Config{Region: aws.String(region), Credentials: creds} dSess := session.New(&config) // Get the Switched Role Session. // 本番環境など、開発環境で使用している認証情報を取得する。 sSess := AssumeRoleWithSession(dSess, roleArn) // Example: Get EC2 info using the switched session. // 開発環境の認証情報から、本番環境の EC2 情報などが(IAM ロールの権限で許可された範囲内で)取得できる。 result, _ := ec2.New(sSess).DescribeInstances(nil) fmt.Println(result) }おわりに
筆者が検証した際に、AWS SDK for Go での AssumeRole の日本語記事がさっと見つからなかったので記事にしました。
どなたかのお役に立てば幸いです。
参考 AWS 公式ドキュメント
- 投稿日:2019-02-11T20:41:26+09:00
GoでWasmでファイルサイズが小さいTinyGo!
とりあず動くページを見てくれ。
https://1l0.github.io/t/tinygo/
こいつはほぼGoで書かれている。
つまりGo使いはJavascriptからおさらばできる……かもしれない。GoとWASM
Goは2018年の中頃にwasmを一応サポートした。なにが一応なのかというと、問題があるのだ。
問題点
本当シンプルにこれだけなのだが、生成されるwasmファイルがくそでかい。なぜならGoのランタイムをまんまwasmにぶちこんでいるからだ。GCやらchannelやらが動くように。
なぜwasmができたかというとファイルサイズの節約が目的の一つになっているので本末転倒である。ページを開いてwasmファイルをロードするのに時間がかかるのだ。そんなこんなで皆が絶望しかけていた頃、救世主が登場する。
TinyGoだ。TinyGo
https://tinygo.org/
こいつは元々wasmを目的としていたわけじゃない。IoTやら小さなデバイスで動くように設計されたGoコンパイラだ。LLVMというライブラリを使っているのだが、それがwasmを生成できるため、「こいつは使える!」となり今に至る。改善点
こいつが生成するwasmは凄まじく小さい。上記の問題点をピンポイントで解決するのだ!
問題点
ただし問題もある。今の所GCがサポートされてない。つまりメモリ管理を慎重にしなくてはならない。Goの利点がちょっと薄れますな。
あと標準ライブラリの対応も現在進行中で完備されていない。つまり既存のライブラリをimportするのは今は無理がある。
今の所安定してコンパイルできる環境はLinuxに限られる(macOS版も進行中)。まとめ
TinyGo最っ高ぅ!
成長速度早いし、今年(2019)中にも使えるものになりそう。現時点(2019/2/11 19:38)ではリポにあるサンプルで動かそうとしてもSafariなどで動かないので注意が必要だ(上のデモは修正済み)。なお、修正のプルリクは申請済みなので直すべき箇所はここを見てくれ。
https://github.com/tinygo-org/tinygo/pull/183同じ投稿をscraivでもしてます。
https://scraiv.com/n/1549883052858
- 投稿日:2019-02-11T17:03:42+09:00
[AOJ]Maximum Profit [golang]
This is a problem I challenged.
You can obtain profits from foreign exchange margin transactions.
For example, if you buy 1000 dollar at a rate of 100 yen per dollar, and sell them at a rate of 108 yen per dollar, you can obtain (108 - 100) × 1000 = 8000 yen.

Write a program which reads values of a currency Rt at a certain time t (t=0,1,2,...n−1), and reports the maximum value of Rj−Ri where j>i .

Input
The first line contains an integer n. In the following n lines, Rt (t=0,1,2,...n−1) are given in order.

Output
Print the maximum value in a line.
first, I think all combinations.
It is 1/2N^2 combinations.for(var j = 0; j < n; j++) for(var i = j + 1; i < n; i++) max = max(max, |r[j] - r[i]|)I need a well designed pattern.
next, I noticed positive and negative of the difference between the number sequence.
if (array[i+1] > 0){
I shouldn't sell the money.
} else if(array[i]+array[i+1] > 0){
this case has possibility when array[i+2]
} else {
I shouldn't buy money.
}
But It is complex and difficult to implement.
This is because (second else if) needs many calc.And I noticed I should buy when it is most cheap before array[i].
So I should another valiable has minR.package main import ( "bufio" "fmt" "math" "os" "strconv" ) var sc = bufio.NewScanner(os.Stdin) func nextLine() int { sc.Scan() n, _ := strconv.Atoi(sc.Text()) return n } func main() { num := nextLine() array := []int{} min := math.MaxInt64 ret := -math.MaxInt64 for i := 0; i < num; i++ { array = append(array, nextLine()) if ret < array[i] - min { ret = array[i] - min } if array[i] < min { min = array[i] } } fmt.Println(ret) }
- 投稿日:2019-02-11T16:24:46+09:00
第4回「FirebaseAuthによるユーザ作成機能導入」@FirebaseAuth+Nuxt.js+Go(v1.11)+GAE開発シリーズ
お題
前回の記事でFirebaseAuthを使った単純なSignIn/Outを実装した。
今回は、SignUp(つまり、FirebaseAuth管理ユーザの新規登録)を実装する。
前回はFirebaseAuthのコンソール上で事前にログイン用ユーザを作成したけど、例えばある種の管理画面などではログイン可能なユーザの作成機能を持たせたりするものなので。
SignIn/OutはJavaScriptのSDKで実装したのでSignUpも合わせようと思うところだけど、JavaScriptのSDKでSignUpを行うと作った途端にそのユーザで自動的にログインした状態になるので、これは使えない。
(つまり、ユーザ作成権限を持つ”ユーザA”でログインして”ユーザB”を作ると、その時点で(”ユーザA”でログインしていたのに)Firebase上は”ユーザB”でログインした状態に変わってしまう。)
なので、SignUpはサーバーサイド側で行う。今回はWebAPIとしてGoを使っているので、Go用のSDKでユーザ作成機能を実装する。FirebaseAuth+Nuxt.js+Go(v1.11)+GAE開発シリーズIndex
- 第3回「FirebaseAuthによるログイン・ログアウト導入」
- 第2回「FirebaseAuth導入前(ログインフォーム実装とバックエンドプロジェクトのガワ作成)」
- 第1回「FirebaseAuth導入前(フロントエンドプロジェクトのガワ作成)」
前提
以下は他にいくらでもよい記事があるので省略。
- 開発環境の構築(GolangやらYarnやらのインストール等)
- Google Cloud Platform環境の取得(App Engine有効化)
- Firebase環境の取得
- Vue.jsやNuxt.jsのチュートリアル
開発環境
# OS
$ cat /etc/os-release
NAME="Ubuntu"
VERSION="18.04.1 LTS (Bionic Beaver)"
# 依存モジュールのバージョン
package.jsonの内容より、以下の通り。"nuxt": "^2.3.4", "vuetify": "^1.3.14", "vuetify-loader": "^1.0.8", "@nuxtjs/axios": "^5.3.6"# Yarn
$ yarn -v
1.12.3
# Golang
$ go version
go version go1.11.4 linux/amd64
実践
■ソース全量
今回作ったソースの全量は下記。
https://github.com/sky0621/Dotato-di-una-libreria/tree/faa9e6567718a7ed69847593315b950d0d7e5dca■フロントエンドにユーザ作成フォームを実装
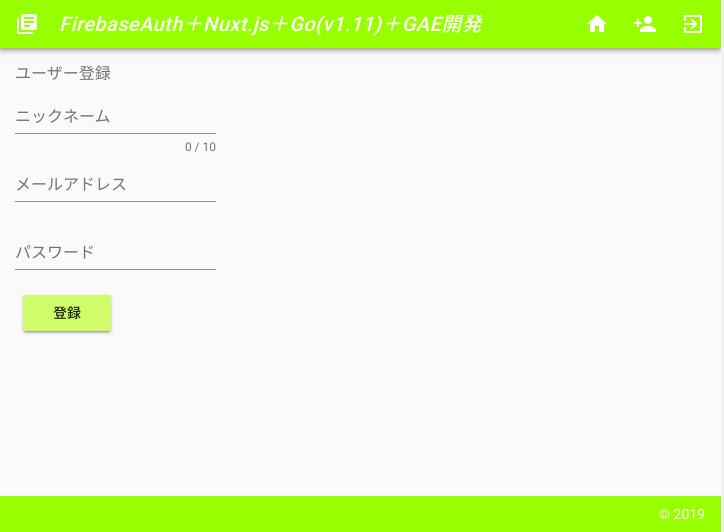
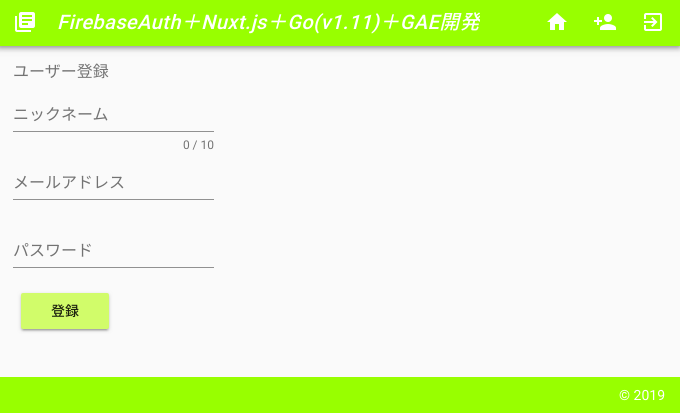
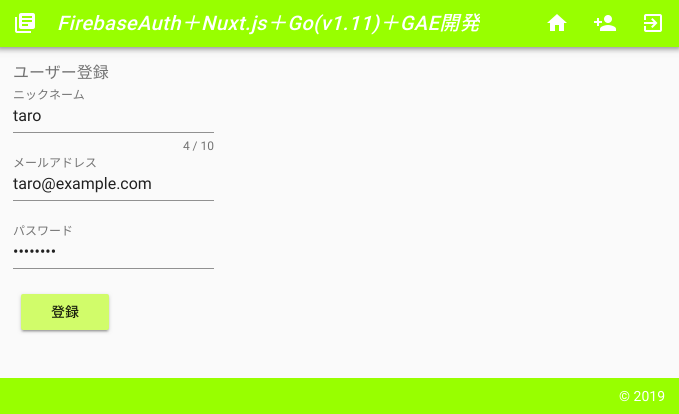
ユーザ作成画面の見た目
こんな感じにしてみた。
Vuetifyを使っているので、ほとんど手間をかけずともそれなりの画面が作れる。
あと、バリデーションはVuelidateを使った。
ソースは後ほど。
画面表示に関する部分のソース
/frontend/pages/signup.vuepagesに「ユーザ作成画面」としてのテンプレートを書き、「ユーザ作成フォーム」の部分だけコンポーネントとして切り出し。
(今後、新規作成と変更とを分けて、フォーム部分を流用することを想定してみたけど、実際のところは、そのときになってみないと、この判断が正しかったかはわからない。。。)[frontend/pages/signup.vue]<template> <v-container fluid> <v-layout align-start justify-start column > <v-flex> <v-label>ユーザー登録</v-label> </v-flex> <v-flex> <signup /> </v-flex> </v-layout> </v-container> </template>
/frontend/components/signup.vue上記pagesの
signup.vueで「<signup />」としていた箇所の中身に当たる。[frontend/components/signup.vue]<template> <form> <v-text-field v-model="name" :error-messages="nameErrors" :counter="10" label="ニックネーム" required @input="$v.name.$touch()" @blur="$v.name.$touch()" /> <v-text-field v-model="email" type="email" :error-messages="emailErrors" label="メールアドレス" required @input="$v.email.$touch()" @blur="$v.email.$touch()" /> <v-text-field v-model="password" type="password" :error-messages="passwordErrors" label="パスワード" required @input="$v.password.$touch()" @blur="$v.password.$touch()" /> <v-btn class="lime lighten-2" @click="submit" > 登録 </v-btn> </form> </template>フォームのロジックに関する部分のソース
以降、フォーム内の3つの要素「ニックネーム」、「メールアドレス」、「パスワード」及び「登録」ボタンそれぞれについて、1要素ずつテンプレートとロジックを抜粋して説明。
抜粋しない完全版のソースは下記参照。
https://github.com/sky0621/Dotato-di-una-libreria/blob/faa9e6567718a7ed69847593315b950d0d7e5dca/frontend/components/signup.vue●「ニックネーム」テキストフィールド
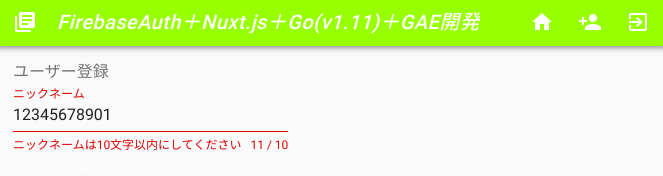
[frontend/components/signup.vue]<template> <form> <v-text-field v-model="name" :error-messages="nameErrors" :counter="10" label="ニックネーム" required @input="$v.name.$touch()" @blur="$v.name.$touch()" /> </form> </template> <script> import { required, maxLength } from 'vuelidate/lib/validators' export default { validations: { name: { required, maxLength: maxLength(10) }, }, data() { return { name: '', } }, computed: { nameErrors() { const errors = [] if (!this.$v.name.$dirty) return errors !this.$v.name.maxLength && errors.push('ニックネームは10文字以内にしてください') !this.$v.name.required && errors.push('ニックネームは必須です') return errors }, }, } </script>テーマ外なのでバリデーションの具体的な仕組みについては解説なしで。↓参照。
https://monterail.github.io/vuelidate/#getting-startedともあれ、上記のように実装すると以下のように入力状態に応じてチェックしてくれる。
●「メールアドレス」テキストフィールド
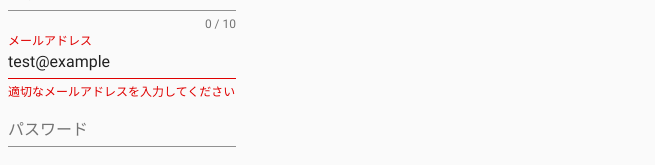
[frontend/components/signup.vue]<template> <form> <v-text-field v-model="email" type="email" :error-messages="emailErrors" label="メールアドレス" required @input="$v.email.$touch()" @blur="$v.email.$touch()" /> </form> </template> <script> import { required, email } from 'vuelidate/lib/validators' export default { validations: { email: { required, email }, }, data() { return { email: '', } }, computed: { emailErrors() { const errors = [] if (!this.$v.email.$dirty) return errors !this.$v.email.email && errors.push('適切なメールアドレスを入力してください') !this.$v.email.required && errors.push('メールアドレスは必須です') return errors }, },上記のように実装すると以下のように入力状態に応じてチェックしてくれる。
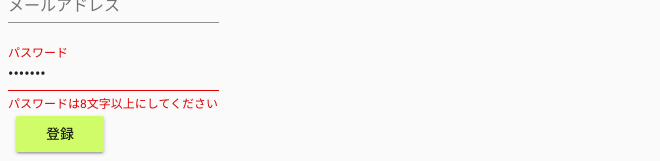
●「パスワード」テキストフィールド
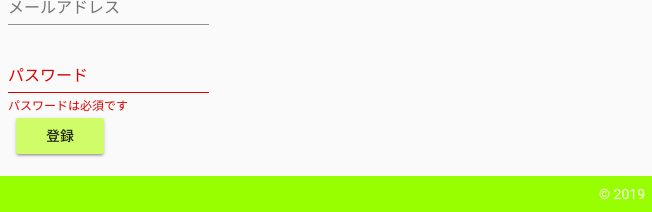
[frontend/components/signup.vue]<template> <form> <v-text-field v-model="password" type="password" :error-messages="passwordErrors" label="パスワード" required @input="$v.password.$touch()" @blur="$v.password.$touch()" /> </form> </template> <script> import { required, minLength } from 'vuelidate/lib/validators' export default { validations: { password: { required, minLength: minLength(8) } }, data() { return { password: '' } }, computed: { passwordErrors() { const errors = [] if (!this.$v.password.$dirty) return errors !this.$v.password.minLength && errors.push('パスワードは8文字以上にしてください') !this.$v.password.required && errors.push('パスワードは必須です') return errors } }, } </script>上記のように実装すると以下のように入力状態に応じてチェックしてくれる。
●「登録」ボタン
this.$v.$touch()でバリデーションを発動させ、if (this.$v.$invalid) returnにより、チェックに引っかかったら処理中断。
あとは、バックエンド側のAPI(パス:/users)にフォームの中身をPOSTするだけ。[frontend/components/signup.vue]<template> <form> <v-btn class="lime lighten-2" @click="submit" > 登録 </v-btn> </form> </template> <script> import * as types from "~/store/types"; export default { data() { return { name: '', email: '', password: '' } }, methods: { submit() { this.$v.$touch() if (this.$v.$invalid) return console.log('validate success') this.$axios .post(process.env.apiBaseUrl + '/users', { 'name': this.name, 'email': this.email, 'password': this.password }) .then((res) => { console.log(res) this.$store.dispatch(types.ACTIVATE_INFO_NOTIFICATION, {message: 'ユーザー「' + this.name + '」を登録しました。'}); this.$router.push('/') }) .catch((err) => { console.log(err) this.$store.dispatch(types.ACTIVATE_ERROR_NOTIFICATION, {message: err}); }) } } } </script>●「通知」スナックバー
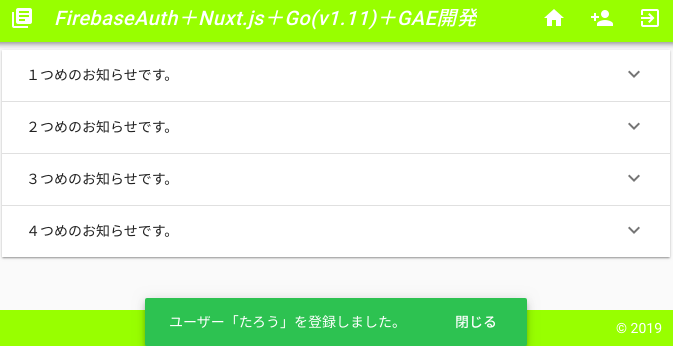
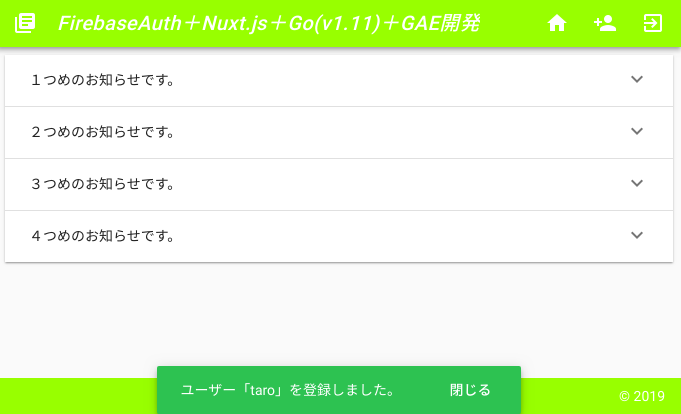
ユーザ登録成功後は、スナックバー(メッセージ:「
ユーザー「○○」を登録しました。」)を表示する。
ユーザ登録失敗時は、やはりスナックバー(メッセージ:サーバから帰ってきたエラーそのもの)を表示する。[frontend/components/signup.vue]<script> methods: { submit() { this.$axios .post(process.env.apiBaseUrl + '/users', { 〜〜省略〜〜 }) .then((res) => { this.$store.dispatch(types.ACTIVATE_INFO_NOTIFICATION, {message: 'ユーザー「' + this.name + '」を登録しました。'}); this.$router.push('/') }) .catch((err) => { this.$store.dispatch(types.ACTIVATE_ERROR_NOTIFICATION, {message: err}); }) } } } </script>このスナックバーの表示内容はコンポーネントないしページをまたいで状態を共有するのでストアに定義。
[frontend/store/index.js]import * as types from './types' export const strict = false export const state = () => ({ notification: { activate: false, message: '', color: '' } }) export const getters = { notification: (state) => { return state.notification } } export const mutations = { setNotification(state, data) { const cdata = _.clone(data) state.notification = { activate: cdata.activate, message: cdata.message, color: cdata.color } } } export const actions = { // 通知を活性化する activateNotification({ commit }, data) { commit(types.SET_NOTIFICATION, { activate: true, message: data.message, color: data.color }) }, // INFO通知を活性化する activateInfoNotification({ commit }, data) { commit(types.SET_NOTIFICATION, { activate: true, message: data.message, color: 'green' }) }, // ERROR通知を活性化する activateErrorNotification({ commit }, data) { commit(types.SET_NOTIFICATION, { activate: true, message: data.message, color: 'red' }) }, // 通知を非活性化する deactivateNotification({ commit }) { commit(types.SET_NOTIFICATION, { activate: false, message: '', color: '' }) } }スナックバー自体を表示するコンポーネントは下記。
[frontend/components/notification.vue]<template> <!-- 通知用スナックバー --> <v-snackbar v-model="snackbar" :color="color" :timeout="timeout" > {{ message }} <v-btn dark flat @click="closeSnackbar" > 閉じる </v-btn> </v-snackbar> </template> <script> import * as types from '~/store/types' export default { data() { return { timeout: 5000, snackbar: false, message: '', color: '' } }, computed: { notification() { return this.$store.getters[types.NOTIFICATION] } }, watch: { notification(val) { this.apply(val) } }, mounted() { const val = this.$store.getters[types.NOTIFICATION] this.apply(val) }, methods: { closeSnackbar() { this.$store.dispatch(types.DEACTIVATE_NOTIFICATION) }, apply(val) { this.message = val.message this.color = val.color this.snackbar = val.activate // TODO: スナックバーのタイムアウト発動タイミングをフックする方法が不明のため、苦肉の策で「同じ時間経過後にスナックバーを非活性化」する対応を仕込む if (this.snackbar) { console.log('setTimeout') setTimeout(this.closeSnackbar, this.timeout) } } } } </script>これにより、ユーザー登録完了後は、トップページ(お知らせ画面)に遷移して、↓のようなスナックバーが表示される。
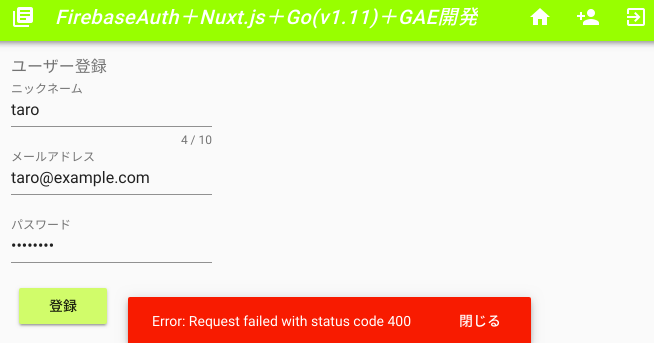
また、エラーが発生した場合は、ユーザー登録画面上で↓のようなスナックバーが表示される。
(※FirebaseAuth上に登録済みのメールアドレスで再度登録を試みた結果)
■バックエンドにユーザ作成APIを実装
バックエンド側の構造は「MVC+S」としている。
各リクエストはcontrollerパッケージ下の機能別ソースで受け付けて、トランザクション境界を持つserviceパッケージ下の機能別ソースを呼び出す。
serviceパッケージ下のソースは適宜、modelパッケージ下のソースを組み合わせて要件を実現する。
前回まででログイン後のトップページに表示する「お知らせ」機能は実装済み。
今回同じような構成で「ユーザ管理」機能を実装する。実装後のパッケージ構成(MVC+S部分のみ抜粋)
├── controller
│   ├── apierror.go
│   ├── form
│   │   ├── form.go
│   │   └── user.go
│   ├── notice.go
│   ├── response
│   ├── router.go
│   └── user.go
├── main.go
├── model
│   ├── dto.go
│   ├── notice.go
│   └── user.go
├── service
│   ├── notice.go
│   └── user.go
backend/controller/router.go[backend/main.go【抜粋】]func main() { 〜〜省略〜〜 // https://echo.labstack.com/guide e := echo.New() 〜〜省略〜〜 // ルーティング設定の起点 controller.Routing(e) appengine.Main() }[backend/controller/router.go]func Routing(e *echo.Echo) { 〜〜省略〜〜 http.Handle("/", e) // 個人の認証を要するWebAPI用のルート authGroup := e.Group("/api/v1") 〜〜省略〜〜 // 「ユーザ」機能のルーティング("/users") HandleUser(authGroup) }
backend/controller/user.go[backend/controller/user.go]func HandleUser(g *echo.Group) { g.POST("/users", createUser) } func createUser(c echo.Context) error { ctx := middleware.GetCustomContext(c) user := &form.User{} if errUser := parse(c, user); errUser != nil { return c.JSON(http.StatusBadRequest, errorJSON(http.StatusBadRequest, errUser.Error())) } if err := service.NewUser(ctx, c.Request().Context()).CreateUser(user.ParseToDto()); err != nil { return c.JSON(http.StatusBadRequest, errorJSON(http.StatusBadRequest, err.Error())) } return c.JSON(http.StatusOK, "{}") }
backend/service/user.goトランザクション境界を設け、最初にDBへのユーザー情報登録、成功したらFirebaseAuthのSDKを使ってFirebase上にユーザー作成という流れ。
[backend/service/user.go]〜〜インターフェース定義や構造体定義、New関数等は省略〜〜 func (s *userService) CreateUser(u *model.User) error { tx := s.db.Begin() defer func() { if tx != nil { db := tx.Commit() if err := db.Error; err != nil { s.lgr.Errorw("Transaction commit failed.", "error", err) } } }() u.ID = util.CreateUniqueID() err := model.NewUserDao(s.lgr, tx, s.firebaseApp).CreateUser(u) if err != nil { tx.Rollback() return err } fbAuth, err := s.firebaseApp.Auth(s.requestCtx) if err != nil { tx.Rollback() return err } fbUser := &auth.UserToCreate{} fbUser.Email(u.Mail) fbUser.Password(u.Password) _, err = fbAuth.CreateUser(s.requestCtx, fbUser) if err != nil { tx.Rollback() return err } return nil }■動作確認
登録画面にて
ユーザー情報を入力して「登録」ボタン押下
トップページにて登録完了が通知される。
データベース上の登録を確認
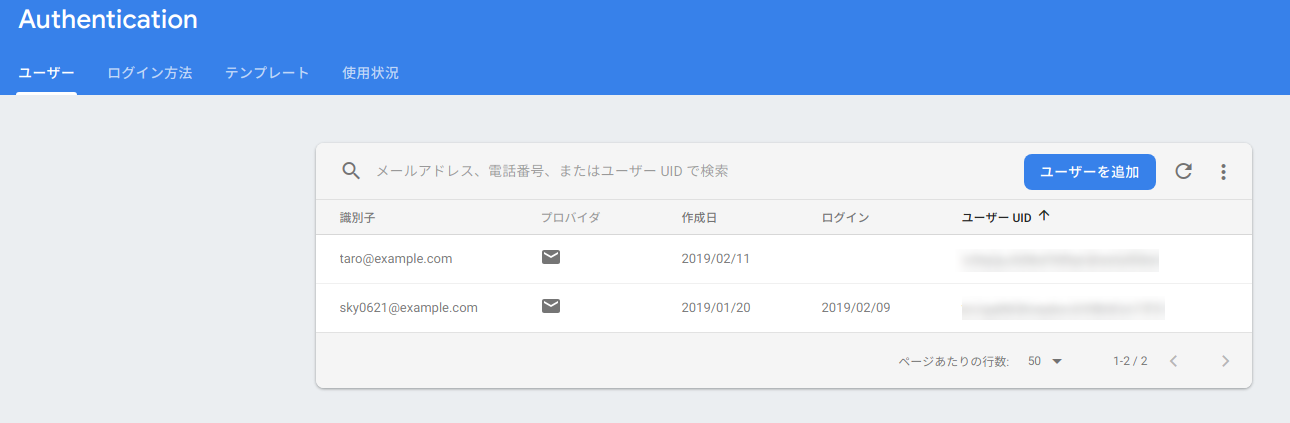
mysql> select * from user where name='taro';
+----------------------------------+------+------------------+-------------+---------------------+-------------+---------------------+------------+
| id                               | name | mail             | create_user | created_at          | update_user | updated_at          | deleted_at |
+----------------------------------+------+------------------+-------------+---------------------+-------------+---------------------+------------+
| c0a5867c55064ff4b8fb944e89770e82 | taro | taro@example.com |             | 2019-02-11 16:09:10 |             | 2019-02-11 16:09:10 | NULL       |
+----------------------------------+------+------------------+-------------+---------------------+-------------+---------------------+------------+
1 row in set (0.00 sec)
FirebaseAuth上も登録を確認
まとめ
現在ログインしているユーザーとは別の新規ユーザーをFirebase上に登録することができた。
ユーザー管理系に触れたので、次回以降は、ユーザーの削除や、メールアドレス、パスワードの変更などを試していきたい。
が、その前に、
今の実装では、ログイン機能はあっても、ログインしているかどうかノーチェックで画面遷移もAPIコールもできてしまう。
これでは実用には耐えられないので、Firebaseログイン後、JWTがもらえるので、それをもとにログインチェック機能を実装しよう。


- 投稿日:2019-02-11T16:09:26+09:00
goで学ぶadapter pattern
adapter patternが本で出てきたのでこんな感じかなぁと書いてみました。
デザインパターンはストーリ仕立てがわかりやすいと思っているので
しばしお付き合いください本文
僕は動物対戦ゲームの開発者。
対戦ゲームなので、動物を定義して戦わせる必要があります動物のinterfaceを定義して、ゲーム内での振る舞いを定義し
それぞれの構造体にロジックを実装していきました。type Animal interface { Attack() int // その他たくさんの定義 } type Gorilla struct { attackPoint int } func (a *Gorilla) Attack() int { return a.attackPoint } // その他の振る舞い // func (a *Gorilla) othrerBehaviour() {} type Lion struct { attackPoint int } func (a *Lion) Attack() int { return a.attackPoint } // func (a *Lion) othrerBehaviour() {}しかし、ここで特定の動物を合体させたものを登場させたいと要望が入りました。
合体させたものには、それぞれの動物がもつ 攻撃力(Attack()) に合体ボーナスを加算したものを
attackPointととして持ちたいとのことex.)
func (a *Lion) Transform() int {
    return a.Attack() + 5 // 動物ごとに異なる合体ボーナス
}
合体できない動物も存在させたいらしく、Animal interface に振る舞いを追加も変だなぁと考えます
今まで作り込んできた構造体の振る舞いは変更したくないし、拡張もしたくない
しかし、既存のクラスのAttack() は流用したい。
そんなときにどうするかというと、2つの作業を行えばスマートに解決できます
- 要望を実現できるinterfaceを定義する
- ↑のinterfaceを実装しつつ、 既存のクラスを継承した構造体を作る
まず、interfaceを定義します
type Parts interface {
    Transform() int
}
そして、↑interfaceを実装しつつ、既存のクラスを継承した構造体を作ります
(goでは、継承を構造体への埋め込みによって実現します)type GorillaParts struct { *Gorilla } func (a *Gorilla) Transform() int { return a.Attack() + 2 } type LionParts struct { *Lion } func (a *LionParts) Transform() int { return a.Attack() + 5 }そして、動物を合体させたものですが、ここでは Chimera としましょう(かっこいい)
Chimeraは 攻撃ポイントと自身が何で作られているかを持っておきますtype Chimera struct { parts []Parts attackPoint int }Chimeraを登場させて見ましょう
func NewChimera(parts ...Parts) Animal {
    c := &Chimera{
        parts: make([]Parts, 0, len(parts)),
    }
    for _, item := range parts {
        c.parts = append(c.parts, item)
        c.attackPoint += item.Transform()
    }
    return c
}
Chimeraはゲーム内で使われるので、Animal を実装させます
func (a *Chimera) Attack() int {
    return a.attackPoint
}
ここまで作業すると、こんな感じになります
playgroundpackage main import "fmt" func main() { g := &Gorilla{ attackPoint: 1, } l := &Lion{ attackPoint: 3, } fmt.Printf("gorilla %v\n", g.Attack()) fmt.Printf("lion %v\n\n", l.Attack()) gp := &GorillaParts{ g, } lp := &LionParts{ l, } fmt.Printf("gorilla parts %v\n", gp.Transform()) fmt.Printf("lion parts %v\n\n", lp.Transform()) c := NewChimera(gp, lp) fmt.Printf("chimera %v\n\n", c.Attack()) } type Parts interface { Transform() int } type Animal interface { Attack() int } type Gorilla struct { attackPoint int } func (a *Gorilla) Attack() int { return a.attackPoint } type GorillaParts struct { *Gorilla } func (a *Gorilla) Transform() int { return a.Attack() + 2 } type Lion struct { attackPoint int } func (a *Lion) Attack() int { return a.attackPoint } type LionParts struct { *Lion } func (a *LionParts) Transform() int { return a.Attack() + 5 } type Chimera struct { parts []Parts attackPoint int } func NewChimera(parts ...Parts) Animal { c := &Chimera{ parts: make([]Parts, 0, len(parts)), } for _, item := range parts { c.parts = append(c.parts, item) c.attackPoint += item.Transform() } return c } func (a *Chimera) Attack() int { return a.attackPoint }余談ですが、今後は特定の合体動物が出てくるかもしれないので
合体動物用のinterfaceを定義して、Chimeraに実装しておくとよいかもしれませんねtype CombinedAnimal interface { Animal // 合体した動物を解除する Release() []Parts } func NewChimera(parts ...Parts) CombinedAnimal { c := &Chimera{ parts: make([]Parts, 0, len(parts)), } for _, item := range parts { c.parts = append(c.parts, item) c.attackPoint += item.Transform() } return c } func (a *Chimera) Attack() int { return a.attackPoint } func (a *Chimera) Release() []Parts { return a.parts }これで、今まで作り込んできた 動物たちの挙動を保ったまま新しい登場人物を作ることができました
まとめ
既存のクラスの振る舞いを利用して、なにか新しいことをやりたいときには
継承したクラスに新しい振る舞いをもたせて、その中で利用してやると既存のクラスが膨れずに済む
- 投稿日:2019-02-11T12:26:39+09:00
GO#5.1 マルチプレクサ続き
http.Handleについて
http.HandleはDefaultServeMuxに、ハンドラを付加してくれるメソッドです。
http.Handle == http.ServeMux.DefaultServeMux.Handleと同じと捉えていいぽい。こうして自分で作ったハンドラ関数、ハンドラをDefaultServeMuxにぶちこんでる。(表現汚いですよね、わかってま
す)ハンドラの定義は(誤魔化しなし)
ServeHTTPという名前がついてる。
第一引数がhttp.ResponseWriterで第2引数が*http.Requestって形になってるもの。でも実際書かれてるものは
hello.go... func hello(w http.ResponseWriter, r *http.Request){ fmt.Fprintf(w, "hello") }みたいな形がおおいいとおもいます。
え、ServeHTTPって名前の関数じゃないじゃん!!って思いますよね。
ここからハンドラ関数がハンドラになるまでを説明したいと思います。
GO言語には、HandlerFuncという名前の関数があります。
このHandlerFunc、helloという関数をメソッドhelloを持つハンドラに変換してくれます。
(FuncToHandlerって名前の関数だったら分かりやすかったのにね笑)func hello(w http.ResponseWriter, r *http.Request){ fmt.Fprintf(w, "hello") } func main() { server := http.Server{ Addr: "127.0.0.1:8080" } http.HandleFunc("/hello", hello) server.ListenAndServe() }出てきましたね、HandleFunc
HandleFunc
ここでhttp.HandleFuncがやってくれてることは、
関数helloをハンドラに変換して、そのハンドラをDefaultServeMuxに登録してくれてます。
そして、そのハンドラをURLの"/hello"と紐付けてくれてます。
- 投稿日:2019-02-11T12:03:26+09:00
goalng contextのキャンセル処理について
『Go言語による並行処理』を読んで
Contextチョットワカルようになったので記録に残します。
Contextの解決したい問題
- Goは並行処理のためにゴルーチンを簡単に生成できる
- 多くの場合ゴルーチンは他のゴルーチンと連携しており、子のゴルーチンが処理を続けるべきかを知ることでリソースを効率的に利用できる
- それを実現する標準的なパターンが必要となり
Contextパッケージができた使う時にどうするのが良いのか
実際に確かめてみました。
サンプルコードはgithubにあげてます。Proxy
別の場所からリクエストを受け取って次のサーバー流す場合。
Proxy自身も個別にタイムアウト設定を持っており渡した先で一定時間に終わらない場合にタイムアウトをさせます。
childCtx, cancel := context.WithCancel(ctx)でcancel関数とそれとつながったContextを生成しそれを次のサーバーに渡し、Proxyがtimeoutだと判断したらcancel()を呼びます。childCtx, cancel := context.WithCancel(ctx) defer cancel() go func() { // Call server's method with cancelable context by proxy res, err := p.Server.Call(childCtx, task) ch <- ProxiedResponce{ Responce: res, Error: err, } }() go func() { // Call cancel after proxy timeout <-time.After(p.Timeout) cancel() }()サンプルの結果は以下のとおりです。
# Responce表示は[(計測時間)/(TaskのTimeout設定)]
# Clientは`70ms`でTimeoutするContextを渡す

# Proxyのtimeoutは45ms
# 30msで完了する`Fast`Serverにリクエストを渡した場合
Proxy: through[TO:45ms] Fast: Timeout [20.1622ms/20ms] Timeout by Server # time 20msなのでServerにてTimeout
Proxy: through[TO:45ms] Fast: Complete [30.9573ms/60ms] <nil>
Proxy: through[TO:45ms] Fast: Complete [30.9573ms/40ms] <nil>
Proxy: through[TO:45ms] Fast: Complete [30.9573ms/80ms] <nil>

# 90msで完了する`Slow`Serverにリクエストを渡した場合
Proxy: through[TO:45ms] Slow: Timeout [20.1622ms/20ms] Timeout by Server
Proxy: through[TO:45ms] Slow: Timeout [40.8834ms/40ms] Timeout by Server
Proxy: through[TO:45ms] Slow: Cancel [45.0796ms/80ms] context canceled # ProxyによるCancel
Proxy: through[TO:45ms] Slow: Cancel [45.0796ms/60ms] context canceled # ProxyによるCancel

# Proxyのtimeoutを75msに変更
# 30msで完了する`Fast`Serverにリクエストを渡した場合
Proxy: through[TO:75ms] Fast: Timeout [20.1622ms/20ms] Timeout by Server # time 20msなのでServerにてTimeout
Proxy: through[TO:75ms] Fast: Complete [30.9573ms/60ms] <nil>
Proxy: through[TO:75ms] Fast: Complete [30.9573ms/80ms] <nil>
Proxy: through[TO:75ms] Fast: Complete [30.9573ms/40ms] <nil>

# 90msで完了する`Slow`Serverにリクエストを渡した場合
Proxy: through[TO:75ms] Slow: Timeout [20.1622ms/20ms] Timeout by Server
Proxy: through[TO:75ms] Slow: Timeout [40.8041ms/40ms] Timeout by Server
Proxy: through[TO:75ms] Slow: Timeout [61.0672ms/60ms] Timeout by Server
Proxy: through[TO:75ms] Slow: Cancel [70.9447ms/80ms] context deadline exceeded # Clientの指定したTimeoutによるCancel
コード全体を示します。Clientに返すのにサーバーからの戻り値を受けていますがプロキシ自身がエラーメッセージを生成して戻したり
WithTimeoutでより短いコンテキストを生成しなおすというパターンもありそうです。
キャンセル時のRollback完了まで確認が必要か、誰がキャンセルをしたのか明示が必要か、などによってそのあたり変わりそうですね。// ProxyProcessWithTimeout pass the request to the next process // and interrupts the request by its own time out setting type ProxyProcessWithTimeout struct { Name string Server Process Timeout time.Duration } func (p *ProxyProcessWithTimeout) Call(ctx context.Context, task Task) (Responce, error) { type ProxiedResponce struct { Responce Responce Error error } // Generate goroutine ch := make(chan ProxiedResponce) // Get a cancel function to cancel by proxy childCtx, cancel := context.WithCancel(ctx) defer cancel() go func() { // Call server's method with cancelable context by proxy res, err := p.Server.Call(childCtx, task) ch <- ProxiedResponce{ Responce: res, Error: err, } }() go func() { // Call cancel after proxy timeout <-time.After(p.Timeout) cancel() }() // wait responce pres := <-ch res := Responce(fmt.Sprintf("%s: through[TO:%s] %s", p.Name, p.Timeout, string(pres.Responce))) return res, pres.Error }Process
重い処理を行う場合は受け取った
Contextから割り込みを適切に受けるのが良いです。
一定の短いループに分解できるのであれば途中で<-ctx.Done()を確認して中断をすべきかを判断させます。for { // 何らかの処理... // ... // select { // Cancel, Time case <-ctx.Done(): // rollback return default: // 終了条件 } }サンプルの結果は以下のとおりです。
# Timeout [(計測時間)/(TaskのTimeout設定)]
# Clientは`70ms`でTimeoutするContextを渡す
# Proxyは`75ms`でContextをCancelする

Proxy: through[TO:75ms] l:1ms: Complete [loop: 20] [33.804ms/40ms] <nil>
Proxy: through[TO:75ms] l:1ms: Timeout [41.9723ms/40ms] Timeout by Simulation
Proxy: through[TO:75ms] l:1ms: Cancel [70.7212ms/80ms] context deadline exceeded # Contextのシグナルを受けて中断できている
Proxy: through[TO:75ms] l:1ms: Cancel [70.7212ms/80ms] context deadline exceeded
サンプルの全体は以下のとおりです。
Tick時間かかる処理をn回行う(task.Valueから取る)とし、ループのたびにcontextを確認します。
例では1tick=1msで動かしてますが20loopの実行に30msかかってますね。どこに時間がかかってるかまた調べます。// ProcessSimulation simurate the real process. // This is an example of a process that can be suspended from Context type ProcessSimulation struct { Name string Tick time.Duration } func (p *ProcessSimulation) Call(ctx context.Context, task Task) (Responce, error) { start := time.Now() loopMax, ok := task.Value.(int) if !ok { return Responce(""), errors.Errorf("Task Value is not int") } if loopMax < 1 { return Responce(""), errors.Errorf("Task.Value must int type and 1 or more") } // Heavy loop process var counter int timeout := time.After(task.Timeout) for { if counter >= loopMax { return Responce(fmt.Sprintf("%s: Complete [loop: %d] [%s/%s]", p.Name, counter, time.Since(start), task.Timeout)), nil } counter++ // Here is check Context and time out setting. select { case <-ctx.Done(): // Add Rollback process when need return Responce(fmt.Sprintf("%s: Cancel [%s/%s]", p.Name, time.Since(start), task.Timeout)), ctx.Err() case <-timeout: // Add Rollback process when need return Responce(fmt.Sprintf("%s: Timeout [%s/%s]", p.Name, time.Since(start), task.Timeout)), errors.Errorf("Timeout by Simulation") case <-time.After(p.Tick): } } }まとめ
以上
Contextのキャンセル処理について試しました。
今思うと上記サンプルのResponceにはerorrを含んだほうが良かった気がします。
こういうのを考えるのは楽しいですね。
Contextをhttp.Requestなどから渡されるところから入ると単なるキャリアのように感じますが(私がそうでした)パフォーマンスを出すために裏側でゴルーチンが動いておりその背景からContextを引き継いでいるのだということでいろいろ納得をしました。
パフォーマンスを出すうえでゴルーチンで並行処理をすると思うのでその際は以下に注意して作ると良さそうです。
Contextを引数にとって割り込み可能に作る- 重い処理はどこで割り込ませるのか、Rollback処理、エラーの伝播を設計時に考えておく
- 投稿日:2019-02-11T12:03:26+09:00
golang contextのキャンセル処理について
『Go言語による並行処理』を読んで
Contextチョットワカルようになったので記録に残します。
Contextの解決したい問題
- Goは並行処理のためにゴルーチンを簡単に生成できる
- 多くの場合ゴルーチンは他のゴルーチンと連携しており、子のゴルーチンが処理を続けるべきかを知ることでリソースを効率的に利用できる
- それを実現する標準的なパターンが必要となり
Contextパッケージができた使う時にどうするのが良いのか
実際に確かめてみました。
サンプルコードはgithubにあげてます。Proxy
別の場所からリクエストを受け取って次のサーバー流す場合。
Proxy自身も個別にタイムアウト設定を持っており渡した先で一定時間に終わらない場合にタイムアウトをさせます。
childCtx, cancel := context.WithCancel(ctx)でcancel関数とそれとつながったContextを生成しそれを次のサーバーに渡し、Proxyがtimeoutだと判断したらcancel()を呼びます。childCtx, cancel := context.WithCancel(ctx) defer cancel() go func() { // Call server's method with cancelable context by proxy res, err := p.Server.Call(childCtx, task) ch <- ProxiedResponce{ Responce: res, Error: err, } }() go func() { // Call cancel after proxy timeout <-time.After(p.Timeout) cancel() }()サンプルの結果は以下のとおりです。
# Responce表示は[(計測時間)/(TaskのTimeout設定)]
# Clientは`70ms`でTimeoutするContextを渡す

# Proxyのtimeoutは45ms
# 30msで完了する`Fast`Serverにリクエストを渡した場合
Proxy: through[TO:45ms] Fast: Timeout [20.1622ms/20ms] Timeout by Server # time 20msなのでServerにてTimeout
Proxy: through[TO:45ms] Fast: Complete [30.9573ms/60ms] <nil>
Proxy: through[TO:45ms] Fast: Complete [30.9573ms/40ms] <nil>
Proxy: through[TO:45ms] Fast: Complete [30.9573ms/80ms] <nil>

# 90msで完了する`Slow`Serverにリクエストを渡した場合
Proxy: through[TO:45ms] Slow: Timeout [20.1622ms/20ms] Timeout by Server
Proxy: through[TO:45ms] Slow: Timeout [40.8834ms/40ms] Timeout by Server
Proxy: through[TO:45ms] Slow: Cancel [45.0796ms/80ms] context canceled # ProxyによるCancel
Proxy: through[TO:45ms] Slow: Cancel [45.0796ms/60ms] context canceled # ProxyによるCancel

# Proxyのtimeoutを75msに変更
# 30msで完了する`Fast`Serverにリクエストを渡した場合
Proxy: through[TO:75ms] Fast: Timeout [20.1622ms/20ms] Timeout by Server # time 20msなのでServerにてTimeout
Proxy: through[TO:75ms] Fast: Complete [30.9573ms/60ms] <nil>
Proxy: through[TO:75ms] Fast: Complete [30.9573ms/80ms] <nil>
Proxy: through[TO:75ms] Fast: Complete [30.9573ms/40ms] <nil>

# 90msで完了する`Slow`Serverにリクエストを渡した場合
Proxy: through[TO:75ms] Slow: Timeout [20.1622ms/20ms] Timeout by Server
Proxy: through[TO:75ms] Slow: Timeout [40.8041ms/40ms] Timeout by Server
Proxy: through[TO:75ms] Slow: Timeout [61.0672ms/60ms] Timeout by Server
Proxy: through[TO:75ms] Slow: Cancel [70.9447ms/80ms] context deadline exceeded # Clientの指定したTimeoutによるCancel
コード全体を示します。Clientに返すのにサーバーからの戻り値を受けていますがプロキシ自身がエラーメッセージを生成して戻したり
WithTimeoutでより短いコンテキストを生成しなおすというパターンもありそうです。
キャンセル時のRollback完了まで確認が必要か、誰がキャンセルをしたのか明示が必要か、などによってそのあたり変わりそうですね。// ProxyProcessWithTimeout pass the request to the next process // and interrupts the request by its own time out setting type ProxyProcessWithTimeout struct { Name string Server Process Timeout time.Duration } func (p *ProxyProcessWithTimeout) Call(ctx context.Context, task Task) (Responce, error) { type ProxiedResponce struct { Responce Responce Error error } // Generate goroutine ch := make(chan ProxiedResponce) // Get a cancel function to cancel by proxy childCtx, cancel := context.WithCancel(ctx) defer cancel() go func() { // Call server's method with cancelable context by proxy res, err := p.Server.Call(childCtx, task) ch <- ProxiedResponce{ Responce: res, Error: err, } }() go func() { // Call cancel after proxy timeout <-time.After(p.Timeout) cancel() }() // wait responce pres := <-ch res := Responce(fmt.Sprintf("%s: through[TO:%s] %s", p.Name, p.Timeout, string(pres.Responce))) return res, pres.Error }Process
重い処理を行う場合は受け取った
Contextから割り込みを適切に受けるのが良いです。
一定の短いループに分解できるのであれば途中で<-ctx.Done()を確認して中断をすべきかを判断させます。for { // 何らかの処理... // ... // select { // Cancel, Time case <-ctx.Done(): // rollback return default: // 終了条件 } }サンプルの結果は以下のとおりです。
# Timeout [(計測時間)/(TaskのTimeout設定)]
# Clientは`70ms`でTimeoutするContextを渡す
# Proxyは`75ms`でContextをCancelする

Proxy: through[TO:75ms] l:1ms: Complete [loop: 20] [33.804ms/40ms] <nil>
Proxy: through[TO:75ms] l:1ms: Timeout [41.9723ms/40ms] Timeout by Simulation
Proxy: through[TO:75ms] l:1ms: Cancel [70.7212ms/80ms] context deadline exceeded # Contextのシグナルを受けて中断できている
Proxy: through[TO:75ms] l:1ms: Cancel [70.7212ms/80ms] context deadline exceeded
サンプルの全体は以下のとおりです。
Tick時間かかる処理をn回行う(task.Valueから取る)とし、ループのたびにcontextを確認します。
例では1tick=1msで動かしてますが20loopの実行に30msかかってますね。どこに時間がかかってるかまた調べます。// ProcessSimulation simurate the real process. // This is an example of a process that can be suspended from Context type ProcessSimulation struct { Name string Tick time.Duration } func (p *ProcessSimulation) Call(ctx context.Context, task Task) (Responce, error) { start := time.Now() loopMax, ok := task.Value.(int) if !ok { return Responce(""), errors.Errorf("Task Value is not int") } if loopMax < 1 { return Responce(""), errors.Errorf("Task.Value must int type and 1 or more") } // Heavy loop process var counter int timeout := time.After(task.Timeout) for { if counter >= loopMax { return Responce(fmt.Sprintf("%s: Complete [loop: %d] [%s/%s]", p.Name, counter, time.Since(start), task.Timeout)), nil } counter++ // Here is check Context and time out setting. select { case <-ctx.Done(): // Add Rollback process when need return Responce(fmt.Sprintf("%s: Cancel [%s/%s]", p.Name, time.Since(start), task.Timeout)), ctx.Err() case <-timeout: // Add Rollback process when need return Responce(fmt.Sprintf("%s: Timeout [%s/%s]", p.Name, time.Since(start), task.Timeout)), errors.Errorf("Timeout by Simulation") case <-time.After(p.Tick): } } }ソースコードを読む
次はなぜ
With***で設定をするのか、複数回WithTimeout()を呼んだらどうなるのか知るためにソースコード(context.go)を読んでみました。
- Contextは
With***(ctx,args)のたびに新しいインスタンスを生成している- それらはContext内で宣言された
*emptyCtxを終端に持つ連結リストの子孫である- Cancelは常に親から子に伝播し親は影響を受けない
- Valueは子から親に向かってのみ参照する
という実装になっていました。これで安心してキャンセルできますね。
Cancelの実装
Contextのキャンセルの実装は
cancelCtxにあります。Timeout,DeadlineもcancelCtxを埋め込んであり指定の時間が来たらキャンセルをするだけです。
そのキャンセルの実装が次の部分です自身の状態を見てキャンセルされていない場合は状態を変更し(err fieldをnon-nilにする)子にも同じ
errorを伝え、子を連結リストから取り除きます。
また自身を親の持つ子のリスト取り除きます。親子関係の設定は
With***の際にfunc propagateCancel(parent Context, child canceler)を呼ぶことで行われます。Valueの実装
WithValue(ctx, key, value)は指定されたkeyとvalueとctxへの参照を持つ*valueCtxを返します。
Value(key)が呼ばれるとkeyが一致するまで親の方向をたどります。
すべての親はbackground *emptyCtxであり常にnilを返すのでkeyが一致する最も近い*valueCtxの値かnilのどちらかが返ってきます。Done()から得られる値
Doneの戻り値は
<-chan struct{}です。
クローズしてあるチャンネルはその型のデフォルト値とtrueを返します。
故にどこでどれだけDone()で待っていてもチャンネル閉じられたなら処理は次に進みます。まとめ
以上
Contextのキャンセル処理について試しました。
今思うと上記サンプルのResponceにはerrorを含んだほうが良かった気がします。
こういうのを考えるのは楽しいですね。
Contextをhttp.Requestなどから渡されるところから入ると単なるキャリアのように感じますが(私がそうでした)パフォーマンスを出すために裏側でゴルーチンが動いておりその背景からContextを引き継いでいるのだということでいろいろ納得をしました。
パフォーマンスを出すうえでゴルーチンで並行処理をすると思うのでその際は以下に注意して作ると良さそうです。
Contextを引数にとって割り込み可能に作る- 重い処理はどこで割り込ませるのか、Rollback処理、エラーの伝播を設計時に考えておく
- 投稿日:2019-02-11T11:52:13+09:00
GO#5 ハンドラ、ハンドラ関数、マルチプレクサ のメモ
GOプログラミング実践入門
※自分なりにまとめてみました。間違ってたらじゃんじゃん指摘してください。
サーバー作成
ハンドラとかマルチプレクサは'net/http'のライブラリの魔法です。
http.ListenAndServe("ネットワークアドレス",nil)でサーバーを作成できる。
第2引数はリクエストを処理するハンドラを呼び出す。
ネットワークアドレスが'""'の場合デフォルトのポート80になる。
ハンドラがnilの場合デフォルトの'DefaultServeMux'になる。←これがマルチプレクサってやつらしい。ハンドラとハンドラ関数ってなに??
結論から言うとハンドラ関数はハンドラのように振る舞う関数です!
じゃあそのハンドラって??
ServeHTTP(http.ResponseWriter, *http.Request)の形のやつをハンドラっていいます。(ちょっと誤魔化しました。)
ハンドラはURLによってする処理を決めるという認識だと思います。(railsでいうcontroller)
ここまでをまとめてみます。
ListenAndServeの第2引数がハンドラ。
このハンドラのデフォルト値はDefaultServeMuxここで、ハンドラがマルチプレクサ??意味わからんてなった方もいると思います。安心してください。僕もです笑
構造、インスタンスの関係がこんな感じらしいです。
'Handler > ServeMux > ServeHTTP > DefaultServeMux'
言葉で言いますと、
ServeMuxは構造体Handlerのインスタンス(構造体はrailsで言うmodelみたいな感じですかね)。
ServeHTTPはServeMuxのメソッド(railsでいう`ServeHTTP.ServeMux`で呼び出せる的な??)
DefaultServeMuxはServeMuxのインスタンス。
となります。
では#マルチプレクサについて見てみましょう。
マルチプレクサの仕事
'リクエストを特定のハンドラに転送するURLのマッチング処理'