- 投稿日:2019-02-11T23:54:16+09:00
Mac+vagrant+ubuntu+nodejsインストールでいきなりつまずく
覚書き
MacのVagrant上のubuntuにsshで接続。そこにnode.jsをインストールする。
vagrant@vagrant-ubuntu-trusty-64:~$ sudo apt install -y nodejs npm
Reading package lists... Done
Building dependency tree
Reading state information... Done
npm is already the newest version.
nodejs is already the newest version.
0 upgraded, 0 newly installed, 0 to remove and 0 not upgraded.
ここまで順調。
vagrant@vagrant-ubuntu-trusty-64:~$  sudo npm install n -g
npm http GET https://registry.npmjs.org/n
npm http GET https://registry.npmjs.org/n
npm http GET https://registry.npmjs.org/n
npm ERR! Error: CERT_UNTRUSTED
npm ERR!     at SecurePair.<anonymous> (tls.js:1370:32)
npm ERR!     at SecurePair.EventEmitter.emit (events.js:92:17)
npm ERR!     at SecurePair.maybeInitFinished (tls.js:982:10)
npm ERR!     at CleartextStream.read [as _read] (tls.js:469:13)
npm ERR!     at CleartextStream.Readable.read (_stream_readable.js:320:10)
npm ERR!     at EncryptedStream.write [as _write] (tls.js:366:25)
npm ERR!     at doWrite (_stream_writable.js:223:10)
npm ERR!     at writeOrBuffer (_stream_writable.js:213:5)
npm ERR!     at EncryptedStream.Writable.write (_stream_writable.js:180:11)
npm ERR!     at write (_stream_readable.js:583:24)
npm ERR! If you need help, you may report this log at:
npm ERR!     <http://github.com/isaacs/npm/issues>
npm ERR! or email it to:
npm ERR!     <npm-@googlegroups.com>

npm ERR! System Linux 3.13.0-165-generic
npm ERR! command "/usr/bin/nodejs" "/usr/bin/npm" "install" "n" "-g"
npm ERR! cwd /home/vagrant
npm ERR! node -v v0.10.25
npm ERR! npm -v 1.3.10
npm ERR!
npm ERR! Additional logging details can be found in:
npm ERR!     /home/vagrant/npm-debug.log
npm ERR! not ok code 0
エラーで止まってしまった。
「npm ERR! Error:」で検索してみらたら
npm config set strict-ssl false
というコマンドを叩くらしい。完了したらtrueに戻すのを忘れないように。vagrant@vagrant-ubuntu-trusty-64:~$ npm config set strict-ssl false vagrant@vagrant-ubuntu-trusty-64:~$ vagrant@vagrant-ubuntu-trusty-64:~$ sudo npm install n -g npm http GET https://registry.npmjs.org/n npm http 200 https://registry.npmjs.org/n npm http GET https://registry.npmjs.org/n/-/n-2.1.12.tgz npm http 200 https://registry.npmjs.org/n/-/n-2.1.12.tgz /usr/local/bin/n -> /usr/local/lib/node_modules/n/bin/n n@2.1.12 /usr/local/lib/node_modules/nこれをクリアすれば、先に進める。
- 投稿日:2019-02-11T22:41:57+09:00
BitBar + Node.jsで天気予報を表示させてみた
作成したツール
今回、BitBarというツールとNode.jsを使って、天気予報を表示させるツールを作成してみた。
ツール名は「BitWeather」
一応gitにも公開したので、是非とも閲覧且つ、インストール且つ、スターをつけるをお願いします!!
そんでもって、今回の投稿が初投稿になります。皆さんよろしくです。
BitBarとは
任意のスクリプトまたはプログラムからの出力をMac OS Xのメニューバーに直接表示できる無料ツール。
また、cronのように任意の実行間隔でスクリプトなど、処理を実行できるそう。なるほどってことで、使ってみました。
結論から言うと、導入がクッソ簡単ですww
公式ページ、またはターミナル上からBitBarをインストールします。ターミナルだと、以下の感じで$ brew cask install bitbarインストールされたら、それを実行するだけ( ・∇・)
すると、あら不思議!!メニューバーにBitBarが表示されたじゃないのよ( ・∇・)!!
あとは、BitBar専用のプラグインフォルダを作成して、そのディレクトリにshellやらRubyやらnodeやらのスクリプトを記述すれば、メニューバーに色々な機能が追加できるって感じっす( ・∇・)BitBarについては以下のサイトがとてもわかりやすくまとめているため、詳細などは以下を参照してください!!
天気予報の取得
今回作成したツールでは、OpenWeatherMapっていう無料天気予報APIを使用して天気予報を取得しました。
「天気予報 取得」で検索すると、結構ヒットするのがOpenWeatherMapだったので、自分も使ってみようという感じですね。
あまり、お金かけるの嫌なんで、有料枠のプランではなく無料枠のプランで使用してみることに。
無料のFreeプランだと5日後までの3時間毎の天気予報を取得できて、1分間に60回までAPIコールできるそう。(所感としては、全然無料枠でええやろって感じっす)
あとは、公式サイトからAPI keyを発行し、APIにリクエストを投げれば、天気予報が簡単に取得できます。(説明大分省略してます。。。)試しにターミナル上で
curlコマンドを用いてAPIにリクエストを送ってみました。
以下のURLにおけるリクエストパラメータのappidは公式サイトでのAPI keyなので、皆さんも実際にリクエスト送ってみてください!!$ curl https://samples.openweathermap.org/data/2.5/find?lat=57&lon=-2.15&cnt=3&appid=b6907d289e10d714a6e88b30761fae22 | jqレスポンスはjsonやxmlを指定できるそうです。
以下のレスポンスはjson形式となります。{ "message":"accurate", "cod":"200", "count":3, "list":[ {"id":2641549, "name":"Newtonhill", "coord":{"lat":57.0333,"lon":-2.15}, "main":{"temp":275.15, "pressure":1010, "humidity":93, "temp_min":275.15, "temp_max":275.15}, "dt":1521204600, 以下省略...取得できれば、あとは
JSON.parseしてあげて、表示したいように表示するだけです( ・∇・)現在地の取得
せっかくだし、現在地も取得したいなぁっと思ったので、色々調べてみました。
色々調べてみた結果、「ipinfo.io」というAPIと出会うことができました。
こちらのAPIは意外と正確に現在地を取得してくれます。
何より10万人以上の企業や開発者から信頼されています。
っとか言われたら、そりゃ安心して使っちゃうでしょ!!
また、こちらのAPIも使うのが簡単で、公式ページから「SIGN UP」を選択し、アカウント登録するとtokenが発行できます。
そのtokenをリクエストパラメータとして使用しAPIをたたくと現在地情報など取得できます。こちらも、試しにターミナル上で
curlコマンドを用いてAPIにリクエストを送ってみました。
URLのtoken情報は、実際に発行した、トークン情報となります。$ curl https://ipinfo.io/?token={token} | jqレスポンスはjson形式のみ?だと思われます。
結果は、以下のような感じです。{ "ip": "118.103.63.151", "city": "city name", "region": "region name", "country": "JP", "loc": "lat, lon", "postal": "Postal code", "org": "AS17676 Softbank BB Corp." }取得できたら、こちらもOpenWeatherMap同様、
JSON.parseしてあげ、必要な情報だけ抜き取ったりする感じですね。
今回のツールでは、取得されたデータからOpenWeatherMapのリクエスト情報に緯度、経度の情報を渡してあげて、現在地の天気予報を取得する処理にしました。実装におけるプチこだわり
今回の実装では、なるべくドメイン駆動っぽく実装したかったため、1つのjsファイルに1つの関心事を詰めること意識し実装しました。
jsでのオブジェクトとして、以下のような雛形からオブジェクトを作成しました。var Obj = { create: (arg) => { var obj = Object.create(Obj.prototype); obj.arg = arg; return obj; }, prototype: { method() { // Use arg process. } } }割と上記の書き方は好きです。わかる人にはわかりやすいオブジェクトの書き方ではないかと(勝手に)思ってます。
上記の雛形より、例えばリクエストURLとかのオブジェクトは以下のように作成しました。
url.jsexports.create = (url, parameter) => { return Url.create(url, parameter); } var Url = { create: (requestUrl, requestParameter) => { var url = Object.create(Url.prototype); url.requestUrl = requestUrl; url.requestParameter = requestParameter; return url; }, prototype: { createUrl() { if(this.requestParameter === undefined) { return this.requestUrl; } var keys = Object.keys(this.requestParameter); var mappingKeys = keys.map((key, index) => { return key + '=' + this.requestParameter[key]; }); return this.requestUrl + '?' + mappingKeys.join('&'); } } } // 使用する側 var Url = require('./url'); var url = Url.create('https://request/url', {id: 111, value: 'hoge'}); url.createUrl(); // -> "https://request/url?id=111&value=hoge"まぁ、車輪の再発明感はあるはメソッド名はわかりにくいやら。。。
リファクタリングはまだまだやります。。。まとめ
今回、BitWeatherを作成してみましたが、まずは使ってみる価値ありだと思われます!!(笑)
Node.jsでドメイン駆動っぽく実装したのが初めてだったので、開発には時間がかかりました。まだまだBitWeatherは拡張していくつもりなのでバージョンをどんどん上げていこうと思っていますはい!!
バージョンの付け方やら細かいことは全くよくわかってないので雰囲気でどんどん進めていこうと思っていますですはい!!以上です。
最後まで閲覧してくれた方、ありがとうございます?♂️


- 投稿日:2019-02-11T22:22:24+09:00
Proxy環境化で graphql-request を使う
この記事は、proxy 環境下で graphql-request を使うためのメモです。
はじめに
- graphql-request は、非常にシンプルで軽量な GraphQL のクライアント実装です。
- npm: graphql-request
- GitHub: graphql-request
環境
下記の環境で動作確認しました。
- Windows 10 Pro (64bit)
- Git for Windows 2.20.1
- Git Bash : GNU bash, version 4.4.23(1)-release (x86_64-pc-msys)
- Node.js 8.10.0
- ここでは AWS Lambda でサポートされている最新の Node.js のバージョンに合わせています
- npm 5.6.0
- TypeScript 3.3
graphql-request の動作確認
サンプルプロジェクトの作成
Git Bash を起動して、適当な名前で node module を作成する。
$ mkdir sample-graphql
$ cd sample-graphql
$ npm init -y
Wrote to C:\work\sample-graphql\package.json:

{
  "name": "sample-graphql",
  "version": "1.0.0",
  "description": "",
  "main": "index.js",
  "scripts": {
    "test": "echo \"Error: no test specified\" && exit 1"
  },
  "keywords": [],
  "author": "",
  "license": "ISC"
}
graphql-request のインストール
npm install で graphql-request をインストールする。
$ npm install --save graphql-request
npm WARN registry Using stale data from https://registry.npmjs.org/ because the host is inaccessible -- are you offline?
npm WARN registry Using stale package data from https://registry.npmjs.org/ due to a request error during revalidation.
npm notice created a lockfile as package-lock.json. You should commit this file.
npm WARN sample-graphql@1.0.0 No description
npm WARN sample-graphql@1.0.0 No repository field.

+ graphql-request@1.8.2
added 4 packages in 0.853s
サンプルコードの作成
graphql-request の Quickstart を参考にサンプルコードを作成する。
index.jsconst GraphQLClient = require('graphql-request').GraphQLClient; const endpoint = 'https://api.graph.cool/simple/v1/movies'; const options = {}; const client = new GraphQLClient(endpoint, options); const query = `{ Movie(title: "Inception") { releaseDate actors { name } } }` const variables = {}; client.request(query, variables) .then(data => console.log(JSON.stringify(data, null, 2))) .catch(error => console.error(error));サンプルコードの実行
- 非 Proxy 環境下での実行結果
$ node index.js
{
  "Movie": {
    "releaseDate": "2010-08-28T20:00:00.000Z",
    "actors": [
      {
        "name": "Leonardo DiCaprio"
      },
      {
        "name": "Ellen Page"
      },
      {
        "name": "Tom Hardy"
      },
      {
        "name": "Joseph Gordon-Levitt"
      },
      {
        "name": "Marion Cotillard"
      }
    ]
  }
}
- Proxy 環境下での実行結果
- 接続できずにタイムアウトで失敗
$ node index.js
{ FetchError: request to https://api.graph.cool/simple/v1/movies failed, reason: connect ETIMEDOUT 13.33.0.193:443
    at ClientRequest.<anonymous> (C:\work\sample-graphql\node_modules\node-fetch\lib\index.js:1393:11)
    at emitOne (events.js:116:13)
    at ClientRequest.emit (events.js:211:7)
    at TLSSocket.socketErrorListener (_http_client.js:387:9)
    at emitOne (events.js:116:13)
    at TLSSocket.emit (events.js:211:7)
    at emitErrorNT (internal/streams/destroy.js:64:8)
    at _combinedTickCallback (internal/process/next_tick.js:138:11)
    at process._tickCallback (internal/process/next_tick.js:180:9)
  message: 'request to https://api.graph.cool/simple/v1/movies failed, reason: connect ETIMEDOUT 13.33.0.193:443',
  type: 'system',
  errno: 'ETIMEDOUT',
  code: 'ETIMEDOUT' }
Proxy 対応
https-proxy-agent のインストール
https-proxy-agent は Proxy 経由で HTTPS 接続する node module です。
$ npm install --save https-proxy-agent
npm WARN sample-graphql@1.0.0 No description
npm WARN sample-graphql@1.0.0 No repository field.

+ https-proxy-agent@2.2.1
added 6 packages in 1.766s
サンプルコードの修正と実行
graphql-request は node-fetch を利用しており、 constructor の options に渡した値が Options として渡されます。
index.jsconst GraphQLClient = require('graphql-request').GraphQLClient; const HttpsProxyAgent = require('https-proxy-agent'); const endpoint = 'https://api.graph.cool/simple/v1/movies'; const options = { agent: new HttpsProxyAgent(process.env.HTTP_PROXY), }; const client = new GraphQLClient(endpoint, options); const query = `{ Movie(title: "Inception") { releaseDate actors { name } } }` const variables = {}; client.request(query, variables) .then(data => console.log(JSON.stringify(data, null, 2))) .catch(error => console.error(error));実行結果
$ node index.js
{
  "Movie": {
    "releaseDate": "2010-08-28T20:00:00.000Z",
    "actors": [
      {
        "name": "Leonardo DiCaprio"
      },
      {
        "name": "Ellen Page"
      },
      {
        "name": "Tom Hardy"
      },
      {
        "name": "Joseph Gordon-Levitt"
      },
      {
        "name": "Marion Cotillard"
      }
    ]
  }
}
おまけ:TypeScript の場合
https-proxy-agent.d.ts の作成
https-proxy-agent.d.tsimport { Agent } from 'http'; declare class HttpsProxyAgent extends Agent { constructor(uri: string | { protocol?: string; host?: string; hostname?: string; port?: string }); } export = HttpsProxyAgent;サンプルコードの作成
index.tsimport { GraphQLClient } from 'graphql-request'; import { Variables } from 'graphql-request/dist/src/types'; import HttpsProxyAgent from 'https-proxy-agent'; const endpoint = 'https://api.graph.cool/simple/v1/movies'; const options = { headers: {}, agent: process.env.HTTP_PROXY ? new HttpsProxyAgent(process.env.HTTP_PROXY) : null, }; const client = new GraphQLClient(endpoint, options); const query = `{ Movie(title: "Inception") { releaseDate actors { name } } }` const variables = {}; client.request(query, variables) .then(data => console.log(JSON.stringify(data, null, 2))) .catch(error => console.error(error));
- 投稿日:2019-02-11T20:34:01+09:00
power-assert をインストールするときはテストコードの配置場所に注意しよう
はじめに
power-assert1 は便利なライブラリですが、インストールでハマったのでその記録と対処について書きます。
エラーの表示が変わらない。。
筆者の環境だと、公式ページの説明の通りインストールしても、エラーの表示が Node.js 標準の assert から変わりませんでした。
package.json{ "name": "power-assert-sample", "version": "1.0.0", "main": "index.js", "license": "MIT", "scripts": { "test": "mocha --require intelli-espower-loader tests/*.js" }, "devDependencies": { "intelli-espower-loader": "^1.0.1", "mocha": "^5.2.0", "power-assert": "^1.6.1" }, "dependencies": { } }src/hello.jsmodule.exports = (person) => { return `Hello, ${person}!`; }tests/helloTest.jsconst assert = require('power-assert'); const hello = require('../src/hello.js'); describe('hello test suit', () => { it('greet Taro', () => { assert(hello('Taro') === 'Hello, Taro!'); }); });テスト実行
yarn test1) hello test suit greet Taro: AssertionError [ERR_ASSERTION]: The expression evaluated to a falsy value: func.apply(thisObj, args)原因
power-assert を使うとき、テストコードは
testに置くことを想定していますが、私のリソースではtests/においていました。テストのディレクトリが
testと異なる場合は package.json に明示的に指定するとのこと。
内部で構文解析をしているので、テストコードの場所を知っている必要があるんですね。このことは、
power-assertでなく、intelli-espower-loaderの README2に説明がありました。The default folder is "test/". You must put your test script in this folder.
If you don't put your test code in the right folder, intelli-espower-loader will work incorrectly.
You can change test folder setting in your package.jsonpackage.jsonを以下を追加したらうまく動きました。
... "directories": { "test": "tests" }, ...表示結果assert(hello('John Smith').match(/^Hello, Taro/)) | | | null "Hello, John Smith!"参考
- 投稿日:2019-02-11T17:08:00+09:00
firebase serve --only functions で Cannot find module 'firebase-admin' エラー
試したこと
https://github.com/firebase/firebase-functions/issues/84
ここのやり取りに書いてあることを試しました。でもここの登場人物たちと同じようにエラーは解決しなかったです。
nvm use v6.11.5
エラーメッセージの内容は変わらず。ただCloud Functionsと同じバージョンをつかうように促すためのWarningが一つ消えただけ。
functions/ 内でnpm install
エラーメッセージの内容は変わらず。
functions/ 内でnpm run build
https://firebase.google.com/docs/functions/typescript?hl=ja
Error: Cannot find module '../lib/tsc.js'
どうすりゃええねん。
うまくいった解決策
functions/ 内でrm -rf node_modules/ → npm install
とりあえず動きました。
なんか、node_modulesの中身って時々壊れるみたいですね。
コンピューターがトラブったらとりあえず再起動するみたいな、そういう解決策。しばしば重要で忘れがちですね。
- 投稿日:2019-02-11T16:35:03+09:00
「Puppeteer入門ースクレイピング+Web操作自動処理プログラミング」の動かないサンプルコード③
「Puppeteer入門ースクレイピング+Web操作自動処理プログラミング」の動かないサンプルコード③
「Puppeteer入門ースクレイピング+Web操作自動処理プログラミング」を購入し、ただいま勉強中です。
これね↓
Puppeteer入門 スクレイピング+Web操作自動処理プログラミング
動かないサンプルコードがいくつかありますね。
のちのち使えそうなコードはせっかくなので修正して残しておこうと思いました。まずpuppeteerについて
「Puppeteer入門ースクレイピング+Web操作自動処理プログラミング」の動かないサンプルコード① の「まずpuppeteerについて」の項目をご覧ください。
7章の6,「ブログの画像を保存する」
これも「Puppeteer入門ースクレイピング+Web操作自動処理プログラミング」の動かないサンプルコード②と同じです。do { 処理 } while(true)の中にawait Promise.all([ 処理 ]);があって、その中にpage.clickがある。そのせいか?ループ途中でハングアップします。
解決方法も同じ。
const nextに、セレクタオブジェクト'(a[rel="next"])'を代入するのではなく、そのhref属性(リンク先URL)を代入。
const next = await page.evaluate(() => document.querySelector(
'a[rel="next"]'));
const next = await page.evaluate(() => document.querySelector('a[rel="next"]').href);そしてPromise.allの中で、page.click()ではなくpage.goto()を使う。
です。
したがって修正箇所はほんの2箇所です。/// 修正日(2019年2月11日)修正箇所は'///--修正--///'の行です const puppeteer = require('puppeteer'); const path = require('path'); const request = require('request'); const { promisify } = require('util'); const fs = require('fs'); const delay = require('delay'); /** * ファイルのダウンロードを行う. * @param {string} url - ダウンロードするファイルのURL */ const downloadFile = async (url) => { // ダウンロードファイル名の確定. const filename = url.split('/').pop(); // ファイルの取得. const res = await promisify(request)({ method: 'GET', uri: url, encoding: null }); // 成功(200)したかどうか? if (res.statusCode === 200) { // 成功していればjsと同じフォルダーにファイル出力 await promisify(fs.writeFile)(path.join(__dirname, filename), res.body, 'binary'); } else { // 失敗した場合はエラー処理. throw new Error(`${res.statusCode} ダウンロードエラー`); } }; /** * メインロジック. */ (async () => { // Puppeteerの起動. const browser = await puppeteer.launch({ headless: false, // Headlessモードで起動するかどうか. slowMo: 50, // 指定のミリ秒スローモーションで実行する. }); // 新しい空のページを開く. const page = await browser.newPage(); // view portの設定. await page.setViewport({ width: 1200, height: 800, }); // ページの遷移. console.log('----------------------------------------goto'); await page.goto('http://ryoichi0102.hatenablog.com/'); await delay(1000); // スクレイピングする際にはアクセス間隔を1秒あける. // 先頭の記事のurlを取得し、そのurlへ遷移. console.log('----------------------------------------goto'); const firstPage = await page.evaluate(() => document.querySelector('#main article:nth-child(1) h1.entry-title a').href); // const firstPage = 'http://ryoichi0102.hatenablog.com/entry/2018/12/28/101519'; await page.goto(firstPage); await delay(1000); // スクレイピングする際にはアクセス間隔を1秒あける. // 各記事に対してのそれぞれの処理. do { console.log('----------------------------------------do'); const imageUrls = await page.evaluate(() => Array.from(document.querySelectorAll('img.hatena-fotolife')).map(img => img.src)); for (url of imageUrls) { console.log(`Downloading... ${url}`); await downloadFile(url); } console.log('----------------------------------------eval next'); // 最後の記事までたどると次へボタンは表示されないので、その場合はループを抜ける. ///---修正---/// const next = await page.evaluate(() => document.querySelector('a[rel="next"]')); const next = await page.evaluate(() => document.querySelector('a[rel="next"]').href); console.log('--------------------------------------nextのhrefは、' + next); if (next === null) { break; } // process.on('unhandledRejection', console.dir); // Promise内の捕捉されなかった例外について表示する // 次のページを読み込む. console.log('----------------------------------------next'); await Promise.all([ console.log('----------------------------------------inside Promise.all'), page.waitForNavigation({ waitUntil: 'load' }), ///---修正---/// page.goto('a[rel="next"]'), page.goto(next), ]); await delay(1000); // スクレイピングする際にはアクセス間隔を1秒あける. } while (true); // ブラウザの終了. console.log('----------------------------------------close'); await browser.close(); })();

- 投稿日:2019-02-11T16:21:48+09:00
「Puppeteer入門ースクレイピング+Web操作自動処理プログラミング」の動かないサンプルコード②
「Puppeteer入門ースクレイピング+Web操作自動処理プログラミング」の動かないサンプルコード②
「Puppeteer入門ースクレイピング+Web操作自動処理プログラミング」を購入し、ただいま勉強中です。
これね↓
Puppeteer入門 スクレイピング+Web操作自動処理プログラミング
動かないサンプルコードがいくつかありますね。
のちのち使えそうなコードはせっかくなので修正して残しておこうと思いました。まずpuppeteerについて
「Puppeteer入門ースクレイピング+Web操作自動処理プログラミング」の動かないサンプルコード① の「まずpuppeteerについて」の項目をご覧ください。
7章の3,「ブログをPDFでバックアップする」
このサンプルも、アメブロがバックアップに対応していないので使えそうです。
しかし、どうもdo { 処理 } while(true)の中にawait Promise.all([ 処理 ]);があって、その中にpage.click()があると途中でハングアップしてしまいます。ワタシだけ?
もしワタシだけなら本記事はスルーしてくだい。修正箇所は///---修正---///の行、2箇所だけです。
/// 修正日(2019年2月11日)修正箇所は'///--修正--///'の行です
const puppeteer = require('puppeteer');
const converter = require('convert-filename-ja');
const path = require('path');
const delay = require('delay');

/**
 * メインロジック.
 */
(async () => {
  // Puppeteerの起動.
  const browser = await puppeteer.launch({
    headless: true, // true: Headlessモードで起動する.
    slowMo: 50, // 指定のミリ秒スローモーションで実行する.
  });

  // 新しい空のページを開く.
  const page = await browser.newPage();

  // view portの設定.
  await page.setViewport({
    width: 1200,
    height: 800,
  });

  // ページの遷移.
  console.log('----------------------------------------goto');
  await page.goto('http://ryoichi0102.hatenablog.com/');

  await delay(1000); // スクレイピングする際にはアクセス間隔を1秒あける.

  // 先頭の記事のurlを取得し、そのurlへ遷移.
  console.log('----------------------------------------goto');
  const firstPage = await page.evaluate(() => document.querySelector('#main article:nth-child(1) h1.entry-title a').href);
  // const firstPage = 'http://ryoichi0102.hatenablog.com/entry/2013/06/28/131913';
  await page.goto(firstPage);

  await delay(1000); // スクレイピングする際にはアクセス間隔を1秒あける.

  // 各記事に対してのそれぞれの処理.
  do {
    console.log('----------------------------------------do');

    // 投稿日を取得.
    const entryDate = await page.evaluate(() => document.querySelector('.entry-date').textContent.trim());
    // 投稿タイトルを取得.
    const titleText = await page.evaluate(() => document.querySelector('h1.entry-title').textContent.trim());
    // ファイル名として保存できるよう変換.
    const filename = converter.convert(`${entryDate}-${titleText}`);
    console.log('ファイル名は、' + filename);

    // 保存先のパス/ファイル名を保持し、pdfに保存.
    const filepath = path.join(__dirname, filename);
    // await page.screenshot({ path: `${filepath}.png` });
    await page.pdf({ path: `${filepath}.pdf`, format: 'A4' });

    console.log('----------------------------------------eval next');
    // 最後の記事までたどると次へボタンは表示されないので、その場合はループを抜ける.

    ///---修正---/// const next = await page.evaluate(() => document.querySelector('a[rel="next"]'));
    const next = await page.evaluate(() => document.querySelector('a[rel="next"]').href);
    console.log('--------------------------------------nextのhrefは、' + next);

    if (next === null) {
      break;
    }
    console.log('----------------------------------------was not break');

    // process.on('unhandledRejection', console.dir); // Promise内の捕捉されなかった例外について表示する


    // 次のページを読み込む.
    console.log('----------------------------------------next');

    await Promise.all([
      console.log('----------------------------------------inside promise.all'),
      page.waitForNavigation({ waitUntil: 'load' }),
    ///---修正---///   page.click('a[rel="next"]'),
      page.goto(next),
    ]);


    await delay(1000); // スクレイピングする際にはアクセス間隔を1秒あける.
  } while (true);

  // ブラウザの終了.
  console.log('----------------------------------------close');
  await browser.close();
})();
[修正箇所1]
const nextに、セレクタオブジェクト'(a[rel="next"])'を代入するのではなく、そのhref属性(リンク先URL)を代入。
const next = await page.evaluate(() => document.querySelector(
'a[rel="next"]'));
const next = await page.evaluate(() => document.querySelector('a[rel="next"]').href);[修正箇所2]
そしてPromise.allの中で、page.click()ではなくpage.goto()を使う。
です。他にもいろいろ試行錯誤しましたが、これがいちばんホントにすんなりうまく行きました。
理由はよくわかりません。ワタシの環境はubuntu18.04(x86_64)、node version 11.8.0、puppeteer:1.12.2、Chromium Version:73.0.3679.0 (Developer Build) (64-bit)、メモリ8GBです。
案外こんなところに原因があったりするかもしれませんが検証してません。
Puppeteer just hangs with default Chrome installation
こちらも同じ問題です↓
「Puppeteer入門ースクレイピング+Web操作自動処理プログラミング」の動かないサンプルコード③
- 投稿日:2019-02-11T14:45:09+09:00
Node.jsからSesame API v3 を使う
環境
MacBookAir Mid2012 Sierra。
$ node -v
v10.15.0
requestのインストール
$npm install requesttokenの取得
https://docs.candyhouse.co/#obtain-your-api-key の手順をにしたがってtokenを取得。
- https://my.candyhouse.co/ からCandy House Dash Boardにログイン。
- サイドバーの"API Settings"を選択。アクセスにはVerification codeが必要なので、"SEND CODE"を押して、登録されたemailで受け取ります。受け取ったVerification codeを入力して、"CONFIRM"をクリックします。
- Verifiation Codeを入力するとAPI settingにアクセスできます。"ADD"をクリックして、新しいAPI Keyを取得します。
- このAPI Keyをコピーしておきます。このAPI Keyはrefreshやlogoutすると全体がみえたくなります。そのためどこかにコピーしておくのを忘れないでください。

device idの取得
以下のコードで一番目にあるdevice idを取得します。
testSesame.jsvar request = require('request'); const token_sesame = '[[your_token]]'; var options_device = { uri: 'https://api.candyhouse.co/public/sesames', method: 'GET', headers: { 'Authorization': token_sesame, }, json: true }; let device_id = ""; request.get(options_device, function(error, response, body){ if ( response ){ if (response.statusCode == 200) { device_id = body[0].device_id; console.log(device_id); } } });実行結果です。
$ node testSesame.js
cxxxxxxx-xxxx-xxxx-xxxx-xxxxxxxxxxxx

- 投稿日:2019-02-11T14:45:09+09:00
nodejsからSesame API v3 を使う
環境
MacBookAir Mid2012 Sierra。
$ node -v
v10.15.0
requestのインストール
$npm install requesttokenの取得
https://docs.candyhouse.co/#obtain-your-api-key の手順をにしたがってtokenを取得。
- https://my.candyhouse.co/ からCandy House Dash Boardにログイン。
- サイドバーの"API Settings"を選択。アクセスにはVerification codeが必要なので、"SEND CODE"を押して、登録されたemailで受け取ります。受け取ったVerification codeを入力して、"CONFIRM"をクリックします。
- Verifiation Codeを入力するとAPI settingにアクセスできます。"ADD"をクリックして、新しいAPI Keyを取得します。
- このAPI Keyをコピーしておきます。このAPI Keyはrefreshやlogoutすると全体がみえたくなります。そのためどこかにコピーしておくのを忘れないでください。
device idの取得
以下のコードで一番目にあるdevice idを取得します。
testSesame.jsvar request = require('request'); const token_sesame = '[[your_token]]'; var options_device = { uri: 'https://api.candyhouse.co/public/sesames', method: 'GET', headers: { 'Authorization': token_sesame, }, json: true }; let device_id = ""; request.get(options_device, function(error, response, body){ if ( response ){ if (response.statusCode == 200) { device_id = body[0].device_id; console.log(device_id); } } });実行結果です。
$ node testSesame.js
cxxxxxxx-xxxx-xxxx-xxxx-xxxxxxxxxxxx
- 投稿日:2019-02-11T11:33:14+09:00
Angular Universal の Web サーバを Express でサクッと作る方法
概要
Angular Universal の Web サーバ部分を、簡単な疎通など確認するためにとりあえずサクッとコピペするための備忘録
前提
以下の必要なモジュールは、型定義ファイル(
@types/*でインストール)含めインストールされていること
- express
- express-engine
- @nguniversal/express-engine
- @nguniversal/module-map-ngfactory-loader
Express で Web サーバを作成
以下の通り、Express を使って Web サーバを作成する
server/web-server.ts// 以下の2インポートは最初に呼ばれる必要がある import 'zone.js/dist/zone-node'; import 'reflect-metadata'; import * as express from 'express'; import { join } from 'path'; import { ngExpressEngine } from '@nguniversal/express-engine'; import { provideModuleMap } from '@nguniversal/module-map-ngfactory-loader'; const webServer = express(); const PORT = process.env.PORT || 3000; const CLIENT_DIST_PATH = join(process.cwd(), 'dist/demo-app'); // TODO: パスをビルド先フォルダ名に合わせる // 動的に生成される dist ファイルため、require() のままにしておく const { AppServerModuleNgFactory, LAZY_MODULE_MAP } = require(join(process.cwd(), 'dist/demo-app-server/main')); // TODO: パスをビルド先フォルダ名に合わせる // テンプレートファイル名で拡張子が省略された場合のデフォルト拡張子を設定 webServer.set('view engine', 'html'); // テンプレートファイルを置くパスを設定 webServer.set('views', CLIENT_DIST_PATH); // レンダリングに利用するテンプレートエンジンに Angular Express エンジン を登録 webServer.engine('html', ngExpressEngine({ bootstrap: AppServerModuleNgFactory, providers: [ provideModuleMap(LAZY_MODULE_MAP) ] })); // サーバサイドレンダリングされる静的ファイル webServer.get('*.*', express.static(CLIENT_DIST_PATH)); // 全ての API ルートは このルーティングを使用 webServer.use('/api/*', (req, res) => { console.log('[API が呼び出されました]'); const response = { test1: 'aaa', test2: 'bbb' }; res.status(200).send(response); }); // 全ての通常ルートは Universal エンジンを使用 webServer.get('*', (req, res) => { console.log('[通常ルートが呼び出されました]'); res.render('index', { req, res }); }); // Node サーバ開始 webServer.listen(PORT, () => { console.log(`Node server is listening - http://localhost:${PORT}`); });起動確認
起動スクリプト修正
以下のとおりに、package.json のスクリプトを修正
package.json: "scripts": { "start": "node ./dist/server/web-server.js", "build": "npm run build:client && npm run build:server", "build:client": "ng run demo-app:app-shell:production", "build:server": "tsc --project server --outDir dist --allowjs true", }, :以下のコマンドでビルド、アプリ起動
# ビルド
npm run build

# 起動
npm run start
以下の点をチェックし、問題なく動いていればOK。
- ビルド完了後、以下のディレクトリと中身がルートディレクトリ配下に生成されているか
- dist/common(クラサバ共用ファイル群)
- dist/demo-app(クライアントのソースコード)
- dist/demo-app-server(Universal 対応で作ったやつ)
- dist/server(Express および API ロジック用ファイル群)
- Web ブラウザにアクセスし、以下の挙動が行われるか
http://localhost:3000でアクセスするとホーム画面が表示され、コンソールには[通常ルートが呼び出されました]と標準出力されるhttp://localhost:3000/api/aaaでアクセスすると、画面に{"test1":"aaa","test2":"bbb"}と表示され、コンソールには[API が呼び出されました]と標準出力されるhttp://localhost:3000/apiでアクセスすると、URLはhttp://localhost:3000となり、画面は何かしらの HTML で画面表示がなされ、コンソールには何かしらのエラーログが標準出力される(存在しないページへのアクセスエラー)
- 投稿日:2019-02-11T01:06:02+09:00
ベクトルタイル生産 320neo の整備延期と、320 での試作記録
osmium と Tippecanoe をパイプでつないで planet.osm.pbf からベクトルタイルを生産する、前回の記事の続きです。
320neo の整備延期
前回の記事では、osmium export と Tippecanoe をパイプでつなぐプログラムである produce-320 を試作しましたが、osmium-tool の理論上は、osmium extract と osmium export をパイプでつなぐことも可能であるように思えました。
そこで、produce-320 の new extract option として、osmium extract と osmium export、modify.js と Tippecanoe を全部パイプでつなぐ produce-320neo の試作を試みました。
結果としては、osmium extract にパイプ経由でデータを入れた場合、入れるデータの形式が pbf であった場合、opl であった場合の両方において、osmium extract が、入力の形式を判別できないというエラーを出して正常に機能しないという現象に当たりましたので、320neo を現時点でうまく動かすことはできていません。
当面、320 のままで運用実績を積みたいと思います。320 の特性については、次の通りであると考えています。
- 320neo の試作の際に実感したことであるが、osmium extract が出力を始めてるタイミングはプログラム実行時間の中でもかなり遅いので、neo オプションをとるメリットは、実はそれほど大きくないようである。
- osmium export および Tippecanoe の処理時間と比べて、osmium extract に要する時間は長いので、extract した osm.pbf をファイルとして出しておく 320 のやり方には、modify.js の変更などによるベクトルタイル再生産で手戻りを小さくできる利点がある。
produce-320 が生産するファイルの諸元
produce-320 でのベクトルタイル生産が一通りできましたので、その入出力の諸元をメモしておきます。
- 大元のソースデータである planet-19128.osm.pbf のサイズは 44GB であった。
- そこから produce-320 の作業領域を切り出したファイルである 320.osm.pbf のサイズは 5.3GB であった。
- 上記の 320.osm.pbf を材料として produce-320 を実行したところ、生産された pbf ファイルの総計は 5.1GB、mbtiles ファイルの総計は 8.3GB であった。
- 生産された z=5 タイル範囲を単位とするモジュール pbf ファイルのうち、最大は 6-31-24.osm.pbf であり、そのサイズは 248MB であった。
- 生産された z=5 タイル範囲を単位とするモジュール mbtiles ファイルのうち、最大は、同じく 6-31-24.mbtiles であり、そのサイズは 404MB であった。
- 最小のモジュールは、データが全く含まれないモジュールであり、pbf は 73B、mbtiles は 24KB であった。
これまでの試作とくらべて、320 からは Tippecanoe の --clip-bounding-box オプションを使用しています。どうも、最近追加されたオプションのようです。これを使うことにより、モジュール範囲外にタイルが生産されることを防ぐことができました。これまでは、自前でタイル範囲との intersection をとるコストを回避するため、余計なタイルがモジュールに混ざってくることを許容していました。
今回の試作の結果は https://hfu.github.io/tapioca-six/ に反映済みですが、タイルが抜けることも、ビクトリア湖が消滅するようなこともなく、問題なくタイルが生産されているようです。他方で、mbtiles ファイルのサイズは、数割減少しているように思います。--clip-bounding-box の恩恵を享受できることが確認できたと感じています。
320 が assembly で運用可能であることの確認
今回の試作では、それぞれ thanks および assembly と名付けた複数の計算機環境を使っています。
osmium extract の計算負荷が大きいことから、しばらく thanks でテストをしていましたが、本来ベクトルタイル生産は assembly のような機械でも行われるべきと考えているので、thanks での動作確認後、assembly でも運用できることを確認しています。
thanks では 2並列で実行しましたが、assembly では1並列で実行するほうが安心感があります。その1並列での処理時間レコードの最初の方を例示すると、次のとおりです。
- 6-22-25 19:26 (19分26秒)
- 6-22-26 19:13
- 6-22-27 19:34
- 6-22-28 18:17
- 6-22-29 18:26
- 6-22-30 18:07
thanks では同じような処理に7分程度でしたので、2倍強の時間はかかりますが、安定的に運用できているように見えます。
なお、上記の数値をとっているモジュールは、いずれもデータが存在しないモジュールです、空読みでこのくらいの時間がかかる、ということになります。
- 投稿日:2019-02-11T00:56:47+09:00
Expressで作ったアプリをAWS Lambdaで動かすまで
概要
- 最近expressで作ったアプリをLambdaで動かすことが多いので手順をメモしておくもの
手順
Expressアプリの作成
- 雛形の作成
mkdir express-sample
cd express-sample
yarn init -y
yarn add express
touch index.js
- index.jsを最小限作る
index.jsconst express = require('express'); const app = express(); app.use(function(req, res, next) { res.header('Access-Control-Allow-Origin', '*'); res.header( 'Access-Control-Allow-Headers', 'Origin, X-Requested-With, Content-Type, Accept', ); next(); }); app.get('/', (req, res) => { res.send('Hello'); }); const port = '8080'; app.listen(port, () => { console.log(`app start listening on port ${port}`); });
- 起動して動作確認
node index.js
open http://localhost:8080
- ブラウザに
Helloが表示されればOKLambdaへデプロイ
- ServerlessFrameworkの準備
mkdir serverless.yml
yarn add serverless-http
- sreverless.ymlに設定を記載
serverless.ymlservice: express-sample provider: name: aws runtime: nodejs8.10 region: ap-northeast-1 functions: app: handler: index.handler events: - http: ANY / - http: 'ANY {proxy+}'
- index.jsを修正
- 一行目と最終行を追加
index.jsconst serverless = require('serverless-http'); // <- 追加 const express = require('express'); const app = express(); app.use(function(req, res, next) { res.header('Access-Control-Allow-Origin', '*'); res.header( 'Access-Control-Allow-Headers', 'Origin, X-Requested-With, Content-Type, Accept', ); next(); }); app.get('/', (req, res) => { res.send('Hello'); }); const port = '8080'; app.listen(port, () => { console.log(`app start listening on port ${port}`); }); module.exports.handler = serverless(app); // <- 追加
- awsのkey情報を設定していることを確認
cat ~/.aws/credentials
[default]
aws_access_key_id = xxxxxxxxxxxxxx
aws_secret_access_key = xxxxxxxxxxxxxxxxxxxxxxxxxxxxxxxxxxxxx
output = json
region = ap-northeast-1
- 以下のコマンドでデプロイ
- このコマンドだけでエンドポイント生成やS3へのバックアップ等々全部やってくれる!超便利!
npx serverless deploy
- 以下のようなログが表示される
- endpointsのURLにアクセスしてHelloが返ればOK
Serverless: Packaging service...
Serverless: Excluding development dependencies...
Serverless: Uploading CloudFormation file to S3...
Serverless: Uploading artifacts...
Serverless: Uploading service express-sample.zip file to S3 (663.48 KB)...
Serverless: Validating template...
Serverless: Updating Stack...
Serverless: Checking Stack update progress...
..........
Serverless: Stack update finished...
Service Information
service: express-sample
stage: dev
region: ap-northeast-1
stack: express-sample-dev
resources: 11
api keys:
  None
endpoints:
  ANY - https://la0umc61i3.execute-api.ap-northeast-1.amazonaws.com/dev
  ANY - https://la0umc61i3.execute-api.ap-northeast-1.amazonaws.com/dev/{proxy+}
functions:
  app: express-sample-dev-app
layers:
  None
開発サイクル
- ※もっといいやりかたあれば教えて下さい
- ローカルでの開発は
node index.jsで起動できるのでそれで進める- Lambdaへのデプロイは
npx serverless deployすればLambdaへ反映されるアプリの削除
- 不要なアプリは以下のコマンドで削除できる
- AWSコンソールから手動で消すとゴミが残ってややこしくなるので注意
npx serverless remove
- 投稿日:2019-02-11T00:05:25+09:00
SwaggerでLambdaのデバッグ環境を作る(5):Clovaをデバッグする
第1回投稿で、SwaggerでLambdaのデバッグ環境を作りました。
GoogleHome、Alexaと続いて、とうとうClovaのスキルをデバッグします。
Clovaスキルを作る
早速、Clovaスキルを作成しましょう。
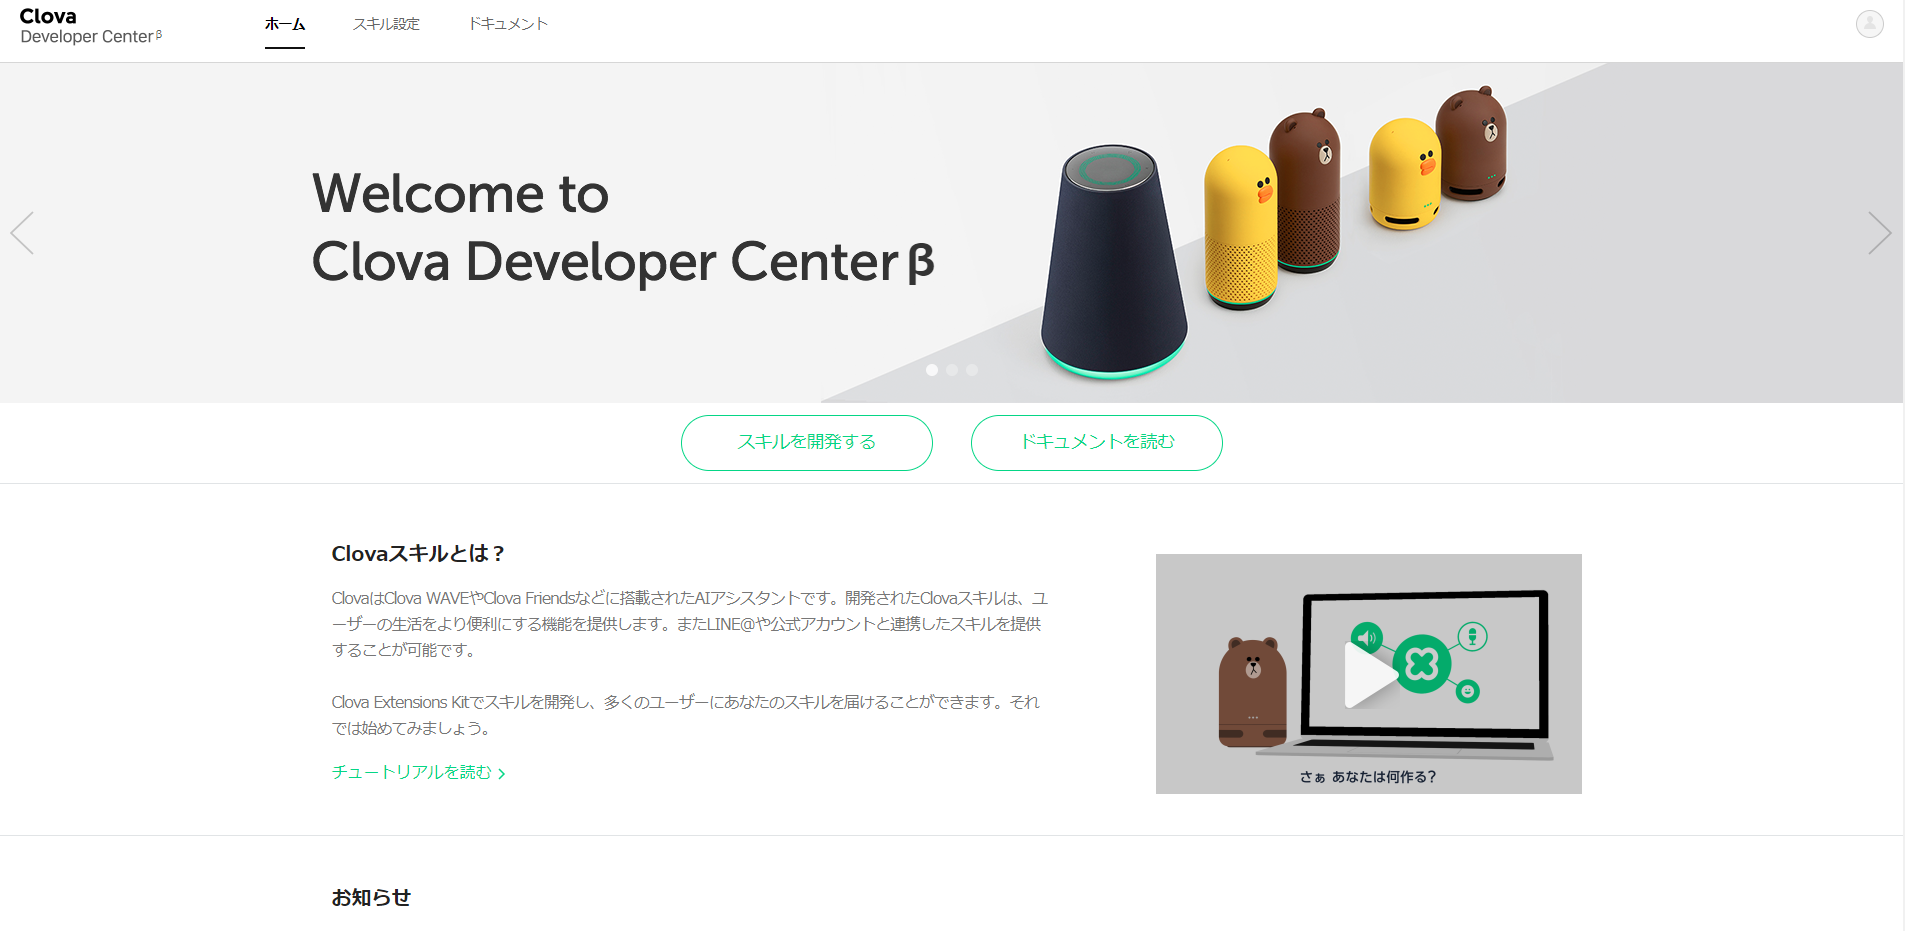
Clova Developer Center β
https://clova-developers.line.biz/
スキル設定、または、スキルを開発する ボタンを押下します。
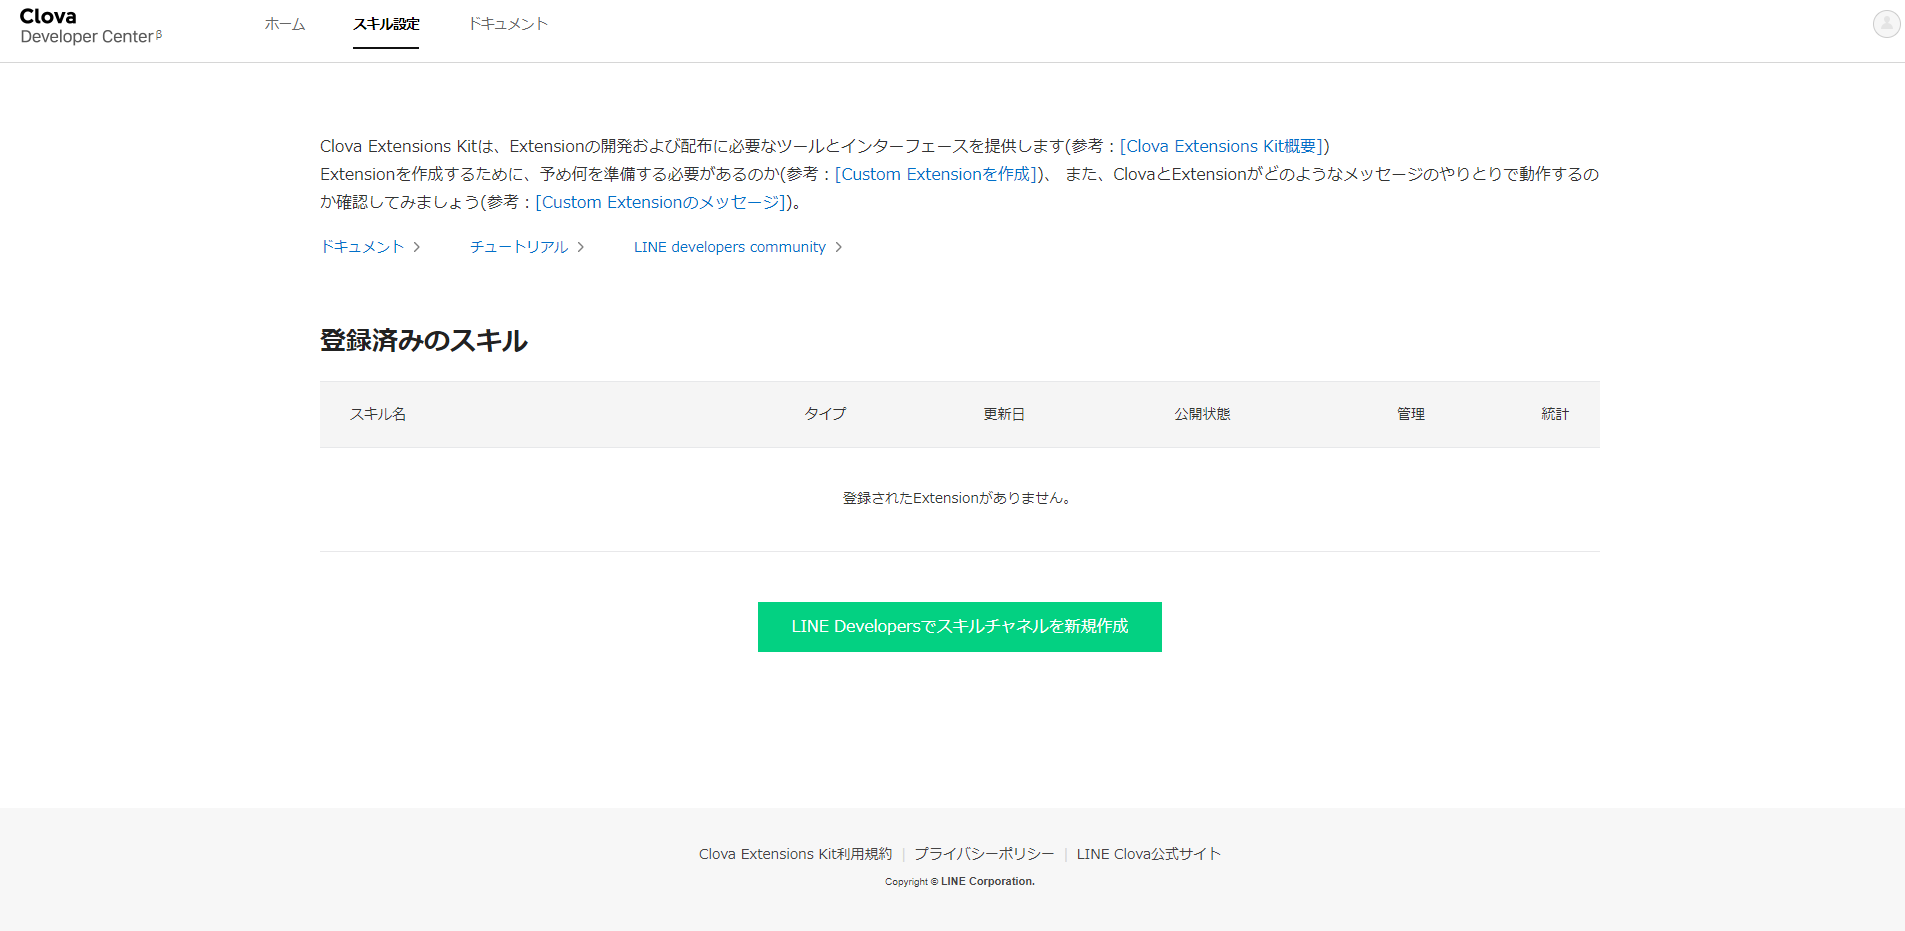
それでは、「LINE Developersでスキルチャネルを新規作成」を押下しましょう。
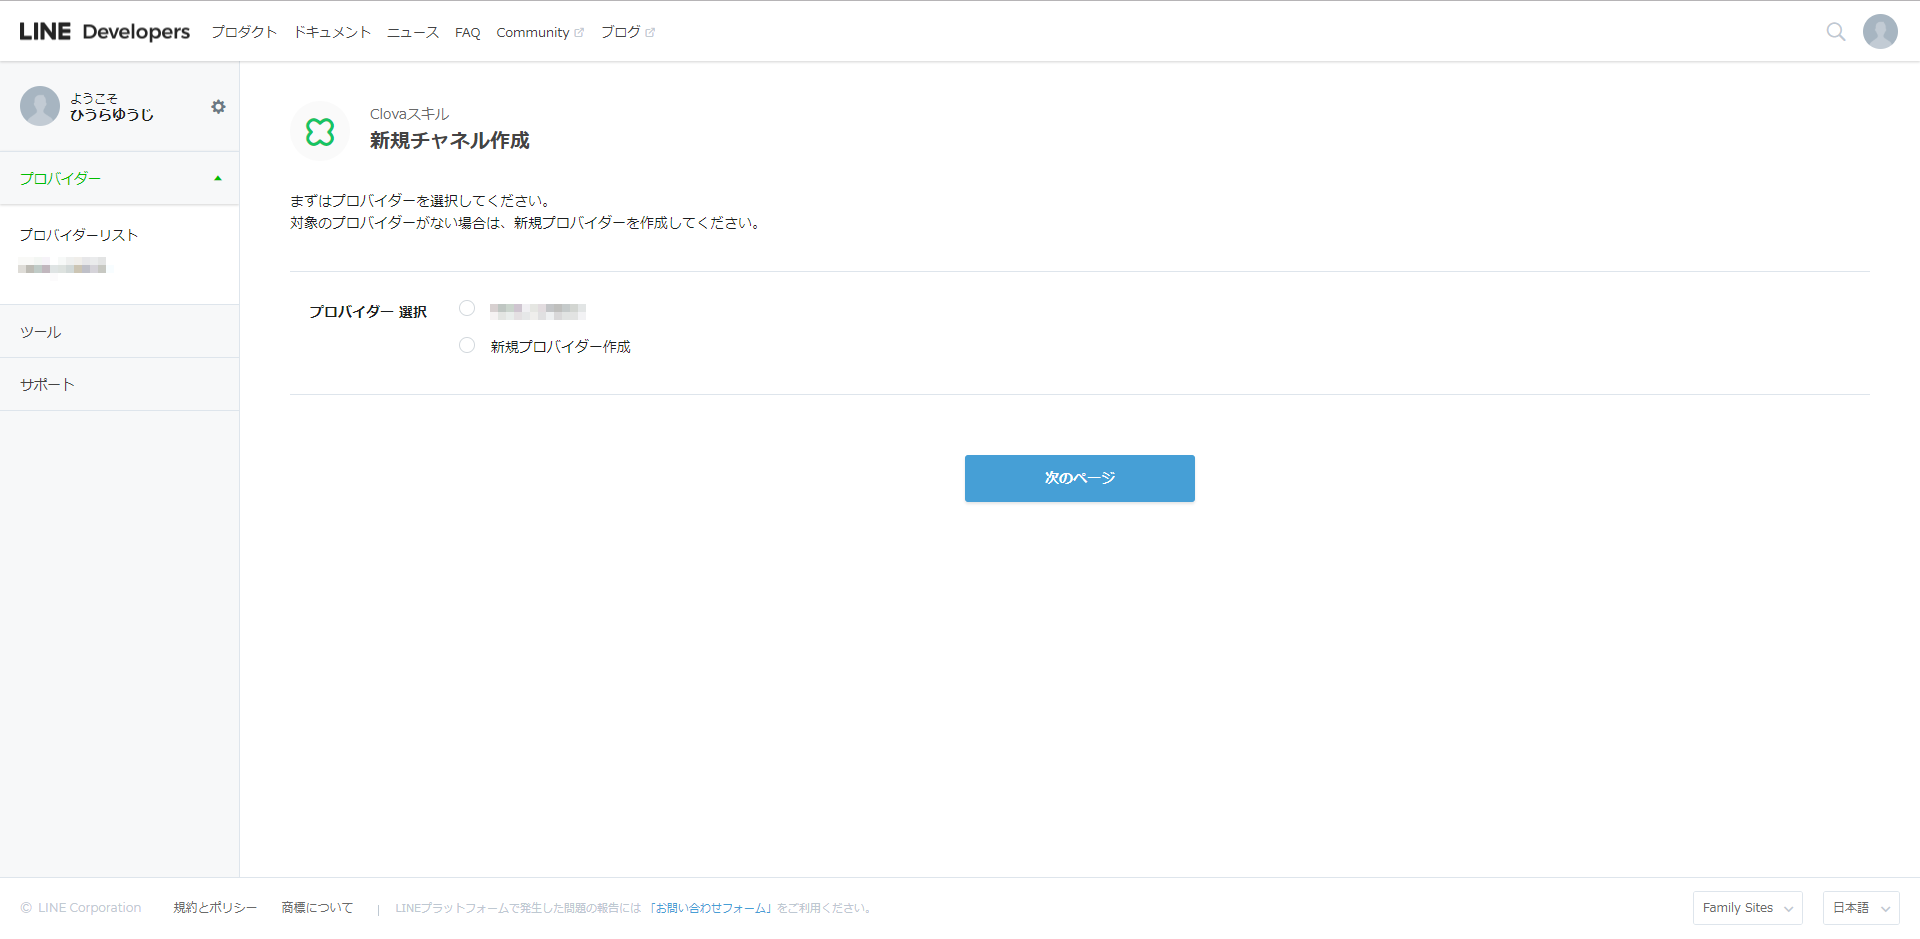
まずは、プロバイダを選択します。まだ作っていなければ、これを機に作りましょう。
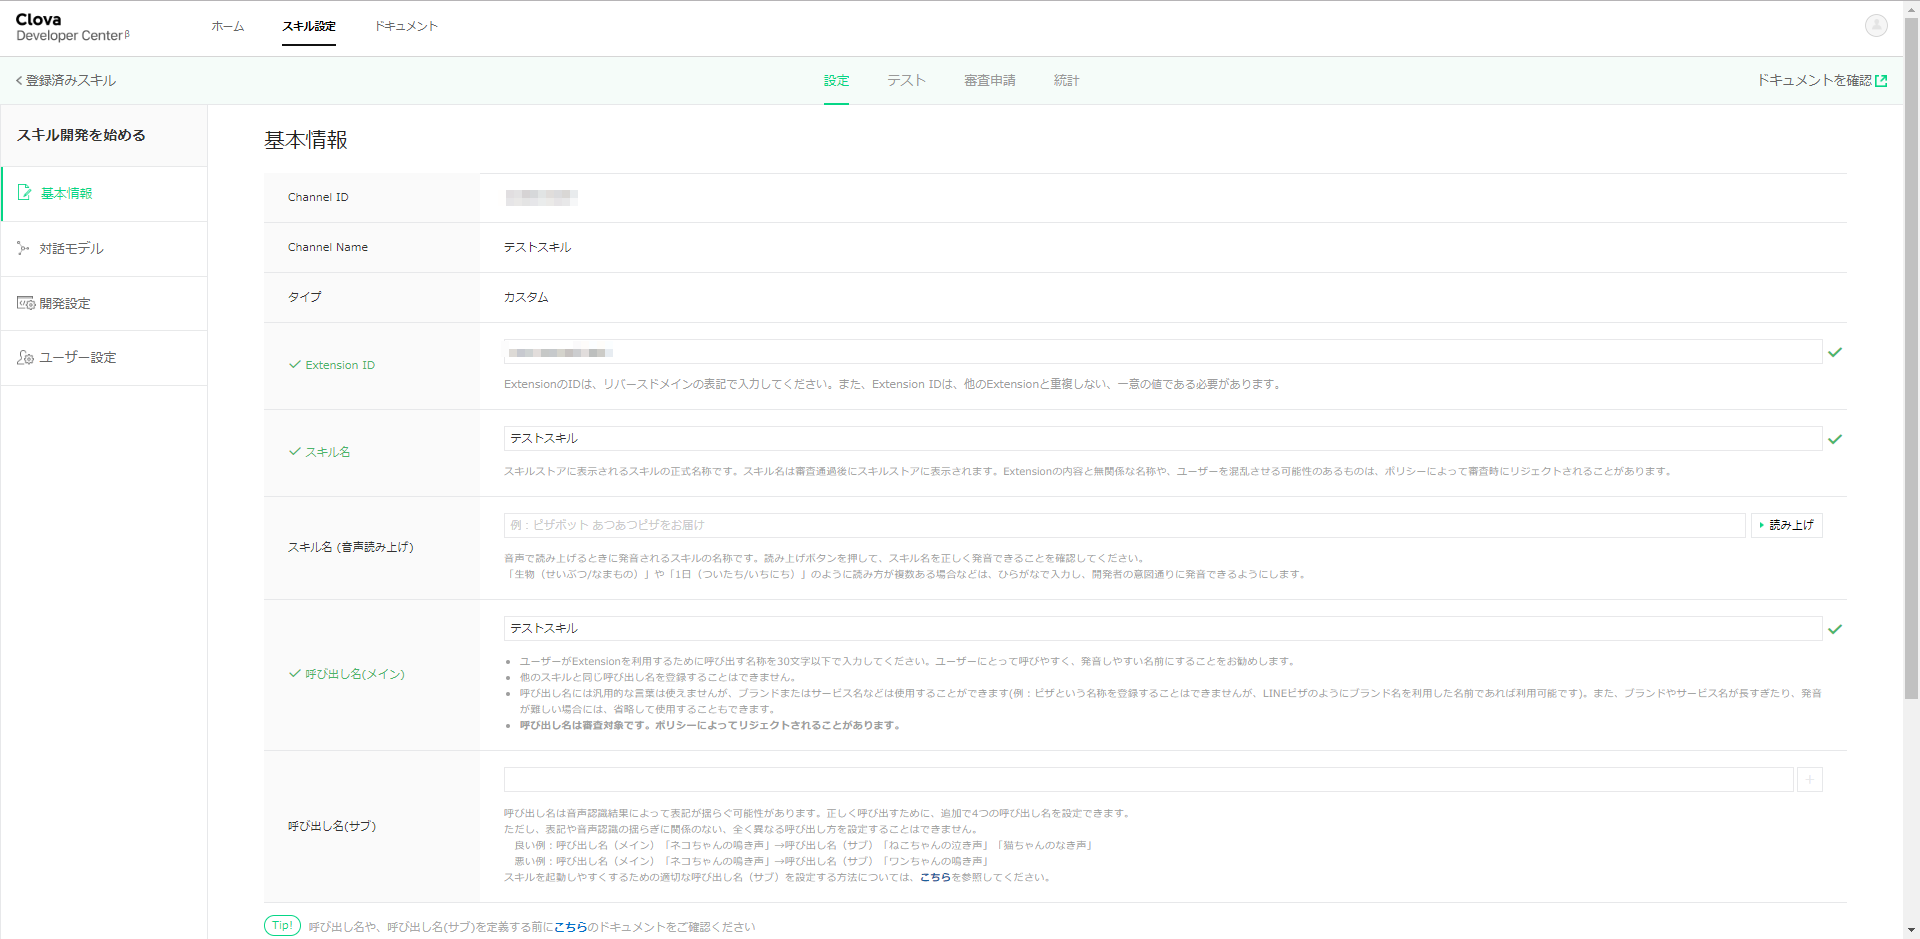
チャネル名は適当に「テストスキル」にしました。
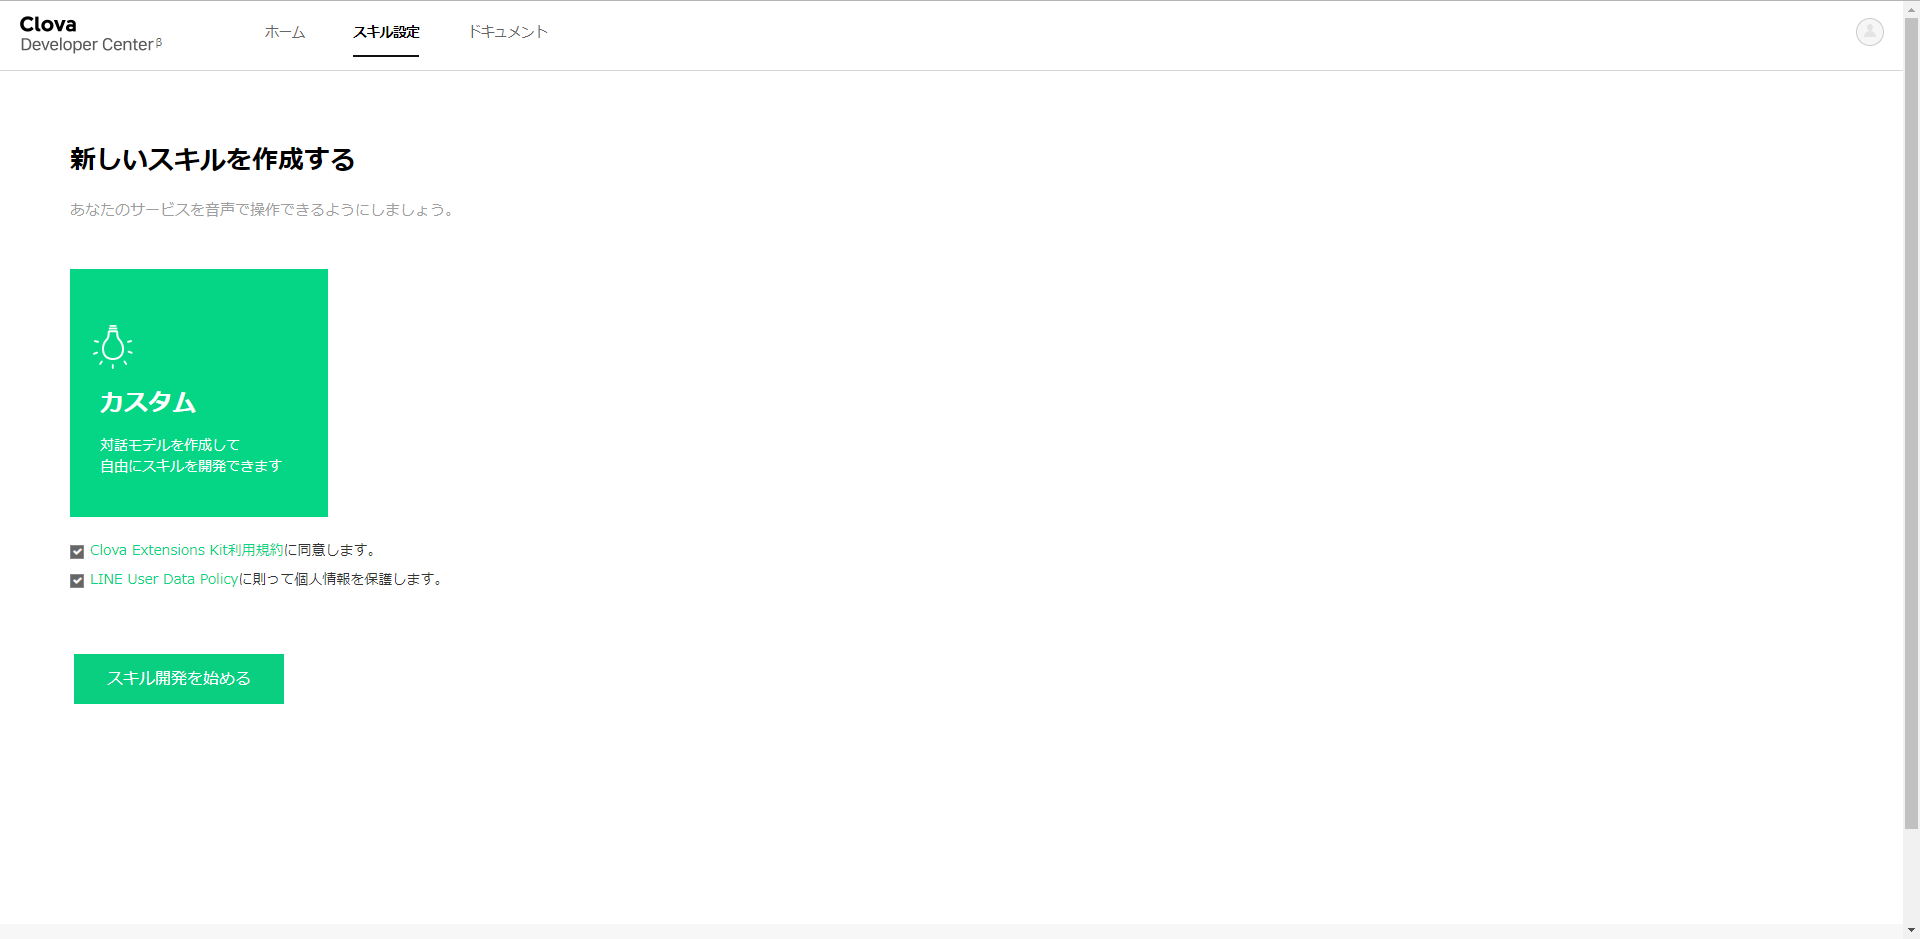
さあ、スキル開発を始めましょう。
手始めに、いくつか入力しなければいけないのですが、適当で大丈夫です。スキル名や呼び出し名は「テストスキル」にしました。
それでは、発話を設定していきます。
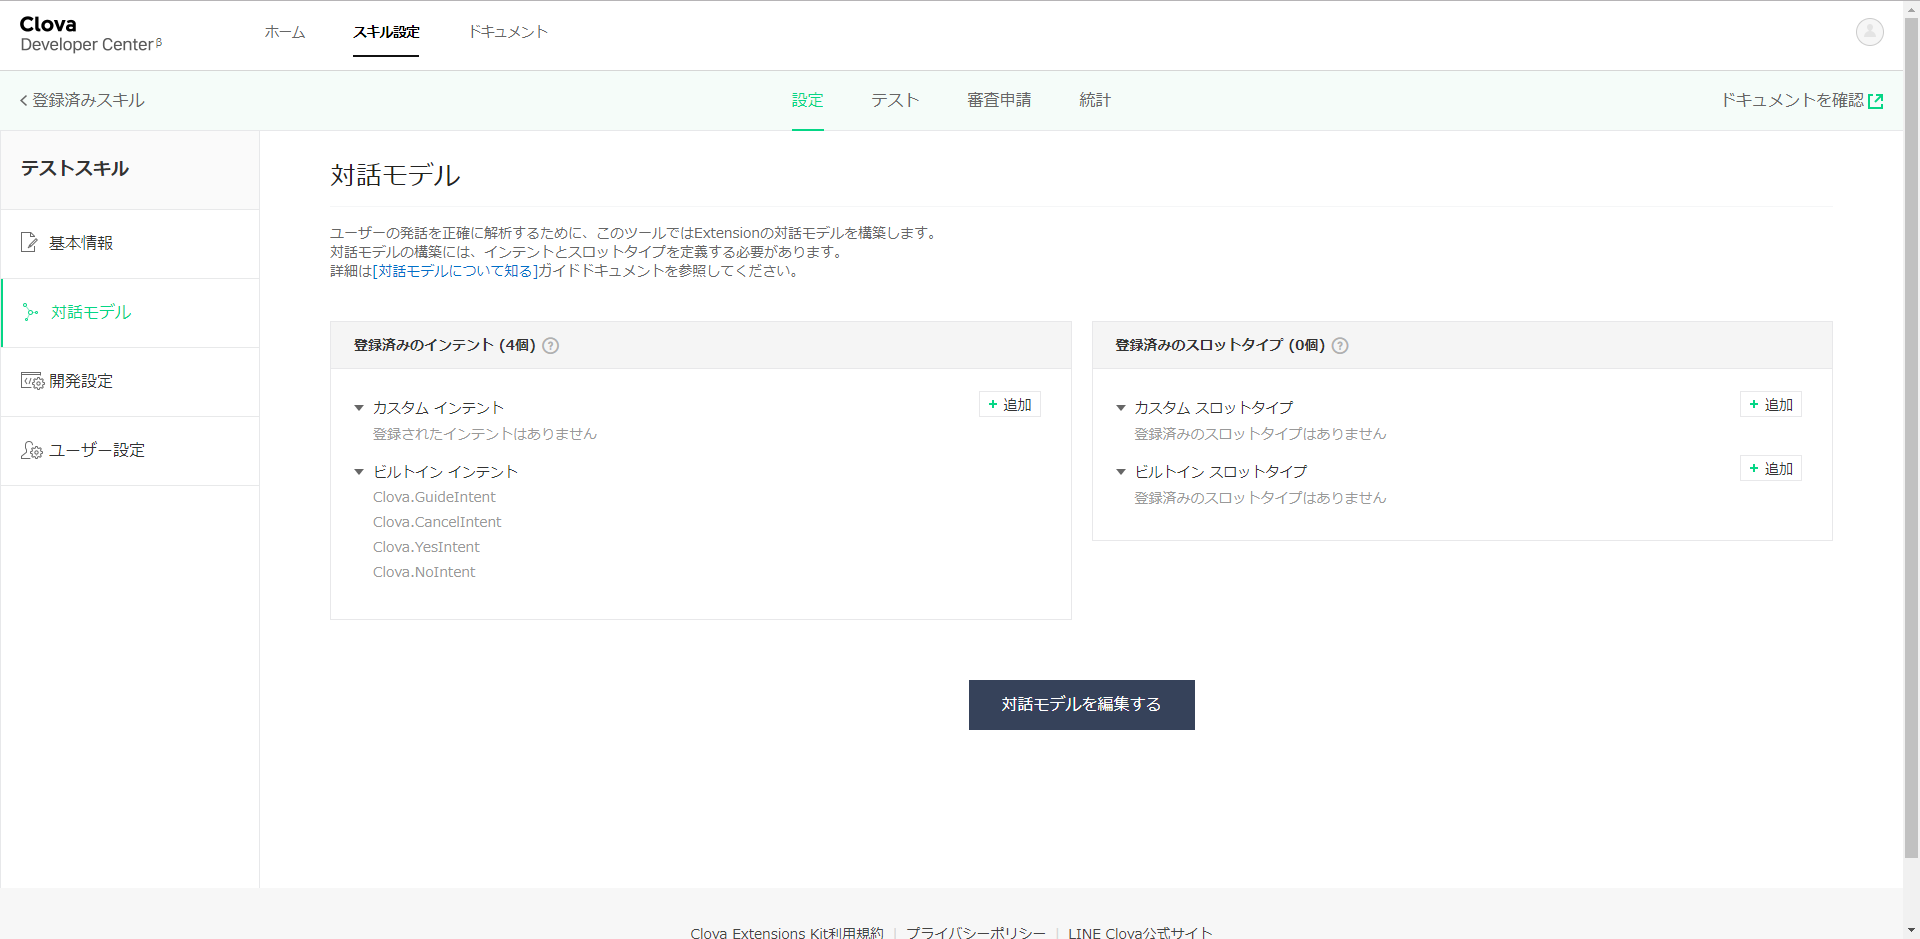
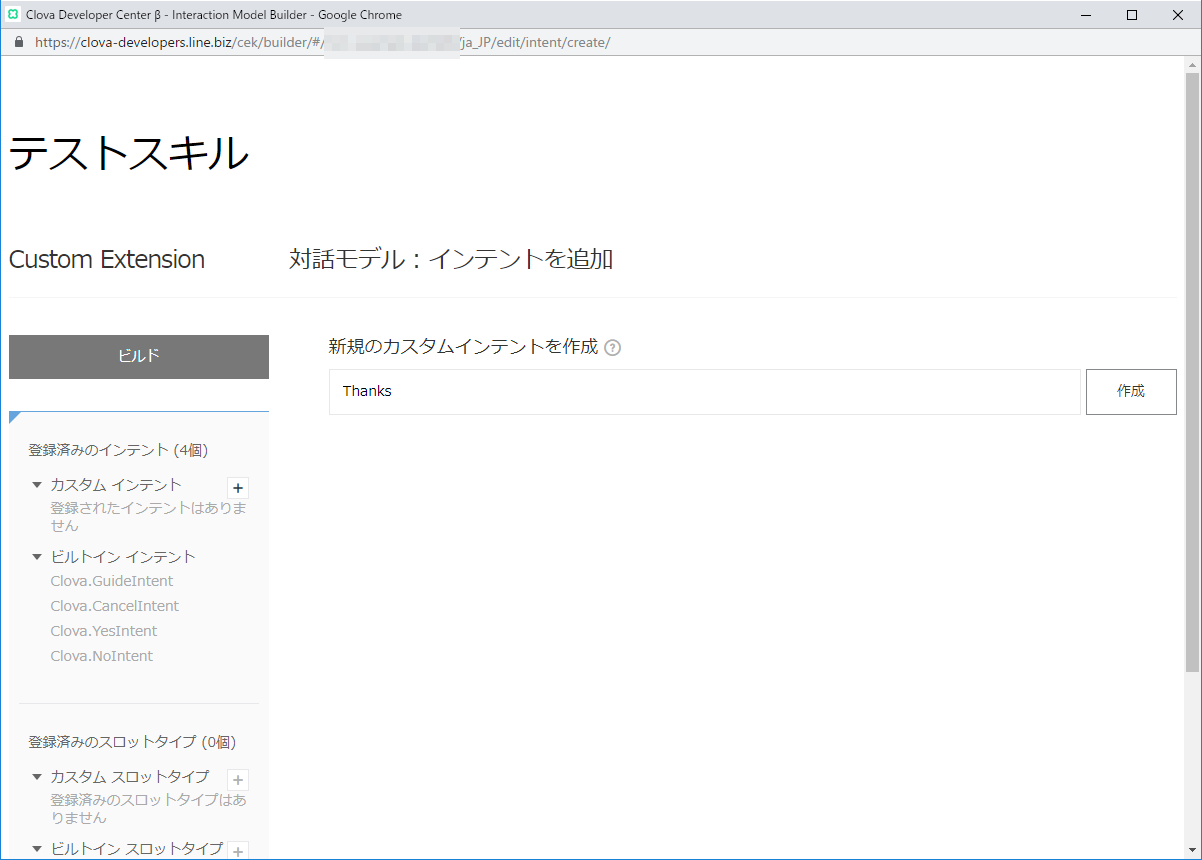
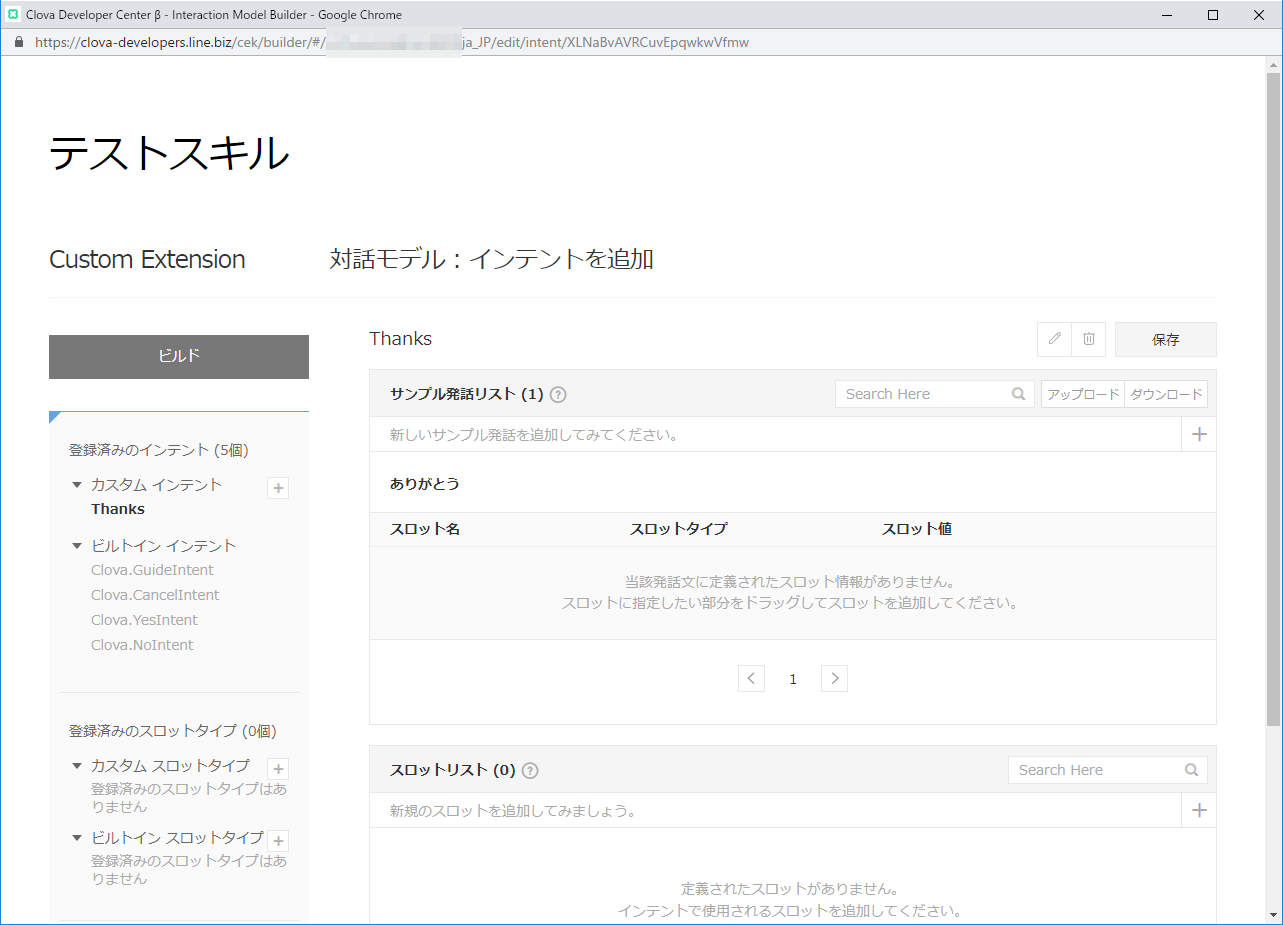
まずは、カスタムインテントを作りましょう。毎度の通り、インテント名を「Thanks」とします。
「ありがとう」というと「どういたしまして」、と返すためです。
サンプル発話に「ありがとう」と入力します。
そして、ビルドボタンでビルドを開始しておきます。
完了まで数分かかります。ローカルのデバッグ環境に転送する。
それでは、受け付けた発話をローカルのデバッグ環境に転送する設定をします。
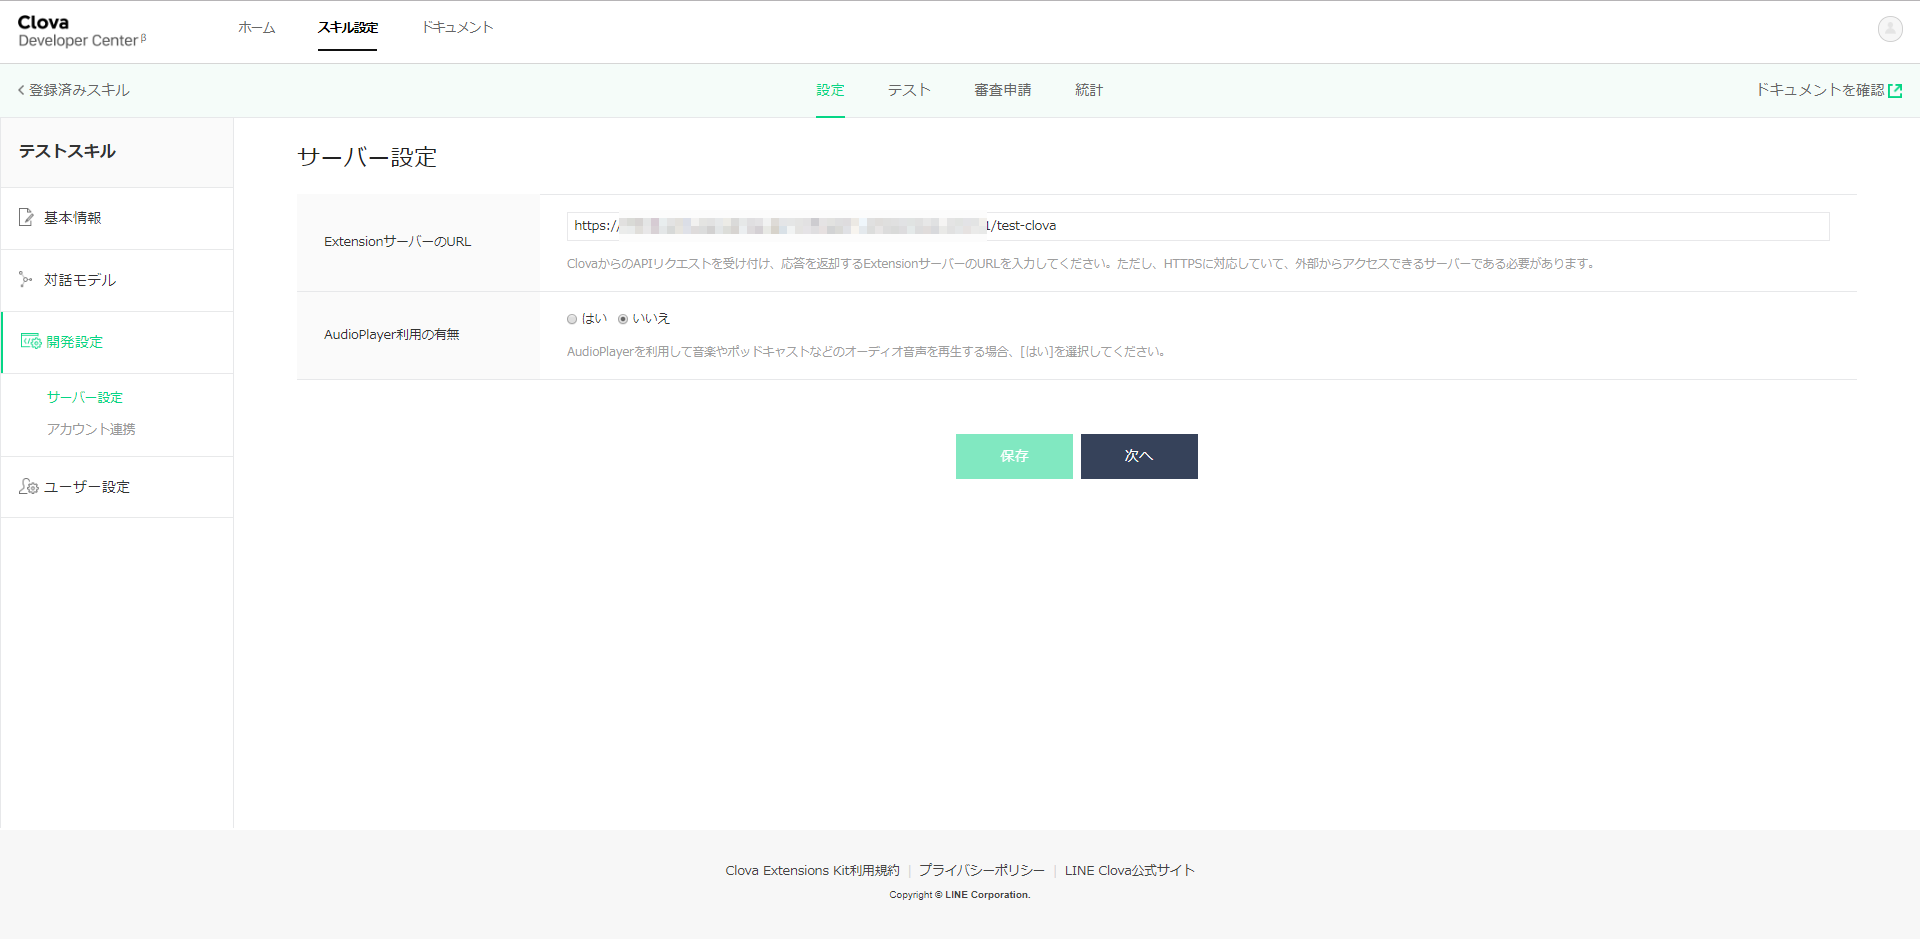
左側のナビゲータから開発設定を選択します。
ここで表示される「ExtensionサーバーのURL」に、これから立ち上げるRESTfulサーバのURLを指定します。
そして、保存ボタンを押下しておきます。ローカルのデバッグ環境を立ち上げる。
それでは、転送を引き受けるデバッグ環境を設定していきます。
Swagger定義ファイルは以下の感じです。
swagger.yaml/test-clova: post: x-swagger-router-controller: routing operationId: test-clova parameters: - in: body name: body schema: $ref: "#/definitions/CommonRequest" responses: 200: description: Success schema: $ref: "#/definitions/CommonResponse"実装の場所をrouting.jsに指定するのですが、これまたちょっと違う場所に指定します。Alexaの時と同じところです。
routing.jsconst alexa_table = { // "test-alexa" : require('./test_alexa').handler, // "test-clova": require('./test-clova').handler, "test-clova": require('./test-clova').handler, };実装には、以下のnpmモジュールを利用しますので、ローカル環境にインストールしておきます。
npm install --save @line/clova-cek-sdk-nodejs
実装は
api/controllers/test-clova/index.jsに置きます。index.jsconst clova = require('@line/clova-cek-sdk-nodejs'); const HELPER_BASE = process.env.HELPER_BASE || '../../helpers/'; const ClovaUtils = require( HELPER_BASE + 'clova-utils'); const app = new ClovaUtils(clova); app.intent('LaunchRequest', async (responseHelper) =>{ responseHelper.setSimpleSpeech({ lang: 'ja', type: 'PlainText', value: 'こんにちは', }); }); app.intent('Thanks', async (responseHelper) =>{ responseHelper.setSimpleSpeech({ lang: 'ja', type: 'PlainText', value: 'どういたしまして。', }); }); exports.handler = app.lambda();Dialogflowと同じような書き方ができるように、ヘルパを使っています。
api/helpers/clova-utils.jsに置きます。clova-utils.js'use strict'; class ClovaUtils{ constructor(clova){ this.clova = clova; this.clovaSkillHandler = clova.Client.configureSkill(); this.launchHandle = null; this.eventHandle = null; this.sessionEndedHandle = null; this.intentHandles = new Map(); this.clovaSkillHandler .onLaunchRequest(async responseHelper => { if( this.launchHandle ){ console.log('handle: LaunchRequest called'); return await this.launchHandle(responseHelper); } }) .onIntentRequest(async responseHelper => { const intent = responseHelper.getIntentName(); var handle = this.intentHandles.get(intent); if( handle ){ console.log('handle: ' + intent + ' called'); return await handle(responseHelper); } }) .onSessionEndedRequest(async responseHelper => { if( this.sessionEndedHandle ){ console.log('handle: SessionEndedRequest called'); return await this.sessionEndedHandle(responseHelper); } }) .onEventRequest(async responseHelper => { if( this.eventHandle ){ console.log('handle: EventRequest called'); return await this.eventdHandle(responseHelper); } }); } intent( matcher, handle ){ if( matcher == 'LaunchRequest') this.launchHandle = handle; else if( matcher == 'SessionEndedRequest') this.sessionEndedHandle = handle; else if( matcher == 'EventRequest') this.eventHandle = handle; else this.intentHandles.set(matcher, handle); } getAttributes( responseHelper ){ return responseHelper.getSessionAttributes(); } setAttributes( responseHelper, attributes){ responseHelper.setSessionAttributes(attributes); } getSlots( responseHelper ){ return responseHelper.getSlots(); } handle(){ return this.clovaSkillHandler.handle(); } lambda(){ return this.clovaSkillHandler.lambda(); } }; module.exports = ClovaUtils;こんな感じで、インテント名を指定すれば、それに該当する発話を受けて関数が呼ばれます。
app.intent(【インテント名】, async (responseHelper) =>{
関数の中身は、Clovaが提供してくれているSDKの作法に従います。
Clova CEK SDK Nodejs
https://github.com/line/clova-cek-sdk-nodejsインテント名「LaunchRequest」は、特別なインテントで、***を開いて と言ってスキルを起動させたときに呼ばれるものです。
さあ、起動させましょう。
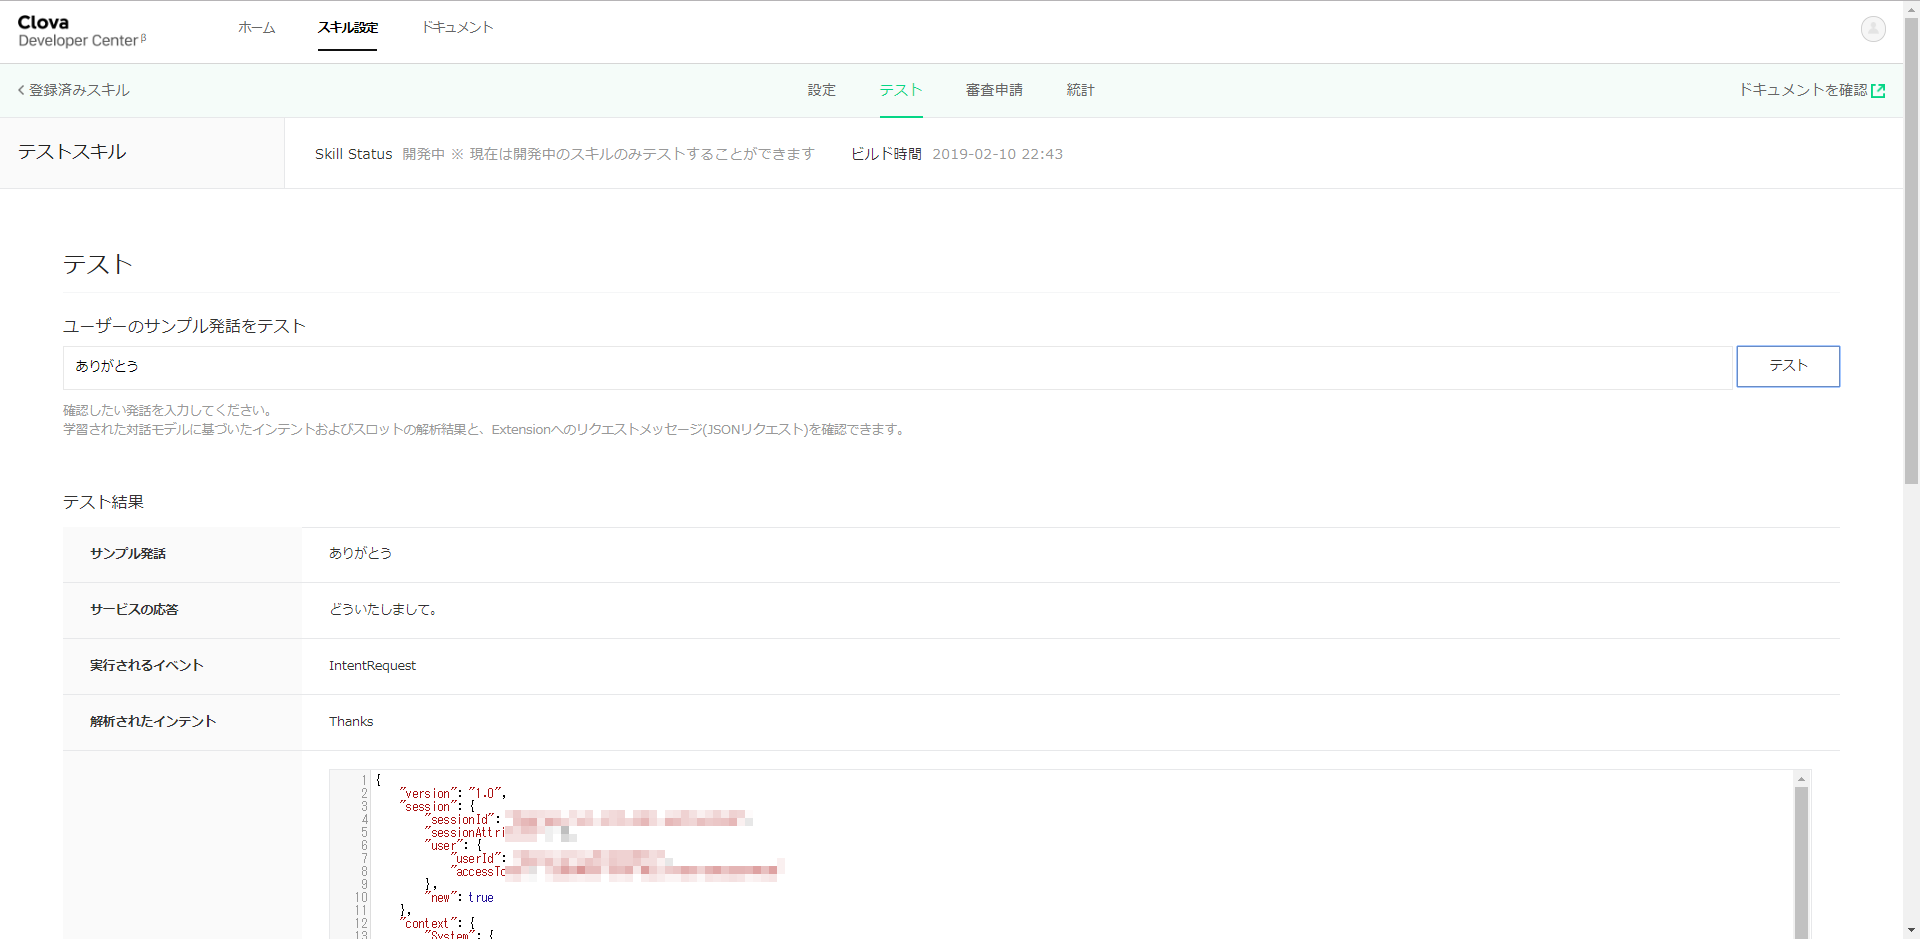
Clova Developer Centerで接続確認ができます。
テストタブを選択します。「ユーザのサンプル発話をテスト」のところに、「ありがとう」と入力して、「テスト」ボタンを押してみましょう。
「どういたしまして」が返ってきましたでしょうか?
Clova Friendsでも試してみます。
Clovaに対して、以下を話してみましょう。→「Clova、テストスキルを開いて」
← 「こんにちは」
→「ありがとう」
← 「どういたしまして」この通りになりましたでしょうか?
Lambdaに配置する
以下を参考に、アップロードします。
SwaggerでLambdaのデバッグ環境を作る(1)
SwaggerでLambdaのデバッグ環境を作る(3):DialogflowをデバッグするSwaggerでLambdaのデバッグ環境を作る(1)の「AWS LambdaにヘルパライブラリのLayerを追加」のあたりからです。
注意点として、clova-utils.jsというヘルパーライブラリを追加していますので、レイヤは更新が必要です。
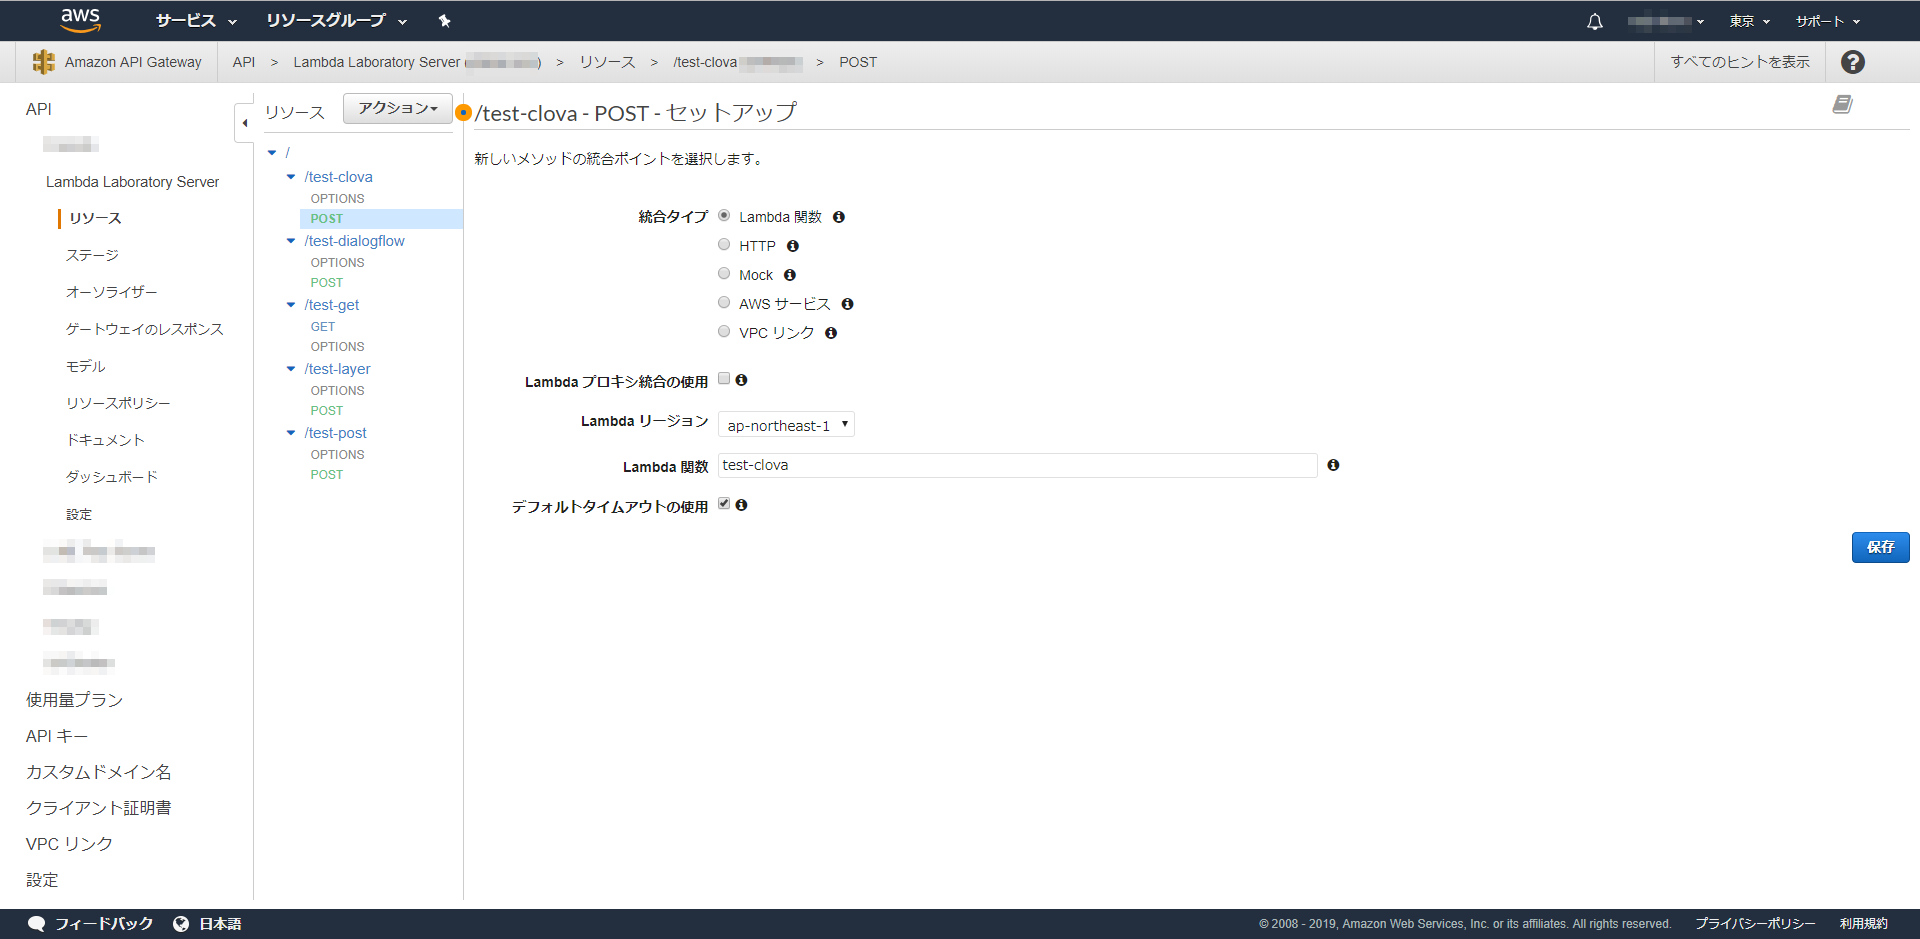
また、Clova用にnpmモジュールを追加していますので、Lambdaに上げるときに一緒にアップしてください。それについては、SwaggerでLambdaのデバッグ環境を作る(3)の「Lambdaにアップロードする」 のあたりを参考にしてください。API Gatewayのエンドポイントを作る際に、注意点があります。
「Lambda プロキシ統合の使用」のチェックボックスはOnにしないでください。
以上です。