- 投稿日:2020-07-01T23:23:07+09:00
deviseで複数モデルを管理
deviseで複数のモデルを管理
最近、ECサイトを開発するにあたり、出てきたユーザーのログイン機能実装。
ですが、ECサイトのようなユーザーとは別な使用(今回でいう注文の確認と新規商品等の確認)をする管理者もログインが必要になる場合、どうしたらいいかということで下記サイトを参考にしました!
https://qiita.com/Yama-to/items/54ab4ce08e126ef7dade
ここからは自分の頭を整理するために流れを簡潔にまとめて見ました。
rails g devise:installconfig/initializers配下にdevise.rb が追加される。
最後の
config.scoped_views = trueに変更してコメントアウト。
このファイル他にもコメントされている部分があってなんかすごい大事そうな気配がしたので、それぞれの意味を調べて見ました!
下記がとてもわかりやすくまとめてありました!https://qiita.com/linkss/items/9b005ebc2ef81a39afa2
どうやらここではdeviseのviewsの編集を許可する意味の記載らしい。
またちょいちょい目にするscopeはとりあえず範囲という意味で把握すれば良いらしい。あとはそれぞれdeviseと関連付けたいモデルとコントローラーを生成する。
 rails g devise "関連づけたいモデル名"
 rails g devise:controllers "関連づけたモデルと連動するコントローラー名(s)"
 rails g devise:views
ルーティングの設定
現状のままだと全て同じコントローラー経由になってしまう。
ルーティングをいじらないとだめということで、devise_for :models, controller: { sessions: "models/sessions", passwords: "models/passwords" registrations: "models/registration" }みたいな感じで記載する。
- 投稿日:2020-07-01T23:21:11+09:00
Selenium::WebDriver::Error::StaleElementReferenceError
開発環境
・Ruby: 2.6.3
・Rails: 6.0.3
Selenium::WebDriver::Error::StaleElementReferenceError
system specのテスト時に以下のエラーが出ました。
Selenium::WebDriver::Error::StaleElementReferenceError:
       stale element reference: element is not attached to the page document
         (Session info: chrome=83.0.4103.116)
ドキュメント
A command failed because the referenced element is no longer attached to the DOM.

訳:参照された要素がDOMにアタッチされなくなったため、コマンドが失敗しました。
エラーが起きたテストをみてみる
spec/system/users_spec.rb#ログイン成功を確認するテスト it 'is success that Creating new user with E-mail' do visit login_path fill_in 'E-mail', with: user.email, match: :first fill_in 'Password', with: 'suzuki1234' within '.login-form' do click_button 'Log in' expect(page).to have_content 'login success' expect(current_path).to eq user_path(user.id) end end結論
spec/system/users_spec.rbwithin '.login-form' do click_button 'Log in' expect(page).to have_content 'login success' expect(current_path).to eq user_path(user.id) endに問題があった。
view内に、Log inというテキストが二箇所あるので、範囲指定をするためにwithinを使っていたが、endの位置が悪かったみたい。修正版
spec/system/users_spec.rbit 'is success that Creating new user with E-mail' do visit login_path fill_in 'E-mail', with: user.email, match: :first fill_in 'Password', with: 'suzuki1234' within '.login-form' do click_button 'Log in' #ここにend end expect(page).to have_content 'login success' expect(current_path).to eq user_path(user.id) endendの位置が悪かった。ごめんなさい...
- 投稿日:2020-07-01T22:48:29+09:00
【Rails】resourceとresourcesは別物ですね
題の通りです。
私はタイポに気づかず1時間悩みました。環境
Rails v5.2.4.3
Ruby v2.5.1やりたかったこと
index.html.erb内にlistsコントローラーのeditにつながるリンクを作りたかったです。
list_controller.rbdef index @lists = List.order("id") endindex.html.erb<% @lists.each do |list| %> <%= link_to "編集", [:edit, list] %> <% end %>routes.rbresource :listsここまで授業を振り返りながらやっていたつもりだったから間違えていると思っていなかった。
だがしかしエラーが出る。undefined method `edit_list_path' for #<#<Class:hoge>:hogehoge>メソッドがないと。
ターミナルの方でルーティングを出してみました。
$ rails routes
(省略)
edit_lists GET    /lists/edit(.:format)
(省略)
はて。
ここで私は/lists/:id/editと表示される気満々だった。
そりゃメソッドがないわけだ。
調べてたらルーティングでresourceとしていると:idとならないことがわかり。routes.rbresources :lists
resourceをresourcesにしたら問題なく動作しました。ルーティングも
$ rails routes
(省略)
edit_lists GET    /lists/:id/edit(.:format)
(省略)
となったので一安心です。
resourcesとresource
ここからはついでに調べたので自分用のメモ書きです。
resourcesは今回のように、ユーザから見てたくさんある対象に対して使うと。
例えば今回ではlistは複数あるものであり、idという番号が振られていて、そのidのlistを編集するためのルーティングが欲しかった。
なのでresources。
resourceは、ユーザから見て一つしかないもの。マイページなどが相当する。
一つしかないからidで絞る必要がないというわけですね。勉強になりました。
参考にさせていただいたサイト
- 投稿日:2020-07-01T22:45:58+09:00
Error ExecJS::RuntimeUnavailable: 発生時の対処法
発生現象
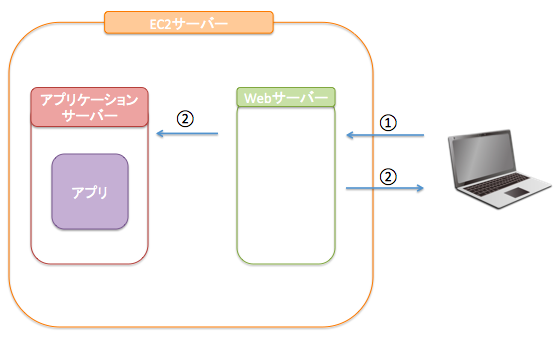
AWSのEC2でWebサーバ、アプリケーションサーバの設定時に、環境変数の設定をする際の
$ rake secretを実行した際に下記Errorが発生。terminalExecJS::RuntimeUnavailable: Could not find a JavaScript runtime. See https://github.com/rails/execjs for a list of available runtimes. /var/www/chat-space/config/application.rb:7:in `<top (required)>' /var/www/chat-space/Rakefile:4:in `require_relative' /var/www/chat-space/Rakefile:4:in `<top (required)>' (See full trace by running task with --trace)→Javascriptがうまく走っていないので、Node.jsをinstallする。
install確認
local環境にて
terminal$ node --version v12.16.1AWSの本番環境にもinstallする
terminalsudo yum install nodejs --enablerepo=epel ←実行 読み込んだプラグイン:priorities, update-motd, upgrade-helper amzn-main | 2.1 kB 00:00:00 amzn-updates | 3.8 kB 00:00:00 epel/x86_64/metalink | 5.3 kB 00:00:00 epel | 4.7 kB 00:00:00 nodesource | 2.5 kB 00:00:00 (1/3): epel/x86_64/group_gz | 74 kB 00:00:00 (2/3): epel/x86_64/updateinfo | 789 kB 00:00:00 (3/3): epel/x86_64/primary_db | 6.1 MB 00:00:00 1073 packages excluded due to repository priority protections 依存性の解決をしています --> トランザクションの確認を実行しています。 ---> パッケージ nodejs.x86_64 2:6.17.1-1nodesource を インストール --> 依存性の処理をしています: python >= 2.6 のパッケージ: 2:nodejs-6.17.1-1nodesource.x86_64 --> トランザクションの確認を実行しています。 ---> パッケージ python26.x86_64 0:2.6.9-2.89.amzn1 を インストール --> 依存性の処理をしています: libpython2.6.so.1.0()(64bit) のパッケージ: python26-2.6.9-2.89.amzn1.x86_64 --> トランザクションの確認を実行しています。 ---> パッケージ python26-libs.x86_64 0:2.6.9-2.89.amzn1 を インストール --> 依存性解決を終了しました。 依存性を解決しました ========================================================================================== Package アーキテクチャー バージョン リポジトリー 容量 ========================================================================================== インストール中: nodejs x86_64 2:6.17.1-1nodesource nodesource 13 M 依存性関連でのインストールをします: python26 x86_64 2.6.9-2.89.amzn1 amzn-main 5.8 M python26-libs x86_64 2.6.9-2.89.amzn1 amzn-main 697 k トランザクションの要約 ========================================================================================== インストール 1 パッケージ (+2 個の依存関係のパッケージ) 総ダウンロード容量: 20 M インストール容量: 59 M Is this ok [y/d/N]: y Downloading packages: 警告: /var/cache/yum/x86_64/latest/nodesource/packages/nodejs-6.17.1-1nodesource.x86_64.rpm: ヘッダー V4 RSA/SHA512 Signature、鍵 ID 34fa74dd: NOKEY nodejs-6.17.1-1nodesource.x86_64.rpm の公開鍵がインストールされていません (1/3): nodejs-6.17.1-1nodesource.x86_64.rpm | 13 MB 00:00:00 (2/3): python26-libs-2.6.9-2.89.amzn1.x86_64.rpm | 697 kB 00:00:00 (3/3): python26-2.6.9-2.89.amzn1.x86_64.rpm | 5.8 MB 00:00:01 ------------------------------------------------------------------------------------------ 合計 16 MB/s | 20 MB 00:00:01 file:///etc/pki/rpm-gpg/NODESOURCE-GPG-SIGNING-KEY-EL から鍵を取得中です。 Importing GPG key 0x34FA74DD: Userid : "NodeSource <gpg-rpm@nodesource.com>" Fingerprint: 2e55 207a 95d9 944b 0cc9 3261 5ddb e8d4 34fa 74dd Package : nodesource-release-el7-1.noarch (installed) From : /etc/pki/rpm-gpg/NODESOURCE-GPG-SIGNING-KEY-EL 上記の処理を行います。よろしいでしょうか? [y/N]y Running transaction check Running transaction test Transaction test succeeded Running transaction インストール中 : python26-libs-2.6.9-2.89.amzn1.x86_64 1/3 インストール中 : python26-2.6.9-2.89.amzn1.x86_64 2/3 インストール中 : 2:nodejs-6.17.1-1nodesource.x86_64 3/3 検証中 : 2:nodejs-6.17.1-1nodesource.x86_64 1/3 検証中 : python26-2.6.9-2.89.amzn1.x86_64 2/3 検証中 : python26-libs-2.6.9-2.89.amzn1.x86_64 3/3 インストール: nodejs.x86_64 2:6.17.1-1nodesource 依存性関連をインストールしました: python26.x86_64 0:2.6.9-2.89.amzn1 python26-libs.x86_64 0:2.6.9-2.89.amzn1 完了しました!以上で本番環境でもjavascriptが走るようになりました。
- 投稿日:2020-07-01T20:36:18+09:00
railsのバリデーションとnull: false 自分用メモ
バリデーションとは、リクエスト側が送信した特定のカラムの値が空のままだったり、意図しない形で保存されるようなことを防ぐために、予めモデルに記述しておく、門番のような役割。
上記の例だと、
text「通りまーす」
validates「待て」
text「えっ」
validates「お前何も入力されてないじゃないか。やり直し」
text「ぴえん」こんな感じ。
一方でnull: falseとは。
実はこちらも空のままのデータを受け入れないための門番、その2。
じゃあどっちが良いのかっていうと、どっちも書くが正解。
なぜか。
理由は、前述した二つの要素にはひとつ、決定的な違いがあって、それは、「守っている場所が違う」こと。
バリデーションくんは、railsアプリの中で張っている門番。フォームからの送信などに対して取り締まってくれる。
対してnull: falseくんは、データベースの前で待ち構えている門番。こちらはデータベースへの直接の書き込みを防いでくれる。銀行の窓口と、金庫前の警備員、のような関係。例えた結果、逆に分かりにくくなっている。
バリデーションが無いとアプリケーションが意図した挙動をしてくれなかったり、null: falseが無いと何らかの方法でデータベースに意図しないデータが送られた時に素通りしてしまう。
なので、二人仲良くデータベースを守っていって欲しい。

- 投稿日:2020-07-01T20:08:29+09:00
Railsの存在確認メソッド 使い分けメモ (any?/empty?/present?(!blank?)/nil?)
はじめに
Railsのビューで、「画像があったら表示させる」みたいな処理を書く場面がありました。
存在確認のためのメソッドは、Rubyのもの、Railsのもの含め、いくつかあります。
ちょっと調べて、「よし、これで行こう!」とメソッドを選択してレビューに出したところ、おもいっきり玉砕したので、今後間違えないように備忘録として残しておきます。環境
macOS Catalina Version 10.15.5
Ruby: 2.6.5
Ruby on Rails: 6.0.3調査対象
- any?(Ruby)
- empty?(Ruby)
- nil?(Ruby)
- present?(Rails)
動機
過去にも類似の記事はあり、実際に大部分、「rubyの真偽判定メソッド(nil?/empty?/blank?/present?)を検証してみた結果、興味深いことがわかった」に乗っからせていただきました。そのうえで、今回投稿に至った理由は、以下となります。
- 上記投稿においてany?メソッドが触れられていなかったが、any?の挙動についても確認したかった(今回直面したのが、配列絡みの問題だったため)
- 上記投稿のまとめの表では、
-「ある かどうかを聞くメソッド(present?等。何かあればtrueを返す)」
-「無い かどうかを聞くメソッド(empty?等。何も無ければtrueを返す)」
が並べて表記されていたが、「何かある場合に〇〇を返す」というように、条件の方向を揃えた表(present?と not empty?が比較できるような表)が欲しかった
※もちろん上記の表のメリットとして、present?とblank?が裏の関係になっていることがわかりやすい、等がありますなお、blank?は除外しています(present?の定義が!blank?のため)。
調査方法
rails consoleを使います。
test = XXX ←ここに色々代入していく

test.any?
!test.empty?
test.present?
!test.nil?
調査結果
any? !empty?
(empty?の否定)present?
(!blank?)!nil?
(nil?の否定)Ruby/Rails Ruby Ruby Rails Ruby 1
数字NoMethodError NoMethodError true true "foo"
文字列NoMethodError true true true {key: value}
ハッシュtrue true true true ["foo"]
配列true true true true true NoMethodError NoMethodError true true false NoMethodError NoMethodError false true nil NoMethodError NoMethodError false false ""
空NoMethodError false false true " "
半角スペースNoMethodError TRUE FALSE true {}
空ハッシュfalse false false true []
空配列false false false true [nil]
配列(要素がnil)FALSE TRUE TRUE TRUE ※
any?はEnumerableモジュールで定義されているため、配列やハッシュ以外で使おうとしてもNoMethodErrorとなります要点
この結果から今後気を付けなきゃなと思ったところは、表内で大文字で強調していますが、改めて以下に記載しておきます。
- 半角スペースは、
!empty?では存在するもの空ではないとみなされtrueを返し、present?では空とみなされfalseを返す
↑(修正)@scivola 様よりコメントをいただき、修正および追記しました。ありがとうございました。
(追記)present?(もといblank?)は、空判定の出る範囲が広めであることに注意
例:false、nil、半角スペース以外に、全角スペース、タブ(\t)、改行(\n)、Unicode(\unnnn)等も空と判定される- 配列に
any?を適用すると、真の要素(=nilでない要素)がある場合にtrueを返す。それ以外のメソッドは、真か否かに関係なく、要素があればtrueを返す。- 素の
nilに!nil?って聞いてもfalseを返すが、[nil]でできた配列に!nil?と聞くとtrueを返すその他
Railsで、
exists?というメソッドもあります。これは、データベースに特定の条件のデータが存在するか確かめるときに使うようで、ActiveRecord::Baseで定義されているメソッドとのことでした。そのことをつゆ知らず、当初調査対象に含めていましたが、すべてNoMethodErrorを返されました。学び
Qiita初投稿となりました。シンプルでごく当たり前の内容だとは思いますが、アウトプットのために調べる、整理する、といった過程を通じて理解を深める良い機会となりました。
定期的に、今後の自分(≒他人)にとって役に立つ記事を投稿していきたいと思います。参考URL
rubyの真偽判定メソッド(nil?/empty?/blank?/present?)を検証してみた結果、興味深いことがわかった
- 投稿日:2020-07-01T19:59:28+09:00
【Railsアプリ、AWS、SendGrid】550 Unauthenticated senders not allowed
RailsアプリをAWSにあげたらSendGridのメールが送れなくて困った。
レイルズチュートリアルの11章の設定を参考にしたままだった模様。なので、基本設定はこちらを参考にした。
https://sendgrid.kke.co.jp/docs/Integrate/Frameworks/rubyonrails.html※ユーザーネームとパスワードはenvファイルを使うこと。
こんな感じ。ENV['SENDGRID_USERNAME'] ENV['SENDGRID_PASSWORD']で、修正したのに以下のエラーが消えない
550 Unauthenticated senders not allowedなんで??と悩むこと1週間ほど。結論を書きます。
①インスタンスを再起動
②nginxを再起動
③Unicornを再起動
②と③は以下を参考にした。
https://qiita.com/naoki_mochizuki/items/5a1757d222806cbe0cd1#%E7%A2%BA%E8%AA%8DEC2サーバーとWEBサーバーとアプリケーションサーバーの3つを再起動する必要があった。
初歩的だけど見落としていた。
- 投稿日:2020-07-01T19:54:42+09:00
【Rails】Bootstrap3を用いた画像スライドショーの実装
目標
開発環境
・Ruby: 2.5.7
・Rails: 5.2.4
・Vagrant: 2.2.7
・VirtualBox: 6.1
・OS: macOS Catalina前提
下記実装済み。
・Slim導入
・Bootstrap3導入
・投稿機能実装
・画像複数アップロード機能実装実装
1.ビューを編集
books/show.html.slim/ 追記 .row #sampleCarousel.carousel.slide data-ride='carousel' ol.carousel-indicators li.active data-target='#sampleCarousel' data-slide-to='0' li data-target='#sampleCarousel' data-slide-to='1' li data-target='#sampleCarousel' data-slide-to='2' .carousel-inner role='listbox' - @book.images.each.with_index(1) do |image, index| - if index == 1 .item.active = image_tag image.to_s, class: 'img-responsive img-rounded carousel-image' - else .item = image_tag image.to_s, class: 'img-responsive img-rounded carousel-image' a.left.carousel-control href='#sampleCarousel' role='button' data-slide='prev' span.glyphicon.glyphicon-chevron-left aria-hidden='true' span.sr-only | 前へ a.right.carousel-control href='#sampleCarousel' role='button' data-slide='next' span.glyphicon.glyphicon-chevron-right aria-hidden='true' span.sr-only | 次へ【解説】
① 本に登録されている画像一覧を繰り返し処理し、indexを付与する。
- @book.images.each.with_index(1) do |image, index|② 1枚目に表示する画像を設定する。
今回は、indexが
1の画像を設定しています。- if index == 1 .item.active = image_tag image.to_s, class: 'carousel-image'③ 2枚目以降の画像を設定する。
- else
  .item
    = image_tag image.to_s, class: 'carousel-image'
2.
application.scssを編集application.scss.carousel-image { width: 30%; // スライドに対する画像の幅を設定 margin: 0 auto; // 画像を中央に配置 }
- 投稿日:2020-07-01T19:32:45+09:00
【Windows】gem install sqlite3ができない
環境
ターミナル: MSYS2(mintty+bash+pacman)
Ruby 2.6 + DevKit
Windows10 64bitSQLiteのバージョンは問わないという人
SQLite 1.3.13をインストールしよう
コンパイル済だからエラー出ることはないはず。gem install sqlite3 --version 1.3.13 --platform rubymkmf.logを見て
①~package configuration for sqlite3 is not found篇~
②~Cannot create temporary file in C:\篇~
模索中...出てくるエラー
C:\Users\foobar>gem install sqlite3 --platform ruby
Temporarily enhancing PATH for MSYS/MINGW...
Installing required msys2 packages: mingw-w64-x86_64-sqlite3
警告: mingw-w64-x86_64-sqlite3-x.xx.x-x は最新です -- スキップ
Building native extensions. This could take a while...
ERROR:  Error installing sqlite3:
        ERROR: Failed to build gem native extension.

    current directory: C:/Ruby26-x64/lib/ruby/gems/2.6.0/gems/sqlite3-1.4.0/ext/sqlite3
C:/Ruby26-x64/bin/ruby.exe -r ./siteconfyyyymmdd-foooo-baaaaar.rb extconf.rb
*** extconf.rb failed ***
Could not create Makefile due to some reason, probably lack of necessary
libraries and/or headers.  Check the mkmf.log file for more details.  You may
need configuration options.

Provided configuration options:
        --with-opt-dir
        --without-opt-dir
        --with-opt-include
        --without-opt-include=${opt-dir}/include
        --with-opt-lib
        --without-opt-lib=${opt-dir}/lib
        --with-make-prog
        --without-make-prog
        --srcdir=.
        --curdir
        --ruby=C:/Ruby25-x64/bin/$(RUBY_BASE_NAME)
        --with-sqlcipher
        --without-sqlcipher
        --with-sqlite3-config
        --without-sqlite3-config
        --with-pkg-config
        --without-pkg-config
C:/Ruby26-x64/lib/ruby/2.6.0/mkmf.rb:467:in `try_do': The compiler failed to generate an executable file. (RuntimeError)
You have to install development tools first.
        from C:/Ruby26-x64/lib/ruby/2.6.0/mkmf.rb:552:in `try_link0'
        from C:/Ruby26-x64/lib/ruby/2.6.0/mkmf.rb:570:in `try_link'
        from C:/Ruby26-x64/lib/ruby/2.6.0/mkmf.rb:672:in `try_ldflags'
        from C:/Ruby26-x64/lib/ruby/2.6.0/mkmf.rb:1832:in `pkg_config'
        from extconf.rb:35:in `<main>'

To see why this extension failed to compile, please check the mkmf.log which can be found here:

  C:/Ruby26-x64/lib/ruby/gems/2.6.0/extensions/x64-mingw32/2.6.0/sqlite3-x.x.x/mkmf.log

extconf failed, exit code 1

Gem files will remain installed in C:/Ruby25-x64/lib/ruby/gems/2.5.0/gems/sqlite3-x.x.x for inspection.
Results logged to C:/Ruby26-x64/lib/ruby/gems/2.6.0/extensions/x64-mingw32/2.5.0/sqlite3-x.x.x/gem_make.out
- 投稿日:2020-07-01T19:30:00+09:00
【Windows】gem install sqlite3ができない ~package configuration for sqlite3 is not found篇~
原因
SQLiteのソースファイルが欠損している
解決
MSYS2コンソールで以下のコマンドを実行
pacman -S libsqlite-develあとはコマンドプロンプトでも良いのでgem install sqlite3 --platform rubyを実行します。
エラー内容
package configuration for sqlite3 is not found
"x86_64-w64-mingw32-gcc -o conftest.exe -IC:/Ruby26-x64/include/ruby-2.6.0/x64-mingw32 -IC:/Ruby26-x64/include/ruby-2.6.0/ruby/backward -IC:/Ruby26-x64/include/ruby-2.6.0 -I. -D__USE_MINGW_ANSI_STDIO=1 -DFD_SETSIZE=2048 -D_WIN32_WINNT=0x0600 -D__MINGW_USE_VC2005_COMPAT -D_FILE_OFFSET_BITS=64  -O3 -fno-fast-math -fstack-protector-strong conftest.c  -L. -LC:/Ruby26-x64/lib -L. -pipe -s -fstack-protector-strong     -lx64-msvcrt-ruby260  -lshell32 -lws2_32 -liphlpapi -limagehlp -lshlwapi  "
checked program was:
/* begin */
1: #include "ruby.h"
2:
3: #include <winsock2.h>
4: #include <windows.h>
5: int main(int argc, char **argv)
6: {
7:   return 0;
8: }
/* end */
- 投稿日:2020-07-01T19:29:46+09:00
【Windows】gem install sqlite3ができない ~Cannot create temporary file in C:\篇~
原因
Windowsのユーザ名に2バイト文字(日本語)が使われている
解決
Tempファイルの位置を移動させる。
コマンドプロンプトで以下を実行mkdir C:\temp set TEMP=C:\temp set TMP=C:\temp日本語が使われていなければどのディレクトリでも大丈夫です。
あとはコマンドプロンプトでも良いのでgem install sqlite3 --platform rubyを実行します。エラー内容
"pkg-config --exists sqlite3"
| pkg-config --libs sqlite3
=> "-LC:/msys64/mingw64/lib lsqlite3\n"
"x86_64-w64-mingw32-gcc -o conftest.exe -IC:/Ruby26-x64/include/ruby-2.6.0/x64-mingw32 -IC:/Ruby26-x64/include/ruby-2.6.0/ruby/backward -IC:/Ruby26-x64/include/ruby-2.6.0 -I. -D__USE_MINGW_ANSI_STDIO=1 -DFD_SETSIZE=2048 -D_WIN32_WINNT=0x0600 -D__MINGW_USE_VC2005_COMPAT -D_FILE_OFFSET_BITS=64  -O3 -fno-fast-math -fstack-protector-strong conftest.c  -L. -LC:/Ruby26-x64/lib -L. -pipe -s -fstack-protector-strong     -lx64-msvcrt-ruby260  -lshell32 -lws2_32 -liphlpapi -limagehlp -lshlwapi  "
Cannot create temporary file in C:\Users\??????\AppData\Local\Temp\: Invalid argument
checked program was:
/* begin */
1: #include "ruby.h"
2:
3: #include <winsock2.h>
4: #include <windows.h>
5: int main(int argc, char **argv)
6: {
7:   return 0;
8: }
/* end */
- 投稿日:2020-07-01T18:14:13+09:00
ncestryによる多階層構造データを表示、投稿!! ~Ajax~
はじめに
ancestryで作成したカテゴリーデータを用いて、選択肢を動的に変化させる機能を実装しました。
学習メモとして投稿します。
まだ、理解が浅いところもありますが参考になればと思います!完成形
https://gyazo.com/8a5adc080698873d544b8665855c0901
以下が完成コードです!
routesresources :products, except: [:index] do get 'new/children_category', to: 'products#children_category' get 'new/grandchildren_category', to: 'products#grandchildren_category' endpuroducts_controllerbefore_action :set_categories, only: [:edit, :update] 〜省略〜 def children_category @children_category = Category.where(ancestry: params[:parent_category_id]) render json: @children_category end def grandchildren_category @grandchildren_category = Category.where(ancestry: "#{params[:parent_category_id]}/#{params[:children_category_id]}") render json: @grandchildren_category endpuroducts/new_html_haml.input-field__contents .input-field__contents-data %p.subline 商品の詳細 .input-field__contents-image__headline .headlabel = f.label :category_id, "カテゴリー" %span.necessary 必須 .sell__about__right__wrap-box.parent %select.select-box1#parent %option{value: 0} --- - @parents.each do |parent| %option{value: "#{parent.id}"} #{parent.name} .child %select.select-box2#child .grand_child .select-box3 = f.collection_select(:category_id, [], :id, :name, {prompt: "---"}, {id: "grand_child"})category_js$(function(){ let buildPrompt = `<option value>---</option>` let buildHtmlOption = function(parent) { let option = `<option value ="${parent.id}">${parent.name}</option>` return option } $('#parent').change(function() { let parent_id = $(this).val(); $.ajax({ type: 'GET', url: 'products/new/children_category', data: {parent_category_id: parent_id}, dataType: 'json' }) .done(function(parent) { $('.child').css('display', 'block'); $('#child').empty(); $('.grand_child').css('display', 'none'); $('#child').append(buildPrompt); parent.forEach(function(child) { var html_option = buildHtmlOption(child); $('#child').append(html_option); }); }) .fail(function() { alert('エラー') }); }); $(this).on("change", "#child", function() { let parent_id = $("#parent").val(); let child_id = $("#child").val(); $.ajax({ type: 'GET', url: 'products/new/grandchildren_category', data: { parent_category_id: parent_id, children_category_id: child_id }, dataType: 'json' }) .done(function(parent) { $('.grand_child').css('display', 'block'); $('#grand_child').empty(); $('#grand_child').append(buildPrompt); parent.forEach(function(child) { var html_option = buildHtmlOption(child); console.log(buildHtmlOption(html_option)); $('#grand_child').append(html_option); }); }) }); })考え方
・親カテゴリーを選択しイベントを発火させたら、子カテゴリーをappend(追加)する
・子カテゴリーを選択しイベントを発火させたら、孫カテゴリーをappend(追加)する
・ajaxを使用を子カテゴリー及び孫カテゴリーが表示されるための通り道を作成する
・最終的には孫カテゴリーの値が保存される様にするざっくりとこんな感じです。
では、一つ一つ見ていきましょう!
ルーティング
プログラムの処理の流れとして、最終的にviewに子カテゴリーと親カテゴリーを表示させます。
それは実際に、コントローラーとjsで処理を行いますのでリクエストが会った際のコントローラーへの通り道を作成します。routesresources :products, except: [:index] do #children_categoryアクションに行くためのパス get 'new/children_category', to: 'products#children_category' #grandchildren_categoryアクションに行くためのパス get 'new/grandchildren_category', to: 'products#grandchildren_category' endコントローラー
前提として、ajax処理行うのでjsでajax処理が行われたあとはコントローラーに行きます。
その際、コントローラーではカテゴリーの値を探してjsに返してあげる必要があります。
したがって、以下の様に書きます。puroducts_controllerbefore_action :set_categories, only: [:edit, :update] 〜省略〜 def children_category #.whereを使ってancestryから値を探して、インスタンス変数に代入する @children_category = Category.where(ancestry: params[:parent_category_id]) #ancestryから探した値をjsに返してあげる render json: @children_category end def grandchildren_category #.whereを使ってancestryから値を探して、インスタンス変数に代入する @grandchildren_category = Category.where(ancestry: "#{params[:parent_category_id]}/#{params[:children_category_id]}") #ancestryから探した値をjsに返してあげる render json: @grandchildren_category endJSの処理
jsでは、カテゴリーが選択されるたびにイベントが発火する様にします。
具体的に、
・親カテゴリーが選択されたら、イベントが発火し子要素のカテゴリー表示させる
・子カテゴリーが選択されたら、イベントが発火し孫要素のカテゴリー表示させる処理としては、イベントが発火したらajaxでコントローラーから値を取得しforEachで全てを表させる流れになります。
category_js//①=====HTMLで表示させるviewを定義=========================== $(function(){ let buildPrompt = `<option value>---</option>` let buildHtmlOption = function(parent) { let option = `<option value ="${parent.id}">${parent.name}</option>` return option } //================================================= //②=====親カテゴリーが選択され子カテゴリーを呼び出す処理============ $('#parent').change(function() { let parent_id = $(this).val(); //ajaxでコントローラーに送る $.ajax({ type: 'GET', url: 'products/new/children_category', data: {parent_category_id: parent_id}, dataType: 'json' }) //以下はコントローラーからのレスポンス後の処理 .done(function(parent) { $('.child').css('display', 'block'); $('#child').empty(); $('.grand_child').css('display', 'none'); $('#child').append(buildPrompt); //コントローラーから取得した値をforEachで全て取得し、.appendでHTML要素に追加する parent.forEach(function(child) { var html_option = buildHtmlOption(child); $('#child').append(html_option); }); }) .fail(function() { alert('エラー') }); }); //============================================= //②=====子カテゴリーが選択され孫カテゴリーを呼び出す処理============ $(this).on("change", "#child", function() { let parent_id = $("#parent").val(); let child_id = $("#child").val(); //ajaxでコントローラーに送る $.ajax({ type: 'GET', url: 'products/new/grandchildren_category', data: { parent_category_id: parent_id, children_category_id: child_id }, dataType: 'json' }) //以下はコントローラーからのレスポンス後の処理 .done(function(parent) { $('.grand_child').css('display', 'block'); $('#grand_child').empty(); $('#grand_child').append(buildPrompt); //コントローラーから取得した値をforEachで全て取得し、.appendでHTML要素に追加する parent.forEach(function(child) { var html_option = buildHtmlOption(child); console.log(buildHtmlOption(html_option)); $('#grand_child').append(html_option); }); }) }); //============================================= })最後には、HTML
HTMLで注意する点は、jsのid属性とHTMLでのid属性に齟齬かないかぐらいです。
ただし、最後の孫カテゴリーの値を保存するためには少し工夫が必要です。
puroducts/new_html_haml.input-field__contents .input-field__contents-data %p.subline 商品の詳細 .input-field__contents-image__headline .headlabel = f.label :category_id, "カテゴリー" %span.necessary 必須 .sell__about__right__wrap-box.parent %select.select-box1#parent %option{value: 0} --- # 親カテゴリーの値を全て表示させる - @parents.each do |parent| %option{value: "#{parent.id}"} #{parent.name} .child # #childのところにjsで定義したviewが挿入される %select.select-box2#child .grand_child .select-box3 # id:grand_childのところにjsで定義したviewが挿入される # また、選択孫カテゴリーの値が保存正しく保存されるために以下の様に書きます。 = f.collection_select(:category_id, [], :id, :name, {prompt: "---"}, {id: "grand_child"})補足で、以下の記述については以下のサイトを参考にしましたのでご確認ください
 f.collection_select(:category_id, [], :id, :name, {prompt: "---"}, {id: "grand_child"})

 #参考記述
 #collection_select(オブジェクト名, メソッド名, 要素の配列, value属性の項目, テキストの項目 [, オプション or HTML属性 or イベント属性])
参考記事:
https://railsdoc.com/page/collection_select終わりに
処理としては、そこまで複雑ではないため1つ1つ確認しながら行ったら上手く行きました!
もし、エラーや上手く値が取得できていない場合は、binding.pryや、console.log();、debuggerで確認してみてください!
ありがとうございました!
- 投稿日:2020-07-01T18:06:22+09:00
Rspec 複数のselectタグのテストを実行する時の注意
テストを実行したい該当のコード
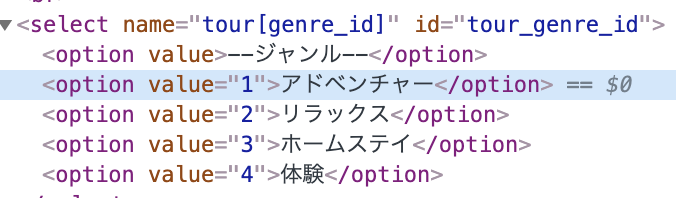
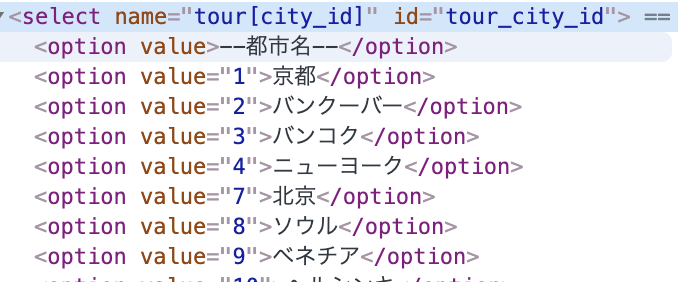
ツアー情報を投稿する際に、ジャンルを選択して保存するようにさせている。
selectタグでvalueが1のoptionを選択してジャンルを保存するテストをやってみたい
とあるページを参考にHTMLに表示される内容(以下だと冒険)を入力してテスト走らせてみた。
tour_spec.rbit 'tour投稿に成功する' do select '冒険', from: 'tour[genre_id]' endハマったエラー
Failure/Error: select '冒険', from: 'tour[genre_id]'
     Capybara::ElementNotFound:
       Unable to find option "冒険" within #<Capybara::Node::Element tag="select" path="/HTML/BODY[1]/DIV[1]/DIV[1]/DIV[1]/DIV[1]/FORM[1]/DIV[3]/DIV[1]/TABLE[1]/TBODY[1]/TR[1]/TD[2]/SELECT[1]">
冒険なんて見つからへんぞってめちゃくちゃ怒られた。
ここで、「やはりvalueを指定してやらないと、できないのではないか???」と、疑い始める。select '', from: '' じゃなくても実現できるみたい
find("option[value='<該当するvalueの値>']").select_option修正して実行してみる
Failure/Error: find("option[value='1']").select_option
     Capybara::Ambiguous:
       Ambiguous match, found 2 elements matching visible css "option[value='1']"
しかし、またキレられた。
なんやら要素が2つあるから特定できひんやんけ!!!!って吠えているこのエラーの原因はもう1つのselectが存在しているからみたいだ。実はジャンル以外にもう1つ、都市を選択するselectタグが存在している
どのselectタグなのか指定してやる
Rspecパイセンがどのselectと立ち向かえばいいか迷わないように、selectタグにあるidを指定してやる。
tour_spec.rbfind("#tour_genre_id").find("option[value='1']").select_option find("#tour_city_id").find("option[value='1']").select_option無事にぶっ倒しました。経験値5000ぐらい得た気する
メモメモ
fill_inやselectは便利やけど、どうやら不安定なことも多いみたい。。。
今回のようにfindで要素を特定して、入力する書き方の方が安全だったり、そうだったり、ラジバンダ、、、。
通っていたテストが時々通らなかったりするのは不安定なことが原因にあるのかよ。知らんかった時はいつもめちゃくちゃ悩んでいたのに
- 投稿日:2020-07-01T17:52:36+09:00
【Rails】UrlHelperを拡張する
独自のUrlHelperを定義したい
Rails.application.routes.url_helpersを include したClassを作成するとよいです。class MyUrlResolver class << self include Rails.application.routes.url_helpers end # 独自定義したhelper def self.custom_users_path(user) if user.admin? admin_users_path else users_path end end endこれで、
> MyUrlResolver.admin_users
=> "/admin_users"
> MyUrlResolver.users_path
=> "/users"
標準のUrlHelperに加えて、
> MyUrlResolver.custom_users_path(admin_user)
=> "/admin_users"
> MyUrlResolver.custom_users_path(normal_user)
=> "/users"
独自定義したUrlHelperも使うことができます。
- 投稿日:2020-07-01T17:43:14+09:00
master.keyが見つからない問題
master.keyが見つからない問題
デプロイ環境構築の過程で
master.keyなるものが必要にRailsアプリのローカル環境に
config/master.keyがみつからない原因
.gitignoreに含まれており、git cloneの過程で失われたと思われる開発途中で環境を変化(Cloud9 >> ローカル)に移行したことが発端かと
参考
Rails5.2から追加された credentials.yml.enc のキホン - Qiita
解決
一旦
**credentials.yml.enc**を削除して
master.keyもない状態で次のコマンドを入力sudo EDITOR="vi" bin/rails credentials:editすると
credentials.yml.encとmaster.keyが生成される$ vi config/master.key中身が空っぽ
$ sudo vi config/master.keyとするとようやく中身が確認できました
以下自分用メモ
サーバー上でも同様にmaster.keyがない状態で
一旦**credentials.yml.enc**を削除し
アプリのルートディレクトリでローカルでやったことと同様にsudo EDITOR="vi" bin/rails credentials:editとすると
やはりcredentials.yml.encとmaster.keyが生成され、
これだけでも先に進めそうです
- 投稿日:2020-07-01T17:42:36+09:00
yarn install ができない
前提
- ruby on rails 6.0.0 を使用。
- エラー文における/~/表記はフォルダ名やアプリ名などのディレクトリ構造として読み替えること。
- 細かい条件は把握しきれていないので同じ症状が起きた場合の解決策の1候補として考えること。
発生したエラー
git clone で持ってきたアプリを編集する際、 yarn install をしようとしたところ、下記のようなエラーが発生した。(全文は長すぎるため直接エラーが出ている箇所のみ記載)
warning Error running install script for optional dependency: "/Users/~/node_modules/fsevents: Command failed.
~
error /Users/~/node_modules/node-sass: Command failed.
解決方法
yarn upgrade というコマンドを実行することで正常にインストールすることができた。
最後に
明確な原因は不明なままだが、解決法から考えるにclone元と自分の環境にバージョンの違いがあったのかと思われる。
いつか自分が成長した頃にもう一度エラー文を読んでみようと思う。
- 投稿日:2020-07-01T16:53:35+09:00
Ransackのsort_linkで孫テーブルの値でソートする
めちゃめちゃハマったので個人的なメモ。
親を表示してるけど中間テーブルを通して別テーブルの値を表示していて、その列をソートしたいとき
<%# 子テーブル名_孫テーブル名_属性名 %>
<%= sort_link(@q, :child_grandchild_name, '孫の名前') %>
でいける。
テーブル名に"_"が入ってても大丈夫。
- 投稿日:2020-07-01T16:42:38+09:00
GraphQLでのPaginationの実装方法について(for ruby)
背景
弊社サービスのCarelyではサーバサイドはRuby(onRails)で実装されておりフロント(Vue)とのデータのやりとりをgraphQLで実装しています。
RailsでのPaginationはKaminariというgemをよく使うのですが、graphQLの場合はRelay-Style Cursor Paginationがstandardっぽいので両方の実装方法を試してみました。使っているgem, versionについて(2020/6/26現在)
kaminariはversion 1.2.1
graphql-rubyはversion 1.10.10
です。Relay-Style Cursor Paginationを使っての実装
(graphql-rubyのPaginationの説明のURLです)
https://graphql-ruby.org/pagination/using_connections.htmlサーバサイド実装例
下記のようにSchema ClassにPaginationのPluginを使うための記述をします。
class MySchema < GraphQL::Schema
  .
  .
  use GraphQL::Pagination::Connections
  .
end
Paginationの機能を追加したいQueryの定義に
::connection_typeという記述を使用します。field :users, Types::UserType::connection_type, null: true do . . argument :name, String, "名前", required: false . endサーバサイドの実装は以上です。
フロントサイド queryの呼び出し例
first(last), after(before)のparameterを指定できるようになります。
下記のqueryだとfirst(先頭)から10件取得でafterを指定することでafterから10件取得になります。
afterに指定する文字列はcursorで取得された文字列を指定します。
またpageInfoというfieldも指定できるようになり、前ページ、次ページがあるか?やstart、endカーソルの位置を取得することができます。query MyQuery { users (first: 10, after: "xxxx") { pageInfo { hasPreviousPage hasNextPage endCursor startCursor } edges { cursor node { firstName lastName mailAddress age . . } } ## nodesでも取れる nodes { firstName lastName mailAddress age . . } ## 結果の例 { "data": { "users": { "pageInfo": { "hasPreviousPage": false, "hasNextPage": true, "endCursor": "MTA", "startCursor": "MQ" }, "edges": [ { "cursor": "MQ", "node": { "firstName": "ホゲホゲ", "lastName": "フガフガ", "mailAddress": "hogehoge@example.com", "age": "20" } }, { "cursor": "Mg", "node": { "firstName": "ホゲホゲ2", "lastName": "フガフガ2", "mailAddress": "hogehoge2@example.com", "age": "30" } }, . . ], "nodes": [ { "firstName": "ホゲホゲ", "lastName": "フガフガ", "mailAddress": "hogehoge@example.com", "age": "20" }, { "firstName": "ホゲホゲ2", "lastName": "フガフガ2", "mailAddress": "hogehoge2@example.com", "age": "30" }, . . ]Kaminariを使っての実装
kaminariでのPaginationで使う一般的なメソッドは以下になります。
# 10件ごとに分割した1ページ目を取得する
User.page(1).per(10)
# tolal件数
User.page(1).per(10).total_count
# tolalページ数
User.page(1).total_pages
# 1ページの件数
User.page(1).limit_value
# 現在のページ数
User.page(1).current_page
# 次ページ数
User.page(1).next_page
# 前ページ数
User.page(1).prev_page
# 最初のページかどうか
User.page(1).first_page?
# 最後のページかどうか
User.page(1).last_page?
GraphQLでkaminariの機能を使う場合の実装例
以下のようなPagination用のTypeを作成します。
module Types
  class PaginationType < Types::BaseObject
    field :total_count, Int, null: true
    field :limit_value, Int, null: true
    field :total_pages, Int, null: true
    field :current_page, Int, null: true
  end
end
以下のように
UserTypeと複数のUser情報とPaginationを返すUsersTypeを作成します。module Types class UserType < Types::BaseObject field :uuid, String, null: true field :first_name, String, null: true field :last_name, String, null: true field :mail_address, String, null: true field :age, String, null: true . . end end module Types class UsersType < Types::BaseObject field :pagination, PaginationType, null: true field :users, [UserType], null: true end endpagination情報を返すためQueryに以下のような処理を追加します。
# 引数でpage, perを渡せるように追加
field :users, Types::UserType, null: true do
  .
  .
  argument :name, String, "名前", required: false
  argument :page, Int, required: false
  argument :per, Int, required: false
  .
end

# 引数 page、perがあればkaminariのpaginationを使用
def users(**args)
  .
  .
  users = User.page(args[:page]).per(args[:per])
  {
     users: users,
     pagination: pagination(users)
  }
end

# kaminariのメソッドを使って件数を返す
def pagination(result)
  {
    total_count: result.total_count,
    limit_value: result.limit_value,
    total_pages: result.total_pages,
    current_page: result.current_page
  }
end
10件ごとに分割した1ページ目を取得するqueryとその結果の例です。
query MyQuery {
  users (per:10, page:1) {
    pagination {
      currentPage
      limitValue
      totalCount
      totalPages
    }
   users {
     firstName
     lastName
     mailAddress
     age
     .
     .
   }
}


## 結果の例
{
  "data": {
    "users": {
      "pagination": {
        "currentPage": 1,
        "limitValue": 10,
        "totalCount": 100,
        "totalPages": 10
      },
      "users": [
        {
          "firstName": "ホゲホゲ",
          "lastName": "フガフガ",
          "mailAddress": "hogehoge@example.com",
          "age": "20"
        },
        {
          "firstName": "ホゲホゲ2",
          "lastName": "フガフガ2",
          "mailAddress": "hogehoge2@example.com",
          "age": "30"
        },
        .
        .
     ]
使い分けについて
Relay-Style Cursor Pagination
APIで情報を検索するだけなら簡単に使えるので良さそう。
ただcursorによる位置情報を持っているだけなのでフロント側でトータル件数、トータルページ数を表示したりするUIを作るのであればカスタムでconnectionを作成する必要がありそうです。
kaminari
社内のエンジニアしか使わず、フロント側でトータル件数、トータルページ数を表示するUIを作るのであればkaminariを使った方が工数的にはかからないです。個人的には
Relay-Style Cursor Paginationを使ってカスタムconnectionを作っていく方がgraphQLのスタイルに合っているので良いのではないかと思います。
- 投稿日:2020-07-01T16:34:57+09:00
Ruby on Railsのリソースベースのルーティングを忘れていて無駄に苦労した件
大学でRuby on Railsを習いました。
せっかくなのでRuby on Railsを使ってTodoリストを作ってみようと思ったら、早速ルーティングで詰みました。
createのルーティングで詰んでました。環境
Rails v5.2.4.3
Ruby v2.5.1やりたかったこと
index.html.erbでform_forメソッドを使いcreateへデータを送信する。
index.html.erbに入力スペースを用意して、そのままデータを作れるようにしたかったんです。lists_controller.rbdef index @list = List.new() end def create @list = List.new(params[:list]) if @list.save redirect_to({ action: :index }, notice: 'やることリストを追加しました') else ridirect_to({ action: :index }, notice: 'やることリストを追加できませんでした') end endindex.html.erb<%= form_for @list, :url => { action: "create" } do |form| %> <table> <tr> <th><%= form.label :text, "内容" %></th> <td><%= form.text_field :text %></td> </tr> <tr> <th><%= form.label :deadline_at, "締め切り" %></th> <td><%= form.datetime_field :deadline_at %></td> </tr> </table> <%= form.submit %> <% end %>routes.rbroot "lists#index" post "lists"まあ、結論から言うとエラーが出たんです。
controller key on routes definition, please check your routes.検索しても検索しても、「rootのルーティングを『〇〇/index』にしているので『〇〇#index』にしてください!」みたいなのしかでてこん。
そこはやってたんよ。なんか、create用のルーティングにcontrollerとactionを書いてあげたら動くようになりました。
routes.rbpost "lists", controller: "lists", action: "create"とここまで長々とお話ししましたが
気がついたんです。
リソースベースのルーティングってなんかなかったっけ、、、
授業内でcreateのルーティング書いたっけ、、、はい。
routes.rbresource :listsこれひとつ書けば、ListsControllerに対して
index、new、create、show、edit、update、destroyのアクションのルーティングが設定できるんですよね!!
もう完全に忘れていました!!!
と言うか授業で教わったときには意味が全然わかってなくて、今回やっと理解できたと言う感じでしたね、、、復習頑張ります。この場面ではrootで設定しているindex以外ではcreateしか使っていないので、
routes.rbroot "lists#index" resource :lists, :only => :createでも問題なく動作しました。
しかし、これからいろいろ機能をつけていく予定なのでcreate以外も使えるようにしておきます。はい。
お疲れ様でした!!!
- 投稿日:2020-07-01T16:34:57+09:00
【Rails】リソースベースのルーティングを忘れていて無駄に苦労した件
大学でRuby on Railsを習いました。
せっかくなのでRuby on Railsを使ってTodoリストを作ってみようと思ったら、早速ルーティングで詰みました。
createのルーティングで詰んでました。環境
Rails v5.2.4.3
Ruby v2.5.1やりたかったこと
index.html.erbでform_forメソッドを使いcreateへデータを送信する。
index.html.erbに入力スペースを用意して、そのままデータを作れるようにしたかったんです。lists_controller.rbdef index @list = List.new() end def create @list = List.new(params[:list]) if @list.save redirect_to({ action: :index }, notice: 'やることリストを追加しました') else ridirect_to({ action: :index }, notice: 'やることリストを追加できませんでした') end endindex.html.erb<%= form_for @list, :url => { action: "create" } do |form| %> <table> <tr> <th><%= form.label :text, "内容" %></th> <td><%= form.text_field :text %></td> </tr> <tr> <th><%= form.label :deadline_at, "締め切り" %></th> <td><%= form.datetime_field :deadline_at %></td> </tr> </table> <%= form.submit %> <% end %>routes.rbroot "lists#index" post "lists"まあ、結論から言うとエラーが出たんです。
controller key on routes definition, please check your routes.検索しても検索しても、「rootのルーティングを『〇〇/index』にしているので『〇〇#index』にしてください!」みたいなのしかでてこん。
そこはやってたんよ。なんか、create用のルーティングにcontrollerとactionを書いてあげたら動くようになりました。
routes.rbpost "lists", controller: "lists", action: "create"とここまで長々とお話ししましたが
気がついたんです。
リソースベースのルーティングってなんかなかったっけ、、、
授業内でcreateのルーティング書いたっけ、、、はい。
routes.rbresources :listsこれひとつ書けば、ListsControllerに対して
index、new、create、show、edit、update、destroyのアクションのルーティングが設定できるんですよね!!
もう完全に忘れていました!!!
と言うか授業で教わったときには意味が全然わかってなくて、今回やっと理解できたと言う感じでしたね、、、復習頑張ります。この場面ではrootで設定しているindex以外ではcreateしか使っていないので、
routes.rbroot "lists#index" resources :lists, :only => :createでも問題なく動作しました。
しかし、これからいろいろ機能をつけていく予定なのでcreate以外も使えるようにしておきます。はい。
お疲れ様でした!!!
- 投稿日:2020-07-01T16:04:13+09:00
Railsアプリケーションに、いいね機能を実装する
Railsアプリケーションに、いいね機能を実装する
SNSなどでよく見かけるいいね機能ですが、ぱっと見は簡単でシンプルな機能に思えます。
ですが、中身は複雑になっています。
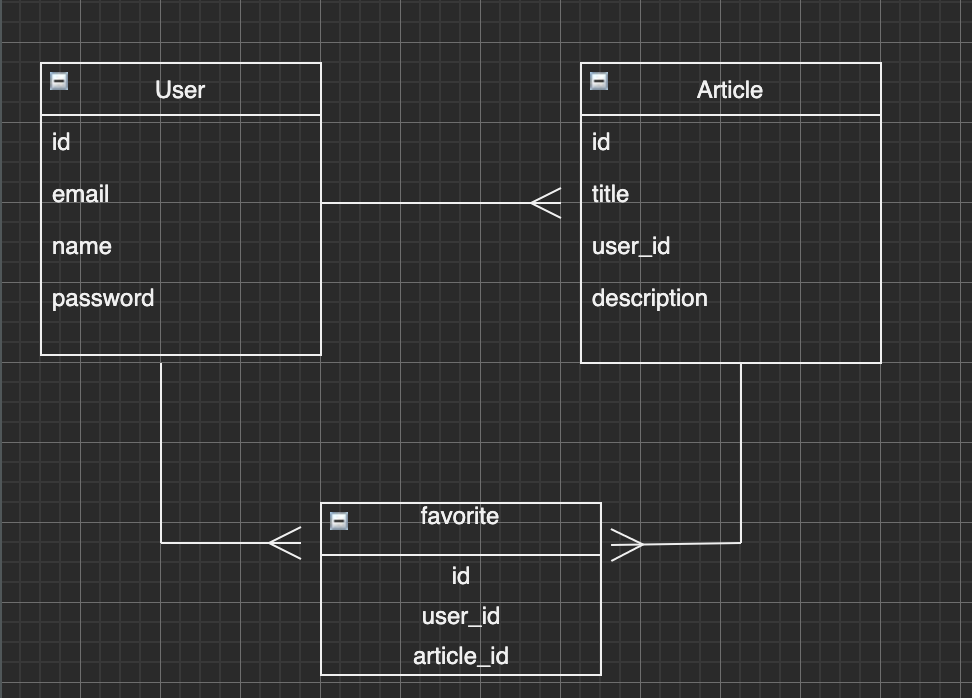
いいね機能を実装するにあたり、User、Article(記事)、Favoriteモデル(いいね)を定義します。
er図はこんな感じです。
いいね機能にフォーカスしたいので、CSSガン無視です(汗)
1.プロジェクト立ち上げ
$ rails new favoriteで、新しくプロジェクトを作成します。
2.devise導入
https://github.com/heartcombo/devise が公式ドキュメントになります。
手順に従って下記のようにしていきます。Gemfileにdeviseを追加します。
Gemfilegem 'devise'bundle installでgemをインストールします。
$ bundle installdeviseをインストールします。
$ rails generate devise:installすると、4項目ほど英文が出てきます。
rails devise完全入門!結局deviseって何ができるの?より引用させていただきました。
1, Ensure you have defined default url options in your environments files.
デフォルトのURLを設定してくださいという意味です。デフォルトのURLは開発環境の場合localhost:3000になるので、例を元に記入していってください。2, Ensure you have defined root_url to something in your config/routes.rb.
rootを設定してくださいという意味です。rootにしたいpathを例にならって設定しましょう。3, Ensure you have flash messages in app/views/layouts/application.html.erb.
flashメッセージを表示するためのタグをapplication.html.erbに記入しましょう。
flashメッセージはそれぞれnotice, alertという変数に格納されます。4, You can copy Devise views (for customization) to your app by running:
deviseのviewはデフォルトだと味気ないものになってしまいます。
viewをカスタマイズするためには rails g devise:views を打つ必要があります。これらには後々手をつけるので、一旦Userモデルを作成します。
$ rails generate devise Userちょっと寄り道したいと思います。
DeviseでUserモデルを作成したときは、nameカラムが存在しません。ログイン時にユーザーの名前などを保持したくても、デフォルトの設定だとできない状態です。なのでnameカラムを追加してあげます。migrationfile・・・・・ def change create_table :users do |t| ## Database authenticatable t.string :email, null: false, default: "" t.string :encrypted_password, null: false, default: "" ## Recoverable ・・・・・・ t.string :name #←nameカラムを追加 t.timestamps null: falsenameカラムを追加したら、
$ rails db:migrateとして、データベースに変更が反映されます。 schema.rbを確認して、nameカラムが追加されていることを確認してください。
次にviewを作ります。
$ rails g devise:viewsdeviseまわりに関わるviewがざっと作られます。
そしたら、
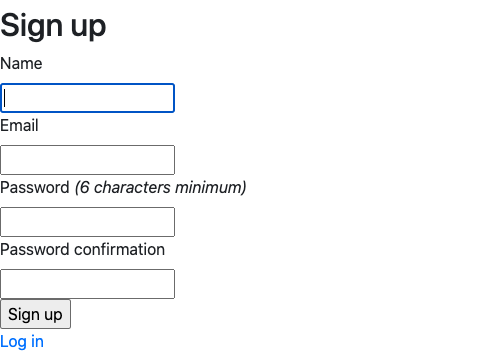
app/views/devise/registrations/new.html.erbを編集します。new.html.erb=================================ここから <div class="field"> <%= f.label :name %><br /> <%= f.text_field :name, autofocus: true, autocomplete: "name" %> </div> =================================ここまで追加 ・・・・・・・・・・・・・・・ <div class="field"> <%= f.label :email %><br /> <%= f.email_field :email, autofocus: true, autocomplete: "email" %> </div>http://localhost:3000/users/sign_up にアクセスすすると、下記のようになります。
サインアップページに、nameが追加されました。
次に、Applicationコントローラを修正します。
先ほども書きましたが、deviseはデフォルトの状態だとemailとpasswordしか受け取らない設定になっているので、カラム追加した際は、新しくパラメーターを設定しなければいけません。
(この辺は公式ドキュメントや、他にdeviseに関して執筆してくださっているエンジニアの方々の記事を参考にしたほうがいいです)ApplicationControllerclass ApplicationController < ActionController::Base before_action :configure_permitted_parameters, if: :devise_controller? protected def configure_permitted_parameters devise_parameter_sanitizer.permit(:sign_up, keys: [:name]) end end現状User周りのルーティングは自動的に設定されましたが、ルートパスを設定していないのでhomeコントローラーを作成します。
$ rails g controller home topで、homeコントローラーとtopアクション、top.htmlなるものが作成されますので、topをルートパスにします。
routes.rbroot to: "home#top"#追加 devise_for :users※ちなみに、ログイン後の画面遷移先を変えたい場合などは、
【Rails】Deviseでユーザーログイン後のリダイレクト先を変更 がおすすめです。3.投稿機能の追加
deviseを使ってログイン、ログアウト周りの実装はできたので、次は投稿機能の実装をしていきます。
先にモデルを作ります。$ rails g model Article title:string description:text user_id:integerで、Articleモデルを作成します。
$ rails db:migrateでデータベースに反映させます。
モデル間のアソシエーションも設定してあげます。user.rb・・・・・・・・ has_many :articles, dependent: :destroy #追加article.rb・・・・・・・・ belongs_to :user #追加新規作成画面と、投稿詳細画面と、投稿一覧画面を作ります。
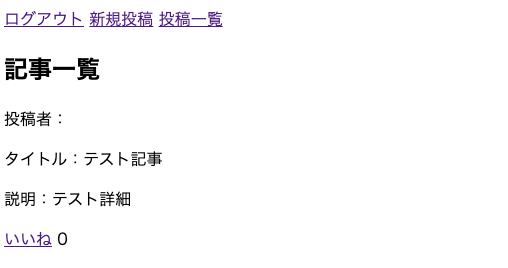
$ rails g controller articles index show newarticlesControllerclass ArticlesController < ApplicationController def index @articles = Article.all end def show @article = Article.find(params[:id]) end def new @article = Article.new end def create @article = Article.new(article_params) @article.user_id = current_user.id if @article.save redirect_to article_path(@article), notice: "投稿に成功しました" else render :new end end def edit @article = Article.find(params[:id]) if @article.user_id != current_user.id redirect_to articles_path, alert: "不正なアクセスです" end end def update @article = Article.find(params[:id]) if @article.update(article_params) redirect_to article_path(@article), notice: "編集に成功しました" else render :edit end end def destroy article = Article.find(params[:id]) article.destroy redirect_to articles_path end private def article_params params.require(:article).permit(:title, :description) end endroutes.rb・・・・・・・・・ resources :articles #追加new.html.erb<h2>新規記事投稿</h2> <%= form_for @article do |f| %> <label>記事名</label> <%= f.text_field :title %> <label>詳細</label> <%= f.text_area :description %> <%= f.submit %> <% end %>index.html.erb<h2>記事一覧</h2> <% @articles.each do |article| %> <p>投稿者:<%= article.user.name %></p> <p>タイトル:<%= article.title %></p> <p>説明:<%= article.description %></p> <% end %>show.html.erb<h2>投稿詳細</h2> <p>タイトル:<%= @article.title %></p> <p>内容:<%= @article.description %></p> <% if @article.user == current_user %> <%= link_to "編集", edit_article_path(@article) %> <%= link_to "削除", article_path(@article), method: :delete %> <% end %>views/articles/edit.html.erb<h2>編集画面</h2> <%= form_for @article do |f| %> <label>記事名</label> <%= f.text_field :title %> <label>詳細</label> <%= f.text_area :description %> <%= f.submit %> <% end %>URLから新規投稿や投稿一覧に行くのも大変なので、/layouts/application.html.erbにリンクを書いていきます。
body内を編集します。application.html.erb<body> <% if user_signed_in? %> <nav> <%= link_to "ログアウト", destroy_user_session_path, method: :delete %> <%= link_to "新規投稿", new_article_path %> <%= link_to "投稿一覧", articles_path %> <% else %> <%= link_to "ログイン", new_user_session_path %> <%= link_to "サインアップ", new_user_registration_path %> </nav> <% end %> <%= yield %> </body>newとeditのviewに関しては全く同じ記述をしているので、出来れば部分テンプレート化した方がいいです。
下記の記事がとても参考になります。
【Rails】部分テンプレートの使い方を徹底解説! | Pikawaka - ピカ1わかりやすいプログラミング用語サイトこれで簡単なログイン、ログアウトから投稿機能までを実装しました。
3.いいね機能の追加
いいね機能を実現するには、「誰が」 「どの投稿に」いいねしたかを保持する必要があります。よって、「誰が」 「どの投稿に」の部分にあたる、user_id,article_idを保持するfavoriteテーブルを作成します。【Rails】いいねボタンを作ろう part2/2のテーブル図をご覧になると理解が深まると思います。
いいねモデルを作成します。
$ rails g model Favorite user_id:integer article_id:integer$ rails db:migrateで、設定をデータベースに反映させます。
モデル間のアソシエーションを設定します。
favoriteモデルに、「1ユーザー」が「1記事」に対して「1いいね」できるように、バリデーションを追加します。favorite.rbclass Favorite < ApplicationRecord belongs_to :user # 追加 belongs_to :article # 追加 validates_uniqueness_of :article_id, scope: :user_id #追加 endarticle.rbhas_many :favorites, dependent: :destroy #追加user.rbhas_many :favorites, dependent: :destroy #追加favoritesコントローラーを作成します。
$ rails g controller favoritesルーティングを定義します。
routes.rbresources :articles do # doからendまで追加 resource :favorites, only: [:create, :destroy] endこれは、ルーティングをネストすると言います。
なぜこれを導入するのかは、ネストとアソシエーション - Qiitaがとても分かりやすいです。
今回は、いいねを作成する機能と、いいねを解除する機能が必要なので、createアクションとdestroyアクションを定義します。favorites_controllerclass FavoritesController < ApplicationController def create @favorite = Favorite.new(user_id: current_user.id, article_id: params[:article_id]) @favorite.save redirect_back(fallback_location: root_path) end def destroy @favorite = Favorite.find_by(user_id: current_user.id, article_id: params[:article_id]) @favorite.destroy redirect_back(fallback_location: root_path) end end
redirect_back(fallback_location: root_path)は、直前のページにリダイレクトさせるという記述です。
user_idには、current_user_id(今ログインしているユーザーのid)が入ります。
いいねにカーソルを合わせたとき画面左下に、localhost:3000/articles/id/favoritesと出てくると思います。
article_id: params[:article_id])には、上記のidが入ることになります。
これによって、user_idとarticle_idが揃うので、セーブすることができるようになります。次にviewを作成していきます。いいね機能単体にviewは存在しないので、投稿一覧画面にいいねボタンを設置していきます。
今回はCSS皆無です。index.html.erb<h2>記事一覧</h2> <% @articles.each do |article| %> <p>投稿者:<%= article.user.name %></p> <p>タイトル:<%= article.title %></p> <p>説明:<%= article.description %></p> <% if Favorite.find_by(user_id: current_user.id, article_id: article.id) %> <%= link_to "いいねを外す", article_favorites_path(article), method: :delete %> <% else %> <%= link_to "いいね", article_favorites_path(article), method: :post %> <% end %> <%= article.favorites.count %> <% end %>
<% if Favorite.find_by(user_id: current_user.id) %>
は、今ログインしているユーザーが既にいいねしてあるかどうかをチェックしています。
favoriteテーブルのuser_idに、今ログインしているユーザーのidが入っていて、かつ投稿のid=いいねしている ということになります。これでいいね機能の実装は完了です。
もっとこうした方がいい、足りない部分等ありましたらご教示いただけますと幸いです。次回はコメント機能も実装していきたいと思います。
- 投稿日:2020-07-01T15:10:05+09:00
Rspec factorybot レコードの内容が異なるデータを用意する
factorybotで同一のデータではなく、内容が異なるデータを準備しちゃうぞー。
参考URL
https://teratail.com/questions/161682
こんな感じてできる。
参考にする時はモデル名に気をつけて、userの部分を該当のモデル名に変えて上げるといいぞ。
user.rbFactoryBot.define do factory :user, class: User do email { 'abc@xxx.com' } password { 'password' } password_confirmation { 'password' } end factory :another_user, class: User do email { 'zyx@xxx.com' } password { 'pasuwa-do' } password_confirmation { 'pasuwa-do' } end endテスト側で定義してあげる
user_spec.rbRSpec.describe 'User', type: :system, js: true do let(:usere) { create(:user) } let(:another_user) { create(:another_user) } endちょい詰まったこと
class: User doを付ける必要があるのを知らなかったから、ずっとuninitialized constantエラーが出てしまっていた。
user.rbFactoryBot.define do factory :user, class: User do #class: User doをつけてないとuninitialized constantエラーが出ちゃう email { 'abc@xxx.com' } password { 'password' } password_confirmation { 'password' } end factory :another_user, class: User do #class: User doをつけてないとuninitialized constantエラーが出ちゃう email { 'zyx@xxx.com' } password { 'password' } password_confirmation { 'password' } end end違うデータを準備できることによって受ける恩恵
ストーカーがマイページを覗きにきやがった時のテストを実行できるべ
最後に
もっといい方法ご存知なら、ご教示していただけると幸福です。
- 投稿日:2020-07-01T15:07:02+09:00
変数名に変数を組み込む
前提
- ruby on rails 6.0.0 を使用。
やりたいこと
- 変数を命名する際に他の変数を組み込む。
- times文を繰り返す中で、それぞれに数字をつけてtimeの数だけ変数を作りたい。
方法
railsに最初から定義されている instance_variable_set というメソッドを使用する。
instance_variable_set("変数名", 代入したい値)先につけたい変数名を、後にその変数に代入したい値を記述することで、任意の変数を作ることができる。
イコールで直接変数を作る方が簡単ではあるが、つけたい変数名を""で囲ってあるためにその内部で別の変数を扱うことができるというメリットがある。movies_controller.rbdef index Tag.all.length.times do |num| tag_point = 0 Movie.where(tag_id: num + 1).each do |movie| tag_point += movie.evaluation end instance_variable_set("@tag#{num + 1}_point", tag_point) end endこのようにすることで、タグの数だけ処理を行いそれぞれで tag1_point, tag2_point といった変数を作ることができるようになる。
終わりに
ひとつひとつレコードの数だけ処理を書くのは大変かつ効率が悪いため、 length.times でまとめようとしたところ、イコールで直接変数を作る方法では変数名に変数を含めることができなかった。
このメソッドを使うことで変数の命名がより自由になるので是非覚えておきたい。
- 投稿日:2020-07-01T14:31:43+09:00
ifを使った分岐
前提
- ruby on rails 6.0.0を使用。
やりたいこと
- コントローラに情報が渡されている場合と渡されていない場合で処理を変えたい。
- 該当するデータが存在するか否かで条件を分岐する。
方法
ifの条件式で情報が渡されているかを判別する。
movies_controller.rbdef index if params[:tag_id] @movies = Movie.where(tag_id: params[:tag_id]) else @movies = Movie.all end end上記2行目のように、有無を判別したい情報を直接おくとtrue,falseの真偽が返ってくるので、これをifの条件式として組み込む。
これにより、情報が渡されている場合はそれに関連したデータを。渡されていない場合は全てのデータを取り出す。といった処理ができるようになる。if param[:tag_id] == true最初はこのようにわざわざtrueを判別する式を記述する方法でやっていたが、先述の方法の方がスタイリッシュなのでそちらでやっていく方が良いと思われる。
終わりに
基礎中の基礎ではあるが、それゆえに重要になってくる部分でもあるのでしっかりと使いこなしていきたい。
- 投稿日:2020-07-01T14:08:35+09:00
FullCalendar導入 カレンダーを表示するまで
Railsfullcalendar1.Gemの追加
Gemfilegem 'jquery-rails' gem 'fullcalendar-rails' gem 'momentjs-rails'
$ bundle install2.Viewファイル
カレンダーを表示したいページにタグを追記します
html<div id="calendar"></div>haml#calendarapp/assets/javascripts/application.js//= require jquery //= require moment //= require fullcalendar//= require moment/ja.js
//= require fullcalendar/lang/jaカレンダーが表示されます
- 投稿日:2020-07-01T14:08:35+09:00
【FullCalendar】カレンダーを表示するまで
Railsfullcalendar1.Gemの追加
Gemfilegem 'jquery-rails' gem 'fullcalendar-rails' gem 'momentjs-rails'
$ bundle install2.Viewファイル
カレンダーを表示したいページにタグを追記します
html<div id="calendar"></div>haml#calendarapp/assets/javascripts/application.js//= require jquery //= require moment //= require fullcalendar //= require moment/ja.js //= require fullcalendar/lang/ja $(document).on("turbolinks:load", function() { $("#calendar").fullCalendar({}); });カレンダーが表示されます
- 投稿日:2020-07-01T12:01:09+09:00
[Rails]画像の複数投稿を実装してみた
はじめに
某プログラミングスクールでフリマアプリを作成しました。画像の複数投稿・編集を担当し、その備忘録として記事を投稿します。今回は、特に苦労した画像の複数投稿について記述していきます。また、プログラミング初学者であるため、拙い箇所や間違ってる解釈があるかもしれません。ご了承の程、よろしくお願い致します。
また、下記の記事を参考にさせて戴きました。
https://qiita.com/gakinchoy7/items/ac1d8e64e33c3ddd377b
https://qiita.com/shinnosuke960801/items/66f2a511803d7dac53a3
https://qiita.com/mylevel/items/bae2204f8a40ff1d2d37仕様
1、10枚まで投稿ができるようにしました。
2、5枚画像を選択した後、2段目に移動するようにしました。
3、1枚ずつプレビューされるようにしました。
4、削除ボタンを押すと、プレビューが消えるようにしました。
(下記URLで挙動の確認ができます)
https://i.gyazo.com/baa9fdb1aaa4c2ffc4a1dc2225043486.mp4
https://i.gyazo.com/6a1b8af554c9c34792c8870cfd796580.mp4
https://i.gyazo.com/c73679d9c9bc3437b1abec53e63ce78c.mp4モデルのアソシエーション
user.rbhas_many :productsimage.rbbelongs_to :productproduct.rbbelongs_to :user has_many :images, dependent: :destroy画像付きで出品できるように
まず最初に、実装に必要なGemfileを編集します。
gemfilegem 'carrierwave' gem 'mini_magick' gem 'jquery-rails'インストールが終わったら、モデルに追記します。
image.rbmount_uploader :image, ImageUploaderproduct.rbaccepts_nested_attributes_for :images, allow_destroy: trueproductが保存される時に、imageが紐づいて保存されるようになります。
次に、コントローラを編集します。
products_controller.rbdef new @product = Product.new @product.images.new end def create @product = Product.create(product_params) if @product.save redirect_to root_path # image以外のデータも送信する想定で下記のように記述しています。 else unless @product.images.present? @product.images.new render 'new' else render 'new' end end end private def product_params params.require(:product).permit(images_attributes: [:image, :_destroy, :id]).merge(user_id: current_user.id) endform内で異なるモデルを編集する際に、fields_forというメソッドを使用します(今回だと、productを編集してimageを保存)。その際に、newアクションの
@product.images.newという記述がないと、viewにフォームが表示されません。また、createアクションですが、画像が送信されたかそうでないかで条件分岐させています。単にrender 'new'だと画像を送信せずにページに戻ってきた際にフォームが表示されません。また、画像を送信しているにも関わらず@product.images.newの記述があると、フォームが2個表示されてしまいます。続いて、viewを作成していきます。
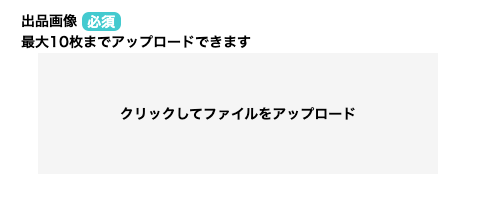
new.html.haml.content-bg-gray .shadowed-rounded-rectangle = form_with(model: @product, local: true, class: "product-new-form") do |f| %section.mainbox-product-header %h2.mainbox-header__text 商品の情報を入力 .product__block__form %span.label_title.profile-form__label 出品画像 %span.require 必須 %p.upload_limit 最大10枚までアップロードできます .product-new__field__uploader = f.fields_for :images do |image| %ul#previews %li.input %label.upload-label .upload-label__text %p クリックしてファイルをアップロード .input-area = image.file_field :image, class: "hidden image_upload"_new.scss.content-bg-gray{ background-color: #EFEFEF; padding-top: 80px; padding-bottom: 100px; .shadowed-rounded-rectangle{ width: 700px; box-shadow: 1px 1px 10px 1px rgba(0,0,0,0.1); margin: 100px auto 0; background-color: #ffffff; border-radius: 60px; padding: 30px; .product-new-form{ width: 434px; margin: auto; .product__block__form{ .product-new__field__uploader{ margin-bottom: 50px; width: 100%; ul{ .input{ display: flex; flex-wrap: wrap; width: 100%; .upload-label{ width: 100%; height: 121px; background-color: rgb(245, 245, 245); .upload-label__text{ text-align: center; position: absolute; top: 50%; z-index: 0; width: 100%; transform: translate(0, -50%); } .input-area{ display: none; } } } } } } } } } .mainbox-product-header{ margin: 30px 0 8px; width: 434px; &__text{ margin-bottom: 20px; } } .require{ display: inline; width: 32px; height: 15px; padding: 2.5px 5.5px; background-color: #68C7CC; color: #ffffff; border-radius: 7px; }BEM規則に基づいて命名できていないので、分かりづらいかもしれませんがviewの完成です。
次に、画像を載せるごとに入力欄を変化させるようにします。
ます、jQueryを使えるよに下記ファイルを編集します。application.js//= require turbolinks //= require jquery //= require jquery_ujs //= require_tree .
new_image.jsファイルを作成し、編集していきます。new_image.js$(function () { # プレビュー機能 # 'change'イベントでは$(this)で要素が取得できないため、 'click'イベントを入れました。 # これにより$(this)で'input'を取得することができ、inputの親要素である'li'まで辿れます。 $(document).on('click', '.image_upload', function () { # inputの要素はクリックされておらず、inputの親要素であるdivが押されています。 # だからdivのクラス名をclickした時にイベントが作動します。 # div(this)から要素を辿ればinputを指定することが可能です。 # $liに追加するためのプレビュー画面のHTMLです。 var preview = $('<div class="image-preview__wapper"><img class="preview"></div><div class="image-preview_btn"><div class="image-preview_btn_delete">削除</div></div>'); # 次の画像を読み込むためのinputです。 var append_input = $(`<li class="input"><label class="upload-label"><div class="upload-label__text"><i class="fa fa-camera fa-4x"></i><div class="input-area display-none"><input class="hidden image_upload" type="file"></div></div></label></li>`) $ul = $('#previews') $li = $(this).parents('li'); $label = $(this).parents('.upload-label'); $inputs = $ul.find('.image_upload'); # inputに画像を読み込んだら、"プレビューの追加"と"新しいli追加"処理が動きます。 $('.image_upload').on('change', function (e) { # inputで選択した画像を読み込みます。 var reader = new FileReader(); # プレビューに追加させるために、inputから画像ファイルを読み込みます。 reader.readAsDataURL(e.target.files[0]); # 画像ファイルが読み込んだら、処理が実行されます。 reader.onload = function (e) { # previewをappendで追加する前に、プレビューできるようにinputで選択した画像を<img>に'src'で付与させます。 # つまり、<img>タグに画像を追加させます。 $(preview).find('.preview').attr('src', e.target.result); } # inputの画像を付与した,previewを$liに追加します。 $li.append(preview); # 生成したliの横幅を決めます。 $('#previews li').css({ 'width': `80px` }) # プレビュー完了後は、inputを非表示にさせます。これによりプレビューだけが残ります。 $label.css('display', 'none'); # inputを非表示にします。 $li.removeClass('input'); # inputのクラスはjQueryで数を数える時に邪魔なので除去します。 $li.addClass('image-preview'); # inputのクラスからプレビュー用のクラスに変更しました、 $lis = $ul.find('.image-preview'); # クラス変更が完了したところで、プレビューの数を数えます。 # 画像が9枚以内なら文字とインプットを追加させます。 if ($lis.length < 10) { $ul.append(append_input) $('#previews li:last-child').css({ 'width': `80px` }) } # inputの最後の"data-image"を取得して、input nameの番号を更新させています。 # これをしないと、それぞれのinputの区別ができず、最後の1枚しかDBに保存されません。 # 全部のプレビューの番号を更新することで、プレビューを削除して、新しく追加しても番号が1,2,3,4,5,6と綺麗に揃います。そのため、全部の番号を更新させます。 $inputs.each(function (num, input) { # nameの番号を更新するために、現在の番号を除去します。 $(input).removeAttr('name'); $(input).attr({ name: "product[images_attributes][" + num + "][image]", id: "images_attributes_" + num + "_image" }); }); }); }); # 削除ボタンをクリックしたとき、処理が動きます。 $(document).on('click', '.image-preview_btn_delete', function () { var append_input = $(`<li class="input"><label class="upload-label"><div class="upload-label__text"><i class="fa fa-camera fa-4x"></i><div class="input-area display-none"><input class="hidden image_upload" type="file"></div></div></label></li>`) $ul = $('#previews') $lis = $ul.find('.image-preview'); $li = $(this).parents('.image-preview'); # "li"ごと削除して、previewとinputを削除させます。 $li.remove(); $lis = $ul.find('.image-preview'); # クラス変更が完了したところで、プレビューの数を数えます。 # 画像が10枚以内なら文字とインプットを追加させます if ($lis.length == 9) { $ul.append(append_input) } $('#previews li:last-child').css({ 'width': `80px` }) }); });jsファイルで追加されたセレクタをcssで編集させていきます。
_new.scss.content-bg-gray{ background-color: #EFEFEF; padding-top: 80px; padding-bottom: 100px; .shadowed-rounded-rectangle{ width: 700px; box-shadow: 1px 1px 10px 1px rgba(0,0,0,0.1); margin: 100px auto 0; background-color: #ffffff; border-radius: 60px; padding: 30px; .product-new-form{ width: 434px; margin: auto; .product__block__form{ .product-new__field__uploader{ margin-bottom: 50px; width: 100%; #previews{ list-style: none; display: flex; flex-wrap: wrap; .image-preview__wapper{ width: 80px; height: 80px; .preview{ width: 80px; height: 80px; } } .image-preview_btn{ text-align: center; padding: 8px; border-top: 1px solid #cccccc; cursor: pointer; &:hover{ transition: 0.5s; background-color: #cccccc; } } .input{ display: flex; flex-wrap: wrap; width: 100%; .upload-label{ width: 100%; height: 121px; background-color: rgb(245, 245, 245); .upload-label__text{ text-align: center; position: absolute; top: 50%; z-index: 0; width: 100%; transform: translate(0, -50%); } .input-area{ display: none; } } } } } } } } } .mainbox-product-header{ margin: 30px 0 8px; width: 434px; &__text{ margin-bottom: 20px; } } .require{ display: inline; width: 32px; height: 15px; padding: 2.5px 5.5px; background-color: #68C7CC; color: #ffffff; border-radius: 7px; }
#previewsの中に.previewと.inputを横並べにし、flex-wrap: wrap;をかけます。5枚×2段になるようにサイズを調整しています。以上で画像の複数投稿の実装は終わりです。
おわりに
リファクタリングが出来ていなかったり、BEMに従って命名出来ていなかったり、他にも課題はいくつかあると思います。機会があれば、画像の枚数に応じてフォームの大きさを小さくしていくするような実装をしてみたいと思います。質問や間違っている点がございましたら、コメントで指摘してくださると幸いです。
- 投稿日:2020-07-01T10:47:27+09:00
Seleniumでnavigator.webdriverの対策をする
enable-automationとかuseAutomationExtensionは期待通りの動作しなかった
とある理由でスクレイピングしたいけど、
navigator.webdriver=trueなブラウザだとNGなサイトだった。
対応したい。できるらしいので。
参考:navigator.webdriver=trueだとロボットだとバレる。その回避法はあるか?puppeteerなら出来そう
でもSelenium使っているしpuppeteer使ったことないし、どうにかできないものか。。動かなかったときの設定
どうやらSeleniumでもできるらしい記事をいくつか見つけた。
やってみた。
    capabilities = Selenium::WebDriver::Remote::Capabilities.chrome(
      accept_insecure_certs: true,
      chromeOptions: {
        args: [
          '-window-size=1920,1080',
          '--user-agent=Mozilla/5.0 (Macintosh; Intel Mac OS X 10_13_6) AppleWebKit/537.36 (KHTML, like Gecko) Chrome/69.0.3497.100 Safari/537.36'
        ],
        excludeSwitches: ['enable-automation'], # 追加
        useAutomationExtension: false # 追加
      }
    )
    driver = Selenium::WebDriver.for(
      :remote,
      url: 'http://chrome:4444/wd/hub',
      desired_capabilities: capabilities,
      http_client: Selenium::WebDriver::Remote::Http::Default.new
    )
実際に動かしてみてもtrueが帰ってくる。ダメだった。
driver.execute_script('return navigator.webdriver')
>>> true
動いた設定
enable-automationとかuseAutomationExtensionは削除。
今まで通りにdriverを設定。capabilities = Selenium::WebDriver::Remote::Capabilities.chrome( accept_insecure_certs: true, chromeOptions: { args: [ '-window-size=1920,1080', '--user-agent=Mozilla/5.0 (Macintosh; Intel Mac OS X 10_13_6) AppleWebKit/537.36 (KHTML, like Gecko) Chrome/69.0.3497.100 Safari/537.36' ], } ) driver = Selenium::WebDriver.for( :remote, url: 'http://chrome:4444/wd/hub', desired_capabilities: capabilities, http_client: Selenium::WebDriver::Remote::Http::Default.new ) # 以下を追加 driver.execute_script('const newProto = navigator.__proto__;delete newProto.webdriver;navigator.__proto__ = newProto;')実際に動かすとundefinedが帰ってくる。
puppeteerと似たような動作する。
良かった。driver.execute_script('return navigator.webdriver') >>> undefined
- 投稿日:2020-07-01T10:47:27+09:00
Seleniumでnavigator.webdriverの対策をしてアクセスする
enable-automationとかuseAutomationExtensionは期待通りの動作しなかった
とある理由でスクレイピングしたいけど、
navigator.webdriver=trueなブラウザだとNGなサイトだった。
対応したい。できるらしいので。
参考:navigator.webdriver=trueだとロボットだとバレる。その回避法はあるか?puppeteerなら出来そう
でもSelenium使っているしpuppeteer使ったことないし、どうにかできないものか。。動かなかったときの設定
どうやらSeleniumでもできるらしい記事をいくつか見つけた。
やってみた。
    capabilities = Selenium::WebDriver::Remote::Capabilities.chrome(
      accept_insecure_certs: true,
      chromeOptions: {
        args: [
          '-window-size=1920,1080',
          '--user-agent=Mozilla/5.0 (Macintosh; Intel Mac OS X 10_13_6) AppleWebKit/537.36 (KHTML, like Gecko) Chrome/69.0.3497.100 Safari/537.36'
        ],
        excludeSwitches: ['enable-automation'], # 追加
        useAutomationExtension: false # 追加
      }
    )
    driver = Selenium::WebDriver.for(
      :remote,
      url: 'http://chrome:4444/wd/hub',
      desired_capabilities: capabilities,
      http_client: Selenium::WebDriver::Remote::Http::Default.new
    )
実際に動かしてみてもtrueが帰ってくる。ダメだった。
driver.execute_script('return navigator.webdriver')
>>> true
動いた設定
enable-automationとかuseAutomationExtensionは削除。
今まで通りにdriverを設定。capabilities = Selenium::WebDriver::Remote::Capabilities.chrome( accept_insecure_certs: true, chromeOptions: { args: [ '-window-size=1920,1080', '--user-agent=Mozilla/5.0 (Macintosh; Intel Mac OS X 10_13_6) AppleWebKit/537.36 (KHTML, like Gecko) Chrome/69.0.3497.100 Safari/537.36' ], } ) driver = Selenium::WebDriver.for( :remote, url: 'http://chrome:4444/wd/hub', desired_capabilities: capabilities, http_client: Selenium::WebDriver::Remote::Http::Default.new ) # 以下を追加 driver.execute_script('const newProto = navigator.__proto__;delete newProto.webdriver;navigator.__proto__ = newProto;')実際に動かすとundefinedが帰ってくる。
puppeteerと似たような動作する。
良かった。driver.execute_script('return navigator.webdriver') >>> undefined
- 投稿日:2020-07-01T08:32:49+09:00
Railsを使った新規プロジェクトの始め方
はじめに
新米エンジニアの@richsan60です。
これからはオウンドメディアを通じた集客や営業も必要と感じ
私の会社でもオウンドメディアの運用を始める運びとなりました。
・・・正確には上司から「オウンドメディアで案件取ってこい」という上司の無茶振りがあryそこで、いくつか記事を作成し、それを通してオウンドメディアを育てて行こうと考え、
まずはその第一歩として最近学んでいるRailsを用いて記事をいくつか作ることにしました。記事作成を通じて学んだことや参考にさせていただいた情報をこちらで紹介していきます。
では早速本題へ
今回はメモ帳アプリの作成を行います。
プロジェクトの新規作成
1. 設計
まずは、どんなアプリやサービスを作りたいのかをまとめ、ドキュメント(紙でも画面でも、図や文章)に落としこみます。
私は過去にこの工程を飛ばしていきなり実装し始めたところ、ロジックミスが発生し、その修正に最初からアプリを作り直すくらい時間がかかったことがあります。
設計にしっかり時間を確保した方が後々の無駄な工数を減らすことにつながると学びました。。。手間はかかりますが、クラス図、画面遷移図、使用する単語(英語訳)を作成することで
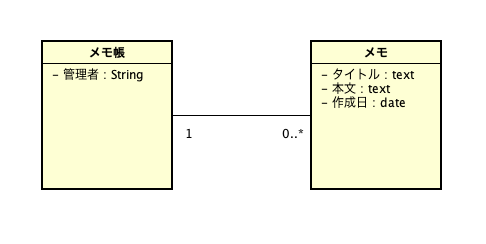
頭の中で描いたイメージを整理できますし、それによって考慮できていないロジックに気づくこともあります。クラス図
クラス図とは、システムを構成するクラスとそれらの関係を表現します。
シンプルなアプリであってもまずはクラス図を作成し、機能や関係を整理することでスムーズな作成につながります。クラス図に関しての説明はこちらのサイトが分かりやすく、オススメです。
https://cacoo.com/ja/blog/how-to-write-class-diagram/
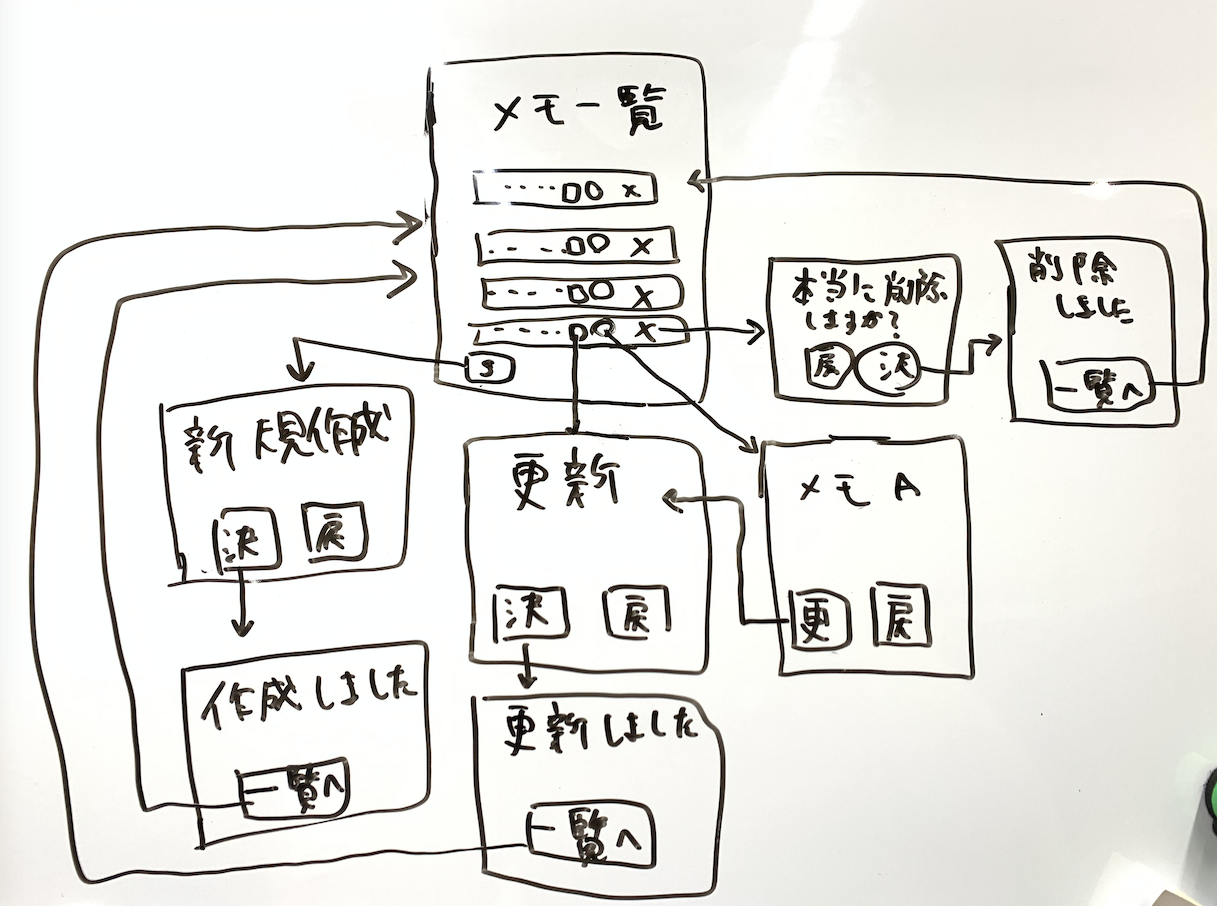
画面遷移図
画面遷移図はアプリの操作の流れを見える形にしたものです。
画面遷移図を作成することによって、各ページの関係性と機能を明確化することが出来、
抜け漏れの防止につながります。
※下記のような手書きでも何でも良いので、書くことで整理できます。
書いてみるとわかるのですが、シンプルな機能しか実装しないアプリでも意外と画面数は多くなります。
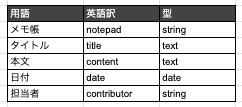
用語の整理
Railsに限らず、アプリを実装する際には使用する用語を整理しておくことで実装中に類似語との混同を未然に防ぐことが出来ます。
整理するのは以下の項目です。
- 使用用語の洗い出し
- 使用用語の英語訳
- 型の設定
作者はスプレッドシートを使用して以下のように整理していました。
2.プロジェクトの作成
ここまで出来たらプロジェクトを作成していきます。
新いプロジェクトを立ち上げるだけであればRailsはすぐに作成が可能です。アプリを開発していくためのディレクトリに移動します
$ cd [アプリを作成するディレクトリ]

ex)
$ cd workspases

もし、上記ディレクトリがない場合は
$ mkdir [アプリを作成するディレクトリ]
でアプリを作成するためのディレクトリを作成してそこに移動します。
新規プロジェクトの作成
Railsにはジェネレータという多数のスクリプトが付属しており、これらが特定のタスクを開始するために必要なものを自動的に作成してくれるため、開発が他の言語と比較してとても容易になります。
下記コマンドを入力して新しいアプリを作成します。
$ rails new [アプリ名]

ex)
$ rails new notepad
これにより、[アプリ名]という名前のアプリケーションがディレクトリに作成され、Gemfile というファイルで指定されているgemファイルがbundleコマンドによってインストールされます。
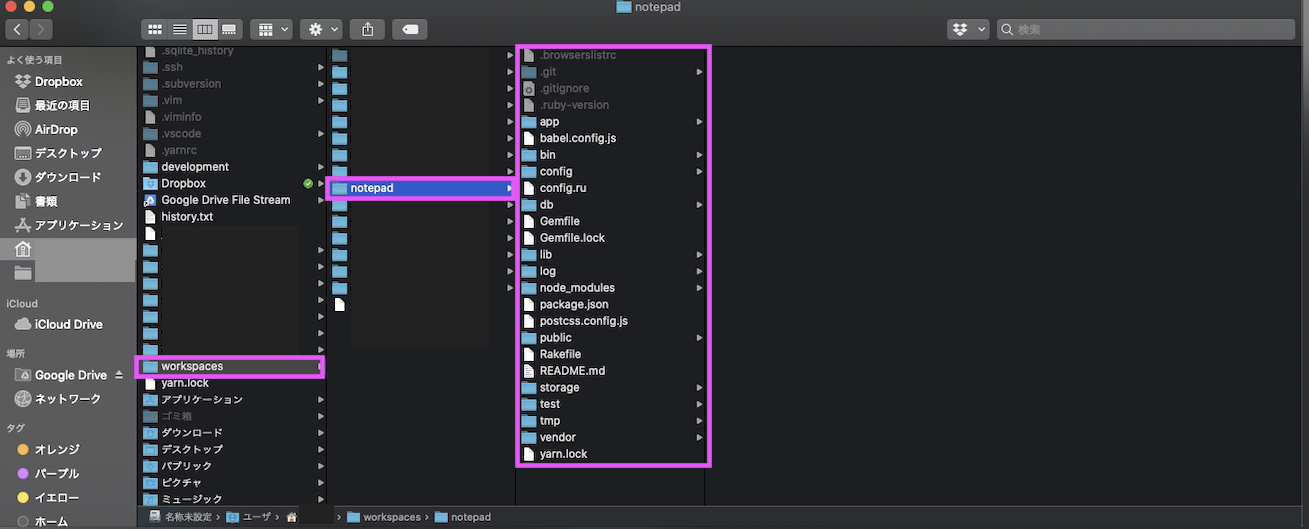
作成したプロジェクトへ移動するとそのディレクトリの下には多数のファイルやフォルダが生成されており、これらがRailsアプリケーションを構成しています。
それぞれのファイルやフォルダに関しては以下のサイトで詳しく説明が入っています。
https://qiita.com/len_crow/items/7127b31d68197983de87上記の流れで作成すると、ディレクトリは以下のように仕上がっていきます。
$ cd [アプリ名]

ex)
$ cd notepad
bundlerのインストール
Bundleはgemの依存関係とバージョンを管理するためのツールで、bundleをインストールすることによって、
バージョン管理がとても容易になります。
以下コマンドにてインストールします。$ bundle installサーバーの起動
railsのサーバーを起動してアプリケーションが動くかを確認します。
以下のコマンドを入力してサーバーを起動します。$ rails server 下記コマンドでもサーバーの起動は可能です。 $ rails s「$ rails server」 で無事サーバーが起動されるとターミナルに以下のログが表示されます。
=> Booting Puma
=> Rails 6.0.3.2 application starting in development
=> Run `rails server --help` for more startup options
Puma starting in single mode...
* Version 4.3.5 (ruby 2.7.1-p83), codename: Mysterious Traveller
* Min threads: 5, max threads: 5
* Environment: development
* Listening on tcp://127.0.0.1:3000
* Listening on tcp://[::1]:3000
Use Ctrl-C to stop
上記コマンドを実行した際に、裏で何が行われているかは以下の記事で詳しく説明の記載があります。
https://qiita.com/kamohicokamo/items/3ec26ccb8e16b8ba9adbサーバーを起動したら http://localhost:3000/ にアクセスして動作確認を行います。
以下のような画面が表示されれば無事新しいプロジェクトは作成は完了です!
サーバーが起動された状態で 「 http://localhost:3000/ 」 にアクセスするとターミナルには以下のログが表示されます。
Started GET "/" for ::1 at 2020-07-14 16:47:17 +0900
   (2.7ms)  SELECT sqlite_version(*)
Processing by Rails::WelcomeController#index as HTML
  Rendering /Users/[ユーザー名]/.rbenv/versions/2.7.1/lib/ruby/gems/2.7.0/gems/railties-6.0.3.2/lib/rails/templates/rails/welcome/index.html.erb
  Rendered /Users/[ユーザー名]/.rbenv/versions/2.7.1/lib/ruby/gems/2.7.0/gems/railties-6.0.3.2/lib/rails/templates/rails/welcome/index.html.erb (Duration: 16.0ms | Allocations: 295)
Completed 200 OK in 28ms (Views: 18.8ms | ActiveRecord: 0.0ms | Allocations: 1737)
これでプロジェクトを新規作成することができました。
次回、メモ帳機能を実装していきます。