- 投稿日:2020-03-10T22:26:44+09:00
StackDriver Monitoring APIを使ってGCPのメトリックの値を取得する
概要
GCPの監視を行うため、
StackDriverから値を取得し
しきい値を超えていないかチェックする Nagios 用のプラグインをGolnagで作成しました。
https://github.com/yuukichi-nankou/check-stackdriver-goその際、苦戦したので
GolangでStackDriver Monitoring APIから値を取得する方法をまとめます。つい先日、StackDriverが管理コンソールに統合されました。
https://cloud.google.com/blog/products/management-tools/cloud-monitoring-dashboards-using-an-api
それに伴い、管理画面では単に Monitoring という名称になっていますが、
本記事では StackDriver Monitoring と記載しています。StackDriverからSDKを使って値を取得する
StackDriverは、GCPコンソール上で収集したメトリックやログの閲覧
しきい値を指定したアラート通知が可能な監視サービスです。
※ AWSのCloudWatchのようなイメージです。今回は
StackDriver Monitoringのデータを取得しました。
StackDriver Monitoringには GCP上のインスタンス数や、CPU使用率などの
リソース状態が自動で収集されています。メトリックの一覧
取得できるメトリックの一覧が公式ドキュメントに公開されています。
https://cloud.google.com/monitoring/api/metrics_gcp?hl=ja今回はCloud Storageバケット内の、ファイル数を取得します。
StackDriver SDK
他のGCPのサービスと同様に、
StackDriverもAPIとそれをプログラムから呼び出すSDKが公開されています。
Golang用のSDKも公開されているので、これを利用します。データの取得処理
メトリックを指定し、一覧を取得する
以下は、SDKを利用し、
Cloud Storageのメトリックを取得したサンプルです。
フィルタの指定で、メトリックを指定します。
metric.type = storage.googleapis.com/storage/object_count
メトリックデータを取得するサンプル
sample.gopackage main import ( "fmt" "os" monitoring "cloud.google.com/go/monitoring/apiv3" googlepb "github.com/golang/protobuf/ptypes/timestamp" "golang.org/x/net/context" "google.golang.org/api/iterator" monitoringpb "google.golang.org/genproto/googleapis/monitoring/v3" ) func main() { // StackDriverAPIに接続する際の認証鍵ファイルを指定する key_path := "./path/to/auth-key.json" os.Setenv("GOOGLE_APPLICATION_CREDENTIALS", key_path) // GCPのプロジェクト名を指定する priject_id := "your-project-id" // フィルタを指定し、取得するデータを絞る filter_query := "metric.type = storage.googleapis.com/storage/object_count AND resource.type = gcs_bucket " // 取得期間をunixtimeで指定する var end_time int64 = 1583766000 var start_time int64 = 1583809200 // リクエストデータを作成する req := &monitoringpb.ListTimeSeriesRequest{ Name: "projects/" + priject_id, Filter: filter_query, Interval: &monitoringpb.TimeInterval{ EndTime: &googlepb.Timestamp{ Seconds: end_time, }, StartTime: &googlepb.Timestamp{ Seconds: start_time, }, }, } ctx := context.Background() client, _ := monitoring.NewMetricClient(ctx) it := client.ListTimeSeries(ctx, req) for { resp, err := it.Next() if err == iterator.Done { break } fmt.Println(resp) } }また以下が、実際にサンプルコードを実行した結果です。
サンプルの実行結果
$ go run sample/sample.go
metric:<type:"storage.googleapis.com/storage/object_count" labels:<key:"storage_class" value:"MULTI_REGIONAL" > > resource:<type:"gcs_bucket" labels:<key:"bucket_name" value:"asia.artifacts.hogehoge-bucket.appspot.com" > labels:<key:"location" value:"asia" > labels:<key:"project_id" value:"hogehoge-bucket" > > metric_kind:GAUGE value_type:INT64 points:<interval:<end_time:<seconds:1583841600 > start_time:<seconds:1583841600 > > value:<int64_value:76 > >
metric:<type:"storage.googleapis.com/storage/object_count" labels:<key:"storage_class" value:"REGIONAL" > > resource:<type:"gcs_bucket" labels:<key:"bucket_name" value:"hogehoge-bucket" > labels:<key:"location" value:"asia-northeast2" > labels:<key:"project_id" value:"hogehoge-bucket" > > metric_kind:GAUGE value_type:INT64 points:<interval:<end_time:<seconds:1583841600 > start_time:<seconds:1583841600 > > value:<int64_value:43 > >
metric:<type:"storage.googleapis.com/storage/object_count" labels:<key:"storage_class" value:"REGIONAL" > > resource:<type:"gcs_bucket" labels:<key:"bucket_name" value:"hogehoge-bucket-frontend" > labels:<key:"location" value:"asia-northeast2" > labels:<key:"project_id" value:"hogehoge-bucket" > > metric_kind:GAUGE value_type:INT64 points:<interval:<end_time:<seconds:1583841600 > start_time:<seconds:1583841600 > > value:<int64_value:575 > >
metric:<type:"storage.googleapis.com/storage/object_count" labels:<key:"storage_class" value:"REGIONAL" > > resource:<type:"gcs_bucket" labels:<key:"bucket_name" value:"hogehoge-bucket-frontend-staging" > labels:<key:"location" value:"asia-northeast2" > labels:<key:"project_id" value:"hogehoge-bucket" > > metric_kind:GAUGE value_type:INT64 points:<interval:<end_time:<seconds:1583841600 > start_time:<seconds:1583841600 > > value:<int64_value:568 > >
フィルタを使い取得するメトリックを制限する
ListTimeSeries の結果はイテレータ形式で取得でき、サンプルのように複数件返ることがあります。
返る件数はメトリックによって変わります。
サンプルコードでは各バケット単位で取得していますが、
GCEのCPU使用率を取得するとインスタンス単位で値が返ります。取得する件数を絞りたい場合は、フィルタを追加します。
例えば、サンプルコードで特定のバケットのみの値を取得したい場合
フィルタを以下のように追加するとsample.gofilter_query := "metric.type = \"storage.googleapis.com/storage/object_count\" AND resource.type = \"gcs_bucket\" " // フィルタを追加する filter_query += "AND resource.labels.bucket_name = \"xtrans-friends-frontend-staging\" "取得する値を絞ることが可能です。
$ go run sample/sample.go
metric:<type:"storage.googleapis.com/storage/object_count" labels:<key:"storage_class" value:"REGIONAL" > > resource:<type:"gcs_bucket" labels:<key:"bucket_name" value:"xtrans-friends-frontend-staging" > labels:<key:"location" value:"asia-northeast2" > labels:<key:"project_id" value:"xtrans-friends" > > metric_kind:GAUGE value_type:INT64 points:<interval:<end_time:<seconds:1583841600 > start_time:<seconds:1583841600 > > value:<int64_value:568 > > points:<interval:<end_time:<seconds:1583841300 > start_time:<seconds:1583841300 > > value:<int64_value:568 > >
取得したメトリックから値を取り出す
メトリックの値はサンプルコードの
resp.Pointsに配列として格納されています。
この値も取得期間に応じ複数取得することがあります。また、値の取り出しは、メトリックのデータ型に応じて呼び出す関数が異なります。
メトリックのデータ型はresp.ValueType.String()で確認が可能です。サンプルコードを一部修正すると、値を確認できます。
sample.gofmt.Println(resp) // 追加 fmt.Println(resp.ValueType.String()) fmt.Println(resp.Points)
storage/object_countメトリックはINT64型で値が格納されていることが分かります。$ go run sample/sample.go metric:<type:"storage.googleapis.com/storage/object_count" labels:<key:"storage_class" value:"REGIONAL" > > resource:<type:"gcs_bucket" labels:<key:"bucket_name" value:"xtrans-friends-frontend-staging" > labels:<key:"location" value:"asia-northeast2" > labels:<key:"project_id" value:"xtrans-friends" > > metric_kind:GAUGE value_type:INT64 points:<interval:<end_time:<seconds:1583841600 > start_time:<seconds:1583841600 > > value:<int64_value:568 > > points:<interval:<end_time:<seconds:1583841300 > start_time:<seconds:1583841300 > > value:<int64_value:568 > > INT64 [interval:<end_time:<seconds:1583841600 > start_time:<seconds:1583841600 > > value:<int64_value:568 > interval:<end_time:<seconds:1583841300 > start_time:<seconds:1583841300 > > value:<int64_value:568 > ]
INT64型の値を取り出す際はGetInt64Value()関数を利用しますが、DOUBLE型の値を取り出す際はGetDoubleValue()関数を利用します。
詳しくはSDKのドキュメントを参照してください。サンプルコードを変更し値を取得します。
sample.gofmt.Println(resp) // 追加 fmt.Println(resp.ValueType.String()) fmt.Println(resp.Points) // 先頭の値を取得する fmt.Println(resp.Points[0].GetValue().GetInt64Value())メトリックの値を取得できました。
$ go run sample/sample.go metric:<type:"storage.googleapis.com/storage/object_count" labels:<key:"storage_class" value:"REGIONAL" > > resource:<type:"gcs_bucket" labels:<key:"bucket_name" value:"xtrans-friends-frontend-staging" > labels:<key:"location" value:"asia-northeast2" > labels:<key:"project_id" value:"xtrans-friends" > > metric_kind:GAUGE value_type:INT64 points:<interval:<end_time:<seconds:1583841600 > start_time:<seconds:1583841600 > > value:<int64_value:568 > > points:<interval:<end_time:<seconds:1583841300 > start_time:<seconds:1583841300 > > value:<int64_value:568 > > INT64 [interval:<end_time:<seconds:1583841600 > start_time:<seconds:1583841600 > > value:<int64_value:568 > interval:<end_time:<seconds:1583841300 > start_time:<seconds:1583841300 > > value:<int64_value:568 > ] 568まとめ
Golangで StackDriver Monitoring APIから値を取得することができました。
フィルタの指定方法や、値の取得など、ドキュメントに詳しく載っておらず苦労したので
StackDriver の値を Golangで取得したい奇特な方の助けになれば幸いです。
- 投稿日:2020-03-10T22:19:40+09:00
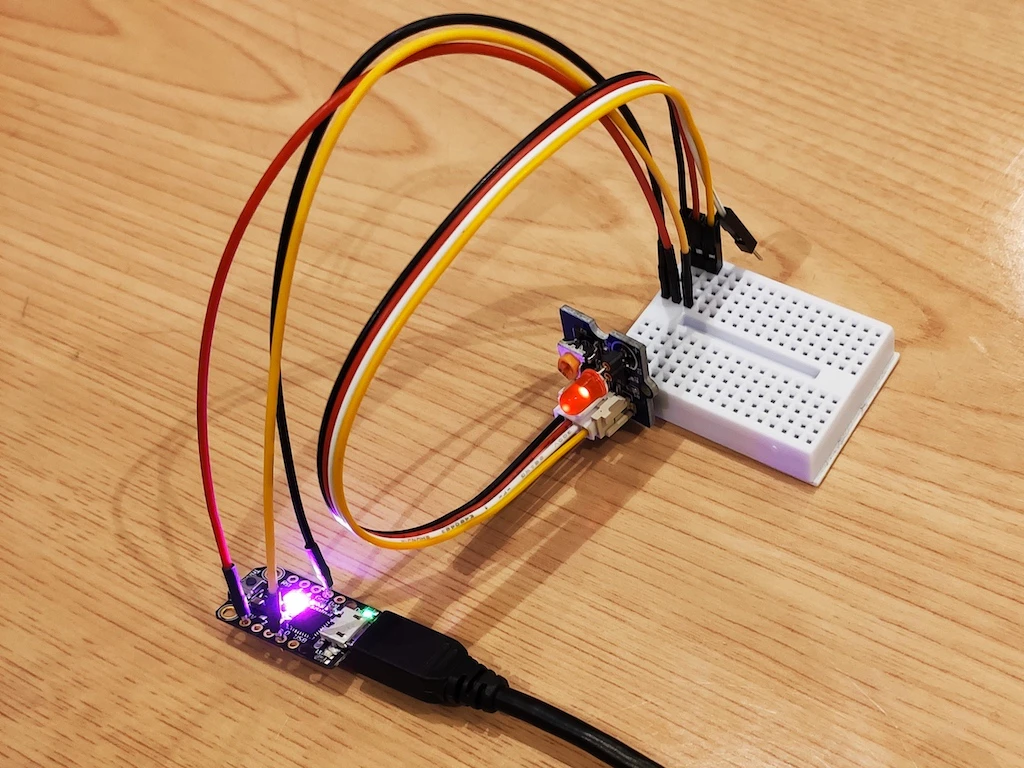
Adafruit Trinket M0でTinyGo(外部LED編)
はじめに
第2回に続き、今回はTinyGoに外部LEDを接続して点滅させてみる
動作環境
- OS: macOS 10.15.3
- Go: 1.13.8
- TinyGo: 0.12.0
- マイコン: Adafruit Trinket M0
- LED: Grove Red LED
配線
Trinket M0 Grove LED D0 SIG - NC 3V3 VCC GND GND D0の代わりにD1〜D4でもOK
実行コード
main.gopackage main import ( "machine" "time" ) func main() { //led = D0 or D1 or D2 or D3 led := machine.D0 led.Configure(machine.PinConfig{Mode: machine.PinOutput}) for { led.Low() time.Sleep(time.Millisecond * 500) led.High() time.Sleep(time.Millisecond * 500) } }ビルド&書き込み
パターン1. Macでビルド&書き込み
MacにインストールしたTinyGoを使ってビルドから書き込みまで一気に実行
$ tinygo flash -target trinket-m0 ./main.goパターン2. Dockerでビルド&Macから書き込み
Mac上でDockerを使ってビルドして、書き込みはMacから実行
Trinket M0はUSBマスストレージとして扱えるので、ビルドで生成されたUF2ファイルをドラッグ&ドロップで書き込み$ docker run --rm -v $(pwd):/src -w /src tinygo/tinygo:0.12.0 \ tinygo build -o /src/flash.uf2 -size=short -target trinket-m0 ./main.go実行結果
- 投稿日:2020-03-10T20:43:18+09:00
OpenAPI3 + OpenAPI generator でgolangサーバ・TypeScriptクライアントの実装を試す
昨今のマイクロサービス化の流れに伴い、サービス間の情報のやり取りのルールをスキーマとして定義してクライアント、サーバーの開発を行うスキーマ駆動開発が取りた出されている。
今回はOpenAPI3(旧Swagger)をスキーマ駆動開発のツールの一つとして取り上げたが、意外と踏み込んだHello Worldの記事が少なかったので書いた。
対象読者
- 最近swaggerやOpenAPIという言葉を聞いて試してみたいが導入に悩んでいる人
- 普段からAPIを使用した開発を行っているがOpenAPIを使ったことがない人
- Dockerや特定プログラミングをある程度まで習熟している人
OpenAPIとは
REST APIのリクエスト方法やパラメータなどの仕様の記述する定義。
OpenAPIはswaggerで使われていたツールが利用可能で、それらを利用することでAPI仕様書の表示・作成、API仕様に則ったサーバ・クライアントのコード生成が行えるようになる。OpenAPIのツールでもっとも重要なものは コードジェネレータ だと自分は認識している。
コードジェネレータがなければ、究極的にはスキーマはただのドキュメントと何も変わらない。
コードジェネレータを使うことでスキーマの変更に追従を自動化することが可能になり、CI/CDでズレの検知が可能になるので放置されることがないためだ。メリット
- API利用者側のクライアントコードの実装が容易になる
- スキーマを定義することで仕様書を簡単に生成することが可能
- スキーマ(インターフェイスと言っても良い)が定まっているのでサーバ・クライアントで独立して開発が可能
- クライアント側はモックサーバやダミーデータを用意しやすい
- コードジェネレータを用いることでAPIドキュメントと実際のコードが一致させ続けることが用意
デメリット
- ツールのサポートがあるとはいえ、スキーマの作成がそれなりに億劫
- 最上流にスキーマが存在するので、スキーマを作成しないと開発が始められない
- (当たり前だが)独自で仕様書を作成するのに比べて覚えることが多い
開発環境
https://github.com/d0riven/HelloApiSchema にコードは置いてある。
- 計算機
- Macbook
- ツール
- DockerDesktop 2.2.03 (docker 19.03.5)
- OpenAPI 3.0.2
- golang 1.13.8
- TypeScript 3.8.2 (その他のツールは package.json を参考)
試す
以下の手順で試していく
- OpenAPI3でスキーマを作成
- モックサーバの構築
- openapi-generatorでgolangのAPIサーバのコードを生成
- ダミーデータを返す実装を追加
- クライアントの構築
- openapi-generatorでTypeScriptのAPIクライアントのコードを生成
- 2で作成したモックサーバを叩く
OpenAPI3でスキーマを作成
OpenAPI3の記法
作成する前にそもそもの書き方や構造を説明する.
ちなみにこの記事が古くなっている可能性はあるので、 Swagger Basic Structureも参考にすると良い。
また githubで仕様も公開されているのでこっちも参考にすると良い。すべてを紹介はしきれないので重要な部分を紹介する。
スキーマ定義は https://qiita.com/teinen_qiita/items/e440ca7b1b52ec918f1b のほうがまとまっているので、こちらを参照しても良いかもしれない。
- openapi
- openapiのバージョン番号を記載(記述時の最新は3.0.3)
- info
- APIの概要情報(タイトルや)を記載する
- servers
- APIが稼働しているサーバ情報を指定する
- コードジェネレータのクライアント側のアクセス先の生成に利用される
- tags
- 後述するAPIのpathに紐付けるもの
- swagger-uiで表示するときにタグにまとめて表示してくれる
- paths
- 最も肝となる部分
- APIのパス、パラメータ、レスポンスの詳細を記述する場所
- プログラミング言語で表現するなら関数の名前、引数、返り値を定義する場所
- コードジェネレータに最も影響を与える定義でもある
- components
- 再利用される可能性がある部品を定義していく場所
- プリミティブな型(例えばユーザのID)、パラメータやスキーマの型(例えばユーザ)を定義できる
- これを記載しなくてもOpenAPIスキーマを定義は可能だが、値の重複が多い状態になる
以下は今回のサンプルで利用する定義だ。
ユーザの取得、更新、作成のエンドポイントを定義したシンプルなもの。
自然言語で書かれているのでざっと見た感じで雰囲気は分かってもらえると思う。
形式はYAMLではなく、JSONも可能。openapi: 3.0.2 info: version: 1.0.0 title: HelloApiSchema description: Practice api schema contact: name: doriven email: doriven@example.com url: 'https://example.com' license: name: MIT servers: - url: http://localhost:{port} description: development variables: port: enum: - '80' - '8080' default: '8080' - url: http://example.com description: example security: - BasicAuth: [] tags: - name: user description: user api paths: /users: post: tags: - user description: Create a new user. operationId: createUser requestBody: description: new user info required: true content: 'application:json': schema: $ref: '#/components/schemas/CreateUserInput' responses: '200': description: hoge content: application/json: schema: $ref: '#/components/schemas/CreateUserOutput' put: tags: - user description: Update a user. operationId: updateUser requestBody: required: true content: 'application:json': schema: $ref: '#/components/schemas/UpdateUserInput' responses: '200': description: hoge content: application/json: schema: $ref: '#/components/schemas/UpdateUserOutput' /users/{id}: get: tags: - user description: Get a user by id. operationId: getUser responses: '200': description: Success by usre content: application/json: schema: $ref: '#/components/schemas/GetUserOutput' parameters: - name: id in: path description: user id required: true schema: type: integer format: int64 components: schemas: user_id: type: integer format: int64 example: 1 email_address: type: string example: example@example.com last_name: type: string example: 山田 first_name: type: string example: 太郎 birthday: type: string format: date example: 2000-01-01 address: type: string example: 東京都新宿区西新宿2丁目8−1 CreateUserInput: type: object required: - email_address - last_name - first_name - birthday - address properties: email_address: $ref: '#/components/schemas/email_address' last_name: $ref: '#/components/schemas/last_name' first_name: $ref: '#/components/schemas/first_name' birthday: $ref: '#/components/schemas/birthday' address: $ref: '#/components/schemas/address' CreateUserOutput: type: object required: - id - email_address - last_name - first_name - birthday - address properties: id: $ref: '#/components/schemas/user_id' email_address: $ref: '#/components/schemas/email_address' last_name: $ref: '#/components/schemas/last_name' first_name: $ref: '#/components/schemas/first_name' birthday: $ref: '#/components/schemas/birthday' address: $ref: '#/components/schemas/address' UpdateUserInput: type: object required: - id properties: id: $ref: '#/components/schemas/user_id' email_address: $ref: '#/components/schemas/email_address' last_name: $ref: '#/components/schemas/last_name' first_name: $ref: '#/components/schemas/first_name' birthday: $ref: '#/components/schemas/birthday' address: $ref: '#/components/schemas/address' UpdateUserOutput: # componentsからcomponentsへの$refを使うとgenerator上で空のstructが生成されるのであえて重複して書いている # $ref: '#/components/schemas/CreateUserOutput' type: object required: - id - email_address - last_name - first_name - birthday - address properties: id: $ref: '#/components/schemas/user_id' email_address: $ref: '#/components/schemas/email_address' last_name: $ref: '#/components/schemas/last_name' first_name: $ref: '#/components/schemas/first_name' birthday: $ref: '#/components/schemas/birthday' address: $ref: '#/components/schemas/address' GetUserOutput: # componentsからcomponentsへの$refを使うとgenerator上で空のstructが生成されるのであえて重複して書いている # $ref: '#/components/schemas/CreateUserOutput' type: object required: - id - email_address - last_name - first_name - birthday - address properties: id: $ref: '#/components/schemas/user_id' email_address: $ref: '#/components/schemas/email_address' last_name: $ref: '#/components/schemas/last_name' first_name: $ref: '#/components/schemas/first_name' birthday: $ref: '#/components/schemas/birthday' address: $ref: '#/components/schemas/address'path記法の詳細
この中で最も重要であり複雑なpath記法について説明していく。
以下、上記のスキーマに対して具体的にコメントを添えている。paths: /users: # パス post: # HTTP メソッド (get|put|post|deleteなどが指定可能) tags: # 関連付けるタグ。複数定義可能 - user description: Create a new user. operationId: createUser # コードジェネレータで生成されたクライアント・サーバの関数名に利用される requestBody: # パラメータをRequestBodyに定義して渡す場合はこちらを記載する description: new user info required: true # RequestBodyが必須であることを表している content: # RequestBodyの中身の定義をcontent配下に書いていく 'application:json': # BodyのContentType schema: # パラメータの詳細 $ref: '#/components/schemas/CreateUserInput' # component配下に定義されているのを参照する場合は$refを使用する # この場合は.components.schemas.CreateUserInputに定義が書かれている responses: # リクエストした結果のレスポンスの定義 '200': # 返ってくるステータスコード description: hoge content: # ステータスコードに対応する中身 application/json: # ContentType schema: # レスポンスの詳細定義 $ref: '#/components/schemas/CreateUserOutput'他にもgetの場合は以下のように記載可能。
schemaで書かれていることを理解するにはJsonSchemaの定義を知ると、より一層理解が深まる。... /users/{id}: # URIにパラメータを含めることもできる get: tags: - user description: Get a user by id. operationId: getUser responses: '200': description: Success by user content: application/json: schema: $ref: '#/components/schemas/GetUserOutput' parameters: # URIのパラメータの詳細を定義 - name: id # URIの{}で囲んだ部分と一致させる必要がある in: path # パラメータが含まれている箇所(query, header, path, cookieが選べる) description: user id required: true schema: # パラメータの型定義(JSONSchemaに準拠している) type: integer format: int64components記法の詳細
pathsを理解するにはschemaに記載された$refの中身を定義しているcomponentsも合わせて紹介する。
componentsは先程も書いたとおり、重複して利用されるオブジェクトをまとめる箇所だ。
typeやformatの詳細はJsonSchemaを参照のこと。例えば、POSTであるCreateUserで定義されたcomponentsは具体的にこのように記載されている。
schemas:
  user_id: # user_id という型を定義している
    type: integer
    format: int64
    example: 1 # SwaggerUIで表示される値の具体例
  email_address:
    type: string
    example: example@example.com
  last_name:
    type: string
    example: 山田
  first_name:
    type: string
    example: 太郎
  birthday:
    type: string
    format: date
    example: 2000-01-01
  address:
    type: string
    example: 東京都新宿区西新宿2丁目8−1
  CreateUserInput:
    type: object
    required: # 必須なプロパティを表している
      - email_address
      - last_name
      - first_name
      - birthday
      - address
    properties:
      email_address: # componentsで定義したemail_addressを再利用している
        $ref: '#/components/schemas/email_address'
      last_name:
        $ref: '#/components/schemas/last_name'
      first_name:
        $ref: '#/components/schemas/first_name'
      birthday:
        $ref: '#/components/schemas/birthday'
      address:
        $ref: '#/components/schemas/address'
  CreateUserOutput:
    type: object
    required:
      - id
      - email_address
      - last_name
      - first_name
      - birthday
      - address
    properties:
      id:
        $ref: '#/components/schemas/user_id'
      email_address:
        $ref: '#/components/schemas/email_address'
      last_name:
        $ref: '#/components/schemas/last_name'
      first_name:
        $ref: '#/components/schemas/first_name'
      birthday:
        $ref: '#/components/schemas/birthday'
      address:
        $ref: '#/components/schemas/address'
Swagger Editorというツールがあるので、サンプルのスキーマを埋め込んで見てみる1このAPIの概要がわかる。
モックサーバの構築
OpenAPIスキーマを作成することは出来たので、スキーマ駆動開発の下地は出来た。
ここからはAPIのリクエストを受けてダミーデータを返すGo言語製のモックサーバを作成してみる。ここで出てくるのが openapi-generator というコードジェネレータ。
openapi-generator とは
https://github.com/OpenAPITools/openapi-generator
名前の通り、OpenAPIに対応したコードジェネレータ。
swagger-codegenというものもあるが、仲違いがあり現状ではopenapi-generatorがオープンソースでコントリビュートされて開発が頻繁にされている状態になっているのでこれからはopenapi-generatorを使っていくのが良い。Hello openapi-generator
openapi-generatorの環境を含んだDockerが公開されているのでそれを使えば良い。
以下のようにプロジェクトルートをマウントして、出力してやれば良い。docker run --rm -v {プロジェクトルートパス}:/app openapitools/openapi-generator-cli generate \ -i {openapiスキーマのyaml or jsonのURL or パスを指定} \ -l {出力する言語とクライアント or サーバを指定} \ -o /app/{コードを出力したいパス}実際のサンプルではプロジェクトルートで以下のようにコマンドを叩いてGo言語製のRestAPIサーバのコードをジェネレートしている。
docker run --rm -v ${PWD}:/app openapitools/openapi-generator-cli generate \ -c /app/api/go-server-config.json \ # -cはgo-serverで利用可能なオプションを定義したファイルを指定することでコード生成時の挙動を替えてあげることがでる -i /app/api/openapi-schema/openapi.yaml \ -g go-server \ # go だけだとクライアント側のコードが生成される。 -o /app/server/golanggeneratorの-gがどのようなものに対応しているかは公式のこのドキュメントを見ればわかる。
go-serverのドキュメントを見に行くとOpenAPIの対応状況やオプションが記載されているので使用する言語のジェネレータのドキュメントは必ずチェックすること。出力先ディレクトリには以下のような構造でファイルが置かれる。
server/golang/
├── .openapi-generator
│   └── VERSION # openapi-generatorのバージョン
├── .openapi-generator-ignore # openapiの生成物として除外したいものはこれに指定する
├── Dockerfile
├── README.md
├── go.mod
├── go.sum
├── main.go
└── pkg
    └── openapi
        ├── api.go
        ├── api_default.go
        ├── api_default_service.go
        ├── logger.go
        ├── model_create_user_input.go # pathsのschemaで定義したものと同じ構造のstructが定義されている
        ├── model_create_user_output.go
        ├── model_get_user_output.go
        ├── model_update_user_input.go
        ├── model_update_user_output.go
        └── routers.go

4 directories, 18 files
ダミーデータを返すようにする
出力したばかりだと
api_default_service.goは何もせずに500を返すような実装になっている。// CreateUser - func (s *DefaultApiService) CreateUser(createUserInput CreateUserInput) (interface{}, error) { // TODO - update CreateUser with the required logic for this service method. // Add api_default_service.go to the .openapi-generator-ignore to avoid overwriting this service implementation when updating open api generation. return nil, errors.New("service method 'CreateUser' not implemented") } ...
api.goにinterfaceが定義されており、これを実装してmain.goで差し替えることによってダミーデータを返す挙動を実現させていく。pkg/openapi/api.go// DefaultApiRouter defines the required methods for binding the api requests to a responses for the DefaultApi // The DefaultApiRouter implementation should parse necessary information from the http request, // pass the data to a DefaultApiServicer to perform the required actions, then write the service results to the http response. type DefaultApiRouter interface { CreateUser(http.ResponseWriter, *http.Request) GetUser(http.ResponseWriter, *http.Request) UpdateUser(http.ResponseWriter, *http.Request) } // DefaultApiServicer defines the api actions for the DefaultApi service // This interface intended to stay up to date with the openapi yaml used to generate it, // while the service implementation can ignored with the .openapi-generator-ignore file // and updated with the logic required for the API. type DefaultApiServicer interface { CreateUser(CreateUserInput) (interface{}, error) GetUser(int64) (interface{}, error) UpdateUser(UpdateUserInput) (interface{}, error) }サンプルコードでは
pkg/apiというディレクトリにモックとなるserviceのコードを実装して配置した。
controller側のコードは特にいじる必要はないので、コードジェネレータから生成されたものをそのまま使う。pkg/api/mock_service.gotype MockApiService struct { } func NewMockApiService() openapi.DefaultApiServicer { return &MockApiService{} } func (s *MockApiService) CreateUser(createUserInput openapi.CreateUserInput) (interface{}, error) { return openapi.CreateUserOutput{ Id: 1, EmailAddress: createUserInput.Address, LastName: createUserInput.LastName, FirstName: createUserInput.FirstName, Birthday: createUserInput.Birthday, Address: createUserInput.Address, }, nil } func (s *MockApiService) GetUser(id int64) (interface{}, error) { return openapi.GetUserOutput{ Id: id, EmailAddress: "example@example.com", LastName: "田中", FirstName: "太郎", Birthday: "2000-01-01", Address: "東京都新宿区西新宿2丁目8−1", }, nil } func (s *MockApiService) UpdateUser(updateUserInput openapi.UpdateUserInput) (interface{}, error) { return openapi.UpdateUserOutput{ Id: updateUserInput.Id, EmailAddress: updateUserInput.EmailAddress, LastName: updateUserInput.LastName, FirstName: updateUserInput.FirstName, Birthday: updateUserInput.Birthday, Address: updateUserInput.Address, }, nil }あとは main.go 側で差し替えを行う。
          log.Printf("Server started")

-       DefaultApiService := openapi.NewDefaultApiService()
+       mockApiService := api.NewMockApiService()
        DefaultApiController := openapi.NewDefaultApiController(mockApiService)

        router := openapi.NewRouter(DefaultApiController)
ここまでくれば
go runさせてみればモックサーバが立ち上がる。
curlなどで動作確認した結果は以下。⟩ go run main.go 2020/03/08 16:59:46 Server started 2020/03/08 17:00:20 GET /users/1 GetUser 456.134µs⟩ curl -sf 'localhost:8080/users/1' | jq . { "id": 1, "email_address": "example@example.com", "last_name": "田中", "first_name": "太郎", "birthday": "2000-01-01", "address": "東京都新宿区西新宿2丁目8−1" }これでモックサーバが完成した。
実際の開発においても、コードジェネレータしたコードには極力触らず(main.goは仕方ないとして)に拡張によって挙動を変えることでOpenAPIスキーマの定義を守れるだろう。go-serverのPreflight対応
これは私が詰まった部分なので記述するが、go-serverのコードジェネレータはAPIのプリフライト(Preflight)リクエストに対応しておらず、ステータス405が返ってきて使えなかった。
今回はPUTもAPIのHTTPメソッドとして利用するのでPreflightが使えないとクライアント側で困ってしまう。下記のようにgo-serverのオプションでCORSのオプションを有効にしたものの、それでは駄目だった。
これだとGET, POSTのCORSしか対応してくれない。{ "sourceFolder": "pkg/openapi", "featureCORS": true }理由としてはmain.goで生成しているtopのrouterでCORSを許容していないため。
オプションではRouter生成時にroute(path)毎にCORSを許可するようにはしてくれるものの、Router側にはCORSが許可されない。
そこで生成されたrouterに対して、CORSメソッドを指定し、引数として許可したいメソッドと追加のヘッダーであるContent-Typeを指定する修正をmain.goに加えた。2- log.Fatal(http.ListenAndServe(":8080", router)) + log.Fatal(http.ListenAndServe(":8080", handlers.CORS( + handlers.AllowedMethods([]string{"GET", "PUT", "POST", "DELETE"}), + handlers.AllowedHeaders([]string{"Content-Type"}), + )(router)))クライアントコードの実装
続いてクライアント側のコードもopenapi-generatorを使用してWebブラウザで利用するTypescriptクライアントを生成していく。
docker run --rm -v ${PWD}:/app openapitools/openapi-generator-cli generate \
  -c /app/api/go-server-config.json \
  -i /app/api/openapi-schema/openapi.yaml \
  -g typescript-fetch \
  -o /app/client/ts/src/api-client
すると以下のようなコードが生成されている。
これはライブラリと捉えて後はお手製のTypeScriptのコードから利用すれば良い。
クライアントからはこのsrc/api-clientをimportして利用する。└── src └── api-client ├── apis │ ├── UserApi.ts │ └── index.ts ├── index.ts ├── models │ ├── CreateUserInput.ts │ ├── CreateUserOutput.ts │ ├── GetUserOutput.ts │ ├── UpdateUserInput.ts │ ├── UpdateUserOutput.ts │ └── index.ts └── runtime.tsコードジェネレータしたコードの利用サンプルは以下。
ボタンを押したらFetchAPIでリクエストしてレスポンスの結果をconsoleに吐き出すという非常に単純なものだ。
クライアントがするべきことはコードジェネレータで生成されたDefaultApiというクライアントクラスを使用して○○Requestを作って引数に渡してやるだけで良い。
(勉強がてら私はReactを使ったが、サンプル実装だけなら純粋にTypeScriptだけを使えばいいと思う)App.tsximport * as React from "react"; import {GetUser} from "./components/GetUser"; import {UpdateUser} from "./components/UpdateUser"; import {CreateUser} from "./components/CreateUser"; export default class App extends React.Component<any, any> { render() { return ( <React.Fragment> <GetUser/> <UpdateUser/> <CreateUser/> </React.Fragment> ); } };GetUser.tsximport * as React from "react"; import {DefaultApi, GetUserOutput} from "../api-client"; export let GetUser = () => ( <button onClick={() => { const c: DefaultApi = new DefaultApi(); c.getUser({id: 1}).then((v: GetUserOutput) => { console.log(v); }); }}>GetUser</button> );CreateUser.tsximport * as React from "react"; import {CreateUserOutput, CreateUserRequest, DefaultApi} from "../api-client"; export let CreateUser = () => ( <button onClick={() => { const c: DefaultApi = new DefaultApi(); const input: CreateUserRequest = { createUserInput: { address: '東京都新宿区西新宿2丁目8−1', birthday: new Date(), emailAddress: 'taro@example.com', lastName: '田中', firstName: '太郎', }, }; c.createUser(input).then((v: CreateUserOutput) => { console.log(v); }); }}>CreateUser</button> );UpdateUser.tsximport * as React from "react"; import {DefaultApi, UpdateUserOutput, UpdateUserRequest} from "../api-client"; export let UpdateUser = () => ( <button onClick={() => { const c: DefaultApi = new DefaultApi(); const input: UpdateUserRequest = { updateUserInput: { id: 1, address: '静岡県駿東郡小山町桑木', birthday: new Date('2020-03-08'), emailAddress: 'kin_taro@example.com', lastName: '金', firstName: '太郎', }, }; c.updateUser(input).then((v: UpdateUserOutput) => { console.log(v); }); }}>UpdateUser</button> );以下のようなレスポンスがconsole.log上に返ってくる。
# GetUser
{
  "id": 1,
  "emailAddress": "example@example.com",
  "lastName": "田中",
  "firstName": "太郎",
  "birthday": "2000-01-01T00:00:00.000Z",
  "address": "東京都新宿区西新宿2丁目8−1"
}

# CreateUser
{
  "id": 1,
  "emailAddress": "東京都新宿区西新宿2丁目8−1",
  "lastName": "田中",
  "firstName": "太郎",
  "birthday": "2020-03-08T00:00:00.000Z",
  "address": "東京都新宿区西新宿2丁目8−1"
}

# UpdateUser
{
  "id": 1,
  "emailAddress": "kin_taro@example.com",
  "lastName": "金",
  "firstName": "太郎",
  "birthday": "2020-03-08T00:00:00.000Z",
  "address": "静岡県駿東郡小山町桑木"
}
クライアント側はこのモックサーバの値を利用して、開発をしていくことが可能でAPIのスキーマが変わってもコードジェネレータを使用することで入出力部分の最小限の変更だけで済ませることができる。
実装していて困った点とか
- 未使用な変数や関数が定義されているので、TypeScriptの設定を厳密なものしているとコケる
- tsconfigの設定はゆるくして一旦は対応した
- コード側にはtslint ignoreが設定されているのでtslintで厳密さは担保すれば良さそうな気はしている
- クライアントが生成するサーバーのURLは一番上が利用される
- マルチサーバを設定しているならモック用の設定は一番上に持ってくる必要がある
クライアント実際に使ってみた個人的な所感
コードジェネレータでのドキュメントと実装の一致が可能なのは魅力的に感じた。
一方で最初に導入するハードルはそこそこ高いと感じた(以下、理由)ので外部向けのAPIの仕様定義としては良いが、内部利用向けのAPIの定義に使うかと聞かれると微妙な気持ちになる。スキーマ定義がそれなりに大変
- swagger-editorを使ってもそんなにスキーマ定義の作成が楽になったとは思えなかった
- 結局は手元のエディタを開いて地道に定義を書いていくことになると思う(もちろん、IDEのプラグインのサポートなどは使ったりしたが)
重要なコードジェネレータの質が言語によってまちまち
- openapi-generatorのクライアント・サーバのコード生成は言語毎にコントリビューターがそれぞれ作成している
- そのためOpenAPIの仕様を実装できているかはその言語のコントリビュートの活発さや質に左右される
- 例えば今回のgo-serverの微妙な点としてPreflightへ対応していなかったり、必須パラメータの型がポインタではないためパラメータが送られていないのかどうかの判断が難しいというのがあったりする
- なので、仕事で使う場合には選択した言語のコントリビュートをするくらいの気持ちで使っていかないと厳しい(自前でコード生成を定義するという技もあるが)
コードジェネレータのコントリビュートをするためにJavaとその周辺ツールを覚える必要がある
- openapi-generatorはJavaで実装されている
- コード生成もJavaのmustacheというテンプレートエンジンが使われている
- そのほかにもJavaのツールを覚える必要がある
- つまり、自分たちが使いやすくしたかったらクライアントの言語 + サーバの言語だけでなくJavaを理解する必要がありそこそこに導入コストが高いと思う
まとめ
ドキュメントと実装の一致をさせることが可能であり、API仕様書の生成を楽に行えるという嬉しさはあるものの、使うにはそれなりに色々な知識が要求されるということが分かった。
実際にOpenAPI3とopenapi-generatorを使った簡単なモックサーバの作成とクライアントサンプル実装を行って理解を深められたのは大きいので、読者も実際に手を動かしてみて導入の判断を決めてもらえればと思う。
SwaggerUIをURLパラメータから指定できるようにしてくれた方のツールを利用 ↩
PRを出そう考えたが筆者はJavaに明るくなくテンプレートエンジンのmustacheを理解することやopenapi-generatorの仕様を理解しないとPRを出せなさそうだったので早々に諦めた。 ↩
- 投稿日:2020-03-10T15:45:08+09:00
kindle本の発行情報がSlackを連携したいの考え
動機
- 最新の技術本の発行情報を知りたい
- でも自分は毎日kindleの発売情報をあんまり見ない。
- slackで自動通知、しかも技術本があるの時だけ来るは一番ベスト
対策
最初考え方はProduct Advertising API使いたいけど、でもこのAPIはアカウント作成が必要、しかもアカウント作成は審査がいる、さらにウェブサイト或いはモバイルアプリも必要なので、slack用の通知だけは無理かも。
そしたらProduct Advertising APIを使ってのサービス キンセリ から情報收集を考えます
実装方法
- golang + agouti でクローラを作りました。
- Incoming Webhookを利用してslackに通知
結果
実際の結果はこんな感じ:

- 投稿日:2020-03-10T15:45:08+09:00
kindle本の発行情報をSlackに連携したい
動機
- 最新の技術本の発行情報を知りたい。
- でも自分は毎日kindleの発行情報をあんまり見ない。
- slackで自動通知、技術本が発行された時だけ来るのが一番ベスト。
対策
最初はProduct Advertising APIを使いたいと考えたけど、このAPIはアカウント作成が必要で、しかもアカウント作成には審査がいる。この審査はウェブサイト或いはモバイルアプリが必要になるので、slack通知だけのために使うのは無理かも。
そこでProduct Advertising APIを使っているサービス キンセリ から発行情報を取得することにした。
実装方法
- golang + agouti でクローラを作る。
- Incoming Webhook を利用してslackに通知。
結果
実際の結果はこんな感じ:
- 投稿日:2020-03-10T14:44:24+09:00
Let's encryptのバグはNimで実装していたら防げたの?
Let's encryptのバグはRustで実装していたら防げたの?
という記事を見かけたので、ではNimではどうなのかと思い書いてみました。はじめに
Let's encryptのバグの原因はポインタに起因する実装ミスでした。
「Nimはいいぞ」と言うためだけにNimで実装した場合を検証してみます。以下引用
原因はなんだった?
詳しくは
https://jovi0608.hatenablog.com/entry/2020/03/09/094737
のステキなまとめを見たほうがいいのですが、シンプルにすると、このような実装です。
fail.gofunc main() { var out []*int for i := 0; i < 3; i++ { out = append(out, &i) } fmt.Println("Values:", *out[0], *out[1], *out[2]) fmt.Println("Addresses:", out[0], out[1], out[2]) }ValuesもAddressesも[0]~[2]で同じ値が表示されます。
ループカウンタを値渡しではなく、
参照渡しをして保管してしまったことが要因です。です。
実際にどのような動きをするのか、Go Playgroundで試してみましょうGo言語では変数名に「&」をつけることで、変数のアドレスを示します。同じことをNimで行うには、変数名を「addr」という関数を通してアドレスを取り出す必要があります。
Goの場合
var a = "abc"
fmt.Println(&a)

>> 0x40c138
Nimの場合
var a = "abc"
echo a.addr.repr

>> ptr 0x5596f66b2c40 --> 0x7fc2daa98058"abc"
Nimではechoで表示できるのはstring型だけです。「addr」はポインタ型を返す関数であり、ポインタ型はstring型ではないために、「repr」を付けて明示的に文字列表現を取り出す必要があります。
簡易的なソースでチェック
では問題のソースを何も考えずにNimで書いてみましょう。
import strformat

var output:seq[int]
for i in 0..2:
  output.add(i)

echo &"Values: {output[0]}, {output[1]}, {output[2]}"
echo &"Address: {output[0].addr.repr}, {output[1].addr.repr}, {output[2].addr.repr}"
>> Values: 0, 1, 2 >> Address: ptr 0x7f20a35d4058 --> 0 , ptr 0x7f20a35d4060 --> 1 , ptr 0x7f20a35d4068 --> 2非常に素直に、期待通りの結果になっていますね。
Nimではシステムプログラミングもできるため、明示的なメモリ管理やポインタへのアクセスの機能も提供されていますが、アプリケーション開発においてはポインタのことは全く考える必要がありません。PHPやPythonやJavaScriptと同じように素直に開発できます。では少し頭を使ってNimで書いてみます。今回はGoのソースと同じように明示的にアドレスを渡します。
import strformat

var output:seq[int]
for i in 0..2:
  output.add(i.unsafeAddr()) # アドレスを渡す
         ^^^^^^^^^^^^^^^^^^^

echo &"Values: {output[0].ptr}, {output[1].ptr}, {output[2].ptr}"
echo &"Address: {output[0].addr.repr}, {output[1].addr.repr}, {output[2].addr.repr}"
コンパイルエラーになります。なぜでしょうか。
答えは「output」の中身の型がint型で定義されているからです。int型で中身が定義された配列に、ポインタ型を追加することはできません。安全ですね!最後に無理やり今回のような事故を起こしてみようとすると、このようになります。
import strformat

var output = newSeq[pointer](0) # 内部がポインタ型の配列を宣言する
for i in 0..2:
  output.add(i.unsafeAddr()) # アドレスを渡す

echo &"Values: {cast[ptr int](output[0])[]}, {cast[ptr int](output[1])[]}, {cast[ptr int](output[2])[]}"
echo &"Address: {output[0].repr}, {output[1].repr}, {output[2].repr}"
>> Values: 2, 2, 2 >> Address: 0x5587019bef70 , 0x5587019bef70 , 0x5587019bef70
cast[ptr int](output[0])[]ってこんなことを書かないとポインタから値を取り出せないんですねー。いくらなんでもこんなことを書いてる時点で、バグに気づくはずです。実際に問題が起きたソースでチェック
さて、問題が起きた実際のコードを見てみましょう
1.func modelToAuthzPB(am *authzModel) (*corepb.Authorization, error) {
2.      expires := am.Expires.UTC().UnixNano()
3.      id := fmt.Sprintf("%d", am.ID)
4.      status := uintToStatus[am.Status]
5       pb := &corepb.Authorization{
6.              Id:             &id,
7.              Status:         &status,
8.              Identifier:     &am.IdentifierValue,
9.              RegistrationID: &am.RegistrationID,
10.             Expires:        &expires,
11.     }
12.    (snip)
13.     return pb, nil
14.}
15.
16. // authzModelMapToPB converts a mapping of domain name to authzModels into a
17. // protobuf authorizations map
18. func authzModelMapToPB(m map[string]authzModel) (*sapb.Authorizations, error) {
19.     resp := &sapb.Authorizations{}
20.     for k, v := range m {
21.             // Make a copy of k because it will be reassigned with each loop.
22.             kCopy := k
23.             authzPB, err := modelToAuthzPB(&v)
24.             if err != nil {
25.                     return nil, err
26.             }
27.             resp.Authz = append(resp.Authz, &sapb.Authorizations_MapElement{Domain: &kCopy, Authz: authzPB})
28.     }
29.     return resp, nil
30.}
23行目のココです
authzPB, err := modelToAuthzPB(&v)20行目の
for k, v := range m {から渡されたvをmodelToAuthzPB関数に参照渡ししています。Go言語では関数の引数には参照(アドレス)を渡すことは普通なので違和感ないかもしれませんが、正しくは22行目のようにkCopy := k vCopy := v authzPB, err := modelToAuthzPB(&vCopy)と一度ローカル変数に代入した上でその参照を渡さなくてはいけません。これこそ今回の問題のキモかと思います。
この問題をRustでは以下のように解決していました。
good.rustfn main() { let mut out:Vec<&i32> = vec![]; for i in 0..3{ out.push(&i); } println!("{:?}", out); }コンパイル時に、このようなエラーが出ます。
6 |         out.push(&i);
  |         ---      ^^ borrowed value does not live long enough
  |         |
  |         borrow later used here
Rustは生存期間を厳密に検証してくれるので、とても安全です!
Nimでは引数に普通に値を渡すだけで、自動的にそれを参照渡しとしてくれます。
問題の箇所も、ローカル変数への代入というのはいりません。PHPやPythonなどスクリプト言語と同じ感覚で書いてOKなのです。for key, val in m.pairs: let authzPB = modelToAuthzPB(val)カンタンですね
Nimはいいぞ
Go言語では普段のアプリケーション開発でも常に参照とポインタのことを意識する必要があります。関数定義で引数はアドレスで受け取り、関数の実装でアドレスから値を取り出して使うということが一般的なGoのコーディングスタイルかと思います。そのために参照を使うべきでない場面でも参照を使ってしまい、今回のような事故が起きてしまったのではないかと思います。
特に今回の事故では、ループから取り出した値を関数の引数に渡すという処理だったために、余計に難しかったと思います。Nimでは
- アプリケーション開発ではポインタや参照のことを意識する必要はない
- 関数定義では自動的に参照渡しになってくれる(わざわざ引数にアドレスを渡さなくてよい)
- 関数内部の引数は自動的に参照から値を取り出してくれる(わざわざアドレスから値を取り出さなくてよい)
- コンパイル時に値渡しか参照渡しか厳密に型チェックしてくれる
によって安全にプログラミングができます。
Nimに興味を持った人は、こちらも読んでくださいね!
- 投稿日:2020-03-10T14:20:19+09:00
Tecpitの教材「【Go】技術ブログサイトを自作してみよう!」を試してみました / TechCommit企画
テックコミットさんのお年玉企画でTecpitさんの「【Go】技術ブログサイトを自作してみよう!」を試してみましたので、情報をまとめて見ました!
自分の知識
GoはTour of Goを一度なぞった程度
完成物
https://damp-journey-45035.herokuapp.com/
教材の概要
マークダウンに対応した、記事投稿システムです
この教材で学べる知識
- echoでサーバーたてる
- Modulesでモジュール管理
- pongo2
- sqlx
- goose(マイグレーションツール)
- freshでホットリロード
- basic認証のかけ方
- 多対多のリレーション
- herokuデプロイ
※Goの文法自体の説明はありません!
教材の注意書きにもありますが、Goの文法自体の説明はありません!
そこらは抑えている前提で話が進みます感想
Goの文法はわかったけど、実際どうやって組み立てていくの?って人にはかなりいい感じの教材だと思いました。
またコードの随所に何をやっているのかという説明が記載されているのもとても分かりやすかったです。
難点をあげるとすれば、HTML、CSS、JavaScriptのパートが多かった気がします。。。プロダクトの性質上仕方ないのですが。
とはいえ、Go楽しかった!教材をありがとうございます
TechCommitさん
Tecpitさん
- 投稿日:2020-03-10T12:25:36+09:00
ありの~ままの~DBスキーマを、go言語ソースコードに自動変換【xorm/reverse】
はい
今回ご紹介するのは、こちらのxorm/reverseです。
https://gitea.com/xorm/reverseなんと!
DBのテーブル構造を直接見に行って、go言語の構造体ソースコードに自動変換してくれます。
対象DB種類も、MySQL以外に色々対応しています。ライセンスは、MITかな?
LICENSEファイルには明示的には書いてないですが、xorm公式ページではMITとなっているので。
https://xorm.io/こちら、実は2年以上前から開発されているようです。
以前はリポジトリはgithubだったんですが、親プロジェクトxormと共にgiteaに移籍したみたいですね。また当時のバージョンではC言語や他の言語ソースへもリバースできたんですが、リニューアル以降はまだ
language/golang.go以外の出力プラグインは作られてないみたいですね。パブリックリポジトリなので、gitea のアカウントを持ってなくてもマイPCからgit cloneできました。
ただ、EC2インスタンスからのgit cloneは失敗しました。AWSはブロックしてるのかしら?
ままエアロ。使い方
・・・をご紹介しようと思ったのですが、早速失敗しました。
READMEどおり
$ go get xorm.io/reverseしたら
# xorm.io/reverse/vendor/github.com/mattn/go-sqlite3
exec: "gcc": executable file not found in %PATH%
gccがインストールされてないと動かない、と。
gcc入れるのダルいなー。それとちょっと改造する用事もあったので、
git cloneしてソースをいじってxorm/reverseのmainコードを直接実行するようにしちゃいましょう。(下準備)リバース対象のお試しMySQLを用意
https://github.com/yagrush/simple-docker-mysql
↑こちらに、docker-composeですぐ起動できるお試しMySQLをご用意しました。
これをgit cloneして起動します。※
docker-compose自体の設定は割愛します。
あるいはAWS EC2用でよろしければ、こちら https://qiita.com/yagrush/items/e85d2da1b0ef9997fa07 をご参照ください。$ cd ~ $ git clone https://github.com/yagrush/simple-docker-mysql.git $ cd simple-docker-mysql $ docker-compose up --build -d
xorm/reverse実行を試みる
xorm/reverseをgit cloneしてくるhttps://gitea.com/xorm/reverse にgit用URLが(githubと同じように)載っているので、ありがたく
git cloneしましょう。$ cd ~ $ git clone https://gitea.com/xorm/reverse.git $ cd reversesqlite3 を対応DBから外す
sqlite3は今回使わないし、
gcc見つからないエラーをちゃっちゃと回避したいので、↓をコメントアウトしちゃいます。
go.mod
require宣言のgithub.com/mattn/go-sqlite3
main.go
import宣言の_ "github.com/mattn/go-sqlite3"
reverse設定ファイルを作る
reverse/examples/goxorm.ymlをmy-mysql.ymlに改名して、プロジェクトルートreverse/にコピーします。そして、中身を適宜編集します。
例えばこんな感じ。kind: reverse name: my-mysql source: database: mysql conn_str: 'root:hogerootpassword@tcp(127.0.0.1:3306)/hogedb' targets: - type: codes include_tables: - hogetable exclude_tables: - foo language: golang template_path: example/template/goxorm.tmpl output_dir: models実行
早速実行してみます。
$ cd reverse
$ go run main.go -f my-mysql.yml
$
何も表示されないですが、エラーもないし、どうやら無事実行されましたかね。
出力を見てみましょう。
設定ファイルにoutput_dir: modelsと書いていたので、これかな?$ cat models/models.go package models type Hogetable struct { Hogename string `xorm:"not null VARCHAR(32)"` Id int `xorm:"not null pk autoincr INT"` }素晴らしい…
ちなみに「
package modelsはいったいどこから来てん?」というと、
↓設定ファイルから参照しているテンプレートファイルgoxorm.tmplにあります。template_path: example/template/goxorm.tmplこれをいじれば、さらにカスタマイズできます。
あと、構造体のフィールドに
xorm:タグがおまけで付いてますね。
これはxorm/reverseの親プロジェクトでもある、オープンソースORMxorm用みたいですね。ちなみにリバース対象にしたDBスキーマは↓こんな感じです。
(上の方でご紹介したお試しセットまんまです)CREATE DATABASE IF NOT EXISTS hogedb; use hogedb; CREATE TABLE hogetable ( id INT NOT NULL AUTO_INCREMENT, hogename VARCHAR(32) NOT NULL, PRIMARY KEY (id) );改造
と、ここまでは良かったのですが、実際使ってみるとつまづきが・・・
この続きは、また!
- 投稿日:2020-03-10T11:48:22+09:00
めんどくさめのinterfaceを満たすgoのmockライブラリを選定する
今回は、
- interfaceがinterfaceを返す
- 返り値がメソッドチェーン的に自身を返す
...ような若干めんどくさいタイプのinterfaceをmockすることにする。
mockしたい仕様
base.gopackage example import "context" type SampleRepository interface { Save(ctx context.Context, sample Sample) error FindByID(ctx context.Context) Where() SampleRepositorySearchSpec } type SampleRepositorySearchSpec interface { IDIn(id ...int) SampleRepositorySearchSpec NameLike(name string) SampleRepositorySearchSpec Find(ctx context.Context) (SampleList, error) Get(ctx context.Context) (*Sample, error) } type Sample struct { ID int UUID string } type SampleList []Sample
SampleRepositoryのWhere()がSampleRepositorySearchSpecという新たなinterfaceを返すところがめんどくささの1。
SampleRepositorySearchSpecはFind()かGet()が実行されるまで自分自身を返し続けることを求められるのがめんどくささの2です。github.com/matryer/moq
https://github.com/matryer/moq
生成
moq -out mocks_repository.go . SampleRepository SampleRepositorySearchSpec
- 割と自分で書いたときのような見慣れた感じのシンプルなモックを吐く。
- 以下のような感じのをジェネる
mocks_repository.gotype SampleRepositoryMock struct { // SaveFunc mocks the Save method. SaveFunc func(ctx context.Context, sample Sample) error // WhereFunc mocks the Where method. WhereFunc func() SampleRepositorySearchSpec // calls tracks calls to the methods. calls struct { // Save holds details about calls to the Save method. Save []struct { // Ctx is the ctx argument value. Ctx context.Context // Sample is the sample argument value. Sample Sample } // Where holds details about calls to the Where method. Where []struct { } } } ....mockするときは、
メソッド名 + Funcみたいなメソッドが生えるので、
こいつに自由な値を返す関数を設定する、といった感じだ。使用感
func TestExample(tt *testing.T) {

    // mock準備
    searcherMock := SampleRepositorySearchSpecMock{
        GetFunc: func(ctx context.Context) (sample *Sample, err error) {
            return &Sample{
                ID:   122,
                UUID: "xxxxx",
            }, nil
        },
        FindFunc: func(ctx context.Context) (list SampleList, err error) {
            return SampleList{
                {
                    ID:   122,
                    UUID: "xxxxx",
                },
                {
                    ID:   123,
                    UUID: "xxxxy",
                },
            }, nil
        },
    }

    searcherMock.IDInFunc = func(id ...int) SampleRepositorySearchSpec {
        return &searcherMock
    }

    repoMock := SampleRepositoryMock{
        SaveFunc: func(ctx context.Context, sample Sample) error {
            return nil
        },
        WhereFunc: func() SampleRepositorySearchSpec {
            return &searcherMock
        },
    }

    // テスト
    tt.Run(`subtest01`, func(t *testing.T) {
        sample122, err := repoMock.Where().IDIn(122).Get(context.Background())
        assert.NoError(t, err)
        assert.Equal(t, 122, sample122.ID)
    })

}
SampleRepositorySearchSpec側のIDInやNameLikeメソッドは自身を返さなければならないため、searcherMock.IDInFunc = func(id ...int) SampleRepositorySearchSpec { return &searcherMock }のように外出ししないといけない。
github.com/golang/mock
https://github.com/golang/mock
mockgen -source ./base.go -package example -destination example.mock.repository.go割と短いコードが生成される
example.mock.repository.go// Code generated by MockGen. DO NOT EDIT. // Source: ./base.go // Package mock_example is a generated GoMock package. package example import ( example "bitbucket.org/wanocoltd/vktc/vkproj/videokicks/core/pkg/domain/domain_service/example" context "context" gomock "github.com/golang/mock/gomock" reflect "reflect" ) // MockSampleRepository is a mock of SampleRepository interface type MockSampleRepository struct { ctrl *gomock.Controller recorder *MockSampleRepositoryMockRecorder } // MockSampleRepositoryMockRecorder is the mock recorder for MockSampleRepository type MockSampleRepositoryMockRecorder struct { mock *MockSampleRepository } // NewMockSampleRepository creates a new mock instance func NewMockSampleRepository(ctrl *gomock.Controller) *MockSampleRepository { mock := &MockSampleRepository{ctrl: ctrl} mock.recorder = &MockSampleRepositoryMockRecorder{mock} return mock } // EXPECT returns an object that allows the caller to indicate expected use func (m *MockSampleRepository) EXPECT() *MockSampleRepositoryMockRecorder { return m.recorder } // Save mocks base method func (m *MockSampleRepository) Save(ctx context.Context, sample example.Sample) error { m.ctrl.T.Helper() ret := m.ctrl.Call(m, "Save", ctx, sample) ret0, _ := ret[0].(error) return ret0 } // Save indicates an expected call of Save func (mr *MockSampleRepositoryMockRecorder) Save(ctx, sample interface{}) *gomock.Call { mr.mock.ctrl.T.Helper() return mr.mock.ctrl.RecordCallWithMethodType(mr.mock, "Save", reflect.TypeOf((*MockSampleRepository)(nil).Save), ctx, sample) } // Where mocks base method func (m *MockSampleRepository) Where() example.SampleRepositorySearchSpec { m.ctrl.T.Helper() ret := m.ctrl.Call(m, "Where") ret0, _ := ret[0].(example.SampleRepositorySearchSpec) return ret0 } // Where indicates an expected call of Where func (mr *MockSampleRepositoryMockRecorder) Where() *gomock.Call { mr.mock.ctrl.T.Helper() return mr.mock.ctrl.RecordCallWithMethodType(mr.mock, "Where", reflect.TypeOf((*MockSampleRepository)(nil).Where)) } // MockSampleRepositorySearchSpec is a mock of SampleRepositorySearchSpec interface type MockSampleRepositorySearchSpec struct { ctrl *gomock.Controller recorder *MockSampleRepositorySearchSpecMockRecorder } // MockSampleRepositorySearchSpecMockRecorder is the mock recorder for MockSampleRepositorySearchSpec type MockSampleRepositorySearchSpecMockRecorder struct { mock *MockSampleRepositorySearchSpec } // NewMockSampleRepositorySearchSpec creates a new mock instance func NewMockSampleRepositorySearchSpec(ctrl *gomock.Controller) *MockSampleRepositorySearchSpec { mock := &MockSampleRepositorySearchSpec{ctrl: ctrl} mock.recorder = &MockSampleRepositorySearchSpecMockRecorder{mock} return mock } // EXPECT returns an object that allows the caller to indicate expected use func (m *MockSampleRepositorySearchSpec) EXPECT() *MockSampleRepositorySearchSpecMockRecorder { return m.recorder } // IDIn mocks base method func (m *MockSampleRepositorySearchSpec) IDIn(id ...int) example.SampleRepositorySearchSpec { m.ctrl.T.Helper() varargs := []interface{}{} for _, a := range id { varargs = append(varargs, a) } ret := m.ctrl.Call(m, "IDIn", varargs...) ret0, _ := ret[0].(example.SampleRepositorySearchSpec) return ret0 } // IDIn indicates an expected call of IDIn func (mr *MockSampleRepositorySearchSpecMockRecorder) IDIn(id ...interface{}) *gomock.Call { mr.mock.ctrl.T.Helper() return mr.mock.ctrl.RecordCallWithMethodType(mr.mock, "IDIn", reflect.TypeOf((*MockSampleRepositorySearchSpec)(nil).IDIn), id...) } // NameLike mocks base method func (m *MockSampleRepositorySearchSpec) NameLike(name string) example.SampleRepositorySearchSpec { m.ctrl.T.Helper() ret := m.ctrl.Call(m, "NameLike", name) ret0, _ := ret[0].(example.SampleRepositorySearchSpec) return ret0 } // NameLike indicates an expected call of NameLike func (mr *MockSampleRepositorySearchSpecMockRecorder) NameLike(name interface{}) *gomock.Call { mr.mock.ctrl.T.Helper() return mr.mock.ctrl.RecordCallWithMethodType(mr.mock, "NameLike", reflect.TypeOf((*MockSampleRepositorySearchSpec)(nil).NameLike), name) } // Find mocks base method func (m *MockSampleRepositorySearchSpec) Find(ctx context.Context) (example.SampleList, error) { m.ctrl.T.Helper() ret := m.ctrl.Call(m, "Find", ctx) ret0, _ := ret[0].(example.SampleList) ret1, _ := ret[1].(error) return ret0, ret1 } // Find indicates an expected call of Find func (mr *MockSampleRepositorySearchSpecMockRecorder) Find(ctx interface{}) *gomock.Call { mr.mock.ctrl.T.Helper() return mr.mock.ctrl.RecordCallWithMethodType(mr.mock, "Find", reflect.TypeOf((*MockSampleRepositorySearchSpec)(nil).Find), ctx) } // Get mocks base method func (m *MockSampleRepositorySearchSpec) Get(ctx context.Context) (*example.Sample, error) { m.ctrl.T.Helper() ret := m.ctrl.Call(m, "Get", ctx) ret0, _ := ret[0].(*example.Sample) ret1, _ := ret[1].(error) return ret0, ret1 } // Get indicates an expected call of Get func (mr *MockSampleRepositorySearchSpecMockRecorder) Get(ctx interface{}) *gomock.Call { mr.mock.ctrl.T.Helper() return mr.mock.ctrl.RecordCallWithMethodType(mr.mock, "Get", reflect.TypeOf((*MockSampleRepositorySearchSpec)(nil).Get), ctx) }使用感
func TestMock2(t *testing.T) {
    ctrl := gomock.NewController(t)
    defer ctrl.Finish()

    filterMock := NewMockSampleRepositorySearchSpec(ctrl)
    filterMock.EXPECT().IDIn(gomock.Any()).Return(filterMock).AnyTimes()
    filterMock.EXPECT().NameLike(gomock.Any()).Return(filterMock).AnyTimes()

    repoMock := NewMockSampleRepository(ctrl)
    repoMock.EXPECT().Where().Return(filterMock)

    t.Run(`subtest2`, func(st *testing.T) {
        // モックを定義
        filterMock.EXPECT().Get(gomock.Any()).Return(&Sample{
            ID:   100,
            UUID: "xxx",
        } , nil)

        sample , err := repoMock.Where().IDIn(100).Get(context.Background())
        assert.NoError(st , err)
        assert.Equal(st  , 100 , sample.ID  )
    })

}
今回のケースでmockしたいのは、究極的には
Find(ctx context.Context)やGet(ctx context.Context)だけなので、メソッドチェーンの途中経過はどうでもいいのである。
そのあたり、gomock.Any()というのが用意されている gomockはなかなか素敵かもしれない。Expect()...XXX()...Return(好きな返り値)という形でダミーで返す値を設定するが、引数がinterfaceなため、適切に仕様を満たさない返り値を設定してしまうと、実行時までエラーがわからない という難点はある。
今回はgomockのほうに好感が持てた。
- 投稿日:2020-03-10T01:04:30+09:00
最低限の Go package の作り方・公開方法
自作した Go の package を公開する方法を書いていきます。
実運用する package を公開する際は、テストを書いたりしてください。自分の GOPATH のありかを知る
$ go env GOPATH
/Users/[username]/go
hello だけを返す package を作成する
$ mkdir -p [得たGOPATH]/src/github.com/[username]/hello
$ cd [得たGOPATH]/src/github.com/[username]/hello
$ go mod init github.com/[username]/hello
$ touch hello.go
package hello func Hello() string { return "Hello" }公開する
$ git init
$ git remote add origin [GitHub上で作成したリポジトリのURL]
$ git add .
$ git commit -m 'Initial commit'
$ git push origin master
適当なファイルから作成した package を利用できるか確認する
package main

import "github.com/[username]/hello"

func main() {
    println(hello.Hello())
}
$ go run main.go Hello利用できることを確認できたら、実際に使えるレベルの package を作っていきましょう?