- 投稿日:2020-03-10T18:55:44+09:00
Unity(Vuforia)でAndroid向けの簡単なAR表示アプリを作る方法
はじめに
UnityでAndroid向けの簡単なAR表示アプリを作ります。
今回はマーカー画像を読み取って3Dモデルを表示できるようにします。
Unityのバージョンによってやり方が異なるようなので、本記事を参考にする際は下記の環境を参照してください。
また、本記事ではUnityが既にインストールされており、プロジェクト作成をできる状態を想定しています。環境
- Windows10
- Unity 2019.2.18f1
- Android SDK & NDK Tools
- Vuforia Endine AR 8.5.9 (ARコンテンツを作成するためのライブラリ)
- Android 9.0
必要な物
- Unity (バージョンは上記の通り)
- Android端末 (Androidの開発者モード設定などを済ませておく)
- マーカーにする画像
準備
Vuforia Engine ARというライブラリからDevelopment Keyを取得しておきます。
アカウントの作成
こちらからアカウントを作成します。
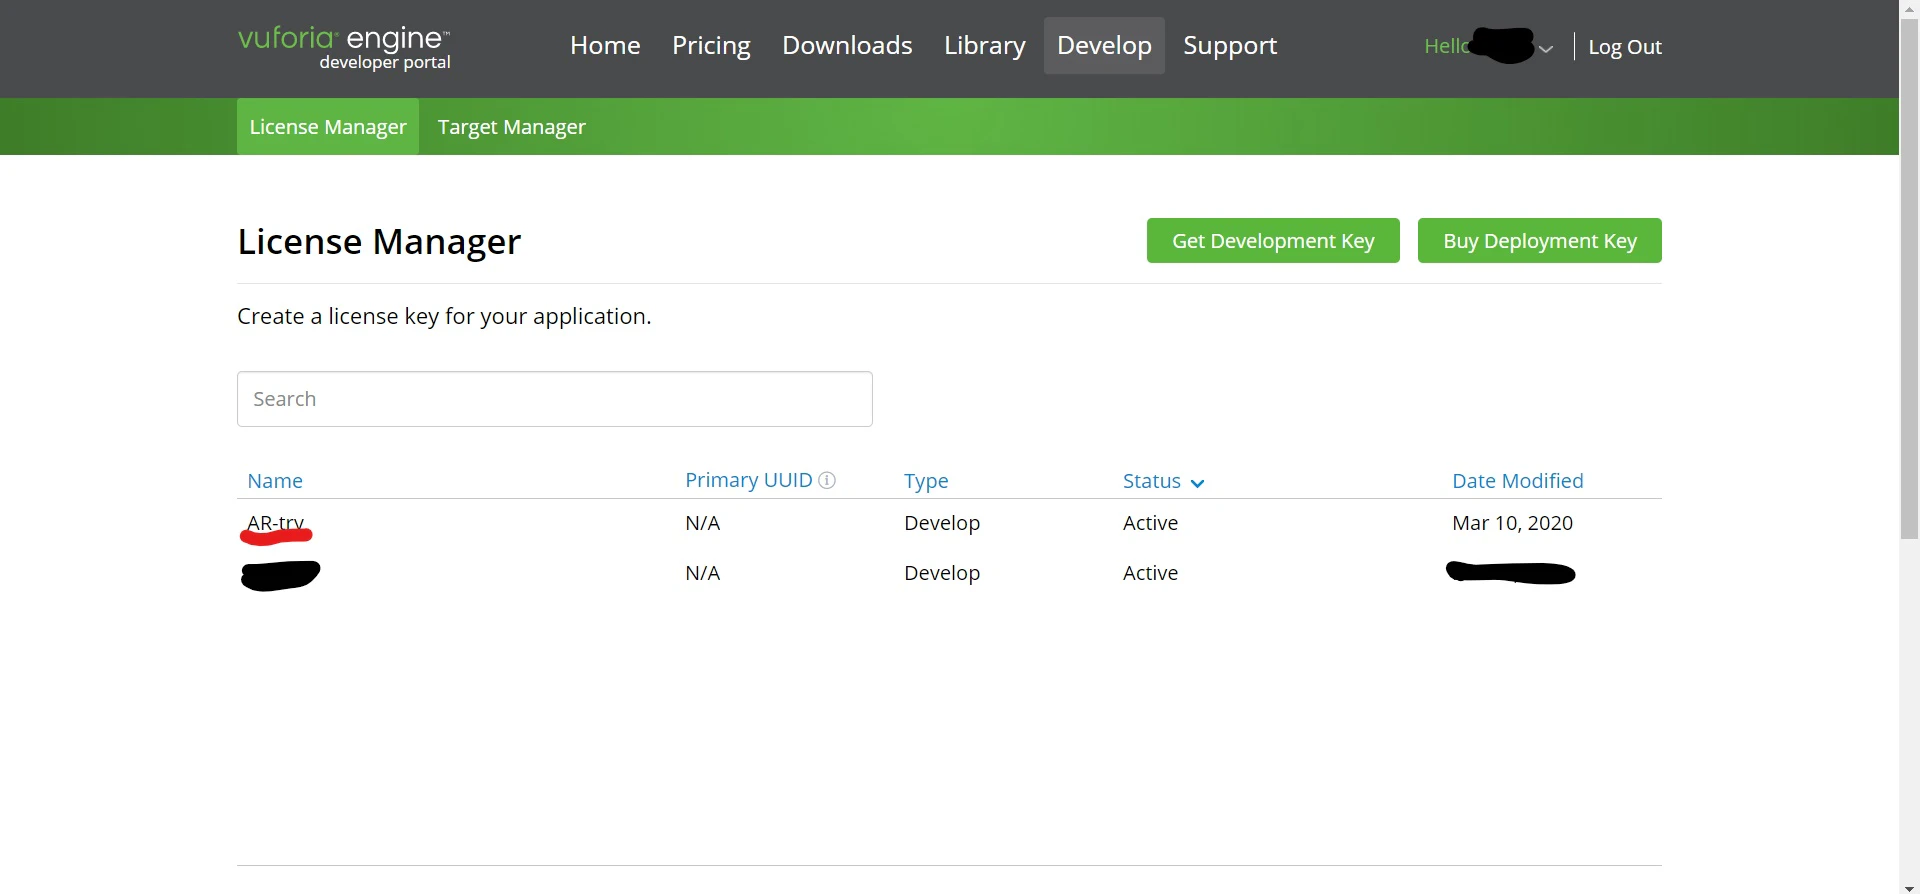
Development Keyの取得
DevelopのLicense Managerというタブから
Get Development Keyをクリックします。
License名を入力して、ボックスにチェックを入れた後、
ConfirmしてDevelopment Keyを作成します。
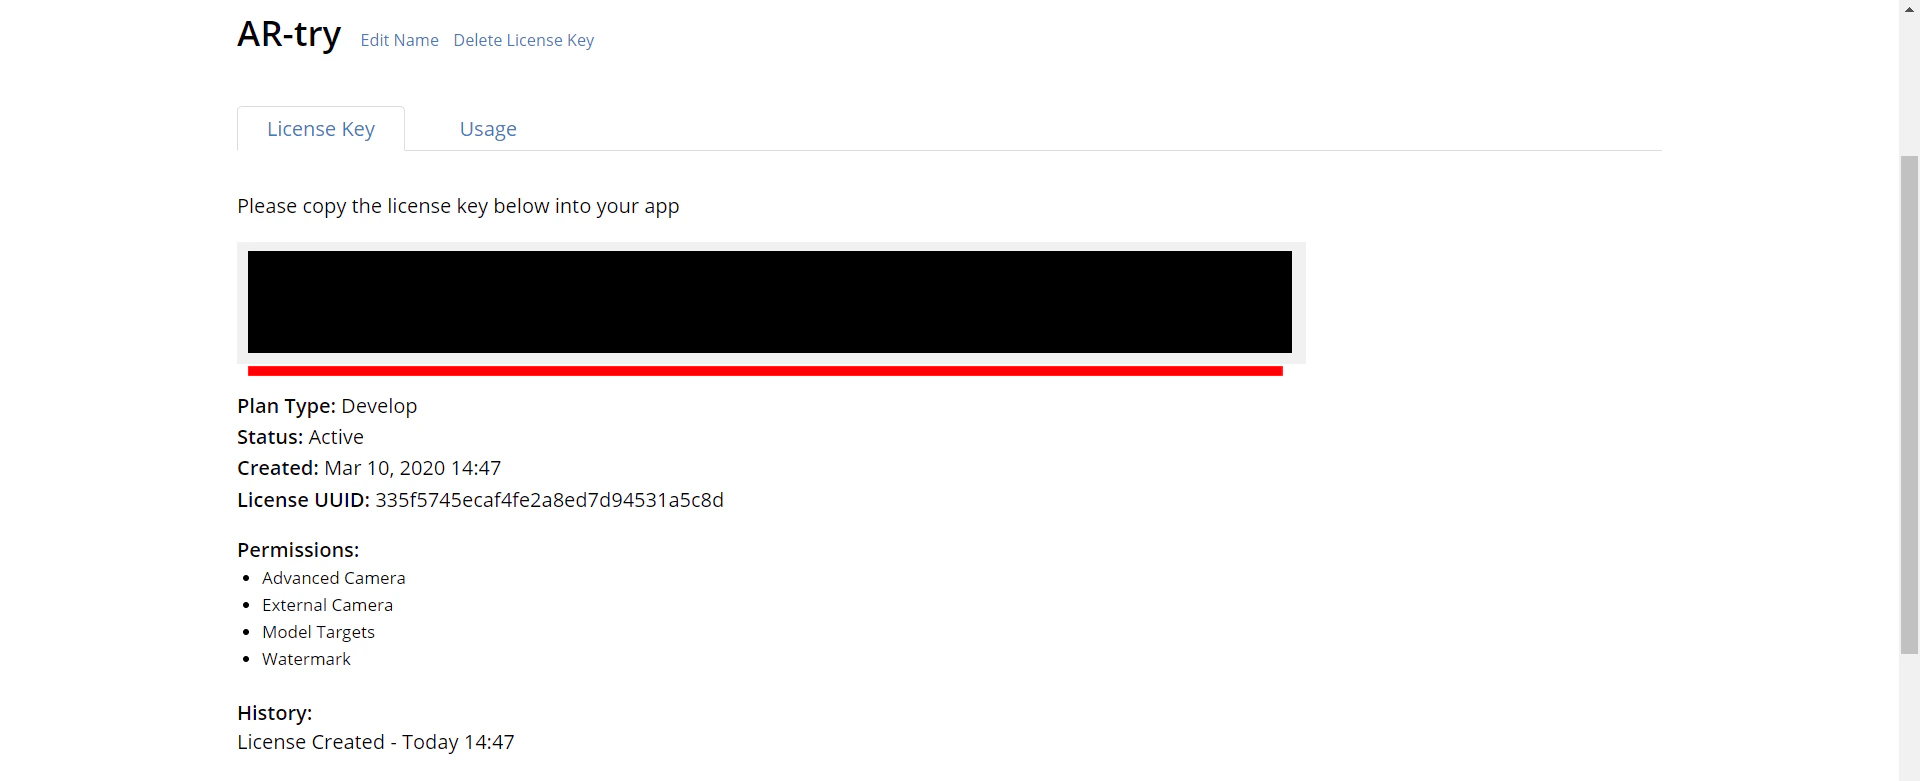
上手くいくと作成したKeyが表示されるので、クリックします。
(画像では隠していますが)
License Keyが表示されているので、クリックしてコピーしておきましょう。
後ほどUnity上で使用します。(A)
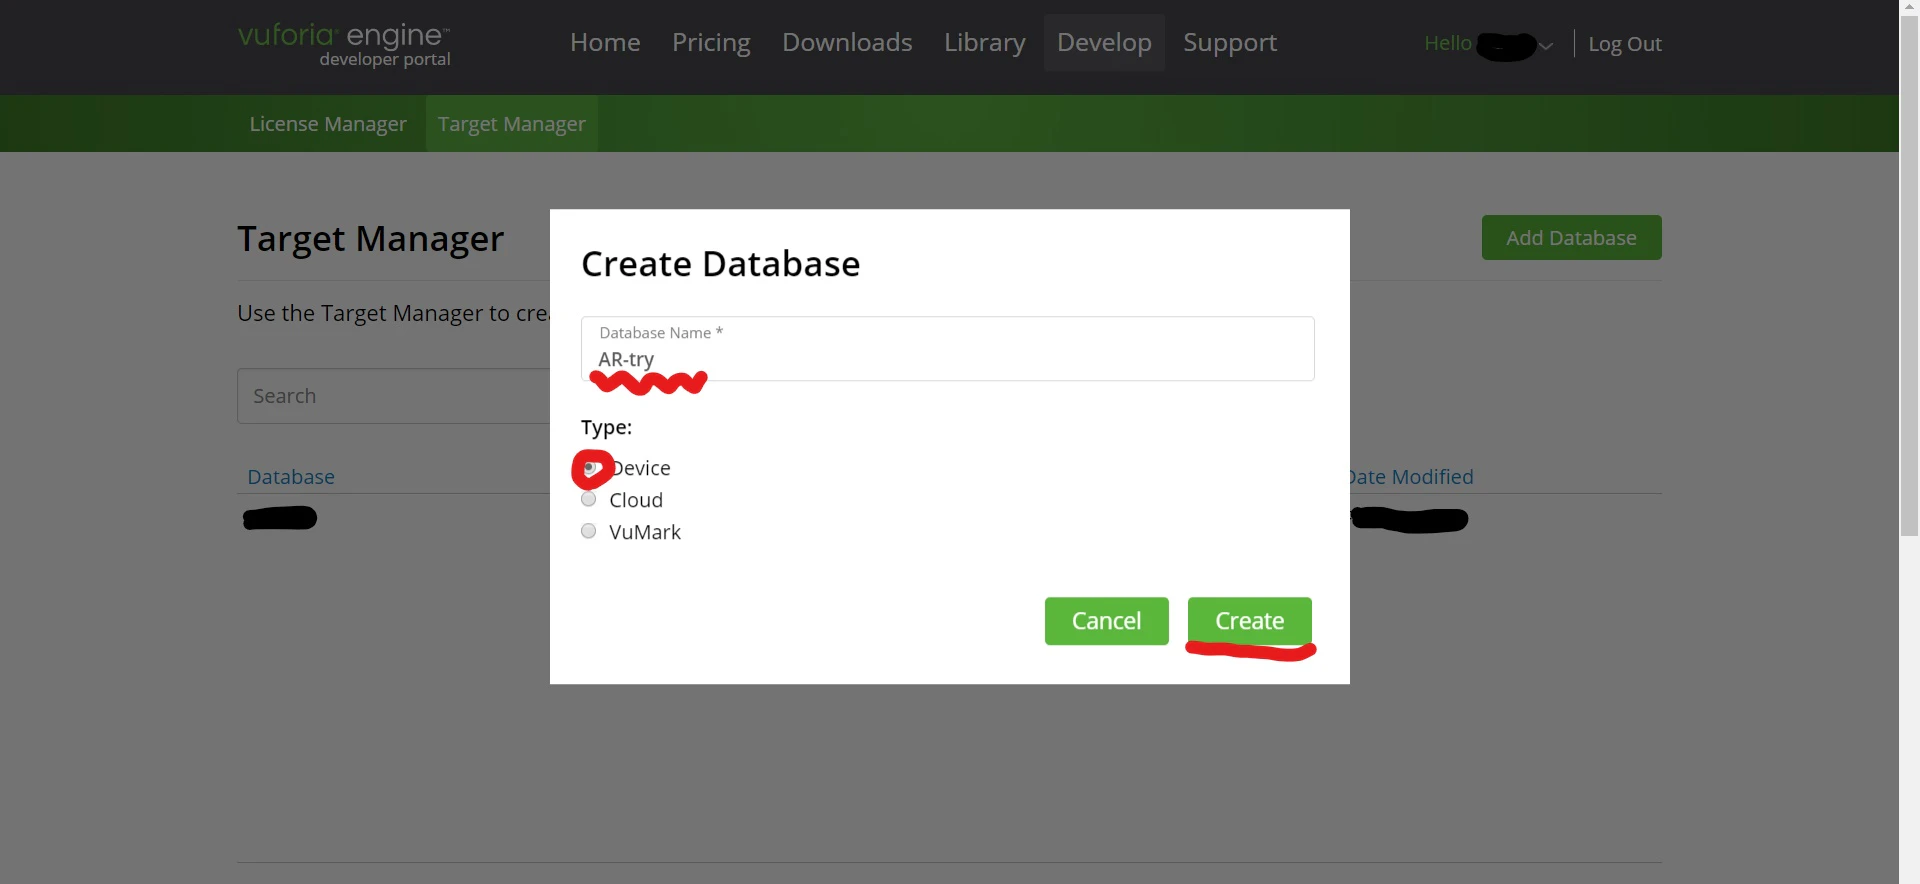
Databaseの取得
DevelopのTarget Managerというタブから
Add Databaseをクリックします。
ポップアップ画面にDatabase名を入力して、
CreateでDatabaseを作成します。
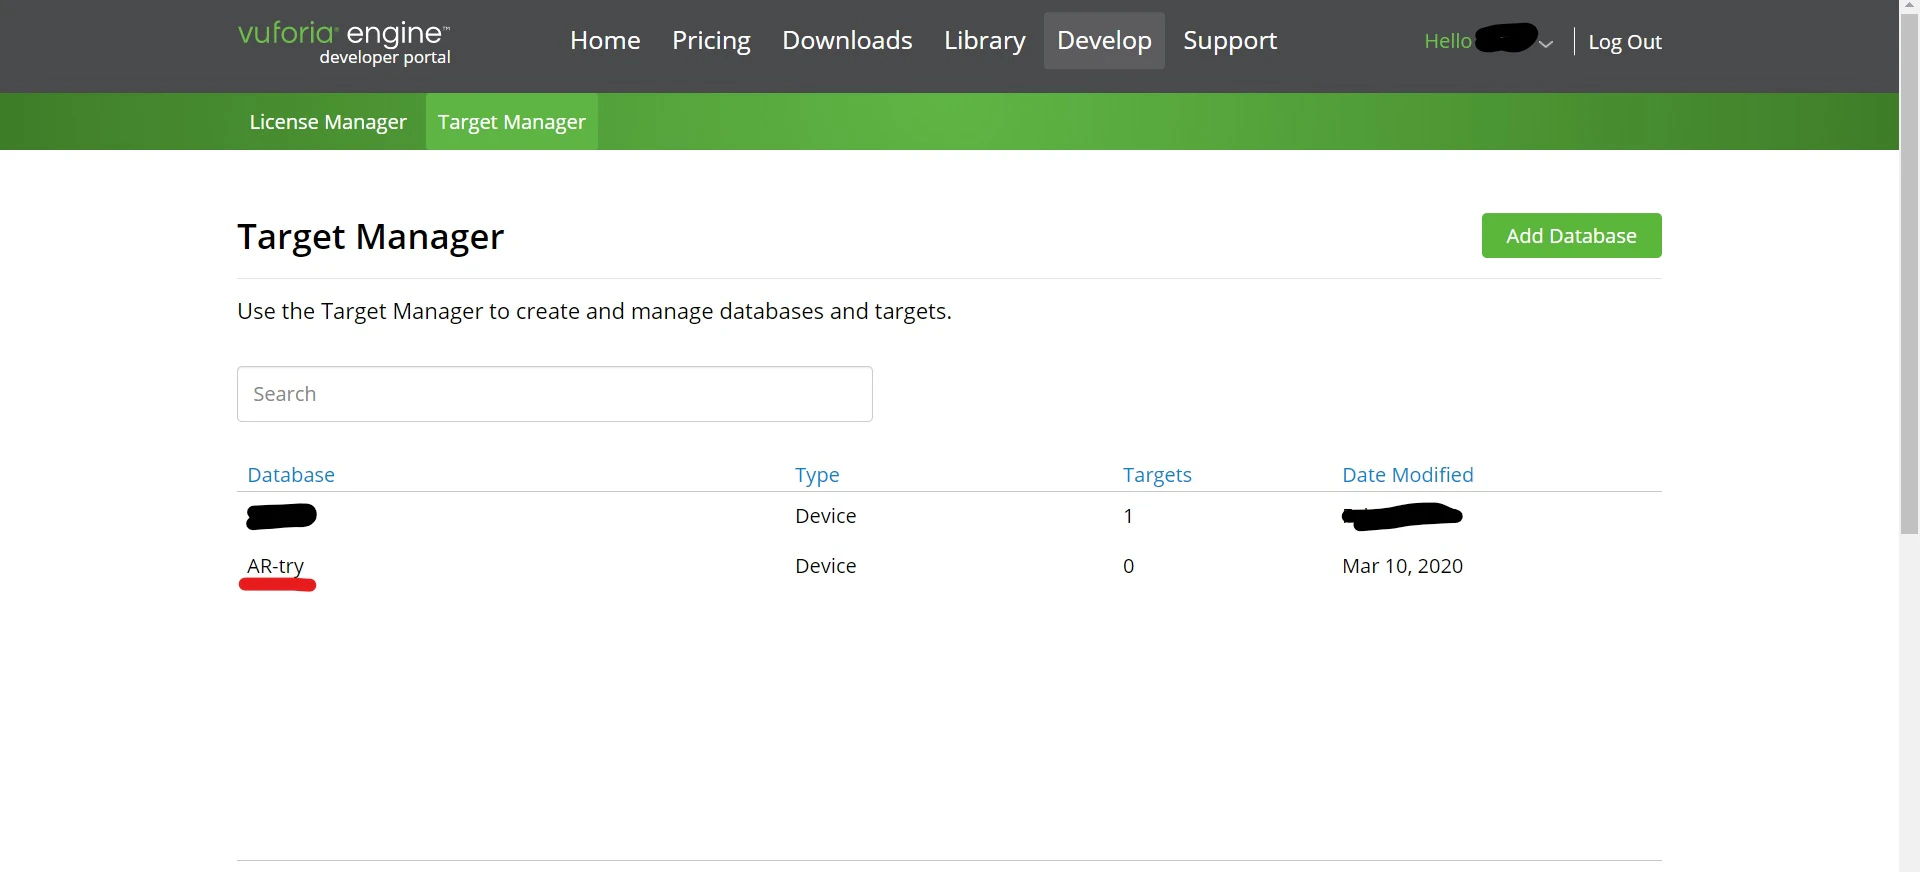
作成したDatabaseをクリックします。
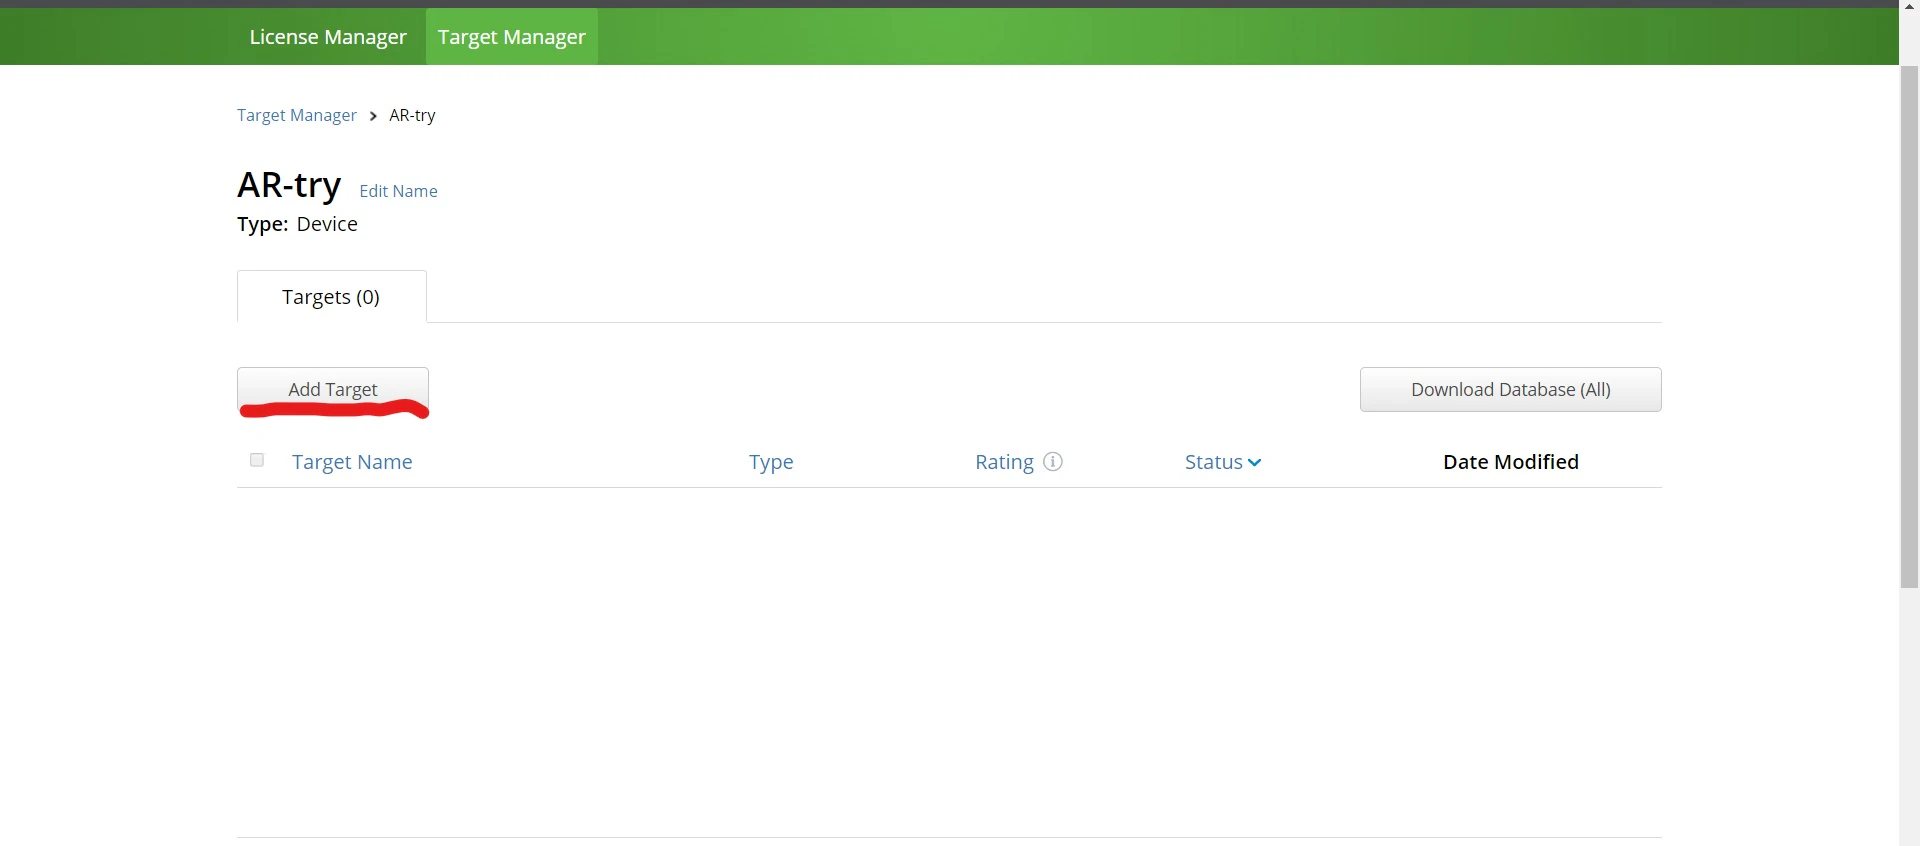
Add Targetをクリックします。
マーカーに使用する画像ファイルを選択して、
Width(100で大丈夫)とNameを入力してAddをクリックします。
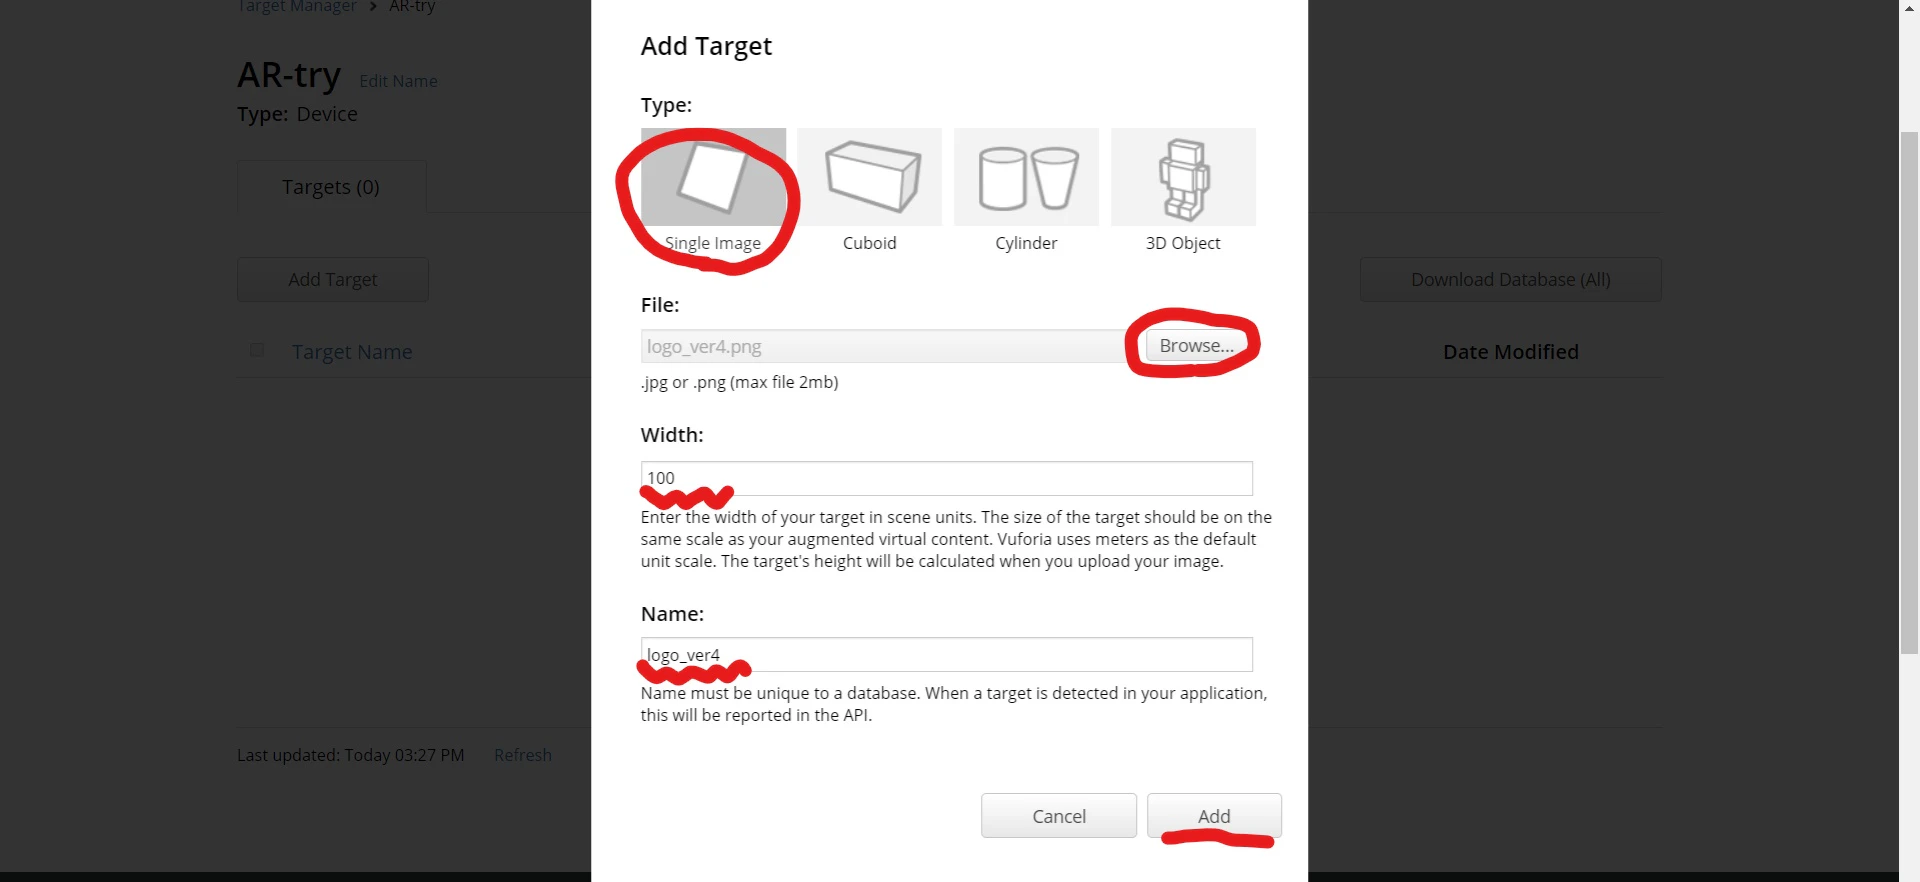
作成したTargetを選択して、
Download Databaseをクリックします。
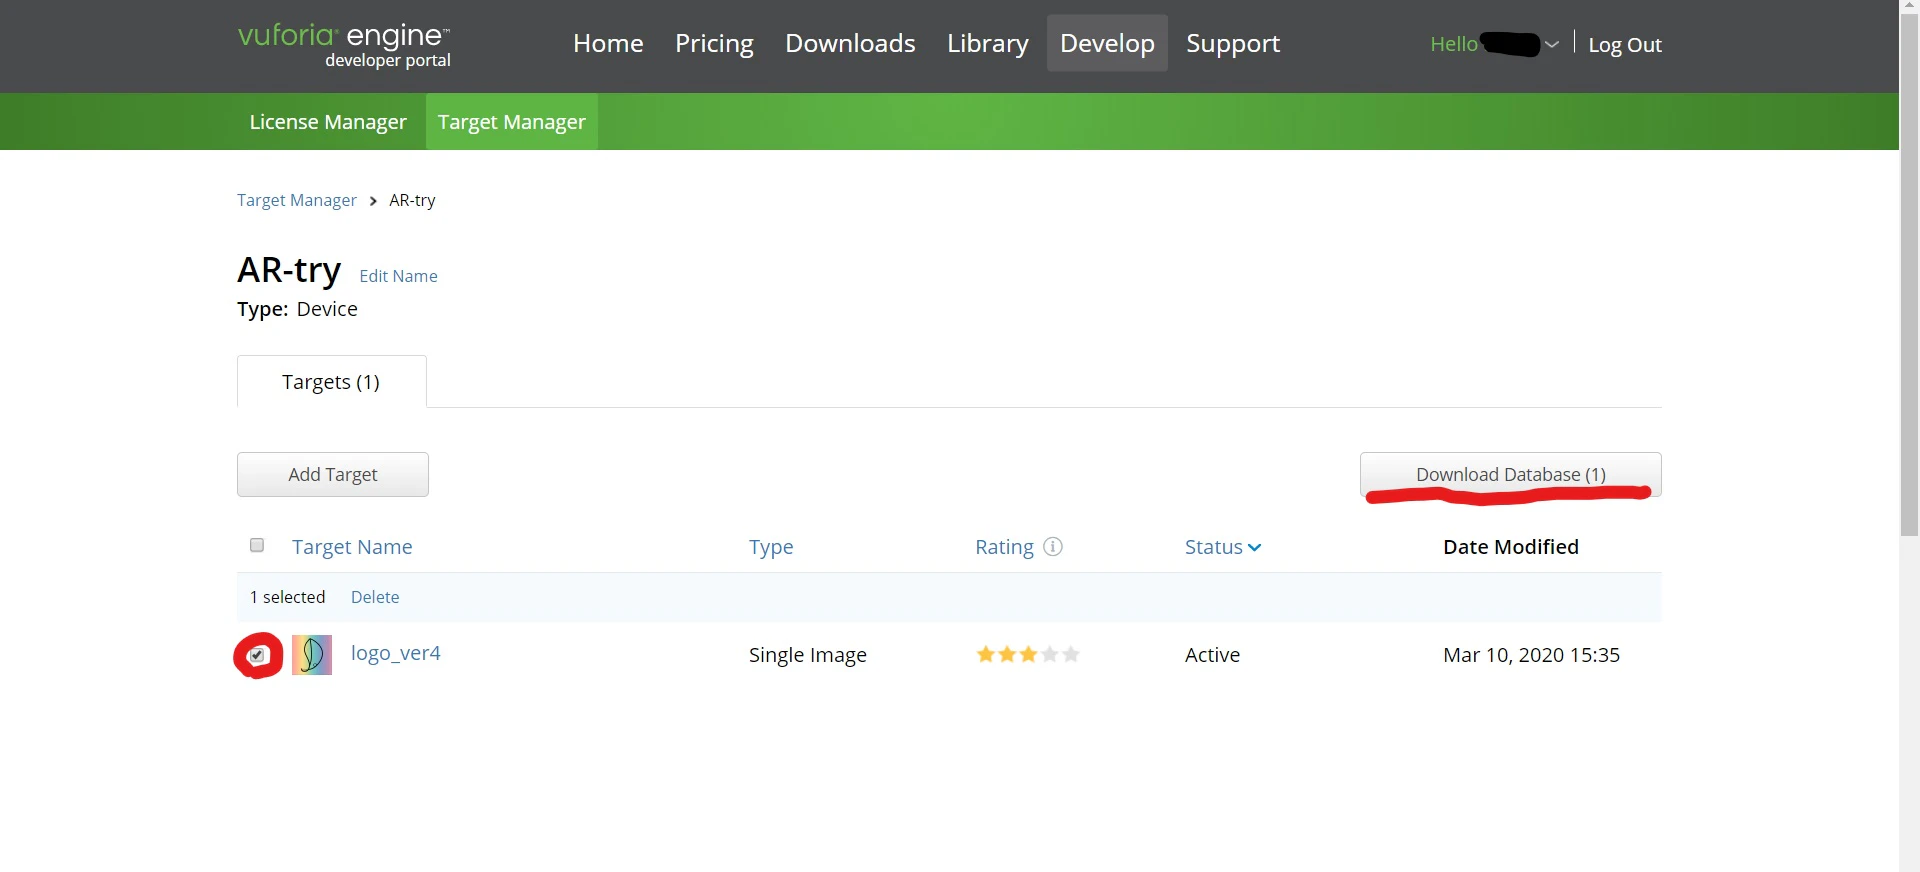
ポップアップ画面上で、
Unity Editorにチェックを入れてダウンロードします。
ダウンロードしたUnity package fileは後ほど使用します。(B)
ARアプリの作成
UnityでARを実装していきます。
UnityにAndroid SDK & NDK Toolsを追加
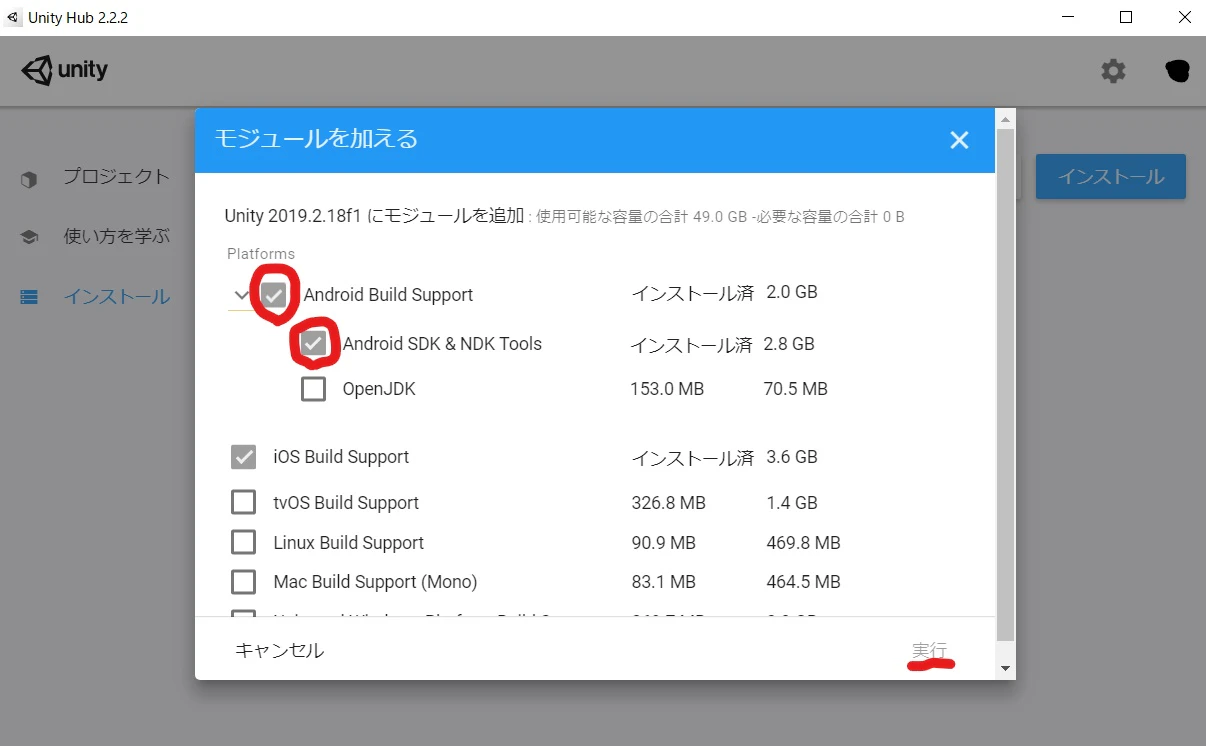
Unity HubからUnity 2019.2.18f1にモジュールを追加します。
Android Build SupportとAndroid SDK & NDK Toolsにチェックを入れて、実行します。
これでAndroid SDK & NDK Toolsが追加されました。
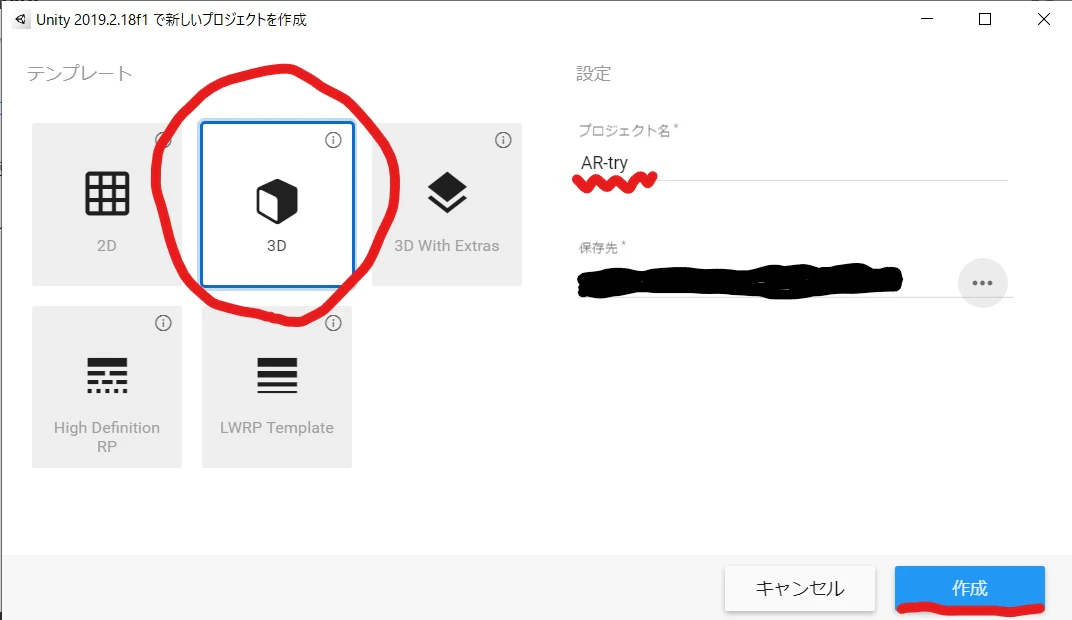
Unityでプロジェクトを作成、設定
Unity 2019.2.18f1で3Dを選択し、プロジェクト名を入力してプロジェクトを作成します。
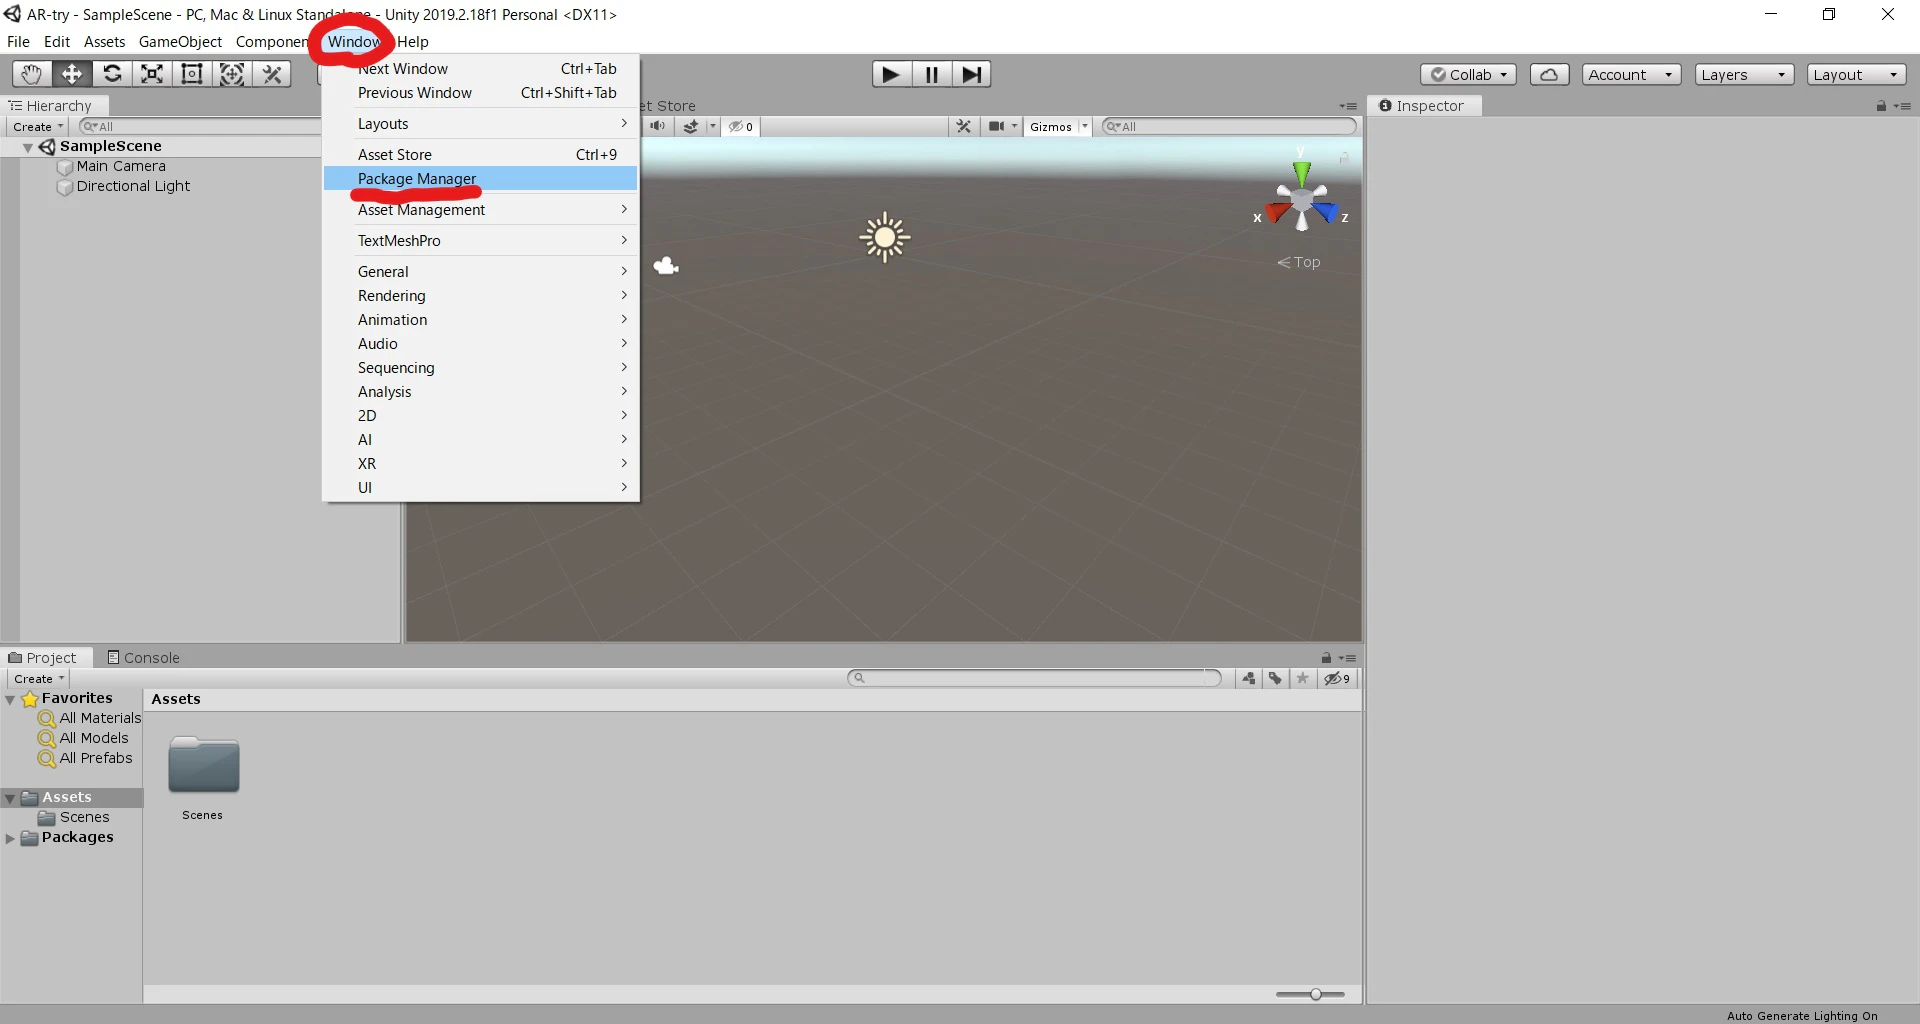
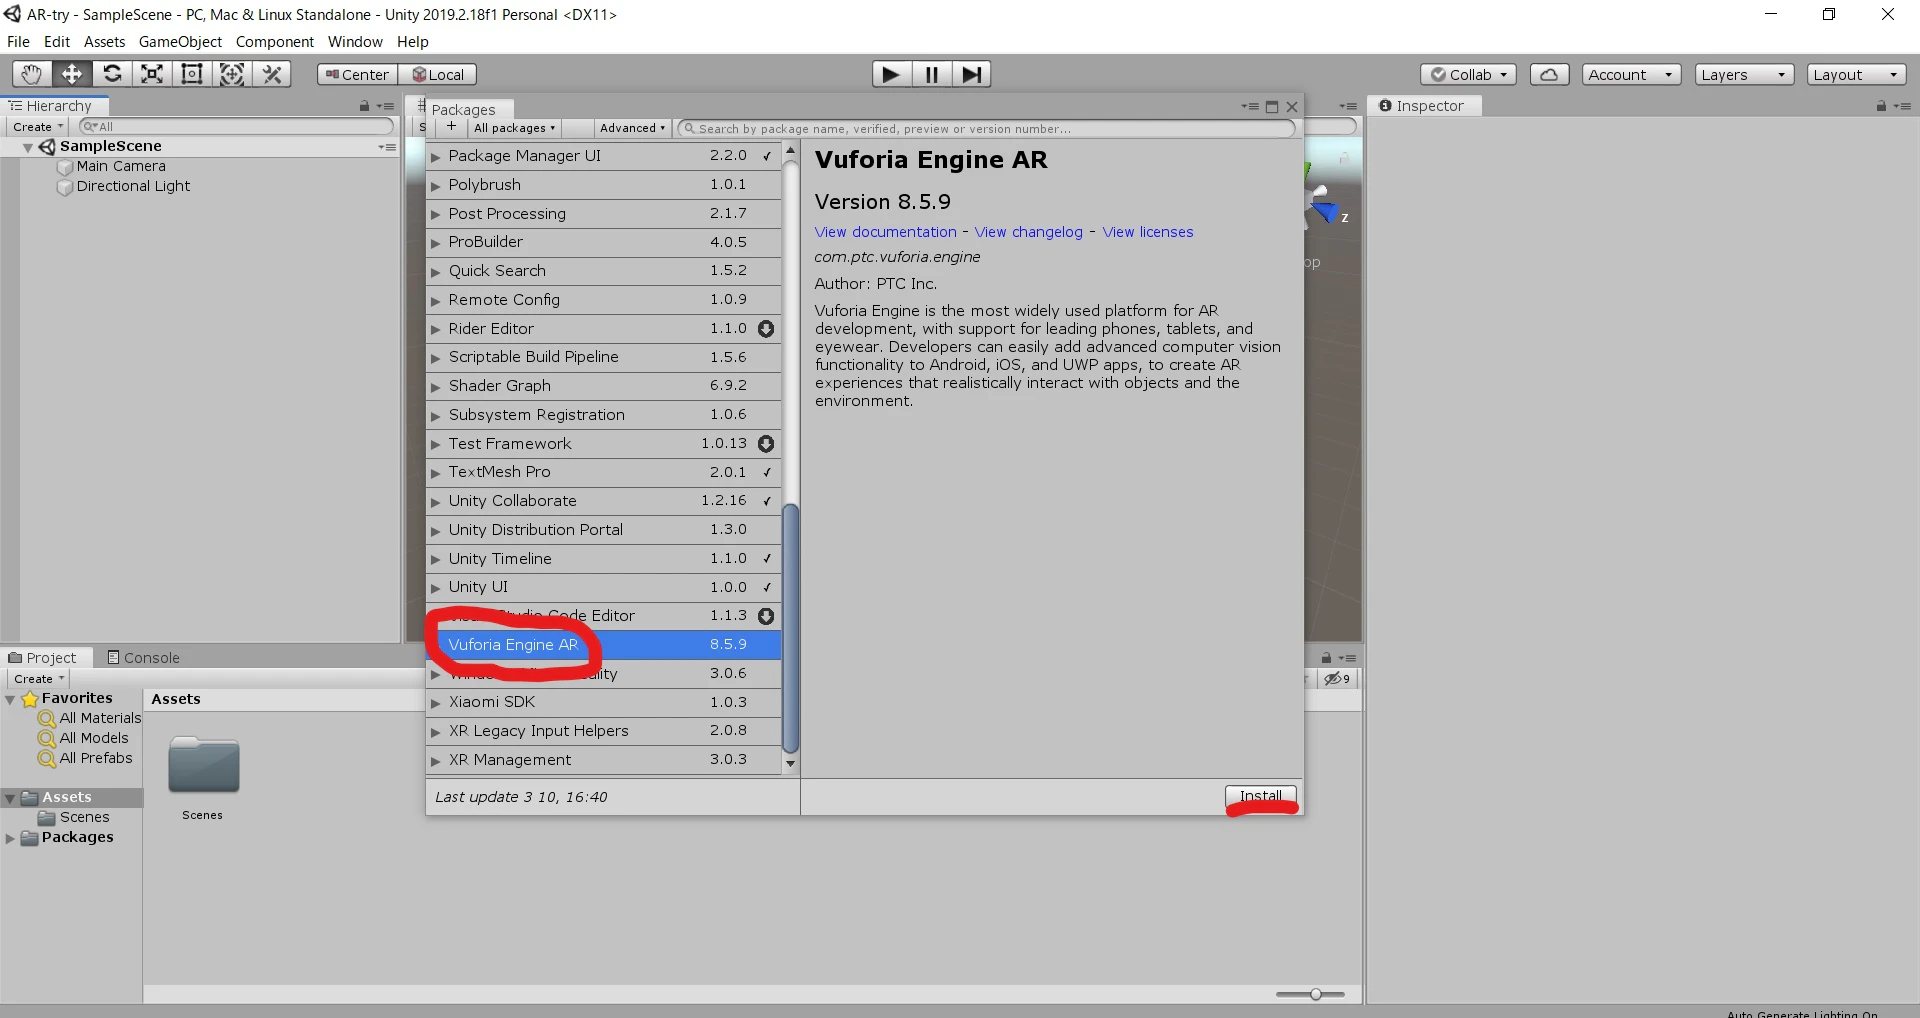
まずは、Vuforia Engine ARをインストールします。
Window > Package Managerをクリックします。
Vuforia Engine ARを開いて、Installします。
HierarchyウィンドウからMain Cameraを削除します。
続いて、下記の2つのGameObjectを追加します。
GameObject > Vuforia > AR CameraGameObject > Vuforia > Camera Image > Camera Image Target
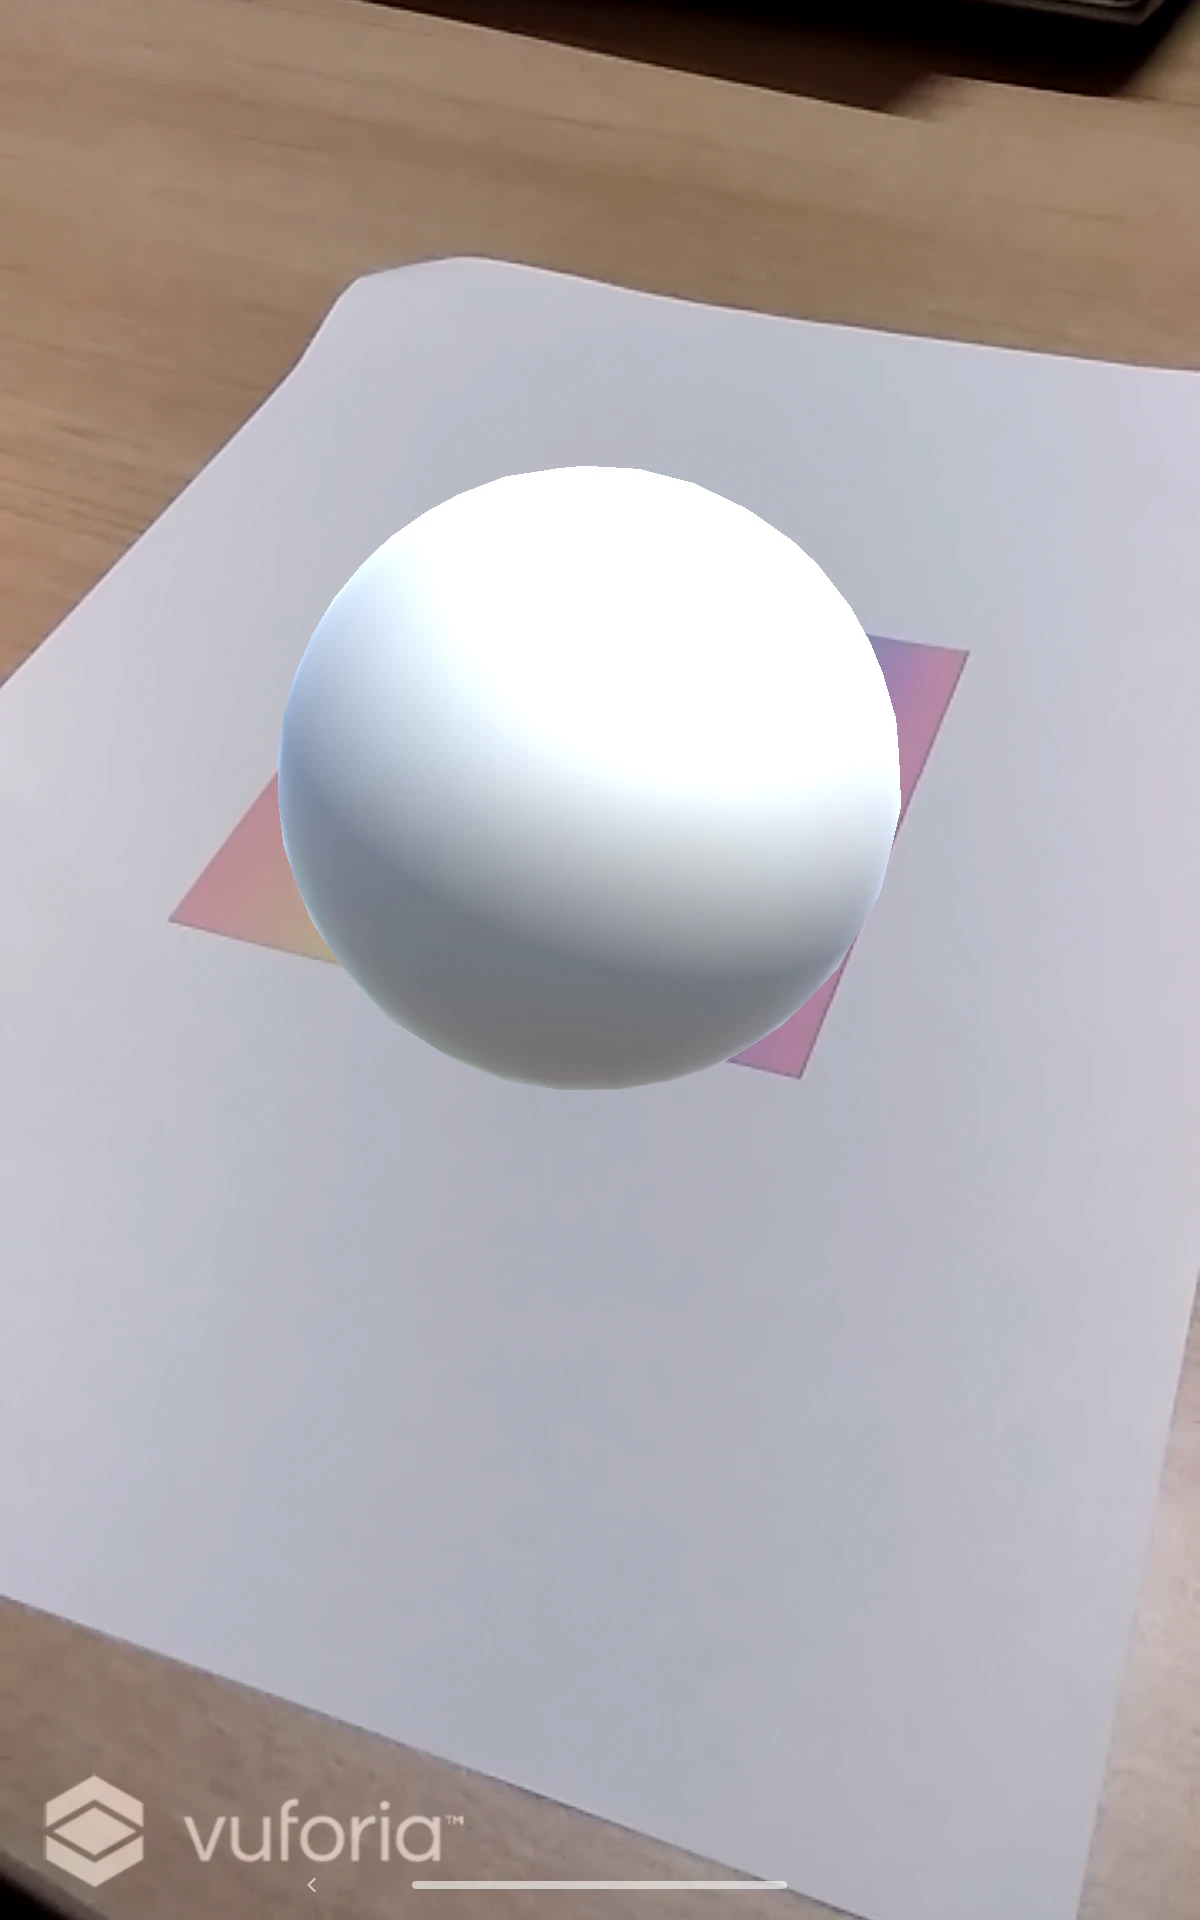
表示したい3Dオブジェクトを作成します。
ここでは、GameObject > 3D Object > Sphereを作成し、ImageTargetに対してドラック&ドロップすることで子オブジェクトにしています。
※この時、SphereのInsrectorウィンドウからTransform > Scaleのxyzを小さくしておくと良いです。(ここではすべて1にしておきます)
次は、
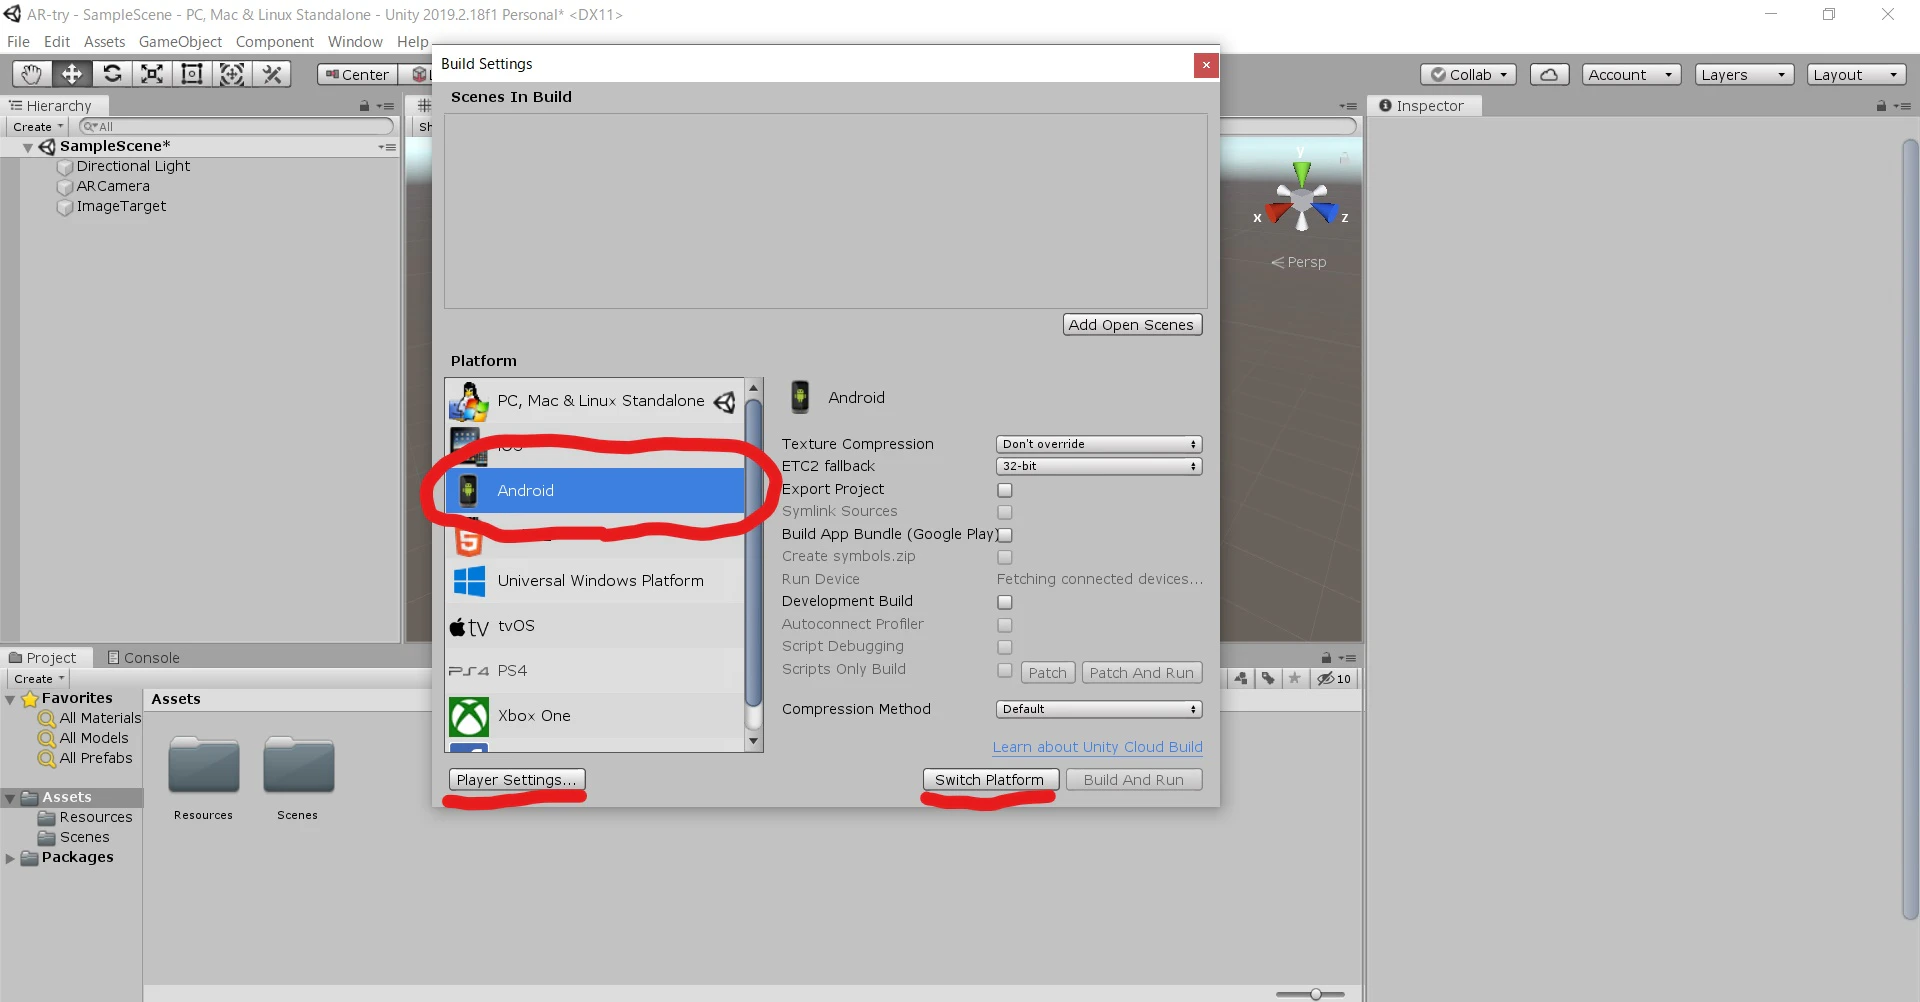
File > Build Settingsを開きます。PlatformにAndroidを選択して、右下の
Switch Platformをクリックします。
UnityのロゴがAndroidの横に表示されるようになったら、左下のPlayer Settingsをクリックします。
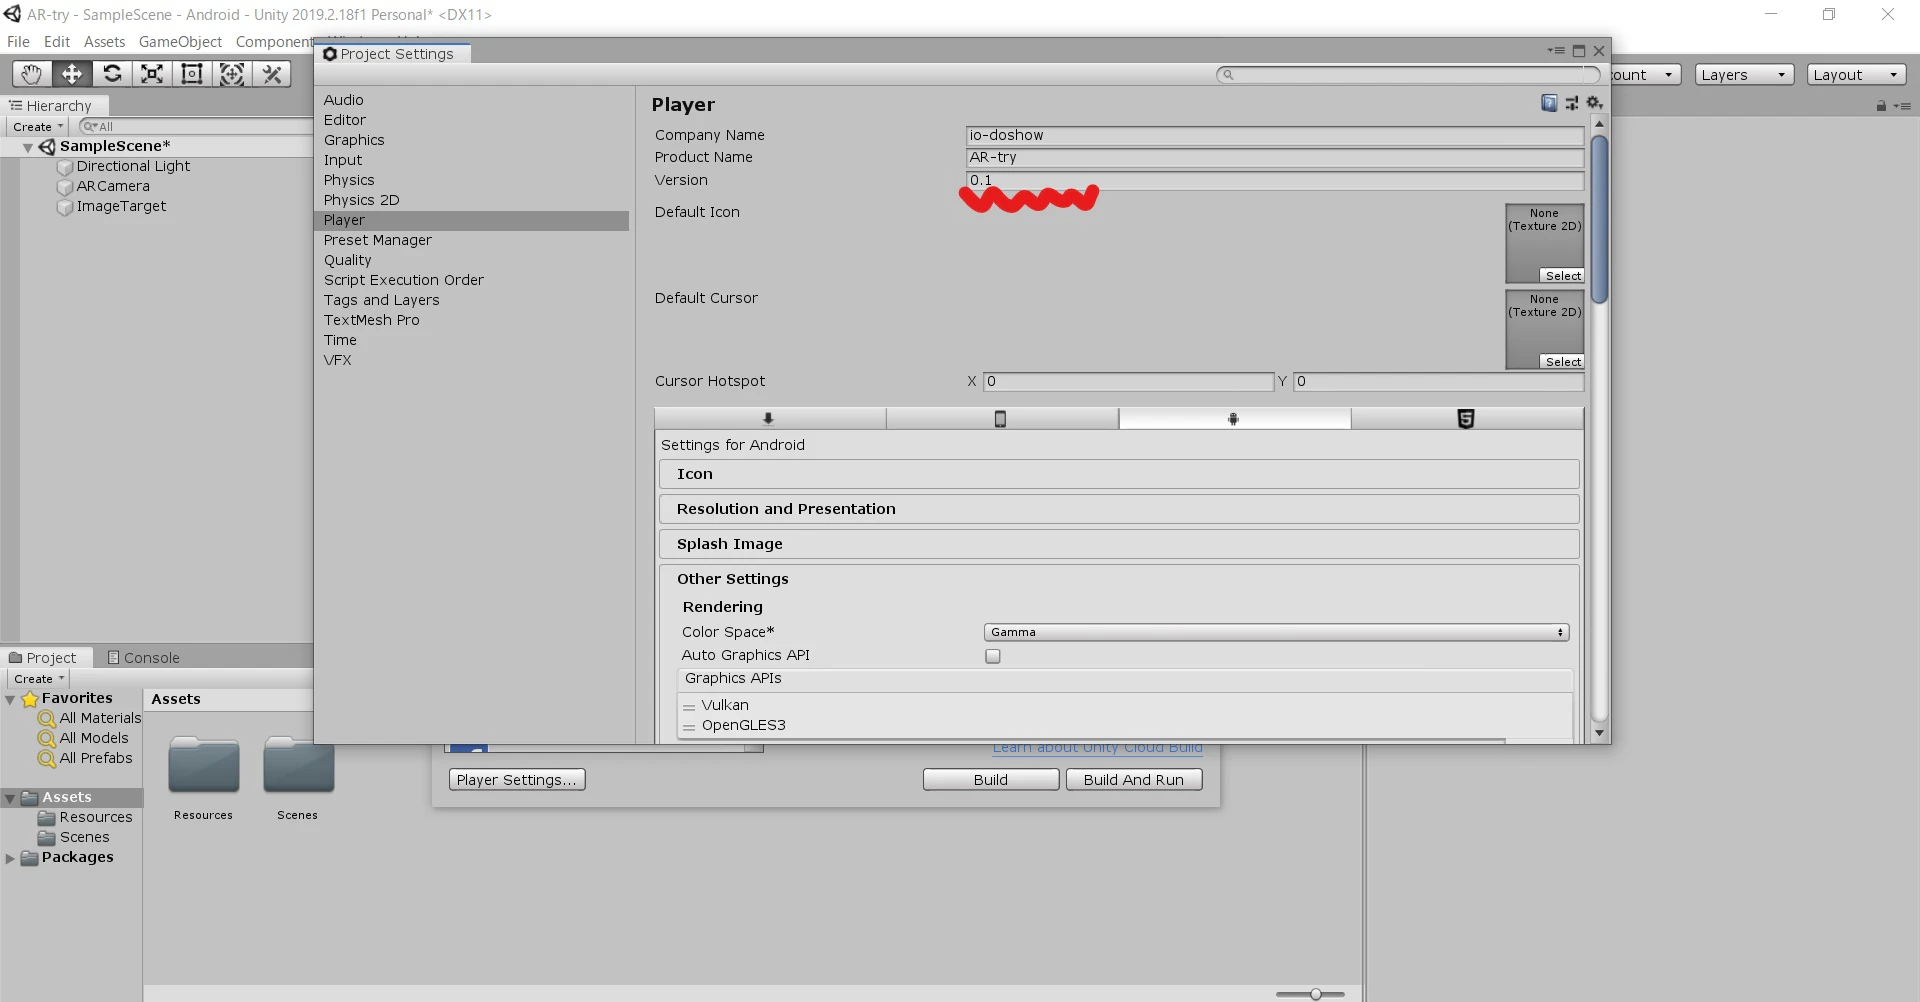
Playerタブにて、
Company NameとProduct Nameを入力。
Other Settings > RenderingからVulkanを選択して削除。
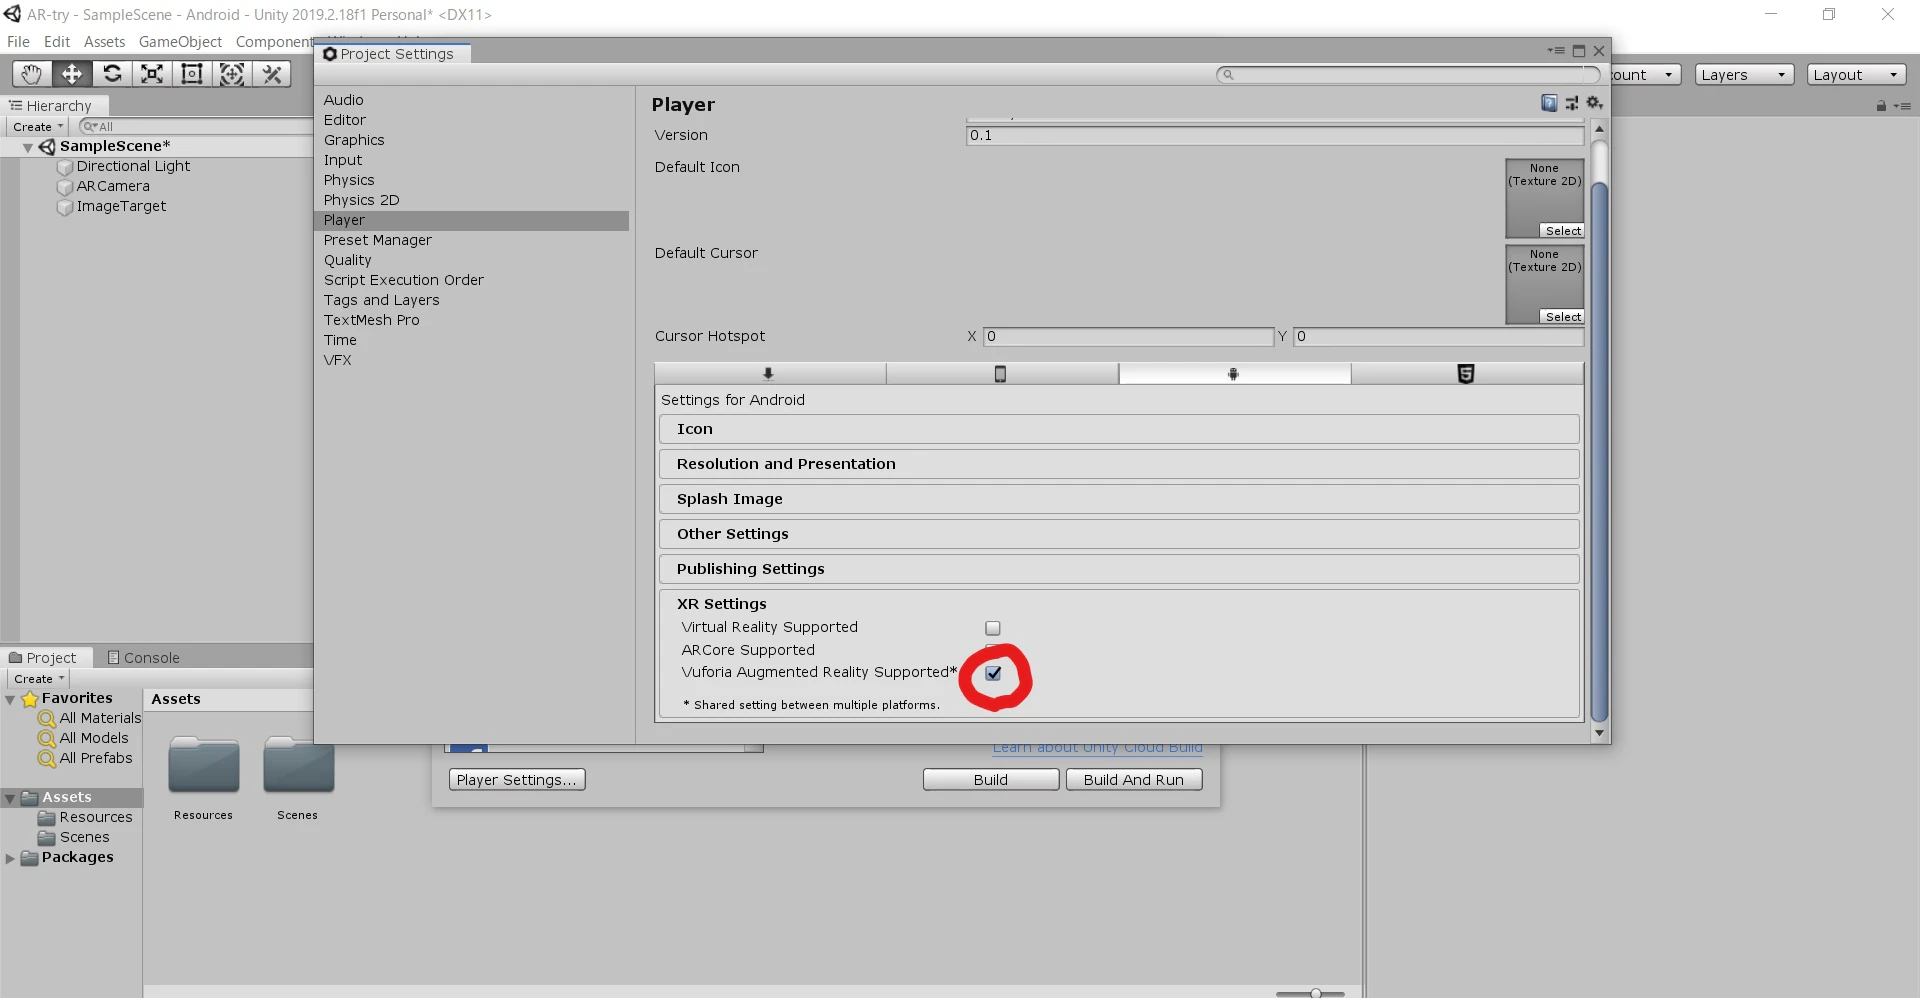
XR Settings > Vuforia Augmented Reality Supportedにチェック。
Vuforiaの設定
HierarchyウィンドウからARCameraを選択し、Inspectorウィンドウの
Vuforia Behaviour > Open Vuforia configurationをクリック。
Global > App License Keyの欄に取得したLicense Key(A)を入力します。
次に、先程ダウンロードしたUnity package fileを開きます。
Importします。
Hierarchyウィンドウから
ImageTargetを選択し、InspectorウィンドウのImage Target Behaviour > TypeをPredefinedに変更。
新たに表示されるDatabaseとImage Targetに登録した情報を選択します。
AndroidアプリのBuild And Run
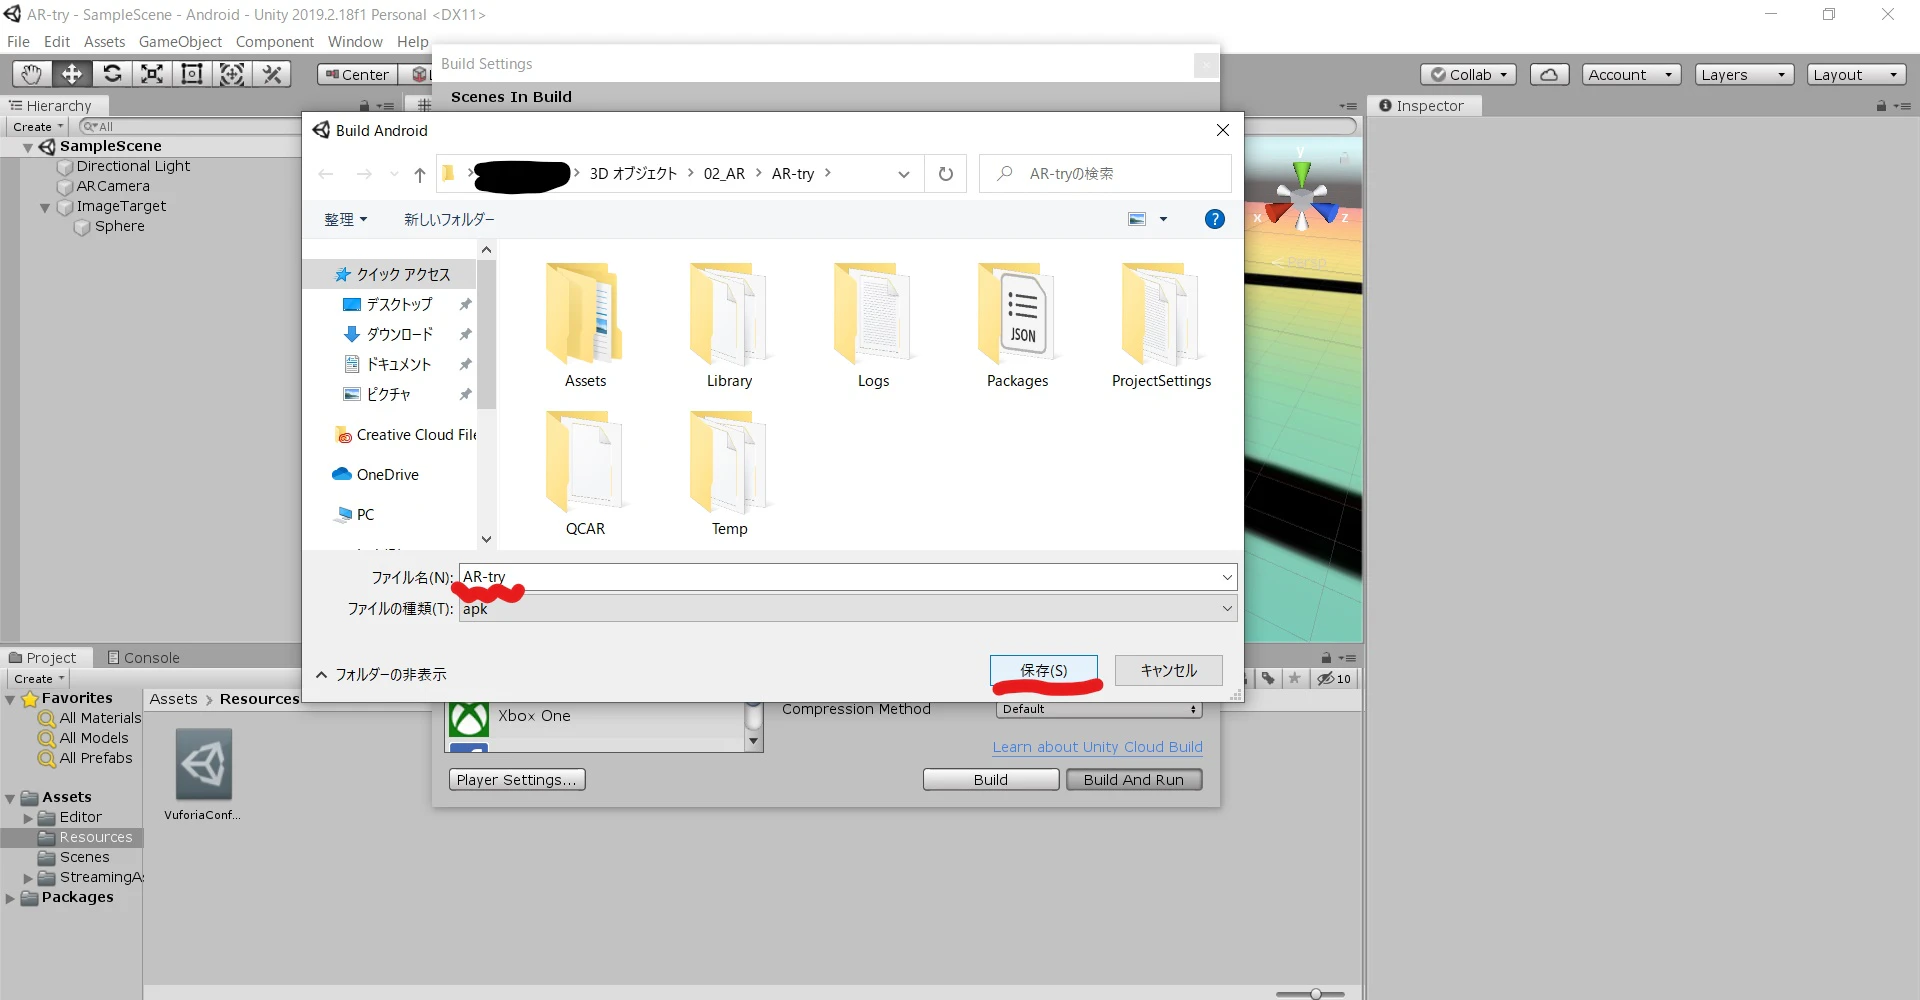
File > Build Settingsを開きます。
Add Open Scenesをクリックして、作成したSampleSceneが表示されていることを確認します。
確認出来たら、Android端末とPCを接続して右下のBUild And Runをクリックしてください。
ポップアップ画面では保存するapkファイル名を入力して、保存します。
しばらく待つとAndroid端末にアプリがインストールされます。!
アプリの作動確認
マーカーの用意
使用した画像を印刷するなどして、マーカーを準備しましょう。
作成した名前のアプリをAndroid端末上で起動し、カメラをマーカーに向けてみます。
きちんと表示されれば成功です。


- 投稿日:2020-03-10T16:36:42+09:00
ConstraintLayout + ConstraintSetを使ったキーフレーム アニメーション
今まで凝ったデザインとか、アニメーションとか何も使わないで生きてきた人生だったので、最近レイアウト周りで苦労しています。なので、きちんとレイアウトの勉強をしようと思って公式Android developerのレイアウトの章を読み始めました。ConstraintLayoutの章を読んでいて、ConstraintSetを使ってキーフレームアニメーションができる!と言うことが書いてあったので実際に触ってみました。
今回実際に作ってみたやつがこれです。こう言うのをキーフレームアニメーションって言うんですね?
僕の書いたサンプルコードはこれです。もし良ければ。
このアニメーションは、ConstraintLayout内の各要素の制約である、
layout:app:layout_constraintEnd_toEndOfなどや各要素のサイズ、表示非表示を切り替えて実現しています。その時に使うのがConstraintSetです。ConstraintSetとは
ConstraintLayout内の要素をコードからいじる時に使うものです。例えば、コードからConstraintLayout内にボタンを追加したりだとか、位置を変更したりだとかするときに使います。
ConstraintSetを使ってapp:layout_constraintEnd_toEndOfなどをコードからいじれるようになると思えば良さそうです。ConstraintSet().apply { // 対象の既存のConstraintLayoutをクローンする this.clone(fragment_main_root) // R.id.fragment_main_username(TextView)を app:layout_constraintStart_toBottomOf="parent" にする this.connect(R.id.fragment_main_username, ConstraintSet.START, ConstraintSet.PARENT_ID, ConstraintSet.BOTTOM) // 対象のConstraintLayoutに定義を反映させる this.applyTo(fragment_main_root) }これ、直接ConstraintLayoutに対して制約を変更すればいいのでは?とも思いますが、ConstraintSetの場合は既存のConstraintLayoutをcloneしてからゴニョゴニョ操作して、最後に
applyToした時に反映されると言う違いがあります。
この最後のapplyToのタイミングで、TransitionManager.beginDelayedTransition()を使うことでアニメーションをさせることができるようです。制約による要素の移動や、サイズの変更などをまとめてよしなにトランジションしてくれる、と言うわけですね。
さらに、clone()ではなくload()を使えばXMLレイアウトファイルを読み込んで反映させることもできます。
今回使うのはこのload()の方です。やってみた
まずは1つレイアウトを作ります。fragmentに表示するレイアウトで、今回のキーフレームアニメーション的にはカードが未展開の状態のレイアウトです。このカードをタップしたら詳細情報が出てきてアニメーションされながらカードが大きくなると言うものを作っていきます。
fragment_main.xml
fragment_main.xml<?xml version="1.0" encoding="utf-8"?> <layout xmlns:android="http://schemas.android.com/apk/res/android" xmlns:app="http://schemas.android.com/apk/res-auto" xmlns:tools="http://schemas.android.com/tools"> <data> <variable name="viewModel" type="com.github.yasukotelin.ui_main.MainViewModel" /> </data> <androidx.constraintlayout.widget.ConstraintLayout android:id="@+id/fragment_main_root" android:layout_width="match_parent" android:layout_height="match_parent"> <androidx.cardview.widget.CardView android:id="@+id/fragment_main_card_view" android:layout_width="match_parent" android:layout_height="100dp" android:layout_marginStart="16dp" android:layout_marginTop="16dp" android:layout_marginEnd="16dp" android:onClick="@{() -> viewModel.onClickUserCard()}" app:layout_constraintEnd_toEndOf="parent" app:layout_constraintStart_toStartOf="parent" app:layout_constraintTop_toTopOf="parent"> <androidx.constraintlayout.widget.ConstraintLayout android:id="@+id/fragment_main_constraint_in_card" android:layout_width="match_parent" android:layout_height="match_parent"> <ImageView android:id="@+id/fragment_main_image_view" android:layout_width="80dp" android:layout_height="80dp" android:layout_marginStart="8dp" android:contentDescription="@string/account_icon_image" android:src="@drawable/ic_person_24dp" app:layout_constraintBottom_toBottomOf="parent" app:layout_constraintStart_toStartOf="parent" app:layout_constraintTop_toTopOf="parent" /> <TextView android:id="@+id/fragment_main_username" style="@style/TextAppearance.AppCompat.Large" android:layout_width="wrap_content" android:layout_height="wrap_content" android:layout_marginStart="8dp" android:layout_marginTop="8dp" android:text="@string/user_name" app:layout_constraintStart_toEndOf="@+id/fragment_main_image_view" app:layout_constraintTop_toTopOf="@+id/fragment_main_image_view" /> <TextView android:id="@+id/fragment_main_userfullname" style="@style/TextAppearance.AppCompat.Caption" android:layout_width="wrap_content" android:layout_height="wrap_content" android:layout_marginStart="8dp" android:layout_marginTop="8dp" android:text="@string/full_name" android:visibility="gone" app:layout_constraintStart_toEndOf="@+id/fragment_main_image_view" app:layout_constraintTop_toTopOf="@+id/fragment_main_image_view" /> <TextView android:id="@+id/fragment_main_short_description" style="@style/TextAppearance.AppCompat.Body1" android:layout_width="wrap_content" android:layout_height="wrap_content" android:layout_marginTop="8dp" android:text="@string/short_description" android:textStyle="normal" android:visibility="visible" app:layout_constraintStart_toStartOf="@+id/fragment_main_username" app:layout_constraintTop_toBottomOf="@+id/fragment_main_username" /> <ImageView android:id="@+id/fragment_main_back_allow" android:layout_width="wrap_content" android:layout_height="wrap_content" android:layout_marginStart="8dp" android:layout_marginTop="8dp" android:contentDescription="@string/back_allow" android:onClick="@{() -> viewModel.onClickBackAllow()}" android:src="@drawable/ic_arrow_back_24dp" android:visibility="gone" app:layout_constraintStart_toStartOf="parent" app:layout_constraintTop_toTopOf="parent" tools:visibility="gone" /> <TextView android:id="@+id/fragment_main_long_description" style="@style/TextAppearance.AppCompat.Body1" android:layout_width="wrap_content" android:layout_height="wrap_content" android:layout_marginStart="8dp" android:layout_marginTop="8dp" android:layout_marginEnd="8dp" android:text="@string/long_description" android:visibility="gone" app:layout_constraintEnd_toEndOf="parent" app:layout_constraintStart_toStartOf="@+id/fragment_main_userfullname" app:layout_constraintTop_toBottomOf="@+id/fragment_main_userfullname" /> </androidx.constraintlayout.widget.ConstraintLayout> </androidx.cardview.widget.CardView> </androidx.constraintlayout.widget.ConstraintLayout> </layout>そしてもう一つレイアウトを作ります。こちらがカードをタップした後にアニメーションされて表示されるレイアウトです。
constset_user_card.xml
fragment_main.xml<?xml version="1.0" encoding="utf-8"?> <layout xmlns:android="http://schemas.android.com/apk/res/android" xmlns:app="http://schemas.android.com/apk/res-auto" xmlns:tools="http://schemas.android.com/tools"> <data> <variable name="viewModel" type="com.github.yasukotelin.ui_main.MainViewModel" /> </data> <androidx.constraintlayout.widget.ConstraintLayout android:layout_width="match_parent" android:layout_height="match_parent"> <androidx.cardview.widget.CardView android:id="@+id/fragment_main_card_view" android:layout_width="match_parent" android:layout_height="250dp" app:layout_constraintEnd_toEndOf="parent" app:layout_constraintStart_toStartOf="parent" app:layout_constraintTop_toTopOf="parent"> <androidx.constraintlayout.widget.ConstraintLayout android:id="@+id/fragment_main_constraint_in_card" android:layout_width="match_parent" android:layout_height="match_parent"> <ImageView android:id="@+id/fragment_main_image_view" android:layout_width="match_parent" android:layout_height="130dp" android:contentDescription="@string/account_icon_image" app:layout_constraintEnd_toEndOf="parent" app:layout_constraintStart_toStartOf="parent" app:layout_constraintTop_toTopOf="parent" app:srcCompat="@drawable/ic_person_24dp" /> <TextView android:id="@+id/fragment_main_username" style="@style/TextAppearance.AppCompat.Large" android:layout_width="wrap_content" android:layout_height="wrap_content" android:layout_marginStart="8dp" android:layout_marginTop="8dp" android:text="@string/user_name" app:layout_constraintStart_toStartOf="parent" app:layout_constraintTop_toBottomOf="@id/fragment_main_image_view" /> <TextView android:id="@+id/fragment_main_userfullname" style="@style/TextAppearance.AppCompat.Caption" android:layout_width="wrap_content" android:layout_height="wrap_content" android:text="@string/full_name" android:visibility="visible" app:layout_constraintStart_toStartOf="@id/fragment_main_username" app:layout_constraintTop_toBottomOf="@id/fragment_main_username" /> <TextView android:id="@+id/fragment_main_short_description" style="@style/TextAppearance.AppCompat.Body1" android:layout_width="wrap_content" android:layout_height="wrap_content" android:layout_marginTop="8dp" android:text="@string/short_description" android:textStyle="normal" android:visibility="gone" app:layout_constraintStart_toStartOf="@+id/fragment_main_username" app:layout_constraintTop_toBottomOf="@+id/fragment_main_username" tools:text="This is fragment_main_description" /> <ImageView android:id="@+id/fragment_main_back_allow" android:layout_width="wrap_content" android:layout_height="wrap_content" android:layout_marginStart="8dp" android:layout_marginTop="8dp" android:contentDescription="@string/back_allow" android:onClick="@{() -> viewModel.onClickBackAllow()}" android:visibility="visible" app:layout_constraintStart_toStartOf="parent" app:layout_constraintTop_toTopOf="parent" app:srcCompat="@drawable/ic_arrow_back_24dp" /> <TextView android:id="@+id/fragment_main_long_description" style="@style/TextAppearance.AppCompat.Body1" android:layout_width="match_parent" android:layout_height="0dp" android:layout_marginStart="8dp" android:layout_marginTop="8dp" android:layout_marginEnd="8dp" android:layout_marginBottom="8dp" android:text="@string/long_description" android:visibility="visible" app:layout_constraintBottom_toBottomOf="parent" app:layout_constraintEnd_toEndOf="parent" app:layout_constraintStart_toStartOf="@+id/fragment_main_userfullname" app:layout_constraintTop_toBottomOf="@+id/fragment_main_userfullname" /> </androidx.constraintlayout.widget.ConstraintLayout> </androidx.cardview.widget.CardView> </androidx.constraintlayout.widget.ConstraintLayout> </layout>この2つのレイアウト、特に2つ目のレイアウトなのですが、このレイアウトはあくまで制約を定義しているレイアウトだと言うことに注意してください。ConstraintSetで反映させるのは、元々あるConstraintLayout内の制約を更新するのみです。なので、2つ目のレイアウトで記載するのは、元々あるConstraintLayoutの各要素が変化される制約を書く必要があります。
。。。と言うと意味わからないですよね。カードの中のプロフィールアイコンのImageViewで説明します。最初左側にあって、展開するとちょっと大きくなって真ん中に移動してきてる部分です。
ImageViewのところだけ抜粋してるのですが、注目すべきは
android:idの部分ですかね。同じIDがついていると思います。
同じIDで宣言した要素の制約や属性の変化を使ってConstraintLayoutがアニメーションしてくれるような仕組みになっています。fragment_main.xml<ImageView android:id="@+id/fragment_main_image_view" android:layout_width="80dp" android:layout_height="80dp" android:layout_marginStart="8dp" android:contentDescription="@string/account_icon_image" android:src="@drawable/ic_person_24dp" app:layout_constraintBottom_toBottomOf="parent" app:layout_constraintStart_toStartOf="parent" app:layout_constraintTop_toTopOf="parent" />constset_user_card.xml<ImageView android:id="@+id/fragment_main_image_view" android:layout_width="match_parent" android:layout_height="130dp" android:contentDescription="@string/account_icon_image" app:layout_constraintEnd_toEndOf="parent" app:layout_constraintStart_toStartOf="parent" app:layout_constraintTop_toTopOf="parent" app:srcCompat="@drawable/ic_person_24dp" />つまり、このConstraintLayoutとConstraintSetのアニメーションと言うのは、別のレイアウトを差し替えてアニメーションさせていると言うことではなくて、対象のレイアウトをそのまま動かして、アニメーションさせている、といったことをしています。
ちなみに、「戻る」用のBackキーImageViewや、first_name、last_nameの部分は元々無かった要素なのにアニメーション後は現れています。これは要素を追加しているのではなく、元々両方に宣言しておいて、visibilityを変化させているだけです。
例えば矢印キーの戻るの部分はこんな感じになっています。
fragment_main.xml<ImageView android:id="@+id/fragment_main_back_allow" android:layout_width="wrap_content" android:layout_height="wrap_content" android:layout_marginStart="8dp" android:layout_marginTop="8dp" android:contentDescription="@string/back_allow" android:onClick="@{() -> viewModel.onClickBackAllow()}" android:src="@drawable/ic_arrow_back_24dp" android:visibility="gone" app:layout_constraintStart_toStartOf="parent" app:layout_constraintTop_toTopOf="parent" />visibilityをgoneにしておいて適当なところに置いておきます。横からフェードイン的なことをしたい時は、表示されない範囲外に表示状態で置いておいて、見えるところに制約をつけることで実現できるようです。
constset_user_card.xml<ImageView android:id="@+id/fragment_main_back_allow" android:layout_width="wrap_content" android:layout_height="wrap_content" android:layout_marginStart="8dp" android:layout_marginTop="8dp" android:contentDescription="@string/back_allow" android:onClick="@{() -> viewModel.onClickBackAllow()}" android:visibility="visible" app:layout_constraintStart_toStartOf="parent" app:layout_constraintTop_toTopOf="parent" app:srcCompat="@drawable/ic_arrow_back_24dp" />visibilityをvisibleにして、適切なところに配置してあげればOKです。こうすることで、元々のConstrainLayoutでは非表示だったものが、いい感じに要素が追加されるような動きになってくれます。
ちなみに、2つ目のレイアウトのほうに元々のレイアウトにはない要素を追加しても画面上に追加はされません。例えば、2つ目の方にTextViewを新規においても、ConstlaintSetでは追加してくれないのです。あくまでも制約の変更、と言うことみたいですね。
こんな感じで2つのレイアウトを用意できたら、あとはコード上でConstlaintSetを使って画面に反映してみます。
CardにonClickとかで下のコードを呼んであげるだけで、よしなにアニメーションがされた上でConstraintLayout内の各要素が動いてくれます!素敵!
MainFragment.ktConstraintSet().apply { // 制約を定義した2つ目のレイアウトファイルをloadする this.load(context, R.layout.constset_user_card // このTransitionManagerを使ってアニメーションを有効化(カスタマイズもできる TransitionManager.beginDelayedTransition(binding.root as ViewGroup) // applyToで読み込んだ制約を対象のConstraintLayoutに反映! this.applyTo(fragment_main_root) this.applyTo(fragment_main_constraint_in_card) }とても簡単ですね!
ちょっと注意なのですが、ConstraintLayoutが入れ子になっている場合はそれぞれに対してapplyToするみたいです。今回の僕の例だと、Cardの外側のConstraintLayoutとCardの内側のConstraintLayoutの2つがあったので2箇所に対してapplyToしています。あとは、アニメーション部分もカスタマイズ可能で、公式のyoutube動画でも紹介していますが、横からフェードインさせてちょっとバウンドさせる、みたいなこともできるみたいです。
ちょっとリッチな動きが、比較的簡単に実装できました!
ただ、実際にコードを書いてみないとニュアンスが掴めない機能だと思うので、公式ドキュメント眺めつつ書いて動かしてみるのが一番だと思います。


- 投稿日:2020-03-10T16:11:02+09:00
【Android】Snackbarを任意の位置から表示させる
概要
Snackbarを画面の下部から出すのではなく、任意の位置から表示させる
レイアウトファイルでCoordinatorLayoutを入れる
fragment_main.xml<?xml version="1.0" encoding="utf-8"?> <LinearLayout xmlns:android="http://schemas.android.com/apk/res/android" xmlns:app="http://schemas.android.com/apk/res-auto" android:layout_width="match_parent" android:layout_height="match_parent"> <androidx.coordinatorlayout.widget.CoordinatorLayout android:layout_width="match_parent" android:layout_height="wrap_content" android:orientation="vertical"> <Button android:id="@+id/button" android:layout_width="match_parent" android:layout_height="100dp" android:layout_marginTop="200dp" android:gravity="center" /> </androidx.coordinatorlayout.widget.CoordinatorLayout> </LinearLayout>
Snackbarを表示させたいViewをCoordinatorLayoutでラップするSnackbarの実装
build.gradledependencies { implementation 'com.google.android.material:material:1.1.1' }
Snackbarを使うためにbuild.gradleにcom.google.android.materialをimplementationする
※バージョンはよしなに変えてくださいMainFragment.javaimport com.google.android.material.snackbar.Snackbar; @Override public void onViewCreated(@NonNull View view, @Nullable Bundle savedInstanceState) { Button button = view.findViewById(R.id.button); button.setText("button"); button.setOnClickListener(new View.OnClickListener() { @Override public void onClick(View v) { showSnackbar("test"); } }); super.onViewCreated(view, savedInstanceState); } private void showSnackbar(String message) { View view = getView(); if (view == null) return; Snackbar snackbar = Snackbar.make(view.findViewById(R.id.button), message, Snackbar.LENGTH_SHORT); snackbar.show(); }
Snackbar表示用のメソッドを作成
Snackbar.makeの第一引数を表示させたい位置のViewのidにする(今回はButton)
ボタンを押した時にボタンのViewの下からSnackbarを出すようにする余分な記載が多いし、もうちょっと良い方法があると思うけど備忘録なので一旦これでいいかな。。
- 投稿日:2020-03-10T15:24:32+09:00
[Android]初回にEditTextにフォーカスを当てる
目的
アプリを開いたときや、特定のページに遷移した時に画面内のEditTextにフォーカスを当ててキーボードを表示させておく方法
内容
ここでXMLファイルのEditTextのタグを拡張して
requestFocusタグを内部に追加しますactivity_second.xml<EditText android:id="@+id/editText" android:layout_width="0dp" android:layout_height="wrap_content" android:hint="ここに入力してね" app:layout_constraintEnd_toEndOf="parent" app:layout_constraintStart_toStartOf="parent" app:layout_constraintTop_toTopOf="parent" > <requestFocus/> </EditText>こうすることで読み込み時にフォーカスをEditTextに当てることができます
- 投稿日:2020-03-10T13:54:54+09:00
文字列の日付を整えて文字列で表示する実例(android kotlin)
文字列を日付型に変換したり、日付型を文字列に変換するやり方はたくさん出てきます。
が、実例が出てこなかったのでまとめておきます。
流れとしては
①string型をparseしてdate型に変換
②date型を、整えたい形のstring型に変換実例を見た方がわかりやすいかと思います
val dateStr = "2020-01-02 03:04:05"
// dateStrの形式に""ぴったり""合わせてください↓
val sdf = SimpleDateFormat("yyyy-MM-dd HH:mm:ss")
val convertedDate = sdf.parse(dateStr)

val sdf2 = SimpleDateFormat("年はyyyyで、月はMMで、日はddのHH時mm分、ss秒")
val resultStr = sdf2.format(convertedDate)
resultStrには
「年は2020で、月は01で、日は02の03時04分、05秒」と出力されます。あと、sdf.parseをするときに注意なのが、例えばssは要らないとして
"yyyy-MM-dd HH:mm"なんて書いたらエラーになります。
- 投稿日:2020-03-10T13:53:45+09:00
Releases Hub Gradle Plugin + GitHub Actions + buildSrcで自動でAndroidのライブラリアップデートのプルリクエストを送る紹介
概要
Releases Hub Gradle PluginでKotlin DSLで依存関係を管理していれば自動でライブラリアップデートのプルリクエストを送る事ができます。
https://github.com/DroidKaigi/conference-app-2020/compare/1f02da06718f3281a1665c2430c1afcec943593f...cf13547
これだけでGitHub Actionsがこういう感じのプルリクエストを送ってくれるようになります!かなり手軽に導入できます!
https://plugin.releaseshub.com/ にPrivacy Policyなどありますのので、一読してください。
Tips
./gradlew listDependenciesで事前にバージョン一覧とか取得できます。
$versionみたいな書き方を使っているとダメみたいです。
object Dep {
    object GradlePlugin {
        val android = "com.android.tools.build:gradle:3.6.0-rc03"
        val kotlin = "org.jetbrains.kotlin:kotlin-gradle-plugin:${Kotlin.version}"
        val kotlinSerialization = "org.jetbrains.kotlin:kotlin-serialization:${Kotlin.version}"
↓
object Dep {
    object GradlePlugin {
        val android = "com.android.tools.build:gradle:3.6.0-rc03"
        val kotlin = "org.jetbrains.kotlin:kotlin-gradle-plugin:1.3.61"
        val kotlinSerialization = "org.jetbrains.kotlin:kotlin-serialization:1.3.61"

- 投稿日:2020-03-10T13:53:45+09:00
自動でAndroidのライブラリアップデートのプルリクエストを送る紹介 (Releases Hub Gradle Plugin + GitHub Actions + buildSrc Kotlin)
概要
Releases Hub Gradle PluginでKotlin DSLで依存関係を管理していれば自動でライブラリアップデートのプルリクエストを送る事ができます。
https://github.com/DroidKaigi/conference-app-2020/compare/1f02da06718f3281a1665c2430c1afcec943593f...cf13547
この変更だけでGitHub Actionsがこういう感じのプルリクエストを送ってくれるようになります。かなり手軽に導入できます!
https://plugin.releaseshub.com/ にPrivacy Policyなどありますのので、一読してください。
Tips
./gradlew listDependenciesで事前にバージョン一覧とか取得できます。
$versionみたいな書き方を使っているとダメみたいです。
object Dep {
    object GradlePlugin {
        val android = "com.android.tools.build:gradle:3.6.0-rc03"
        val kotlin = "org.jetbrains.kotlin:kotlin-gradle-plugin:${Kotlin.version}"
        val kotlinSerialization = "org.jetbrains.kotlin:kotlin-serialization:${Kotlin.version}"
↓
object Dep {
    object GradlePlugin {
        val android = "com.android.tools.build:gradle:3.6.0-rc03"
        val kotlin = "org.jetbrains.kotlin:kotlin-gradle-plugin:1.3.61"
        val kotlinSerialization = "org.jetbrains.kotlin:kotlin-serialization:1.3.61"
- 投稿日:2020-03-10T09:38:53+09:00
Webkit で WebView のダークテーマ対応をする
概要
WebView でダークテーマを適用する方法について述べます。
なぜやるのか?
WebView でダークテーマに対応するには、従来だと手間のかかる実装をする必要がありました。最近出た Webkit 1.2.0 を使えば、そうした手間を削減することができます。
導入
依存の追加
Webkit の依存を追加します。1.2.0 以上を利用してください。
app/build.gradledependencies { implementation "androidx.webkit:webkit:1.2.0"WebView に適用
WebViewFeature で "FORCE_DARK" に対応しているかを確認し、している場合に WebSettingsCompat のメソッドを1つ呼び出すだけです。
import androidx.webkit.WebSettingsCompat
import androidx.webkit.WebViewFeature

// 中略

    private fun applyDarkThemeIfNeed(webView: WebView) {
        if (WebViewFeature.isFeatureSupported(WebViewFeature.FORCE_DARK)) {
            WebSettingsCompat.setForceDark(
                    webView.settings,
                    WebSettingsCompat.FORCE_DARK_ON
            )
        }
    }
スクリーンショット
Name Description FORCE_DARK_ON FORCE_DARK_OFF WebSettingsCompat の FORCE_DARK 系の定数
1.2.0 の段階では以下の3つがあります。
Name Description FORCE_DARK_ON 常にダークテーマを適用 FORCE_DARK_OFF 常に通常のテーマを適用 FORCE_DARK_AUTO parent view のテーマに準拠 この機能は Android 8以下の端末でも設定が効くようなので、本来ダークテーマに対応していない端末向けにアプリの設定としてダークテーマを提供する際にも役立ちます。
参考


- 投稿日:2020-03-10T00:35:46+09:00
Android上でAzure Ink Recognizerを使って手書き文字認識する
はじめに
スマホやタブレットの上で、図形や文字を混ぜ書きしつつも、文字部分に関しては、裏で手書き文字認識した結果をキーワードなりタグとして記録しておき、あとで検索の時に使いたい、なんてユースケースはよくあるかと思います。
そんな時に使えるのが、Azure Ink Recognizerです。ここではAndroid JavaアプリケーションからInk Recognizerを使う方法をご紹介します。
なお、私はInk Recognizerの担当者ではないので、ここでの記述は、とあるサンデーフルスタックエンジニアの独り言であって、特定のベンダーの保証する内容ではありません。
事前準備
Azureのアカウントを用意します。Ink Recognizer(本記事執筆時点ではプレビュー)リソースを作成し、手元にキーとエンドポイントを用意しておきます。
利用方法
GitHubに上がっている Azure-Samples/cognitive-services-java-sdk-samples を git cloneして、InkRecognitionディレクトリをAndroid Studioで開いて、ビルドします。
- Ink Recognition SDK Sample (https://github.com/Azure-Samples/cognitive-services-java-sdk-samples/tree/master/InkRecognition)
これだと英語しか認識されないので、日本語(というかデフォルトロケール)で動作するように手を入れます。
NoteTaker.javapublic class NoteTaker extends View { ... private final String language; ... public NoteTaker(Context context) throws Exception { ... language = Locale.getDefault().toLanguageTag(); displayMetrics = getResources().getDisplayMetrics(); inkRecognizerAsyncClient = new InkRecognizerClientBuilder() .credentials(new InkRecognizerCredentials(appKey)) .endpoint(destinationUrl) .applicationKind(ApplicationKind.MIXED) .language(language) .buildAsyncClient(); .... } }こんな感じで日本語の手書き文字も認識されそうなのだが、認識結果は英語のみ。何度見直してもどこに誤りがあるのかわからず、途方に暮れていたものの、ちゃんとソースコードを読み進めていくと、もう一箇所、言語を設定できるポイントがありました、ということでストローク(手書きの一筆一筆)。InkStrokeImplementorのコンストラクタで言語を受け取るようにします。
InkStrokeImplementor.javaclass InkStrokeImplementor implements InkStroke { ... InkStrokeImplementor(String language) { this.strokeId = getNextNum(); this.language = language; this.kind = InkStrokeKind.UNKNOWN; } ... }言語を渡す方は次の通り。先ほど紹介したNoteTakerクラスの中で、メンバ変数としてlanguageにシステムの規定言語を納めているので、そのまま渡すようにします。
NoteTaker.javapublic boolean onTouchEvent(MotionEvent event) { float x = event.getX(); float y = event.getY(); switch (event.getAction()) { case MotionEvent.ACTION_DOWN: path.moveTo(x, y); stroke = new InkStrokeImplementor(language); ... } ... }あとはアプリをビルドすれば、システムの規定言語で入力した文字を認識してくれるようになります。
おわりに
分かってしまえば、どうってことのない話ですが、MSのサイトにしても、REST形式での実行サンプルはあっても、Java APIを使うようなケースは(このサンプルアプリ以外は)あまり見ないので、同じように不意にハマってしまう方のお役になっていれば、幸いです。