- 投稿日:2019-12-11T23:13:35+09:00
ipadでブラウザ拡張機能のようなものを実行してみた
はじめに
自作したブラウザ拡張機能をスマホやタブレットのブラウザでも使えないかなと思って調べてみました。
すると
Androidではいくつか方法があるが
iosでは拡張機能を使う方法がないようです。それでも何とかiosでブラウザ拡張機能を実行できないかと試したところ
iosの「ショートカット」アプリを使うことで、コンテンツスクリプトを使ったchrome拡張機能を実装できました。
やったこと
iosの「ショートカット」アプリを使ってamazonDriveを画像Viewer化する自作拡張機能ををipadのsafariブラウザ上で実行した。
実行結果
仕組み
1.safariで拡張機能を実行したいwebページを開く
2.ショートカットを実行
3.githubから拡張機能に必要なファイルを取得する
4.取得したファイルからDOMを生成し、jsを実行する
githubにリポジトリを作成し、コードを追加する
chrome拡張機能の置き場所はcorsによるクロスドメイン通信でファイルが取得できるなら何処でもいいです。
コードをgitで管理したかったので今回はgithubに置きました。
ショートカットアプリからJS実行
「ショートカット」アプリの使い方はこちらのqiita記事を参考にさせて頂きました。
iPhone 「ショートカット」アプリで JavaScript を実行する
1.「ショートカットを作成」を選択
2.検索欄に「Web」と入力
3.「WebページでJavaScriptを実行」を選択ショートカットを下記の内容に変更します。
function Main() {

    let jsCount = 0;

    this.run = function () {
        run();
    }

    function run() {

        const base = "https://api.github.com/repos/shiraki-s/amazonDrive/contents/";
        //chrome拡張機能のmanifest.jsonを取得する
        request(base + "manifest.json", function (text) {

            const json = JSON.parse(text);
            const decode = decodeURIComponent(escape(window.atob(json.content)));
            const json2 = JSON.parse(decode);

            //manifest.jsonからjsとcssの相対パスを取得する
            const jses = json2.content_scripts[0].js;
            const csses = json2.content_scripts[0].css;

            //cssをgithubから取得しテキストとして読み込み、DOMを生成
            createCssTag(base, csses);

            //jsをgithubから取得しテキストとして読み込み、DOMを生成
            createJsTag(base, jses, function (script) {

                //全てのjsファイルのDOM生成が完了したら、コンテンツスクリプトを実行する
                init(base, script, jses.length);
            });
        });

    }

    function init(base, script, max) {

        setTimeout(function () {

            if (max == jsCount) {

                const s = document.createElement('script');
                s.innerHTML = script + ' new DriveManager().init("' + base + '");';
                document.body.appendChild(s);

            } else {
                init(base, script, max);
            }


        }, 500);

    }

    function createCssTag(base, array) {

        for (let i = 0, len = array.length; i < len; i++) {

            request(base + array[i], function (text) {
                const json = JSON.parse(text);
                const decode = decodeURIComponent(escape(window.atob(json.content)));

                const style = document.createElement('style');
                style.type = 'text/css';
                style.innerHTML = decode;
                document.body.appendChild(style);
            });

        }

    }

    function createJsTag(base, array, onLoad) {

        for (let i = 0, len = array.length; i < len; i++) {

            const index = i;

            request(base + array[i], function (text) {

                jsCount++;
                const json = JSON.parse(text);
                const decode = decodeURIComponent(escape(window.atob(json.content)));

                if (index == array.length - 1) {
                    onLoad(decode);
                    return;
                }

                const s = document.createElement('script');
                s.innerHTML = decode;
                document.body.appendChild(s);
            });

        }

    }

    function request(url, callback) {

        var request = new XMLHttpRequest();

        request.onreadystatechange = function () {

            if (request.readyState == 4) {

                if (request.status == 200) {
                    callback(request.responseText);
                    return;
                }
            }

        }

        request.open("GET", url, true);
        request.send();
    }

}

var result = [];
new Main().run();

completion(result);
4.設定から「共有シートに表示」をON
5.完了
6.safariから作成したショートカットを実行する最後に
この方法でコンテンツスクリプトを使ったchrome拡張機能をipadのsafariで実行できました。
今回は自作した拡張機能のコードを使用したので問題はないですが
この方法ではどんなjavascriptでも実行が可能なので、第三者が作成したコードを使う際には注意が必要です。最後まで読んでいただき、ありがとうございました。


- 投稿日:2019-12-11T22:05:05+09:00
iOSとiPadOSのステータスバーのダークモード対応
先日ダークモード対応デビューしたのですが、こんな事件がありました。
「ダークモードで背景の色が白とか明るい色だとステータスバーが見えないor見にくい...」
どいうことかというと、背景を白にするとステータスバーが、
ライトモードの時は...ある!!
のに、ダークモードの時は...
ない!!
まあ厳密にはないというより見えていないのですが。バッテリー残量の赤いのがちょっと見えてますね。
事件の真相
ステータスバーの黒がライトモード用とダークモード用で分けられていました。
ダークモード用の黒として、OS13以降でUIStatusBarStyleにdarkContentが追加されています。
UIStatusBarStyleがdefaultのままだとダークモードではステータスバーが白になるので事件が起こったわけですね。import UIKit class ViewController: UIViewController { override func viewDidLoad() { super.viewDidLoad() view.backgroundColor = .white } // ステータスバーの色の決め方 override var preferredStatusBarStyle: UIStatusBarStyle { // OS13以降じゃないならライトモード用の黒で guard #available(iOS 13, *) else { return .default } // ダークモードならダークモード用の黒、そうじゃないならライトモード用の黒で return traitCollection.userInterfaceStyle == .dark ? .darkContent : .default } }こんな感じにすればOKです。ちなみにステータスバーの白はライトモードとダークモードで別れておらず、同じ
lightContentです。誰かの参考になれば幸いです。


- 投稿日:2019-12-11T21:08:16+09:00
は!・か!!・た!!!・の塩(Central)
ゆめみの日常
ある日社内のSlackでこんなやり取りがありました。
※伯方の塩は博多でつくっているわけではないそうです。
このスレッドをながめていたら、昔Twitterで見た「ずんどこきよしのプログラム」っぽいものが作れるんじゃないかと思い、CoreBluetoothで作ってみました。
そして出来たのがこちら。(※音が流れるので注意!)
https://twitter.com/u11238123/status/1198624428143214592
アプリ通信の流れについて
このアプリはCentral(動画内でのiPhone)側からPeripheral(動画内でのiPad)側にwriteをして音声を出力しています。
Bluetoothは固有の名称などがたくさんあり、それを全て説明していると1つ記事がかけてしまうので詳しく知りたい方は過去に僕がまとめた記事があるのでそれを参照してください。
また、この記事ではCentralの実装の解説だけに絞り、音の再生部分などは省略します?♂️
centralの実装
Central側でデータを書き込む流れは以下のような感じです。
① Bluetoothの使用許可をinfo.plistに書く
② CBCentralManagerのインスタンスを作る
③ デバイスがBluetoothを使用可能か判定
④ スキャンを開始する
⑤ 検出したperipheralとコネクトする
⑥ peripheralのServiceを検出する
⑦ Serviceの中のCharacteristicを検出する
⑧ 検出したCharacteristicに対してwriteする① Bluetoothの使用許可をinfo.plistに書く
ios13からiosデバイスでBluetoothを使用する際permissionの許可が必須になったため記載してあげる必要があります。
    <key>NSBluetoothAlwaysUsageDescription</key>
    <string>伯方の塩で使うよ</string>
ここに記載した文章がアプリ内のアラートに表示されますが、大手などのアプリでもいい加減なものを複数観測しているので、審査の際は書いてあればOKなのかなと思います。
ですが、ユーザに不信感を与えるので何に使うかは詳しく書いておいた方が良いと思います。
② CBCentralManagerのインスタンスを作る
CBCentralManagerのインスタンスを作成すると各種delegateメソッドが呼ばれるようになります。
class ViewController: UIViewController {
    var centralManager: CBCentralManager!

    override func viewDidLoad() {
        super.viewDidLoad()
        centralManager = CBCentralManager(delegate: self, queue: nil)
    }
}
extension ViewController: CBCentralManagerDelegate, CBPeripheralDelegate{}
③ デバイスがBluetoothを使用可能か判定
状態の取得はPeripheralと同じく以下のようなcaseが用意されています。
poweredOn以外の時に無理やり次に進もうとするとクラッシュする可能性があるので注意が必要です。func centralManagerDidUpdateState(_ central: CBCentralManager) { switch central.state { case .unknown: print("よくわかないけどダメ!") case .resetting: print("システムとの接続がよくわからんからダメ!") case .unsupported: print("Bluetooth許可されてないじゃんダメ!") case .unauthorized: print("このデバイスBluetooth使えないからダメ!") case .poweredOff: print("Bluetooth offになってるからダメ!") case .poweredOn: print("つかえるよ!!!") @unknown default: fatalError("へんなのきたからダメ!") } }④ スキャンを開始する
poweredOnの状態(Bluetoothが使用可能)な場合以下のようにスキャンを開始するメソッドを呼び出します。
伯方の塩(Peripheral)の記事の方でuuidgenを使って作成したUUIDを指定しています。scanForPeripheralsの第一引数にはnilを指定することも可能で、nilを指定した場合は見つかった全てのPeripheralが検知のメソッドに飛んできます。
    func centralManagerDidUpdateState(_ central: CBCentralManager) {
        if central.state == .poweredOn {
            central.scanForPeripherals(withServices: [CBUUID(string: "19688AFB-4E68-4F21-BCBA-421220280930")], options: nil)
        }
    }
⑤ 検出したperipheralとコネクトする
scanForPeripheralsが呼ばれて指定したServiceを持つPeripheralを見つけるとcentralManager(_ central: CBCentralManager,didDiscover peripheral: CBPeripheral,advertisementData: [String : Any],rssi RSSI: NSNumber)メソッドが呼ばれます。
この時注意しなくてはいけないのがconnectを行うperipheralはメンバに保持しておかないといけないという点です。
これ以降に呼ばれるメソッドにもperipheralは引数として保持していますが、ローカルに保持していないperipheralに対してwriteなどを行なっても実行されません。var myPeripheral: CBPeripheral! func centralManager(_ central: CBCentralManager, didDiscover peripheral: CBPeripheral, advertisementData: [String : Any], rssi RSSI: NSNumber) { myPeripheral = peripheral myCentralManager.connect(myPeripheral, options: nil) }今回は使用していない2つの引数ですが、advertisementDataはその名のとうりperipheral側でadvertiseで持たせたデータが入っています。
RSSIはperipheralの電波強度が入っています。よくRSSIはcentralとperipheral間の距離だと勘違いしている人がいますが、電波強度なのでperipheralの充電が減ったりすると当然値が変化してしまいます。
そのためRSSI==距離ではないので注意
⑥ peripheralのServiceを検出する
コネクトが成功したらメンバとして保持しておいたperipheralにdelegateをセットしてServiceの検索を行います。
こちらもスキャンを行なっていた時同様nilを指定するとコネクトしているPeripheralの全てのServiceを検出します。
    func centralManager(_ central: CBCentralManager, didConnect peripheral: CBPeripheral) {
        myPeripheral.delegate = self
        myPeripheral.discoverServices([CBUUID(string: "19688AFB-4E68-4F21-BCBA-421220280930")])
    }
⑦ Serviceの中のCharacteristicを検出する
Serviceを検出すると以下のメソッドに渡ってくるのでその中でServiceの保持しているCharacteristicをさらに探しに行きます。
discoverCharacteristicsの第一引数にもnilを渡した場合はServiceの保持しているすべてのCharacteristicがそのまま渡されることになります。
    func peripheral(_ peripheral: CBPeripheral, didDiscoverServices error: Error?) {
        if error != nil {
            print(error)
        }
        peripheral.services.forEach { servie in
           if service.uuid.uuidString == "19688AFB-4E68-4F21-BCBA-421220280930" {
               myPeripheral.discoverCharacteristics([CBUUID(string: "999889FF-42B0-4FC8-B5BC-0CAB8C323FD2")], for: service)
           }
        }
    }
⑧ 検出したCharacteristicに対してwriteする
あとはperipheralに向けて値をwriteするだけです。
冒頭の動画では0x01, 0x02, 0x03の値をランダムに送ってperipheral側で音声を出力していました。let sendData: [UInt8] = [0x01, 0x02, 0x03] func peripheral(_ peripheral: CBPeripheral, didDiscoverCharacteristicsFor service: CBService, error: Error?) { if error != nil { print(error) } service.characteristics?.forEach{ characteristic in if characteristic.uuid.uuidString == "999889FF-42B0-4FC8-B5BC-0CAB8C323FD2"{ let data = Data(bytes: [sendData.randomElement()!]) myPeripheral!.writeValue(data, for: targetCharacteristic, type: .withResponse) } } }writeは必ずこのメソッドの中で呼ばなければいけないかというとそうではなく、このメソッドに到達した時点でwriteできることが可能だということが証明されるものだと考えてください。
peripheralを他のクラスに渡してwriteやread,notifyなどを行うことも可能です。
Peripheralをiosで実装した際のキャッシュ問題
ios以外でperipheralを作った時は問題ないんですが、CoreBluetoothでPeripheralを実装するともともとデバイスの保持しているServiceやCharacteristicしか検出することができません。
これがデバイスがGATTをキャッシュしていることが問題で起こる問題です。以下のメソッドの中で再度Serviceの検出を行うことで追加したServiceを見つけることができます。
    func peripheral(_ peripheral: CBPeripheral, didModifyServices invalidatedServices: [CBService]) {
        myPeripheral.discoverServices([CBUUID(string: "19688AFB-4E68-4F21-BCBA-421220280930")])
    }


- 投稿日:2019-12-11T19:38:36+09:00
Xcodeのstoryboardで画面遷移の設定をする方法
僕のXcodeでは、画面遷移がデフォルトで下のような挙動になってしまい、
「普通にフルスクリーンで表示させたいんだけどな、、、」
と一瞬詰まったのでメモします。
※Xcodeのバージョンは11.2.1でした。かなり初心者向けの内容です。
解決方法
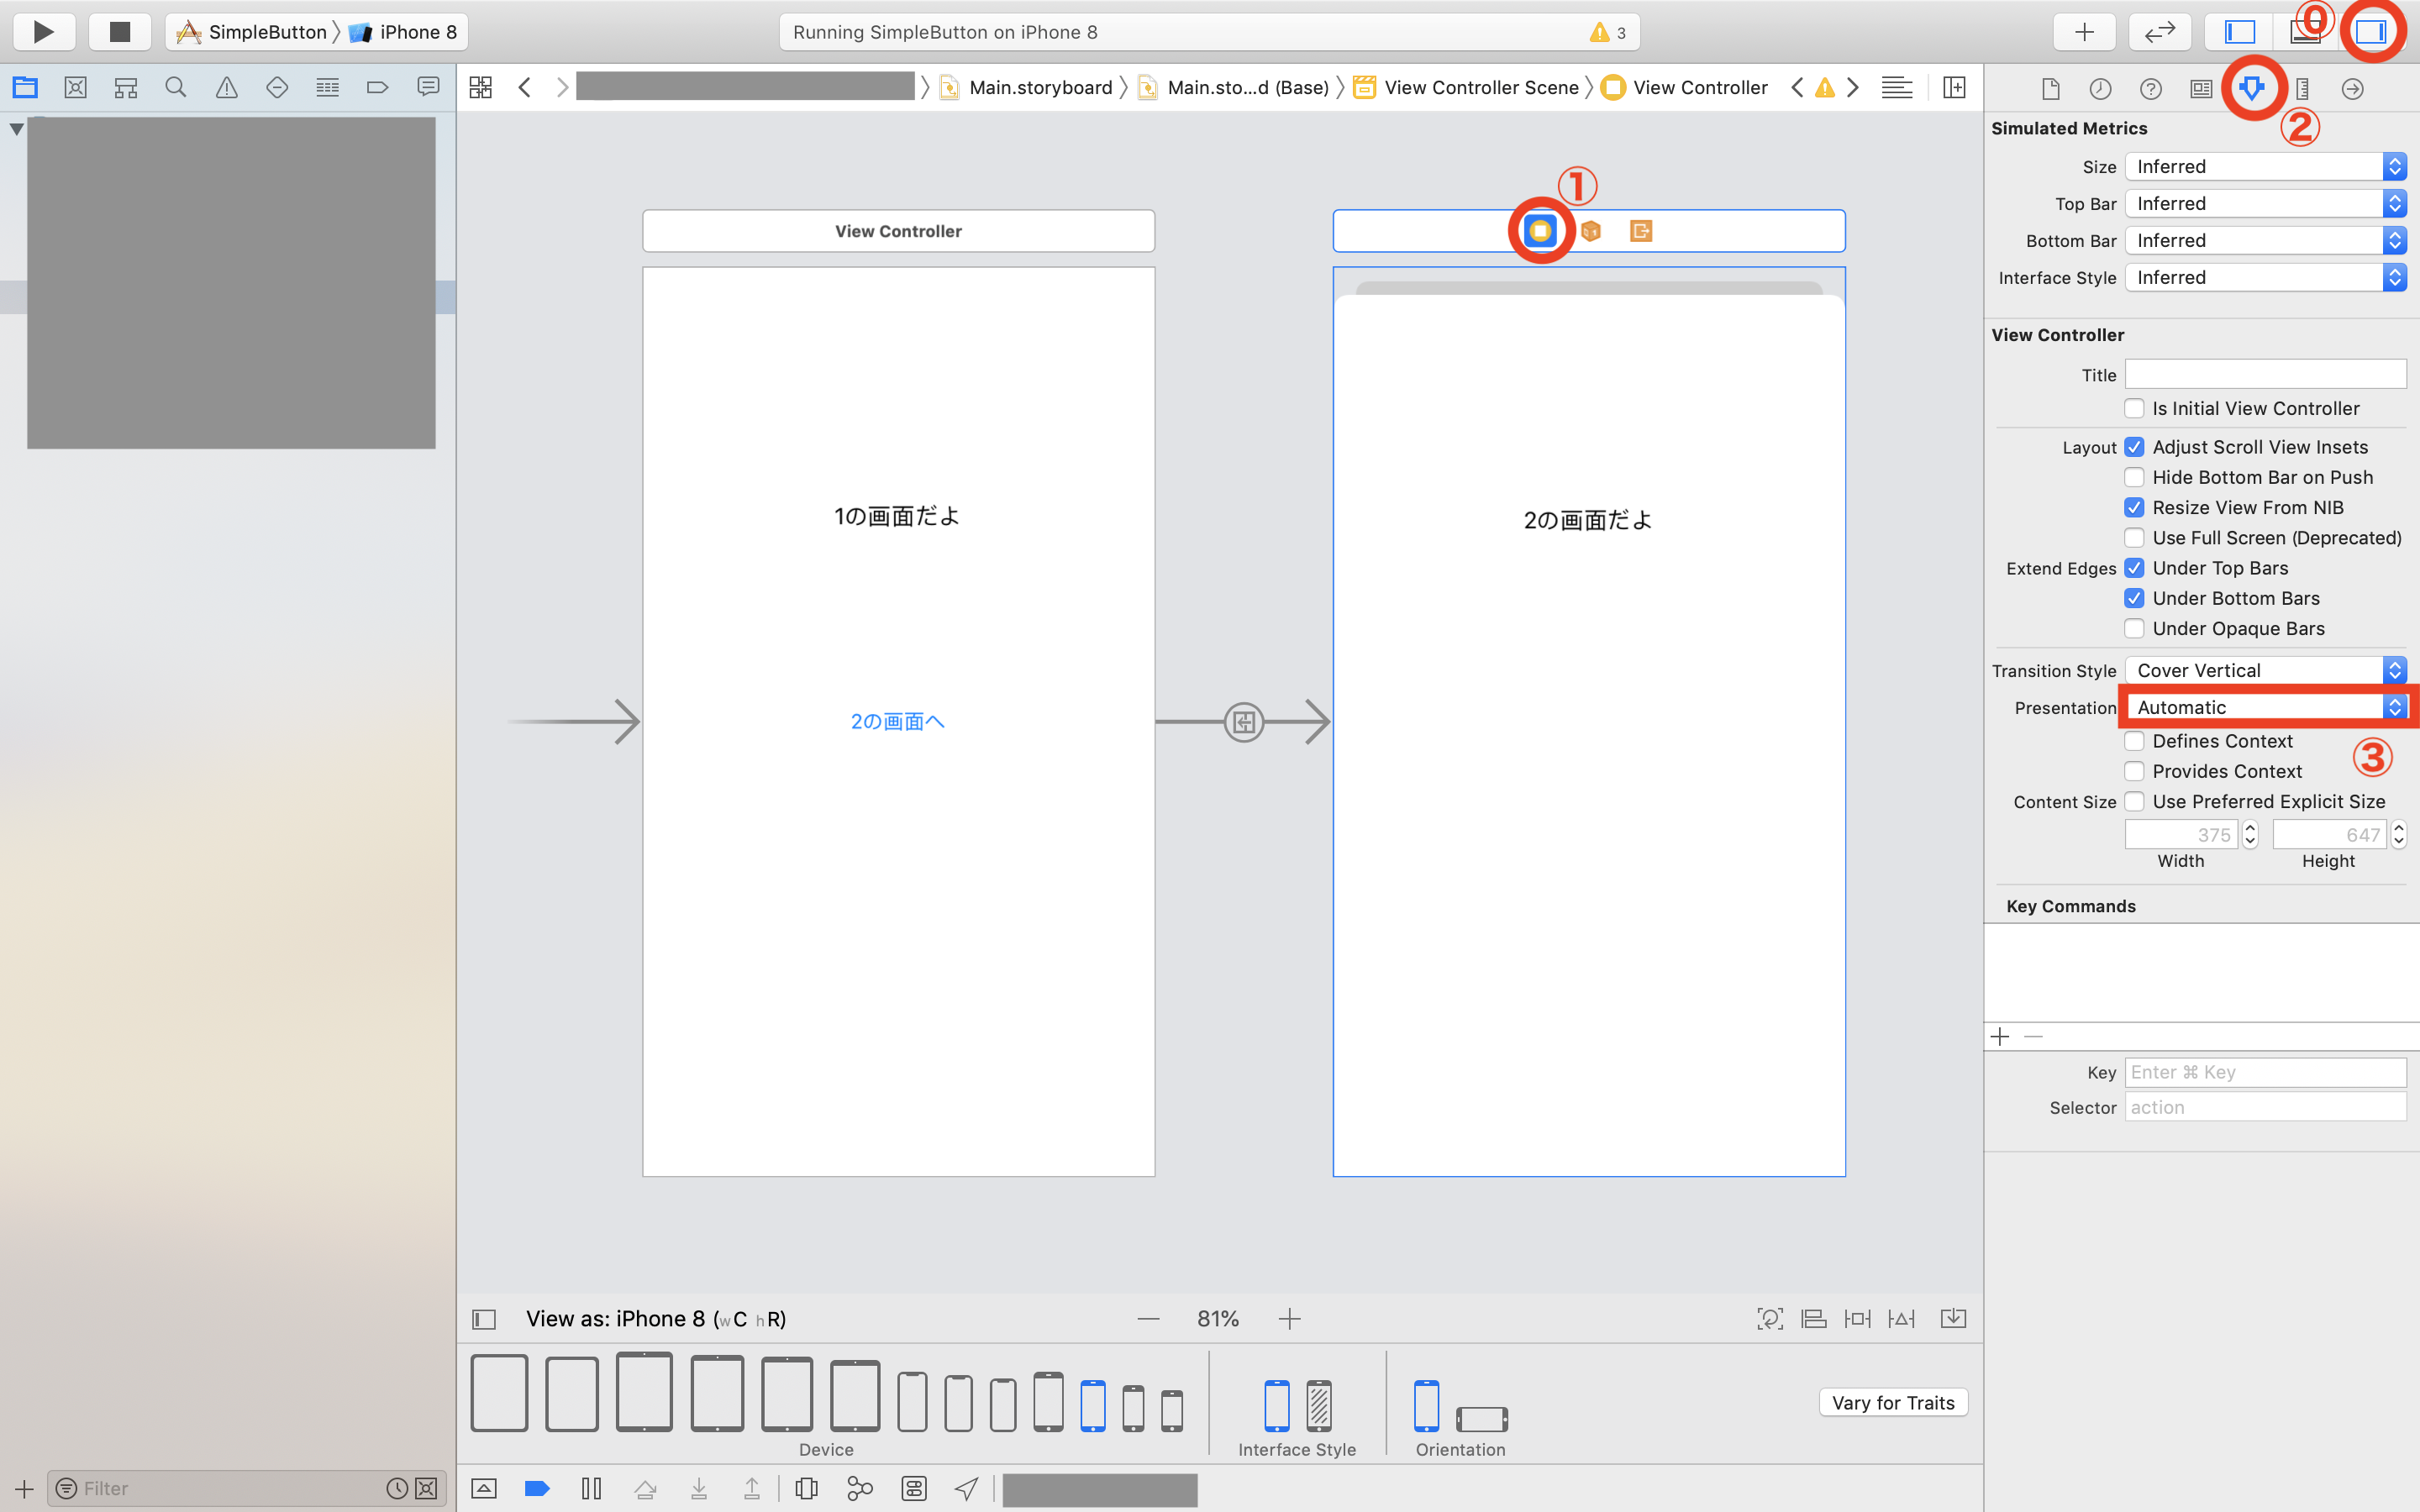
(0. 右のInspectorのメニュー画面を出していなかったら、⓪を押して表示)
1. ①を押してView Controllerの設定を表示
2. ②を押してAttributes Inspectorを表示
3. ③のPresentationを、「Automatic」→「Full Screen」に変更これでフルスクリーンで画面遷移ができるようになります。
おまけ
③のPresentationの上にあるTransition Styleを変更することで、画面遷移のアニメーションを変更することができます。
- Cover Vertical(デフォルト):次の画面が下から上にスライドしてくる
- Flip Horizontal:回転して画面が入れ替わる。前の画面の裏に次の画面があるような挙動
- Cross Dissolve:クロスディゾルブ。前の画面がフェードアウト、次の画面がフェードインしてくる
- Partial Curl:紙を下からめくるようなアニメーション

- 投稿日:2019-12-11T17:53:25+09:00
Swift初心者がCoreMLで機械学習に足を踏み入れてみた実装手順
はじめに
Swift初心者ではありますが、以前から興味があったCoreMLで機械学習にチャレンジしてみました。
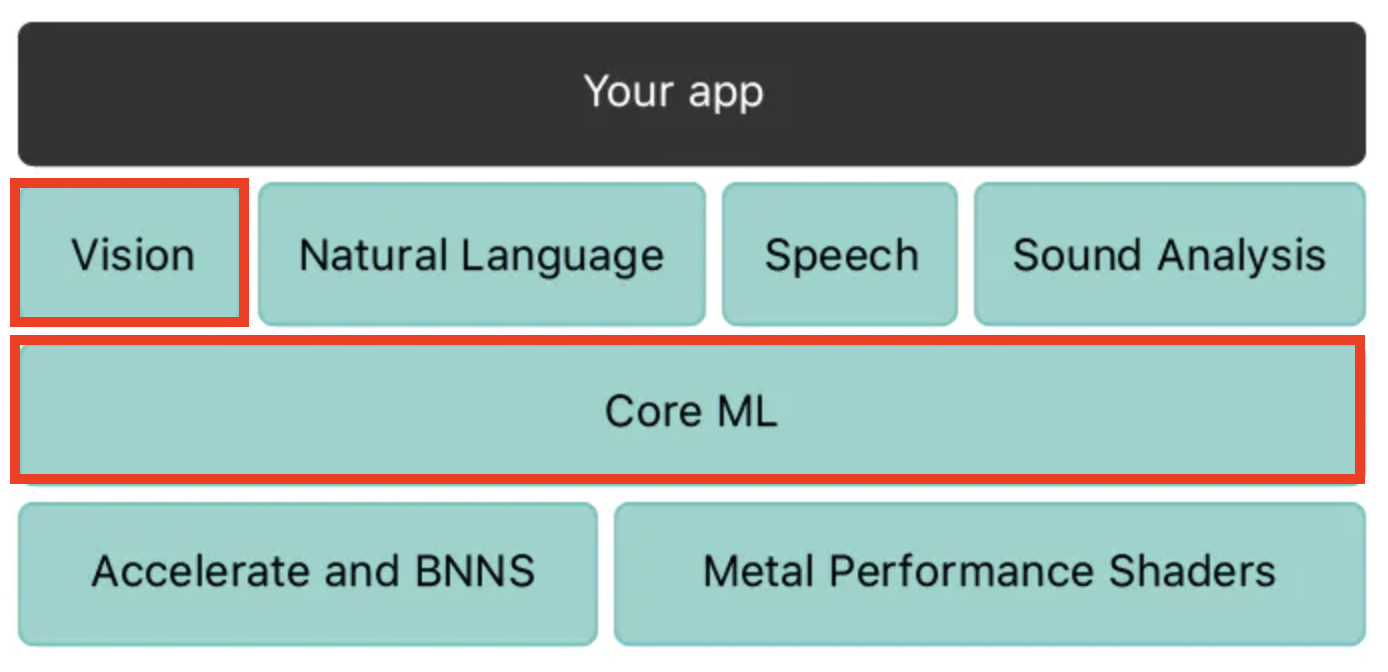
機械学習と聞くと、なんとなく難しそうでハードルが高いイメージがあったのですが、実際に触れてみると想像よりも簡単に実装できましたのでまとめてみました。そもそもCore MLとは?については、まとめられている記事がありましたので紹介させていだきます。
Appleの機械学習がヤバい成果物
今回は、機械学習モデルを活用してiPhoneで撮影した画像の中の主要なオブジェクトを分類して、その中で1番割合を占めているオブジェクト名を表示する機能を作成していきます。
Siamese cat = シャム猫のようですね。(正解はラグドールなのでOKですかね?笑)
猫の種類まで検出するのすごい。。
一応猫を判別することに成功しました!作成の流れ
作成にあたり以下のような流れで進めていきます。
1. Core MLを使用するための前準備
Core MLを使用するためには、モデルのダウンロードとインポートが必要になります。
ここでは、こちらの工程を説明していきます。1-1. Core MLモデルのダウンロード
今回は、画像識別を行うためのCore MLモデルの1つである
MobileNetV2を使用します。
そのために、以下Apple developerサイトのモデル一覧からダウンロードする必要があります。
https://developer.apple.com/jp/machine-learning/models/
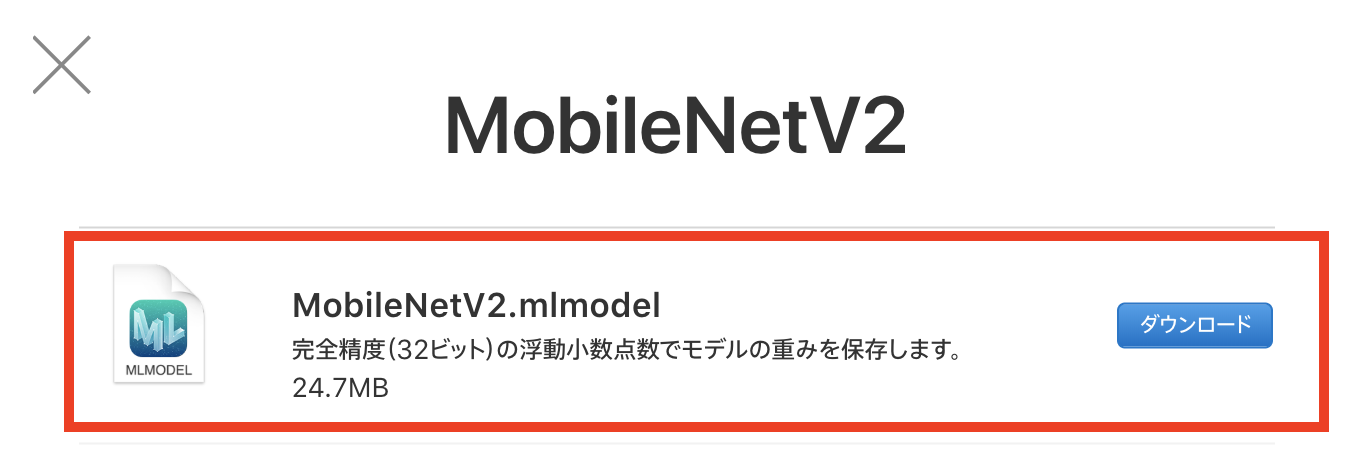
「モデルを見る」をクリックすると以下の画像が表示されます。
赤枠内のファイルをダウンロードすることで、今回使用するCore MLモデルを入手することができます。1-2. Core MLモデルをインポート
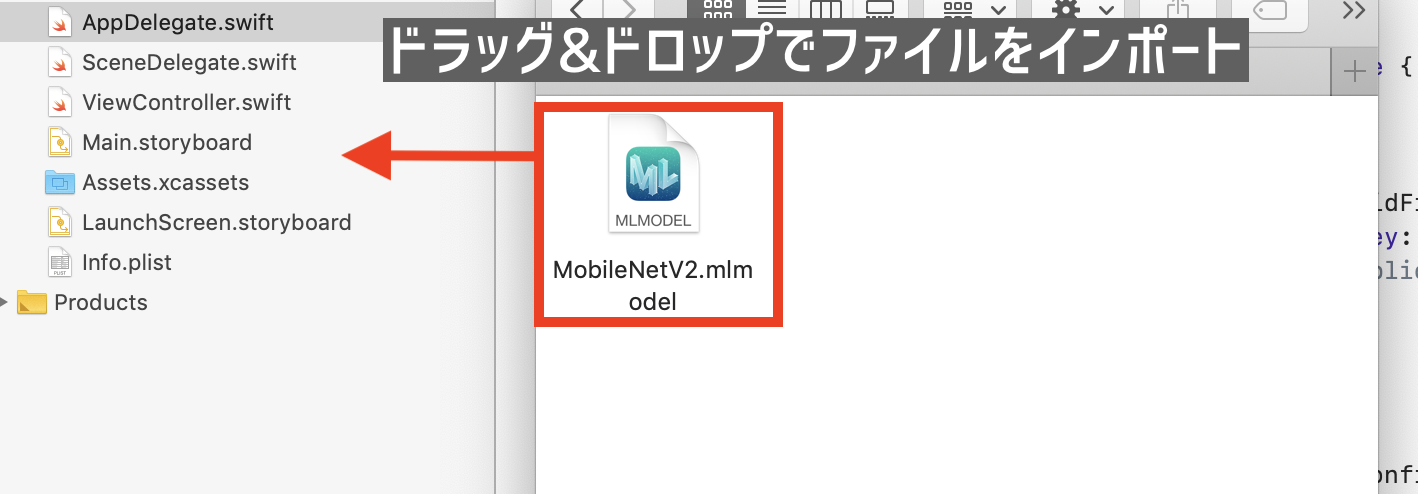
実際に使用するためにXcodeに
Core MLモデルをインポートしていきます。
とは言っても、実際にはドラッグ&ドロップするだけの作業になります。。
MobileNetV2.mlmodelが追加されていれば準備作業は完了です。
続いて、実装作業に進んでいきます。2. 実装
ここでは、
2-1. iPhoneで撮影した画像を表示する処理
2-2. 画像データを機械学習モデルで分類する処理
を順に実装していきます。2-1. iPhoneで撮影した画像を表示する処理
2-1-1. StoryBoadに設置
今回は個人的に楽に実装しやすそうなNavigationBarにCameraを配置していきます。
撮影した写真を表示させるためにUIImageViewを配置します。2-1-2. 機能を実装
先ほど設置したオブジェクトにアクションを追加していきます。
Cameraをタップするとカメラを起動させるUIImageViewに撮影した画像を表示させるViewController.swiftclass ViewController: UIViewController, UINavigationControllerDelegate { // 撮影した画像を表示するImageView @IBOutlet weak var imageView: UIImageView! let imagePicker = UIImagePickerController() override func viewDidLoad() { super.viewDidLoad() imagePicker.delegate = self // .photoLibraryにするとフォト内の写真を開くことができます。 imagePicker.sourceType = .camera imagePicker.allowsEditing = false } /// NavigationbarItemのカメラをタップした時のアクション @IBAction func didSelectCamera(_ sender: Any) { present(imagePicker, animated: true, completion: nil) } } /// UIImagePickerの処理 extension ViewController: UIImagePickerControllerDelegate { func imagePickerController(_ picker: UIImagePickerController, didFinishPickingMediaWithInfo info: [UIImagePickerController.InfoKey : Any]) { if let userSelectedImage = info[.originalImage] as? UIImage { imageView.image = userSelectedImage } imagePicker.dismiss(animated: true, completion: nil) } }UIImagePickerController:
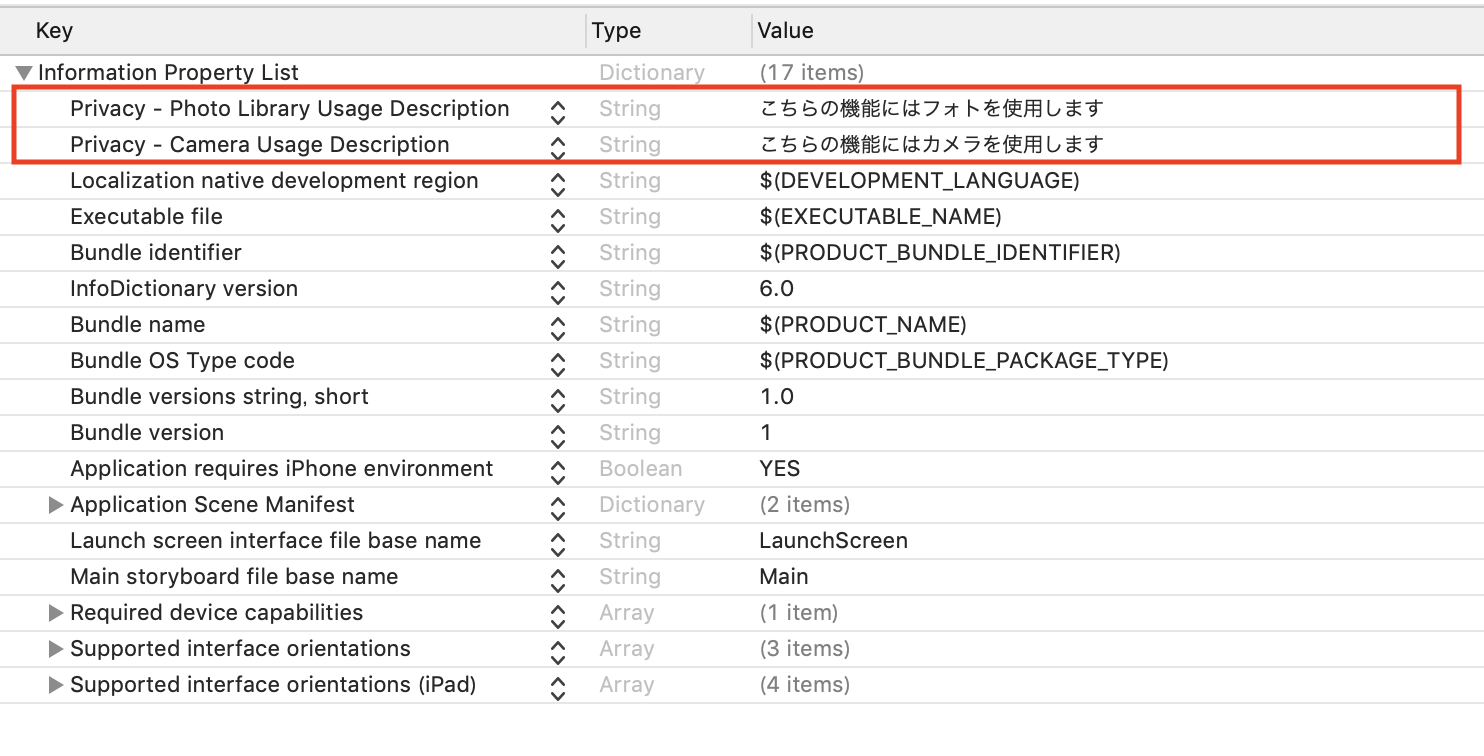
https://developer.apple.com/documentation/uikit/uiimagepickercontroller2-1-3. info.plistでカメラ使用許可などを設定
カメラ使用などにユーザーの許可が必要になるためinfo.plistに設定を追加します。
コードではこちらになります。
info.plist<key>NSPhotoLibraryUsageDescription</key> <string>こちらの機能にはフォトを使用します</string> <key>NSCameraUsageDescription</key> <string>こちらの機能にはカメラを使用します</string>2-2. 機械学習の処理を実装
今回は、Core MLで画像の分類を行うためVisionフレームワークを使用して実装していきます。2-2-1. 使用するフレームワークなどをimportする
ViewController.swiftimport CoreML import VisionCore ML:
https://developer.apple.com/jp/documentation/coreml
Visionフレームワーク:
https://developer.apple.com/documentation/vision2-2-2. Core MLモデルのインスタンス生成と処理
ViewController.swift// 使用するCore MLモデルのインスタンスを生成 let model = VNCoreMLModel(for: MobileNetV2().model) // これでVisionからリクエストを送りmodelを元に解析することができる let request = VNCoreMLRequest(model: model) { (request, error) in // 解析結果を分類情報として保存 guard let results = request.results as? [VNClassificationObservation] else { return } }VNCoreMLModel:
https://developer.apple.com/documentation/vision/vncoremlmodel
VNClassificationObservation:
https://developer.apple.com/documentation/vision/vnclassificationobservation2-2-3. 画像の解析リクエストをする
2-2-2で作成したCore MLモデルの解析をリクエストする処理を書いていきます。
ViewController.swift// Visionへリクエストを送るためにUIImage→CIImageへ変換する let ciImage = CIImage(image: image) // 画像解析をリクエスト let handler = VNImageRequestHandler(ciImage: ciImage) // リクエストを実行 do { try handler.perform([request]) } catch { print(error) }CIImage:
https://developer.apple.com/documentation/coreimage/ciimage
VNImageRequestHandler:
https://developer.apple.com/documentation/vision/vnimagerequesthandler3. 完成形
ViewController.swiftimport UIKit import CoreML import Vision class ViewController: UIViewController { // 撮影した画像を表示するImageView @IBOutlet weak var imageView: UIImageView! let imagePicker = UIImagePickerController() override func viewDidLoad() { super.viewDidLoad() imagePicker.delegate = self imagePicker.sourceType = .camera imagePicker.allowsEditing = false } @IBAction func didSelectCamera(_ sender: Any) { present(imagePicker, animated: true, completion: nil) } } /// UIImagePickerの処理 extension ViewController: UINavigationControllerDelegate, UIImagePickerControllerDelegate { func imagePickerController(_ picker: UIImagePickerController, didFinishPickingMediaWithInfo info: [UIImagePickerController.InfoKey : Any]) { if let userSelectedImage = info[.originalImage] as? UIImage { imageView.image = userSelectedImage // 画像からオブジェクトを検出し、出力する detectImageObject(image: userSelectedImage) } imagePicker.dismiss(animated: true, completion: nil) } /// 画像からオブジェクトを検出・結果を出力 func detectImageObject(image: UIImage) { // VNCoreMLModel(for: xx.modle): xxは使用するCore MLモデルによって変わります guard let ciImage = CIImage(image: image), let model = try? VNCoreMLModel(for: MobileNetV2().model) else { return } // Core MLモデルを使用して画像を処理する画像解析リクエスト let request = VNCoreMLRequest(model: model) { (request, error) in // 解析結果を分類情報として保存 guard let results = request.results as? [VNClassificationObservation] else { return } // 画像内の一番割合が大きいオブジェクトを出力する if let firstResult = results.first { let objectArray = firstResult.identifier.components(separatedBy: ",") if objectArray.count == 1 { self.navigationItem.title = firstResult.identifier } else { self.navigationItem.title = objectArray.first } } } // 画像解析をリクエスト let handler = VNImageRequestHandler(ciImage: ciImage) // リクエストを実行 do { try handler.perform([request]) } catch { print(error) } } }VisionおよびCore MLを使用した画像の分類
https://developer.apple.com/documentation/vision/classifying_images_with_vision_and_core_mlまとめ
Core MLの情報はdeveloper.appleにサンプルコードなどがあり、手が出しやすい部類かなと思います。また、用意されているCore MLモデル以外に他社製の機械学習モデルも変換してアプリで使用することができるようなので、かなりの可能性が秘めているなと感じました。ただ、まだ理解できてないところが多いので、実際にコードを書きながら理解を深めて記事でも書ければと思います。
また、本記事に間違い等ございましたら、
大変恐縮でありますがご指摘いただければと存じます。
よろしくお願いいたします。


- 投稿日:2019-12-11T17:53:25+09:00
Swift初心者がCoreMLで機械学習に足を踏み入れてみた
はじめに
Swift初心者ではありますが、以前から興味があったCoreMLで機械学習にチャレンジしてみました。
機械学習と聞くと、なんとなく難しそうでハードルが高いイメージがあったのですが、実際に触れてみると想像よりも簡単に実装できましたのでまとめてみました。そもそもCore MLとは?については、まとめられている記事がありましたので紹介させていだきます。
Appleの機械学習がヤバい成果物
今回は、機械学習モデルを活用してiPhoneで撮影した画像の中の主要なオブジェクトを分類して、その中で1番割合を占めているオブジェクト名を表示する機能を作成していきます。
Siamese cat = シャム猫のようですね。(ラグドールなのでOKですかね?)
一応猫を判別することに成功!作成の流れ
作成にあたり以下のような流れで進めていきます。
1. Core MLを使用するための前準備
Core MLを使用するためには、モデルのダウンロードとインポートが必要になります。
ここでは、こちらの工程を説明していきます。1-1. Core MLモデルのダウンロード
今回は、画像識別を行うためのCore MLモデルの1つである
MobileNetV2を使用します。
そのために、以下Apple developerサイトのモデル一覧からダウンロードする必要があります。
https://developer.apple.com/jp/machine-learning/models/
「モデルを見る」をクリックすると以下の画像が表示されます。
赤枠内のファイルをダウンロードすることで、今回使用するCore MLモデルを入手することができます。1-2. Core MLモデルをインポート
実際に使用するためにXcodeに
Core MLモデルをインポートしていきます。
とは言っても、実際にはドラッグ&ドロップするだけの作業になります。。
MobileNetV2.mlmodelが追加されていれば準備作業は完了です。
続いて、実装作業に進んでいきます。2. 実装
ここでは、
2-1. iPhoneで撮影した画像を表示する処理
2-2. 画像データを機械学習モデルで分類する処理
を順に実装していきます。2-1. iPhoneで撮影した画像を表示する処理
2-1-1. StoryBoadに設置
今回は個人的に楽に実装しやすそうなNavigationBarにCameraを配置していきます。
撮影した写真を表示させるためにUIImageViewを配置します。2-1-2. 機能を実装
先ほど設置したオブジェクトにアクションを追加していきます。
Cameraをタップするとカメラを起動させるUIImageViewに撮影した画像を表示させるViewController.swiftclass ViewController: UIViewController, UINavigationControllerDelegate { @IBOutlet weak var imageView: UIImageView! let imagePicker = UIImagePickerController() override func viewDidLoad() { super.viewDidLoad() imagePicker.delegate = self // .photoLibraryにするとフォト内の写真を開くことができます。 imagePicker.sourceType = .camera imagePicker.allowsEditing = false } /// NavigationbarItemのカメラをタップした時のアクション @IBAction func didSelectCamera(_ sender: Any) { present(imagePicker, animated: true, completion: nil) } } /// UIImagePickerの処理 extension ViewController: UIImagePickerControllerDelegate { func imagePickerController(_ picker: UIImagePickerController, didFinishPickingMediaWithInfo info: [UIImagePickerController.InfoKey : Any]) { if let userSelectedImage = info[.originalImage] as? UIImage { imageView.image = userSelectedImage } imagePicker.dismiss(animated: true, completion: nil) } }UIImagePickerController:
https://developer.apple.com/documentation/uikit/uiimagepickercontroller2-1-3. info.plistでカメラ使用許可などを設定
カメラ使用などにユーザーの許可が必要になるためinfo.plistに設定を追加します。
コードではこちらになります。
info.plist<key>NSPhotoLibraryUsageDescription</key> <string>こちらの機能にはフォトを使用します</string> <key>NSCameraUsageDescription</key> <string>こちらの機能にはカメラを使用します</string>2-2. 機械学習の処理を実装
今回は、Core MLで画像の分類を行うためVisionフレームワークを使用して実装していきます。2-2-1. 使用するフレームワークなどをimportする
ViewController.swiftimport CoreML import VisionCore ML:
https://developer.apple.com/jp/documentation/coreml
Visionフレームワーク:
https://developer.apple.com/documentation/vision2-2-2. Core MLモデルのインスタンス生成と処理
ViewController.swift// 使用するCore MLモデルのインスタンスを生成 let model = VNCoreMLModel(for: MobileNetV2().model) // これでVisionからリクエストを送りmodelを元に解析することができる let request = VNCoreMLRequest(model: model) { (request, error) in // 解析結果を分類情報として保存 guard let results = request.results as? [VNClassificationObservation] else { return } }VNCoreMLModel:
https://developer.apple.com/documentation/vision/vncoremlmodel
VNClassificationObservation:
https://developer.apple.com/documentation/vision/vnclassificationobservation2-2-3. 画像の解析リクエストをする
2-2-2で作成したCore MLモデルの解析をリクエストする処理を書いていきます。
ViewController.swift// Visionへリクエストを送るためにUIImage→CIImageへ変換する let ciImage = CIImage(image: image) // 画像解析をリクエスト let handler = VNImageRequestHandler(ciImage: ciImage) // リクエストを実行 do { try handler.perform([request]) } catch { print(error) }CIImage:
https://developer.apple.com/documentation/coreimage/ciimage
VNImageRequestHandler:
https://developer.apple.com/documentation/vision/vnimagerequesthandler3. 完成形
ViewController.swiftimport UIKit import CoreML import Vision class ViewController: UIViewController { @IBOutlet weak var imageView: UIImageView! let imagePicker = UIImagePickerController() override func viewDidLoad() { super.viewDidLoad() imagePicker.delegate = self imagePicker.sourceType = .camera imagePicker.allowsEditing = false } @IBAction func didSelectCamera(_ sender: Any) { present(imagePicker, animated: true, completion: nil) } } /// UIImagePickerの処理 extension ViewController: UINavigationControllerDelegate, UIImagePickerControllerDelegate { func imagePickerController(_ picker: UIImagePickerController, didFinishPickingMediaWithInfo info: [UIImagePickerController.InfoKey : Any]) { if let userSelectedImage = info[.originalImage] as? UIImage { imageView.image = userSelectedImage // 画像からオブジェクトを検出し、出力する detectImageObject(image: userSelectedImage) } imagePicker.dismiss(animated: true, completion: nil) } /// 画像からオブジェクトを検出・結果を出力 func detectImageObject(image: UIImage) { // VNCoreMLModel(for: xx.modle): xxは使用するCore MLモデルによって変わります guard let ciImage = CIImage(image: image), let model = try? VNCoreMLModel(for: MobileNetV2().model) else { return } // Core MLモデルを使用して画像を処理する画像解析リクエスト let request = VNCoreMLRequest(model: model) { (request, error) in // 解析結果を分類情報として保存 guard let results = request.results as? [VNClassificationObservation] else { return } // 画像内の一番割合が大きいオブジェクトを出力する if let firstResult = results.first { let objectArray = firstResult.identifier.components(separatedBy: ",") if objectArray.count == 1 { self.navigationItem.title = firstResult.identifier } else { self.navigationItem.title = objectArray.first } } } // 画像解析をリクエスト let handler = VNImageRequestHandler(ciImage: ciImage) // リクエストを実行 do { try handler.perform([request]) } catch { print(error) } } }VisionおよびCore MLを使用した画像の分類
https://developer.apple.com/documentation/vision/classifying_images_with_vision_and_core_mlまとめ
Core MLの情報はdeveloper.appleにサンプルコードなどがあり、手が出しやすい部類かなと思います。また、用意されているCore MLモデル以外に他社製の機械学習モデルも変換してアプリで使用することができるようなので、かなりの可能性が秘めているなと感じました。ただ、まだ理解できてないところが多いので、実際にコードを書きながら理解を深めて記事でも書ければと思います。
また、本記事に間違い等ございましたら、
大変恐縮でありますがご指摘いただければと存じます。
よろしくお願いいたします。
- 投稿日:2019-12-11T15:33:36+09:00
MVP意識しながら自分のクラロワアカウントをアプリに表示する。(Model編)
最初に
前回の続きです。
こちらを見てからどーぞ。
https://qiita.com/daichi77/items/0c849108ada04d7083e0#完成画面
こんな感じで僕のクラロワの最高トロフィーとかを表示できました。Modelのファイルたち
解説
ClashRoyaleClientError.swift
エラーのパターンをまとめたenumClashRoyaleClientError.swiftenum ClashRoyaleClientError: Error { //通信に失敗 case connectionError(Error) //レスポンスの解釈に失敗 case responseParseError(Error) //エラーレスポンスを受け取った時 case apiError(Error) }ClashRoyaleAPIError
APIから帰ってきたエラーメッセージなどを格納するやつClashRoyaleAPIErrorstruct ClashRoyaleAPIError: Decodable, Error { struct fieldError: Decodable { let error: Bool let status: Int let message: String } }Player.swift
APIから取ってきた情報を格納する構造体。
JSONにあわせて作りましょう。
Decodableを継承させておくといい感じにjsonを構造体に変換してくれます。Player.swiftpublic struct Player: Decodable { let tag: String let name: String let expLevel: Int let trophies: Int let bestTrophies: Int let wins: Int let losses: Int let battleCount: Int let threeCrownWins: Int let challengeCardsWon: Int let challengeMaxWins: Int let tournamentCardsWon: Int let tournamentBattleCount: Int let donations: Int let donationsReceived: Int let totalDonations: Int let warDayWins: Int let clanCardsCollected: Int struct arena: Decodable { let id: Int let name: String } struct leagueStatistics: Decodable { struct currentSeason: Decodable { let trophies: Int let bestTrophies: Int } struct previousSeason: Decodable { let id: String let trophies: Int let bestTrophies: Int } struct bestSeason: Decodable { let id: String let trophies: Int } } struct Badges: Decodable { let name: String let level: Int? let maxLevel: Int? let progress: Int } let badges: [Badges] struct Achievements: Decodable { let name: String let stars: Int let value: Int let target: Int let info: String } let achievements: [Achievements] struct Cards: Decodable { let name: String let id: Int let level: Int let maxLevel: Int let count: Int struct iconUrls: Decodable { let medium: String } } let cards: [Cards] struct currentFavouriteCard: Decodable { let name: String let id: Int let maxLevel: Int struct iconUrls: Decodable { let medium: String } } }Result.swift
その名の通り結果を返すenum型です。
APIからデータが返ってくればsucceess(T)エラーが帰ってくればfailure(error)
になります。Result.swiftenum Result<T, Error: Swift.Error> { case success(T) case failure(Error) init(value: T) { self = .success(value) } init(error: Error) { self = .failure(error) } }HTTPMethod.swift
今回はGETしか使いませんがとりあえず他のやつも定義しています。HTTPMethod.swiftenum HTTPMethod: String { case get = "GET" case post = "POST" case put = "PUT" case head = "HEAD" case delete = "DELETE" case patch = "PATCH" case trace = "TRACE" case options = "OPTIONS" case connect = "CONNECT" }ClashRoyaleAPI.swift
ここでpathとかjsonを変換する型(今回はPlayerを取ってくるのでPlayerに)などを決めます。
例えばプレイヤーじゃなくクランを取ってくる場合はResponseの型をClan型にしたりします。
pathなども同様にPostならpostにしたりします。ClashRoyaleAPI.swiftfinal class ClashRoyaleAPI { struct SearchUser: ClashRoyaleRequest { typealias Response = Player//ここは取ってくる情報によって違う値に変更 let keyword: String var method: HTTPMethod { return .get } var path: String { return "players" + keyword } } }ClashRoyaleRequest.swift
ここでリクエストの設定をしたりJsonをPlayer.swiftに変換したりしてます。ClashRoyaleRequest.swift//protocolで切り出してます。これをもとにリクエストを作ります。 protocol ClashRoyaleRequest { associatedtype Response: Decodable var baseURL: URL { get } var headers: [String: String] { get } var path: String { get } var method: HTTPMethod { get } } // baseURLとHeaderはどのリクエストでも共通なのでprotocolextensionで初期化 extension ClashRoyaleRequest { var baseURL: URL { return URL(string: "https://api.clashroyale.com/v1/")! } var headers: [String: String] { return [ "Authorization": "Bearer {apikey}"//各自のAPIkey ] } func buildURLRequest() -> URLRequest { //baseURLとpathを合体。 let url = baseURL.appendingPathComponent(path) let components = URLComponents(url: url, resolvingAgainstBaseURL: true) var urlRequest = URLRequest(url: url) urlRequest.url = components?.url urlRequest.httpMethod = method.rawValue//get urlRequest.allHTTPHeaderFields = headers//apikeyなど return urlRequest } //APIから返ってきた値が200から300ならjsonをUserモデルに変換してます。 func response(from data: Data, urlResponse: URLResponse) throws -> Response { let decoder = JSONDecoder() if case (200..<300)? = (urlResponse as? HTTPURLResponse)?.statusCode { print(Response.self) //このResponse.selfはrequestによって型が変わります return try decoder.decode(Response.self, from: data) } else { //ClashRoyaleAPIErrorの型に変換 throw try decoder.decode(ClashRoyaleAPIError.self, from: data) } } }ClashRoyaleClient.swiftclass ClashRoyaleClient { private let session: URLSession = { let configuration = URLSessionConfiguration.default let session = URLSession(configuration: configuration) return session }() //api叩くところです。 func send<Request: ClashRoyaleRequest> ( request: Request, completion: @escaping (Result<Request.Response,ClashRoyaleClientError>) -> Void) { let urlRequest = request.buildURLRequest() let task = self.session.dataTask(with: urlRequest) { data, response, error in switch(data,response,error) { case (_,_, let error?): completion(Result(error: .connectionError(error))) case (let data?,let response?, _): do {//responseを読んでjsonを変換 let response = try request.response(from: data, urlResponse: response) completion(Result(value: response)) } catch let error as ClashRoyaleAPIError {//api呼べてないとか completion(Result(error: .apiError(error))) } catch {//データは帰ってきたけどparseに失敗した時。 //jsonの形式とmodelの形式があっているか確認しましょう。 completion(Result(error: .responseParseError(error))) } default: fatalError("invalid response combination \(data),\(response), \(error)") } } DispatchQueue.main.async { task.resume() } } }まとめ
前回の記事に書いたPresenterからClashRoyaleClient.swiftを呼んでます。
記事が分かれてしまってすみません。
解説はコメントに書いてありますが聞きたいことがあればコメントください。前回の記事


- 投稿日:2019-12-11T15:26:49+09:00
xib で定義されてる cell の使いやすくようにする
問題点
ベタ書きでエラーが発生する可能性は十分あるんで悩ましい。
let nib = UINib(nibName: "MyCell", bundle: nil)か
tableView.register(UINib(nibName: "MyCell", bundle: nil), forCellReuseIdentifier: "MyCellIdentifier")やりたいこと
- Embedded Framework 対応
- bundle に入れるべき値は cell class によって変わる
- nibNameの入れ方をスマートに
解決方法
String(describing:)
let nibName = String(describing: MyCell.self)動的に Bundle を取得
let bundle = Bundle(for: MyCell.self)Bundle が動的に取得できれば Cell が他の target/framework に定義されても困らない。
合併してみる
合併したらこんな感じになります
let nibName = String(describing: MyCell.self)
let bundle = Bundle(for: MyCell.self)

let nib = UINib(nibName: nibName, bundle: bundle)
よしなにヘルパーを設ける
extension UITableViewCell {
    public static var nib: UINib {
        return UINib(nibName: nibName, bundle: Bundle(for: self))
    }

    static var nibName: String {
        return String(describing: MyCell.self)
    }
}
使い方
tableView.register(MyCell.nib, forCellReuseIdentifier: "MyCellIdentifier")この書き方にするなら、ヒューマンエラ可能性も低くになると思います。
次は cell reuse identifier の方を書こうと思います。
- 投稿日:2019-12-11T14:25:54+09:00
は!・か!!・た!!!・の塩(Peripheral)
ゆめみの日常
ある日社内のSlackでこんなやり取りがありました。
※伯方の塩は博多でつくっているわけではないそうです。
このスレッドをながめていたら、昔Twitterで見た「ずんどこきよしのプログラム」っぽいものが作れるんじゃないかと思い、CoreBluetoothで作ってみました。
そして出来たのがこちら。(※音が流れるので注意!)
https://twitter.com/u11238123/status/1198624428143214592
アプリ通信の流れについて
このアプリはCentral(動画内でのiPhone)側からPeripheral(動画内でのiPad)側にwriteをして音声を出力しています。
Bluetoothは固有の名称などがたくさんあり、それを全て説明していると1つ記事がかけてしまうので詳しく知りたい方は過去に僕がまとめた記事があるのでそれを参照してください。
また、この記事ではPeripheralの実装の解説だけに絞り、音の再生部分などは省略します?♂️
peripheralの実装
Peripheral側でデータを受け取る流れは以下のような感じです。
① Bluetoothの使用許可をinfo.plistに書く
② CBPeripheralManagerのインスタンスを作る
③ デバイスがBluetoothを使用可能か判定
④ ServiceとCharacteristicをつめる
⑤ アドバタイズ(情報の公開)開始!
⑥ データを受け取る厳密にアプリを作る際はもっと細かく用意されているメソッドを呼び出してハンドリングなどが必要になりますが、複雑になるので今回は省略します。
①Bluetoothの使用許可をinfo.plistに書く
ios13からiosデバイスでBluetoothを使用する際permissionの許可が必須になったため記載してあげる必要があります。
    <key>NSBluetoothAlwaysUsageDescription</key>
    <string>伯方の塩で使うよ</string>
ここに記載した文章がアプリ内のアラートに表示されますが、大手などのアプリでもいい加減なものを複数観測しているので、審査の際は書いてあればOKなのかなと思います。
ですが、ユーザに不信感を与えるので何に使うかは詳しく書いておいた方が良いと思います。
② CBPeripheralManagerのインスタンスを作る
コードはこんな感じです。
CBPeripheralManagerのインスタンスが作成されるとデリゲートメソッドが呼ばれはじめます。class ViewController: UIViewController { var manager: CBPeripheralManager! override func viewDidLoad() { super.viewDidLoad() self.manager = CBPeripheralManager(delegate: self, queue: nil) } } extension ViewController: CBPeripheralManagerDelegate {}③ デバイスがBluetoothを使用可能か判定し、可能なら情報をつめる
CBPeripheralManagerのインスタンスを作るとまず最初にperipheralManagerDidUpdateStateというメソッドが呼ばれます。
まず最初にデバイスがアドバタイズ可能かを判定する必要があります。peripheral(デバイス)の状態は引数に持っているperipheralのstateから判別することができます。
func peripheralManagerDidUpdateState(_ peripheral: CBPeripheralManager) {

    switch peripheral.state {
    case .unknown:
        print("よくわかないけどダメ!")
    case .resetting:
        print("システムとの接続がよくわからんからダメ!")
    case .unsupported:
        print("Bluetooth許可されてないじゃんダメ!")
    case .unauthorized:
        print("このデバイスBluetooth使えないからダメ!")
    case .poweredOff:
        print("Bluetooth offになってるからダメ!")
    case .poweredOn:
        print("つかえるよ!!!")
    @unknown default:
        fatalError("へんなのきたからダメ!")
    }
}
④ ServiceとCharacteristicをつめる
デバイスが通信可能であれば、アドバタイズ情報の中にServiceとCharacteristicをつめるわけですが、それぞれのUUIDを決める必要があります。
UUID作成用のtarminalコマンド(uuidgen)が用意されているのでそれで作成するのが簡単です。試しに2つ作成してみました、1つ目をServiceのUUID、2つ目をCharacteristicのUUIDとします。
19688AFB-4E68-4F21-BCBA-421220280930
999889FF-42B0-4FC8-B5BC-0CAB8C323FD2
プロパティとパーミッションは全部盛りにしていますが、今回は実質writeしか使わないのでプロパティはwrite、パーミッションはwritableだけでも問題ありません。
    func peripheralManagerDidUpdateState(_ peripheral: CBPeripheralManager) {
        switch peripheral.state {
        case .poweredOn:
            let serviceUUID = CBUUID(string: "19688AFB-4E68-4F21-BCBA-421220280930")
            let characteristicUUID = CBUUID(string: "999889FF-42B0-4FC8-B5BC-0CAB8C323FD2")

            let service = CBMutableService(type: serviceUUID, primary: true)
            let property: CBCharacteristicProperties = [.notify, .read, .write]
            let permission: CBAttributePermissions = [.readable, .writeable]
            var characteristic = CBMutableCharacteristic(type: characteristicUUID, properties: property, value: nil, permissions: permission)
            service.characteristics = [characteristic]
            self.manager.add(service)
        @unknown default:
        //コードが長くなってしまうのでダメなcaseは省略
            break
        }
    }
図解ServiceとCharacteristic
サービスとキャラクタリスティックの図を僕の過去の記事から引っ張ってきました。
今回はサービス1つ、キャラクタリスティック1つの構成ですが、市販されているPeripheralの多くは複数のサービスとキャラクタリスティックを保持しており、図のよう担っていると思います。
⑤ アドバタイズ(情報の公開)開始
サービスの追加が無事成功するとperipheralManager(_ peripheral: CBPeripheralManager, didAdd service: CBService, error: Error?)というメソッドが呼ばるので、その中でアドバタイズを行います。
    func peripheralManager(_ peripheral: CBPeripheralManager, didAdd service: CBService, error: Error?) {
        if error != nil {
            print("失敗してるよ")
        }
        if self.manager.isAdvertising == false {
            let advertiseData = [CBAdvertisementDataLocalNameKey: "博多の塩"]
            manager.startAdvertising(advertiseData)
        }
    }
引数なしでも良いのですが、せっかくなので名前をつけてアドバタイズさせてみました。
iosデバイス同士でやる時の注意なのですが、一度ペアリングを行ってしまうと以降ここで登録した名前ではなくデバイス名が表示されてしまうので注意が必要です!アドバタイズが問題なくできてるかの確認はLightBlue® Explorerというアプリを使うのが便利です。
アプリを起動すると画像のように近くでアドバタイズを行なっているデバイスを見つけることができます。
⑥ データを受け取る
central側からwriteされた場合はperipheralManager(_ peripheral: CBPeripheralManager, didReceiveWrite requests: [CBATTRequest])の中にwriteされた20byte以下のData型が飛んでくるのでその中身を見るだけです!
データ型の中身を確認する際は文字列にするのがわかりやすくて良いので以下のようなextendionをData型に生やしておくと便利です。
extension Data {

    struct HexEncodingOptions: OptionSet {
        let rawValue: Int
        static let upperCase = HexEncodingOptions(rawValue: 1 << 0)
    }

    func hexEncodedString(options: HexEncodingOptions = []) -> String {
        let hexDigits = Array((options.contains(.upperCase) ? "0123456789ABCDEF" : "0123456789abcdef").utf16)
        var chars: [unichar] = []
        chars.reserveCapacity(2 * count)
        for byte in self {
            chars.append(hexDigits[Int(byte / 16)])
            chars.append(hexDigits[Int(byte % 16)])
        }
        return String(utf16CodeUnits: chars, count: chars.count)
    }
}
あとはextensionで生やしたメソッドを使い、値を文字列で検出して実現したい処理をおこなうだけです。
func peripheralManager(_ peripheral: CBPeripheralManager, didReceiveWrite requests: [CBATTRequest]) {
        let responseData = requests[0].value?.hexEncodedString()
}


- 投稿日:2019-12-11T14:05:28+09:00
Swift5時代の画面遷移フレームワークを考える
皆さんこんにちは、iOS Advent Calendar 2019の15日目の @imk2o です。
かなり昔に Swift時代の画面遷移実装を考える という記事を書き、実務でも使っていたのですが、今回は改めてより良い実現方法を模索してみたことを紹介します!
Storyboardとコードとの「距離」を縮める
様々な意見があると思いますが、私はStoryboardやSegueを積極的に使っています。
一方でSwiftコードとの相性については決して良いとは言えません。ただそれを理由に使うのを諦めたくはないので、可能な限りシンプルかつ安全なバインディングを模索しました。Storyboardの要素とコードは、各要素に付与した
Identifierによって関連付けますが、Segueの場合そのままではリテラルを多用することになりがちです。
そこで下記のようにSegue Identifierと同じ名前のプロパティを定義することで、これを画面遷移則および、遷移先のキーとすることができるような設計を考案しました。この方法によって、以下の点が改善されます。
- どんなSegueがあり、どの画面(ViewController)に遷移するのかがひと目でわかる
- Segueの定義と、UIKitの画面遷移ロジックを集約できる
- Segue Identifierを表すリテラルが排除できる
以下は、Item一覧画面からの遷移則を表すコードです。
ItemListViewController.swiftextension ItemListViewController: DeclarativeRouting { struct SegueRoutes: SegueRouteDeclarations { // Segue Identifierが "showDetail" のAction Segueの遷移則 private let showDetail = ActionSegueRoute<ItemDetailViewController> { (segue, sender) in // 選択したセルに対応するItemを求める let source = segue.source as! ItemListViewController guard let cell = sender as? UITableViewCell, let item = source.item(for: cell) else { fatalError() } return item.id // 詳細画面にItem IDを渡す } // Segue Identifierが "showPageView" のManual Segueの遷移則 let showPageView = ManualSegueRoute<ItemPageContainerViewController>() static let shared: Self = .init() private init() {} } override func prepare(for segue: UIStoryboardSegue, sender: Any?) { // 代理でハンドリング self.segueRoutes.prepare(for: segue, sender: sender) } }なお遷移先となるItem詳細画面は以下のような実装になっています。
ItemDetailViewController.swift// MARK: - Routing extension ItemDetailViewController: DestinationScene { typealias Context = Int // Item IDをパラメータとして受け取る }コードからManual Segueを発火する方法も、上記の遷移則を利用します。
ItemListViewController.swift@IBAction func showPageView(_ sender: Any) { // Segue Routeを使って画面遷移 // (遷移先画面がパラメータ不要なので()を渡している) self.segueRoutes.showPageView.perform(with: (), from: self) }Segue Identifierのリテラルが排除され、遷移先に渡すパラメータの型が明確になったのではないでしょうか。
Global Routing: Segueに依らない画面遷移
ご承知のとおり、Segueのみであらゆる画面遷移を表現できるわけではありません。
Storyboardは使うけどSegueは使わない、と決めて運用しているプロダクトもあるでしょう。
そのような画面はグローバルなルーティング・テーブルに登録し、どの画面からも呼び出せるような仕組みを用意しています。PreferencesViewController.swift// MARK: - Routing extension PreferencesViewController: DescribedDestinationScene { // パラメータなし typealias Context = Void // Preferences.storyboardのInitial View Controllerに対応する static let storyboardDescription = StoryboardDescription(name: "Preferences") } extension Routes { // どこからでも遷移可能なルートとして追加 static let showPreferences = GlobalRoute<PreferencesViewController>() }ItemListViewController.swift@IBAction func showPreferences(_ sender: Any) { // Global Routeを使って画面遷移 Routes.showPreferences.perform(with: (), from: self) }原理
SwiftPM化したライブラリとサンプルコードをGitHubで公開していますので、詳細はそちらを読んでください?♂️
ポイントだけ列挙すると、
- Segue Identifierと
SegueRoutes下のプロパティとのバインディングは Mirror を使っている- 遷移先画面は
DestinationSceneプロトコルに準拠し、受け取る型を宣言している- 受け取ったパラメータはVCが保有するのではなく
ContextStoreにVCのインスタンスと紐付けて管理している
NSMapTableでVCを弱参照キーとすることで、パラメータは自動破棄- Global Routingできる画面は
DescribedDestinationSceneプロトコルに準拠し、インスタンス化のためのストーリーボード情報を記述Routesにタイプ・プロパティを追加して、画面VCに一意な名前を付与Segue Actionの必要性
このフレームワークが出来てしまうと、iOS13から使えるようになったSegue Actionは果たして必要なのか?という疑問に辿り着きました。Segue ActionによってStoryboard/Segueを使いつつDIできる利点はありますが、このフレームワークでも
DescribedDestinationSceneに準拠すればDIが可能です。
(正確にはVC自体に注入していないが、意図した振る舞いにはなる)SomeViewController.swiftprotocol SomeViewModel { ... } class SomeViewController: UIViewController, DescribedDestinationScene { typealias Context = SomeViewModel static let storyboardDescription = StoryboardDescription(...) ... } // Test with mock struct MockViewModel: SomeViewModel { ... } let injectableVC = InjectableViewController.instantiate(with: MockViewModel()) ...実装コストや複雑さの面においても、Segue Actionと大差ないと思います。
Manual Segueを使う場合は結局Segue IdentifierでperformSegue()する必要があるため、このフレームワークの方がシンプルに扱えるのではないでしょうか。引き続きSegue Actionの利点を探りつつ、有用であればフレームワークへ統合していきたいと思います。
今後の課題
まだコンセプトレベルのフレームワークであるため、実用度を上げるべく以下の課題について検討し改善したいと思います。
- Unwind Segue対応
- guard条件(ログインしていないと遷移できない等のコントロール)
- Segue Actionの統合検討
明日は @k0mach1 さんです。お楽しみに!
- 投稿日:2019-12-11T13:55:23+09:00
Webしか触ったことのないアプリ未経験者がFlutterでiOS・Androidのアプリを個人開発でリリースした話
こんにちは、@y_temp4です。普段は主にフリーランスエンジニアとして Web のフロントエンド周りの開発をしており、これまでアプリの開発というものはほぼやったことがありませんでした。
しかし今回、最近流行りの Flutter を使って iOS・Android 両対応のアプリをリリースしてみましたので、そこで得た知見や、開発の流れを共有していこうと思います。
開発したアプリ
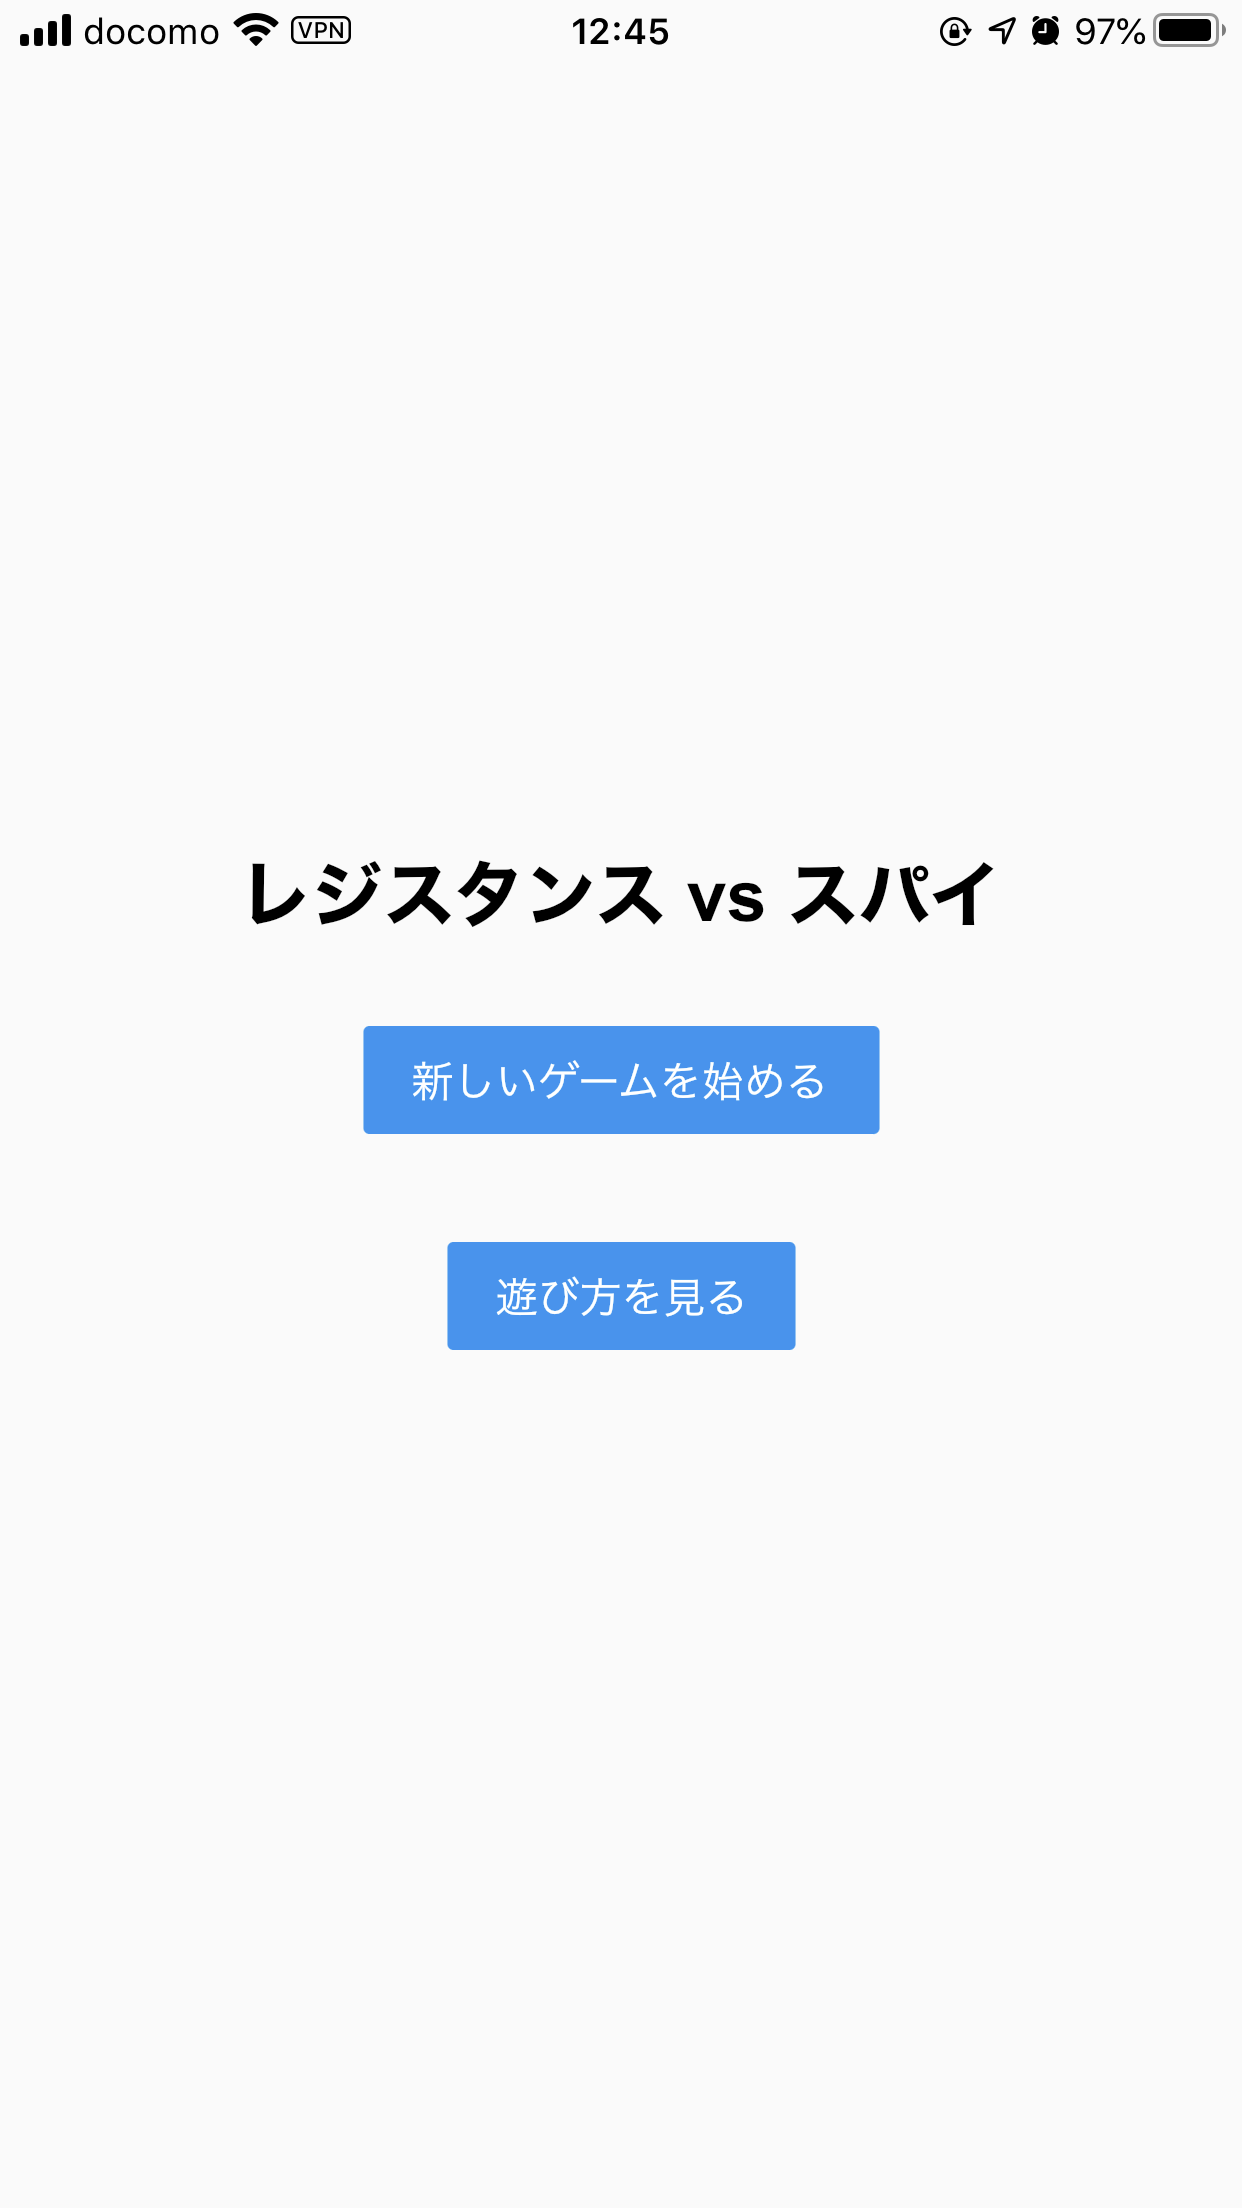
今回リリースしたのは「レジスタンス vs スパイ」というアプリです。
以前職場の人とやったボードゲーム「レジスタンス」がとてもおもしろかったので、アプリで作ってみようと思い開発に挑戦してみました。
人狼ライクなボードゲームで、プレイ人数が 5 ~ 10 人と最低でも 5 人必要なのですが、人狼が好きな人ならハマると思うのでぜひプレイしてみてください ?
これまでの開発の経験
アプリ開発の流れを書いていく前に、開発者である私自信のアプリ開発の経験について共有します。
- 普段は Web のフロントエンドの開発がメイン
- アプリの経験はほぼなし(ほんの少しだけ Monaca に触れたことがあるくらい)
- Flutter は少し前にインストールしてチュートリアルだけやったことがあった
自分は完全に Web 系のエンジニアで、アプリの開発はほぼ未経験でした。これまではネイティブに触れた経験はほぼなくて、React Native や Monaca などクロスプラットフォーム系の開発基盤に少し興味を持っていたくらいです。
Flutter に関しては半年くらい前に触ったことがあったのですが、チュートリアルをやったくらいでそのときにはがっつり開発とまではいきませんでした(当時、特に作りたいものもなかったので)。
開発の手順
では実際に、開発をする上での手順をまとめていきます。
1. 画面構成を決める
まずはじめに、アプリの画面構成を考えました。
アプリの遊び方としては、アプリがインストールされた端末をプレイヤーに順番に回していくスタイル(よくある人狼アプリと同じような感じ)を想定していたので、以下を満たす必要がありました。
- 画面が順番に切り替わっていく
- 前の画面には戻れない(前のプレイヤーの情報が見れてしまうので)
そこで、アプリの画面構成としてはスクリーンを複数作成し、それを順番に切り替えていくような感じにしました。
これを、トップページにある「新しいゲームを始める」ボタンから始められるようにします。
また、アプリの途中では戻るボタンは使えませんが、いつでもゲームを破棄してホームに戻れるように、画面の右上に「ホームに戻るボタン」を配置することにしました。
最後に、トップページでは遊び方へのリンクも欲しかったので配置しました。
main.dartimport 'package:flutter/material.dart'; import 'package:resistance/models/app.dart'; import 'package:resistance/screens/home.dart'; import 'package:resistance/screens/select_member_count.dart'; import 'package:resistance/screens/add_user.dart'; import 'package:resistance/screens/check_position_before.dart'; import 'package:resistance/screens/check_position.dart'; import 'package:resistance/screens/discussion_time.dart'; import 'package:resistance/screens/select_mission_member.dart'; import 'package:resistance/screens/vote_of_confidence.dart'; import 'package:resistance/screens/vote_result.dart'; import 'package:resistance/screens/command_mission.dart'; import 'package:resistance/screens/show_mission_result.dart'; import 'package:resistance/screens/command_mission_before.dart'; import 'package:resistance/screens/show_game_result.dart'; import 'package:resistance/screens/how_to_play.dart'; import 'package:scoped_model/scoped_model.dart'; void main() { final app = AppModel(); runApp( ScopedModel<AppModel>( model: app, child: MyApp(), ), ); } class MyApp extends StatelessWidget { @override Widget build(BuildContext context) { return MaterialApp( debugShowCheckedModeBanner: false, title: 'レジスタンス vs スパイ', theme: ThemeData( primarySwatch: Colors.blue, textTheme: TextTheme( display4: TextStyle( fontFamily: 'Arial', fontWeight: FontWeight.w800, fontSize: 24, color: Colors.black, ), ), ), initialRoute: '/', routes: { '/': (context) => Home(), '/select_member_count': (context) => SelectMemberCount(), '/add_user': (context) => AddUser(), '/check_position_before': (context) => CheckPositionBefore(), '/check_position': (context) => CheckPosition(), '/discussion_time': (context) => DiscssionTime(), '/select_mission_member': (context) => SelectMissionMember(), '/vote_of_confidence': (context) => VoteOfConfidence(), '/vote_result': (context) => VoteResult(), '/command_mission_before': (context) => CommandMissionBefore(), '/command_mission': (context) => CommandMission(), '/show_mission_result': (context) => ShowMissionResult(), '/show_game_result': (context) => ShowGameResult(), '/how_to_play': (context) => HowToPlay(), }, ); } }2. 状態管理の方法を決める
アプリでは、画面をまたいで状態を保持しておく必要がありました。
Fulutter における状態管理の方法をあまり知らなかったので、とりあえず自分は「グローバルなステートがあればいいや」と思いました。
結果的には scoped_model を使い、1 つだけ app というモデルにアプリすべての状態を保持して管理することにしました。
app.dartimport 'dart:math'; import 'package:scoped_model/scoped_model.dart'; ... class AppModel extends Model { int _memberCount = 0; List _users = []; ... int get memberCount => _memberCount; String get memberCountString => '$_memberCount'; List get users => _users; ... void setMemberCount(int number) { _memberCount = number; } ... }(※長いので省略しています。ちなみに、コードは全体だと 300 行弱くらいです。)
今回のアプリ制作では、結果的にはこれであまり困ることなく開発を進められました。状態がそこまで多くないアプリであれば、これでもなんとかなるかもしれません。
3. 各画面を実装していく
あとは愚直に画面を作成していくだけです。各画面ではそれぞれ地味にロジックを考える必要があって少し悩むこともありましたが、一応最後まで実装することができました。
2. 状態管理の方法を決めるで定義した scoped_model から値やメソッドを呼び出す際はScopedModel.of<AppModel>(context)を利用します。参考までに、最初の画面のコードを貼っておきます。
select_member_count.dartimport 'package:flutter/material.dart'; import 'package:resistance/models/app.dart'; import 'package:scoped_model/scoped_model.dart'; import 'package:resistance/functions/to_home.dart'; class SelectMemberCount extends StatelessWidget { @override Widget build(BuildContext context) { return Scaffold( appBar: AppBar(title: Text('プレイ人数の設定'), actions: [ IconButton(icon: Icon(Icons.home), onPressed: () => toHome(context)), ]), body: Center( child: Padding( padding: const EdgeInsets.symmetric(horizontal: 64), child: Column( mainAxisAlignment: MainAxisAlignment.center, children: [ MyCustomForm(), ], ))), ); } } class MyCustomForm extends StatefulWidget { @override MyCustomFormState createState() { return MyCustomFormState(); } } class MyCustomFormState extends State<MyCustomForm> { final numberController = new TextEditingController(); String memberCount = '5'; void onClick(BuildContext context) { ScopedModel.of<AppModel>(context).setMemberCount(int.parse(memberCount)); Navigator.pushReplacementNamed(context, '/add_user'); } @override Widget build(BuildContext context) { return SingleChildScrollView( scrollDirection: Axis.horizontal, child: Row( mainAxisAlignment: MainAxisAlignment.center, children: <Widget>[ Text('プレイ人数:', style: TextStyle( fontSize: 18, )), DropdownButton<String>( value: memberCount, items: <String>['5', '6', '7', '8', '9', '10'].map((String value) { return DropdownMenuItem<String>( value: value, child: Text( value, style: TextStyle( fontSize: 18, ), ), ); }).toList(), onChanged: (value) { setState(() { memberCount = value; }); }, ), Padding( padding: const EdgeInsets.symmetric(horizontal: 16.0), child: FlatButton( onPressed: () => onClick(context), color: Colors.blue, child: Text( '次へ', style: TextStyle(color: Colors.white), ), ), ), ], )); } }苦労したポイント
開発する中で大変だった点をまとめてみます。
ホームに戻る挙動
画面右上のホームに戻るボタンを実装する際、ホームに戻りますか?というダイアログに対して
- はい → ホームに戻る
- いいえ → 元の画面に戻る
という挙動を実装するのに若干手間取ったのを覚えています。最終的には実装できたので、動作するコードを貼っておきます。
Navigator.of(context).pop()とNavigator.pushNamedAndRemoveUntil(context, '/', (_) => false)がポイントですね。to_home.dartimport 'package:flutter/material.dart'; import 'package:resistance/models/app.dart'; import 'package:scoped_model/scoped_model.dart'; void toHome(context) { showDialog( context: context, builder: (BuildContext context) { // return object of type Dialog return AlertDialog( title: Text("確認"), content: Text('ホームに戻ります。現在のゲームのデータはリセットされますが、よろしいですか?'), actions: <Widget>[ // usually buttons at the bottom of the dialog FlatButton( child: Text("いいえ"), onPressed: () { Navigator.of(context).pop(); }, ), FlatButton( child: Text("はい"), onPressed: () { Navigator.pushNamedAndRemoveUntil(context, '/', (_) => false); ScopedModel.of<AppModel>(context).reset(); }, ), ], ); }, ); }Admob が本番環境に反映されない
このアプリは firebase_admob を使って広告を表示していますが、本番環境にて広告が表示されずかなり悩んでいました。
が、結果的に原因はこのリンクにあるように、Admob 側で「お支払い」の設定をしていないことが原因でした・・・。
初めて Admob を使った収益化をする方は、気をつけたほうが良さそうです。
さいごに
全体を通しての感想としては、
- Dart は普段 JS / TS を書いている人であれば親しみやすい
- 実装自体は慣れれば割とスムーズにいけそう
- アプリ独特のリリースまでの流れが面倒だった
といった感じでしょうか。やはりアプリ特有のリリース手順や、開発環境の重さ(エミュレータの起動など)は慣れない部分もあり、Web の開発はその点楽だったんだな・・・と感じました。
とはいえ、これでアプリ開発は終了ではなく、今後も機会があればぜひ Flutter には触れていけたらなと思います?
また、全体通して設計には苦労したので、もし「自分だったらこのように実装するのにな〜」などといったアドバイスがありましたら、コメントにて教えていただけますと幸いです?♂️
もし今回の記事が参考になった方はぜひいいねしていただけますと嬉しいです?
最後まで読んでいただき、ありがとうございました!


- 投稿日:2019-12-11T13:33:35+09:00
【2019年12月版】iOS周りのトレンドを調べてみた
iOS Advent Calendar 2019の4日目担当の@satoshi-baba-0823です!
最近はBitrise職人になりつつありますが、頑張っていきますのでよろしくお願いします!はじめに
今年もiOS界隈ではたくさんのアップデートがあったかと思います。
Swift5やSwiftUIなど開発に関わることも多かったですよね。iOS界隈では毎年6月頃に実施されるWWDCで新機能発表されるケースが多く、その時期は注目を浴びる機能も多いです。
でも、発表直後はよく聞いたけど、最近あの機能の話聞かないなってことありますよね?
これってトリビアになりませんか?調査方法
Google Trendsでワードごとの比較などでざっくり調べてみたいと思います。
https://trends.google.co.jp/trends/集計対象は「すべての国」、「過去12か月間」、「すべてのカテゴリ」、「ウェブ検索」
調べてみた
ざっくりここ1年くらいでよく聞いたな〜とか、あれ?こいつってみんな対応してるのかな?って思うものを調べてみました。
Swift4 & Swift5
今年もやっぱりSwiftのアップデートありましたね!
まだまだSwfit4優勢かなと思ってましたが、Swift5が逆転しつつありますね。
アップデートして数ヶ月経ち安定した頃合いなので、そろそろ乗り換える頃合いかもしれませんね。
WatchOS6 & iOS13 & iPadOS & tvOS
今年はiPadOSが新たに発表されましたね。
発表直後とリリース直後はかなり調べられているものの、あまり関心は集められていないようです。
10月頃に跳ね上がっているのは、リリースしているアプリがiPadOSで動くか調査を命じられているSIerが多かったのですかね。
Dark Mode & Apple Arcade & Memoji
こちらはユーザに直接関係のありそうな機能です。
Memojiは今年もアップデート入ってましたよね。Dark Modeに関してはやはりiOS13リリース前後に跳ね上がってますね。おそらく開発者の動作確認などだと思います。
意外とApple Arcadeの検索が多くないのが意外でした。
もっとユーザに突き刺さっているかと思いましたが、やっぱり安いとは言え有料なのがネックなんですかね。
スマホゲーム界隈の闇を少し感じました。
ARKit & Sign in With Apple & SwiftUI
Sign in With Appleありましたね!
サードパーティの認証使っている開発者には激震走ったかと思います。別の意味でSwiftUIも激震が走りましたよね!
辛かったUIの構築がこれでかなり改善できるんじゃないかと期待できます。グラフを見るとやはりSwiftUIが注目を浴びています。
Sign in With Appleも必要に迫られている開発者が多いのか、徐々に上昇傾向にあります。それに比べてARKitは去年までに比べてかなり落ち着いていますね。
市場に出てから数年経ちますし目新しさがなくなって感があります。
これからサービスに取り入れる場合は、もう1つ工夫がないと埋もれてしまいそうです。
AR & Accessibility & Dark Mode
アクセシビリティも今年注目されたものの1つかなと思います。
機能や事例が増えてはいるものの、これ1つでサービスが劇的に変わるわけではないので、いまいち伸び悩んでいるようですね。
まとめ
やはり今年大注目のSwiftUIは伸び続けていて、来年にはiOSエンジニア必須の知識となりそうです。
Swiftもそろそろ5に引き上げる時期ですかね...!
僕も徐々に対応していこうかなと思います!それではみなさん!素敵なiOSライフをお送りください!
おまけ
AR & VR & MR & SR
xR系も比べてみました。
MRが恐らく僕が思っていたMRじゃない気がしますね。(医療用語的な)
SRもこんなに浸透しているわけないので、違うSRがヒットしている感じでしょうか。(ソシャゲ的な)
トレンド調査も難しいものがありますね。


- 投稿日:2019-12-11T11:18:50+09:00
Unityを使って手軽にスマホアプリからtoioを操作する方法(ライブラリ付き)
はじめに
Hiroshi Takagiと申します。普段は組み込みエンジニアをやっています。
toioで公開されている、技術仕様書とjavascriptライブラリを参考にしながら、Unityを使ってスマホアプリで動作するtoioの開発環境を作りました。
完成した。 pic.twitter.com/SNwwaIIcmn
— Hiroshi Takagi (@TkgHrsh) December 13, 2019技術仕様ver2.0.0で公開されているものはほぼすべて操作可能なスクリプトもご用意したので、興味ある方はぜひ使ってみてください。
ただ、できるだけ素早く簡単にできることを目標にしたので、Bluetooth Low Energy(BLE)の有料アセットが必要になります。
Unityはつい最近始めたのですが、学習にはこの本がおすすめです。
Unityの教科書 Unity2019完全対応版それではやっていきましょう。
使ったもの
- Unity (2018.4.14f1)
- toio コア キューブ 1台
- Mac 1台 [Mac mini(2018) OS Version10.14.6]
- iPhone 1台 [iPhone 7]
- Xcode(11.3)
Windows,Androidではまだ試していませんので、もしやってみたかたいましたら、ご連絡いただけると嬉しいです。
アセットのインポート
まずは以下のアセットを新規2Dプロジェクトにインポートします。
https://assetstore.unity.com/packages/tools/network/bluetooth-le-for-ios-tvos-and-android-26661アセットのImport方法が分からない方はこの記事を参考にするとよいかと思います。
キューブを操作するスクリプトの配置
以下をコピーして、プロジェクト内のC#スクリプトとして使用してください。
コード全文
CubeController.csusing System; using UnityEngine; public class CubeLightParams { public uint red; public uint green; public uint blue; public UInt16 durationMs; public CubeLightParams(uint red, uint green, uint blue, UInt16 durationMs) { this.red = red; this.green = green; this.blue = blue; this.durationMs = durationMs; } } public class CubeSoundParams { public uint noteNum; public UInt16 durationMs; public CubeSoundParams(uint noteNum, UInt16 durationMs) { this.noteNum = noteNum; this.durationMs = durationMs; } } public class CubeController : MonoBehaviour { public enum States { None, Scan, ScanRSSI, Connect, Disconnect, Connecting, } private const string DeviceName = "toio Core Cube"; private const string ServiceUUID = "10B20100-5B3B-4571-9508-CF3EFCD7BBAE"; private const string IdCharacteristic = "10B20101-5B3B-4571-9508-CF3EFCD7BBAE"; private const string SensorCharacteristic = "10B20106-5B3B-4571-9508-CF3EFCD7BBAE"; private const string ButtonCharacteristic = "10B20107-5B3B-4571-9508-CF3EFCD7BBAE"; private const string BatteryCharacteristic = "10B20108-5B3B-4571-9508-CF3EFCD7BBAE"; private const string MotorCharacteristic = "10B20102-5B3B-4571-9508-CF3EFCD7BBAE"; private const string LightCharacteristic = "10B20103-5B3B-4571-9508-CF3EFCD7BBAE"; private const string SoundCharacteristic = "10B20104-5B3B-4571-9508-CF3EFCD7BBAE"; private const string ConfigrationCharacteristic = "10B201FF-5B3B-4571-9508-CF3EFCD7BBAE"; private string[] _characteristics = { IdCharacteristic, SensorCharacteristic, ButtonCharacteristic, BatteryCharacteristic, MotorCharacteristic, LightCharacteristic, SoundCharacteristic, ConfigrationCharacteristic }; private float _timeout = 0f; private States _state = States.None; private string _deviceAddress; private int _foundCharCount = 0; private bool _rssiOnly = false; private int _rssi = 0; void Reset() { _timeout = 0f; _state = States.None; _deviceAddress = null; _foundCharCount = 0; _rssi = 0; } void SetState(States newState, float timeout) { _state = newState; _timeout = timeout; } void StartProcess() { Reset(); BluetoothLEHardwareInterface.Initialize(true, false, () => { SetState(States.Scan, 0.1f); }, (error) => { BluetoothLEHardwareInterface.Log("Error during initialize: " + error); }); } // Use this for initialization void Start() { StartProcess(); } // Update is called once per frame void Update() { if (_timeout > 0f) { _timeout -= Time.deltaTime; if (_timeout <= 0f) { _timeout = 0f; switch (_state) { case States.None: break; case States.Scan: BluetoothLEHardwareInterface.ScanForPeripheralsWithServices(null, (address, name) => { // if your device does not advertise the rssi and manufacturer specific data // then you must use this callback because the next callback only gets called // if you have manufacturer specific data if (!_rssiOnly) { if (name.Contains(DeviceName)) { BluetoothLEHardwareInterface.StopScan(); // found a device with the name we want // this example does not deal with finding more than one _deviceAddress = address; SetState(States.Connect, 0.5f); } } }, (address, name, rssi, bytes) => { // use this one if the device responses with manufacturer specific data and the rssi if (name.Contains(DeviceName)) { if (_rssiOnly) { _rssi = rssi; } else { BluetoothLEHardwareInterface.StopScan(); // found a device with the name we want // this example does not deal with finding more than one _deviceAddress = address; SetState(States.Connect, 0.5f); } } }, _rssiOnly); // this last setting allows RFduino to send RSSI without having manufacturer data if (_rssiOnly) SetState(States.ScanRSSI, 0.5f); break; case States.ScanRSSI: break; case States.Connect: // set these flags _foundCharCount = 0; // note that the first parameter is the address, not the name. I have not fixed this because // of backwards compatiblity. BluetoothLEHardwareInterface.ConnectToPeripheral(_deviceAddress, null, null, (address, serviceUUID, characteristicUUID) => { if (IsEqual(serviceUUID, ServiceUUID)) { for (int i = 0; i < this._characteristics.Length; i++) { if (IsEqual(characteristicUUID, this._characteristics[i])) { this._foundCharCount++; } } // if we have found all characteristics that we are waiting for // set the state. make sure there is enough timeout that if the // device is still enumerating other characteristics it finishes // before we try to subscribe if (this._foundCharCount == this._characteristics.Length) { SetState(States.Connecting, 0); batterySubscribe(); motionSensorSubscribe(); buttonSubscribe(); idInformationSubscribe(); } } }); break; } } } } bool IsEqual(string uuid1, string uuid2) { return (uuid1.ToUpper().CompareTo(uuid2.ToUpper()) == 0); } // // Motor // public void Move(int left, int right, uint durationMs) { if (_state != States.Connecting) { Debug.Log("Cube is not ready"); return; } byte leftDir = (byte)((left >= 0) ? 01 : 02); byte rightDir = (byte)((right >= 0) ? 01 : 02); byte leftVal = (byte)Math.Min(Math.Abs(left), 0xff); byte rightVal = (byte)Math.Min(Math.Abs(right), 0xff); byte dur = (byte)Math.Min(durationMs / 10, 0xff); byte[] data = new byte[] { 02, 01, leftDir, leftVal, 02, rightDir, rightVal, dur }; BluetoothLEHardwareInterface.WriteCharacteristic(_deviceAddress, ServiceUUID, MotorCharacteristic, data, data.Length, false, (characteristicUUID) => { BluetoothLEHardwareInterface.Log("Write Succeeded"); }); } public void MoveStop() { if (_state != States.Connecting) { Debug.Log("Cube is not ready"); return; } byte[] data = new byte[] { 01, 01, 01, 00, 02, 01, 00 }; BluetoothLEHardwareInterface.WriteCharacteristic(_deviceAddress, ServiceUUID, MotorCharacteristic, data, data.Length, false, (characteristicUUID) => { BluetoothLEHardwareInterface.Log("Write Succeeded"); }); } // // Light // public void LightUp(CubeLightParams[] arr, uint repeat) { if (_state != States.Connecting) { Debug.Log("Cube is not ready"); return; } if (arr.Length >= 30) { Debug.Log("too much array Length"); return; } byte[] data = new byte[3 + 6 * arr.Length]; int len = 0; data[len++] = 04; data[len++] = (byte)repeat; data[len++] = (byte)arr.Length; for (int i = 0; i < arr.Length; i++) { data[len++] = (byte)Math.Min(arr[i].durationMs / 10, 0xff); data[len++] = 01; data[len++] = 01; data[len++] = (byte)arr[i].red; data[len++] = (byte)arr[i].green; data[len++] = (byte)arr[i].blue; } BluetoothLEHardwareInterface.WriteCharacteristic(_deviceAddress, ServiceUUID, LightCharacteristic, data, data.Length, true, (characteristicUUID) => { BluetoothLEHardwareInterface.Log("Write Succeeded"); }); } public void LightOff() { if (_state != States.Connecting) { Debug.Log("Cube is not ready"); return; } byte[] data = new byte[] { 01 }; BluetoothLEHardwareInterface.WriteCharacteristic(_deviceAddress, ServiceUUID, LightCharacteristic, data, data.Length, true, (characteristicUUID) => { BluetoothLEHardwareInterface.Log("Write Succeeded"); }); } // // Sound // public void Sound(CubeSoundParams[] arr, uint repeat) { if (_state != States.Connecting) { Debug.Log("Cube is not ready"); return; } if (arr.Length >= 60) { Debug.Log("too much array Length"); return; } byte[] data = new byte[3 + 3 * arr.Length]; int len = 0; data[len++] = 03; data[len++] = (byte)repeat; data[len++] = (byte)arr.Length; for (int i = 0; i < arr.Length; i++) { data[len++] = (byte)Math.Min(arr[i].durationMs / 10, 0xff); data[len++] = (byte)arr[i].noteNum; data[len++] = 0xff; } BluetoothLEHardwareInterface.WriteCharacteristic(_deviceAddress, ServiceUUID, SoundCharacteristic, data, data.Length, true, (characteristicUUID) => { BluetoothLEHardwareInterface.Log("Write Succeeded"); }); } public void SoundPreset(uint id) { if (_state != States.Connecting) { Debug.Log("Cube is not ready"); return; } byte[] data = new byte[] { 02, (byte)id, 0xff }; BluetoothLEHardwareInterface.WriteCharacteristic(_deviceAddress, ServiceUUID, SoundCharacteristic, data, data.Length, true, (characteristicUUID) => { BluetoothLEHardwareInterface.Log("Write Succeeded"); }); } public void SoundOff() { if (_state != States.Connecting) { Debug.Log("Cube is not ready"); return; } byte[] data = new byte[] { 01 }; BluetoothLEHardwareInterface.WriteCharacteristic(_deviceAddress, ServiceUUID, SoundCharacteristic, data, data.Length, true, (characteristicUUID) => { BluetoothLEHardwareInterface.Log("Write Succeeded"); }); } // // Battery // private Action<uint> batteryCb = null; private void batterySubscribe() { BluetoothLEHardwareInterface.SubscribeCharacteristicWithDeviceAddress(_deviceAddress, ServiceUUID, BatteryCharacteristic, null, (address, characteristic, bytes) => { if (this.batteryCb != null) { this.batteryCb(bytes[0]); } }); } public void GetBattery(Action<uint> result) { this.batteryCb = result; } // // Motion Sensor // private bool lastCollisiton = false; private Action<bool, bool> motionSensorCb = null; private void motionSensorSubscribe() { BluetoothLEHardwareInterface.SubscribeCharacteristicWithDeviceAddress(_deviceAddress, ServiceUUID, SensorCharacteristic, null, (address, characteristic, bytes) => { Debug.Log("motion sensro changed"); if (this.motionSensorCb != null) { if (bytes[0] == 01) { bool flat = (bytes[1] == 01); bool collisiton = (bytes[2] == 01); this.motionSensorCb(flat, collisiton); this.lastCollisiton = collisiton; } } }); } public void GetMotionSensor(Action<bool, bool> result) { this.motionSensorCb = result; } // // Button // private Action<bool> buttonCb = null; private void buttonSubscribe() { BluetoothLEHardwareInterface.SubscribeCharacteristicWithDeviceAddress(_deviceAddress, ServiceUUID, ButtonCharacteristic, null, (address, characteristic, bytes) => { if (this.buttonCb != null) { if (bytes[0] == 01) { this.buttonCb(bytes[1] == 0x80); } } }); } public void GetButton(Action<bool> result) { this.buttonCb = result; } // // ID Information // private Action<UInt16, UInt16, UInt32, UInt16> idInformationCb = null; private void idInformationSubscribe() { UInt16 positionX = 0xffff; UInt16 positionY = 0xffff; UInt16 angle = 0xffff; UInt32 standardID = 0xffffffff; BluetoothLEHardwareInterface.SubscribeCharacteristicWithDeviceAddress(_deviceAddress, ServiceUUID, IdCharacteristic, null, (address, characteristic, bytes) => { if (this.idInformationCb != null) { switch (bytes[0]) { case 01: positionX = (UInt16)(bytes[1] | (bytes[2] << 8)); positionY = (UInt16)(bytes[3] | (bytes[4] << 8)); standardID = 0xffffffff; angle = (UInt16)(bytes[5] | (bytes[6] << 8)); this.idInformationCb(positionX, positionY, standardID, angle); break; case 02: positionX = 0xffff; positionY = 0xffff; standardID = (UInt32)(bytes[1] | (bytes[2] << 8) | (bytes[3] << 16) | (bytes[4] << 24)); angle = (UInt16)(bytes[5] | (bytes[6] << 8)); this.idInformationCb(positionX, positionY, standardID, angle); break; case 03: case 04: positionX = 0xffff; positionY = 0xffff; standardID = 0xffffffff; angle = 0xffff; this.idInformationCb(positionX, positionY, standardID, angle); break; } } }); } public void GetIdInformation(Action<UInt16, UInt16, UInt32, UInt16> result) { this.idInformationCb = result; } }このスクリプトは、自動的にキューブを探してペアリングして、完了すると各機能の操作および状態の通知が実行されるようになっています。
サンプルアプリケーションの作成
以下をコピーして、プロジェクト内のC#スクリプトとして使用してください。
コード全文
Director.csusing System.Collections; using System.Collections.Generic; using UnityEngine; using UnityEngine.UI; public class Director : MonoBehaviour { GameObject Battery; GameObject Flat; GameObject Collision; GameObject CubeController; GameObject Button; GameObject PositionID; GameObject StandardID; GameObject Angle; GameObject Tap; bool enMove = false; // Start is called before the first frame update void Start() { this.Battery = GameObject.Find("Battery"); this.Flat = GameObject.Find("Flat"); this.Collision = GameObject.Find("Collision"); this.CubeController = GameObject.Find("CubeController"); this.Button = GameObject.Find("Button"); this.PositionID = GameObject.Find("PositionID"); this.StandardID = GameObject.Find("StandardID"); this.Angle = GameObject.Find("Angle"); this.Tap = GameObject.Find("Tap"); notifyStatus(); } // Update is called once per frame void Update() { if (Input.GetMouseButtonDown(0)) { if (enMove) { stopMove(); } else { startMove(); } enMove = !enMove; } } private void startMove() { CubeSoundParams[] sound = new CubeSoundParams[4]; sound[0] = new CubeSoundParams(60, 200); sound[1] = new CubeSoundParams(72, 200); sound[2] = new CubeSoundParams(84, 200); sound[3] = new CubeSoundParams(128, 1000); CubeLightParams[] light = new CubeLightParams[4]; light[0] = new CubeLightParams(255, 255, 0, 400); light[1] = new CubeLightParams(0, 255, 255, 400); light[2] = new CubeLightParams(255, 0, 255, 400); light[3] = new CubeLightParams(255, 255, 255, 400); this.CubeController.GetComponent<CubeController>().Sound(sound, 0); this.CubeController.GetComponent<CubeController>().LightUp(light, 0); this.CubeController.GetComponent<CubeController>().Move(20, 20, 0); this.Tap.GetComponent<Text>().text = "Tap to stop moving"; } private void stopMove() { this.CubeController.GetComponent<CubeController>().SoundOff(); this.CubeController.GetComponent<CubeController>().LightOff(); this.CubeController.GetComponent<CubeController>().MoveStop(); this.Tap.GetComponent<Text>().text = "Tap to start moving"; } private void notifyStatus() { this.CubeController.GetComponent<CubeController>().GetBattery((result) => { this.Battery.GetComponent<Text>().text = "Battery残量 : " + result.ToString("D3") + "%"; }); this.CubeController.GetComponent<CubeController>().GetMotionSensor((isFlat, isCollision) => { if (isFlat) { this.Flat.GetComponent<Text>().text = "水平検出 : 水平"; } else { this.Flat.GetComponent<Text>().text = "水平検出 : 水平でない"; } if (isCollision) { this.Collision.GetComponent<Text>().text = "衝突検出 : 衝突あり"; } else { this.Collision.GetComponent<Text>().text = "衝突検出 : 衝突なし"; } }); this.CubeController.GetComponent<CubeController>().GetButton((result) => { if (result) { this.Button.GetComponent<Text>().text = "ボタン : ON"; } else { this.Button.GetComponent<Text>().text = "ボタン : OFF"; } }); this.CubeController.GetComponent<CubeController>().GetIdInformation((positionX, positionY, standardID, angle) => { if (positionX != 0xffff || positionY != 0xffff) { this.PositionID.GetComponent<Text>().text = "X座標 : " + positionX.ToString("D3") + " / Y座標 : " + positionY.ToString("D3"); } else { this.PositionID.GetComponent<Text>().text = "Position ID情報なし"; } if (standardID != 0xffffffff) { this.StandardID.GetComponent<Text>().text = "Standard Id : " + standardID.ToString("D7"); } else { this.StandardID.GetComponent<Text>().text = "Standard ID情報なし"; } if (angle != 0xffff) { this.Angle.GetComponent<Text>().text = "角度 : " + angle.ToString("D3"); } else { this.Angle.GetComponent<Text>().text = "角度情報なし"; } }); } }今回のサンプルアプリケーションの構成です。
下図のように、空のObjectを二つ(CubeController, Director)とTextオブジェクト(Battery, Flat, Collision, Button, PositionID, StandardID, Angle, Tap)を8個を登録してください。
名前を間違えるとうまく動きませんのでご注意ください。Textの配置とサイズは適当にお願いします。最後に、CubeControllerにCubeController.csを、DirectorにDirector.csをアタッチすれば準備完了です。
試しにPC上で、実行して動作するか確認してみてください。
ビルドしてスマホに移す
この記事を参考にするとよいと思います。
iOSの話になってしまいますが、一点注意点です。
XCODEから実行する際に、下図のように、Infoに[Privacy - Bluetooth Always Usage Description]を追加する必要があります。これがないとアプリが起動できなくなります。
さいごに
うまく動きましたでしょうか?
あとはサンプルアプリケーションを参考に、自分のオリジナルのtoioアプリが作成できると思いますので、ぜひ使ってみてください。最新のtoioの技術仕様書を見ると、ver2.1.0に更新されているので、またアップデートしてご紹介したいと思います。
それではよいクリスマスをお過ごしください。


- 投稿日:2019-12-11T11:06:59+09:00
React NativeとFlutterのレンダリングアーキテクチャ
はじめに
React NativeとFlutterのレンダリングアーキテクチャについて紹介します。
React NativeとFlutterは、ともにモバイルアプリのクロスプラットフォーム開発フレームワークですが、JS/Dartコードとネイティブコード間の相互通信の方法、コアエンジンの違いなど、様々な違いが存在します。
本記事では、それらの内容について紹介したいと思います。
React Native
React Nativeでは、これまでのJavaScriptクロスプラットフォームフレームワークとは異なり、プラットフォームごとにネイティブウィジェットを呼び出しレンダリングを行います。
以下では、レンダリングが行われるまでの仕組みと、JavaScriptとネイティブコード間の通信について紹介します。
Thread
React Native ではすべての処理が以下のスレッドで実行されます。
- Main Thread
- Shadow Queue (Shadow Node Thread)
- Native Modules
- JS Thread
Main ThreadはUIのレンダリングを行うスレッドです。TouchやPressなどのインタラクションイベントの受け取りも行い、ブリッジを介してJS Threadへ通知します。
Shadow QueueはUIのレンダリングに必要なプロパティを受け取り、UIの位置を決定するための演算処理を行います。レンダリングをする準備が整うとMain Threadに処理を引き渡します。
Native ModulesはネイティブAPIを使用した処理を行い、各Native Moduleは独自のスレッドで動作します。iOSではパラレルGCDキューを使用し、Androidではスレッドプールを共有します。
JS ThreadはすべてのJavaScriptアプリケーションコードが実行されるスレッドです。JavaScriptイベントループに基づいているため、UIスレッドよりも遅く、アプリケーションで複雑な計算を行って多くのUIを変更すると、パフォーマンスが低下する可能性があります。ブリッジ
JavaScriptとネイティブコード間のすべての通信およびメッセージはブリッジを介します。
ブリッジを介した情報は、
Async Serialized Batchedにより下記のJSON形式にシリアル化され、MessageQueueで処理されます。example// type: 0=N->JS, 1=JS->N type BridgeData = { type: number, module: ?string, method: string | number, args: any }ネイティブモジュール
ネイティブモジュールは、ネイティブAPIへのアクセスを提供します。
最初に、ネイティブモジュールまたはUIコンポーネントを構築する必要があるかどうかを選択する必要があります。ネイティブモジュールは、メソッドと定数をエクスポートするだけでUIをレンダリングは行いません。
UIコンポーネント
UIコンポーネントを構築するには、ViewManager を使用します。ViewManager は View を生成するファクトリで、ViewManager 自身のインスタンスがブリッジごとに作成されます。
ViewManagerとブリッジは以下の図の通りに働き、ネイティブビューをレンダリングします。
- ブリッジは、全てのネイティブモジュールの情報を保持します
- ネイティブコンポーネントを要求します (
requireNativeComponent)- ViewManagerは、ブリッジのビューインスタンスへの参照を格納するビューを作成します
- ビューの参照を送信します
- 他のReact Componentと同様に
renderを呼び出し、最終的にネイティブビューをレンダリングしますFlutter
一方、フラッターではネイティブウィジェットのレンダリングを行いません。Dartフレームワークで管理されたウィジェットを呼び出し、レンダリングエンジンに依存して2Dウィジェット要素をペイントします。
主にC++で記述されたFlutterのレンダリングエンジンは、GoogleのSkia Graphics Libraryを使用して低レベルのレンダリングサポートを提供します。
参照: The-Engine-architecture - GitHubThread
Flutterエンジンは、独自のスレッドを作成または管理せず、
Embedder(各プラットフォーム)で作成・管理する必要があります。また、EmbedderはFlutterエンジンのスレッドで動作するTask Runnerを提供します。The Flutter engine does not create or manage its own threads. Instead, it is the responsibility of the embedder to create and manage threads (and their message loops) for the Flutter engine. The embedder gives the Flutter engine task runners for the threads it manages. In addition to the threads managed by the embedder for the engine, the Dart VM also has its own thread pool. Neither the Flutter engine or the embedder have any access to the threads in this pool.
Task Runner
主なタスクランナーは次のとおりです。
Platform Task RunnerUI Task RunnerGPU Task RunnerIO Task Runner
Platform Task Runnerは、Embedderがメインスレッドと見なすスレッドのタスクランナーです。
例えば、Androidではメインスレッド、iOSではFoundationによって参照されるメインスレッドです。
UI Task Runnerは、エンジンがRoot IsolateのすべてのDartコードを実行する場所です。
GPU Task Runnerは、デバイス上のGPUにアクセスする必要があるタスクを実行します。OpenGLVulkanなどのSkia用にセットアップされたバックエンドソフトウェアを使用してレンダリングを行うことができます。
IO Task Runnerは、主にアセットから圧縮画像を読み取り、画像データを処理し、共有のContextを通じてGPU Task Runnerに処理を引き渡すことができます。つまり、ディスクIOに関連するトランザクションが処理されます。レンダリング結果の違い
React NativeとFlutterでレンダリングアーキテクチャが大きく異なる点として、React Nativeはネイティブコードが提供するモジュールをレンダリングし、FlutterはDartフレームワークに組み込まれたウィジェットを、Skia Graphics Libraryがレンダリングする点です。
これは、ウィジェットが最終的にレンダリングされる結果に違いを及ぼします。
上記の例として、マテリアルデザインが採用された Android 5.0 (APILevel 21) 以降と未満ではUIが大きく変わります。
実際にReact Nativeで作成したアプリでは、特別な処理やライブラリを入れない限り、ネイティブコードをレンダリングするため、上記の仕様が踏襲されるはずです。
一方、Flutterのレンダリングエンジンは、OSバージョンやAPILevelに関係なく、Dartフレームワークに組み込まれたマテリアルデザインウィジェット(Android)/クパチーノウィジェット(iOS)をレンダリングするため、バージョンの差分を吸収して同じ結果が出力されるはずです。
おわりに
これらの内容は、アプリのパフォーマンスチューニングを行う場合や、ネイティブAPIを使用する必要がある場合にとても役立つ情報となります。
また、コアレンダリングエンジンの違いは、技術選定を行う上で重要なポイントとなるのではないでしょうか。
この記事が少しでもモバイルアプリ開発者の参考になれば幸いです。参考URL


- 投稿日:2019-12-11T09:53:37+09:00
Xcode 11.0で追加された便利機能まとめ
この記事は、NTTテクノクロス Advent Calendar 2019 13日目です。
NTTテクノクロスの神長です。
社内では、モバイル向けアプリ開発の技術支援、ノウハウ記事の執筆、社内研修講師等を担当してます。また、2018年から、地域の小学生を対象にしたプログラミング教育も行なってます。
はじめに
本記事では、「Xcode 11.0で追加された便利機能まとめ」と題し、 簡単且つ、直ぐに使える!便利な機能 をPick upして紹介します。
- エディタ関連
- 管理関連
- テスト・デバック関連
Xcode 11.0の便利機能
エディタ関連
inline code diffs
inline code diffsは、ローカルファイルのコードの変更前後の箇所をわかり易く明示する機能です。
ここでは、以下項目を説明します。
- 表示
- 非表示
- 変更の取り止め
表示
ソースコードから
print("Sample")を削除した場合を例に、表示の説明をします。override func viewDidLoad() { super.viewDidLoad() print("Sample") }
- チェンジバーをクリックし、以下のメニュー画面を表示後、 「Show Change」 を選択します。
- 以下のように、変更箇所が表示されます。
非表示
- チェンジバーをクリックし、以下のメニュー画面を表示後、 「Hide Change」 を選択します。
変更の取り止め
- 変更の取り止めを行う場合、チェンジバーをクリックし、以下のメニュー画面を表示後、 「Discard Change」 を選択します。
- 実行後、コードが変更前の状態に戻ります。(削除したコード(print("Sample"))が元に戻る場合を掲載してます。)
Spell Checking
Spell Checkingは、ソースコード内の誤字を検出。検出した誤字の修正ができる機能です。
ここでは、以下項目を説明します。
- オープン中のファイルに対して、スペルチェック
- 自動的にスペルチェック
- スペル候補の表示
オープン中のファイルに対して、スペルチェック
以下操作を行うことで、オープン中のファイルに対してのスペルチェック(変数、関数、クラス等)が行えます。
Check Document Now
- Xcodeのメニューから、 「Edit > Format > Spelling and Grammar > Check Document Now」 を実行します。
- 誤り箇所が、以下のようにハイライトされます。
Show Spell Checking and Grammar
- Xcodeのメニューから、 「Edit > Format > Spelling and Grammar > Check Document Now」 を実行します。
- 誤り箇所の修正、修正候補が表示される画面が表示されます。 青枠箇所に変更を行いたい文字を入力後、 Changeボタン を押下することで、誤った文字の修正が行えます。
自動的にスペルチェック
以下操作を行うことで、コード記述時に自動的にスペルチェックが行われます。
- Xcodeメニューから、 「Edit > Format > Spelling and Grammar > Check Spelling While Typing」 を実行します。
スペル候補の表示
以下操作を行うことで、正しいと考えられるスペルの候補が表示されます。
- 誤り箇所を選択→右クリック を実行します。
Mini Map
Mini Mapは、すばやく任意のセクションに移動したり、マウスオーバーで関数名を表示する等、ソースコードの読み込みを行う際の生産性が向上が期待できる機能です。ここでは、以下項目を説明します。
- 起動
- 停止
起動
Xcodeメニューから、以下操作を行うことでMini Mapを起動できます。
- Editor > Minimap を実行します。
- 実行後、エディターの右上にMini Mapが出現します。 マウスオーバーすることでコード内の構成の閲覧が行え、クリックすることで任意のセクションへの移動が行えます。
また、Mini Mapを表示中に検索を行なった場合、検索内容と一致する部分がMini Mapにも反映され、エディタ上で選択中の箇所が強調表示されます。
停止
Xcodeメニューから、以下操作を行うことでMini Mapを停止できます。
- Minimapにチェックがついている状態で、 Editor > Minimap を実行します。
Documentation function
以下の機能を説明します。
- Edit All in Scope
- Add Documentation
なお、本機能は、任意のコードを選択した状態から、 Commandボタン+クリック で起動します。
起動すると以下のメニュー画面が表示されます。
Edit All in Scope
Edit All in Scopeは、コード上で選択した定義を全選択、同時編集可能な状態にする機能です。
同一定義を一括で編集する場合の効率アップ、人的ミスの派生を防止することができます。
Add Documentation
実行箇所に、ドキュメンテーションコメントの雛形を挿入する機能です。
また、関数に引数を追加した後に、当該機能を実行すると追加した引数のドキュメンテーションコメントの雛形を追加します。
管理関連
管理関連として、以下の機能を説明します。
- パッケージ管理(Swift Package Manager)
- 構成管理(Gitコマンド)
パッケージ管理(Swift Package Manager)
Swift Package Managerとは、CocoaPodsやCarthageと同じように、パッケージの依存関係を解決し、プロジェクトで利用できるようにするパッケージ管理ツールです。
このSwift Package Managerが、Xcode 11.0からXcodeの機能として利用できるようになりました。
Xcode 11.0が登場するまでは、Swift Package Managerは、macOS、Linuxのターミナル上で実行するアプリやサーバーサイドのプログラム等に利用されてきましたが、Xcode 11.0からは、iOSアプリのプロジェクトでも使えるようになりました。ここでは、以下項目を説明します。
- 事前準備
- パッケージの追加
- パッケージの削除
事前準備
事前準備として、以下設定を行います。
- Preference…のAccountsにGitHub等のパッケージ取得先のアカウントを追加します。
パッケージの追加
以下操作でパッケージを追加できます。
- Xcodeメニューから、 File>Swift Packages>Add Package Dependency を実行します。
- 以下画面が表示されるので、画面上段の検索フィールドにインポートするパッケージの名称を入力後、パッケージが表示されるので、選択後、Nextボタンを押下します。
- 以下画面が表示されるので、Version/Branch/Commitの何かを選択し、Nextボタンを押下します。
- 以下画面が表示されるので、Finishボタンを押下します。
- プロジェクトツリーに、パッケージが追加されていることを確認します。
- 最後にパッケージを利用したいコードに定義します。
パッケージの削除
取得したパッケージを削除する場合は、以下操作を行ってください。
- Projectの Swift Packages を開きます。
- 削除したいパッケージを選択し、-ボタンを押下すると、以下画面が表示されるのでRemoveボタンを押下します。
- プロジェクトツリーからパッケージが削除されていることを確認します。
構成管理(Gitコマンド)
Xcode 11.0から、Xcodeで利用できるGitコマンドに、以下コマンドが追加されました。
ここでは、各コマンドの詳細を説明します。
- Stash Changes…
- Cherry-Pick…
Stash Changes…
Stash Changes…とは、commitしていない変更を一時退避できる機能です。
利用方法は、以下の通りです。
- Xcodeメニューから、 Source Control>Stash Changes… を実行します。
- 以下の画面が表示されるので、必要に応じて後で参照できるように、変更の説明を入力します。入力後、Stashボタンを押下します。なお、入力した説明は、ソース管理ナビゲータに表示されます。
Cherry-Pick…
Cherry-Pick…とは、別ブランチでのcommitを反映できる機能です。
利用方法は、以下の通りです。
- Xcodeメニューから、 Source Control>Cherry-Pick… を実行します。
- 以下の画面が表示されるので、必要に応じて後で参照できるように、変更の説明を入力します。 入力後、Cherry-Pickボタンを押下します。なお、入力した説明は、ソース管理ナビゲータに表示されます。
テスト・デバック関連
テスト・デバック関連として、以下の機能を説明します。
- Device Conditions
- Environment Overrides
- Debugging SwiftUI View Hierarchies
Device Conditions
Device Conditionsとは、Xcode 11.0から追加された端末の発熱状態をシミュレートする 「Thermal state condition」 と端末の通信状態をシュミレートする 「Network link condition」 の2機能を指します。
Xcode 11.0リリース以前は、デバイスの状態に関わるテスト・デバックには、端末の利用が必須でしたが、Xcodeで設定を行い、テスト・デバックができるようになりました。
ここでは、この2機能の説明をします。
- Thermal state condition
- Network link condition
Thermal state condition
Xcode 11.0から、端末の発熱をシミュレートする「Thermal state condition」が実装されました。
この機能の最大のメリットは、 端末(実機)を実際に発熱させることなく、温度の変化によるアプリの動作をテスト・デバックできる点 です。
この機能は、Xcodeメニューより、以下の操作を行うことで、利用できます。
- Window>Devices and Simulatorsを実行します。
- 以下の画面が表示されるので、 「Condition」に「Thermal State」 を設定し、 「Profile」に以下3種の何かの状態 を設定する。
Profile詳細
- Fair:やや高い。
- Serious:高い。
- Critical:非常に高い。
- 設定完了後、startボタンを押下します。
Network link condition
Xcode 11.0から、端末の通信状態をシュミレートする「Network link condition」が実装されました。
この機能の最大のメリットは、 直接端末の通信状態をシュミレートし、通信状態の変化によるアプリの動作をテスト・デバックできる点 です。
この機能は、Xcodeメニューより、以下の操作を行うことで、利用できます。
- Window>Devices and Simulatorsを実行します。
- 以下の画面が表示されるので、 「Condition」に「Network Link」 を設定し、「Profile」に以下の何かの状態 を設定します。
Profile詳細
- 100% packet loss
- Very poor network
- Edge Network - poor
- Edge Network - average
- Edge Network - good
- Edge Network - best
- 2G Network - poor
- 2G Network - better
- 3G Network - average
- 3G Network - good
- 3G Network - bet
- LTE Network
- WiFi Network
- WiFi Network (802.11ac)
- DSL Network
- High Latency DNS
- 設定完了後、startボタンを押下します。
Environment Overrides
Xcode 11.0より、デバック領域に「Environment Overrides」が実装されました。
この機能の最大のメリットは、 実機、シミュレータに対して、表示に関する設定やアクセシビリティの設定の変更をリアルタイムに反映できる点 です。
この機能を活用することで、設定変更時のアプリのレイアウト崩れを確認するテスト等の生産性を向上させることができます。この機能は、以下の操作を行うことで利用できます。
- デバック領域にあるEnvironment Overridesボタンを押下します。
- 以下の画面が表示されることを確認します。この画面より、各種設定の変更を行うことができます。
Debugging SwiftUI View Hierarchies
iOS13からのSwiftUIサポートに伴い、Xcode 11.0よりDebug View HierarchyもSwiftUIの対応がなされました。
これにより、Debug View Hierarchyの画面でSwiftUIのコンポーネント毎の情報が、インスペクタに表示されるようになり、SwiftUI実装時、リアルタイム且つ、コンポーネント単位の確認が行えるようになりました。
なお、Debug View Hierarchyの画面は、デバック領域にあるDebug View Hierarchyボタンを押下することで表示できます。(イメージ内の赤枠箇所)
参考・引用
以下のサイトを参考に記事を執筆しました。
また、引用したソースコードの一部(SwiftUI関連)は、以下のサイトで公開されているソースコードを引用してます。
おわりに
最後まで読んで頂き、ありがとうございます。
私が、初めてXcodeに触ったのは、今から3年前でした。
今日までに、様々な機能の追加・改善がなされ、年々使い易くなってゆくため、毎年のバージョンアップが楽しみです。今回は、Xcodeに焦点を当てた記事を執筆しましたが、今後は、iOS、Swift、プログラミング教育を行う過程で得た知見・ノウハウ等の記事も公開できればと考えてます。
それでは、NTTテクノクロス Advent Calendar 2019の14日目にバトンタッチします。
引き続き、お楽しみください。


- 投稿日:2019-12-11T08:22:20+09:00
iOSアプリでapi叩いてみた
はじめに
前回の記事で、golangでapiを作成しました。
→ golangで楽々API作成
api作ったら、叩きたくなるのが男の性今回の記事では、*簡単に*apiからjsonを取得し、table viewに表示する方法を書きたいと思います。
細かいところの説明は省略しますが、機会があったらまとめたいと思います。GitHubからEC2にPull
省略しますが、前回作成したapiを公開しました。
画面を作成する
とりあえず画面を作成します。
Table Viewの上に、cellを置き、さらにその上にボタンやラベルを置きます。
今回は、「タスクの完了/未完了を設定するボタン」「タスク名を表示するラベル」「期限を表示するラベル」の3つを設置します。
コード上で識別できるように、3つそれぞれのtagに数字を設定します。
(画像では、完了/未完了を設定するボタンのtagに「1」を設定している)api叩いてみる
ViewController.swiftimport UIKit class ViewController: UIViewController { override func viewDidLoad() { super.viewDidLoad() let url: URL = URL(string: "http://xxx.xxx.xxx.xxx:xxxx/api/v1/tasks")! let task: URLSessionTask = URLSession.shared.dataTask(with: url, completionHandler: {data, response, error in do { let json = try JSONSerialization.jsonObject(with: data!, options: JSONSerialization.ReadingOptions.allowFragments) as! [Any] let jsonMap = json.map { (jsonMap) -> [String: Any] in return jsonMap as! [String: Any] } print(jsonMap) } catch { print(error) } }) task.resume() } }viewDidLoad()は、画面描画の前に呼ばれるメソッド。
ここで、apiを叩いてみる!
task.resume()実行後、dataの中にgetに対するレスポンスがかえってくる。
その後の処理で、JSONにパース。
実行結果↓(JSON形式でデータを取得できているのが確認できます。)
TableViewのCellに表示してみる
ViewController.swiftimport UIKit class ViewController: UIViewController, UITableViewDataSource, UITableViewDelegate{ @IBOutlet weak var tableView: UITableView! var jsonMap: [[String: Any]] = [] override func viewDidLoad() { super.viewDidLoad() tableView.delegate = self tableView.dataSource = self let url: URL = URL(string: "http://xxx.xxx.xxx.xxx:xxxx/api/v1/tasks")! let task: URLSessionTask = URLSession.shared.dataTask(with: url, completionHandler: {data, response, error in do { let json = try JSONSerialization.jsonObject(with: data!, options: JSONSerialization.ReadingOptions.allowFragments) as! [Any] self.jsonMap = json.map { (jsonMap) -> [String: Any] in return jsonMap as! [String: Any] } print(self.jsonMap) } catch { // 例外処理を書く print(error) } }) task.resume() } // セルの設定 // ここで、セルの中身を設定する func tableView(_ table: UITableView, cellForRowAt indexPath: IndexPath) -> UITableViewCell { let cell: UITableViewCell = table.dequeueReusableCell(withIdentifier: "cell", for: indexPath) let taskNameLbl = cell.viewWithTag(2) as! UILabel let deadlineLbl = cell.viewWithTag(3) as! UILabel taskNameLbl.text = jsonMap[indexPath.row]["TaskName"] as? String deadlineLbl.text = jsonMap[indexPath.row]["Deadline"] as? String return cell } // セル数の設定 // 今回は、apiを叩いた後、jsonMapにデータが格納されるので、`jsonMap.count`を設定 func tableView(_ table: UITableView, numberOfRowsInSection section: Int) -> Int { return jsonMap.count } // セルの高さを設定 func tableView(_ table: UITableView, heightForRowAt indexPath: IndexPath) -> CGFloat { return 90.0 } }Main.storyboardのTable ViewをIBOutletで
tableViewと紐付けます。
その後、UITableViewDataSource, UITableViewDelegateを継承し、必要なメソッドを追加します。
cellの中身は、追加したメソッドの中で設定!動かしてみる
リストが表示されない...
デバックコンソールを見る限り、apiからデータの取得はできている...原因
apiからのレスポンスがかえってくる前に、tableviewが描画されていることが原因!
レスポンス取得後、viewを再描画してあげればいい
self.tableView.reloadData()をprint(self.jsonMap)の前後に追加
無事表示できました。今後
今回は、swiftでGETでapiからデータ取得を行いました。
データの取得以外にも更新/削除などアプリから操作できるようになりたいですね。
また、機能を拡張するにあたり、もう少し綺麗にコードを整理したいとおもいます。


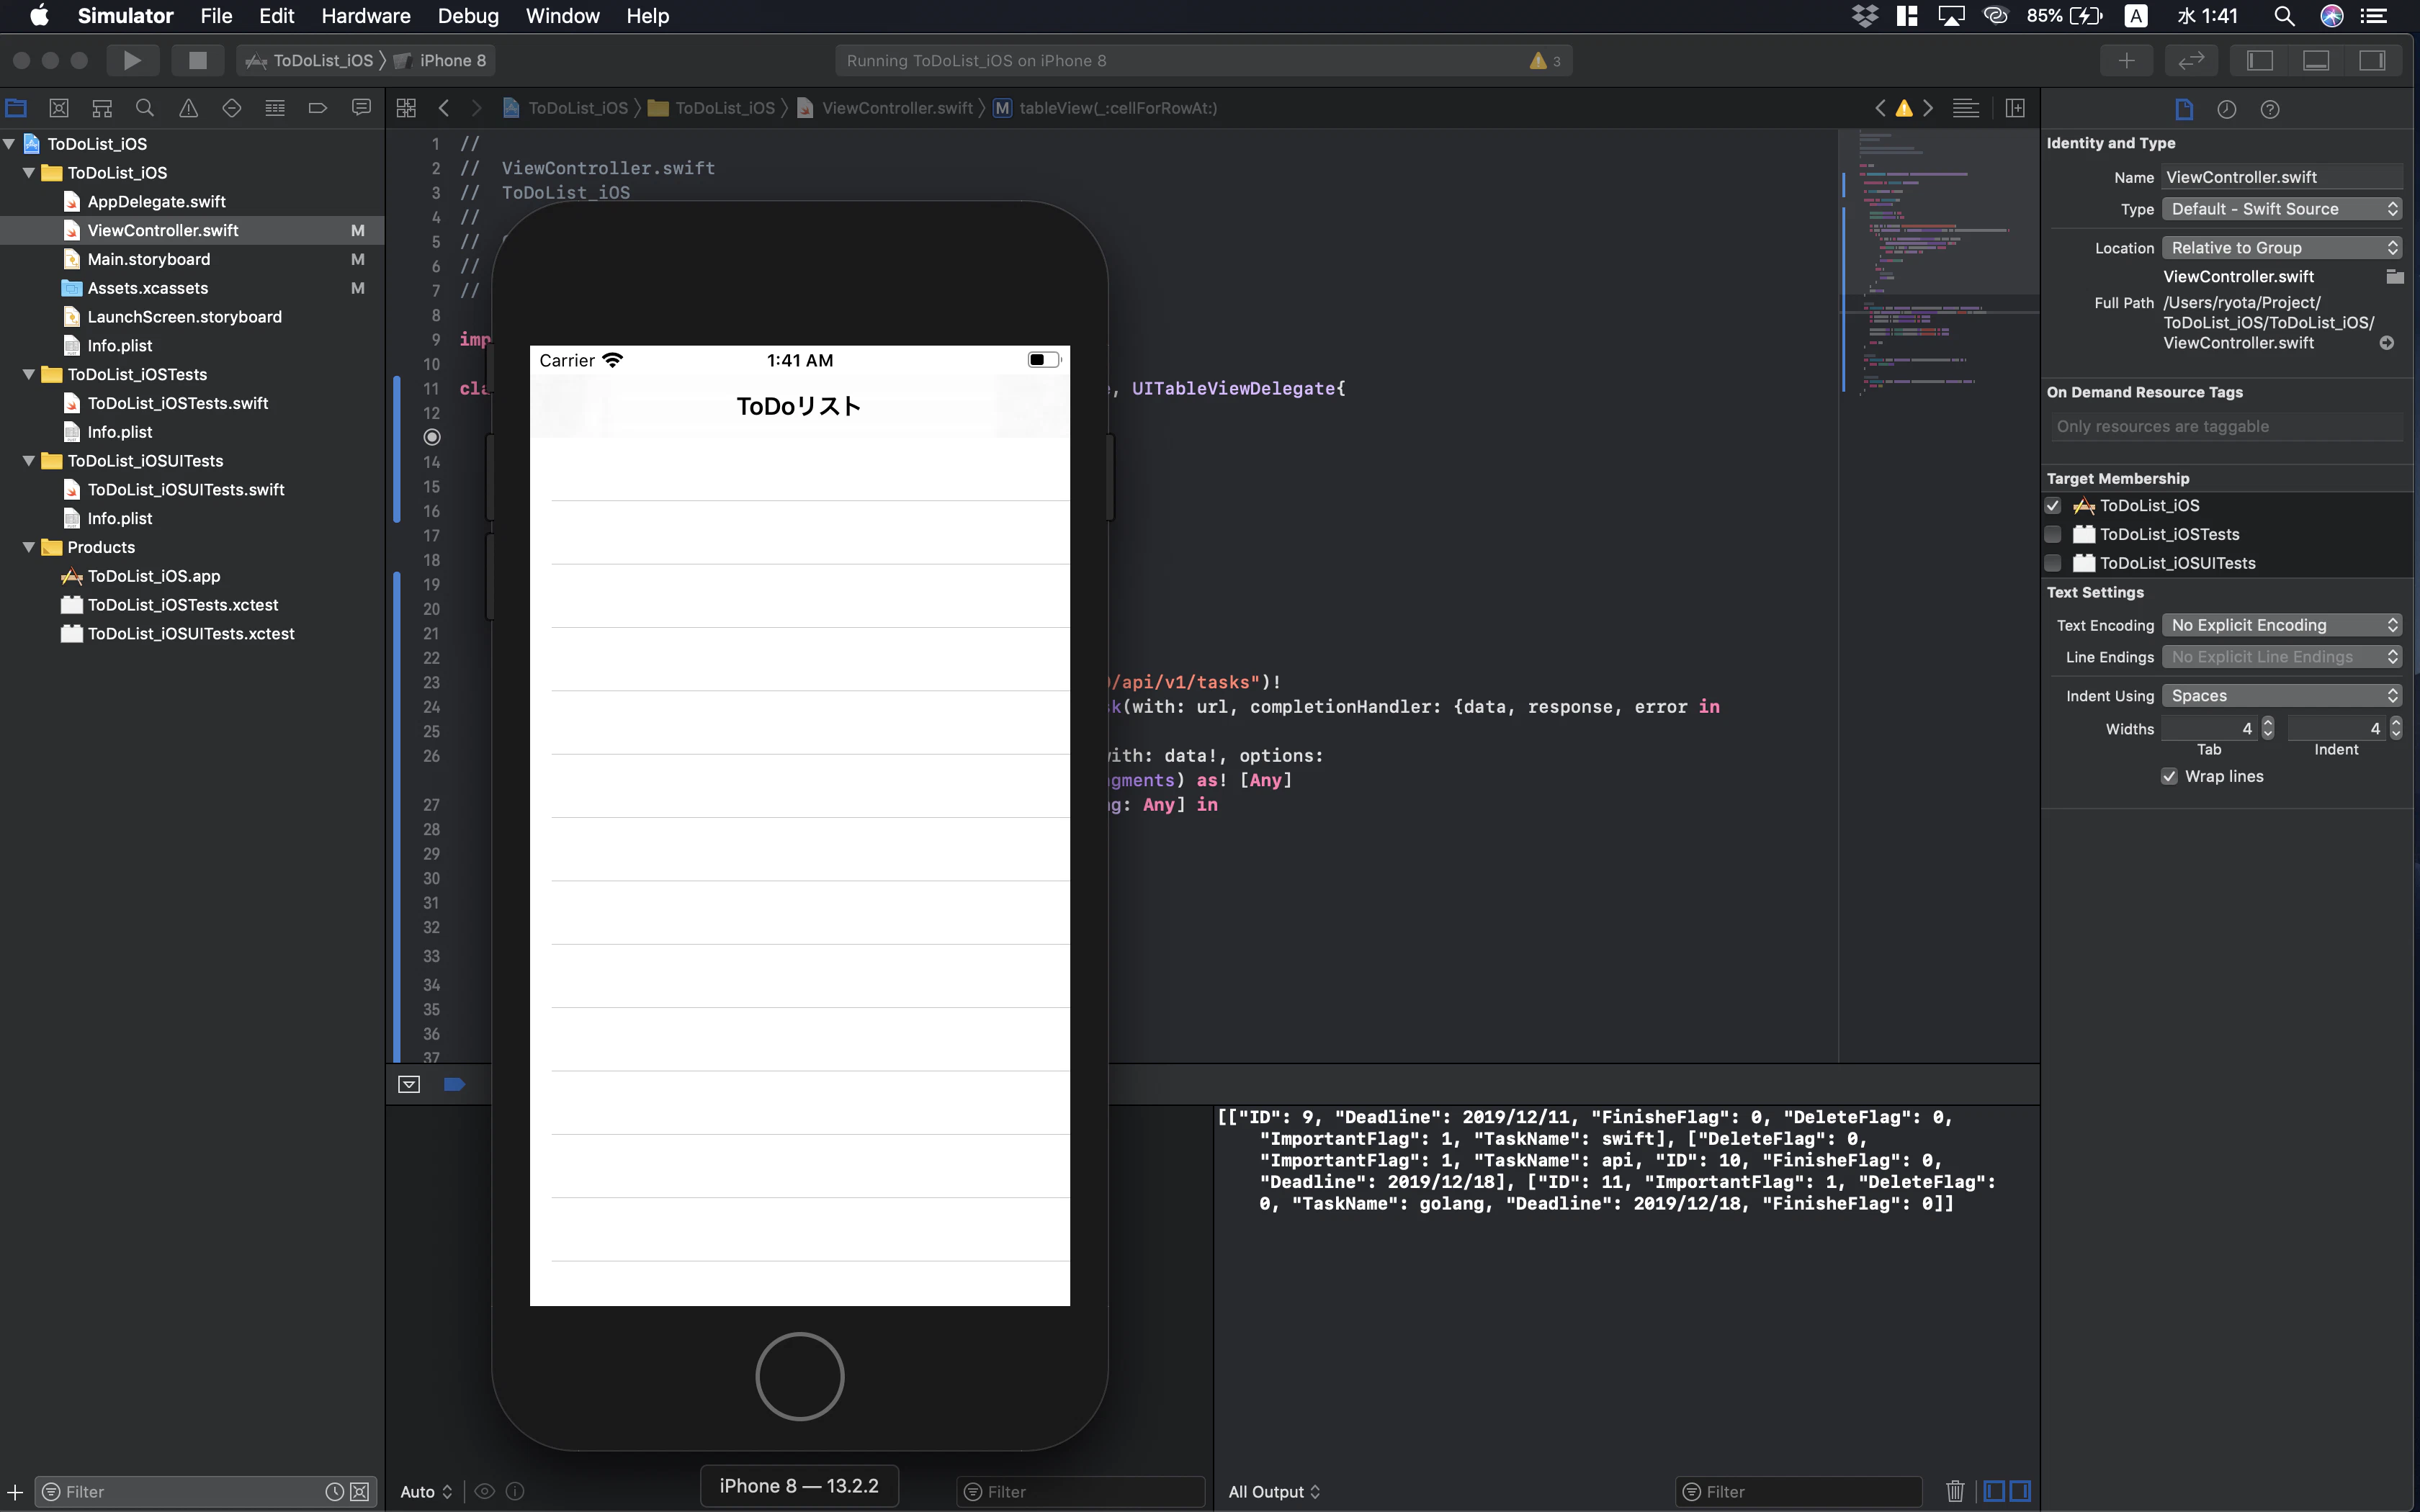

- 投稿日:2019-12-11T05:48:25+09:00
iosアプリケーションのリバースエンジニアリングメモ
使えるツール
- frida
- Hopper Disassembler
- dsdump
- strings
- otool
- プロキシツール(なんでもええがスクリプティングできるのでmitmproxyオススメ)
大まかな流れ
静的解析
- いい感じにdecrypted binaryを抽出する
- frida-ios-dump( https://github.com/AloneMonkey/frida-ios-dump )を使うと出来る
- バイナリ見たりヘッダファイル抽出して動的解析につなげる
- Hopper使う
- ヘッダファイルはdsdumpで秒で抜ける(swiftも対応してる)
- フレームワーク見たりする
動的解析
基本fridaでなんとかなる(bp貼るとかはできんがhookとかこれ一つでできるのでええんとちゃう)
- 投稿日:2019-12-11T02:29:15+09:00
iPhone で電子マネー(楽天Edy、nanaco、WAON)を読み取ってみよう!
前回の記事は iPhone で運転免許証を読み取ってみよう!【ライブラリを使わずに350行の Swift で本籍を読み取る】 で、前々回とは異なりライブラリなしで運転免許証を読み取る方法を紹介しました。
しかし、運転免許証は個人情報の塊、かつ暗証番号は絶対に間違えてはいけないので気軽に試せない…。
今回は電子マネー(楽天Edy、nanaco、WAON)を読み取っていきます。運転免許証に比べては簡単に、お手軽に試せますね!環境
- 開発
- Xcode Version 11.2.1 (11B500)
- Apple Swift version 5.1.2 (swiftlang-1100.0.278 clang-1100.0.33.9)
- macOS Catalina 10.15.1(19B88)
- 実機
- iPhone 11 Pro (A2215、MWCC2J/A)
- iOS 13.2.3 (17B111)
実行結果
ライブラリを使う場合
前々回の記事で紹介した treastrain/TRETJapanNFCReader では 楽天Edy、nanaco、WAON などの電子マネーの読み取りも行うことができます。
Info.plist と Capability と Entitlements の設定を済ませ、ライブラリを導入してコードを数行書くけば簡単に残高や利用履歴を取得できます。treastrain/TRETJapanNFCReaderを使った場合import UIKit import TRETJapanNFCReader class ViewController: UIViewController, FeliCaReaderSessionDelegate { var reader: RakutenEdyReader! override func viewDidLoad() { super.viewDidLoad() self.reader = RakutenEdyReader(viewController: self) self.reader.get(items: [.balance]) } func feliCaReaderSession(didRead feliCaCard: FeliCaCard) { let rakutenEdyCard = feliCaCard as! RakutenEdyCard let balance = rakutenEdyCard.balance! // カード残高 } }※ treastrain/TRETJapanNFCReader/README.md より
しかし、せっかくの Core NFC Advent Calendar なので、以降はライブラリなし、直接 Core NFC を操作して電子マネーの残高を読み取っていきます。
Xcode プロジェクトの作成
まずは Create a new Xcode project から iOS の Single View App を作成します。
Capability と Entitlements の設定
Project の Target から Signing & Capabilities を選択し、「+ Capability」から「Near Field Communication Tag Reading」を追加します。
すると、「<Product-Name>.entitlements」というファイルが追加されているので、「Near Field Communication Tag Reader Session Formats」に「NFC Data Exchange Format」および「NFC tag-specific data protocol」があることを確認します。Info.plist の設定
Info.plist に「Privacy - NFC Scan Usage Description」と「ISO18092 system codes for NFC Tag Reader Session」を追加します。
「Privacy - NFC Scan Usage Description」には NFC を何のために使用するのかについての説明を、「ISO18092 system codes for NFC Tag Reader Session」の配下には以下の FeliCa システムコードを記述します。
FE00
以上で設定はおしまいです。ファイルツリー
今回のプロジェクトのファイルツリーを確認しておきます。
処理は全てViewController.swiftに記述します。コーディング
まずコード全文を載せた後、各部を解説していきます。運転免許証のときに比べればネストの深さはかわいいものです。
ViewController.swiftimport UIKit import CoreNFC class ViewController: UIViewController, NFCTagReaderSessionDelegate { var session: NFCTagReaderSession? override func viewDidLoad() { super.viewDidLoad() guard NFCTagReaderSession.readingAvailable else { print("NFC タグの読み取りに非対応のデバイス") return } self.session = NFCTagReaderSession(pollingOption: .iso18092, delegate: self) self.session?.alertMessage = "カードの上に iPhone の上部を載せてください" self.session?.begin() } func tagReaderSessionDidBecomeActive(_ session: NFCTagReaderSession) { print("tagReaderSessionDidBecomeActive(_:)") } func tagReaderSession(_ session: NFCTagReaderSession, didInvalidateWithError error: Error) { let readerError = error as! NFCReaderError print(readerError.code, readerError.localizedDescription) } func tagReaderSession(_ session: NFCTagReaderSession, didDetect tags: [NFCTag]) { print("tagReaderSession(_:didDetect:)") let tag = tags.first! session.connect(to: tag) { (error) in if let error = error { session.invalidate(errorMessage: error.localizedDescription) return } guard case NFCTag.feliCa(let feliCaTag) = tag else { session.invalidate(errorMessage: "FeliCa ではない") return } session.alertMessage = "カードを読み取っています…" let idm = feliCaTag.currentIDm.map { String(format: "%.2hhx", $0) }.joined() print("IDm:", idm) /// FeliCa サービスコード let rakutenEdyServiceCode = Data([0x13, 0x17].reversed()) let nanacoServiceCode = Data([0x55, 0x97].reversed()) let waonServiceCode = Data([0x68, 0x17].reversed()) let serviceCodeList = [rakutenEdyServiceCode] /// ブロック数 let blocks = 1 let blockList = (0..<blocks).map { (block) -> Data in Data([0x80, UInt8(block)]) } feliCaTag.readWithoutEncryption(serviceCodeList: serviceCodeList, blockList: blockList) { (status1, status2, blockData, error) in if let error = error { session.invalidate(errorMessage: error.localizedDescription) return } guard status1 == 0x00, status2 == 0x00 else { print("ステータスフラグがエラーを示しています", status1, status2) session.invalidate(errorMessage: "ステータスフラグがエラーを示しています s1:\(status1), s2:\(status2)") return } let data = blockData.first! let balance = data.toIntReversed(0, 3) print(data as NSData) print("残高: ¥\(balance)") session.alertMessage = "残高: ¥\(balance)" session.invalidate() } } } } extension Data { /// https://github.com/treastrain/TRETJapanNFCReader/blob/master/TRETJapanNFCReader/Extensions.swift#L112 func toIntReversed(_ startIndex: Int, _ endIndex: Int) -> Int { var s = 0 for (n, i) in (startIndex...endIndex).enumerated() { s += Int(self[i]) << (n * 8) } return s } }コード解説
対応端末かどうかを確かめる
guard NFCTagReaderSession.readingAvailable else {
    print("NFC タグの読み取りに非対応のデバイス")
    return
}
前回に引き続き Core NFC を使うときのお約束、そもそも使っている端末が読み取りに対応しているかどうかを
NFCTagReaderSession.readingAvailableで確かめます。
NFCTagReaderSessionをスタートさせるself.session = NFCTagReaderSession(pollingOption: .iso18092, delegate: self) self.session?.alertMessage = "カードの上に iPhone の上部を載せてください" self.session?.begin()対応端末であることを確認した後、
NFCTagReaderSessionを初期化してbegin()でスタートさせます。読み取るカードは FeliCa、つまり ISO 18092 なので、pollingOptionもそのように指定します。
NFCTagReaderSessionDelegatefunc tagReaderSessionDidBecomeActive(_ session: NFCTagReaderSession) { print("tagReaderSessionDidBecomeActive(_:)") } func tagReaderSession(_ session: NFCTagReaderSession, didInvalidateWithError error: Error) { let readerError = error as! NFCReaderError print(readerError.code, readerError.localizedDescription) } func tagReaderSession(_ session: NFCTagReaderSession, didDetect tags: [NFCTag]) { print("tagReaderSession(_:didDetect:)") // … }この部分の説明は前回の記事と全く同じなので省略します。
タグに接続する
let tag = tags.first!
session.connect(to: tag) { (error) in
    if let error = error {
        session.invalidate(errorMessage: error.localizedDescription)
        return
    }

    guard case NFCTag.feliCa(let feliCaTag) = tag else {
        session.invalidate(errorMessage: "FeliCa ではない")
        return
    }

    session.alertMessage = "カードを読み取っています…"

    let idm = feliCaTag.currentIDm.map { String(format: "%.2hhx", $0) }.joined()
    print("IDm:", idm)

    // …
}
まずは
session.connect(to:completionHandler:)でタグに接続します。
接続したタグが FeliCa であるかを確かめ、そうでない場合はsession.invalidate(errorMessage:)でセッションを終了します。
ついでに FeliCa タグに割り振られている IDm くらいは
今回は FeliCa システムコードをFE00のみ Info.plist に記述していますので、feliCaTag.currentIDmは必ずFE00の IDm になります。FeliCa サービスコードの指定
/// FeliCa サービスコード
let rakutenEdyServiceCode = Data([0x13, 0x17].reversed())
let nanacoServiceCode = Data([0x55, 0x97].reversed())
let waonServiceCode = Data([0x68, 0x17].reversed())
let serviceCodeList = [rakutenEdyServiceCode]

/// ブロック数
let blocks = 1
let blockList = (0..<blocks).map { (block) -> Data in
    Data([0x80, UInt8(block)])
}
さて、FeliCa ですがデータ構造を少し理解しておく必要があります。
公式の情報であれば FeliCaカード ユーザーズマニュアル 抜粋版、Qiita の記事であれば [PASMO] FeliCa から情報を吸い出してみる - FeliCaの仕様編 [Android][Kotlin] がとてもわかりやすいと思います。やはり Android の情報にたどりつく…
次の Read Without Encryption コマンドを送信するために、サービスコードをリトルエンディアンで準備しておきます。
Read Without Encryption コマンドを送信
feliCaTag.readWithoutEncryption(serviceCodeList: serviceCodeList, blockList: blockList) { (status1, status2, blockData, error) in
    if let error = error {
        session.invalidate(errorMessage: error.localizedDescription)
        return
    }

    guard status1 == 0x00, status2 == 0x00 else {
        print("ステータスフラグがエラーを示しています", status1, status2)
        session.invalidate(errorMessage: "ステータスフラグがエラーを示しています s1:\(status1), s2:\(status2)")
        return
    }

    // …
}
Read Without Encryption コマンドを FeliCa タグに送信します。FeliCa のステータスフラグについては FeliCaカード ユーザーズマニュアル 抜粋版 に記載があります。両方とも
0なら正常に終了しています。
もし、status1が1、status2が166(0xA6) であれば "サービスコードリスト不正" にあたるので、前項のサービスコードの指定が間違っていることになります。serviceCodeListの中身が読み取ろうとしたカードに合っていますか?データの解析
let data = blockData.first!
let balance = data.toIntReversed(0, 3)

print(data as NSData)
print("残高: ¥\(balance)")
session.alertMessage = "残高: ¥\(balance)"
session.invalidate()
エラーなく Read Without Encryption コマンドが終了したら、いよいよデータの解析です。
解析をしやすいようにNSDataで…と、言っても今回の 楽天Edy、nanaco、WAON の残高は先頭4ビットがリトルエンディアンで入っているので、それを
Intにします。toIntReversedは以下のextensionに定義しました。extension Data { /// https://github.com/treastrain/TRETJapanNFCReader/blob/master/TRETJapanNFCReader/Extensions.swift#L112 func toIntReversed(_ startIndex: Int, _ endIndex: Int) -> Int { var s = 0 for (n, i) in (startIndex...endIndex).enumerated() { s += Int(self[i]) << (n * 8) } return s } }すべて終わったら忘れずに
session.invalidate()を呼んでセッションを正しく終了させましょう。後記
お疲れさまでした。前回のコード量の3分の1です。
とても簡単に残高を取得できました。
Core NFC、どんどん使っていきましょう…!ここでのコードは Gist にも載せておきました。参考にしてください。
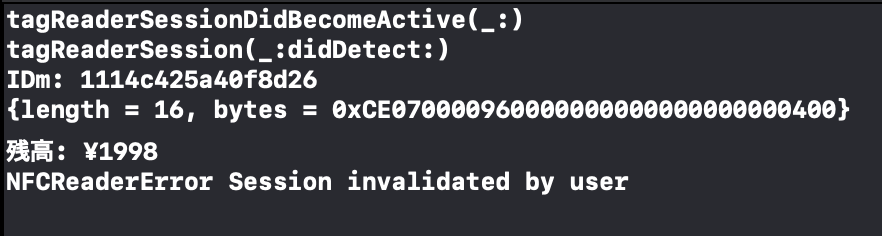


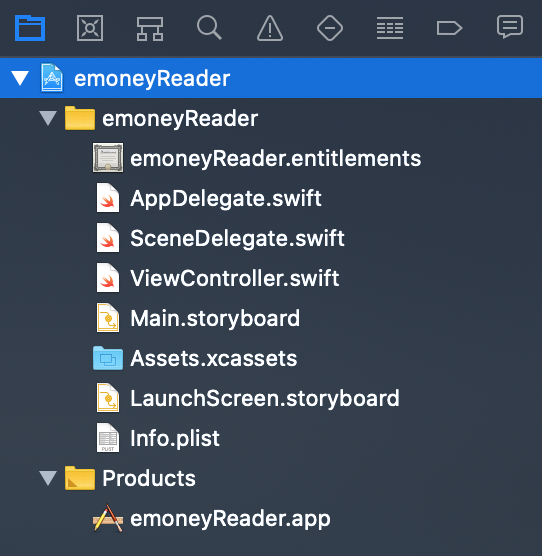
- 投稿日:2019-12-11T02:21:41+09:00
SwiftでLINEのようなトーク画面をライブラリ無しで作ろうとした
やりたいこと
個人でマッチングアプリを開発していた時に、トーク画面が必要になりました。
Swiftのトーク画面といえば色々なライブラリがありますが、使い方がよくわからなかったので、一から自分で作成することにしました。
下準備
共通で使う色とLabelのカスタムクラスを定義します。
UI.swift//トーク画面の背景の色 let commonBackgroundColor = UIColor(red: 0.9, green: 0.9, blue: 0.9, alpha: 1.0) //LINEのトーク画面の自分が送った文章の背景色 let greenColor = UIColor(red: 0.52, green: 0.89, blue: 0.29, alpha: 1.0) //自分のテキストと相手のテキストを表示するためのラベル class messageLabel: UILabel { override init(frame: CGRect) { super.init(frame: frame) self.numberOfLines = 0 self.layer.masksToBounds = true self.layer.cornerRadius = 10.0 self.textAlignment = .left self.textColor = UIColor.black self.font = UIFont.systemFont(ofSize: 16.0) } required init?(coder aDecoder: NSCoder) { fatalError("init(coder:) has not been implemented") } }サーバーから取得してきたタイムスタンプを、ユーザーに表示する日付に変換する関数を作ります
Common.swiftfunc unixToString(unix: Int) -> String { let dateUnix: TimeInterval = TimeInterval(unix) let date = Date(timeIntervalSince1970: dateUnix) // NSDate型を日時文字列に変換するためのNSDateFormatterを生成 let formatter = DateFormatter() formatter.dateFormat = "MM月dd日 HH:mm" //年は不要 formatter.locale = NSLocale(localeIdentifier: "en_US_POSIX") as Locale let dateStr: String = formatter.string(from: date) return dateStr }トーク画面のViewControllerの作成
ChatViewController.swiftimport UIKit import Alamofire final class ChatDetailViewController: UIViewController { let chatDetailView = ChatDetailView() var isKeyBoardOpen: Bool = false override func viewDidLoad() { super.viewDidLoad() self.edgesForExtendedLayout = [] navigationItem.title = "相手の名前" self.navigationController?.navigationBar.isTranslucent = false chatDetailView.frame = CGRect(x: 0, y: 0, width: self.view.frame.width, height: self.view.frame.height - (self.navigationController?.navigationBar.frame.height)! - UIApplication.shared.statusBarFrame.height) view.addSubview(chatDetailView) NotificationCenter.default.addObserver(self, selector: #selector(keyboardWillShow(_:)), name: UIResponder.keyboardWillShowNotification, object: nil) NotificationCenter.default.addObserver(self, selector: #selector(keyboardWillHide(_:)), name: UIResponder.keyboardWillHideNotification, object: nil) getData() } override func touchesBegan(_ touches: Set<UITouch>, with event: UIEvent?) { view.endEditing(true) } @objc func send() { //サーバーへメッセージを送信 //送信に成功したら画面上にメッセージを追加する self.chatDetailView.setText(text: "こんばんは",timeStamp: 1000000001,mine: true) } func getData() { //ここでAPIを叩いてテキストを取得 //相手が送ったメッセージを表示 self.chatDetailView.setText(text: "こんにちは",timeStamp: 1000000000,mine: false) //自分が送ったメッセージを表示 self.chatDetailView.setText(text: "こんばんは",timeStamp: 1000000001,mine: true) } @objc private func keyboardWillShow(_ notification: Notification) { guard let userInfo = notification.userInfo as? [String: Any] else { return } guard let keyboardInfo = userInfo[UIResponder.keyboardFrameEndUserInfoKey] as? NSValue else { return } guard let _ = userInfo[UIResponder.keyboardAnimationDurationUserInfoKey] as? Double else { return } if !isKeyBoardOpen { isKeyBoardOpen = true //ここでレイアウトを調整する } } @objc private func keyboardWillHide(_ notification: Notification) { if isKeyBoardOpen { isKeyBoardOpen = false //ここでレイアウトを調整する } } } extension UIScrollView { override open func touchesBegan(_ touches: Set<UITouch>, with event: UIEvent?) { //scrollViewをタップした時にキーボードが閉じられるようにする self.next?.touchesBegan(touches, with: event) } }左スワイプで元の画面に戻る
せっかくなので、LINEっぽくトーク画面から左スワイプで前の画面に戻るように拡張しましょう。
ChatDetailViewController.swiftextension ChatDetailViewController { func setSwipeBack() { let target = self.navigationController?.value(forKey: "_cachedInteractionController") let recognizer = UIPanGestureRecognizer(target: target, action: Selector(("handleNavigationTransition:"))) self.view.addGestureRecognizer(recognizer) } }トーク画面のView
必要な部品は、縦にするクロールする画面、送信ボタン、テキスト入力欄、メッセージのラベル、時刻表示のラベルです。
ChatDetailView.swiftimport Foundation import UIKit final class ChatDetailView: UIView { var scrollView: UIScrollView = UIScrollView() let textField = UITextField() let checkButton = UIButton() let sendButton: UIButton = { //送信ボタンを作成 let button = UIButton() button.setTitle("送信", for: .normal) button.setTitleColor(UIColor.white, for: .normal) button.backgroundColor = orangeColor button.titleLabel!.font = UIFont.boldSystemFont(ofSize: 19.0) button.layer.masksToBounds = true button.layer.cornerRadius = 20.0 button.translatesAutoresizingMaskIntoConstraints = false return button }() required override init(frame:CGRect){ super.init(frame:frame) addSubview(scrollView) addSubview(sendButton) addSubview(textField) } required init?(coder aDecoder: NSCoder) { fatalError("init(coder:) has not been implemented") } override func layoutSubviews() { super.layoutSubviews() makeScrollView() sendButton.topAnchor.constraint(equalTo: self.textField.topAnchor, constant: 0).isActive = true sendButton.leftAnchor.constraint(equalTo: self.textField.rightAnchor, constant: 10.0).isActive = true sendButton.rightAnchor.constraint(equalTo: self.rightAnchor, constant: -10.0).isActive = true sendButton.bottomAnchor.constraint(equalTo: self.textField.bottomAnchor, constant: 0.0).isActive = true textField.translatesAutoresizingMaskIntoConstraints = false textField.backgroundColor = commonBackgroundColor textField.topAnchor.constraint(equalTo: self.scrollView.bottomAnchor, constant: 10.0).isActive = true textField.leftAnchor.constraint(equalTo: self.leftAnchor, constant: 10.0).isActive = true textField.rightAnchor.constraint(equalTo: self.rightAnchor, constant: -100.0).isActive = true scrollView.topAnchor.constraint(equalTo: self.topAnchor, constant: 0.0).isActive = true scrollView.leftAnchor.constraint(equalTo: self.leftAnchor, constant: 0.0).isActive = true scrollView.rightAnchor.constraint(equalTo: self.rightAnchor, constant: 0.0).isActive = true } func makeScrollView() { //scrollViewを作成する scrollView.contentSize = CGSize(width: self.frame.width, height: 10) scrollView.bounces = false scrollView.indicatorStyle = .default scrollView.scrollIndicatorInsets = UIEdgeInsets(top: 10, left: 0, bottom: 10, right: 0) scrollView.translatesAutoresizingMaskIntoConstraints = false scrollView.backgroundColor = commonBackgroundColor scrollView.keyboardDismissMode = .onDrag } func setText(text: String, timeStamp: Int, mine: Bool) { let height = scrollView.contentSize.height let label = messageLabel(frame: CGRect()) label.text = text //自分のテキストは右側 相手のテキストは左側に表示する if mine { label.frame = CGRect(x: self.frame.size.width/2-50, y: height, width: self.frame.size.width/2 + 40, height: 100) label.backgroundColor = greenColor } else { label.frame = CGRect(x: 10, y: height, width: self.frame.size.width/2 + 40, height: 100) label.backgroundColor = .white } label.sizeToFit() //メッセージを表示するlabelにpaddingを設ける label.frame.size.height += 20.0 label.frame.size.width += 10.0 scrollView.addSubview(label) let dayLabel = UILabel() //先ほど定義した関数を用いて日付を表示 dayLabel.text = unixToString(unix: timeStamp) dayLabel.numberOfLines = 1 dayLabel.backgroundColor = commonBackgroundColor dayLabel.textColor = UIColor.black if mine { dayLabel.textAlignment = .right dayLabel.frame = CGRect(x: 0, y: height, width: self.frame.size.width/2 - 60, height: 40) } else { dayLabel.textAlignment = .left dayLabel.frame = CGRect(x: self.frame.size.width/2 + 60, y: height, width: self.frame.size.width/2 - 20, height: 40) } dayLabel.font = UIFont.systemFont(ofSize: 11.0) scrollView.addSubview(dayLabel) //テキストが追加されるたびに、スクロールビューの中身の高さを伸ばしていく scrollView.contentSize.height = height + label.frame.size.height + 10 } }setText関数では、第二引数のmineで自分のメッセージか相手のメッセージかを区別しています。自分のメッセージか相手のメッセージかによってラベルの背景色と位置と、時刻の表示場所が変わります。
実際の表示
まとめと課題
このままではキーボードが出された時に、送信ボタンをテキスト入力欄が隠れてしまいます。この辺りの情報は適宜追加していきたいと思います。IQKeyboardManagerなどのライブラリを使うと早いですね。
あとは吹き出しに見られるような突き出る部分をコードだけで書くのは辛いですね。とりあえずトーク画面っぽいものを作りたい人は参考にしてもらえたら嬉しいです。
