- 投稿日:2019-12-11T22:05:05+09:00
iOSとiPadOSのステータスバーのダークモード対応
先日ダークモード対応デビューしたのですが、こんな事件がありました。
「ダークモードで背景の色が白とか明るい色だとステータスバーが見えないor見にくい...」
どいうことかというと、背景を白にするとステータスバーが、
ライトモードの時は...ある!!
のに、ダークモードの時は...
ない!!
まあ厳密にはないというより見えていないのですが。バッテリー残量の赤いのがちょっと見えてますね。
事件の真相
ステータスバーの黒がライトモード用とダークモード用で分けられていました。
ダークモード用の黒として、OS13以降でUIStatusBarStyleにdarkContentが追加されています。
UIStatusBarStyleがdefaultのままだとダークモードではステータスバーが白になるので事件が起こったわけですね。import UIKit class ViewController: UIViewController { override func viewDidLoad() { super.viewDidLoad() view.backgroundColor = .white } // ステータスバーの色の決め方 override var preferredStatusBarStyle: UIStatusBarStyle { // OS13以降じゃないならライトモード用の黒で guard #available(iOS 13, *) else { return .default } // ダークモードならダークモード用の黒、そうじゃないならライトモード用の黒で return traitCollection.userInterfaceStyle == .dark ? .darkContent : .default } }こんな感じにすればOKです。ちなみにステータスバーの白はライトモードとダークモードで別れておらず、同じ
lightContentです。誰かの参考になれば幸いです。


- 投稿日:2019-12-11T22:02:27+09:00
macOS CatalinaでSwiftLintが"zsh: illegal hardware instruction"というエラーで利用できない場合の対処法
macOS CatalinaでSwiftLintを利用しようとした際にエラーが出て、対処しようとしたもののエラーメッセージが分かりにくくて時間がかかってしまったので、メモしておく
環境
- macOS 10.15.1
- シェル: zsh (デフォルト)
- Xcode 11.3
結論
xcode-selectでXcodeアプリに含まれるデベロッパーツールを選択していなかったことが原因であった詳細
XcodeとSwiftLintをインストールした後でLintコマンドを実行すると、以下のようなエラーが吐かれていた
% swiftlint
Fatal error: Loading sourcekitd.framework/Versions/A/sourcekitd failed: file /private/tmp/swiftlint-20191203-72607-1br7cj0/.build/checkouts/SourceKitten/Source/SourceKittenFramework/library_wrapper.swift, line 39
zsh: illegal hardware instruction  swiftlint
xcode-selectで利用するデベロッパーツールのディレクトリを確認すると、以下のようになっていた% xcode-select -p /Library/Developer/CommandLineTools上記にはSwiftの解析ツール等が含まれていないため、SwiftLintがエラーを吐いて停止していた模様
以下のようにXcode.appの中のデベロッパーツールを選択することで、SwiftLintが正常に実行されるようになった% sudo xcode-select -s /Applications/Xcode_11.3.app/Contents/Developer参考
- 投稿日:2019-12-11T21:08:42+09:00
簡単なポモドーロタイマーを作ってみました
概要
- macOS Development for Beginnersシリーズを読み、SwiftのmacOSアプリの基礎を学びました。
- 学んだことの実践として、上記シリーズのEggTimerを参考にポモドーロタイマーを作成しました。
- ポモドーロタイマーの概要は以下の通りです
- 今回はタスク・休憩・長めの休憩の周期をもつタイマー機能に絞った実装をしています
ポモドーロ・テクニック:世界が実践する時間管理術はこうして生まれた
ステップ1:実行するタスクを決める。
ステップ2:タイマーを25分に設定。
ステップ3:タイマーが鳴るまでタスクを行う。
ステップ4:タイマーが鳴ったら作業を終了し、「今日やること」シートにチェックマークを付ける。
ステップ5:5分間の休憩を取る(その際、深呼吸したり、瞑想したり、コーヒーを飲むなど、仕事とはまったく関係のないことをして脳を休ませる)。
ステップ6:ポモドーロを4回した後に長い休憩(20〜30分)を取る(次のポモドーロで新しいタスクができるように完全に脳を休ませる)。外観
タイマー
設定画面
GitHub
解説
- キモのタイマー部分は元記事かコードを参照下さい(下手に説明するよりは、step by stepで実装したほうが理解が早そうです)
2つあるボタンの動作の遷移
- メイン画面にはボタンが2つしかなく、これらの表示を切り替えていくつかの動作を割り当てています。
- 動作は以下のアプリの動きを参考にしました
()はdisableの意ポモドーロ中
左ボタン 右ボタン 計測前 開始 (停止) 計測中 一時停止 停止 一時停止 再開 完了 休憩中
左ボタン 右ボタン 計測前 開始 (停止) 計測中 一時停止 スキップ 一時停止 再開 スキップ メニューバーへのタイマー機能実装
class AppDelegate: NSObject, NSApplicationDelegate {

    @IBOutlet weak var leftTimerMenuItem : NSMenuItem!
    @IBOutlet weak var rightTimerMenuItem: NSMenuItem!
func configureMenus(leftTitle: String, rightTitle: String) { leftTimerMenuItem.title = leftTitle rightTimerMenuItem.title = rightTitle }
AppDelegateにアウトレットとメソッドを宣言しているif let appDel = NSApplication.shared.delegate as? AppDelegate { appDel.configureMenus(leftTitle: leftButton.title, rightTitle: rightButton.title) }
- ただし呼び出すのは
ViewControllerからである。// MARK: - IBActions - menus @IBAction func startTimerMenuItemSelected(_ sender: Any) { leftButtonClicked(sender) } @IBAction func stopTimerMenuItemSelected(_ sender: Any) { rightButtonClicked(sender) }
- メニューアイテムのアクションも
ViewControllerから呼んでいる。- メニューアイテムのアウトレットが
ViewControllerから呼び出せないのだろうか。タイマー完了時の通知
- NSUserNotificationを使用する
- 【Swift】Dateの王道 【日付】
- NSNotificationのidentifierに日付を使用
- User Notifications in macOS
- パッと見delegateの設定の記述がないようなので注意
- NSUserNotificationを使って、通知のポップアップを表示する - Qiita
- Objective-Cですけどやっていることは同じです。
extension ViewController: NSUserNotificationCenterDelegate {

    // MARK: - Finish Notification
NSUserNotificationCenterDelegate用のextention内に記述するfunc postCompletingNotification() { let notification = NSUserNotification() notification.identifier = createNotificationIdentifier() switch pomodoroTimer.timerMode { case .interval, .longInterval: notification.title = "Complete working!" notification.subtitle = "It's time to break" case .task: notification.title = "Finish interval!" notification.subtitle = "It's time to work" } notification.soundName = NSUserNotificationDefaultSoundName // Manually display the notification let notificationCenter = NSUserNotificationCenter.default notificationCenter.delegate = self notificationCenter.deliver(notification) }func userNotificationCenter(_ center: NSUserNotificationCenter, didDeliver notification: NSUserNotification) { print("通知を受け取りました。") } func userNotificationCenter(_ center: NSUserNotificationCenter, didActivate notification: NSUserNotification) { center.removeDeliveredNotification(notification) print("通知を削除しました") } // アクティブ時にも通知を行いたい場合にコメントアウトする // func userNotificationCenter(_ center: NSUserNotificationCenter, shouldPresent notification: NSUserNotification) -> Bool { // return true // }// 通知用のidentifierを作成する // e.g. ikeh1024_2019/12/11 14:11:32 func createNotificationIdentifier() -> String { let f = DateFormatter() f.timeStyle = .medium f.dateStyle = .medium f.locale = Locale(identifier: "ja_JP") let now = Date() return "ikeh1024_\(f.string(from: now))" } }ここから実用化する際に追加したい機能
- タスク名の入力と管理
- SNS共有機能
- 週月別の統計で管理できる機能
- トマトのイメージなどおしゃれなUI
- メニューバーアイコンを実装してに残り時間を表示する
macOS Development for Beginners:シリーズのメモ
macOS Development for Beginners: Part 1 | raywenderlich.com
- いわゆるHello,Worldアプリ
- 基本のキ
ViewController.swiftimport Cocoa class ViewController: NSViewController { @IBOutlet weak var nameField: NSTextField! @IBOutlet weak var helloLabel: NSTextField! override func viewDidLoad() { super.viewDidLoad() // Do any additional setup after loading the view. } override var representedObject: Any? { didSet { // Update the view, if already loaded. } } @IBAction func sayButtonClicked(_ sender: Any) { var name = nameField.stringValue if name.isEmpty { name = "Hello" } let greeting = "Hello, \(name)!" helloLabel.stringValue = greeting } }macOS Development for Beginners: Part 2
- AutoLayoutは色々と見返す価値がある。
- またStackViewの作り方は参考に。
- Storyboardで扱う際は
NSWindowControllerとNSViewControllerがあることが差異かな?
macOS Development for Beginners: Part 3
- いきなりコードがババン!とでてきて落差がつらいぞ!
- 初見だと今何やっているか分からなくなりそう。
- こういうバインディングのやり方があるのか…?
Preferencesが複数クラスで共有されている。- それぞれ別のPreferencesを持つが、シングルトンの
NSUserDefaultsで情報交換をしているので、データとしては同じとなる。Now PrefsViewController has a prefs object and so does ViewController - is this a problem? No, for a couple of reasons.
Preferences is a struct, so it is value-based not reference-based. Each View Controller gets its own copy.
The Preferences struct interacts with UserDefaults through a singleton, so both copies are using the same UserDefaults and getting the same data.


- 投稿日:2019-12-11T21:08:16+09:00
は!・か!!・た!!!・の塩(Central)
ゆめみの日常
ある日社内のSlackでこんなやり取りがありました。
※伯方の塩は博多でつくっているわけではないそうです。
このスレッドをながめていたら、昔Twitterで見た「ずんどこきよしのプログラム」っぽいものが作れるんじゃないかと思い、CoreBluetoothで作ってみました。
そして出来たのがこちら。(※音が流れるので注意!)
https://twitter.com/u11238123/status/1198624428143214592
アプリ通信の流れについて
このアプリはCentral(動画内でのiPhone)側からPeripheral(動画内でのiPad)側にwriteをして音声を出力しています。
Bluetoothは固有の名称などがたくさんあり、それを全て説明していると1つ記事がかけてしまうので詳しく知りたい方は過去に僕がまとめた記事があるのでそれを参照してください。
また、この記事ではCentralの実装の解説だけに絞り、音の再生部分などは省略します?♂️
centralの実装
Central側でデータを書き込む流れは以下のような感じです。
① Bluetoothの使用許可をinfo.plistに書く
② CBCentralManagerのインスタンスを作る
③ デバイスがBluetoothを使用可能か判定
④ スキャンを開始する
⑤ 検出したperipheralとコネクトする
⑥ peripheralのServiceを検出する
⑦ Serviceの中のCharacteristicを検出する
⑧ 検出したCharacteristicに対してwriteする① Bluetoothの使用許可をinfo.plistに書く
ios13からiosデバイスでBluetoothを使用する際permissionの許可が必須になったため記載してあげる必要があります。
    <key>NSBluetoothAlwaysUsageDescription</key>
    <string>伯方の塩で使うよ</string>
ここに記載した文章がアプリ内のアラートに表示されますが、大手などのアプリでもいい加減なものを複数観測しているので、審査の際は書いてあればOKなのかなと思います。
ですが、ユーザに不信感を与えるので何に使うかは詳しく書いておいた方が良いと思います。
② CBCentralManagerのインスタンスを作る
CBCentralManagerのインスタンスを作成すると各種delegateメソッドが呼ばれるようになります。
class ViewController: UIViewController {
    var centralManager: CBCentralManager!

    override func viewDidLoad() {
        super.viewDidLoad()
        centralManager = CBCentralManager(delegate: self, queue: nil)
    }
}
extension ViewController: CBCentralManagerDelegate, CBPeripheralDelegate{}
③ デバイスがBluetoothを使用可能か判定
状態の取得はPeripheralと同じく以下のようなcaseが用意されています。
poweredOn以外の時に無理やり次に進もうとするとクラッシュする可能性があるので注意が必要です。func centralManagerDidUpdateState(_ central: CBCentralManager) { switch central.state { case .unknown: print("よくわかないけどダメ!") case .resetting: print("システムとの接続がよくわからんからダメ!") case .unsupported: print("Bluetooth許可されてないじゃんダメ!") case .unauthorized: print("このデバイスBluetooth使えないからダメ!") case .poweredOff: print("Bluetooth offになってるからダメ!") case .poweredOn: print("つかえるよ!!!") @unknown default: fatalError("へんなのきたからダメ!") } }④ スキャンを開始する
poweredOnの状態(Bluetoothが使用可能)な場合以下のようにスキャンを開始するメソッドを呼び出します。
伯方の塩(Peripheral)の記事の方でuuidgenを使って作成したUUIDを指定しています。scanForPeripheralsの第一引数にはnilを指定することも可能で、nilを指定した場合は見つかった全てのPeripheralが検知のメソッドに飛んできます。
    func centralManagerDidUpdateState(_ central: CBCentralManager) {
        if central.state == .poweredOn {
            central.scanForPeripherals(withServices: [CBUUID(string: "19688AFB-4E68-4F21-BCBA-421220280930")], options: nil)
        }
    }
⑤ 検出したperipheralとコネクトする
scanForPeripheralsが呼ばれて指定したServiceを持つPeripheralを見つけるとcentralManager(_ central: CBCentralManager,didDiscover peripheral: CBPeripheral,advertisementData: [String : Any],rssi RSSI: NSNumber)メソッドが呼ばれます。
この時注意しなくてはいけないのがconnectを行うperipheralはメンバに保持しておかないといけないという点です。
これ以降に呼ばれるメソッドにもperipheralは引数として保持していますが、ローカルに保持していないperipheralに対してwriteなどを行なっても実行されません。var myPeripheral: CBPeripheral! func centralManager(_ central: CBCentralManager, didDiscover peripheral: CBPeripheral, advertisementData: [String : Any], rssi RSSI: NSNumber) { myPeripheral = peripheral myCentralManager.connect(myPeripheral, options: nil) }今回は使用していない2つの引数ですが、advertisementDataはその名のとうりperipheral側でadvertiseで持たせたデータが入っています。
RSSIはperipheralの電波強度が入っています。よくRSSIはcentralとperipheral間の距離だと勘違いしている人がいますが、電波強度なのでperipheralの充電が減ったりすると当然値が変化してしまいます。
そのためRSSI==距離ではないので注意
⑥ peripheralのServiceを検出する
コネクトが成功したらメンバとして保持しておいたperipheralにdelegateをセットしてServiceの検索を行います。
こちらもスキャンを行なっていた時同様nilを指定するとコネクトしているPeripheralの全てのServiceを検出します。
    func centralManager(_ central: CBCentralManager, didConnect peripheral: CBPeripheral) {
        myPeripheral.delegate = self
        myPeripheral.discoverServices([CBUUID(string: "19688AFB-4E68-4F21-BCBA-421220280930")])
    }
⑦ Serviceの中のCharacteristicを検出する
Serviceを検出すると以下のメソッドに渡ってくるのでその中でServiceの保持しているCharacteristicをさらに探しに行きます。
discoverCharacteristicsの第一引数にもnilを渡した場合はServiceの保持しているすべてのCharacteristicがそのまま渡されることになります。
    func peripheral(_ peripheral: CBPeripheral, didDiscoverServices error: Error?) {
        if error != nil {
            print(error)
        }
        peripheral.services.forEach { servie in
           if service.uuid.uuidString == "19688AFB-4E68-4F21-BCBA-421220280930" {
               myPeripheral.discoverCharacteristics([CBUUID(string: "999889FF-42B0-4FC8-B5BC-0CAB8C323FD2")], for: service)
           }
        }
    }
⑧ 検出したCharacteristicに対してwriteする
あとはperipheralに向けて値をwriteするだけです。
冒頭の動画では0x01, 0x02, 0x03の値をランダムに送ってperipheral側で音声を出力していました。let sendData: [UInt8] = [0x01, 0x02, 0x03] func peripheral(_ peripheral: CBPeripheral, didDiscoverCharacteristicsFor service: CBService, error: Error?) { if error != nil { print(error) } service.characteristics?.forEach{ characteristic in if characteristic.uuid.uuidString == "999889FF-42B0-4FC8-B5BC-0CAB8C323FD2"{ let data = Data(bytes: [sendData.randomElement()!]) myPeripheral!.writeValue(data, for: targetCharacteristic, type: .withResponse) } } }writeは必ずこのメソッドの中で呼ばなければいけないかというとそうではなく、このメソッドに到達した時点でwriteできることが可能だということが証明されるものだと考えてください。
peripheralを他のクラスに渡してwriteやread,notifyなどを行うことも可能です。
Peripheralをiosで実装した際のキャッシュ問題
ios以外でperipheralを作った時は問題ないんですが、CoreBluetoothでPeripheralを実装するともともとデバイスの保持しているServiceやCharacteristicしか検出することができません。
これがデバイスがGATTをキャッシュしていることが問題で起こる問題です。以下のメソッドの中で再度Serviceの検出を行うことで追加したServiceを見つけることができます。
    func peripheral(_ peripheral: CBPeripheral, didModifyServices invalidatedServices: [CBService]) {
        myPeripheral.discoverServices([CBUUID(string: "19688AFB-4E68-4F21-BCBA-421220280930")])
    }


- 投稿日:2019-12-11T19:38:36+09:00
Xcodeのstoryboardで画面遷移の設定をする方法
僕のXcodeでは、画面遷移がデフォルトで下のような挙動になってしまい、
「普通にフルスクリーンで表示させたいんだけどな、、、」
と一瞬詰まったのでメモします。
※Xcodeのバージョンは11.2.1でした。かなり初心者向けの内容です。
解決方法
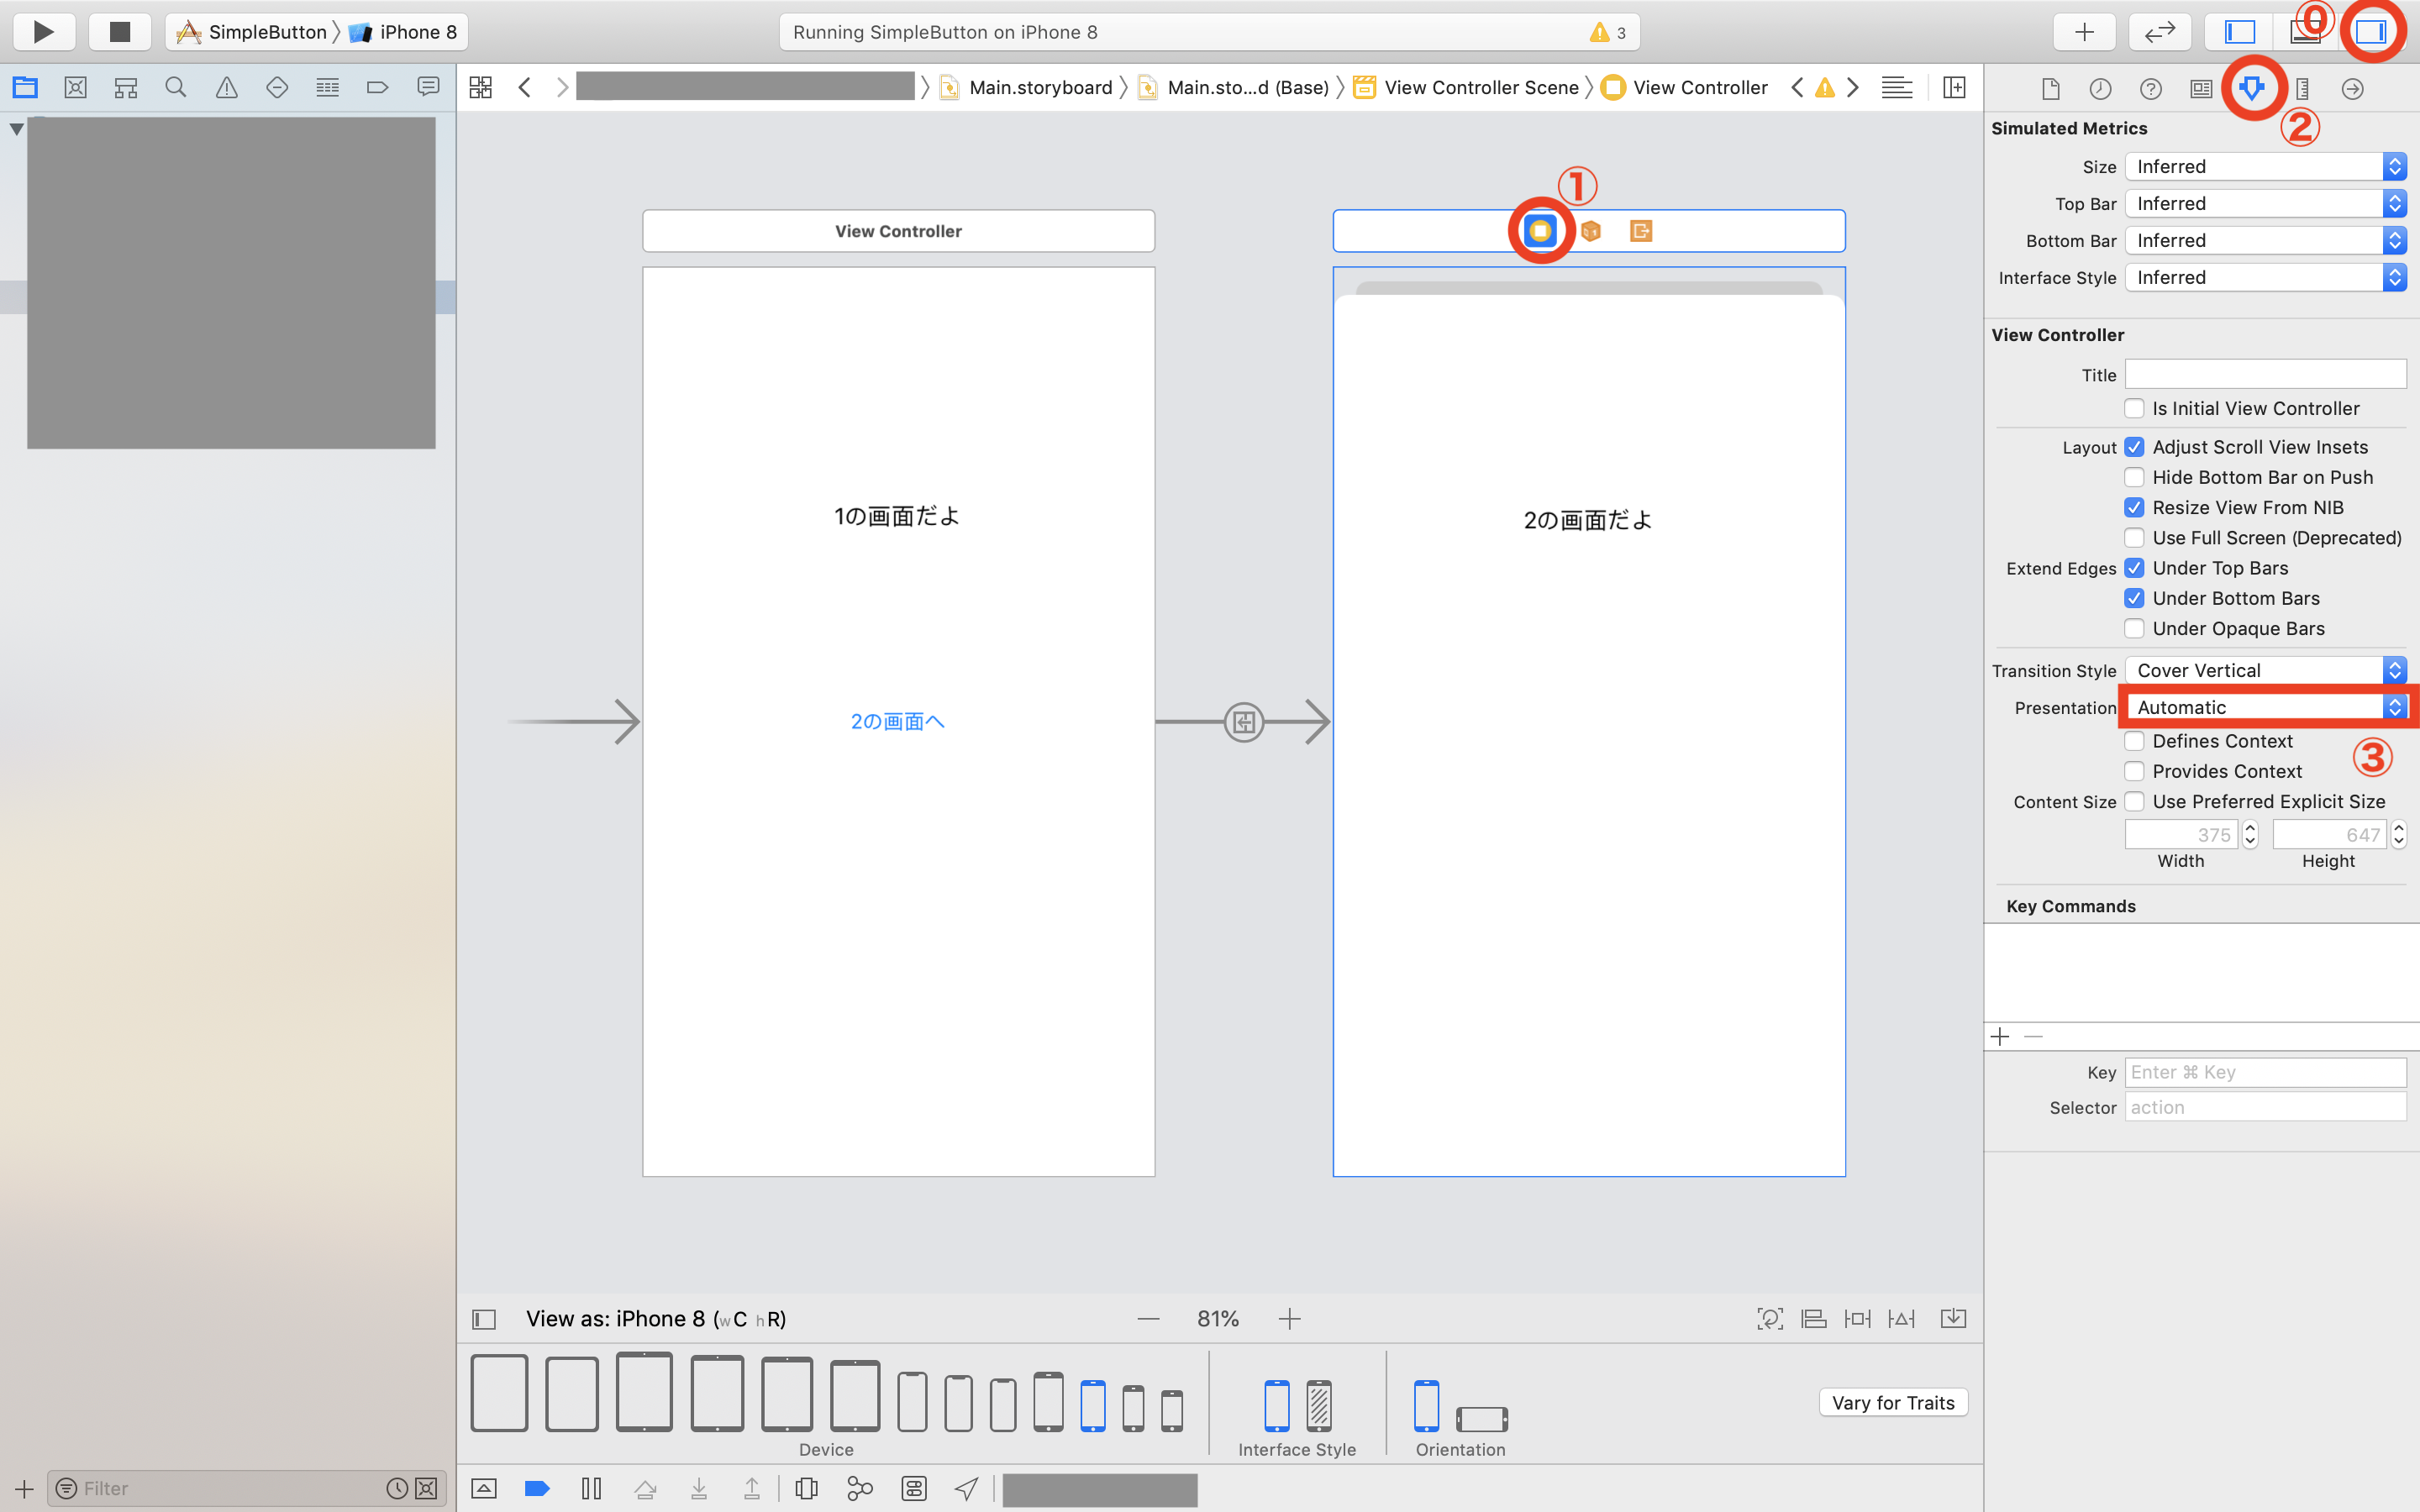
(0. 右のInspectorのメニュー画面を出していなかったら、⓪を押して表示)
1. ①を押してView Controllerの設定を表示
2. ②を押してAttributes Inspectorを表示
3. ③のPresentationを、「Automatic」→「Full Screen」に変更これでフルスクリーンで画面遷移ができるようになります。
おまけ
③のPresentationの上にあるTransition Styleを変更することで、画面遷移のアニメーションを変更することができます。
- Cover Vertical(デフォルト):次の画面が下から上にスライドしてくる
- Flip Horizontal:回転して画面が入れ替わる。前の画面の裏に次の画面があるような挙動
- Cross Dissolve:クロスディゾルブ。前の画面がフェードアウト、次の画面がフェードインしてくる
- Partial Curl:紙を下からめくるようなアニメーション

- 投稿日:2019-12-11T17:53:25+09:00
Swift初心者がCoreMLで機械学習に足を踏み入れてみた実装手順
はじめに
Swift初心者ではありますが、以前から興味があったCoreMLで機械学習にチャレンジしてみました。
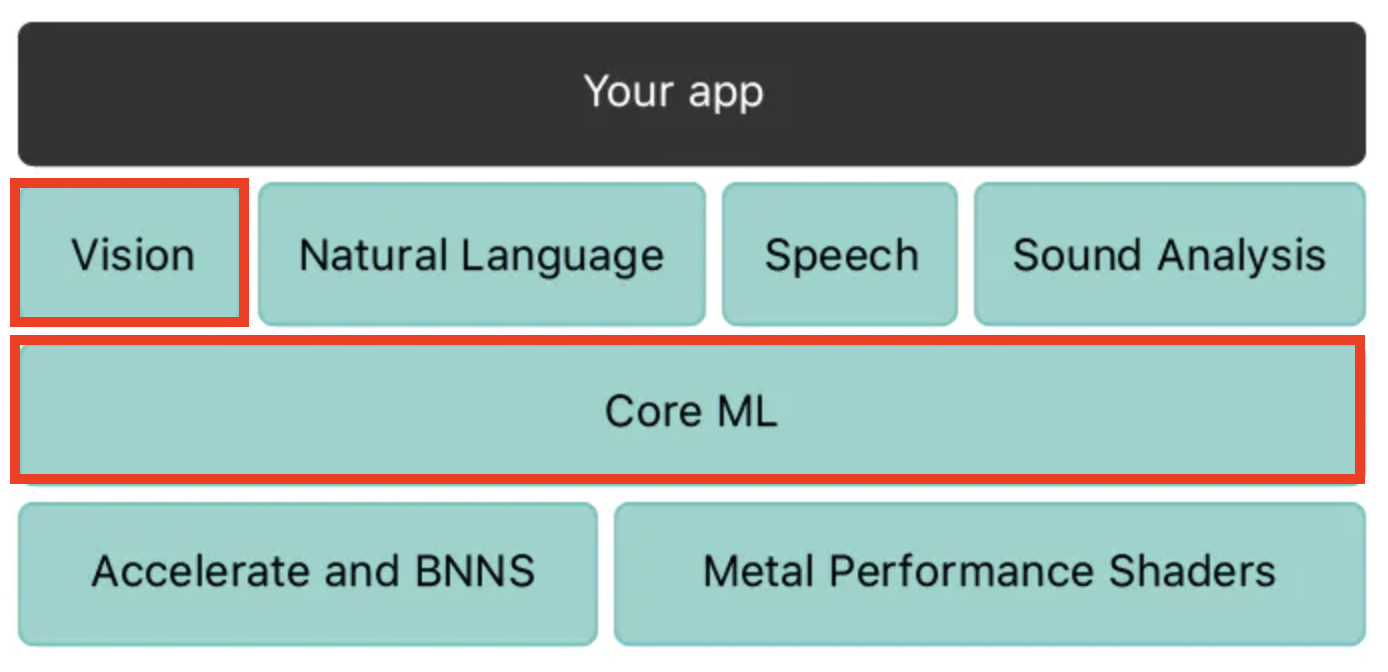
機械学習と聞くと、なんとなく難しそうでハードルが高いイメージがあったのですが、実際に触れてみると想像よりも簡単に実装できましたのでまとめてみました。そもそもCore MLとは?については、まとめられている記事がありましたので紹介させていだきます。
Appleの機械学習がヤバい成果物
今回は、機械学習モデルを活用してiPhoneで撮影した画像の中の主要なオブジェクトを分類して、その中で1番割合を占めているオブジェクト名を表示する機能を作成していきます。
Siamese cat = シャム猫のようですね。(正解はラグドールなのでOKですかね?笑)
猫の種類まで検出するのすごい。。
一応猫を判別することに成功しました!作成の流れ
作成にあたり以下のような流れで進めていきます。
1. Core MLを使用するための前準備
Core MLを使用するためには、モデルのダウンロードとインポートが必要になります。
ここでは、こちらの工程を説明していきます。1-1. Core MLモデルのダウンロード
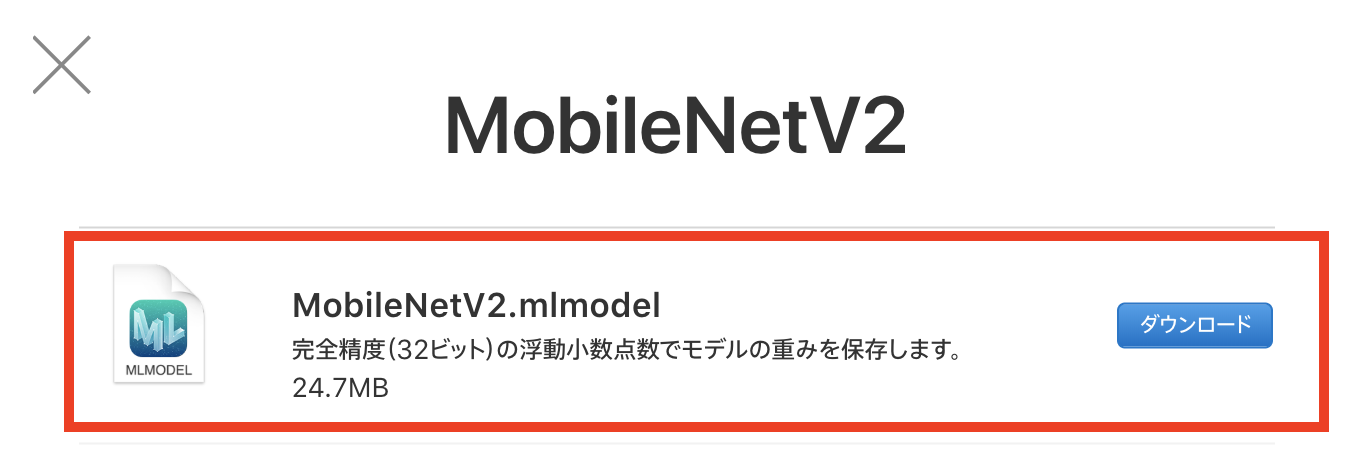
今回は、画像識別を行うためのCore MLモデルの1つである
MobileNetV2を使用します。
そのために、以下Apple developerサイトのモデル一覧からダウンロードする必要があります。
https://developer.apple.com/jp/machine-learning/models/
「モデルを見る」をクリックすると以下の画像が表示されます。
赤枠内のファイルをダウンロードすることで、今回使用するCore MLモデルを入手することができます。1-2. Core MLモデルをインポート
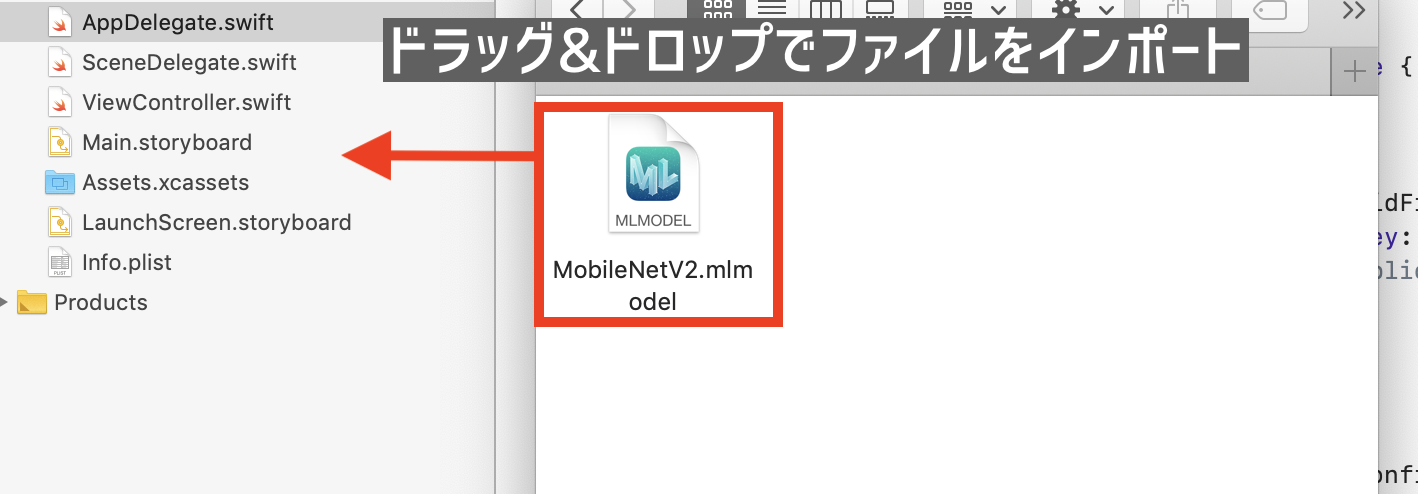
実際に使用するためにXcodeに
Core MLモデルをインポートしていきます。
とは言っても、実際にはドラッグ&ドロップするだけの作業になります。。
MobileNetV2.mlmodelが追加されていれば準備作業は完了です。
続いて、実装作業に進んでいきます。2. 実装
ここでは、
2-1. iPhoneで撮影した画像を表示する処理
2-2. 画像データを機械学習モデルで分類する処理
を順に実装していきます。2-1. iPhoneで撮影した画像を表示する処理
2-1-1. StoryBoadに設置
今回は個人的に楽に実装しやすそうなNavigationBarにCameraを配置していきます。
撮影した写真を表示させるためにUIImageViewを配置します。2-1-2. 機能を実装
先ほど設置したオブジェクトにアクションを追加していきます。
Cameraをタップするとカメラを起動させるUIImageViewに撮影した画像を表示させるViewController.swiftclass ViewController: UIViewController, UINavigationControllerDelegate { // 撮影した画像を表示するImageView @IBOutlet weak var imageView: UIImageView! let imagePicker = UIImagePickerController() override func viewDidLoad() { super.viewDidLoad() imagePicker.delegate = self // .photoLibraryにするとフォト内の写真を開くことができます。 imagePicker.sourceType = .camera imagePicker.allowsEditing = false } /// NavigationbarItemのカメラをタップした時のアクション @IBAction func didSelectCamera(_ sender: Any) { present(imagePicker, animated: true, completion: nil) } } /// UIImagePickerの処理 extension ViewController: UIImagePickerControllerDelegate { func imagePickerController(_ picker: UIImagePickerController, didFinishPickingMediaWithInfo info: [UIImagePickerController.InfoKey : Any]) { if let userSelectedImage = info[.originalImage] as? UIImage { imageView.image = userSelectedImage } imagePicker.dismiss(animated: true, completion: nil) } }UIImagePickerController:
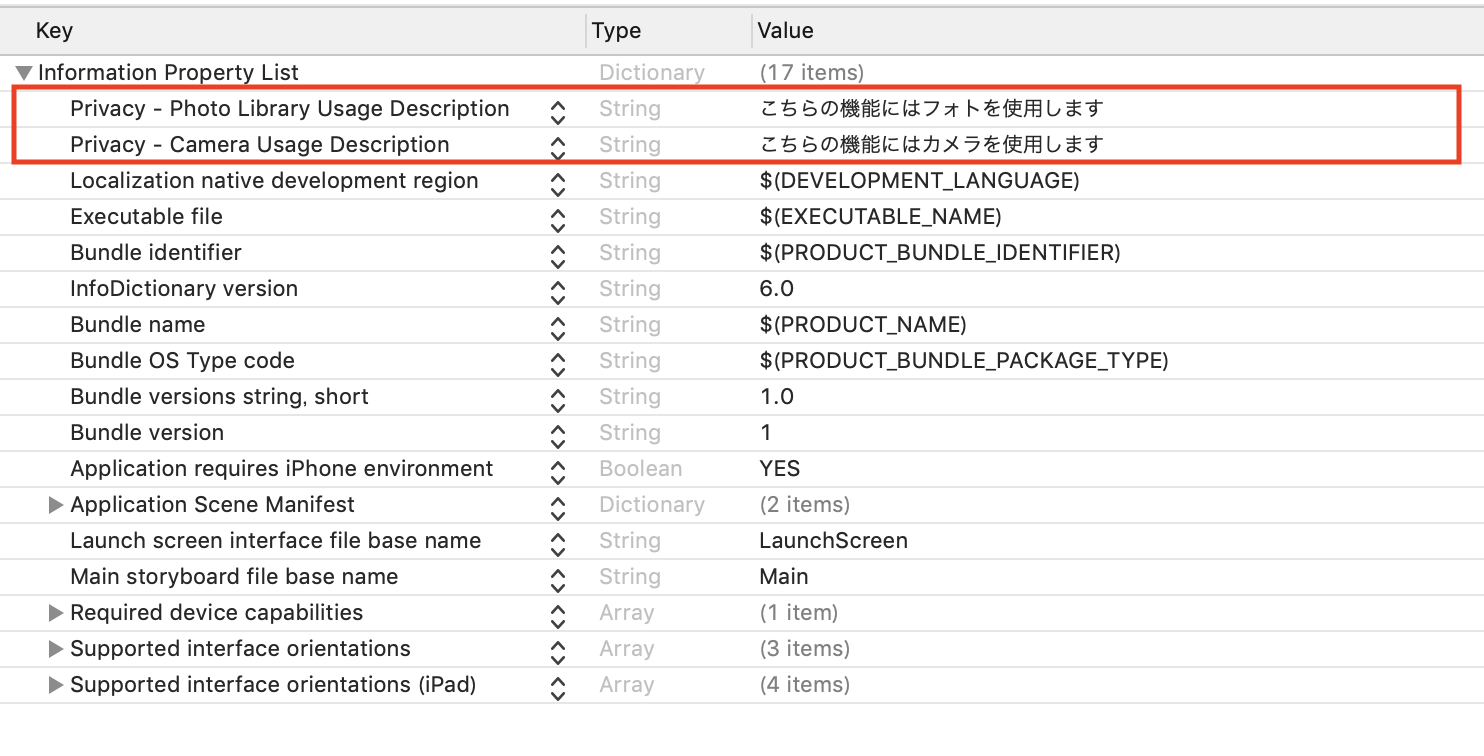
https://developer.apple.com/documentation/uikit/uiimagepickercontroller2-1-3. info.plistでカメラ使用許可などを設定
カメラ使用などにユーザーの許可が必要になるためinfo.plistに設定を追加します。
コードではこちらになります。
info.plist<key>NSPhotoLibraryUsageDescription</key> <string>こちらの機能にはフォトを使用します</string> <key>NSCameraUsageDescription</key> <string>こちらの機能にはカメラを使用します</string>2-2. 機械学習の処理を実装
今回は、Core MLで画像の分類を行うためVisionフレームワークを使用して実装していきます。2-2-1. 使用するフレームワークなどをimportする
ViewController.swiftimport CoreML import VisionCore ML:
https://developer.apple.com/jp/documentation/coreml
Visionフレームワーク:
https://developer.apple.com/documentation/vision2-2-2. Core MLモデルのインスタンス生成と処理
ViewController.swift// 使用するCore MLモデルのインスタンスを生成 let model = VNCoreMLModel(for: MobileNetV2().model) // これでVisionからリクエストを送りmodelを元に解析することができる let request = VNCoreMLRequest(model: model) { (request, error) in // 解析結果を分類情報として保存 guard let results = request.results as? [VNClassificationObservation] else { return } }VNCoreMLModel:
https://developer.apple.com/documentation/vision/vncoremlmodel
VNClassificationObservation:
https://developer.apple.com/documentation/vision/vnclassificationobservation2-2-3. 画像の解析リクエストをする
2-2-2で作成したCore MLモデルの解析をリクエストする処理を書いていきます。
ViewController.swift// Visionへリクエストを送るためにUIImage→CIImageへ変換する let ciImage = CIImage(image: image) // 画像解析をリクエスト let handler = VNImageRequestHandler(ciImage: ciImage) // リクエストを実行 do { try handler.perform([request]) } catch { print(error) }CIImage:
https://developer.apple.com/documentation/coreimage/ciimage
VNImageRequestHandler:
https://developer.apple.com/documentation/vision/vnimagerequesthandler3. 完成形
ViewController.swiftimport UIKit import CoreML import Vision class ViewController: UIViewController { // 撮影した画像を表示するImageView @IBOutlet weak var imageView: UIImageView! let imagePicker = UIImagePickerController() override func viewDidLoad() { super.viewDidLoad() imagePicker.delegate = self imagePicker.sourceType = .camera imagePicker.allowsEditing = false } @IBAction func didSelectCamera(_ sender: Any) { present(imagePicker, animated: true, completion: nil) } } /// UIImagePickerの処理 extension ViewController: UINavigationControllerDelegate, UIImagePickerControllerDelegate { func imagePickerController(_ picker: UIImagePickerController, didFinishPickingMediaWithInfo info: [UIImagePickerController.InfoKey : Any]) { if let userSelectedImage = info[.originalImage] as? UIImage { imageView.image = userSelectedImage // 画像からオブジェクトを検出し、出力する detectImageObject(image: userSelectedImage) } imagePicker.dismiss(animated: true, completion: nil) } /// 画像からオブジェクトを検出・結果を出力 func detectImageObject(image: UIImage) { // VNCoreMLModel(for: xx.modle): xxは使用するCore MLモデルによって変わります guard let ciImage = CIImage(image: image), let model = try? VNCoreMLModel(for: MobileNetV2().model) else { return } // Core MLモデルを使用して画像を処理する画像解析リクエスト let request = VNCoreMLRequest(model: model) { (request, error) in // 解析結果を分類情報として保存 guard let results = request.results as? [VNClassificationObservation] else { return } // 画像内の一番割合が大きいオブジェクトを出力する if let firstResult = results.first { let objectArray = firstResult.identifier.components(separatedBy: ",") if objectArray.count == 1 { self.navigationItem.title = firstResult.identifier } else { self.navigationItem.title = objectArray.first } } } // 画像解析をリクエスト let handler = VNImageRequestHandler(ciImage: ciImage) // リクエストを実行 do { try handler.perform([request]) } catch { print(error) } } }VisionおよびCore MLを使用した画像の分類
https://developer.apple.com/documentation/vision/classifying_images_with_vision_and_core_mlまとめ
Core MLの情報はdeveloper.appleにサンプルコードなどがあり、手が出しやすい部類かなと思います。また、用意されているCore MLモデル以外に他社製の機械学習モデルも変換してアプリで使用することができるようなので、かなりの可能性が秘めているなと感じました。ただ、まだ理解できてないところが多いので、実際にコードを書きながら理解を深めて記事でも書ければと思います。
また、本記事に間違い等ございましたら、
大変恐縮でありますがご指摘いただければと存じます。
よろしくお願いいたします。


- 投稿日:2019-12-11T17:53:25+09:00
Swift初心者がCoreMLで機械学習に足を踏み入れてみた
はじめに
Swift初心者ではありますが、以前から興味があったCoreMLで機械学習にチャレンジしてみました。
機械学習と聞くと、なんとなく難しそうでハードルが高いイメージがあったのですが、実際に触れてみると想像よりも簡単に実装できましたのでまとめてみました。そもそもCore MLとは?については、まとめられている記事がありましたので紹介させていだきます。
Appleの機械学習がヤバい成果物
今回は、機械学習モデルを活用してiPhoneで撮影した画像の中の主要なオブジェクトを分類して、その中で1番割合を占めているオブジェクト名を表示する機能を作成していきます。
Siamese cat = シャム猫のようですね。(ラグドールなのでOKですかね?)
一応猫を判別することに成功!作成の流れ
作成にあたり以下のような流れで進めていきます。
1. Core MLを使用するための前準備
Core MLを使用するためには、モデルのダウンロードとインポートが必要になります。
ここでは、こちらの工程を説明していきます。1-1. Core MLモデルのダウンロード
今回は、画像識別を行うためのCore MLモデルの1つである
MobileNetV2を使用します。
そのために、以下Apple developerサイトのモデル一覧からダウンロードする必要があります。
https://developer.apple.com/jp/machine-learning/models/
「モデルを見る」をクリックすると以下の画像が表示されます。
赤枠内のファイルをダウンロードすることで、今回使用するCore MLモデルを入手することができます。1-2. Core MLモデルをインポート
実際に使用するためにXcodeに
Core MLモデルをインポートしていきます。
とは言っても、実際にはドラッグ&ドロップするだけの作業になります。。
MobileNetV2.mlmodelが追加されていれば準備作業は完了です。
続いて、実装作業に進んでいきます。2. 実装
ここでは、
2-1. iPhoneで撮影した画像を表示する処理
2-2. 画像データを機械学習モデルで分類する処理
を順に実装していきます。2-1. iPhoneで撮影した画像を表示する処理
2-1-1. StoryBoadに設置
今回は個人的に楽に実装しやすそうなNavigationBarにCameraを配置していきます。
撮影した写真を表示させるためにUIImageViewを配置します。2-1-2. 機能を実装
先ほど設置したオブジェクトにアクションを追加していきます。
Cameraをタップするとカメラを起動させるUIImageViewに撮影した画像を表示させるViewController.swiftclass ViewController: UIViewController, UINavigationControllerDelegate { @IBOutlet weak var imageView: UIImageView! let imagePicker = UIImagePickerController() override func viewDidLoad() { super.viewDidLoad() imagePicker.delegate = self // .photoLibraryにするとフォト内の写真を開くことができます。 imagePicker.sourceType = .camera imagePicker.allowsEditing = false } /// NavigationbarItemのカメラをタップした時のアクション @IBAction func didSelectCamera(_ sender: Any) { present(imagePicker, animated: true, completion: nil) } } /// UIImagePickerの処理 extension ViewController: UIImagePickerControllerDelegate { func imagePickerController(_ picker: UIImagePickerController, didFinishPickingMediaWithInfo info: [UIImagePickerController.InfoKey : Any]) { if let userSelectedImage = info[.originalImage] as? UIImage { imageView.image = userSelectedImage } imagePicker.dismiss(animated: true, completion: nil) } }UIImagePickerController:
https://developer.apple.com/documentation/uikit/uiimagepickercontroller2-1-3. info.plistでカメラ使用許可などを設定
カメラ使用などにユーザーの許可が必要になるためinfo.plistに設定を追加します。
コードではこちらになります。
info.plist<key>NSPhotoLibraryUsageDescription</key> <string>こちらの機能にはフォトを使用します</string> <key>NSCameraUsageDescription</key> <string>こちらの機能にはカメラを使用します</string>2-2. 機械学習の処理を実装
今回は、Core MLで画像の分類を行うためVisionフレームワークを使用して実装していきます。2-2-1. 使用するフレームワークなどをimportする
ViewController.swiftimport CoreML import VisionCore ML:
https://developer.apple.com/jp/documentation/coreml
Visionフレームワーク:
https://developer.apple.com/documentation/vision2-2-2. Core MLモデルのインスタンス生成と処理
ViewController.swift// 使用するCore MLモデルのインスタンスを生成 let model = VNCoreMLModel(for: MobileNetV2().model) // これでVisionからリクエストを送りmodelを元に解析することができる let request = VNCoreMLRequest(model: model) { (request, error) in // 解析結果を分類情報として保存 guard let results = request.results as? [VNClassificationObservation] else { return } }VNCoreMLModel:
https://developer.apple.com/documentation/vision/vncoremlmodel
VNClassificationObservation:
https://developer.apple.com/documentation/vision/vnclassificationobservation2-2-3. 画像の解析リクエストをする
2-2-2で作成したCore MLモデルの解析をリクエストする処理を書いていきます。
ViewController.swift// Visionへリクエストを送るためにUIImage→CIImageへ変換する let ciImage = CIImage(image: image) // 画像解析をリクエスト let handler = VNImageRequestHandler(ciImage: ciImage) // リクエストを実行 do { try handler.perform([request]) } catch { print(error) }CIImage:
https://developer.apple.com/documentation/coreimage/ciimage
VNImageRequestHandler:
https://developer.apple.com/documentation/vision/vnimagerequesthandler3. 完成形
ViewController.swiftimport UIKit import CoreML import Vision class ViewController: UIViewController { @IBOutlet weak var imageView: UIImageView! let imagePicker = UIImagePickerController() override func viewDidLoad() { super.viewDidLoad() imagePicker.delegate = self imagePicker.sourceType = .camera imagePicker.allowsEditing = false } @IBAction func didSelectCamera(_ sender: Any) { present(imagePicker, animated: true, completion: nil) } } /// UIImagePickerの処理 extension ViewController: UINavigationControllerDelegate, UIImagePickerControllerDelegate { func imagePickerController(_ picker: UIImagePickerController, didFinishPickingMediaWithInfo info: [UIImagePickerController.InfoKey : Any]) { if let userSelectedImage = info[.originalImage] as? UIImage { imageView.image = userSelectedImage // 画像からオブジェクトを検出し、出力する detectImageObject(image: userSelectedImage) } imagePicker.dismiss(animated: true, completion: nil) } /// 画像からオブジェクトを検出・結果を出力 func detectImageObject(image: UIImage) { // VNCoreMLModel(for: xx.modle): xxは使用するCore MLモデルによって変わります guard let ciImage = CIImage(image: image), let model = try? VNCoreMLModel(for: MobileNetV2().model) else { return } // Core MLモデルを使用して画像を処理する画像解析リクエスト let request = VNCoreMLRequest(model: model) { (request, error) in // 解析結果を分類情報として保存 guard let results = request.results as? [VNClassificationObservation] else { return } // 画像内の一番割合が大きいオブジェクトを出力する if let firstResult = results.first { let objectArray = firstResult.identifier.components(separatedBy: ",") if objectArray.count == 1 { self.navigationItem.title = firstResult.identifier } else { self.navigationItem.title = objectArray.first } } } // 画像解析をリクエスト let handler = VNImageRequestHandler(ciImage: ciImage) // リクエストを実行 do { try handler.perform([request]) } catch { print(error) } } }VisionおよびCore MLを使用した画像の分類
https://developer.apple.com/documentation/vision/classifying_images_with_vision_and_core_mlまとめ
Core MLの情報はdeveloper.appleにサンプルコードなどがあり、手が出しやすい部類かなと思います。また、用意されているCore MLモデル以外に他社製の機械学習モデルも変換してアプリで使用することができるようなので、かなりの可能性が秘めているなと感じました。ただ、まだ理解できてないところが多いので、実際にコードを書きながら理解を深めて記事でも書ければと思います。
また、本記事に間違い等ございましたら、
大変恐縮でありますがご指摘いただければと存じます。
よろしくお願いいたします。
- 投稿日:2019-12-11T17:18:07+09:00
忘備録-Swiftのジェネリクス
趣味でIOSアプリ開発をかじっていた自分が、改めてSwiftを勉強し始めた際に、曖昧に理解していたところや知らなかったところをメモしています。いつか書き直します。
参考文献
この記事は以下の書籍の情報を参考にして執筆しました。
ジェネリクス
型をパラメータとしてプログラムに記述するための機能。
ジェネリクスを使った関数例型パラメータの書き方
<T> : 関数定義、型定義に書くことによってTを型パラメータとして使うことを示す。
<T,U> : 型パラメータが2つ欲しいときはこのように書く。
<T: OtherType> : TはプロトコルOtherTypeに適合するか、クラスOtherType自体かそのサブクラスであることを示す。
where 条件 : T:OtherTypeやT==Uのような条件を記述する。プロトコルによる制約
func mySwap<T: Comparable>(little a: inout T, great b: inout T){
  if a < b {
    let t = a; a = b; b = t
  }
}

var a = "hoge"
var b = "piyo"

print(a,b)    // hoge piyo
mySwap(little: &a, great: &b)
print(a,b)    // piyo hoge

var c = 10
var d = 30

print(c,d)    // 10 30
mySwap(little: &c, great: &d)
print(c,d)    // 30 10

var e = ("hoge", 0)
var f = ("piyo", 100)
mySwap(little: &e, great: &f)    // error Comparableに適応してないことを指摘される。
型パラメータの推論
// 任意のオプショナル型配列を返す関数
func f<T>(_ n:Int) -> [T?] {
  return [T?]( repeating:nil, count:n )
}

//let a = f(3)    // 型推論の座愛量がないのでエラーとなる
let a: [Int?] = f(3)
print(a)    // [nil, nil, nil]
型パラメータをもつ構造体の定義
構造体や列挙型、クラスが型パラメータを持つように定義することができる。
定義方法は名前の後にをつける。
て戯号するべきプロトコルなどの条件をつけることもできる。// プロトコルを作成 protocol SimpleVector { associatedtype Element var x : Element { get } var y : Element { get } } // 型パラメータを持つ構造体を定義 struct Vector<T> : SimpleVector { typealias Element = T var x,y : T }型パラメータを持つtypealias
型パラメータに複雑な制約をつけることも可能。
typealias Avatar<T,U> = (power: T, armor: U) where T: Comparable, U:Collection, U.Element == (String, T)
let fighter: Avatar = (power: 90, armor: [("Sword", 50), ("Hoge", 10)])
print(fighter.armor.first!)    // ("Sword", 50)
不透明型
関数の戻り値型としてSelfまたは付属生を持つプロトコルを指定する。
例えば下記の例で返り値にRankedというプロトコルを指定するが、プロパティに含まれるRank型が何かわからないのでエラーとなる。
このような場合にプロトコルの前にsomeというキーワードを置いて、返り値の型として使用できるようになる。protocol Ranked { associatedtype Rank: Comparable var name: String { get } var rank: Rank { get } } struct Person: Ranked { var name: String var rank: Int } //func comparRank<T>(_ a: T, _ b: T) -> Ranked where T: Ranked { // error func comparRank<T>(_ a: T, _ b: T) -> some Ranked where T: Ranked { let c = (a.rank > b.rank) ? a : b return Person(name: c.name, rank: c.rank as! Int ) } let a = Person(name:"hoge", rank: 1) let b = Person(name:"fuga", rank: 30) let c = comparRank(a, b) print(c.name, c.rank)不透明型の性質
下記のようなプログラムを実行するときsomeを使わずにプロトコルを返す関数を実装。
返り値を2通り返すような処理にしてsomeを記述するとエラーとなる。
someを指定した場合プロトコルに適合するいずれか1種類の型でないといけない。protocol Named { var name: String { get } } protocol Ranked : Named{ associatedtype Rank: Comparable // var name: String { get } var rank: Rank { get } } struct Person: Ranked { var name: String var rank: Int } //func comparRank<T>(_ a: T, _ b: T) -> some Named where T: Named { // error func comparRank<T>(_ a: T, _ b: T) -> Named where T: Named { if (a.name > b.name) { return Person(name: a.name, rank: 0) } return b } let a = Person(name:"hoge", rank: 1) let b = Person(name:"fuga", rank: 30) let c = comparRank(a, b) print(c.name) //print(c.rank) // error Namedプロトコルにrankがないのでまた、some Named型が複数存在する場合、それぞれが違う型とされるので代入などできない。
func newMember(name: String) -> some Named {
  return Person(name: name, rank: 0)
}

var a: some Named = newMember(name: "hoge")
var b: some Named = newMember(name: "fuga")
a = b //error
クロージャやジェネリクスを使って提供されているメソッド
filter - 条件を満たす要素を取り出す
let a = (1...100).filter { $0 % 22 == 0 || $0 % 33 == 0 }
print(a)    // [22, 33, 44, 66, 88, 99]
map - 各要素を処理した結果を配列として得る
let b = (1...10).map { $0 * 3}
print(b)    // [3, 6, 9, 12, 15, 18, 21, 24, 27, 30]
filterと組み合わせて使うこともできる
let c = (1...10).map { $0 * 3}.filter { $0 > 15}
print(c)    // [18, 21, 24, 27, 30]
mapValues - 辞書の含まれる要素の値に対して処理を適用し、その結果とキーを組みあわせた辞書を返す。
let d = ["りんご":100, "みかん":80, "ぶどう":300]
let mapped = d.mapValues{ (value:Int) -> Int in
  return Int(Double(value) * 1.1)
}
print(mapped)    // ["りんご": 110, "ぶどう": 330, "みかん": 88]
compactMap - 引数クロージャがnilを返した場合配列に含めない
let e = ["Hoge", "fuga","1", "Pochi","piyo", "99"].map { Int($0) }
print(e)    // [nil, nil, Optional(1), nil, nil, Optional(99)]
let f = ["Hoge", "fuga","1", "Pochi","piyo", "99"].compactMap { Int($0) }
print(f)    // [1, 99]
flatMap - シーケンスを返すクロージャを引数とし、全てのクロージャの要素を含む配列を返す
let g = [["Hoge", "fuga"], ["dog", "Pochi"], ["piyo", "foo"]].flatMap {$0}
print(g)    // ["Hoge", "fuga", "dog", "Pochi", "piyo", "foo"]
reduce - 各要素を連続的に処理して1つの値を得る
let h = ["Hoge", "fuga","piyo", "foo"].reduce("AAA"){ $0 + $1 }
print(h)    // AAAHogefugapiyofoo
- 投稿日:2019-12-11T15:44:05+09:00
Swift5でちょっと安全になったAccess Control
こんにちは。 Swift Advent Calendar 11日目担当の @sato-shin です。
今日は、Objective-C で Protocol 宣言されたオプショナルなメソッドを呼び出すときの、Swift5 と Swift4系 の挙動の違いから、Access Controlがちょっと安全になったよというお話です。
SwiftでProtocolを宣言し、使ってみる
foo()をもつFooProtocolを定義します。なお、foo()にはデフォルト実装が存在しています。protocol FooProtocol { func foo() } extension FooProtocol { func foo() {} }この
FooProtocolに適合するBarクラスを定義します。class Bar: FooProtocol { func foo() {} }この時、
Barに実装するfoo()の Access Control を private や fileprivate にするとコンパイルできなくなります。class Bar: FooProtocol { // ErrorMsg: Method 'foo()' must be declared internal because it matches a requirement in internal protocol 'FooProtocol' private func foo() {} }Objective-CでProtocolを宣言し、使ってみる
では次に、
FooProtocolと同じような使い方ができるObjcFooProtocolを作ってみます。
FooProtocolではfoo()のデフォルト実装が存在したため、適合側でfoo()の実装は任意でした。
そこで、ObjcFooProtocolでも同じ使い方ができるようにするため、foo()はオプショナルであると宣言します。ObjcFooProtocol.h@protocol ObjcFooProtocol <NSObject> @optional - (void)foo; @end
ObjcFooProtocolに適合する、Barクラスを swift で実装すると以下のようになります。class Bar: NSObject, ObjcFooProtocol { func foo() {} }Swift4とSwift5の挙動の違い
それでは、
foo()を private にし、Swift4 と Swift5 でコンパイルしてみましょう。
すると、Swift4ではコンパイルが成功し、Swift5ではコンパイルが失敗します。Bar.swiftclass Bar: NSObject, ObjcFooProtocol { // Swift4系ではコンパイルが成功する // // Swift5だとコンパイルが失敗する // ErrorMsg: Method 'foo()' must be as accessible as its enclosing type because it matches a requirement in protocol 'ObjcFooProtocol' private func foo() {} }このようにSwift5では、Swiftから見るObjective-CのProtocolに適合させるさいにprivateやfileprivateが許されなくなりました。
この変更により何がよくなったのか?
これによりDelegate実装のミスをなくすことができるようになりました。
どうミスが無くなるのか説明していきます。プレゼントを届けることのできないサンタさん
以下のコードでは、
ObjcSantaClaus,Daddyの二人が登場し、
サンタさんの代わりにパパさんがプレゼントを届けるということを表現しています。
ObjcSantaClausがdeliveryHappyItem()をすると、
ObjcSantaClausDelegateに適合するオブジェクトのputGift()に動作が委譲されています。
DaddyはObjcSantaClausDelegateに適合しており、ObjcSantaClausの代わりにプレゼントを届けることができます。ObjcSantaClaus.h#import <Foundation/Foundation.h> @protocol ObjcSantaClausDelegate <NSObject> @optional - (void)putGift; @end @interface ObjcSantaClaus : NSObject @property (weak, nonatomic) id <ObjcSantaClausDelegate> delegate; - (void)deliveryHappyItem; @endObjcSantaClaus.m#import "ObjcSantaClaus.h" @interface ObjcSantaClaus () @end @implementation ObjcSantaClaus - (void)deliveryHappyItem { if ([self.delegate respondsToSelector:@selector(putGift)]) { [self.delegate putGift]; } } @endDaddyclass Daddy: NSObject, ObjcSantaClausDelegate { func putGift() { print("put a gift!") } }プレゼントを届けるlet santa = ObjcSantaClaus() let daddy = Daddy() santa.delegate = daddy santa.deliveryHappyItem() // put a gift! と表示されるこれは正常に動作し、 put a gift! と表示され、無事にプレゼントが届きました。
問題
このとき、
DaddyクラスのputGift()を privateに変更したらどうなるでしょうか?class Daddy: NSObject, ObjcSantaClausDelegate { private func putGift() { print("put a gift!") } }答え
- Swift4系ではコンパイルが成功するが、実行しても
DaddyのputGift()が呼ばれない。- Swift5ではコンパイルが失敗する。
です。
なぜか
DaddyがputGift()を実装していても、private宣言をされていると、
SantaClausクラス側の[self.delegate respondsToSelector:@selector(putGift)]でputGift()へアクセスできないので、このようなことが起こります。これで、Swift4では
ObjcSantaClausがプレゼントを届けようとしてもプレゼントが届かないコードの完成です。
Swift5ではコンパイルが失敗し、上記のようなミスをできないので安全になりました。まとめ
Swift5からは、Objective-Cによって定義されたprotocolに適合するよう実装するときにprivate, fileprivateを指定できなくなったため、
Swift4では気づきづらかった、 Delegate におけるの Access Control のミスをコンパイル時に見つけることができるようになりました。蛇足
サンタさんはいます。25日にはサンタさんを追跡しましょう。
https://santatracker.google.com/
- 投稿日:2019-12-11T15:33:36+09:00
MVP意識しながら自分のクラロワアカウントをアプリに表示する。(Model編)
最初に
前回の続きです。
こちらを見てからどーぞ。
https://qiita.com/daichi77/items/0c849108ada04d7083e0#完成画面
こんな感じで僕のクラロワの最高トロフィーとかを表示できました。Modelのファイルたち
解説
ClashRoyaleClientError.swift
エラーのパターンをまとめたenumClashRoyaleClientError.swiftenum ClashRoyaleClientError: Error { //通信に失敗 case connectionError(Error) //レスポンスの解釈に失敗 case responseParseError(Error) //エラーレスポンスを受け取った時 case apiError(Error) }ClashRoyaleAPIError
APIから帰ってきたエラーメッセージなどを格納するやつClashRoyaleAPIErrorstruct ClashRoyaleAPIError: Decodable, Error { struct fieldError: Decodable { let error: Bool let status: Int let message: String } }Player.swift
APIから取ってきた情報を格納する構造体。
JSONにあわせて作りましょう。
Decodableを継承させておくといい感じにjsonを構造体に変換してくれます。Player.swiftpublic struct Player: Decodable { let tag: String let name: String let expLevel: Int let trophies: Int let bestTrophies: Int let wins: Int let losses: Int let battleCount: Int let threeCrownWins: Int let challengeCardsWon: Int let challengeMaxWins: Int let tournamentCardsWon: Int let tournamentBattleCount: Int let donations: Int let donationsReceived: Int let totalDonations: Int let warDayWins: Int let clanCardsCollected: Int struct arena: Decodable { let id: Int let name: String } struct leagueStatistics: Decodable { struct currentSeason: Decodable { let trophies: Int let bestTrophies: Int } struct previousSeason: Decodable { let id: String let trophies: Int let bestTrophies: Int } struct bestSeason: Decodable { let id: String let trophies: Int } } struct Badges: Decodable { let name: String let level: Int? let maxLevel: Int? let progress: Int } let badges: [Badges] struct Achievements: Decodable { let name: String let stars: Int let value: Int let target: Int let info: String } let achievements: [Achievements] struct Cards: Decodable { let name: String let id: Int let level: Int let maxLevel: Int let count: Int struct iconUrls: Decodable { let medium: String } } let cards: [Cards] struct currentFavouriteCard: Decodable { let name: String let id: Int let maxLevel: Int struct iconUrls: Decodable { let medium: String } } }Result.swift
その名の通り結果を返すenum型です。
APIからデータが返ってくればsucceess(T)エラーが帰ってくればfailure(error)
になります。Result.swiftenum Result<T, Error: Swift.Error> { case success(T) case failure(Error) init(value: T) { self = .success(value) } init(error: Error) { self = .failure(error) } }HTTPMethod.swift
今回はGETしか使いませんがとりあえず他のやつも定義しています。HTTPMethod.swiftenum HTTPMethod: String { case get = "GET" case post = "POST" case put = "PUT" case head = "HEAD" case delete = "DELETE" case patch = "PATCH" case trace = "TRACE" case options = "OPTIONS" case connect = "CONNECT" }ClashRoyaleAPI.swift
ここでpathとかjsonを変換する型(今回はPlayerを取ってくるのでPlayerに)などを決めます。
例えばプレイヤーじゃなくクランを取ってくる場合はResponseの型をClan型にしたりします。
pathなども同様にPostならpostにしたりします。ClashRoyaleAPI.swiftfinal class ClashRoyaleAPI { struct SearchUser: ClashRoyaleRequest { typealias Response = Player//ここは取ってくる情報によって違う値に変更 let keyword: String var method: HTTPMethod { return .get } var path: String { return "players" + keyword } } }ClashRoyaleRequest.swift
ここでリクエストの設定をしたりJsonをPlayer.swiftに変換したりしてます。ClashRoyaleRequest.swift//protocolで切り出してます。これをもとにリクエストを作ります。 protocol ClashRoyaleRequest { associatedtype Response: Decodable var baseURL: URL { get } var headers: [String: String] { get } var path: String { get } var method: HTTPMethod { get } } // baseURLとHeaderはどのリクエストでも共通なのでprotocolextensionで初期化 extension ClashRoyaleRequest { var baseURL: URL { return URL(string: "https://api.clashroyale.com/v1/")! } var headers: [String: String] { return [ "Authorization": "Bearer {apikey}"//各自のAPIkey ] } func buildURLRequest() -> URLRequest { //baseURLとpathを合体。 let url = baseURL.appendingPathComponent(path) let components = URLComponents(url: url, resolvingAgainstBaseURL: true) var urlRequest = URLRequest(url: url) urlRequest.url = components?.url urlRequest.httpMethod = method.rawValue//get urlRequest.allHTTPHeaderFields = headers//apikeyなど return urlRequest } //APIから返ってきた値が200から300ならjsonをUserモデルに変換してます。 func response(from data: Data, urlResponse: URLResponse) throws -> Response { let decoder = JSONDecoder() if case (200..<300)? = (urlResponse as? HTTPURLResponse)?.statusCode { print(Response.self) //このResponse.selfはrequestによって型が変わります return try decoder.decode(Response.self, from: data) } else { //ClashRoyaleAPIErrorの型に変換 throw try decoder.decode(ClashRoyaleAPIError.self, from: data) } } }ClashRoyaleClient.swiftclass ClashRoyaleClient { private let session: URLSession = { let configuration = URLSessionConfiguration.default let session = URLSession(configuration: configuration) return session }() //api叩くところです。 func send<Request: ClashRoyaleRequest> ( request: Request, completion: @escaping (Result<Request.Response,ClashRoyaleClientError>) -> Void) { let urlRequest = request.buildURLRequest() let task = self.session.dataTask(with: urlRequest) { data, response, error in switch(data,response,error) { case (_,_, let error?): completion(Result(error: .connectionError(error))) case (let data?,let response?, _): do {//responseを読んでjsonを変換 let response = try request.response(from: data, urlResponse: response) completion(Result(value: response)) } catch let error as ClashRoyaleAPIError {//api呼べてないとか completion(Result(error: .apiError(error))) } catch {//データは帰ってきたけどparseに失敗した時。 //jsonの形式とmodelの形式があっているか確認しましょう。 completion(Result(error: .responseParseError(error))) } default: fatalError("invalid response combination \(data),\(response), \(error)") } } DispatchQueue.main.async { task.resume() } } }まとめ
前回の記事に書いたPresenterからClashRoyaleClient.swiftを呼んでます。
記事が分かれてしまってすみません。
解説はコメントに書いてありますが聞きたいことがあればコメントください。前回の記事


- 投稿日:2019-12-11T15:26:49+09:00
xib で定義されてる cell の使いやすくようにする
問題点
ベタ書きでエラーが発生する可能性は十分あるんで悩ましい。
let nib = UINib(nibName: "MyCell", bundle: nil)か
tableView.register(UINib(nibName: "MyCell", bundle: nil), forCellReuseIdentifier: "MyCellIdentifier")やりたいこと
- Embedded Framework 対応
- bundle に入れるべき値は cell class によって変わる
- nibNameの入れ方をスマートに
解決方法
String(describing:)
let nibName = String(describing: MyCell.self)動的に Bundle を取得
let bundle = Bundle(for: MyCell.self)Bundle が動的に取得できれば Cell が他の target/framework に定義されても困らない。
合併してみる
合併したらこんな感じになります
let nibName = String(describing: MyCell.self)
let bundle = Bundle(for: MyCell.self)

let nib = UINib(nibName: nibName, bundle: bundle)
よしなにヘルパーを設ける
extension UITableViewCell {
    public static var nib: UINib {
        return UINib(nibName: nibName, bundle: Bundle(for: self))
    }

    static var nibName: String {
        return String(describing: MyCell.self)
    }
}
使い方
tableView.register(MyCell.nib, forCellReuseIdentifier: "MyCellIdentifier")この書き方にするなら、ヒューマンエラ可能性も低くになると思います。
次は cell reuse identifier の方を書こうと思います。
- 投稿日:2019-12-11T14:25:54+09:00
は!・か!!・た!!!・の塩(Peripheral)
ゆめみの日常
ある日社内のSlackでこんなやり取りがありました。
※伯方の塩は博多でつくっているわけではないそうです。
このスレッドをながめていたら、昔Twitterで見た「ずんどこきよしのプログラム」っぽいものが作れるんじゃないかと思い、CoreBluetoothで作ってみました。
そして出来たのがこちら。(※音が流れるので注意!)
https://twitter.com/u11238123/status/1198624428143214592
アプリ通信の流れについて
このアプリはCentral(動画内でのiPhone)側からPeripheral(動画内でのiPad)側にwriteをして音声を出力しています。
Bluetoothは固有の名称などがたくさんあり、それを全て説明していると1つ記事がかけてしまうので詳しく知りたい方は過去に僕がまとめた記事があるのでそれを参照してください。
また、この記事ではPeripheralの実装の解説だけに絞り、音の再生部分などは省略します?♂️
peripheralの実装
Peripheral側でデータを受け取る流れは以下のような感じです。
① Bluetoothの使用許可をinfo.plistに書く
② CBPeripheralManagerのインスタンスを作る
③ デバイスがBluetoothを使用可能か判定
④ ServiceとCharacteristicをつめる
⑤ アドバタイズ(情報の公開)開始!
⑥ データを受け取る厳密にアプリを作る際はもっと細かく用意されているメソッドを呼び出してハンドリングなどが必要になりますが、複雑になるので今回は省略します。
①Bluetoothの使用許可をinfo.plistに書く
ios13からiosデバイスでBluetoothを使用する際permissionの許可が必須になったため記載してあげる必要があります。
    <key>NSBluetoothAlwaysUsageDescription</key>
    <string>伯方の塩で使うよ</string>
ここに記載した文章がアプリ内のアラートに表示されますが、大手などのアプリでもいい加減なものを複数観測しているので、審査の際は書いてあればOKなのかなと思います。
ですが、ユーザに不信感を与えるので何に使うかは詳しく書いておいた方が良いと思います。
② CBPeripheralManagerのインスタンスを作る
コードはこんな感じです。
CBPeripheralManagerのインスタンスが作成されるとデリゲートメソッドが呼ばれはじめます。class ViewController: UIViewController { var manager: CBPeripheralManager! override func viewDidLoad() { super.viewDidLoad() self.manager = CBPeripheralManager(delegate: self, queue: nil) } } extension ViewController: CBPeripheralManagerDelegate {}③ デバイスがBluetoothを使用可能か判定し、可能なら情報をつめる
CBPeripheralManagerのインスタンスを作るとまず最初にperipheralManagerDidUpdateStateというメソッドが呼ばれます。
まず最初にデバイスがアドバタイズ可能かを判定する必要があります。peripheral(デバイス)の状態は引数に持っているperipheralのstateから判別することができます。
func peripheralManagerDidUpdateState(_ peripheral: CBPeripheralManager) {

    switch peripheral.state {
    case .unknown:
        print("よくわかないけどダメ!")
    case .resetting:
        print("システムとの接続がよくわからんからダメ!")
    case .unsupported:
        print("Bluetooth許可されてないじゃんダメ!")
    case .unauthorized:
        print("このデバイスBluetooth使えないからダメ!")
    case .poweredOff:
        print("Bluetooth offになってるからダメ!")
    case .poweredOn:
        print("つかえるよ!!!")
    @unknown default:
        fatalError("へんなのきたからダメ!")
    }
}
④ ServiceとCharacteristicをつめる
デバイスが通信可能であれば、アドバタイズ情報の中にServiceとCharacteristicをつめるわけですが、それぞれのUUIDを決める必要があります。
UUID作成用のtarminalコマンド(uuidgen)が用意されているのでそれで作成するのが簡単です。試しに2つ作成してみました、1つ目をServiceのUUID、2つ目をCharacteristicのUUIDとします。
19688AFB-4E68-4F21-BCBA-421220280930
999889FF-42B0-4FC8-B5BC-0CAB8C323FD2
プロパティとパーミッションは全部盛りにしていますが、今回は実質writeしか使わないのでプロパティはwrite、パーミッションはwritableだけでも問題ありません。
    func peripheralManagerDidUpdateState(_ peripheral: CBPeripheralManager) {
        switch peripheral.state {
        case .poweredOn:
            let serviceUUID = CBUUID(string: "19688AFB-4E68-4F21-BCBA-421220280930")
            let characteristicUUID = CBUUID(string: "999889FF-42B0-4FC8-B5BC-0CAB8C323FD2")

            let service = CBMutableService(type: serviceUUID, primary: true)
            let property: CBCharacteristicProperties = [.notify, .read, .write]
            let permission: CBAttributePermissions = [.readable, .writeable]
            var characteristic = CBMutableCharacteristic(type: characteristicUUID, properties: property, value: nil, permissions: permission)
            service.characteristics = [characteristic]
            self.manager.add(service)
        @unknown default:
        //コードが長くなってしまうのでダメなcaseは省略
            break
        }
    }
図解ServiceとCharacteristic
サービスとキャラクタリスティックの図を僕の過去の記事から引っ張ってきました。
今回はサービス1つ、キャラクタリスティック1つの構成ですが、市販されているPeripheralの多くは複数のサービスとキャラクタリスティックを保持しており、図のよう担っていると思います。
⑤ アドバタイズ(情報の公開)開始
サービスの追加が無事成功するとperipheralManager(_ peripheral: CBPeripheralManager, didAdd service: CBService, error: Error?)というメソッドが呼ばるので、その中でアドバタイズを行います。
    func peripheralManager(_ peripheral: CBPeripheralManager, didAdd service: CBService, error: Error?) {
        if error != nil {
            print("失敗してるよ")
        }
        if self.manager.isAdvertising == false {
            let advertiseData = [CBAdvertisementDataLocalNameKey: "博多の塩"]
            manager.startAdvertising(advertiseData)
        }
    }
引数なしでも良いのですが、せっかくなので名前をつけてアドバタイズさせてみました。
iosデバイス同士でやる時の注意なのですが、一度ペアリングを行ってしまうと以降ここで登録した名前ではなくデバイス名が表示されてしまうので注意が必要です!アドバタイズが問題なくできてるかの確認はLightBlue® Explorerというアプリを使うのが便利です。
アプリを起動すると画像のように近くでアドバタイズを行なっているデバイスを見つけることができます。
⑥ データを受け取る
central側からwriteされた場合はperipheralManager(_ peripheral: CBPeripheralManager, didReceiveWrite requests: [CBATTRequest])の中にwriteされた20byte以下のData型が飛んでくるのでその中身を見るだけです!
データ型の中身を確認する際は文字列にするのがわかりやすくて良いので以下のようなextendionをData型に生やしておくと便利です。
extension Data {

    struct HexEncodingOptions: OptionSet {
        let rawValue: Int
        static let upperCase = HexEncodingOptions(rawValue: 1 << 0)
    }

    func hexEncodedString(options: HexEncodingOptions = []) -> String {
        let hexDigits = Array((options.contains(.upperCase) ? "0123456789ABCDEF" : "0123456789abcdef").utf16)
        var chars: [unichar] = []
        chars.reserveCapacity(2 * count)
        for byte in self {
            chars.append(hexDigits[Int(byte / 16)])
            chars.append(hexDigits[Int(byte % 16)])
        }
        return String(utf16CodeUnits: chars, count: chars.count)
    }
}
あとはextensionで生やしたメソッドを使い、値を文字列で検出して実現したい処理をおこなうだけです。
func peripheralManager(_ peripheral: CBPeripheralManager, didReceiveWrite requests: [CBATTRequest]) {
        let responseData = requests[0].value?.hexEncodedString()
}


- 投稿日:2019-12-11T14:05:28+09:00
Swift5時代の画面遷移フレームワークを考える
皆さんこんにちは、iOS Advent Calendar 2019の15日目の @imk2o です。
かなり昔に Swift時代の画面遷移実装を考える という記事を書き、実務でも使っていたのですが、今回は改めてより良い実現方法を模索してみたことを紹介します!
Storyboardとコードとの「距離」を縮める
様々な意見があると思いますが、私はStoryboardやSegueを積極的に使っています。
一方でSwiftコードとの相性については決して良いとは言えません。ただそれを理由に使うのを諦めたくはないので、可能な限りシンプルかつ安全なバインディングを模索しました。Storyboardの要素とコードは、各要素に付与した
Identifierによって関連付けますが、Segueの場合そのままではリテラルを多用することになりがちです。
そこで下記のようにSegue Identifierと同じ名前のプロパティを定義することで、これを画面遷移則および、遷移先のキーとすることができるような設計を考案しました。この方法によって、以下の点が改善されます。
- どんなSegueがあり、どの画面(ViewController)に遷移するのかがひと目でわかる
- Segueの定義と、UIKitの画面遷移ロジックを集約できる
- Segue Identifierを表すリテラルが排除できる
以下は、Item一覧画面からの遷移則を表すコードです。
ItemListViewController.swiftextension ItemListViewController: DeclarativeRouting { struct SegueRoutes: SegueRouteDeclarations { // Segue Identifierが "showDetail" のAction Segueの遷移則 private let showDetail = ActionSegueRoute<ItemDetailViewController> { (segue, sender) in // 選択したセルに対応するItemを求める let source = segue.source as! ItemListViewController guard let cell = sender as? UITableViewCell, let item = source.item(for: cell) else { fatalError() } return item.id // 詳細画面にItem IDを渡す } // Segue Identifierが "showPageView" のManual Segueの遷移則 let showPageView = ManualSegueRoute<ItemPageContainerViewController>() static let shared: Self = .init() private init() {} } override func prepare(for segue: UIStoryboardSegue, sender: Any?) { // 代理でハンドリング self.segueRoutes.prepare(for: segue, sender: sender) } }なお遷移先となるItem詳細画面は以下のような実装になっています。
ItemDetailViewController.swift// MARK: - Routing extension ItemDetailViewController: DestinationScene { typealias Context = Int // Item IDをパラメータとして受け取る }コードからManual Segueを発火する方法も、上記の遷移則を利用します。
ItemListViewController.swift@IBAction func showPageView(_ sender: Any) { // Segue Routeを使って画面遷移 // (遷移先画面がパラメータ不要なので()を渡している) self.segueRoutes.showPageView.perform(with: (), from: self) }Segue Identifierのリテラルが排除され、遷移先に渡すパラメータの型が明確になったのではないでしょうか。
Global Routing: Segueに依らない画面遷移
ご承知のとおり、Segueのみであらゆる画面遷移を表現できるわけではありません。
Storyboardは使うけどSegueは使わない、と決めて運用しているプロダクトもあるでしょう。
そのような画面はグローバルなルーティング・テーブルに登録し、どの画面からも呼び出せるような仕組みを用意しています。PreferencesViewController.swift// MARK: - Routing extension PreferencesViewController: DescribedDestinationScene { // パラメータなし typealias Context = Void // Preferences.storyboardのInitial View Controllerに対応する static let storyboardDescription = StoryboardDescription(name: "Preferences") } extension Routes { // どこからでも遷移可能なルートとして追加 static let showPreferences = GlobalRoute<PreferencesViewController>() }ItemListViewController.swift@IBAction func showPreferences(_ sender: Any) { // Global Routeを使って画面遷移 Routes.showPreferences.perform(with: (), from: self) }原理
SwiftPM化したライブラリとサンプルコードをGitHubで公開していますので、詳細はそちらを読んでください?♂️
ポイントだけ列挙すると、
- Segue Identifierと
SegueRoutes下のプロパティとのバインディングは Mirror を使っている- 遷移先画面は
DestinationSceneプロトコルに準拠し、受け取る型を宣言している- 受け取ったパラメータはVCが保有するのではなく
ContextStoreにVCのインスタンスと紐付けて管理している
NSMapTableでVCを弱参照キーとすることで、パラメータは自動破棄- Global Routingできる画面は
DescribedDestinationSceneプロトコルに準拠し、インスタンス化のためのストーリーボード情報を記述Routesにタイプ・プロパティを追加して、画面VCに一意な名前を付与Segue Actionの必要性
このフレームワークが出来てしまうと、iOS13から使えるようになったSegue Actionは果たして必要なのか?という疑問に辿り着きました。Segue ActionによってStoryboard/Segueを使いつつDIできる利点はありますが、このフレームワークでも
DescribedDestinationSceneに準拠すればDIが可能です。
(正確にはVC自体に注入していないが、意図した振る舞いにはなる)SomeViewController.swiftprotocol SomeViewModel { ... } class SomeViewController: UIViewController, DescribedDestinationScene { typealias Context = SomeViewModel static let storyboardDescription = StoryboardDescription(...) ... } // Test with mock struct MockViewModel: SomeViewModel { ... } let injectableVC = InjectableViewController.instantiate(with: MockViewModel()) ...実装コストや複雑さの面においても、Segue Actionと大差ないと思います。
Manual Segueを使う場合は結局Segue IdentifierでperformSegue()する必要があるため、このフレームワークの方がシンプルに扱えるのではないでしょうか。引き続きSegue Actionの利点を探りつつ、有用であればフレームワークへ統合していきたいと思います。
今後の課題
まだコンセプトレベルのフレームワークであるため、実用度を上げるべく以下の課題について検討し改善したいと思います。
- Unwind Segue対応
- guard条件(ログインしていないと遷移できない等のコントロール)
- Segue Actionの統合検討
明日は @k0mach1 さんです。お楽しみに!
- 投稿日:2019-12-11T13:33:35+09:00
【2019年12月版】iOS周りのトレンドを調べてみた
iOS Advent Calendar 2019の4日目担当の@satoshi-baba-0823です!
最近はBitrise職人になりつつありますが、頑張っていきますのでよろしくお願いします!はじめに
今年もiOS界隈ではたくさんのアップデートがあったかと思います。
Swift5やSwiftUIなど開発に関わることも多かったですよね。iOS界隈では毎年6月頃に実施されるWWDCで新機能発表されるケースが多く、その時期は注目を浴びる機能も多いです。
でも、発表直後はよく聞いたけど、最近あの機能の話聞かないなってことありますよね?
これってトリビアになりませんか?調査方法
Google Trendsでワードごとの比較などでざっくり調べてみたいと思います。
https://trends.google.co.jp/trends/集計対象は「すべての国」、「過去12か月間」、「すべてのカテゴリ」、「ウェブ検索」
調べてみた
ざっくりここ1年くらいでよく聞いたな〜とか、あれ?こいつってみんな対応してるのかな?って思うものを調べてみました。
Swift4 & Swift5
今年もやっぱりSwiftのアップデートありましたね!
まだまだSwfit4優勢かなと思ってましたが、Swift5が逆転しつつありますね。
アップデートして数ヶ月経ち安定した頃合いなので、そろそろ乗り換える頃合いかもしれませんね。
WatchOS6 & iOS13 & iPadOS & tvOS
今年はiPadOSが新たに発表されましたね。
発表直後とリリース直後はかなり調べられているものの、あまり関心は集められていないようです。
10月頃に跳ね上がっているのは、リリースしているアプリがiPadOSで動くか調査を命じられているSIerが多かったのですかね。
Dark Mode & Apple Arcade & Memoji
こちらはユーザに直接関係のありそうな機能です。
Memojiは今年もアップデート入ってましたよね。Dark Modeに関してはやはりiOS13リリース前後に跳ね上がってますね。おそらく開発者の動作確認などだと思います。
意外とApple Arcadeの検索が多くないのが意外でした。
もっとユーザに突き刺さっているかと思いましたが、やっぱり安いとは言え有料なのがネックなんですかね。
スマホゲーム界隈の闇を少し感じました。
ARKit & Sign in With Apple & SwiftUI
Sign in With Appleありましたね!
サードパーティの認証使っている開発者には激震走ったかと思います。別の意味でSwiftUIも激震が走りましたよね!
辛かったUIの構築がこれでかなり改善できるんじゃないかと期待できます。グラフを見るとやはりSwiftUIが注目を浴びています。
Sign in With Appleも必要に迫られている開発者が多いのか、徐々に上昇傾向にあります。それに比べてARKitは去年までに比べてかなり落ち着いていますね。
市場に出てから数年経ちますし目新しさがなくなって感があります。
これからサービスに取り入れる場合は、もう1つ工夫がないと埋もれてしまいそうです。
AR & Accessibility & Dark Mode
アクセシビリティも今年注目されたものの1つかなと思います。
機能や事例が増えてはいるものの、これ1つでサービスが劇的に変わるわけではないので、いまいち伸び悩んでいるようですね。
まとめ
やはり今年大注目のSwiftUIは伸び続けていて、来年にはiOSエンジニア必須の知識となりそうです。
Swiftもそろそろ5に引き上げる時期ですかね...!
僕も徐々に対応していこうかなと思います!それではみなさん!素敵なiOSライフをお送りください!
おまけ
AR & VR & MR & SR
xR系も比べてみました。
MRが恐らく僕が思っていたMRじゃない気がしますね。(医療用語的な)
SRもこんなに浸透しているわけないので、違うSRがヒットしている感じでしょうか。(ソシャゲ的な)
トレンド調査も難しいものがありますね。


- 投稿日:2019-12-11T13:05:13+09:00
[iOS]アクションシートの選択肢の上の枠を消す方法
UIAlertControllerのtitleとmessageにnilを指定することでアクションシートの選択肢の上の枠を消せる。
UIAlertController(title: nil, message: nil, preferredStyle: .actionSheet)また、片方にnilを設定することで文字を中央に配置できる。
nilではなく空文字だと枠も消えないし位置もずれるので注意。
- 投稿日:2019-12-11T12:44:03+09:00
忘備録-Swiftのクロージャ
趣味でIOSアプリ開発をかじっていた自分が、改めてSwiftを勉強し始めた際に、曖昧に理解していたところや知らなかったところをメモしています。いつか書き直します。
参考文献
この記事は以下の書籍の情報を参考にして執筆しました。
クロージャ概要
簡単なクロージャ の例
let c1 = {
  print("Hello")
  print("hoge")
}
let c2 = {
  (a:Int, b:Int) -> Double in
  return Double(a) * Double (b)
}
print("c1-------")
c1()
print("c2-------")
print(c2(10,2))
出力
c1-------
Hello
hoge
c2-------
20.0
クロージャと関数の型
クロージャーは関数と同じように実行でき、同等のものとして扱うことができる。
クロージャーと関数の違いは後で書く。let c1 = { (a:Int, b:Int) -> Double in return Double(a) * Double (b) } var c2: (Int, Int) -> Double = c1 print(c2(10,8)) // 80.0 print(c1) // (Function) func f1(a: Int, b:Int) -> Double{ return Double(a) * Double (b) } print(f1) // (Function) c2 = f1 print( f1(a:2, b:6) ) // 12.0 print( c2(a:2, b:6) ) // erroe print( c2(2, 6) ) // 12.0オーバーロードされた関数の区別
使うときに引数ラベルを指定する
関数の引数と戻り値がわかる方法で記述する。let c1 = { (a:Int, b:Int) -> Double in return Double(a) * Double (b) } var c2: (Int, Int) -> Double = c1 func f1(a: Int, b:Int) -> Double{ return Double(a) * Double (b) } func f1(c: Int, d:Int) -> Double{ return Double(c) / Double (d) } // 追加 func f1(f: Int, g:Int) -> String{ return "\(f) + \(g)" } // 追加 c2 = f1(c:d:) // 変更 引数ラベルを指定 print( c2(2, 6) ) // 0.3333333333333333 //以下追加 var c3: (Int, Int) -> String c3 = f1 // f1の中でj上記の引数と型を持つのは一つしかないので引数ラベル不要 print(c3(1,3)) // 1 + 3クロージャーの複雑な宣言
// オプショナル型を返すクロージャー
let c1: (Int, Int) -> Double?

// クロージャー自体がオプショナル型
let c2: ((Int, Int) -> Double)?


// クロージャーの配列
let c3 = [(Int, Int) -> Double]()
// クロージャをtaypaliasで宣言してコンパクトにする
// クロージャの処理用途を記載して意味のある名前にすると可読性が上がる
typealias MyClosure = (Int, Int) -> Double
let c5 = [MyClosure]()
メモ
オプショナルのクロージャーってどういう状態?
let c1 = {
  (a:Int, b:Int) -> Double in
  return Double(a) * Double (b)
}

var c2: (Int, Int) -> Double
//print(c2) //error 初期化を促される
c2 = c1
print(c2)    // (Function)

var c3: ((Int, Int) -> Double)?
print(c3)    // nil
c3 = c1
print(c3)    // Optional((Function))
変数のキャプチャ
クロージャが関数と違うのは使い方。
クロージャは常に同じ機能のインスタンスが作られるのではなく、プログラムの外側にある変数の値を取り込んでインスタンスの一部とし、インスタンスが呼び出されるときにはいつでも値を取り出して使える。これをキャプチャという。新しくファイルを作って
クロージャを返す関数を作成する。var globalCount = 0 func maker(_ a: Int, _ b: Int) -> (() -> Int){ var localvar = a return { () -> Int in globalCount += 1 // globalCount+1するだけ localvar += b return localvar } }作った関数を使って2つのクロージャの挙動をみる。
クロージャm1とm2はそれぞれで値が増えていくので、それぞれのインスタンスで処理の外にある変数の実体を保持していることがわかる。var m1 = maker(10, 2) print(m1(),globalCount) // 12 1 print(m1(),globalCount) // 14 2 globalCount = 100 print(m1(),globalCount) // 16 101 var m2 = maker(100,50) print(m2(),globalCount) // 150 102 print(m1(),globalCount) // 18 103 print(m2(),globalCount) // 200 104変数キャプチャの共有
同一の変数をキャプチャした場合変数のキャプチャが共有される
var m1:(() -> ())! = nil
var m2:(() -> ())! = nil

func makerW(_ a: Int){
  var localvar = a
  m1 = { localvar += 1; print("m1: \(localvar)")}
  m2 = { localvar += 5; print("m2: \(localvar)")}
  m1()    // m1: 11
  m2()    // m2: 16
}

makerW(10)
m1()    // m1: 17
m2()    // m2: 22
m2()    // m2: 27
m1()    // m1: 28
参照型変数のキャプチャ
クロージャがクラスのインスタンスをキャプチャすると強い参照でインスタンスを保持する。
class MyInt {
  var value = 0
  init(_ v: Int) { value = v }
  deinit {print("\(value) : deinit")}
}

func makerZ(_ a:MyInt, _ s: String) -> () -> () {
  let localvar = a
  return {
    localvar.value += 1
    print("\(s) : \(localvar.value)")
  }
}

var obj = MyInt(10)
var m1:(() -> ())! = makerZ(obj, "m1")
m1()    // m1 : 11
var m2:(() -> ()) = makerZ(obj, "m2")
m2()    // m2 : 12

m1()    // m1 : 13
m1 = nil    // この時点でインスタンスは解放されない
m2()    // m2 : 14
// ここでインスタンスが解放される 14 : deinit
キャプチャリスト
クロージャの先頭に[]で囲んだ変数はキャッチリストと呼ばれ、ここに記述した変数はクロージャの生成時に値がコピーされ元の変数の値に変更があっても影響を受けない。
ただし、コピーできるのは値型のデータで、参照型のデータはキャプチャリストを使っても同じ値を参照するので個別に値を持てない。var a, b, c: () -> () do{ var count = 0 var name = "Hoge" a = { print(count, name) } b = { [count] in print(count, name) } c = { [count, name] in print(count, name) } count = 3 name = "Fuga" } a() // 3 Fuga b() // 0 Fuga c() // 0 Hogeキャプチャリストの中の識別子はクロージャ内で別の名前を指定することも可能なので、このように記述したほうがわかりやすい。
c = { [num = count, title = name] in print(num, count) }引数リストの省略
var c: (Int, Int) -> String

// 今まで取り扱った記述
c = { (a:Int, b:Int) -> String in "\(a)\(b)" }
print(c(1,3))

// 引数と返り値の省略
c = { a, b in "\(a)\(b)" }
print(c(1,3))

// $数字という記述で何番目の仮引数か知ることができる。
c = { "\($0)\($1)" }
print(c(1,3))
配列の整列
配列の要素を並び替えるメソッドsorted()は引数としてクロージャを使う
let list = ["hoge", "fuga", "piyo", "foo"]
let slist = list.sorted(by: {
  (a:String, b:String) -> Bool in a<b
})
print(slist)    // ["foo", "fuga", "hoge", "piyo"]
// 書き換え let slist = list.sorted(by: { $0 < $1 }) // <は次のように書くこともできる let slist = list.sorted(by: < )クロージャを引数とする関数の定義
//渡された文字列の配列を条件に合致する配列とそうでない配列に分けて返す関数
func separate(_ list: [String], by filter:(String) -> Bool) -> ([String],[String]){
  var sel = [String]()
  var des = [String]()
  for s in list {
    if filter(s) {
      sel.append(s)

    } else {
      des.append(s)
    }
  }
  return (sel, des)
}

let list = ["Hoge", "fuga", "piyo", "Foo", "AAA", "aaa"]

let t = separate(list, by:{
  for c in $0 {
    if case "A" ... "Z" = c {return true}
  }
  return false
})
print(t)    // (["Hoge", "Foo", "AAA"], ["fuga", "piyo", "aaa"])
接尾クロージャ
クロージャ式が引数の最後で呼ばれる場合、特別な記述ができる。
上記で記述した呼び出し部分の書き換えlet t = separate(list){ for c in $0 { if case "A" ... "Z" = c {return true} } return false } print(t) // (["Hoge", "Foo", "AAA"], ["fuga", "piyo", "aaa"])エラーを投げるクロージャ
let hoge = { (a:Double) throws -> Double in
  guard a > 0 else { throw XError.zero }
  return 1.0
}

// 使い方
if let d = try? hoge(-9.0){
  print(d)
} else {
  print("error")    // error
}
再通報する関数
エラーを投げるクロージャを引数とする関数が、そのクロージャを実行した結果エラーを伝播させる場合、再通報するという。
引数リストの後にrethrowsを置く
発生したエラーを外部に伝播させる必要がないのであればrethrowsは書かなくていいfunc Fuga(_ hoge: (Double) throws -> Double) rethrows -> Double{ //処理 let d = try hoge(-9.0) return d } let hoge = { (a:Double) throws -> Double in guard a > 0 else { throw XError.zero } return 1.0 } do{ let d = try Fuga(hoge) print(d) }catch{ print("error") // error }参照の循環
インスタンスのメンバのクロージャが他のメンバのキャプチャをしたときに参照の循環が起きる。
class Hoge {
  let str = "hoge"
  var fuga = { () -> String in " " }
  func hoge() {
    fuga = { () -> String in
      return self.str
    }
  }
  deinit {
    print("deinit")
  }
}

do {
  let piyo = Hoge()
  piyo.hoge()
}
// deinitが呼ばれない
キャプチャリストを使った解決
キャプチャリストは変数のコピーを作成するので参照の循環が起きなくなる。
func hoge() {
  fuga = { [str] () -> String in
    return str
  }
}
弱い参照を使った解決
弱い参照にするとunwrapする必要がある。
func hoge() {
  fuga = { [weak self] () -> String in
    guard let self = self else { return " " }
    return self.str
  }
}
関数の引数にクロージャを渡す
関数の引数にクロージャを渡したあと、関数内でクロージャを変数に保存することによって、関数呼び出しが終了した後でもクロージャが呼び出される可能性がある。
このような状態をクロージャの離脱、またはエスケープという。
クロージャが保存されない場合、関数終了時にクロージャへの参照が消滅する。
クロージャが保存されると、強い参照でキャプチャしている他のインスタンスが解放されない。var theFunc:((Int) -> Int)! = nil func setFunc(_ f:(Int) -> Int) { theFunc = f }関数の引数のクロージャが離脱する場合、@escapingで修飾しないといけない
func setFunc(_ f:@escaping (Int) -> Int) { theFunc = f }
- 投稿日:2019-12-11T11:56:13+09:00
UICollectionViewでレンガ積み
この記事は Goodpatch Advent Calendar 2019 の11日目です.
UICollectionViewで自由度の高いレイアウト定義をしたくなる機会があったので、遊んでみました。UICollectionViewLayout
UICollectionViewLayoutを使うと、UICollectionView内に表示するセル配置の自由度を高められるのでとても便利です。すべてのセルのサイズが決まっていて、かつ格子状に並べるだけであれば
storyboardでの設定やUICollectionViewDelegateFlowLayoutで事足りる場合が多い一方で、たとえばセルごとに高さが異なることで、必ずしも格子状に並ばない状況もありえます。そうしたときは、UICollectionViewLayoutでレイアウト定義を実装します。実装してみる
以下のように、
UICollectionViewLayoutのサブクラスを実装しますclass Layout: UICollectionViewLayout { //レイアウト計算結果(キャッシュ) private var calcResult: [IndexPath : UICollectionViewLayoutAttributes] = [:] //結果的に collectionView.contentSize.height となる値 private var contentHeight: CGFloat = 0 //①レイアウト計算 override func prepare() { super.prepare() guard let collectionView = collectionView else { return } if !calculationCache.isEmpty { return } //↑キャッシュがあれば以下のレイアウト計算はしない let numOfSections = collectionView.numberOfSections for section in 0..<numOfSections { let numOfItems = collectionView.numberOfItems(inSection: section) for i in 0..<numOfItems { let indexPath = IndexPath(item: i, section: section) let cellFrame: CGRect = ... //⭐️indexPathに対応するセルのframe計算⭐️ //キャッシュ let attrs = UICollectionViewLayoutAttributes(forCellWith: indexPath) attrs.frame = cellFrame calcResult[indexPath] = attrs //contentSize.heightの更新 contentHeight = max(contentHeight, cellFrame.maxY) } } } //②計算済みのキャッシュからindexPathに対応するセルのレイアウト属性を返す override func layoutAttributesForItem(at indexPath: IndexPath) -> UICollectionViewLayoutAttributes? { return calcResult[indexPath] } //③計算済みのキャッシュからある領域内に含まれるセルのレイアウト override func layoutAttributesForElements(in rect: CGRect) -> [UICollectionViewLayoutAttributes]? { return calcResults.filter { $0.value.frame.intersects(rect) }.map { $0.value } } //④collectionView.contentSizeを返す override var collectionViewContentSize: CGSize { return CGSize(width: contentWidth, height: contentHeight) } //⑤レイアウトの再計算が必要な際はキャッシュを削除する override func invalidateLayout() { super.invalidateLayout() calcResult.removeAll() } }実装した
UICollectionViewLayoutをイニシャライズ時に渡せば完了です。let cv = collectionView(frame: frame, collectionViewLayout: Layout())レンガを積む
レイアウトの定義においては、①レイアウト計算
prepare()の実装をがんばればよいのです。
幅をランダムに指定したセルを敷き詰める例が以下。(prepare()の実装から抜粋)//レンガ高さは40で固定 let brickHeight: CGFloat = 40 //可変のレンガ幅 let brickWidthRange: ClosedRange<CGFloat> = 60...120 func brickWidth() -> CGFloat { CGFloat.random(in: brickWidthRange) } for i in 0..<collectionView.numberOfItems(inSection: section) { let brickFrame: CGRect if contentWidth - currentPos.x > brickWidthRange.upperBound { //現在行に十分なあまりがあれば、そのまま隣に並べる let brickSize = CGSize(width: brickWidth(), height: brickHeight) brickFrame = .init(origin: currentPos, size: brickSize) currentPos.x += brickSize.width } else { //現在行に十分なあまりがなければ、あまりを埋める let brickSize = CGSize(width: contentWidth - currentPos.x, height: brickHeight) brickFrame = .init(origin: currentPos, size: brickSize) //改行する currentPos.x = 0 currentPos.y += brickSize.height } let attrs = UICollectionViewLayoutAttributes(forCellWith: IndexPath(item: i, section: section)) let insetFrame = brickFrame.inset(by: .init(top: 1, left: 1, bottom: 1, right: 1)) attrs.frame = insetFrame calcResults.append(attrs) }
実用的にはコンテンツに応じてセル高さを決めるので、その場合は独自に実装した
delegateを介して、prepare()で文字列や画像サイズを得、レイアウトを決定することになるでしょう。たとえば、簡単に、単語の配列をもとにセルサイズを決定するならば次のような実装になります。
func brickWidth(forText text: String) -> CGFloat {
    let brickSidePadding: CGFloat = 8
    let string = text as NSString
    let textWidth = string.boundingRect(with: .init(width: 0, height: brickHeight), attributes: [.font : fontOfCellLabel], context: nil).width
    return ceil(textWidth + brickSidePadding * 2)
}

override func prepare() {
    guard let delegate = delegate else { return }
    ...
    for i in 0..<collectionView.numberOfItems(inSection: section) {
        ...
        let indexPath = IndexPath(item: i, section: section)
        // delegate経由でindexPathに相当したセルに表示する文字列を取得し、セル幅を計算
        let text = delegate.string(for: indexPath) as NSString
        let brickWidth = brickWidth(forText: text)
        ...
    }
}
これでは右側が空いていたりと不格好なので、たとえばレンガ列を1段下げる前に、空いた幅分列内のレンガ幅に均等に配分する、など上記のアルゴリズムを工夫することで、いい感じの見た目を実現することができます。
まとめ
簡単な例でしたが、タグクラウド的な応用ができそうです。
最終的なサンプルは以下。
https://gist.github.com/p0dee/03e81df4b7dd6e7994d295686ca29d32
UICollectionViewLayoutでGoogle画像検索すると、ほかにもタイムテーブルといったさまざまな活用方法が見つけられます。


- 投稿日:2019-12-11T08:22:20+09:00
iOSアプリでapi叩いてみた
はじめに
前回の記事で、golangでapiを作成しました。
→ golangで楽々API作成
api作ったら、叩きたくなるのが男の性今回の記事では、*簡単に*apiからjsonを取得し、table viewに表示する方法を書きたいと思います。
細かいところの説明は省略しますが、機会があったらまとめたいと思います。GitHubからEC2にPull
省略しますが、前回作成したapiを公開しました。
画面を作成する
とりあえず画面を作成します。
Table Viewの上に、cellを置き、さらにその上にボタンやラベルを置きます。
今回は、「タスクの完了/未完了を設定するボタン」「タスク名を表示するラベル」「期限を表示するラベル」の3つを設置します。
コード上で識別できるように、3つそれぞれのtagに数字を設定します。
(画像では、完了/未完了を設定するボタンのtagに「1」を設定している)api叩いてみる
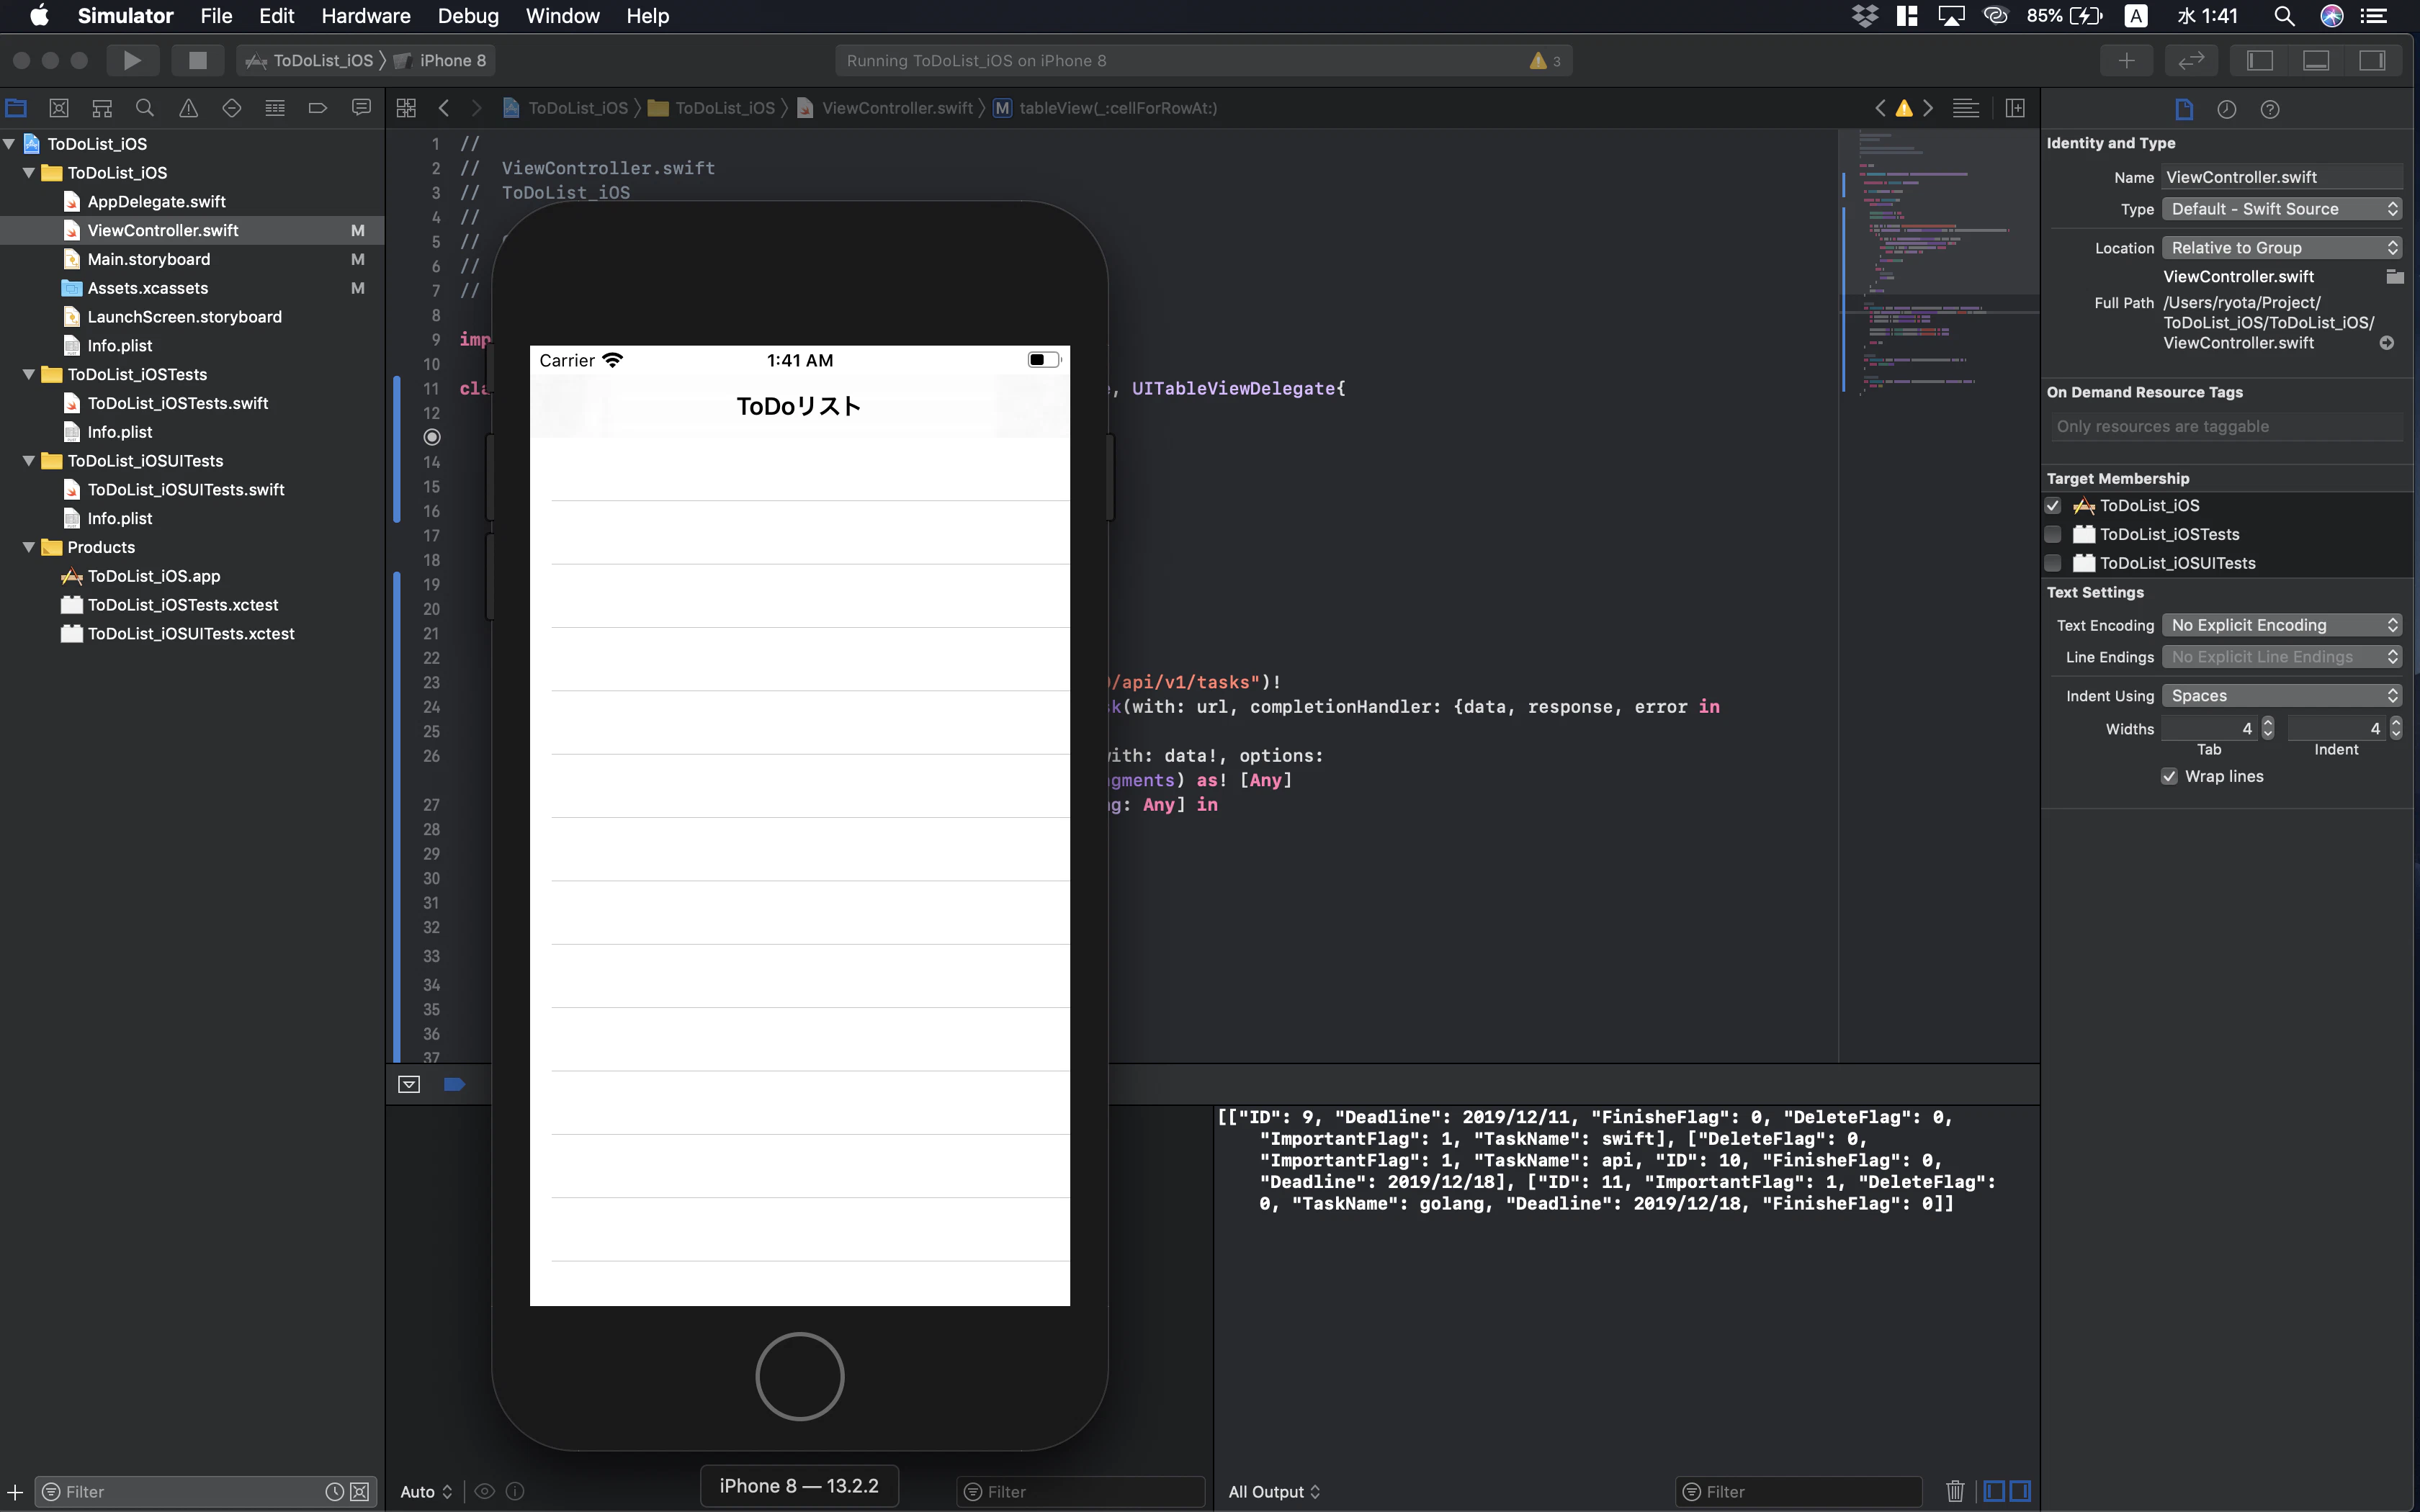
ViewController.swiftimport UIKit class ViewController: UIViewController { override func viewDidLoad() { super.viewDidLoad() let url: URL = URL(string: "http://xxx.xxx.xxx.xxx:xxxx/api/v1/tasks")! let task: URLSessionTask = URLSession.shared.dataTask(with: url, completionHandler: {data, response, error in do { let json = try JSONSerialization.jsonObject(with: data!, options: JSONSerialization.ReadingOptions.allowFragments) as! [Any] let jsonMap = json.map { (jsonMap) -> [String: Any] in return jsonMap as! [String: Any] } print(jsonMap) } catch { print(error) } }) task.resume() } }viewDidLoad()は、画面描画の前に呼ばれるメソッド。
ここで、apiを叩いてみる!
task.resume()実行後、dataの中にgetに対するレスポンスがかえってくる。
その後の処理で、JSONにパース。
実行結果↓(JSON形式でデータを取得できているのが確認できます。)
TableViewのCellに表示してみる
ViewController.swiftimport UIKit class ViewController: UIViewController, UITableViewDataSource, UITableViewDelegate{ @IBOutlet weak var tableView: UITableView! var jsonMap: [[String: Any]] = [] override func viewDidLoad() { super.viewDidLoad() tableView.delegate = self tableView.dataSource = self let url: URL = URL(string: "http://xxx.xxx.xxx.xxx:xxxx/api/v1/tasks")! let task: URLSessionTask = URLSession.shared.dataTask(with: url, completionHandler: {data, response, error in do { let json = try JSONSerialization.jsonObject(with: data!, options: JSONSerialization.ReadingOptions.allowFragments) as! [Any] self.jsonMap = json.map { (jsonMap) -> [String: Any] in return jsonMap as! [String: Any] } print(self.jsonMap) } catch { // 例外処理を書く print(error) } }) task.resume() } // セルの設定 // ここで、セルの中身を設定する func tableView(_ table: UITableView, cellForRowAt indexPath: IndexPath) -> UITableViewCell { let cell: UITableViewCell = table.dequeueReusableCell(withIdentifier: "cell", for: indexPath) let taskNameLbl = cell.viewWithTag(2) as! UILabel let deadlineLbl = cell.viewWithTag(3) as! UILabel taskNameLbl.text = jsonMap[indexPath.row]["TaskName"] as? String deadlineLbl.text = jsonMap[indexPath.row]["Deadline"] as? String return cell } // セル数の設定 // 今回は、apiを叩いた後、jsonMapにデータが格納されるので、`jsonMap.count`を設定 func tableView(_ table: UITableView, numberOfRowsInSection section: Int) -> Int { return jsonMap.count } // セルの高さを設定 func tableView(_ table: UITableView, heightForRowAt indexPath: IndexPath) -> CGFloat { return 90.0 } }Main.storyboardのTable ViewをIBOutletで
tableViewと紐付けます。
その後、UITableViewDataSource, UITableViewDelegateを継承し、必要なメソッドを追加します。
cellの中身は、追加したメソッドの中で設定!動かしてみる
リストが表示されない...
デバックコンソールを見る限り、apiからデータの取得はできている...原因
apiからのレスポンスがかえってくる前に、tableviewが描画されていることが原因!
レスポンス取得後、viewを再描画してあげればいい
self.tableView.reloadData()をprint(self.jsonMap)の前後に追加
無事表示できました。今後
今回は、swiftでGETでapiからデータ取得を行いました。
データの取得以外にも更新/削除などアプリから操作できるようになりたいですね。
また、機能を拡張するにあたり、もう少し綺麗にコードを整理したいとおもいます。


- 投稿日:2019-12-11T02:21:41+09:00
SwiftでLINEのようなトーク画面をライブラリ無しで作ろうとした
やりたいこと
個人でマッチングアプリを開発していた時に、トーク画面が必要になりました。
Swiftのトーク画面といえば色々なライブラリがありますが、使い方がよくわからなかったので、一から自分で作成することにしました。
下準備
共通で使う色とLabelのカスタムクラスを定義します。
UI.swift//トーク画面の背景の色 let commonBackgroundColor = UIColor(red: 0.9, green: 0.9, blue: 0.9, alpha: 1.0) //LINEのトーク画面の自分が送った文章の背景色 let greenColor = UIColor(red: 0.52, green: 0.89, blue: 0.29, alpha: 1.0) //自分のテキストと相手のテキストを表示するためのラベル class messageLabel: UILabel { override init(frame: CGRect) { super.init(frame: frame) self.numberOfLines = 0 self.layer.masksToBounds = true self.layer.cornerRadius = 10.0 self.textAlignment = .left self.textColor = UIColor.black self.font = UIFont.systemFont(ofSize: 16.0) } required init?(coder aDecoder: NSCoder) { fatalError("init(coder:) has not been implemented") } }サーバーから取得してきたタイムスタンプを、ユーザーに表示する日付に変換する関数を作ります
Common.swiftfunc unixToString(unix: Int) -> String { let dateUnix: TimeInterval = TimeInterval(unix) let date = Date(timeIntervalSince1970: dateUnix) // NSDate型を日時文字列に変換するためのNSDateFormatterを生成 let formatter = DateFormatter() formatter.dateFormat = "MM月dd日 HH:mm" //年は不要 formatter.locale = NSLocale(localeIdentifier: "en_US_POSIX") as Locale let dateStr: String = formatter.string(from: date) return dateStr }トーク画面のViewControllerの作成
ChatViewController.swiftimport UIKit import Alamofire final class ChatDetailViewController: UIViewController { let chatDetailView = ChatDetailView() var isKeyBoardOpen: Bool = false override func viewDidLoad() { super.viewDidLoad() self.edgesForExtendedLayout = [] navigationItem.title = "相手の名前" self.navigationController?.navigationBar.isTranslucent = false chatDetailView.frame = CGRect(x: 0, y: 0, width: self.view.frame.width, height: self.view.frame.height - (self.navigationController?.navigationBar.frame.height)! - UIApplication.shared.statusBarFrame.height) view.addSubview(chatDetailView) NotificationCenter.default.addObserver(self, selector: #selector(keyboardWillShow(_:)), name: UIResponder.keyboardWillShowNotification, object: nil) NotificationCenter.default.addObserver(self, selector: #selector(keyboardWillHide(_:)), name: UIResponder.keyboardWillHideNotification, object: nil) getData() } override func touchesBegan(_ touches: Set<UITouch>, with event: UIEvent?) { view.endEditing(true) } @objc func send() { //サーバーへメッセージを送信 //送信に成功したら画面上にメッセージを追加する self.chatDetailView.setText(text: "こんばんは",timeStamp: 1000000001,mine: true) } func getData() { //ここでAPIを叩いてテキストを取得 //相手が送ったメッセージを表示 self.chatDetailView.setText(text: "こんにちは",timeStamp: 1000000000,mine: false) //自分が送ったメッセージを表示 self.chatDetailView.setText(text: "こんばんは",timeStamp: 1000000001,mine: true) } @objc private func keyboardWillShow(_ notification: Notification) { guard let userInfo = notification.userInfo as? [String: Any] else { return } guard let keyboardInfo = userInfo[UIResponder.keyboardFrameEndUserInfoKey] as? NSValue else { return } guard let _ = userInfo[UIResponder.keyboardAnimationDurationUserInfoKey] as? Double else { return } if !isKeyBoardOpen { isKeyBoardOpen = true //ここでレイアウトを調整する } } @objc private func keyboardWillHide(_ notification: Notification) { if isKeyBoardOpen { isKeyBoardOpen = false //ここでレイアウトを調整する } } } extension UIScrollView { override open func touchesBegan(_ touches: Set<UITouch>, with event: UIEvent?) { //scrollViewをタップした時にキーボードが閉じられるようにする self.next?.touchesBegan(touches, with: event) } }左スワイプで元の画面に戻る
せっかくなので、LINEっぽくトーク画面から左スワイプで前の画面に戻るように拡張しましょう。
ChatDetailViewController.swiftextension ChatDetailViewController { func setSwipeBack() { let target = self.navigationController?.value(forKey: "_cachedInteractionController") let recognizer = UIPanGestureRecognizer(target: target, action: Selector(("handleNavigationTransition:"))) self.view.addGestureRecognizer(recognizer) } }トーク画面のView
必要な部品は、縦にするクロールする画面、送信ボタン、テキスト入力欄、メッセージのラベル、時刻表示のラベルです。
ChatDetailView.swiftimport Foundation import UIKit final class ChatDetailView: UIView { var scrollView: UIScrollView = UIScrollView() let textField = UITextField() let checkButton = UIButton() let sendButton: UIButton = { //送信ボタンを作成 let button = UIButton() button.setTitle("送信", for: .normal) button.setTitleColor(UIColor.white, for: .normal) button.backgroundColor = orangeColor button.titleLabel!.font = UIFont.boldSystemFont(ofSize: 19.0) button.layer.masksToBounds = true button.layer.cornerRadius = 20.0 button.translatesAutoresizingMaskIntoConstraints = false return button }() required override init(frame:CGRect){ super.init(frame:frame) addSubview(scrollView) addSubview(sendButton) addSubview(textField) } required init?(coder aDecoder: NSCoder) { fatalError("init(coder:) has not been implemented") } override func layoutSubviews() { super.layoutSubviews() makeScrollView() sendButton.topAnchor.constraint(equalTo: self.textField.topAnchor, constant: 0).isActive = true sendButton.leftAnchor.constraint(equalTo: self.textField.rightAnchor, constant: 10.0).isActive = true sendButton.rightAnchor.constraint(equalTo: self.rightAnchor, constant: -10.0).isActive = true sendButton.bottomAnchor.constraint(equalTo: self.textField.bottomAnchor, constant: 0.0).isActive = true textField.translatesAutoresizingMaskIntoConstraints = false textField.backgroundColor = commonBackgroundColor textField.topAnchor.constraint(equalTo: self.scrollView.bottomAnchor, constant: 10.0).isActive = true textField.leftAnchor.constraint(equalTo: self.leftAnchor, constant: 10.0).isActive = true textField.rightAnchor.constraint(equalTo: self.rightAnchor, constant: -100.0).isActive = true scrollView.topAnchor.constraint(equalTo: self.topAnchor, constant: 0.0).isActive = true scrollView.leftAnchor.constraint(equalTo: self.leftAnchor, constant: 0.0).isActive = true scrollView.rightAnchor.constraint(equalTo: self.rightAnchor, constant: 0.0).isActive = true } func makeScrollView() { //scrollViewを作成する scrollView.contentSize = CGSize(width: self.frame.width, height: 10) scrollView.bounces = false scrollView.indicatorStyle = .default scrollView.scrollIndicatorInsets = UIEdgeInsets(top: 10, left: 0, bottom: 10, right: 0) scrollView.translatesAutoresizingMaskIntoConstraints = false scrollView.backgroundColor = commonBackgroundColor scrollView.keyboardDismissMode = .onDrag } func setText(text: String, timeStamp: Int, mine: Bool) { let height = scrollView.contentSize.height let label = messageLabel(frame: CGRect()) label.text = text //自分のテキストは右側 相手のテキストは左側に表示する if mine { label.frame = CGRect(x: self.frame.size.width/2-50, y: height, width: self.frame.size.width/2 + 40, height: 100) label.backgroundColor = greenColor } else { label.frame = CGRect(x: 10, y: height, width: self.frame.size.width/2 + 40, height: 100) label.backgroundColor = .white } label.sizeToFit() //メッセージを表示するlabelにpaddingを設ける label.frame.size.height += 20.0 label.frame.size.width += 10.0 scrollView.addSubview(label) let dayLabel = UILabel() //先ほど定義した関数を用いて日付を表示 dayLabel.text = unixToString(unix: timeStamp) dayLabel.numberOfLines = 1 dayLabel.backgroundColor = commonBackgroundColor dayLabel.textColor = UIColor.black if mine { dayLabel.textAlignment = .right dayLabel.frame = CGRect(x: 0, y: height, width: self.frame.size.width/2 - 60, height: 40) } else { dayLabel.textAlignment = .left dayLabel.frame = CGRect(x: self.frame.size.width/2 + 60, y: height, width: self.frame.size.width/2 - 20, height: 40) } dayLabel.font = UIFont.systemFont(ofSize: 11.0) scrollView.addSubview(dayLabel) //テキストが追加されるたびに、スクロールビューの中身の高さを伸ばしていく scrollView.contentSize.height = height + label.frame.size.height + 10 } }setText関数では、第二引数のmineで自分のメッセージか相手のメッセージかを区別しています。自分のメッセージか相手のメッセージかによってラベルの背景色と位置と、時刻の表示場所が変わります。
実際の表示
まとめと課題
このままではキーボードが出された時に、送信ボタンをテキスト入力欄が隠れてしまいます。この辺りの情報は適宜追加していきたいと思います。IQKeyboardManagerなどのライブラリを使うと早いですね。
あとは吹き出しに見られるような突き出る部分をコードだけで書くのは辛いですね。とりあえずトーク画面っぽいものを作りたい人は参考にしてもらえたら嬉しいです。
