- 投稿日:2019-06-07T22:58:04+09:00
UIView, UIScrollView, UITableView の画像キャプチャのシンプルな実装
本記事の趣旨
下記の目的に対して、巧妙な実装をしている解説記事が多かったので、よりシンプルな実装を提案するものです。
- 任意の
Viewのキャプチャ画像をUIImageとして取得する- 任意の
UIScrollView/UITableViewのコンテンツ全体の画像をUIImageとして取得する万が一うまくいかなかったらコメントで教えていただけると幸いです。
方法
1. 任意の
Viewのキャプチャ画像をUIImageとして取得するここでは、
UIViewの extension として記述します。UIView+getImage.swiftimport UIKit extension UIView { func getImage() -> UIImage? { // 確実に不透明なら、第2引数は true がよい UIGraphicsBeginImageContextWithOptions(self.bounds.size, false, 0.0) guard let context = UIGraphicsGetCurrentContext() else { return nil } self.layer.render(in: context) let capturedImage: UIImage? = UIGraphicsGetImageFromCurrentImageContext() UIGraphicsEndImageContext() return capturedImage } }2. 任意の UIScrollView / UITableView のコンテンツ全体の画像を UIImage として取得する
キャプチャの瞬間だけ、
UIScrollView/UITableViewのframe.sizeをcontentSizeに変更してしまう方針です。
UItableViewはUIScrollViewを継承しているので、UIScrollViewの extension として記述します。
(先ほどのgetImage()とconflict しないように別名のメソッド (getContentImage()) とします。)UIScrollView+getContentImage.swiftimport UIKit extension UIScrollView { func getContentImage() -> UIImage? { UIGraphicsBeginImageContextWithOptions(captureSize, false, 0.0) guard let context = UIGraphicsGetCurrentContext() else { return nil } // 元の frame.size を記憶 let originalSize = self.frame.size // frame.size を一時的に変更 self.frame.size = self.contentSize self.layer.render(in: context) // 元に戻す self.frame.size = originalSize let capturedImage: UIImage? = UIGraphicsGetImageFromCurrentImageContext() UIGraphicsEndImageContext(); return capturedImage } }
- 投稿日:2019-06-07T21:25:38+09:00
UnityAdMobPluginアプデ時のエラー対処方法
はじめに
AdMobプラグインアップデート後に以下のエラーがiOS/Android共に発生
The Google Mobile Ads SDK was initialized incorrectly実装環境
- Unity 2019.1.4f1
- Google Mobile Ads Unity Plugin v3.17
対処方法
AppIDの設定箇所が重複しているため、以下のファイルの該当部分をコメントアウト
もしくはAppIDをセットするiOS
GoogleMobileAds/Editor/PListProcessor.csusing System.IO; using UnityEditor; using UnityEditor.Callbacks; using UnityEditor.iOS.Xcode; public static class PListProcessor { [PostProcessBuild] public static void OnPostProcessBuild(BuildTarget buildTarget, string path) { // Replace with your iOS AdMob app ID. Your AdMob App ID will look // similar to this sample ID: ca-app-pub-3940256099942544~1458002511 //以下の部分をコメントアウト /* string appId = "ADMOB_APPLICATION_ID"; string plistPath = Path.Combine(path, "Info.plist"); PlistDocument plist = new PlistDocument(); plist.ReadFromFile(plistPath); plist.root.SetString("GADApplicationIdentifier", appId); File.WriteAllText(plistPath, plist.WriteToString()); */ } }Android
Plugins/Android/GoogleMobileAdsPlugin/AndroidManifest.xml<?xml version="1.0" encoding="utf-8"?> <!-- This Google Mobile Ads plugin library manifest will get merged with your application's manifest, adding the necessary activity and permissions required for displaying ads. --> <manifest xmlns:android="http://schemas.android.com/apk/res/android" package="com.google.unity.ads" android:versionName="1.0" android:versionCode="1"> <uses-sdk android:minSdkVersion="14" android:targetSdkVersion="19" /> <application> <uses-library android:required="false" android:name="org.apache.http.legacy"/> <!-- Your AdMob App ID will look similar to this sample ID: ca-app-pub-3940256099942544~3347511713 --> <!-- 以下の部分をコメントアウト --> <!-- <meta-data android:name="com.google.android.gms.ads.APPLICATION_ID" android:value="[ADMOB APPLICATION ID]"/> --> </application> </manifest>参考リンク
- 投稿日:2019-06-07T20:05:08+09:00
WKWebViewでローカルのindex.htmlを読み込んでscriptを実行してみた
ネットを介してのWebView表示ではなく、手元にあるHTMLをWebViewで表示、scriptタグ内のJSメソッドの呼び出し方法をまとめます。
SwiftでWebViewを表示させる場合、WKWebViewを使うことがほとんどだと思います。現在ではUIWebViewは非推奨です。そちらについては以下の記事がとても参考になります。
[参考元]:UIWebViewを使わない理由とWKWebViewを使う理由環境
OS: Mojave 10.14.5
Xcode: 10.1
Swift 4.2HTML
今回はindex.htmlをWKWebViewでロードし、
<script>タグ内にあるJSメソッドを呼び出すことをします。
HTMLファイルはプロジェクト内に置きます。置き場は自由で構わないのですが、例として以下のように配置しておきます。例project ├─Resource │ ├index.html │ └sample.json │ └─View └SomeViewControllerHTMLのロード
ローカルのHTMLファイルはパスを取得する必要があり、取得には
Bundle.main.pathを使用します。
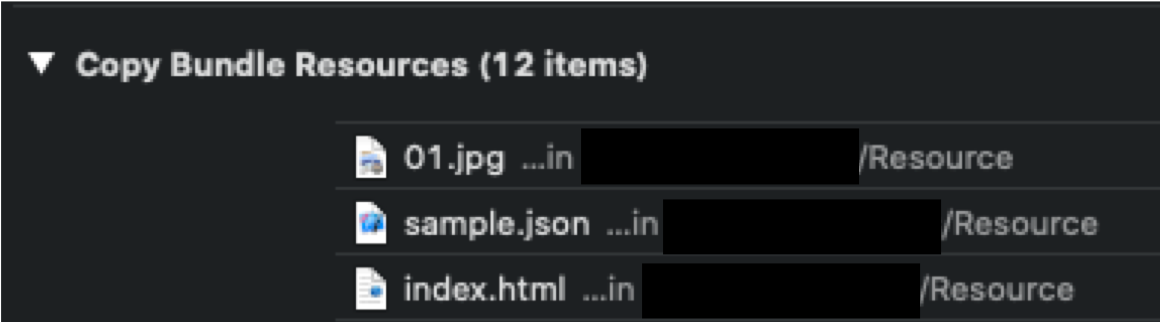
仕様ではBundle.main.pathはプロジェクトのBuild Setting>Copy Bundle Resourcesにあるファイルを取得するようです。
まずこの項目を確認し、取得したいHTMLファイルがなければ追加しておきましょう。
[参考元]:Swiftでプロジェクト内のファイルを取得する際の注意点2つ
HTMLファイルのパスをURL型にキャストしてWebViewの
loadFileURLの引数に与えます。これでWebViewにロードできました。func loadLocalHTML() { guard let path: String = Bundle.main.path(forResource: "index", ofType: "html") else { return } let localHTMLUrl = URL(fileURLWithPath: path, isDirectory: false) webView.loadFileURL(localHTMLUrl, allowingReadAccessTo: localHTMLUrl) }Swift側からscript内のjsを実行
実行タイミング
<script>タグにあるメソッドは、HTML全てがロードし終わってから呼び出さないとメソッド呼び出しに失敗します。
ロードが終わったことを通知するdelegateがWKNavigationDelegateにあります。delegateの通知先は自分であることの宣言を忘れずに。
SomeViewContollerwebView.navigationDelegate = selfSomeViewControllerextension SomeViewController: WKNavigationDelegate { func webView(_ webView: WKWebView, didFinish navigation: WKNavigation!) { // ここでJSの実行をする } }JSの実行
evaluateJavaScriptを使います。引数のjavaScriptStringに、実行するメソッドをStringで渡します。
また、ここのStringではjsの文法で書く必要があります。jsの知見が乏しい筆者はここで躓きました。[公式リファレンス]:evaluateJavaScript(_:completionHandler:)
<script>の中身は以下のようなものと仮定して、initHTML関数に引数を渡し実行する方法を解説します。<script> function initHTML(id, jsonData, onload) { console.log('initHTMLだお'); console.log(id, jsonData); onload(); } </script>引数
Swiftは静的型付け、JSは動的型付けなので、ゆるい方向への値渡しです。
initHTMLの引数(id, jsonData, onload)は、Swift側ではそれぞれInt,Json,関数として渡します。基本は文字列リテラル内での値の展開
\()を使います。
Jsonに関しては、Jsonファイルを読み取ってData->Stringに変換して、値展開で渡しています。Stringで渡してもWebView側でJsonとして扱ってくれます。
関数はjsの書き方であるアロー関数を用いて書きましょう。extension SomeViewController: WKNavigationDelegate { func webView(_ webView: WKWebView, didFinish navigation: WKNavigation!) { let intValue = 10 guard let json = getLocalJson() else { return } guard let strJson = String(data: json, encoding: .utf8) else { return } let script = "initHTML(\(intValue), \(strJson), () => { console.log('Swiftから渡された値だお') });" webView.evaluateJavaScript(script) { object, error in print(error ?? "成功") } } func getLocalJson() -> Data? { guard let path = Bundle.main.path(forResource: "sample", ofType: "json") else { return nil } let url = URL(fileURLWithPath: path) let json: Data? do { json = try Data(contentsOf: url) } catch { json = nil } return json } }コンソールの確認
JSの実行ができたらコンソールを確認しましょう。
しかしWebViewで実行したJSコンソールログはXcodeでは見れません。
ブラウザであるSafariで見ることができます。開発->端末名->index.jsと選択するとWebインスペクターが開きます。
呼び出しがうまくいってログが出力されています!
表示がない場合は左上らへんにある更新マークを押しましょう。次回
WebViewのJS内でprojectのソース(画像とか)にアクセスしたときに発生するエラー、
Orijin null is not byAccess-Control-Allow-Origin編に続く...WWDC19あとがき
SwiftUIめっちゃすごい。iOSのUI回りに激震が走りましたね。
ここまでUIの作成ハードルが下がると我々iOSエンジニアの価値が相対的に下がっていくのでは…
Combine frameworkの登場により、Rxライブラリは今後必要なくなるのかな。ただObserverパターンの考え方は必要なのでここはそれなりにハードルは依然高そう。参考


- 投稿日:2019-06-07T18:31:28+09:00
TableViewのCell入れ替えでViewが透過されてしまったあなたへ
まくら
iOSアプリといえばUITableViewでございます。たぶん。
今回はそんなUITableViewの小ネタをひとつ。UITableViewは割と簡単な設定でセルの入れ替えを実現させてくれます。
extension TableWorkViewController: UITableViewDataSource {
    // ...省略...

    // 移動可能
    func tableView(_ tableView: UITableView, canMoveRowAt indexPath: IndexPath) -> Bool {
        return true
    }

    // 移動実行
    func tableView(_ tableView: UITableView, moveRowAt sourceIndexPath: IndexPath, to destinationIndexPath: IndexPath) {
        print("source: \(sourceIndexPath)")
        print("dest: \(destinationIndexPath)")
    }
}
こんな感じで設定してやって、どこかで
self.tableView.isEditing = trueしてやると、
こんな感じで入れ替えアイコンが表示されるようになります。
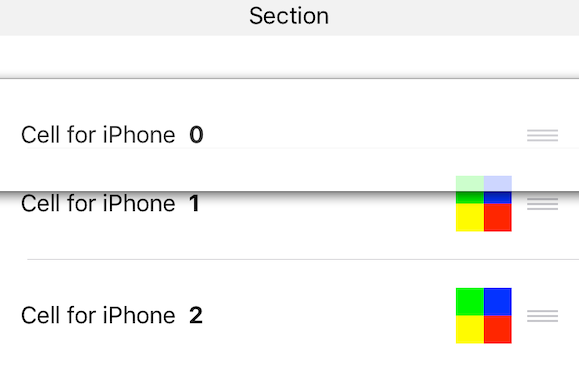
基本的なものでいいのならこれだけ。簡単。では実際に入れ替えてみましょう。
お気づきだろうか?
セルの上に
UIViewを乗せているのですが、見えなくなっていますね。
どうやら入れ替えの時はセルの上に乗っているUIViewは透明にされてしまっているようです。何やらちょっと気持ち悪いので、対策を考えてみましょう。
ほんだい
という訳で本題。
自分も地味にハマってしまったのですが、ナイスな力技で解決している方がいたので、マネさせて頂きました。
参考:
https://medium.com/@vhart/tableview-cell-reordering-keep-the-color-4c03623d2399最高!この力技感!
元ネタの方を見て頂けばわかる通り、移動の時に
UIViewのbackgroundColorに透明がセットされてしまうので、強制的に色を保持してやろうという訳です。そんなわけで作ったものがこちら
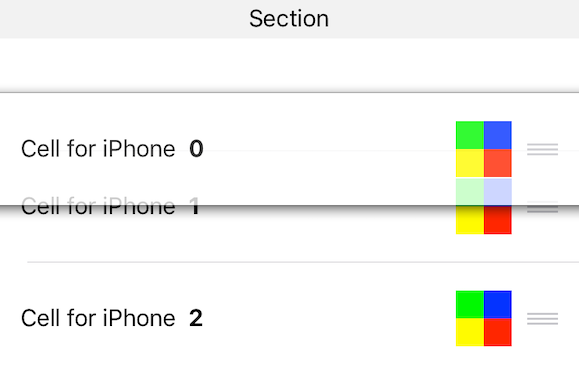
/// セルの入れ替え時に色をのキープしておくためのView
class TableWorkColorKeepView: UIView {

    /// キープ用のbackgroundColor
    @IBInspectable var keepBackgroundColor: UIColor = .clear {
        didSet {
            self.backgroundColor = self.keepBackgroundColor
        }
    }

    /// 背景色
    override var backgroundColor: UIColor? {
        set {
            // キープしている色と異なればリターン
            guard newValue == keepBackgroundColor else {
                return
            }
            super.backgroundColor = newValue
        }
        get {
            return super.backgroundColor
        }
    }
}
これを使うと、
こうなります。
キープ用の色を用意して、背景色が変更される時にその色と異なったら無視してやっているだけですね。
背景色をセットしたい場合はkeepBackgroundColorの方に設定してやる感じです。
(Storyboardで初期値設定したかったので@IBInspectableしてやっています)しまいに
力技なので用法用量にご注意を。
もっとスマートなやり方あれば教えてつかあさい。

- 投稿日:2019-06-07T16:18:37+09:00
一部の画面だけSwiftUIを使いたいとき
本記事は公開済みのドキュメントを元に作成しています。今後仕様変更などにより記載内容と異なる場合があります。予めご了承ください。
はじめに
SwiftUIを触っていて、
「SwiftUIのViewとUIKitのUIView間の連携ってどうやるんだ?」となったので調べました。
結論から言うと、UIHostingController/UIViewRepresentableでなんとかなりそうです。UIViewの中で画面の一部として使う
UIView/UIViewControllerの中でSwiftUIのViewを使う場合は、UIHostingControllerでラップしてあげる形になります。
こんな感じで。import SwiftUI class ViewController: UIViewController { override func viewDidLoad() { super.viewDidLoad() let vc: UIHostingController = UIHostingController(rootView: SubView()) self.addChild(vc) self.view.addSubview(vc.view) vc.didMove(toParent: self) vc.view.translatesAutoresizingMaskIntoConstraints = false vc.view.heightAnchor.constraint(equalToConstant: 320).isActive = true vc.view.leftAnchor.constraint(equalTo: self.view.leftAnchor, constant: 16).isActive = true vc.view.rightAnchor.constraint(equalTo: self.view.rightAnchor, constant: -16).isActive = true vc.view.centerYAnchor.constraint(equalTo: self.view.centerYAnchor).isActive = true } } struct SubView : View { var body: some View { Text("にゃーん?") } }画面遷移先として使う
UIHostingControllerはUIViewControllerを継承しているので、そのまま遷移先としても使えます。import SwiftUI class ViewController: UIViewController { override func viewDidLoad() { super.viewDidLoad() let button: UIButton = UIButton(type: .system) button.setTitle("?", for: .normal) button.addTarget(self, action: #selector(didTapTransitButton(_:)), for: .touchUpInside) self.view.addSubview(button) button.translatesAutoresizingMaskIntoConstraints = false button.centerYAnchor.constraint(equalTo: self.view.centerYAnchor).isActive = true button.centerXAnchor.constraint(equalTo: self.view.centerXAnchor).isActive = true } @objc func didTapTransitButton(_ sender: UIButton) { self.present(UIHostingController(rootView: DetailView()), animated: true) } } struct DetailView : View { var body: some View { Text("にゃーん?") } }Viewの中でUIViewを使う
逆に
Viewの中でUIViewを使いたい時は、UIViewRepresentableを継承して使います。
チュートリアルのCreating and Combining Viewsにも記載があります。import SwiftUI struct ContentView: View { var body: some View { ZStack { BackgroundView() Text("にゃーん?") } } } struct BackgroundView: UIViewRepresentable { func makeUIView(context: UIViewRepresentableContext<BackgroundView>) -> UIView { let view: UIView = UIView() view.backgroundColor = UIColor(red: 0.9, green: 0.9, blue: 0.9, alpha: 1.0) return view } func updateUIView(_ uiView: UIView, context: Context) { // } }参考
UIHostingController - SwiftUI | Apple Developer Documentation
UIViewRepresentable - SwiftUI | Apple Developer Documentation
Creating and Combining Views — SwiftUI Tutorials | Apple Developer Documentation
- 投稿日:2019-06-07T15:42:59+09:00
AppStoreConnectアップロード時、'UIApplicationExitsOnSuspend'の警告が出る件
概要
AppStoreConnectアップロード時、iOS13で
UIApplicationExitsOnSuspendのサポートがなくなるので、非推奨だよというメッセージが出るようになりました。WARING ITEMS-90339 "Deprecated info.plist" Key. The Info.plist contains a key 'UIApplicationExitsOnSuspend' in bundle myapp [myapp.app] that will soon be sunsupported.iOS13のリリースノート iOS & iPadOS 13 Beta Release Notes | Apple Developer Documentation
問題
UIApplicationExitsOnSuspendはアプリのバックグラウンド実行を禁止する機能ですが、デフォルトだとNOだと思うので、大体のアプリは消せばOK。Deprecations
The UIApplicationExitsOnSuspend key is no longer supported in iOS & iPadOS 13. Update your apps to handle modern multitasking. (43958234)
※リリースノートから引用「バックグラウンド実行を無効化出来なくなるのでマルチタスク処理をしていない人はやってね」と言われているので、無効化設定している人はバックグラウンド処理を改修する必要がありますね。
解決方法
Waringが出るだけで、アップロード自体は出来るが、警告出てるのも気持ち悪いし、リジェクトされたら嫌なので対応しました。
とりあえず、plist.infoから
Application does not run in backgroundの項目をDeleteすればOK。Unityからは現状、自動的に追加されてしまうので、ビルドスクリプト(PostProcessBuildなど)を用いて
UIApplicationExitsOnSuspendを削除するのが良さそう。フォーラムにサンプルコードが投稿されています。Unityフォーラムページ The Info.plist contains a key 'UIApplicationExitsOnSuspend
- 投稿日:2019-06-07T14:16:37+09:00
無限ループするUIPageViewControllerとタブ
はじめに
ライブラリ「XLPagerTabStrip」を使って横スワイプでタブ・ページ切り替えしていた画面を
無限スクロールさせることになりました。有名なライブラリだしきっと簡単に無限スクロールできるよね。
と思い調査してみたら、意外とループ機能が無かった...ので自作しました。自分用の備忘録として、実装のポイントをメモします。
デモ
いろんなアプリでよく見かけますね
ページが切り替わるタイミングは3種類。
- ページを左右スワイプしたとき
- タブを左右スワイプしたとき
- 未選択のタブを押下したとき
タブは無限スクロールし、またページの切り替えに合わせて追従します。
選択されたタブは色が変わり、タブのタイトル幅に合わせてバーのサイズも変わります。環境
- XCode Version 10.1
- Swift 4.2
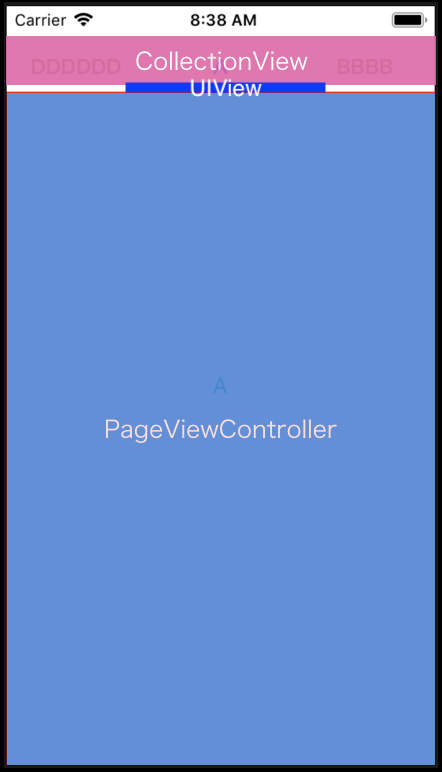
画面構成
タブはCollectionView、ページはPageViewController
タブ下のBarはUIViewで構成しました。
CollectionViewにはUILabelが乗ったカスタムCellをセットします。
ループ処理
実装するにあたってこちらのサイトにはとてもお世話になりました。
UIPageViewControllerをつかって無限スクロールできるタブUIを実装してOSSとして公開しましたUIPageViewControllerのループ処理
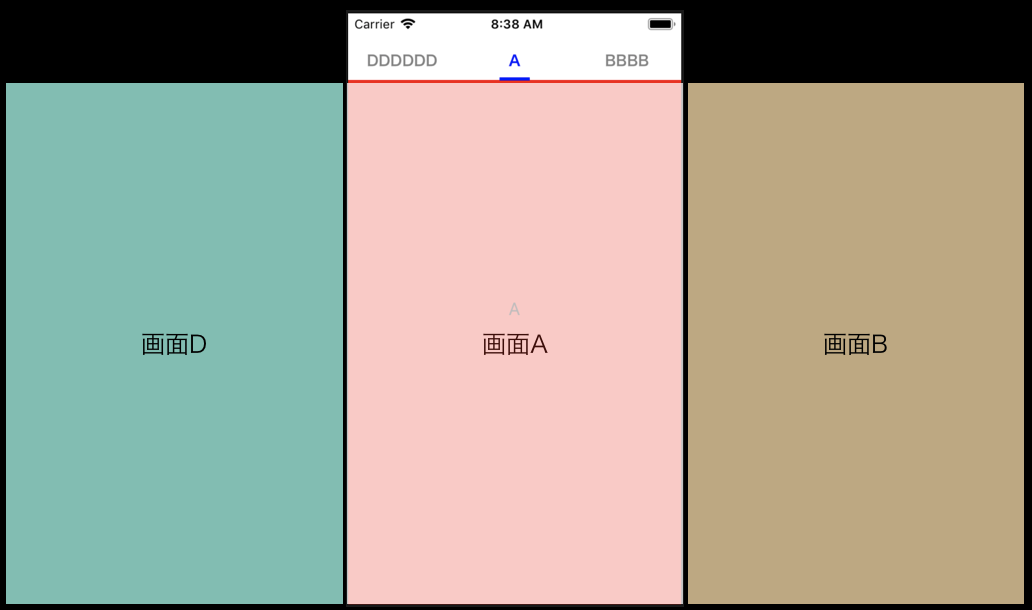
今回のサンプルコードでは画面をA,B,C,Dの4種類用意しました。
ページのループ処理は以下の通り。PageViewController.swiftpageViewController(_ pageViewController: UIPageViewController, viewControllerBefore viewController: UIViewController) pageViewController(_ pageViewController: UIPageViewController, viewControllerAfter viewController: UIViewController)前後のVCを読み込むDelegateでメソッド「nextViewController」を呼び
PageViewController.swift// 画面A,B,C,DのUIViewControllerが格納された配列 private (set) var pageControllergrop = [UIViewController]() private func nextViewController(viewController: UIViewController, isAfter: Bool) -> UIViewController? { guard var index = self.pageControllergrop.index(of: viewController) else { return nil } index = isAfter ? (index + 1) : (index - 1) if index < 0 { index = self.pageControllergrop.count - 1 } else if index == self.pageControllergrop.count { index = 0 } if index >= 0 && index < self.pageControllergrop.count { return self.pageControllergrop[index] } return nil }前のVCが無ければ末尾のVCを、後のVCが無ければ頭のVCを表示させることで、ページをループさせます。
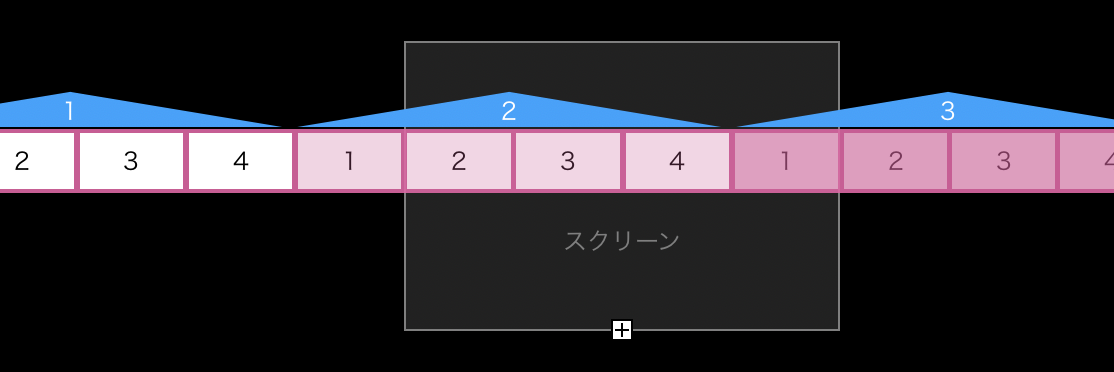
UICollectionViewのループ処理
高速スクロールしてもCellが見切れないよう、Cell数を項目の5倍用意しました。PageViewController.swiftfunc scrollViewDidScroll(_ scrollView: UIScrollView) { let isScrollCollectionView: Bool = (scrollView.className == "UICollectionView") ... // CollectionView スクロール時 if isScrollCollectionView { // CollectionView 1項目分の横幅 let listWidth = self.collectionView.contentSize.width / 5.0 // スクロールが左側のしきい値を超えたとき、中央に戻す if (self.collectionView.contentOffset.x <= self.cellWidth) { self.collectionView.contentOffset.x = (listWidth * 2) + self.cellWidth // スクロールが右側のしきい値を超えたとき、中央に戻す } else if (self.collectionView.contentOffset.x) >= (listWidth * 3) + cellWidth { self.collectionView.contentOffset.x = listWidth + self.cellWidth } } ... }画面左側に1ループ目/1番目のCellが来たら、3ループ目/1番目のCellへ
画面左側に4ループ目/1番目のCellが来たら、2ループ目/1番目のCellへ
強制的にスクロール位置を戻すことでループを実現させます。ページ切り替えに合わせてタブを追従させる
他アプリでは、ページ切り替え後にタブを移動させるアニメーションを割と見かけましたが
指の動きに合わせて動いてくれた方が見た目タイムラグが無さそうだな
と思ったので実装してみました。PageViewController.swift// スクロール開始位置 private var startPointPageX:CGFloat = 0 func scrollViewWillBeginDragging(_ scrollView: UIScrollView) { // スワイプ前のスクロール位置を保持 self.startPointPageX = scrollView.contentOffset.x // 表示中のページにCellの中心値を合わせるため、CollectionViewの初回スクロール位置を設定 self.startPointCollectionX = { let listWidth = self.collectionView.contentSize.width / CGFloat(self.pagelistsCount) let contentOffsetX = listWidth * 2 + (self.cellWidth * CGFloat(self.selectedPageNum)) let centerMargin = (App.windowWidth - self.cellWidth) / 2 return contentOffsetX - centerMargin }() ... } func scrollViewDidScroll(_ scrollView: UIScrollView) { let isScrollCollectionView: Bool = (scrollView.className == "UICollectionView") // Pageスクロール中はCollectionViewスクロールを禁止 self.collectionView.isScrollEnabled = isScrollCollectionView if isScrollCollectionView { ... // PageViewをスクロール時 } else { // スワイプ前の位置からどれだけ移動したか計算 let changePageX = self.startPointPageX - scrollView.contentOffset.x // 1枚のページ内で移動した割合をCellの移動割合に let changeCollectionX = self.cellWidth * (changePageX / App.windowWidth) // 高速スクロールを封じる if abs(changePageX) > 0 && abs(changePageX) < App.windowWidth { self.notScrollView.isHidden = false } // 計算した分CollectionViewをスクロール if changeCollectionX != 0 { self.collectionView.contentOffset.x = self.startPointCollectionX - changeCollectionX } } ... }これでページをスワイプ中に、指の動きに合わせてCellも追従します。
欠点として、ページを高速で切り替えると、CollectionViewのループ処理と競合して
CollectionViewの追従がズレてしまう問題が発生しました。追従時のみUIPageViewControllerの上に透明なUIViewを表示することで
ページの高速スクロールを封じることができましたが、この辺りもっとイケてる実装にできないか..。タブの色味を追従に合わせる
画面中央に来たCellのタイトルを青く染めます。またタブ下のバーの横幅を変更します。
画面が切り替わったら色が変わるのではなく、中央に来たら変わるのがポイント。PageViewController.swiftprivate let pagelist: [String] = ["A", "BBBB", "CCC", "DDDDDD"] private var selectedCollectionNum:Int! // Cellの色を更新するメソッド private func changeCellColor(_ indexPath: IndexPath? = nil) { // 一旦全てのCell色をリセット for cell in self.collectionView.visibleCells { if let cell = cell as? BarCollectionViewCell { // カスタムCell内に配置しているLabelを灰色に cell.setSelectedCell(false) } } // 更新するCellが存在しなければreturn guard let indexPath = indexPath else { self.selectedCollectionNum = nil return } guard let cell = self.collectionView.cellForItem(at: indexPath) as? BarCollectionViewCell else { self.selectedCollectionNum = nil return } // 選択したCell番号を保持 self.selectedCollectionNum = indexPath.row // バーの横幅を更新 self.changeSelectBar(indexPath.row % self.pagelist.count) // カスタムCell内に配置しているLabelを青色に cell.setSelectedCell(true) } private func changeSelectBar(_ nextPageNum: NSInteger) { // バーの横幅を、タイトルの文字数に合わせて計算 let titleWidth: CGFloat = (CGFloat(self.pagelist[nextPageNum].count) * 15) + 14 UIView.animate( withDuration: 0.25, animations: { self.selectBarView.frame.size = CGSize(width: titleWidth, height: 3) self.selectBarView.center.x = App.windowWidth / 2 }) }BarCollectionViewCell.swiftclass BarCollectionViewCell: UICollectionViewCell { @IBOutlet private weak var categoryTitleLabel: UILabel! override func awakeFromNib() { super.awakeFromNib() // Initialization code } func setTitle(_ title: String) { self.categoryTitleLabel.text = title setSelectedCell(false) } // ラベルの色を切り替え func setSelectedCell(_ select: Bool) { self.categoryTitleLabel.textColor = select ? UIColor.blue : UIColor.gray } }selectBarViewは、タブ下に配置しているUIViewです。
本メソッドは、ページスクロール前、スクロール中、スクロール後、タブ選択時に呼ばれます。
具体的には以下の箇所。
- scrollViewDidScroll
- scrollViewDidEndDragging
- scrollViewDidEndDecelerating
- scrollViewWillBeginDragging // 全Cellの色味をリセットするため
- collectionView(_ collectionView: UICollectionView, didSelectItemAt indexPath: IndexPath)
選択したCell番号を、selectedCollectionNumに保持している理由は
scrollViewDidScrollで本メソッドが何度も無駄に呼ばれるのを防ぐため。PageViewController.swiftfunc scrollViewDidScroll(_ scrollView: UIScrollView) { ... // cellの色味を更新 let center = self.view.convert(self.collectionView.center, to: self.collectionView) guard let indexPath = self.collectionView.indexPathForItem(at: center) else { return } if self.selectedCollectionNum != indexPath.row { self.changeCellColor(indexPath) } }scrollViewDidScroll内で中央のCellを算出後、CellのindexPath.rowとselectedCollectionNumを比較し
異なっている時だけメソッドを呼んでいます。まとめ
実装の詳細は、Githubのサンプルコードからどうぞ。
LoopPageDemoページの高速スクロールはできませんが、ライブラリ不使用でそれなりのUIになりました。
もっとこうした方が良い等アドバイスがあれば、ぜひ (#・ω・)参考サイト


- 投稿日:2019-06-07T13:49:08+09:00
iOS/Android設定画面の各アプリの画面から独自の設定やライセンス表示をするには?
iOS/Android において、変更頻度の低いアプリの設定や、直接ユーザーには関係のないライセンス表示のような画面は、アプリの中から遷移させる必要性は薄いですし、その遷移のためのボタンの領域を確保するのはもったいないですよね。
ということで、各OSの設定画面にあるアプリ情報の画面でそれを行う方法をまとめます。
iOS
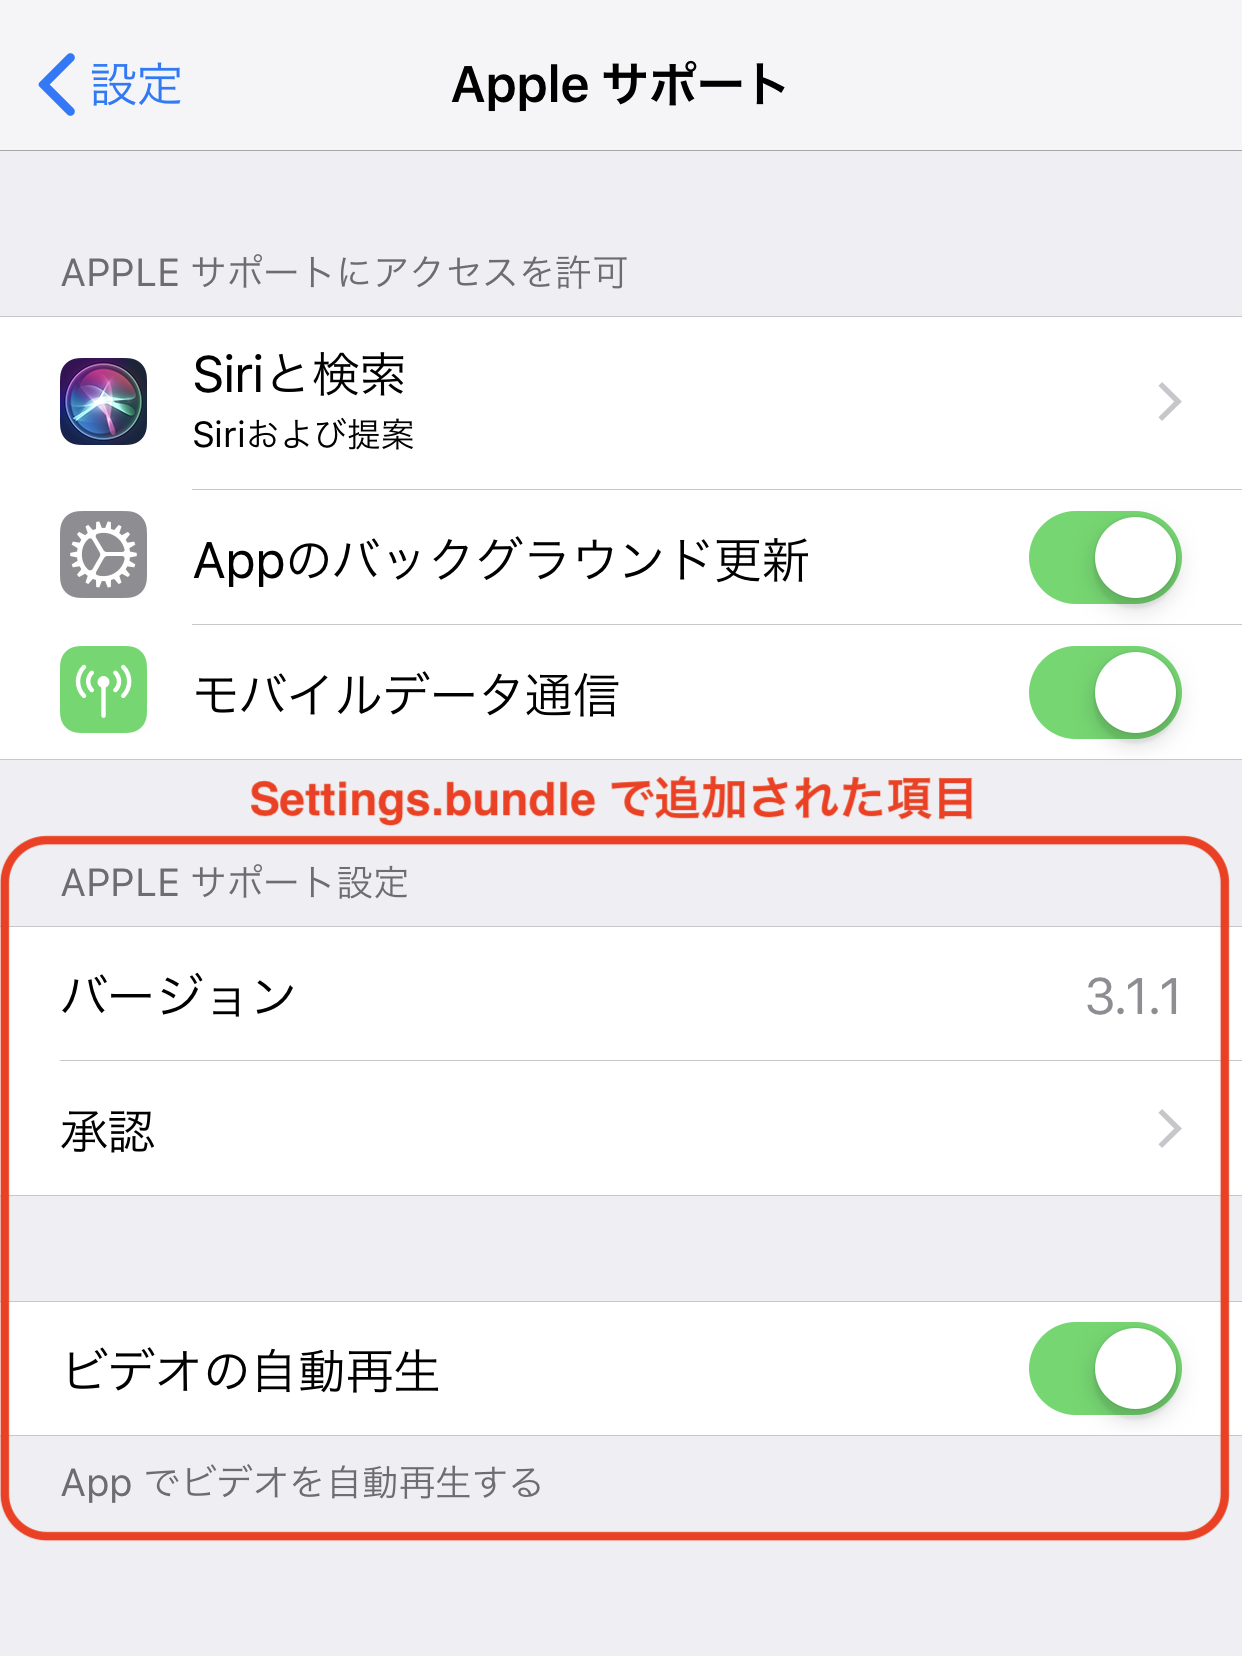
iOS では Settings.bundle を用いることで iOS設定画面の各アプリの画面でそのアプリの設定項目を表示することができます。
Appleサポート アプリの場合
アプリの設定
アプリの設定項目を Settings.bundle として定義しておくだけです。ここで設定された項目はアプリからは UserDefaults により取得できるようになります。詳細は公式ドキュメントを読みましょう!
Preferences and Settings Programming Guide / Implementing an iOS Settings Bundle
ライセンス表示
LicensePlist を使いましょう!
CocoaPods や Carthage でインストールしたライブラリからライセンス一覧を生成して Settings.bundle への組み込みまで自動でやってくれます。Android
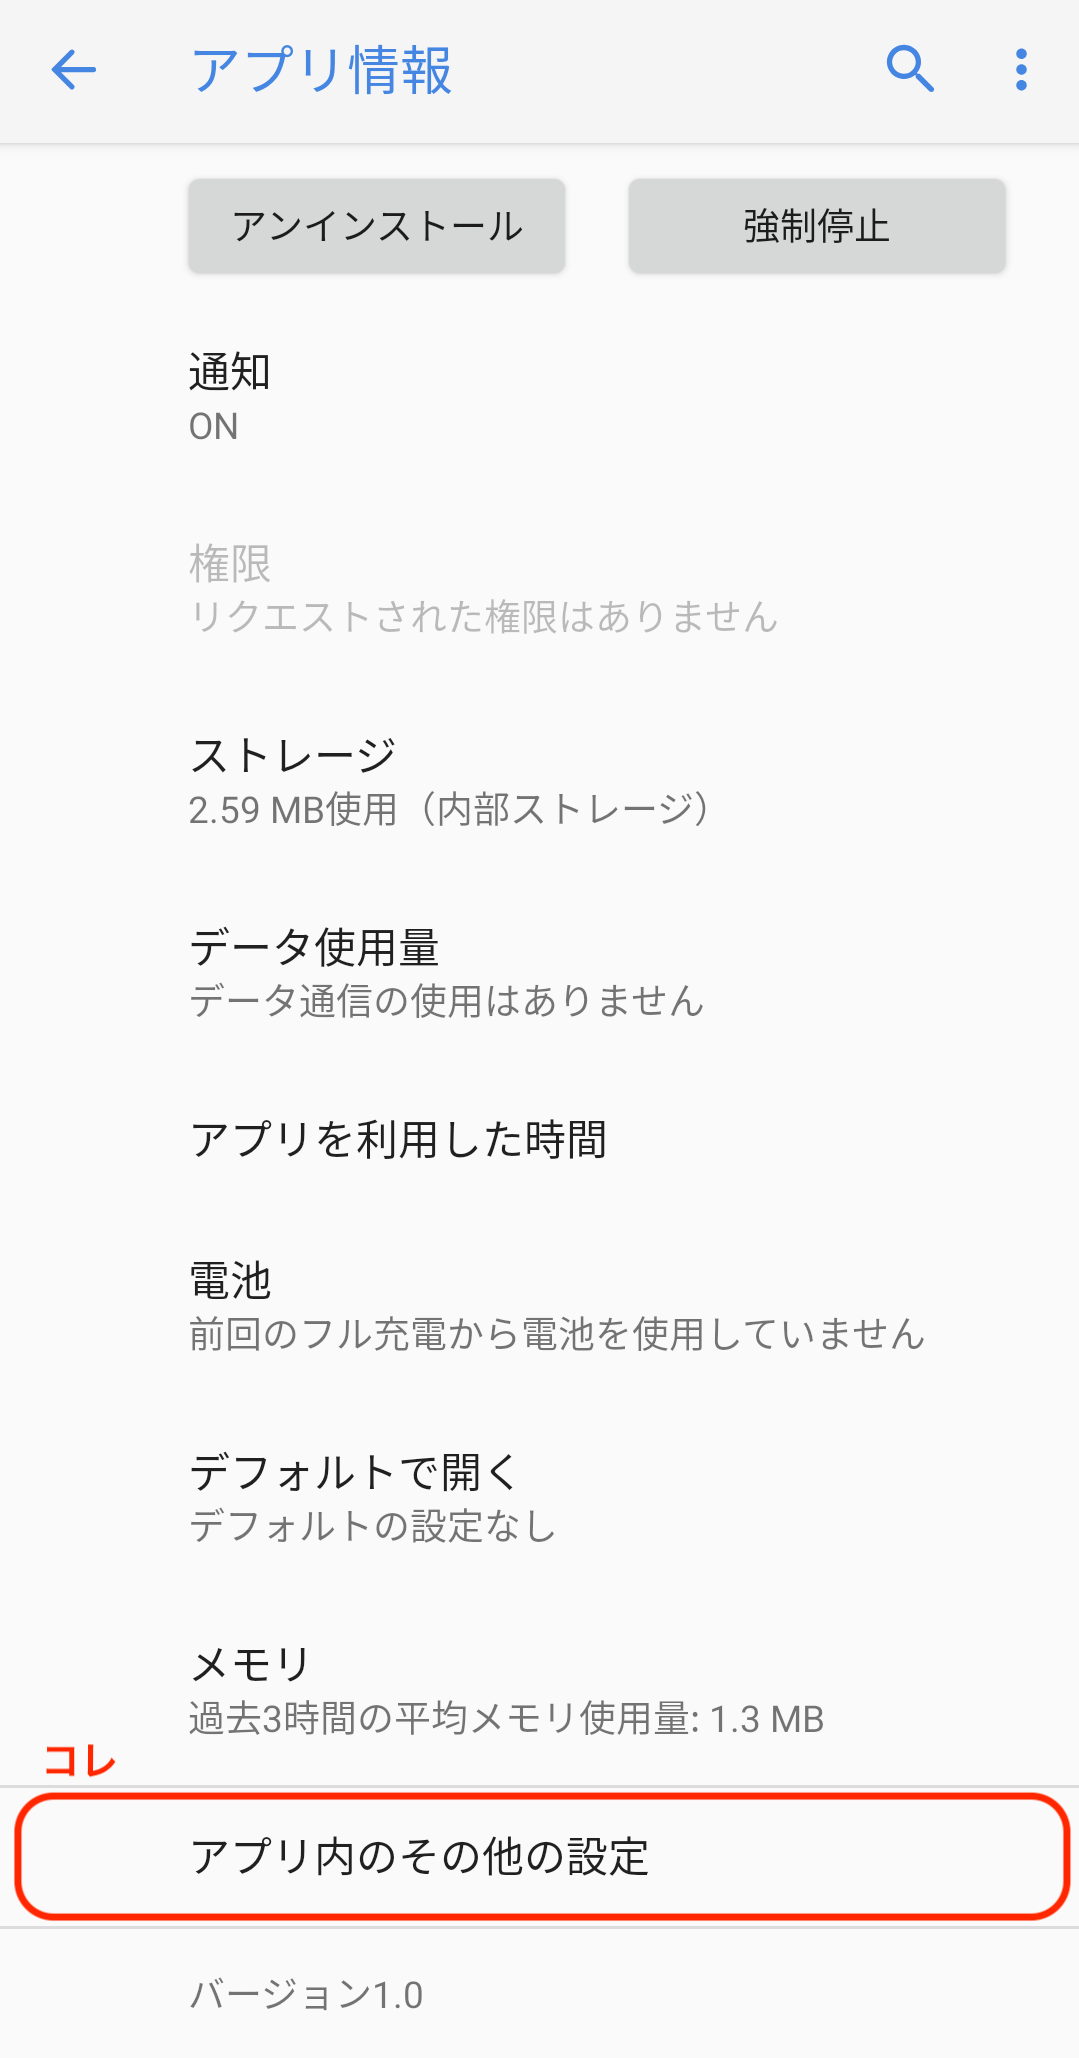
Android N 以降限定ですが、マニフェストファイル中の Activity の Intent Filter に ACTION_APPLICATION_PREFERENCES を追加することで、Android 設定画面のアプリ情報画面にその Activity への導線が表示されるようになります。
AndroidManifest.xml<activity android:name=".SettingActivity"> <intent-filter> <action android:name="android.intent.action.APPLICATION_PREFERENCES" /> </intent-filter> </activity>Android P の場合
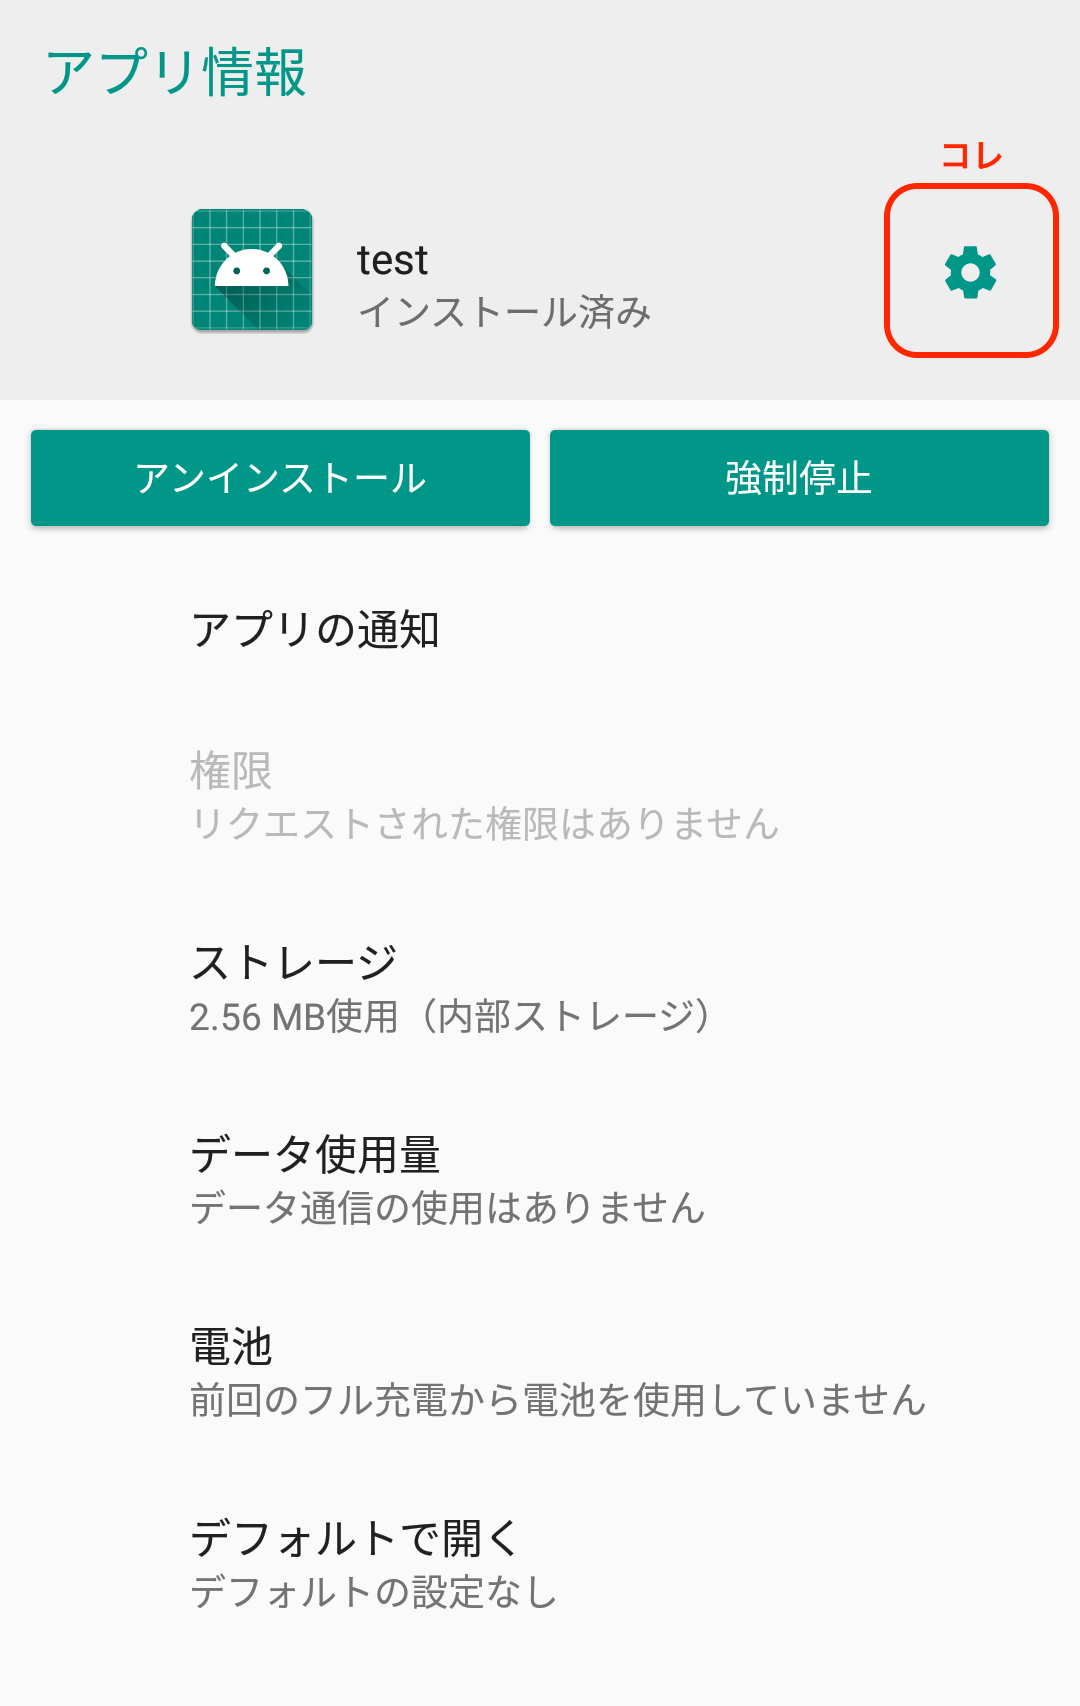
Android N,O の場合
アプリの設定
Android Jetpack の Preference 機能を使うことで、XML でアプリの設定項目を定義するだけで設定画面を構築することができます。ここで設定された項目はアプリからは SharedPreferences により取得できるようになります。詳細は公式ドキュメントを読みましょう!
Android Developers / Android Jetpack / 設定
ライセンス表示
com.google.gms:oss-licenses を使いましょう!これによりアプリが依存しているライブラリのライセンス情報を取得し、それを
OssLicensesMenuActivityで表示することができます。上記の Preference 機能では設定項目からインテントを投げるアクションも定義できるので、そこから
OssLicensesMenuActivityを開くと良さそうです。
- 投稿日:2019-06-07T08:42:38+09:00
【iOS】対応必須かも?Sign In with Appleまとめ(第一報)
Sign In with Appleとは?
今年のWWDCで発表された
Appleアカウントでアプリの
サインアップやサインインができる機能です。
対応必須?
様々なニュースで下記のようなことが書かれており
https://japan.cnet.com/article/35138002/レビューガイドラインを見る限り
サードパーティーのログイン連携をしているアプリは
Sign In with Appleの実装が必須になるようです。弊社のアプリでもFacebookログインなどを使用しており
今後対応が必要になるだろうと思い
まずどういうものか知るために
サンプルコードとセッション動画の内容から
現状わかったことをまとめてみました。公式のサイトはこちら
https://developer.apple.com/sign-in-with-apple/レビューガイドラインの更新情報はこちら
https://developer.apple.com/news/?id=06032019jIntroducing Sign In with Apple(セッション動画)
https://developer.apple.com/videos/play/wwdc2019/706/ちなみに
ベータテストは今夏に
正式版は今年の終わり近くに利用可能になる予定のようです。Sign In with Apple will be available for beta testing this summer. It will be required as an option for users in apps that support third-party sign-in when it is commercially available later this year.※
Xcodeの画面などはNDAの関係があるため
正式版になったあとに追加させていただきます使用しているものは
公開されているスライド、ドキュメントやサンプルコードを使用していますが
もし不適切な箇所がございましたら
ご指摘いただけますと幸いですSign In with Appleの特徴
早く、簡単にアプリへの
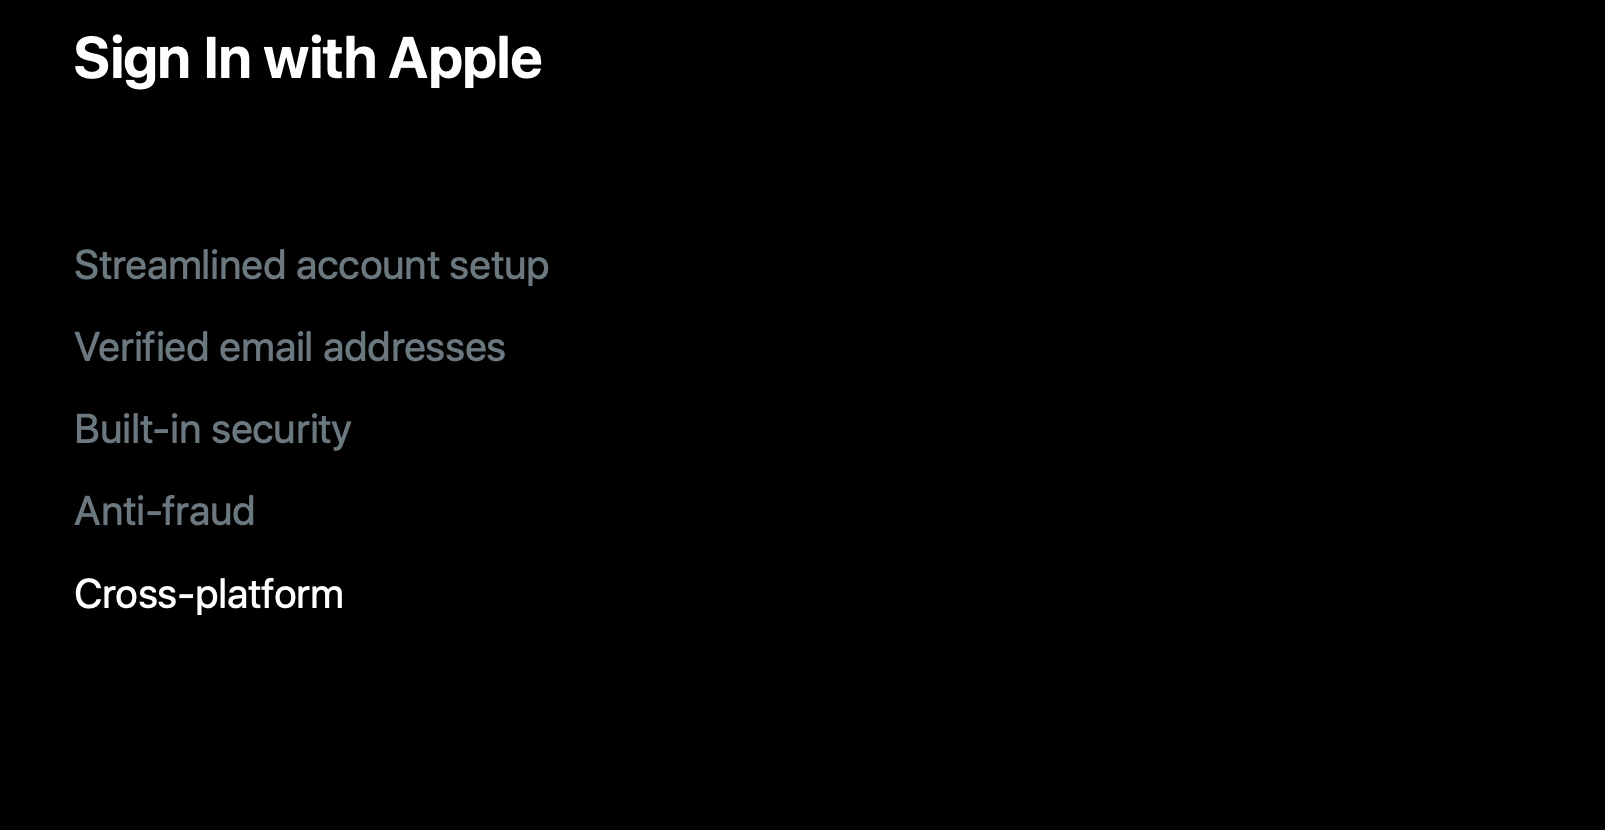
サインアップやサインインができるとのことです。主な特徴として下記の5つの点が挙げられていました。
合理化されたアカウントセットアップ
すでにAppleのアカウントへは
ログイン状態にあることが多いので
タップだけでセットアップが完了できます。また
デバイスをまたがって同じ認証情報が使用可能です。認証されたメールアドレス
Appleがすでに認証しているので
メールを受け取って->リンクをタップする
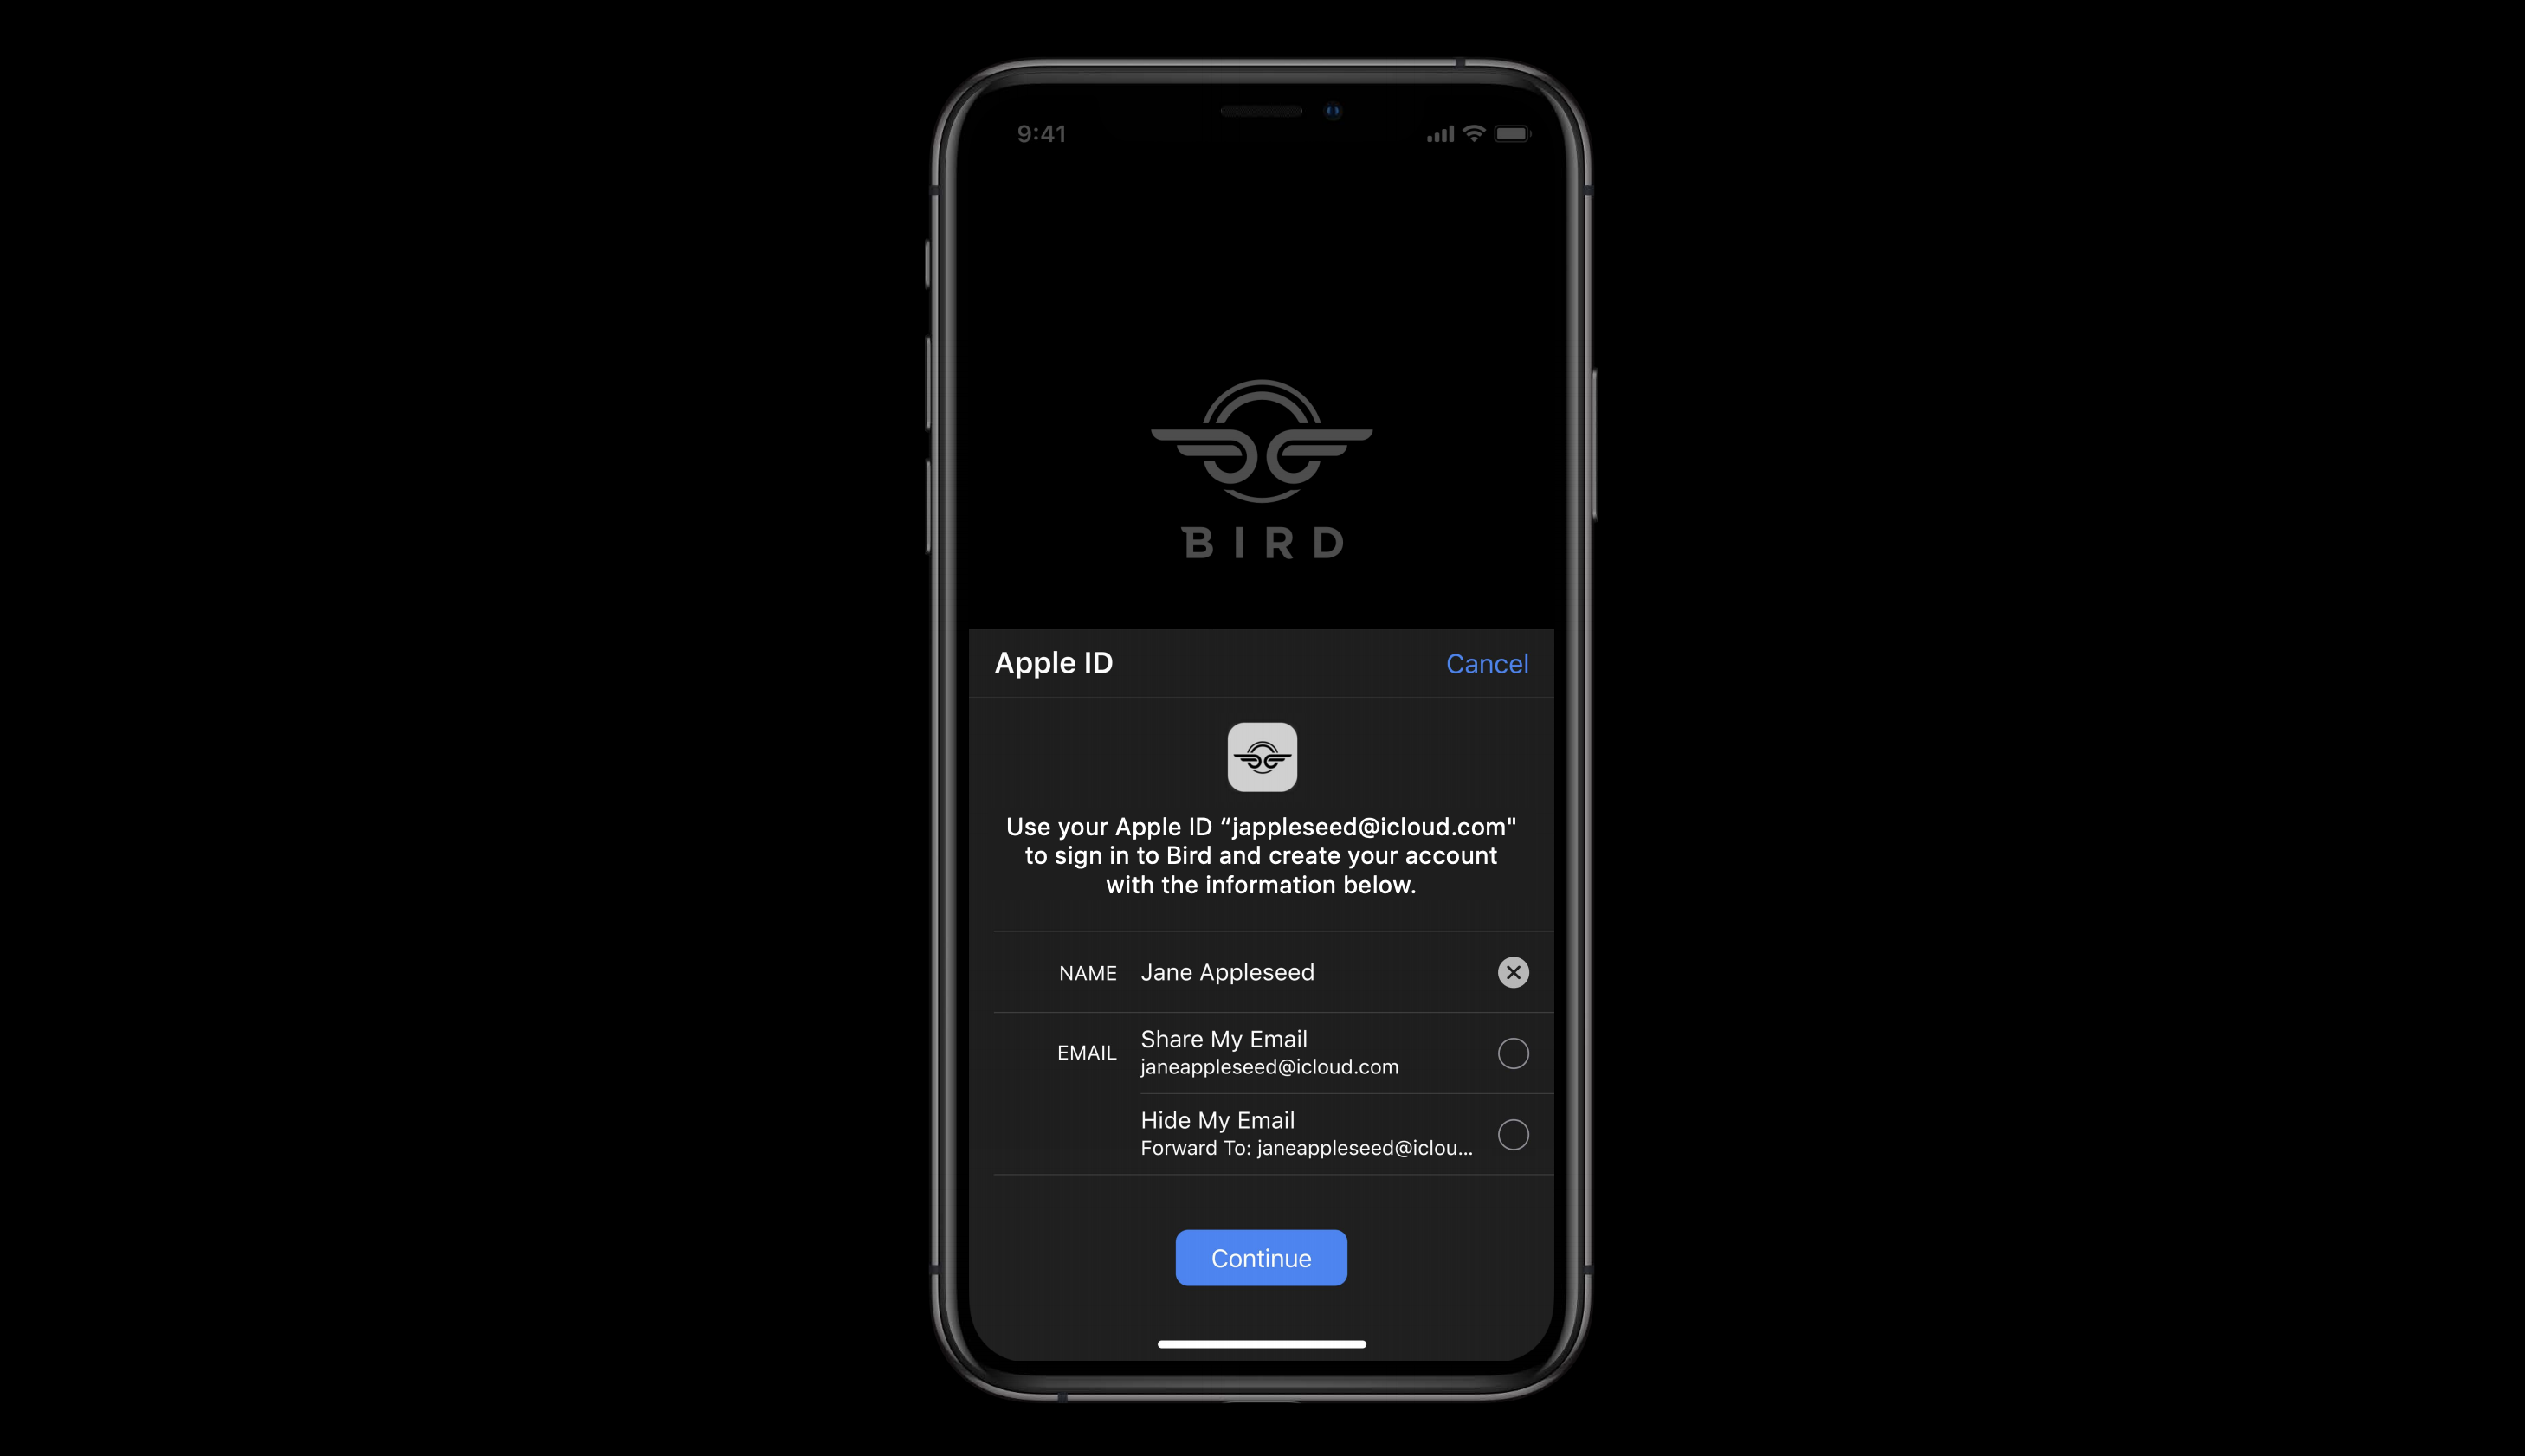
などの余計な認証プロセスが必要になることはありません。Hide My Email
実際のメールアドレスとは異なる
下記のようなメールアドレスを使うことができ
アプリに個人情報を渡すことを避けることができます。もちろん本物のメールアドレスと同じように使えます。
※ Appleがメール内容を保持するということはないとも言っていました。
ビルトインのセキュリティ
パスワードを忘れたとしても
Appleアカウントでは2段階認証を使っているため
追加のパスワード認証プロセスや入力が必要ありません。Anti-Fraud(詐欺対策)
ユーザが疑わしいかどうかをシステムがサポートしてくれます。
内部的な情報とアカウント情報を照らし合わせて判断しているようです。
マルチプラットフォーム
iOS macOS iPadOS watchOS Javascript
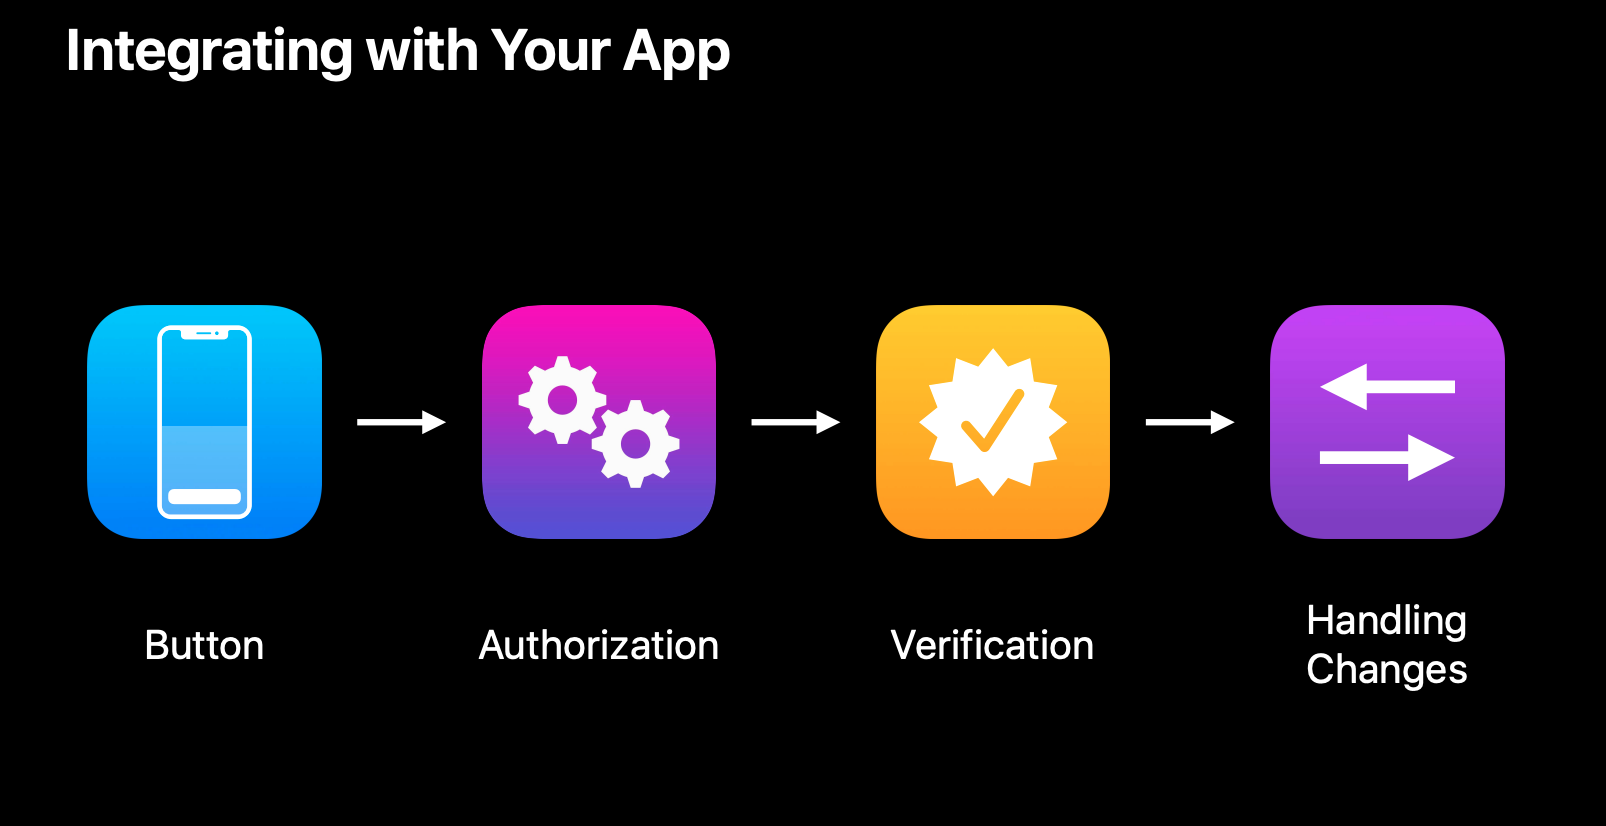
実装することが可能です。処理の流れ
下記の様な手順で行っていきます。
具体的にどのような処理を行っていくか
ここからはサンプルのコードで見ていきたいと思います。Sign in with Appleを使用するためには
AuthenticationServicesというフレームワークを用います。https://developer.apple.com/documentation/authenticationservices
これを使用することで
- AppleIDを用いてログインをすることができる
- サインインフローの中で保存しているパスワードを使用することができる
- OAuthのような仕組みを使用してWebブラウザとアプリ間でデータを共有することができる
- エンタープライズアプリではシングルサインオン(SSO)のような体験を提供できる
などが実現できます。
OAuthとは?
https://ja.wikipedia.org/wiki/OAuthシングルサインオンとは?
https://ja.wikipedia.org/wiki/%E3%82%B7%E3%83%B3%E3%82%B0%E3%83%AB%E3%82%B5%E3%82%A4%E3%83%B3%E3%82%AA%E3%83%B3では実際の中身に関してはサンプルのコードから見ていきたいと思います。
Xcodeの設定をする(Sign In with Apple Entitlementを用意する)
まずはXcodeの設定が必要です。
targetを選択しSigning&Capabilitiesの中から
Sing in With Appleを選択します。サインアップボタンを用意する
ASAuthorizationAppleIDButtonを使用します。標準のものをそのまま使用することも可能です。
カスタマイズも可能ですが、
その際にはデザインガイドラインに従う必要があります。デザインガイドラインはこちら
https://developer.apple.com/design/human-interface-guidelines/sign-in-with-apple/overview/
ASAuthorizationAppleIDButton
https://developer.apple.com/documentation/authenticationservices/asauthorizationappleidbuttonAppleにユーザ情報を取得するためのリクエストを送る
次にユーザの情報を取得するために
Appleへリクエストを送ります。ユーザにタップされた際の処理は下記のようになります。
@objc
func handleAuthorizationAppleIDButtonPress() {
    let appleIDProvider = ASAuthorizationAppleIDProvider()
    let request = appleIDProvider.createRequest()
    request.requestedScopes = [.fullName, .email]

    let authorizationController = ASAuthorizationController(authorizationRequests: [request])
    authorizationController.delegate = self
    authorizationController.presentationContextProvider = self
    authorizationController.performRequests()
}
ここで出てくるいくつかのクラスについて見ていきます。
ASAuthorizationAppleIDProvider
ASAuthorizationAppleIDProviderと
ASAuthorizationAppleIDRequestを用いて
ユーザのAppleIDを元に
アプリが認証済みかどうかのリクエストを作成します。let appleIDProvider = ASAuthorizationAppleIDProvider() let request = appleIDProvider.createRequest() request.requestedScopes = [.fullName, .email]
fullNameと
オプションで指定することができます。
ASAuthorizationAppleIDProvider
https://developer.apple.com/documentation/authenticationservices/asauthorizationappleidprovider
ASAuthorizationAppleIDRequest
https://developer.apple.com/documentation/authenticationservices/asauthorizationappleidrequestASAuthorizationController
次に上記で作成したリクエストを使って
ASAuthorizationControllerを初期化し
performRequestsでAppleへリクエストを送ります。let controller = ASAuthorizationController(authorizationRequests: [request]) authorizationController.delegate = self authorizationController.presentationContextProvider = self authorizationController.performRequests()
ASAuthorizationController
https://developer.apple.com/documentation/authenticationservices/asauthorizationcontroller
performRequests
https://developer.apple.com/documentation/authenticationservices/asauthorizationcontroller/3153047-performrequestsASAuthorizationControllerDelegate
上記の中で
authorizationController.delegate = selfとありますが
これは
ASAuthorizationControllerDelegateというプロトコルです。
ASAuthorizationControllerDelegate
https://developer.apple.com/documentation/authenticationservices/asauthorizationcontrollerdelegateこれを設定するとリクエストのレスポンスを下記のデリゲートで取得することができます。
extension LoginViewController: ASAuthorizationControllerDelegate {
    func authorizationController(controller: ASAuthorizationController, didCompleteWithAuthorization authorization: ASAuthorization) {

        // ASAuthorizationAppleIDCredentialの場合
        if let appleIDCredential = authorization.credential as? ASAuthorizationAppleIDCredential {

            // 取得できた情報
            let userIdentifier = appleIDCredential.user
            let fullName = appleIDCredential.fullName
            let email = appleIDCredential.email

            // 取得した情報を元にアカウントの作成などを行う

        // ASPasswordCredentialの場合(※あとで紹介します※)
        } else if let passwordCredential = authorization.credential as? ASPasswordCredential {
            // 既存のiCloud Keychainクレデンシャル情報
            let username = passwordCredential.user
            let password = passwordCredential.password

            // 取得した情報を元にアカウントの作成などを行う

        }
    }
}
ASAuthorizationAppleIDProviderのリクエストが成功した場合
取得できる情報はASAuthorizationAppleIDCredentialです。
ASAuthorizationAppleIDCredential
https://developer.apple.com/documentation/authenticationservices/asauthorizationこの中の情報を使ってアカウントの作成などを行います。
authorizationController(controller:didCompleteWithAuthorization:)
https://developer.apple.com/documentation/authenticationservices/asauthorizationcontrollerdelegate/3153050-authorizationcontrollerエラーの場合は下記のデリゲートメソッドが呼ばれます。
func authorizationController(controller: ASAuthorizationController, didCompleteWithError error: Error) {
    // Handle error.
}
authorizationController(controller:didCompleteWithError:)
https://developer.apple.com/documentation/authenticationservices/asauthorizationcontrollerdelegate/3153051-authorizationcontrollerASPasswordCredentialについて
上記のデリゲートメソッドの中で
} else if let passwordCredential = authorization.credential as? ASPasswordCredential {という分岐が出てきていますが
これはiCloud KeyChainのパスワード情報をリクエストした場合に
取得できる情報です。
ASPasswordCredential
https://developer.apple.com/documentation/authenticationservices/aspasswordcredential実はサンプルコードの中では
ユーザのタップする場合以外にも
viewDidAppearの中でも
認証情報のリクエストを送っています。func performExistingAccountSetupFlows() { // Prepare requests for both Apple ID and password providers. let requests = [ASAuthorizationAppleIDProvider().createRequest(), ASAuthorizationPasswordProvider().createRequest()] // Create an authorization controller with the given requests. let authorizationController = ASAuthorizationController(authorizationRequests: requests) authorizationController.delegate = self authorizationController.presentationContextProvider = self authorizationController.performRequests() }注目点は下記で
let requests = [ASAuthorizationAppleIDProvider().createRequest(),
                ASAuthorizationPasswordProvider().createRequest()]
ASAuthorizationPasswordProviderを使っています。
ASAuthorizationPasswordProvider
https://developer.apple.com/documentation/authenticationservices/asauthorizationpasswordproviderこのリクエストを送ることで
iCloud Keychainのクレデンシャル情報を使って
アカウントの作成などが可能になります。※複数設定した場合の優先順位などに関しては何も言及がありませんでしたので
これは今後調べたいと思います。今回は割愛させていただきますが
シングルサインオン用の入り口もあります。
ASAuthorizationSingleSignOnProvider
https://developer.apple.com/documentation/authenticationservices/asauthorizationsinglesignonprovider
ASAuthorizationSingleSignOnCredential
https://developer.apple.com/documentation/authenticationservices/asauthorizationsinglesignoncredentialASAuthorizationControllerPresentationContextProviding
リクエストを送る際に下記のコードがありました。
authorizationController.presentationContextProvider = selfこれは
ASAuthorizationControllerPresentationContextProvidingプロトコルで
システムが認証プロセスをユーザに提供するためのUIWindowの指定をします。
いくつかのリクエストでは必須となっているようです。
ASAuthorizationControllerPresentationContextProviding
https://developer.apple.com/documentation/authenticationservices/asauthorizationcontrollerpresentationcontextprovidingサンプルコードでは
下記のようにアプリのUIWindowを設定しています。extension LoginViewController: ASAuthorizationControllerPresentationContextProviding { func presentationAnchor(for controller: ASAuthorizationController) -> ASPresentationAnchor { return self.view.window! } }
presentationAnchor(for:)
https://developer.apple.com/documentation/authenticationservices/asauthorizationcontrollerpresentationcontextproviding/3237228-presentationanchorこのようにしてユーザのアカウント作成ができます。
クレデンシャル情報の変更に対応する
例えば
- アプリでAppleIDの使用をやめた
- デバイスでサインアウトをした
などが起きた場合への対応も必要になります。
サンプルのAppDelegateを見ていきます。
func application(_ application: UIApplication, didFinishLaunchingWithOptions launchOptions: [UIApplication.LaunchOptionsKey: Any]?) -> Bool {
    let appleIDProvider = ASAuthorizationAppleIDProvider()
    appleIDProvider.getCredentialState(forUserID: KeychainItem.currentUserIdentifier) { (credentialState, error) in
        switch credentialState {
        case .authorized:
            // Apple IDクレデンシャルが妥当だった場合
            break
        case .revoked:
            // Apple IDクレデンシャルが無効だった場合
            break
        case .notFound:
            // Apple IDクレデンシャル情報がなかった場合

            // サインアップのフローを開始する

        default:
            break
        }
    }
    return true
}
発表のスライドとはやや異なりますが、
Keychainに保存しているcurrentUserIdentifierを
getCredentialState(forUserID:completion:)の引数として設定し
クレデンシャル情報を取得しています。
getCredentialState(forUserID:completion:)
https://developer.apple.com/documentation/authenticationservices/asauthorizationappleidprovider/3175423-getcredentialstateここで得られる
credentialStateが
ASAuthorizationAppleIDProvider.CredentialStateです。enum CredentialState : Int { case authorized = 1 case notFound = 2 case revoked = 3 }
ASAuthorizationAppleIDProvider.CredentialState
https://developer.apple.com/documentation/authenticationservices/asauthorizationappleidprovider/credentialstateこの
revokedの際に対応していきます。また発表スライドでは
通知を受け取ることもできるとあり
下記のような形で
クレデンシャル情報が無効になった時の処理ができます。// Register for revocation notification let center = NotificationCenter.default let name = NSNotification.Name.ASAuthorizationAppleIDProviderCredentialRevoked let observer = center.addObserver(forName: name, object: nil, queue: nil) { (Notification) in // サインアウトして、再度サインインフローを表示するなど }
ASAuthorizationAppleIDProviderCredentialRevoked
https://developer.apple.com/documentation/foundation/nsnotification/name/3175424-asauthorizationappleidprovidercrサインイン後はワンタップでサインインできる
サインアップのプロセスを見てきましたが
Appleアカウントでアプリの認証がされていることで
アプリ起動時に認証されているかどうかがわかり
即座にサインイン状態だと判定することが可能です。
※ 上記AppDelegateのメソッド内の分岐をご参照ください。これはユーザにとっても
不要な手順が省かれ楽になり
個人情報を入力するリスクを避けられます。最後に
サンプルコードとセッションの情報から
まずまとめてみました。まだまだ理解ができていない部分や知らないことは
多々あると思いますので
更新情報がありましたら追記したいと思います。


- 投稿日:2019-06-07T00:48:27+09:00
iOS13のScene-Basedライフサイクル(UISceneDelegate)
はじめに
iOS12のアプリライフサイクル(AppDelegate)を調べていたら、
iOS13のscene-basedだとライフサイクルが変わるようなので、
資料から読み取れる概要を書いていきます。
iOS12のAppDelegate相当が、 scene-basedの場合には、
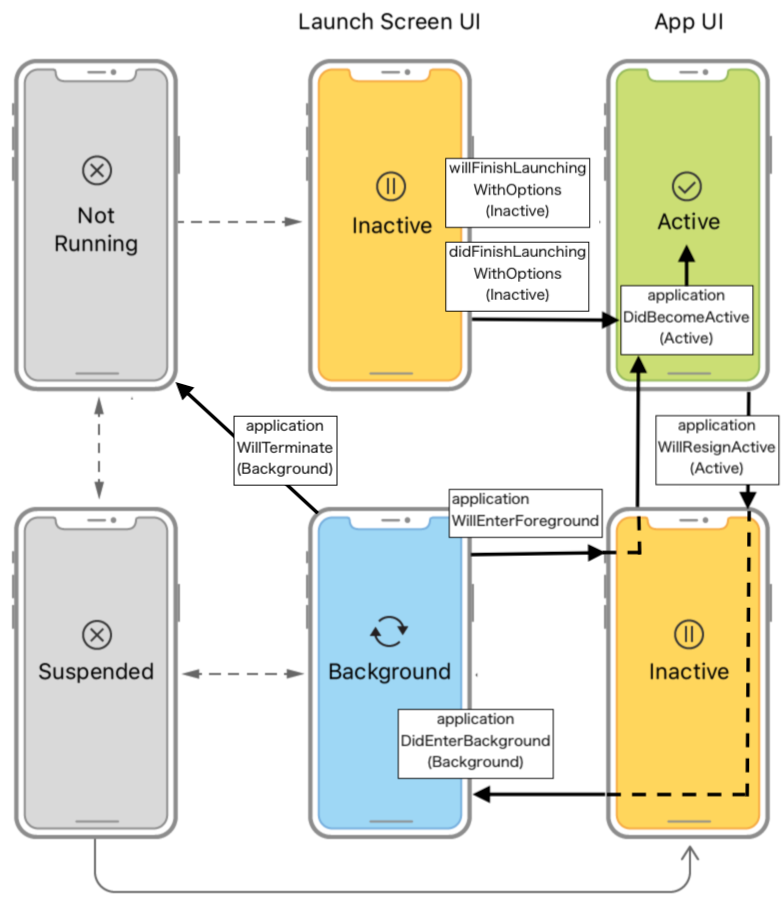
UISceneDelegateになるようです。Scene-Basedライフサイクル(ios13以降)
大きな考え方は、ios12のApp-Basedライフサイクルとそれほど変わらなさそう。
フォアグランドに遷移する時には、以下のメソッドが呼ばれる。
- func sceneWillEnterForeground(UIScene)
- func sceneDidBecomeActive(UIScene)バックグランドに遷移する時には、以下のメソッドが呼ばれる。
- func sceneWillResignActive(UIScene)
- func sceneDidEnterBackground(UIScene)
App-Basedライフサイクル(参考)
参考文献