- 投稿日:2019-06-07T23:57:07+09:00
GraalVM for Java Performance (Windows Developer Build)
What is GraalVM?
High-performance polyglot VM
Install GraalVM
Download GraalVM from OTN
Windows GraalVM Early Adopter
Support for GraalVM on Windows is currently under development.
Note: You will need to accept the license at the top of the page before downloading:
Download GraalVM based on JDK8, preview for Windows (19.0.1) (cksum - 3226557420)Extract the downloaded file to any directory
Expand-Archive "C:\<DOWNLOADED FOLDER>\graalvm-ee-windows-amd64-19.0.1.zip" "C:\Program Files\Java\"Installation Check
PS C:> & 'C:\Program Files\Java\graalvm-ee-19.0.1\bin\java.exe' -version
java.exe : java version "1.8.0_212"
Java(TM) SE Runtime Environment (build 1.8.0_212-b31)
Java HotSpot(TM) GraalVM EE 19.0.1 (build 25.212-b31-jvmci-19-b01, mixed mode)
Performance Check and Compare
- Compile JDK1.8 + Run JDK1.8
- Compile JDK1.8 + Run JDK11
- Compile JDK1.8 + Run GraalVM Java (NOT native)
GraalTest.javapublic class GraalTest { public static void main(String[] args) { try { String s = ""; int x = 0; for (int i = 0; i < 100000; i++) { x = i++; s = s + x; } System.out.println("HELLO GRAALVM!!!" + x); } catch (Throwable t) { t.printStackTrace(); } } }Compile GraalTest.java by JDK1.8
PS C:> & 'C:\Program Files\Java\jdk1.8.0\bin\javac.exe' -source 1.8 -d C:\Temp GraalTest.javaRun JDK1.8
PS C:\Temp> Measure-Command { & 'C:\Program Files\Java\jdk1.8.0\bin\java.exe' GraalTest }
TotalMilliseconds : 5854.9947
TotalMilliseconds : 5832.4753
TotalMilliseconds : 6098.0974
TotalMilliseconds : 5845.2103
TotalMilliseconds : 5861.4335
Run JDK12
PS C:\Temp> Measure-Command { & 'C:\Program Files\Java\jdk-12.0.1\bin\java.exe' GraalTest }
TotalMilliseconds : 3144.7322
TotalMilliseconds : 3154.0768
TotalMilliseconds : 3143.5346
TotalMilliseconds : 3104.6148
TotalMilliseconds : 3137.0850
Run GraalVM Java (NOT native)
PS C:\Temp>  Measure-Command { & 'C:\Program Files\Java\graalvm-ee-19.0.1\bin\java.exe' GraalTest }
TotalMilliseconds : 8705.5772
TotalMilliseconds : 8486.3084
TotalMilliseconds : 8407.4948
TotalMilliseconds : 8262.7547
TotalMilliseconds : 8391.5344
Conclusion
- 投稿日:2019-06-07T22:16:38+09:00
Javaをコマンドプロンプト上でコンパイルする
windowsのコマンドプロンプト上でjavaのコンパイル・実行をする機会があり、苦戦したのでまとめました。
javac ... javaのコンパイルコマンド
①cdで、まずコンパイルしたいjavaファイルのある場所へ移動する。
②コンパイル
//パッケージのないクラスの場合
javac Test.java

//パッケージのあるクラスの場合
javac pacakage.Test.java

//jarのライブラリを参照してコンパイルしたい場合
※jarの指定時は、フルパスで
javac -classpath C¥test.jar; pacakage.Test.java

//コンパイルしたclassファイルの出力先変更をしたい場合
※javaファイル指定の前に、-dで出力先を指定する、
javac -classpath C¥test.jar; -d C¥local¥classes pacakage.Test.java
- 投稿日:2019-06-07T19:48:51+09:00
今日学んだこと
javaのコレクションはmap,set,Listがあってまずはそのそれぞれの特性を理解しておくこと。
ここがわかりやすかった
https://ameblo.jp/gotovictory/entry-10265696900.html随時更新していきます
- 投稿日:2019-06-07T17:33:02+09:00
【Java】APIのレスポンスで日付型のJSONに"T"が含まれてしまう
JavaでWeb APIを作ったとき、レスポンスにおいてLocalDateTime型などの日付型が
2019-01-01T01:00:00のようになってしまう場合の解決方法
解決方法
- シリアライズのアダプタを作成
- レスポンスのモデルがあるパッケージにpackage-info.javaを作成し、作成したアダプタを読み込む
JAXBでの例
アダプタを作成
LocalDateAdapter.javapackage api.adapters; import java.time.LocalDate; import java.time.format.DateTimeFormatter; import javax.xml.bind.annotation.adapters.XmlAdapter; public class LocalDateAdapter extends XmlAdapter<String, LocalDate> { @Override public LocalDate unmarshal(String s) throws Exception { if (s == null) { return null; } DateTimeFormatter formatter = DateTimeFormatter.ofPattern("yyyy-MM-dd"); LocalDate dateTime = LocalDate.parse(s, formatter); return dateTime; } @Override public String marshal(LocalDate d) throws Exception { if (d == null) { return null; } DateTimeFormatter formatter = DateTimeFormatter.ofPattern("yyyy-MM-dd"); String formattedDateTime = d.format(formatter); return formattedDateTime; } }LocalDateTimeAdapter.javapackage api.adapters; import java.time.LocalDateTime; import java.time.format.DateTimeFormatter; import javax.xml.bind.annotation.adapters.XmlAdapter; public class LocalDateTimeAdapter extends XmlAdapter<String, LocalDateTime> { @Override public LocalDateTime unmarshal(String s) throws Exception { if (s == null) { return null; } DateTimeFormatter formatter = DateTimeFormatter.ofPattern("yyyy-MM-dd HH:mm:ss"); LocalDateTime dateTime = LocalDateTime.parse(s, formatter); return dateTime; } @Override public String marshal(LocalDateTime d) throws Exception { if (d == null) { return null; } DateTimeFormatter formatter = DateTimeFormatter.ofPattern("yyyy-MM-dd HH:mm:ss"); String formattedDateTime = d.format(formatter); return formattedDateTime; } }package-infoで読み込む
package-info.java//アダプタをアノテーションで付与 @XmlJavaTypeAdapters(value = { @XmlJavaTypeAdapter(value = LocalDateTimeAdapter.class, type = java.time.LocalDateTime.class), @XmlJavaTypeAdapter(value = LocalDateAdapter.class, type = java.time.LocalDate.class) }) package api.model.response; import javax.xml.bind.annotation.adapters.XmlJavaTypeAdapter; import javax.xml.bind.annotation.adapters.XmlJavaTypeAdapters; // アダプタをインポート import api.adapters.LocalDateAdapter; import api.adapters.LocalDateTimeAdapter;
- 投稿日:2019-06-07T16:37:23+09:00
Kafka Streams DSLを一通り体験する (3. ステートフル処理実践編)
Kafka Streams DSLを一通り体験する (3. ステートフル処理実践編)
この記事でやる事
Kafka Streams DSLのうち、ステートフルな操作(
join,reduce,aggregate,windowingなど)を実際に触り、動作を確認します。また最後に、本稿と前回で登場した関数を使用してステートフルなストリームFizzBuzzを実装してみます。
実際にやってみる
前々回の記事(準備編)のプロジェクトが作成済みである事を前提とします。
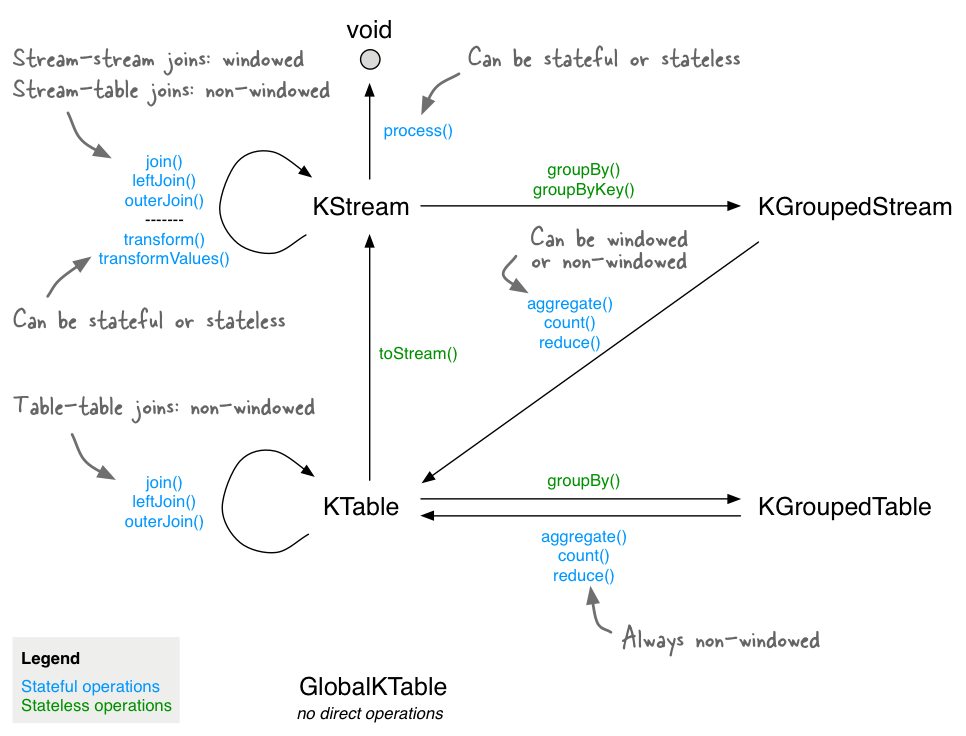
KTable
まずはじめに、
KTable,KGroupedStreamについて知っておく必要があります。
KGroupedStreamはkeyの値毎にグループ化されたKStreamで、KTableはkeyとvalueの最新状態を保持するテーブルとして扱えるものです。
KTableはnew StreamsBuilder().table("topic-name")...のように直接トピックから生成したり、KGroupedStreamを集約して生成したりと様々なルートで生成することができます。
公式ドキュメントの以下の図が非常に分かりやすいです。Aggregate
KGroupedStreamをkeyごとに集約し、KTableに変換します。
コードと実行結果を見るのが一番早いと思います。
Main.classprivate static Initializer<String> initializer = () -> "InitVal"; private static Aggregator<String, String, String> aggregator = (key, val, agg) -> agg + " & " + val; public static Topology getTopology() { StreamsBuilder builder = new StreamsBuilder(); builder .stream("input-topic") .groupByKey() .aggregate(initializer, aggregator) .toStream() // KTableの更新履歴をストリームとして取り出す .to("output-topic"); return builder.build(); }
Initializerは初期値を返す関数で、Java streamで言うとSupplierです。
Aggregatorはkey,value,現在のステートの3つを引数として受け取り、新たなステートを生成するための関数です。
aggregateの結果はKTableですが、更新結果を確認するためにtoStream()を使います。
Main.class@Test void test() throws InterruptedException { inputRecord("input-topic", "key1", "hoge"); inputRecord("input-topic", "key1", "fuga"); inputRecord("input-topic", "key2", "foo"); inputRecord("input-topic", "key2", "bar"); System.out.println(getOutputRecord("output-topic")); System.out.println(getOutputRecord("output-topic")); System.out.println(getOutputRecord("output-topic")); System.out.println(getOutputRecord("output-topic")); }実行結果(可読性のため編集しています)
topic=output-topic, key=key1, value=InitVal & hoge
topic=output-topic, key=key1, value=InitVal & hoge & fuga
topic=output-topic, key=key2, value=InitVal & foo
topic=output-topic, key=key2, value=InitVal & foo & bar
keyに対応するvalueが、aggregatorに記述した通りにどんどん連結されていっていますね。
簡易版のような機能として
reduceとcountも用意されています。
reduceはinitializerが無いaggregateのようなもので、特定のkeyに対して最初に来たvalueが初期値になります。private static Reducer<String> reducer = (val, agg) -> agg + " & " + val; ... builder .stream("input-topic") .groupByKey() .reduce(reducer) .toStream() .to("output-topic"); ...key=key1, value=hoge key=key1, value=hoge & fugacount
簡易版aggregateで、keyに対するレコード数をカウントするKTableを生成します。
元のレコード内容は失われてしまうので、throughなどで別のストリームを生やして使うのが一般的かと思います。
Main.classpublic static Topology getTopology() { StreamsBuilder builder = new StreamsBuilder(); builder .stream("input-topic"); .groupByKey() .count() .toStream() .to("output-topic", Produced.with(Serdes.String(), Serdes.Long())); return builder.build(); }
MainTest.classprivate ProducerRecord<String, Long> getOutputRecord(String topicName) { return testDriver.readOutput(topicName, Serdes.String().deserializer(), Serdes.Long().deserializer()); } @Test void test() throws InterruptedException { inputRecord("input-topic", "key1", "hoge"); inputRecord("input-topic", "key1", "fuga"); inputRecord("input-topic", "key2", "foo"); inputRecord("input-topic", "key2", "bar"); System.out.println(getOutputRecord("output-topic")); System.out.println(getOutputRecord("output-topic")); System.out.println(getOutputRecord("output-topic")); System.out.println(getOutputRecord("output-topic")); }実行結果
topic=output-topic, key=key1, value=1
topic=output-topic, key=key1, value=2
topic=output-topic, key=key2, value=1
topic=output-topic, key=key2, value=2
Windowing
ストリームを時間枠で切り取ります。Tubling, Hopping, Sliding, Sessionの4種類がありここでは紹介しきれないため、公式ドキュメントの図を見ていただくのが最もわかりやすいかと思います。
今回は1000msのTumblingでレコードをcountしてみます。
windowedByを行うと、Windowedオブジェクトがkeyとして使用されます。
試しに.toString()でkeyの内容も確認してみましょう
Main.classpublic static Topology getTopology() { StreamsBuilder builder = new StreamsBuilder(); builder .stream("input-topic") .groupByKey() .windowedBy(TimeWindows.of(Duration.ofMillis(1000))) .count() .toStream() .selectKey((key, value) -> key.toString()) .to("output-topic", Produced.with(Serdes.String(), Serdes.Long())); return builder.build(); }
MainTest.class@Test void test() throws InterruptedException { inputRecord("input-topic", "key1", "hoge"); inputRecord("input-topic", "key1", "fuga"); inputRecord("input-topic", "key1", "foo"); Thread.sleep(1000); inputRecord("input-topic", "key1", "bar"); System.out.println(getOutputRecord("output-topic")); System.out.println(getOutputRecord("output-topic")); System.out.println(getOutputRecord("output-topic")); System.out.println(getOutputRecord("output-topic")); }実行結果
topic=output-topic, key=[key1@1559886985000/1559886986000], value=1
topic=output-topic, key=[key1@1559886985000/1559886986000], value=2
topic=output-topic, key=[key1@1559886985000/1559886986000], value=3
topic=output-topic, key=[key1@1559886986000/1559886987000], value=1
keyが
{元のkey値}@{window開始時刻}/{window終了時刻}になっていますね。
そしてhogefugafooは同一window内でカウントされ、時間が開いたbarは次のwindowに入っています。Join
同一のkeyを持つ2つのレコードを組み合わせ、新たなストリームを生成します。
KStream同士、KStreamとKTable、KTable同士それぞれで実行できます。
例としてKStream同士のjoinを行ってみます。
Main.classprivate static ValueJoiner<String, String, String> joiner = (left, right) -> left + " & " + right; public static Topology getTopology() { StreamsBuilder builder = new StreamsBuilder(); KStream<String, String> streamA = builder.stream("input-topicA"); KStream<String, String> streamB = builder.stream("input-topicB"); streamA .join(streamB, joiner, JoinWindows.of(Duration.ofMillis(100))) .to("output-topic"); return builder.build(); }
ValueJoinerは2つのvalueから新たなvalueを生成する関数です。
KStream同士をjoinする場合は、JoinWindowsで2つのレコードが揃うまでの待ち受け時間を定義します。相手がKTableの場合はkeyに対する最後(最新)のvalueの値がjoinされるため、Windowの定義は不要です。
MainTest.class@Test void test() throws InterruptedException { inputRecord("input-topicA", "key1", "hoge"); inputRecord("input-topicB", "key1", "fuga"); inputRecord("input-topicA", "key2", "foo"); Thread.sleep(200); inputRecord("input-topicB", "key2", "bar"); System.out.println(getOutputRecord("output-topic")); System.out.println(getOutputRecord("output-topic")); }実行結果
topic=output-topic, key=key1, value=hoge & fuga
null
key1を持つhogeとfugaが結合しています。また、fooとbarはJoinWindow内に収まっていないため、joinが実施されていません。
joinの他にleftJoinとouterJoinが用意されています。KSQL同様、リレーショナルDBの感覚ですね。ステートフルFizzBuzzを実装する
さて、長くなりましたがKafka Streams DSLの大方を触ってみました。
これまで見てきた物を使って、ステートフルなFizzBuzzを実装してみましょう。
以下の要件でやってみます。
- 自然数をconsumeする度に加算していき、総和が3の倍数ならFizz, 5の倍数ならBuzz, 15の倍数ならFizzBuzz、それ以外なら現在の総和をoutput-topicにproduceする。
- FizzBuzzが出力されるか、5秒以上入力レコードが来なければ総和を0に戻す
Main.classprivate static Aggregator<String, Integer, String> aggregator = (k, v, a) -> { Integer sum; try { sum = Integer.valueOf(a); } catch (NumberFormatException e) { sum = 0; } sum += v; if (sum % 15 == 0) { return "FizzBuzz (" + sum + ")"; } else if (sum % 3 == 0) { return "Fizz (" + sum + ")"; } else if (sum % 5 == 0) { return "Buzz (" + sum + ")"; } return sum.toString(); }; public static Topology getTopology() { StreamsBuilder builder = new StreamsBuilder(); builder .stream("input-topic", Consumed.with(Serdes.String(), Serdes.Integer())) .groupByKey(Grouped.with(Serdes.String(), Serdes.Integer())) .windowedBy(TimeWindows.of(Duration.ofMillis(5000))) .aggregate(() -> "0", aggregator) .toStream() .selectKey((k, v) -> k.toString()) .to("output-topic", Produced.with(Serdes.String(), Serdes.String())); return builder.build(); }あまり美しくはないですが、最も単純に「前回の計算結果をそのままステートにする」実装にしてみました。
是非実際のKafka環境をセットアップして遊んでみてください。Consume/Publishで実装するとちょっと面倒な要件も、非常にシンプルに記述できることが実感できたかと思います。
これで完結となります、ご覧いただきありがとうございました!
- 投稿日:2019-06-07T13:03:42+09:00
基本データ型と参照型メモリについて
今回は、基本データ型と参照型メモリについて勉強しました!
1基本データ型とは?
(boolean,byte,char,short,int,float,long,double)8種類
2参照型とは?
(String,配列,class)上記の8種類以外
少しややこしいです。
ありがとうございました!


- 投稿日:2019-06-07T03:09:49+09:00
Gradle設定メモ (all in one) 自分用
tree.├─sub │ ├─sub-sample1 │ │ └─src │ │ ├─main │ │ │ ├─java │ │ │ │ └─sample │ │ │ │ └─subs │ │ │ │ Sub1.java │ │ │ │ │ │ │ └─resources │ │ │ └─subs │ │ │ subSample2.txt │ │ └─test │ │ ├─java │ │ └─resources │ └─sub-sample1 │ └─src │ ├─main │ │ ├─java │ │ │ └─sample │ │ │ └─subs │ │ │ Sub2.java │ │ │ │ │ └─resources │ │ └─subs │ │ subSample2.txt │ │ │ └─test │ ├─java │ └─resources └─src ├─main │ ├─java │ │ Main.java │ │ │ └─resources │ sample.txt │ └─test ├─java └─resourcesbuild.gradleallprojects { apply plugin: 'java' group 'sample' version '1.0-SNAPSHOT' sourceCompatibility = 1.8 targetCompatibility = 1.8 compileJava.options.encoding = 'UTF-8' repositories { mavenCentral() } dependencies { testCompile group: 'junit', name: 'junit', version: '4.12' } } dependencies { compile project(':sub:sub-sample1') compile project(':sub:sub-sample2') } def mainProjects = [':sub:sub-sample1', ':sub:sub-sample2'] task oneJar(type:Jar, dependsOn: mainProjects.collect({ it+':compileJava' })){ dependsOn build baseName = rootProject.name manifest.attributes 'Main-Class': 'Main' def javaSubDir = "/classes/java/main" def resourcesSubDir = "/resources/main" from(buildDir.path + javaSubDir, files(mainProjects.collect{ project(it).buildDir.path + javaSubDir })) from(buildDir.path + resourcesSubDir, files(mainProjects.collect{ project(it).buildDir.path + resourcesSubDir })) }gradlew oneJarで実行.
task:build << oneJarjar.│ Main.class │ sample.txt │ ├─subs │ sample1.txt │ sample2.txt │ ├─META-INF │ MANIFEST.MF │ └─sample └─subs Sub1.class Sub2.class
- 投稿日:2019-06-07T03:09:49+09:00
Gradle設定メモ (マルチプロジェクト to all in one) 自分用
Gradle 5.4.1
tree.├─sub │ ├─sub-sample1 │ │ └─src │ │ ├─main │ │ │ ├─java │ │ │ │ └─sample │ │ │ │ └─subs │ │ │ │ Sub1.java │ │ │ │ │ │ │ └─resources │ │ │ └─subs │ │ │ subSample1.txt │ │ └─test │ │ ├─java │ │ └─resources │ └─sub-sample1 │ └─src │ ├─main │ │ ├─java │ │ │ └─sample │ │ │ └─subs │ │ │ Sub2.java │ │ │ │ │ └─resources │ │ └─subs │ │ subSample2.txt │ │ │ └─test │ ├─java │ └─resources └─src ├─main │ ├─java │ │ Main.java │ │ │ └─resources │ sample.txt │ └─test ├─java └─resourcesbuild.gradleallprojects { apply plugin: 'java' group 'sample' version '1.0-SNAPSHOT' sourceCompatibility = 1.8 targetCompatibility = 1.8 compileJava.options.encoding = 'UTF-8' repositories { mavenCentral() } dependencies { testCompile group: 'junit', name: 'junit', version: '4.12' } } dependencies { compile project(':sub:sub-sample1') compile project(':sub:sub-sample2') } def mainProjects = [':sub:sub-sample1', ':sub:sub-sample2'] task allInJar(type:Jar, dependsOn: mainProjects.collect({ it+':compileJava' })){ dependsOn build baseName = rootProject.name manifest.attributes 'Main-Class': 'Main' def javaSubDir = "/classes/java/main" def resourcesSubDir = "/resources/main" from(buildDir.path + javaSubDir, files(mainProjects.collect{ project(it).buildDir.path + javaSubDir })) from(buildDir.path + resourcesSubDir, files(mainProjects.collect{ project(it).buildDir.path + resourcesSubDir })) }gradlew allInJarで実行.
task:build << allInJarjar.│ Main.class │ sample.txt │ ├─subs │ sample1.txt │ sample2.txt │ ├─META-INF │ MANIFEST.MF │ └─sample └─subs Sub1.class Sub2.class参考;
Gradle徹底入門 次世代ビルドツールによる自動化基盤の構築(著 綿引 琢磨, 須江 信洋, 林 政利, 今井 勝信)
java – 複数のプロジェクトを1つのjarファイルにGradleできますか?