- 投稿日:2019-06-07T22:14:45+09:00
AWS 認定 機械学習 – 専門知識 サンプル問題 日本語訳
https://aws.amazon.com/jp/certification/certified-machine-learning-specialty/
先日、セキュリティ専門知識になんとか合格できました。
これでアソシエイトとプロと専門知識1個の6冠です。
で、次なのですが・・機械学習いってみようかと。とはいっても機械学習、ほぼわかりません。これにしようと思った理由は単に模試があるから。
深く考えずにひとまず取り組んでみましょう。
サンプル問題 なのですが・・英語ですね。
ちょっとググってみても日本語訳がみつからず。では翻訳してみましょう。
俺のgoogle翻訳が唸ります。サンプル問題日本語訳
早速サンプル問題をみてみましょう。
download sample questions - pdf10問あって全部解答付きです。
ちなみに・・日本語訳とか書いてますが、書いてる人の英語力はほぼありませんのであらかじめご了承下さい。
基本google翻訳に通した後に補正しています。
気になる点とかがあればご指摘くださればなおします。Q1
A Machine Learning team has several large CSV datasets in Amazon S3. Historically, models built with the Amazon SageMaker Linear Learner algorithm have taken hours to train on similar-sized datasets. The team’s leaders need to accelerate the training process.

What can a Machine Learning Specialist do to address this concern?

A. Use Amazon SageMaker Pipe mode.

B. Use Amazon Machine Learning to train the models.

C. Use Amazon Kinesis to stream the data to Amazon SageMaker.

D. Use AWS Glue to transform the CSV dataset to the JSON format.
answer
A – Amazon SageMaker Pipe mode streams the data directly to the container, which improves the performance of training jobs. (Refer to this link for supporting information.) In Pipe mode, your training job streams data directly from Amazon S3. Streaming can provide faster start times for training jobs and better throughput. With Pipe mode, you also reduce the size of the Amazon EBS volumes for your training instances. B would not apply in this scenario. C is a streaming ingestion solution, but is not applicable in this scenario. D transforms the data structure.
機械学習チームは、Amazon S3にいくつかの大きなCSVデータセットを持っています。 歴史的に、Amazon SageMaker Linear Learner algorithmを使用して構築されたモデルは、同じサイズのデータセットを学習するのに何時間もかかりました。 チームのリーダーはトレーニングプロセスを加速する必要があります。 機械学習の専門家はこの懸念に対処するために何ができるでしょうか? A. Amazon SageMaker Pipeモードを使用してください。 B. Amazon Machine Learningを使用してモデルをトレーニングします。 C. Amazon Kinesisを使用してデータをAmazon SageMakerにストリーミングします。 D. AWS Glueを使用してCSVデータセットをJSON形式に変換します。
answer
A - Amazon SageMaker Pipeモードはデータを直接コンテナにストリーミングするため、トレーニングジョブのパフォーマンスが向上します。 (このlink を参照してください。)パイプモードでは、トレーニングジョブはAmazon S3から直接データをストリーミングします。ストリーミングにより、トレーニングジョブの開始時間が短縮され、スループットが向上します。パイプモードでは、トレーニングインスタンス用のAmazon EBSボリュームのサイズも縮小します。 Bはこのシナリオには適用されません。 Cはストリーミング取り込みソリューションですが、このシナリオには適用されません。 Dはデータ構造を変換します。
Q2
A term frequency–inverse document frequency (tf–idf) matrix using both unigrams and bigrams is built from a text corpus consisting of the following two sentences:

1. Please call the number below.
2. Please do not call us.

What are the dimensions of the tf–idf matrix?

A. (2, 16)

B. (2, 8)

C. (2, 10)

D. (8, 10)
answer
A – There are 2 sentences, 8 unique unigrams, and 8 unique bigrams, so the result would be (2,16). The phrases are “Please call the number below” and “Please do not call us.” Each word individually (unigram) is “Please,” “call,” ”the,” ”number,” “below,” “do,” “not,” and “us.” The unique bigrams are “Please call,” “call the,” ”the number,” “number below,” “Please do,” “do not,” “not call,” and “call us.” The tf–idf vectorizer is described at this link.
unigramsとbigramsの両方を使用するterm frequency–inverse document frequency (tf–idf) matrixは、次の2つの文からなるテキストコーパスから作成されます。

1. Please call the number below.
2. Please do not call us.

tf–idf matrixの大きさは?

A.(2、16)

B.(2、8)

C.(2、10)

D.(8、10)
answer
A - 2つの文、8つの固有のunigrams、および8つの固有のbigramsがあるため、結果は(2,16)になります。フレーズは、「Please call the number below. 」および「Please do not call us. 」です。個々の単語(unigrams)は、“Please,” “call,” ”the,” ”number,” “below,” “do,” “not,” “us.”です。ユニークなbigramsは、“Please call,” “call the,” ”the number,” “number below,” “Please do,” “do not,” “not call,” “call us.”です。 tf–idf vectorizerはこのlink で説明されています。
Q3
A company is setting up a system to manage all of the datasets it stores in Amazon S3. The company would like to automate running transformation jobs on the data and maintaining a catalog of the metadata concerning the datasets. The solution should require the least amount of setup and maintenance.

Which solution will allow the company to achieve its goals?

A. Create an Amazon EMR cluster with Apache Hive installed. Then, create a Hive metastore and a script to run transformation jobs on a schedule.

B. Create an AWS Glue crawler to populate the AWS Glue Data Catalog. Then, author an AWS Glue ETL job, and set up a schedule for data transformation jobs.

C. Create an Amazon EMR cluster with Apache Spark installed. Then, create an Apache Hive metastore and a script to run transformation jobs on a schedule.

D. Create an AWS Data Pipeline that transforms the data. Then, create an Apache Hive metastore and a script to run transformation jobs on a schedule..
answer
B – AWS Glue is the correct answer because this option requires the least amount of setup and maintenance since it is serverless, and it does not require management of the infrastructure. Refer to this link for supporting information. A, C, and D are all solutions that can solve the problem, but require more steps for configuration, and require higher operational overhead to run and maintain.
ある会社が、Amazon S3に保存しているすべてのデータセットを管理するためのシステムを設定しています。
同社は、データに対して変換ジョブを実行し、データセットに関するメタデータのカタログを管理することを自動化したいと考えています。
このソリューションは、最小限のセットアップとメンテナンスで済みます。

どのソリューションが会社の目標を達成するのを可能にするでしょうか

A. Apache HiveをインストールしてAmazon EMRクラスターを作成します。次に、スケジュールに基づいて変換ジョブを実行するためのHive metastoreとスクリプトを作成します。

B. AWS Glueデータカタログを作成するためのAWS Glueクローラーを作成します。次に、AWS Glue ETLジョブを作成し、データ変換ジョブのスケジュールを設定します。

C. Apache SparkがインストールされたAmazon EMRクラスターを作成します。それから、Apache Hiveメタストアと変換ジョブをスケジュールに従って実行するスクリプトを作成します。

D.データを変換するAWS Data Pipelineを作成します。次に、Apache Hiveメタストアと、スケジュールに従って変換ジョブを実行するスクリプトを作成します。
answer
B - AWS Glueは正しい答えです。これは、このオプションはサーバーがないため最小限のセットアップとメンテナンスで済み、インフラストラクチャの管理が不要だからです。補足情報についてはこちら link を参照してください。 A、C、およびDは、問題を解決できるソリューションですが、構成に必要な手順が増え、実行と保守に高い運用オーバーヘッドが必要になります。
Q4
A Data Scientist is working on optimizing a model during the training process by varying multiple parameters. The Data Scientist observes that, during multiple runs with identical parameters, the loss function converges to different, yet stable, values.

What should the Data Scientist do to improve the training process?

A. Increase the learning rate. Keep the batch size the same.

B. Reduce the batch size. Decrease the learning rate.

C. Keep the batch size the same. Decrease the learning rate.

D. Do not change the learning rate. Increase the batch size.
answer
B – It is most likely that the loss function is very curvy and has multiple local minima where the training is getting stuck. Decreasing the batch size would help the Data Scientist stochastically get out of the local minima saddles. Decreasing the learning rate would prevent overshooting the global loss function minimum. Refer to the paper at this link for an explanation.
データサイエンティストは、トレーニングプロセス中に複数のパラメータを変更することによってモデルの最適化に取り組んでいます。
データサイエンティストは、同一のパラメータでの複数回の実行中に、損失関数は異なるが安定した値に収束することを観察しています。

データサイエンティストはトレーニングプロセスを改善するために何をすべきですか?

A.学習率を上げてください。バッチサイズを同じにしてください。

B.バッチサイズを減らします。学習率を下げてください。

C.バッチサイズを同じにしてください。学習率を下げてください。

D.学習率を変えないでください。バッチサイズを大きくしてください。
answer
B - 損失関数は非常に曲線的で、トレーニングが行き詰まっている場所で複数の極小値を持つことが最も可能性があります。バッチサイズを小さくすると、データサイエンティストは確率的にlocal minima saddlesから抜け出すことができます。学習率を下げると、グローバルな損失関数の最小値を超えることを防ぐことができます。説明はこのlinkにある論文を参照してください。
Q5
A Data Scientist is evaluating different binary classification models. A false positive result is 5 times more expensive (from a business perspective) than a false negative result.

The models should be evaluated based on the following criteria:
1) Must have a recall rate of at least 80%
2) Must have a false positive rate of 10% or less
3) Must minimize business costs

After creating each binary classification model, the Data Scientist generates the corresponding confusion matrix.

Which confusion matrix represents the model that satisfies the requirements?

A. TN = 91, FP = 9
 FN = 22, TP = 78

B. TN = 99, FP = 1
 FN = 21, TP = 79

C. TN = 96, FP = 4
 FN = 10, TP = 90

D. TN = 98, FP = 2
 FN = 18, TP = 82
answer
D – The following calculations are required:TP = True Positive
FP = False Positive
FN = False Negative
TN = True Negative
FN = False NegativeRecall = TP / (TP + FN)
False Positive Rate (FPR) = FP / (FP + TN)
Cost = 5 * FP + FN
A B C D Recall 78 / (78 + 22) = 0.78 79 / (79 + 21) = 0.79 90 / (90 + 10) = 0.9 82 / (82 + 18) = 0.82 False Positive Rate 9 / (9 + 91) = 0.09 1 / (1 + 99) = 0.01 4 / (4 + 96) = 0.04 2 / (2 + 98) = 0.02 Costs 5 * 9 + 22 = 67 5 * 1 + 21 = 26 5 * 4 + 10 = 30 5 * 2 + 18 = 28 Options C and D have a recall greater than 80% and an FPR less than 10%, but D is the most cost effective. For supporting information, refer to this link.
データサイエンティストが、さまざまなバイナリ分類モデルを評価しています。
誤検出の結果は、5倍のコストがかかります(ビジネスの観点から)。

以下の基準に基づいてモデルを評価する必要があります。
1)回収率が80%以上であること
2)誤検知率が10%以下であること
3)ビジネスコストを最小限に抑える

各バイナリ分類モデルを作成した後、データサイエンティストは対応する混同行列を生成します。

要件を満たすモデルを表す混同行列はどれですか。

A. TN = 91、FP = 9
 FN = 22、TP = 78

B. TN = 99、FP = 1
 FN = 21、TP = 79

C. TN = 96、FP = 4
 FN = 10、TP = 90

D. TN = 98、FP = 2
 FN = 18、TP = 82
answer
D - 以下の計算が必要です。TP =True Positive
FP =False Positive
FN =False Negative
TN =True Negative
FN =False NegativeRecall= TP /(TP + FN)
False Positive Rate(FPR)= FP /(FP + TN)
Costs= 5 * FP + FN
A B C D Recall 78 / (78 + 22) = 0.78 79 / (79 + 21) = 0.79 90 / (90 + 10) = 0.9 82 / (82 + 18) = 0.82 False Positive Rate 9 / (9 + 91) = 0.09 1 / (1 + 99) = 0.01 4 / (4 + 96) = 0.04 2 / (2 + 98) = 0.02 Costs 5 * 9 + 22 = 67 5 * 1 + 21 = 26 5 * 4 + 10 = 30 5 * 2 + 18 = 28 オプションCとDの回収率は80%を超え、FPRは10%未満ですが、Dが最も費用対効果に優れています。補足情報については、こちらのlinkを参照してください。
Q6
A Data Scientist uses logistic regression to build a fraud detection model. While the model accuracy is 99%, 90% of the fraud cases are not detected by the model.

What action will definitively help the model detect more than 10% of fraud cases?

A. Using undersampling to balance the dataset

B. Decreasing the class probability threshold

C. Using regularization to reduce overfitting

D. Using oversampling to balance the dataset
answer
B – Decreasing the class probability threshold makes the model more sensitive and, therefore, marks more cases as the positive class, which is fraud in this case. This will increase the likelihood of fraud detection. However, it comes at the price of lowering precision. This is covered in the Discussion section of the paper at this link.
データサイエンティストは、ロジスティック回帰を使用してfraud detection modelを構築します。
モデルの精度は99%ですが、fraud casesの90%はモデルによって検出されません。

このモデルが10%以上のfraud casesを確実に検出するためにどのようなアクションが確実に役立つでしょうか?

A.undersamplingを使ってデータセットのバランスをとる

B.クラス確率のしきい値を下げる

C.overfittingを減らすためのregularizationの使用

D. oversamplingを使ってデータセットのバランスをとる
answer
B - クラス確率のしきい値を下げると、モデルの感度が高くなり、したがって、ポジティブクラスとしてより多くのケースがマークされます。これは、このケースでは不正です。これは不正検出の可能性を高めます。ただし、精度が低下するという代償があります。これについてはこのlinkのホワイトペーパーのDiscussionセクションで説明されています。
Q7
A company is interested in building a fraud detection model. Currently, the Data Scientist does not have a sufficient amount of information due to the low number of fraud cases.

Which method is MOST likely to detect the GREATEST number of valid fraud cases?

A. Oversampling using bootstrapping

B. Undersampling

C. Oversampling using SMOTE

D. Class weight adjustment
answer
C – With datasets that are not fully populated, the Synthetic Minority Over-sampling Technique (SMOTE) adds new information by adding synthetic data points to the minority class. This technique would be the most effective in this scenario. Refer to Section 4.2 at this link for supporting information.
ある会社がfraud detection modelの構築に興味を持っています。
現在、データサイエンティストは、fraud casesの数が少ないため、十分な量の情報を持っていません。

正当なfraud casesの最大数を検出する可能性が最も高いのはどの方法ですか?

A.ブートストラップを使ったOversampling

B.Undersampling

C.SMOTEを使ったOversampling

D.クラスの重みの調整
answer
C - 完全に入力されていないデータセットでは、Synthetic Minority Over-sampling Technique (SMOTE)が、少数派クラスにsynthetic data pointsを追加することによって新しい情報を追加します。このシナリオでは、この手法が最も効果的です。補足情報については、このlinkでセクション4.2を参照してください。
Q8
A Machine Learning Engineer is preparing a data frame for a supervised learning task with the Amazon SageMaker Linear Learner algorithm. The ML Engineer notices the target label classes are highly imbalanced and multiple feature columns contain missing values. The proportion of missing values across the entire data frame is less than 5%.

What should the ML Engineer do to minimize bias due to missing values?

A. Replace each missing value by the mean or median across non-missing values in same row.

B. Delete observations that contain missing values because these represent less than 5% of the data.

C. Replace each missing value by the mean or median across non-missing values in the same column.

D. For each feature, approximate the missing values using supervised learning based on other features.
answer
D – Use supervised learning to predict missing values based on the values of other features. Different supervised learning approaches might have different performances, but any properly implemented supervised learning approach should provide the same or better approximation than mean or median approximation, as proposed in responses A and C. Supervised learning applied to the imputation of missing values is an active field of research. Refer to this link for an example.
機械学習エンジニアが、Amazon SageMaker Linear Learner algorithmを使用して、教師付き学習タスク用のデータフレームを準備しています。
機械学習エンジニアは、target label classesのバランスが非常に悪く、複数のfeature columnsに欠損値が含まれていることに気付きました。
データフレーム全体の欠損値の割合は5%未満です。

欠損値による偏りを最小限に抑えるために機械学習エンジニアは何をすべきですか?

A.各行の欠損値を、同じ行の欠損値以外の値の平均または中央値で置き換えます。

B.欠損値を含む観測値は、データの5%未満を表すため、それらを削除します。

C.それぞれの欠損値を、同じ列の欠損値以外の値の平均または中央値で置き換えます。

D.各特徴について、他の特徴に基づく教師あり学習を使用して欠損値を概算する。
answer
D - 教師付き学習を使用して他の特徴の値に基づいて欠損値を予測します。教師付き学習アプローチが異なるとパフォーマンスも異なる場合がありますが、回答Aおよび回答Cで提案されているように、適切に実装された教師付き学習アプローチは平均または中央値近似と同じまたはそれ以上の近似値を提供します。研究のこれを参照してくださいlink
Q9
A company has collected customer comments on its products, rating them as safe or unsafe, using decision trees. The training dataset has the following features: id, date, full review, full review summary, and a binary safe/unsafe tag. During training, any data sample with missing features was dropped. In a few instances, the test set was found to be missing the full review text field.

For this use case, which is the most effective course of action to address test data samples with missing features?

A. Drop the test samples with missing full review text fields, and then run through the test set.

B. Copy the summary text fields and use them to fill in the missing full review text fields, and then run through the test set.

C. Use an algorithm that handles missing data better than decision trees.

D. Generate synthetic data to fill in the fields that are missing data, and then run through the test set.
ある企業が自社製品に関する顧客のコメントを収集し、decision treesを使用してそれらを安全または安全でないと評価しました。
トレーニングデータセットには、id、date、full review、full review summary、およびbinary safe/unsafe tagの機能があります。
トレーニング中に、機能が欠けているデータサンプルはすべて削除されました。いくつかの例では、テストセットにfull review テキストフィールドがないことがわかりました。

このユースケースでは、機能が欠けているテストデータサンプルに対処するための最も効果的な対策はどれですか。

A.full reviewフィールドが欠けているテストサンプルをドロップしてから、テストセットを実行します。

B.full review summaryフィールドをコピーしてそれらを使用して、欠落しているfull reviewフィールドを埋めてから、テストセットを実行します。

C.decision treesよりも欠けているデータをうまく処理するアルゴリズムを使用する。

D.データが欠落しているフィールドを埋めるためにsynthetic dataを生成してから、テストセットを実行します。
Q10
An insurance company needs to automate claim compliance reviews because human reviews are expensive and error-prone. The company has a large set of claims and a compliance label for each. Each claim consists of a few sentences in English, many of which contain complex related information. Management would like to use Amazon SageMaker built-in algorithms to design a machine learning supervised model that can be trained to read each claim and predict if the claim is compliant or not.

Which approach should be used to extract features from the claims to be used as inputs for the downstream supervised task?

A. Derive a dictionary of tokens from claims in the entire dataset. Apply one-hot encoding to tokens found in each claim of the training set. Send the derived features space as inputs to an Amazon SageMaker builtin supervised learning algorithm.

B. Apply Amazon SageMaker BlazingText in Word2Vec mode to claims in the training set. Send the derived features space as inputs for the downstream supervised task.

C. Apply Amazon SageMaker BlazingText in classification mode to labeled claims in the training set to derive features for the claims that correspond to the compliant and non-compliant labels, respectively.

D. Apply Amazon SageMaker Object2Vec to claims in the training set. Send the derived features space as inputs for the downstream supervised task.
answer
D – Amazon SageMaker Object2Vec generalizes the Word2Vec embedding technique for words to more complex objects, such as sentences and paragraphs. Since the supervised learning task is at the level of whole claims, for which there are labels, and no labels are available at the word level, Object2Vec needs be used instead of Word2Vec. For supporting information, refer to this link and this link.
人力によるレビューは高コストであり、間違いが発生しやすいため、保険会社はクレームコンプライアンスレビューを自動化する必要があります。
同社には多数のクレームとそれぞれのコンプライアンスラベルがあります。
それぞれの主張は英語のいくつかの文から成り、その多くは複雑な関連情報を含んでいます。
経営陣は、Amazon SageMakerの組み込みアルゴリズムを使用して、各要求を読み取り、その要求が準拠しているかどうかを予測するように学習できる教師あり学習モデルを設計したいと考えています。

下流の教師あり学習のためのインプットとして使用されるべきクレームから、特徴を抽出するためにどのアプローチが使用されるべきですか?

A.データセット全体のクレームからトークンの辞書を導き出します。トレーニングセットの各請求に含まれるトークンにone-hot encodingを適用します。derived features spaceを入力としてAmazon SageMaker組み込み教師あり学習アルゴリズムに送信します。

B. Word2VecモードのAmazon SageMaker BlazingTextをトレーニングセットのクレームに適用します。導出された特徴空間を下流の教師あり学習のためのインプットとして送る。

C.分類モードのAmazon SageMaker BlazingTextをトレーニングセットのラベル付きクレームに適用して、それぞれ準拠ラベルと非準拠ラベルに対応するクレームの機能を導き出します。

D.トレーニングセット内のクレームにAmazon SageMaker Object2Vecを適用します。導出された特徴空間を下流の教師あり学習のための入力として送る。
んー、アカン。専門用語多すぎて違和感なく訳せてるかわからん。
ひとまず公開しつつも、随時編集という事で追々調整していきます。というかやっぱこの資格は厳しいかもな。。全然理解できない。
- 投稿日:2019-06-07T18:26:19+09:00
React+Amplify+AppSync+TypeScriptでリアルタイム掲示板アプリを作る
この記事は、「【爆速】React+Amplify+AppSyncでリアルタイム掲示板アプリを15分で作り上げる 〜これが最高のDeveloper Experienceだ〜 - Qiita」を参考にさせて頂きました。
Amplifyのコマンドでコードを自動生する際にTypeScriptを選択できるようなので、どんな感じなのか試してみました。
ついでに、ReactのHooksも使ってます。バージョン
使用した環境は以下のとおりです。
$ create-react-app --version
3.0.1
$ node -v
v8.15.1
$ npm -v
6.9.0
$ amplify --version
1.7.0
自分の環境にはamplifyのコマンドすら入っていない状態だったので、公式のページを見てインストールしました。
Getting Started · Create React App
Reactアプリの雛形を作る
create-react-appで引数に--typescriptを指定して作成し、amplify initで初期化設定をしていきます。
profileの指定等は適宜変更して下さい。$ create-react-app boardapp --typescript $ cd boardapp $ amplify init Note: It is recommended to run this command from the root of your app directory ? Enter a name for the project boardapp ? Enter a name for the environment dev ? Choose your default editor: Visual Studio Code ? Choose the type of app that you're building javascript Please tell us about your project ? What javascript framework are you using react ? Source Directory Path: src ? Distribution Directory Path: build ? Build Command: npm run-script build ? Start Command: npm run-script start ? Do you want to use an AWS profile? Yes ? Please choose the profile you want to use defaultGraphQLのAPIを追加します。
$ amplify add api
? Please select from one of the below mentioned services GraphQL
? Provide API name: boardapp
? Choose an authorization type for the API API key
? Do you have an annotated GraphQL schema? No
? Do you want a guided schema creation? No
? Provide a custom type name Post
以下のスキーマのサンプルが出来るので、そのまま使います。
amplify/backend/api/schema.graphqltype Post @model { id: ID! title: String! content: String! price: Int rating: Float }次に、デプロイとクライアントのコードの自動生成をします。
$ amplify push
? Are you sure you want to continue? Yes
? Do you want to generate code for your newly created GraphQL API Yes
? Choose the code generation language target typescript
? Enter the file name pattern of graphql queries, mutations and subscriptions src/graphql/**/*.ts
? Do you want to generate/update all possible GraphQL operations - queries, mutations and subscriptions Yes
? Enter maximum statement depth [increase from default if your schema is deeply nested] 2
? Enter the file name for the generated code src/API.ts
ここまで終わると、GraplQLのAPIがAWSにデプロイされ、ローカルのディレクトリは以下のような構成になりました。
$ tree -L 5 -I "node_modules"
.
├── README.md
├── amplify
│   ├── #current-cloud-backend
│   │   ├── amplify-meta.json
│   │   ├── api
│   │   │   └── boardapp
│   │   │       ├── build
│   │   │       ├── parameters.json
│   │   │       ├── resolvers
│   │   │       ├── schema.graphql
│   │   │       └── stacks
│   │   └── backend-config.json
│   ├── backend
│   │   ├── amplify-meta.json
│   │   ├── api
│   │   │   └── boardapp
│   │   │       ├── build
│   │   │       ├── parameters.json
│   │   │       ├── resolvers
│   │   │       ├── schema.graphql
│   │   │       └── stacks
│   │   ├── awscloudformation
│   │   │   └── nested-cloudformation-stack.yml
│   │   └── backend-config.json
│   └── team-provider-info.json
├── package.json
├── public
│   ├── favicon.ico
│   ├── index.html
│   └── manifest.json
├── src
│   ├── API.ts
│   ├── App.css
│   ├── App.test.tsx
│   ├── App.tsx
│   ├── aws-exports.js
│   ├── graphql
│   │   ├── mutations.ts
│   │   ├── queries.ts
│   │   ├── schema.json
│   │   └── subscriptions.ts
│   ├── index.css
│   ├── index.tsx
│   ├── logo.svg
│   ├── react-app-env.d.ts
│   └── serviceWorker.ts
├── tsconfig.json
└── yarn.lock
amplifyのパッケージ追加
yarnでパッケージを登録します。
TypeScriptの型も一緒にに登録されるようです。$ yarn add aws-amplify aws-amplify-reactアプリケーションの更新
create-react-appで自動生成されたコードを変更していきます。
まず、Amplifyの初期化部分です。src/index.tsximport React from 'react'; import ReactDOM from 'react-dom'; import './index.css'; import App from './App'; import * as serviceWorker from './serviceWorker'; import Amplify from "aws-amplify" // 追加 import config from "./aws-exports" // 追加 Amplify.configure(config) // 追加 ReactDOM.render(<App />, document.getElementById('root')); // If you want your app to work offline and load faster, you can change // unregister() to register() below. Note this comes with some pitfalls. // Learn more about service workers: https://bit.ly/CRA-PWA serviceWorker.unregister();次に、アプリ本体です。ポイントは後ほど解説します。
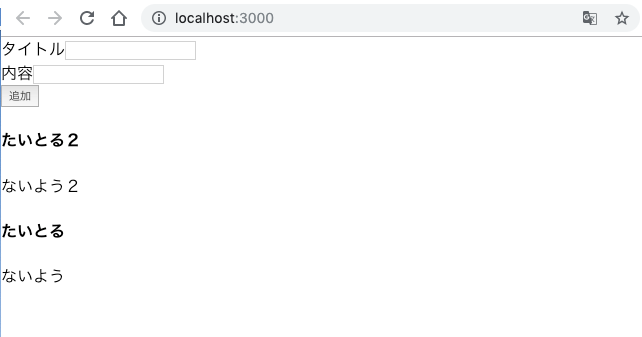
また、流れを掴む事が目的のため、エラー処理は入れてません。src/App.tsximport React, { useEffect, useState } from "react"; import { API, graphqlOperation } from "aws-amplify"; import { listPosts } from "./graphql/queries"; import { createPost } from "./graphql/mutations"; import { onCreatePost } from "./graphql/subscriptions"; import { ListPostsQuery, OnCreatePostSubscription, CreatePostMutationVariables } from "./API"; type Post = { id: string; title: string; content: string; price: number | null; rating: number | null; }; type FormState = { title: string; content: string; }; type PostSubscriptionEvent = { value: { data: OnCreatePostSubscription } }; const usePosts = () => { const [posts, setPosts] = useState<Post[]>([]); useEffect(() => { (async () => { // 最初のPost一覧取得 const result = await API.graphql(graphqlOperation(listPosts)); if ("data" in result && result.data) { const posts = result.data as ListPostsQuery; if (posts.listPosts) { setPosts(posts.listPosts.items as Post[]); } } // Post追加イベントの購読 const client = API.graphql(graphqlOperation(onCreatePost)); if ("subscribe" in client) { client.subscribe({ next: ({ value: { data } }: PostSubscriptionEvent) => { if (data.onCreatePost) { const post: Post = data.onCreatePost; setPosts(prev => [...prev, post]); } } }); } })(); }, []); return posts; }; const App: React.FC = () => { const [input, setInput] = useState<FormState>({ title: "", content: "" }); const posts = usePosts(); const onFormChange = ({ target: { name, value } }: React.ChangeEvent<HTMLInputElement>) => { setInput(prev => ({ ...prev, [name]: value })); }; const onPost = () => { if (input.title === "" || input.content === "") return; const newPost: CreatePostMutationVariables = { input: { title: input.title, content: input.content } }; setInput({ title: "", content: "" }); API.graphql(graphqlOperation(createPost, newPost)); }; return ( <div className="App"> <div> タイトル <input value={input.title} name="title" onChange={onFormChange} /> </div> <div> 内容 <input value={input.content} name="content" onChange={onFormChange} /> </div> <button onClick={onPost}>追加</button> <div> {posts.map(data => { return ( <div key={data.id}> <h4>{data.title}</h4> <p>{data.content}</p> </div> ); })} </div> </div> ); }; export default App;あとは、起動するだけです。
$ yarn start
複数画面開くと、同時にリアルタイムで更新されます。
解説と感想
モデル
graphqlのスキーマに対応した型が
src/API.tsに自動生成されているので、基本的にここに定義されている型を使います。src/API.tsexport type ListPostsQuery = { listPosts: { __typename: "ModelPostConnection", items: Array< { __typename: "Post", id: string, title: string, content: string, price: number | null, rating: number | null, } | null > | null, nextToken: string | null, } | null, }; export type OnUpdatePostSubscription = { onUpdatePost: { __typename: "Post", id: string, title: string, content: string, price: number | null, rating: number | null, } | null, };Postの中身のみの型が無かったので、以下のように独自に定義しています。
src/App.tsxtype Post = { id: string; title: string; content: string; price: number | null; rating: number | null; };GraphQLのスキーマそのままなので、自動生成されて欲しい気もします。
登録
追加ボタンを押したときに呼ばれるメソッドです。
src/App.tsxconst onPost = () => { if (input.title === "" || input.content === "") return; const newPost: CreatePostMutationVariables = { input: { title: input.title, content: input.content } }; setInput({ title: "", content: "" }); API.graphql(graphqlOperation(createPost, newPost)); };GraphQLの代表的なクエリが自動生成されているので、
graphqlOperationに指定することで、クエリの種類を切り替えられます。ここでは新規登録なので、createPostを使います。src/graphql/mutations.tsexport const createPost = `mutation CreatePost($input: CreatePostInput!) { createPost(input: $input) { id title content price rating } } `;追加するときの引数
$input: CreatePostInput!に対応する型も自動生成されているので、これに登録したいデータを設定してクエリを送信するだけです。src/API.tsexport type CreatePostInput = { id?: string | null, title: string, content: string, price?: number | null, rating?: number | null, }; export type CreatePostMutationVariables = { input: CreatePostInput, };一覧取得とデータ登録の監視
登録されたデータの一覧取得と追加されたデータの監視は、カスタムフックを作って実現しています。
useEffectでコンポーネントのマウント時に、Postの一覧取得、Post作成の購読を追加を順番に行い、useStateで作成したPost一覧を戻り値として返す事で、Post一覧の更新を伝えます。src/App.tsxtype PostSubscriptionEvent = { value: { data: OnCreatePostSubscription } }; const usePosts = () => { const [posts, setPosts] = useState<Post[]>([]); useEffect(() => { (async () => { // 最初のPost一覧取得 const result = await API.graphql(graphqlOperation(listPosts)); if ("data" in result && result.data) { const posts = result.data as ListPostsQuery; if (posts.listPosts) { setPosts(posts.listPosts.items as Post[]); } } // Post追加イベントの購読 const client = API.graphql(graphqlOperation(onCreatePost)); if ("subscribe" in client) { client.subscribe({ next: ({ value: { data } }: PostSubscriptionEvent) => { if (data.onCreatePost) { const post: Post = data.onCreatePost; setPosts(prev => [...prev, post]); } } }); } })(); }, []); return posts; };型の整合性を取るため、少しややこしいです。
API.graphqlの戻り値の型はPromise<GraphQLResult> | Observable<object>となっています。
引数のgraphqlOperationの内容によって戻り値の型が変わります。また、戻り値のデータ型がobjectで、ジェネリックで型の指定も出来ないので、所々ifで型を絞り込んだり、asでキャストしてます。もっとうまい使い方があるのかもしれませんが、もう少し使いやすくならないかなーと思いました。
さいごに
最初は全体のイメージが掴みづらかったのですが、実際に使ってみると
思ったよりも簡単にGraphQLのAPIが作れました。
DynamoDB以外にもRDBやLambdaとも連携できるようなので、色々と応用も出来て便利そうです。

- 投稿日:2019-06-07T16:59:39+09:00
Zabbix vs. Cloudwatch
はじめに
AWSのサービスを監視する方法として、「Zabbix」か「Cloudwatch」かを検討する機会があったため、比較メモとしてこの記事を投稿します。
「Zabbix」で監視可能なサービス(EC2、ECS)をメインに比較してみました。全体
Zabbix Cloudwatch 形態 OSS サービス 料金 タダ 課金あり 監視可能なサービス EC2, ECS 色々※ ダッシュボード 〇 〇 マネージャー管理
手動スケーリングなど必要 不要 EC2
Zabbix Cloudwatch(※エージェントなし) Cloudwatch(※エージェント利用) メトリクスの種類 多※1 少 多※2 ログ監視 任意のファイル × 任意のファイル トリガー・アラーム 〇 △ △ ※1 Zabbixのメトリクス
※2 EC2 Cloudwatchのメトリクスログ監視について補足です。
ファイル名指定は、ZabbixはWebコンソールからファイル名指定で監視できますが、CloudwatchではEC2インスタンス側で出力するログファイルを指定します。
また、文字列パターン等を設定してのアラーム発行はZabbix,Cloudwatchともに可能ですが、Cloudwatchでは対象のログが表示されないというデメリットがあります。ECS(Fargate)
Zabbix Cloudwatch メトリクスの種類 多 少※ ログ監視 任意のファイル 標準出力、標準エラーのみ サービス監視 × 〇 タスク監視 〇 × コンテナ監視 × × トリガー・アラーム 〇 〇 コンテナ監視をしたい場合、
EC2起動タイプのタスクであれば、cAdvisorを利用できます。
Fargateでのコンテナ監視はおそらく不可能…まとめ
EC2、ECSでログメインの監視をするのであれば、Webコンソールだけで操作が完結するZabbixを使うと良いでしょう。
Cloudwatchでは、障害時に原因のログが表示されないので使い勝手の点で劣ると思います。それ以外のサービスも合わせて監視したいのであれば、Cloudwatchを選ぶことになります。
Zabbixには、任意スクリプトのリターン値をメトリクスとして取得できる機能があるので
AWS APIを駆使すれば、EC2、ECS以外のサービスも含めてZabbixで監視も可能です。
- 投稿日:2019-06-07T16:42:03+09:00
Terraform aws_ecs_task_difinition リソースを更新してapplyしたときに、古いrevisionが削除されないようにする方法
はじめに
terraform で ecs のタスク部分を管理するコードを書いていたところ、更新するたびに古いrevisionにdestroyが走ってしまい、困っていました。
古いrevisionを削除せずに、新しいrevisionとしてapply出来る方法がわかったので、記事にさせていただきます。
スマートな方法ではないと思うので、何か他にいい方法や新しいオプション等が出ていたら教えていただきたく思います。
環境
Terraform v0.11.14
+ provider.aws v1.60.0macbook
OS:mojave 10.14.5Fargate×ECSでAWSが提供するnginxのコンテナを動かしてみます。
コンテナ定義の環境変数を追加したり削除したりして、挙動をみていきます。ディレクトリ構成
> tree
.
├── test_workspace
│   ├── cloudwatch.tf
│   ├── config.tf
│   ├── data_remote_state.tf
│   ├── ecs_service.tf
│   ├── ecs_task.tf
│   ├── iam.tf
│   ├── region.tf
│   ├── service_discovery.tf
│   ├── subnet.tf
│   ├── container-definitions
│   │   └── container_definitions.json
│   ├── terraform.tfstate.d/...
│   └── variables.tf
└── workspace
    ├── acm.tf
    ├── alb.tf
    ├── config.tf
    ├── ecr.tf
    ├── ecs_cluster.tf
    ├── iam.tf
    ├── outputs.tf
    ├── region.tf
    ├── securitygroup.tf
    ├── terraform.tfstate.d/...
    ├── variables.tf
    └── vpc.tf
今回ディレクトリを分けて構築しようと思った理由は3つあります。
1つ目は、tfstateの肥大化を抑え、オペミスの影響範囲を狭くするため。
2つ目は、サービスとタスクはスケール対応したいときに迅速に対応できるよう切り分けておきたいため。
3つ目は、今後、コンテナ周りのリソースに関しては、インフラエンジニアだけでなくデプロイに関わるアプリケーションエンジニアも他のリソースを気にせずterraformの編集ができ、環境変数の変更やスケール対応等を行えるよう環境を整備したいため。下記リソースは事前に他のディレクトリ(workspaceディレクトリ)で構築済みの状態です。
今回は構築済みリソースに関しては詳細を省きます。
vpc
acm
alb
ecs_cluster
iam_role
securitygroup
variables古いrevisionが削除されるパターン
taskのコード
> cat ecs_task.tf

resource "aws_ecs_task_definition" "maint_test_task_definition" {
  family                   = "maint_test_task_definition"
  container_definitions    = "${file("container_definitions/container_definitions.json")}"
  task_role_arn            = "arn:aws:iam::012345678910:role/ecsTaskExecutionRole"
  execution_role_arn       = "arn:aws:iam::012345678910:role/ecsTaskExecutionRole"
  network_mode             = "awsvpc"
  memory                   = "2048"
  cpu                      = "1024"
  requires_compatibilities = ["FARGATE"]

}
container_definitions.jsonに環境変数を追加
[
  {
    "name": "nginx",
    "image": "nginx:alpine",
    "cpu": 256,
    "memory": 512,
    "essential": true,
    "network_mode": "awsvpc",
    "portMappings": [
      {
        "hostPort": 80,
        "protocol": "tcp",
        "containerPort": 80
      }
    ],
    "logConfiguration": {
        "logDriver": "awslogs",
        "secretOptions": null,
        "options": {
            "awslogs-group": "/ecs/test",
            "awslogs-region": "us-west-2",
            "awslogs-stream-prefix": "ecs"
        }
    },
    "environment": [
      {
        "name": "API_ENV",
        "value": "develop"
      },
      {
        "name": "MYSQL_ENV",
        "value": "mysql-dev"
      }
    ]
  }
]
下記の行が追記された内容です。環境変数を1つ追加しました。
,
      {
        "name": "MYSQL_ENV",
        "value": "mysql-dev"
      }
serviceのコード
> cat ecs_service.tf

resource "aws_ecs_service" "maint-test" {
  name                               = "maint-test-service"
  cluster                            = "${data.terraform_remote_state.maint.ecs.maint_test_ecs_cluster_id}"
  task_definition                    = "${aws_ecs_task_definition.maint_test_task_definition.arn}"
  platform_version                   = "LATEST"
  desired_count                      = 2
  launch_type                        = "FARGATE"
  deployment_minimum_healthy_percent = "50"
  deployment_maximum_percent         = "100"
  health_check_grace_period_seconds  = "180"

  load_balancer {
    target_group_arn = "${data.terraform_remote_state.maint.alb.maint_test_ecs_alb_tg_arn}"
    container_name   = "nginx"
    container_port   = 80
  }

  network_configuration {
    subnets          = ["${data.terraform_remote_state.maint.vpc.subnet-public-a}","${data.terraform_remote_state.maint.vpc.subnet-public-c}"]
    security_groups  = ["${data.terraform_remote_state.maint.sg.security_group_WEB_id}"]
    assign_public_ip = "true"
  }

  service_registries {
    registry_arn = "${aws_service_discovery_service.maint_test.arn}"
  }

}
terraform plan 結果
このようにdestroyが出てしまいます。
> terraform plan

省略

------------------------------------------------------------------------

An execution plan has been generated and is shown below.
Resource actions are indicated with the following symbols:
-/+ destroy and then create replacement

Terraform will perform the following actions:

-/+ aws_ecs_task_definition.maint_test_task_definition (new resource required)
      id:                                  "maint_test_task_definition" => <computed> (forces new resource)
      arn:                                 "arn:aws:ecs:us-west-2:012345678910:task-definition/maint_test_task_definition:13" => <computed>
      container_definitions:               "[{\"cpu\":256,\"environment\":[{\"name\":\"API_ENV\",\"value\":\"develop\"}],\"essential\":true,\"image\":\"nginx:alpine\",\"logConfiguration\":{\"logDriver\":\"awslogs\",\"options\":{\"awslogs-group\":\"/ecs/maint-test\",\"awslogs-region\":\"us-west-2\",\"awslogs-stream-prefix\":\"ecs\"}},\"memory\":512,\"mountPoints\":[],\"name\":\"nginx\",\"portMappings\":[{\"containerPort\":80,\"hostPort\":80,\"protocol\":\"tcp\"}],\"volumesFrom\":[]}]" => "[{\"cpu\":256,\"environment\":[{\"name\":\"API_ENV\",\"value\":\"develop\"},{\"name\":\"MYSQL_ENV\",\"value\":\"mysql-dev\"}],\"essential\":true,\"image\":\"nginx:alpine\",\"logConfiguration\":{\"logDriver\":\"awslogs\",\"options\":{\"awslogs-group\":\"/ecs/maint-test\",\"awslogs-region\":\"us-west-2\",\"awslogs-stream-prefix\":\"ecs\"},\"secretOptions\":null},\"memory\":512,\"name\":\"nginx\",\"network_mode\":\"awsvpc\",\"portMappings\":[{\"containerPort\":80,\"hostPort\":80,\"protocol\":\"tcp\"}]}]" (forces new resource)
      cpu:                                 "1024" => "1024"
      execution_role_arn:                  "arn:aws:iam::012345678910:role/ecsTaskExecutionRole" => "arn:aws:iam::012345678910:role/ecsTaskExecutionRole"
      family:                              "maint_test_task_definition" => "maint_test_task_definition"
      memory:                              "2048" => "2048"
      network_mode:                        "awsvpc" => "awsvpc"
      requires_compatibilities.#:          "1" => "1"
      requires_compatibilities.3072437307: "FARGATE" => "FARGATE"
      revision:                            "13" => <computed>
      task_role_arn:                       "arn:aws:iam::012345678910:role/ecsTaskExecutionRole" => "arn:aws:iam::012345678910:role/ecsTaskExecutionRole"


Plan: 1 to add, 0 to change, 1 to destroy.

------------------------------------------------------------------------

Note: You didn't specify an "-out" parameter to save this plan, so Terraform
can't guarantee that exactly these actions will be performed if
"terraform apply" is subsequently run.
terraform apply 結果
 > terraform apply

省略

  Enter a value: yes

aws_ecs_task_definition.maint_test_task_definition: Destroying... (ID: maint_test_task_definition)
aws_ecs_task_definition.maint_test_task_definition: Destruction complete after 1s
aws_ecs_task_definition.maint_test_task_definition: Creating...
  arn:                                 "" => "<computed>"
  container_definitions:               "" => "[{\"cpu\":256,\"environment\":[{\"name\":\"API_ENV\",\"value\":\"develop\"},{\"name\":\"MYSQL_ENV\",\"value\":\"mysql-dev\"}],\"essential\":true,\"image\":\"nginx:alpine\",\"logConfiguration\":{\"logDriver\":\"awslogs\",\"options\":{\"awslogs-group\":\"/ecs/maint-test\",\"awslogs-region\":\"us-west-2\",\"awslogs-stream-prefix\":\"ecs\"},\"secretOptions\":null},\"memory\":512,\"name\":\"nginx\",\"network_mode\":\"awsvpc\",\"portMappings\":[{\"containerPort\":80,\"hostPort\":80,\"protocol\":\"tcp\"}]}]"
  cpu:                                 "" => "1024"
  execution_role_arn:                  "" => "arn:aws:iam::012345678910:role/ecsTaskExecutionRole"
  family:                              "" => "maint_test_task_definition"
  memory:                              "" => "2048"
  network_mode:                        "" => "awsvpc"
  requires_compatibilities.#:          "" => "1"
  requires_compatibilities.3072437307: "" => "FARGATE"
  revision:                            "" => "<computed>"
  task_role_arn:                       "" => "arn:aws:iam::012345678910:role/ecsTaskExecutionRole"
aws_ecs_task_definition.maint_test_task_definition: Creation complete after 2s (ID: maint_test_task_definition)

Apply complete! Resources: 1 added, 0 changed, 1 destroyed.
コンソールで確認をすると、maint_test_task_definition:13のrevisionが削除されてmaint_test_task_definition:14が新しく作成されてしまっています。
古いrevisionが削除されない方法
下記コマンドでstateファイルでタスク定義を管理しないようにします。リソースは削除されないので安心してください。あくまでterraformの管理下から外すだけです。
こちらのgithubのやりとりを参考にさせていただきました。
https://github.com/terraform-providers/terraform-provider-aws/issues/258#issuecomment-460981864
> terraform state rm aws_ecs_task_definition.maint_test_task_definition
1 items removed.
Item removal successful.
タスク定義をterraformの管理から外した状態でapplyすると、新しいrevisionで更新したタスクが作成されて、古いrevisionも削除されないで残しておくことができました。
container_definitions.jsonに環境変数を削除
今回は先程増やした環境変数を削除する変更を加えてみます。
> cat container_definitions.json
[
  {
    "name": "nginx",
    "image": "nginx:alpine",
    "cpu": 256,
    "memory": 512,
    "essential": true,
    "network_mode": "awsvpc",
    "portMappings": [
      {
        "hostPort": 80,
        "protocol": "tcp",
        "containerPort": 80
      }
    ],
    "logConfiguration": {
        "logDriver": "awslogs",
        "secretOptions": null,
        "options": {
            "awslogs-group": "/ecs/maint-test",
            "awslogs-region": "us-west-2",
            "awslogs-stream-prefix": "ecs"
        }
    },
    "environment": [
      {
        "name": "API_ENV",
        "value": "develop"
      }
    ]
  }
]
terraform plan 結果
destroyがでなくなり、createのみとなりました。
> terraform plan

省略

------------------------------------------------------------------------

An execution plan has been generated and is shown below.
Resource actions are indicated with the following symbols:
  + create

Terraform will perform the following actions:

  + aws_ecs_task_definition.maint_test_task_definition
      id:                                  <computed>
      arn:                                 <computed>
      container_definitions:               "[{\"cpu\":256,\"environment\":[{\"name\":\"API_ENV\",\"value\":\"develop\"}],\"essential\":true,\"image\":\"nginx:alpine\",\"logConfiguration\":{\"logDriver\":\"awslogs\",\"options\":{\"awslogs-group\":\"/ecs/maint-test\",\"awslogs-region\":\"us-west-2\",\"awslogs-stream-prefix\":\"ecs\"},\"secretOptions\":null},\"memory\":512,\"name\":\"nginx\",\"network_mode\":\"awsvpc\",\"portMappings\":[{\"containerPort\":80,\"hostPort\":80,\"protocol\":\"tcp\"}]}]"
      cpu:                                 "1024"
      execution_role_arn:                  "arn:aws:iam::012345678910:role/ecsTaskExecutionRole"
      family:                              "maint_test_task_definition"
      memory:                              "2048"
      network_mode:                        "awsvpc"
      requires_compatibilities.#:          "1"
      requires_compatibilities.3072437307: "FARGATE"
      revision:                            <computed>
      task_role_arn:                       "arn:aws:iam::012345678910:role/ecsTaskExecutionRole"


Plan: 1 to add, 0 to change, 0 to destroy.

------------------------------------------------------------------------

Note: You didn't specify an "-out" parameter to save this plan, so Terraform
can't guarantee that exactly these actions will be performed if
"terraform apply" is subsequently run.
terraform apply 結果
こちらでもdestroyが出ずに、createのみです。
> terraform apply

省略

  Enter a value: yes

aws_ecs_task_definition.maint_test_task_definition: Creating...
  arn:                                 "" => "<computed>"
  container_definitions:               "" => "[{\"cpu\":256,\"environment\":[{\"name\":\"API_ENV\",\"value\":\"develop\"}],\"essential\":true,\"image\":\"nginx:alpine\",\"logConfiguration\":{\"logDriver\":\"awslogs\",\"options\":{\"awslogs-group\":\"/ecs/maint-test\",\"awslogs-region\":\"us-west-2\",\"awslogs-stream-prefix\":\"ecs\"},\"secretOptions\":null},\"memory\":512,\"name\":\"nginx\",\"network_mode\":\"awsvpc\",\"portMappings\":[{\"containerPort\":80,\"hostPort\":80,\"protocol\":\"tcp\"}]}]"
  cpu:                                 "" => "1024"
  execution_role_arn:                  "" => "arn:aws:iam::012345678910:role/ecsTaskExecutionRole"
  family:                              "" => "maint_test_task_definition"
  memory:                              "" => "2048"
  network_mode:                        "" => "awsvpc"
  requires_compatibilities.#:          "" => "1"
  requires_compatibilities.3072437307: "" => "FARGATE"
  revision:                            "" => "<computed>"
  task_role_arn:                       "" => "arn:aws:iam::012345678910:role/ecsTaskExecutionRole"
aws_ecs_task_definition.maint_test_task_definition: Creation complete after 1s (ID: maint_test_task_definition)

Apply complete! Resources: 1 added, 0 changed, 0 destroyed.
コンソールからも確認してみます。
先程は、maint_test_task_definition:13が削除されてmaint_test_task_definition:14が作成されましたが、今回は、maint_test_task_definition:14は削除されず、maint_test_task_definition:15が作成されました。
最後に
最後まで読んでいただきありがとうございました。
今回はじめてterraform state rm コマンド使いましたが、このコマンドでまたterraformの構成管理の仕様の理解が深まりました。
変更がある度に、state rm コマンドを打つのはスマートじゃないと思うので、何かいい方法はないかと探しています。
知っている方いたらおしえてください!もしわかれば追記するか、新たに記事にさせていただきます。task_definitionの内容に変更がなければ、そのままの状態を維持し、変更があった場合のみ、新しいrevisionで追加してくれるようになったらいいなと思います。
参考リンク
「Resource: aws_ecs_task_definition」
https://www.terraform.io/docs/providers/aws/r/ecs_task_definition.html
「aws_ecs_task_definition overwrites previous revision」
https://github.com/terraform-providers/terraform-provider-aws/issues/258
「Optionally skip destroy previous aws_ecs_task_definition resource 」


- 投稿日:2019-06-07T15:26:47+09:00
Ingressでクロスネームスペースでのロードバランシング
TL;DR
複数のnamespaceのpodsたちにむけてを1つのロードバランサで振り分けるのはめんどくさいって話です。
ExternalNameを使えばできる。ことの発端
そんなにトラフィックはないけど機能ごとにnamespaceを分けておこうかなと思って、バッチやAPPのPodsやServiceのnamespaceを分けてデプロイしようかなと思った。
いざ、Ingressの設定をしようと思ったら、backendにnamespace書くところないじゃんとなった。このspec.rules.http.pathごとにnamespaceを切っていた。
apiVersion: extensions/v1beta1
kind: Ingress
metadata:
  name: lb
  annotations:
    #nginx.ingress.kubernetes.io/rewrite-target: /
    nginx.ingress.kubernetes.io/ssl-redirect: "false"
    nginx.ingress.kubernetes.io/enable-cors: "true"
    nginx.ingress.kubernetes.io/cors-allow-methods: "PUT, GET, POST, OPTIONS"
    nginx.ingress.kubernetes.io/cors-allow-origin: "*"
spec:
  rules:
    - host: api.192.168.99.107.nip.io
      http:
        paths:
          - path: /dapps
            backend:
              serviceName: dapps-svc
              servicePort: 80
          - path: /gas
            backend:
              serviceName: gas-svc
              servicePort: 80
          - path: /miner
            backend:
              serviceName: miner-svc
              servicePort: 80
もしかしてkubens的な感じで書けばいけるのかなと思ったけど、serviceNameに「.」を入れるとエラーを吐いてくれてデプロイすらできない。(dapps-svc.namespace1とかってしても無駄。)
* spec.rules[0].http.backend.serviceName: Invalid value: "dapps-svc.namespace1": a DNS-1035 label must consist of lower case alphanumeric characters or '-', start with an alphabetic character, and end with an alphanumeric character (e.g. 'my-name', or 'abc-123', regex used for validation is '[a-z]([-a-z0-9]*[a-z0-9])?')ググるマン
とりあえず公式のドキュメントを見ると、
https://kubernetes.io/docs/concepts/services-networking/ingress/
https://kubernetes.io/docs/reference/generated/kubernetes-api/v1.14/#ingress-v1beta1-networking-k8s-ioその辺の記載はない。
とりあえず今回は切ったnamespaceを全部Ingress側に寄せて(default)デプロイして回避することにした。そんな馬鹿な納得できない。
ちゃんと検証してみようと思ってこんな感じに環境を構築した。http HeaderのServerとかで振り分け確認をすればいいや。
(minikubeでやりました。)
conf
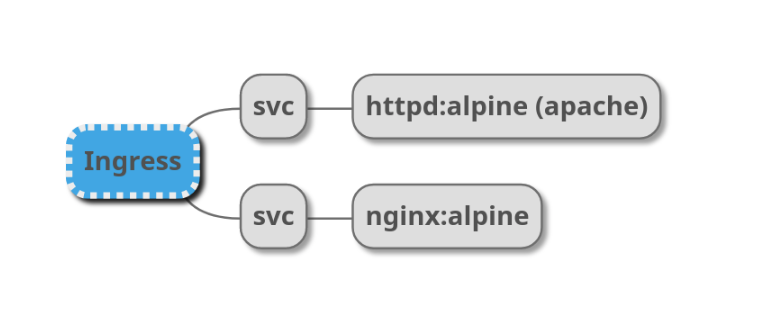
とりあえず全部同一namespaceで動くものを。
# namespace
apiVersion: v1
kind: Namespace
metadata:
  name: ns-test
---
# ingress
apiVersion: extensions/v1beta1
kind: Ingress
metadata:
  name: lb
  namespace: ns-test
  annotations:
    nginx.ingress.kubernetes.io/rewrite-target: /
    nginx.ingress.kubernetes.io/ssl-redirect: "false"
spec:
  rules:
    - host: ns-test.192.168.99.107.nip.io
      http:
        paths:
          - path: /apache
            backend:
              serviceName: apache-svc
              servicePort: 80
          - path: /nginx
            backend:
              serviceName: nginx-svc
              servicePort: 80
          - path: /
            backend:
              serviceName: blackhole
              servicePort: 80
---
# apache
apiVersion: v1
kind: Service
metadata:
  name: apache-svc
  namespace: ns-test
spec:
  ports:
  - port: 80
    protocol: TCP
    targetPort: 80
  selector:
    app: httpd
  type: NodePort
---
apiVersion: apps/v1
kind: Deployment
metadata:
  name: httpd
  namespace: ns-test
spec:
  replicas: 1
  selector:
    matchLabels:
      app: httpd
  template:
    metadata:
      labels:
        app: httpd
    spec:
      containers:
      - image: httpd:alpine
        name: httpd
        ports:
        - containerPort: 80
---
# nginx
apiVersion: v1
kind: Service
metadata:
  name: nginx-svc
  namespace: ns-test
spec:
  ports:
  - port: 80
    protocol: TCP
    targetPort: 80
  selector:
    app: nginx
  type: NodePort
---
apiVersion: apps/v1
kind: Deployment
metadata:
  name: nginx
  namespace: ns-test
spec:
  replicas: 1
  selector:
    matchLabels:
      app: nginx
  template:
    metadata:
      labels:
        app: nginx
    spec:
      containers:
      - image: nginx:alpine
        name: nginx
        ports:
        - containerPort: 80
デフォルトnamespaceを切り替えて
❯ kubens ns-test
Context "vm" modified.
Active namespace is "ns-test".
こんな感じ
❯ kubectl get all,ingress -o wide
NAME                         READY   STATUS    RESTARTS   AGE   IP           NODE       NOMINATED NODE   READINESS GATES
pod/httpd-55c79f4cb-zrzdc    1/1     Running   0          29s   172.17.0.2   minikube   <none>           <none>
pod/nginx-66d89c74cb-l7gdv   1/1     Running   0          29s   172.17.0.3   minikube   <none>           <none>

NAME                 TYPE       CLUSTER-IP      EXTERNAL-IP   PORT(S)        AGE   SELECTOR
service/apache-svc   NodePort   10.101.246.95   <none>        80:32141/TCP   29s   app=httpd
service/nginx-svc    NodePort   10.97.137.34    <none>        80:30783/TCP   29s   app=nginx

NAME                    READY   UP-TO-DATE   AVAILABLE   AGE   CONTAINERS   IMAGES         SELECTOR
deployment.apps/httpd   1/1     1            1           29s   httpd        httpd:alpine   app=httpd
deployment.apps/nginx   1/1     1            1           29s   nginx        nginx:alpine   app=nginx

NAME                               DESIRED   CURRENT   READY   AGE   CONTAINERS   IMAGES         SELECTOR
replicaset.apps/httpd-55c79f4cb    1         1         1       29s   httpd        httpd:alpine   app=httpd,pod-template-hash=55c79f4cb
replicaset.apps/nginx-66d89c74cb   1         1         1       29s   nginx        nginx:alpine   app=nginx,pod-template-hash=66d89c74cb

NAME                    HOSTS                           ADDRESS   PORTS   AGE
ingress.extensions/lb   ns-test.192.168.99.107.nip.io             80      29s
動いてるかな?
❯ curl http://ns-test.192.168.99.107.nip.io/apache
<html><body><h1>It works!</h1></body></html>

~
❯ curl http://ns-test.192.168.99.107.nip.io/nginx
<!DOCTYPE html>
<html>
<head>
<title>Welcome to nginx!</title>
問題なさそう。本当はヘッダーで判別したかったけど、Ingressのnginxで上書きされてしまっていたのでbodyで。
namespace変えてみる。
podsのapacheのnamespaceをns-test-podsとしてみよう。
IngressのTargetは変えていないので404になるはず。
kubectl delete all --allとかで一回きれいにしてからやらないと前のnamespaceのpodsが残るよ。namespace追加とServiceとPod変更
6a7,12
> # namespace
> apiVersion: v1
> kind: Namespace
> metadata:
>   name: ns-test-pods
> ---
39c45
<   namespace: ns-test
---
>   namespace: ns-test-pods
53c59
<   namespace: ns-test
---
>   namespace: ns-test-pods
❯ curl http://ns-test.192.168.99.107.nip.io/nginx <!DOCTYPE html> <html> <head> <title>Welcome to nginx!</title> <style> body { ~snip; ❯ curl http://ns-test.192.168.99.107.nip.io/apache <html> <head><title>503 Service Temporarily Unavailable</title></head> ~snip; ❯ curl http://ns-test.192.168.99.107.nip.io/apache -I HTTP/1.1 503 Service Temporarily Unavailable Server: nginx/1.15.9 Date: Fri, 07 Jun 2019 04:18:20 GMT Content-Type: text/html Content-Length: 197 Connection: keep-alive503になった、リバプロ(Ingress)が吐いてるから正しいね。
serviceName変えてみる。
29c29
<               serviceName: apache-svc
---
>               serviceName: apache-svc.ns-test-pods
違うだろボケナス!って言われる。
The Ingress "lb" is invalid: spec.rules[0].http.backend.serviceName: Invalid value: "apache-svc.ns-test-pods": a DNS-1035 label must consist of lower case alphanumeric characters or '-', start with an alphabetic c
haracter, and end with an alphanumeric character (e.g. 'my-name',  or 'abc-123', regex used for validation is '[a-z]([-a-z0-9]*[a-z0-9])?')
ExternalNameの登場
ExternalNameっていうtypeのServiceがあって、別名をつけることができる。
そもそも、k8sのpodsやらserviceやらは名前がついていて、<名前>..<タイプ>.cluster.local で名前解決できるようになっている。
ここで別のnamespaceのapache-svcをこのServiceで紐づけてやる。わかりやすい?ように、Ingress側のターゲットを
serviceName: apache-svc-koituとして下のServiceを挟む。apiVersion: v1 kind: Service metadata: name: apache-svc-koitu namespace: ns-test spec: type: ExternalName externalName: apache-svc.ns-test-pods.svc.cluster.localこうすると、
❯ curl http://ns-test.192.168.99.107.nip.io/apache
<html><body><h1>It works!</h1></body></html>
ちゃんとアクセスできたまん。
最終的にこんな感じになった。
# namespace
apiVersion: v1
kind: Namespace
metadata:
  name: ns-test
---
# namespace
apiVersion: v1
kind: Namespace
metadata:
  name: ns-test-pods
---
# ingress
apiVersion: extensions/v1beta1
kind: Ingress
metadata:
  name: lb
  namespace: ns-test
  annotations:
    nginx.ingress.kubernetes.io/rewrite-target: /
    nginx.ingress.kubernetes.io/ssl-redirect: "false"
spec:
  rules:
    - host: ns-test.192.168.99.107.nip.io
      http:
        paths:
          - path: /apache
            backend:
              serviceName: apache-svc-koitu
              servicePort: 80
          - path: /nginx
            backend:
              serviceName: nginx-svc
              servicePort: 80
          - path: /
            backend:
              serviceName: blackhole
              servicePort: 80
---
apiVersion: v1
kind: Service
metadata:
  name: apache-svc-koitu
  namespace: ns-test
spec:
  type: ExternalName
  externalName: apache-svc.ns-test-pods.svc.cluster.local
---
# apache
apiVersion: v1
kind: Service
metadata:
  name: apache-svc
  namespace: ns-test-pods
spec:
  ports:
  - port: 80
    protocol: TCP
    targetPort: 80
  selector:
    app: httpd
  type: NodePort
---
apiVersion: apps/v1
kind: Deployment
metadata:
  name: httpd
  namespace: ns-test-pods
spec:
  replicas: 1
  selector:
    matchLabels:
      app: httpd
  template:
    metadata:
      labels:
        app: httpd
    spec:
      containers:
      - image: httpd:alpine
        name: httpd
        ports:
        - containerPort: 80
---
# nginx
apiVersion: v1
kind: Service
metadata:
  name: nginx-svc
  namespace: ns-test
spec:
  ports:
  - port: 80
    protocol: TCP
    targetPort: 80
  selector:
    app: nginx
  type: NodePort
---
apiVersion: apps/v1
kind: Deployment
metadata:
  name: nginx
  namespace: ns-test
spec:
  replicas: 1
  selector:
    matchLabels:
      app: nginx
  template:
    metadata:
      labels:
        app: nginx
    spec:
      containers:
      - image: nginx:alpine
        name: nginx
        ports:
        - containerPort: 80
こんなイメージ
目的は果たせた。
まとめ
ALBを1個増やすとさんぜんえんだからね!ExternalName使っていって良いと思います。
ただし、namespaceを分けすぎるのは良くない。kubectl get xxxで見るときにツライことになる。
本当はIngressまで分けたほうがいいけど、そこまでしなくても・・・みたいなときに使うようにしたいと思います。参考: )
https://github.com/kubernetes/ingress-nginx/issues/2971
https://kubernetes.io/docs/concepts/services-networking/dns-pod-service/
https://qiita.com/ryicoh/items/24e5cf4ffdb6cc8dbbdf (この記事そのまんまであった)

- 投稿日:2019-06-07T14:15:15+09:00
ブラウザから S3 へダイレクトアップロード
はじめまして、streampackチームのminsuです。
やりたいこと
S3へファイルをアップロードする際に、Railsサーバを通すことなくブラウザからS3へのダイレクトアップロードを実装してみます。
ブラウザからS3にファイルを直接アップロードすることにより、余分な負荷を削減できるメリットがあります。
また、Railsのgem aws-sdkを利用して生成したpresigned POSTを利用することでブラウザにaws credentialsを持たせる事なくアップロードを行えます。AWSリソースの準備
まず、AWSアクセスキーを作成してACCESS_KEY_ID, SECRET_ACCESS_KEYを取得してください。
次にS3のバケットの作成します。
作成したバケットのCORSの設定を行い、外部からのPOSTを許可します。<?xml version="1.0" encoding="UTF-8"?> <CORSConfiguration xmlns="http://s3.amazonaws.com/doc/2006-03-01/"> <CORSRule> <AllowedOrigin>*</AllowedOrigin> <AllowedMethod>GET</AllowedMethod> <AllowedMethod>PUT</AllowedMethod> <AllowedMethod>POST</AllowedMethod> <MaxAgeSeconds>3000</MaxAgeSeconds> <AllowedHeader>*</AllowedHeader> </CORSRule> </CORSConfiguration>AllowedOrigin、AllowedHeaderはワイルドカードを設定しましたが、環境に合わせて変更してください。
Railsでpresigned POSTを返すアクションを設定
まずは環境変数に必要な値を持たせておきます。
.envAWS_ACCESS_KEY_ID=your-key-id AWS_SECRET_ACCESS_KEY=your-secret-key BUCKET=your-bucket-name次にGemfileに
Gemfilegem `aws-sdk', '~3'を追加して
$ bundle installそして環境変数に保存した値を使ってS3のインスタンスを作成します。
config/initializers/aws.rbAws.config.update({ region: 'ap-northeast-1', credentials: Aws::Credentials.new(ENV['AWS_ACCESS_KEY_ID'], ENV['AWS_SECRET_ACCESS_KEY']), }) S3_BUCKET = Aws::S3::Resource.new.bucket(ENV['S3_BUCKET'])GET 要求に対して、 ブラウザから S3 へ POST するために必要な情報を返すアクションを実装します。
今回は video モデルのコントローラーにアクションを追加しました。VideosController < ApplicationController def upload filename = params[:filename] filetype = params[:filetype] post = S3_BUCKET.presigned_post( key: "upload_video/#{filename}", acl: 'public-read', content_type: filetype, metadata: { 'original-filename' => filename } }) render json: {url: post.url,fields: post.fields} end endバケット内の保存先は
key:で指定するので、この値をDBに保存してモデルと紐づけることが可能です。GET リクエストで filename,filetype パラメータ受け取ったuploadアクションは以下のpresigned POSTとして次のjsonを返します。
{
    "url": "https://your-bucket-name.s3.ap-northeast-1.amazonaws.com",
    "fields": {
        "key": "upload_video/test.mp4",
        "acl": "public-read",
        "Content-Type": "video/mp4",
        "x-amz-meta-original-filename": "test.mp4",
        "policy": "eyJleHBpc...",
        "x-amz-credential": "oiMjAxO...",
        "x-amz-algorithm": "AWS4-HMAC-SHA256",
        "x-amz-date": "20190607T004657Z",
        "x-amz-signature": "mF0aW9uIj..."
    }
}
ブラウザページの作成
動作としては
- RailsにGETリクエストを送ってpresigned POSTを受け取る
- presigned POSTを使ってS3へPOST
- 実装はfetch api
です
<!DOCTYPE html>
<html>
  <head>
    <title>S3 POST Form</title>
    <meta http-equiv="Content-Type" content="text/html; charset=UTF-8" />
  </head>

  <body>
    <input type="file" id="up_file">
    <br><input type="button" id="send" onclick="upload();" value="アップロード">
    <!-- fetch api -->
    <script>
      function upload(){
        const up_files = document.getElementById('up_file');
        const up_file = up_files.files[0];
        if (up_files.value === "") {
          return false;
        }
        const url= 'http://localhost:3000/api/v1/video_upload/get_post_fields?filename=' + up_file.name + "&filetype=" + up_file.type;
        // Rails に GET
        console.log("GET 開始");
        fetch(
          url,
          {method: 'GET'}
        ).then(response => {
          if(response.ok){
            console.log("GET 成功");
            return response.json();
          }
        }).then((data)=>{
          formdata = new FormData()
          for (key in data.fields) {
            formdata.append(key,data.fields[key]);
          }
          formdata.append("file",up_file);
          const headers = {
          "accept": "multipart/form-data"
          }
          // S3 に POST
          console.log("POST 開始");
          fetch(
            data.url,
            {
              method: 'POST',
              headers,
              body: formdata
            }
          ).then((response) => {
            if(response.ok){
              console.log("POST 成功");
              return response.text();
            }
          })
        });
      }
    </script>
  </body>
</html>
これでブラウザからのS3へのダイレクトアップロードを実装することができました。
参考
- 投稿日:2019-06-07T14:15:15+09:00
ブラウザからS3へのダイレクトアップロード
はじめまして、streampackチームのminsuです。
やりたいこと
S3へファイルをアップロードする際に、Railsサーバを通すことなくブラウザからS3へのダイレクトアップロードを実装してみます。
ブラウザからS3にファイルを直接アップロードすることにより、余分な負荷を削減できるメリットがあります。
また、Railsのgem aws-sdkを利用して生成したpresigned POSTを利用することでブラウザにaws credentialsを持たせる事なくアップロードを行えます。AWSリソースの準備
まず、AWSアクセスキーを作成してACCESS_KEY_ID, SECRET_ACCESS_KEYを取得してください。
次にS3のバケットの作成します。
作成したバケットのCORSの設定を行い、外部からのPOSTを許可します。<?xml version="1.0" encoding="UTF-8"?> <CORSConfiguration xmlns="http://s3.amazonaws.com/doc/2006-03-01/"> <CORSRule> <AllowedOrigin>*</AllowedOrigin> <AllowedMethod>GET</AllowedMethod> <AllowedMethod>PUT</AllowedMethod> <AllowedMethod>POST</AllowedMethod> <MaxAgeSeconds>3000</MaxAgeSeconds> <AllowedHeader>*</AllowedHeader> </CORSRule> </CORSConfiguration>AllowedOrigin、AllowedHeaderはワイルドカードを設定しましたが、環境に合わせて変更してください。
Railsでpresigned POSTを返すアクションを設定
まずは環境変数に必要な値を持たせておきます。
.envAWS_ACCESS_KEY_ID=your-key-id AWS_SECRET_ACCESS_KEY=your-secret-key BUCKET=your-bucket-name次にGemfileに
Gemfilegem `aws-sdk', '~3'を追加して
$ bundle installそして環境変数に保存した値を使ってS3のインスタンスを作成します。
config/initializers/aws.rbAws.config.update({ region: 'ap-northeast-1', credentials: Aws::Credentials.new(ENV['AWS_ACCESS_KEY_ID'], ENV['AWS_SECRET_ACCESS_KEY']), }) S3_BUCKET = Aws::S3::Resource.new.bucket(ENV['S3_BUCKET'])GET 要求に対して、 ブラウザから S3 へ POST するために必要な情報を返すアクションを実装します。
今回は video モデルのコントローラーにアクションを追加しました。VideosController < ApplicationController def upload filename = params[:filename] filetype = params[:filetype] post = S3_BUCKET.presigned_post( key: "upload_video/#{filename}", acl: 'public-read', content_type: filetype, metadata: { 'original-filename' => filename } }) render json: {url: post.url,fields: post.fields} end endバケット内の保存先は
key:で指定するので、この値をDBに保存してモデルと紐づけることが可能です。GET リクエストで filename,filetype パラメータ受け取ったuploadアクションは以下のpresigned POSTとして次のjsonを返します。
{
    "url": "https://your-bucket-name.s3.ap-northeast-1.amazonaws.com",
    "fields": {
        "key": "upload_video/test.mp4",
        "acl": "public-read",
        "Content-Type": "video/mp4",
        "x-amz-meta-original-filename": "test.mp4",
        "policy": "eyJleHBpc...",
        "x-amz-credential": "oiMjAxO...",
        "x-amz-algorithm": "AWS4-HMAC-SHA256",
        "x-amz-date": "20190607T004657Z",
        "x-amz-signature": "mF0aW9uIj..."
    }
}
ブラウザページの作成
動作としては
- RailsにGETリクエストを送ってpresigned POSTを受け取る
- presigned POSTを使ってS3へPOST
- 実装はfetch api
です
<!DOCTYPE html>
<html>
  <head>
    <title>S3 POST Form</title>
    <meta http-equiv="Content-Type" content="text/html; charset=UTF-8" />
  </head>

  <body>
    <input type="file" id="up_file">
    <br><input type="button" id="send" onclick="upload();" value="アップロード">
    <!-- fetch api -->
    <script>
      function upload(){
        const up_files = document.getElementById('up_file');
        const up_file = up_files.files[0];
        if (up_files.value === "") {
          return false;
        }
        const url= 'http://localhost:3000/api/v1/video_upload/get_post_fields?filename=' + up_file.name + "&filetype=" + up_file.type;
        // Rails に GET
        console.log("GET 開始");
        fetch(
          url,
          {method: 'GET'}
        ).then(response => {
          if(response.ok){
            console.log("GET 成功");
            return response.json();
          }
        }).then((data)=>{
          formdata = new FormData()
          for (key in data.fields) {
            formdata.append(key,data.fields[key]);
          }
          formdata.append("file",up_file);
          const headers = {
          "accept": "multipart/form-data"
          }
          // S3 に POST
          console.log("POST 開始");
          fetch(
            data.url,
            {
              method: 'POST',
              headers,
              body: formdata
            }
          ).then((response) => {
            if(response.ok){
              console.log("POST 成功");
              return response.text();
            }
          })
        });
      }
    </script>
  </body>
</html>
これでブラウザからのS3へのダイレクトアップロードを実装することができました。
参考
- 投稿日:2019-06-07T14:09:25+09:00
EC2へ自動テスト、デプロイをCircleCIで実現する(Django)
はじめに
AWSのEC2インスタンスにSSH接続→
git pullして手動でデプロイしていたのですが、CircleCIを使用して自動デプロイする手順をまとめました。実現したいこと
GitHubにmasterブランチをpushした際に、CircleCIを動かしてDjangoのUnittestを実施。
テストにパスした際は、そのままEC2インスタンスにSSH接続してgit pullして最新のコードを反映させる。
なお、Djangoのアプリはdocker上で動かしています(docker-compose up -d)。
下記リンクがdockerの環境構成です。
Django+Nginx+MySQLの開発環境をDockerで構築するEC2インスタンス
事前に
gitdockerdocker-composeをインストールしておきます。
さらに、後述しますCircleCI用の公開鍵も記述します。
手順は下記にまとめました。
EC2インスタンスにgit,docker,docker-composeを導入、公開鍵の登録(CircleCI用)CircleCI
対象のGitHubリポジトリをCircleCIに登録しておきます。
以下を実行します。
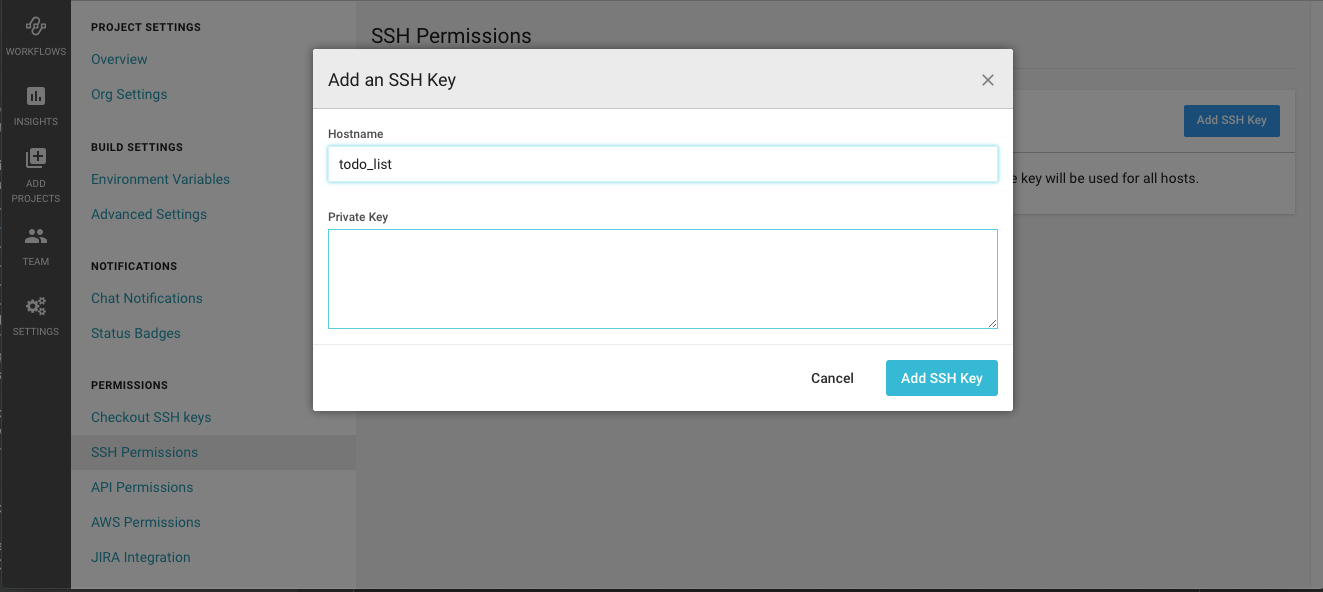
1. 秘密鍵の登録
2. EC2インスタンスのホスト名、ドメイン名の登録
参照記事:Circle CIでwebサイトを自動デプロイ秘密鍵の登録
CircleCIに使用できる鍵認証は形式が決まっていますので、それに従い作成します。
フォルダを作成し、そこに作成します。
参照:Adding an SSH Key to CircleCI# 鍵の作成 $ mkdir ssh $ ssh-keygen -m pem Generating public/private rsa key pair. Enter file in which to save the key (/Users/kenkono/.ssh/id_rsa): sshCircleCIのコンソール画面で作成した秘密鍵を登録します。
Hostnameには任意の文字を記入します。
EC2インスタンスのホスト名、ドメイン名の登録
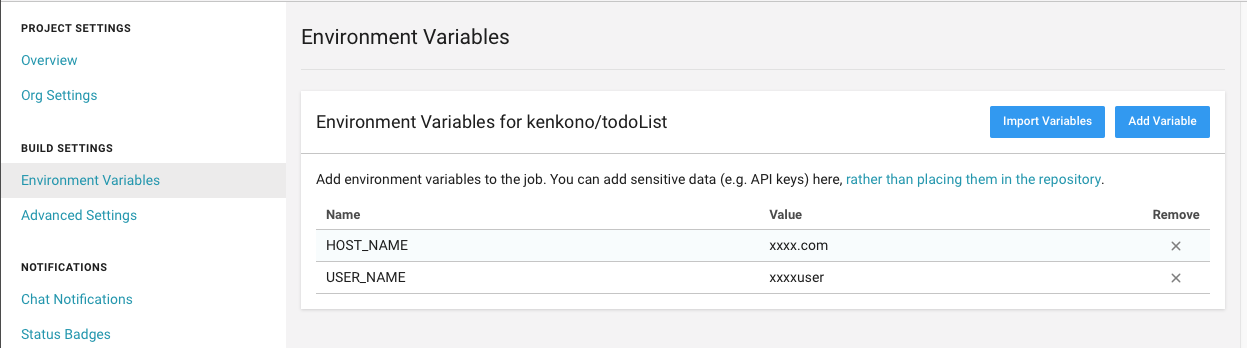
環境変数として登録します。
EC2の場合、ec2-user@ドメイン名かと思いますので、以下登録します。
HOST_NAME = ドメイン名
USER_NAME = ec2-user
CircleCIの実行コード
.circleci/config.ymlに記載したコードが、対象のGitHubレポジトリにpushされた際に実行されます。
以下記述内容です。
docker-composeを実行したいので、CircleCIでは仮想マシンであるcircleci/classic:edgeを指定します。config.yml# circleCIのバージョン指定 version: 2 jobs: build: machine: image: circleci/classic:edge steps: # Djangoのテストを実行 - checkout - run: name: docker-compose up command: docker-compose up -d - run: name: sleep for launch db to migrate at Django command: sleep 10 - run: name: migrate command: docker-compose run python ./manage.py migrate - run: name: test command: docker-compose run python ./manage.py test - run: name: docker-compose down command: docker-compose down # EC2にSSH接続し、デプロイを実行 deploy: machine: image: circleci/classic:edge steps: - checkout # CircleCIに登録した秘密鍵を呼び出す。 - add_ssh_keys: - run: ssh ${USER_NAME}@${HOST_NAME} 'cd todoList && git pull && docker-compose run python ./manage.py migrate' # テストが成功した場合のみ、deployを実行するようにします。 workflows: version: 2 build_and_deploy: jobs: - build - deploy: requires: - build # masterブランチがpushされた場合のみdeployするようにする。 filters: branches: only: master実行
git pushで一連の記述が動作します。参照元
- 投稿日:2019-06-07T12:58:48+09:00
AWSのrootアカウントへ多要素認証 (MFA) を1Passwordを使用して導入する
tl;dr
AWSのrootアカウントをセキュアなものとするために多要素認証 (MFA) を導入する
認証ツールは色々あって、Authenticatorもできるが、今回は1Passwordを使用
AWS マネジメントコンソールから、IAMへ
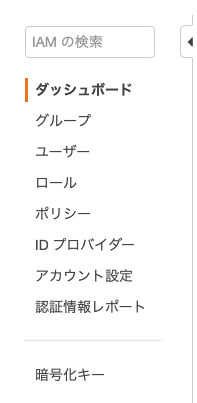
サイドバーのダッシュボードを選択
(アカウントのメニューのマイセキュリティ資格情報からも飛べるが、今回はこれで)
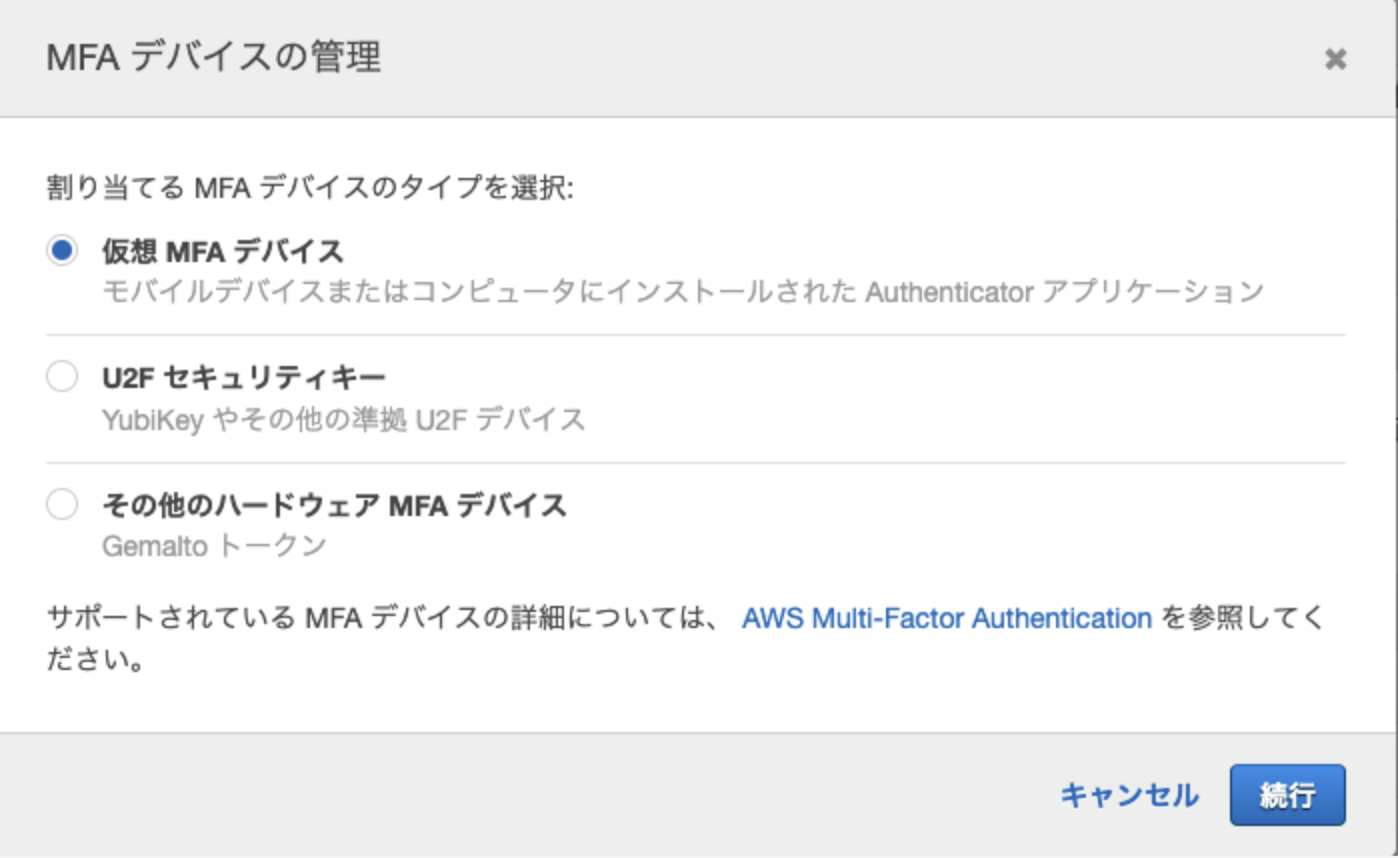
ルートアカウントのMFAを有効化タブを押し、MFAの管理を選択

仮想MFAデバイスを選択
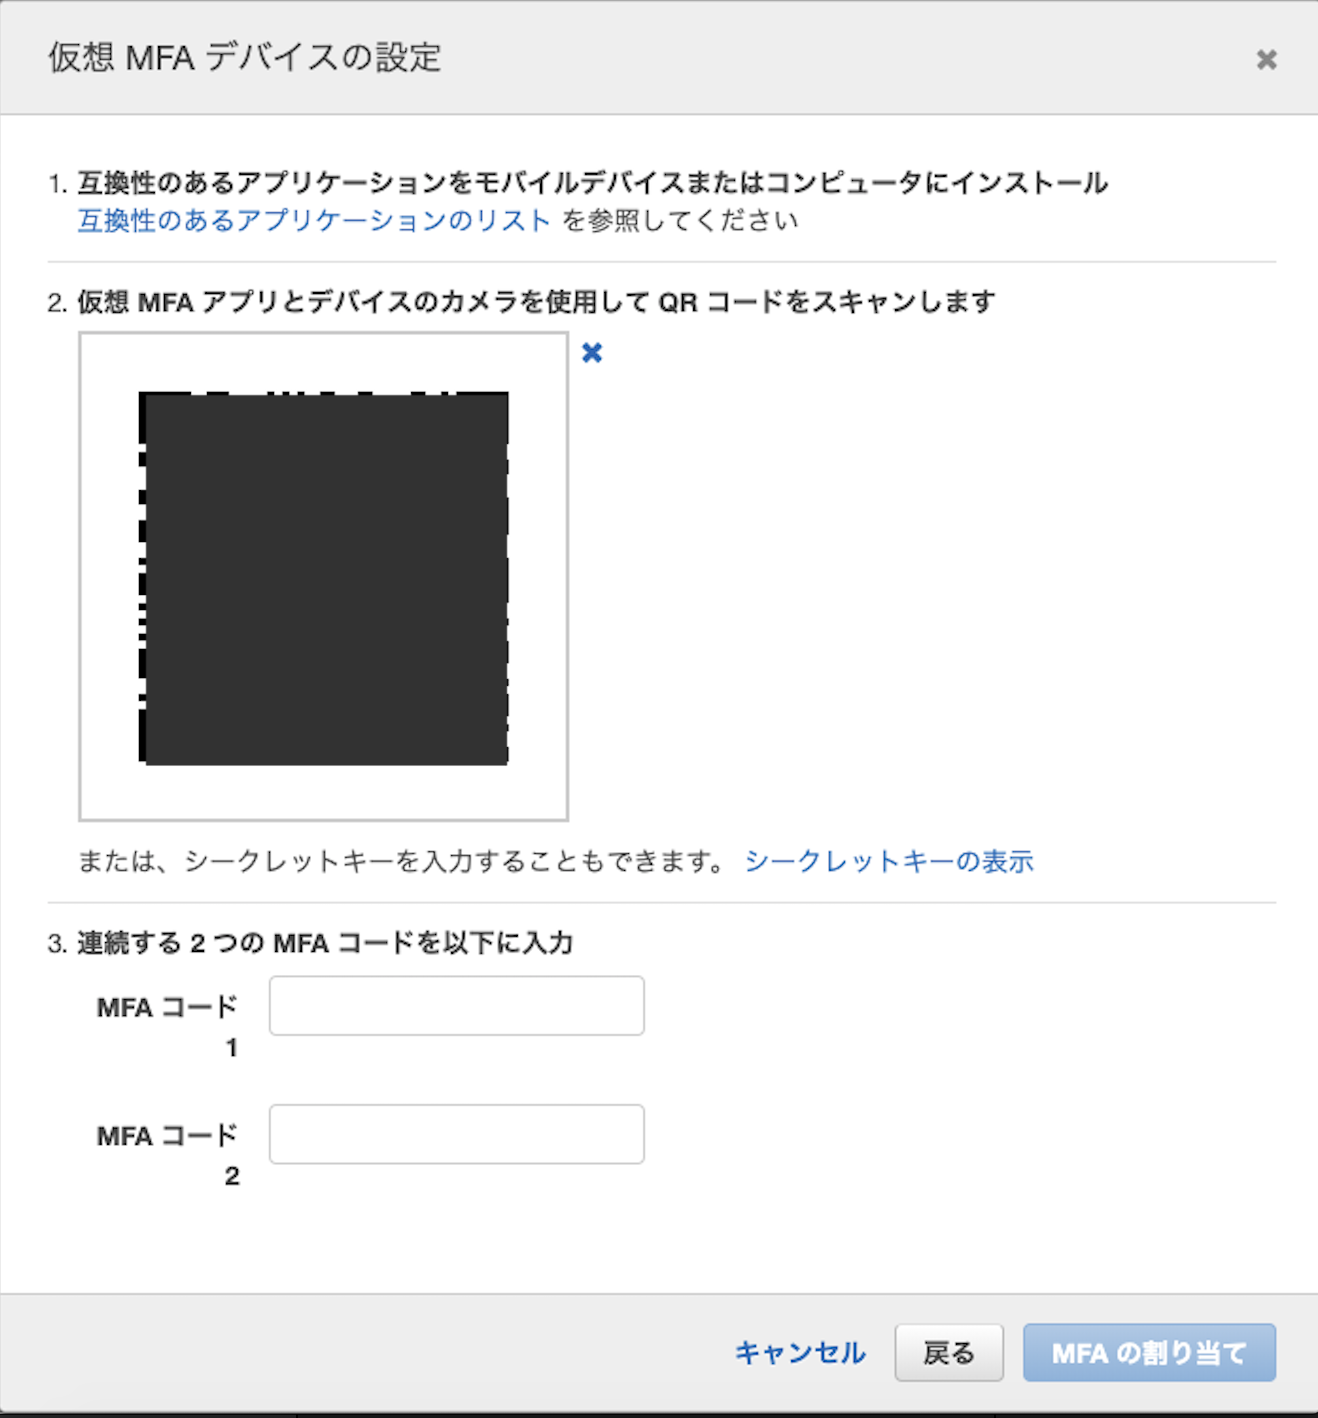
QRコードを表示する
1Passwordの設定
前提として、AWSのID・パスワードは登録済みのものとします
また、今回はmacOSの1Passwordのアプリケーションを例とします

登録済みのパスワードの上部の、
編集を選択
画面下部のセクションとラベル部分へ
セクション名は適当に、
one_time_passwordとか入れます
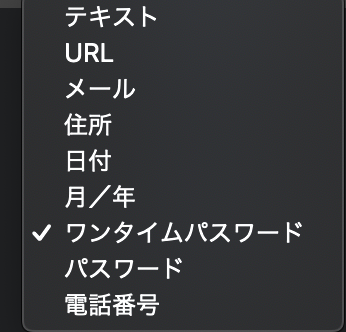
右のプルダウンから
ワンタイムパスワードを選択
こんな表示になります
小さいQRコードのボタンがあるので、それをクリック
こんな別ウインドウが出ます
ふたたびAWSへ
上で出たウインドウを
ここの上に重ねますそうすると1Passwordのラベル欄に自動的に入力されます
保存!
そうするとこんな画面が
このワンタイムパスワードを
2回分表示して
ここの
MFAコード欄に入れます
一旦ログアウトして確認
1Passwordに表示されたものを入力してログイン!


- 投稿日:2019-06-07T12:24:10+09:00
AWS LambdaでNokogiriを動かす
近々、AWS Lambdaを使って簡易的なクローラを作る予定があったので
Lambda上でNokogiriが使えるか 検証しました。開発環境
ローカルの開発環境はMac、クローラはRubyで実装します。
ポイント
クローリングに必要となるGemである「Nokogiri」はネイティブライブラリを含むGemであるため、
Mac上でビルドしてAWSへデプロイすると「cannot load such file -- nokogiri」が発生します。これを回避するため、AWS SAMを用いて雛形作成した上で、
「sam build --use-container」を実行しAmazonLinux2のDockerコンテナ上でビルドを行いました。AWS SAM CLIでHello World
AWS SAM CLIを使ってRubyのLambdaハンドラの雛形を作成します。
アプリの名前が実際に作ろうとしているクローラの名前になっていますので、適宜置き換えてください。$ sam init --runtime ruby2.5 --name sample_app $ cd sample_app $ sam build $ sam local invoke HelloWorldFunction --event event.json参考: https://aws.amazon.com/jp/about-aws/whats-new/2018/04/aws-sam-cli-releases-new-init-command/
Nokogiriのインストール
今回はLambda上でスクレイピングツールであるNokogiriを動かす必要があります。
このGemはネイティブライブラリが含まれるため、ローカル環境(今回はMac)でインストールするとLambda上でエラーとなります。が、AWS SAM CLIは以下コマンドでネイティブライブラリも含めて良い感じにビルドしてくれるコマンドを提供してくれています。便利ですね。
hello_world/Gemfilesource "https://rubygems.org" gem "httparty" gem "nokogiri" # 追記 gem "robotex" # 追記追記先はルートのGemfileではありませんので注意してください。
cannot load such file -- nokogiriが起こる原因となります。Nokogiriを使うLambdaハンドラを実装
動作確認のためLambdaハンドラの処理も修正します。
hello_world/app.rbrequire "bundler/setup" Bundler.require URL='https://www.google.com/' def lambda_handler(event:, context:) charset = nil robotex = Robotex.new robotex.allowed?(URL) robotex.delay!(URL) html = open(URL) do |f| charset = f.charset f.read end doc = Nokogiri::HTML.parse(html, nil, charset) { statusCode: 200, body: { page_title: doc.title, }.to_json } endローカルの開発環境で動作確認
ビルドして実行してみましょう。
GoogleのTOPページのタイトルが取得できました。$ sam build --use-container $ sam local invoke HelloWorldFunction --event event_file.json {"statusCode":200,"body":"{\"page_title\":\"Google\"}"}デプロイ
AWS SAM CLIを使ってデプロイします。
$ sam package --output-template-file output.yaml --s3-bucket sample_app
$ sam deploy --template-file output.yaml --stack-name sample_app --capabilities CAPABILITY_NAMED_IAM
ただし、
sam packageに--template-fileオプションを指定すると、vendor配下がアップロードされない問題が発生しました。--template-fileは設定しないようにしましょう。AWSコンソールにログインして、Lambdaを実行すると無事成功しました。
参考
https://aws.amazon.com/jp/blogs/developer/announcing-ruby-build-support-for-aws-sam-cli/

- 投稿日:2019-06-07T08:10:22+09:00
Lambda(Golang)でAPI Gatewayのクエリ文字列を使用する
はじめに
Lambda(Golang)でAPI Gatewayのクエリ文字列を使用する方法がなかなか見つからなかったので備忘録としてまとめます。
デモ
https://rjt8xm2a63.execute-api.ap-northeast-1.amazonaws.com/dev/hello?name=Naoki
{"message":"Hello, Naoki"}
TL;DR
- Lambdaのハンドラーの第2引数で
request events.APIGatewayProxyRequestを受け取るq := request.QueryStringParametersでクエリ文字列のMapを返すサンプルコード
https://github.com/oke-py/qs-demo
Serverless Frameworkを利用してデプロイする前提とします。serverless.ymlservice: qs-demo frameworkVersion: ">=1.28.0 <2.0.0" provider: name: aws runtime: go1.x # you can overwrite defaults here stage: dev region: ap-northeast-1 # you can add statements to the Lambda function's IAM Role here iamRoleStatements: - Effect: "Allow" Action: - "logs:CreateLogGroup" - "logs:CreateLogStream" - "logs:PutLogEvents" Resource: "arn:aws:logs:*:*:*" package: exclude: - ./** include: - ./bin/** functions: hello: handler: bin/hello events: - http: path: hello method: get request: parameters: querystrings: # クエリ文字列が必須ならtrue、必須でなければfalse name: truehello/main.gopackage main import ( "bytes" "context" "encoding/json" "github.com/aws/aws-lambda-go/events" "github.com/aws/aws-lambda-go/lambda" ) // Response is of type APIGatewayProxyResponse since we're leveraging the // AWS Lambda Proxy Request functionality (default behavior) // // https://serverless.com/framework/docs/providers/aws/events/apigateway/#lambda-proxy-integration type Response events.APIGatewayProxyResponse // Handler is our lambda handler invoked by the `lambda.Start` function call func Handler(ctx context.Context, request events.APIGatewayProxyRequest) (Response, error) { q := request.QueryStringParameters name := q["name"] var buf bytes.Buffer body, err := json.Marshal(map[string]interface{}{ "message": "Hello, " + name, }) if err != nil { return Response{StatusCode: 404}, err } json.HTMLEscape(&buf, body) resp := Response{ StatusCode: 200, IsBase64Encoded: false, Body: buf.String(), Headers: map[string]string{ "Content-Type": "application/json", "X-MyCompany-Func-Reply": "hello-handler", }, } return resp, nil } func main() { lambda.Start(Handler) }まとめ
無事、Lambda(Golang)でAPI Gatewayのクエリ文字列を使用することができました。
参考
- 投稿日:2019-06-07T02:47:59+09:00
個人開発のインフラをEC2からFargateに置き換えました!
概要
Qiitaのストックを整理するためのサービス「Mindexer(ミンデクサー)」のインフラをEC2からFargateに置き換えました。その際に得られたTipsをまとめた記事となります。
AWSの環境は全てTerraformで構築しています。開発環境のみECSのEC2起動モードも利用しています。
ソースコードは、こちらで公開しています。
https://github.com/nekochans/qiita-stocker-terraformなお、ECSのスペックについては本番を想定した設定となっていませんのでご注意ください。
サービスについて
AWS + Laravel + Vue.js でQiitaのストックを整理するサービスを作りました!【個人開発】
にて解説ししていますので、こちらも合わせて見ていただけますと幸いです?
バックエンド、フロントエンドの技術についてもソースコード付きで解説しています。全体の構成
実際の構成はTerraformのプロジェクトをご確認いただくのが早いと思いますが、ここでは設定のポイント等を解説したいと思います。
- ECR
- CodeBuild
- ECS(EC2インスタンスを利用)
- Laravel/Nginx
- Fargate
- Laravel/Nginx
ECR
ECS(EC2)、Fargate共に利用しています。
CodeBuildプロジェクトを作成し、ECRへのプッシュを行なっています。(最終的には、CodePipelineを利用したFargateへのデプロイを構築する予定。)ECRのライフサイクルポリシー
ライフサイクルポリシーを設定しておくことで不要になったイメージを自動で削除することができます。
ECRには月500MBのストレージの無料利用枠が用意されていますが、これ以上となると利用料が発生するため、ライフサイクルを設定しておくといいかと思います。AWSドキュメント Amazon ECR ライフサイクルポリシー
下記は、イメージを5つまで保持し、6つめ以上の古いイメージは自動で削除される設定です。
locals {
  lifecycle_policy = <<EOF
  {
    "rules": [
      {
        "rulePriority": 10,
        "description": "Expire images count more than 5",
        "selection": {
          "tagStatus": "any",
          "countType": "imageCountMoreThan",
          "countNumber": 5
        },
        "action": {
          "type": "expire"
        }
      }
    ]
  }
EOF
}
ECS(EC2インスタンス)
開発環境のみで使用しています。
FargateではコンテナホストにSSHするこができないため、開発中にSSHでコンテナの動作確認等を行いたい場合などに利用しています。EC2インスタンスをECSのクラスタに所属させる設定
デフォルトでは、EC2のコンテナインスタンスはデフォルトのクラスタで起動されます。
そのため、デフォルト以外のクラスタで起動するには、クラスタを指定する必要があります。
この設定が、Terraformで構築している際にわかりにくかったので、記載しておきます。EC2ユーザーデータを使用して、コンテナインスタンスの環境変数を設定します。
ここでは、ECS_CLUSTERにコンテナ名を指定しています。ECS_CLUSTER
このエージェントが確認するクラスター。この値を定義しない場合、default クラスターが想定されます。default クラスターが存在しない場合は、Amazon ECS コンテナエージェントによってその作成が試みられます。default 以外のクラスターを指定した場合、そのクラスターが存在しないと、登録は失敗します。参考:AWSドキュメント Amazon ECS コンテナエージェントの設定
userdata.sh#!/bin/bash cat << EOT >> /etc/ecs/ecs.config ECS_CLUSTER=${cluster_name} EOTecs.tfdata "template_file" "user_data" { template = "${file("../../../../modules/aws/api/user-data/userdata.sh")}" vars { cluster_name = "${aws_ecs_cluster.api_ecs_cluster.name}" } } resource "aws_instance" "ecs_instance" { // その他の設定は省略 user_data = "${data.template_file.user_data.rendered}" }Fargate
Fargateは本番での運用を想定し、Green/Blueデプロイの設定も行なっています。
Terraformでの構築においてECS(EC2)との設定の大きな違いは、EC2インスタンスの設定が不要なところです。
(上記で設定した、コンテナインスタンスの環境変数の設定ももちろん不要)ここでは、Blue/Greenデプロイについて解説します。
マネジメントコンソールからの設定については、AWS FargateでBlue/Greenデプロイを行うという記事の中で解説しております。
- ターゲットグループの設定
ターゲットを切り替えることでBlue/Greenデプロイを実行するため、
fargate_api_blue,fargate_api_greenの2つのターゲットグループを作成します。alb.tfresource "aws_alb_target_group" "fargate_api_blue" { name = "${lookup(var.fargate, "${terraform.env}.name", var.fargate["default.name"])}-blue" port = 80 protocol = "HTTP" vpc_id = "${lookup(var.vpc, "vpc_id")}" health_check { path = "/api/statuses" timeout = 5 healthy_threshold = 5 unhealthy_threshold = 2 interval = 20 matcher = 200 } target_type = "ip" } resource "aws_alb_target_group" "fargate_api_green" { name = "${lookup(var.fargate, "${terraform.env}.name", var.fargate["default.name"])}-green" port = 80 protocol = "HTTP" vpc_id = "${lookup(var.vpc, "vpc_id")}" health_check { path = "/api/statuses" timeout = 5 healthy_threshold = 5 unhealthy_threshold = 2 interval = 20 matcher = 200 } target_type = "ip" }
- CodeDeployアプリケーションとデプロイメントグループを作成
codedeploy.tfresource "aws_codedeploy_app" "fargate_api" { compute_platform = "ECS" name = "${lookup(var.fargate, "${terraform.env}.name", var.fargate["default.name"])}" } resource "aws_codedeploy_deployment_group" "fargate_api_blue_green_deploy" { app_name = "${aws_codedeploy_app.fargate_api.name}" deployment_group_name = "blue-green" service_role_arn = "${aws_iam_role.codedeploy_for_fargate_role.arn}" deployment_config_name = "CodeDeployDefault.ECSAllAtOnce" auto_rollback_configuration { enabled = true events = ["DEPLOYMENT_FAILURE"] } blue_green_deployment_config { deployment_ready_option { action_on_timeout = "CONTINUE_DEPLOYMENT" } terminate_blue_instances_on_deployment_success { action = "TERMINATE" termination_wait_time_in_minutes = "1" } } deployment_style { deployment_option = "WITH_TRAFFIC_CONTROL" deployment_type = "BLUE_GREEN" } ecs_service { cluster_name = "${aws_ecs_cluster.api_fargate_cluster.name}" service_name = "${aws_ecs_service.api_fargate_service.name}" } load_balancer_info { target_group_pair_info { prod_traffic_route { listener_arns = ["${aws_alb_listener.fargate_alb.arn}"] } target_group { name = "${aws_alb_target_group.fargate_api_blue.name}" } target_group { name = "${aws_alb_target_group.fargate_api_green.name}" } } } }IAMロールの設定などは割愛していますが、簡単にBlue/Greenデプロイの設定ができるのでとても便利ですね!
NginxのDockerfile
ECS(EC2)とFargateではコンテナ間の通信方法が異なります。
- ECS(EC2):タスクの定義で
linkパラメータを設定しコンテナ間の通信を許可する- Fargate:同じタスクに属するコンテナは、localhost+ポート番号で通信する
上記の内容を踏まえて、Nginxの設定ファイルをECS(EC2)とFargateの両方で使用できるよう作成します。
テンプレート
default.conf.templateを作成し、PHP_HOSTを切り替え可能とします。docker/nginx/config/default.conf.templatelocation ~ \.php$ { fastcgi_pass ${PHP_HOST}:9000; }DockerfileFROM nginx:1.15.5-alpine ENV PHP_HOST=127.0.0.1 ADD ./docker/nginx/config/default.conf.template /etc/nginx/conf.d/default.conf.template RUN mkdir -p /var/www/html/public ADD ./public/ /var/www/html/public CMD /bin/sh -c 'sed "s/\${PHP_HOST}/$PHP_HOST/" /etc/nginx/conf.d/default.conf.template > /etc/nginx/conf.d/default.conf && nginx -g "daemon off;"'ECS(EC2)のタスクの定義の中で、
default.confに設定するための環境変数を設定します。
(Fargateのタスクの定義では環境変数の設定を行わないので、Dockerfileで設定しているPHP_HOST=127.0.0.1が設定される)modules/aws/api/task/ecs-api.json"links": ["php"], "environment": [ { "name": "PHP_HOST", "value": "php" } :コンテナの環境変数
タスクの定義の環境変数は、パラメータストアから取得しています。プログラムに機密情報を保持する必要がなくなるというメリットがあります。
設定方法は下記の通りです。
- マネジメントコンソールからAWS Secrets Managerに機密情報を登録
- AWS Secrets ManagerからParameter StoreをTerraformで作成
- タスクの定義のParameter StoreのAmazon リソースネーム (ARN)をタスクの定義に設置する
2. AWS Secrets ManagerからParameter StoreをTerraformで作成の解説については、下記の記事をご確認ください。
AWS Secrets ManagerからParameter StoreをTerraformで作成するTerraformでECSを管理する際の注意点
Terraformで作成したタスクの定義がECSサービスで動作している状態でTerraformでタスクの定義を変更すると、現在動いているタスクの定義を削除してから新しいリビジョンのタスクの定義が作成されます。
タスクの定義が削除されれば、当然サービスも停止してしまいますので、注意が必要です。今後の課題
以下についても、今後対応する予定です。
デプロイの自動化
現時点では、CodeBuildでECRへプッシュするところまでしか自動化することができていません。
今後は、CodePipelineを使って、GitHubにプッシュされたら自動でデプロイが実行されるまでの仕組みを構築しようと思っています。Datadogを利用したコンテナの監視
Amazon ECS CloudWatch のメトリクスではクラスタ、およびクラスタ内のサービス単位のメトリクスはサポートされていますが、タスク単位のメトリクスはサポートされていません。
Datadogを利用して、タスク単位でリソースを監視できるようにしていきたいと思っています。AWS ドキュメント Amazon ECS CloudWatch のメトリクス
Datadog Docs ECS Fargate
- 投稿日:2019-06-07T01:31:31+09:00
Fラン文系大学生がAWSのSAAを取得する(6〜7日目)
6日目
六日目は、急遽お休みをいただきました。。。
一応デスクに向かったのですが、大学内でパソコンの接続がうまくいかなくて断念しました。。。7日目
とうとう1週間が経ちました。
この生活も、あっという間です。
そんなこんなで、本日は、EC2について学びました。EC2について
本日は割と時間があったので、ハンズオンでEC2についてインスタンスを作成しながらやってみました。
二日目の、迷宮入りしそうだった、ターミナルからのコマンドでインスタンスと接続する動作も、出来るようになり、成長しているなぁと少し感じました。ここから、まとめに入りますが、間違っている部分があればコメントいただけたら幸いです。
本日理解できたこと
・EC2とは、数分で立ち上げることができる仮想サーバーのこと
・EBSとは、EC2のストレージ(容量)の追加分のこと(おかわり的な?)
・ELBとは、EC2で立ち上げたサーバーにトラフィックを分散させる機能のこと
・Snapshotはバックアップを取るサービス(サーバーを一旦停止すること?)
※お願いなのですが、SnapshotとAMIの概要がまだ理解できていないので、コメントいただけたら幸いです。(できれば違いなどもFラン文系でもわかるような感じで
)