- 投稿日:2019-03-24T21:42:18+09:00
WordPressインストールしたあとにやった方がよさそうなことメモ
前回の記事の続きです。
⇒勉強する気力がびっくりするくらい湧かないしWordPressでアフィブログ作ろうと思った話前回のあらすじ
ドメイン取得してレンタルサーバー借りてWordPressインストールしました。
宣伝⇒できたブログサーバー設定でやり忘れてたこと
SSLの設定
どうもGoogle先生はSSL設定してないサイトが嫌いみたいなので一応設定しました。
こうするとhttpでもhttpsでもどっちでもアクセスできるようになります。サーバーの管理コンソールからぽちぽちやったらできました。
Secureになって何がうれしいのかはよくわかりません。WordPressの設定をいじる
SEO対策の設定まわり
だいたいこのあたりのサイトを見ながらやっておきました。
WordPressインストール後すぐやっておきたい6つの初期設定
SEO的にもいいらしいです。
デザインテーマの設定をする
LION BLOGってテーマがイケてるって話だったので使ってみました。
管理用のダッシュボードで検索しても出てこないのでググったら公式っぽいのが出てきました。(はい)
zipがダウンロードできるので何も考えずに解凍したんですけどzipのままぶっこめってなってて少し損しました。
細かい設定はよくわからないのであんまり弄ってないです。プラグインをいれる
ゴテゴテにプラグイン入れてるサイトもあるみたいですけど重くなるし個人的にも管理しきれないなってことで相当絞ってます。
以下入れたやつ
- Akismet Anti-Spam
スパムコメント勝手に消してくれるマン。インストールしたら最初っから入っていたので有効にしておきました。- Edit Author Slug
WordPressで作ってるサイトってURL末尾に/?author=IDをつけるとIDが見れちゃうみたいでそれをガードしてくれます。設定方法はググってください。- EWWW Image Optimizer
画像をいい感じに圧縮してくれる。らしいです。詳しくはわからないですけど位置情報とかも消してくれるみたいなのでこのまま入れておこうと思います。- Google XML Sitemaps
サイトマップのXMLを勝手に作ってくれる?よくわからない子です。おすすめされてたので入れました。- All In One SEO Pack SEO対策をあれこれやってくれる。たぶん。これ入れると微妙にサイトのレスポンス悪くなるらしいので入れたくない人はいれなくていいかもです。
Googleにゴマすりをする
Google先生にゴマすりしないとサイトのアクセスが増えないみたいなのでやっておきます。
詳しくはよくわからないんですけどググったらサーチコンソールとGoogleアナリティクスがどうのこうのって書いてあったので登録しておきました。たぶん全然活用できてないです。おわりに
たぶんここまでやったらまあまあ問題ないページなんじゃないでしょうか。あとはたぶん宣伝用にSNS周りの設定が必要だと思うんですけどめんどくさかったのでやってないです。
クラウドワークスとかでWordPressのページ作成3万とかで受けてる人マジですげーなって思いました。
おわり。
- 投稿日:2019-03-24T16:18:13+09:00
Laravel5.4以上でGD Library extension not available with this PHP installation.のエラーが出た時の対処法
環境
PHP:v7.0.31
Laravel:v5.5
IDE:cloud9エラー内容
composer require intervention/imageも実行した。
config/app.php//provider 'Intervention\Image\ImageServiceProvider', //aliases 'Image' => 'Intervention\Image\Facades\Image',この2つも追加した。
いざアップロードすると
Driver.phpGD Library extension not available with this PHP installation.このエラーが出る。
なんと
実は、「Intervention/image」はPHP5.4以上で画像処理ライブラリのGDまたはImageMagickがインストールされている必要があるそうです。てことでGDをインストールします。
sudo apt-get update
sudo apt-get install php7.0-gd
以上2つのコマンドをターミナルでうち、apache再起動すれば動くと思います。
- 投稿日:2019-03-24T16:18:13+09:00
LaravelでGD Library extension not available with this PHP installation.のエラーが出た時の対処法
環境
PHP:v7.0.31
Laravel:v5.5
IDE:cloud9エラー内容
composer require intervention/imageも実行した。
config/app.php//provider Intervention\Image\ImageServiceProvider::class, //aliases 'Image' => Intervention\Image\Facades\Image::class,この2つも追加した。
app/http/Controllers/PhotosController.phpuse Image;も対象のコントローラのトップに追加してある。
しかしながら、以下Driver.phpGD Library extension not available with this PHP installation.このエラーが出る。
なんと
実は、「Intervention/image」はPHP5.4以上で画像処理ライブラリのGDまたはImageMagickがインストールされている必要があるそうです。てことでGDをインストールします。
sudo apt-get update
sudo apt-get install php7.0-gd
以上2つのコマンドをターミナルでうち、apache再起動すれば動くと思います。
- 投稿日:2019-03-24T14:32:13+09:00
【PHP】APIを使用しQiitaでの自分の投稿を取得する方法。
Qiitaでの自分の投稿を取得しよう!
今回は、ポートフォリオに学習したことを掲載するためQiitaの投稿を取得しました。そして、取得した内容をブラウザに表示するまでのことを記事にします。
コード
index.php<?php $curl = curl_init('https://qiita.com/api/v2/authenticated_user/items'); $option = [ CURLOPT_CUSTOMREQUEST => 'GET', CURLOPT_RETURNTRANSFER => true, CURLOPT_HTTPHEADER => [ 'Authorization: Bearer [取得したアクセストークン]', 'Content-Type: application/json', ], ]; curl_setopt_array($curl, $option); $result = curl_exec($curl); $decode_res = json_decode($result); ?> <DOCTYPE html> / / (省略) / <?php foreach($decode_res as $res){ ?> <a href="<?php echo $res->url;?>" target="_brank"> <p><?php echo $res->title;?></p> </a> <?php } ?>基本的にはアクセストークンをQiitaで取得し自分の投稿を取得します。
配列の形になって返ってくるので、foreachで回すだけです。Qiitaのアクセストークン取得方法
「設定」⇨「アプリケーション」⇨「新しくトークンを発行する」
この後は、自分が何をしたいのかによって取得するトークンは変わるのですが、今回は投稿を取得するので「read_qiita」でアクセストークンを取得します。関数curl()
取得したら実際にコードを書いていきます。
その時に使うのがcurl()関数です。
今回はこちらを使います。
・curl_init()
・curl_setopt_array()
・curl_exec()
・curl_close()
流れはこう。
1,curl_init()で初期化
2,curl_setopt_array()で色々なオプションを決める
3,curl_exec()で実行
4,curl_close()で終了説明
まずcurl_init()にこのURLを「https://qiita.com/api/v2/authenticated_user/item」
ちなみにこのURLは何がしたいかによって変わるのでこちらを参照してください。
Qiita APIそして次にcurl_set_opt()でオプションの設定です。
オプションとはなんだ?って方はまたもやこちらを参考にしてください。
オプション一覧ここで使っているオプションの説明だけします。
・CURLOPT_CUSTOMREQUEST⇨HTTPリクエストの方法を指定します。GETだったりPOSTだったり。
・CURLOPT_RETURNTRANSFER⇨curl_exec()の値をデータで返すのか、文字列で返すのかの指定です。trueなら文字列で返します。
・CURLOPT_HTTPHEADER⇨ 任意でHTTPヘッダーを設定できます。簡単にいうとサーバーにリクエストする際の情報をこちらで追加できるみたいな感じですかね。後はcurl_seopt_array()で配列に格納。
実行したものを$resultに代入。
このとき$resultはjsonファイルになっているのでjson_decode()でPHPの型にして返します。それをforeachでぶん回します。
取得したいものはQiit APIで確認してみてください。
- 投稿日:2019-03-24T13:20:35+09:00
リレーションはメソッドで定義したはずが、プロパティアクセスで動作する謎を解明する(Laravel)
前提
Bookというモデルには、detail()というメソッドが定義してあるとする。この定義によりBookモデルとBookdetailモデルが、「bookdetail_idとid」を通して、1対1に結合(hasOne)していることになる。
<?php

namespace App;

use Illuminate\Database\Eloquent\Model;

class Book extends Model
{
  public function detail(){
    return $this->hasOne('\App\Bookdetail','id','bookdetail_id');
  }
}
下記は、Bookモデルからid=1であるもののbookdetail_idを通して、Bookdetailモデルからisbnを出力するコードである。
class TestController extends Controller
{
  public function test(){
    $book = \App\Book::find(1);
    echo $book->detail->isbn;
  }
}
疑問点
先ほどのBookモデルでは、detail()とメソッドとして定義したはずだ。しかし、このコードでは、->detailとプロパティアクセスの形になっている。どこにもメソッドとして実行する記述はない。いったい何が起こっているのだろう?
Laravelのコアファイルを深掘りする
それでは、Laravelのコアファイルを一つずつ辿っていきたい。
本記事の動作前提となるファイルは下記に用意してあるので、自分でサンプルデータを作るのが面倒な方は、適宜利用いただきたい。
https://github.com/3tomcha/qiita->detailとはつまり何をしているのか
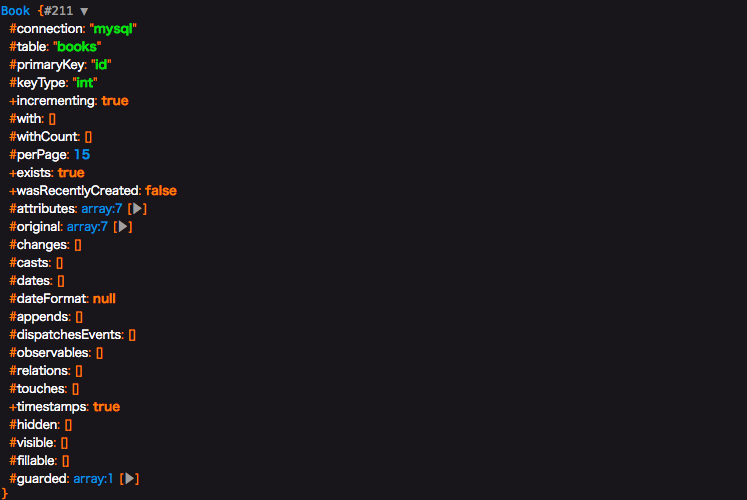
まずはアクセスされる側の$bookの型を調べて見よう。dd()を使って出力するとBook型とわかる。(これは大方の予想通りであろう)
つまり->detailの正体を知るには、\App\Bookを調べるのが良さそうだと検討がつく。<?php namespace App\Http\Controllers; use Illuminate\Http\Request; class TestController extends Controller { public function test(){ $book = \App\Book::find(1); dd($book); echo $book->detail->isbn; } }
さてApp\Bookをみてみると、直接関係ありそうな記述はない。よって、Illuminate\Database\Eloquent\Modelを辿ってみる。
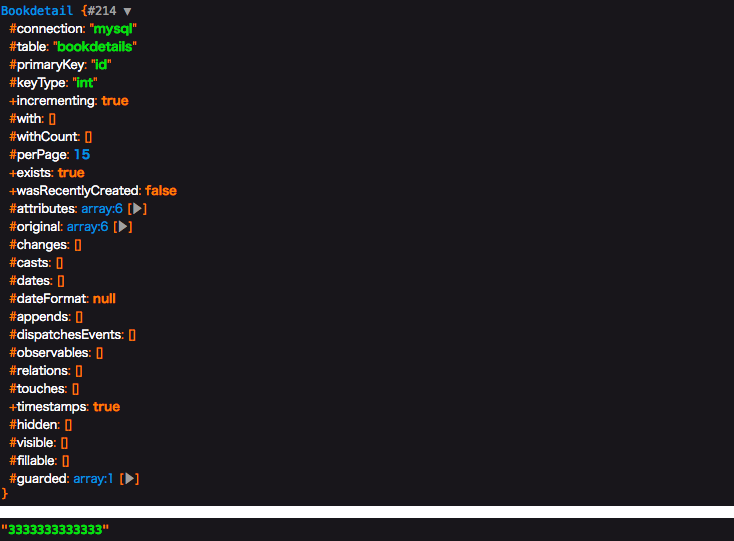
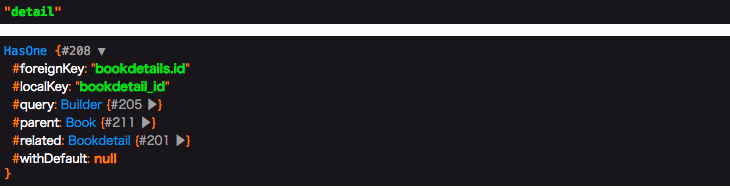
<?php

namespace App;

use Illuminate\Database\Eloquent\Model;

class Book extends Model
{
  public function detail(){
    return $this->hasOne('\App\Bookdetail','id','bookdetail_id');
  }
}
Illuminate\Database\Eloquent\Model をみると、気になる記述が見つかる。__getはマジックメソッドと呼ばれるもので、アクセスできないプロパティにアクセスした時に呼ばれるものだ。これが働いているのではと検討がつく。実際にdump()を使ってみると、__getは2回行われており、1回目はBookdetailオブジェクト、2回目は結果のisbnである"3333333333333"を返している。
    /**
     * Dynamically retrieve attributes on the model.
     *
     * @param  string  $key
     * @return mixed
     */
    public function __get($key)
    {
        return $this->getAttribute($key);
    }
次に__getで行われている getAttribute()を辿って見よう。
Illuminate\Database\Eloquent\Concerns\HasAttrubute.php に定義されている。
今回は、hasOneというリレーションを定義しているため、最後の return $this->getRelationValue($key); が動いていそうだと検討を付けて、さらに進む。/** * Get an attribute from the model. * * @param string $key * @return mixed */ public function getAttribute($key) { if (! $key) { return; } // If the attribute exists in the attribute array or has a "get" mutator we will // get the attribute's value. Otherwise, we will proceed as if the developers // are asking for a relationship's value. This covers both types of values. if (array_key_exists($key, $this->attributes) || $this->hasGetMutator($key)) { return $this->getAttributeValue($key); } // Here we will determine if the model base class itself contains this given key // since we don't want to treat any of those methods as relationships because // they are all intended as helper methods and none of these are relations. if (method_exists(self::class, $key)) { return; } return $this->getRelationValue($key); }getRelationValueは同じく Illuminate\Database\Eloquent\Concerns\HasAttrubute.php に定義されている。最下部にあるgetRelationshipFromMethod を辿って見よう。
/**
     * Get a relationship.
     *
     * @param  string  $key
     * @return mixed
     */
    public function getRelationValue($key)
    {
        // If the key already exists in the relationships array, it just means the
        // relationship has already been loaded, so we'll just return it out of
        // here because there is no need to query within the relations twice.
        if ($this->relationLoaded($key)) {
            return $this->relations[$key];
        }

        // If the "attribute" exists as a method on the model, we will just assume
        // it is a relationship and will load and return results from the query
        // and hydrate the relationship's value on the "relationships" array.
        if (method_exists($this, $key)) {
            return $this->getRelationshipFromMethod($key);
        }
    }
getRelationshipFromMethodは同じく Illuminate\Database\Eloquent\Concerns\HasAttrubute.php に定義されている。
ここで、今まで辿ってきたことに確信が持てるはずだ。$relation = $this->$method(); の記述によって、なぜ->detailとアクセスしたのに、detail()が動いているのだろうという疑問が解決された。/** * Get a relationship value from a method. * * @param string $method * @return mixed * * @throws \LogicException */ protected function getRelationshipFromMethod($method) { $relation = $this->$method(); if (! $relation instanceof Relation) { throw new LogicException(sprintf( '%s::%s must return a relationship instance.', static::class, $method )); } return tap($relation->getResults(), function ($results) use ($method) { $this->setRelation($method, $results); }); }$methodと$relation をそれぞれdumpしてみると、予想通り$methodはdetailであり、$relationにはBookモデルのdetail()が行われた結果であるHasOneオブジェクトが入っていることがわかった。
<?php

namespace App;

use Illuminate\Database\Eloquent\Model;

class Book extends Model
{
  public function detail(){
    return $this->hasOne('\App\Bookdetail','id','bookdetail_id');
  }
}
結論
プロパティアクセスの形でしか書いていないのに、モデルのメソッドが動く理由は、コアの処理の途中で$method()として実行しているため。
修正ご意見お待ちしています
- 投稿日:2019-03-24T11:46:55+09:00
[postfix,sendmail] phpでメールを送信するまでのまとめ
目的
プログラムでメールを送っている仕組みを整理したい。
本当の目的
qiitaで久しぶりに何か上げたかった
役者たち
- php
- 今回メール送信を行う言語
- sendmail
- プログラムでメール送信を行うときに内部で呼び出されるコマンド
- postfix
- メール送信の設定を行う何か(メールの送信元とか)
実験環境
OS: OSX ver 10.13.6
php: 7.1.16メール送信プログラム
今回実行するコード(test.php)↓(メールアドレスは匿名)
<?php
$to = 'hogehoge@example.com';
$subject = "let's php mail";
$message = 'Can you see it?';
mb_send_mail($to, $subject, $message);
メールの送信元設定
メールは送信元がないと送れない(常識)
その設定をpostfixで行うpostfixでメールの送信元を設定
$ sudo vim /etc/postfix/sasl_password今回はgmailを利用してメールを行う。
そのためには、gmailのアプリケーションパスワードが必要である。
アプリケーションパスワードの設定はこちら(注意:gmailに紐づくアカウントが2段階認証されてないとダメ)sasl_password(メールを送信するエージェントをgmailに設定)
[smtp.gmail.com]:587 <ここにメールアドレス>:<ここにアプリケーションパスワード>設定をpostfixに反映
$ sudo postmap /etc/postfix/sasl_password試しにsendmailで送ってみる
$ sendmail hoge@example.com(送信先アドレス)
testhoge
.
phpで実行
$ php test.phpまとめ
メール送信するだけでも、色々疲れちゃった
- 投稿日:2019-03-24T02:58:17+09:00
laradock で『laradock_mysql_1 docker-entrypoint.sh mysqld Exit 2』となる問題を解決
環境
OS:macOS Mojave 10.14.3
Docker:18.09.2
docker-compose:1.23.2
docker-machine:0.16.1
php:7.1.23
Laravel Framework:5.8.7
mysql:Ver 14.14 Distrib 5.7.25, for Linux (x86_64) using EditLine wrapper事象
laradockで構築したmysqlを起動すると
$ docker-compose up -d php-fpm nginx mysql
Recreating laradock_mysql_1          ... done
Starting laradock_docker-in-docker_1 ... done
Starting laradock_workspace_1        ... done
Starting laradock_php-fpm_1          ... done
Starting laradock_nginx_1            ... done


$ docker-compose ps
           Name                          Command              State                      Ports
-----------------------------------------------------------------------------------------------------------------
laradock_docker-in-docker_1   dockerd-entrypoint.sh           Up       2375/tcp
laradock_mysql_1              docker-entrypoint.sh mysqld     Exit 2
laradock_nginx_1              /bin/bash /opt/startup.sh       Up       0.0.0.0:443->443/tcp, 0.0.0.0:8080->80/tcp
laradock_php-fpm_1            docker-php-entrypoint php-fpm   Up       9000/tcp
laradock_workspace_1          /sbin/my_init                   Up       0.0.0.0:2222->22/tcp
となり起動にコケてしまう事象が発生しました。
解決方法
一旦dockerを止めます。
docker-compose stop以下のファイルを変更します。
.env### MYSQL ################################################# MYSQL_VERSION=latest #latestのまま - MYSQL_DATABASE=default + MYSQL_DATABASE=laradock - MYSQL_USER=root + MYSQL_USER=laradock - MYSQL_PASSWORD=root + MYSQL_PASSWORD=secret MYSQL_PORT=3306 MYSQL_ROOT_PASSWORD=root MYSQL_ENTRYPOINT_INITDB=./mysql/docker-entrypoint-initdb.dさらに、以下のディレクトリ配下のファイルをすべて削除します。
/Users/{USER NAME}/.laradock/data/mysql/終わり
以上、対応後にdockerを起動すると
$ docker-compose up -d php-fpm nginx mysql
Starting laradock_docker-in-docker_1 ... done
Recreating laradock_mysql_1          ... done
Starting laradock_workspace_1        ... done
Starting laradock_php-fpm_1          ... done
Starting laradock_nginx_1            ... done


$ docker-compose ps
           Name                          Command              State                     Ports
----------------------------------------------------------------------------------------------------------------
laradock_docker-in-docker_1   dockerd-entrypoint.sh           Up      2375/tcp
laradock_mysql_1              docker-entrypoint.sh mysqld     Up      0.0.0.0:3306->3306/tcp, 33060/tcp
laradock_nginx_1              /bin/bash /opt/startup.sh       Up      0.0.0.0:443->443/tcp, 0.0.0.0:8080->80/tcp
laradock_php-fpm_1            docker-php-entrypoint php-fpm   Up      9000/tcp
laradock_workspace_1          /sbin/my_init                   Up      0.0.0.0:2222->22/tcp
mysqlのプロセスが確認できれば完了です。お疲れ様でした^^
- 投稿日:2019-03-24T02:47:21+09:00
【改】WordPressでMVCフレームワーク風の立ち回りをする。(3ヶ月間運用してみてこうなった)
前回、wordpressの運用管理が既存のテンプレート階層のルーティングだと大変だと感じ、サイトの設計をMCVフレームワーク風にしてみた。という記事を書きました。
WordpressでMVCフレームワーク風の立ち回りをする。
そこから実際に3ヶ月ほど運用を行い、こうした方が管理が楽という部分も出てきたので、結果はこうなりました。という部分を端的にまとめます。細かい部分を知りたい場合は是非、質問をください。
1. ディレクトリ構成
[ディレクトリ名の意味]
- pages => フロント用(管理画面じゃないページ)の格納場所
- page => 固定ページ用のフォルダ
- post_type => 投稿タイプ別のフォルダ (実際はpost_type別のフォルダはもっと多くなります。今回はゴチャゴチャしないように一つだけにしました。)
- 下記ディレクトリ構成のファイル名の部分に
ORと記載している箇所がありますが、共通テンプレートや固有のテンプレートが存在する部分です。
- 意味としては、
page.phpやpost_type_single.phpは共通テンプレートpage_slug.phpやpost_type_single_name.phpは各ページ固有のテンプレートです。. ├── app │ ├── .npm │ ├── .composer │ ├── assets │ │ └── pages │ │ ├── home │ │ │ ├── css │ │ │ │ └── xxxxxx.css │ │ │ ├── img │ │ │ │ └── xxxxxx.png │ │ │ └── js │ │ │ └── xxxxxx.js │ │ ├── page │ │ │ ├── css │ │ │ └── img │ │ └── post_type │ │ ├── post_type_archive │ │ │ ├── css │ │ │ └── img │ │ └── post_type_single │ │ ├── css │ │ └── img │ ├── functions │ │ ├── controllers │ │ │ ├── resources │ │ │ │ ├── all │ │ │ │ │ └── all.php │ │ │ │ ├── home │ │ │ │ │ └── home.php │ │ │ │ ├── page │ │ │ │ │ └── page.php OR page_slug.php │ │ │ │ └── post_type │ │ │ │ ├── post_type_archive │ │ │ │ │ └── post_type.php │ │ │ │ └── post_type_single │ │ │ │ └── post_type_single.php OR post_type_single_name.php │ │ │ └── router │ │ │ └── router.php │ │ └── models │ │ ├── config │ │ │ ├── basis.php │ │ │ └── wpcf7.php │ │ ├── data │ │ │ ├── csv │ │ │ └── json │ │ ├── modules │ │ │ ├── xxxx.php │ │ │ └── shortcode.php │ │ └── pages │ │ ├── home │ │ │ └── home.php │ │ ├── page │ │ │ └── page.php OR page_slug.php │ │ └── post_type │ │ ├── post_type_archive │ │ │ └── post_type.php │ │ └── post_type_single │ │ └── post_type_single.php OR post_type_single_name.php │ └── views │ ├── pages │ │ ├── home │ │ │ └── home.php │ │ ├── page │ │ │ └── page.php OR page_slug.php │ │ ├── post_type │ │ │ ├── post_type_archive │ │ │ │ └── post_type.php │ │ │ └── post_type_single │ │ │ └── post_type_single.php OR post_type_single_name.php │ │ └── error │ │ └── 404.php │ ├── templates │ │ ├── footer.php │ │ └── header.php │ └── util │ └── analysis │ ├── fb-ad.php │ ├── gtm.php │ ├── gtm_no-script.php │ └── ytm.php ├── editor-style.css ├── functions.php ├── index.php └── style.cssまず、前回から変更した部分で言うと、テーマディレクトリ直下のsingle.phpやarchive.phpなどのテンプレートファイルを排除しました。これは極論、index.phpだけでルーティングしても問題なかったためです。
2. ルーティング
次にルーティングの方法を変更しました。
テンプレートのロード、cssとjsのロード
前回ではテンプレートを読み込む
classとcss、jsを読み込むclassを分けていたのですが、一つのclassへまとめました。
コードで見ると下記のようになります。変更前
router_home.phpnamespace controllers\router\pages\home; class router_home { public function __construct() { $this->load_template(); } # テンプレートの読み込み public function load_template() { require_once get_template_directory() . '/app/views/pages/home/home.php'; } }loader_home.phpnamespace controllers\loader\pages\home; class loader_home { public function __construct() { $this->wp_enqueue_scripts(); } # css、jsの読み込み public function wp_enqueue_scripts() { wp_enqueue_style('home', get_template_directory_uri() . '/app/assets/pages/home/css/style.css'); wp_enqueue_script('app', get_template_directory_uri() . '/app/assets/pages/home/js/app.js', array(), null, true); } }変更後
home.phpnamespace controllers\resources\home; class home { public function __construct() { $this->wp_enqueue_scripts(); $this->template_directory(); } # css、jsの読み込み public function wp_enqueue_scripts() { wp_enqueue_style('home', get_template_directory_uri() . '/app/assets/pages/home/css/style.css'); wp_enqueue_script('app', get_template_directory_uri() . '/app/assets/pages/home/js/app.js', array(), null, true); } # テンプレートの読み込み public function template_directory() { require_once get_template_directory() . '/app/views/pages/home/home.php'; } }変更後の
home.phpのように、resourcesフォルダ内の各classへまとめました。
ポイントとしてはこのクラスがインスタンス化された時にcss、jsの読み込みを行う関数が最初に動くようにしておく事です。(テンプレートを引っ張ってくる関数を最初に動かすと画面レイアウトが崩れる場合がある)←多分、フックをちゃんと指定すれば大丈夫だと思います。router.php
こちらは結構、仕様変更しました。
変更前
router.phpclass Router { public function __construct() { add_action('wp', array($this, 'front_controller')); } public function front_controller() { global $wp_query; global $post; # トップページ if (is_home()) { new models\pages\home\model_home(); new controllers\loader\pages\home\loader_home(); new controllers\router\pages\home\router_home(); } # 固定ページ else if (is_page()) { $pagename = isset($wp_query->query['pagename']) ? $wp_query->query['pagename'] : ''; switch ($pagename) { case 'unique_slug_name': new \models\pages\slug_name\model_slug_name(); new \controllers\loader\pages\slug_name\loader_slug_name(); new \controllers\router\pages\slug_name\router_slug_name(); break; case 'unique_slug_name': ... break; case 'unique_slug_name': ... break; default: return; break; } } # カスタム投稿アーカイブ elseif (is_post_archive()) { ... } # カスタム投稿個別ページ elseif (is_singular()) { ... } # 404ページ else { new \controllers\loader\pages\error\loader_404(); new \controllers\router\pages\error\router_404(); } } } new Router();変更後
router.php/*------------------------------------------------------------------------------------ /* 全ページ共通 /*----------------------------------------------------------------------------------*/ # 基本設定 new \models\config\basis(); ... # 全ページで読み込むcss add_action('wp',function(){new \controllers\resources\all\all();}); /*------------------------------------------------------------------------------------ /* トップページ /*----------------------------------------------------------------------------------*/ add_action('wp', function() { if (is_home()) { new \models\pages\home\home(); new \controllers\resources\home\home(); } }); /*------------------------------------------------------------------------------------ /* 固定ページ /*----------------------------------------------------------------------------------*/ # 固定ページの共通テンプレート add_action('wp', function() { if (is_page()) { $template = get_field_object('example_template'); $value = $template['value']; if ($value == 'default') { new \models\pages\page\page(); new \controllers\resources\page\page(); } } }); # 共通ではなくオリジナルの固定ページテンプレート add_action('wp', function() { if (is_page('example')) { $template = get_field_object('example_template'); $value = $template['value']; if ($value == 'templateA') { new \models\pages\page\page_slug(); new \controllers\resources\page\page_slug(); } } }); /*------------------------------------------------------------------------------------ /* 投稿タイプA /*----------------------------------------------------------------------------------*/ # 共通テンプレートの記事ページ add_action('wp', function() { if (is_singular('post_typeA') && is_single()) { $template = get_field_object('example_template'); $value = $template['value']; if ($value == 'default') { new \models\pages\post_typeA\post_type_single(); new \controllers\resources\post_typeA\post_type_single(); } } }); # 共通ではなくオリジナルテンプレートの記事ページ add_action('wp', function() { if (is_singular('post_typeA') && is_single('example')) { $template = get_field_object('example_template'); $value = $template['value']; if ($value == 'templateA') { new \models\pages\post_typeA\single_slug(); new \controllers\resources\post_typeA\single_slug(); } } }); # アーカイブ add_action('wp', function() { if (is_post_type_archive('post_typeA')) { new \models\pages\post_typeA\post_type_archive(); new \controllers\resources\post_typeA\post_type_archive(); } }); /*------------------------------------------------------------------------------------ /* 404ページ /*----------------------------------------------------------------------------------*/ add_action('wp', function() { if (is_404()) { new \controllers\resources\error\error_404(); } });前回では
router.phpをクラスファイルとして利用していましたが、クラスではなく、ページ単位のアクションフック付き関数にしました。こっちの方がpost_type毎の関数を一箇所にまとめられて見通しが良かったです。(前回ではテンプレート階層毎にまとめていた)また、途中で
$template = get_field_object('event_template');のような記述が入っていますが、これはカスタムフィールドの値によって使用するテンプレートが正か否かを判別しています。というのも、固定ページも含めこの構成にすると、なにかしらの工夫をしなければ、投稿編集画面からテンプレートの選択ができなくなります。( ̄Д ̄;)
私は対策としてAdvanced Custom Fieldsを使って投稿編集画面右側にテンプレート選択のフィールドを追加しました。
この辺も含め、まだまだ改良の余地がありそうです...
3. All in One SEO Packとの互換性
このディレクトリ構成にすると
wp_title()がテンプレート内で使えなくなりました。
4.4ぐらいから非推奨にはなっていたものの、4.9とかでもまだ動いていたので放置していましたが、これを機にadd_theme_support('title-tag');へ移行しました。しかし、思わぬところで落とし穴が...
All in One SEO Packの機能で、投稿編集画面内にTitleを個別に設定できるようにするフィールドを追加できますが、そこに入力されたTitleが読み込まれなくなってしまった...(SEO担当に注意されてしまいました...(´・ω・`))下記はこちらの不具合で対応したコードです。
調べると参考になる記事がたくさん出てきましたが、どうやら_aioseop_titleでフィールドに入力した値を取れるみたいですね。basis.phpnamespace models\config; class basis { public function __construct() { add_filter('pre_get_document_title', array($this, 'custom_single_title')); ... } # 個別記事ページへAll in seo packで設定したタイトルを出力 public function custom_single_title($title) { if (is_single()) { global $post; if (get_post_meta($post->ID, '_aioseop_title', true)) { $title = get_post_meta($post->ID, '_aioseop_title', true) . ' | サイトの名前'; } } return $title; } ... }まとめ
私の場合は、すでにwordpressで構築されたサイトを引き継いでいるケースですが、サービスの初期構築段階で、ある程度の規模のサイトだという事が分かっているならlaravelなどのフレームワークを選択しましょう。
ここまで書いておいてですが、wordpressでMVCテーマを作るのはちょっと大変ですね。
- 投稿日:2019-03-24T02:47:21+09:00
MVCフレームワーク風のWordPressテーマを3ヶ月間運用してみたらこうなった。
前回、wordpressの運用管理が既存のテンプレート階層のルーティングだと大変だと感じ、サイトの設計をMVCフレームワーク風にしてみた。という記事を書きました。
そこから実際に3ヶ月ほど運用を行い、こうした方が管理が楽という部分も出てきたので、結果はこうなりました。という部分を端的にまとめます。細かい部分を知りたい場合は是非、質問をください。
1. ディレクトリ構成
[ディレクトリ名の意味]
- pages => フロント用(管理画面じゃないページ)の格納場所
- page => 固定ページ用のフォルダ
- post_type => 投稿タイプ別のフォルダ (実際はpost_type別のフォルダはもっと多くなります。今回はゴチャゴチャしないように一つだけにしました。)
- 下記ディレクトリ構成のファイル名の部分に
ORと記載している箇所がありますが、共通テンプレートや固有のテンプレートが存在する部分です。
- 意味としては、
page.phpやpost_type_single.phpは共通テンプレートpage_slug.phpやpost_type_single_name.phpは各ページ固有のテンプレートです。. ├── app │ ├── .npm │ ├── .composer │ ├── assets │ │ └── pages │ │ ├── home │ │ │ ├── css │ │ │ │ └── xxxxxx.css │ │ │ ├── img │ │ │ │ └── xxxxxx.png │ │ │ └── js │ │ │ └── xxxxxx.js │ │ ├── page │ │ │ ├── css │ │ │ └── img │ │ └── post_type │ │ ├── post_type_archive │ │ │ ├── css │ │ │ └── img │ │ └── post_type_single │ │ ├── css │ │ └── img │ ├── functions │ │ ├── controllers │ │ │ ├── resources │ │ │ │ ├── all │ │ │ │ │ └── all.php │ │ │ │ ├── home │ │ │ │ │ └── home.php │ │ │ │ ├── page │ │ │ │ │ └── page.php OR page_slug.php │ │ │ │ └── post_type │ │ │ │ ├── post_type_archive │ │ │ │ │ └── post_type.php │ │ │ │ └── post_type_single │ │ │ │ └── post_type_single.php OR post_type_single_name.php │ │ │ └── router │ │ │ └── router.php │ │ └── models │ │ ├── config │ │ │ ├── basis.php │ │ │ └── wpcf7.php │ │ ├── data │ │ │ ├── csv │ │ │ └── json │ │ ├── modules │ │ │ ├── xxxx.php │ │ │ └── shortcode.php │ │ └── pages │ │ ├── home │ │ │ └── home.php │ │ ├── page │ │ │ └── page.php OR page_slug.php │ │ └── post_type │ │ ├── post_type_archive │ │ │ └── post_type.php │ │ └── post_type_single │ │ └── post_type_single.php OR post_type_single_name.php │ └── views │ ├── pages │ │ ├── home │ │ │ └── home.php │ │ ├── page │ │ │ └── page.php OR page_slug.php │ │ ├── post_type │ │ │ ├── post_type_archive │ │ │ │ └── post_type.php │ │ │ └── post_type_single │ │ │ └── post_type_single.php OR post_type_single_name.php │ │ └── error │ │ └── 404.php │ ├── templates │ │ ├── footer.php │ │ └── header.php │ └── util │ └── analysis │ ├── fb-ad.php │ ├── gtm.php │ ├── gtm_no-script.php │ └── ytm.php ├── editor-style.css ├── functions.php ├── index.php └── style.cssまず、前回から変更した部分で言うと、テーマディレクトリ直下のsingle.phpやarchive.phpなどのテンプレートファイルを排除しました。これは極論、index.phpだけでルーティングしても問題なかったためです。
2. ルーティング
次にルーティングの方法を変更しました。
テンプレートのロード、cssとjsのロード
前回ではテンプレートを読み込む
classとcss、jsを読み込むclassを分けていたのですが、一つのclassへまとめました。
コードで見ると下記のようになります。変更前
router_home.phpnamespace controllers\router\pages\home; class router_home { public function __construct() { $this->load_template(); } # テンプレートの読み込み public function load_template() { require_once get_template_directory() . '/app/views/pages/home/home.php'; } }loader_home.phpnamespace controllers\loader\pages\home; class loader_home { public function __construct() { $this->wp_enqueue_scripts(); } # css、jsの読み込み public function wp_enqueue_scripts() { wp_enqueue_style('home', get_template_directory_uri() . '/app/assets/pages/home/css/style.css'); wp_enqueue_script('app', get_template_directory_uri() . '/app/assets/pages/home/js/app.js', array(), null, true); } }変更後
home.phpnamespace controllers\resources\home; class home { public function __construct() { $this->wp_enqueue_scripts(); $this->template_directory(); } # css、jsの読み込み public function wp_enqueue_scripts() { wp_enqueue_style('home', get_template_directory_uri() . '/app/assets/pages/home/css/style.css'); wp_enqueue_script('app', get_template_directory_uri() . '/app/assets/pages/home/js/app.js', array(), null, true); } # テンプレートの読み込み public function template_directory() { require_once get_template_directory() . '/app/views/pages/home/home.php'; } }変更後の
home.phpのように、resourcesフォルダ内の各classへまとめました。
ポイントとしてはこのクラスがインスタンス化された時にcss、jsの読み込みを行う関数が最初に動くようにしておく事です。(テンプレートを引っ張ってくる関数を最初に動かすと画面レイアウトが崩れる場合がある)←多分、フックをちゃんと指定すれば大丈夫だと思います。router.php
こちらは結構、仕様変更しました。
変更前
router.phpclass Router { public function __construct() { add_action('wp', array($this, 'front_controller')); } public function front_controller() { global $wp_query; global $post; # トップページ if (is_home()) { new models\pages\home\model_home(); new controllers\loader\pages\home\loader_home(); new controllers\router\pages\home\router_home(); } # 固定ページ else if (is_page()) { $pagename = isset($wp_query->query['pagename']) ? $wp_query->query['pagename'] : ''; switch ($pagename) { case 'unique_slug_name': new \models\pages\slug_name\model_slug_name(); new \controllers\loader\pages\slug_name\loader_slug_name(); new \controllers\router\pages\slug_name\router_slug_name(); break; case 'unique_slug_name': ... break; case 'unique_slug_name': ... break; default: return; break; } } # カスタム投稿アーカイブ elseif (is_post_archive()) { ... } # カスタム投稿個別ページ elseif (is_singular()) { ... } # 404ページ else { new \controllers\loader\pages\error\loader_404(); new \controllers\router\pages\error\router_404(); } } } new Router();変更後
router.php/*------------------------------------------------------------------------------------ /* 全ページ共通 /*----------------------------------------------------------------------------------*/ # 基本設定 new \models\config\basis(); ... # 全ページで読み込むcss add_action('wp',function(){new \controllers\resources\all\all();}); /*------------------------------------------------------------------------------------ /* トップページ /*----------------------------------------------------------------------------------*/ add_action('wp', function() { if (is_home()) { new \models\pages\home\home(); new \controllers\resources\home\home(); } }); /*------------------------------------------------------------------------------------ /* 固定ページ /*----------------------------------------------------------------------------------*/ # 固定ページの共通テンプレート add_action('wp', function() { if (is_page()) { $template = get_field_object('example_template'); $value = $template['value']; if ($value == 'default') { new \models\pages\page\page(); new \controllers\resources\page\page(); } } }); # 共通ではなくオリジナルの固定ページテンプレート add_action('wp', function() { if (is_page('example')) { $template = get_field_object('example_template'); $value = $template['value']; if ($value == 'templateA') { new \models\pages\page\page_slug(); new \controllers\resources\page\page_slug(); } } }); /*------------------------------------------------------------------------------------ /* 投稿タイプA /*----------------------------------------------------------------------------------*/ # 共通テンプレートの記事ページ add_action('wp', function() { if (is_singular('post_typeA') && is_single()) { $template = get_field_object('example_template'); $value = $template['value']; if ($value == 'default') { new \models\pages\post_typeA\post_type_single(); new \controllers\resources\post_typeA\post_type_single(); } } }); # 共通ではなくオリジナルテンプレートの記事ページ add_action('wp', function() { if (is_singular('post_typeA') && is_single('example')) { $template = get_field_object('example_template'); $value = $template['value']; if ($value == 'templateA') { new \models\pages\post_typeA\single_slug(); new \controllers\resources\post_typeA\single_slug(); } } }); # アーカイブ add_action('wp', function() { if (is_post_type_archive('post_typeA')) { new \models\pages\post_typeA\post_type_archive(); new \controllers\resources\post_typeA\post_type_archive(); } }); /*------------------------------------------------------------------------------------ /* 404ページ /*----------------------------------------------------------------------------------*/ add_action('wp', function() { if (is_404()) { new \controllers\resources\error\error_404(); } });前回では
router.phpをクラスファイルとして利用していましたが、クラスではなく、ページ単位のアクションフック付き関数にしました。こっちの方がpost_type毎の関数を一箇所にまとめられて見通しが良かったです。(前回ではテンプレート階層毎にまとめていた)また、途中で
$template = get_field_object('event_template');のような記述が入っていますが、これはカスタムフィールドの値によって使用するテンプレートが正か否かを判別しています。というのも、固定ページも含めこの構成にすると、なにかしらの工夫をしなければ、投稿編集画面からテンプレートの選択ができなくなります。( ̄Д ̄;)
私は対策としてAdvanced Custom Fieldsを使って投稿編集画面右側にテンプレート選択のフィールドを追加しました。
この辺も含め、まだまだ改良の余地がありそうです...
3. All in One SEO Packとの互換性
このディレクトリ構成にすると
wp_title()がテンプレート内で使えなくなりました。
4.4ぐらいから非推奨にはなっていたものの、4.9とかでもまだ動いていたので放置していましたが、これを機にadd_theme_support('title-tag');へ移行しました。しかし、思わぬところで落とし穴が...
All in One SEO Packの機能で、投稿編集画面内にTitleを個別に設定できるようにするフィールドを追加できますが、そこに入力されたTitleが読み込まれなくなってしまった...(SEO担当に注意されてしまいました...(´・ω・`))下記はこちらの不具合で対応したコードです。
調べると参考になる記事がたくさん出てきましたが、どうやら_aioseop_titleでフィールドに入力した値を取れるみたいですね。basis.phpnamespace models\config; class basis { public function __construct() { add_filter('pre_get_document_title', array($this, 'custom_single_title')); ... } # 個別記事ページへAll in seo packで設定したタイトルを出力 public function custom_single_title($title) { if (is_single()) { global $post; if (get_post_meta($post->ID, '_aioseop_title', true)) { $title = get_post_meta($post->ID, '_aioseop_title', true) . ' | サイトの名前'; } } return $title; } ... }まとめ
私の場合は、すでにwordpressで構築されたサイトを引き継いでいるケースですが、サービスの初期構築段階で、ある程度の規模のサイトだという事が分かっているならlaravelなどのフレームワークを選択しましょう。
ここまで書いておいてですが、wordpressでMVCテーマを作るのはちょっと大変ですね。
- 投稿日:2019-03-24T01:53:35+09:00
php-master-changes 2019-03-23
2019-03-23
krakjoe: For consistency with Windows, and because ZTS is not experimental or a "maintainer" feature, this commits renames --enable-maintainer-zts to --enable-zts in the autotools build, and related documentation
- https://github.com/php/php-src/commit/161adfff3f437bf9370e037a9e2bf593c784ccff
- --enable-maintainer-zts を --enable-zts にする修正
- マルチスレッドで速くしたいがために ZTS 版ビルドする時 maintainer って何だよ、とつい最近に俺も思ってた
- 「PHP でマルチスレッド?一体何の話だい?」と思う向きもあるかもしれないが、なんなら今のところ 1.3 〜 1.5 倍くらいにしか性能上がらない JIT より効くケースがあるというのをマリオで試した俺は知っている
- でもこれ 7.4 で deprecation にしつつエイリアスで入れるとかないと、PHP をビルドする系のツールとかが困るんじゃないかな、確かに期間はあるけど急に 8 で変わる感じになっちゃうし
- PR:3974
alekitto: fix bug #76801: phpdbg too many open files error
- https://github.com/php/php-src/commit/b8b880932e95ff1e575a04a6988bc0cf00b89842
- [7.2~]
- sapi/phpdbg で、Windows 環境だと include / require の際にファイルハンドルが解放されず too many open files とか言われていた問題の修正
- 投稿日:2019-03-24T01:34:39+09:00
php-master-changes 2019-03-22
この日は AST の行番号管理の修正、重複コードをまとめる/削除する等のリファクタリング、新しいカスタムオブジェクトシリアライゼーションの実装、ReflectionClass::getMethods() に null を渡すと空配列を返す問題の修正、mysqli が unbuffered クエリでメモリリークする問題の修正、テストの微修正があった!
2019-03-22
nikic: Switch to bison location tracking
- https://github.com/php/php-src/commit/e528762c1c59bc0bd0bd6d78246c14269630cf0f
- [7.4~]
- コンパイラで、AST の行番号管理を bison の location tracking へ移行
- zend_ast_loc というのへ情報を詰めてる
rjhdby: Deduplicate code in zend_builtin_functions.c
- https://github.com/php/php-src/commit/5456a6ea92243d6028ea2012407dbef557113215
- [7.4~]
- 重複コードをまとめるリファクタリング、class_exists() / interface_exists() / trait_exists() とか get_declared_classes() / get_declared_interfaces() とか
rjhdby: Make zend_hash_sort() return void
- https://github.com/php/php-src/commit/e86cdce549c9e81847584d2caa2dff7f89eac682
- success しか返さない zend_hash_sort() を void にして呼び出し側のチェックも削除
nikic: Remove HAVE_PCRE/HAVE_BUNDLED_PCRE checks
- https://github.com/php/php-src/commit/e7e2056d1a993a01c9d57fb2261066855d282d8f
- [7.4~]
- PCRE は常にあるので散在する HAVE_PCRE/HAVE_BUNDLED_PCRE のチェックを削除
nikic: Implement new custom object serialization mechanism
- https://github.com/php/php-src/commit/d373c11e710b525feb6373629e3d1ebffef2dd5b
- [7.4~]
- PHP RFC: New custom object serialization mechanism の実装
nikic: Fixed bug #77772
- https://github.com/php/php-src/commit/da35fa2cb8d454c8e797067e28e647030a5fe5df
- [7.2~]
- ext/reflection で、ReflectionClass::getMethods() に null を渡しても意味のある動作をしない(空配列を返す)問題の修正
- 任意引数なので null だと渡さないのと同じ扱いか、と思いきや 0 扱いになる
- 元の挙動に意味ないんで BC 気にしないでスッと直しちゃうね、らしい
nikic: Fixed bug #77773
- https://github.com/php/php-src/commit/30ddfd49edbd8066cc0a18a557e3de30c2397d12
- [7.3~]
- ext/mysqli で、unbuffered クエリでメモリリークする問題の修正
- #77308 からの話
remicollet: ensure pcre.jit=1 for these tests
- https://github.com/php/php-src/commit/2e9dccef78d169be9a4a37c813e0b5d624bd5ac7
- [7.2~]
- PCRE JIT 有効が前提のテストで、INI セクション使って pcre.jit=1 を保証するよう修正
remicollet: ensure pcre.jit=1 for this test
- 投稿日:2019-03-24T00:58:53+09:00
プリペアードステートメントでSQLを作成するときに同じ変数を2回使いたい
プリペアードステートメントを使うときにハマったので備忘録。
例えば、
$sql = 'SELECT * FROM orders WHERE buy_user = :user_id OR sale_user = :user_id AND delete_flg = 0';
$data = [':user_id' => $user_id];
だとエラーを吐く。
なので、
$sql = 'SELECT * FROM orders WHERE buy_user = :user_id OR sale_user = :id AND delete_flg = 0';
$data = [':user_id' => $user_id, ':id' => $user_id];
としなくてはならない。理由はわからないがPDOはそういう仕様らしい。バインドするときのキーは複数あったらだめらしい。
- 投稿日:2019-03-24T00:53:18+09:00
docker-compose build でE: Failed to fetch http://... Writing more data than expected (1123368 > 1086978)が発生する時の対応方法
環境
OS:macOS Mojave 10.14.3
Docker:18.09.2, build 6247962
docker-compose:1.23.2, build 1110ad01
docker-machine:0.16.1, build cce350d7
php:7.1.23事象
dockerを以下のコマンドでビルドをすると
docker-compose build --no-cache workspace

.
. 省略
.

+ groupadd -g 1000 laradock
+ useradd -u 1000 -g laradock -m laradock -G docker_env
+ usermod -p * laradock -s /bin/bash
+ apt-get install -yqq apt-utils php7.1-zip nasm
E: Failed to fetch http://220.152.42.162:80/data/06abb81878b24fba/archive.ubuntu.com/ubuntu/pool/universe/n/nasm/nasm_2.11.08-1ubuntu0.1_amd64.deb  Writing more data than expected (1088616 > 1086978)
となりビルドがエラーで落ちるといった事象が発生しました。
対象となる方は少ないかと思いますが、もし同じ事象でお困りの方がいましたら、一旦私が行った処置をシェアしたいと思います。
お役に立てれは幸いです。解決ではないが一旦これでエラー回避
以下のファイルの対象の部分をコメントアウトするだけです。
laradock/workspace/Dockerfile# always run apt update when start and after add new source list, then clean up at end. RUN set -xe; \ apt-get update -yqq && \ pecl channel-update pecl.php.net && \ groupadd -g ${PGID} laradock && \ useradd -u ${PUID} -g laradock -m laradock -G docker_env && \ usermod -p "*" laradock -s /bin/bash && \ apt-get install -yqq \ apt-utils && \ # #-------------------------------------------------------------------------- # Mandatory Software's Installation #-------------------------------------------------------------------------- # # Mandatory Software's such as ("php-cli", "git", "vim", ....) are # installed on the base image 'laradock/workspace' image. If you want # to add more Software's or remove existing one, you need to edit the # base image (https://github.com/Laradock/workspace). # # next lines are here becase there is no auto build on dockerhub see https://github.com/laradock/laradock/pull/1903#issuecomment-463142846 - libzip-dev zip unzip \ + # libzip-dev zip unzip \ コメントアウトした # Install the zip extension - php${LARADOCK_PHP_VERSION}-zip \ + # php${LARADOCK_PHP_VERSION}-zip \ コメントアウトした # nasm - nasm && \ + # nasm && \ コメントアウトした php -m | grep -q 'zip'結論
時間がなくなぜエラーが発生しているのかまだわかっていません。
私が必要とする環境では、必要のないモジュールでエラーが発生していたので一旦コメントアウトで対応しました。もし解決方法をご存知の方がいらしたら是非教えていただけると嬉しいです。
- 投稿日:2019-03-24T00:38:05+09:00
PHPで関数を書く方法
PHPで関数を作る方法
こんにちは、未来電子テクノロジーでインターンをしているueken0403です。
Progate/PHPのPHPⅠを学習し終えたので、得た学びを共有したいと思います。
今回は、PHPで関数を作る方法を解説したいと思います。プログラミング初心者であるため、内容に誤りがあるかもしれません。
もし、誤りがあれば修正するのでどんどん指摘してください。PHPでは関数が使える
PHPには、「組み込み関数」という便利な関数が元々埋め込まれており、決められた命令を打ち込めばそれらを使うことができます。
関数は、
[関数]()
という風に書くのですが、この()に与える数を「引数」と言います。
ちなみに読み方は「いんすう」ではなく「ひきすう」です。
例えば、strlenという関数があるのですが、これは引数の文字列の文字数を数えて返してくれる関数です。PHPでは関数が作れる
関数を作るには「function 関数名(){ 処理 }」という書き方をします。
関数名は自由につけることができます。
作った関数を呼び出すときは、「関数名()」という風に書きましょう。簡単な関数の例
めちゃくちゃ簡単ですが、「三角形の面積の公式」の関数を作ってみましょう。
三角形の面積の公式は当然「底辺×高さ÷2」ですね。
普通は英語を使うのですが、今回は便宜上日本語で行きますね。
自分としてもそっちの方が整理しやすいのでご容赦ください。では関数の名前を「三角形の面積」にして、1つ目の変数を「$底辺」2つ目の変数を「$高さ」とします。
そうした場合、目的の関数は、function 三角形の面積($底辺,$高さ){echo $底辺*$高さ/2;}
となります。
これで「三角関数の面積(3,4);」のように呼び出し、引数を入力すれば勝手に計算をしてくれます。(答えは6)
まとめ
今回は、PHPで関数を作る方法を解説しました。
用意されたものだけでなく、自分で関数を作れるのはシンプルに便利だし、応用の幅が広そうですね。
まだまだ初心者ですが、プログラミングの可能性を感じるレッスンでした。