- 投稿日:2020-07-09T19:44:09+09:00
いきなりGoを使うのに試したこと
ちょうど欲しいと思っていたライブラリが Go で書かれているのを見付けました。それまで Go を使ったことがなかった状態から、そのライブラリを使うために試行錯誤した過程をメモしておきます。
ライブラリ
使いたかったのは vocx というライブラリです。エスペラントをポーランド語のエンジンで音声合成するため、ポーランド語風の綴りに変換するというものです。
用途は特殊ですが、受け取った文字列を正規表現で変換しており、ありふれた文字列処理です。
Usaget := vocx.NewTranscriber() t.Transcribe("Ĉu vi ŝatas Esperanton? Esperanto estas facila lingvo.") // czu wij szatas esperanton? esperanto estas fatssila lijngwo.ビルド
まずライブラリを git clone します。
Makfile にはテストのことしか書かれていません。
Makefileall: test test: @go test -mod=vendor -cover ./... .PHONY: all test
makeするとテストは実行されますが、バイナリの類は生成されません。$ ls LICENSE Makefile README.md default_rules.go go.mod rules.go vocx.go vocx_test.go $ make ok github.com/martinrue/vocx 0.025s coverage: 94.9% of statements $ ls LICENSE Makefile README.md default_rules.go go.mod rules.go vocx.go vocx_test.go
go buildとしても、やはり何も生成されません。main.go
とりあえずこのディレクトリに見よう見まねで main.go を書いてみます。
【参考】 goコマンドざっくりまとめ
main.gopackage main import ( "fmt" "github.com/martinrue/vocx" ) func main() { t := vocx.NewTranscriber() r := t.Transcribe("Ĉu vi ŝatas Esperanton? Esperanto estas facila lingvo.") fmt.Println(r) }しかしビルドも実行もできません。
$ go build
can't load package: package github.com/martinrue/vocx: found packages vocx (default_rules.go) and main (main.go) in /home/xxx/vocx
$ go run main.go
main.go:5:5: found packages vocx (default_rules.go) and main (main.go) in /home/xxx/vocx
ファイル名を指定してもダメです。
$ go build main.go default_rules.go rules.go vocx.go
can't load package: package main: found packages main (main.go) and vocx (default_rules.go) in /home/xxx/vocx
$ go run main.go default_rules.go rules.go vocx.go
package main: found packages main (main.go) and vocx (default_rules.go) in /home/xxx/vocx
エラーメッセージを見る限り、異なるパッケージを同じディレクトリに混ぜてはいけないようです。
分離
別にディレクトリを作って、main.go を単独で置きます。
とりあえず実行してみると、当然のようにライブラリが見付かりません。
$ go run main.go
main.go:5:5: cannot find package "github.com/martinrue/vocx" in any of:
        /usr/lib/go/src/github.com/martinrue/vocx (from $GOROOT)
        /home/xxx/go/src/github.com/martinrue/vocx (from $GOPATH)
試しに言われたディレクトリを作って vocx を移すと、実行できました。
$ mkdir -p ~/go/src/github.com/martinrue
$ mv ../vocx ~/go/src/github.com/martinrue
$ go run main.go
czu wij szatas esperanton? esperanto estas fatssila lijngwo.
go.mod
とりあえず動きましたが、あまりスマートではないので調べました。
どうやらモジュールの初期化が必要なようです。
【参考】 Go Modules
初期化すると、ビルド時に自動で依存パッケージをダウンロードしてくれました。これはスマートです。
$ ls
main.go
$ go mod init test
go: creating new go.mod: module test
$ ls
go.mod  main.go
$ go build
go: finding module for package github.com/martinrue/vocx
go: downloading github.com/martinrue/vocx v0.0.8
go: found github.com/martinrue/vocx in github.com/martinrue/vocx v0.0.8
$ ls
go.mod  go.sum  main.go  test*
$ ./test
czu wij szatas esperanton? esperanto estas fatssila lijngwo.
生成された go.mod と go.sum の内容を示します。
go.modmodule test go 1.14go.sumgithub.com/martinrue/vocx v0.0.8 h1:02g28A3fxULEeg9ew7mSRR1jJ+5zAFAMKwleAZdTqfw= github.com/martinrue/vocx v0.0.8/go.mod h1:rlD2FhmLGi03xF/XfdIprJQMKFXcItoAZzUo2guy1po=ダウンロードされたライブラリは ~/go/pkg に入りました。GOPATH を設定すれば変えられるようです。
ここまでのまとめ
Go でプログラムを書くときは、新規にディレクトリを作成して
go mod initする。こうすれば依存ライブラリはビルド時に自動でダウンロードされる。コマンドライン引数
変換対象の文字列をコマンドライン引数で指定できるようにします。
【参考】 golang でコマンドライン引数を使う
main2.gopackage main import ( "fmt" "os" "github.com/martinrue/vocx" ) func main() { t := vocx.NewTranscriber() r := t.Transcribe(os.Args[1]) fmt.Println(r) }実行結果$ go run main2.go "Ĉu vi ŝatas Esperanton? Esperanto estas facila lingvo." czu wij szatas esperanton? esperanto estas fatssila lijngwo.引数のチェック
引数の数をチェックしていないため、引数を指定しないとエラーになります。
エラー$ go run main2.go panic: runtime error: index out of range [1] with length 1 goroutine 1 [running]: main.main() /home/xxx/vocx/main2.go:11 +0xd7 exit status 2引数の数をチェックします。Python と同様に
len()を使います。【参考】 逆引きGolang (配列)#配列の要素数を取得する
main3.gopackage main import ( "fmt" "os" "github.com/martinrue/vocx" ) func main() { if len(os.Args) > 1 { t := vocx.NewTranscriber() r := t.Transcribe(os.Args[1]) fmt.Println(r) } }実行結果$ go run main3.go $ go run main3.go "Ĉu vi ŝatas Esperanton? Esperanto estas facila lingvo." czu wij szatas esperanton? esperanto estas fatssila lijngwo.usage
引数を指定しないときは標準エラー出力に usage を表示して終了します。
【参考】 【Go】print系関数の違い
【参考】 Go でシェルの Exit code を扱う | tellme.tokyomain4.gopackage main import ( "fmt" "os" "github.com/martinrue/vocx" ) func main() { if len(os.Args) != 2 { fmt.Fprintf(os.Stderr, "usage: %s text\n", os.Args[0]) os.Exit(1) } t := vocx.NewTranscriber() r := t.Transcribe(os.Args[1]) fmt.Println(r) }実行結果$ go run main4.go usage: /tmp/go-build031103390/b001/exe/main4 text exit status 1ビルドすると
exit statusは表示されなくなります。$ go build main4.go $ ./main4 usage: ./main4 text $ echo $? 1ファイル読み込み
オプションを指定してファイルを読み込めるようにします。
【参考】 golang でコマンドライン引数を使う
【参考】 Go言語でのファイル読み取り
【参考】 Go でシェルの Exit code を扱う | tellme.tokyomain5.gopackage main import ( "flag" "fmt" "io/ioutil" "os" "github.com/martinrue/vocx" ) func main() { file := flag.String("f", "", "file to read") flag.Parse() if *file == "" && flag.NArg() != 1 { fmt.Fprintf(os.Stderr, "usage: %s [-f file] | text\n", os.Args[0]) flag.PrintDefaults() os.Exit(1) } t := vocx.NewTranscriber() if (*file == "") { fmt.Println(t.Transcribe(flag.Arg(0))) } else { f, err := os.Open(*file) if err != nil { fmt.Fprintf(os.Stderr, "[ERROR] %v\n", err) os.Exit(1) } b, _ := ioutil.ReadAll(f) f.Close() fmt.Println(t.Transcribe(string(b))) } }実行結果$ go build main5.go $ ./main5 usage: ./main5 [-f file] | text -f string file to read $ echo Ĉu vi ŝatas Esperanton? Esperanto estas facila lingvo. > test.txt $ ./main5 -f test.txt czu wij szatas esperanton? esperanto estas fatssila lijngwo.普通のコマンドラインツールっぽくなって来ました。
REPL
gore という REPL があるようなので試してみます。
【参考】 みんGo学習メモ〜コード補完もできるREPL「gore」を使ってみた
$ gore
gore version 0.5.0  :help for help
gore> :import github.com/martinrue/vocx
gore> t := vocx.NewTranscriber()
(略)
gore> t.Transcribe("Ĉu vi ŝatas Esperanton? Esperanto estas facila lingvo.")
"czu wij szatas esperanton? esperanto estas fatssila lijngwo."
今までの苦労は何だったんだ?というくらいあっけないですね。今回は本格的にプログラミングしたいわけではなく、ライブラリをちょっと試したかっただけなので、これで十分だったかもしれません。
感想
急に必要に迫られたため、学習を飛ばして新しい言語をいきなり使わざるを得ないということは、割とあります。使い始めは右も左も分からないので、どうしても個別にやりたいことを調べてコピペするような感じになってしまいます。
ライブラリの使用感は Python に似ていると感じました。スクリプト言語からネイティブコンパイルする言語に乗り換える選択肢としては、Go は C 言語よりもかなり敷居が低いのではないでしょうか。
プログラムをディレクトリ単位で管理することを前提にコマンドが作られていて、コマンドでビルドや実行をするのは、今の流行りのようです。.NET Core や Rust もそのやり方です。
関連記事
エスペラントの綴りを音節に分解して、UPS と呼ばれる発音表記に変換して読み上げる記事です。この方法は発音を比較的忠実に再現できますが、環境を選びます。
参考
vocx は Parol というシステムの一部です。Parol は以下で知りました。
Parol のデモサイトです。実際にしゃべらせて MP3 で保存できます。音声合成には Amazon Polly を使用しています。
作者は Parol を使った言語学習システムを開発中のようです。
Parol と SAPI を比較した動画です。
komparo de vocx (konvertilo de Parol) kaj ssml-epo (mia konvertilo)
— 7shi_conlang (@7shi_conlang) July 7, 2020
Mi pensas, ke Herena (kataluna) havas la plej bonan voĉon, sed ŝi havas iom da bruo. Tial mi preferas uzi Filip (slovaka).
ssml-epohttps://t.co/MEso23LQbd pic.twitter.com/GJXBsGy28f
- 投稿日:2020-07-09T18:34:04+09:00
頑張らない勤怠管理〜ラズパイとfreeeでWi-Fi打刻〜
皆さん勤怠管理してますか?
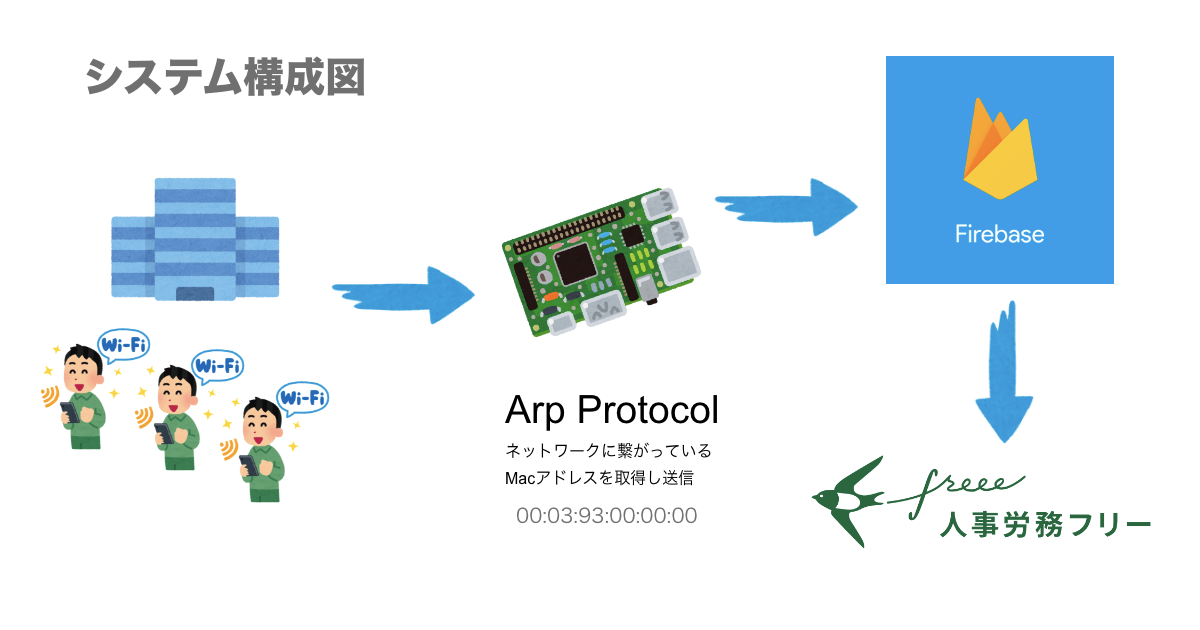
今回は人事労務freeeさんのAPIと連携して、Wi-Fiに接続したら出勤、Wi-Fiの接続が切れたら退勤というものを作ってみました!
用意するもの
- freeeの開発用アカウント
- Raspberry Pi(社内サーバがあればそれで良いです)
- Firebaseアカウント
システム構成図
- Wi-Fiが繋がったデバイスをラズパイでarpで取得
- MacアドレスをFirebaseに送信
- Firebaseから人事労務freeeのAPIを呼ぶ
freeeのセットアップ
APIを叩くにはclient_id, client_secret,code, access token, refresh token がそれぞれ必要になるのですが、下記の公式チュートリアル記事が大変参考になりました。
https://developer.freee.co.jp/tutorials
OAuthを私が雰囲気でしか理解していないためか、認可コード(code)、refresh token, access tokenと似たような認証コードが幾つかあるので混乱しました。
ここで補足しておくと
- 認可コード
- アプリケーションを第3者に利用してもらう場合の、認証のために必要
- access token, refresh tokenを発行するために使う
- 使用すると使えなくなる
- 有効なrefresh tokenを無くすと認可コードを再発行する必要がある
- refresh token
- 使用期間無限
- 更新すると古いrefresh tokenは使えなくなる
- access tokenを発行するために使う
- 更新すると新しいrefresh tokenが返ってくる
- access token
- API呼び出しに使うトークン
- revokeで発行
- 発行後24時間は有効
https://accounts.secure.freee.co.jp/public_api/tokenこのAPIに渡すgrant_typeによって、refresh tokenの新規発行とaccess tokenの更新を管理しています。
grant_typeが authorization_codeの場合新規access_token, refresh tokenの発行です。
grant_typeが refresh_tokenの場合access tokenの更新です。
なので、まとめると認証/認可は以下のような順番になります。
- 初めての場合はgrant_typeをauthorization_codeにしてaccess_token, refresh tokenを取得する
- refresh tokenを取得後は、access tokenが24時間で切れてしまうことに注意を払いながら、利用する
- access tokenの期限が切れそう or 切れた場合は grant_typeをrefresh_tokenにしてrefresh tokenとaccess tokenを更新する。
Raspberry Piのセットアップ
最初に断っておくと、ラズパイである必要はありません。安価で入手しやすく、24時間稼働するサーバとしてお手軽なので選んでいるだけです。
拙作のOSS noplan-inc/arp-device-notifierを利用すると、楽にMacアドレスをサーバーに送信することができます。
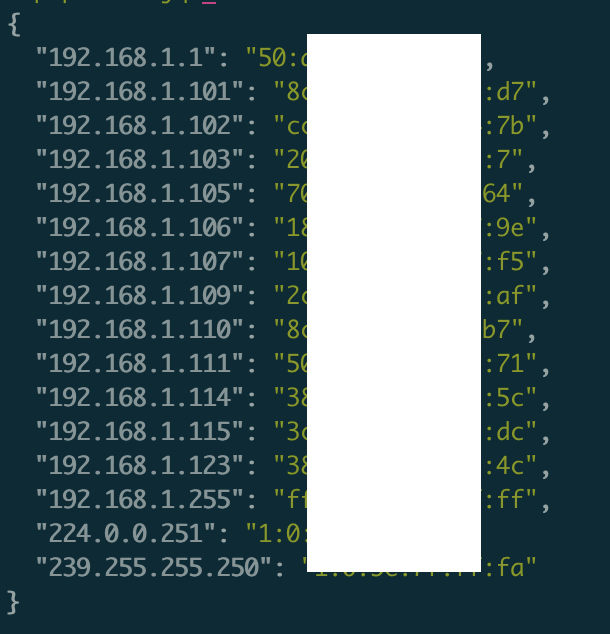
arp-device-notifierはarpプロトコルでネットワーク内のデバイスのIPアドレスとMacアドレスを一覧にし、それをjsonで指定のエンドポイントで投げてくれる君です。Goで書いたCLIツールなので、どこでも動くと思います。
インストール
Goが入っているのであれば、下記コマンドで
$ go get github.com/noplan-inc/arp-device-notifier入っていないのであればバイナリから入れると楽だと思います。
$ wget https://github.com/noplan-inc/arp-device-notifier/releases/download/v0.1/arp-device-notifier_linux_arm
$ chmod 755 arp-device-notifier_linux_arm
$ mv arp-device-notifier_linux_arm /usr/local/bin/arp-device-notifier
使い方
使い方は至ってシンプルで、エンドポイントを指定するだけです。
送信間隔を-iで決めれます。デフォルトだと10秒です。そこまで厳密にする必要がない場合60秒ぐらいにしても全く問題ないと思います。
arp-device-notifier post -e http://example.com -i 60Firebaseのセットアップ
外部から社内にいる人がみたいという要件が今回は別にあったので、FirebaseとFirestoreを使って外部からも参照できるようにしました。ただ打刻するだけの場合、ここまでする必要はなくFreeeのAPIを叩くデーモンをラズパイに同居させておけば良いと思います。
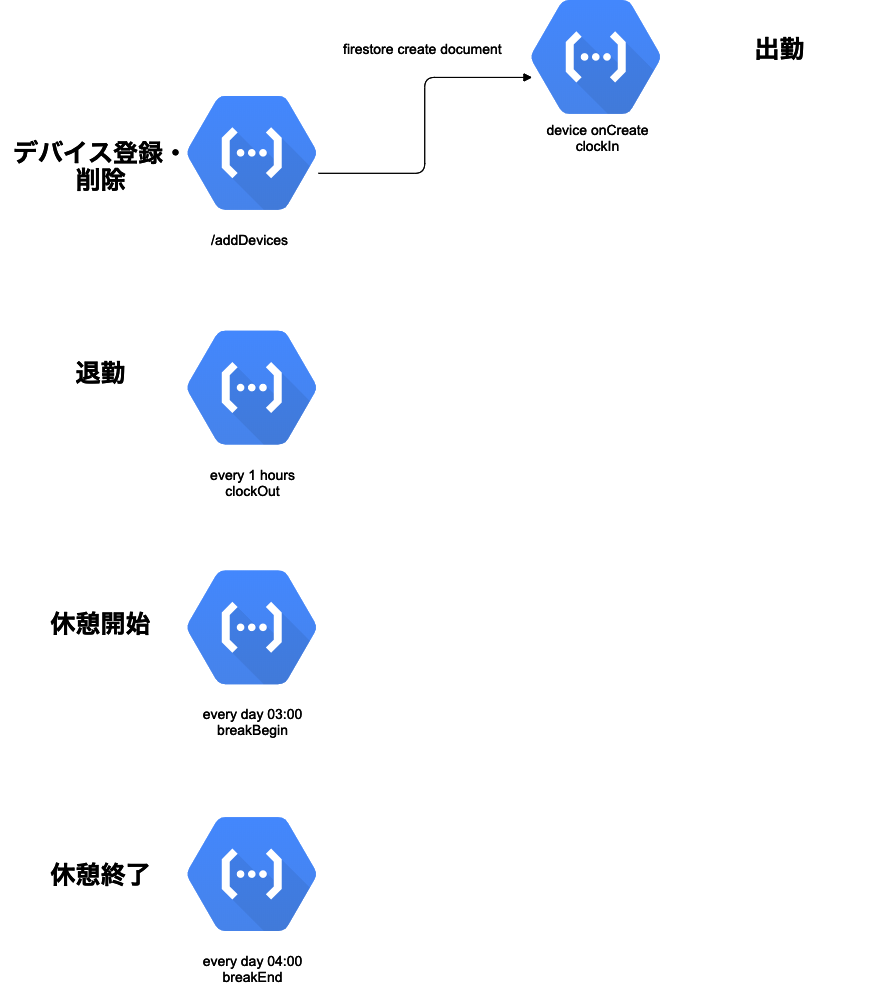
こんな感じのシンプルなアーキテクチャになっています。デバイス登録・削除のfunctionsだけを外部に露出させ、あとはスケジューラーによって休憩の管理をしています。
プロジェクトの作成
http://console.firebase.google.com/にアクセスして、プロジェクトを作リます。
課金プランにしておかないと、スケジューラーが使えないので、従量課金プランにしておきます。
リージョンの設定とFirestoreの作成もついでにしておきましょう。
プロジェクトの準備(ローカル)
$ firebase init
.........<省略>.........
 ◉ Firestore: Deploy rules and create indexes for Firestore
 ◉ Functions: Configure and deploy Cloud Functions
.........<省略>.........
Use an existing project
.........<省略>.........
先ほど作ったプロジェクト
.........<省略>.........
あとは大体enterかyes
.........<省略>.........
typescript yes
これでプロジェクトが作成される。
functions/src/index.tsをおもむろに開いてサンプルコードを参考にしてください。functions/src/index.tsimport * as admin from 'firebase-admin' import * as functions from 'firebase-functions' import axios from 'axios' admin.initializeApp() const db = admin.firestore() const config = functions.config() const company_id = 2526055 type ClockType = 'clock_in' | 'break_begin' | 'break_end' | 'clock_out' const base_endpoint = 'https://api.freee.co.jp/hr' const refresh_token = async (date: string): Promise<string> => { const old_refresh_token_refs = db.collection('token').orderBy('created_at', 'desc').limit(1) const old_refresh_token_docs = await old_refresh_token_refs.get() if (old_refresh_token_docs.empty) { throw new Error('token collectionがありません') } const old_refresh_token_data = old_refresh_token_docs.docs[0].data() || {} const res = await axios.post(`https://accounts.secure.freee.co.jp/public_api/token`, { grant_type: 'refresh_token', client_id: config.freee.client_id, client_secret: config.freee.client_secret, refresh_token: old_refresh_token_data.refresh_token, }) console.log(res.data) const {access_token, refresh_token} = res.data await db.collection('token').doc(date).create({ access_token, refresh_token, created_at: admin.firestore.FieldValue.serverTimestamp() }) return access_token } const get_access_token = async (): Promise<string> => { // ex) 2020-07-09 const date_string = new Date().toJSON().split('T')[0] const token_ref = db.collection('token').doc(date_string) const token_doc = await token_ref.get() if (!token_doc.exists) { return refresh_token(date_string) } const token_data = token_doc.data() || {} return token_data.access_token } const change_clocks = async (type: ClockType, emp_id: string) => { const access_token = await get_access_token() const date = new Date() // JST => UTC date.setHours(date.getHours() + 9) try { await axios.post(`${base_endpoint}/api/v1/employees/${emp_id}/time_clocks`, { company_id, type, datetime: date.toLocaleDateString('ja', { year: 'numeric', month: '2-digit', day: '2-digit', hour: '2-digit', minute: '2-digit', second: '2-digit', }) // ex) '2020/07/09 18:07:54' }, { headers: { Authorization: `Bearer ${access_token}`, } }) } catch (e) { console.error(e) } } export const addDevices = functions.https.onRequest(async (request, response) => { const devices = request.body const mac_addrs = Object.keys(devices).map(k => devices[k]) console.log(mac_addrs) const devices_refs = db.collection('devices') const devices_docs = await devices_refs.get() const added_mac_addrs: { [key: string]: boolean } = {} devices_docs.docs.forEach(d => added_mac_addrs[d.id] = true) const clock_out_devices_refs = db.collection('maybe_clock_out_devices') const clock_out_devices_docs = await clock_out_devices_refs.get() const clock_out_mac_addrs: { [key: string]: boolean } = {} clock_out_devices_docs.docs.forEach(d => clock_out_mac_addrs[d.id] = true) const batch = db.batch() mac_addrs.forEach(addr => { const device_ref = db.collection('devices').doc(addr) if (addr in added_mac_addrs) { // 既に登録されている console.log(`already added! : ${addr}`) delete added_mac_addrs[addr] } else { batch.set(device_ref, { created_at: admin.firestore.FieldValue.serverTimestamp() }) } }) // 退勤した人 = 既に登録されたデバイスリスト - 今回のデバイスリスト console.log(`退勤したかも: ${JSON.stringify(added_mac_addrs)}`) Object.keys(added_mac_addrs).forEach(_addr => { const device_ref = db.collection('devices').doc(_addr) batch.delete(device_ref) const maybe_clock_out_devices_ref = db.collection('maybe_clock_out_devices').doc(_addr) batch.set(maybe_clock_out_devices_ref, { created_at: admin.firestore.FieldValue.serverTimestamp() }) }) // 退勤したかもリストの人が復活した Object.keys(clock_out_mac_addrs).forEach(_addr => { if (_addr in mac_addrs) { const maybe_clock_out_devices_ref = db.collection('maybe_clock_out_devices').doc(_addr) batch.delete(maybe_clock_out_devices_ref) } }) const wr = await batch.commit() console.log(`${wr.length} devices was added!`) response.send(`${wr.length} devices was added!`) }); export const deviceOnCreate = functions.firestore.document('devices/{device_id}').onCreate(async doc => { const mac_addr = doc.id const employee_refs = db.collection('employee').where('mac_addr', '==', mac_addr).limit(1) const employee_docs = await employee_refs.get() if (employee_docs.empty) { return } const employee_data = employee_docs.docs[0].data() || {} const {emp_id} = employee_data await change_clocks('clock_in', emp_id) console.log(`${employee_data.name}さんが出勤をしました!`) }) export const clockOut = functions.pubsub.schedule('every 1 hours').onRun(async () => { const maybe_clock_out_devices_refs = db.collection('maybe_clock_out_devices') const maybe_clock_out_devices_docs = await maybe_clock_out_devices_refs.get() if (maybe_clock_out_devices_docs.empty) return const batch = db.batch() const promises = maybe_clock_out_devices_docs.docs.map(d => { const data = d.data() || {} const now = new Date() // 2時間以上離れていたら、退勤したとみなす if (+now - data.created_at.toDate() > 7200000) { batch.delete(d.ref) return change_clocks('clock_out', d.id) } else { return Promise.resolve(null) } }) await Promise.all(promises) await batch.commit() console.log(`${promises.length} devices is clockOut!`) }) // UTC 03:00 => JST12:00 export const breakBegin = functions.pubsub.schedule('every day 03:00').onRun(async () => { const device_refs = db.collection('devices') const device_docs = await device_refs.get() if (device_docs.empty) return const promises = device_docs.docs.map(d => { return change_clocks('break_begin', d.id) }) await Promise.all(promises) console.log(`${promises.length} devices is break_begin`) }) // UTC 04:00 => JST13:00 export const breakEnd = functions.pubsub.schedule('every day 04:00').onRun(async () => { const device_refs = db.collection('devices') const device_docs = await device_refs.get() if (device_docs.empty) return const promises = device_docs.docs.map(d => { return change_clocks('break_begin', d.id) }) await Promise.all(promises) console.log(`${promises.length} devices is break_end`) })デプロイ
$ firebase functions:config:set freee.client_secret='<CLIENT_SECRET>'
$ firebase functions:config:set freee.client_id='<CLIENT_ID>'
$ firebase deploy
Firestoreにマスターデータを入れる
tokencollectionに 日付をdocument IDにしたドキュメントを作る例)
2020-07-10の場合
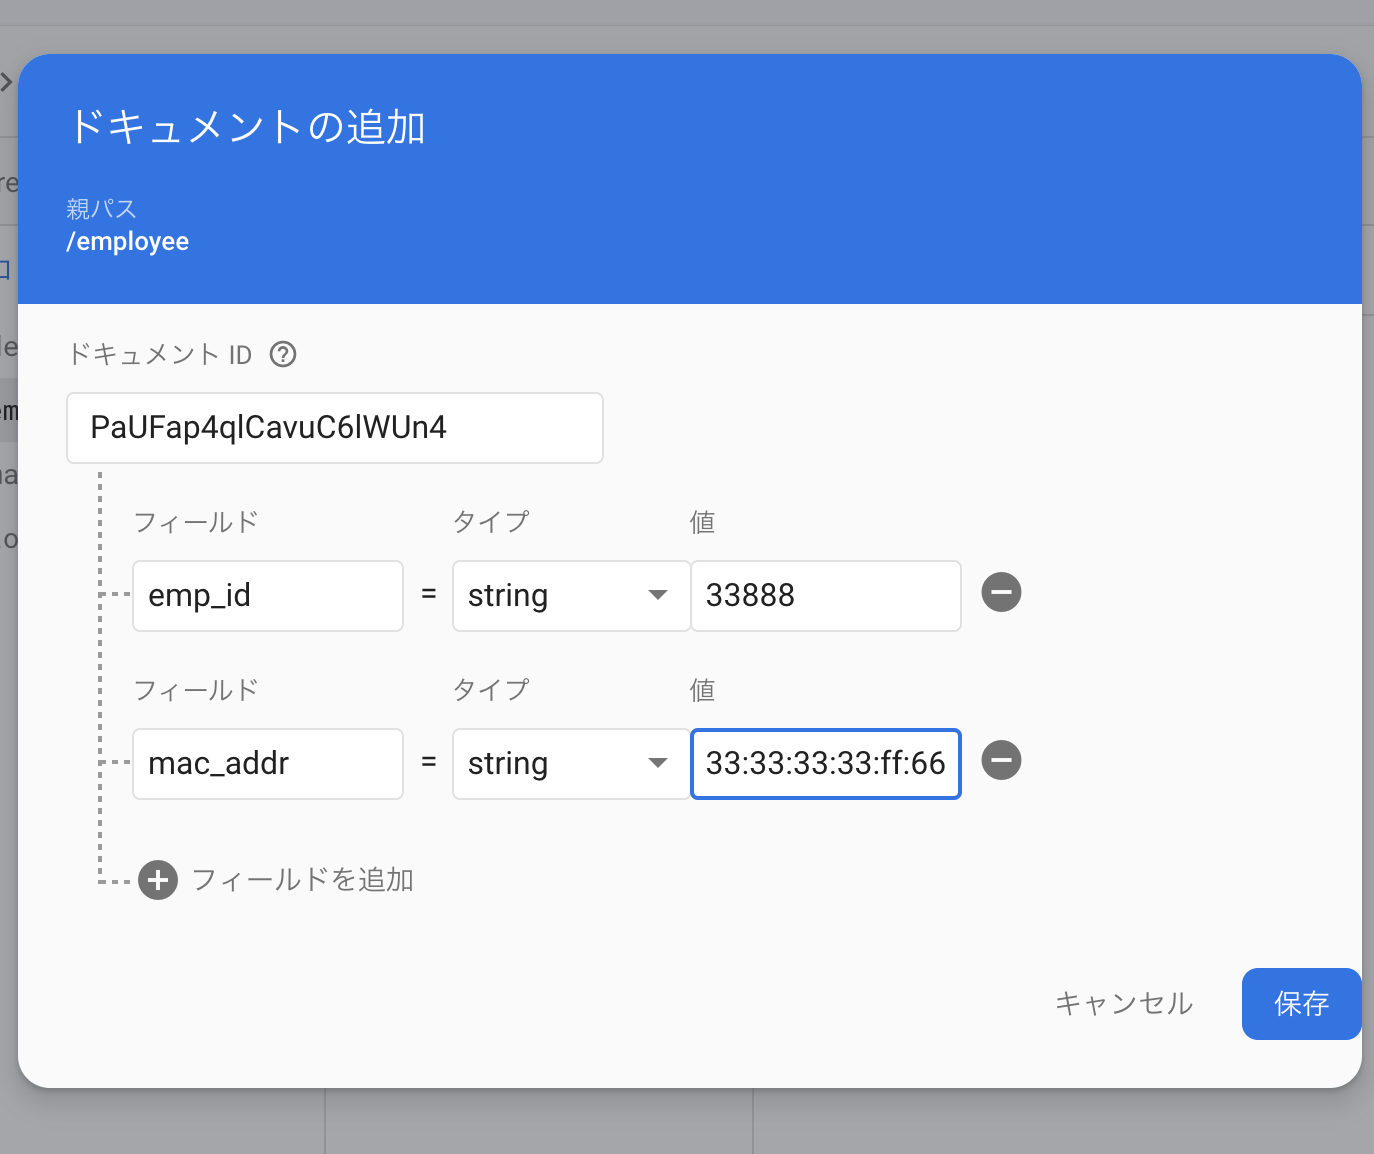
employeeコレクションに従業員のMacアドレスとemp_idを紐付ける必須じゃないですけど、名前がないと誰かわかりづらいのでnameフィールドも追加しておくといいと思います。
これで出勤と退勤と休憩が打刻されていれば成功です!!
freee APIの謎
DELETE /api/v1/employees/{emp_id}/work_records/{date}で削除しても、clock_outしか打刻できないかもしれない?
- デバッグのために何度も1日に出勤、退勤を繰り返せず、不便でした
- 使い方を間違えているのかもしれません
先行研究
先行研究として、勤怠打刻操作を意識しないAPI打刻をするを参考にさせていただきました。
各MacBookで設定するのは、非エンジニアにとっては難しい気がしたので非エンジニアでも気軽に使えるということを目指しました。後Windows対応したかったっていうのもあります。
Macアドレスの登録が面倒ですが、そこはドキュメントにしてしまえばなんとか乗り切れるだろうと思いました!工夫したところ
Wi-Fiが切れただけで退勤したことにしてしまうと、簡単に退勤してしまうことになりかねないので、Wi-Fiが切れた後に仮打刻をし2時間経過した時に本打刻をするようにしました。
今後の展望
時間なさすぎて、一旦リリースしましたが、以下の機能は設計当初に考えていた機能でした!
- デバイスのmacアドレスを登録するUI
- 出勤者一覧機能
まとめ
急ぎ足になってしまいましたが、freeeさんのAPIを使うと簡単にWi-Fi打刻システムが作れます!!
Swaggerでリクエストが送れるAPIドキュメントが整備されていたり、素晴らしいな〜と思いました!
参考資料
- 投稿日:2020-07-09T13:53:17+09:00
go修行18日目 構造化されたWebサーバ
構造化されたWebサーバ
メイン
main.gopackage main import ( "html/template" "io/ioutil" "log" "net/http" ) type Page struct { Title string Body []byte } func (p *Page) save() error { filename := p.Title + ".txt" return ioutil.WriteFile(filename, p.Body, 0600) } func loadPage(title string) (*Page, error) { filename := title + ".txt" body, err := ioutil.ReadFile(filename) if err != nil { return nil, err } return &Page{Title: title, Body: body}, nil } // htmlファイルのテンプレートを指定できる // 直接書いてもいいけれどソースがわかりにくくなる func renderTemplate(w http.ResponseWriter, tmpl string, p *Page) { // ローカルのhtmlファイルを指定 t, _ := template.ParseFiles(tmpl + ".html") t.Execute(w, p) } func viewHandler(w http.ResponseWriter, r *http.Request) { title := r.URL.Path[len("/view/"):] p, err := loadPage(title) // もしエラー(ページがなかったら)editページへリダイレクトされる if err != nil { http.Redirect(w, r, "/edit/"+title, http.StatusFound) return } renderTemplate(w, "view", p) } func editHandler(w http.ResponseWriter, r *http.Request) { title := r.URL.Path[len("/edit/"):] p, err := loadPage(title) if err != nil { p = &Page{Title: title} } renderTemplate(w, "edit", p) } func saveHandler(w http.ResponseWriter, r *http.Request) { title := r.URL.Path[len("/save/"):] body := r.FormValue("body") p := &Page{Title: title, Body: []byte(body)} err := p.save() // saveに失敗したら、500エラー if err != nil { http.Error(w, err.Error(), http.StatusInternalServerError) return } http.Redirect(w, r, "/view/"+title, http.StatusFound) } func main() { http.HandleFunc("/view/", viewHandler) http.HandleFunc("/edit/", editHandler) http.HandleFunc("/save/", saveHandler) // /にアクセスしたり/view以外にアクセスすると404NOTFOUND log.Fatal(http.ListenAndServe(":8080", nil)) }/editとなるhtmlファイル
edit.html<h1>Editing {{.Title}}</h1> <form action="/save/{{.Title}}" method="POST"> <div> <textarea name="body" rows="20" cols="80">{{printf "%s" .Body}}</textarea> </div> <div> <input type="submit" value="Save"> </div> </form>/viewとなるhmtlファイル
view.html<h1>{{.Title}}</h1> <p>[<a href="/edit/{{.Title}}">Edit</a>]</p> <div>{{printf "%s" .Body}}</div>動作確認
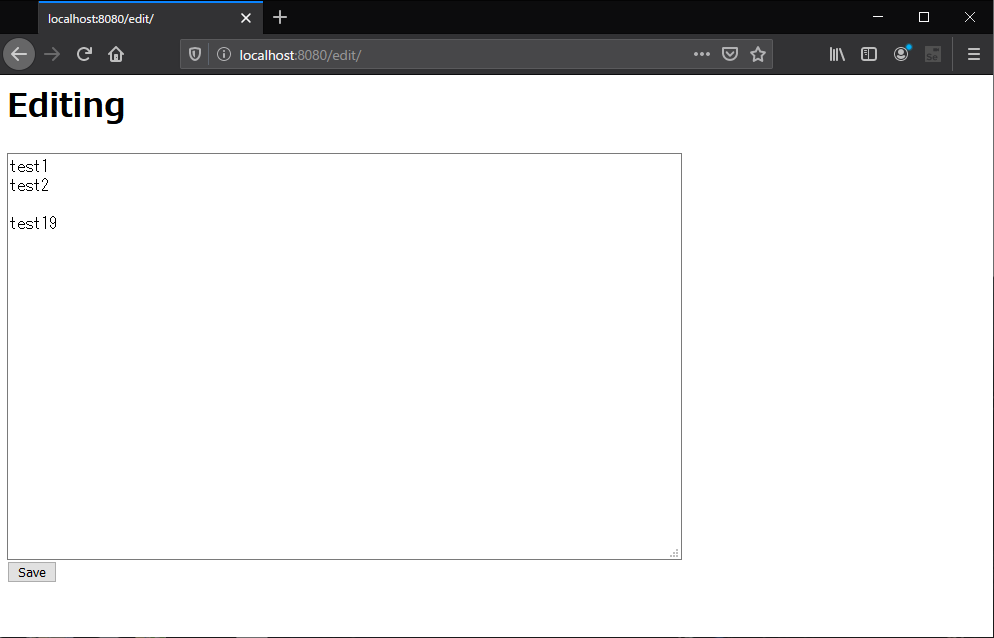
editページでhtmlファイル生成
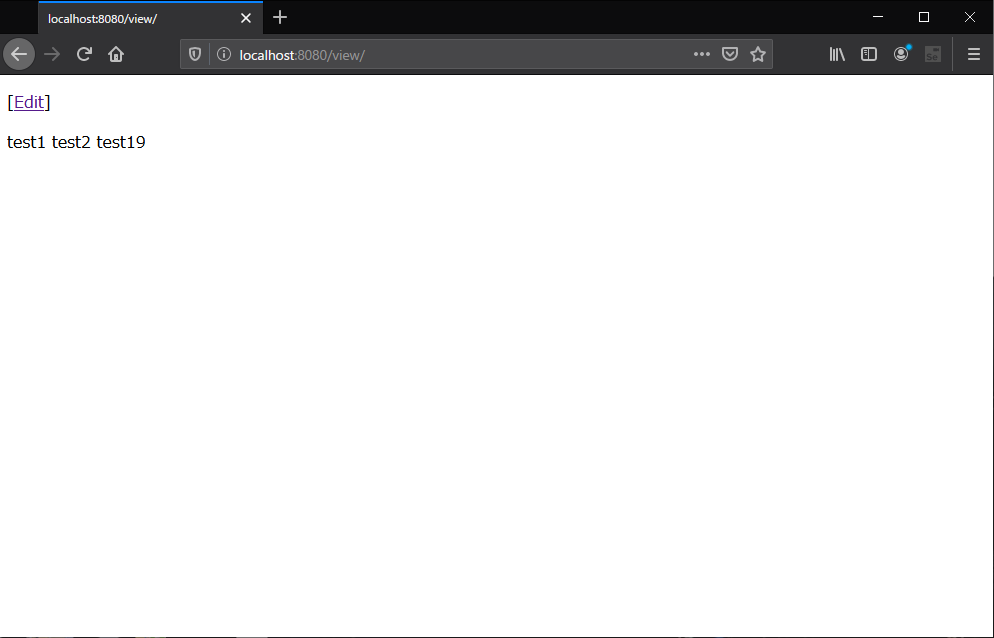
/viewが一覧ページ
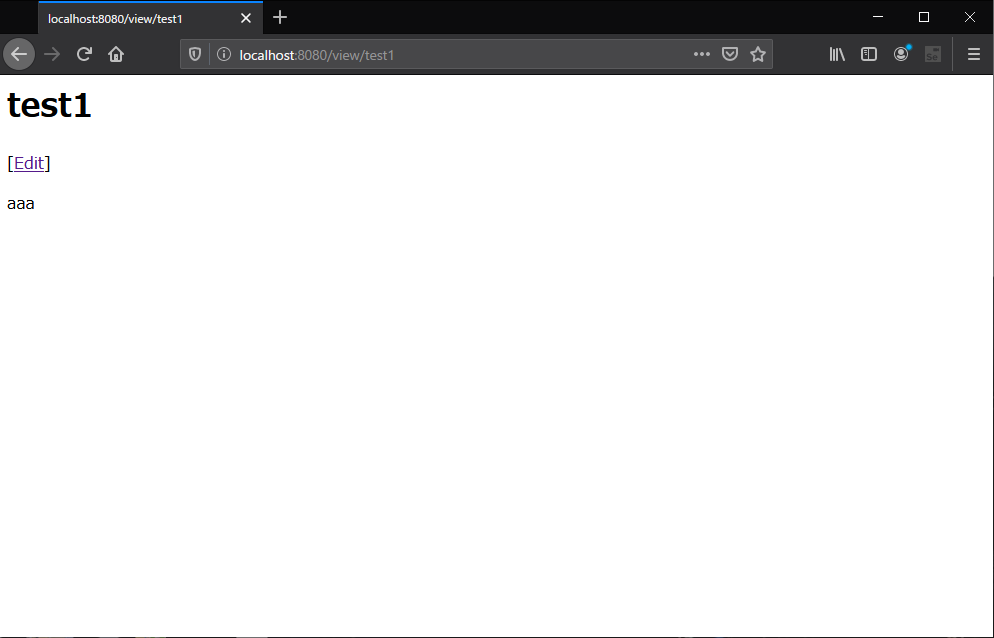
/view/test1などでアクセス
教材
https://www.udemy.com/course/go-fintech/learn/lecture/12088980
- 投稿日:2020-07-09T05:38:35+09:00
gorenameでexportした変数名でも短時間でリネームするためのシェルスクリプトを書いた
動作確認環境
- Ubuntu 18.04
- Go 1.14.2
macOSでも動くと思います。
背景
Go Toolsに含まれるgorenameは、様々な変数の名前を変更するためのツールで、リファクタリングなどに活用できます。
ただし、エクスポートされた変数の場合は、マシン内のワークスペース($GOROOTおよび$GOPATH)をスキャンするという挙動があり、非常に時間がかかることがあるようです。(参考)
$ gorename -help
:
gorename automatically computes the set of packages that might be
affected.  For a local renaming, this is just the package specified by
-from or -offset, but for a potentially exported name, gorename scans
the workspace ($GOROOT and $GOPATH).
作成したシェルスクリプト
概要
そこで、モジュール開発時を想定して、以下のような操作を行うシェルスクリプトを書きました:
- GOPATHを設定するための一時ディレクトリを作成する
- 開発中のモジュールだけをそこにシンボリックで配置する
GOPATH=${一時ディレクトリ} gorenameコマンドを実行する- 置換が終わったら一時ディレクトリは削除
ソースはこちらです:
Requirements
- Bash
gorenameコマンドgo.modがあるディレクトリで実行すること。
go.modの1行目にmodule ${moduleパス}の記載がある想定使い方
Syntax:
go-rename-dev [PATH].FROM_NAME TO_NAME [OPTIONS]例:
go-rename-dev internal/logs.Log Logging
# gorename -from '"${module}/intenal/logs".Log' -to Logging

go-rename-dev .Conf Config -v
# gorename -from '"${module}".Conf' -to Config -v
上のコマンド例は、それぞれ内部的に直下のコメントアウトしてある
gorenameコマンドを実行します。実行例
$ pwd
/home/progrhyme/my/go/src/github.com/progrhyme/binq

$ go-rename-dev internal/cli.CLI.OutStream OutStr -v
+ GOPATH=/tmp/tmp.Stu5A9b9CX
+ gorename -from '"github.com/progrhyme/binq/internal/cli".CLI.OutStream' -to OutStr -v
gorename: -from spec: {pkg:github.com/progrhyme/binq/internal/cli fromName:OutStream searchFor: pkgMember:CLI typeMember:OutStream filename: offset:0}
gorename: Loading package: github.com/progrhyme/binq/internal/cli
gorename: Potentially global renaming; scanning workspace...
While scanning Go workspace:
Package "github.com": cannot find module providing package github.com: unrecognized import path "github.com": parse https://github.com/?go-get=1: no go-import meta tags ().
Package "github.com/progrhyme": cannot find module providing package github.com/progrhyme: invalid github.com/ import path "github.com/progrhyme".
gorename: Loading package: github.com/progrhyme/binq/internal/cli
gorename: Updating package github.com/progrhyme/binq/internal/cli
Renamed 4 occurrences in 1 file in 1 package.
+ set +x
若干、見慣れないようなエラーが出ているのが気になりますが(汗)、置換自体は上手く行っています。
効果
(Before)
最近
$HOME/goに色々溜まっており、エクスポートされた変数名に対してgorenameを実行すると数分経っても結果が返って来ないので、諦めていました。(After)
このラッパーコマンドを使うことで、多少の依存があるモジュールでrenameを実行しても30秒以内には終わるようになりました。
まとめ
gorenameを使って、エクスポートした変数名であっても短時間でリネームするためのシェルスクリプトを書きました。
同様のケースでお困りの方は、ご自由にご利用ください。

