- 投稿日:2020-06-27T22:53:58+09:00
Docker で Ruby on Jets + React のアプリを作成する開発環境構築
概要
Ruby on Jets(API)と React のアプリを作成するための開発環境構築手順です。
Ruby on Jets は API 専用として作成します。DB は MySQL を利用。
React は Typescript を使います。
Docker は Docker for Mac を利用。ローカルでページを開くと API から DB に保存されているユーザー情報を取得して表示するところまでやっています。
AWS へのデプロイまではしていません。ファイル構成
reactjets/
  ├ api/
  │  ├ ...
  ├ front/
  │  ├ ...
  ├ docker/
  │  ├ api/
  │  │  ├ Dockerfile
  │  ├ front/
  │  │  ├ Dockerfile
  │  ├ mysql/
  │  │  ├ conf.d
  │  │  │  ├ my.cnf
  │  ├ docker-compose.yml
Docker 環境構築
Dockerfile(2種),Gemfile, Gemfile.lock, my.cnf, docker-compose.yml を作成
docker/front/DockerfileFROM node:12.18docker/api/DockerfileFROM ruby:2.5.8 WORKDIR /api COPY api /api RUN bundle installapi/Gemfilesource 'https://rubygems.org' gem 'jets'Gemfile.lock は空のファイルを作成
api/Gemfile.locktouch Gemfile.lockdocker/mysql/conf.d/my.cnf[mysqld] character-set-server=utf8mb4 explicit-defaults-for-timestamp=1 [client] default-character-set=utf8mb4docker/docker-compose.ymlversion: '3' services: front: build: context: ../ dockerfile: docker/front/Dockerfile volumes: # :より左の部分は自分の環境に合わせる - ~/Dev/reactjets/front:/front ports: - "8000:3000" stdin_open: true api: build: context: ../ dockerfile: docker/api/Dockerfile command: bash -c "bundle exec jets server --port 3000 --host 0.0.0.0" volumes: # :より左の部分は自分の環境に合わせる - ~/Dev/reactjets/api:/api ports: - "3000:3000" depends_on: - db db: image: mysql:5.7 environment: MYSQL_ROOT_PASSWORD: root MYSQL_DATABASE: app MYSQL_USER: docker MYSQL_PASSWORD: docker TZ: 'Asia/Tokyo' ports: - 3306:3306 volumes: - ./mysql/conf.d:/etc/mysql/conf.ddocker-compose ビルド
$ docker-compose buildJets アプリ作成
$ docker-compose run api jets new . --mode api --database=mysql※ Overwrite /api/Gemfile? (enter "h" for help) [Ynaqdhm] がでてきたら Y
api 配下に jets アプリケーションが作成されていることを確認
DB 接続のために .env.development に環境変数を追加.env.developmentDB_HOST=db DB_NAME=app DB_USER=docker DB_PASS=dockerReact アプリ作成
$ docker-compose run --rm front sh -c 'yarn create react-app front --template typescript'front 配下に react アプリケーションが作成されていることを確認
起動
$ docker-compose up --buildreact 起動
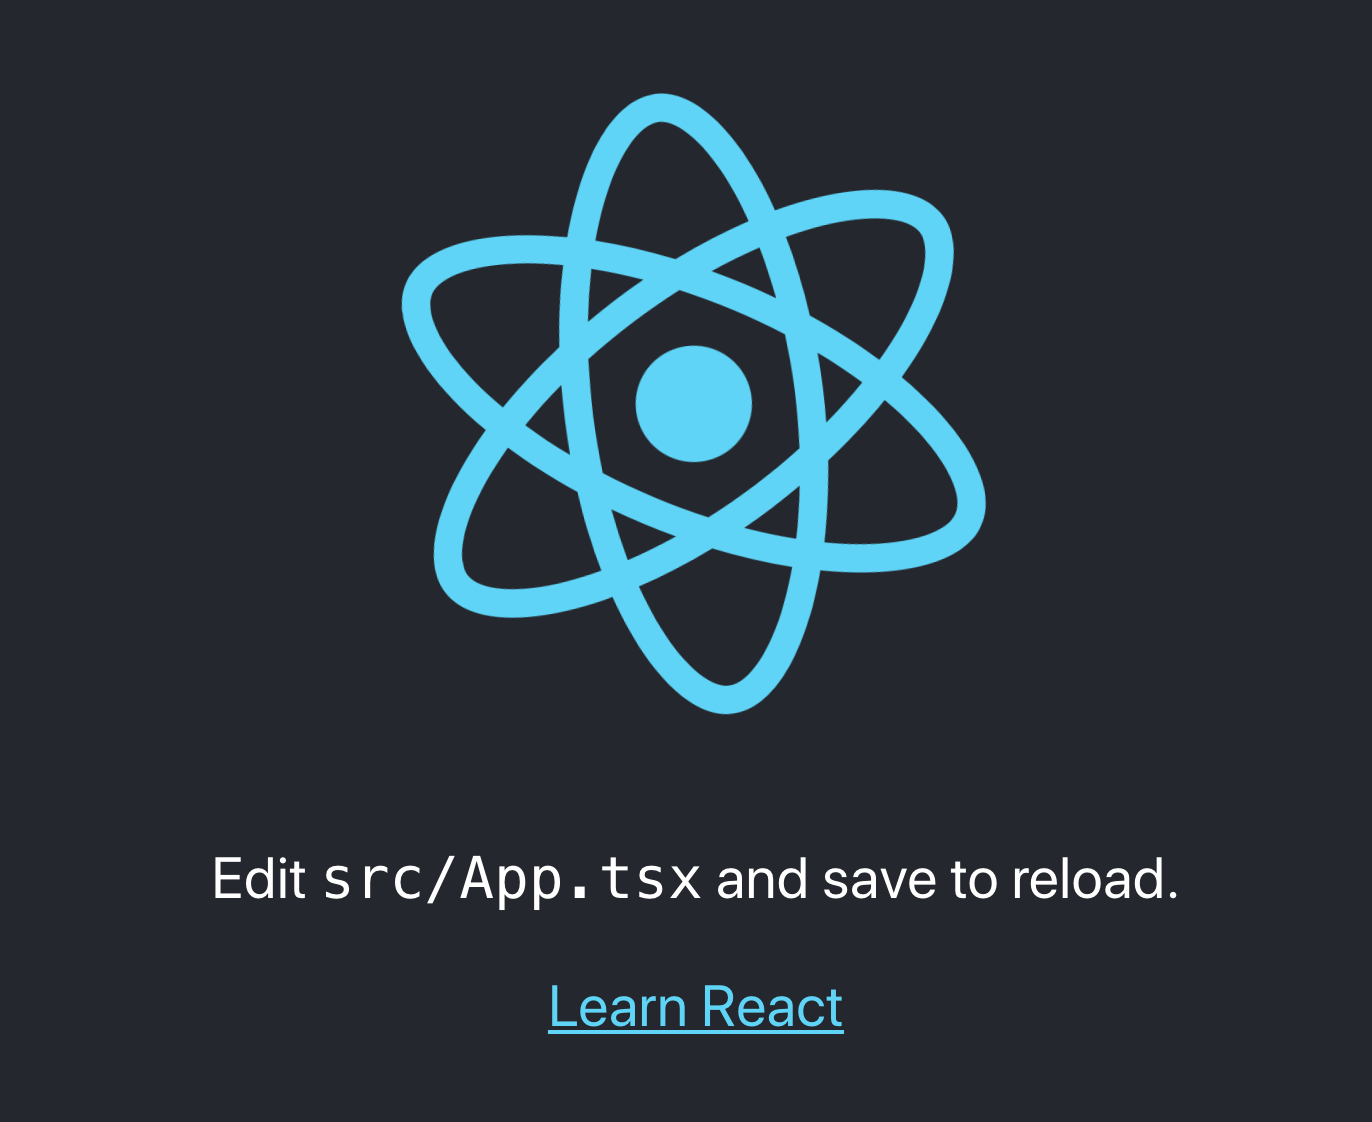
$ docker exec -it docker_front_1 bash

# cd front
# yarn start
画面が表示されることを確認
Ruby on Jets : http://localhost:3000
React : http://localhost:8000
api 作成
user を scaffold で作成
$ docker exec -it docker_api_1 bash

# jets generate scaffold user name:string age:integer
# jets db:create db:migrate
※ jets db:create db:migrate で access denied など出ていたら mysql 側のユーザーの権限設定を確認する
GRANT ALL ON *.* to docker@'%';users テーブルが作成されているので、直接2件適当に INSERT し
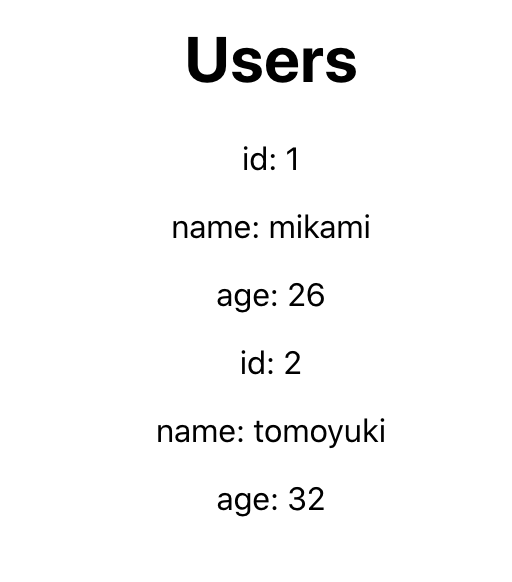
http://localhost:3000/users にアクセスすると、以下のようなデータが返ってきていることが確認できる[{"id":1,"name":"mikami","age":26,"created_at":"2020-06-27T18:57:44.000Z","updated_at":"2020-06-27T18:57:44.000Z"},{"id":2,"name":"tomoyuki","age":32,"created_at":"2020-06-27T18:57:44.000Z","updated_at":"2020-06-27T18:57:44.000Z"}]front と api の疎通
front 側
axios インストール
$ docker exec -it docker_front_1 bash

# cd front
# yarn add axios
App.tsx を編集
App.tsximport React from 'react'; import axios from 'axios'; import './App.css'; class App extends React.Component<any, any> { constructor(props: any) { super(props); this.state = { users: [] } } componentDidMount() { axios.get('http://localhost:3000/users') .then((result) => { this.setState({ users: result.data }); }) } render() { return ( <div className="App"> <h1>Users</h1> <div> { this.state.users.map((v: any) => { return ( <div key={v.id}> <p>id: {v.id}</p> <p>name: {v.name}</p> <p>age: {v.age}</p> </div> ) })} </div> </div> ) } } export default App;このままでは CORS で通信できないので、api 側で CORS の設定をする
api 側
以下のコメントアウトを外す
application.rbconfig.cors = true # for '*'' # defaults to false確認
再起動
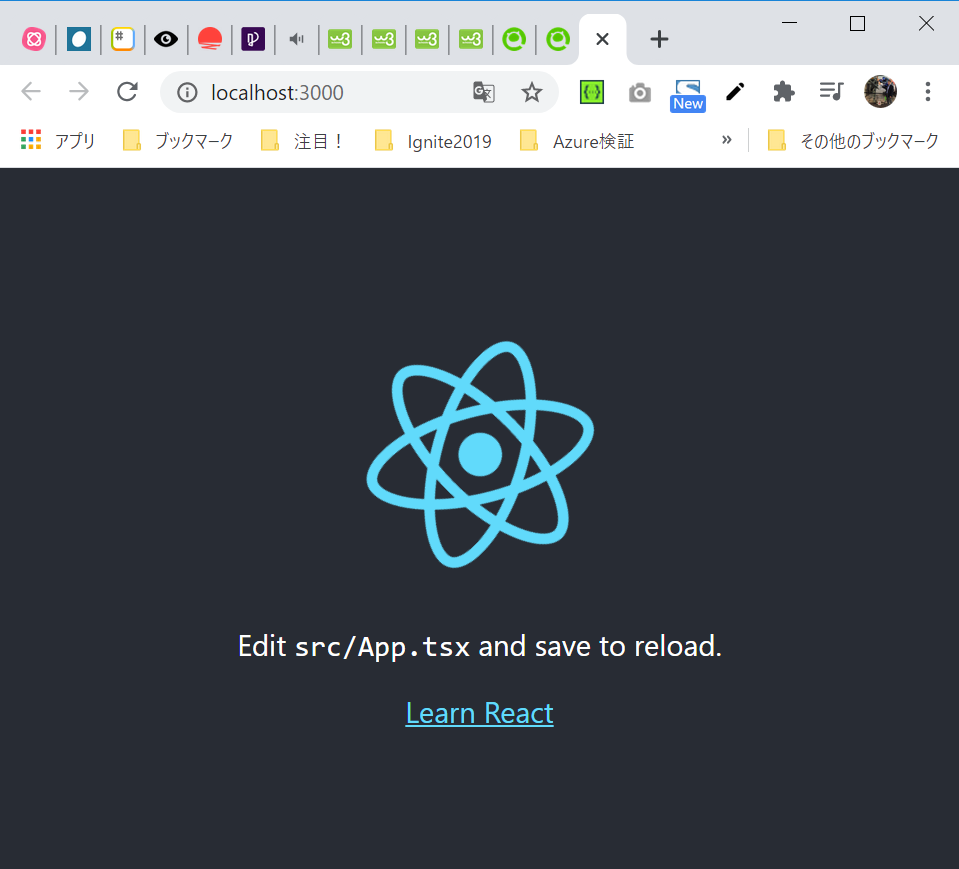
$ docker-compose stop
$ docker-compose start
$ docker exec -it docker_front_1 bash

# cd front
# yarn start
http://localhost:8000/ にアクセスすると以下のように表示されていれば疎通ok
WIP
AWS へのデプロイ手順
Ruby on Jets デプロイ
https://qiita.com/kskinaba/items/9c570093ed912f8f1681 この通りにやる
Ruby 2.5系じゃないとだめらしい…
Deploying to Lambda api-dev environment...
/usr/local/bundle/gems/memoist-0.16.2/lib/memoist.rb:213: warning: Using the last argument as keyword parameters is deprecated; maybe ** should be added to the call
/usr/local/bundle/gems/jets-2.3.16/lib/jets/lambda/dsl.rb:319: warning: The called method `_unmemoized_find_all_tasks' is defined here
Building CloudFormation templates.
Generated CloudFormation templates at /tmp/jets/api/templates
Deploying CloudFormation stack with jets app!
Waiting for stack to complete
02:25:31AM CREATE_IN_PROGRESS AWS::CloudFormation::Stack api-dev User Initiated
02:25:34AM CREATE_IN_PROGRESS AWS::S3::Bucket S3Bucket
02:25:35AM CREATE_IN_PROGRESS AWS::S3::Bucket S3Bucket Resource creation Initiated
02:25:56AM CREATE_COMPLETE AWS::S3::Bucket S3Bucket
02:25:58AM CREATE_COMPLETE AWS::CloudFormation::Stack api-dev
Stack success status: CREATE_COMPLETE
Time took for stack deployment: 28s.
You are using Ruby version 2.7.1 which is not supported by Jets.
Jets uses Ruby 2.5.3.  You should use a variant of Ruby 2.5.x
- 投稿日:2020-06-27T19:06:42+09:00
Learning React #2 最初のプロジェクト
早速最初のReactアプリケーションプロジェクトを作ってみましょう。
Facebookが便利なツール"create-react-app"を提供してくれていますのでこれを使いましょう。最初のReactプロジェクト
適当にフォルダーを作成し、そのフォルダーに移動して
create-react-appを実行します。
私は"react-app"というフォルダを作成し、"hello-world"という名前のプロジェクトを作成しました。
実行コマンドは以下の通りです。実行コマンド(旧)$ npx create-react-app hello-world --typescript実行コマンド(新)$ npx create-react-app hello-world --template typescript
npxは前にも説明しましたが、コマンド実行時に必要なパッケージをインストールしておかなくても、必要に応じて自動でダウンロードして実行してくれるようにするものです。
ここで"旧"と"新"の両方を記載しましたが、よく書籍では"旧"のほうが記載されているのですが、実行すると分かりますが、将来的には"--typescript"というパラメータは削除される可能性があるので新しいパラメータ"--template typescript"を使ってねん
と言われるので、一応"新"パラメータも載せました。
上記コマンドを実行すると、バーッとメッセージが表示されるのですが、何が行われているのか分からなかったので、1つ1つのメッセージを調べました。
いきなりこんなにメッセージが出力されるので最初はビビりますが、これって自分が作ったプロジェクトがどのように作成されているのかを知るための良い情報ですよね。出力メッセージに1つ1つのメッセージに括弧付き番号"()"をつけて解説します。
このあと説明しますね。最初のReactプロジェクトsatom@W1007018N182 MINGW64 ~/src/react-app $ npx create-react-app hello-world --typescript (1) Creating a new React app in C:\Users\satom\src\react-app\hello-world. (2) The --typescript option has been deprecated and will be removed in a future release. In future, please use --template typescript. (3) Installing packages. This might take a couple of minutes. (4) Installing react, react-dom, and react-scripts with cra-template-typescript... (5) yarn add v1.22.4 (6) [1/4] Resolving packages... (7) [2/4] Fetching packages... info fsevents@1.2.11: The platform "win32" is incompatible with this module. info "fsevents@1.2.11" is an optional dependency and failed compatibility check. Excluding it from installation. info fsevents@2.1.2: The platform "win32" is incompatible with this module. info "fsevents@2.1.2" is an optional dependency and failed compatibility check. Excluding it from installation. (8) [3/4] Linking dependencies... warning "react-scripts > @typescript-eslint/eslint-plugin > tsutils@3.17.1" has unmet peer dependency "typescript@>=2.8.0 || >= 3.2.0-dev || >= 3.3.0-dev || >= 3.4.0-dev || >= 3.5.0-dev || >= 3.6.0-dev || >= 3.6.0-beta || >= 3.7.0-dev || >= 3.7.0-beta". (9) [4/4] Building fresh packages... success Saved lockfile. success Saved 33 new dependencies. info Direct dependencies ├─ cra-template-typescript@1.0.3 ├─ react-dom@16.13.1 ├─ react-scripts@3.4.1 └─ react@16.13.1 (10) info All dependencies ├─ @babel/compat-data@7.10.3 ├─ @babel/helper-builder-react-jsx@7.10.3 ├─ @babel/helper-define-map@7.10.3 ├─ @babel/helper-get-function-arity@7.10.3 ├─ @babel/helper-member-expression-to-functions@7.10.3 ├─ @babel/plugin-syntax-numeric-separator@7.10.1 ├─ @babel/plugin-transform-parameters@7.10.1 ├─ @babel/runtime-corejs3@7.10.3 ├─ babel-eslint@10.1.0 ├─ babel-preset-react-app@9.1.2 ├─ core-js-pure@3.6.5 ├─ cra-template-typescript@1.0.3 ├─ electron-to-chromium@1.3.483 ├─ escalade@3.0.1 ├─ eslint-config-react-app@5.2.1 ├─ eslint-plugin-import@2.20.1 ├─ eslint-plugin-react@7.19.0 ├─ internal-slot@1.0.2 ├─ node-releases@1.1.58 ├─ open@7.0.4 ├─ pnp-webpack-plugin@1.6.4 ├─ react-dev-utils@10.2.1 ├─ react-dom@16.13.1 ├─ react-error-overlay@6.0.7 ├─ react-scripts@3.4.1 ├─ react@16.13.1 ├─ scheduler@0.19.1 ├─ string.prototype.matchall@4.0.2 ├─ terser-webpack-plugin@2.3.5 ├─ ts-pnp@1.1.6 ├─ webpack-dev-server@3.10.3 ├─ webpack@4.42.0 └─ xregexp@4.3.0 Done in 211.09s. (11) Initialized a git repository. (12) Installing template dependencies using yarnpkg... yarn add v1.22.4 [1/4] Resolving packages... warning @testing-library/react > @types/testing-library__react > @types/testing-library__dom@7.5.0: This is a stub types definition. testing-library__dom provides its own type definitions, so you do not need this installed. [2/4] Fetching packages... info fsevents@2.1.2: The platform "win32" is incompatible with this module. info "fsevents@2.1.2" is an optional dependency and failed compatibility check. Excluding it from installation. info fsevents@1.2.11: The platform "win32" is incompatible with this module. info "fsevents@1.2.11" is an optional dependency and failed compatibility check. Excluding it from installation. [3/4] Linking dependencies... warning " > @testing-library/user-event@7.2.1" has unmet peer dependency "@testing-library/dom@>=5". [4/4] Building fresh packages... success Saved lockfile. success Saved 24 new dependencies. info Direct dependencies ├─ @testing-library/jest-dom@4.2.4 ├─ @testing-library/react@9.5.0 ├─ @testing-library/user-event@7.2.1 ├─ @types/jest@24.9.1 ├─ @types/node@12.12.47 ├─ @types/react-dom@16.9.8 ├─ @types/react@16.9.41 ├─ react-dom@16.13.1 ├─ react@16.13.1 └─ typescript@3.7.5 info All dependencies ├─ @sheerun/mutationobserver-shim@0.3.3 ├─ @testing-library/dom@6.16.0 ├─ @testing-library/jest-dom@4.2.4 ├─ @testing-library/react@9.5.0 ├─ @testing-library/user-event@7.2.1 ├─ @types/color-name@1.1.1 ├─ @types/jest@24.9.1 ├─ @types/node@12.12.47 ├─ @types/prop-types@15.7.3 ├─ @types/react-dom@16.9.8 ├─ @types/react@16.9.41 ├─ @types/testing-library__dom@7.5.0 ├─ @types/testing-library__react@9.1.3 ├─ aria-query@4.2.2 ├─ css.escape@1.5.1 ├─ csstype@2.6.10 ├─ dom-accessibility-api@0.3.0 ├─ min-indent@1.0.1 ├─ react-dom@16.13.1 ├─ react@16.13.1 ├─ redent@3.0.0 ├─ strip-indent@3.0.0 ├─ typescript@3.7.5 └─ wait-for-expect@3.0.2 Done in 35.15s. (13) We detected TypeScript in your project (src\App.test.tsx) and created a tsconfig.json file for you. (14) Your tsconfig.json has been populated with default values. (15) Removing template package using yarnpkg... yarn remove v1.22.4 [1/2] Removing module cra-template-typescript... [2/2] Regenerating lockfile and installing missing dependencies... info fsevents@2.1.2: The platform "win32" is incompatible with this module. info "fsevents@2.1.2" is an optional dependency and failed compatibility check. Excluding it from installation. info fsevents@1.2.11: The platform "win32" is incompatible with this module. info "fsevents@1.2.11" is an optional dependency and failed compatibility check. Excluding it from installation. warning " > @testing-library/user-event@7.2.1" has unmet peer dependency "@testing-library/dom@>=5". success Uninstalled packages. Done in 23.94s. (16) Created git commit. (17) Success! Created hello-world at C:\Users\satom\src\react-app\hello-world Inside that directory, you can run several commands: yarn start Starts the development server. yarn build Bundles the app into static files for production. yarn test Starts the test runner. yarn eject Removes this tool and copies build dependencies, configuration files and scripts into the app directory. If you do this, you can’t go back! (18) We suggest that you begin by typing: cd hello-world yarn start Happy hacking! satom@W1007018N182 MINGW64 ~/src/react-app $それでは解説します!
(1) プロジェクトフォルダーの作成
現在のフォルダー"c:\Users\satom\src\react-app"に"hello-world"という名前のReactアプリケーションのプロジェクトを作成します。
実際には、"hello-world"という名前のフォルダーが作成され、そのフォルダーがプロジェクトフォルダーになります。(2) 旧パラメータに対する警告と、新パラメータのアナウンス
冒頭で説明した"旧"と"新"のコマンドによる違いがここで説明されています。
今後は"--template typescript"を使用しましょう。(3) Reactプロジェクト作成に必要なパッケージのインストール
ここで少し心配になるぐらい時間かからいますが、安心してください、動いてます!
(4) TypeScriptのプロジェクト作成テンプレートのインストール
"cra-template-typescript"は、Reactの公式なTypeScriptプロジェクトのテンプレート名です。
要するにここで公式テンプレートを使用したプロジェクト作成を行っています。(5) ~ (9) yarnによるReactプロジェクトの構築ステップ
(5)から(9)まで、yarnが実行され、Reactプロジェクト構築に必要なパッケージと、それらに必要な依存関係のある関連パッケージ全てがインストールされ、Reactプロジェクトが構築されます。
(10) Reactプロジェクトで必要となった全パッケージの表示
最終的に、Reactプロジェクトを構築するために必要な全パッケージの情報を表示します。
(11) Gitローカルリポジトリの自動作成
作成したReactプロジェクトをベースにgitリポジトリを自動作成します。なんと一気にGitリポジトリも作成してくれるのです。便利な世の中になりました。でも、少しだけお節介ですねw
(12) Reactプロジェクトのテストモジュールのインストール
Reactプロジェクトにテストモジュールを追加構築しています。
(13)~(14) TypeScriptのための設定ファイルの自動生成
作成したReactプロジェクトがTypeScriptベースの場合、設定ファイルを自動作成します。
(15) 不要となったパッケージを削除
これは何をしているのか不明。。
(16) Gitローカルリポジトリへのコミット
ここまでのプロジェクトファイルをGitローカルリポジトリに保存。
(17) Reactプロジェクトの構築完了!
これが表示されれば、プロジェクトの構築は完了です!
yarnコマンドを使って、Reactアプリケーションのローカル実行(yarn start) 、リリースモジュール作成(yarn build)、自動テスト実行(yarn test)が可能です。
yarn ejectだけは何をしているのか不明。。。(18) Let's try to run your first app!
ここまで完了した場合、デフォルトの状態でアプリケーションが起動できるようになっています。
という事で、プロジェクトフォルダーに移動して作成したアプリケーションを実行しましょう!最初のアプリケーション実行satom@W1007018N182 MINGW64 ~/src/react-app $ cd hello-world/ satom@W1007018N182 MINGW64 ~/src/react-app/hello-world (master) $ yarn start yarn run v1.22.4 $ react-scripts start i 「wds」: Project is running at http://192.168.3.8/ i 「wds」: webpack output is served from i 「wds」: Content not from webpack is served from C:\Users\satom\src\react-app\hello-world\public i 「wds」: 404s will fallback to / Starting the development server... Compiled successfully! You can now view hello-world in the browser. Local: http://localhost:3000 On Your Network: http://192.168.3.8:3000 Note that the development build is not optimized. To create a production build, use yarn build.
- 投稿日:2020-06-27T08:30:42+09:00
Learning React #1 セットアップ
これって王道なのかしら。よく見かける組み合わせなので、少しづつ勉強したいと思い、その軌跡をつづっていきます。
React + TypeScriptの環境セットアップ
私はWindows環境を想定した環境をセットアップします。
使用するツールのバージョン確認
今回は以下の環境で実施します。それぞれ説明すると、
- node : JavaScript実行環境
- npm : nodeのパッケージマネージャ(Node Package Managerの略)
- yarn : npmの改良版。nodeモジュールの追加/削除、モジュール間の依存関係の解消も自動化
- npx : nodeコマンド実行ツール。node上で実行するコマンドで必要となるパッケージをインストールしなくても実行できるようにするコマンド
- create-react-app : Reactアプリケーション用のプロジェクトフォルダーを自動生成するコマンド
バージョン確認satom@W1007018N182 MINGW64 ~ $ node -v v12.16.1 satom@W1007018N182 MINGW64 ~ $ npm -v 6.13.7 satom@W1007018N182 MINGW64 ~ $ yarn -v 1.22.4 satom@W1007018N182 MINGW64 ~ $ npx -v 6.13.7 satom@W1007018N182 MINGW64 ~ $ create-react-app -V 3.4.0ちなみに
yarnはFacebook社が開発したパッケージマネージャーで、npmよりも高速だそうです。コーディングツール
今回はVS Codeを使用します。
以下からダウンロードします。
https://azure.microsoft.com/ja-jp/products/visual-studio-code/ダウンロードしたらインストールします。
インストール後、以下のプラグインをインストールすると、より快適な開発環境になると思います。
特に私はvimを愛用してきたので、vim用のプラグインも入れてます。
- Prettier : コード自動整形ツール
- ESList : コード解析ツール
- stylelint-plus : スタイルシート用Lint
- Visual Studio IntelliCode : AI支援によるAPIサジェストの精度向上
- Bracket Pair Coloizer : 対応する括弧を色で表示
- Debugger for Chrome : VSCode上でブレークポイントや変数の監視が可能になる
- VSCodeVim : VS Code用のvimエミュレータ
以上、環境セットアップはここまで。
- 投稿日:2020-06-27T03:13:17+09:00
firebase firestoreで非同期でデータを取得する(Javascript,reactnative)
背景
ReactnativeでAndroidアプリ開発をしています。
本当に初学者なので間違えている点あると思いますがご了承ください、、、firebase & Reactnativeでの開発をしていてタイムラインを実装しようとしたときに
1.まずPostをcollectiongroupとして取得
2.そのPostそれぞれが持つuidを元にPostを投稿したUserを取得し、User情報と一緒にListにぶち込む
3.そのListをsetListとしてstateを変更してFlatListで表示するという実装をしたかったのですが、FlatListをScrollViewの中に入れてしまったりするとどうも表示されず、setListもうまく機能していなかったので色々調べました
ソースコード
うだうだ話していてもあれなので実際に実装したコードをとりあえず貼っておきます
TLScreen.jsuseEffect(()=>{ firestore() .collectionGroup('posts') .onSnapshot(async(querySnapshot) => { let tempList = []; await Promise.all(querySnapshot.docs.map(async doc => { let documentSnapshot=await firestore().collection('users').doc(doc.get('uid')).get(); tempList.push({ ...doc.data(), uid:doc.get('uid'), uname:documentSnapshot.get('nickname'), uimg:documentSnapshot.get('img'), id: doc.id, }); })); setList(tempList); }); },[]);私はタイムラインをつくる、という目的だったのでuseEffect内での関数ですが、
上のような実装をすると無事postにデータが入った状態でScreenがRenderされるのでいい感じに表示できました!
詰まった所について解説しておきます。
async awaitについて
初心者向けです。
まだ自分も初心者なので理解が浅く、非同期関数でつまずいてしまったので
同じような人の助けになればと思い書かせて頂きます。asyncは何があってもPromiseを返す関数
例えば、//これは1を返す function number(){ return 1 } //これは1をラップしたPromiseが返される async function number(){ return 1 }awaitはPromiseを返す関数の前につければ、その関数の処理が終わるまでその行で関数の実行を待っていてくれるやつ(ただしasync関数内でしか使えない)
例えば、async function a(){ //firestoreからなんか取ってくるとかの重い処理をするとこの行↓で実行が止まってくれる! let users = await firestore().collection('users').get() //上のawaitの関数の結果が返ってきてからconsole.logが動く! console.log(users) }といった感じで考えてもらえるとよいかと思います。(間違っていたらすみません!)
じゃあPromiseとは?てなる人がいるかもしれません
これも私の理解が浅いのですが、Promiseは.thenとか.catchとかを関数の後に続けることができて、前の結果を受けて次にどんな処理をするのか、というのを決めることができるという返り値です。
firestore().collection('users').get()
.then(()=>{})
.catch(()=>{})
的な感じです多分、、、
Promiseがあることで何かの処理を終えた後で何かの処理を行うという非同期処理を行うことができるのです。
このPromiseを使いやすくしたのがasync awaitで、awaitを使えばPromiseのときのように.thenなどを使わずにどの処理を待てばよいかわかる、というようなものだと思います、多分、、、
流れ
実際に流れを見ていくと
TLScreen.jsuseEffect(()=>{ firestore() .collectionGroup('posts') .onSnapshot(async(querySnapshot) => { let tempList = [];まずここまではuseEffect内でpostsのcollectionGroupを取ってきて.onSnapshotでその結果であるquerySnapshotを用いて関数を実行しています。
ここでasyncを用いているのはこの関数内でawaitを使いたい(処理を待たせたい)関数があるため、awaitを使うためにasync関数にしています。
let tempList=[]はpostsの情報を一時的に入れておくための箱を用意してるだけです。TLScreen.js.onSnapshot(async(querySnapshot) => { let tempList = []; await Promise.all(querySnapshot.docs.map(async doc => {その後ですが、async関数内でawaitを使いたいものとは、Promise.allというものです。
この関数は複数のPromiseを返す関数を平行して処理してPromiseを返す、というものです。もちろんPromiseを返してくれるのでawaitをつけることができます。
次にPromise.allが処理する関数はなにかといわれると、引数のquerySnapshot.docs.map(async doc =>{...となるのですが、
ここではquerySnapshotが持つdocumentひとつひとつに対してそれらを引数としたasync関数を実行している、という感じです。
また先ほどとは違い、ここでasyncを使っているのはawaitを使いたいだけでなく、
async関数は必ずPromiseを返すので、Promise.allで実行することができる、ということも考えています。TLScreen.js.onSnapshot(async(querySnapshot) => { let tempList = []; await Promise.all(querySnapshot.docs.map(async doc => { let documentSnapshot=await firestore().collection('users').doc(doc.get('uid')).get(); tempList.push({ ...doc.data(), uid:doc.get('uid'), uname:documentSnapshot.get('nickname'), uimg:documentSnapshot.get('img'), id: doc.id, }); })); setList(tempList); }); },[]);そしてそのあとですが、ここで2回目のfirestoreの呼び出しが起こります。
ここで注意してほしいのが、firestore().collection().doc().onSnapshotは使えない、ということです。さっきは.onSnapshotを使っていたのに今回はなぜだめなのか、となるかと思います(なってほしい笑)
いま、このasync関数の中では、
1. 処理の重いfirestoreへの呼び出し
2. tempListへのデータのpush
の2つのことが行われようとしています。このときfirestoreへの呼び出しができてからtempListにデータをpushしたいのですが、そのためには1の段階で処理を止めないといけません。
そのためasyncを使いたいのですが、asyncはPromiseを返す関数にしか使えないので、.onSnapshotとしてしまうと間違いなのです。
そこで、get()メソッドを用います。get()はPromiseを返してくれるのでawaitを用いることができ、非同期でDocumentSnapshotを取得することができるのです!
*ちなみに.onSnapshotとするとawaitがつけられないので処理をしただけで結果が返ってこないまま進むので結果的に空のtempListをsetListすることになり表示されません
かくしてtempListにデータが無事入り、setListでstateにセットすることができたのでFlatlist等で表示できるかと思います!
参考にさせていただいたサイト
Firestoreのデータをasync/await, mapで取り出したい
Async/await - 現代の JavaScript チュートリアル
firebase公式サイト様様
- 投稿日:2020-06-27T00:23:58+09:00
laravel × react × ajax でformを送信する
環境
・Laravel Framework 7.16.1
・react
・jqueryコード
form
名前、メッセージ、画像を送信します。
import React from 'react';

function Post()
{
    return(
         <>
         <div>
             <form className="main_form" action="" method="post">
                 <p>NAME:<input type="text" name="name"></input></p>
                 <textarea spellCheck="false" name="message" id="" cols="30" rows="10"></textarea>
                 <p>Image:<input type="file" name="path"></input></p>
                 <p><button type="submit">Post!</button></p>
              </form>
         </div>

         {posts.map((post) =>

          <div key={post.id}>
               <p>{post.name}</p>
              <img src={'/storage/' + post.path}></img>
              <p>{post.message}</p>
          </div>
         )}
       </>
      )
}

export default Post;
ajaxの処理
※FormDataは送信が可能な、フォームフィールドおよびそれらの値から表現されるキーと値のペアのセットを簡単に構築する手段を提供します。下記コードは空のFormDataにappendを使ってinputの値を入れています。
以下のコード内の
 processData: false,
 contentType: false
について。
ザックリ言うと、Ajaxはデータ送信時にデータ形式を変換しようとするのですが、それを許すとエラーが出るらしいので形式変換させないように指定しています。welcome.blade.php<head> ~ <meta name="csrf-token" content="{{ csrf_token() }}"> ~ </head> <body> <div id="app"></div> <script src="https://code.jquery.com/jquery-3.2.1.js" integrity="sha256-DZAnKJ/6XZ9si04Hgrsxu/8s717jcIzLy3oi35EouyE=" crossorigin="anonymous"></script> <script> $(function(){ $.ajaxSetup({ headers: { 'X-CSRF-TOKEN' : $('meta[name="csrf-token"]').attr('content') } }) $('.main_form').submit(function(event) { event.preventDefault(); var formData = new FormData(); formData.append('name', $("input[name=name]").val()); formData.append('message', $("textarea[name=message]").val()); formData.append('path', $("input[name=path]")[0].files[0]); $.ajax({ url: "{{ action('ReactController@post') }}", type: 'POST', data: formData, processData: false, contentType: false }) .done(function(data) { console.log('succecss') }) .fail(function(data) { console.log('fail') }); }); }); </script> </body>postされたデータを保存するためのコントローラー
web.phpRoute::post('/post', 'ReactController@post');名前、メッセージ、画像を保存する
ReactController.phppublic function post(Request $request) { $post = new Post; $form = $request->all(); unset($form['_token']); $file_name = $request ->file('path') ->getClientOriginalName(); :kissing_heart: $request->file('path')->storeAs('public', $file_name); $post->name = $request->name; $post->message = $request->message; $post->path = $file_name; $post->save(); return redirect('/user'); }以上です。
素人の日記なので、気になるところはしっかり調べて正しい情報を得ることをお勧めします。