- 投稿日:2019-02-18T23:50:24+09:00
ウェブで歌詞を自動に取得
今日、”https://mp3.zing.vn/zing-chart-tuan/bai-hat-US-UK/IWZ9Z0BW.html”で歌詞を取得する自動的なツールを書きます
技術
技術 バージョン Nodejs 10.14.1 Puppeteer 1.12.2 準備
- 新たなフォルダーを作る(名前はなんでも良い)
- 「1」で作ったフォルダーにアクセスし、ターミナルで
npm init->npm i puppeteerを書く- index.jsを作る
- 歌詞を保存するフォルダーを作る
- Google Chromeを使用する
PuppeteerのAPI
page.evaluateだけを使用するので、他のAPIはここで参照して下さい
開発
- page.evaluateはウェブでスクリプトを実行して、結果を帰ります。なので、HTML構築の分析が必要です。
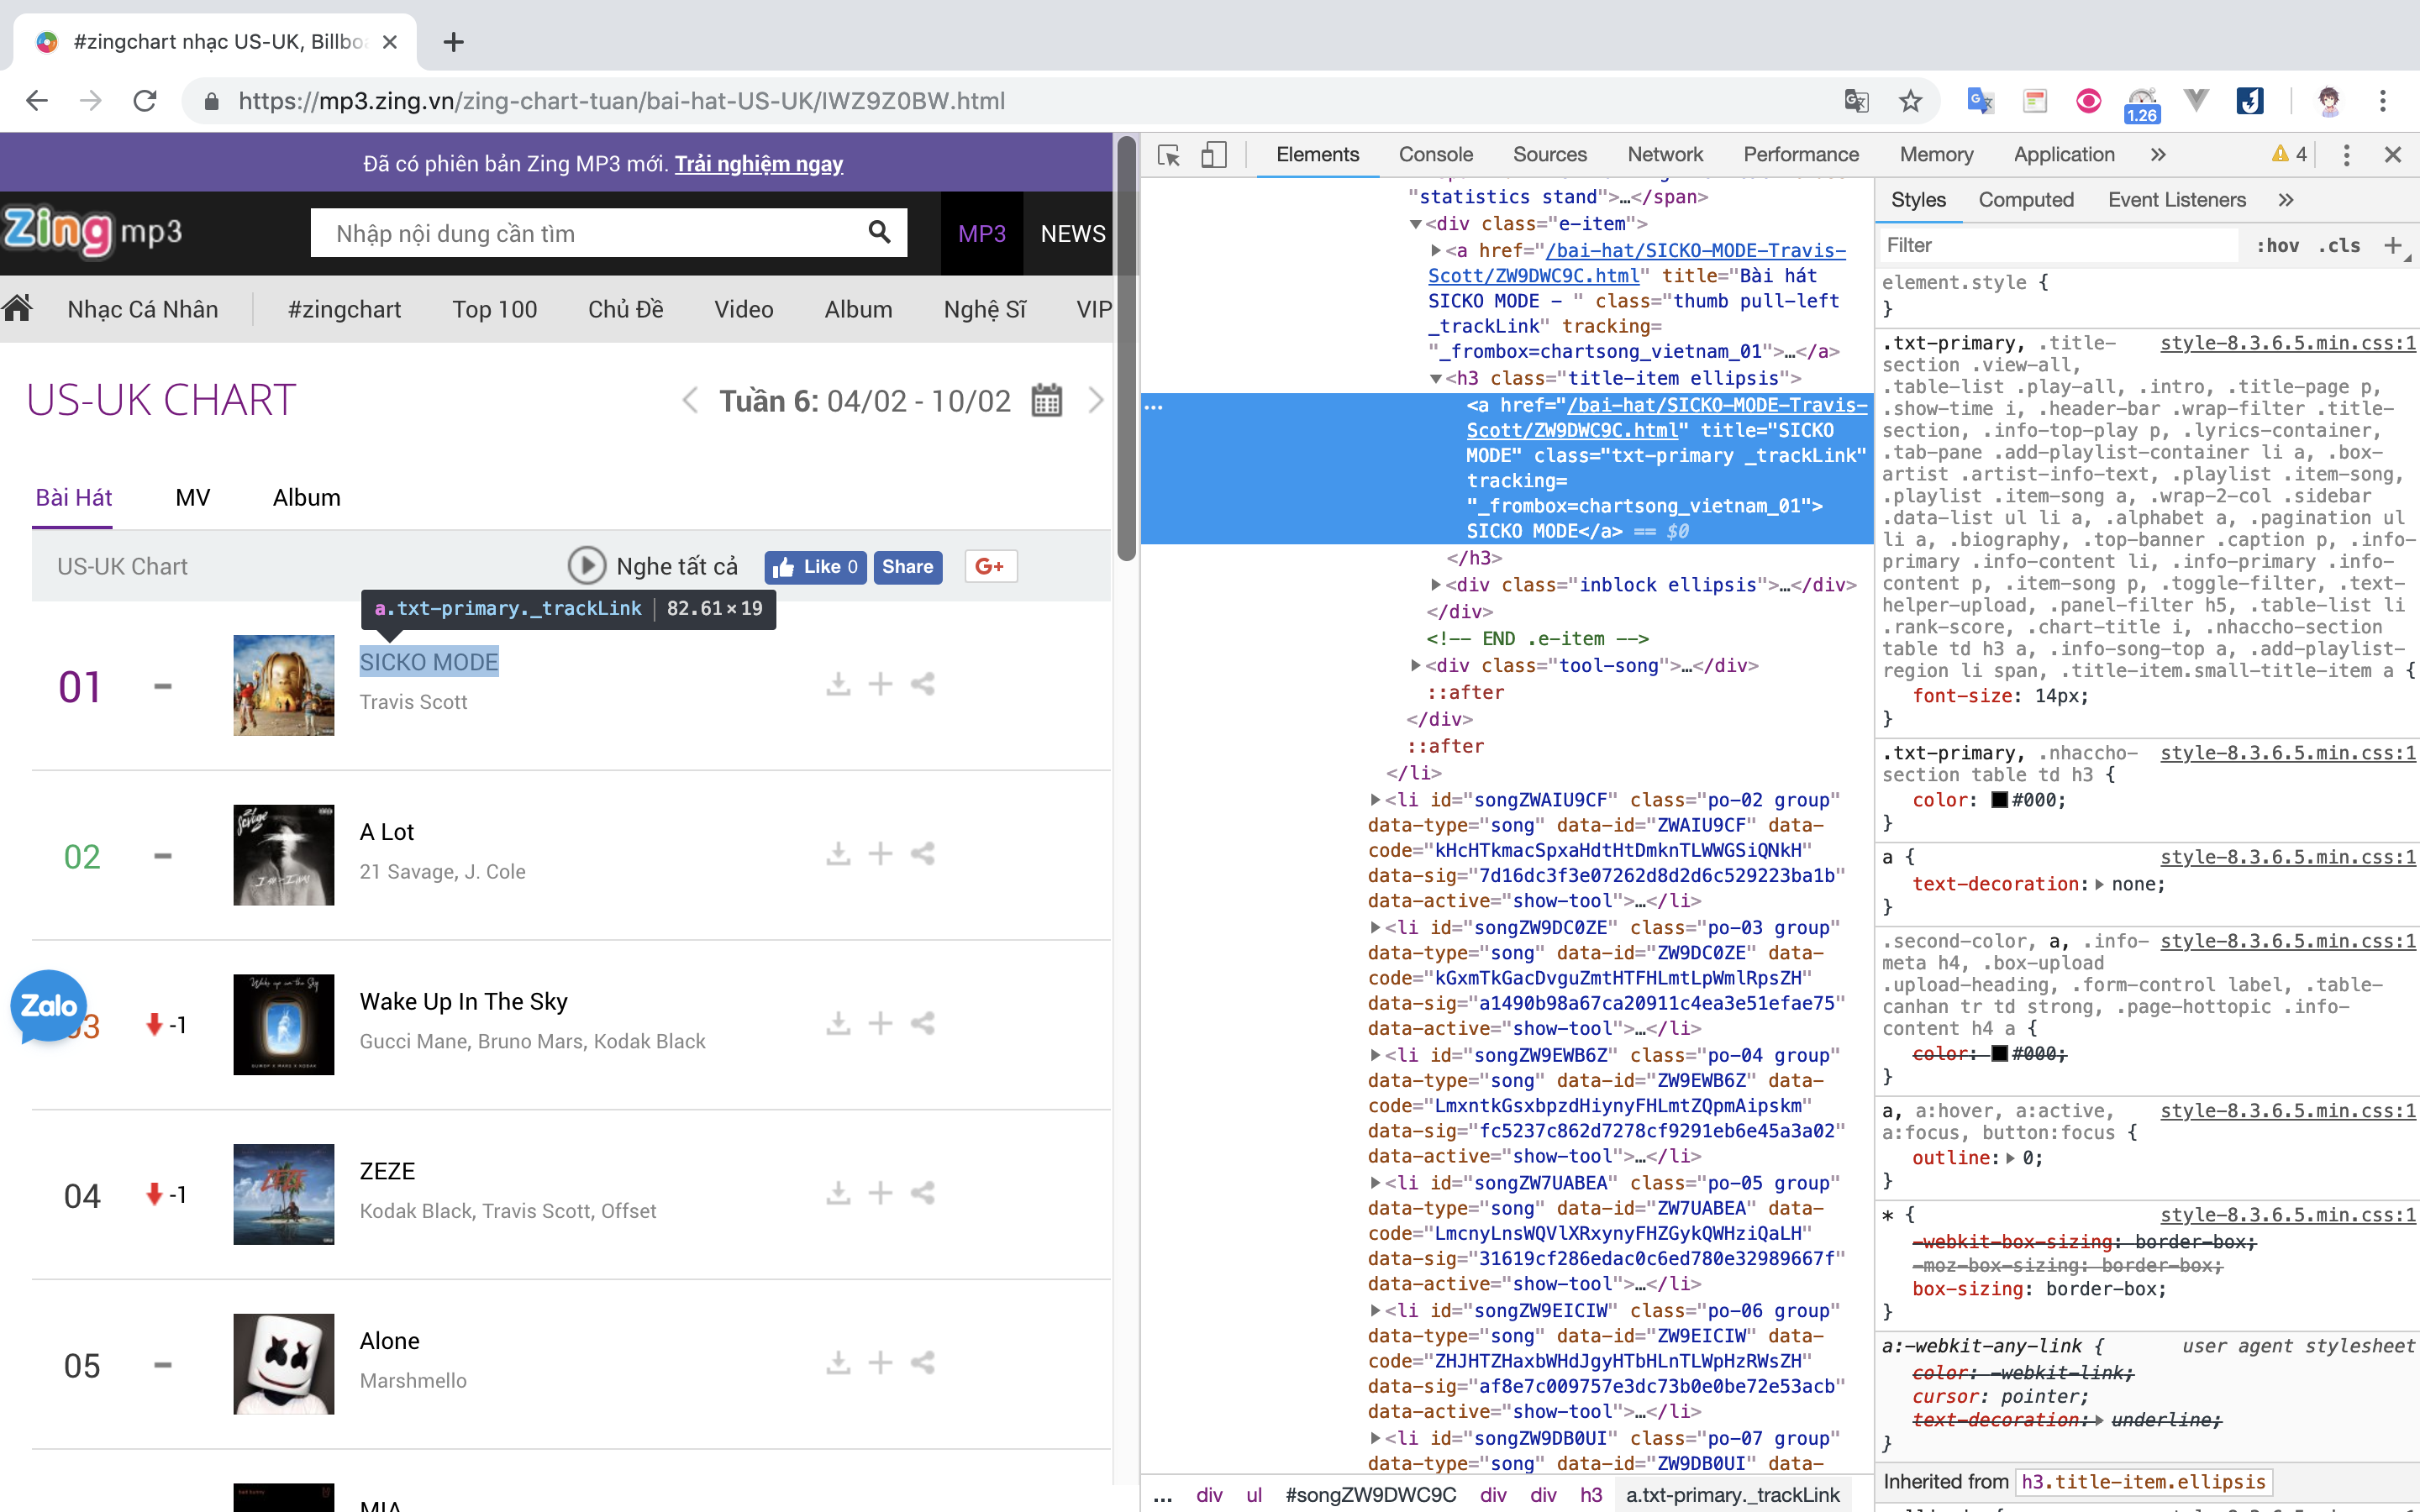
それぞれの歌は<div>の「e-item」の中に有ります:
- txt-primary _trackLinkのclassがある<a>:歌の名前
- href:歌詳細へのリンク
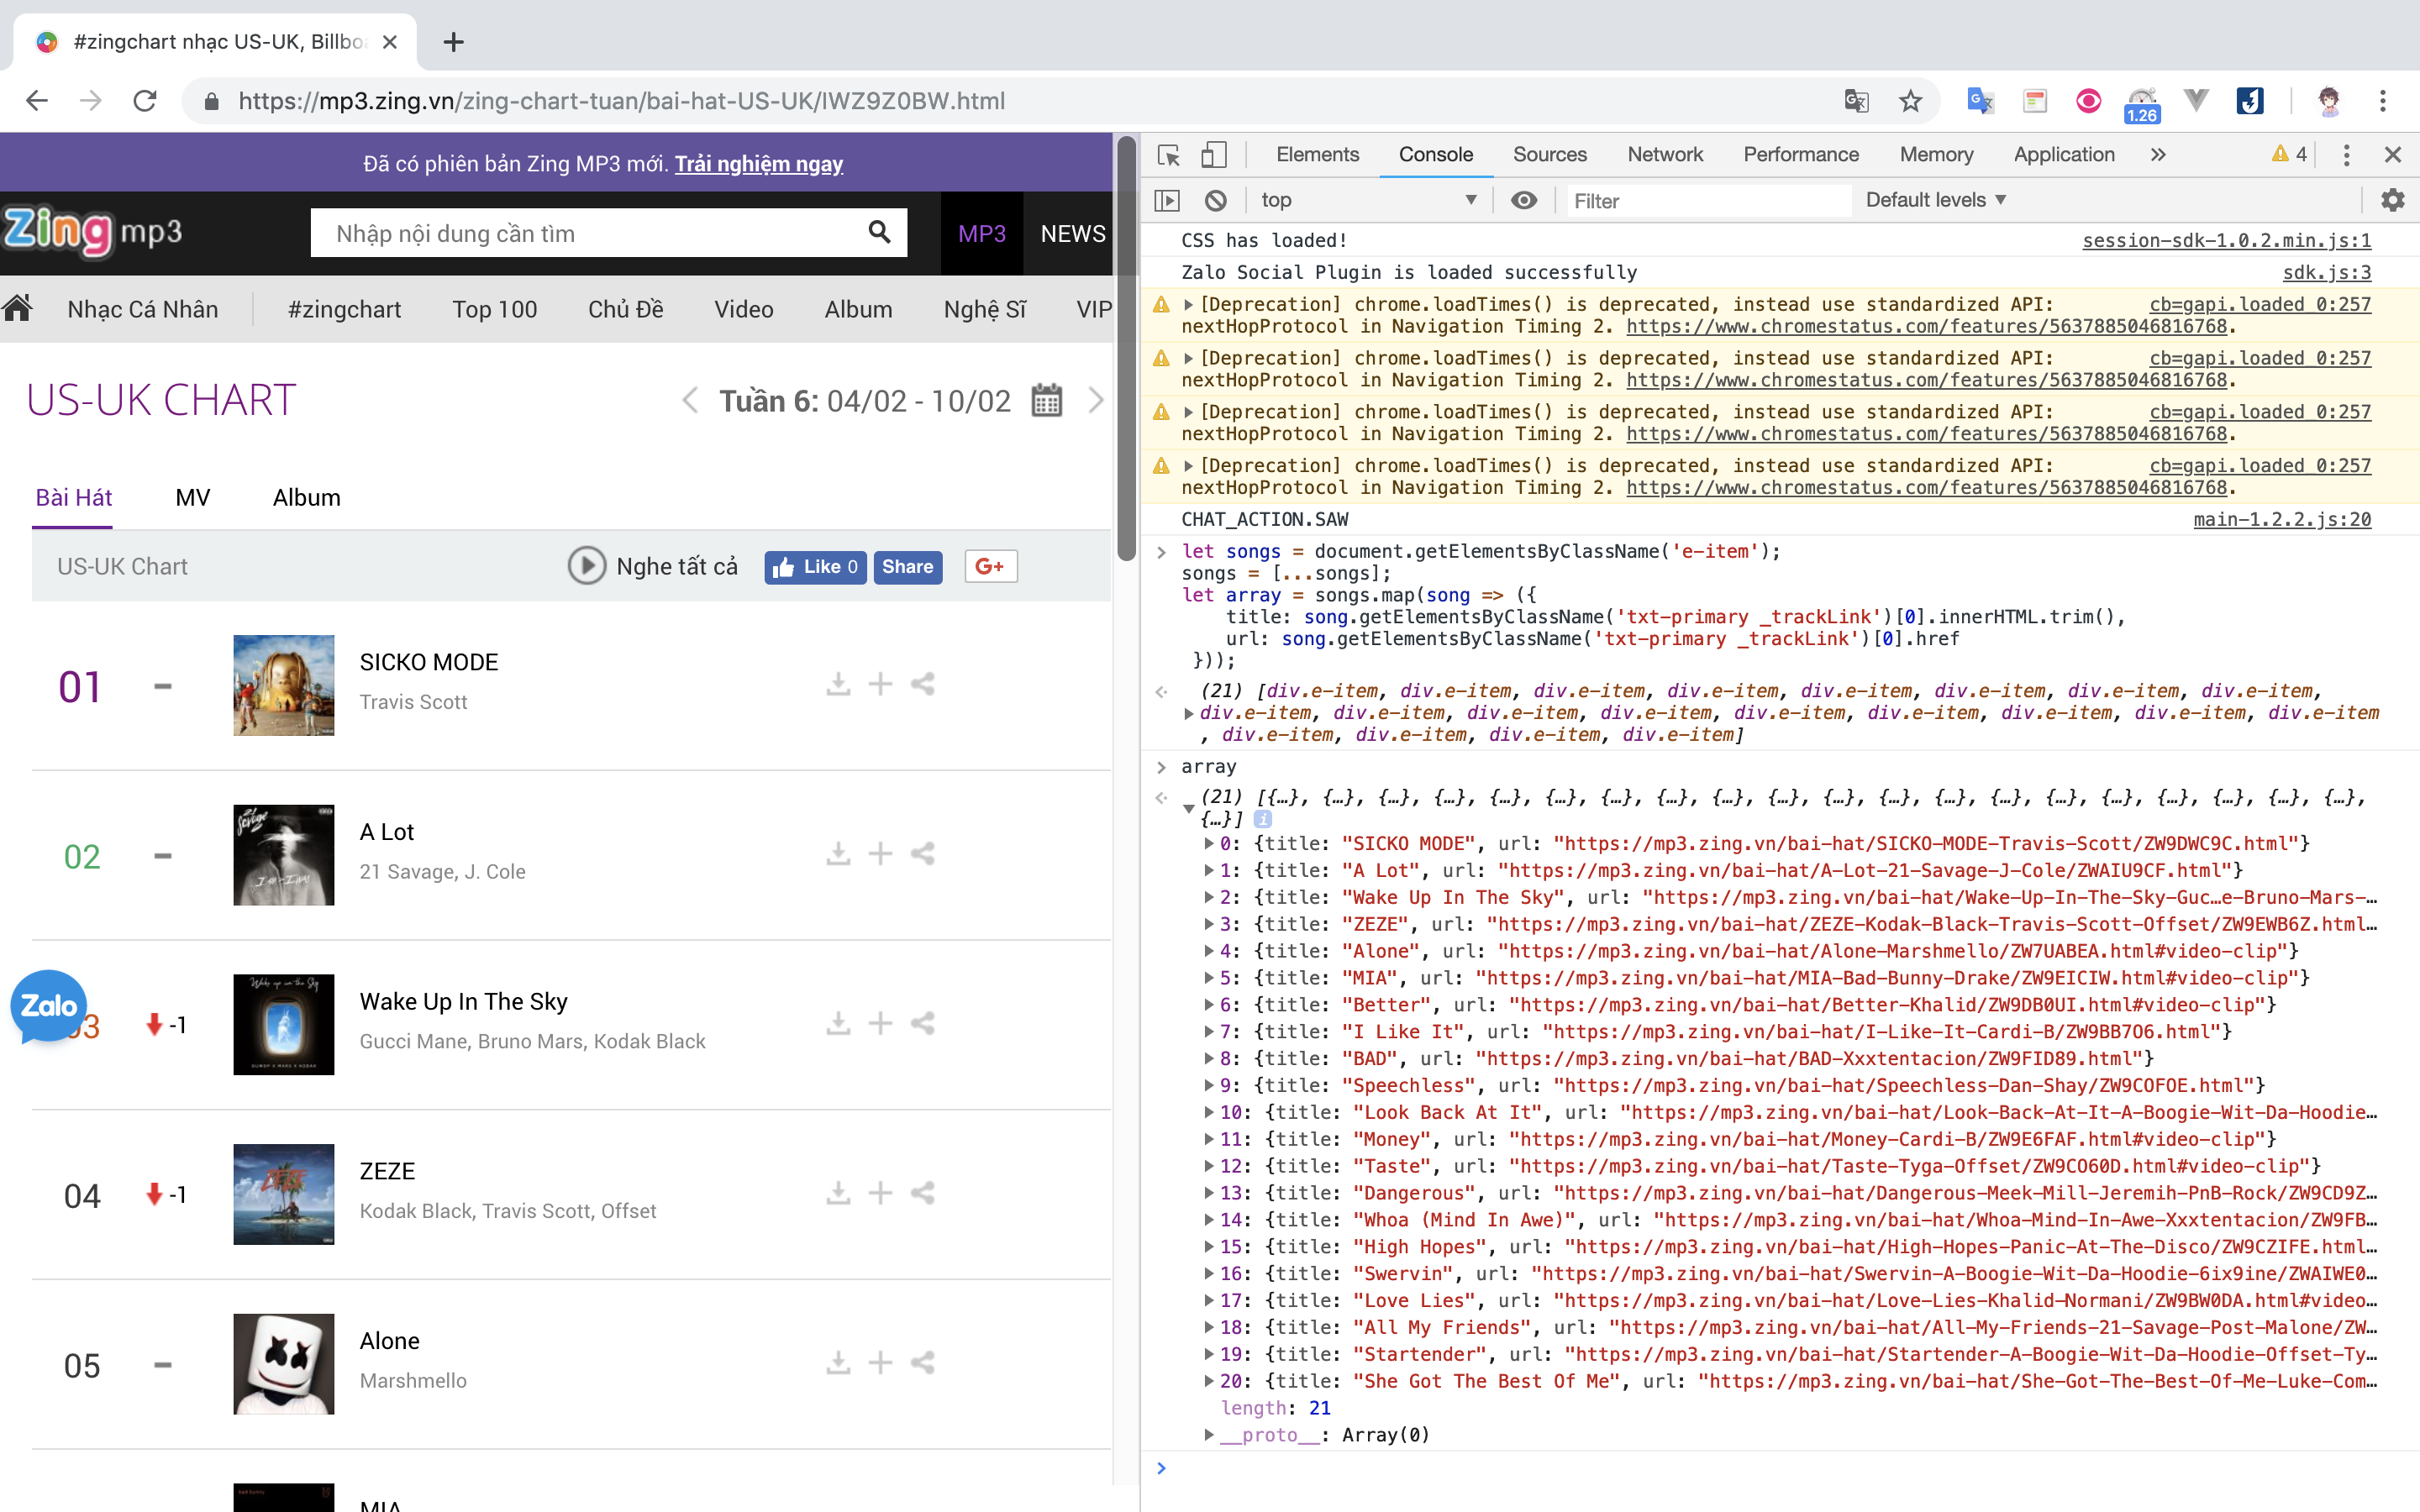
2. Google ChromeのConsoleでスクリプトを試しますlet songs = document.getElementsByClassName('e-item'); songs = [...songs]; let array = songs.map(song => ({ title: song.getElementsByClassName('txt-primary _trackLink')[0].innerHTML.trim(), url: song.getElementsByClassName('txt-primary _trackLink')[0].href }));結果
イメージのような結果が出てくると、成功です。
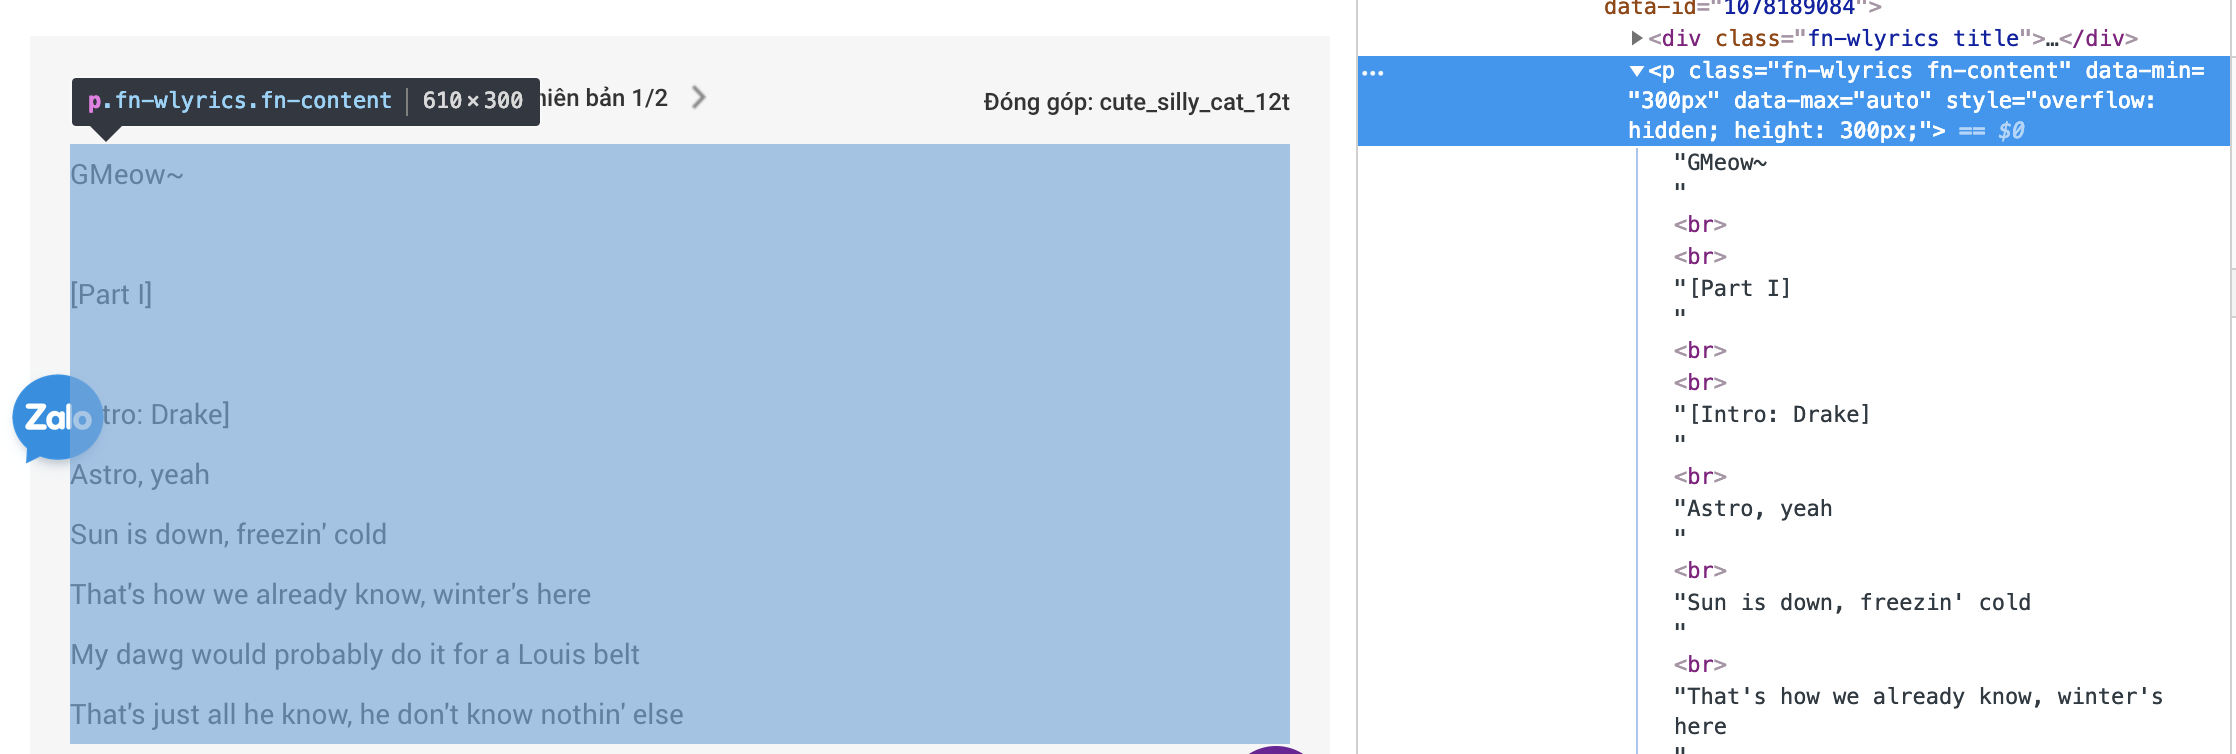
3. 次は、ウェブで歌詞の取得スクリプトを試します
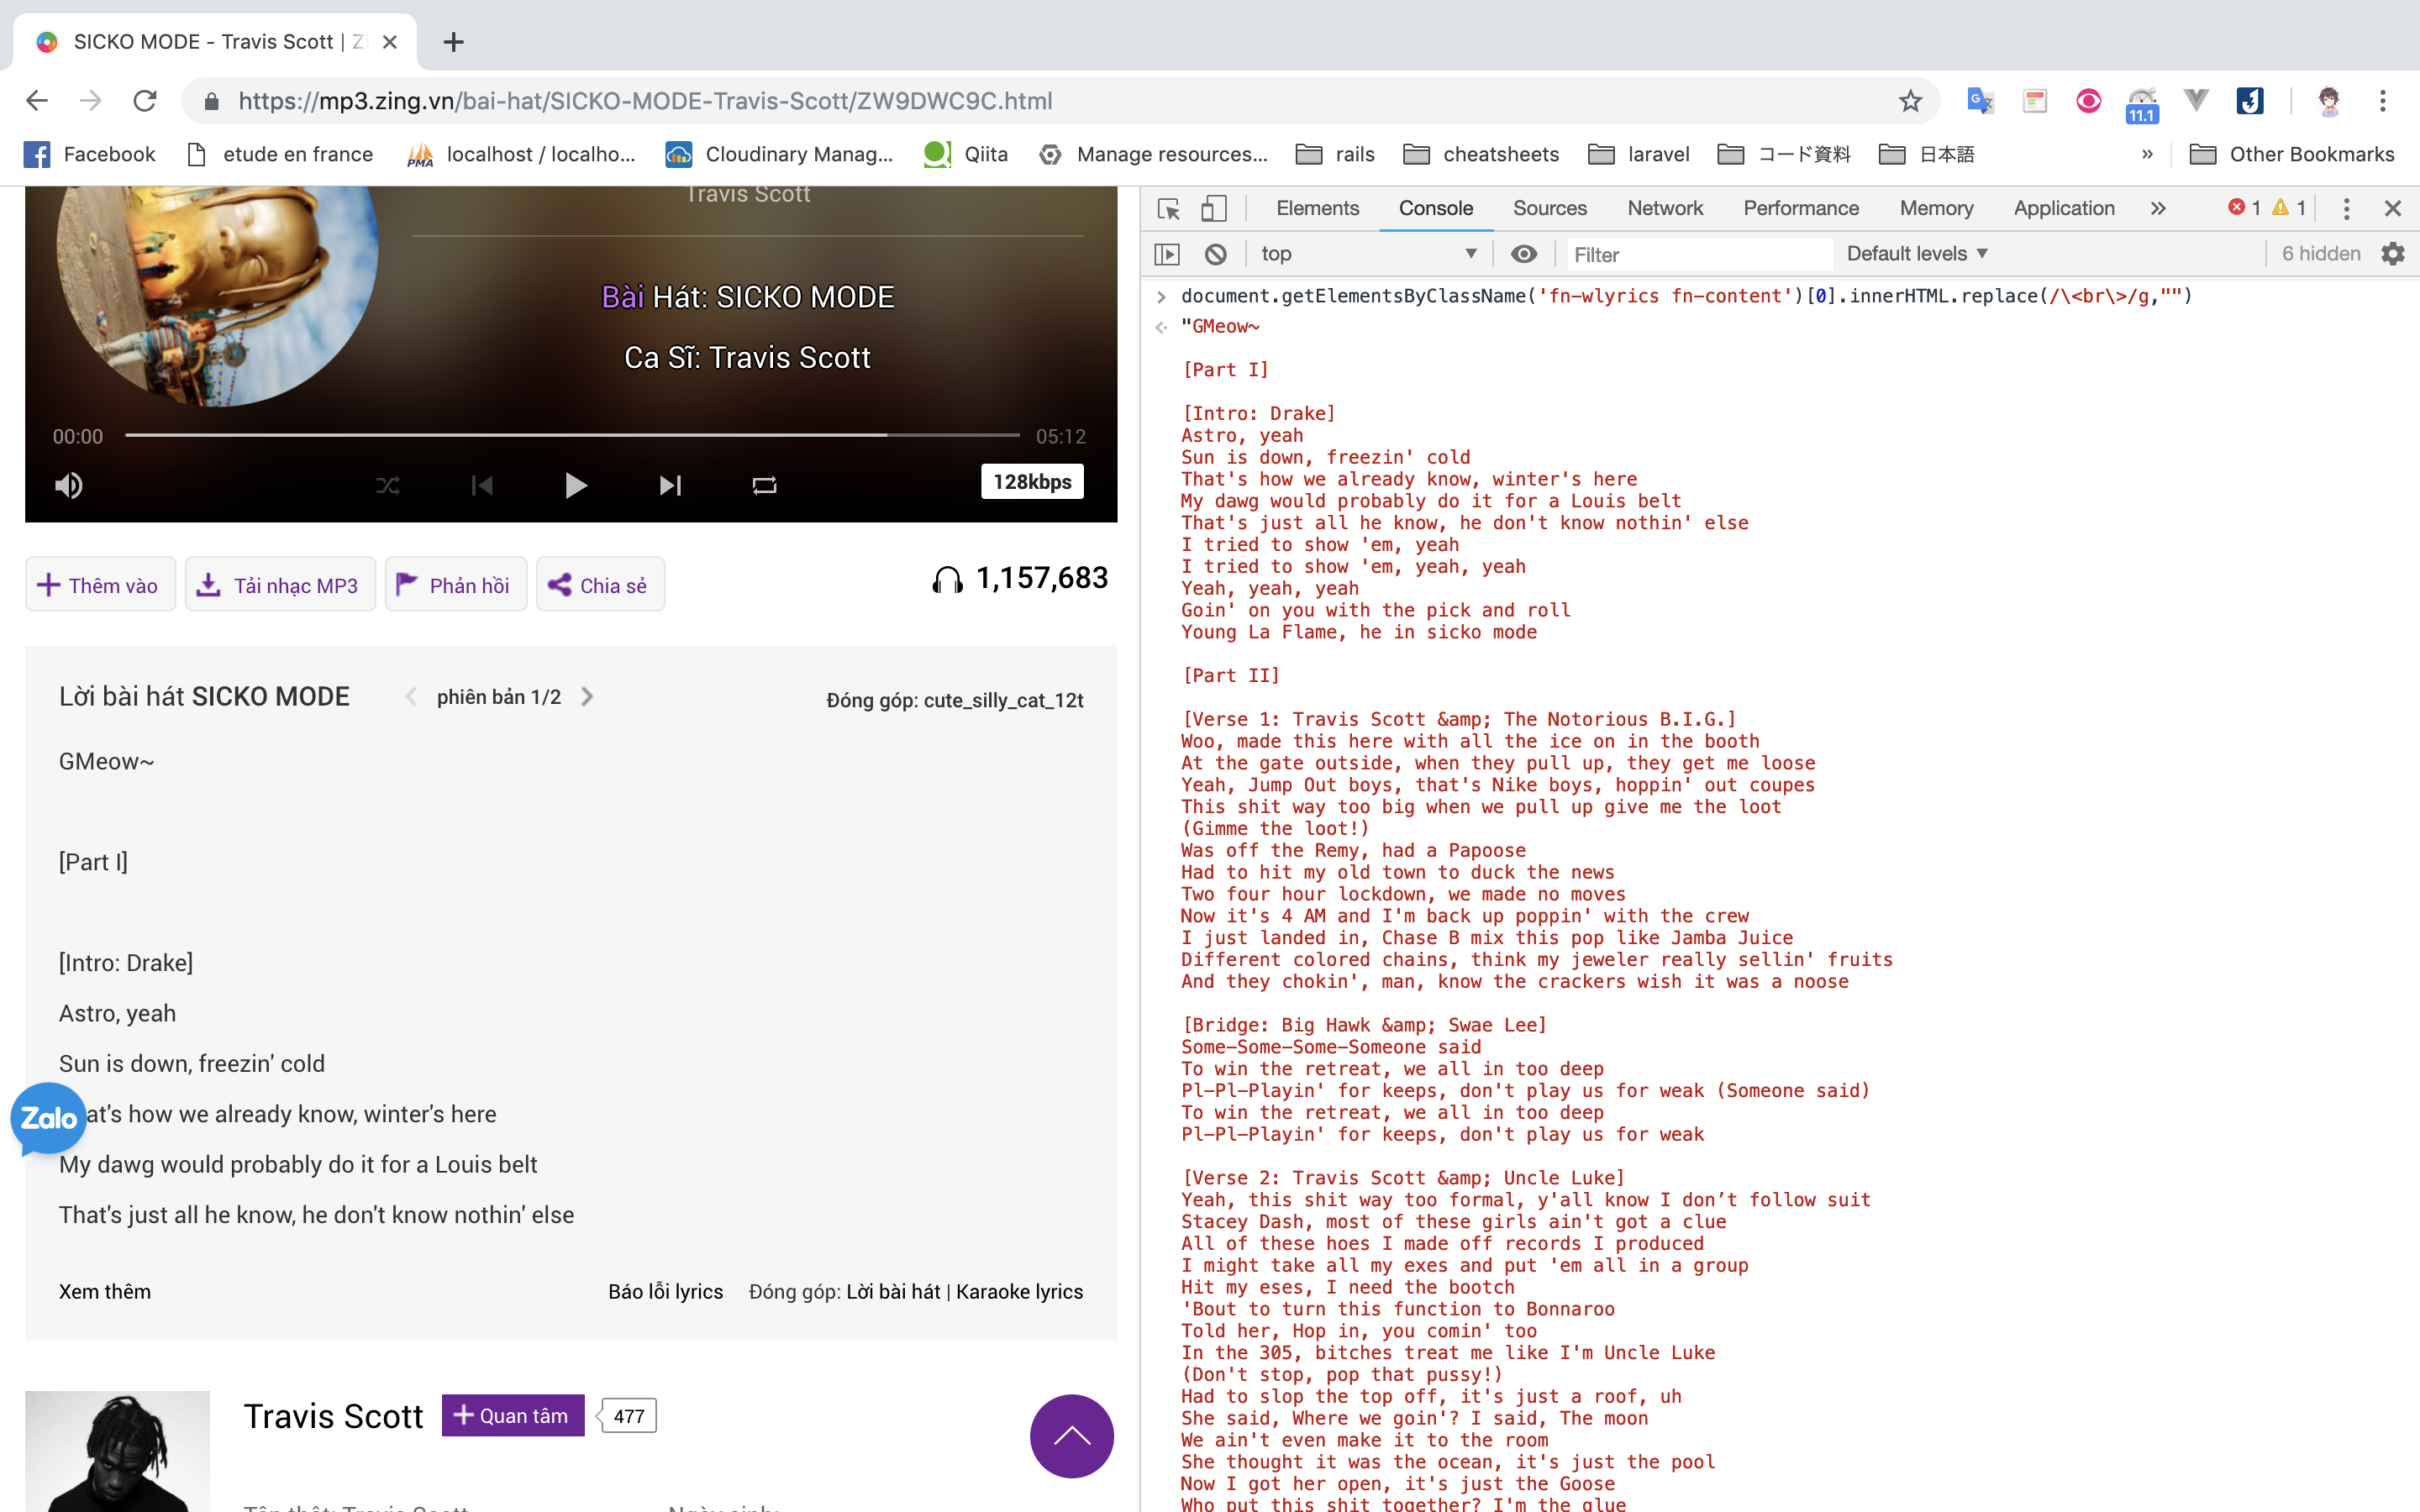
歌詞はfn-wlyrics fn-contentのclassがある<p>です
また、<br />が有りますので、replaceを使って、それを省く
スクリプト:document.getElementsByClassName('fn-wlyrics fn-content')[0].innerHTML.replace(/\<br\>/g,"")
結果
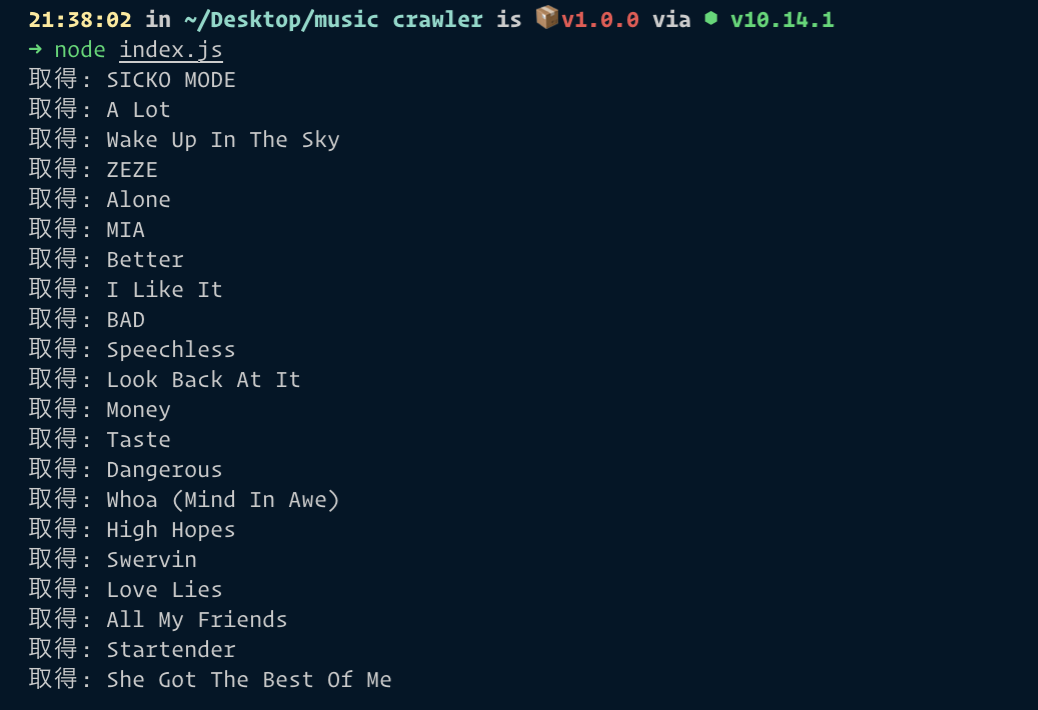
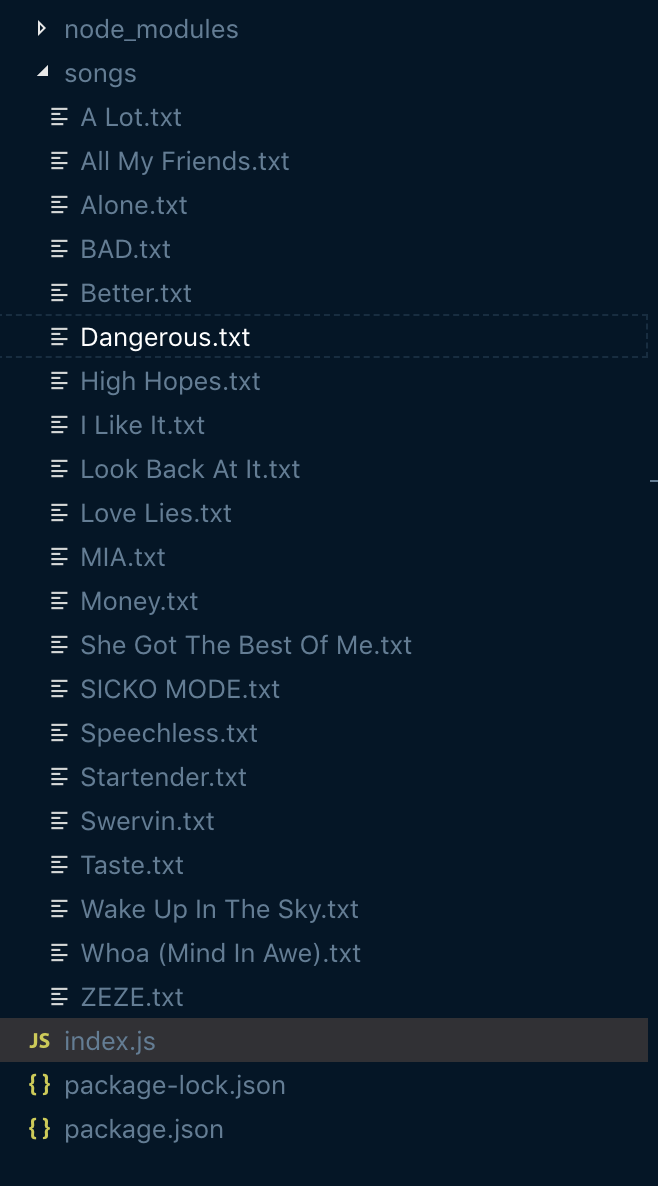
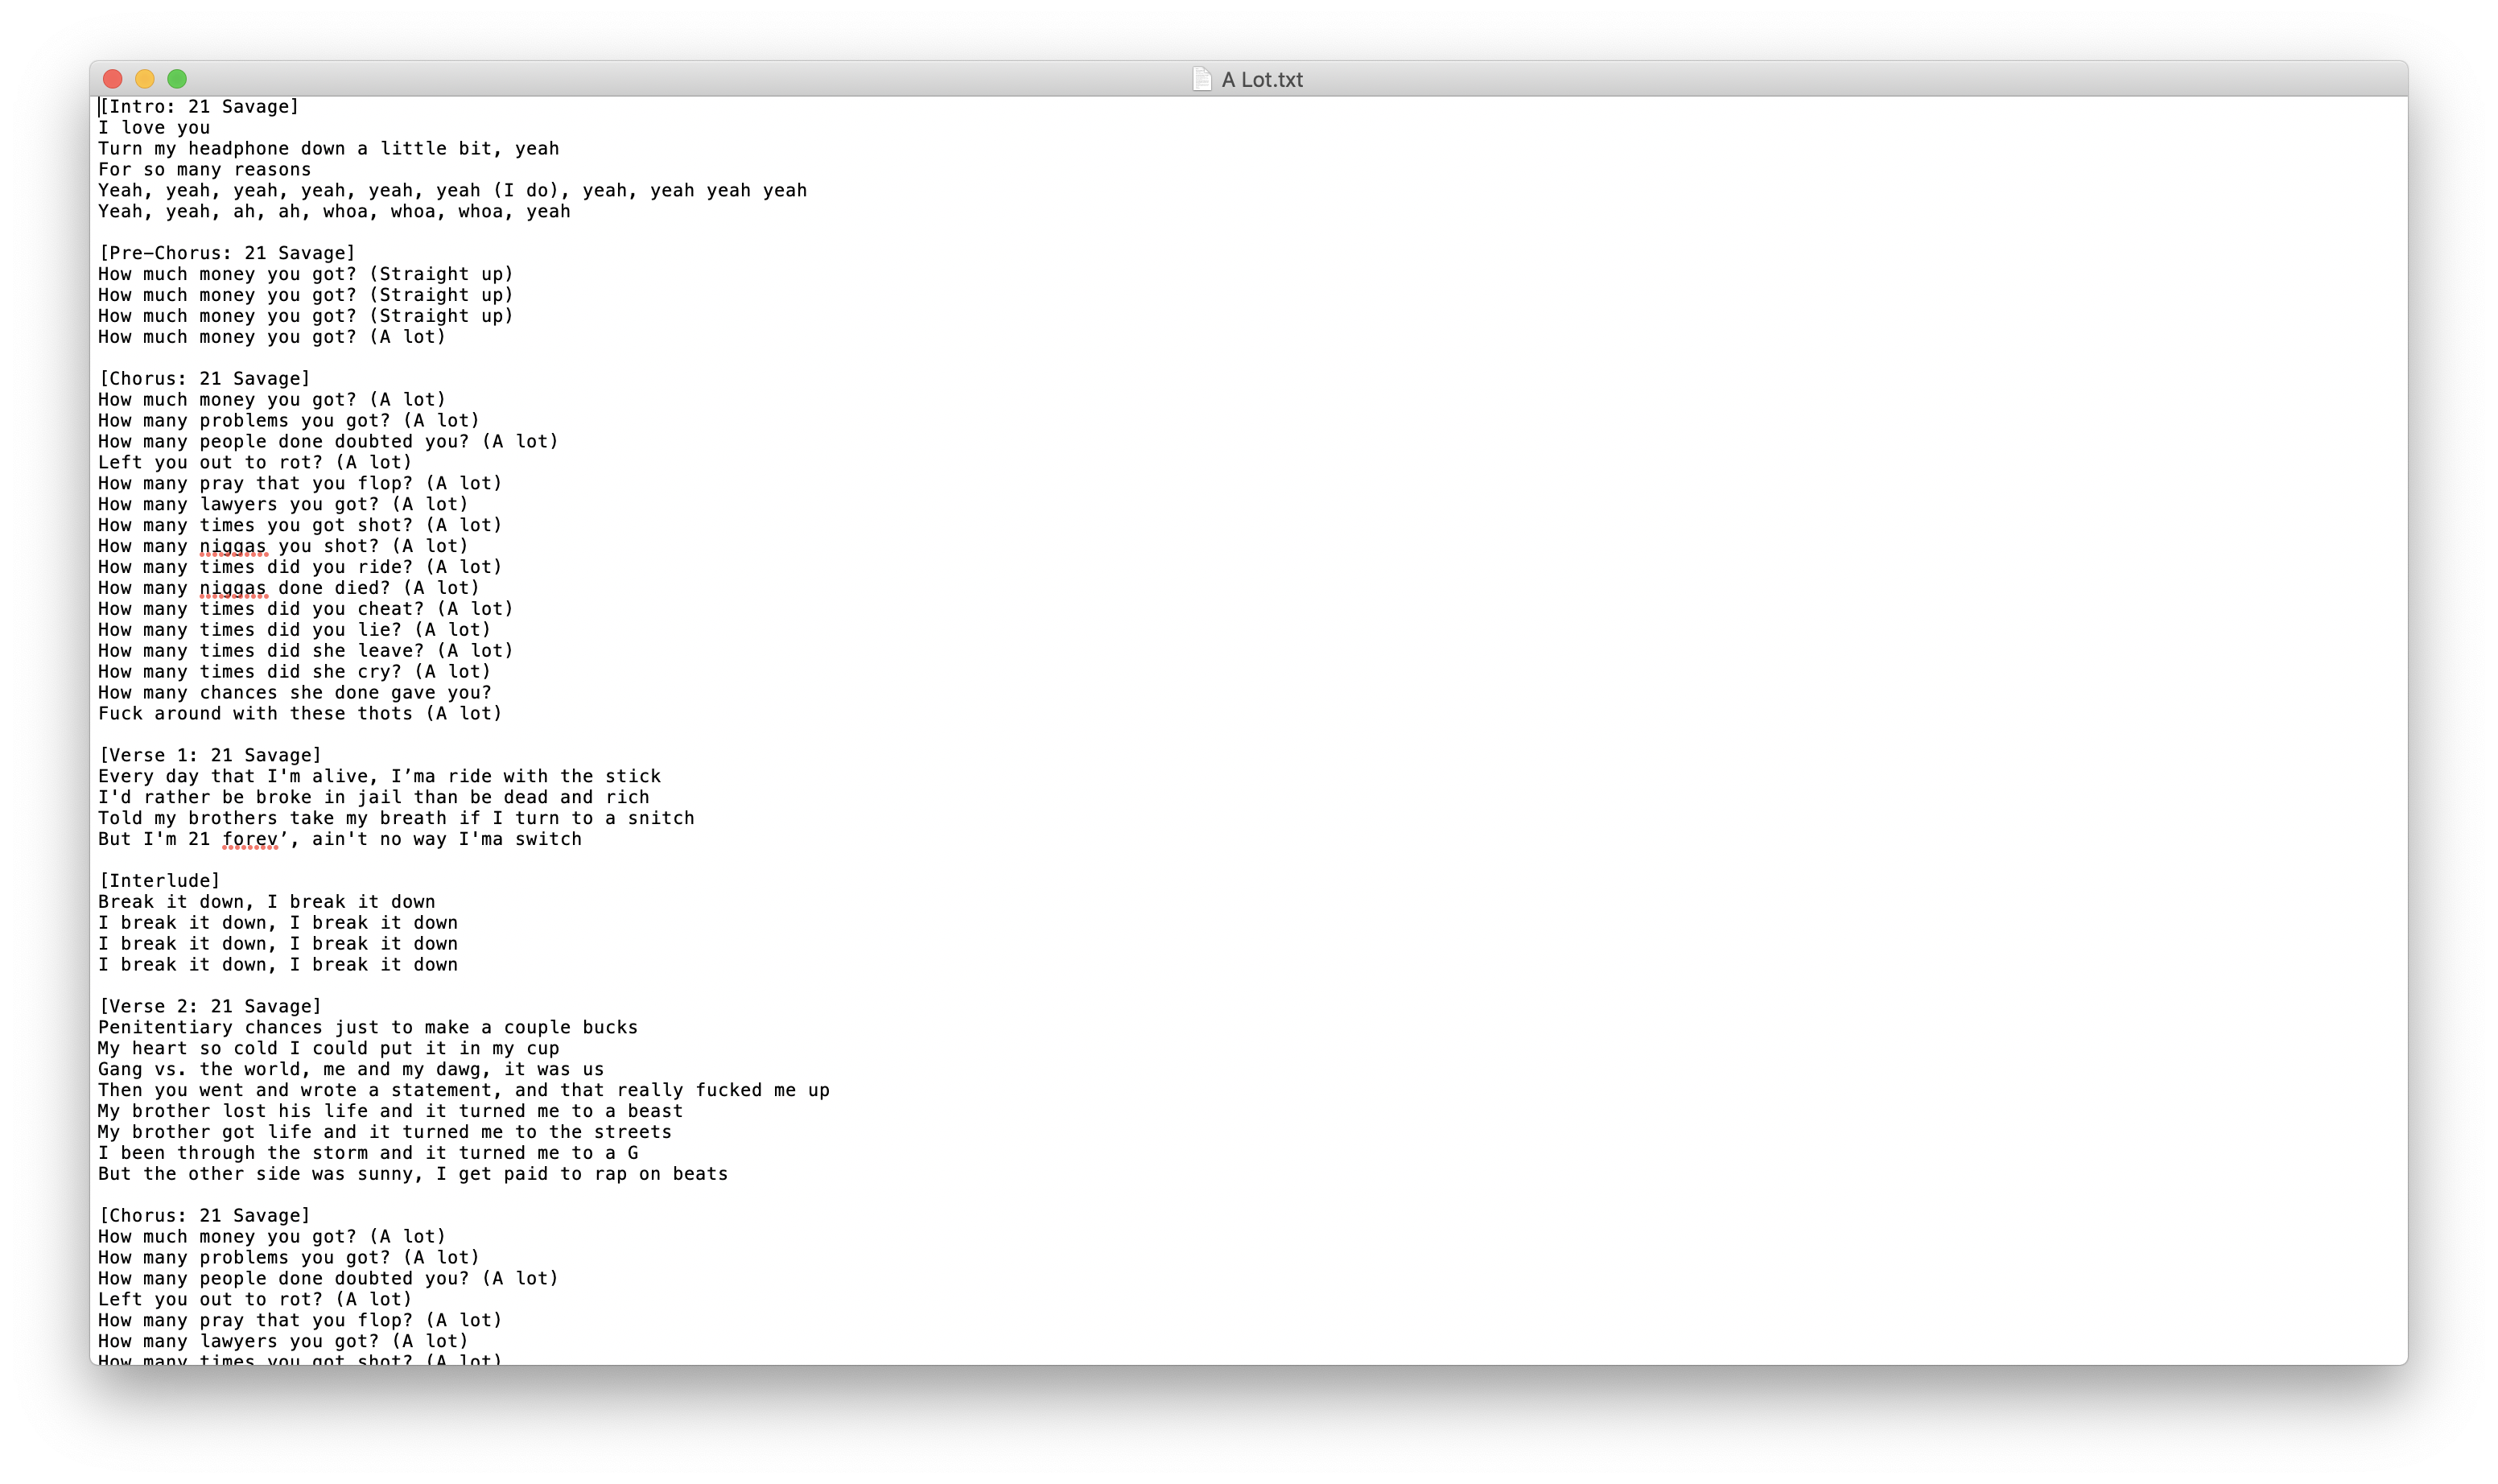
4. 今、index.jsを書きましょう。歌詞はファイルに保存します。index.jsconst puppeteer = require('puppeteer'); const fs = require('fs'); (async()=>{ const browser=await puppeteer.launch({headless:true}); const page=await browser.newPage(); await page.goto('https://mp3.zing.vn/zing-chart-tuan/bai-hat-US-UK/IWZ9Z0BW.html'); const songs = await page.evaluate(() => { let songs = document.getElementsByClassName('e-item'); songs = [...songs]; let array = songs.map(song => ({ title: song.getElementsByClassName('txt-primary _trackLink')[0].innerHTML.trim(), url: song.getElementsByClassName('txt-primary _trackLink')[0].href })); return array; }); for(let song of songs){ await page.goto(song.url); let lyric = await page.evaluate(()=>{ const evaluatedLyric = document.getElementsByClassName('fn-wlyrics fn-content')[0]; // 歌詞はいつもあるわけではないので、条件をチェック if (evaluatedLyric !== undefined) { return evaluatedLyric.innerHTML.replace(/\<br\>/g,""); } else return "歌詞無し"; }); await fs.writeFile(`songs/${song.title}.txt`,lyric,function(err){ if(err) throw err; console.log("取得: "+song.title); }); } await browser.close(); })();最終的に、以下の結果が出る
まとめ
この方法はかなり簡単ですが、HTML構築の分析が必要なので、時々嫌を感じるかもしれません。それで、使用の前に、注意しべきです。

- 投稿日:2019-02-18T23:50:24+09:00
Webで歌詞を自動に取得
今日、”https://mp3.zing.vn/zing-chart-tuan/bai-hat-US-UK/IWZ9Z0BW.html”で歌詞を取得する自動的なツールを書きます
技術
技術 バージョン Nodejs 10.14.1 Puppeteer 1.12.2 準備
- 新たなフォルダを作る(名前はなんでも良い)
- 「1」で作ったフォルダにアクセスし、ターミナルで
npm init->npm i puppeteerを書く- index.jsを作る
- 歌詞を保存するフォルダを作る
- Google Chromeを使用する
PuppeteerのAPI
page.evaluateだけを使用するので、他のAPIはここで参照して下さい
開発
- page.evaluateはWebでスクリプトを実行して、結果を帰ります。なので、HTML構築の分析が必要です。
それぞれの歌は<div>の「e-item」の中に有ります:
- txt-primary _trackLinkのclassがある<a>:歌の名前
- href:歌詳細へのリンク
2. Google ChromeのConsoleでスクリプトを試しますlet songs = document.getElementsByClassName('e-item'); songs = [...songs]; let array = songs.map(song => ({ title: song.getElementsByClassName('txt-primary _trackLink')[0].innerHTML.trim(), url: song.getElementsByClassName('txt-primary _trackLink')[0].href }));結果
イメージのような結果が出てくると、成功です。
3. 次は、Webで歌詞の取得スクリプトを試します
歌詞はfn-wlyrics fn-contentのclassがある<p>です
また、<br />が有りますので、replaceを使って、それを省く
スクリプト:document.getElementsByClassName('fn-wlyrics fn-content')[0].innerHTML.replace(/\<br\>/g,"")
結果
4. 今、index.jsを書きましょう。歌詞はファイルに保存します。index.jsconst puppeteer = require('puppeteer'); const fs = require('fs'); (async()=>{ const browser=await puppeteer.launch({headless:true}); const page=await browser.newPage(); await page.goto('https://mp3.zing.vn/zing-chart-tuan/bai-hat-US-UK/IWZ9Z0BW.html'); const songs = await page.evaluate(() => { let songs = document.getElementsByClassName('e-item'); songs = [...songs]; let array = songs.map(song => ({ title: song.getElementsByClassName('txt-primary _trackLink')[0].innerHTML.trim(), url: song.getElementsByClassName('txt-primary _trackLink')[0].href })); return array; }); for(let song of songs){ await page.goto(song.url); let lyric = await page.evaluate(()=>{ const evaluatedLyric = document.getElementsByClassName('fn-wlyrics fn-content')[0]; // 歌詞はいつもあるわけではないので、条件をチェック if (evaluatedLyric !== undefined) { return evaluatedLyric.innerHTML.replace(/\<br\>/g,""); } else return "歌詞無し"; }); await fs.writeFile(`songs/${song.title}.txt`,lyric,function(err){ if(err) throw err; console.log("取得: "+song.title); }); } await browser.close(); })();最終的に、以下の結果が出る
まとめ
この方法はかなり簡単ですが、HTML構築の分析が必要なので、時々嫌を感じるかもしれません。それで、使用の前に、注意しべきです。
- 投稿日:2019-02-18T17:47:33+09:00
STSのassumeRoleをLambdaで使うと、2回目以降でAccess Dinedになる件
こんな感じでLambdaに処理を実装する。
const AWS = require('aws-sdk')

const arn = 'arn:aws:iam::9999999:role/EXAMPLE'
const sts = new AWS.STS()
sts.assumeRole({
  RoleArn: arn,
  RoleSessionName: 'test'
}).promise().then(data => {
  AWS.config.update({
    credentials: new AWS.Credentials(
      data.Credentials.AccessKeyId,
      data.Credentials.SecretAccessKey,
      data.Credentials.SessionToken
    ),
    region: 'us-west-2'
  })
  const docClient = new AWS.DynamoDB.DocumentClient()
  return docClient.get({
    TableName: 'Test',
    Key: {
      ID: 'hello'
    }
  }).promise()
})
.then(data => console.log(data))
.catch(e => console.log(e))
1回目は問題なく動くが、2回目以降にこうなる。
{
  "message": "Access denied",
  "code": "AccessDenied",
  "time": "2019-02-18T08:18:27.089Z",
  "requestId": "c44f9f87-3355-11e9-bfa8-451bc09ebb35",
  "statusCode": 403,
  "retryable": false,
  "retryDelay": 20.810919578930864
}
原因
AWS.config.updateで切り替えた後の情報でAWS SDKの処理が走るため、1回目と2回目以降では実行しようとしているIAMロールが異なる。
sts.getCallerIdentity()でAccountなどの情報を見ると、変わっているのがわかる。対応
sts.getCallerIdentity()でどのロールを使おうとしているかわかるので、assumeRoleする必要がないときは何もしないようにすれば良い。const AWS = require('aws-sdk') const getCallerIdentity = () => { return new Promise((resolve, reject) => { const sts = new AWS.STS() sts.getCallerIdentity((error, data) => { if (error) return reject(error) return resolve(data) }) }) } getCallerIdentity() .then({Account} => { if (Account === 'YOUR_ACCOUNT_ID') return Account const sts = new AWS.STS() return sts.assumeRole({ RoleArn: 'arn:aws:iam::9999999:role/EXAMPLE', RoleSessionName: 'test' }).promise() }).then(data => { AWS.config.update({ credentials: new AWS.Credentials( data.Credentials.AccessKeyId, data.Credentials.SecretAccessKey, data.Credentials.SessionToken ), region: 'us-west-2' }) const docClient = new AWS.DynamoDB.DocumentClient() return docClient.get({ TableName: 'Test', Key: { ID: 'hello' } }).promise() }) .then(data => console.log(data)) .catch(e => console.log(e))
- 投稿日:2019-02-18T15:12:29+09:00
AWS.config.updateでアクセスキーが設定できないときに見るページ
ドハマリしたので覚書。
やりたいこと
AWS.config.updateでAWSへのアクセスキーをセットしたい。
-> STSのassumeRoleでクロスアカウントアクセスしたかった。よく見るコード
AWS.config.update({
  accessKeyId: "AccessKeyId",
  secretKey: "SecretAccessKey",
  region: "region"
})
起きたこと
.envrcに設定しているprofileが勝って、意図したアカウントにつながらない。アカウントが変わっているかを確認する方法
こんな感じでaccess keyが変わっているか確認すれば良い。
console.log(AWS.config.credentials.accessKeyId)
AWS.config.update({
  accessKeyId: "AccessKeyId",
  secretKey: "SecretAccessKey",
  region: "region"
})
console.log(AWS.config.credentials.accessKeyId)
意図したとおりに動いたコード
  AWS.config.update({
    credentials: new AWS.Credentials(
      "AccessKeyId",
      "SecretAccessKey"
    ),
    region: "region"
  })
AWS.Credentialsをインスタンス化して入れる方法だと動く。そもそもの問題
https://github.com/aws/aws-sdk-js/blob/master/lib/config.d.ts#L192-L209 を見ると、よく見かけるコードの方は非推奨扱いになっている。
export abstract class ConfigurationOptions {
    /**
     * AWS access key ID.
     *
     * @deprecated
     */
    accessKeyId?: string
    /**
     * AWS secret access key.
     *
     * @deprecated
     */
    secretAccessKey?: string
    /**
     * AWS session token.
     *
     * @deprecated
     */
    sessionToken?: string
STSでクロスアカウントアクセスするコード
こうすればよさそう。
const AWS = require('aws-sdk')

const arn = 'arn:aws:iam::9999999:role/EXAMPLE'
const sts = new AWS.STS()
sts.assumeRole({
  RoleArn: arn,
  RoleSessionName: 'test'
}).promise().then(data => {
  AWS.config.update({
    credentials: new AWS.Credentials(
      data.Credentials.AccessKeyId,
      data.Credentials.SecretAccessKey,
      data.Credentials.SessionToken
    ),
    region: 'us-west-2'
  })
  const docClient = new AWS.DynamoDB.DocumentClient()
  return docClient.get({
    TableName: 'Test',
    Key: {
      ID: 'hello'
    }
  }).promise()
})
.then(data => console.log(data))
.catch(e => console.log(e))
- 投稿日:2019-02-18T15:05:35+09:00
LambdaからAppSyncをIAM認証で使う
LambdaからAppSyncを使いたい
事の発端は、フロントエンドからDynamoDBに投げたデータをLambdaで処理を行った後(まぁまぁ時間が掛かることを想定したもの)、反映された情報をSubscriptionによってリアクティブに更新させたいと思ったのですが、AppSyncでSubscriptionする上で、AppSyncのMutationを通さずに更新した情報はSubscriptionできなさそうなので、バックエンドのLambdaからの更新もAppSyncを使う必要がある。1
その際に、認証方法にAPI_KEYは嫌だし、Lambdaの認証のためにCognito Userを登録するのもナンセンスな気がしたので、IAM認証を。やり方
基本的に大部分こちらで説明されている方法でいけます。
ただ、こちらのサイトもAPI KEYを使って説明されているので、このままAUTH TYPEをAWS_IAMに変えても403になってしまいます。答えはとても簡単で、ここにほとんど答えが載ってますが、credentialsを渡してあげればいいです。
しかし、Credentialsに何を渡すか、どう渡すかですが、単純にLambdaの実行Roleにより取得できるCredentialsを渡してあげましょうindex.jsrequire('isomorphic-fetch'); const aws = require('aws-sdk'); //AWS-SDKの読込します const AWSAppSyncClient = require('aws-appsync').default; const gql = require('graphql-tag'); const AppSyncConfig = require('./aws-exports').default; //~~~~~Mutationやらの定義は上記サイトを参考に同じように~~~~~ exports.handler = async (event) => { const client = new AWSAppSyncClient({ url: AppSyncConfig.aws_appsync_graphqlEndpoint, region: AppSyncConfig.aws_appsync_region, auth: { type: AppSyncConfig.aws_appsync_authenticationType, credentials: ()=> aws.config.credentials //ここ!! }, disableOffline: true }); //~~~Mutationの実行などは上記サイトを参考に同じように~~~ };単純にAWS-SDKを読み込んであげることで、Credentialsの取得がなされるので、それをauth.credentialsに渡してあげるだけです。
IAM認証を使っている方の記事が少なく、何気にたどり着くのに時間が掛かったので、どなたかのお役に立てば幸いです。
この部分そもそもちゃんと検証していないので理解が間違っていたら、是非ご指摘を! ↩