プログラマー向けの最高の本でウェブサイトを作成しました。 このリンクを確認してください https://techread.dev フィードバックをお待ちしております。
プログラマー向けの最高の本でウェブサイトを作成しました。 このリンクを確認してください https://techread.dev
フィードバックをお待ちしております。
最近Vue+Vuexはじめました。 いきなり本題ですが、下記のようにv-text-fieldの変更を@changeからメソッドに引き渡し、 idと変更内容を受け取ろうとしてみました。こんな感じで。 <v-text-field id="text1" label="テキスト" @change="updateField($event)" ></v-text-field> methods: { updateField(e){ console.log(e.target.id,e.target.value) }, } が、、動かないな???なんでかな?? とりあえずinputは動くからinputで受けるか、、、 inputの戻り値はstringで入力した内容だけなので、第2に手動でidを指定してと、、、 <v-text-field id="text1" label="テキスト" @input="updateField($event,'text1')" ></v-text-field> methods: { updateField(e,_id){ console.log(e,_id) }, } 結果 [変更内容] undefined なんでや!!! こうしてみたら・・・? <v-text-field id="text1" label="テキスト" @input="updateField([$event,'text1'])" ></v-text-field> methods: { updateField(e){ console.log(e) }, } 結果 (2) ["[変更内容]", "text1"] ヤレバデキルジャン☺️ しかしなぜ@changeが効かないのか・・・。Vuexを使うとv-modelが使えないし・・・。 あんまりこのやり方もスマートではないので解決策が欲しいところ。 ちなみに、 updateField({id:'text1',value:$event}) とオブジェクトでこんなふうにも渡せます。こっちのが一般的か。
最近Vue+Vuexはじめました。
いきなり本題ですが、下記のようにv-text-fieldの変更を@changeからメソッドに引き渡し、 idと変更内容を受け取ろうとしてみました。こんな感じで。
          <v-text-field
            id="text1"
            label="テキスト"
            @change="updateField($event)"
          ></v-text-field>
  methods: {
      updateField(e){
        console.log(e.target.id,e.target.value)
      },
}
が、、動かないな???なんでかな?? とりあえずinputは動くからinputで受けるか、、、 inputの戻り値はstringで入力した内容だけなので、第2に手動でidを指定してと、、、
          <v-text-field
            id="text1"
            label="テキスト"
            @input="updateField($event,'text1')"
          ></v-text-field>
  methods: {
      updateField(e,_id){
        console.log(e,_id)
      },
}
結果 [変更内容] undefined
[変更内容] undefined
なんでや!!!
こうしてみたら・・・?
          <v-text-field
            id="text1"
            label="テキスト"
            @input="updateField([$event,'text1'])"
          ></v-text-field>
  methods: {
      updateField(e){
        console.log(e)
      },
}
結果 (2) ["[変更内容]", "text1"]
(2) ["[変更内容]", "text1"]
ヤレバデキルジャン☺️
しかしなぜ@changeが効かないのか・・・。Vuexを使うとv-modelが使えないし・・・。 あんまりこのやり方もスマートではないので解決策が欲しいところ。
ちなみに、
updateField({id:'text1',value:$event})
とオブジェクトでこんなふうにも渡せます。こっちのが一般的か。
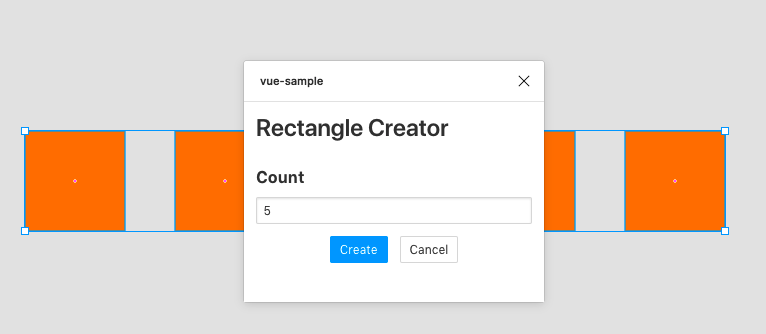
About Figma Pluginに未来を感じています。 公式ドキュメントには、UIをReactで構築する流れ(Building React)が紹介されています。 しかし、個人的に(会社的に)はVueに慣れていることもあり、以下の環境で構築してみようと試みました。 Vue.js TypeScript Sass Bulma 注: Figma Pluginはあまり関係なく、ほぼWebpackの設定の問題ですw 結論 GitHubにコードを置いておきました。 https://github.com/hosopy/figma-plugin-vue-sample 解説: ビルド環境 まず、公式ドキュメントのBundling with Webpackを参考に、Webpackベースのコードベースを構築しました。 公式GitHubにサンプルがあります。 以下は、Bundling with Webpackのコードベースからの差分に関する解説です。 package.json Vue.js, Sass, Bulmaを使うために必要なパッケージを追加しました。 $ npm install --save vue vue-class-component vue-property-decorator bulma $ npm install --save-dev node-sass sass-loader vue-loader vue-template-compiler tsconfig.json Vue.jsのTypeScript推奨構成に変更しました。 tsconfig.json { "compilerOptions": { "target": "es5", "strict": true, "experimentalDecorators": true, "moduleResolution": "node", "module": "es2015" } } webpack.config.js 主な変更点 rules vue-loaderの設定を追加 ts-loaderのオプションにappendTsSuffixTo: [/\.vue$/]を追加 sass-loaderの設定を追加 resolve .vueに関する設定を追加 plugins VueLoaderPluginを追加 ... const VueLoaderPlugin = require('vue-loader/lib/plugin') ... module.exports = (env, argv) => ({ ... module: { rules: [ { test: /\.vue$/, loader: 'vue-loader', options: { loaders: { 'scss': 'vue-style-loader!css-loader!sass-loader', 'sass': 'vue-style-loader!css-loader!sass-loader?indentedSyntax' } } }, { test: /\.tsx?$/, loader: 'ts-loader', exclude: /node_modules/, options: { appendTsSuffixTo: [/\.vue$/] } }, ... { test: /\.scss$/, loader: [ { loader: 'style-loader' }, { loader: 'css-loader' }, { loader: 'sass-loader' } ] }, ... ], }, resolve: { extensions: ['.tsx', '.ts', '.jsx', '.js', '.vue'], alias: { 'vue$': 'vue/dist/vue.esm.js' } }, plugins: [ ... new VueLoaderPlugin() ] }) 解説: UIの実装 Reactのサンプルと同じく、指定した数の正方形を描画するRectangle CreatorをVueで実装してみました。 まず、UIのエントリポイントsrc/ui.htmlとsrc/ui.tsです。 src/ui.html <div id="app"></div> src/ui.ts import Vue from 'Vue' import RectangleCreator from './RectangleCreator' import './ui.scss' new Vue({ el: '#app', render (h) { return h('rectangle-creator') }, components: { RectangleCreator } }) src/ui.scssでは、Bulmaを読み込んで変数の設定などを行います。 src/ui.scss @charset "utf-8"; @import "~bulma/sass/utilities/initial-variables"; @import "~bulma/sass/utilities/functions"; $brand: #18A0FB; $primary: $brand; @import "~bulma/bulma"; 最後に、BulmaのCSSを使ってRectangle Creatorを書き換えてみます。 src/RectangleCreator.vue <template> <div class="container"> <h2 class="title is-4">Rectangle Creator</h2> <div class="field"> <label class="label">Count</label> <p class="control"> <input class="input is-small" type="number" v-model="count"> </p> </div> <div class="field is-grouped is-grouped-centered"> <p class="control"> <button class="button is-primary is-small" @click="create"> Create </button> </p> <p class="control"> <button class="button is-small" @click="cancel"> Cancel </button> </p> </div> </div> </template> <script lang="ts"> import Vue from 'vue' import Component from 'vue-class-component' @Component({ name: 'RectangleCreator' }) export default class RectangleCreator extends Vue { count: number = 5 create () { parent.postMessage({ pluginMessage: { type: 'create-rectangles', count: this.count } }, '*') } cancel () { parent.postMessage({ pluginMessage: { type: 'cancel' } }, '*') } } </script> <style lang="scss"> .container { padding: 0.75rem; } </style> 実行するとこんな感じ 参考: 途中ハマったこと 初期提供のfigma.d.tsが古い問題 Figma Desktop Appでプラグインの初期生成したときに提供されるfigma.d.tsは古い?もので問題があり、コンパイルエラーが発生しました。 (2019/08/22現在) 具体的には、LineHeightのインタフェース定義でエラーになります。 interface LineHeight { readonly value: number readonly unit: "PIXELS" | "PERCENT" } | { readonly unit: "AUTO" } GitHubのサンプルのfigma.d.tsを参考に、型エイリアスに書き換えることで解決しました。 type LineHeight = { readonly value: number readonly unit: "PIXELS" | "PERCENT" } | { readonly unit: "AUTO" }
Figma Pluginに未来を感じています。
公式ドキュメントには、UIをReactで構築する流れ(Building React)が紹介されています。 しかし、個人的に(会社的に)はVueに慣れていることもあり、以下の環境で構築してみようと試みました。
注: Figma Pluginはあまり関係なく、ほぼWebpackの設定の問題ですw
GitHubにコードを置いておきました。
https://github.com/hosopy/figma-plugin-vue-sample
まず、公式ドキュメントのBundling with Webpackを参考に、Webpackベースのコードベースを構築しました。 公式GitHubにサンプルがあります。
以下は、Bundling with Webpackのコードベースからの差分に関する解説です。
Vue.js, Sass, Bulmaを使うために必要なパッケージを追加しました。
$ npm install --save vue vue-class-component vue-property-decorator bulma
$ npm install --save-dev node-sass sass-loader vue-loader vue-template-compiler
Vue.jsのTypeScript推奨構成に変更しました。
{
  "compilerOptions": {
    "target": "es5",
    "strict": true,
    "experimentalDecorators": true,
    "moduleResolution": "node",
    "module": "es2015"
  }
}
主な変更点
rules
vue-loader
ts-loader
appendTsSuffixTo: [/\.vue$/]
sass-loader
resolve
.vue
plugins
VueLoaderPlugin
...

const VueLoaderPlugin = require('vue-loader/lib/plugin')

...

module.exports = (env, argv) => ({
  ...

  module: {
    rules: [
      {
        test: /\.vue$/,
        loader: 'vue-loader',
        options: {
          loaders: {
            'scss': 'vue-style-loader!css-loader!sass-loader',
            'sass': 'vue-style-loader!css-loader!sass-loader?indentedSyntax'
          }
        }
      },
      {
        test: /\.tsx?$/,
        loader: 'ts-loader',
        exclude: /node_modules/,
        options: {
          appendTsSuffixTo: [/\.vue$/]
        }
      },
      ...
      {
        test: /\.scss$/,
        loader: [
          { loader: 'style-loader' },
          { loader: 'css-loader' },
          { loader: 'sass-loader' }
        ]
      },
      ...
    ],
  },

  resolve: {
    extensions: ['.tsx', '.ts', '.jsx', '.js', '.vue'],
    alias: {
      'vue$': 'vue/dist/vue.esm.js'
    }
  },

  plugins: [
    ...
    new VueLoaderPlugin()
  ]
})
Reactのサンプルと同じく、指定した数の正方形を描画するRectangle CreatorをVueで実装してみました。
まず、UIのエントリポイントsrc/ui.htmlとsrc/ui.tsです。
src/ui.html
src/ui.ts
<div id="app"></div>
import Vue from 'Vue'
import RectangleCreator from './RectangleCreator'
import './ui.scss'

new Vue({
  el: '#app',
  render (h) {
    return h('rectangle-creator')
  },
  components: {
    RectangleCreator
  }
})
src/ui.scssでは、Bulmaを読み込んで変数の設定などを行います。
src/ui.scss
@charset "utf-8";

@import "~bulma/sass/utilities/initial-variables";
@import "~bulma/sass/utilities/functions";

$brand: #18A0FB;
$primary: $brand;

@import "~bulma/bulma";
最後に、BulmaのCSSを使ってRectangle Creatorを書き換えてみます。
<template>
  <div class="container">
    <h2 class="title is-4">Rectangle Creator</h2>

    <div class="field">
      <label class="label">Count</label>
      <p class="control">
        <input class="input is-small" type="number" v-model="count">
      </p>
    </div>

    <div class="field is-grouped is-grouped-centered">
      <p class="control">
        <button class="button is-primary is-small" @click="create">
          Create
        </button>
      </p>
      <p class="control">
        <button class="button is-small" @click="cancel">
          Cancel
        </button>
      </p>
    </div>
  </div>
</template>

<script lang="ts">
import Vue from 'vue'
import Component from 'vue-class-component'

@Component({
  name: 'RectangleCreator'
})
export default class RectangleCreator extends Vue {
  count: number = 5

  create () {
    parent.postMessage({ pluginMessage: { type: 'create-rectangles', count: this.count } }, '*')
  }

  cancel () {
    parent.postMessage({ pluginMessage: { type: 'cancel' } }, '*')
  }
}
</script>

<style lang="scss">
.container {
  padding: 0.75rem;
}
</style>
実行するとこんな感じ
Figma Desktop Appでプラグインの初期生成したときに提供されるfigma.d.tsは古い?もので問題があり、コンパイルエラーが発生しました。 (2019/08/22現在)
figma.d.ts
具体的には、LineHeightのインタフェース定義でエラーになります。
LineHeight
interface LineHeight {
  readonly value: number
  readonly unit: "PIXELS" | "PERCENT"
} | {
  readonly unit: "AUTO"
}
GitHubのサンプルのfigma.d.tsを参考に、型エイリアスに書き換えることで解決しました。
type LineHeight = {
  readonly value: number
  readonly unit: "PIXELS" | "PERCENT"
} | {
  readonly unit: "AUTO"
}
本記事について 下記問題に当たった人向けにv-modelと$emitを使った解決方法を記載してます。 - Vuetifyを使った子コンポーネントと親コンポーネント間のデータ受け渡しで困った方 - 双方向データ受け渡しを実装したけど、「Vue warn]: Avoid mutating a prop directly since ~」って出ちゃった人 問題 例えば、<v-navigation-drawer>をの開閉Toggleを親コンポーネント内で作成したく下記のような実装をしたとする。 子コンポーネント AppNavigationDrawer.vue <template> <v-navigation-drawer v-model="drawer" absolute temporary > </v-navigation-drawer> </template> <script> export default { props: { drawer: { type: Boolean, default: false } } } </script> 親コンポーネント AppHeader.vue <template> <v-app-bar> <v-app-bar-nav-icon @click.stop="drawer = !drawer" /> </v-app-bar> <navigation-drawer v-model="drawer" /> </template> <script> import NavigationDrawer from '@/components/AppNavigationDrawer' export default { components: { AppNavigationDrawer }, data () { return { drawer: false } } } </script> 結果、子コンポーネント側のdrawerが変化するような操作、例えばNavigationの外側をクリックをすると下記のようなエラーが出る。 propsを直接変更するんじゃねぇ!っていうアラートですね。 解決方法 直接変更がダメならemitを使えばいいじゃない。つまり、この辺の話をVuetify Componentに応用すれば良いだけ。 子コンポーネント AppNavigationDrawer.vue <template> <v-navigation-drawer :value="value" absolute temporary @input="$emit('input', $event)" > </v-navigation-drawer> </template> <script> export default { props: { value: { type: Boolean, default: false } } } </script> 親コンポーネント AppHeader.vue <template> <v-app-bar> <v-app-bar-nav-icon @click.stop="drawer = !drawer" /> </v-app-bar> <navigation-drawer v-model="drawer" /> </template> <script> import NavigationDrawer from '@/components/AppNavigationDrawer' export default { components: { AppNavigationDrawer }, data () { return { drawer: false } } } </script> 親からのprops valueを<v-navigation-drawer></v-navigation-drawer>の開閉状態であるvalueにbindする。 子の変化は自身のinput event契機で、親のinputイベントを$emitすることで親コンポーネントへ変化を伝播する。 他 eventとvalueが定義されているVuetifty Componentであれば何でも応用できそうです。
下記問題に当たった人向けにv-modelと$emitを使った解決方法を記載してます。 - Vuetifyを使った子コンポーネントと親コンポーネント間のデータ受け渡しで困った方 - 双方向データ受け渡しを実装したけど、「Vue warn]: Avoid mutating a prop directly since ~」って出ちゃった人
例えば、<v-navigation-drawer>をの開閉Toggleを親コンポーネント内で作成したく下記のような実装をしたとする。
<v-navigation-drawer>
<template>
  <v-navigation-drawer
    v-model="drawer"
    absolute
    temporary
  >
  </v-navigation-drawer>
</template>
<script>
  export default {
    props: {
      drawer: {
        type: Boolean,
        default: false
      }
    }
  }
</script>
<template>
  <v-app-bar>
    <v-app-bar-nav-icon
      @click.stop="drawer = !drawer"
    />
  </v-app-bar>
 <navigation-drawer
   v-model="drawer"
 />
</template>
<script>
import NavigationDrawer from '@/components/AppNavigationDrawer'

export default {
  components: {
    AppNavigationDrawer
  },
  data () {
    return {
      drawer: false
    }
  }
}
</script>
結果、子コンポーネント側のdrawerが変化するような操作、例えばNavigationの外側をクリックをすると下記のようなエラーが出る。 propsを直接変更するんじゃねぇ!っていうアラートですね。
直接変更がダメならemitを使えばいいじゃない。つまり、この辺の話をVuetify Componentに応用すれば良いだけ。
<template>
  <v-navigation-drawer
    :value="value"
    absolute
    temporary
    @input="$emit('input', $event)"
  >
  </v-navigation-drawer>
</template>
<script>
  export default {
    props: {
      value: {
        type: Boolean,
        default: false
      }
    }
  }
</script>
親からのprops valueを<v-navigation-drawer></v-navigation-drawer>の開閉状態であるvalueにbindする。 子の変化は自身のinput event契機で、親のinputイベントを$emitすることで親コンポーネントへ変化を伝播する。
<v-navigation-drawer></v-navigation-drawer>
eventとvalueが定義されているVuetifty Componentであれば何でも応用できそうです。
モチベーション Vue のカスタムディレクティブ を作ったことがなかったので、挑戦してみる せっかくやるならば TypeScript で せっかくやるならばタイプセーフで(ただしベストエフォート) せっかくやるならば npm に公開 作ったもの Vue Intersect Directive (NPM / GitHub) 任意の要素(コンポーネント)がブラウザのビューポート内にあるかどうかを判別し、その情報を基にスタイルを適用したり、コールバック関数を呼び出します。スティッキー的な実装に役に立つかもしれません。 <div v-intersect="{ true: ['visible'] }">Hello</div> デモ Vue.directive インターフェースの確認 Vue.directive API を使い、Vue.directive('vue-intersect', IntersectDirective) のように呼び出せる形を目指します。 ひとまず Vue.dierective API の型定義を確認してみます。 node_modules/vue/types/vue.d.ts directive( id: string, definition?: DirectiveOptions | DirectiveFunction ): DirectiveOptions; node_modules/vue/types/options.d.ts export interface DirectiveOptions { bind?: DirectiveFunction; inserted?: DirectiveFunction; update?: DirectiveFunction; componentUpdated?: DirectiveFunction; unbind?: DirectiveFunction; } export type DirectiveFunction = ( el: HTMLElement, binding: DirectiveBinding, vnode: VNode, oldVnode: VNode ) => void; カスタムディレクティブの開発 今回は、要素がビューポートに存在しているかどうかを判別するのに、IntersectionObserver を使いました。 bind フック関数 にて、IntersectionObserver を生成し、要素の監視を開始するだけでも機能はしそうですが、unbind フック で IntersectionObserver による監視を終了する実装も用意しました。 おおよその枠組みは以下のようになります。 実装の詳細は割愛しますので、興味がある型は GitHub のソースをご覧ください。 src/intersect-directive.ts import { DirectiveOptions, DirectiveFunction, VNode } from 'vue' import { DirectiveBinding } from 'vue/types/options' /** * */ const bind: DirectiveFunction = (el: HTMLElement, binding: DirectiveBinding, vnode: VNode, oldVnode: VNode) => { // 具体的な実装 } /** * */ const unbind: DirectiveFunction = (el: HTMLElement, binding: DirectiveBinding, vnode: VNode, oldVnode: VNode) => { // 具体的な実装 } /** * */ const IntersectDirective: DirectiveOptions = { bind, unbind, } export default IntersectDirective プラグイン化 さらに Vue.use API を使い、Vue.use(VueIntersect) でも使えるようにしたのですが、正直なところ、ここの型付けについてはこれで正しいのかイマイチ分からず..。 Vue ではなく _Vue を参照するとかなんとか書いてあるサイトもあったのですが、よく意図が分からなかったです。 src/index.ts import IntersectDirective from './intersect-directive' import Vue, { PluginObject, PluginFunction } from 'vue' // window.Vue を TS に認識してもらってます。 declare global { interface Window { Vue: Vue | undefined } } const install: PluginFunction<never> = () => { Vue.directive('intersect', IntersectDirective) } const VueIntersect: PluginObject<never> = { install, } // import ではなく、<script> タグの読み込みの場合の処理です。 if (window.Vue) { Vue.use(VueIntersect.install) } export { IntersectDirective } // IntersectDirective をエクスポート export default VueIntersect // PluginFunction をデフォルトエクスポート おまけ (NPM への公開まで) カスタムディレクティブの開発よりも、むしろこちらの手順の方で調べることが多かったのでメモしておきます。 モジュールのフォーマットについて 配布するモジュールは、RollupJS で、UMD、ESM、ブラウザ用 (iife) の 3 つをコンパイルしました。 それぞれ 設定用ファイルを用意し、ブラウザ版パッケージにはミニファイ処理も追加しています。 TypeScript の型定義ファイルの書き出し *.d.ts の書き出しは、tsconfig.json にて、declaration (と declarationDir)プロパティを設定すれば良いはずなのですが、今回は Rollup によるバンドルの影響なのか、なぜかビルド処理では型定義ファイルが出力がされませんでした。 仕方ないので、package.json に型定義ファイルをビルドするための、コマンドを用意しました。 "build:dts": "tsc src/index.ts -d --emitDeclarationOnly --declarationDir dist/types" 以上になります。
Vue Intersect Directive (NPM / GitHub)
任意の要素(コンポーネント)がブラウザのビューポート内にあるかどうかを判別し、その情報を基にスタイルを適用したり、コールバック関数を呼び出します。スティッキー的な実装に役に立つかもしれません。
<div v-intersect="{ true: ['visible'] }">Hello</div>
デモ
Vue.directive API を使い、Vue.directive('vue-intersect', IntersectDirective) のように呼び出せる形を目指します。 ひとまず Vue.dierective API の型定義を確認してみます。
Vue.directive('vue-intersect', IntersectDirective)
directive(
  id: string,
  definition?: DirectiveOptions | DirectiveFunction
): DirectiveOptions;
export interface DirectiveOptions {
  bind?: DirectiveFunction;
  inserted?: DirectiveFunction;
  update?: DirectiveFunction;
  componentUpdated?: DirectiveFunction;
  unbind?: DirectiveFunction;
}

export type DirectiveFunction = (
  el: HTMLElement,
  binding: DirectiveBinding,
  vnode: VNode,
  oldVnode: VNode
) => void;
今回は、要素がビューポートに存在しているかどうかを判別するのに、IntersectionObserver を使いました。
bind フック関数 にて、IntersectionObserver を生成し、要素の監視を開始するだけでも機能はしそうですが、unbind フック で IntersectionObserver による監視を終了する実装も用意しました。
おおよその枠組みは以下のようになります。 実装の詳細は割愛しますので、興味がある型は GitHub のソースをご覧ください。
import { DirectiveOptions, DirectiveFunction, VNode } from 'vue'
import { DirectiveBinding } from 'vue/types/options'

/**
 *
 */
const bind: DirectiveFunction = (el: HTMLElement, binding: DirectiveBinding, vnode: VNode, oldVnode: VNode) => {
  // 具体的な実装
}

/**
 *
 */
const unbind: DirectiveFunction = (el: HTMLElement, binding: DirectiveBinding, vnode: VNode, oldVnode: VNode) => {
  // 具体的な実装
}

/**
 *
 */
const IntersectDirective: DirectiveOptions = {
  bind,
  unbind,
}

export default IntersectDirective
さらに Vue.use API を使い、Vue.use(VueIntersect) でも使えるようにしたのですが、正直なところ、ここの型付けについてはこれで正しいのかイマイチ分からず..。 Vue ではなく _Vue を参照するとかなんとか書いてあるサイトもあったのですが、よく意図が分からなかったです。
Vue.use(VueIntersect)
import IntersectDirective from './intersect-directive'
import Vue, { PluginObject, PluginFunction } from 'vue'

// window.Vue を TS に認識してもらってます。
declare global {
  interface Window {
    Vue: Vue | undefined
  }
}

const install: PluginFunction<never> = () => {
  Vue.directive('intersect', IntersectDirective)
}

const VueIntersect: PluginObject<never> = {
  install,
}

// import ではなく、<script> タグの読み込みの場合の処理です。
if (window.Vue) {
  Vue.use(VueIntersect.install)
}

export { IntersectDirective } // IntersectDirective をエクスポート
export default VueIntersect   // PluginFunction をデフォルトエクスポート
カスタムディレクティブの開発よりも、むしろこちらの手順の方で調べることが多かったのでメモしておきます。
配布するモジュールは、RollupJS で、UMD、ESM、ブラウザ用 (iife) の 3 つをコンパイルしました。 それぞれ 設定用ファイルを用意し、ブラウザ版パッケージにはミニファイ処理も追加しています。
*.d.ts の書き出しは、tsconfig.json にて、declaration (と declarationDir)プロパティを設定すれば良いはずなのですが、今回は Rollup によるバンドルの影響なのか、なぜかビルド処理では型定義ファイルが出力がされませんでした。 仕方ないので、package.json に型定義ファイルをビルドするための、コマンドを用意しました。
tsconfig.json
declaration
declarationDir
"build:dts": "tsc src/index.ts -d --emitDeclarationOnly --declarationDir dist/types"
以上になります。
Rails+Vue.js+Webpackerによる「Create, Read, Update, Destroy」処理のチュートリアルを記述する。 なお,前提知識として,Railsチュートリアル終了程度を想定する。 <概要> ■ 記事共通 目次 ソースコード(GitHubへリンク) 〜Part1: 環境構築編 〜Part2: Read編 〜Part3: Vue Router設定編 〜Part4: Create, Update, Delete編 ▲Part5: Vuex設定編:本記事 実装機能 お気に入りの本を登録,参照,編集,削除できるアプリケーションを作成する。 非同期通信(Ajax)による[Rails+Vue.js]のCRUD処理を実装する。 SinglePageApplication(SPA)として実装する。 開発環境 MacOS Mojave Ruby(2.5.1) Ruby on Rails(5.2.1) Vue.js(2.6.10) Yarn(1.17.0) Webpack(4.39.2) 学習情報URL Vue.js公式 Vue Mastery(The Vue Instance) ■ 本記事の内容 Part4迄で作成した[BookHome.vue]のデータ処理について,Vuexの管理下に移行する。 今回のコードは,GitHubのコミット履歴で確認可能である。 [Vuexの導入]から[ヘルパー関数による省略技法]まで 本記事の参考URL Vuex公式 Vue.js + Vuexでデータが循環する全体像を図解してみた <本文> ■ Vuexの導入 ○1:Vuexをインストール $ yarn add vuex ○2:[store.js]を作成 app/javascript/store/store.js import Vue from 'vue' import Vuex from 'vuex' import router from '../router/router.js' import axios from 'axios' Vue.use(Vuex) export default new Vuex.Store({ state: {}, mutations: {} }) ○3:[application.js]に[store.js]を登録 app/javascript/packs/application.js import Vue from 'vue' import App from './App.vue' import Router from '../router/router.js' import Store from '../store/store.js' const app = new Vue({ el: '#app', router: Router, store: Store, render: h => h(App) }) ■ [fetchBooks]関連を移行 ○1:[store.js]を修正 app/javascript/store/store.js import Vue from 'vue' import Vuex from 'vuex' import router from '../router/router.js' import axios from 'axios' Vue.use(Vuex) export default new Vuex.Store({ // [state]がコンポーネントにおける[data]に相当 state: { books: [] }, // [mutations]がコンポーネントにおける[methods]に相当 mutations: { fetchBooks(state) { state.books = []; axios.get('/api/books').then((res) => { for(var i = 0; i < res.data.books.length; i++) { state.books.push(res.data.books[i]); } }, (error) => { console.log(error); }); } }, }) ○2:[HomeBook.vue]を修正 app/javascript/pages/BookHome.vue ... <script> ... data: function() { return { bookInfo: {}, bookInfoBool: false, // [store.js]に移行するため,[books]を削除 } }, computed: { // [store.js]から[books]を呼び出して,[BookHome.vue]のdata[books]に格納 books() { return this.$store.state.books } }, mounted: function() { // [fetchBooks]を[store.js]から呼び出すため,コード修正 this.$store.commit('fetchBooks') }, methods: { // [store.js]に移行するため,[fetchBooks]を削除 ... } ... ■ [setBookInfo]関連を移行 ○1:[store.js]を修正 app/javascript/store/store.js ... state: { books: [], bookInfo: {}, bookInfoBool: false }, mutations: { ... setBookInfo(state, { id } ) { axios.get(`api/books/${id}.json`).then(res => { state.bookInfo = res.data; state.bookInfoBool = true; }); } } }) ○2:[HomeBook.vue]を修正 app/javascript/pages/BookHome.vue <script> ... // [data:]は,全て削除 computed: { books() { return this.$store.state.books }, // [bookInfo, bookInfoBool]を追加 bookInfo() { return this.$store.state.bookInfo }, bookInfoBool() { return this.$store.state.bookInfoBool } }, ... methods: { // [setBookInfo]を[store.js]から呼び出すため,コード修正 setBookInfo(id) { this.$store.commit('setBookInfo', { id }) }, ... ■ [deleteBook]関連を移行 ○1:[store.js]を修正 app/javascript/store/store.js ... mutations: { ... deleteBook(state, { id } ) { axios.delete(`/api/books/${id}`).then(res => { state.bookInfo = ''; state.bookInfoBool = false; }); } ... ○2:[HomeBook.vue]を修正 app/javascript/pages/BookHome.vue <script> ... methods: { setBookInfo(id) { this.$store.commit('setBookInfo', { id }) }, // [deleteBook]のコードを修正 deleteBook(id) { this.$store.commit('deleteBook', { id }) this.$store.commit('fetchBooks') }, } ... ■ ヘルパー関数による省略技法 ストアのstateを呼び出す際のコードが冗長であるため,ヘルパー関数を使用して,コードを簡略化する。 mapStateと同様に,mapMutations, mapGetters, mapActions等も存在するが,本記事では使用しない。 参考URL 公式:コンポーネントをバインドするヘルパー Vuex: mapStateの使い方を理解する Vuex:mapStateの書き方8パターン+11サンプルコード app/javascript/store/store.js ... <script> import axios from 'axios' import { mapState } from 'vuex' export default { name: 'BookHome', computed: mapState([ 'books', 'bookInfo', 'bookInfoBool', ]), ... /* 上記のコードと同等 ~Ver.1:mapStateを使用して,異なるデータ名に格納したい場合~ computed: mapState({ books: 'books', bookInfo: 'bookInfo', bookInfoBool: 'bookInfoBool' }) ~Ver.2:デフォルト~ computed: { books() { return this.$store.state.books }, bookInfo() { return this.$store.state.bookInfo }, bookInfoBool() { return this.$store.state.bookInfoBool } } */ ■ 特記事項 ○1:[action,getter]について 今後チュートリアルで必要性が出てきたら追記します。 ○2:Vuexの状態管理下に置くデータについて Vuexの機能上,全てのデータを管理下に置くことは可能であり,複雑でもModuleを使用したら実装できるかと思います。 しかし,一つのコンポーネントでしか使用しないデータを共通の管理下に置くことは,冗長になり,管理が大変になることが予想されますので,以下の情報が判断の参考になるかと思い引用します。 ステートに適したデータ サーバーからデータを取得中かどうかを表すフラグ ログイン中のユーザー情報など,アプリケーション全体で使用されるデータ ECサイトにおける商品の情報など,アプリケーションの複数の場所で使用される可能性のあるデータ コンポーネント側で持つべきデータ マウスポインタがある要素の上に存在するかどうかを表すフラグ ドラッグ中の要素の座標 入力中のフォームの値 【引用:Vue.js入門~基礎から実践アプリケーション開発まで~ 245-246.】 〜Part5: Vuex設定編終了〜
Rails+Vue.js+Webpackerによる「Create, Read, Update, Destroy」処理のチュートリアルを記述する。 なお,前提知識として,Railsチュートリアル終了程度を想定する。
目次
実装機能
開発環境
学習情報URL
○1:Vuexをインストール
$ yarn add vuex
○2:[store.js]を作成
import Vue from 'vue'
import Vuex from 'vuex'
import router from '../router/router.js'
import axios from 'axios'

Vue.use(Vuex)

export default new Vuex.Store({
  state: {},
  mutations: {}
})
○3:[application.js]に[store.js]を登録
import Vue    from 'vue'
import App    from './App.vue'
import Router from '../router/router.js'
import Store  from '../store/store.js'

const app = new Vue({
   el: '#app',
   router: Router,
   store: Store,
   render: h => h(App)
})
○1:[store.js]を修正
import Vue from 'vue'
import Vuex from 'vuex'
import router from '../router/router.js'
import axios from 'axios'

Vue.use(Vuex)

export default new Vuex.Store({
  // [state]がコンポーネントにおける[data]に相当
  state: {
    books: []
  },
  // [mutations]がコンポーネントにおける[methods]に相当
  mutations: {
    fetchBooks(state) {
      state.books = [];
      axios.get('/api/books').then((res) => {
        for(var i = 0; i < res.data.books.length; i++) {
          state.books.push(res.data.books[i]);
        }
      }, (error) => {
        console.log(error);
      });
    }
  },
})
○2:[HomeBook.vue]を修正
...
<script>
...
    data: function() {
      return {
        bookInfo: {},
        bookInfoBool: false,
        // [store.js]に移行するため,[books]を削除
      }
    },
    computed: {
       // [store.js]から[books]を呼び出して,[BookHome.vue]のdata[books]に格納
      books() {
       return this.$store.state.books
      }
    },
    mounted: function() {
      // [fetchBooks]を[store.js]から呼び出すため,コード修正
      this.$store.commit('fetchBooks')
    },
    methods: {
      // [store.js]に移行するため,[fetchBooks]を削除
      ...
    }
...
...
  state: {
    books: [],
    bookInfo: {},
    bookInfoBool: false
  },
  mutations: {
    ...
    setBookInfo(state, { id } ) {
      axios.get(`api/books/${id}.json`).then(res => {
        state.bookInfo = res.data;
        state.bookInfoBool = true;
      });
    }
  }
})
<script>
...
    // [data:]は,全て削除
    computed: {
     books() {
       return this.$store.state.books
     },
     // [bookInfo, bookInfoBool]を追加
     bookInfo() {
       return this.$store.state.bookInfo
     },
     bookInfoBool() {
       return this.$store.state.bookInfoBool
     }
    },
    ...
    methods: {
    // [setBookInfo]を[store.js]から呼び出すため,コード修正
      setBookInfo(id) {
        this.$store.commit('setBookInfo', { id })
      },
...
...
  mutations: {
    ...
    deleteBook(state, { id } ) {
      axios.delete(`/api/books/${id}`).then(res => {
        state.bookInfo = '';
        state.bookInfoBool = false;
      });
    }
...
<script>
...
    methods: {
      setBookInfo(id) {
        this.$store.commit('setBookInfo', { id })
      },
      // [deleteBook]のコードを修正
      deleteBook(id) {
        this.$store.commit('deleteBook', { id })
        this.$store.commit('fetchBooks')
      },
    }
...
...
<script>
  import axios from 'axios'
  import { mapState } from 'vuex'

  export default {
    name: 'BookHome',
    computed: mapState([
      'books',
      'bookInfo',
      'bookInfoBool',
    ]),
...

/* 上記のコードと同等
 ~Ver.1:mapStateを使用して,異なるデータ名に格納したい場合~
    computed: mapState({
      books: 'books',
      bookInfo: 'bookInfo',
      bookInfoBool: 'bookInfoBool'
    })

 ~Ver.2:デフォルト~
    computed: {
      books() {
        return this.$store.state.books
      },
      bookInfo() {
        return this.$store.state.bookInfo
      },
      bookInfoBool() {
        return this.$store.state.bookInfoBool
      }
    }
*/
○1:[action,getter]について 今後チュートリアルで必要性が出てきたら追記します。
○2:Vuexの状態管理下に置くデータについて Vuexの機能上,全てのデータを管理下に置くことは可能であり,複雑でもModuleを使用したら実装できるかと思います。 しかし,一つのコンポーネントでしか使用しないデータを共通の管理下に置くことは,冗長になり,管理が大変になることが予想されますので,以下の情報が判断の参考になるかと思い引用します。
ステートに適したデータ サーバーからデータを取得中かどうかを表すフラグ ログイン中のユーザー情報など,アプリケーション全体で使用されるデータ ECサイトにおける商品の情報など,アプリケーションの複数の場所で使用される可能性のあるデータ コンポーネント側で持つべきデータ マウスポインタがある要素の上に存在するかどうかを表すフラグ ドラッグ中の要素の座標 入力中のフォームの値 【引用:Vue.js入門~基礎から実践アプリケーション開発まで~ 245-246.】
【引用:Vue.js入門~基礎から実践アプリケーション開発まで~ 245-246.】
〜Part5: Vuex設定編終了〜
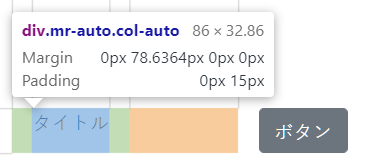
やりたかったこと 下図のような感じで画面の両端にコンポーネントを配置したいなあと思っていました。 解決方法 左側に配置したいコンポーネントのクラスにmr-autoを追加しました。 コード pug b-container b-row b-col.mr-auto(cols="auto") div タイトル b-col(cols="auto") b-button.download ボタン mr-auto このクラスが追加された要素の右側のマージンを、右側のコンポーネントまで詰めることができます。 ↓こんな感じ↓ 詰まっていたところ CSSのfloatプロパティでできると思っていたのですが、flexではできない? 備考 右側のコンポーネントのcolsだけをautoにしてもできるけど、ちゃんとやりたいならマージンを使った方がいいのかなあと思います。 参考文献 Margin utilities on columns - Layout and Grid System _ Components _ BootstrapVue
下図のような感じで画面の両端にコンポーネントを配置したいなあと思っていました。
左側に配置したいコンポーネントのクラスにmr-autoを追加しました。
mr-auto
コード
  b-container
    b-row
      b-col.mr-auto(cols="auto")
        div タイトル
      b-col(cols="auto")
        b-button.download ボタン
このクラスが追加された要素の右側のマージンを、右側のコンポーネントまで詰めることができます。 ↓こんな感じ↓
CSSのfloatプロパティでできると思っていたのですが、flexではできない?
float
右側のコンポーネントのcolsだけをautoにしてもできるけど、ちゃんとやりたいならマージンを使った方がいいのかなあと思います。
cols
auto
Margin utilities on columns - Layout and Grid System _ Components _ BootstrapVue
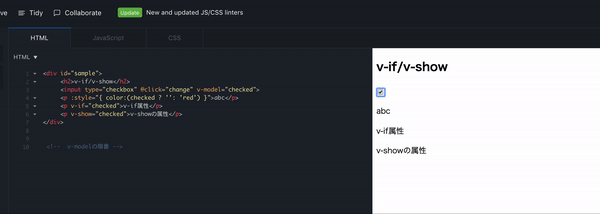
はじめに 今回の記事はVue.jsの出力までの流れと最大の特徴であるディレクティブの説明をしていきます。私もVue.jsを学習してから2ヶ月半しかたっておらず、まだまだ未熟ですが、初学者の目線に立って丁寧に解説していきます。 まずは出力してみる 今回はJSFiddleを使い、セットアップなしで説明していきます。 html <div id="app"> <p> {{ message }} </p> </div> js new Vue({ el: '#app', data: { message: 'Hello Vue.js!' } }) 簡単な出力までの流れを説明します。 1.Vueインスタンスを作成 js new Vue({ ・・・ }) 2.elで指定したDOM要素にインスタンスを適用する js { el: '#app' } 3.UIのdataを定義 js data: { message: 'hello Vue.js!' } 4.dataを展開する html {{ message }} 画面にHello Vue.js!と出たら成功です ディレクティブ HTML要素にv-から始まる属性名(ディレクティブ)を追加することでDOM操作を行います。これがかなり便利なので、実用例とともに紹介していきます。 v-on v-on:イベント名="実行したい関数名"でイベントが発生した時、関数を呼ぶことができるものです。 checkboxがチェックされるというイベントが発生したら、alertが表示されるというプログラムを書いてみます。 ※v-onは@に省略可能 html <div id="sample"> <h2>v-if/v-show</h2> <input type="checkbox" @click="changed"> <!-- v-on:click="changed"とも書ける --> </div> js new Vue({ el: '#sample', data: { checked: true }, methods: { changed (event) { alert("データが変更されました") } } }) 使い方 1.checkboxをclick(チェック)した時にchangedを呼び出す html <input type="checkbox" @click="changed"> 2.changedメソッドが呼ばれalertが表示される js methods: { changed (event) { alert("データが変更されました") } } v-bind 特定の条件が成立する時、変数をHTMLに反映させ、classやstyleなどを変えたい!そんな時に使えるのがv-bindです。 checkboxがチェックされた時に色を変えるようなプログラムを書いてみましょう。 ※v-bindは :に省略可能 html <div id="sample"> <h3>v-if/v-show</h3> <input type="checkbox" v-model="checked"> <p :style="{ color:(checked ? '' : 'red') }">赤くなった</p> <!-- v-bind:styleとも書ける --> </div> js new Vue({ el: '#sample', data: { checked: false } }) 使い方 1.checkboxがチェックされcheckedのBoolean型のdataが変更される(false->true) ※v-modelの説明は後ほどいたします js data: { checked: false } 2.checkedがtrueの時、文字列「赤くなった」のstyleが赤色に変更される html <p :style="{ color: (checked ? '' : 'red') }">赤くなった</p> v-model v-bind:valueとv-on:inputを一緒に記述するものになります。 実際にv-modelを使いクライアントが<input>タグの中に打ち込んだ文字列を出力させるプログラムを書いていきます。 html <div id="sample"> <h2>v-model</h2> <input type="string" v-model="message"> <p>{{ message }}</p> </div> js new Vue({ el: '#sample', data: { message: '' } }) 使い方 1.messageが紐づけられた<input>タグ内にクライアントが文字列を打ち込む html <input type="string" v-model="message"> 2.空のdataを用意したmessageに<input>タグ内に打ち込まれた文字列が更新される js data: { message: '' } 3.更新されたdataが<p>タグの中に出力される。 html <input type="string" v-model="message"> <p>{{ message }}</p> v-if/v-show 要素の表示・非表示はv-if/v-showを使います。 ちなみにv-ifとv-showの使い分け方は公式サイト を参照していただければご理解いただけるかと思います。簡単にまとめると表示を切り替える回数が多いとv-show、そうでなければv-ifを使いましょうと説明されています。 以下公式サイトから引用 とても頻繁に何かを切り替える必要があれば v-show を選び、条件が実行時に変更することがほとんどない場合は、v-if を選びます checkboxがチェックされたら表示、外されたら非表示にするプログラムを書いてみます。 html <div id="sample"> <h2>v-if/v-show</h2> <input type="checkbox" v-model="checked"> <p v-if="checked">v-if属性</p> <p v-show="checked">v-show属性</p> </div> js new Vue({ el: '#sample', data: { checked: false } }) 使い方 1.checkedが紐付けされたcheckboxがチェックされる html <input type="checkbox" v-model="checked"> 2.checkedのBoolean型のdataが変更される(false->true) js data: { checked: false } 3.<p>タグのv-if/v-show="checked"ががtrueになったので<p>タグが出力される html <p v-if="checked">v-if属性</p> <p v-show="checked">v-show属性</p> 一連の流れ 以上がディレクティブを使った実用例になります。まだまだ学ぶべきことは沢山あるのでどんどん記事書いていこうと思います!
今回の記事はVue.jsの出力までの流れと最大の特徴であるディレクティブの説明をしていきます。私もVue.jsを学習してから2ヶ月半しかたっておらず、まだまだ未熟ですが、初学者の目線に立って丁寧に解説していきます。
今回はJSFiddleを使い、セットアップなしで説明していきます。
<div id="app">
  <p>
    {{ message }}
  </p>
</div>
new Vue({
  el: '#app',
  data: {
    message: 'Hello Vue.js!'
  }
})
簡単な出力までの流れを説明します。
1.Vueインスタンスを作成
Vue
new Vue({
・・・
})
2.elで指定したDOM要素にインスタンスを適用する
el
{
  el: '#app'
}
3.UIのdataを定義
data
 data: {
    message: 'hello Vue.js!'
  }
4.dataを展開する
{{ message }}
画面にHello Vue.js!と出たら成功です
Hello Vue.js!
HTML要素にv-から始まる属性名(ディレクティブ)を追加することでDOM操作を行います。これがかなり便利なので、実用例とともに紹介していきます。
v-
v-on
v-on:イベント名="実行したい関数名"でイベントが発生した時、関数を呼ぶことができるものです。 checkboxがチェックされるというイベントが発生したら、alertが表示されるというプログラムを書いてみます。 ※v-onは@に省略可能
v-on:イベント名="実行したい関数名"
checkbox
alert
@
<div id="sample">
  <h2>v-if/v-show</h2>
  <input type="checkbox" @click="changed">
   <!-- v-on:click="changed"とも書ける -->
</div>
new Vue({
  el: '#sample',
  data: {
    checked: true
  },
  methods: {
    changed (event) {
      alert("データが変更されました")
    }
  }
})
1.checkboxをclick(チェック)した時にchangedを呼び出す
click
changed
<input type="checkbox" @click="changed">
2.changedメソッドが呼ばれalertが表示される
changedメソッド
methods: {
  changed (event) {
    alert("データが変更されました")
  }
}
v-bind
特定の条件が成立する時、変数をHTMLに反映させ、classやstyleなどを変えたい!そんな時に使えるのがv-bindです。 checkboxがチェックされた時に色を変えるようなプログラムを書いてみましょう。 ※v-bindは :に省略可能
class
style
:
<div id="sample">
  <h3>v-if/v-show</h3>
  <input type="checkbox" v-model="checked">
  <p :style="{ color:(checked ? '' : 'red') }">赤くなった</p>
<!-- v-bind:styleとも書ける -->
</div>
new Vue({
  el: '#sample',
  data: {
    checked: false
  }
})
1.checkboxがチェックされcheckedのBoolean型のdataが変更される(false->true) ※v-modelの説明は後ほどいたします
checked
Boolean
false
true
v-model
data: {
  checked: false
}
2.checkedがtrueの時、文字列「赤くなった」のstyleが赤色に変更される
<p :style="{ color: (checked ? '' : 'red') }">赤くなった</p>
v-bind:valueとv-on:inputを一緒に記述するものになります。 実際にv-modelを使いクライアントが<input>タグの中に打ち込んだ文字列を出力させるプログラムを書いていきます。
v-bind:value
v-on:input
<input>
<div id="sample">
  <h2>v-model</h2>
  <input type="string" v-model="message">
  <p>{{ message }}</p>
</div>
new Vue({
  el: '#sample',
  data: {
    message: ''
  }
})
1.messageが紐づけられた<input>タグ内にクライアントが文字列を打ち込む
message
<input type="string" v-model="message">
2.空のdataを用意したmessageに<input>タグ内に打ち込まれた文字列が更新される
data: {
  message: ''
}
3.更新されたdataが<p>タグの中に出力される。
<p>
<input type="string" v-model="message">
<p>{{ message }}</p>
v-if/v-show
要素の表示・非表示はv-if/v-showを使います。 ちなみにv-ifとv-showの使い分け方は公式サイト を参照していただければご理解いただけるかと思います。簡単にまとめると表示を切り替える回数が多いとv-show、そうでなければv-ifを使いましょうと説明されています。
v-if
v-show
以下公式サイトから引用
とても頻繁に何かを切り替える必要があれば v-show を選び、条件が実行時に変更することがほとんどない場合は、v-if を選びます
checkboxがチェックされたら表示、外されたら非表示にするプログラムを書いてみます。
<div id="sample">
  <h2>v-if/v-show</h2>
  <input type="checkbox" v-model="checked">
  <p v-if="checked">v-if属性</p>
  <p v-show="checked">v-show属性</p>
</div>
1.checkedが紐付けされたcheckboxがチェックされる
<input type="checkbox" v-model="checked">
2.checkedのBoolean型のdataが変更される(false->true)
3.<p>タグのv-if/v-show="checked"ががtrueになったので<p>タグが出力される
v-if/v-show="checked"が
<p v-if="checked">v-if属性</p>
<p v-show="checked">v-show属性</p>
以上がディレクティブを使った実用例になります。まだまだ学ぶべきことは沢山あるのでどんどん記事書いていこうと思います!
for文を使う例が多く出てきて混乱したので書きました。 環境 Windows10 yarn -v 1.13.0 node -v 8.11.1 vue --version 2.9.6 結果 index.vue <template> <div class="index"> <transition-group tag="div"> <div key="1" v-if="hoge == 1">分岐1の内容</div> <div key="2" v-else-if="hoge == 2">分岐2の内容</div> <div key="3" v-else>分岐3の内容</div> </transition-group> </div> </template> <style scoped> .v-enter-active { transition: opacity 1s; } .v-enter { opacity: 0; } </style> <script> export default {} </script> これでコンテンツ内容が切り替わるとき、トランジションが発動します。 if文に変数を書いていますが、今回はdataで定義するのではなく、データベースの値を参照したのでそのへんのscriptは割愛しています。 まあ普通になにがしかのdata変化させるボタンとか作ればすぐ同じ感じになります。 苦難の道 を書こうと思ったのですが何に悩んでたのかを忘れてしまったので思い出したら書きます(すみません)
for文を使う例が多く出てきて混乱したので書きました。
Windows10 yarn -v 1.13.0 node -v 8.11.1 vue --version 2.9.6
yarn -v
node -v
vue --version
<template>
<div class="index">
  <transition-group tag="div">
    <div key="1" v-if="hoge == 1">分岐1の内容</div>
    <div key="2" v-else-if="hoge == 2">分岐2の内容</div>
    <div key="3" v-else>分岐3の内容</div>
  </transition-group>
</div>
</template>
<style scoped>
.v-enter-active {
  transition: opacity 1s;
}
.v-enter {
  opacity: 0;
}
</style>
<script>
export default {}
</script>
これでコンテンツ内容が切り替わるとき、トランジションが発動します。 if文に変数を書いていますが、今回はdataで定義するのではなく、データベースの値を参照したのでそのへんのscriptは割愛しています。 まあ普通になにがしかのdata変化させるボタンとか作ればすぐ同じ感じになります。
を書こうと思ったのですが何に悩んでたのかを忘れてしまったので思い出したら書きます(すみません)
答えはココに詰まっている これは映らない maintainAspectRatio: false これは映る maintainAspectRatio: true アスペクト比を維持 タブでクリックで描画し直すと、チャートが大きくなって、表示仕切れなかったと推測!
答えはココに詰まっている
これは映らない
maintainAspectRatio: false
これは映る
maintainAspectRatio: true
アスペクト比を維持
タブでクリックで描画し直すと、チャートが大きくなって、表示仕切れなかったと推測!
Nuxt.js v2.9がリリースされました Nuxt v2.9.0 is out ?- Typescript support now externalised (https://t.co/AlvY55s0cC)- Vue Meta upgraded to v2.0- 10+ bug fixes ?- 10+ new features ?https://t.co/vEfQoUWh8l pic.twitter.com/qwmSsEfkxJ— Nuxt.js (@nuxt_js) August 20, 2019 TSの対応方法がそれまでと大きく変わっているので、以前の記事からの差分をのせていこうと思います。 オフィシャルの手順は以下になります。 Migration from Nuxt 2.8 | Nuxt TypeScript Runtime 前述の移行手順とは順序が異なりますが、以前の記事でnuxt.config.tsを使っているため、Runtimeを先にインストールします。 $ yarn add @nuxt/typescript-runtime NuxtのTS回りのNPMがいくつかに分解されました。 そのうち、@nuxt/typescript-runtimeはNode環境でTSを処理するためのものです。 具体的にはnuxt.configやserverMiddlewaresでTSを使いたいときに必要になります。 ちなみに@nuxt/typescript-runtimeはProduction環境(NODE_ENV=production)でも必要になるので、dependenciesに追加する必要があります。 (nuxt-ts startで使用するので) また一連のnuxtコマンドをnuxt-tsにしてあげる必要があります。 package.json "private": true, "scripts": { - "dev": "nuxt", - "build": "nuxt build", - "start": "nuxt start", - "generate": "nuxt generate", + "dev": "nuxt-ts", + "build": "nuxt-ts build", + "start": "nuxt-ts start", + "generate": "nuxt-ts generate", }, 一周回ってv2.5に戻った感じですねw @nuxt/typescript-buildのinstall nuxt buildでTSを扱うためのものが@nuxt/typescript-buildです。 @nuxt/typescriptは@nuxt/typescript-buildに含まれるようになったので直接の依存は不要になります。 $ yarn remove @nuxt/typescript $ yarn add -D @nuxt/typescript-build @nuxt/typescript-buildはnuxt buildなどで使うだけなのでRuntimeとは違い、devDependenciesとして追加します。 @nuxt/typescriptがRuntimeとに分離されて使いやすくなった感じですね。 またnuxt.config.ts内のConfigurationの型定義が@nuxt/typesからExportされるようになりました。 nuxt.config.ts -import NuxtConfiguration from '@nuxt/config' +import {Configuration} from '@nuxt/types' -const nuxtConfig: NuxtConfiguration = { +const nuxtConfig: Configuration = { + buildModules: ['@nuxt/typescript-build'], ... } module.exports = nuxtConfig またv2.9で追加されたbuildModulesに@nuxt/typescript-buildを指定しています。 buildModulesにすることでbuildのみ(generateも)で使用するmoduleをdevDependenciesに指定できるようになりました。 tsconfig.jsonの更新 tsconfig.jsonのtypesに@nuxt/vue-appを指定していましたが、@nuxt/vue-appはなくなったので代わりに@nuxt/typesを使う必要があります。 tsconfig.json }, "types": [ "@types/node", - "@nuxt/vue-app" + "@nuxt/types" ] } } @nuxt/typesが@nuxt/vue-appと@nuxt/configとを置き換える形ですね。
Nuxt.js v2.9がリリースされました
Nuxt v2.9.0 is out ?- Typescript support now externalised (https://t.co/AlvY55s0cC)- Vue Meta upgraded to v2.0- 10+ bug fixes ?- 10+ new features ?https://t.co/vEfQoUWh8l pic.twitter.com/qwmSsEfkxJ— Nuxt.js (@nuxt_js) August 20, 2019
Nuxt v2.9.0 is out ?- Typescript support now externalised (https://t.co/AlvY55s0cC)- Vue Meta upgraded to v2.0- 10+ bug fixes ?- 10+ new features ?https://t.co/vEfQoUWh8l pic.twitter.com/qwmSsEfkxJ
TSの対応方法がそれまでと大きく変わっているので、以前の記事からの差分をのせていこうと思います。
オフィシャルの手順は以下になります。 Migration from Nuxt 2.8 | Nuxt TypeScript
前述の移行手順とは順序が異なりますが、以前の記事でnuxt.config.tsを使っているため、Runtimeを先にインストールします。
nuxt.config.ts
$ yarn add @nuxt/typescript-runtime
NuxtのTS回りのNPMがいくつかに分解されました。 そのうち、@nuxt/typescript-runtimeはNode環境でTSを処理するためのものです。 具体的にはnuxt.configやserverMiddlewaresでTSを使いたいときに必要になります。 ちなみに@nuxt/typescript-runtimeはProduction環境(NODE_ENV=production)でも必要になるので、dependenciesに追加する必要があります。 (nuxt-ts startで使用するので)
@nuxt/typescript-runtime
nuxt.config
serverMiddlewares
dependencies
nuxt-ts start
また一連のnuxtコマンドをnuxt-tsにしてあげる必要があります。
nuxt
nuxt-ts
   "private": true,
   "scripts": {
-    "dev": "nuxt",
-    "build": "nuxt build",
-    "start": "nuxt start",
-    "generate": "nuxt generate",
+    "dev": "nuxt-ts",
+    "build": "nuxt-ts build",
+    "start": "nuxt-ts start",
+    "generate": "nuxt-ts generate",
   },
一周回ってv2.5に戻った感じですねw
@nuxt/typescript-build
nuxt buildでTSを扱うためのものが@nuxt/typescript-buildです。 @nuxt/typescriptは@nuxt/typescript-buildに含まれるようになったので直接の依存は不要になります。
nuxt build
@nuxt/typescript
$ yarn remove @nuxt/typescript
$ yarn add -D @nuxt/typescript-build
@nuxt/typescript-buildはnuxt buildなどで使うだけなのでRuntimeとは違い、devDependenciesとして追加します。 @nuxt/typescriptがRuntimeとに分離されて使いやすくなった感じですね。
devDependencies
またnuxt.config.ts内のConfigurationの型定義が@nuxt/typesからExportされるようになりました。
@nuxt/types
-import NuxtConfiguration from '@nuxt/config'
+import {Configuration} from '@nuxt/types'

-const nuxtConfig: NuxtConfiguration = {
+const nuxtConfig: Configuration = {
+  buildModules: ['@nuxt/typescript-build'],
...
}

module.exports = nuxtConfig
またv2.9で追加されたbuildModulesに@nuxt/typescript-buildを指定しています。 buildModulesにすることでbuildのみ(generateも)で使用するmoduleをdevDependenciesに指定できるようになりました。
buildModules
tsconfig.jsonのtypesに@nuxt/vue-appを指定していましたが、@nuxt/vue-appはなくなったので代わりに@nuxt/typesを使う必要があります。
types
@nuxt/vue-app
     },
     "types": [
       "@types/node",
-      "@nuxt/vue-app"
+      "@nuxt/types"
     ]
   }
 }
@nuxt/typesが@nuxt/vue-appと@nuxt/configとを置き換える形ですね。
@nuxt/config
asyncDataの引数について Nuxt.jsでよく使われる「asyncData()」メソッドの引数には、 Contextというオブジェクトが渡されてきます。 分割代入の例 index.vue export default { async asyncData ({ params }) { // ここでContextが引数に渡されてくる let { data } = await axios.get(`https://api-test/posts/${params.id}`) return { name: data.name } } } 参照:公式ドキュメント/非同期なデータ Contextとは Contextには、paramsやstore、route等の asyncData内で使用できるオブジェクトが入っています。 Contextの詳細については、公式ドキュメント/Contextに詳しく載っています。 asyncData({ params })の{}はES6の分割代入 引数の{}のなかにContextの中身を書いているのは、 下記のような記法を利用しているためです。 例 index.js const vegitables = { tomato: 1, lettuce: 2, eggplant: 3 } const { tomato } = vegitables console.log(tomato) // 「1」が出力される この記事を書いた経緯 Nuxt.jsで開発を始めた時、asyncDataの引数が何なのか理解に時間がかかったため、 分かりやすくまとめてあるサイトがあるといいなと思ったためです。 公式ドキュメント/非同期なデータにasyncDataの引数についての記載はありますが、 理解に時間がかかりました。
Nuxt.jsでよく使われる「asyncData()」メソッドの引数には、 Contextというオブジェクトが渡されてきます。
Context
export default {
  async asyncData ({ params }) {  // ここでContextが引数に渡されてくる
    let { data } = await axios.get(`https://api-test/posts/${params.id}`)
    return { name: data.name }
  }
}
参照:公式ドキュメント/非同期なデータ
Contextには、paramsやstore、route等の asyncData内で使用できるオブジェクトが入っています。 Contextの詳細については、公式ドキュメント/Contextに詳しく載っています。
params
store
route
引数の{}のなかにContextの中身を書いているのは、 下記のような記法を利用しているためです。
  const vegitables = { tomato: 1, lettuce: 2, eggplant: 3 }
  const { tomato } = vegitables

  console.log(tomato) // 「1」が出力される
Nuxt.jsで開発を始めた時、asyncDataの引数が何なのか理解に時間がかかったため、 分かりやすくまとめてあるサイトがあるといいなと思ったためです。 公式ドキュメント/非同期なデータにasyncDataの引数についての記載はありますが、 理解に時間がかかりました。