- 投稿日:2019-08-22T22:36:23+09:00
AutomationObject Ruby Gem for UI Automation Published
AutomationObject Ruby gem is a YAML configuration based dynamic DSL framework for UI automation using Selenium or Appium drivers.
Gem Purpose:
The purpose of this gem was to provide a layer in between the drivers I commonly used and my Cucumber testing suite. Using YAML configurations to define and map the UI, this gem enables the creation of a dynamic DSL framework reflecting the configuration that allows automation to occur through the provided DSL API.
Reason for Creating:
Working as a QA developer in Test, I was having a hard time figuring out how I could scale up our testing codebase. I had an idea which included using configurations to define UI automation behavior and combine that with Ruby’s super sweet meta programming (reflection) abilities to create a dynamic DSL framework that controls the UI automation. Using the DSL framework which represented the UI I wanted to automate, I could issue commands to the framework and keep the complexities of UI automation hidden from the rest of the codebase.
The hope was that the codebase growth would be limited to the YAML configurations and cucumber features, and nowhere else. With the proper organization of the YAML configuration files, I could continue to grow those configurations and have legacy versions stored too. Using stateless step definitions, I wouldn’t have continual growth in that part of the codebase. Then finally, cucumber features that would test specific sites that can write my essay online or apps using specific YAML configurations would be the only other part to grow.
Example YAML Configuration File:
qiita.rbbase_url: 'http://www.spartzinc.com' default_screen: 'home_screen' screens: home_screen: elements: team_link: css: '#path div.to #element' click: after: change_screen: 'team_screen' team_screen: before_load: wait_for_elements: - element_name: 'title' exists?: true visible?: true text: 'Meet Our Team' elements: title: xpath: '//path/to/element'Example Ruby File:
qiita.rbrequire 'automation_object' require 'selenium-webdriver' #New Selenium Driver driver = Selenium::WebDriver.for :chrome #Will load split up YAML files and return them merged into one Hash object blue_prints = AutomationObject::BluePrint.new('/file/path/containing/yaml/files') #Create the DSL framework automation_object = AutomationObject::Framework.new(driver, blue_prints) #Now lets automate, default screen is home_screen automation_object.home_screen.team_link.click #Framework has already executed the waiting hooks in the config above #Now lets print out the team screen title puts automation_object.team_screen.title.textFair Warning:
This is the initial release of this gem, kind of a proof of concept. There is a lot of coupling and very long methods that make this gem less appealing, but it is stable. Although we do use this at our company for all of our UI testing and we have a very stable and scalable testing codebase.
Future Plans:
I plan on creating a new class/object structure, unit testing, internal documentation to support further growth of this gem by the end of Q1 2015. Also considering adding Cucumber step definitions for your use that will implement the AutomationObject framework so that testing will be plug and play, only needing features and configurations from you.
Finally:
I am very grateful that my managers at Spartz allowed me to pursue this idea, even though I had no idea how this would be implemented. The idea ended up working out for us and I hope you may get some use out of it too.
Installation Instructions:
https://github.com/spartzinc/automation_object#installation
Source Code:
https://github.com/spartzinc/automation_object
Examples:
https://github.com/spartzinc/automation_object/blob/master/docs/README.md#examples
RubyGems:
https://rubygems.org/gems/automation_object
- 投稿日:2019-08-22T21:36:37+09:00
gitlabCIでhttp通信による自動デプロイをしようとしたらハマった話
まずはじめに
デプロイ先用のアカウントをつくってSSH接続するのがめんどくさかったので手っ取り早くHTTP通信で自動デプロイしようとしたら
謎の挙動をされハマったのでメモ。
ちなみにここではgitlab-ci.ymlのこまかい書き方とかは触れません。違う記事を参照してください。
そして、もっと正統派なやり方があるはずなので、あまり参考にはならないかもしれません。。。環境
AWS EC2
1つ目・・・WEBサーバ(centos)
2つ目・・・gitサーバ(gitlab)
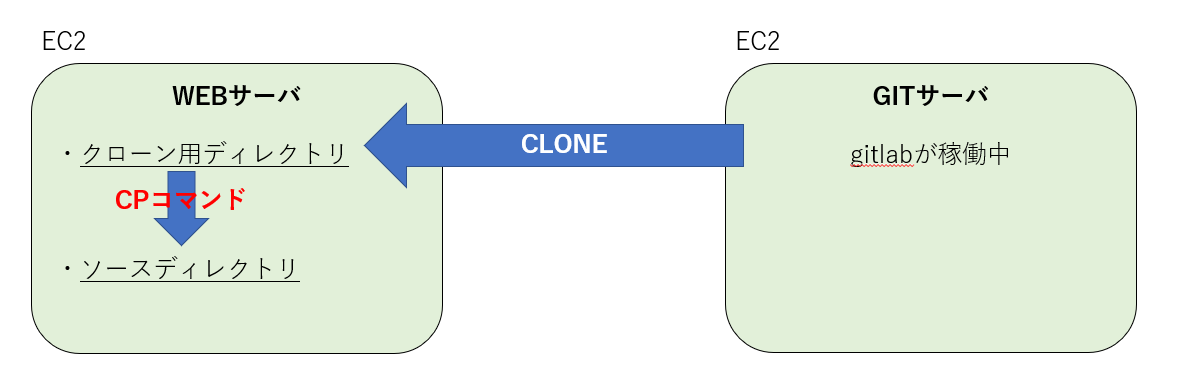
これらは同一セキュリティグループ(同一ネットワーク)内に存在している今回の自動デプロイの全体図
今回はgitlab-ci初めてですし、
ただただWEBサーバが常にdevelopブランチの最新状態になってほしいのでコードのテストとかはこの手順の中でやってません。
(しかしこの方法だと使われていない古いファイルなどが残ってしまうので、rsyncでやったほうが良いと思いました)単純なgitlab-ci.ymlを用意したがなぜかcloneできない
ymlにcloneを書いたときに認証とおすのどうしたら良いのかわからず無駄にシェルにしてみる
gitlab-ci.ymlbuild: stage: deploy script: - bash .gitlab-deploy.sh environment: name: staging url: http://{パブリックIP}/staging when: on_success only: - develop最初のエラーは、同一ネットワークに存在するのにgitlabの画面で表示されているままにcloneURLのIP部分をパブリックIPにしていたからでした。
しかし、プライベートIPに修正するも延々とfaildするJobたち。。。Running with gitlab-runner 11.7.0 (8bb608ff) on test mrx2efNr Using Shell executor... Running on ip-10-2-1-10.ap-northeast-1.compute.internal... Cloning repository... Cloning into '/home/gitlab-runner/builds/mrx2efNr/0/hoge-dev/hoge-project'... fatal: repository 'http://gitlab-ci-token:xxxxxxxxxxxxxxxxxxxx@10.2.1.20/hoge-dev01/hoge-project.git/hoge-dev01/hoge-project.git/' not found bash: 66 行: cd: /home/gitlab-runner/builds/mrx2efNr/0/hoge-dev01/hoge-project: そのようなファイルやディレクトリはありません ERROR: Job failed: exit status 1
gitlab-ci-tokenなんてymlに書いた覚えはないが、なんかそれをつかって勝手に知らない場所にcloneしている模様。
cloneできないなら、clone用ディレクトリを最初にgit initしとけばとりあえずpullできるかなーと思い修正。gitlab-ci.ymlstages: - deploy deploy_develop: stage: deploy script: - cd /var/www/hoge-project - git pull origin develop only: - developしかし、ymlにpullしか書かないで実行してもなぜか勝手にcloneして失敗、
そしてその後の処理ができないという具合になっている。最後のディレクトリがないというエラーだが、
/home/gitlab-runner/builds/mrx2efNr/0/このパスは存在するし
リポジトリは確実に存在しているので、cloneできてないということっぽい。そこで勝手にcloneしている処理で使われている
gitlab-ci-tokenについて調べてみることにしました。gitlab-ci-tokenについて
ぐぐってみると、こいつはgitlab8.12からの機能らしいが、結構な人数の人がcloneできない!と嘆いていることが判明。
https://gitlab.com/gitlab-org/gitlab-ce/issues/22723結局解決方法とかのってないのかよ~~とおもっていたら発見!
https://gitlab.com/gitlab-org/gitlab-runner/issues/1884#note_18695580
・gitlabCI側で勝手にgit cloneしてしまうのをまず無効にする(GIT_STRATEGY: noneと書くと無効にできる)
・cloneとかしたいならbefore_scriptで自分で書く
とのことでした。GIT_STRATEGYとはなんぞ??とということでこちらを発見。
https://docs.gitlab.com/ee/ci/yaml/#git-strategy
「If left unspecified, the default from project settings will be used.」ということで、デフォルトはきっとcloneすることになっていたんでしょう。ということで、ymlに
GIT_STRATEGY: noneを追加。しかし、pullをするにはアカウント情報とかが必要・・・。
入力を求められたタイミングでパスワードを入力する等の処理が複雑で対応できなかったのと
アカウント作ってSSH Keyを作成したり登録したりするのも面倒だったので、HTTP通信でデプロイできる方法を探すことにしました。
なんか便利なものないのかなーとgitlabの設定周りを見ていたら、便利そうなものを見つけました。
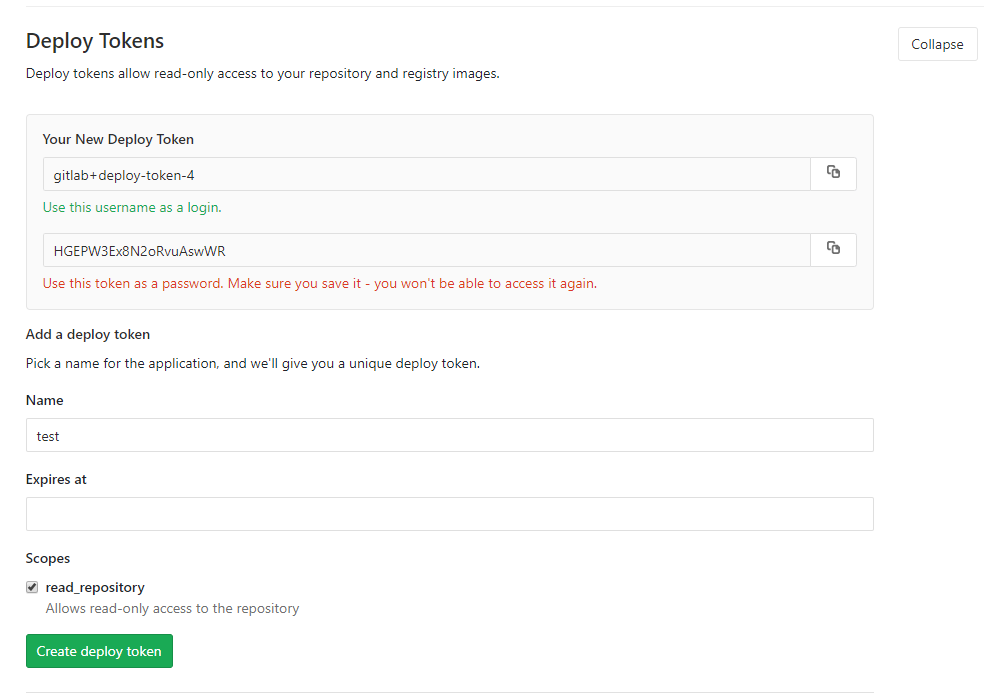
その名もdeploy-tokenです!deploy-tokenについて
Setting > Repository に存在する機能です。
「Deploy tokens allow read-only access to your repository and registry images.」
なるほど、このトークンを発行するとリポジトリへの読み取り専用アクセスができるらしい。
作成すると、デプロイトークンのユーザ名とパスワードが発行されました。(Expires atは設定しなくても作成できます。)
パスワードに関してはもう見られなくなるそうなので、この時点でしっかりキャプチャ撮ったりコピって保存したりしておきましょう。
実際に使うときは、こんな感じで使います。
git clone -b develop http://{gitlab+deploy-token-N}:{発行されたパスワード}@{IP}/{リポジトリのグループ}/{プロジェクト名}.git {クローンしたいディレクトリ(書かない場合はカレントディレクトリになる)}結論: deploy-tokenを使ってクローンできました!
色々面倒くさがってしまいましたが、なんやかんやでこんな感じでできました!
gitlab-ci.ymlvariables: GIT_STRATEGY: none before_script: ## clean the working directory - CLONE_DIR="/var/www/clone_dir/" - sudo rm -rf $CLONE_DIR - sudo mkdir -p $CLONE_DIR ## clone the project each time (inefficient, consider performing fetch instead if it already exists) - git clone -b develop http://{user}:{pass}@{IP}/hoge-dev/hoge-prjct.git $CLONE_DIR - cd $CLONE_DIR - ls -l stages: - deploy deploy_develop: stage: deploy script: - cd /var/www/ - sudo cp -rf $CLONE_DIR* /var/www/hoge-prjct/ - cd /var/www/hoge-prjct/ - chmod -R 777 . - composer dump-autoload - composer install - php artisan migrate:refresh --seed - ls -l only: - developdeploy-tokenは参照用のみでリポジトリにアクセスできるものなので
CI以外の場面でも使ったりできます、割と便利!
という話でした。
- 投稿日:2019-08-22T20:59:41+09:00
Gitコマンド一覧
git config user.name //ユーザー名確認
git config user.mail //ユーザーメール確認git clone [リポジトリのurl] [保存したいディレクトリ] //指定したリモートリポジトリを指定ディレクトリにローカルリポジトリを作成
git init //gitファイルを作成
git add //ステージにあげる
-u //バージョン管理しているファイル全ての変更をステージングする
-A //新規に追加されたファイルも含めて全ての変更をステージングする。削除ファイルも含める
-p //変更箇所単位(hunk)でのステージングが可能git commit //ローカルリポジトリにあげる
-m コミットメッセージ //コミットメッセージを同時に入力可能
-amend //直線のコミットをやり直す
-a //バージョン管理されているファイルの更新全てをコミットgit status //現在の変更内容確認(ステージとリポジトリ)
git diff //gid addする前の変更差分を確認
git diff --staged //gid addした後の変更分git log //変更履歴を確認できる
git log --oneline //一行で表示
git log -p ファイル名 //ファイルの変更差分を表示
git log -n //表示するコミット数を制限するgit rm ファイル名 //ファイルごと削除(ワークツリー&リポジトリ)
git rm -r ディレクトリ名 //ディレクトリごと削除(ワークツリー&リポジトリ)
git rm --cached ファイル名 //リポジトリのものだけ削除(ワークツリー&リポジトリgit mv 旧ファイル名 新ファイル名 //ファイルの移動を記録する
git remote add origin リモートリポジトリアドレス //リモートリポジトリをoriginとして登録
git push リモート名 ブランチ名 //リモートリポジトリにローカルリポジトリ内容を追加
git push origin master //リモートリポジトリにローカルリポジトリ内容を追加
git push origin master -u //-uをつけておくと次回以降、git pushだけでプッシュされるGitHub見方
RAW:コピペするのに便利
Blame:誰がいつ変更したのか確認できる
History:履歴を確認できる(commitsと違い個別ファイルについて)commits:プロジェクト全体の履歴を確認
clone or download:GitHub上のファイルをコピーできるコマンドにエイリアス(ショートカットキーをつける)
git config --global alias.ci commit
git config --global alias.st status
git config --global alias.br branch
git config --global alias.co checkout
//--globalをつけるとPC全体に反映
//--globalがないと現在ワークツリーフォルダだけに範囲される管理しないファイルをGitの管理から外す
書き方例指定したファイルを除外
index.html
ルートディレクトリを指定
/root.html
ディレクトリ以下を除外
dir/
/以外の文字列にマッチ「*」
//.css //一つ下のディレクトリを挟んでさらに下の階層の.cssファイルを除外
touch ファイル名 //空ファイルを作成
ファイルへの変更を取り消す
git checkout --ファイル名 //ワークツリーでの変更を取り消す(ステージと同じ状態にする)
git checkout --ディレクト名ステージした変更を取り消す(ステージの内容をリポジトリの内容に書き換える)
git reset HEAD ファイル名
git reset HEAD ディレクトリ名
git reset HEAD . //全変更を取り消す直前のコミットをやり直す
git commit --amend //今のステージを元にコミットを上書きする
*リモートリポジトリにプッシュしたリポジトリにはこれ使っちゃダメ!リモートを表示する
git remote
git remote -v //対応するURLを表示リモートリポジトリを新規追加する
git remote add リモート名 リモートURL //追加したら、以降はリモート名でリモートリポジトリにアップ・取得できるリモートから情報を取得する(フェッチ)
git fetch リモート名 //リモートリポジトリの内容をローカルリポジトリにコピー ワークツリーにはコピーされない
git merge origin/master //originリポジトリのmasterブランチをワークツリーに統合する補足
cat ファイル名 //ファイルの中身を表示リモートから情報を取得してマージする(プル)
git pull リモート名 ブランチ名
git pull origin master
git pull // これだけで上のorigin masterありのときと同じ
*プルよりフェッチを使うべき、取得したデータを統合する際に統合したいフォルダにいなかったら、
別な場所に統合してしまい、訳わからなくなるリモートの詳細情報を表示する
git remote show リモート名リモートを変更・削除する
git remote name 旧リモート名 新リモート名 //変更する
git remote rm リモート名 //削除するブランチ作成
git branch ブランチ名 //作るだけブランチ一覧表示
git branch
git branch -a //リモートも含める?
git log --oneline --decorate //現在のブランチが指しているcommitを参照ブランチ切り替える
git checkout branch 既存ブランチ名
git checkout branch -b 新規ブランチ名 //切り替えと新規作成を同時にブランチをリモートに登録
git push -u origin 作成したブランチ名マージ
git merge ブランチ名
git merge リモート名/ブランチ名
git merge origin/masterマージには3種類ある
・Fast Forward //枝分かれしてなかったら、ポインタを前に進めるだけ
・Auto Merge //一般的なマージ
・Conflict //同じファイルの同じ箇所を同時に変更した場合のエラーConflict防止策
・同じファイルを変更しない
・pullやmergeする前は変更中の状態を無くしておく(commitやstashをしておく)
・pullする時は同じブランチに切り替えてから、行うブランチ名を変更
git branch -m ブランチ名 //今作業しているブランチの名前を変更ブランチを削除
git branch -d ブランチ名 //masterにmergeされていない変更が残っていると削除しない(安全)
git branch -D ブランチ名 //強制削除開発の流れ
masterブランチをリリース用に
開発はトピックブランチで作業を行うのが大きな流れ(一般的)-------------------------------issue管理-------------------------------
一覧表示
$ ghi list -- 【ユーザ名】/【リポジトリ名】
Issue 1件を表示
$ ghi show 【Issue 番号】 -- 【ユーザ名】/【リポジトリ名】
新規 Issue を作成する
$ ghi open --label '【ラベル名】' -- 【ユーザ名】/【リポジトリ名】
叩くと Vi エディタの画面に移る。ラベルは ghi open コマンドのオプションとして先に渡す必要がある
作成済 Issue を編集する
$ ghi edit 【Issue 番号】 -- 【ユーザ名】/【リポジトリ名】
作成済 Issue にコメントする
$ ghi comment 【Issue 番号】 -- 【ユーザ名】/【リポジトリ名】
Issue を閉じる
$ ghi close 【Issue 番号】 -- 【ユーザ名】/【リポジトリ名】
-------------------------------issue管理-------------------------------
- 投稿日:2019-08-22T20:10:09+09:00
コミットメッセージにチケット番号+[半スペ]が無い場合エラーを返すスクリプト
業務ルールでRedmineとコミット内容を紐ずけるため、
#00000 コミットメッセージでコミットをするという内部ルールがあります。
ただうっかり入力し忘れたり、半角スペースが全角スペースになってRedmineと紐図かなかったりというまれにあったので、Gitフックを使用して対策をしてみたいと思います。Gitフックとは
Gitフックは、Gitでコマンドを実行する直前もしくは実行後に特定のスクリプトを実行するための仕組み。
commit-msg フック
コミットメッセージを入力後、処理を走らせることができる。
以下格納先。.git/hooks/commit-msg
.sampleを外し、フックスクリプトとして使用する。
他にも、
コミット直前に実行:pre-commit
プッシュ直前に実行:pre-push
など色々とある。Rubyで書く
個人的にRubyを学習中だったのでRubyでスクリプトを記述しました。
1行目に以下を記述。#!/usr/bin/env ruby
#!はシェバングと言い、これ以下に書いてあるコマンドで実行し直してくれる。
/usr/bin/envを使う事でwhich rubyで出てくる環境依存のPATHを記述しなくてもよくなる。
※/usr/bin/envも実は環境依存だがほぼ共通で入っている。。。はず。内容
#!/usr/bin/env ruby

# #00000+[半スペ] 、Mergeコミット以外エラー
message = File.read(ARGV[0])
$regex = /#\d+\s|^Merge branch/

if !$regex.match(message)
  puts "\e[31mチケット番号入力してください\e[0m"
  exit(1)
end
ARGV(アーグヴイ)
コマンドラインからスクリプトの引数として与えられた文字列を要素として持つ。
 # ファイルを読み込んだ際コマンドラインの第一引数を実行する
File.read(ARGV[0])
matchメソッド
正規表現とmatchメソッドを使用し、定義した正義表現に当てはまらない場合はエラーメッセージを実行し処理を中断させる。
exitコマンド
エラーの文字列を表示した後、exitコマンドで処理を終了させる。
exit(0):正常終了
exit(1):以上終了色を変更する
エラーメッセージの色を変えた方が視覚的にわかりやすいのでメッセージの色を変更する為、エスケープシーケンスを使用。
エスケープシーケンスとは
ターミナル上で色を含む特定の制御を実現するための特殊な文字列print "\e[31mhello\e[0m" # 赤色感想
Gitフックをもっと活用すれば、コミット前orプッシュ前にエラーを検知したり色々なことができそう!
一番手こずったのはシェバングでした!!
(最初書き方がわからず全然Rubyを認識しませんでした。。。)
- 投稿日:2019-08-22T18:57:26+09:00
初心者がCodeCommitから新しいリポジトリを作成した後、クローンして作業ブランチを作る
はじめに
今まで誰かが既に中に何かを作ったリポジトリからしかクローン・作業してきませんでした。
今回、自分でCodeCommitでリポジトリを作成するところからやってみて色々詰まったので、自分用のメモです。
そんな背景があるので、根本的に非効率・おかしい点があるかもしれません、その場合はすみません。記事の前提
- Mac PC
- git, AWS CLIがインストール済み
- IAMアカウントとSSHキーが紐付けてある
- SSHキーを紐付けたIAMのクレデンシャルが登録してある
動作確認環境
- バージョン
- bash:
GNU bash, version 3.2.57(1)-release (x86_64-apple-darwin18)- git:
2.17.0- AWS CLI:
aws-cli/1.16.221 Python/3.7.4 Darwin/18.7.0 botocore/1.12.2111. 新規リポジトリを作成する
AWSコンソールを開き、サービス一覧からAWS CodeCommitを選択し、「リポジトリを作成」
作成したリポジトリのページを開き、「URLのクローン」 > 「SSHのクローン」
(今回はSSHを前提に話します)2. 新規作成したリポジトリをクローンする
- コマンドライン上のリポジトリを落としてきたい場所で下記コマンドを実行
$ git clone ssh://git-codecommit.{region}.amazonaws.com/v1/repos/sample-repository
Cloning into sample-repository...
warning: You appear to have cloned an empty repository.
最後の
warningでは「空のリポジトリ落としてきてるっぽいよ」て言われています。
- リポジトリの中に移動
$ cd sample-repositoryこの状態のブランチを確認すると、何もいません。
$ git branch
# 何も表示されない
# gitステータス確認 $ git status On branch master No commits yet nothing to commit (create/copy files and use "git add" to track) # gitコミットlog確認 $ git log fatal: your current branch 'master' does not have any commits yet
- (任意)Sourcetreeで開く
Sourcetreeを見ても、何もできないし何もない。
3. masterに最初のコミットをする
何も変更を行わずにコミットします。
--allow-emptyで空でもコミットできるようになります。$ git commit --allow-empty -m "first commit" [master (root-commit) xxxxxxx] first commit
- コミット内容を確認
# gitステータス確認 $ git status On branch master Your branch is based on 'origin/master', but the upstream is gone. (use "git branch --unset-upstream" to fixup) nothing to commit, working tree clean # gitコミットlog確認 $ git log commit xxxxxxxxxxxxxxxxxxxxxxxxxxxxxxxxxxxxxxxx (HEAD -> master) Author: Your Name <Your Email Address> Date: Thu Aug 22 12:43:48 2019 +0900 first commit注意:
--allow-emptyオプションをつけない場合、何か新規ファイルがないと、下記からわかるように、コミットさせてくれないです。$ git commit -m "Initial commit" On branch master first commit nothing to commit4. 最初のコミットをoriginに向けてpushする
- 下記コマンドを実行
$ git push origin master
Counting objects: 2, done.
Writing objects: 100% (2/2), 147 bytes | 147.00 KiB/s, done.
Total 2 (delta 0), reused 0 (delta 0)
To ssh://git-codecommit.{region}.amazonaws.com/v1/repos/sample-repository
 * [new branch]      master -> master
これが終わるとようやくブランチが現れます。
- ブランチを確認
$ git branch
* master
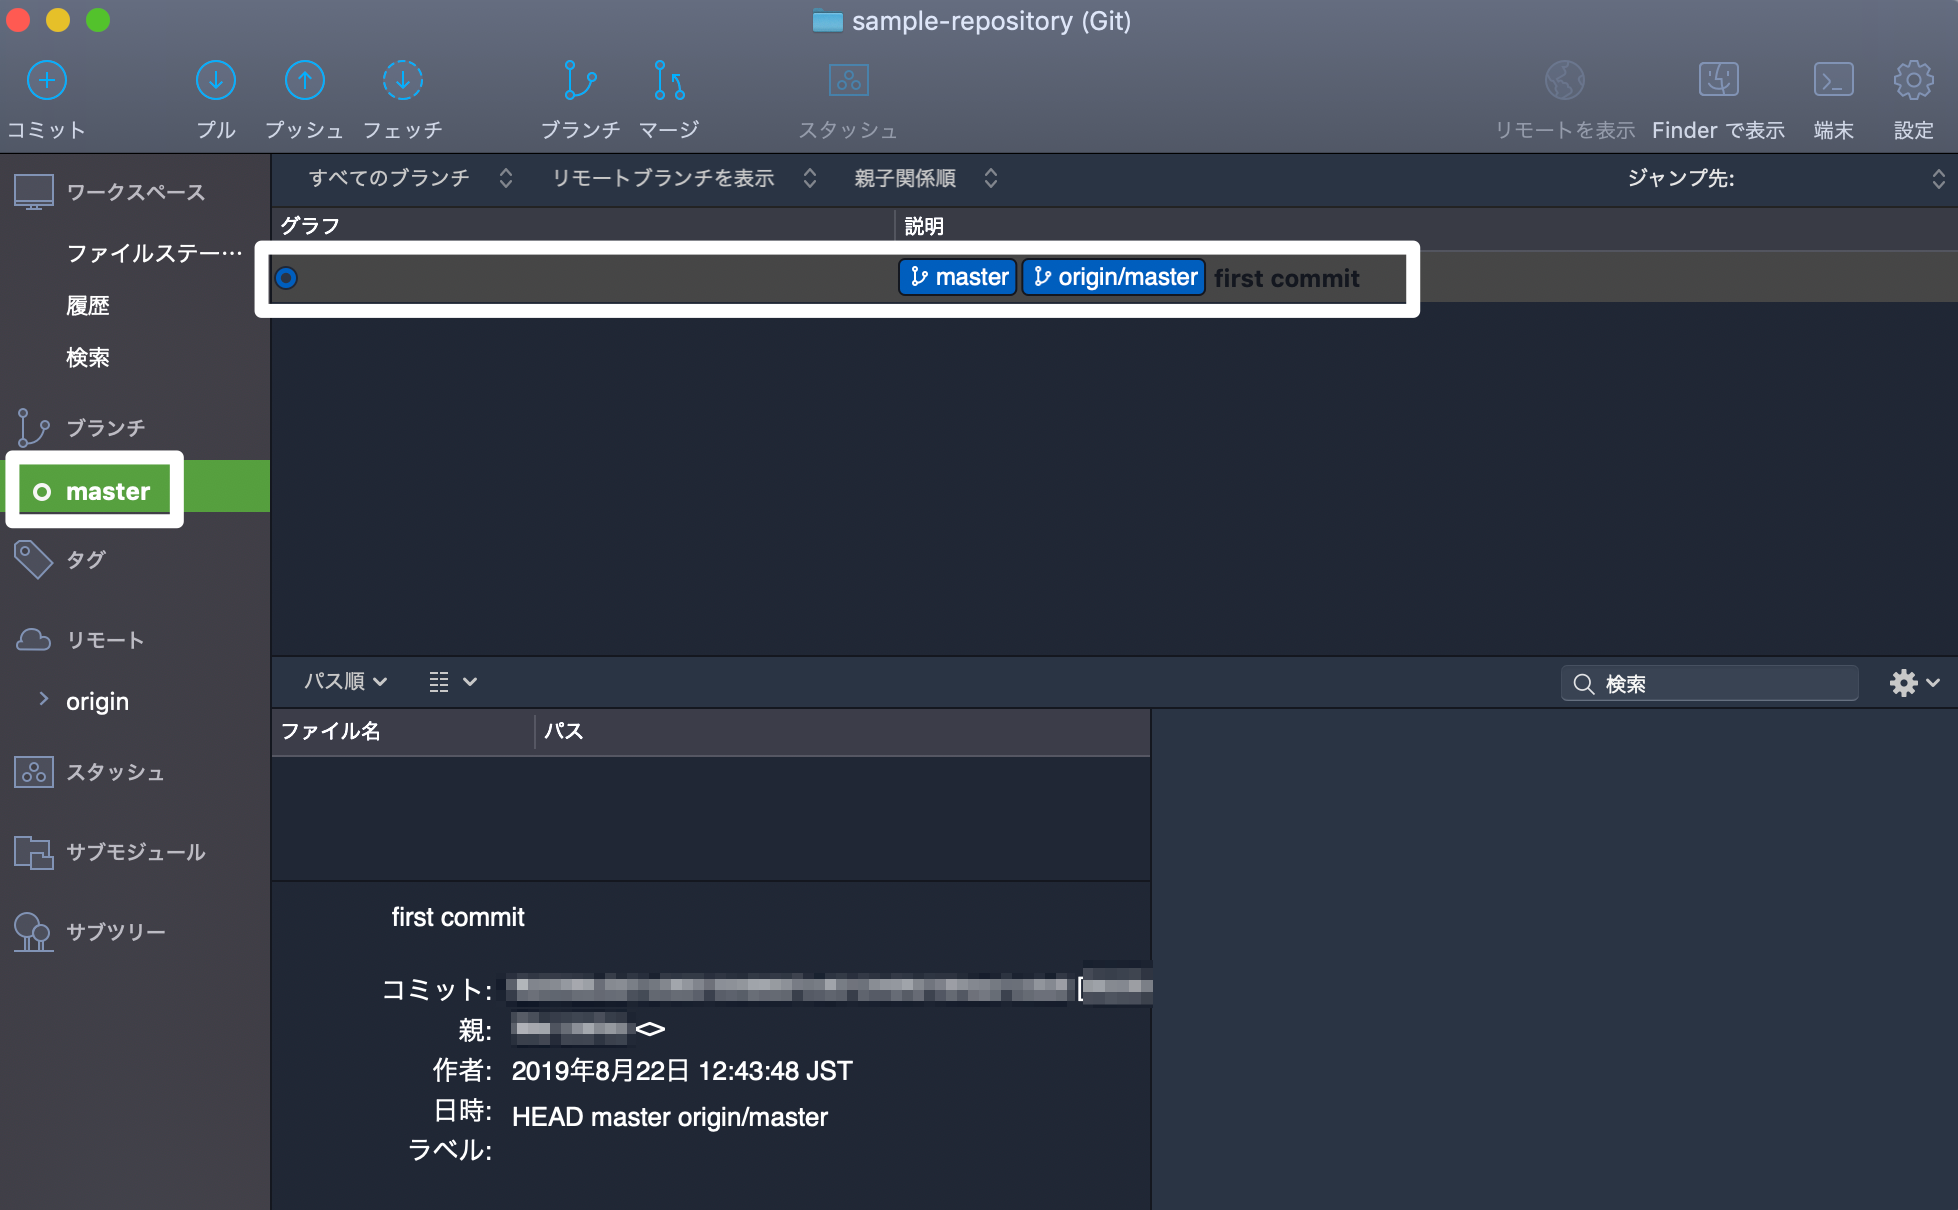
- (任意)Sourcetreeにブランチが現れたことを確認
あとはSourceTreeなりコマンドラインなりCodeCommitなりで新規ブランチを生やしましょう!
- 例:gitコマンドでmasterブランチから開発用ブランチ(例:
develop)を作成・ブランチ切り替える場合$ git checkout -b develop Switched to a new branch 'develop' # ブランチ確認 $ git branch * develop master
- (任意)gitで作成した開発用ブランチをSourcetreeで確認する
余談: masterからはコミットしない場合
masterブランチからコミットしない方がいいとよく聞くので、私は最初、masterをいじらずそこから新しいブランチを作成・チェックアウトし、上記のようにpushしました。
すると、masterのリモートの存在が消えてしまい、作ったブランチからmasterを作成しないといけなくなって面倒でした。
また、この方法では、最後にmasterブランチを作り直した後、作業用ブランチに切り替えるのを忘れそうです。
masterでコミットする中身は空ですので、はじめに説明した方法で良さそうです。
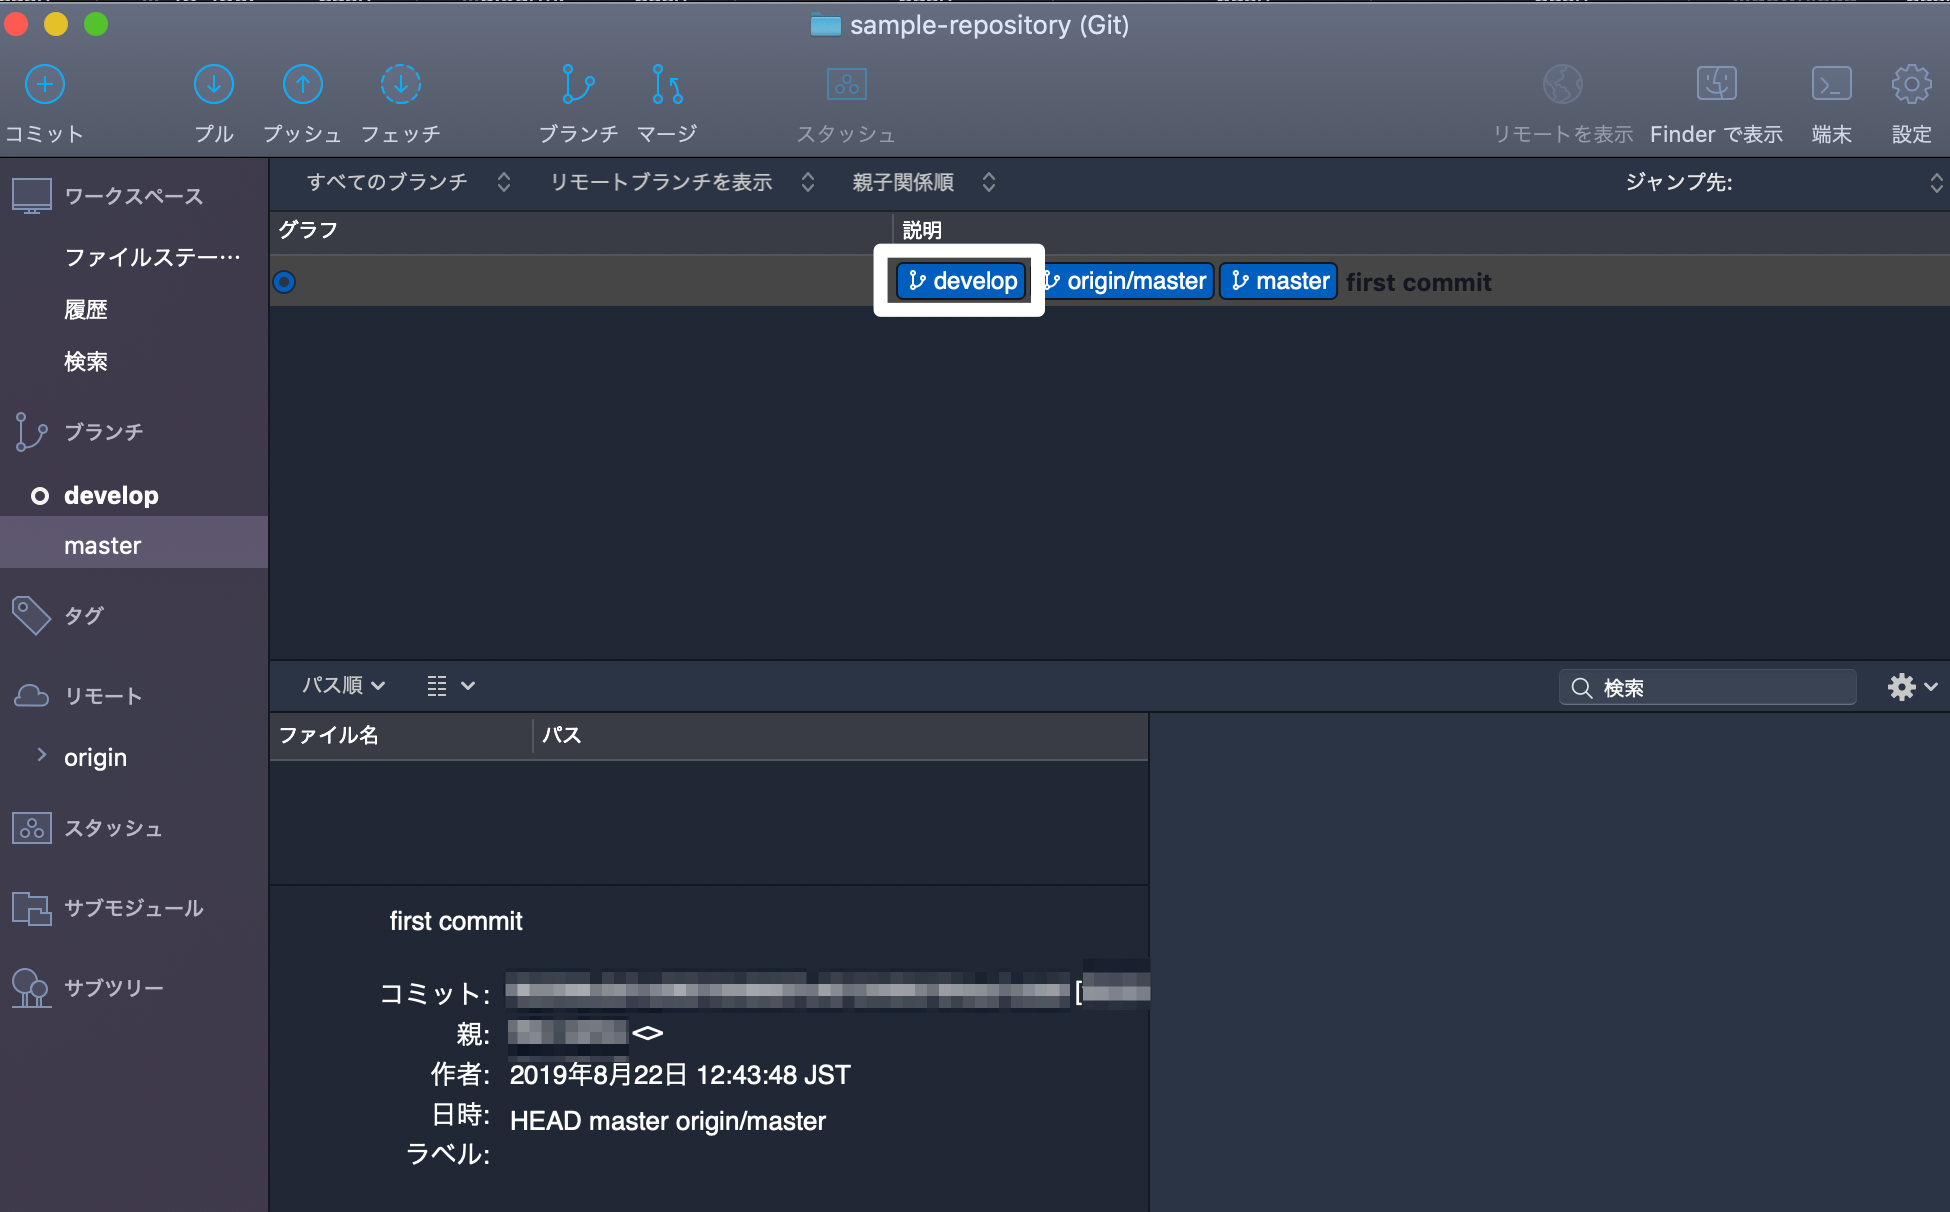
- 例: 開発用ブランチ(例:
develop)から"first commit"した場合# リポジトリ内に移動してからのコマンド $ git checkout -b "develop" Switched to a new branch 'develop' $ git commit --allow-empty -m "first commit" [develop (root-commit) 321da3b] first commit $ git push origin develop Counting objects: 2, done. Writing objects: 100% (2/2), 148 bytes | 148.00 KiB/s, done. Total 2 (delta 0), reused 0 (delta 0) To ssh://git-codecommit.{region}.amazonaws.com/v1/repos/another-sample-repository * [new branch] develop -> develop $ git checkout -b "master" Switched to a new branch 'master' Your branch is based on 'origin/master', but the upstream is gone. (use "git branch --unset-upstream" to fixup) $ git branch --unset-upstream # ブランチの切り替えを忘れずに $ git checkout develop

- 投稿日:2019-08-22T18:49:36+09:00
github apiでブランチの作成と削除を行う
バッチ処理の途中にブランチを作成したり削除したりしたくなった時はAPIでできます。
準備
githubのpersonal access tokenが必要です。(作成方法は割愛)
ブランチ削除
削除は簡単です。
curl -s -X DELETE -u [user]:[token] https://api.github.com/repos/[owner]/[repo]/git/refs/heads/[branch]例えば
nysalor/foo_projのfeature/barを削除するならcurl -s -X DELETE -u [user]:[token] https://api.github.com/repos/nysalor/foo_proj/git/refs/heads/feature/barブランチ作成
作成はちょっと複雑で二段階になります。
SHA取得
まず作成元のブランチのSHAを得ます。(この例ではmasterから作成します)
curl -s -u [user]:[token] https://api.github.com/repos/[owner]/[repo]/git/refs/heads/masterjsonでオブジェクトの情報が返るのでSHAを切り出します。
{
  "ref": "refs/heads/master",
  "node_id": "xxxx==",
  "url": "https://api.github.com/repos/[owner]/[repo]/git/refs/heads/master",
  "object": {
    "sha": "xxxx",
    "type": "commit",
    "url": "https://api.github.com/repos/[owner]/[repo]/git/commits/xxxx"
  }
}
なお、
jqを使えば一発でSHAを切り出せます。SHA=$(curl -s -u [user]:[token] https://api.github.com/repos/[owner]/[repo]/git/refs/heads/master | jq -r .object.sha)ブランチ作成
SHAからブランチを作成します。
curl -s -X POST -u [user]:[token] -H "Content-Type: application/json" -d '{"ref": "refs/heads/[branch]", "sha": "'[上記で得たSHA]'"}' https://api.github.com/repos/[owner]/[repo]/git/refs例えばS
nysalor/foo_projのmasterからfeature/barを作成するならSHA=$(curl -s -u [user]:[token] https://api.github.com/repos/nysalor/foo_proj/git/refs/heads/master | jq -r .object.sha) curl -s -X POST -u [user]:[token] -H "Content-Type: application/json" -d '{"ref": "refs/heads/feature/bar", "sha": "'$SHA'"}' https://api.github.com/repos/nysalor/foo_proj/git/refs
- 投稿日:2019-08-22T14:05:00+09:00
Gitでよく忘れるやつ
featureブランチ作成&プッシュ (Windowsにて)
set REPOSITORY_URL=<リポジトリURL> # https://~/<リポジトリ>.git
set REPOSITORY=<リポジトリ>
set BRANCH=<ブランチ> # feature/より右の部分
git clone %REPOSITORY_URL%
rename %REPOSITORY% %REPOSITORY%.%BRANCH%
copy %REPOSITORY%.master\.vscode\launch.json %REPOSITORY%.%BRANCH%\.vscode # Git管理外ファイルのコピー例
cd %REPOSITORY%.%BRANCH%
git checkout -b feature/%BRANCH% # 新ブランチを作成して現ブランチとする
git push -u origin feature/%BRANCH% # 作成したブランチをプッシュ
ブランチ名変更
git branch -m feature/mybranchnew
git push origin :feature/mybranchold
git push origin feature/mybranchnew
masterが新しくなったのを現ブランチに取り込む
git rebase masterconflictが起きたらそのファイルを手で直してから
git add <直したファイル>
git rebase --continue
rebaseが最後まで行ったら(conflictがなくなったら)
git pullgit rebase masterがCurrent branch feature/XXX is up to dateで空振りする場合
git checkout master
git pull
git checkout feature/XXX
git rebase master
リモートで消えたブランチがローカルに残っている(git branch -aで見える)のを消す
git fetch --prune ■じゃないかも
git branch -d feature/XXX
間違って現ブランチにpushした内容を戻す
git reset --hard <戻したい時点のcommitのハッシュ>
git push -f
- 投稿日:2019-08-22T09:04:29+09:00
【勉強メモ】複数Gitアカウント開設してSSHで接続できるようにする
2個目GitHubアカウントを作成する際に、アカウント開設、SSH-keysの作成、登録などをキレイサッパリ忘れていた。
あと複数アカウント使用時に必要になる設定もあわせてメモ。GitHubアカウント開設〜リポジトリ作成
- github.com にてアカウント開設
- 新しいリポジトリを作成
- とりあえず、なんでもいいから一つcommitする(READMEなど)
SSH keys を作成してGitHubアカウントに登録
- ターミナルからssh keysを生成する
【参考記事】
お前らのSSH Keysの作り方は間違っている
ssh-keygenでファイル名を指定して鍵を生成する- .sshフォルダに公開鍵(ファイル名.pub)と秘密鍵(ファイル名)が生成されているのを確認
- GitHubに公開鍵を登録
- ターミナルからgithub.comにsshアクセス。が、ここで最初にアカウント開設したユーザーが認識される
- .sshフォルダのconfigファイルにホストを追加してからアクセスする必要がある
【参考記事】
【メモ】githubの複数アカウントにSSH接続するための設定手順
GitHubで複数のアカウントを使う方法
- ホスト追加だけではアクセスできなかった。以下、原因と対策。
- なぜか秘密鍵がちゃんと生成されていなかった → 現状のキーペアを削除して生成し直した(githubアカウントもssh keyを登録し直し)
ssh-addコマンドで生成した秘密鍵を登録- これで再度チャレンジしたら、sshアクセス成功!
次やること
あとはSourcetreeで複数githubアカウントを使えるようになる必要がある。
ちなみに、今回は朝活2回分(1時間 x 2回)だった。
- 投稿日:2019-08-22T09:04:29+09:00
【勉強メモ】Gitアカウント開設してSourcetreeに登録する
2個目GitHubアカウントを作成する際に、アカウント開設、SSH-keysの作成、登録などをキレイサッパリ忘れていた。
あと複数アカウント使用時に必要になる設定もあわせてメモ。GitHubアカウント開設〜リポジトリ作成
- github.com にてアカウント開設
- 新しいリポジトリを作成
- とりあえず、なんでもいいから一つcommitする(READMEなど)
SSH keys を作成してGitHubアカウントに登録
- ターミナルからssh keysを生成する
【参考記事】
お前らのSSH Keysの作り方は間違っている
ssh-keygenでファイル名を指定して鍵を生成する- .sshフォルダに公開鍵(ファイル名.pub)と秘密鍵(ファイル名)が生成されているのを確認
- GitHubに公開鍵を登録
- ターミナルからgithub.comにsshアクセス。が、ここで最初にアカウント開設したユーザーが認識される
- .sshフォルダのconfigファイルにホストを追加してからアクセスする必要がある
【参考記事】
【メモ】githubの複数アカウントにSSH接続するための設定手順
GitHubで複数のアカウントを使う方法
- ホスト追加だけではアクセスできなかった。以下、原因と対策。
- なぜか秘密鍵がちゃんと生成されていなかった → 現状のキーペアを削除して生成し直した(githubアカウントもssh keyを登録し直し)
ssh-addコマンドで生成した秘密鍵を登録- これで再度チャレンジしたら、sshアクセス成功!
次やること
あとはSourcetreeで複数githubアカウントを使えるようになる必要がある。
ちなみに、今回は朝活2回分(1時間 x 2回)だった。