- 投稿日:2019-08-22T23:58:08+09:00
docker-sync.ymlがあるディレクトリをdocker-syncのルートにする
docker-syncを起動するとき、docker-syncルートを指定する方法がわかったので共有します!
いちいちプロジェクトのルートに移動してdocker-sync startするのが面倒だなって思ってたんですが、やっぱりちゃんと方法はあったんですね。。。以下のディレクトリ構成で、
volume_dirをdocker-syncを使ってvolumeします。ディレクトリ構成project_root/ ┣━ docker-symc.yml ┗━ volume_dir/docker-sync.ymlversion: '2' option: project_root: 'config_path' syncs: volume_dir: src: './mount_directry' sync_strategy: 'unison'こんな感じで
option要素のproject_root要素に対して'config_path'を指定すれば、docker-sync.ymlが置いてあるディレクトリをrootとしてdocker-syncが起動できます。
volume_dir以下でdocker-sync startしてもちゃんとvolume_dirがvolumeできるわけです。この
project_root要素では'pwd'と'config_path'のどちらかを指定できるみたいなんですが、デフォルトでは'pwd'が指定されています。なので、カレントディレクトリがルートになってしまいます。どういう時に
'pwd'を使うのか思いつかないんですが、もし知ってる方がいたら教えて欲しいです。参考
docker-syncはgemだし
src: '<%= Dir.pwd %>/mount_directory'とかでできるんじゃないかと思ったけど全然違いました。。。
docker-syncのgithubリポジトリにサンプルがあったんですね。。。もっと早く知りたかった。他にも色々細かく設定できるみたいです。時間があるときに日本語訳します。(参考)
https# version 0.2.x以降から記述が必須 version: "2" # もっと簡単な例は https://github.com/EugenMayer/docker-sync-boilerplate の雛形を参照 options: # 変更可能。デフォルトでは docker-compose.yml 。指定するcomposeファイルの場所とかパスは変更可能 compose-file-path: 'docker-compose.yml' # 変更可能。デフォルトは docker-compose-dev.yml 。指定するcomposeファイルの場所とかパスは変更可能。使用しない場合はファイルを配置しないこと # 指定したcomposeファイルが存在する場合は使われる。ファイルの名前を明示的に指定する場合はファイルが存在してないとだめ compose-dev-file-path: 'docker-compose-dev.yml' # 選択可能。デバッグが必要な場合はtrueに設定する。デフォルトはfalse verbose: true # can be docker-sync, thor or auto and defines, how the sync will be invoked on the cli. Mostly depending if your are using docker-sync solo, scaffolded or in development ( thor ) cli_mode: 'auto' # optional, maximum number of attempts for unison waiting for the success exit status. The default is 5 attempts (1-second sleep for each attempt). Only used in unison. max_attempt: 5 # optional, default: pwd, root directory to be used when transforming sync src into absolute path, accepted values: pwd (current working directory), config_path (the directory where docker-sync.yml is found) project_root: 'pwd' # replace <sync_strategy> with either rsync, unison, native_osx to set a custom image for all sync of this type <sync_strategy>_image: 'yourcustomimage' syncs: default-sync: # if you want to run a custom image, set it here image: 'yourcustomimage' # os aware sync strategy, default to unison under osx, and native docker volume under linux sync_strategy: 'default' # which folder to watch / sync from - you can use tilde, it will get expanded. # the contents of this directory will be synchronized to the Docker volume with the name of this sync entry ('default-sync' here) src: './default-data/' # this is only available if you use docker-for-mac edge for now host_disk_mount_mode: 'cached' # see https://github.com/moby/moby/pull/31047 # other unison options can also be specified here, which will be used when run under osx, # and ignored when run under linux unison-sync: # unison 2 way-sync sync_strategy: 'unison' # common options # see rsync documentation for all these common options src: './data4/' # be aware, this only gives you a notification on the initial sync, not the syncs after changes. this is a difference # to the rsync implementation notify_terminal: true # default is 'auto', which means, your docker-machine/docker host ip will be detected automatically. If you set this to a concrete IP, this ip will be enforced sync_host_ip: 'auto' # when a port of a container is exposed, on which IP does it get exposed. Localhost for docker for mac, something else for docker-machine sync_userid: '33' # specific options # If you need to sync a lot of files, you can reach out the system limit # of inotify watches. You can set the limit by using this parameter. This will # prompt you for your sudo password to modify the system configuration. #max_inotify_watches: 100000 # Additional unison options # @see http://www.cis.upenn.edu/~bcpierce/unison/download/releases/stable/unison-manual.html#prefs # For example, these provided options will automatically resolve conflicts by using the newer version of the file # and append a suffix to the conflicted file to prevent its deletion. # do not use --copyonconflict or --prefer here, those are handled by the sync_prefer setting sync_args: [ '-v' ] # Exclude some files / directories that matches **exactly** the path # this currently use the the -Path option of unison, use sync_excludes_type to change this behavior # see http://www.cis.upenn.edu/~bcpierce/unison/download/releases/stable/unison-manual.html#pathspec for more sync_excludes: [ '.git', '.idea', 'node_modules' ] # use this to change the exclude syntax. # Path: you match the exact path ( nesting problem ) # Name: If a file or a folder does match this string ( solves nesting problem ) # Regex: Define a regular expression # none: You can define a type for each sync exclude, so sync_excludes: ['Name .git', 'Path Gemlock'] # # for more see http://www.cis.upenn.edu/~bcpierce/unison/download/releases/stable/unison-manual.html#pathspec # Name is the default since 0.2.0 sync_excludes_type: 'Name' # defines how sync-conflicts should be handled. With default it will prefer the source with --copyonconflict # so on conflict, pick the one from the host and copy the conflicted file for backup sync_prefer: 'default' rsync-sync: # IMPORTANT: this name must be unique and should NOT match your real application container name! # enable terminal_notifier. On every sync sends a Terminal Notification regarding files being synced. ( Mac Only ). # good thing incase you are developing and want to know exactly when your changes took effect. notify_terminal: true # which folder to watch / sync from - you can use tilde, it will get expanded. # the contents of this directory will be synchronized to the Docker volume with the name of this sync entry ('rsync-sync' here) src: './data1/' # when a port of a container is exposed, on which IP does it get exposed. Localhost for docker for mac, something else for docker-machine # default is 'auto', which means, your docker-machine/docker host ip will be detected automatically. If you set this to a concrete IP, this ip will be enforced sync_host_ip: 'auto' # should be a unique port this sync instance uses on the host to offer the rsync service on sync_host_port: 20871 # set of IPs (10.0.2.2) or networks (10.0.0.0/8) that will be granted access to this rsync service, useful when running on FreeBSD with Virtualbox and a host-only interface # sync_host_allow: '10.0.0.0/8' # optionl, a list of excludes for rsync - see rsync docs for details sync_excludes: ['Gemfile.lock', 'Gemfile', 'config.rb', '.sass-cache/', 'sass/', 'sass-cache/', 'composer.json' , 'bower.json', 'package.json', 'Gruntfile*', 'bower_components/', 'node_modules/', '.gitignore', '.git/', '*.coffee', '*.scss', '*.sass'] # optional: use this to switch to rsync verbose mode sync_args: '-v' # optional, a list of regular expressions to exclude from the fswatch - see fswatch docs for details # use rsync by setting this sync_strategy: 'rsync' # this does not user groupmap but rather configures the server to map # optional: usually if you map users you want to set the user id of your application container here # set it to 'from_host' to automatically bound it to the uid of the user who launches docker-sync (unison only at the moment) sync_userid: '5000' # optional: usually if you map groups you want to set the group id of your application container here # this does not user groupmap but rather configures the server to map # this is only available for unison/rsync, not for d4m/native (default) strategies sync_groupid: '6000' # optional: enable fswatch in the container side (unison only) to automatically retrieve files created in the container to the host watch_in_container: true watch_excludes: ['.*/.git', '.*/node_modules', '.*/bower_components', '.*/sass-cache', '.*/.sass-cache', '.*/.sass-cache', '.coffee', '.scss', '.sass', '.gitignore'] # optional: use this to switch to fswatch verbose mode watch_args: '-v' # optional: default is fswatch, if set to disable, no watcher will be used and you would need to start the sync manually watch_strategy: 'fswatch' # monit can be used to monitor the health of unison in the native_osx strategy and can restart unison if it detects a problem # optional: use this to switch monit monitoring on monit_enable: false # optional: use this to change how many seconds between each monit check (cycle) monit_interval: 5 # optional: use this to change how many consecutive times high cpu usage must be observed before unison is restarted monit_high_cpu_cycles: 2
- 投稿日:2019-08-22T22:23:47+09:00
alpine linuxのapk updateが失敗して動かなくなったときの解決法
apk updateできない.
突然,alpine linuxのapk updateが失敗しはじめました. (2019/08/22現在)
$ sudo docker run --rm -it alpine:3.10
[sudo] password for kotauchisunsun:
Unable to find image 'alpine:3.10' locally
3.10: Pulling from library/alpine
Digest: sha256:72c42ed48c3a2db31b7dafe17d275b634664a708d901ec9fd57b1529280f01fb
Status: Downloaded newer image for alpine:3.10
/ # apk update
fetch http://dl-cdn.alpinelinux.org/alpine/v3.10/main/x86_64/APKINDEX.tar.gz
ERROR: http://dl-cdn.alpinelinux.org/alpine/v3.10/main: temporary error (try again later)
WARNING: Ignoring APKINDEX.00740ba1.tar.gz: No such file or directory
fetch http://dl-cdn.alpinelinux.org/alpine/v3.10/community/x86_64/APKINDEX.tar.gz
ERROR: http://dl-cdn.alpinelinux.org/alpine/v3.10/community: temporary error (try again later)
WARNING: Ignoring APKINDEX.d8b2a6f4.tar.gz: No such file or directory
2 errors; 14 distinct packages available
どうやら,
http://dl-cdn.alpinelinux.org/alpine/v3.10/main/x86_64/APKINDEX.tar.gz
あたりが死んでいるために,動かないようです.
が,ブラウザで開くと普通にダウンロードできます.解決法
一応フォーラムにもIssueが上がっていますが,最新版でも動かなかったです.
apk WARNING Ignoring APKINDEX No such file or directory #207
単純にalpine linuxをビルドしたいだけ.動かしたいだけなら以下のオプションで動きます.
$ sudo docker run --rm -it --network=host alpine
/ # apk update
fetch http://dl-cdn.alpinelinux.org/alpine/v3.10/main/x86_64/APKINDEX.tar.gz
fetch http://dl-cdn.alpinelinux.org/alpine/v3.10/community/x86_64/APKINDEX.tar.gz
v3.10.2-7-g312cad7bde [http://dl-cdn.alpinelinux.org/alpine/v3.10/main]
v3.10.2-7-g312cad7bde [http://dl-cdn.alpinelinux.org/alpine/v3.10/community]
OK: 10336 distinct packages available
肝は,
--network=hostの部分で,これで動くようになります.
どうやらalpine linuxのDNS周りの動きが死んでるっぽく,Issueにもdockerの設定を変更することで回避する方法が書かれていました.困っている人がいればご参考にください.
しかし,意外に,みんなTwitterとかでつぶやかないのね・・・
- 投稿日:2019-08-22T20:03:34+09:00
スクリプトでCIの自動化をやろうとした時、dindコンテナ内のDockerデーモンが起動するまで待つ
CIに関連する作業の中でコンテナ上でコンテナ動かしたかったのでDinDを触っていた時の知見
DinDコンテナと、その上で動くコンテナはそれぞれDinDコンテナとコンテナで単語を使い分けてます。結論
DinDコンテナ内で
/var/run/docker.pidを見ていれば良いらしい。
デーモンが起動した後に生成される、dockerのpidが書かれたファイルハマった事
スクリプト1つ実行させるだけでDinDコンテナ起動、DinDコンテナ内でコンテナ起動、色んな作業/テスト実行とかやりたかったのですがDinDコンテナ起動直後はDockerデーモンが立ち上がりきっておらず、デーモン動いてる?とエラーを吐かれます。
最初は無理やりsleep 10とかつけていたのですがこれはもちろんアンチパターンです。Go言語触ってる人からすると卒倒モノですね。
時間で待機するのはよろしくないので、何かデーモンが起動したと確実に分かる方法が欲しかったので調べていた所、ここにpidファイルを吐き出すパスを指定するオプションがあることを見つけました。pid吐き出されるならデーモンも起動しているだろって事で上記を解決出来ました。例
例えばこんなスクリプト書いて
wait.sh#!/bin/bash while : do if [ -e /var/run/docker.pid ]; then break fi done exit 0こんなのも書き
start.sh#!/bin/bash docker run --privileged --name test -v `pwd`/wait.sh:/wait.sh -d docker:dind docker exec test sh /wait.sh docker exec test docker run hello-worldあとは
$ sh start.sh
を実行してみます。
start.shのdocker exec test sh /wait.shをコメントアウトしてみると分かりますが、wait.shがDinDコンテナ内で実行されたおかげでhello-worldもといHello Dockerが実行されます。
- 投稿日:2019-08-22T19:55:42+09:00
docker-composeで、一つのWebサーバーコンテナ上に複数のLaravelアプリを立ち上げる
同じDBを参照する、2つのLaravelアプリをdocker-composeで立ち上げる方法について書いていきます。一つのWebサーバー上で2つのLaravelアプリが動いていて、それぞれが同じDBを見ている、といった構成です。
ググったらいくらでも出てくるかな?と思ったら、Laradocを使った方法しかなかったので意外でした。
コンテナの構成
コンテナ関連のディレクトリ構成は、以下の記事を参考にしています。今回やることは、以下の記事のゴールの状態から、立ち上げるLaravelアプリを1つ追加する、みたいなイメージです。
docker-compose.ymlを変更
webサーバーにnginxを使っている場合、docker-compose.ymlは以下のような記述になっているかと思います。
docker-compose.ymlversion: "3" services: app: context: ./docker/php // アプリコンテナの記述 web: image: nginx:1.17-alpine depends_on: app // portsなどの記述別のLaravelアプリを立ち上げる場合は、起動するアプリコンテナを一つ増やします。記述例としてはこんな感じ。
docker-compose.ymlversion: "3" services: app: context: ./docker/php // アプリコンテナの記述 other: context: ./docker/php // アプリコンテナの記述 web: image: nginx:1.17-alpine depends_on: app other ports: 3500:80 3501:79 volumes: - ./app:/work/app - ./other:/work/other - ./logs:/var/log/nginx - ./docker/nginx/default.conf:/etc/nginx/conf.d/default.confこれにより、docker-compose upを実行すると、otherコンテナが立ち上がります。参照するDockerfileは、appと同じものをにするか、新しく定義するかはお好みで。
また、nginxコンテナのdepends_onにotherコンテナを指定し、加えてportsの設定を一つ増やします。これにより、「localhost:3500」でサーバーコンテナの80番ポートに、「localhost:3501」で79番ポートにアクセスできるようになります。
あと、volumesにも変更を加えています。docker-compose.ymlがあるディレクトリの、app/配下がwebサーバーコンテナの/work/appに、other/配下が/work/otherに配置されるようにしています。
default.confの変更
次に、nginxの設定ファイルを変更しています。変更前はこんな感じになっているはず。
default.confserver { listen 80; root /work/app/public; index index.php; charset utf-8; location / { root /work/app/public; try_files $uri $uri/ /index.php$is_args$args; } location ~ \.php$ { fastcgi_split_path_info ^(.+\.php)(/.+)$; fastcgi_pass app:9000; fastcgi_index index.php; include fastcgi_params; fastcgi_param SCRIPT_FILENAME /work/app/public/index.php; fastcgi_param PATH_INFO $fastcgi_path_info; } }80番ポートにアクセスが来るとnginxがそれに対応する、みたいな標準的な設定です。80番ポートはapp/に配置されているLaravelアプリに対応するようになっています。
今回、otherコンテナに配置するLaravelアプリは79番ポートで受け付けられるようにするので、以下のように記述を追加します。
default.confserver { // 80番ポートの設定 } server { listen 79; root /work/other/public; index index.php; charset utf-8; location / { root /work/other/public; try_files $uri $uri/ /index.php$is_args$args; } location ~ \.php$ { fastcgi_split_path_info ^(.+\.php)(/.+)$; fastcgi_pass other:9000; fastcgi_index index.php; include fastcgi_params; fastcgi_param SCRIPT_FILENAME /work/other/public/index.php; fastcgi_param PATH_INFO $fastcgi_path_info; } }listenを79番に、rootを/work/other/publicに変更しています。docker-compose.ymlのvolumesに対応するようにrootを設定しましょう。(publicはLaravelの公開ディレクトリです)。
webサーバーコンテナの中が、/work/other/(Laravelのディレクトリ群)のような構成になることを想定した記述ですね。
また、「location ~ .php」の中の記述も少し変更しています。
まず、「fastcgi_pass」がapp:9000から、other:9000になっています。app、otherはアプリコンテナのことで、PHP-FPMとの通信ポートをそれぞれ指定しています。
あと、「fastcgi_param SCRIPT_FILENAME」以下の記述も変更しており、Laravelアプリのpublicフォルダ内のindex.phpを参照するようにしています。ここがズレているとphpファイルが正しく読み込まれず、「File not Found」と表示されて悲しい気持ちになるので忘れずに変更しておいてください。
今回は直接パスを記述していますが、「\$document_root/index.php」みたいな書き方もあります。($document_rootにはrootで指定したパスが入る)
これで、app/配下、other配下にLaravelをインストールし、.envやディレクトリの権限変更を正しく行えば、localhost:10080、localhost:10079にアクセスするとそれぞれLaravelのWelcomeページが表示されるはずです。
今回は、それぞれのアプリが同じDBを参照するようにしたいので、.envを変更して参照先が同じになるよう設定しておきましょう。
ページが表示されねぇ!みたいなときは、./logs配下のaccess.logやerror.logをヒントに対応してください。
まとめ
docker-composeでバシッと環境が整うと気持ちいいですよね。nginxの設定は基本的なものだけしか記述していないので、勉強がてらいろいろイジり倒そうと思います。
- 投稿日:2019-08-22T19:55:26+09:00
一歩進んだ Docker との付き合い方
最近,改めて Docker 周辺のことを勉強していて,その中で学んだ「今まで困っていたことを解決する方法」や新しく知った「便利なツール」「今後使っていきたいツール」を備忘録がてらまとめました!
管理関連
- lazydocker - A simple terminal UI for both docker and docker-compose
- docui - TUI Client for Docker Written in Go
lazydocker は既存のコンテナやサービスの管理に関するツールで,docui はコンテナやサービスの作成と構成に関するツールです。
どちらもターミナル上で使うツールです。一方,Portainer はブラウザからアクセスするコンテナやサービス, Swarm クラスターの管理ツールです。
ターミナルかブラウザか,適材適所で使い分けると良さそうです。
セキュリティ関連
- Dockle - Container Image Linter for Security, Helping build the Best-Practice Docker Image, Easy to start
- trivy - A Simple and Comprehensive Vulnerability Scanner for Containers, Suitable for CI
Dockle はイメージに含まれるセキュリティホールをチェックするもので,Dockerfile などではなく,イメージを直接解析するため,元イメージに含まれている脆弱性も検知します。
また,ベストプラクティスなイメージの作成を助けてくれるツールです。trivy は脆弱性を検知するもので,アプリケーションの依存ライブラリもチェックしてくれます。
ちなみにこの trivy は 趣味で作ったソフトウェアが海外企業に買われるまでの話 - knqyf263's blog ということでまた話題になっていますね。どちらかやればいいものではなく,どちらもやるのが良さそうです。
CI などと組み合わせても利用しやすい形になっているので,積極的に使っていきたいですね。なお,docker hub で公開されているイメージの一部は dockle と Trivy の実行結果が Security Issues in Popular Containers に掲載されていますので,手っ取り早くどんな感じなのか確認したい方はチェックしていただくと良いと思います。
個人的には今後も https://containers.goodwith.tech/ に、ユーザーの入力したイメージ名からスキャンをするなど、機能追加していく予定です。
が実装されるのを心待ちにしています(開発者さんに届け…
参考
- 人を震えさせるツール「Dockle」の仕組みを解説〜Dockerセキュリティの基礎知識も一緒に - Qiita
- DockerHubで公開されているコンテナが安全か確かめてみた結果【人気のコンテナ上位800個】 - Qiita
読むべき
Docker 公式関連
ログ関連
今まで開発やデバッグ中に大量のログにより restart 後,ログの表示に時間が取られたりしていましたが,docker run のオプションや docker-compose ファイルで rotate などの指定ができます。
Dockerコンテナのログは標準オプションでローテートできる - Qiita
もっと早くに知っていれば…
なお,すでに肥大化したログの一時的な削除は次の記事が参考になります。
肥大化してしまったdockerコンテナのログを消し去る方法 - Qiita
multi-stage build
Vue.js とかをやるようになって知りました。
大変便利。
フロントエンド周りでも大活躍ですが,スクリプトのドキュメント生成と公開なんかでも大活躍です。最後に
以上,2019年上半期ちょっとで個人的に熱い docker 関連のプロダクト,機能のまとめでした!
少しでも皆さんのお役に立ってたなら幸いです。
- 投稿日:2019-08-22T18:14:57+09:00
Docker Network メモ
クソメモです。
ある程度情報そろったらきれいにします。。。参考
https://tech.uzabase.com/entry/2017/08/07/172411
https://tech.uzabase.com/entry/2017/08/23/175813
https://docs.docker.com/network/overlay/
https://docs.docker.com/network/network-tutorial-overlay/Docker マルチホストネットワーク
1. Docker Swarm mode (swarm service network?)
[メモ]
古いバージョンのSwarmだとこの機能を使用するため、分散KVS(etcd,consul,zookeper)が必要であったが、新しめのバージョンではDockerに機能が組み込まれているため、不要になった
-> いつのバージョンから??SwarmにてOverlay Networkを利用することでコンテナのマルチホスト間通信を実現する
Breakdown
overlay Networkにて使用されるポート
- TCP 2377 -> クラスタ管理通信
- TCP/UDP 7946 -> ノード間通信
- UDP 4789 -> overlay Network通信
セキュリティ
管理用通信はすべてAESにより暗号化されている
overlay network作成時に"--opt encrypted"オプションを付与してあげることでアプリケーション通信(overlay Network通信?)もIPSECにより暗号化される。(Dockerノード間でIPSECトンネリング)
IPSECも結局AESアルゴリズムにより暗号化されている
-> ネットワークパフォーマンスに影響する可能性があるため、テストはマストおまけ: encryptedしているoverlay networkはwindowsに対応していない
docker swarmを初期構築およびworkerとしてswarmに追加した際に以下のネットワークが作成される
- ingress
- swarmの管理用トラフィックの送受信用
- swarm serviceを構築時、ネットワークを選択しない場合はデフォルトでこれに接続される
- docker_gwbridge
- Swarmに関係する個々のdockerデーモン同士が通信する際に利用する
- ingressをdockerホストのIFに接続する
- これによりswarm manager/worker間の通信が可能?
overlay networkはserviceにて要求されたタイミングで自動で作成される
-> managerだけで定義すればOKControl traffic と Data trafficを分割
swarmに登録する際に --advertise-addrおよび--datapath-addrを分ける
2. Overalay Network 構築ツールを使う
flannel -> もともとk8sにてマルチホストネットワークを実現する機能だった
3. 手動で構築
分散KVSとdocker network create -d overlay コマンドを使って構築する
Tutorial
manager# docker network create --driver=overlay --attachable test-net wpwhkxk5ovxfheq0z37fi6t0pmanager# docker run -it --name alpine1 --network test-net alpineworker1# docker network ls managerで作成したnetworkは表示されない # docker run -dit --name alpine2 --network test-net alpine # docker network ls managerで作成したnetworkが表示されるmanager# ping alpine2 PING alpine2 (10.0.3.10): 56 data bytes 64 bytes from 10.0.3.10: seq=0 ttl=64 time=0.679 ms 64 bytes from 10.0.3.10: seq=1 ttl=64 time=0.408 ms
- 投稿日:2019-08-22T18:14:28+09:00
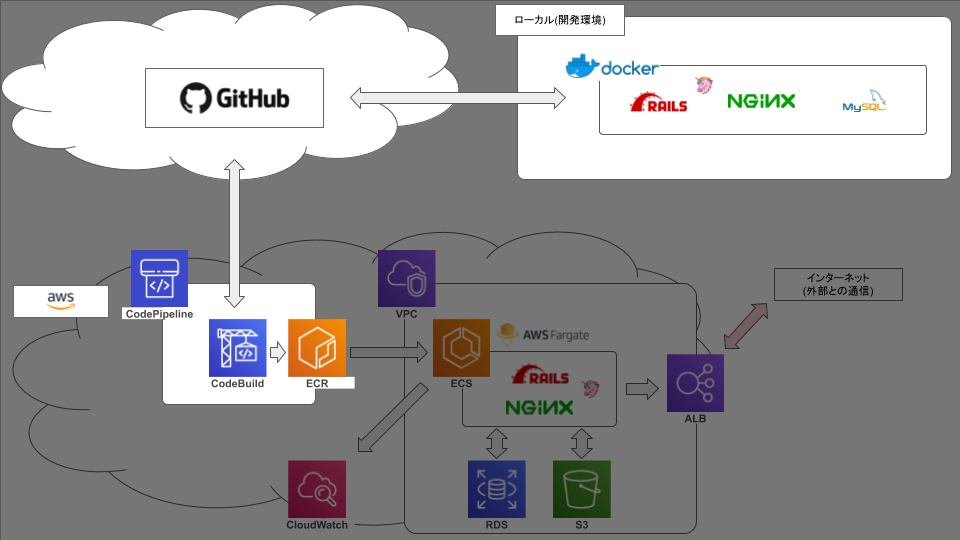
ECS FargateでRails動かそうとして2ヶ月かかって手元に残ったもの【2.Build編】
弊社の基幹システムをVPSからAWSに移行するにあたって、まずはrailsを動かしてみる、という段階で無事に死にました☆
今後のための備忘録です。前記事: ECS FargateでRails動かそうとして2ヶ月かかって手元に残ったもの【1.docker編】
前回まででやったこと
今回やったこと
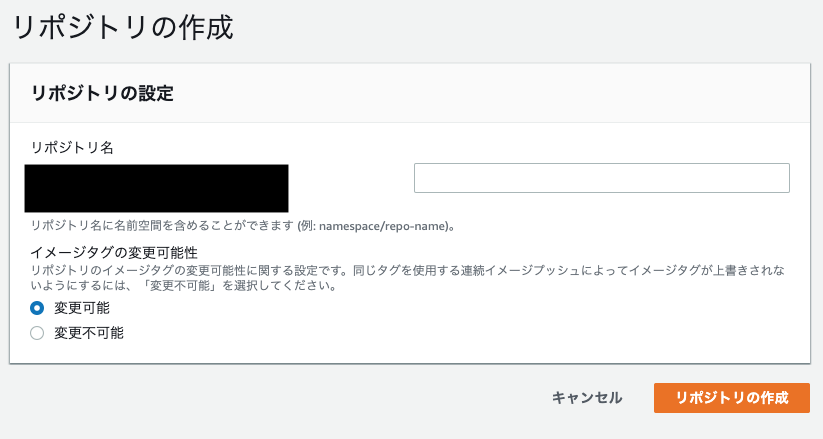
githubへのリポジトリの作成は割愛します。
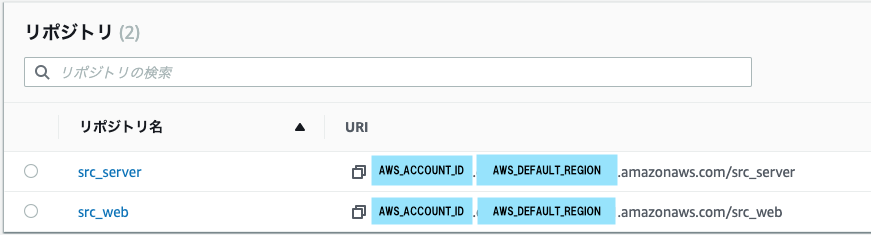
今回はgithubのmasterブランチに変更をpushしたときに本番環境のコンテナイメージが自動更新されるところまでやってみます。ECR
今回はリポジトリを2つ作ります。
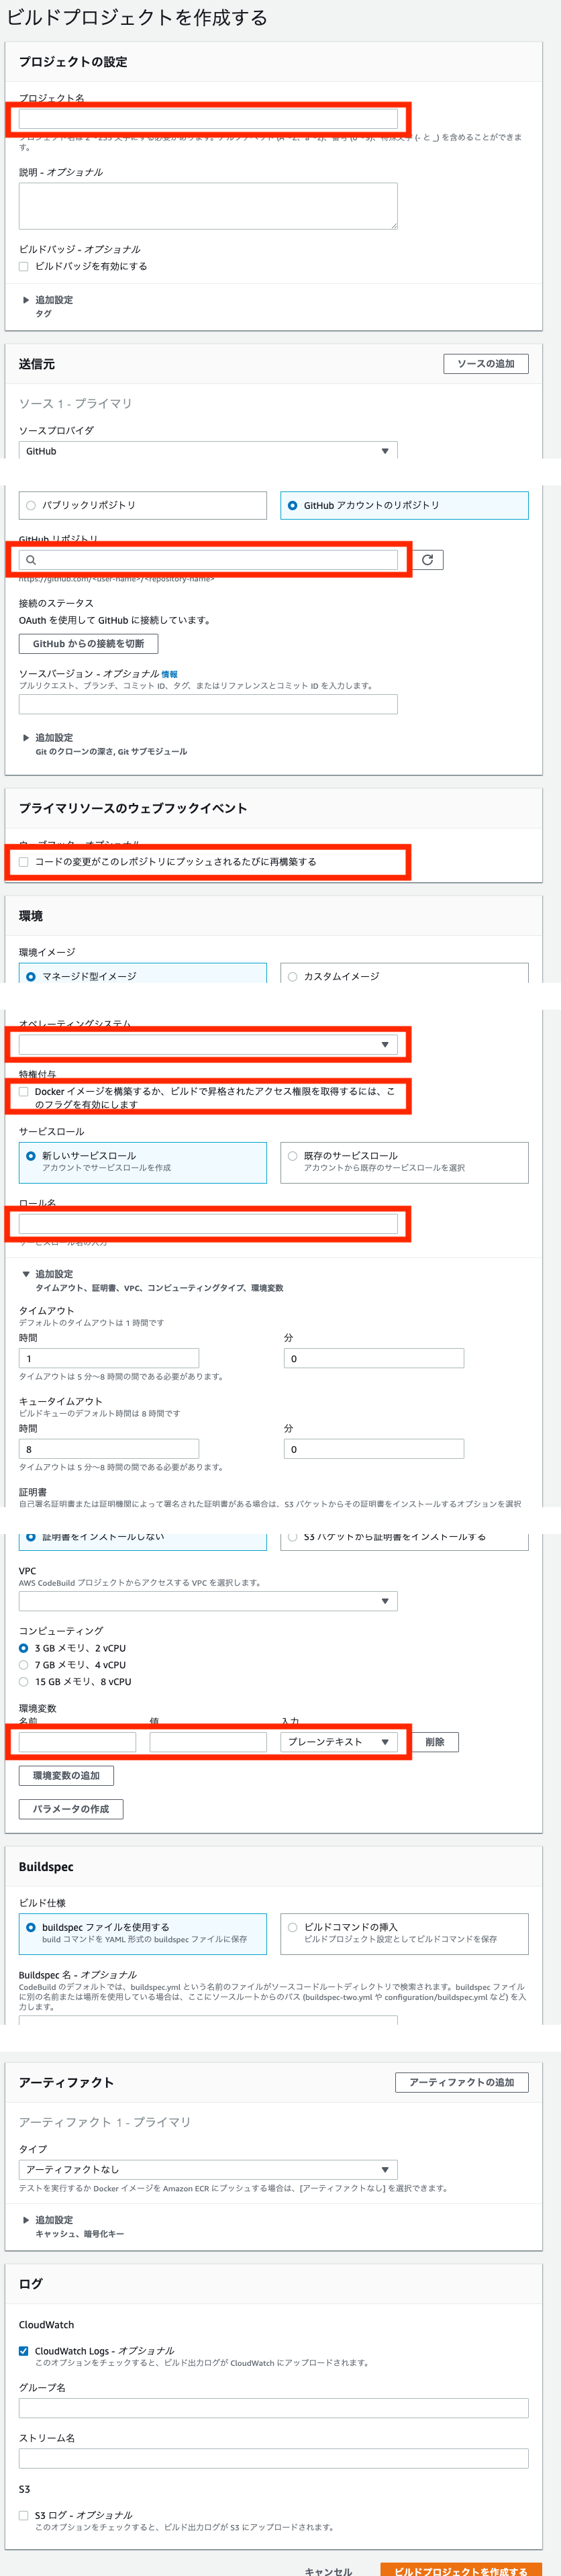
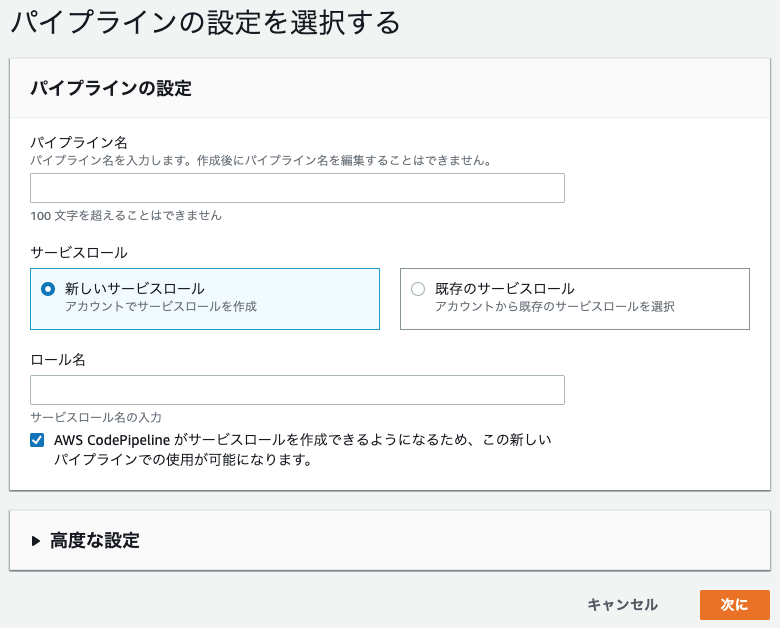
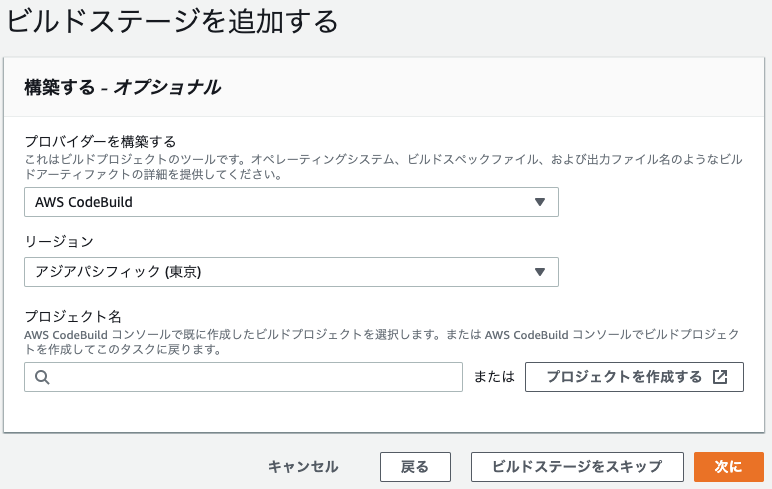
CodeBuild
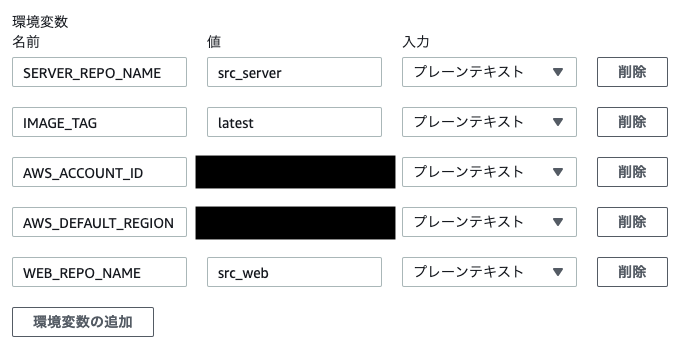
途中、環境変数を設定する部分があります。
そこには以下のように設定します。
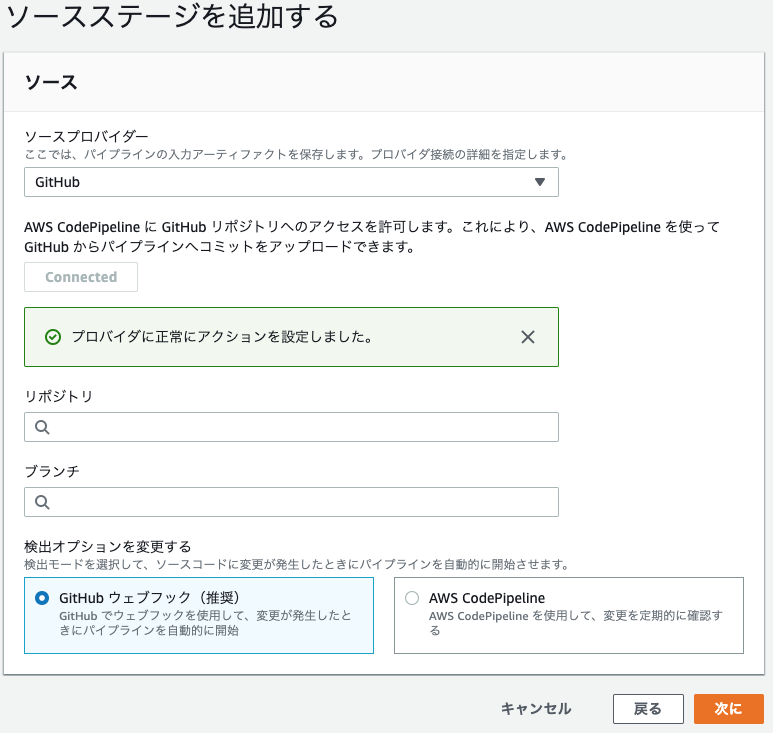
CodePipeline
ここではCodeBuildで設定したリポジトリと同じリポジトリを設定します。
そして、先程作ったCodeBuildのプロジェクト名を設定します。
CodeBuild側の設定は以上ですが、CodeBuildでコンテナをビルドするためには
buildspec.ymlというファイルが必要になります。プロジェクトルート ├ docker │ ├ mysql │ │ ├ volumes │ │ │ └ developmentのmysqlの永続化用 │ │ ├ charset.cnf │ │ ├ password.yml │ │ └ Dockerfile │ ├ nginx │ │ ├ development │ │ │ ├ default.conf │ │ │ └ Dockerfile │ │ ├ production │ │ │ ├ default.conf │ │ │ └ Dockerfile │ │ └ nginx.conf │ └ rails │ └ Dockerfile ├ src │ └ railsアプリのソース ├ .gitignore ├ buildspec.yml ←コイツ ├ docker-compose.common.yml ├ docker-compose.development.yml ├ docker-compose.production.yml └ README.mdこのファイル構成でここまで説明をしていない唯一のファイルです。
ビルドコマンドや、railsコマンド等はこのファイルに書きます。buildspec.ymlversion: 0.2 phases: install: runtime-versions: nodejs: 10 ruby: 2.6 pre_build: commands: - $(aws ecr get-login --no-include-email --region $AWS_DEFAULT_REGION) build: commands: - docker-compose -f docker-compose.production.yml build - docker-compose -f docker-compose.production.yml run --rm web rake db:migrate RAILS_ENV=production - docker-compose -f docker-compose.production.yml run --rm web rake assets:precompile RAILS_ENV=production - docker tag $WEB_REPO_NAME:$IMAGE_TAG $AWS_ACCOUNT_ID.dkr.ecr.$AWS_DEFAULT_REGION.amazonaws.com/$WEB_REPO_NAME:$IMAGE_TAG - docker tag $SERVER_REPO_NAME:$IMAGE_TAG $AWS_ACCOUNT_ID.dkr.ecr.$AWS_DEFAULT_REGION.amazonaws.com/$SERVER_REPO_NAME:$IMAGE_TAG post_build: commands: - docker push $AWS_ACCOUNT_ID.dkr.ecr.$AWS_DEFAULT_REGION.amazonaws.com/$WEB_REPO_NAME:$IMAGE_TAG - docker push $AWS_ACCOUNT_ID.dkr.ecr.$AWS_DEFAULT_REGION.amazonaws.com/$SERVER_REPO_NAME:$IMAGE_TAG先程の環境変数はここで読み込まれます。
さて、これで準備ができました。
コードを更新して、githubにpushしてみましょう。
CodePipeline上で更新が始まったことが確認できます。
更新には5分程かかります。
この時間の短縮も、今後の課題の一つです。
CodeBuild上でもリアルタイムで状況が把握できます。
COMPLETEまでフェーズが進めば、今回の目的は達成です。ここまでできたこと
次記事:Fargate編


- 投稿日:2019-08-22T18:00:42+09:00
ローカルDockerでCentOS立てた時の忘備録 ~Docker基本(pull, run, save, load)~
何について書くのか
DockerでCentOSイメージコンテナを立て、アプリケーション環境を用意したが保存をしたい。
始めはイマイチ忘れてよくわからなくなる。
やったことベースで簡潔に纏めておきたかった。コマンド自体はたくさんあるが、必要最低限のものだけ記載したので
私とやりたいことが似ていたら役立つかもしれません。ローカル、と記載している理由は、いつもAWS上で使っていましたが
今回は自身のMac上で行ったため、です。イメージを持ってくる
これから記載するのはすでに公開されているイメージを引っ張ってくる場合です。
「あーMacでCentOS7の検証したいな〜」 という場合は
# docker pull centos:centos7
これで持って来れます。もちろん「単純に分離したいだけ」「自作のイメージを配布したいだけ」などなら
自分で作るので別にいいんですが、大体の場合私は
ローカルでCentOSなどのイメージを持ってきたいなんて場合が多い。イメージさ、どこから持ってくるの?
Dockerhubです。
https://hub.docker.com普通のCentosであればこの辺りを使います
https://hub.docker.com/_/centos?tab=tagsあ、もちろんサイトにわざわざ行かなくても、コマンドで探したりもできます。
他の用途だと、例えば
Deep LearningのためPython×TensorFlow環境用意するの面倒で
Kerasとか色々環境用意するのだるいな…
なんて時もベースイメージとしてこの辺り持って来れば済みます。
しかも、プロセスとして機能するDocker、メモリなりCPUを制限させておけば暴走の心配がほぼない。分離。
https://hub.docker.com/r/tensorflow/tensorflow/
↑よく使ってたでは、やっていきます。
欲しいイメージの検索。こちらはCentOSの場合。
# docker search centos
NAME                               DESCRIPTION                                     STARS               OFFICIAL            AUTOMATED
centos                             The official build of CentOS.                   5520                [OK]
ansible/centos7-ansible            Ansible on Centos7                              122                                     [OK]
jdeathe/centos-ssh                 CentOS-6 6.10 x86_64 / CentOS-7 7.6.1810 x86…   111                                     [OK]
consol/centos-xfce-vnc             Centos container with "headless" VNC session…   99                                      [OK]
centos/mysql-57-centos7            MySQL 5.7 SQL database server                   62
imagine10255/centos6-lnmp-php56    centos6-lnmp-php56                              57                                      [OK]
tutum/centos                       Simple CentOS docker image with SSH access      44
centos/postgresql-96-centos7       PostgreSQL is an advanced Object-Relational …   39
kinogmt/centos-ssh                 CentOS with SSH                                 29                                      [OK]
centos/php-56-centos7              Platform for building and running PHP 5.6 ap…   22
pivotaldata/centos-gpdb-dev        CentOS image for GPDB development. Tag names…   10
nathonfowlie/centos-jre            Latest CentOS image with the JRE pre-install…   8                                       [OK]
drecom/centos-ruby                 centos ruby                                     6                                       [OK]
mamohr/centos-java                 Oracle Java 8 Docker image based on Centos 7    3                                       [OK]
darksheer/centos                   Base Centos Image -- Updated hourly             3                                       [OK]
…
ギャーイッパイデテキタ ( ◠‿◠ )
ここで行ってる検索は、Dockerhubでここに文字入れてるのと同じようなものです。(filter可)
Ubuntuイメージでやってみるの巻
ではこれから試しにUbuntuイメージを持ってきます。
念の為まずはイメージ検索します。$ docker search ubuntu NAME DESCRIPTION STARS OFFICIAL AUTOMATED ubuntu Ubuntu is a Debian-based Linux operating sys… 9855 [OK] dorowu/ubuntu-desktop-lxde-vnc Docker image to provide HTML5 VNC interface … 334 [OK] rastasheep/ubuntu-sshd Dockerized SSH service, built on top of offi… 228 [OK] consol/ubuntu-xfce-vnc Ubuntu container with "headless" VNC session… 186 [OK] ubuntu-upstart Upstart is an event-based replacement for th… 99 [OK] …あ、大丈夫ですね。ちゃんとイメージ公開されています。
では一番上のOfficialイメージにしましょう。$ docker pull ubuntu Using default tag: latest latest: Pulling from library/ubuntu 35c102085707: Pull complete 251f5509d51d: Pull complete 8e829fe70a46: Pull complete 6001e1789921: Pull complete Digest: sha256:d1~c94d90 Status: Downloaded newer image for ubuntu:latest docker.io/library/ubuntu:latestなにもタグを指定しないとlatestを引っ張る模様。
https://hub.docker.com/_/ubuntu?tab=descriptionイメージの確認
持ってきたイメージを確認します。
$ docker images
REPOSITORY          TAG                 IMAGE ID            CREATED             SIZE
ubuntu              latest              a2a15febcdf3        6 days ago          64.2MB
※今後、REPOSITORY:TAGでよく指定する機会があります。
立ち上げ
では、実際に立ち上げてみます。
$ docker run -ti ubuntu:latest /bin/bash
root@df0c54ef3b07:/#
立ち上がって入れました。
root@df0c54ef3b07:/# cat /etc/os-release
NAME="Ubuntu"
VERSION="18.04.3 LTS (Bionic Beaver)"
…
確認できました。
Dockerコンテナが立ち上がっているのか確認するときは
$ docker ps
CONTAINER ID        IMAGE               COMMAND             CREATED              STATUS              PORTS                              NAMES
cfb97fea54fe        ubuntu:latest       "/bin/bash"         About a minute ago   Up About a minute                                      peaceful_villani
です。
※以下補足です。
docker runにて
オプション 説明 -ti コンテナのプロセスにttyを割り当てる。 /bin/bash bashで起動 イメージの保存と読込
試しにdocker内でファイルを作成しておきます(新しくUbuntu立てた)
root@e7ff353d5a71:~# touch meguro
root@e7ff353d5a71:~# ls
meguro
現在のイメージは以前の状態。
$ docker images
REPOSITORY          TAG                 IMAGE ID            CREATED             SIZE
ubuntu              latest              a2a15febcdf3        7 days ago          64.2MB
コンテナをイメージに変換して
$ docker commit be6e776efcc4 ubuntu:meguntu
sha256:~e67r2d
saveコマンドでイメージ保存!
$ docker save ubuntu:meguntu > meguntu.tar確認。できてる!
$ docker images
REPOSITORY          TAG                 IMAGE ID            CREATED             SIZE
ubuntu              meguntu             63322548e865        2 minutes ago       64.2MB
(今起動しているコンテナを停止。こうやってIDで指定もできる。)
$ docker stop be6e776efcc4
be6e776efcc4
(イメージも持っていない状態にします)
$ docker rmi ubuntu:meguntu
Untagged: ubuntu:meguntu
果たして保存されているのか?
ロードする$ docker load < meguntu.tar 61f77b8c33fa: Loading layer [==================================================>] 2.048kB/2.048kB Loaded image: ubuntu:meguntu確認。できてる
$ docker images
REPOSITORY          TAG                 IMAGE ID            CREATED             SIZE
ubuntu              latest              a2a15febcdf3        7 days ago          64.2MB
では動かしてみる。本当に保存できてた…?
$ docker run -ti ubuntu:meguntu /bin/bash
root@d8eab066c577:/# cd
root@d8eab066c577:~# ls
meguro
できてたー!
まとめ
ということで、ローカルDockerでCentOSを立て、構築など変更をし、そのイメージ保存/ロードまでできました。
保存したイメージ、dockerhubで公開なり配布をすれば、Dockerのメリットを享受できますね。
少しでも、役に立った!復習できた!
と思って頂けたら、いいね!お願いしますm(_ _)mありがとうございました。
- 投稿日:2019-08-22T15:45:20+09:00
【Airflow on Kubernetes】JdbcOperatorの使い方
概要
AirflowでJdbcOperatorを利用してTeradataにアクセスする。
目次
Version
Requirements
- openjdk
- openjdk-11-jdk
- pip
- Teradata Driver
- terajdbc4.jar
- tdgssconfig.jar
Container
airflowのDockerに、前述のRequirementsをすべて追加する。
以下は一例なので、別の方法でもよい。Dockerfileに以下を追記する。(別途jreのDockerイメージを作成し、DAGでexecutor_configのKubernetesExecutorにimageを指定する方法でもよい)
また、TeradataのDriverであるterajdbc4.jarとtdgssconfig.jarを用意する。# Teradata RUN apt-get install -y openjdk-11-jdk COPY jdbc/terajdbc4.jar /opt/jdbc/terajdbc4.jar COPY jdbc/tdgssconfig.jar /opt/jdbc/tdgssconfig.jarsetup.pyの以下箇所にpipモジュールを追記する。
setup.pydef do_setup(): """Perform the Airflow package setup.""" write_version() setup( name='apache-airflow', # **snip** install_requires=[ 'tzlocal>=1.4,<2.0.0', 'unicodecsv>=0.14.1', 'zope.deprecation>=4.0, <5.0', + 'JayDeBeApi>=1.1.1', + 'JPype1==0.6.3', ],build
build.shを実行してairflowのDockerイメージを作成する。
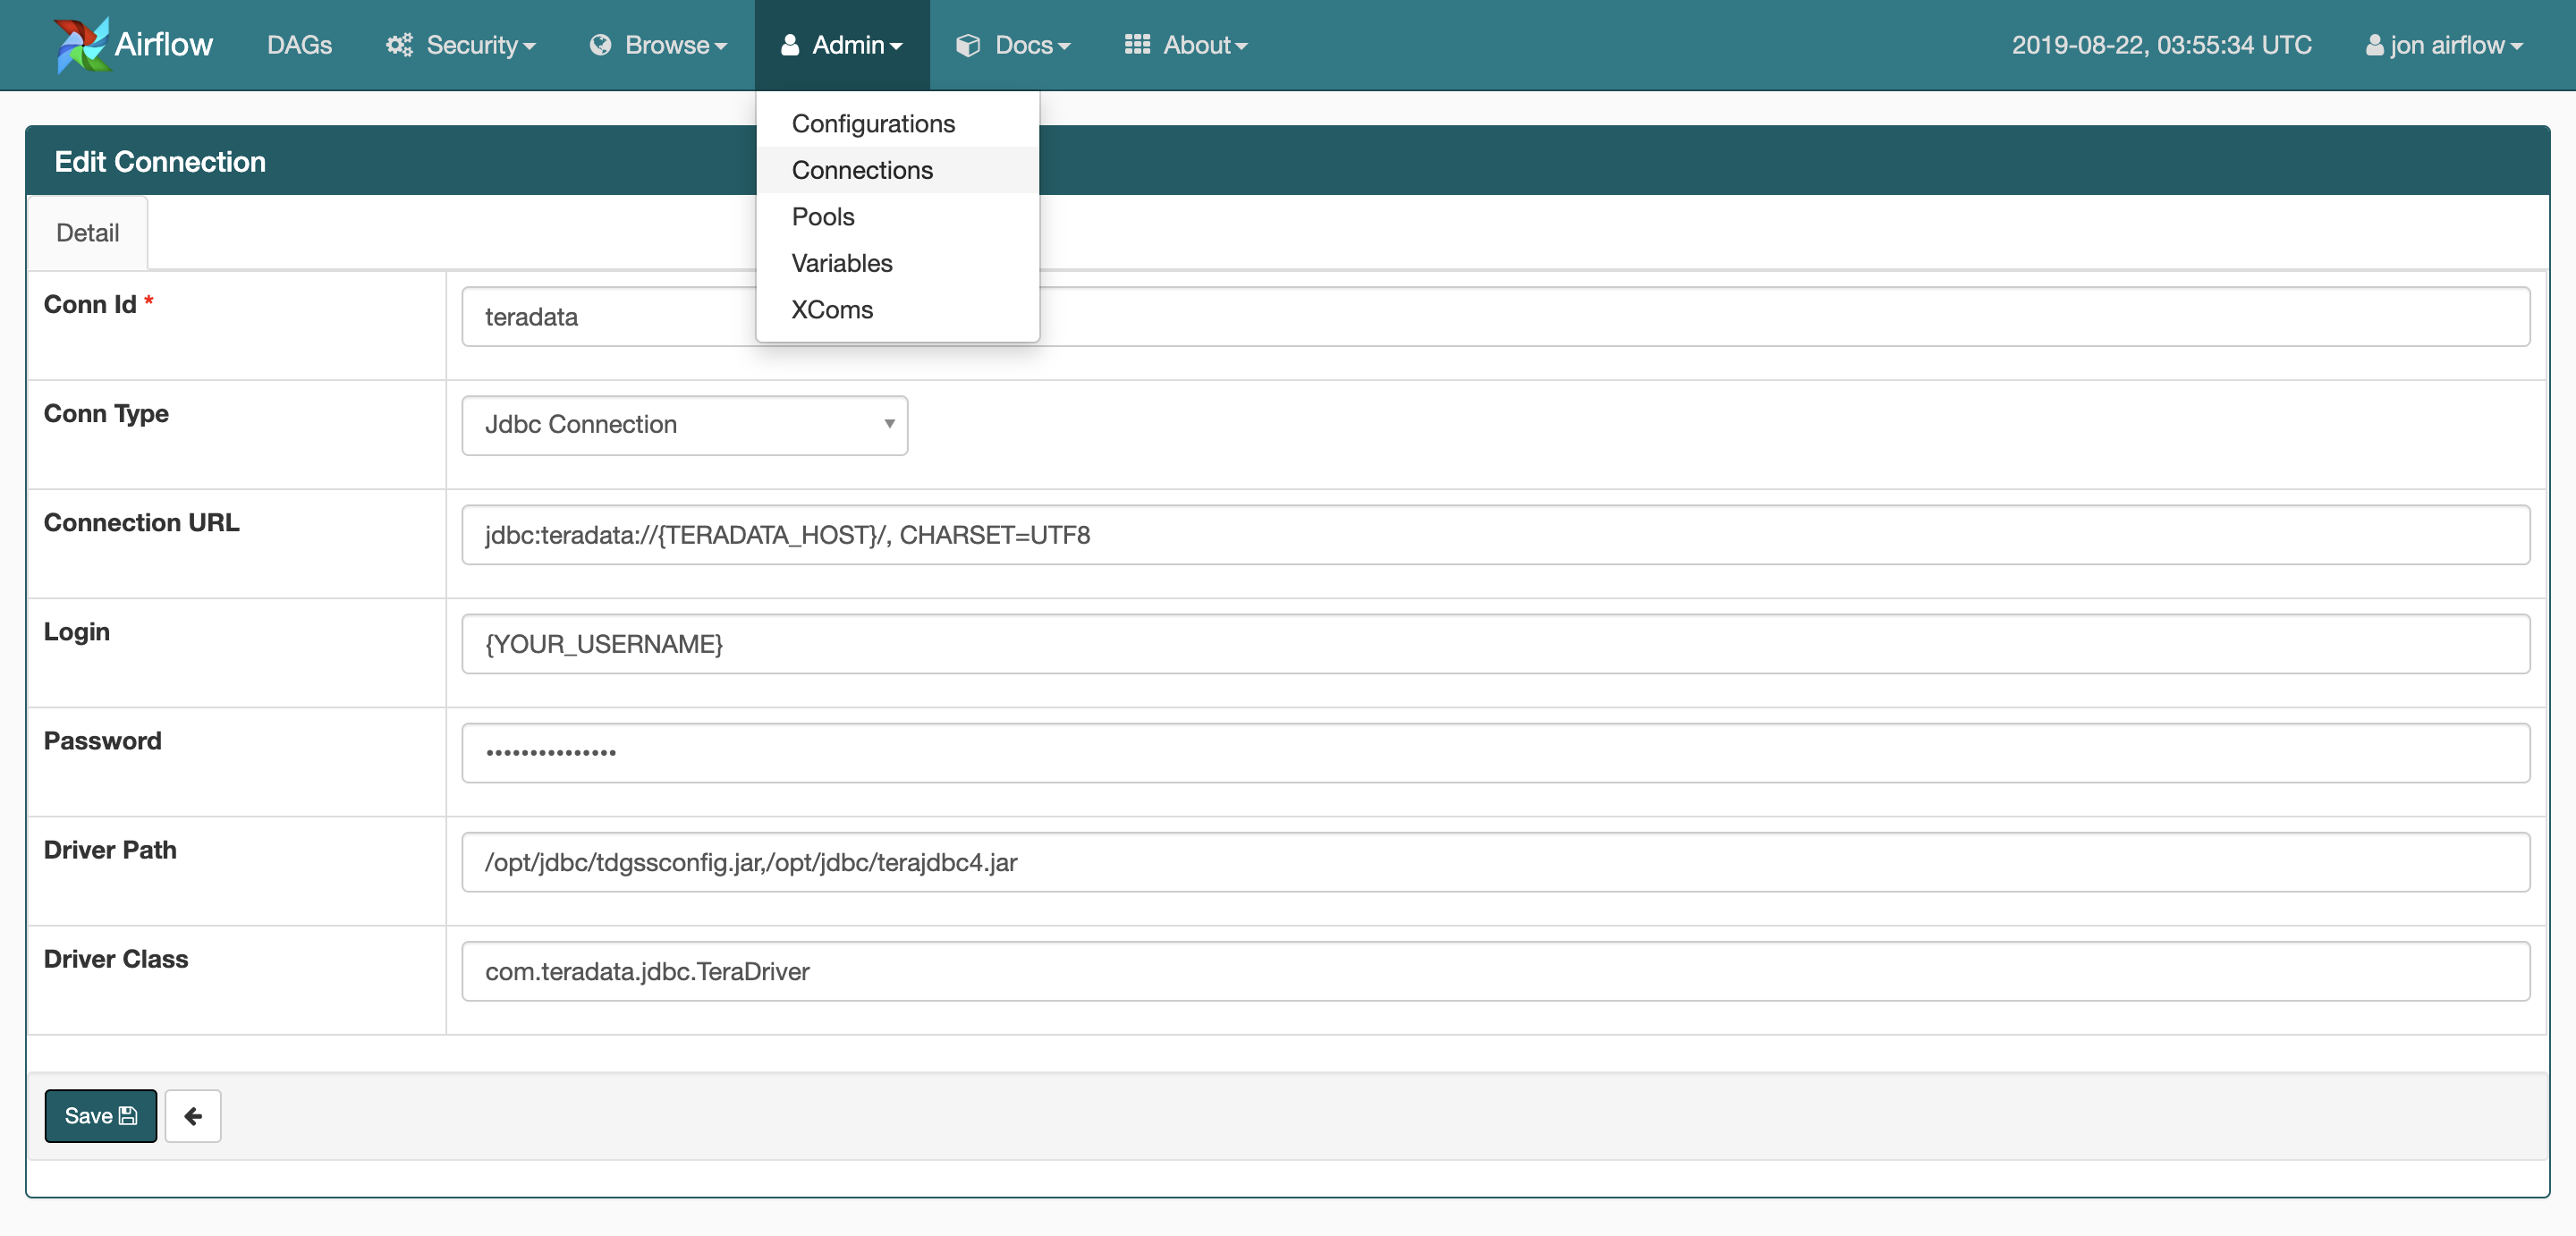
Connectionを追加
WEB UIでConnectionの設定をする。
https://{YOUR_HOST}/connection/list/
Keys Values DESC Conn Id * teradata 任意の名前 Conn Type Jdbc Connection Connection URL jdbc:teradata://{TERADATA_HOST}, CHARSET=UTF8 LDAPの場合: jdbc:teradata://{TERADATA_HOST}/LOGMECH=LDAPLogin {YOUR_USERNAME} Password {YOUR_PASSWORD} Driver Path /opt/jdbc/tdgssconfig.jar,/opt/jdbc/terajdbc4.jar 複数ある場合はカンマ区切り Driver Class com.teradata.jdbc.TeraDriver DAG
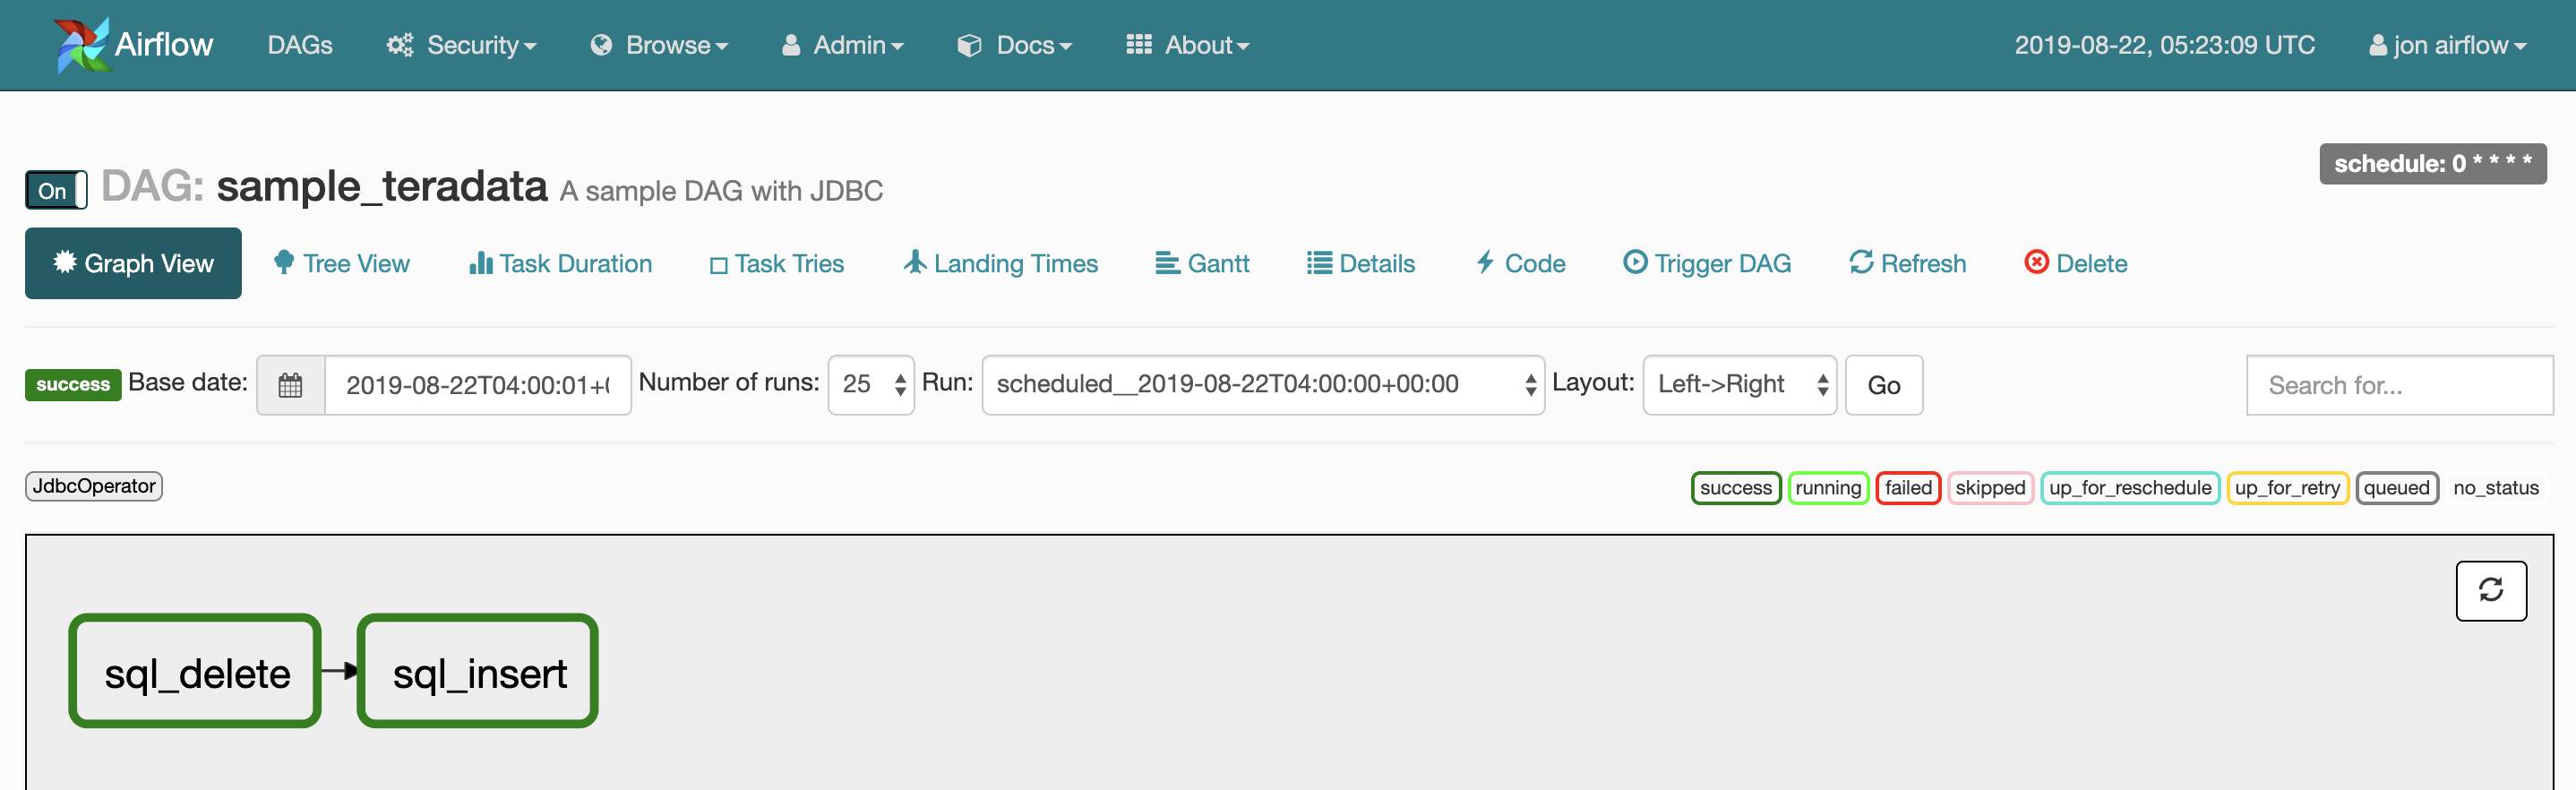
例として、以下の処理を実行するDAGを作成する。
- log_dateカラムが30日以上前のレコードをDelete
- log_dateが今日の日付のレコードをDelete/Insert
- 以下のカラムを持つテーブルを用意する
log_dateDATE FORMAT 'YYYYMMDD' NOT NULLnameVARCHAR(50) CHARACTER SET UNICODE NOT CASESPECIFICageINTEGER# -*- coding:utf-8 -*- import airflow from airflow import DAG from airflow.operators.jdbc_operator import JdbcOperator import datetime from datetime import timedelta default_args = { 'owner': 'airflow', 'depends_on_past': False, # 指定した日時から現在時刻までに実行されていないjobがすべて直ちに実行される 'start_date': airflow.utils.dates.days_ago(2), 'email': ['airflow@example.com'], 'email_on_failure': False, 'email_on_retry': False, 'retries': 1, 'retry_delay': timedelta(minutes=5), } dag = DAG( # DAG名 'sample_teradata', default_args=default_args, description='A sample DAG with JDBC', # 実行スケジュール schedule_interval='0 * * * *', ) # Lotate lotate_date = (datetime.date.today() - timedelta(days=29)).strftime("%Y%m%d") sql_task1 = JdbcOperator( task_id='sql_delete', # 設定したConn Idを入力することで接続情報がセットされる jdbc_conn_id='teradata', sql=['delete from YOUR_TABLE_NAME where log_date < \'{}\''.format(lotate_date)], params={"db":'YOUR_DB_NAME'}, dag=dag ) # DeleteInsert log_date = datetime.date.today().strftime("%Y%m%d") name = 'Smith' age = 30 sql_task2 = JdbcOperator( task_id='sql_insert', # 設定したConn Idを入力することで接続情報がセットされる jdbc_conn_id='teradata', sql=[ 'delete from YOUR_TABLE_NAME where log_date=\'{}\''.format(log_date), 'insert into YOUR_TABLE_NAME (log_date, name, age) values(\'{}\', \'{}\', {})'.format(log_date, name, age) ], params={"db":'YOUR_DB_NAME'}, dag=dag ) sql_task1 >> sql_task2Graph View
Pod
DAG実行中のPodの挙動
$ sudo kubectl get pod -w
airflow-58ccbb7c66-p9ckz                                   2/2     Running             0          111s
postgres-airflow-84dfd85977-6tpdh                          1/1     Running             0          7d17h
sampleteradatasqldelete-cbdc29dad6814d11a721d9fe9416a3ec   0/1     Pending              0          0s
sampleteradatasqldelete-cbdc29dad6814d11a721d9fe9416a3ec   0/1     Pending              0          0s
sampleteradatasqldelete-cbdc29dad6814d11a721d9fe9416a3ec   0/1     ContainerCreating    0          0s
sampleteradatasqldelete-cbdc29dad6814d11a721d9fe9416a3ec   1/1     Running              0          2s
sampleteradatasqldelete-cbdc29dad6814d11a721d9fe9416a3ec   0/1     Completed            0          8s
sampleteradatasqldelete-cbdc29dad6814d11a721d9fe9416a3ec   0/1     Terminating          0          10s
sampleteradatasqldelete-cbdc29dad6814d11a721d9fe9416a3ec   0/1     Terminating          0          10s
sampleteradatasqlinsert-db4b5d25ad6f47c691d3992f62a48d38   0/1     Pending              0          0s
sampleteradatasqlinsert-db4b5d25ad6f47c691d3992f62a48d38   0/1     Pending              0          0s
sampleteradatasqlinsert-db4b5d25ad6f47c691d3992f62a48d38   0/1     ContainerCreating    0          0s
sampleteradatasqlinsert-db4b5d25ad6f47c691d3992f62a48d38   1/1     Running              0          1s
sampleteradatasqlinsert-db4b5d25ad6f47c691d3992f62a48d38   0/1     Completed            0          8s
sampleteradatasqlinsert-db4b5d25ad6f47c691d3992f62a48d38   0/1     Terminating          0          10s
sampleteradatasqlinsert-db4b5d25ad6f47c691d3992f62a48d38   0/1     Terminating          0          10s
確認
Teradataで実際にデータがDelete、Insertされていることが確認できればOK。
関連記事
参考
- 投稿日:2019-08-22T15:09:38+09:00
AzureBatchのキホン
はじめに
コンテナにロジックを閉じ込め任意のインスタンスで動かすことができるAWS Batchが便利で使っていたのですが、今の案件はAzureでしたのでAzure Batchを使ってみました。これもコンセプトはAWSと同じです。
Azureは相変わらずドキュメントやQiitaなどにもあまり記事がないので少しでもお役に立てれば幸いです。ちなみに今回JavaSDKで実装していますが、画面上からバッチの定義を行ったり他の言語のSDKを使った場合も同じ設定値に設定することで動かすことができますので参考になるかと思います。
Azure Batch
AzureBatchでは任意のプログラム(Shellも)を、指定された大きさのインスタンスで動かすことが可能なサービスです。
AWS Batchのようにコンテナ内のプログラムを動かすことが可能です。ちなみにAWSではCloudWatchEventsを使ってスケジュールさせていましたが、AzureBatchではスケジュール機能が組み込まれています。前準備
コンテナで動かすプログラムはこんな感じです。
ちゃんと指定されたインスタンスで動いているかどうか確認するためにOSなどの情報を出してみましょう。ちなみにJavaでOSの情報をだすにはhttps://github.com/oshi/oshiが便利ですよ。
public class BatchMain {

    public static void main(String[] args) {

        System.out.println("execute main method.");

        System.out.println("Environment Variables");
        System.getenv().forEach((k,v) -> System.out.println(k + ":" + v));

        var si = new SystemInfo();
        System.out.println("OS: " + si.getOperatingSystem());

        var hardware = si.getHardware();
        System.out.println("Processor: " + hardware.getProcessor());

        var memory = hardware.getMemory();
        System.out.println("Memory: " + memory.getAvailable() + " / " + memory.getTotal());

        System.exit(0);
    }
}
さてこれをAzure Container Registryにpushしていきます。いつも通りjibを使ってpushします。
gradle.propertiesにUSERNAMEとPASSWORDを忘れずに書いておいてください。jib { to { image = 'xxxxx.azurecr.io/batch:0.0.1-SNAPSHOT' auth { username = "${USERNAME}" password = "${PASSWORD}" } } }gradlew jibプールを作る
Azure Batchでは実行環境の定義をPoolで行います。プールの設定はジョブごとに作る必要はなく環境が変わらないのであれば一つ大丈夫です。AWSでいうとComputing Environmentかな。
サポートされる仮想マシンイメージ(Linux)はこちらに記載がありますがcentos or ubuntuのみになります。
自分で用意することももちろん可能です。指定する値はAzureの管理コンソールから探したほうが簡単でしょう
public class Pool {

    public static final String POOL_ID = "pool_1";

    public static void main(String[] args) throws IOException {
        BatchClient client = BatchClient.open(new BatchSharedKeyCredentials(
                "https://xxxxx.japaneast.batch.azure.com",
                "xxxx",
                "xxxxxx"));

        ContainerRegistry containerRegistry = new ContainerRegistry()
                .withRegistryServer("xxxxxx.azurecr.io")
                .withUserName("xxxxxx")
                .withPassword("xxxxxxxxx");

        ContainerConfiguration containerConfiguration = new ContainerConfiguration();
        containerConfiguration.withContainerRegistries(Arrays.asList(containerRegistry));
        containerConfiguration.withContainerImageNames(Arrays.asList("xxxx.azurecr.io/batch:0.0.1-SNAPSHOT"));

        ImageReference imageReference = new ImageReference();
        imageReference.withPublisher("microsoft-azure-batch");
        imageReference.withOffer("ubuntu-server-container");
        imageReference.withSku("16-04-lts");
        imageReference.withVersion("latest");

        // VM Configuration
        VirtualMachineConfiguration virtualMachineConfiguration = new VirtualMachineConfiguration();
        virtualMachineConfiguration.withImageReference(imageReference);
        virtualMachineConfiguration.withContainerConfiguration(containerConfiguration);
        virtualMachineConfiguration.withNodeAgentSKUId("batch.node.ubuntu 16.04");

        // Create Pool
        client.poolOperations().createPool(POOL_ID, "standard_d1_v2", virtualMachineConfiguration, 1);
    }

}
シンプルに動かす
Poolで定義した情報をもとにJOB、Taskを動かしてみます。
まずはJOBを作ります。public class SimpleJob { public static final String POOL_ID = "pool_1"; public static final String JOB_ID = "job_1"; public static void main(String[] args) throws IOException { BatchClient client = BatchClient.open(new BatchSharedKeyCredentials( "https://xxxxx.japaneast.batch.azure.com", "xxxx", "xxxxxx")); PoolInformation poolInformation = new PoolInformation(); poolInformation.withPoolId(POOL_ID); // CreateJob client.jobOperations().createJob(JOB_ID, poolInformation); } }JOB内でタスクを動かします。
public class SimpleTask {

    public static void main(String[] args) throws IOException, InterruptedException {

        BatchClient client = BatchClient.open(new BatchSharedKeyCredentials(
                "https://xxxxx.japaneast.batch.azure.com",
                "xxxx",
                "xxxxxx"));

        TaskAddParameter parameter = new TaskAddParameter();
        parameter.withId("task1")
                .withUserIdentity(new UserIdentity().withAutoUser(new AutoUserSpecification().withElevationLevel(ElevationLevel.ADMIN).withScope(AutoUserScope.TASK)))
                .withContainerSettings(new TaskContainerSettings().withImageName("xxxx.azurecr.io/batch:0.0.1-SNAPSHOT")
                        .withContainerRunOptions("--rm"))
                .withConstraints(new TaskConstraints().withMaxTaskRetryCount(-1)).withCommandLine("");
        client.taskOperations().createTask(ScheduleJob.JOB_ID, parameter);

        long timeout = 300 * 1000;
        long startTime = System.currentTimeMillis();

        while (System.currentTimeMillis() - startTime <= timeout) {
            CloudTask task = client.taskOperations().getTask(ScheduleJob.JOB_ID, parameter.id());

            if (task.state() != TaskState.COMPLETED) {
                Thread.sleep(1000);
            }
        }
    }
}
これを実行するとAzureの管理画面上で確認できます。
動いたJOBをクリックすると、Taskの画面が表示され出力された内容は画面上から見ることができます。
指定された時間にJOBを実行する
JOBの時間をwithDoNotRunUntilで指定します。JOBが実行されると動くタスクも合わせて定義します。
public class ScheduleJob {

    public static final String POOL_ID = "pool_1";

    public static final String JOB_ID = "job_5";

    public static void main(String[] args) throws IOException {
        BatchClient client = BatchClient.open(new BatchSharedKeyCredentials(
                "https://xxxxx.japaneast.batch.azure.com",
                "xxxx",
                "xxxxxx"));

        // Create Schedule SimpleJob
        DateTime scheduleDateTime = new DateTime(2019,8,22,4,30, DateTimeZone.UTC);
        Schedule schedule = new Schedule().withDoNotRunUntil(scheduleDateTime);

        // pool
        PoolInformation poolInformation = new PoolInformation();
        poolInformation.withPoolId(POOL_ID);

        // container
        JobManagerTask task = new JobManagerTask();
        task.withId("scheduletask")
                .withUserIdentity(new UserIdentity().withAutoUser(new AutoUserSpecification().withElevationLevel(ElevationLevel.ADMIN).withScope(AutoUserScope.TASK)))
                .withContainerSettings(new TaskContainerSettings().withImageName("xxxxx.azurecr.io/batch:0.0.1-SNAPSHOT")
                        .withContainerRunOptions("--rm"))
                .withCommandLine("");

        JobSpecification jobSpecification = new JobSpecification().withPoolInfo(poolInformation).withJobManagerTask(task);

        client.jobScheduleOperations().createJobSchedule(JOB_ID,schedule, jobSpecification);
    }
}
指定された時間から繰り返し動かす(Cron)
初回に動く時刻をDoNotRunUntilで指定し、RecurrenceIntervalで繰り返し動かす時間を指定します。
DoNotRunUntilを指定しない場合は、JOBを定義された時間から繰り返し動かすことになります。public class CronScheduleJob { public static final String POOL_ID = "pool_1"; public static final String JOB_ID = "job_7"; public static void main(String[] args) throws IOException { BatchClient client = BatchClient.open(new BatchSharedKeyCredentials( "https://xxxxx.japaneast.batch.azure.com", "xxxx", "xxxxxx")); // Create Schedule SimpleJob DateTime startDateTime = new DateTime(2019,8,22,4,45, DateTimeZone.UTC); Period period = new Period(0,1,0,0); Schedule schedule = new Schedule().withRecurrenceInterval(period).withDoNotRunUntil(startDateTime); // pool PoolInformation poolInformation = new PoolInformation(); poolInformation.withPoolId(POOL_ID); // container JobManagerTask task = new JobManagerTask(); task.withId("cronscheduletask") .withUserIdentity(new UserIdentity().withAutoUser(new AutoUserSpecification().withElevationLevel(ElevationLevel.ADMIN).withScope(AutoUserScope.TASK))) .withContainerSettings(new TaskContainerSettings().withImageName("xxxxx.azurecr.io/batch:0.0.1-SNAPSHOT") .withContainerRunOptions("--rm")) .withCommandLine(""); JobSpecification jobSpecification = new JobSpecification().withPoolInfo(poolInformation).withJobManagerTask(task); client.jobScheduleOperations().createJobSchedule(JOB_ID,schedule, jobSpecification); } }参考


- 投稿日:2019-08-22T15:09:38+09:00
Azure Batchを使ってコンテナでバッチを動かそう
はじめに
コンテナにロジックを閉じ込め任意のインスタンスで動かすことができるAWS Batchが便利で使っていたのですが、今の案件はAzureでしたのでAzure Batchを使ってみました。これもコンセプトはAWSと同じです。
Azureは相変わらずドキュメントやQiitaなどにもあまり記事がないので少しでもお役に立てれば幸いです。ちなみに今回JavaSDKで実装していますが、画面上からバッチの定義を行ったり他の言語のSDKを使った場合も同じ設定値に設定することで動かすことができますので参考になるかと思います。
Azure Batch
AzureBatchでは任意のプログラム(Shellも)を、指定された大きさのインスタンスで動かすことが可能なサービスです。
AWS Batchのようにコンテナ内のプログラムを動かすことが可能です。ちなみにAWS(※)ではCloudWatchEventsを使ってスケジュールさせていましたが、AzureBatchではスケジュール機能が組み込まれています。※ AWSの場合は、CloudWatchEvents -> Lambda -> AWS Batchって感じで動かす必要があります
前準備
コンテナで動かすプログラムはこんな感じです。
ちゃんと指定されたインスタンスで動いているかどうか確認するためにOSなどの情報を出してみましょう。ちなみにJavaでOSの情報をだすにはhttps://github.com/oshi/oshiが便利ですよ。
public class BatchMain {

    public static void main(String[] args) {

        System.out.println("execute main method.");

        System.out.println("Environment Variables");
        System.getenv().forEach((k,v) -> System.out.println(k + ":" + v));

        var si = new SystemInfo();
        System.out.println("OS: " + si.getOperatingSystem());

        var hardware = si.getHardware();
        System.out.println("Processor: " + hardware.getProcessor());

        var memory = hardware.getMemory();
        System.out.println("Memory: " + memory.getAvailable() + " / " + memory.getTotal());

        System.exit(0);
    }
}
さてこれをAzure Container Registryにpushしていきます。いつも通りjibを使ってpushします。
gradle.propertiesにUSERNAMEとPASSWORDを忘れずに書いておいてください。jib { to { image = 'xxxxx.azurecr.io/batch:0.0.1-SNAPSHOT' auth { username = "${USERNAME}" password = "${PASSWORD}" } } }gradlew jibAzure Batchのアカウントを作る
「batch accounts」を選択します。
batch アカウントを作りましょう。
batch account, url, primary access keyをコピーしておきます。これはプログラムで指定するときに利用します。
プールを作る
Azure Batchでは実行環境の定義をPoolで行います。プールの設定はジョブごとに作る必要はなく環境が変わらないのであれば一つ大丈夫です。AWSでいうとComputing Environmentかな。
サポートされる仮想マシンイメージ(Linux)はこちらに記載がありますがcentos or ubuntuのみになります。
自分で用意することももちろん可能です。指定する値はAzureの管理コンソールから探したほうが簡単でしょう
public class Pool {

    public static final String POOL_ID = "pool_1";

    public static void main(String[] args) throws IOException {
        BatchClient client = BatchClient.open(new BatchSharedKeyCredentials(
                "https://xxxxx.japaneast.batch.azure.com",
                "xxxx",
                "xxxxxx"));

        ContainerRegistry containerRegistry = new ContainerRegistry()
                .withRegistryServer("xxxxxx.azurecr.io")
                .withUserName("xxxxxx")
                .withPassword("xxxxxxxxx");

        ContainerConfiguration containerConfiguration = new ContainerConfiguration();
        containerConfiguration.withContainerRegistries(Arrays.asList(containerRegistry));
        containerConfiguration.withContainerImageNames(Arrays.asList("xxxx.azurecr.io/batch:0.0.1-SNAPSHOT"));

        ImageReference imageReference = new ImageReference();
        imageReference.withPublisher("microsoft-azure-batch");
        imageReference.withOffer("ubuntu-server-container");
        imageReference.withSku("16-04-lts");
        imageReference.withVersion("latest");

        // VM Configuration
        VirtualMachineConfiguration virtualMachineConfiguration = new VirtualMachineConfiguration();
        virtualMachineConfiguration.withImageReference(imageReference);
        virtualMachineConfiguration.withContainerConfiguration(containerConfiguration);
        virtualMachineConfiguration.withNodeAgentSKUId("batch.node.ubuntu 16.04");

        // Create Pool
        client.poolOperations().createPool(POOL_ID, "standard_d1_v2", virtualMachineConfiguration, 1);
    }

}
シンプルに動かす
Poolで定義した情報をもとにJOB、Taskを動かしてみます。
まずはJOBを作ります。public class SimpleJob { public static final String POOL_ID = "pool_1"; public static final String JOB_ID = "job_1"; public static void main(String[] args) throws IOException { BatchClient client = BatchClient.open(new BatchSharedKeyCredentials( "https://xxxxx.japaneast.batch.azure.com", "xxxx", "xxxxxx")); PoolInformation poolInformation = new PoolInformation(); poolInformation.withPoolId(POOL_ID); // CreateJob client.jobOperations().createJob(JOB_ID, poolInformation); } }JOB内でタスクを動かします。
public class SimpleTask {

    public static void main(String[] args) throws IOException, InterruptedException {

        BatchClient client = BatchClient.open(new BatchSharedKeyCredentials(
                "https://xxxxx.japaneast.batch.azure.com",
                "xxxx",
                "xxxxxx"));

        TaskAddParameter parameter = new TaskAddParameter();
        parameter.withId("task1")
                .withUserIdentity(new UserIdentity().withAutoUser(new AutoUserSpecification().withElevationLevel(ElevationLevel.ADMIN).withScope(AutoUserScope.TASK)))
                .withContainerSettings(new TaskContainerSettings().withImageName("xxxx.azurecr.io/batch:0.0.1-SNAPSHOT")
                        .withContainerRunOptions("--rm"))
                .withConstraints(new TaskConstraints().withMaxTaskRetryCount(-1)).withCommandLine("");
        client.taskOperations().createTask(ScheduleJob.JOB_ID, parameter);

        long timeout = 300 * 1000;
        long startTime = System.currentTimeMillis();

        while (System.currentTimeMillis() - startTime <= timeout) {
            CloudTask task = client.taskOperations().getTask(ScheduleJob.JOB_ID, parameter.id());

            if (task.state() != TaskState.COMPLETED) {
                Thread.sleep(1000);
            }
        }
    }
}
これを実行するとAzureの管理画面上で確認できます。
動いたJOBをクリックすると、Taskの画面が表示され出力された内容は画面上から見ることができます。
指定された時間にJOBを実行する
JOBの時間をwithDoNotRunUntilで指定します。JOBが実行されると動くタスクも合わせて定義します。
public class ScheduleJob {

    public static final String POOL_ID = "pool_1";

    public static final String JOB_ID = "job_5";

    public static void main(String[] args) throws IOException {
        BatchClient client = BatchClient.open(new BatchSharedKeyCredentials(
                "https://xxxxx.japaneast.batch.azure.com",
                "xxxx",
                "xxxxxx"));

        // Create Schedule SimpleJob
        DateTime scheduleDateTime = new DateTime(2019,8,22,4,30, DateTimeZone.UTC);
        Schedule schedule = new Schedule().withDoNotRunUntil(scheduleDateTime);

        // pool
        PoolInformation poolInformation = new PoolInformation();
        poolInformation.withPoolId(POOL_ID);

        // container
        JobManagerTask task = new JobManagerTask();
        task.withId("scheduletask")
                .withUserIdentity(new UserIdentity().withAutoUser(new AutoUserSpecification().withElevationLevel(ElevationLevel.ADMIN).withScope(AutoUserScope.TASK)))
                .withContainerSettings(new TaskContainerSettings().withImageName("xxxxx.azurecr.io/batch:0.0.1-SNAPSHOT")
                        .withContainerRunOptions("--rm"))
                .withCommandLine("");

        JobSpecification jobSpecification = new JobSpecification().withPoolInfo(poolInformation).withJobManagerTask(task);

        client.jobScheduleOperations().createJobSchedule(JOB_ID,schedule, jobSpecification);
    }
}
指定された時間から繰り返し動かす(Cron)
初回に動く時刻をDoNotRunUntilで指定し、RecurrenceIntervalで繰り返し動かす時間を指定します。
DoNotRunUntilを指定しない場合は、JOBを定義された時間から繰り返し動かすことになります。public class CronScheduleJob { public static final String POOL_ID = "pool_1"; public static final String JOB_ID = "job_7"; public static void main(String[] args) throws IOException { BatchClient client = BatchClient.open(new BatchSharedKeyCredentials( "https://xxxxx.japaneast.batch.azure.com", "xxxx", "xxxxxx")); // Create Schedule SimpleJob DateTime startDateTime = new DateTime(2019,8,22,4,45, DateTimeZone.UTC); Period period = new Period(0,1,0,0); Schedule schedule = new Schedule().withRecurrenceInterval(period).withDoNotRunUntil(startDateTime); // pool PoolInformation poolInformation = new PoolInformation(); poolInformation.withPoolId(POOL_ID); // container JobManagerTask task = new JobManagerTask(); task.withId("cronscheduletask") .withUserIdentity(new UserIdentity().withAutoUser(new AutoUserSpecification().withElevationLevel(ElevationLevel.ADMIN).withScope(AutoUserScope.TASK))) .withContainerSettings(new TaskContainerSettings().withImageName("xxxxx.azurecr.io/batch:0.0.1-SNAPSHOT") .withContainerRunOptions("--rm")) .withCommandLine(""); JobSpecification jobSpecification = new JobSpecification().withPoolInfo(poolInformation).withJobManagerTask(task); client.jobScheduleOperations().createJobSchedule(JOB_ID,schedule, jobSpecification); } }参考


- 投稿日:2019-08-22T14:29:32+09:00
ECS FargateでRails動かそうとして2ヶ月かかって死んだ話【1.docker編】
弊社の基幹システムをVPSからAWSに移行するにあたって、まずはrailsを動かしてみる、という段階で無事に死にました☆
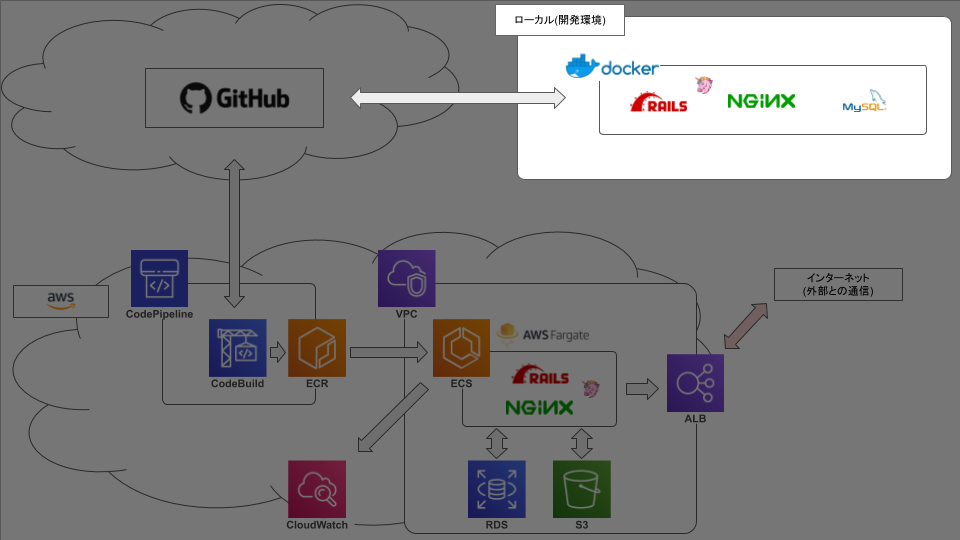
今後のための備忘録です。やりたいこと
こんな感じ。やったこと
docker
まず、ファイル構成は以下。
プロジェクトルート
  ├ docker
  │  ├ mysql
  │  │  ├ volumes
  │  │  │  └ ※mysqlの永続化に使う。後述
  │  │  ├ charset.cnf
  │  │  ├ password.yml
  │  │  └ Dockerfile
  │  ├ nginx
  │  │  ├ development
  │  │  │  ├ default.conf
  │  │  │  └ Dockerfile
  │  │  ├ production
  │  │  │  ├ default.conf
  │  │  │  └ Dockerfile
  │  │  └ nginx.conf
  │  └ rails
  │     └ Dockerfile
  ├ src
  │  └ ※railsアプリのソースをここに置きます。後述
  ├ .gitignore
  ├ buildspec.yml
  ├ docker-compose.common.yml
  ├ docker-compose.development.yml
  ├ docker-compose.production.yml
  └ README.md
開発環境と本番環境で
docker-composeの内容にかなり差があるので、ファイルを分けています。
共通する内容はdocker-compose.common.ymlに記述して、なるべく助長化を防ぎます。
ただし、nginxのDockerfileに関しては環境ごとにほぼ同じ内容でファイルを分けて作っています。これも後述しますが、最後までハマり続けたポイントを解決するための苦肉の策です。
docker-compose
docker-compose.common.ymlversion: '2' services: server: environment: TZ: Asia/Tokyo ports: - '80:80' web: build: context: . dockerfile: ./docker/rails/Dockerfile ports: - '3000:3000' volumes: - ./src:/app extends: file: ./docker/mysql/password.yml service: password db: build: context: . dockerfile: ./docker/mysql/Dockerfile ports: - '3306:3306' extends: file: ./docker/mysql/password.yml service: passworddocker-compose.development.ymlversion: '2' services: datastore: image: busybox volumes: - /share - ./docker/mysql/volumes:/var/lib/mysql server: build: context: . dockerfile: ./docker/nginx/development/Dockerfile extends: file: docker-compose.common.yml service: server volumes_from: - datastore depends_on: - datastore web: extends: file: docker-compose.common.yml service: web command: bundle exec unicorn -p 3000 -c /app/config/unicorn.rb volumes_from: - datastore depends_on: - db db: extends: file: docker-compose.common.yml service: db volumes_from: - datastore depends_on: - datastoredocker-compose.production.ymlversion: '2' services: server: build: context: . dockerfile: ./docker/nginx/production/Dockerfile extends: file: docker-compose.common.yml service: server web: extends: file: docker-compose.common.yml service: web depends_on: - server environment: RAILS_ENV: production DB_HOST: ◯◯.△△.ap-northeast-1.rds.amazonaws.com DB_USERNAME: ユーザー名 DB_PASSWORD: パスワード DB_DATABASE: データベース名serviceで言えば、
development
- datastore → busybox
- server → nginx
- web → ruby(rails)
- db → mysql
production
- server → nginx
- web → ruby(rails)
といった構成になっています。
本番環境ではECS fargate上でストレージの共有ができるのでdatastoreは不要です。
また、データベースはRDSを用いるのでdbも不要です。Dockerfile
nginx
docker/nginx/development/DockerfileFROM nginx:1.11 RUN apt-get update && \ apt-get install -y apt-utils \ locales && \ sed -i -e 's/# ja_JP.UTF-8/ja_JP.UTF-8/g' /etc/locale.gen && \ locale-gen ja_JP.UTF-8 ENV LANG ja_JP.UTF-8 ENV LC_TIME C ADD ./docker/nginx/nginx.conf /etc/nginx/nginx.conf # productionでは次の行のファイルパスが変わる ADD ./docker/nginx/development/default.conf /etc/nginx/conf.d/default.confrails
docker/rails/DockerfileFROM ruby:2.2.3 RUN apt-get update -qq && \ apt-get install -y apt-utils \ build-essential \ libpq-dev \ nodejs \ mysql-client RUN mkdir /app WORKDIR /app ADD ./src/Gemfile /app/Gemfile ADD ./src/Gemfile.lock /app/Gemfile.lock RUN bundle install -j4 ADD ./src /app EXPOSE 3000 # 次の行は本番環境でしか実行されない CMD ["unicorn", "-p", "3000", "-c", "/app/config/unicorn.rb", "-E", "production"]mysql
docker/mysql/DockerfileFROM mysql:5.7 RUN apt-get update && \ apt-get install -y apt-utils \ locales && \ rm -rf /var/lib/apt/lists/* && \ echo "ja_JP.UTF-8 UTF-8" > /etc/locale.gen && \ locale-gen ja_JP.UTF-8 ENV LC_ALL ja_JP.UTF-8 ADD ./docker/mysql/charset.cnf /etc/mysql/conf.d/charset.cnfそれぞれのコンテナのコマンドやファイルのコピー、ライブラリの更新などは
Dockerfileに記述するようなイメージがあります。
また、ローカルのdockerではコマンドが動いても本番では動かない、もしくはその逆が度々あったので、railsのDockerfileにはCMDの記述がされています。その他のファイル
nginx
docker/nginx/development/default.confupstream unicorn { # productionではserver以降が 127.0.0.1:3000 になる server unix:/share/unicorn.sock; } server { listen 80 default_server; server_name localhost; root /app/public; try_files $uri/index.html $uri @unicorn; proxy_connect_timeout 600; proxy_read_timeout 600; proxy_send_timeout 600; location @unicorn { proxy_set_header X-Real-IP $remote_addr; proxy_set_header X-Forwarded-For $proxy_add_x_forwarded_for; proxy_set_header Host $http_host; proxy_pass http://unicorn; } }docker/nginx/nginx.confuser nginx; worker_processes 1; error_log /var/log/nginx/error.log warn; pid /var/run/nginx.pid; events { worker_connections 1024; } http { include /etc/nginx/mime.types; default_type application/octet-stream; log_format main '$remote_addr - $remote_user [$time_local] "$request" ' '$status $body_bytes_sent "$http_referer" ' '"$http_user_agent" "$http_x_forwarded_for"'; access_log /var/log/nginx/access.log main; sendfile on; keepalive_timeout 600; include /etc/nginx/conf.d/*.conf; }ここでのポイントは
default.confの2行目の記述と、それぞれのファイルのtimeoutの時間設定です。
この2点が今回ハマって、かなりの時間を奪われたポイントでした。1. ソケットファイル
default.conf(抜粋)upstream unicorn { # productionではserver以降が 127.0.0.1:3000 になる server unix:/share/unicorn.sock; }developmentではbusyboxを使ったストレージ共有で、ソケットファイルを準備していました。
nginxとrails(unicorn)の両方から、同じソケットファイルを見ることで繋げるようなイメージですが、本番環境ではストレージの共有ができず、直接ローカルIPとポート127.0.0.1:3000を指定したら動きました。2. タイムアウト
default.conf(抜粋)proxy_connect_timeout 600; proxy_read_timeout 600; proxy_send_timeout 600;nginx.conf(抜粋)keepalive_timeout 600;railsサーバーやRDSへの接続には少なからず時間がかかります。
キャッシュが効き始めれば読み込み速度は大きく向上するのですが、初回アクセス時などは504 Gateway Time-Outのエラーになることも多くありました。
そのため、タイムアウトまでの時間を伸ばしました。
デフォルトは60秒などで設定されていると思います。mysql
docker/mysql/charset.cnf[mysqld] character-set-server=utf8mb4 collation-server=utf8mb4_general_ci [client] default-character-set=utf8mb4docker/mysql/password.ymlversion: '2' services: password: environment: MYSQL_ROOT_PASSWORD: ルートパスワード TZ: "Asia/Tokyo"セキュアな情報はできるだけコード上には書きたくなかったのですが、最低限環境変数として管理できるようにしました。
運用段階までにはもう少し改善したいです。railsソース側の変更
unicornというgemの設定と、mysqlとRDSを使い分けるための設定をします。unicorn
unicornはrailsのアプリケーションサーバとnginxのwebサーバを繋げるためのpassengerのようなモジュールの位置付けです。
単体でもサーバとして使えるらしいです。src/Gemfile# 追記 gem "unicorn"bundle installインストールが完了したら、早速設定ファイルを編集します。
src/configディレクトリにunicorn.rbファイルがない場合は作ります。src/config/unicorn.rbworker_processes 2 pid "/var/run/unicorn.pid" # developmentとproductionで場合分け if ENV['RAILS_ENV'] == 'production' listen 3000 else listen "/share/unicorn.sock" end # タイムアウトまでの時間を伸ばす timeout 600ここでも先程のnginxと同じように、開発環境と本番環境の場合分け、タイムアウトの設定をしています。
特にlistenの値はdefault.confと設定がズレていると起動後に上手く繋がらないので、ご注意ください。mysql
src/config/database.ymldefault: &default adapter: mysql2 encoding: utf8 pool: 5 timeout: 5000 development: <<: *default username: 開発環境のユーザー名 password: <%= ENV['MYSQL_ROOT_PASSWORD'] %> database: 開発環境のデータベース名 host: db production: <<: *default host: <%= ENV['DB_HOST'] %> username: <%= ENV['DB_USERNAME'] %> password: <%= ENV['DB_PASSWORD'] %> database: <%= ENV['DB_DATABASE'] %>
Dockerfileやpassword.ymlで設定してきた環境変数がここで読み込まれていきます。
developmentのhostで指定しているdbというのはdocker-compose.ymlでデータベースに設定しているサービス名です。
別の名前に設定している場合はそちらの名前にしてください。ビルドと起動
やっと動かす段階です。
dockerを起動しておいてください。
また、3000番ポート、3306番ポートを使うので、他で使っていれば、そちらを停止しておきます。
プロジェクトのルートディレクトリでコマンドを打ちます。ビルドdocker-compose -f docker-compose.development.yml -p development buildデータベース作成(初回のみ)docker-compose -f docker-compose.development.yml -p development run --rm web rake db:createマイグレート(変更があった場合のみ)docker-compose -f docker-compose.development.yml -p development run --rm web rake db:migrate起動docker-compose -f docker-compose.development.yml -p development up -dこれでブラウザで
localhostにアクセスすると、railsのホーム画面が見られると思います。
ちなみに、停止コマンドは以下です。停止docker-compose -f docker-compose.development.yml -p development stop
docker-compose -f docker-compose.development.yml -p developmentは共通なので、お使いのshellでエイリアスに登録してもいいかと思います。
当方の設定を参考に載せておきます。.zshrcalias dcdev='docker-compose -f docker-compose.development.yml -p development' # コンテナ全削除 alias drm='docker rm $(docker ps -q -a) -f' # イメージ全削除 alias dirm='docker rmi $(docker images -q) -f'次回、AWS編へ続きます。

- 投稿日:2019-08-22T14:29:32+09:00
ECS FargateでRails動かそうとして2ヶ月かかって手元に残ったもの【1.docker編】
弊社の基幹システムをVPSからAWSに移行するにあたって、まずはrailsを動かしてみる、という段階で無事に死にました☆
今後のための備忘録です。やりたいこと
こんな感じ。今回やったこと
ファイル構成
プロジェクトルート
  ├ docker
  │  ├ mysql
  │  │  ├ volumes
  │  │  │  └ ※mysqlの永続化に使う。後述
  │  │  ├ charset.cnf
  │  │  ├ password.yml
  │  │  └ Dockerfile
  │  ├ nginx
  │  │  ├ development
  │  │  │  ├ default.conf
  │  │  │  └ Dockerfile
  │  │  ├ production
  │  │  │  ├ default.conf
  │  │  │  └ Dockerfile
  │  │  └ nginx.conf
  │  └ rails
  │     └ Dockerfile
  ├ src
  │  └ ※railsアプリのソースをここに置きます。後述
  ├ .gitignore
  ├ buildspec.yml
  ├ docker-compose.common.yml
  ├ docker-compose.development.yml
  ├ docker-compose.production.yml
  └ README.md
開発環境と本番環境で
docker-composeの内容にかなり差があるので、ファイルを分けています。
共通する内容はdocker-compose.common.ymlに記述して、なるべく助長化を防ぎます。
ただし、nginxのDockerfileに関しては環境ごとにほぼ同じ内容でファイルを分けて作っています。これも後述しますが、最後までハマり続けたポイントを解決するための苦肉の策です。
docker-compose
docker-compose.common.ymlversion: '2' services: server: environment: TZ: Asia/Tokyo ports: - '80:80' web: build: context: . dockerfile: ./docker/rails/Dockerfile ports: - '3000:3000' volumes: - ./src:/app extends: file: ./docker/mysql/password.yml service: password db: build: context: . dockerfile: ./docker/mysql/Dockerfile ports: - '3306:3306' extends: file: ./docker/mysql/password.yml service: passworddocker-compose.development.ymlversion: '2' services: datastore: image: busybox volumes: - /share - ./docker/mysql/volumes:/var/lib/mysql server: build: context: . dockerfile: ./docker/nginx/development/Dockerfile extends: file: docker-compose.common.yml service: server volumes_from: - datastore depends_on: - datastore web: extends: file: docker-compose.common.yml service: web command: bundle exec unicorn -p 3000 -c /app/config/unicorn.rb volumes_from: - datastore depends_on: - db db: extends: file: docker-compose.common.yml service: db volumes_from: - datastore depends_on: - datastoredocker-compose.production.ymlversion: '2' services: server: build: context: . dockerfile: ./docker/nginx/production/Dockerfile extends: file: docker-compose.common.yml service: server web: extends: file: docker-compose.common.yml service: web depends_on: - server environment: RAILS_ENV: production DB_HOST: ◯◯.△△.ap-northeast-1.rds.amazonaws.com DB_USERNAME: ユーザー名 DB_PASSWORD: パスワード DB_DATABASE: データベース名serviceで言えば、
development
- datastore → busybox
- server → nginx
- web → ruby(rails)
- db → mysql
production
- server → nginx
- web → ruby(rails)
といった構成になっています。
developmentのdatastoreでvolumesとしてローカルディレクトリのdocker/mysql/volumesを/var/lib/mysqlにマウントしています。
dockerはイメージを停止するとデータが消えてしまいますが、このようにすることで、開発環境のデータベースを永続化できます。
docker/mysql/volumesの中身は.gitignoreに設定して、git管理はしないようにしましょう。本番環境ではECS fargate上でストレージの共有ができるので
datastoreは不要です。
また、データベースはRDSを用いるのでdbも不要です。Dockerfile
nginx
docker/nginx/development/DockerfileFROM nginx:1.11 RUN apt-get update && \ apt-get install -y apt-utils \ locales && \ sed -i -e 's/# ja_JP.UTF-8/ja_JP.UTF-8/g' /etc/locale.gen && \ locale-gen ja_JP.UTF-8 ENV LANG ja_JP.UTF-8 ENV LC_TIME C ADD ./docker/nginx/nginx.conf /etc/nginx/nginx.conf # productionでは次の行のファイルパスが変わる ADD ./docker/nginx/development/default.conf /etc/nginx/conf.d/default.confrails
docker/rails/DockerfileFROM ruby:2.2.3 RUN apt-get update -qq && \ apt-get install -y apt-utils \ build-essential \ libpq-dev \ nodejs \ mysql-client RUN mkdir /app WORKDIR /app ADD ./src/Gemfile /app/Gemfile ADD ./src/Gemfile.lock /app/Gemfile.lock RUN bundle install -j4 ADD ./src /app EXPOSE 3000 # 次の行は本番環境でしか実行されない CMD ["unicorn", "-p", "3000", "-c", "/app/config/unicorn.rb", "-E", "production"]mysql
docker/mysql/DockerfileFROM mysql:5.7 RUN apt-get update && \ apt-get install -y apt-utils \ locales && \ rm -rf /var/lib/apt/lists/* && \ echo "ja_JP.UTF-8 UTF-8" > /etc/locale.gen && \ locale-gen ja_JP.UTF-8 ENV LC_ALL ja_JP.UTF-8 ADD ./docker/mysql/charset.cnf /etc/mysql/conf.d/charset.cnfそれぞれのコンテナのコマンドやファイルのコピー、ライブラリの更新などは
Dockerfileに記述するようにしています。
ただ、ローカルのdockerではコマンドが動いても本番では動かない、もしくはその逆が度々あったので、railsのDockerfileにはCMDの記述がされていたりしますが、productionでしか使わないコマンドがDockerfileに書いてあるのは気持ち悪い気がするので、ここは後々修正したいです。その他のファイル
nginx
docker/nginx/development/default.confupstream unicorn { # productionではserver以降が 127.0.0.1:3000 になる server unix:/share/unicorn.sock; } server { listen 80 default_server; server_name localhost; root /app/public; try_files $uri/index.html $uri @unicorn; proxy_connect_timeout 600; proxy_read_timeout 600; proxy_send_timeout 600; location @unicorn { proxy_set_header X-Real-IP $remote_addr; proxy_set_header X-Forwarded-For $proxy_add_x_forwarded_for; proxy_set_header Host $http_host; proxy_pass http://unicorn; } }docker/nginx/nginx.confuser nginx; worker_processes 1; error_log /var/log/nginx/error.log warn; pid /var/run/nginx.pid; events { worker_connections 1024; } http { include /etc/nginx/mime.types; default_type application/octet-stream; log_format main '$remote_addr - $remote_user [$time_local] "$request" ' '$status $body_bytes_sent "$http_referer" ' '"$http_user_agent" "$http_x_forwarded_for"'; access_log /var/log/nginx/access.log main; sendfile on; keepalive_timeout 600; include /etc/nginx/conf.d/*.conf; }ここでのポイントは
default.confの2行目の記述と、それぞれのファイルのtimeoutの時間設定です。
この2点が今回ハマって、かなりの時間を奪われたポイントでした。1. ソケットファイル
default.conf(抜粋)upstream unicorn { # productionではserver以降が 127.0.0.1:3000 になる server unix:/share/unicorn.sock; }developmentではbusyboxを使ったストレージ共有で、ソケットファイルを準備していました。
nginxとrails(unicorn)の両方から、同じソケットファイルを見ることで繋げるようなイメージですが、本番環境ではストレージの共有ができず、直接ローカルIPとポート127.0.0.1:3000を指定したら動きました。なるべく助長なファイル構成は避けたかったのですが、nginxの設定ファイルに環境変数などを読み込ませることが手間だったので、このファイルは開発環境と本番環境でほとんど同じ内容なのですが、環境ごとにファイルを分けて対応しています。
2. タイムアウト
default.conf(抜粋)proxy_connect_timeout 600; proxy_read_timeout 600; proxy_send_timeout 600;nginx.conf(抜粋)keepalive_timeout 600;railsサーバーやRDSへの接続には少なからず時間がかかります。
キャッシュが効き始めれば読み込み速度は大きく向上するのですが、初回アクセス時などは504 Gateway Time-Outのエラーになることも多くありました。
そのため、タイムアウトまでの時間を伸ばしました。
デフォルトは60秒などで設定されていると思います。mysql
docker/mysql/charset.cnf[mysqld] character-set-server=utf8mb4 collation-server=utf8mb4_general_ci [client] default-character-set=utf8mb4docker/mysql/password.ymlversion: '2' services: password: environment: MYSQL_ROOT_PASSWORD: ルートパスワード TZ: "Asia/Tokyo"セキュアな情報はできるだけコード上には書きたくなかったのですが、最低限環境変数として管理できるようにしました。
運用段階までにはもう少し改善したいです。railsソース側の変更
当方は複数のrailsアプリケーションを管理する必要があったので、docker関連のファイルを容易に使い回せるように、あえてrailsアプリケーションのソースはsrcディレクトリに分けて配置しています。
ここではunicornというgemの設定と、mysqlとRDSを使い分けるための設定をします。unicorn
unicornはrailsのアプリケーションサーバとnginxのwebサーバを繋げるためのpassengerのようなモジュールの位置付けです。
単体でもサーバとして使えるらしいです。src/Gemfile# 追記 gem "unicorn"bundle installインストールが完了したら、早速設定ファイルを編集します。
src/configディレクトリにunicorn.rbファイルがない場合は作ります。src/config/unicorn.rbworker_processes 2 pid "/var/run/unicorn.pid" # developmentとproductionで場合分け if ENV['RAILS_ENV'] == 'production' listen 3000 else listen "/share/unicorn.sock" end # タイムアウトまでの時間を伸ばす timeout 600ここでも先程のnginxと同じように、開発環境と本番環境の場合分け、タイムアウトの設定をしています。
特にlistenの値はdefault.confと設定がズレていると起動後に上手く繋がらないので、ご注意ください。mysql
src/config/database.ymldefault: &default adapter: mysql2 encoding: utf8 pool: 5 timeout: 5000 development: <<: *default username: 開発環境のユーザー名 password: <%= ENV['MYSQL_ROOT_PASSWORD'] %> database: 開発環境のデータベース名 host: db production: <<: *default host: <%= ENV['DB_HOST'] %> username: <%= ENV['DB_USERNAME'] %> password: <%= ENV['DB_PASSWORD'] %> database: <%= ENV['DB_DATABASE'] %>
Dockerfileやpassword.ymlで設定してきた環境変数がここで読み込まれていきます。
developmentのhostで指定しているdbというのはdocker-compose.ymlでデータベースに設定しているサービス名です。
別の名前に設定している場合はそちらの名前にしてください。ビルドと起動
やっと動かす段階です。
dockerを起動しておいてください。
また、3000番ポート、3306番ポートを使うので、他で使っていれば、そちらを停止しておきます。
プロジェクトのルートディレクトリでコマンドを打ちます。ビルドdocker-compose -f docker-compose.development.yml -p development buildデータベース作成(初回のみ)docker-compose -f docker-compose.development.yml -p development run --rm web rake db:createマイグレート(変更があった場合のみ)docker-compose -f docker-compose.development.yml -p development run --rm web rake db:migrate起動docker-compose -f docker-compose.development.yml -p development up -dこれでブラウザで
localhostにアクセスすると、railsのホーム画面が見られると思います。
ちなみに、停止コマンドは以下です。停止docker-compose -f docker-compose.development.yml -p development stop
docker-compose -f docker-compose.development.yml -p developmentは共通なので、お使いのshellでエイリアスに登録してもいいかと思います。
当方の設定を参考に載せておきます。.zshrcalias dcdev='docker-compose -f docker-compose.development.yml -p development' # コンテナ全削除 alias drm='docker rm $(docker ps -q -a) -f' # イメージ全削除 alias dirm='docker rmi $(docker images -q) -f'ここまででできたこと
- 投稿日:2019-08-22T14:03:43+09:00
dockerとdumpファイル
hostnameは
docker-compose psもしくはcontainer_namedocker-compose run <host_name> mysql -u root -p<pass> -h <host_name> database_development < ./database.dump docker-compose run db psql -h db -U postgres -d xxx_docker < dumpfile.dump
- 投稿日:2019-08-22T10:55:51+09:00
Dockerでのjupyter notebook立ち上げの手順
Dockerでjupyter notebookに入るためにはポートの同期、マウントが必要です。
一連の流れに沿って自分が詰まった点とその解決法を共有いたします。Dockerをローカルと紐付けて、ポートを解放して起動
docker run -it -p 8888:8888 -v $(pwd):path/to/local path/to/docker bash
8888はDockerが共有できるポート
これが8000の場合、うまくポートが共有できずVMにアクセスできない。設定コンフィグ作成
jupyter notebook --generate-configvimインストール(もしVM上にvimが入ってなければ)
apt-get update
apt-get install vimvim内でコンフィグにポート解放書き込み
vi /root/.jupyter/jupyter_notebook_config.py
パスの部分は設定コンフィグ作成の時点で出たパスを入力する設定ファイルのの一番上に設定書き込み
c.NotebookApp.ip = '0.0.0.0'jupyter起動(--allow-rootはオプション)
jupyter notebook --allow-rootDockerの終了
ctrl + p -> ctrl + q起動しているDockerに入る
docker exec -it container_name bash
- 投稿日:2019-08-22T08:05:18+09:00
Docker の capability --cap-add 及び --cap-drop オプションについて調べた
メモ。
以下を読ませて頂きましたcapablity について詳しい訳ではないため、認識が異なった部分などあればご指摘頂けますと助かります。
TL:DR
- Linux には、root が持っている絶対的な権限を小分けにし、 細かくした権限をプロセスに与えられるようにする機構がある。その細かい権限のことを、ケーパビリティ(capablity)と呼ぶらしい ケーパビリティ で権限を少しだけ与える
- Docker ではデフォルトでいくつかの capability は有効化されている。具体的有効化されているものは公式ドキュメントに記載ありで
pscapコマンドでも確認出来る--cap-dropオプションを指定することでデフォルトで有効化されている capability を無効化出来る- 逆に
--cap-addオプションを指定することでデフォルトで無効化されている capability を有効化出来る--privilegedオプションを付与した場合、明示的に有効化されていない capability も利用でき、すべての capability が有効化されている--userオプションを指定した場合、capablity が無効化(?)されていた(Root 以外は基本的に capablity がないためだと思われます)環境
docker info
Containers: 59
 Running: 5
 Paused: 0
 Stopped: 54
Images: 27
Server Version: 18.06.1-ce
Storage Driver: overlay2
 Backing Filesystem: extfs
 Supports d_type: true
 Native Overlay Diff: true
Logging Driver: json-file
Cgroup Driver: cgroupfs
Plugins:
 Volume: local
 Network: bridge host macvlan null overlay
 Log: awslogs fluentd gcplogs gelf journald json-file logentries splunk syslog
Swarm: inactive
Runtimes: runc
Default Runtime: runc
Init Binary: docker-init
containerd version: 468a545b9edcd5932818eb9de8e72413e616e86e
runc version: 69663f0bd4b60df09991c08812a60108003fa340
init version: fec3683
Security Options:
 seccomp
  Profile: default
Kernel Version: 4.14.77-80.57.amzn2.x86_64
Operating System: Amazon Linux 2
OSType: linux
Architecture: x86_64
CPUs: 1
Total Memory: 985.7MiB
Name: ip-172-31-30-50.ap-northeast-1.compute.internal
ID: M5OF:USUI:CHU4:NPLX:6TPC:DJ52:6C6O:DEHT:2BUM:WDHN:DSCO:HFHD
Docker Root Dir: /var/lib/docker
Debug Mode (client): false
Debug Mode (server): false
Registry: https://index.docker.io/v1/
Labels:
Experimental: false
Insecure Registries:
 127.0.0.0/8
Live Restore Enabled: false
試す
--cap-drop
Runtime privilege and Linux capabilities
The following table lists the Linux capability options which are allowed by default and can be dropped.
と書いてあり、
CHOWNはデフォルトでは許可されている。$docker run -it ubuntu chown root:staff tmpデフォルトで許可されている capability を無効化する場合
--cap-dropを指定する。$docker run -it --cap-drop CHOWN ubuntu chown root:staff tmp chown: changing ownership of 'tmp': Operation not permittedcapability は
pscapで見れそうなので確認
Ubuntu の場合、apt-get install libcap-ng-utilsで良さそうlibcap-ng-utils_0.7.7-3.1_amd64.deb
# デフォルト
$docker run -it ubuntu /bin/bash
#apt-get update
#apt-get install libcap-ng-utils
#pscap -a
ppid  pid   name        command           capabilities
0     1     root        bash              chown, dac_override, fowner, fsetid, kill, setgid, setuid, setpcap, net_bind_service, net_raw, sys_chroot, mknod, audit_write, setfcap

# drop してみる
$docker run -it --cap-drop CHOWN ubuntu /bin/bash
#apt-get update
#apt-get install libcap-ng-utils
#pscap -a
ppid  pid   name        command           capabilities
0     1     root        bash              dac_override, fowner, fsetid, kill, setgid, setuid, setpcap, net_bind_service, net_raw, sys_chroot, mknod, audit_write, setfcap
確かに drop すると capability から
CHOWNが無くなっていた。ちなみに
--privilegedを付与するとどうなる?$docker run -it --privileged --cap-drop CHOWN ubuntu chown root:staff tmp成功してしまう
こちらもpscapで確認(細かいコマンドは除外)# privilledge を付与すると capability full となり、すべて許可される $docker run -it --privileged ubuntu /bin/bash # pscap -a ppid pid name command capabilities 0 1 root bash full # cap-drop しても full $docker run -it --privileged --cap-drop CHOWN ubuntu /bin/bash #pscap -a ppid pid name command capabilities 0 1 root bash fullなるほど。
ちなみに
--userオプションを変えるとどうなる?$docker run --user nobody -it ubuntu whoami nobody # ユーザーのみ指定。権限がないのでエラー $docker run --user nobody -it ubuntu chown root:staff tmp chown: changing ownership of 'tmp': Operation not permitted # priviledge をつけてもエラー $docker run --privileged --user nobody -it ubuntu chown root:staff tmp chown: changing ownership of 'tmp': Operation not permittedcapability も確認してみようと思ったが、入ってなかったのでさくっとイメージを作る。
(最初からこうすればよかった。。。)FROM ubuntu RUN apt-get update && apt-get install -y \ libcap-ng-utils$docker build -t pscap-ubuntu .確認。
# 何も出ない
$docker run --user nobody -it pscap-ubuntu pscap -a

# 何も出ない
$docker run --privileged  --user nobody -it pscap-ubuntu pscap -a
もしかすると root 以外は capablity はない?
root のプロセスは、基本的にはすべてのケーパビリティを持っていますが、 必要のないケーパビリティを外していくことで、 セキュリティを向上させることができます。
また、root でないプロセスは、基本的にはどのケーパビリティも持っていません。 ですが、実行するコマンドにケーパビリティが設定されている場合は、 そのケーパビリティを持つことができます。なるほど。
--cap-add
以下を参考にさせて頂き検証。
(ヽ´ω`) < Dockerで--cap-addオプションを試す
デフォルトで許可されていない
SYS_TIMEを利用。$docker run -it ubuntu date -s "2000/01/01 00:00:00" date: cannot set date: Operation not permitted Sat Jan 1 00:00:00 UTC 2000想定通り NG。
許可してみる$docker run -it --cap-add=SYS_TIME ubuntu date -s "2000/01/01 00:00:00"エラーが無くなった。
--privilegedを付与した場合も実行できてしまう$docker run -it --privileged ubuntu date -s "2000/01/01 00:00:00" Sat Jan 1 00:00:00 UTC 2000これは先程の検証の通り、
--priviledgeを付与することですべての capability が許可されるためだと思われる。