- 投稿日:2019-08-21T23:29:21+09:00
Swiftlintで警告がでないようにする
Swiftlintを導入すると、いろいろと警告を出してもらえるので便利な反面、エラーが出すぎるとエディタの可視性が悪くなります。
そこで警告を消す方法です。// swiftlint: disable type-body-length
- 投稿日:2019-08-21T22:41:18+09:00
React Native + React Navigation で、 Android の画面遷移アニメーションを iOS と同様にする
React Navigation の画面遷移のアニメーション、 Android だけよくわからない。
デフォルトだと、モーダルが重なるようになるが、 iOS のように左から右に進んでいくようにしたい。
めっちゃ簡単にできた。
import {
  createAppContainer,
  createStackNavigator,
  StackViewTransitionConfigs,
} from 'react-navigation'

const Navigation = createStackNavigator({
  screenA: ComponentA,
  screenB: ComponentB,
}, {
  mode: 'card',
  transitionConfig: () => StackViewTransitionConfigs.SlideFromRightIOS,
}

export const AppNavigation = createAppContainer(Navigation)
なんでこれがデフォルトじゃないんだ・・・笑

- 投稿日:2019-08-21T21:41:26+09:00
Unityでデータベースと連携させたい!(Firebase編)
Unityをデータベースと連携させたいなと思い、とりあえずFirebaseを使用してScoreデータを取得、更新し、Scoreの値によってSphereの色が変わるサンプルコンテンツを作成しました!
環境
PC: MacBook Air
debug: iPhone8 Plus参照記事
Unity の Firebase Realtime Database を使ってみる
How to use Firebase Database in Unity (REST API)
【Unity】スクリプトからGameObjectの色を変更する
Can't compile: BadImageFormatException
iOS10とXcode8でプロビジョニングファイルを求められた
以下作業手順
その1
Unityプロジェクトを作成し、バンドルID を取得
まずは適当にUnityプロジェクト(3D)を準備します
今回は最新正式リリースの2019.2.1f1を使用して新規プロジェクトを作成
iOSビルドは追加していなかったので、モジュール追加も実施
作成できたら、プロジェクトをクリックしてUnityで開き、プラットフォーム固有の ID を取得します
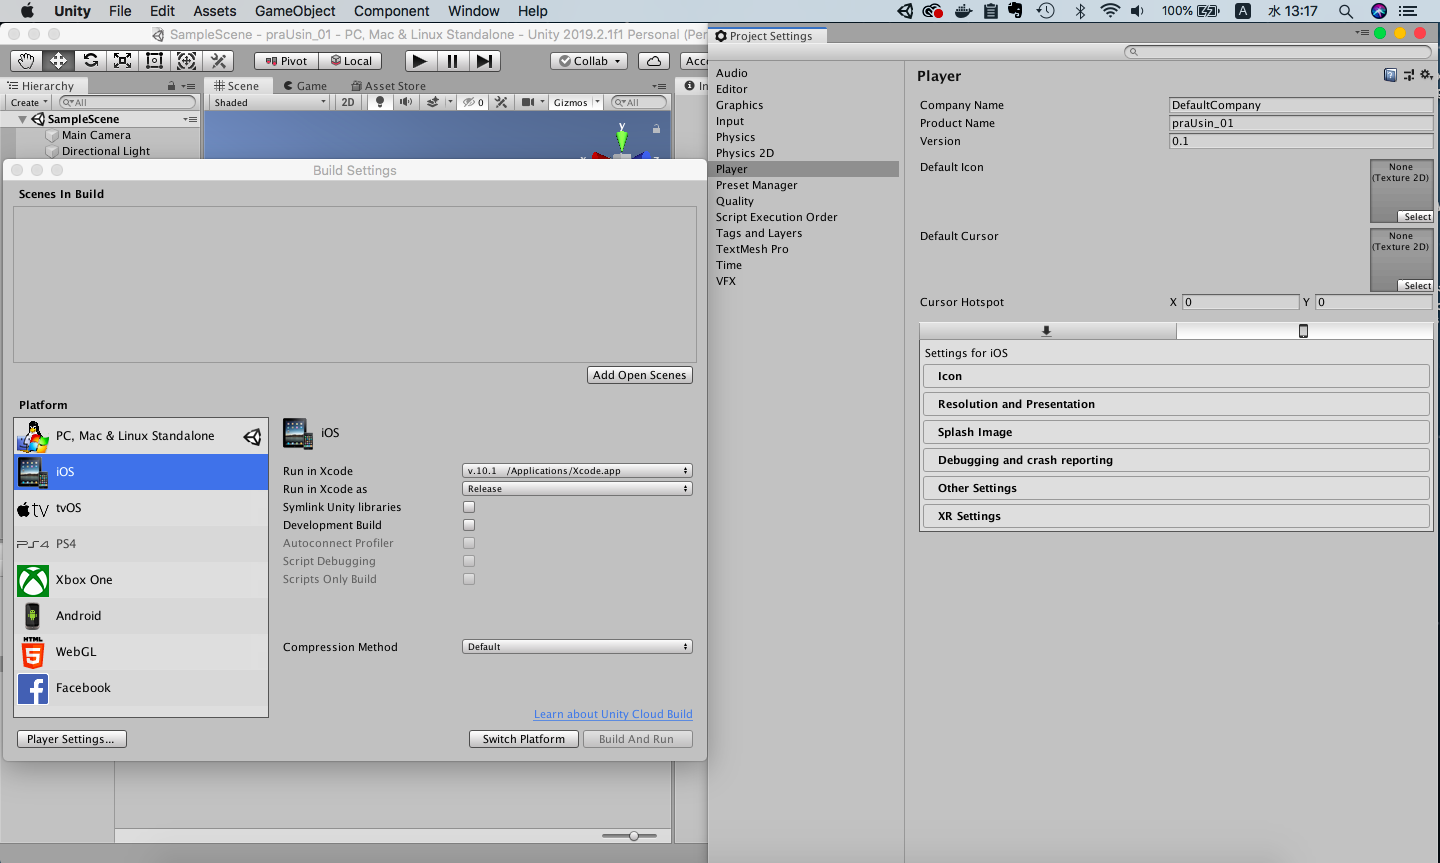
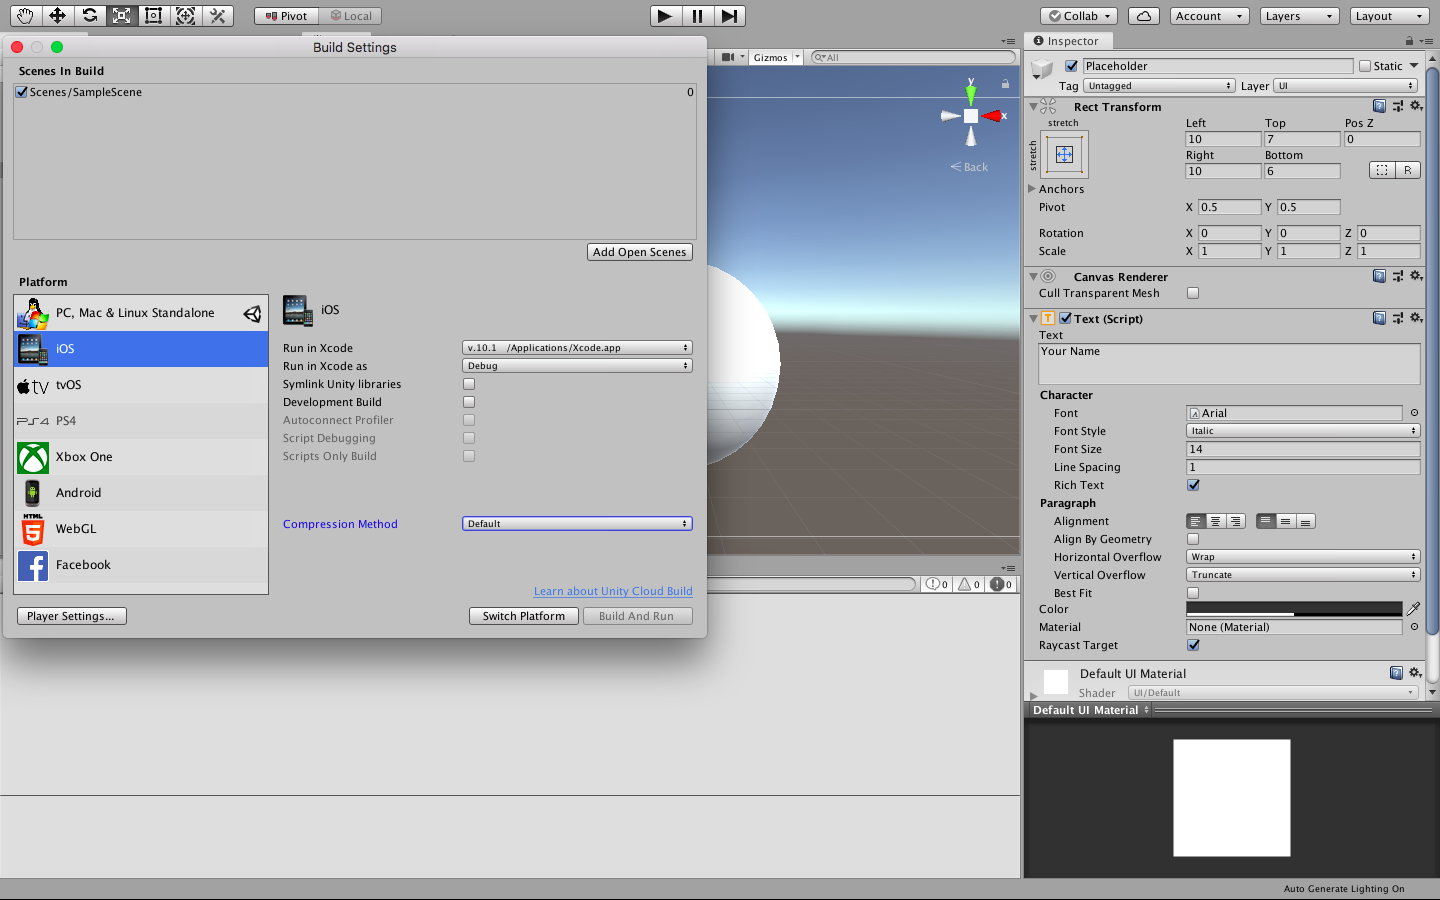
[File]->[Build Settings]でiOSプラットフォームを選択し、左下の[Player Settings...]を押下
[Player]タブの右下[Other Settings]をクリック
- [identification]欄の[Bundle Identifier]に記載されているバンドルID(cf:
com.DefaultCompany.sample01)をコピーしておくその2
Firebaseにプロジェクト追加
次に、Unityのデータベースとして使うFirebaseプロジェクトを作成します
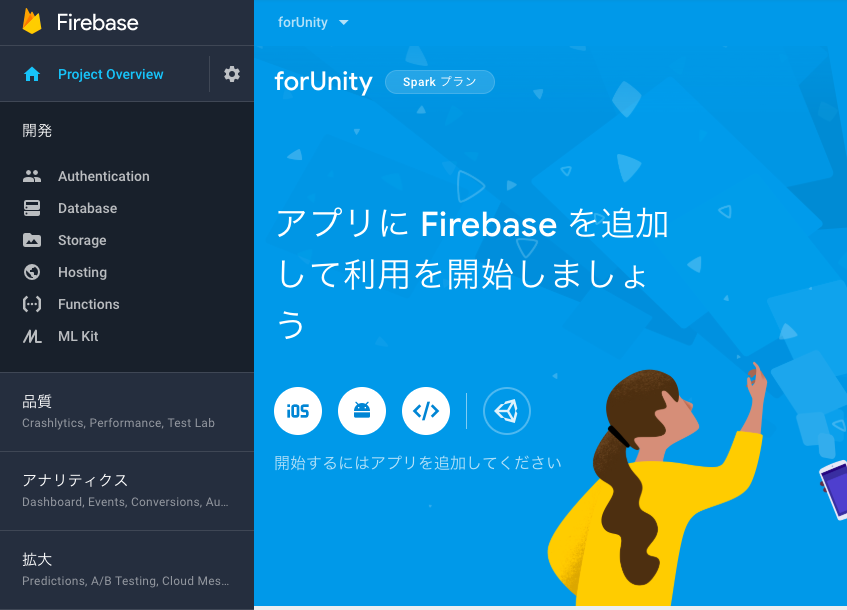
- Firebaseにプロジェクトを作成(今回は[forUnity]という名前で作成)
その3
FirebaseプロジェクトとUnityプロジェクトを連携
作成したFirebaseプロジェクトに、UnityプロジェクトのバンドルIDを登録します
- Firebaseのコンソール画面に入り、先ほど作成したFirebaseプロジェクト[forUnity]を選択し、「開始するにはアプリを〜」の上に表示されているUnityアイコンをクリック (もし、画面が違う場合、左上のメニューバーから[Project Overview]をクリックしてUnityアイコン表示画面に移動)
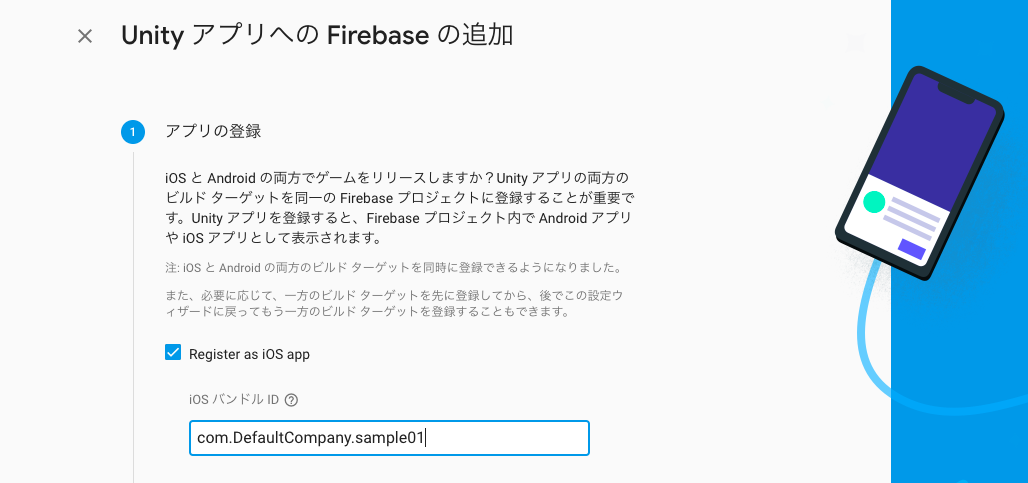
- [Register as iOS app]にチェックを入れ、先ほどUnityでコピーしておいたバンドルIDを[iOS バンドルID]の欄に貼り付け
適当にアプリのニックネームを入力(省略可だけど今回は[サンプルアプリ]と入力)し、 [アプリを登録]をクリック
[GoogleService-Info.plist をダウンロード]をクリックし、保存先を今回作成したUnityプロジェクトのAssets配下の任意の場所(今回はAssets配下にFirebaseというフォルダを作成してその中)に保存し、[次へ]をクリック
[Firebase Unity SDK をダウンロード] をクリックし、ダウンロードしたZIPファイルを適切な場所で解凍(プロジェクト固有のものじゃないので、今回はSSDのアセットストアのデータを保存しているディレクトリと同階層に解凍)
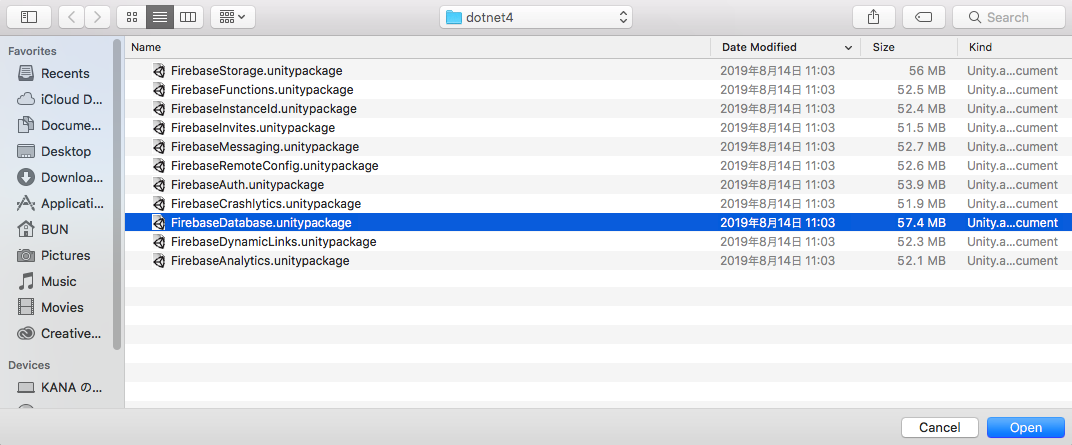
開いているUnityプロジェクトに行き、 [Assets]->[Import Package]->[Custom Package] をクリック、[dotnet4]->[FirebaseDatabase.unitypackage]を[open]
[Import Unity Package] ウィンドウが出てくるので[import]をクリック
Firebaseに戻り、[次へ]をクリックで FirebaseプロジェクトとUnityプロジェクトの連携完了なので、[Firebaseコンソールに進む]をクリック
その4
Firebaseでデータベースを準備
FirebaseでRealtime Databaseを作成します
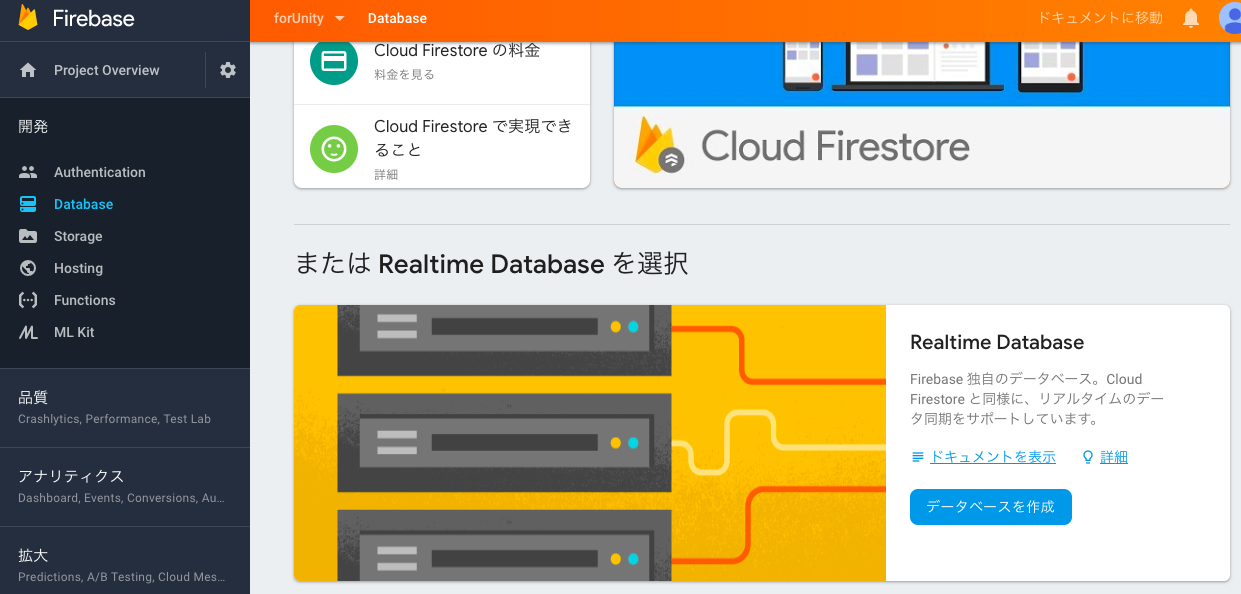
Firebaseコンソール画面左側メニューの[Database]をクリック
少しスクロールして、 [または Realtime Database を選択] の[データベースの作成]->[テストモードで開始](※)->[有効にする]
※今回は簡単に連携させてみたいだけなのでテストモードで作成しますprz
その5
Unity側でサンプルコンテンツを準備
UnityプロジェクトにFirebaseのデータベースと連携させるサンプルコンテンツを作成します
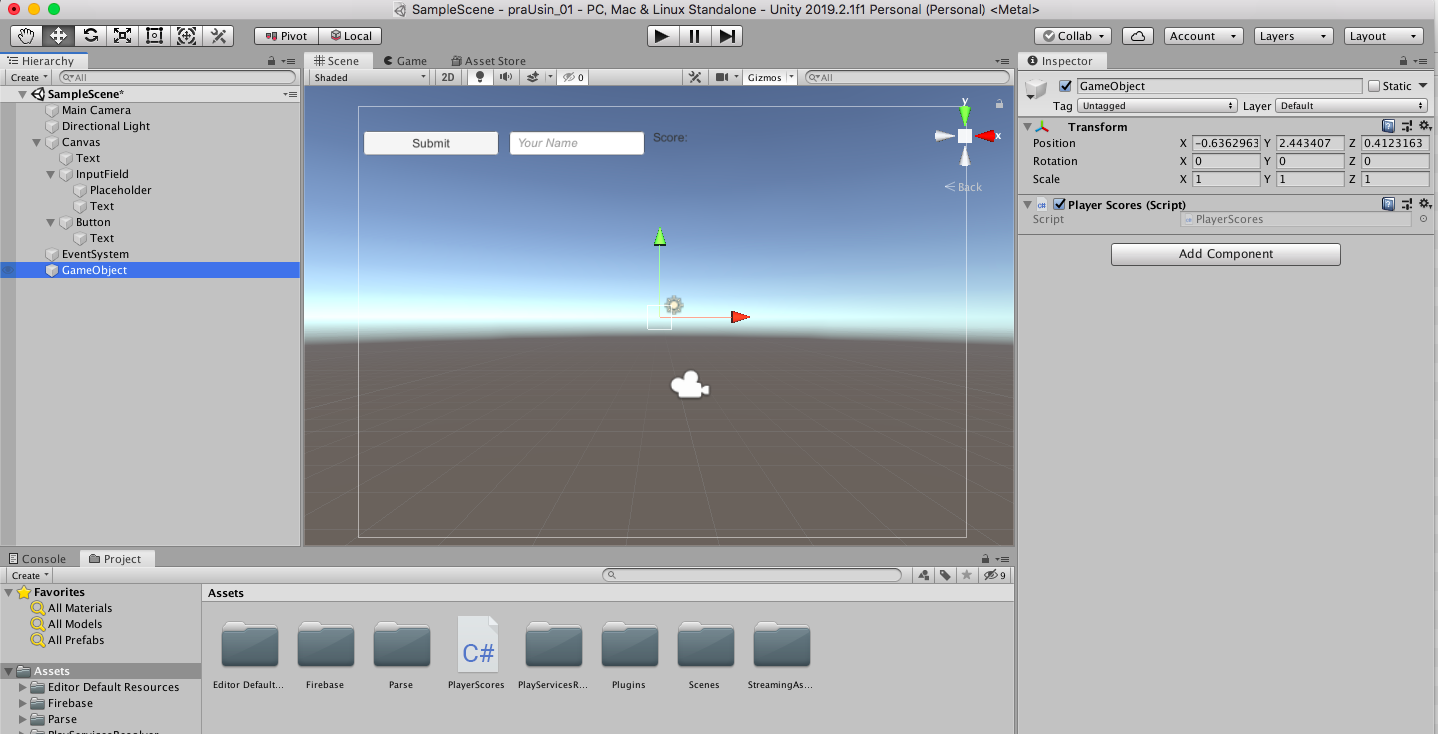
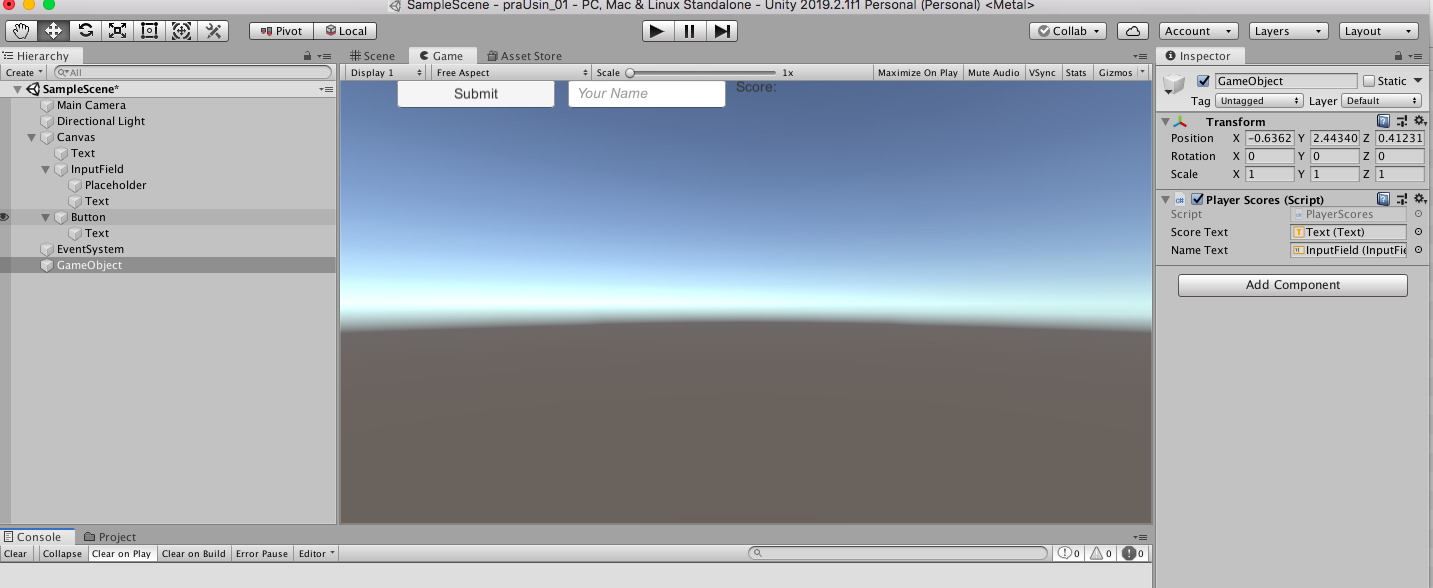
- [Create]->[UI] から、Text,Input Field,Buttonの3つを作成(w160,h30)し適当に横並びにする
- TextはTextを「Score:」,Input FieldはPlaceholderを「Your Name」,ButtonはTextを「Submit」に変更
- [Create]->[Create Empty]でGameObjectを作成し、[Add Component]から、「PlayerScores」と検索バーに入力し、[NewScript]->[Create and Add]をクリックし、PlayerScores という名前のスクリプトをGameObjectに作成&追加
- 作成した
PlayerScores.csを編集PlayerScores.csusing System.Collections; using System.Collections.Generic; using UnityEngine; using UnityEngine.UI; public class PlayerScores : MonoBehaviour { public Text scoreText; public InputField nameText; private System.Random random = new System.Random(); public static int playerScore; public static string playerName; // Start is called before the first frame update void Start() { playerScore = random.Next(0, 101); scoreText.text = "Score: " + playerScore; } public void OnSubmit(){ playerName = nameText.text; } }
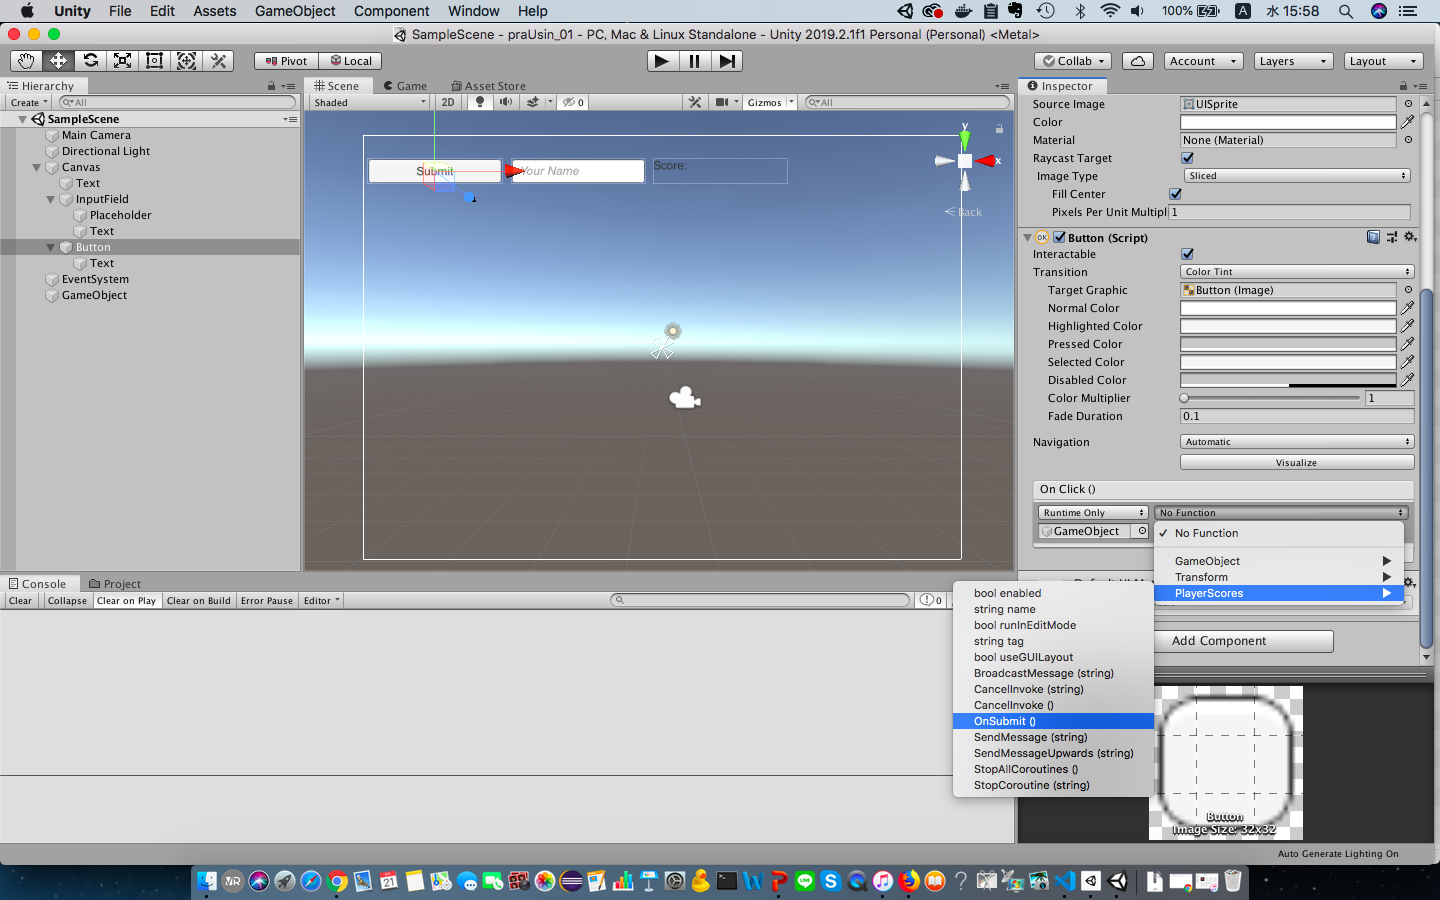
- ButtonのOnClick()にGameObjectをアサインし、PlayerScoresのOnSubmit()ファンクションを選択
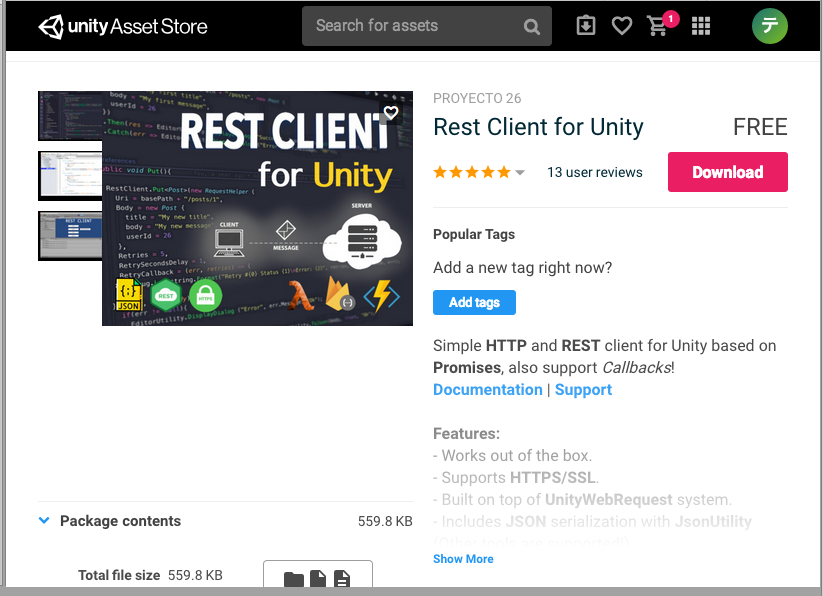
- 次に、REST APIを投げられるように、Rest Client for Unity をAssetStore で検索し [Download] and [Import]
- importまで完了したら、ProjectフォルダのAssetsのなかで、右クリックし、[Create]->[C# Script]で
User.csを作成し、下記のように編集User.csusing System; using System.Collections; using System.Collections.Generic; using UnityEngine; [Serializable] public class User { public string userName; public int userScore; public User(){ userName = PlayerScores.playerName; userScore = PlayerScores.playerScore; } }
PlayerScores.csも下記の箇所を編集PlayerScores.cspublic void OnSubmit(){ playerName = nameText.text; }↓ PostToDatabase()メソッドを追加し、OnSubmit()にも追記
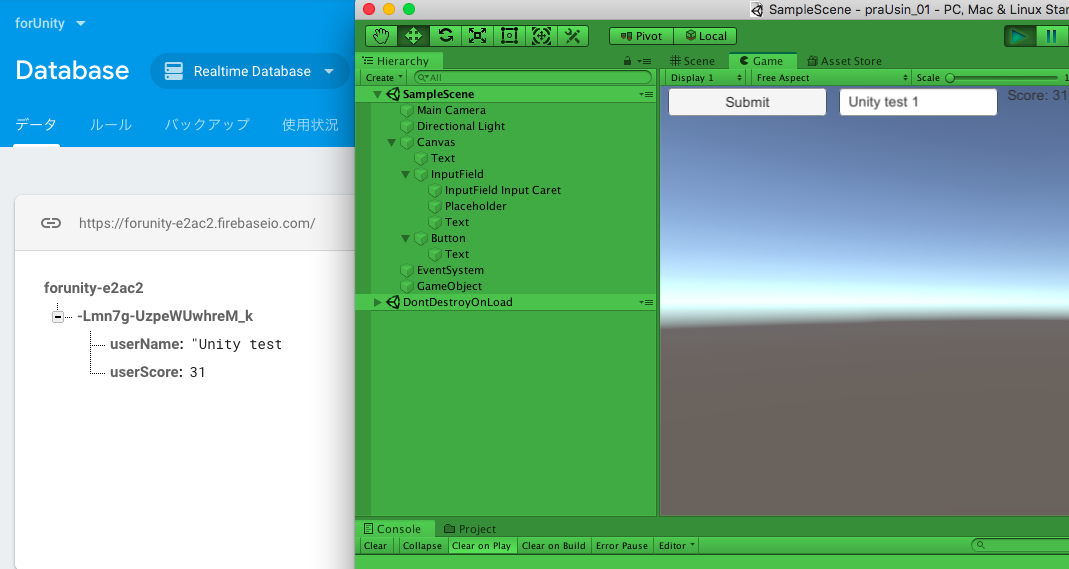
PlayerScores.cspublic void OnSubmit(){ playerName = nameText.text; PostToDatabase(); } private void PostToDatabase(){ User user = new User(); RestClient.Post("https://forunity-e2ac2.firebaseio.com/.json",user); }
- スクリプトの追加と修正が終わったら、GameObjectのPlayerScoresスクリプトのフィールドの部分に、Score TextにはScoreのTextオブジェクトを、Name TextにはInputFieldオブジェクトをそれぞれアサイン
- アサインできたら、Unityプロジェクトを実行し、Name欄に名前を入れて、Submitをクリックし、Firebaseのデータベースに値が入れば登録は成功
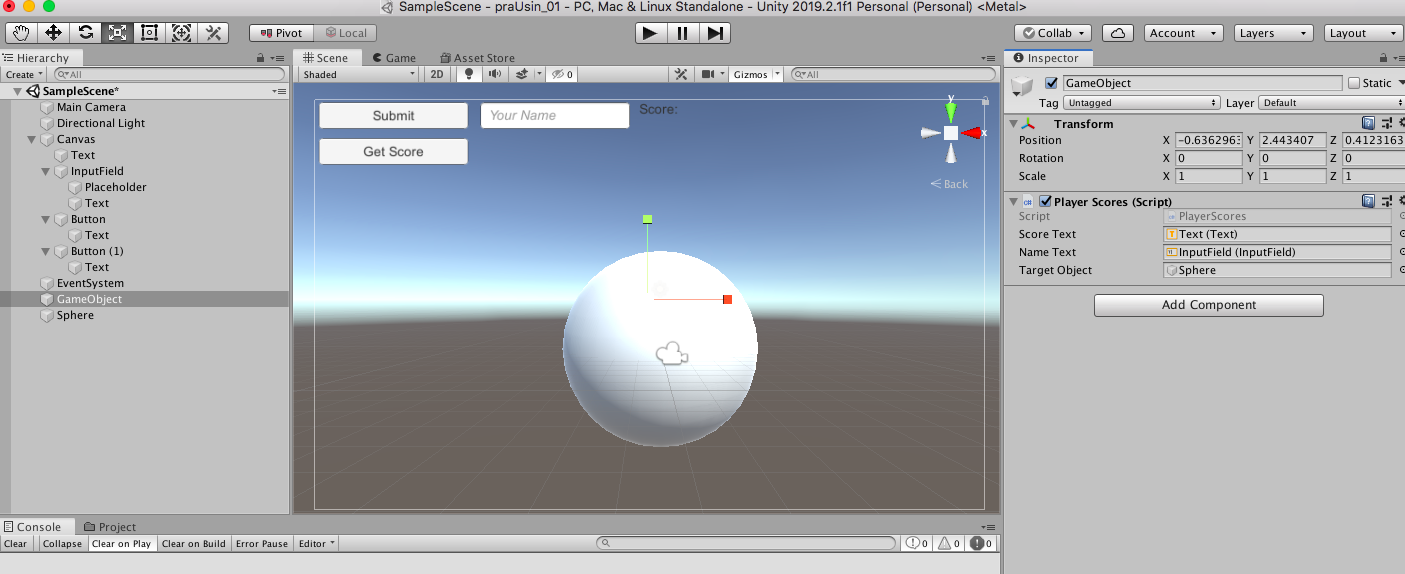
- 次に、firebaseからデータを取得するために、Buttonを複製し、Textを「Get Score」に変更
PlayerScores.csのPlayerScoresクラス配下にOnGetScore(),UpdateScore(),RetrieveFromDatabase()メソッドを追加し、 User user = new User();を上の方で宣言PlayerScores(修正後).csusing System.Collections; using System.Collections.Generic; using UnityEngine; using UnityEngine.UI; using Proyecto26; public class PlayerScores : MonoBehaviour { public Text scoreText; public InputField nameText; private System.Random random = new System.Random(); User user = new User(); public static int playerScore; public static string playerName; // Start is called before the first frame update void Start() { playerScore = random.Next(0, 101); scoreText.text = "Score: " + playerScore; } public void OnSubmit(){ playerName = nameText.text; PostToDatabase(); } public void OnGetScore(){ RetrieveFromDatabase(); } private void UpdateScore(){ scoreText.text = "Score: " + user.userScore; } private void PostToDatabase(){ User user = new User(); //PostではなくPutに変更し、playerNameの配下にデータが入るようにした RestClient.Put("https://forunity-e2ac2.firebaseio.com/"+ playerName +".json",user); } private void RetrieveFromDatabase(){ RestClient.Get<User>("https://forunity-e2ac2.firebaseio.com/"+ nameText.text +".json").Then(response => { user = response; UpdateScore(); }); } }
- Name欄に登録ずみのNameを入力し、[Get Store]でScoreの表示されている値が登録済みのものにさし変わったら、データの取得も完了!
最後に、Sphereを作成してscore値によって色を変化させる
PlayerScores.csのPlayerScoresクラス配下にChangeColorName()メソッドを追加し、public GameObject targetObject;を上の方で宣言し、UpdateScore(),PostToDatabase()に、引数にscoreを持たせてChangeColorName()を追記PlayerScores(修正後).csusing System.Collections; using System.Collections.Generic; using UnityEngine; using UnityEngine.UI; using Proyecto26; public class PlayerScores : MonoBehaviour { public Text scoreText; public InputField nameText; private System.Random random = new System.Random(); User user = new User(); public static int playerScore; public static string playerName; public GameObject targetObject; // Start is called before the first frame update void Start() { playerScore = random.Next(0, 101); scoreText.text = "Score: " + playerScore; } public void OnSubmit(){ playerName = nameText.text; PostToDatabase(); } public void OnGetScore(){ RetrieveFromDatabase(); } private void UpdateScore(){ scoreText.text = "Score: " + user.userScore; ChangeColorName(user.userScore); } private void PostToDatabase(){ User user = new User(); RestClient.Put("https://forunity-e2ac2.firebaseio.com/"+ playerName +".json",user); ChangeColorName(user.userScore); } private void RetrieveFromDatabase(){ RestClient.Get<User>("https://forunity-e2ac2.firebaseio.com/"+ nameText.text +".json").Then(response => { user = response; UpdateScore(); }); } private void ChangeColorName(int score){ //Debug.Log(score); if(score < 25){ // red targetObject.GetComponent<Renderer>().material.color = Color.red; } else if (score < 50){ // yellow targetObject.GetComponent<Renderer>().material.color = Color.yellow; } else if (score < 75){ // green targetObject.GetComponent<Renderer>().material.color = Color.green; } else { // blue targetObject.GetComponent<Renderer>().material.color = Color.blue; } } }
- [Create]->[3D Object]->[Sphere]でSphereを作成し、[GameObject]の[Target Object]にアサイン
- Sphereの色がScore値(0~100)によって下記仕様で色が変化すればOK
0~24: red
25~49: yellow
50~74: green
75~100: blue
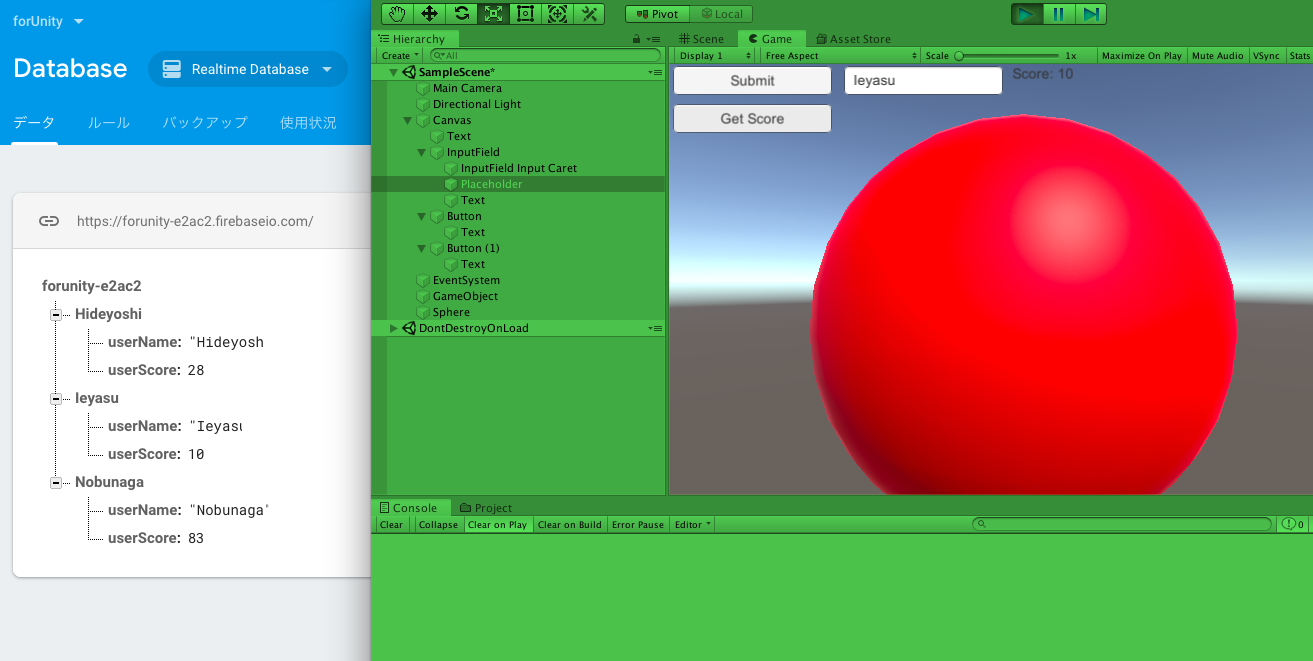
まず、確認しやすくするためFirebaseのデータベースに入っているテストデータをいったん削除
次に、Unityプロジェクトを実行し、Name欄に「Nobunaga」を入力して[Submit]し、Scoreに合った色であることを確認し実行解除、再度Unityプロジェクトを実行し、今度はName欄に「Ieyasu」を入力して[Submit]し、Scoreに合った色であることを確認
確認できたら、Name欄に「Nobunaga」を入力して[Get Score]、正しいScoreと色であることを確認し、続けてName欄に「Ieyasu」を入力して[Get Score]、正しいScoreと色であることも確認できたらサンプルコンテンツ完成
確認作業
iOSでビルドしてiPhone実機で確認
完成したUnityプロジェクトをiOS用にビルドして、実機で動作確認する
- まずは [File]->[Build Settings]からiOSを選択して[Switch Platform]、完了したら、Sceneが追加されてなかったら、[Add Open Scene]でSceneを追加してから、[Build And Run]をクリック
- 保存場所を聞かれるのでSSDのUnityプロジェクトのディレクトリ配下に適当な名前をつけて[Save]するとビルドが始まる
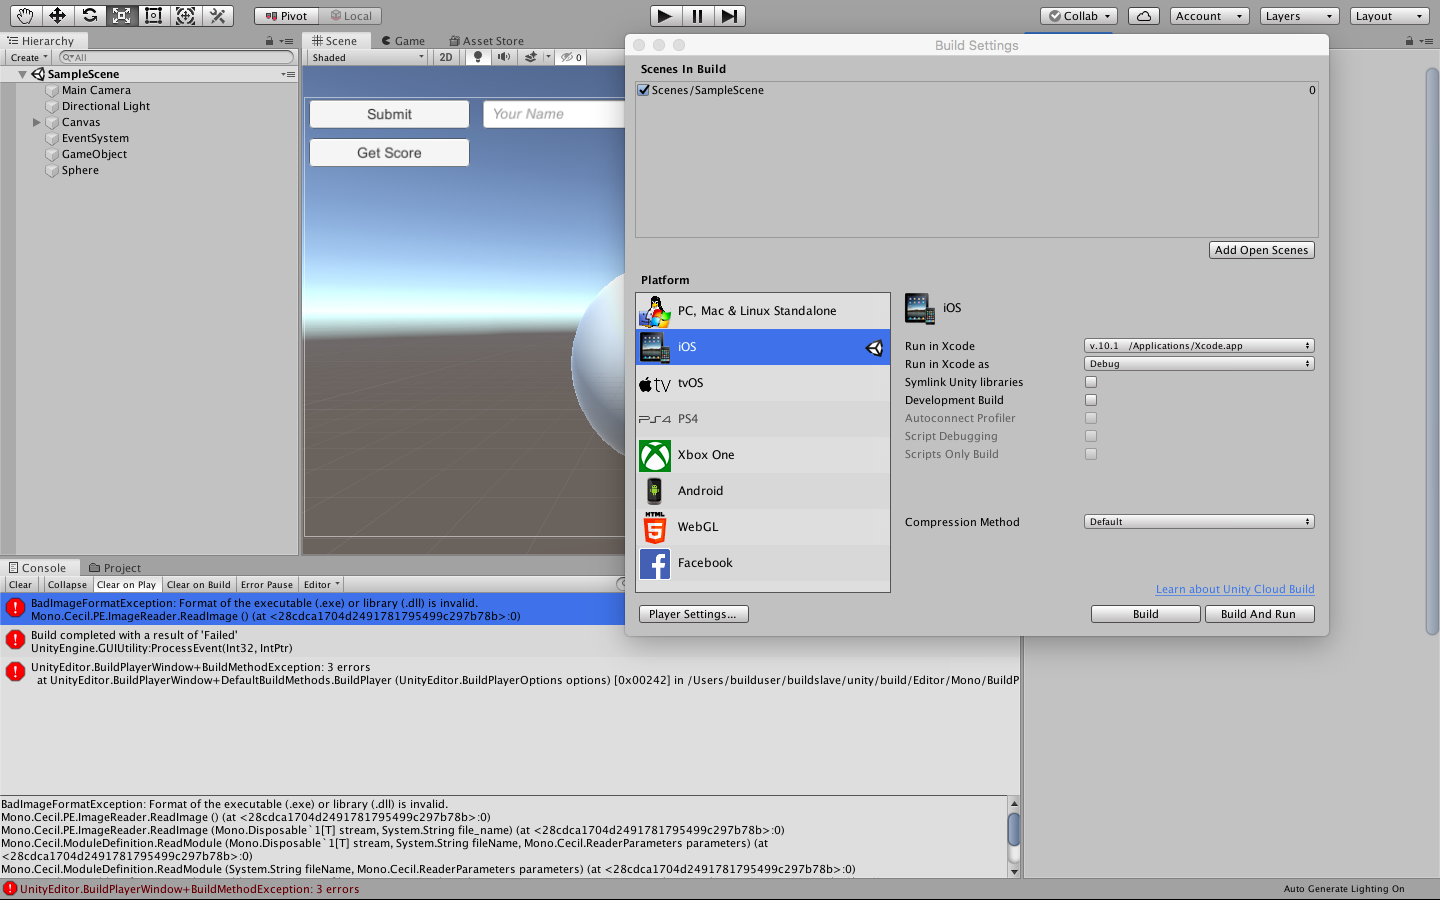
...エラー
BadImageFormatException: Format of the executable (.exe) or library (.dll) is invalid.
調べてみたところ、どうやら保存先が外付けなのがよくない模様。。
試しに、Save先をPC側にして再度実行してみた、、が、同様のエラーに。。なので今度はPC側に今回作成したUnityプロジェクトを丸っとコピーして、それをプロジェクトリストに追加してUnityエディタで開き、Unity上で問題なく動作することを確認してから、Save先をPC側にして再度実行
そしたら、Xcodeまでは無事行けたけれど、別のエラー
error: "Target名" requires a provisioning profile. Select a provisioning profile for the "Debug" build configuration in the project editor. (in target 'Target名')
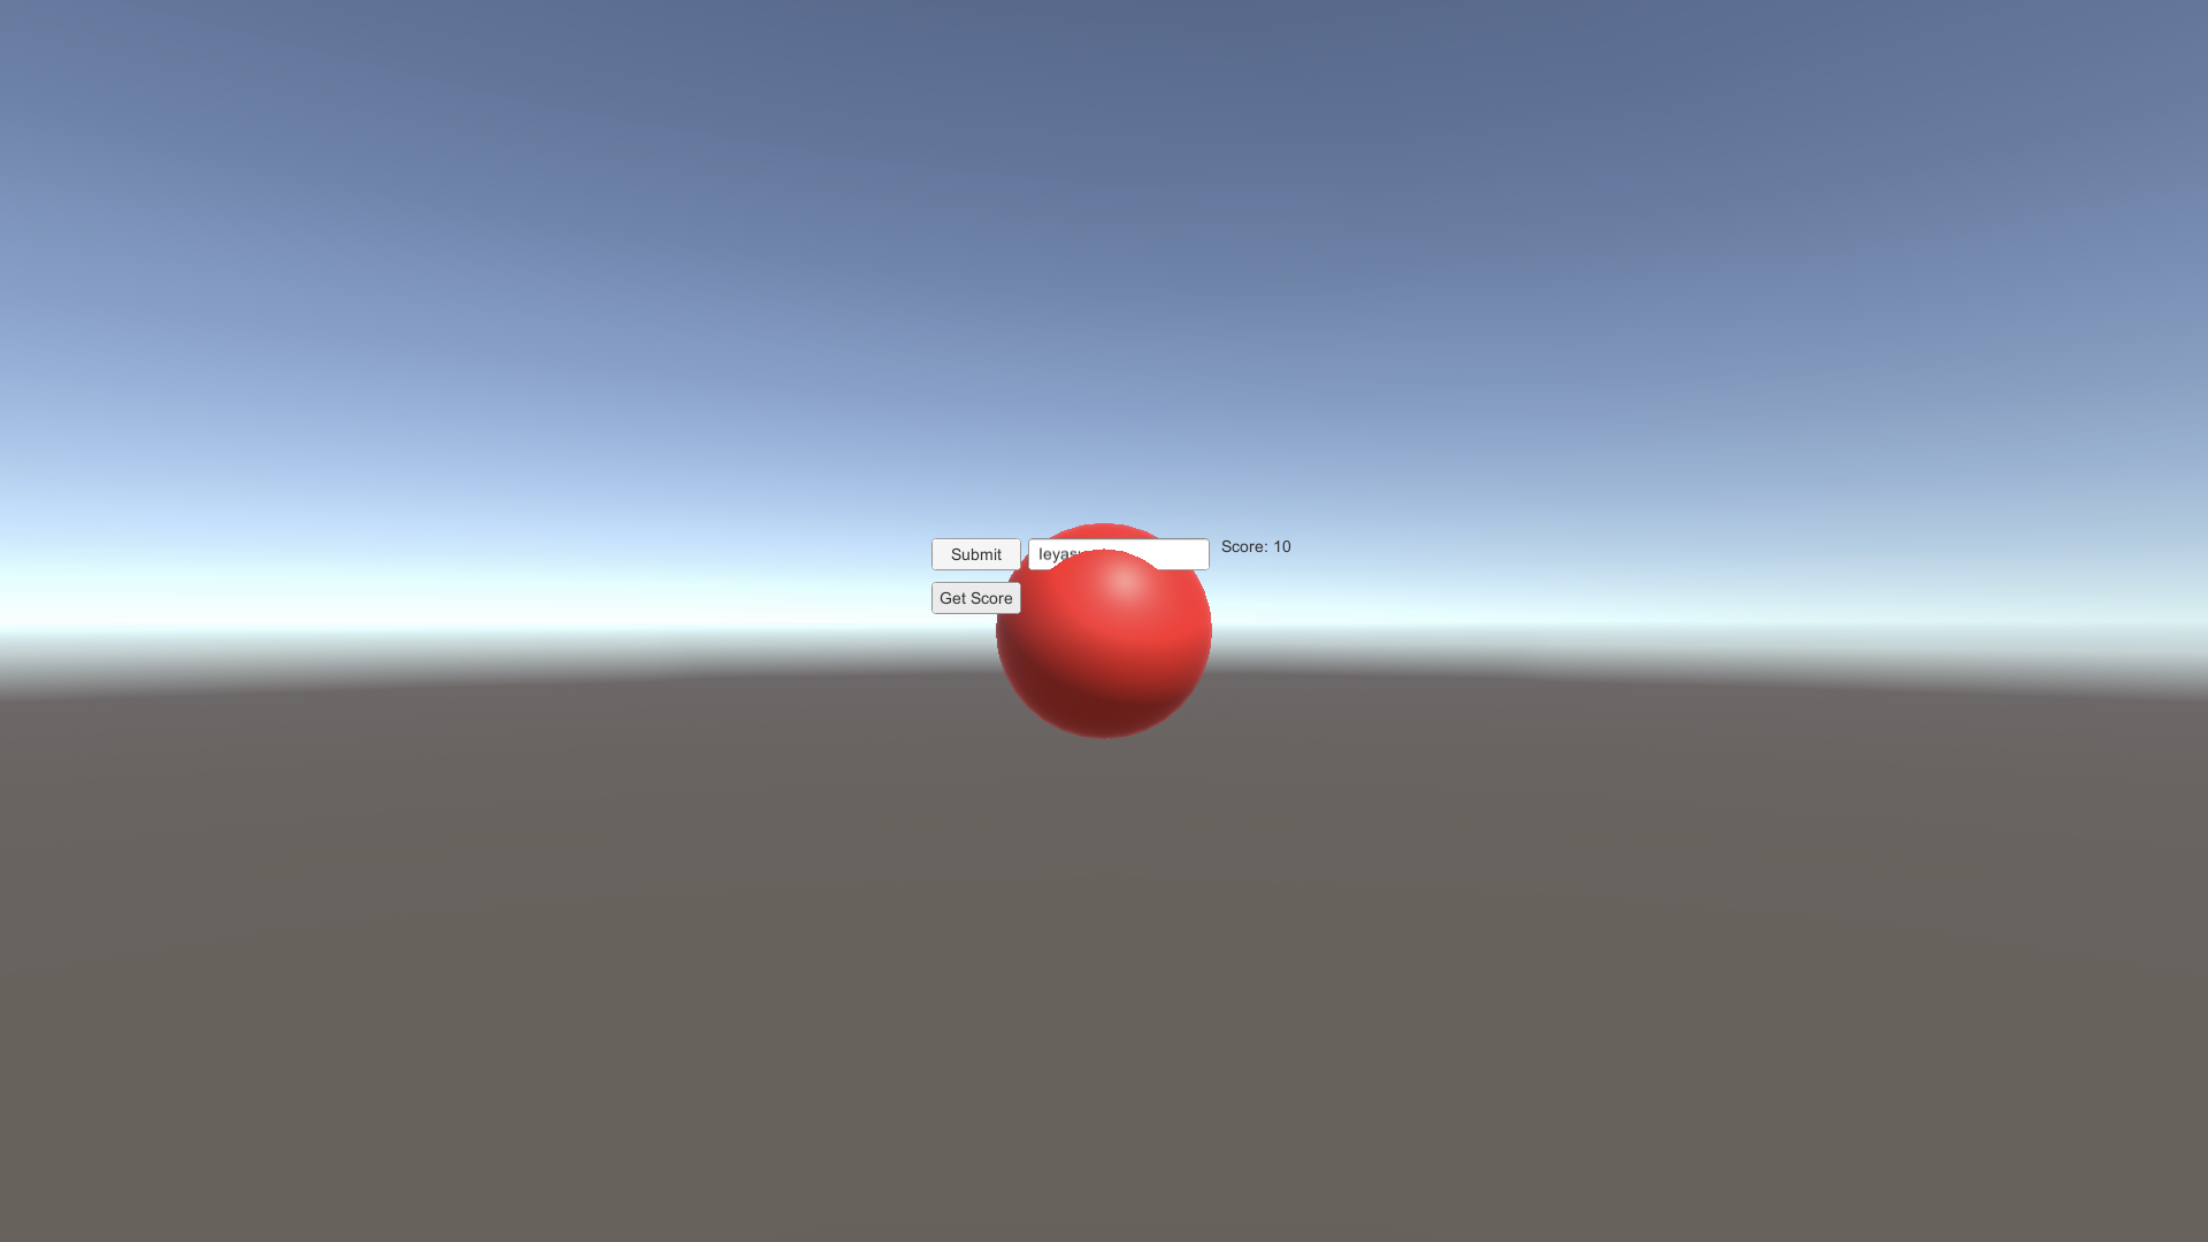
これについては、Targetの[General]タブの[Signing]の[Automatically]にチェックを入れて、適切なTeamを選択してから、再度実行(▶︎)マークを押したら、無事にiPhone実機で確認できました!
(※Sphereの位置がボタンとかよりも前過ぎたので、Unityで調節し直してから再度ビルドしたのですが、そこは本題ではないので割愛しますprz)
振り返り
またしてもSSD運用のデメリットが見つかってしまい悲しいです。。
とりあえず、 ビルドの段階になったら、Unityプロジェクトを丸っとPC側にコピーして、プロジェクトリストにPC側にコピーしたものを追加してUnityエディタで開く ↓ BuildのSave先もPC側を指定して、Build And Runして実機確認 ↓ 諸々デバッグ・調整完了したら、PC側の修正を丸っとSSD側にコピーして反映という運用で頑張ろうと思います。
コンテンツ自体はとても簡単なものではありますが、REST APIの部分でAssetを使ったこともあり、想像していたよりあっさり実装できたなと感じました。
今度は Rest Client for Unity を使わずに UnityWebRequest を使って実装してみたいです!
以上!→ UnityWebRequest版 実装しました! 【続】Unityでデータベースと連携させたい!(Firebase編)
以上!


- 投稿日:2019-08-21T21:04:23+09:00
ドキュメントはリリースノートもしっかり見たほうがいいよって話
経緯
初めて自作iOSアプリを作っていて、公式のドキュメントにしたがってGoogleログインを実装しているときに詰まったので備忘録。
Value of type 'GIDSignIn?' has no member 'presentViewController'ただSign inボタンを足したいだけだったのに
https://developers.google.com/identity/sign-in/ios/sign-in?ver=swift
Google先生の言いなりになって、
viewDidLoad()内に以下のメソッドを追加しました。LoginViewController.swiftoverride func viewDidLoad() { super.viewDidLoad() GIDSignIn.sharedInstance()?.presentingViewController = self // Automatically sign in the user. GIDSignIn.sharedInstance()?.restorePreviousSignIn() // ... }怒られました
ググった
検索結果: 2件
GIDSignIn
このクラスを探してみても、
presentingViewControllerはあるみたいですが、出てこず。
https://developers.google.com/identity/sign-in/ios/reference/Classes/GIDSignIn
ふと思った
あれ、そもそもなんで必要なんだっけ?
  GIDSignIn.sharedInstance()?.presentingViewController = self

  // Automatically sign in the user.
  GIDSignIn.sharedInstance()?.restorePreviousSignIn()

一旦無視することにした
使われていないんですかね。
一旦このまま進めることにします。追記
見つけてしまった。
このメソッドは廃止されたようでした?
https://developers.google.com/identity/sign-in/ios/release


- 投稿日:2019-08-21T21:04:23+09:00
Value of type 'GIDSignIn?' has no member 'presentViewController'
経緯
初めて自作iOSアプリを作っていて、公式のドキュメントにしたがってGoogleログインを実装しているときに詰まったので備忘録。
ただSign inボタンを足したいだけだったのに
https://developers.google.com/identity/sign-in/ios/sign-in?ver=swift
Google先生の言いなりになって、
viewDidLoad()内に以下のメソッドを追加しました。LoginViewController.swiftoverride func viewDidLoad() { super.viewDidLoad() GIDSignIn.sharedInstance()?.presentingViewController = self // Automatically sign in the user. GIDSignIn.sharedInstance()?.restorePreviousSignIn() // ... }怒られました
ググった
検索結果: 2件
GIDSignIn
このクラスを探してみても、
presentingViewControllerはあるみたいですが、出てこず。
https://developers.google.com/identity/sign-in/ios/reference/Classes/GIDSignIn
ふと思った
あれ、そもそもなんで必要なんだっけ?
  GIDSignIn.sharedInstance()?.presentingViewController = self

  // Automatically sign in the user.
  GIDSignIn.sharedInstance()?.restorePreviousSignIn()
一旦無視することにした
使われていないんですかね。
一旦このまま進めることにします。追記
見つけてしまった。
https://developers.google.com/identity/sign-in/ios/release
- 投稿日:2019-08-21T20:07:38+09:00
Unityでデータベースと連携させたい!(Firebase編)
Unityをデータベースと連携させたいなと思い、とりあえずFirebaseを使用してScoreデータを取得、更新し、Scoreの値によってSphereの色が変わるサンプルコンテンツを作成しました!
環境
PC: MacBook Air
debug: iPhone8 Plus参照記事
Unity の Firebase Realtime Database を使ってみる
How to use Firebase Database in Unity (REST API)
【Unity】スクリプトからGameObjectの色を変更する
その1
Unityプロジェクトを作成し、バンドルID を取得
まずは適当にUnityプロジェクト(3D)を準備します
今回は最新正式リリースの2019.2.1f1を使用して新規プロジェクトを作成
iOSビルドは追加していなかったので、モジュール追加も実施
作成できたら、プロジェクトをクリックしてUnityで開き、プラットフォーム固有の ID を取得します
[File]->[Build Settings]でiOSプラットフォームを選択し、左下の[Player Settings...]を押下
[Player]タブの右下[Other Settings]をクリック
- [identification]欄の[Bundle Identifier]に記載されているバンドルID(cf:
com.DefaultCompany.sample01)をコピーしておくその2
Firebaseにプロジェクト追加
次に、Unityのデータベースとして使うFirebaseプロジェクトを作成します
- Firebaseにプロジェクトを作成(今回は[forUnity]という名前で作成)
その3
FirebaseプロジェクトとUnityプロジェクトを連携
作成したFirebaseプロジェクトに、UnityプロジェクトのバンドルIDを登録します
- Firebaseのコンソール画面に入り、先ほど作成したFirebaseプロジェクト[forUnity]を選択し、左上のエリアに表示されているUnityアイコンをクリック (もし、画面が違う場合、左上のメニューバーから[Project Overview]をクリックしてUnityアイコン表示画面に移動)
- [Register as iOS app]にチェックを入れ、先ほどUnityでコピーしておいたバンドルIDを[iOS バンドルID]の欄に貼り付け
適当にアプリのニックネームを入力(省略可だけど今回は[サンプルアプリ]と入力)し、 [アプリを登録]をクリック
[GoogleService-Info.plist をダウンロード]をクリックし、保存先を今回作成したUnityプロジェクトのAssets配下の任意の場所(今回はAssets配下にFirebaseというフォルダを作成してその中)に保存し、[次へ]をクリック
[Firebase Unity SDK をダウンロード] をクリックし、ダウンロードしたZIPファイルを適切な場所で解凍(プロジェクト固有のものじゃないので、今回はSSDのアセットストアのデータを保存しているディレクトリと同階層に解凍)
開いているUnityプロジェクトに行き、 [Assets]->[Import Package]->[Custom Package] をクリック、[dotnet4]->[FirebaseDatabase.unitypackage]を[open]
[Import Unity Package] ウィンドウが出てくるので[import]をクリック
Firebaseに戻り、[次へ]をクリックで FirebaseプロジェクトとUnityプロジェクトの連携完了なので、[Firebaseコンソールに進む]をクリック
その4
Firebaseでデータベースを準備
FirebaseでRealtime Databaseを作成します
- Firebaseコンソール画面左側メニューの[Database]をクリック -少しスクロールして、 [または Realtime Database を選択] の[データベースの作成]->[テストモードで開始](※)->[有効にする]
※今回は簡単に連携させてみたいだけなのでテストモードで作成しますprz
その5
Unity側でサンプルコンテンツを準備
UnityプロジェクトにFirebaseのデータベースと連携させるサンプルコンテンツを作成する
- [Create]->[UI] から、Text,Input Field,Buttonの3つを作成(w160,h30)し適当に横並びにする
- TextはTextを「Score:」,Input FieldはPlaceholderを「Your Name」,ButtonはTextを「Submit」に変更
- [Create]->[Create Empty]でGameObjectを作成し、[Add Component]から、「PlayerScores」と検索バーに入力し、[NewScript]->[Create and Add]をクリックし、PlayerScores という名前のスクリプトをGameObjectに作成&追加
- 作成した
PlayerScores.csを編集PlayerScores.csusing System.Collections; using System.Collections.Generic; using UnityEngine; using UnityEngine.UI; public class PlayerScores : MonoBehaviour { public Text scoreText; public InputField nameText; private System.Random random = new System.Random(); public static int playerScore; public static string playerName; // Start is called before the first frame update void Start() { playerScore = random.Next(0, 101); scoreText.text = "Score: " + playerScore; } public void OnSubmit(){ playerName = nameText.text; } }
- ButtonのOnClick()にGameObjectをアサインし、PlayerScoresのOnSubmit()ファンクションを選択
- 次に、REST APIを投げられるように、Rest Client for Unity をAssetStore で検索し [Download] and [Import]
- importまで完了したら、ProjectフォルダのAssetsのなかで、右クリックし、[Create]->[C# Script]で
User.csを作成し、下記のように編集User.csusing System; using System.Collections; using System.Collections.Generic; using UnityEngine; [Serializable] public class User { public string userName; public int userScore; public User(){ userName = PlayerScores.playerName; userScore = PlayerScores.playerScore; } }
PlayerScores.csも下記の箇所を編集PlayerScores.cspublic void OnSubmit(){ playerName = nameText.text; }↓ PostToDatabase()メソッドを追加し、OnSubmit()にも追記
PlayerScores.cspublic void OnSubmit(){ playerName = nameText.text; PostToDatabase(); } private void PostToDatabase(){ User user = new User(); RestClient.Post("https://forunity-e2ac2.firebaseio.com/.json",user); }
- スクリプトの追加と修正が終わったら、GameObjectのPlayerScoresスクリプトのフィールドの部分に、Score TextにはScoreのTextオブジェクトを、Name TextにはInputFieldオブジェクトをそれぞれアサイン
- アサインできたら、Unityプロジェクトを実行し、Name欄に名前を入れて、Submitをクリックし、Firebaseのデータベースに値が入れば登録は成功
- 次に、firebaseからデータを取得するために、Buttonを複製し、Textを「Get Score」に変更
-
PlayerScores.csのPlayerScoresクラス配下にOnGetScore(),UpdateScore(),RetrieveFromDatabase()メソッドを追加し、
User user = new User();を上の方で宣言PlayerScores(修正後).csusing System.Collections; using System.Collections.Generic; using UnityEngine; using UnityEngine.UI; using Proyecto26; public class PlayerScores : MonoBehaviour { public Text scoreText; public InputField nameText; private System.Random random = new System.Random(); User user = new User(); public static int playerScore; public static string playerName; // Start is called before the first frame update void Start() { playerScore = random.Next(0, 101); scoreText.text = "Score: " + playerScore; } public void OnSubmit(){ playerName = nameText.text; PostToDatabase(); } public void OnGetScore(){ RetrieveFromDatabase(); } private void UpdateScore(){ scoreText.text = "Score: " + user.userScore; } private void PostToDatabase(){ User user = new User(); RestClient.Put("https://forunity-e2ac2.firebaseio.com/"+ playerName +".json",user); } private void RetrieveFromDatabase(){ RestClient.Get<User>("https://forunity-e2ac2.firebaseio.com/"+ nameText.text +".json").Then(response => { user = response; UpdateScore(); }); } }
- Name欄に登録ずみのNameを入力し、[Get Store]でScoreの表示されている値が登録済みのものにさし変わったら、データの取得も完了!
最後に、Sphereを作成してscore値によって色を変化させる
-
PlayerScores.csのPlayerScoresクラス配下にChangeColorName()メソッドを追加し、public GameObject targetObject;を上の方で宣言し、UpdateScore(),PostToDatabase()に、引数にscoreを持たせてChangeColorName()を追記PlayerScores(修正後).csusing System.Collections; using System.Collections.Generic; using UnityEngine; using UnityEngine.UI; using Proyecto26; public class PlayerScores : MonoBehaviour { public Text scoreText; public InputField nameText; private System.Random random = new System.Random(); User user = new User(); public static int playerScore; public static string playerName; public GameObject targetObject; // Start is called before the first frame update void Start() { playerScore = random.Next(0, 101); scoreText.text = "Score: " + playerScore; } public void OnSubmit(){ playerName = nameText.text; PostToDatabase(); } public void OnGetScore(){ RetrieveFromDatabase(); } private void UpdateScore(){ scoreText.text = "Score: " + user.userScore; ChangeColorName(user.userScore); } private void PostToDatabase(){ User user = new User(); RestClient.Put("https://forunity-e2ac2.firebaseio.com/"+ playerName +".json",user); ChangeColorName(user.userScore); } private void RetrieveFromDatabase(){ RestClient.Get<User>("https://forunity-e2ac2.firebaseio.com/"+ nameText.text +".json").Then(response => { user = response; UpdateScore(); }); } private void ChangeColorName(int score){ //Debug.Log(score); if(score < 25){ // red targetObject.GetComponent<Renderer>().material.color = Color.red; } else if (score < 50){ // yellow targetObject.GetComponent<Renderer>().material.color = Color.yellow; } else if (score < 75){ // green targetObject.GetComponent<Renderer>().material.color = Color.green; } else { // blue targetObject.GetComponent<Renderer>().material.color = Color.blue; } } }
- [Create]->[3D Object]->[Sphere]でSphereを作成し、[GameObject]の[Target Object]にアサイン
確認作業
Sphereの色がScoreの値によってきちんと変わるか最終確認
Score値(0~100)は下記仕様で色が変化すればOK
0~24: red
25~49: yellow
50~74: green
75~100: blue
まず、確認しやすくするためFirebaseのデータベースに入っているテストデータをいったん削除
次に、Unityプロジェクトを実行し、Name欄に「Nobunaga」を入力して[Submit]し、Scoreに合った色であることを確認し実行解除、再度Unityプロジェクトを実行し、今度はName欄に「Ieyasu」を入力して[Submit]し、Scoreに合った色であることを確認
確認できたら、Name欄に「Nobunaga」を入力して[Get Score]、正しいScoreと色であることを確認し、続けてName欄に「Ieyasu」を入力して[Get Score]、正しいScoreと色であることも確認できたらサンプルコンテンツ完成
とても簡単なサンプルコンテンツではありますが、REST APIの部分でAssetを使ってしまったので、想像していたよりあっさり実装できました。
今度は Rest Client for Unity を使わずに UnityWebRequest を使って実装し直してみたいです!以上!
- 投稿日:2019-08-21T17:54:44+09:00
Ionicアプリをストア通さずにアップデートしてみた
MicrosoftのCodePushに感動した話。
背景
ハイブリッドアプリのjs/ts部分をちょこっと修正する度にストアに申請するのは手間である!!
(特にiOSの場合は審査に時間を要するしね。)そこで「ゆーてNativeの部分を書き換えないんだし、jsだけ更新する仕組みないかなぁ...」と思ったら、ありました。
CodePushとの運命的な出会いです。CodePush
CodePushとは、IonicやReact Nativeなどハイブリッドアプリの生産性向上のために生み出された魔法のようなツールです。冒頭での紹介の通り、公式ストアでのアップデートを介さずにHTML,CSS,JSなどを更新する機能を持ちます。
ネットの評判読んだ感じ「Ionic4ではうまく動かないよ!」という感触だったのですが、いざ使ってみるとちゃんと稼働したので記事にしたためました。
(未検証ですがReact Nativeでの実装も同様にできそうです。)実装
今回の環境
- macOS Mojave(v10.14.6)
- Node.js v10.15.0
- Ionic: v5.2.5
- cordova v9.0.0
- [実機]Google Pixel 3a(Android 9)
途中の処理でcordovaバージョン9.0.0を必須としてきているので、お手元のバージョンを必ずご確認ください。
1. Ionic プロジェクトの作成
Blankで作成しますが、ご自身の環境にあわせて適宜変更してください。詳細は割愛します。
2. Microsoft AppCenterでの作業
2-1. ログイン
CodePushは現在Microsoft AppCenter内の一機能のようですので、まずはこちらにログインしましょう。Microsoft・Googleアカウントでの認証以外にも、先日買収したことで話題になったGithubでの認証も実装されています。2-2. アプリの作成
画面中央の【Add app】を押して、アプリを作成しましょう。
OSはAndroid/iOSのいずれかを選択します。
またIonicで作成する場合には、PlatformはCorodvaを選択します。
【Getting started】の画面に遷移したら、[2]Link the SDKの項にあるとおり
<platform name="[OS name]">
  <preference name="APP_SECRET" value="xxxxxxxx-xxxx-xxxx-xxxx-xxxxxxxxxxxx" />
</platform>
を、先ほど作成したプロジェクトの
config.xmlに適用します。3. プロジェクトの設定
3-1. プラグインの導入
CodePushプラグインを導入します。公式サイトにあるとおり
$ ionic cordova plugin add cordova-plugin-code-push
$ npm install @ionic-native/code-push
で問題ありません。(
src/app/app.module.tsへの追記をお忘れ無きよう。)3-2. CodePushの利用
アプリ起動時にこっそり同期していて欲しいので、
src/app/app.component.tsに所定の処理を記述します。src/app/app.component.tsimport { Component } from "@angular/core"; import { Platform } from "@ionic/angular"; import { SplashScreen } from "@ionic-native/splash-screen/ngx"; import { StatusBar } from "@ionic-native/status-bar/ngx"; // 追記 import { CodePush } from "@ionic-native/code-push/ngx"; @Component({ selector: "app-root", templateUrl: "app.component.html", styleUrls: ["app.component.scss"] }) export class AppComponent { constructor( private platform: Platform, private splashScreen: SplashScreen, private statusBar: StatusBar, private codePush: CodePush, // 追記 ) { this.initializeApp(); } initializeApp() { // ここから追記 this.codePush.sync().subscribe(syncStatus => console.log(syncStatus)); const downloadProgress = progress => { console.log( `Downloaded ${progress.receivedBytes} of ${progress.totalBytes}` ); }; this.codePush .sync({}, downloadProgress) .subscribe(syncStatus => console.log(syncStatus)); // ここまで追記 this.platform.ready().then(() => { this.statusBar.styleDefault(); this.splashScreen.hide(); }); } }4. 使ってみる
4-1. CodePushでの操作
まずCodePushを再び開きます。アプリの左メニューに【Distribute/CodePush】があるのでこちらに移動しましょう。
↑ここです。「デプロイを設置してね」と言われるので青いボタンを押します。おそらく
Stagingリリース とProductionリリースが設置されると思います。
Everything is ready.と言われたらあと一歩です!
右上の工具マークを押してデプロイキーを表示しましょう。
このうち使いたいリリースのデプロイキーをコピーします。(今回はProduction)そしてプロジェクトの
config.xmlの対応するOSの位置に下記の設定を記述します。<preference name="CodePushDeploymentKey" value="[先ほどのデプロイキー]" />また、このページの【Release an update】のコマンドをどこかに控えておいてください。
4-2. 実機へのインストールその1
開発端末に実機を接続し
ionic cordova run androidを実行します。すると初期版のアプリが実機にインストールされます。4-3. CodePushへデプロイ
その後実機を切断して、ソースコードを改変します。
src/app/home/home.page.htmlに追記するのがわかりやすいかと思います。src/app/home/home.page.html<ion-header> <ion-toolbar> <ion-title> Ionic Blank </ion-title> </ion-toolbar> </ion-header> <ion-content> <div class="ion-padding"> The world is your oyster. <p>If you get lost, the <a target="_blank" rel="noopener" href="https://ionicframework.com/docs/">docs</a> will be your guide.</p> <!--ここから下 --> <br> <br> <p><b>This is the new Version</b></p> </div> </ion-content>次に、CLI上でAppCenterにログインします。下記のコマンドを実行しましょう。
$ npm i -g appcenter $ appcenter loginそしてプロジェクトルートで先ほどのRelease an updateのコマンドを実行します。
$ appcenter codepush release-cordova -a 【プロジェクト名】 -d 【リリース名】その後実機のアプリを一度閉じて開くと...無事に実機の表示が更新されているはずです。
更新されないときは...
AppCenterのCodePushページで適当なリリースにデプロイされているか確認できます。
また、デプロイ一覧からデプロイを押すと詳細を確認できます。(アップデートのリーチ状況など)万が一それでもダメなときは、デプロイ設定(右上の工具マーク)から【Required Update】をオンにするとイケそうです。
まとめ
- Ionicがますます便利になりそう
- AppCenter、実はアクティブユーザー等統計や、Push通知なども実装している
- そのうち検証したいです。


- 投稿日:2019-08-21T17:54:44+09:00
【CodePush】Ionicアプリをストアを経由せずに更新する術
MicrosoftのCodePushに感動した話。
背景
ハイブリッドアプリのjs/ts部分をちょこっと修正する度にストアに申請するのは手間である!!
(特にiOSの場合は審査に時間を要するしね。)そこで「ゆーてNativeの部分を書き換えないんだし、jsだけ更新する仕組みないかなぁ...」と思ったら、ありました。
CodePushとの運命的な出会いです。CodePush
CodePushとは、IonicやReact Nativeなどハイブリッドアプリの生産性向上のために生み出された魔法のようなツールです。冒頭での紹介の通り、公式ストアでのアップデートを介さずにHTML,CSS,JSなどを更新する機能を持ちます。
ネットの評判読んだ感じ「Ionic4ではうまく動かないよ!」という感触だったのですが、いざ使ってみるとちゃんと稼働したので記事にしたためました。
(未検証ですがReact Nativeでの実装も同様にできそうです。)実装
今回の環境
- macOS Mojave(v10.14.6)
- Node.js v10.15.0
- Ionic: v5.2.5
- cordova v9.0.0
- [実機]Google Pixel 3a(Android 9)
途中の処理でcordovaバージョン9.0.0を必須としてきているので、お手元のバージョンを必ずご確認ください。
1. Ionic プロジェクトの作成
Blankで作成しますが、ご自身の環境にあわせて適宜変更してください。詳細は割愛します。
2. Microsoft AppCenterでの作業
2-1. ログイン
CodePushは現在Microsoft AppCenter内の一機能のようですので、まずはこちらにログインしましょう。Microsoft・Googleアカウントでの認証以外にも、先日買収したことで話題になったGithubでの認証も実装されています。2-2. アプリの作成
画面中央の【Add app】を押して、アプリを作成しましょう。
OSはAndroid/iOSのいずれかを選択します。
またIonicで作成する場合には、PlatformはCorodvaを選択します。
【Getting started】の画面に遷移したら、[2]Link the SDKの項にあるとおり
<platform name="[OS name]">
  <preference name="APP_SECRET" value="xxxxxxxx-xxxx-xxxx-xxxx-xxxxxxxxxxxx" />
</platform>
を、先ほど作成したプロジェクトの
config.xmlに適用します。3. プロジェクトの設定
3-1. プラグインの導入
CodePushプラグインを導入します。公式サイトにあるとおり
$ ionic cordova plugin add cordova-plugin-code-push
$ npm install @ionic-native/code-push
で問題ありません。(
src/app/app.module.tsへの追記をお忘れ無きよう。)3-2. CodePushの利用
アプリ起動時にこっそり同期していて欲しいので、
src/app/app.component.tsに所定の処理を記述します。src/app/app.component.tsimport { Component } from "@angular/core"; import { Platform } from "@ionic/angular"; import { SplashScreen } from "@ionic-native/splash-screen/ngx"; import { StatusBar } from "@ionic-native/status-bar/ngx"; // 追記 import { CodePush } from "@ionic-native/code-push/ngx"; @Component({ selector: "app-root", templateUrl: "app.component.html", styleUrls: ["app.component.scss"] }) export class AppComponent { constructor( private platform: Platform, private splashScreen: SplashScreen, private statusBar: StatusBar, private codePush: CodePush, // 追記 ) { this.initializeApp(); } initializeApp() { // ここから追記 this.codePush.sync().subscribe(syncStatus => console.log(syncStatus)); const downloadProgress = progress => { console.log( `Downloaded ${progress.receivedBytes} of ${progress.totalBytes}` ); }; this.codePush .sync({}, downloadProgress) .subscribe(syncStatus => console.log(syncStatus)); // ここまで追記 this.platform.ready().then(() => { this.statusBar.styleDefault(); this.splashScreen.hide(); }); } }4. 使ってみる
4-1. CodePushでの操作
まずCodePushを再び開きます。アプリの左メニューに【Distribute/CodePush】があるのでこちらに移動しましょう。
↑ここです。「デプロイを設置してね」と言われるので青いボタンを押します。おそらく
Stagingリリース とProductionリリースが設置されると思います。
Everything is ready.と言われたらあと一歩です!
右上の工具マークを押してデプロイキーを表示しましょう。
このうち使いたいリリースのデプロイキーをコピーします。(今回はProduction)そしてプロジェクトの
config.xmlの対応するOSの位置に下記の設定を記述します。<preference name="CodePushDeploymentKey" value="[先ほどのデプロイキー]" />また、このページの【Release an update】のコマンドをどこかに控えておいてください。
4-2. 実機へのインストールその1
開発端末に実機を接続し
ionic cordova run androidを実行します。すると初期版のアプリが実機にインストールされます。4-3. CodePushへデプロイ
その後実機を切断して、ソースコードを改変します。
src/app/home/home.page.htmlに追記するのがわかりやすいかと思います。src/app/home/home.page.html<ion-header> <ion-toolbar> <ion-title> Ionic Blank </ion-title> </ion-toolbar> </ion-header> <ion-content> <div class="ion-padding"> The world is your oyster. <p>If you get lost, the <a target="_blank" rel="noopener" href="https://ionicframework.com/docs/">docs</a> will be your guide.</p> <!--ここから下 --> <br> <br> <p><b>This is the new Version</b></p> </div> </ion-content>次に、CLI上でAppCenterにログインします。下記のコマンドを実行しましょう。
$ npm i -g appcenter $ appcenter loginそしてプロジェクトルートで先ほどのRelease an updateのコマンドを実行します。
$ ionic cordova build android # wwwディレクトリを更新します
$ appcenter codepush release-cordova -a 【プロジェクト名】 -d 【リリース名】
その後実機のアプリを一度閉じて開くと...無事に実機の表示が更新されているはずです。
更新されないときは...
AppCenterのCodePushページで適当なリリースにデプロイされているか確認できます。
また、デプロイ一覧からデプロイを押すと詳細を確認できます。(アップデートのリーチ状況など)万が一それでもダメなときは、デプロイ設定(右上の工具マーク)から【Required Update】をオンにするとイケそうです。
欠点(...?)
あくまでwwwディレクトリの更新なので、Native APIは更新できない(
ionic cordova plugin add hogeで導入するやつ)まとめ
- Ionicがますます便利になりそう
- AppCenter、実はアクティブユーザー等統計や、Push通知なども実装している
- そのうち検証したいです。
- 投稿日:2019-08-21T15:55:09+09:00
ウェブフロントエンドエンジニアがiOSアプリ開発をする際に知っておきたかったこと
はじめに
この記事はふだんウェブフロントエンド(javascript/html/css)の業務をしているエンジニアが、iOS開発の予習に取り組んだ際に躓いた点を共有し、これからiOS開発を始めたいエンジニアの助けになることを目的としたものです。
XcodeのバージョンとSwiftのバージョン
当然これらは固定して開発に望みたいので、以下の記事を参考にしました。
http://kimagureneet.hatenablog.com/entry/2019/04/08/125129
プロジェクト内のファイルツリーと実ファイルの関係性
プロジェクトの左側のファイルツリーにある黄色と、青色のフォルダアイコンに困惑しました。
http://kurogomapurin.hatenablog.com/entry/2014/06/05/012415
https://qiita.com/nmbakfm/items/8f2e303ee4ec71640008
https://qiita.com/yimajo/items/6cffb5cd5a5dd659edb4UI実装/レイアウト
ストーリーボードを分割する
ご存知ストーリーボード、このファイルの実体(foo.storyboard)はxmlファイルであり、Xcode上の操作が即座にこのxmlファイルに反映されます。
しかしこのファイルはヒューマンリーダブルとはなかなか言いにくいものです。
開発はGitでの管理下で行っていると思いますので、ストーリーボードのファイルが大きくなると目が潰れそうな差分が多く発生します。
そのため、ストーリーボードは初期の段階から適切な大きさに分割しておくのが良いでしょう。
私が開発に参加したアプリは一般的なタブビューのレイアウトだったので、初期の段階でタブごとにストーリーボードを分割しました。https://qiita.com/Simmon/items/2af23fab4a42ab7247ba
UINavigatorController
一般的なアプリによくある、一覧画面->詳細画面に遷移するデザインは、UINavigatorController と TableViewなどで実装します。
UINavigatorControllerを利用する場合、ストーリーボード上でコンテンツとなるviewControllerにembedする操作を行うのですが、この際のストーリーボード上での配置が直感的ではなく、最初困惑しました。
並列に配置されているこれらのviewControllerは
A navigation controller is a container view controller—that is, it embeds the content of other view controllers inside of itself.
https://developer.apple.com/documentation/uikit/uinavigationcontroller
ということで、実際には左側のNavigation Controllerはコンテナの役割を果たしているのですね。
カスタムビューの実装
ストーリーボード上のUI開発で最初に面を食らったポイントは、UIViewと言われる汎用のUIクラスはborderなど、レイアウトにかかせない要素をリアルタイムに確認する術を持たないことです。
webでUIを作る際にはcssでborder: 1px solid blackなどと書いていけばカンタンに進められる作業ももう少し長くコードを書いて実装する必要があります。extentionを書いておくとストーリーボードでも確認できるようになるので、最初のうちに勉強しておくとあとがラクになります。
https://qiita.com/taji-taji/items/17ad3389b3d250fcad6e
https://qiita.com/xxminamixx/items/ee8435a4e07d31cf28fdベクターイメージ
PDF!!!
svgじゃなく!!!
PDF使うのか!!!コードとの接続
アクション/アウトレットについて
https://swift-ios.keicode.com/ios/action.php
https://swift-ios.keicode.com/ios/outlet.phpなお接続は適切に外さないと、ビルド時にエラーが起きます。
https://pg-happy.jp/xcode-delete-action-outlet-connection.html
https://qiita.com/Atsushi_/items/f7930dd00a2c2ea464cdUIStackView
cssのブロックモデルに近い感覚でレイアウトできるのがUIstackviewです。
このClassが提供されてから、レイアウトの実装はだいぶラクになっただろうとたやすく想像できる非常に便利なClassです。
積極的に使いましょう。https://qiita.com/taka1068/items/69273f05d34cfbeb3679
autoLayout
ストーリーボードでのレイアウトで、意外と気に入ったのがautoLayoutです。
触ってて嬉しかったのが、重複する制約に優先度をつけられること。cssのイメージでいうと、!importantに優先度をつけられるかんじ。1日さわっていれば慣れます。
https://qiita.com/_ha1f/items/5c292bb6a4617da60d4f
autoLayoutだけでもこういうのができる
https://blog.kishikawakatsumi.com/entry/2018/11/05/044228ちなみにautoLayoutの制約もOutletでコードと関連づけられるので、状態に応じて制御したいときに重宝します。
https://nackpan.net/blog/2015/08/16/autolayout-constraints-can-connect-code/segueによる画面遷移
https://qiita.com/fromage-blanc/items/b3cb0e7833a1d5659463
ロジック(Swift)
JSやTSでの開発と違って面白いなーと思った点
delegate
https://qiita.com/mochizukikotaro/items/a5bc60d92aa2d6fe52ca
https://qiita.com/narukun/items/326bd50a78cf34371169関数のオーバーロード
https://wp-p.info/tpl_rep.php?cat=swift-biginner&fl=r23
Optional型の安全なunwrap
https://qiita.com/maiki055/items/b24378a3707bd35a31a8
https://qiita.com/mokumoku/items/5fef496f4e97a053e53e外部ライブラリの導入
ビルド速度の低下のことを考えると、carthageで配布されているものはそちらを選んだほうが良さそうです。
cocoaPods
https://qiita.com/ShinokiRyosei/items/3090290cb72434852460
carthage
https://qiita.com/yutat93/items/97fe9bc2bf2e97da7ec1
細かな点をあげればきりがないですが、勉強を始める前に自分が知りたかったポイントとしてはこんなところでしょうか。
iOS開発ではUIKitの強力さとSwiftの表現力の高さに感銘を受けました。
ふだんやっているwebアプリ開発でもUIKitくらい強力なファウンデーションがあるとラクなんですけどねえ。

- 投稿日:2019-08-21T14:41:50+09:00
Unity IAPを試してみた (Yet Another Purchaser.cs)
前提
- Unity 2018.4.5f1
- Unity IAP 1.22.0
- Apple App Store、Google Play Store
- この記事では、Unity IAPの一部機能を限定的に使用し、汎用性のない部分があります。
- サーバレス、消費/非消費タイプ使用、購読タイプ未使用
- この記事のソースは、実際のストアでテストしていますが、製品版での使用実績はありません。
- ソース中のIDは実際と異なります。
公式ドキュメント
- マニュアル
- スクリプトリファレンス
- 2019/08/02時点で、バージョンによって記述があったりなかったりします。
- 記述あり 5.6、2017.1、2017.2、2017.3、2018.1、2018.2
- 記述なし 2017.4、2018.3、2018.4、2019.1
ネームスペース
UnityEngine.Purchasing
- 必須のネームスペースです。
UnityEngine.Purchasing.Security
- レシートの検証で必要なネームスペースです。
- スクリプトリファレンスに記述が見つかりません。
UnityEngine.Purchasing.Extension
- この記事では扱いません。
初期化
初期化の開始
UnityPurchasing.Initialize ()を呼ぶことで、初期化を開始します。UnityPurchasing.Initialize (Purchaser instance, ConfigurationBuilder builder);
- 初期化の要求はブロックされず、後に、結果に応じたコールバックがあります。
イベントハンドラ
- コールバックを受け取るために、
IStoreListenerを継承したクラスのインスタンスが必要です。
- 必ずしも
MonoBehaviourを継承する必要はありません。- インターフェイス
IStoreListenerでは、OnInitialized ()、OnInitializeFailed ()、OnPurchaseFailed ()、ProcessPurchase ()の4つのイベントハンドラが必要になります。準備
Initialize ()を呼ぶためには、ConfigurationBuilder builderのインスタンスを得る必要があります。ConfigurationBuilder.Instance ()を呼ぶためには、IPurchasingModuleを継承したクラスのインスタンスが必要なようですが、この辺りを記載したドキュメントが見つかりません。- 付属のDemoでは、
StandardPurchasingModuleがそのクラスにあたるようで、そのインスタンスを得て使われています。- 得られたインスタンス
moduleにストアの設定を行い、さらにbuilderインスタンスを得ます。- 得られたインスタンス
builderに製品を登録し、検証器を生成して、初期化を開始します。- ここでは、クラスのコンストラクタで、準備から初期化の開始までを行っています。
- コンストラクタが
privateなのは、シングルトンで使うためです。Purchaser.cs/// <summary>コンストラクタ</summary> private Purchaser (IEnumerable<ProductDefinition> products) { Debug.Log ("Purchaser.Construct"); var module = StandardPurchasingModule.Instance (); module.useFakeStoreUIMode = FakeStoreUIMode.StandardUser; isGooglePlayStoreSelected = Application.platform == RuntimePlatform.Android && module.appStore == AppStore.GooglePlay; isAppleAppStoreSelected = Application.platform == RuntimePlatform.IPhonePlayer && module.appStore == AppStore.AppleAppStore; validator = new CrossPlatformValidator (GooglePlayTangle.Data (), AppleTangle.Data (), Application.identifier); var builder = ConfigurationBuilder.Instance (module); builder.AddProducts (products); UnityPurchasing.Initialize (this, builder); }製品定義
- 先のコンストラクタが受け取って
builderに登録した製品定義は、製品のIDとタイプのセットです。Sample.csvar products = new [] { new ProductDefinition ("jp.nyanta.tetr4lab.unityiaptest.item1", ProductType.Consumable), new ProductDefinition ("jp.nyanta.tetr4lab.unityiaptest.item2", ProductType.NonConsumable), new ProductDefinition ("jp.nyanta.tetr4lab.unityiaptest.item3", ProductType.NonConsumable), };
- これらはストア・ダッシュボードでの設定と正しく呼応している必要があります。
- Apple App Storeでは、IDと製品タイプの双方が設定されます。
- Google Play Storeでは、IDが設定されますが、消費の有無についての設定はありません。
- 消費タイプでは、アプリを消費したことを申告するだけです。
- この記事では、消費タイプ
Consumableと非消費タイプNonConsumableだけを扱い、購読タイプは扱いません。初期化の完了
- 初期化に成功したら、得られた
IStoreControllerとIExtensionProviderを保存します。Purchaser.cs/// <summary>初期化完了</summary> public void OnInitialized (IStoreController controller, IExtensionProvider extensions) { Debug.Log ($"Purchaser.Initialized {controller}, {extensions}"); appleExtensions = extensions.GetExtension<IAppleExtensions> (); appleExtensions.RegisterPurchaseDeferredListener (OnDeferred); googlePlayStoreExtensions = extensions.GetExtension<IGooglePlayStoreExtensions> (); this.controller = controller; this.extensions = extensions; Inventory = new Inventory { }; foreach (var product in controller.products.all) { Inventory [product] = possession (product); } } /// <summary>初期化失敗</summary> public void OnInitializeFailed (InitializationFailureReason error) { Debug.LogError ($"Purchaser.InitializeFailed {error}"); Unavailable = true; }
- iOSの'Ask to buy'関連、
OnDeferredはテストできていません。Inventoryについては、後述します。製品目録
- 初期化に成功すると、
controller.products.allで、製品目録を得ることができます。Sample.csforeach (var product in Purchaser.Products.all) { Debug.Log (Purchaser.GetProductProperties (product)); }Purchaser.cs/// <summary>製品目録 初期化時の製品IDに対してストアから得た情報</summary> public static ProductCollection Products => Valid ? instance.controller.products : null;Purchaser.cs/// <summary>製品諸元</summary> public static string GetProperties (this Product product) { return string.Join ("\n", new [] { $"id={product.definition.id} ({product.definition.storeSpecificId})", $"type={product.definition.type}", $"enabled={product.definition.enabled}", $"available={product.availableToPurchase}", $"localizedTitle={product.metadata.localizedTitle}({product.metadata.shortTitle ()})", $"localizedDescription={product.metadata.localizedDescription}", $"isoCurrencyCode={product.metadata.isoCurrencyCode}", $"localizedPrice={product.metadata.localizedPrice}", $"localizedPriceString={product.metadata.localizedPriceString}", $"transactionID={product.transactionID}", $"Receipt has={product.hasReceipt}", $"Purchaser.Valid={Purchaser.Valid}", $"Receipt validation={Purchaser.ValidateReceipt (product)}", $"Possession={Purchaser.Inventory [product]}", }); }目録の謎
※以下は、Google Play StoreとApple App Store (Sandbox)で確認した内容です。製品でのテストではありません。
- もし、初期化の際に製品定義を渡さなかったらどうなるのでしょうか?
- その場合、製品目録は基本的に空になります。ただし、購入済みの非消費製品は取得されます。
- ストアから製品IDのカタログが得られるわけではありません。つまり、ストアに新製品を登録しただけでは、製品に組み込めないのです。
ProductDefinition.enabledは、スクリプトリファレンスでは"This flag indicates whether a product should be offered for sale. It is controlled through the cloud catalog dashboard."と説明されています。
- これを見る限り、ストアのダッシュボードで設定されている有効/無効状態を取得できるように読めますが、実際には常に
trueになります。- 例え、ストアに登録されていないIDを指定した場合でも
trueです。全く役に立ちません。
- ストアにない場合は、
Product.availableToPurchaseはFalseになります。- Play Storeで無効にされている製品を購入しようとすると「原因不明の購入エラー」になります。
- App Storeで無効にされている製品でも、Sandboxでは購入できてしまいます。
- つまり、以下の制約が生じます。
- ストアに登録されている未知の製品を取得することはできません。
- ストアでの状態(有効/無効)を取得することはできません。
- 購入の失敗が、ストアでの無効設定によるものと判別できません。
- その結果、以下のような使い方になります。
- ストアとは別の手段(あらかじめ組み込む、自前のサーバから取得するなど)で製品定義を保持する必要があります。
- ストアでの製品の有効/無効は、アプリの使用する製品定義に連動させます。
- 緊急時以外は、ストア独自に製品を無効化しないようにします。
購入
購入の開始
IStoreController.InitiatePurchase ()にProductを渡すことで、購入が開始されます。Purchaser.cs/// <summary>課金開始</summary> private bool purchase (Product product) { if (product != null && product.Valid ()) { Debug.Log ($"Purchaser.InitiatePurchase {product.definition.id} {product.metadata.localizedTitle} {product.metadata.localizedPriceString}"); controller.InitiatePurchase (product); return true; } return false; }
- 購入の要求はブロックされず、後に、結果に応じたコールバックがあります。
購入の完了
- 課金結果のコールバックでは、購入に関わる処理が全て完了したら、
PurchaseProcessingResult.Completeを返します。
- 消費タイプの場合は、消費が実行されます。
Purchaser.cs/// <summary>課金失敗</summary> public void OnPurchaseFailed (Product product, PurchaseFailureReason reason) { Debug.LogError ($"Purchaser.PurchaseFailed Reason={reason}\n{product.GetProperties ()}"); } /// <summary>課金結果 有効な消耗品なら保留、それ以外は完了とする</summary> public PurchaseProcessingResult ProcessPurchase (PurchaseEventArgs eventArgs) { var validated = ValidateReceipt (eventArgs.purchasedProduct); Debug.Log ($"Purchaser.ProcessPurchase {(validated ? "Validated" : "ValidationError")} {eventArgs.purchasedProduct.GetProperties ()}"); Inventory [eventArgs.purchasedProduct] = validated; return (validated && eventArgs.purchasedProduct.definition.type == ProductType.Consumable) ? PurchaseProcessingResult.Pending : PurchaseProcessingResult.Complete; }
- このコードでは、消費タイプでは
PurchaseProcessingResult.Pendingを返し、それ以外ではCompleteを返します。
Pendingを返すと、消費は保留されます。この保留状態は、(謎の)クラウドで保持されるためアプリが中断しても失われず、起動毎に
ProcessPurchase ()へのコールバックが繰り返されます。
- 保留状態を終わらせるには、
ProcessPurchase ()でCompleteを返すか、別途IStoreController.ConfirmPendingPurchase (product)を呼びます。
Product.hasReceiptは、起動直後に未購入または消費済みであればfalseとなり、購入完了時にはtrueに変化します。
- しかし、
Completeを返した場合も、消費を促すConfirmPendingPurchase (product)を行おうとも、その場ではfalseには戻りません。- つまり、
hasReceiptを見て消費完了を知ることはできません。- また、
ConfirmPendingPurchase (product)には、結果を知らせるコールバックがありません。従って、保留と消費の状態を判別するためには、Unity-IAPの外側で所持状態を管理する必要があります。
なお、非消費タイプでは、購入済みの
hasReceiptは常にtrueになります。所有状態の管理
- このコードでは、
InventoryというDictionary派生クラスを用意して、製品所有状態を管理しています。
- 初期化完了のコールバック中で初期化しています。
Inventory [string 製品ID]またはInventory [Product 製品]で真偽値を得ることができます。Purchaser.cs/// <summary>productID基準でProductの在庫を表現する辞書</summary> public class Inventory : Dictionary<string, bool> { /// <summary>Productによるアクセス</summary> public bool this [Product product] { get { return base [product.definition.id]; } set { base [product.definition.id] = value; } } }復元
- Appleの既定では、ユーザーがこの処理を明示的に行える必要があるのですが、これを呼ばなくてもUnity-IAPが自動的に復元をしているようなので、それ以上の意味はないように思われます。正直よく分かりません。
Purchaser.cs/// <summary>復元</summary> private void restore (Action<bool> onRestored = null) { Debug.Log ("Purchaser.Restore"); Action<bool> onTransactionsRestored = success => { OnTransactionsRestored (success); onRestored?.Invoke (success); }; if (isGooglePlayStoreSelected) { googlePlayStoreExtensions.RestoreTransactions (onTransactionsRestored); } else if (isAppleAppStoreSelected) { appleExtensions.RestoreTransactions (onTransactionsRestored); } }Purchaser.cs/// <summary>復元完了</summary> private void OnTransactionsRestored (bool success) { Debug.Log ($"Purchaser.Restored {success}"); }コード全容
Purchaser.cs// Copyright© tetr4lab. using System; using System.Text.RegularExpressions; using System.Collections.Generic; using UnityEngine; using UnityEngine.Purchasing; using UnityEngine.Purchasing.Security; /// <summary>UnityIAPを使う</summary> namespace UnityInAppPuchaser { /// <summary>課金処理</summary> public class Purchaser : IStoreListener { #region Static /// <summary>シングルトン</summary> private static Purchaser instance; /// <summary>在庫目録 製品の課金状況一覧、消費タイプは未消費を表す</summary> public static Inventory Inventory { get; private set; } /// <summary>有効 初期化が完了している</summary> public static bool Valid => (instance != null && instance.valid); /// <summary>使用不能 初期化に失敗した</summary> public static bool Unavailable { get; private set; } /// <summary>製品目録 初期化時の製品IDに対してストアから得た情報</summary> public static ProductCollection Products => Valid ? instance.controller.products : null; /// <summary>クラス初期化 製品のIDとタイプの一覧を渡す</summary> public static void Init (IEnumerable<ProductDefinition> products) { if (instance == null || Unavailable) { instance = new Purchaser (products); } } /// <summary>所有検証 有効なレシートが存在する</summary> private static bool possession (Product product) { return product.hasReceipt && Purchaser.ValidateReceipt (product); } /// <summary>レシート検証</summary> public static bool ValidateReceipt (string productID) { return (!string.IsNullOrEmpty (productID) && instance.validateReceipt (instance.controller.products.WithID (productID))); } /// <summary>レシート検証</summary> public static bool ValidateReceipt (Product product) { return (instance != null && instance.validateReceipt (product)); } /// <summary>課金 指定製品の課金処理を開始する</summary> public static bool Purchase (string productID) { if (!string.IsNullOrEmpty (productID) && Valid) { return instance.purchase (instance.controller.products.WithID (productID)); } return false; } /// <summary>課金 指定製品の課金処理を開始する</summary> public static bool Purchase (Product product) { if (product != null && Valid) { return instance.purchase (product); } return false; } /// <summary>保留した課金の完了 消費タイプの指定製品の保留していた消費を完了する</summary> public static bool ConfirmPendingPurchase (string productID) { if (!string.IsNullOrEmpty (productID) && Valid) { return instance.confirmPendingPurchase (instance.controller.products.WithID (productID)); } return false; } /// <summary>保留した課金の完了 消費タイプの指定製品の保留していた消費を完了する</summary> public static bool ConfirmPendingPurchase (Product product) { if (product != null && Valid) { return instance.confirmPendingPurchase (product); } return false; } /// <summary>復元 課金情報の復元を行い、結果のコールバックを得ることができる</summary> public static void Restore (Action<bool> onRestored = null) { if (Valid) { instance.restore (onRestored); } } #endregion /// <summary>コントローラー</summary> private IStoreController controller; /// <summary>拡張プロバイダ</summary> private IExtensionProvider extensions; /// <summary>Apple拡張</summary> private IAppleExtensions appleExtensions; /// <summary>Google拡張</summary> private IGooglePlayStoreExtensions googlePlayStoreExtensions; /// <summary>AppleAppStore</summary> private bool isAppleAppStoreSelected; /// <summary>GooglePlayStore</summary> private bool isGooglePlayStoreSelected; /// <summary>検証機構</summary> private CrossPlatformValidator validator; /// <summary>有効</summary> private bool valid => (controller != null && controller.products != null); /// <summary>コンストラクタ</summary> private Purchaser (IEnumerable<ProductDefinition> products) { Debug.Log ("Purchaser.Construct"); var module = StandardPurchasingModule.Instance (); module.useFakeStoreUIMode = FakeStoreUIMode.StandardUser; isGooglePlayStoreSelected = Application.platform == RuntimePlatform.Android && module.appStore == AppStore.GooglePlay; isAppleAppStoreSelected = Application.platform == RuntimePlatform.IPhonePlayer && module.appStore == AppStore.AppleAppStore; validator = new CrossPlatformValidator (GooglePlayTangle.Data (), AppleTangle.Data (), Application.identifier); var builder = ConfigurationBuilder.Instance (module); builder.AddProducts (products); UnityPurchasing.Initialize (this, builder); } /// <summary>レシート検証</summary> private bool validateReceipt (Product product) { if (!valid || !product.hasReceipt) { return false; } #if UNITY_EDITOR return true; #else try { var result = validator.Validate (product.receipt); Debug.Log ("Purchaser.validateReceipt Receipt is valid. Contents:"); return true; } catch (IAPSecurityException ex) { Debug.LogError ($"Purchaser.validateReceipt Invalid receipt {product.definition.id}, not unlocking content. {ex}"); return false; } #endif } /// <summary>課金開始</summary> private bool purchase (Product product) { if (product != null && product.Valid ()) { Debug.Log ($"Purchaser.InitiatePurchase {product.definition.id} {product.metadata.localizedTitle} {product.metadata.localizedPriceString}"); controller.InitiatePurchase (product); return true; } return false; } /// <summary>保留した課金の完了</summary> private bool confirmPendingPurchase (Product product) { if (product != null && Inventory [product] && possession (product)) { controller.ConfirmPendingPurchase (product); Inventory [product] = false; Debug.Log ($"Purchaser.ConfirmPendingPurchase {product.GetProperties ()}"); return true; } return false; } /// <summary>復元</summary> private void restore (Action<bool> onRestored = null) { Debug.Log ("Purchaser.Restore"); Action<bool> onTransactionsRestored = success => { OnTransactionsRestored (success); onRestored?.Invoke (success); }; if (isGooglePlayStoreSelected) { googlePlayStoreExtensions.RestoreTransactions (onTransactionsRestored); } else if (isAppleAppStoreSelected) { appleExtensions.RestoreTransactions (onTransactionsRestored); } } #region Event Handler /// <summary>復元完了</summary> private void OnTransactionsRestored (bool success) { Debug.Log ($"Purchaser.Restored {success}"); } /// <summary>iOS 'Ask to buy' 未成年者の「承認と購入のリクエスト」 承認または却下されると通常の購入イベントが発生する</summary> private void OnDeferred (Product product) { Debug.Log ($"Purchaser.Deferred {product.GetProperties ()}"); } /// <summary>初期化完了</summary> public void OnInitialized (IStoreController controller, IExtensionProvider extensions) { Debug.Log ($"Purchaser.Initialized {controller}, {extensions}"); appleExtensions = extensions.GetExtension<IAppleExtensions> (); appleExtensions.RegisterPurchaseDeferredListener (OnDeferred); googlePlayStoreExtensions = extensions.GetExtension<IGooglePlayStoreExtensions> (); this.controller = controller; this.extensions = extensions; Inventory = new Inventory { }; foreach (var product in controller.products.all) { Inventory [product] = possession (product); } } /// <summary>初期化失敗</summary> public void OnInitializeFailed (InitializationFailureReason error) { Debug.LogError ($"Purchaser.InitializeFailed {error}"); Unavailable = true; } /// <summary>課金失敗</summary> public void OnPurchaseFailed (Product product, PurchaseFailureReason reason) { Debug.LogError ($"Purchaser.PurchaseFailed Reason={reason}\n{product.GetProperties ()}"); } /// <summary>課金結果 有効な消耗品なら保留、それ以外は完了とする</summary> public PurchaseProcessingResult ProcessPurchase (PurchaseEventArgs eventArgs) { var validated = ValidateReceipt (eventArgs.purchasedProduct); Debug.Log ($"Purchaser.ProcessPurchase {(validated ? "Validated" : "ValidationError")} {eventArgs.purchasedProduct.GetProperties ()}"); Inventory [eventArgs.purchasedProduct] = validated; return (validated && eventArgs.purchasedProduct.definition.type == ProductType.Consumable) ? PurchaseProcessingResult.Pending : PurchaseProcessingResult.Complete; } /// <summary>破棄</summary> ~Purchaser () { Debug.Log ("Purchaser.Destruct"); if (instance == this) { instance = null; Inventory = null; Unavailable = false; } } #endregion } /// <summary>製品拡張</summary> public static class ProductExtentions { /// <summary>製品諸元</summary> public static string GetProperties (this Product product) { return string.Join ("\n", new [] { $"id={product.definition.id} ({product.definition.storeSpecificId})", $"type={product.definition.type}", $"enabled={product.definition.enabled}", $"available={product.availableToPurchase}", $"localizedTitle={product.metadata.localizedTitle}({product.metadata.shortTitle ()})", $"localizedDescription={product.metadata.localizedDescription}", $"isoCurrencyCode={product.metadata.isoCurrencyCode}", $"localizedPrice={product.metadata.localizedPrice}", $"localizedPriceString={product.metadata.localizedPriceString}", $"transactionID={product.transactionID}", $"Receipt has={product.hasReceipt}", $"Purchaser.Valid={Purchaser.Valid}", $"Receipt validation={Purchaser.ValidateReceipt (product)}", $"Possession={Purchaser.Inventory [product]}", }); } /// <summary>有効性 製品がストアに登録されていることを示すが、ストアで有効かどうかには拠らない</summary> public static bool Valid (this Product product) { return (product.definition.enabled && product.availableToPurchase); } /// <summary>アプリ名を含まないタイトル</summary> public static string shortTitle (this ProductMetadata metadata) { return (metadata != null && !string.IsNullOrEmpty (metadata.localizedTitle)) ? (new Regex (@"\s*\(.+\)$")).Replace (metadata.localizedTitle, "") : string.Empty; } } /// <summary>productID基準でProductの在庫を表現する辞書</summary> public class Inventory : Dictionary<string, bool> { /// <summary>Productによるアクセス</summary> public bool this [Product product] { get { return base [product.definition.id]; } set { base [product.definition.id] = value; } } } }Sample.csusing System.Collections; using System.Collections.Generic; using UnityEngine; using UnityEngine.UI; using UnityEngine.Purchasing; using UnityInAppPuchaser; public class Sample : MonoBehaviour { [SerializeField] private Transform CatalogHolder = default; [SerializeField] private Button RestoreButton = default; /// <summary>製品目録</summary> private readonly ProductDefinition [] products = new [] { new ProductDefinition ("jp.nyanta.tetr4lab.unityiaptest.item1", ProductType.Consumable), new ProductDefinition ("jp.nyanta.tetr4lab.unityiaptest.item2", ProductType.NonConsumable), new ProductDefinition ("jp.nyanta.tetr4lab.unityiaptest.item3", ProductType.NonConsumable), }; /// <summary>起動</summary> private void Start () { StartCoroutine (initPurchaser ()); } /// <summary>開始処理</summary> private IEnumerator initPurchaser () { RestoreButton.interactable = false; Purchaser.Init (products); yield return new WaitUntil (() => Purchaser.Valid || Purchaser.Unavailable); // 初期化完了を待つ if (Purchaser.Valid) { Catalog.Create (CatalogHolder); foreach (var product in Purchaser.Products.all) { CatalogItem.Create (Catalog.ScrollRect.content, product); } } RestoreButton.interactable = true; } /// <summary>復元ボタン</summary> public void OnPushRestoreButton () { if (Purchaser.Unavailable) { StartCoroutine (initPurchaser ()); } else if (Purchaser.Valid) { Purchaser.Restore (success => { if (!success) { ModalDialog.Create (transform.parent, "リストアに失敗しました。\nネットワーク接続を確認してください。"); } }); } } }
- 投稿日:2019-08-21T13:40:23+09:00
ATSに求められるサーバ要件
Appleの記事に書いてある通りなのだが、簡単に言うとこういうことである。
- 次のうちのいずれかをルート証明書として持っている
- iOSがルート証明書として登録している
- ユーザかシステム管理者がルート証明書として登録している
- AES-128かAES-256共通鍵暗号を用いる。一時的な楕円曲線ディフィー・ヘルマン鍵共有アルゴリズムを使ったPerfect forward secrecy(仮に暗号化されたデータを盗聴して記録しておいても、将来的にも解読されないことが保証される)をサポートするアルゴリズムであるこれらのいずれかである必要がある
- TLS_ECDHE_ECDSA_WITH_AES_256_GCM_SHA384
- TLS_ECDHE_ECDSA_WITH_AES_128_GCM_SHA256
- TLS_ECDHE_ECDSA_WITH_AES_256_CBC_SHA384
- TLS_ECDHE_ECDSA_WITH_AES_256_CBC_SHA
- TLS_ECDHE_ECDSA_WITH_AES_128_CBC_SHA256
- TLS_ECDHE_ECDSA_WITH_AES_128_CBC_SHA
- TLS_ECDHE_RSA_WITH_AES_256_GCM_SHA384
- TLS_ECDHE_RSA_WITH_AES_128_GCM_SHA256
- TLS_ECDHE_RSA_WITH_AES_256_CBC_SHA384
- TLS_ECDHE_RSA_WITH_AES_128_CBC_SHA256
- TLS_ECDHE_RSA_WITH_AES_128_CBC_SHA
- サーバ証明書が2048ビット以上のRSAか256ビット以上のECCで署名されていて、ダイジェストアルゴリズムとしてSHA-2(256ビット以上)であること
サーバが問題なくこれらをサポートしているかは、Mac OS X上で
nscurl --ats-diagnostics https://[domain name]/と実行すればわかる。
Default ATS Secure Connectionの部分がResult : PASSとなっていればOKである。
- 投稿日:2019-08-21T11:37:46+09:00
[iOS13] ASWebAuthenticationSession用いたOAuth認証の変更点
はじめに
OAuth認証やASWebAuthenticationSession、などについてはここではふれません。
ASWebAuthenticationSession用いたOAuth認証をiOS12で実装しており、これからiOS13に対応する方法の一例を書きたいと思います。変更点
ASWebAuthenticationSessionのstartを呼び出す前に、presentationContextProviderを設定しなければいけないIn macOS, and for iOS apps with a deployment target of iOS 13 or later, after you call start, the session instance stores a strong reference to itself. To avoid deallocation during the authentication process, the session keeps the reference until after it calls the completion handler.
For iOS apps with a deployment target earlier than iOS 13, your app must keep a strong reference to the session to prevent the system from deallocating the session while waiting for authentication to complete.
これにより、以下の書き換えが必要になります。
iOS12.mself.webAuthenticationSession = [[ASWebAuthenticationSession alloc] initWithURL:[NSURL URLWithString:url] callbackURLScheme:nil completionHandler:^(NSURL *callbackURL, NSError *error) { // SessionToken の取得など self.webAuthenticationSession = nil; }]; [self.webAuthenticationSession start];↓
iOS13.mself.webAuthenticationSession = [[ASWebAuthenticationSession alloc] initWithURL:[NSURL URLWithString:url] callbackURLScheme:nil completionHandler:^(NSURL *callbackURL, NSError *error) { // SessionToken の取得など self.webAuthenticationSession = nil; }]; #if __IPHONE_OS_VERSION_MAX_ALLOWED >= 130000 if (@available(iOS 13.0, *)) { self.webAuthenticationSession.presentationContextProvider = uiViewController; // uiViewControllerについては後で記載 } #endif [self.webAuthenticationSession start];以下のように
presentationContextProviderにASWebAuthenticationPresentationContextProvidingProtocol を実装したインスタンスを設定すればいいだけです。self.webAuthenticationSession.presentationContextProvider = uiViewController;例えば
HogeLoginViewController.h#import <Foundation/Foundation.h> #import <UIKit/UIKit.h> #if __IPHONE_OS_VERSION_MAX_ALLOWED >= 130000 API_AVAILABLE(ios(13.0), macos(10.15)) @interface HogeLoginViewController : UIViewController <ASWebAuthenticationPresentationContextProviding> @end #endifHogeLoginViewController.m#import "HogeLoginViewController.h" #if __IPHONE_OS_VERSION_MAX_ALLOWED >= 130000 @implementation HogeLoginViewController { } ... - (ASPresentationAnchor)presentationAnchorForWebAuthenticationSession:(ASWebAuthenticationSession *)session { return view.window; } ... @end #endif問題点
これだと、認証システム基盤を作成するには、問題があります。
APIの引数にUI要素のものを渡し他場合、以下のような問題が出てくるからです。
- Androidと共通基盤の場合、引数が異なる
- 引数にUI要素なものを渡さないといけない?
- Unityなどで利用する場合、どうするの?
解決策は簡単で、
UIViewControllerを使わないだけです。解決策
HogeBridgeAPI.h#import <Foundation/Foundation.h> #if __IPHONE_OS_VERSION_MAX_ALLOWED >= 130000 API_AVAILABLE(ios(13.0), macos(10.15)) @interface HogeBridgeAPI : NSObject <ASWebAuthenticationPresentationContextProviding> @end #endifHogeBridgeAPI.m#import "HogeBridgeAPI.h" #if __IPHONE_OS_VERSION_MAX_ALLOWED >= 130000 @implementation HogeBridgeAPI { } - (ASPresentationAnchor)presentationAnchorForWebAuthenticationSession:(ASWebAuthenticationSession *)session { return UIApplication.sharedApplication.keyWindow; } @end #endifHogeBridgeAPIなるものを作成します。
return UIApplication.sharedApplication.keyWindow;
presentationAnchorForWebAuthenticationSessionの戻り値は、UIApplication.sharedApplication.keyWindowとすることでUIViewControllerを使わくても大丈夫です。あとは、 コンストラクタなどで
HogeBridgeAPIを生成self.webAuthenticationSession.presentationContextProvider = self.bridgeAPI;などしてあげれば解決します。
- 投稿日:2019-08-21T08:28:08+09:00
【Core Bluetooth】Objective-cでのBluetooth通信について
概要
Objective-cでのBluetooth接続についてまとめました。
CoreBluetoothを使用しIOS端末とBluetooth機器を接続、バッテリー等の機器情報の取得を行います。以下の流れで情報を取得します。
1.Blutooth機器の検索→Bluetooth機器の情報取得
2.Blutooth機器に接続
3.通信している情報の取得
4.通信内容から機器情報等の取得環境
Xcide10.3
Objective-c
端末:IOS12.4
Bluetooth機器:TrackR pixel初期設定
CoreBluetoothをインポートさせ、centralManagerの初期化を行います。
@import CoreBluetooth;

@interface ViewController () <CBCentralManagerDelegate, CBPeripheralDelegate, CBPeripheralManagerDelegate>

@property (nonatomic, strong) CBCentralManager *centralManager;
@property (nonatomic, strong) CBPeripheral *get_peripheral;
@property (nonatomic, strong) NSArray *get_services;
@property (nonatomic, strong) CBPeripheralManager *peripheralManager;

@end

- (void)viewDidLoad {
   [super viewDidLoad];

   //CBCentralManagerの初期化
   self.centralManager = [[CBCentralManager alloc] initWithDelegate:self queue:nil];
}

//セントラルマネージャ_状態変化
- (void)centralManagerDidUpdateState:(CBCentralManager *)central {
   NSLog(@"%ld", (long)central.state);
}
通信するBluetooth機器の情報取得
接続する際に、Bluetooth機器の情報が必要になります。
使用可能なBluetoothを検索してBluetooth機器が存在するか確認します。//スキャン_開始 [self.centralManager scanForPeripheralsWithServices:nil options:nil]; //スキャン_停止 [self.centralManager stopScan];呼び出されるメソッドの、peripheralから機器の情報を取得できます。
peripheral.identifierのUUIDを使用し、通信するBluetooth機器の情報のみ取得します。//スキャン結果_取得 - (void)centralManager:(CBCentralManager *)central didDiscoverPeripheral:(CBPeripheral *)peripheral advertisementData:(NSDictionary *)advertisementData RSSI:(NSNumber *)RSSI { //通信するBlutooth機器のUUID NSUUID *UUID = [[NSUUID alloc] initWithUUIDString:@"Bluetooth機器のUUID"]; if ([peripheral.identifier isEqual: UUID]) { //一致時のみ取得 NSLog(@"%@", peripheral); self.get_peripheral = peripheral; } }出力結果<CBPeripheral: 0x280f48000, identifier = Bluetooth機器のUUID, name = tkr, state = disconnected>ペリフェラルへ接続
Bluetooth機器の情報を使用し、Bluetooth機器に接続を行います。
//ペリフェラルに接続開始
[self.centralManager connectPeripheral:self.peripheral options:nil];
呼び出されるメソッドは、成功時と失敗時で2つあります。
//ペリフェラルに接続成功
- (void)centralManager:(CBCentralManager *)central didConnectPeripheral:(CBPeripheral *)peripheral {
   NSLog(@"接続に成功しました");
}

//ペリフェラルに接続失敗
- (void)centralManager:(CBCentralManager *)central didFailToConnectPeripheral:(CBPeripheral *)peripheral error:(NSError *)error {
   NSLog(@"接続に失敗しました");
}
サービスの取得
Bluetooth機器に接続が完了したら、Bluetoothで通信しているサービスを取得します。
//サービス_探索開始
self.get_peripheral.delegate = self;
[self.get_peripheral discoverServices:nil];
呼び出されるメソッドの、peripheral.servicesから通信しているサービスを取得できます。
//サービス_探索結果
- (void) peripheral:(CBPeripheral *)peripheral didDiscoverServices:(NSError *)error {
-
   if (error) {
      NSLog(@"error");
      return;
   }
   self.get_services = peripheral.services;

}
キャラクタリスティックの取得
取得したサービスからキャラクタリスティックを取得します。
サービスは複数あるため、各サービスごとにキャラクタリスティックを取得させる必要があります。
キャラクタリスティックの情報から端末等の情報を確認することができます。//キャラクタリスティック_探索開始 for (int i=0; i<self.get_services.count; i++) { NSLog(@"%@", self.get_services[i]); [self.get_peripheral discoverCharacteristics:nil forService:self.get_services[i]]; }//キャラクタリスティック_探索結果 - (void) peripheral:(CBPeripheral *)peripheral didDiscoverCharacteristicsForService:(CBService *)service error:(NSError *)error { if (error) { NSLog(@"error"); return; } NSLog(@"%@", service); }出力結果//Bluetooth機器情報 <CBService: 0x282b11ec0, isPrimary = YES, UUID = Device Information> <CBCharacteristic: 0x281a480c0, UUID = Manufacturer Name String, properties = 0x2, value = < xxxx >, notifying = NO> <CBCharacteristic: 0x281a48060, UUID = Model Number String, properties = 0x2, value = < xxxx >, notifying = NO> <CBCharacteristic: 0x281a48120, UUID = Firmware Revision String, properties = 0x2, value = < xxxx >, notifying = NO> <CBCharacteristic: 0x281a48180, UUID = Software Revision String, properties = 0x2, value = < xxxx >, notifying = NO> // バッテリー情報 <CBService: 0x280c8c540, isPrimary = YES, UUID = Battery> <CBCharacteristic: 0x283dd4120, UUID = Battery Level, properties = 0x12, value = <64>, notifying = NO> ・・・・参考
- 投稿日:2019-08-21T08:28:08+09:00
【CoreBluetooth】Objective-cでのBluetooth通信について
概要
Objective-cでのBluetooth接続についてまとめました。
CoreBluetoothを使用しIOS端末とBluetooth機器を接続、バッテリー等の機器情報の取得を行います。以下の流れで情報を取得します。
1.Blutooth機器の検索→Bluetooth機器の情報取得
2.Blutooth機器に接続
3.通信している情報の取得
4.通信内容から機器情報等の取得環境
Xcide10.3
Objective-c
端末:IOS12.4
Bluetooth機器:TrackR pixel初期設定
CoreBluetoothをインポートさせ、centralManagerの初期化を行います。
@import CoreBluetooth;

@interface ViewController () <CBCentralManagerDelegate, CBPeripheralDelegate, CBPeripheralManagerDelegate>

@property (nonatomic, strong) CBCentralManager *centralManager;
@property (nonatomic, strong) CBPeripheral *get_peripheral;
@property (nonatomic, strong) NSArray *get_services;
@property (nonatomic, strong) CBPeripheralManager *peripheralManager;

@end

- (void)viewDidLoad {
   [super viewDidLoad];

   //CBCentralManagerの初期化
   self.centralManager = [[CBCentralManager alloc] initWithDelegate:self queue:nil];
}

//セントラルマネージャ_状態変化
- (void)centralManagerDidUpdateState:(CBCentralManager *)central {
   NSLog(@"%ld", (long)central.state);
}
通信するBluetooth機器の情報取得
接続する際に、Bluetooth機器の情報が必要になります。
使用可能なBluetoothを検索してBluetooth機器が存在するか確認します。//スキャン_開始 [self.centralManager scanForPeripheralsWithServices:nil options:nil]; //スキャン_停止 [self.centralManager stopScan];呼び出されるメソッドの、peripheralから機器の情報を取得できます。
peripheral.identifierのUUIDを使用し、通信するBluetooth機器の情報のみ取得します。//スキャン結果_取得 - (void)centralManager:(CBCentralManager *)central didDiscoverPeripheral:(CBPeripheral *)peripheral advertisementData:(NSDictionary *)advertisementData RSSI:(NSNumber *)RSSI { //通信するBlutooth機器のUUID NSUUID *UUID = [[NSUUID alloc] initWithUUIDString:@"Bluetooth機器のUUID"]; if ([peripheral.identifier isEqual: UUID]) { //一致時のみ取得 NSLog(@"%@", peripheral); self.get_peripheral = peripheral; } }出力結果<CBPeripheral: 0x280f48000, identifier = Bluetooth機器のUUID, name = tkr, state = disconnected>ペリフェラルへ接続
Bluetooth機器の情報を使用し、Bluetooth機器に接続を行います。
//ペリフェラルに接続開始
[self.centralManager connectPeripheral:self.peripheral options:nil];
呼び出されるメソッドは、成功時と失敗時で2つあります。
//ペリフェラルに接続成功
- (void)centralManager:(CBCentralManager *)central didConnectPeripheral:(CBPeripheral *)peripheral {
   NSLog(@"接続に成功しました");
}

//ペリフェラルに接続失敗
- (void)centralManager:(CBCentralManager *)central didFailToConnectPeripheral:(CBPeripheral *)peripheral error:(NSError *)error {
   NSLog(@"接続に失敗しました");
}
サービスの取得
Bluetooth機器に接続が完了したら、Bluetoothで通信しているサービスを取得します。
//サービス_探索開始
self.get_peripheral.delegate = self;
[self.get_peripheral discoverServices:nil];
呼び出されるメソッドの、peripheral.servicesから通信しているサービスを取得できます。
//サービス_探索結果
- (void) peripheral:(CBPeripheral *)peripheral didDiscoverServices:(NSError *)error {
-
   if (error) {
      NSLog(@"error");
      return;
   }
   self.get_services = peripheral.services;

}
キャラクタリスティックの取得
取得したサービスからキャラクタリスティックを取得します。
サービスは複数あるため、各サービスごとにキャラクタリスティックを取得させる必要があります。
キャラクタリスティックの情報から端末等の情報を確認することができます。//キャラクタリスティック_探索開始 for (int i=0; i<self.get_services.count; i++) { NSLog(@"%@", self.get_services[i]); [self.get_peripheral discoverCharacteristics:nil forService:self.get_services[i]]; }//キャラクタリスティック_探索結果 - (void) peripheral:(CBPeripheral *)peripheral didDiscoverCharacteristicsForService:(CBService *)service error:(NSError *)error { if (error) { NSLog(@"error"); return; } NSLog(@"%@", service); }出力結果//Bluetooth機器情報 <CBService: 0x282b11ec0, isPrimary = YES, UUID = Device Information> <CBCharacteristic: 0x281a480c0, UUID = Manufacturer Name String, properties = 0x2, value = < xxxx >, notifying = NO> <CBCharacteristic: 0x281a48060, UUID = Model Number String, properties = 0x2, value = < xxxx >, notifying = NO> <CBCharacteristic: 0x281a48120, UUID = Firmware Revision String, properties = 0x2, value = < xxxx >, notifying = NO> <CBCharacteristic: 0x281a48180, UUID = Software Revision String, properties = 0x2, value = < xxxx >, notifying = NO> // バッテリー情報 <CBService: 0x280c8c540, isPrimary = YES, UUID = Battery> <CBCharacteristic: 0x283dd4120, UUID = Battery Level, properties = 0x12, value = <64>, notifying = NO> ・・・・参考
- 投稿日:2019-08-21T08:22:39+09:00
AndroidStudio / Xcodeで現在開いているファイルをファイルツリー上で表示する

- 投稿日:2019-08-21T07:07:05+09:00
iOS13でPopoverにもSafe Areaがやってきた。
iOS12まではSuperviewに対してConstraintを設定しても、Safe Areaに対してConstraintを設定しても、下図のように矢印を含まない領域にViewControllerが表示されていました。
しかし、
iOS13では、Superviewに対してConstraintを設定すると、
矢印を含む領域にまでViewControllerが表示されます。
右端からの距離でレイアウト設定していると右よりに見えてしまいます。
理由は下図のように
Superviewが矢印を含む領域まで拡大されているからです。
従来のように矢印を含まない領域内に表示するためにはSafe Areaを使用する必要があります。
対策
StoryboardでUse Safe Area Layout Guidesにチェックを付けます。
Superviewに対して設定しているConstraintを
Safe Areaに対して設定し直します。
直りました。
iOS13 beta 8、Xcode11 beta 6を元に作成しています。
リリース版では変更される可能性があります。


- 投稿日:2019-08-21T00:06:32+09:00
NSRangeからSwiftのRangeへの置換方法
はじめに
NSRangeはlocation(位置)とlength(長さ)の2つを持つ、範囲を表す構造体です。
SwiftではRangeとして範囲の扱いについて再定義されています。
NSを外せば置き換えられません。別物といってもいいくらいです。対比表
とりあえずNSRangeからRangeに置き換えたいときは、この対比表で置き換えてください。
NSRange Range 開始位置 location startIndex 長さ length count NSRange
文字列から取得する方法
NSString *text = @"つれづれなるままに";
NSRange rangeTest = [text rangeOfString:@"ままに"];
また、
NSMakeRangeで作成することもできます。NSRange range = NSMakeRange(3, 5);参照
NSRange - Foundation | Apple Developer Documentation
Range - Swift Standard Library | Apple Developer DocumentationNSRangeの使い方 - Object for cutie
swift - How to convert Range in NSRange? - Stack Overflow
[Swift2]Stringの Range と NSRange の変換 : 永遠日誌