- 投稿日:2019-08-21T23:29:55+09:00
配列をシャッフルするアルゴリズムを思いついたが既存だった話【JavaScript/Rubyサンプルコードあり】
0.前提
アルゴリズムそのものは筆者自身がゼロから考えました。もし他の方の考えたアルゴリズムと同じだったとしてもごめんなさい。
アルゴリズム界隈にそこまで詳しくないのでこれが有名なアルゴリズムだったとしても知らない
→追記:どうやら、フィッシャー–イェーツのシャッフル - Wikipediaという有名なヤツらしいです。本当に何も知らなかったんです。信じてください。ここから先、サンプルコードを書いてる途中で気づくまでウッキウキで解説してる筆者の展望をご覧ください。書き直すのも億劫なのでそのままにしておきます。1.アルゴリズム
さて、このアルゴリズムはもともと前回【JavaScript】重複のない乱数配列を作ってみた【ES6(ES2015)】でアルゴリズムを考えていたときに生まれたものです。もし気になるならそっちも見てみてください。
前回に続いて『アルゴリズムこうしん~♪』とかやろうと思いましたが今回はやめておきます。
先にアルゴリズムを説明しておくことにしましょう。サンプルコードは私が書ける言語の範囲()でこの下に書いておきます。
ひとまず、要素数5の配列で説明します。ほぼ前回のと同じですが笑。initAry:
添字 0 1 2 3 4 要素 kurorin kotone hime hina tyanmari この配列をシャッフルするよ!
0~4(
initAryの添字の最大値)の乱数を発生させて、initAryからその乱数の位置にある要素を一つ取り出し新しい配列randAryに入れるよ。randomNumber:
3
取り出す要素はinitAry[3]=hime
initAry:
添字 0 1 2 3 要素 kurorin kotone hina tyanmari randAry:
添字 0 要素 hime これを、initAryが空になるまで繰り返すよ。
0~3(initAryの添字の最大値)の乱数を発生させて、initAryからその乱数の位置にある要素を一つ取り出し配列randAryに入れるよ。randomNumber:
2
取り出す要素はinitAry[2]=hinainitAry:
添字 0 1 2 要素 kurorin kotone tyanmari randAry:
添字 0 1 要素 hime hina ・・・(略)・・・
randomNumber:
0
取り出す要素はinitAry[0]=kotone
initAry:
添字 要素 randAry:
添字 0 1 2 3 4 要素 hime hina kurorin tyanmari kotone さて、要素数
5の配列がシャッフルできたよ!
これを要素数nの配列でやればシャッフルできるよ!すっごーい!3.サンプルコード
そこまで難しくないと思うので、解説は簡略化します。
JavaScript(ES6)
//min以上max未満の乱数を発生させる関数
const getRandomInt =(min, max) => {
  min = Math.ceil(min);
  max = Math.floor(max);
  return Math.floor(Math.random() * (max - min)) + min;
}

//配列をシャッフルする関数
const getRandomAry = (ary) => {
  const initAry = ary.slice();
  let randAry = [];
  while(initAry.length > 0){
    randAry.push(initAry.splice(getRandomInt(0,initAry.length), 1).pop());
  }
  return randAry;
}
ES6(ES2015)のアロー関数を用いているので、非対応環境では
functionとか使って書いてください。
わざわざconst initAry = ary.slice();と二度手間を踏んでいるのは値渡しをするためです。これをしないと、参照渡しとなり、関数呼び出し時に引数として渡した配列が空になってしまうためです。アロー関数だと引数が配列の場合、参照渡し参照の値渡しになりその配列を破壊的に操作されるようですね・・・。別で記事まとめました→【JavaScript】配列を引数渡しすると破壊的に動作する話【メモ書き】Ruby
def get_random_array(initAry)
  randAry = Array.new
  while(initAry.length > 0)
    randAry.push(initAry.slice!(rand(initAry.length)))
  end
  return randAry
end
コード書いてて何故か処理が終わらないな・・・と思ってたら
slice!をsliceと書いていて破壊的メソッドになっていないからでした。
ってか、書いてみたけどArrayクラスにshuffleってメソッドあるじゃん。というわけでそれを使いましょう。
C++#include<vector>~サンプルコード作成途中の話~
・・・ん? なんかstd::shuffleってのがあるな?以下の実装では、フィッシャー - イェーツのシャッフルアルゴリズムが使用されている
shuffle - cpprefjp C++日本語リファレンス「フィッシャー - イェーツのシャッフル」・・・?
~Wikipediaを読む筆者~・・・。
・・・・・・。
一緒じゃねえか!!
誰がねェ・・・誰がどう見ても、おんなじやおんなじや思てェ!!
うわああああああああああああああああああああああああああん!!!!
・・・書きかけのサンプルコード、乗りかかった船だし
やってやろうじゃねえか!まあゆくどりさんは天才ですから?!?!
(何でも言うことを聞いてくれるアカネチャン風)
ということで動的配列vectorを使って書こうとしました。・・・・・・。
が。乱数生成の段階で詰まりました。DxLibくらいでしか触れたことのない私ではまだ無理でした。ヘッダとか色々読みましたが、最近のC++ではC言語のrand()やsrand()を使うのは非推奨なようで、よく理解してない私が「これがサンプルコードです」と提示すると界隈の方々に叩かれそうなので止めました。また理解できるようになってから覚えていたら帰ってきてここに書くことにします。
4.参考文献
JavaScriptで配列のコピー(値渡し) - Qiita
るりまサーチ(サンプルコード作成時リファレンスの検索に使用)
shuffle - cpprefjp C++日本語リファレンス5.さいごに
結局、思いついたのは既存アルゴリズムでした。まあ、このアルゴリズムを自分で思いついたのでよく理解できていますし、損はしないと思っています。また何か思いついたりしたら書きます。
ありがとうございました。
- 投稿日:2019-08-21T22:45:39+09:00
【RubyonRails入門】独自のヘルパーを作成する
[Rails]独自のヘルパーをつくる
1.ヘルパー
app/helpers/forms_helper.rbmodule FormsHelper def hello(name) "こんにちは、" + name + "さん。" end def check_age(age) if age.to_i >= 15 "ようこそ、お楽しみください。" else "このサイトは15歳以上限定です。" end end end■to_i と to_s
.to_i==> int型(数字)に変換する
.to_s==> string型(文字)に変換する2.ヘルパーを元にした、ビュー
app/views/forms/formtest.html.erb<%= hello("花子") %> <!-- こんにちは、花子さん。 -->app/views/forms/input_age.html.erb<%= check_age(25) %> <!-- ようこそ、お楽しみください。 --> <%= check_age(25) %> <!-- このサイトは15歳以上限定です。 -->
- 投稿日:2019-08-21T21:22:05+09:00
RSpec の Compound Matcher Expressions (合成マッチャ式) を使う際に not_to (〜でないこと) と同等の検証をする方法
はじめに
RSpec 3 から登場した Compound Matcher Expressions (合成マッチャ式) を使って、検証したい複数の事象を一つの
expectにまとめることができるようになりました。しかし、Compound Matcher Expressions では
not_to(「〜でないこと」) を使うことはできません。この記事では、Compound Matcher Expressions を使う際に、not_toと同等のテストを書くための方法を紹介します。TL;DR
Define Negated Matcher と組み合わせることで、
not_toに相当する反転マッチャを定義することができる。RSpec::Matchers.define_negated_matcher :not_start_with, :start_with RSpec::Matchers.define_negated_matcher :not_end_with, :end_with expect(alphabet).to not_start_with("あ").and not_end_with("ん")RSpec::Matchers.define_negated_matcher :not_end_with, :end_with expect(alphabet).to start_with("a").and not_end_with("ん")そもそも Compound Matcher Expressions (合成マッチャ式) とは何か?
RSpec のブログにわかりやすいコード例が紹介されています。
Compound Matcher Expressions - New in RSpec 3: Composable Matchers
上記リンク先のコード例を引用して簡単に説明します。
アルファベットが
"a"で始まり、"z"で終わることを検証したかったとします。RSpec 3 以前では、このように書く必要がありました。expect(alphabet).to start_with("a") expect(alphabet).to end_with("z")RSpec 3 で登場した Compound Matcher Expressions を使うと、上記のコードを以下のように書くことができるようになります。
expect(alphabet).to start_with("a").and end_with("z")
andを使うことで、二つのexpectを一つにまとめることができました。
andは二つの条件を両方満たす場合にパスしますが、どちらか片方のみ条件を満たす場合にパスするorも用意されています。たとえば、信号機の色が、赤、青、黄色のいずれかであることを検証したい場合は以下のように書くことができます。
expect(stoplight.color).to eq("red").or eq("green").or eq("yellow")問題点
本題に戻ります。
上記のコード例では「〜であること」を検証しているため、
toを使っています。「アルファベットが"a"で始まり、"z"で終わること」や「信号機の色が、赤、青、黄色のいずれかであること」のように。ときには、「〜でないこと」を検証したいこともあるでしょう。しかし、残念ながら Compound Matcher Expressions で
not_toを使うことはできません。Failures: 1) should not start with "a" and end with "z" Failure/Error: expect(alphabet).not_to start_with('a').and end_with('z') NotImplementedError: `expect(...).not_to matcher.and matcher` is not supported, since it creates a bit of an ambiguity. Instead, define negated versions of whatever matchers you wish to negate with `RSpec::Matchers.define_negated_matcher` and use `expect(...).to matcher.and matcher`.「
expect(...).not_to matcher.and matcherはサポートされていません。」というエラーが表示されてしまいます。解決策
実は先ほどのエラーメッセージの中に解決策が書かれていました。Define Negated Matcher (反転マッチャ) を使います。
Define Negated Matcher は、マッチャの条件を反転させたものを新たに定義することができます。
start_withは文字列の先頭が、引数で与えられた文字 (列) であることを検証するマッチャですが、反対に文字列の先頭が引数で与えられた文字 (列) ではないことを検証するマッチャを以下のように定義することができます。RSpec::Matchers.define_negated_matcher :not_start_with, :start_with
define_negated_matcherの第一引数に、定義したいマッチャの名前を指定し、第二引数に、反転したい対象のマッチャを指定します。これで、文字列の先頭が、引数で与えられた文字 (列) ではないことを検証できる
not_start_withマッチャが使えるようになりました。これを使って、「アルファベットが
"あ"で始まらず、"ん"で終わらないこと」を検証するコードを Compound Matcher Expressions と Define Negated Matcher を使って以下のように書くことができます。RSpec::Matchers.define_negated_matcher :not_start_with, :start_with RSpec::Matchers.define_negated_matcher :not_end_with, :end_with expect(alphabet).to not_start_with("あ").and not_end_with("ん")もちろん、「〜であること」と「〜でないこと」を同時に検証することもできます。たとえば「アルファベットが
"a"で始まり、"ん"で終わらないこと」を検証するコードは以下のように書くことができます。RSpec::Matchers.define_negated_matcher :not_end_with, :end_with expect(alphabet).to start_with("a").and not_end_with("ん")Compound Matcher Expressions はどういうときに有用か
Compound Matcher Expressions の利点は、単にまとめて書けることだけではありません。まとめて書かないと都合が悪いときに活躍します。
標準出力せずに他の検証もしたい場合
たとえば、以下のような実装コードがあったとします。
def alphabet
  puts 'abcdefghijklmnopqrstuvwxyz'
end
上記のコードは
putsを使ってアルファベットを標準出力しています。上記のコードにおいて、例外が発生しないことだけを検証するシンプルなテストを書くと以下のようになります。
expect { alphabet }.not_to raise_error上記のテストは正常に動作しますが、以下のように標準出力にアルファベットが表示されてしまいます。
abcdefghijklmnopqrstuvwxyz
.

Finished in 0.00476 seconds (files took 0.1303 seconds to load)
1 example, 0 failures
当然といえば当然なのですが、この標準出力を RSpec では表示しないようにするために、標準出力を検証する方法があります。
expect { alphabet }.to output("abcdefghijklmnopqrstuvwxyz\n").to_stdout_from_any_process上記のコードは
alphabetメソッド実行後の出力が"abcdefghijklmnopqrstuvwxyz\n"であることを検証しています。上記のテストを実行しても画面上にはアルファベットが表示されません。このように標準出力をチェックすると画面上には出力されないというテクニックが使えます。
ところが、例外が発生しないかどうかの検証と、出力の検証を別々の
expectで書くとやはりアルファベットが出力されてしまいます。expect { alphabet }.not_to raise_error expect { alphabet }.to output("abcdefghijklmnopqrstuvwxyz\n").to_stdout_from_any_processなぜなら、
expect { alphabet }.not_to raise_errorのほうでalphabetメソッドが実行されて標準出力されてしまうからです。これを解決するために、Compound Matcher Expressions が使えます。
RSpec::Matchers.define_negated_matcher :not_raise_error, :raise_error

expect { alphabet }.to not_raise_error.and output("abcdefghijklmnopqrstuvwxyz\n").to_stdout_from_any_process
例外が発生しないことを検証するマッチャ
not_raise_errorを Define Negated Matcher を使って定義します。そして、not_raise_errorとoutputを組み合わせて、一つのexpectで表現します。これにより、例外が発生しないことと出力が正しいことを検証しつつ、RSpec 実行時に画面にアルファベットを出力しないようにすることができます。
exit せずに他の検証もしたい場合
もう一つ別の例を挙げましょう。
def bye
  puts 'Bye!'
  exit
end
Bye!と表示して exit するコードです。このコードに対して、
Hello!と出力されずに、exitされることを検証したかったとします。素直に書くと以下のようなコードになります。
it 'does not output hello' do
  expect { bye }.not_to output("Hello!\n").to_stdout_from_any_process
end

it 'exits' do
  expect { bye }.to raise_error(SystemExit)
end
上記のテストは、失敗はしませんが正しくテストできていません。
Finished in 0.01792 seconds (files took 0.11834 seconds to load)
1 example, 0 failures
テストが成功している際に表示される
.が表示されていません。また、テストは 2 つあるにも関わらず1 exampleとなっています。実装コード内で exit するようなコードがある際に RSpec を実行すると、実際に
exitが実行された時点で RSpec が終了してしまいます。実装コードを実行するプロセスと RSpec を実行するプロセスが同じためです。実は、それを解消する方法として、
SystemExitという例外を補足すると、exit せずに次のテストに進むことができます。上記のテストコードはまさにそのテクニックが使われているのですが、標準出力を検証する
expectを実行した段階で exit されてしまっているのでそこで RSpec が終了してしまいます。これを解決するためには、やはり Compound Matcher Expressions を使って「
Hello!と出力されないこと」と「exitされること」を一つのexpectで表現します。RSpec::Matchers.define_negated_matcher :not_output, :output it 'does not output hello and exits' do expect { bye }.to not_output("Hello!\n").to_stdout_from_any_process.and raise_error(SystemExit) end上記のテストコードを実行すると正しくテストできます。
.

Finished in 0.02079 seconds (files took 0.1141 seconds to load)
1 example, 0 failures
まとめ
Compound Matcher Expressions で
not_toを使うことはできませんが、代わりに Define Negated Matcher を使ってnot_toに相当するマッチャを定義することで同等の検証を行う方法を紹介しました。最後の「Compound Matcher Expressions はどういうときに有用か」は若干こじつけ感がありますが、実際に自分がテストコードを書くなかで使ったテクニックです。
Ruby で CLI ツールを作る際に、標準出力したり、エラー時に exit したりする実装にすることはあるかと思います。
そういうときに Compound Matcher Expressions や Define Negated Matcher を使うと、検証したいテストが簡潔に書けるようになります。
参考にしたサイト
- 投稿日:2019-08-21T21:19:55+09:00
[Rails] ハッシュ入門
ハッシュ入門
二段階構造のハッシュの値をとる
d = {"test" => {"japanese" => 80, "science" => 60, "English" => 90}}"test"の中に、
さらに"japanese","science","English"のハッシュがある。===> "japanese"の中の"kobun"の値をとりたい!!
"test"の中の"japanese"の値をとる
d["test"]["japanese"]答えはシンプルでした。
逆に、
d["test"]["japanese"]は、
d => {"test" => {"japanese" => xxx}}
となることがわかります!
- 投稿日:2019-08-21T21:19:55+09:00
【RubyonRails入門】 ハッシュの値を取得する
ハッシュ入門
二段階構造のハッシュの値をとる
d = {"test" => {"japanese" => 80, "science" => 60, "English" => 90}}"test"の中に、
さらに"japanese","science","English"のハッシュがある。===> "japanese"の中の"kobun"の値をとりたい!!
"test"の中の"japanese"の値をとる
d["test"]["japanese"]答えはシンプルでした。
逆に、
d["test"]["japanese"]は、
d => {"test" => {"japanese" => xxx}}
となることがわかります!
- 投稿日:2019-08-21T20:20:58+09:00
RailsでCSVを出力する機能を実装(Shift_JIS対応)
最近の勉強で学んだ事を、ノート代わりにまとめていきます。
主に自分の学習の流れを振り返りで残す形なので色々、省いてます。
Webエンジニアの諸先輩方からアドバイスやご指摘を頂けたらありがたいです!CSVエクスポート(出力)
以下の記事を参考にさせて頂きました!
Ruby on RailsでCSV一覧出力する3つの方法まずはcsvでしっかり出力できるかを試したかったので参考にした記事の
①csv出力用のアクションを作成する方法を行いました!
これは記事にも書いている通りREST設計に背く形となるので1つのデメリットですね。
なぜならRESTfulに設計するとindexで処理すべき内容だからです。アクションはこのように定義しました。
def export
    @members = Member.all
    send_data render_to_string, filename: "members_#{Time.now.utc.strftime("%Y/%m/%d %H:%M:%S")}.csv", type: :csv
  end
いつ出力したのかをファイル名で確認できるようにこのようなコードを追記した感じです。
filename: "members_#{Time.now.utc.strftime("%Y/%m/%d %H:%M:%S")}.csv"あとはルーティングを設定し、csv出力ファイルであるexport.csv.rubyファイルを作成して出力したい値を設定します!
require 'csv'

CSV.generate do |csv|

    csv_column_names = [
        "アカウントID",
        "ユーザー名",
        "メールアドレス",
        "姓",
        "名",
        "性別"
    ]
    csv << csv_column_names

    @members.each do |member|
        csv_column_values = [
            member.account_id,
            member.user_name,
            member.email,
            member.last_name,
            member.first_name,
            member.gender
      ]
     csv << csv_column_values
  end
end
これで最後にファイル出力する為のリンクを作成したら終了です。
<%= link_to "csv出力",csv_export_path(format: :csv) %>エクセルで読み込むためのCSVファイルにする
csvファイルを無事出力できて喜んでいたのですがここで問題がなんとエクセルと開くと文字化けが発生!
原因を調査していると理由が判明RailsアプリケーションでCSV出力をしたファイルをExcelで開くと文字化ける。
理由はExcelがUTF-8のファイルをShift_JISで開こうとしてしまうため。エクセルはShift_JISしか対応してみたいな
なんやそれ〜めちゃくちゃめんどくさい笑この記事に書いているみたいに文字コードの問題を解決する為に「BOM」を使えば上手くいくようなのですが僕の場合は上手くいかず。
参考ページを見てこのようにしたら上手くいきました!
send_data render_to_string.encode(Encoding::Windows_31J, undef: :replace, row_sep: "\r\n", force_quotes: true), filename: "members_#{Time.now.utc.strftime("%Y/%m/%d %H:%M:%S")}.csv", type: :csv参考ページ
Rubyでエンコードのエラーの対処
RailsからShift-JISとUTF-8でCSV出力する
send_dataでファイルを書き出すときの日本語ファイル名の文字化け対策
ruby on rails で utf-8 から shift_jis にしたかった
[Rails] SJISのエクスポートでの「ActionView::Template::Error (U+2212 from UTF-8 to Windows-31J):」のエラー対応
- 投稿日:2019-08-21T19:23:46+09:00
Windows で Ruby on Ruby の 環境構築 を する
目的
- WindowsでRuby on Railsの開発環境を整えられるようにする。 ※これはRails6.0.0以前の方法です。現在はこの方法では環境構築ができない可能性があります。
この記事のターゲット
- WindowsにRuby on Railsの開発環境を立ち上げたい方
- Ruby on Railsのローカル開発環境の立ち上げがうまくいかず、あきらめたくなってきた方
ローカル開発環境で必要なもの
本記事はMSYS2とRubyがすでにインストールされていること前提で進める
MSYS2とRubyのインストール方法はこちら
- MSYS2
- Ruby
- SQLite3
- Rails
SQLite3のインストール
- 下記サイトにアクセス
https://sqlite.org/index.html

- 画像のところクリック

- 画像のところクリック自分のPCにビット数合わせたものをクリックする

- 取得したsqlite-dll-win64-x64-3290000.zipを展開

- 「sqlite3.dll」というファイルを「C:¥Ruby25-x64¥bin」へコピー

- 下記サイトにアクセス

- 画像のところクリック
https://sqlite.org/index.html
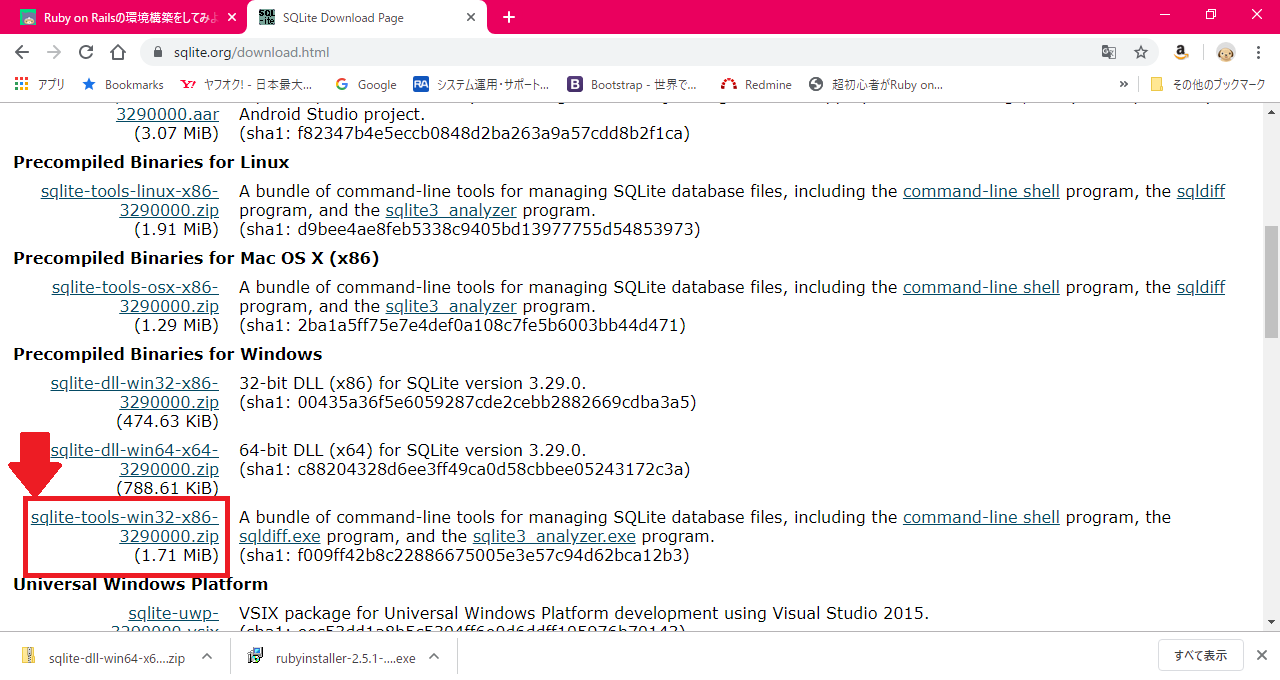
- 取得したsqlite-tools-win32-x86-3290000.zip展開

- 「sqlite3.exe」というファイルを「C:¥Ruby25-x64¥bin」へコピー

Ruby on Railsのインストール
- プロンプトを開いて下記コマンドを実行
gem install rails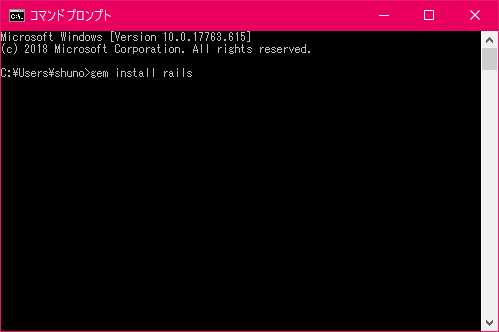
- 下記の様になればOK

- プロンプトを開いて下記コマンドを実行
rails -v- 下記の様になればOK

ためしにアプリ作ってみる
- 任意のフォルダに移動して下記コマンドを実行
rails new sample_app
1. エラーが出たので同じプロンプト内で下記コマンドを実行cd sample_app ridk exec pacman -S mingw-w64-x86_64-sqlite3
- Yを入力してエンター

- 何もなく終われば下記コマンドを実行
bundle install
- 下記画像見たいになってればOK

- PCを再起動する
サーバを立てる
- フォルダsample_appの中で下記コマンドを実行してサーバを立てる
cd sample_app
rails s
1. 下記の画像のようになってればサーバ立ってる
1. ブラウザ開いて新しいタブのURL打つところに下記のURLを打つhttp://localhost:3000/
1. 下記の画像に用なかわいい画面が見れたら無事サーバ起動完了!!お疲れさん
1. ローカルサーバを止めたいときはフォルダsample_appの中で下記コマンドを実行control + c


- 投稿日:2019-08-21T16:13:09+09:00
Ruby Mailで添付ファイルを付ける方法、どこかで変わった?
Ruby Mailで添付ファイルを付ける方法ですが、検索してすぐに見つかる方法だとエラーが発生してしまいました。
環境はMail 2.7.1 です。
$ gem list mail
mail(2.7.1)
エラーになった方法
require 'mail'

mail = Mail.new do
  from    "from@example.com"
  to      "to@example.com"
  subject "testmail"
  body    "This mail is test."
end

# この行がエラーになる
mail.add_file = "./attachment_file.txt"

# 以下省略
発生したエラーは
undefined method `add_file='です。
Did you mean? add_fileと言われました。ということは、add_fileはメソッドになっている、、、?
動作した方法
require 'mail'

mail = Mail.new do
  from    "from@example.com"
  to      "to@example.com"
  subject "testmail"
  body    "This mail is test."
end

# これなら動く
mail.add_file("./attachment_file.txt")

# 送信するところまで省略せずに記載
# 192.168.0.1にSMTPサーバがあると仮定
options = {
  address: '192.168.0.1',
  port: 25
}

mail.charset = 'utf-8'
mail.delivery_method(:smtp, options)
mail.deliver
いつから変更になったのかは調べきれませんでしたが、少なくともMail 2.2.17のときにはすでにメソッドになっていたようです。
https://www.rubydoc.info/gems/mail/2.2.17/Mail%2FMessage:add_file
- 投稿日:2019-08-21T16:13:09+09:00
Ruby Mailで添付ファイルを付ける方法、いつから変わった?
Ruby Mailで添付ファイルを付ける方法ですが、検索してすぐに見つかる方法1だとエラーが発生してしまいましたが、それを解決しました。
環境はMail 2.7.1 です。
$ gem list mail
mail(2.7.1)
エラーになった方法
require 'mail' #gem install mail

mail = Mail.new do
  from    "from@example.com"
  to      "to@example.com"
  subject "testmail"
  body    "This mail is test."
end

# この行がエラーになる
mail.add_file = "./attachment_file.txt"

# 以下省略
発生したエラーは
undefined method `add_file='です。
Did you mean? add_fileと言われました。ということは、add_fileはメソッドになっている、、、?
動作した方法
require 'mail' #gem install mail

mail = Mail.new do
  from    "from@example.com"
  to      "to@example.com"
  subject "testmail"
  body    "This mail is test."
end

# これなら動く
mail.add_file("./attachment_file.txt")

# 送信するところまで省略せずに記載
# 192.168.0.1にSMTPサーバがあると仮定
options = {
  address: '192.168.0.1',
  port: 25
}

mail.charset = 'utf-8'
mail.delivery_method(:smtp, options)
mail.deliver
いつから変更になったのかは調べきれませんでしたが、少なくともMail 2.2.17のときにはすでにメソッドになっていたようです。
https://www.rubydoc.info/gems/mail/2.2.17/Mail%2FMessage:add_file検索結果を鵜呑みにせず、公式ドキュメントを確認するのは大事ですね。
執筆時点=2019/8/21では、2015年のQiita記事がトップヒットでした。 ↩
- 投稿日:2019-08-21T16:09:06+09:00
GitHubでセキュリティ脆弱性のアラートが来てビビりながら対応した話
はじめに
いつも通りポートフォリオを作っていた時のこと、自分のデポジトリーを見た時に
いきな怖いマークの付いた通知が来ていました。
なんのアラートなのか確認をしてみるとnokogiriに脆弱性が見つかったらしく早くバージョンをアップしろとのこと。
すぐさまバージョンを上げようと思ったのですが、なんか「Gemfile.lock」を書き換えろと言われているみたいなのですが、変更するのは「Gemfile」じゃないの?と疑問に思い調べながらバージョンをあげることにしました。
1.「Gemfile」と「Gemfile.lock」の違いって何?
1-1.Gemfileについて
Gemfileとは、使用するgem(パッケージ)を記入することでbundle installコマンドを実行すればGemfileに記述されているgemの中でインストールされていないものを見つけてインストールを実行してくれる。
1-2.Gemfile.lockについて
Gemfile.lockとは、Gemfileを元に実際にインストールされたgemを記録しており、インストールされているバージョンまで記載している。
1-3.両ファイルの違い
Gemfileは、インストールするgemを指定するファイル
Gemfile.lockは、実際にインストールされたものを記載したファイルインストールの内容をいじるのはGemfileで間違っていないみたいなのでGemfileに加筆をしていきます。
2.バージョンアップまでの手順
2-1.現状のGemfileの中身
Gemfilesource 'https://rubygems.org' git_source(:github) { |repo| "https://github.com/#{repo}.git" } ruby '2.5.5' # Bundle edge Rails instead: gem 'rails', github: 'rails/rails' gem 'rails', '~> 5.2.3' # Use sqlite3 as the database for Active Record gem 'sqlite3' # Use Puma as the app server gem 'puma', '~> 3.11' # Use SCSS for stylesheets gem 'sass-rails', '~> 5.0' # Use Uglifier as compressor for JavaScript assets gem 'uglifier', '>= 1.3.0' # See https://github.com/rails/execjs#readme for more supported runtimes # gem 'mini_racer', platforms: :ruby gem 'active_hash' gem 'nokogiri' ...(省略)見ての通り特にバージョンを指定していないなかったみたいです。
2-2.バージョンの指定
Gemfile...(省略) gem 'nokogiri', ">= 1.10.4" ...(省略)GitHubで通知された通りに、1.10.4以上をインストールするように記述します。
2-2.バージョンのアップデート
$ gem update nokogiri数分待ったらアップデートの完了
2-3.GitHubにマージ後
アップデートが完了しましたので、そのままGitHubにマージをしてGitHubを覗いてみると
まだアラートが出ていました;;;
ファイルを見直してみると、どうもGemfile.lockの記述が変わっていないみたいなので
反映される条件を探してみました。2-4.Gemfile.lockに反映するには
bundle installをしないと、Gemfileに反映されないとのことなので改めて更新のために実行
$ bundle install
The dependency tzinfo-data (>= 0) will be unused by any of the platforms Bundler is installing for. Bundler is installing for ruby but the dependency is only for x86-mingw32, x86-mswin32, x64-mingw32, java. To add those platforms to the bundle, run `bundle lock --add-platform x86-mingw32 x86-mswin32 x64-mingw32 java`.
Fetching gem metadata from https://rubygems.org/............
Fetching gem metadata from https://rubygems.org/.
You have requested:
  nokogiri >= 1.10.4

The bundle currently has nokogiri locked at 1.10.3.
Try running `bundle update nokogiri`

If you are updating multiple gems in your Gemfile at once,
try passing them all to `bundle update`
めっちゃエラー吐いた。
2-5.再・Gemfile.lockに反映するには
$ bundle update nokogiri言われた通りにbundle update nokogiriを実行したらGemfile.lockも自動で反映されました!
とわ言え、アラートが消えるかわからないのでひとまずGitHubにマージしてTOPを確かめてみると...
無事消えてました。
3.その他
gem updateとbundle updateの違いが謎なので次回以降詳しく調べてみます。(余力があれば記事にします。)
検索クエリには「gem update vs bundle update」なんてものもあるぐらいなので調べてみるのが面白そうな気がしています。


- 投稿日:2019-08-21T15:27:58+09:00
『レストラン口コミサイト』の制作過程
はじめに
ポートフォリオ用で制作したサイトのまとめです。
現在の進行状況を随時更新していきます。現状
現在やっている作業
画像が編集画面で出ないので、修正中
ブックマーク機能の実装
dockerの導入実装済み機能
レストラン投稿機能
レストラン名での検索機能
ジャンルやシーンでの検索機能
コメント機能
ユーザー登録、削除機能
投稿の削除機能未実装機能(実装予定)
単体テスト
統合テスト
管理ユーザー機能アプリ概要
使用した技術
今回はRails+mysql+AWS+bootstrapでアプリを作っていきます。
AWSではEC2+S3を使用し、デプロイをしました。
credentials.yml.encのまとめ記事
AWSデプロイでのエラーまとめ解決したい事とアプリへの想い
アプリを作ろうとしたキッカケはレストランの口コミサイトは数多くあるが、数が多すぎて大事な日にいく様なレストラン
(グランメゾン)の情報を探すのに困っていました。
みんなも同じ様な経験をしているのと、私が元調理師と言うのも合わさってかよく友達からオススメのレストランを聞かれる事があったので、私の知っているレストランをベースにまとめようとしたのがキッカケです。出来ること、価値
オススメのレストランの投稿と、その投稿に対してコメントする事も出来ます。
簡単にコメント出来る様にしたかったのでログイン無しで出来るようにしました。
また、グランメゾンの様なレストランの場合、値段や場所よりもお店の雰囲気であったり、利用目的が優先されるので、利用シーンの登録とそこからの検索機能を実装しました。課題と反省
①如何に投稿の質を保つか(機能面)
元々は1ユーザー1投稿しか出来ない仕様で進めていましたが、投稿しようとしたレストランが既にあった場合、どうするかと言う問題が発生してしまいました。
既にあった場合、投稿出来なくするか投稿出来て、なんらかの情報で紐づけるの二択ですがどちらも根本的解決にはなりませんでした。
投稿出来なくする場合、他の投稿をする→質を保つと言う意味でこの方式を取ろうと思ったのに、それが出来なくなってしまう
情報で紐づける→必ず共通する情報が少ない。店名は特に鮨屋や料亭に多いですが、同じ様な名前が多いです。また、鮨〇〇を〇〇と表記すると紐付けられなくなってしまいます。
なので紐づけするとしたら住所や電話番号で紐づける必要があると思いました。書いている段階で気が付いたので、その様な形で実装していきます。②テストを後回しにしてしまった(実装面)
実際にアプリを公開する想定で進めていましたが、テストを後回しにしてしました。都度書いていくのが理想ですが、後回しにしてしまったので、次に作るときには反省を生かして書いていきたいです。詰まった所
主にQiitaにてまとめています。
都度追加します。まとめ
まとまり次第追加します。
- 投稿日:2019-08-21T14:43:27+09:00
配列の繰り返し処理でのエラー
lines=[r1,r2,r3,r4,r5]
g1=r2-r1  #lines[1]-lines[0]
g2=r3-r2  #lines[2]-lines[1]
g3=r4-r3  #lines[3]-lines[2]
g4=r5-r4  #lines[4]-lines[3]

puts g1
puts g2
puts g3
puts g4
という処理があり
なんとか簡略化出来ないか試行錯誤し
days = [] #空の配列
  n=0
  while n<lines.length               #配列の要素の数だけ繰り返し
  days << lines[n+1]-lines[n]        #新しく作りたい配列の要素
  n+=1
  end

  days.each do|n|
  puts n
  end
としたがエラーが出てしまった。
undefined method `-' for nil:NilClass (NoMethodError)teratailで質問をしたところ
配列の要素n<lines.lengthが最大値4であり
最大値4の時days << lines[n+1]-lines[n]がlines[5]という存在しない
nilになっておりnilには演算子が使えないのでエラーが出るということでした。。。なので条件を
n<lines.length-1とすればエラーなく実行できます。合わせて他の方から
each_consというメソッドを教えていただいてこれを使うとdays = lines.each_cons(2).map{ |a, b| b - a } days.each do |n| puts n endと短く実装できます。
とても便利なものを教えていただいて感謝です。
- 投稿日:2019-08-21T12:09:48+09:00
Rubyのgemを公開しつつCircleCIでCI/CD(継続的インティグレーション/継続的デリバリー)を体験しよう
Rubyを触り始めて半年以上経ちました……
半年以上経った記念としてqiita_trend(Qiitaのトレンドをたったの10秒で取得できるgem)を作成し公開しました。この記事はqiita_trendを作る過程で手に入れた知見をまとめたものになります
qiita_trendのgemを使用してSlackにQiitaのトレンドを通知するスクリプトを作成したのでもし良かったら使ってください
dodonki1223/qiita_trend_slack_notifier: qiita_trendを使用したslack通知スクリプト
gemを一から作成する方法、CI/CD(継続的インティグレーション/継続的デリバリー)を体験することを目的とした記事になります
具体的にはgemを作成しそのgemのブランチのコードに変更があるたび、CircleCIが実行され、RuboCop(静的解析ツール)、RSpec(テスト)が実行されるようになります
masterブランチに限ってはRuboCop(静的解析ツール)、RSpec(テスト)が成功したらRubyGemsに自動デプロイする
また失敗した時はデプロイされない状態を作っていきます
gemを公開する
CircleCIの凄さを確認するためにまずはgemを公開します
gemの公開方法についてはいろいろな方が記事にしています上記記事も参考にしつつgemを作成していきます
gemの雛形を作成する
前準備
前準備として
gemのアップデート、Bundlerのアップデートを行うgem自体をアップデートする
$ gem update --system
Latest version already installed. Done.
Bundler自体をインストールする(インストールしていない場合)
$ gem install bundler
Successfully installed bundler-2.0.2
Parsing documentation for bundler-2.0.2
Done installing documentation for bundler after 2 seconds
1 gem installed
Bundlerのアップデート
$ gem update bundler
Updating installed gems
Nothing to update
gemの雛形を作成する
今回は
dodonki_sampleというgemを作成していきます。-tオプションはテスト関連のファイルを作成してくれます。$ bundle gem dodonki_sample -t Creating gem 'dodonki_sample'... create dodonki_sample/Gemfile create dodonki_sample/lib/dodonki_sample.rb create dodonki_sample/lib/dodonki_sample/version.rb create dodonki_sample/dodonki_sample.gemspec create dodonki_sample/Rakefile create dodonki_sample/README.md create dodonki_sample/bin/console create dodonki_sample/bin/setup create dodonki_sample/.gitignore create dodonki_sample/.travis.yml create dodonki_sample/.rspec create dodonki_sample/spec/spec_helper.rb create dodonki_sample/spec/dodonki_sample_spec.rb Initializing git repo in /Users/dodonki/Project/dodonki_sample Gem 'dodonki_sample' was successfully created. For more information on making a RubyGem visit https://bundler.io/guides/creating_gem.html
-tオプションを指定しないで実行した場合は下記の結果になりますbundle gem dodonki_sample Creating gem 'dodonki_sample'... create dodonki_sample/Gemfile create dodonki_sample/lib/dodonki_sample.rb create dodonki_sample/lib/dodonki_sample/version.rb create dodonki_sample/dodonki_sample.gemspec create dodonki_sample/Rakefile create dodonki_sample/README.md create dodonki_sample/bin/console create dodonki_sample/bin/setup create dodonki_sample/.gitignore Initializing git repo in /Users/dodonki/Project/dodonki_sample Gem 'dodonki_sample' was successfully created. For more information on making a RubyGem visit https://bundler.io/guides/creating_gem.html今回はRSpecを実行してテストを自動化するので
-tオプションを付けてください作成されるファイルについて
詳しくはBundlerのドキュメントを確認してください
gem名について
gem名は既存のgemとかぶらないようにRubyGemsと
gem searchコマンドを使用して確認しましょうRubyGemsにて検索
gem searchコマンド検索
$ gem search dodonki_sample *** REMOTE GEMS ***【Ruby】gemの作り方から公開までの記事のgemの名付けにおける注意1を参考にさせていただきました
gem名で使用する-(ハイフン)と_(アンダーバー)の違い
-(ハイフン)で作成した場合
$ bundle gem dodonki-sample -t Creating gem 'dodonki-sample'... create dodonki-sample/Gemfile create dodonki-sample/lib/dodonki/sample.rb create dodonki-sample/lib/dodonki/sample/version.rb create dodonki-sample/dodonki-sample.gemspec create dodonki-sample/Rakefile create dodonki-sample/README.md create dodonki-sample/bin/console create dodonki-sample/bin/setup create dodonki-sample/.gitignore create dodonki-sample/.travis.yml create dodonki-sample/.rspec create dodonki-sample/spec/spec_helper.rb create dodonki-sample/spec/dodonki/sample_spec.rb Initializing git repo in /Users/dodonki/Project/dodonki-sample Gem 'dodonki-sample' was successfully created. For more information on making a RubyGem visit https://bundler.io/guides/creating_gem.html_(アンダーバー)で作成した場合
$ bundle gem dodonki_sample -t Creating gem 'dodonki_sample'... create dodonki_sample/Gemfile create dodonki_sample/lib/dodonki_sample.rb create dodonki_sample/lib/dodonki_sample/version.rb create dodonki_sample/dodonki_sample.gemspec create dodonki_sample/Rakefile create dodonki_sample/README.md create dodonki_sample/bin/console create dodonki_sample/bin/setup create dodonki_sample/.gitignore create dodonki_sample/.travis.yml create dodonki_sample/.rspec create dodonki_sample/spec/spec_helper.rb create dodonki_sample/spec/dodonki_sample_spec.rb Initializing git repo in /Users/dodonki/Project/dodonki_sample Gem 'dodonki_sample' was successfully created. For more information on making a RubyGem visit https://bundler.io/guides/creating_gem.html作成されるディレクトリ構造が違うことに気づくでしょう
これはrequireでgemを呼び出す時の呼び出し方法が変わることを意味していますRubyGemsのドキュメントよりgem名とrequiereの関係とクラスとモジュールの関係については以下のようになるようです
GEM NAME REQUIRE STATEMENT MAIN CLASS OR MODULE ruby_parser require 'ruby_parser' RubyParser rdoc-data require 'rdoc/data' RDoc::Data net-http-persistent require 'net/http/persistent' Net::HTTP::Persistent net-http-persistent require 'net/http/persistent' Net::HTTP::Persistent 【Ruby】gemの作り方から公開までの記事のgemの名付けにおける注意2を参考にさせていただきました
.gemspecファイルの変更
ディレクトリ直下にある
gem名.gemspecファイルを編集します。基本的にはTODOと書かれている箇所の修正を行います。今回は詳しいことはあまり説明しません。修正前ソース
lib = File.expand_path("lib", __dir__)
$LOAD_PATH.unshift(lib) unless $LOAD_PATH.include?(lib)
require "dodonki_sample/version"

Gem::Specification.new do |spec|
  spec.name          = "dodonki_sample"
  spec.version       = DodonkiSample::VERSION
  spec.authors       = ["dodonki1223"]
  spec.email         = ["自分のemailが設定されています"]

  spec.summary       = %q{TODO: Write a short summary, because RubyGems requires one.}
  spec.description   = %q{TODO: Write a longer description or delete this line.}
  spec.homepage      = "TODO: Put your gem's website or public repo URL here."

  spec.metadata["allowed_push_host"] = "TODO: Set to 'http://mygemserver.com'"

  spec.metadata["homepage_uri"] = spec.homepage
  spec.metadata["source_code_uri"] = "TODO: Put your gem's public repo URL here."
  spec.metadata["changelog_uri"] = "TODO: Put your gem's CHANGELOG.md URL here."

  # Specify which files should be added to the gem when it is released.
  # The `git ls-files -z` loads the files in the RubyGem that have been added into git.
  spec.files         = Dir.chdir(File.expand_path('..', __FILE__)) do
    `git ls-files -z`.split("\x0").reject { |f| f.match(%r{^(test|spec|features)/}) }
  end
  spec.bindir        = "exe"
  spec.executables   = spec.files.grep(%r{^exe/}) { |f| File.basename(f) }
  spec.require_paths = ["lib"]

  spec.add_development_dependency "bundler", "~> 2.0"
  spec.add_development_dependency "rake", "~> 10.0"
  spec.add_development_dependency "rspec", "~> 3.0"
end
gemの説明情報をセット
僕の作成したqiita_trendの場合は下記のようになっています
  spec.summary       = 'Easy to get trend for Qiita in 10 seconds'
  spec.description   = 'Easy to get trend for Qiita in 10 seconds'
  spec.homepage      = 'https://github.com/dodonki1223/qiita_trend'
必要のない箇所をコメントアウト
下記のTODOの部分はコメントアウトします。gemの追加情報なのでコメントアウトしてしまっても問題ありません
詳しくは公式ドキュメントを確認してください
  # spec.metadata["allowed_push_host"] = "TODO: Set to 'http://mygemserver.com'"

  # spec.metadata["homepage_uri"] = spec.homepage
  # spec.metadata["source_code_uri"] = "TODO: Put your gem's public repo URL here."
  # spec.metadata["changelog_uri"] = "TODO: Put your gem's CHANGELOG.md URL here."
ライセンス情報をセット
spec.homepageの下にライセンス情報を追加します。
MITライセンスについてはこちらを確認くださいspec.license = 'MIT'gem内で使用するgemを追加する
追加形式は下記のようになっています
# プログラム内で使用するgemの場合は
spec.add_dependency 'gem名'

# 開発時に使用するgemの場合
spec.add_development_dependency 'gem名'
今回はCircleCIでCIの凄さを試すために下記gemを追加します
- RSpec JUnit Formatter(JUnit形式でテスト結果を出力してくれるツール)
- CircleCIでテストを実行する時に必要なため(CircleCIのドキュメントにかかれています)
- RuboCop(静的解析ツール)
- SimpleCov(テストカバレッジ確認ツール)
- YARD(ドキュメント自動生成ツール)
  spec.add_development_dependency 'rspec_junit_formatter'
  spec.add_development_dependency 'rubocop', '~> 0.62'
  spec.add_development_dependency 'rubocop-rspec'
  spec.add_development_dependency 'simplecov'
  spec.add_development_dependency 'yard'
.gemspecファイルの修正結果
lib = File.expand_path("lib", __dir__)
$LOAD_PATH.unshift(lib) unless $LOAD_PATH.include?(lib)
require "dodonki_sample/version"

Gem::Specification.new do |spec|
  spec.name          = "dodonki_sample"
  spec.version       = DodonkiSample::VERSION
  spec.authors       = ["dodonki1223"]
  spec.email         = ["自分のemailが設定されています"]

  spec.summary       = 'dodonki sample gem file'
  spec.description   = 'dodonki sample gem file'
  spec.homepage      = 'https://github.com/dodonki1223/dodonki_sample'
  spec.license       = 'MIT'

  # spec.metadata["allowed_push_host"] = "TODO: Set to 'http://mygemserver.com'"

  # spec.metadata["homepage_uri"] = spec.homepage
  # spec.metadata["source_code_uri"] = "TODO: Put your gem's public repo URL here."
  # spec.metadata["changelog_uri"] = "TODO: Put your gem's CHANGELOG.md URL here."

  # Specify which files should be added to the gem when it is released.
  # The `git ls-files -z` loads the files in the RubyGem that have been added into git.
  spec.files         = Dir.chdir(File.expand_path('..', __FILE__)) do
    `git ls-files -z`.split("\x0").reject { |f| f.match(%r{^(test|spec|features)/}) }
  end
  spec.bindir        = "exe"
  spec.executables   = spec.files.grep(%r{^exe/}) { |f| File.basename(f) }
  spec.require_paths = ["lib"]

  spec.add_development_dependency "bundler", "~> 2.0"
  spec.add_development_dependency "rake", "~> 10.0"
  spec.add_development_dependency "rspec", "~> 3.0"
  spec.add_development_dependency 'rspec_junit_formatter'
  spec.add_development_dependency 'rubocop', '~> 0.62'
  spec.add_development_dependency 'rubocop-rspec'
  spec.add_development_dependency 'simplecov'
  spec.add_development_dependency 'yard'
end
.gemspecファイルの設定項目について
公式のドキュメントに詳しく書かれているので参照すること
gemをインストールする
$ bundle install --path vendor/bundle.gitignoreにvendorディレクトリを除外する設定を追加(
/vendor/の記述を追加)/.bundle/ /.yardoc /_yardoc/ /coverage/ /doc/ /pkg/ /spec/reports/ /tmp/ /vendor/ # rspec failure tracking .rspec_status /cache/ /spec/vcr/MITのライセンスファイルを追加する
下記コマンドを実行してLICENSE.txtファイルを作成してください
$ touch LICENSE.txtMIT Licenseの原文をコピーし作成したLICENSE.txtに貼り付けて
<YEAR>、<COPYRIGHT HOLDER>をいい感じに変更してください「Hello World」を出力するプログラムを作成する
lib/dodonki_sample.rbの修正
lib/dodonki_sample.rbのファイルを編集します修正前ソース
require "dodonki_sample/version"

module DodonkiSample
  class Error < StandardError; end
  # Your code goes here...
end
修正後ソース
require "dodonki_sample/version"

module DodonkiSample
  def self.test
    'Hello World'
  end
end
動作確認
bin/consoleコマンドを実行するとirbが立ち上がるのでDodonkiSample.testを実行しHello Worldが表示されればOKです$ bin/console irb(main):001:0> DodonkiSample.test => "Hello World"Githubにpushする
$ git add .

$ git commit -m 'first commit'

# リモートリポジトリの設定を追加する
# 「https://github.com/dodonki1223/dodonki_sample.git」ここは適宜変更してください
$ git remote add origin https://github.com/dodonki1223/dodonki_sample.git

$ git push -u origin master
RubyGemsに登録しデプロイする
RubyGemsにアカウントを作成する
- 新規登録ページにアクセスしアカウントを作成してください
Gemコマンドを使うための設定
プロフィール編集画面にアクセスし下記コマンドをローカルで実行してください
$ curl -u user_name https://rubygems.org/api/v1/api_key.yaml > ~/.gem/credentials; chmod 0600 ~/.gem/credentialsこの作業はなくても良いかも知れません……
RubyGemsにデプロイする
Bundlerを使ってビルドとデプロイを行います
gemをビルド
フォルダ直下のpkgフォルダの中に作成されます
$ bundle exec rake build
dodonki_sample 0.1.1 built to pkg/dodonki_sample-0.1.1.gem.
gemのデプロイ
$ bundle exec rake release
dodonki_sample 0.1.1 built to pkg/dodonki_sample-0.1.1.gem.
Tagged v0.1.1.
Pushed git commits and tags.
Pushing gem to https://rubygems.org...
Successfully registered gem: dodonki_sample (0.1.1)
Pushed dodonki_sample 0.1.1 to rubygems.org
エラーがでる場合
変更ファイルがある場合に下記のようなエラーが出ます
$ bundle exec rake release
dodonki_sample 0.1.1 built to pkg/dodonki_sample-0.1.1.gem.
rake aborted!
There are files that need to be committed first.
/Users/dodonki/.anyenv/envs/rbenv/versions/2.6.2/bin/bundle:23:in `load'
/Users/dodonki/.anyenv/envs/rbenv/versions/2.6.2/bin/bundle:23:in `<main>'
Tasks: TOP => release => release:guard_clean
(See full trace by running task with --trace)
git statusで確認できる変更ファイルがあるのでcommitしてpushしてからもう一度デプロイ作業をしましょう
version.rbファイルのバージョンを上げた時bundle installし忘れてよくこのエラーが出ました……その他のビルド方法
Gemコマンドを使用してビルドする方法もあります
gemのビルド
bundle exec rake buildとの違いはフォルダ直下に出来上がることです$ gem build gem_name.gemspecビルドについて
The best way to build a gem is to use a Rakefile and the Gem::PackageTask which ships with RubyGems.
と書かれています。
bundle exec rake buildはRakefileでGem::PackageTaskを使用しているのでbundle exec rake buildを使うのが良さそうですデプロイ完了
こんな感じで表示されていればgemの公開完了です!!
CircleCIを導入しテストを自動化(CI/継続的インティグレーション)する
基本的にはCircleCIのドキュメント通りに導入していきます
CircleCIのconfig.ymlファイルを作成する
ディレクトリ直下に
.circleci/config.ymlを作成します$ mkdir .circleci $ touch .circleci/config.ymlRubyプロジェクト用のCircleCIを設定する
公式ドキュメントのRubyプロジェクトのサンプル設定を作成した
config.ymlに貼り付けますversion: 2 # use CircleCI 2.0 jobs: # a collection of steps build: # runs not using Workflows must have a `build` job as entry point parallelism: 3 # run three instances of this job in parallel docker: # run the steps with Docker - image: circleci/ruby:2.4.2-jessie-node # ...with this image as the primary container; this is where all `steps` will run environment: # environment variables for primary container BUNDLE_JOBS: 3 BUNDLE_RETRY: 3 BUNDLE_PATH: vendor/bundle PGHOST: 127.0.0.1 PGUSER: circleci-demo-ruby RAILS_ENV: test - image: circleci/postgres:9.5-alpine # database image environment: # environment variables for database POSTGRES_USER: circleci-demo-ruby POSTGRES_DB: rails_blog POSTGRES_PASSWORD: "" steps: # a collection of executable commands - checkout # special step to check out source code to working directory # Which version of bundler? - run: name: Which bundler? command: bundle -v # Restore bundle cache # Read about caching dependencies: https://circleci.com/docs/2.0/caching/ - restore_cache: keys: - rails-demo-bundle-v2-{{ checksum "Gemfile.lock" }} - rails-demo-bundle-v2- - run: # Install Ruby dependencies name: Bundle Install command: bundle check --path vendor/bundle || bundle install --deployment # Store bundle cache for Ruby dependencies - save_cache: key: rails-demo-bundle-v2-{{ checksum "Gemfile.lock" }} paths: - vendor/bundle # Only necessary if app uses webpacker or yarn in some other way - restore_cache: keys: - rails-demo-yarn-{{ checksum "yarn.lock" }} - rails-demo-yarn- - run: name: Yarn Install command: yarn install --cache-folder ~/.cache/yarn # Store yarn / webpacker cache - save_cache: key: rails-demo-yarn-{{ checksum "yarn.lock" }} paths: - ~/.cache/yarn - run: name: Wait for DB command: dockerize -wait tcp://localhost:5432 -timeout 1m - run: name: Database setup command: bin/rails db:schema:load --trace - run: name: Run rspec in parallel command: | bundle exec rspec --profile 10 \ --format RspecJunitFormatter \ --out test_results/rspec.xml \ --format progress \ $(circleci tests glob "spec/**/*_spec.rb" | circleci tests split --split-by=timings) # Save test results for timing analysis - store_test_results: # Upload test results for display in Test Summary: https://circleci.com/docs/2.0/collect-test-data/ path: test_results # See https://circleci.com/docs/2.0/deployment-integrations/ for example deploy configsローカル環境でCircleCIを実行する
CircleCIはローカルでも実行することができます。いくつかのインストール方法がありますが今回は簡単にインストールできるHomebrewを使ってインストールします
他のインストール方法は公式ドキュメントに書かれているので確認してください。下記、記事でも別のインストール方法を行って実施しています
$ brew install circleciインストールが終わったら早速、実行してみましょう
$ circleci build
Docker image digest: sha256:b26ca9419c2baff5af2c92ab9dc93d91c8d7343ae2a32375d9d6c2f105c92e5a
====>> Spin up Environment
Build-agent version 1.0.13832-2ab6edfd (2019-08-16T10:37:19+0000)
Docker Engine Version: 19.03.1
Kernel Version: Linux c52c55bd6b64 4.9.184-linuxkit #1 SMP Tue Jul 2 22:58:16 UTC 2019 x86_64 Linux
Starting container circleci/ruby:2.4.2-jessie-node
  using image circleci/ruby@sha256:61e67a20f4411e80456599db160a0df736f70d539e372d06f2e24ccc90366703
Starting container circleci/postgres:9.5-alpine
  using image circleci/postgres@sha256:762188fcc7d0e00179c18479db6b604c9939c81082d7d057dfaf37d18ee1908e
====>> Container circleci/postgres:9.5-alpine
Service containers logs streaming is disabled for local builds
You can manually monitor container 956455e71253772001459050ad93da34d190b76dfbcc620cc306062a7bbb6bbb
====>> Checkout code
  #!/bin/bash -eo pipefail
mkdir -p /home/circleci/project && cd /tmp/_circleci_local_build_repo && git ls-files | tar -T - -c | tar -x -C /home/circleci/project && cp -a /tmp/_circleci_local_build_repo/.git /home/circleci/project
====>> Which bundler?
  #!/bin/bash -eo pipefail
bundle -v
Bundler version 1.16.0
====>> Restoring Cache
Error:
Skipping cache - error checking storage: not supported

Step failed
====>> Bundle Install
  #!/bin/bash -eo pipefail
bundle check --path vendor/bundle || bundle install --deployment
You must use Bundler 2 or greater with this lockfile.
You must use Bundler 2 or greater with this lockfile.
Error: Exited with code 20
Step failed
====>> Uploading test results
Error: Unable to save test results from /home/circleci/project/test_results
Error stat /home/circleci/project/test_results: no such file or directory

Error: Found no path with test results, skipping
Error: runner failed (exited with 101)
Task failed
Error: task failed
おそらくエラーになったでしょう。
このサンプルがRailsプロジェクトのものなので今回のgemで実行した場合はエラーになってしまいます。それでは修正していきましょうRailsプロジェクトで使用しているものを削除する
必要のない環境変数の設定を削除する
          PGHOST: 127.0.0.1
          PGUSER: circleci-demo-ruby
          RAILS_ENV: test
DBの設定を削除する
      - image: circleci/postgres:9.5-alpine # database image
        environment: # environment variables for database
          POSTGRES_USER: circleci-demo-ruby
          POSTGRES_DB: rails_blog
          POSTGRES_PASSWORD: ""
webpackerの設定を削除する
      # Only necessary if app uses webpacker or yarn in some other way
      - restore_cache:
          keys:
            - rails-demo-yarn-{{ checksum "yarn.lock" }}
            - rails-demo-yarn-

      - run:
          name: Yarn Install
          command: yarn install --cache-folder ~/.cache/yarn

      # Store yarn / webpacker cache
      - save_cache:
          key: rails-demo-yarn-{{ checksum "yarn.lock" }}
          paths:
            - ~/.cache/yarn
DBのセットアップ系の設定を削除する
      - run:
          name: Wait for DB
          command: dockerize -wait tcp://localhost:5432 -timeout 1m

      - run:
          name: Database setup
          command: bin/rails db:schema:load --trace
この状態で実行してもBundlerでエラーが出るため今度はBundlerのエラーを修正していきます
bundle check --path vendor/bundle || bundle install --deployment
You must use Bundler 2 or greater with this lockfile.
You must use Bundler 2 or greater with this lockfile.
Error: Exited with code 20
Step failed
Bundlerのエラーを解消する
こちらの記事を参考にBundlerのインストール処理を追加します
- Using Bundler 2.0 during CI fails - Bug Reports - CircleCI Discuss
- checkoutの後にBundlerのインストール処理を追加します
Gemfile.lockから使用しているBundlerのバージョンからインストールするようにする- run: name: install Bundler command: | echo 'export BUNDLER_VERSION=$(cat Gemfile.lock | tail -1 | tr -d " ")' >> $BASH_ENV source $BASH_ENV gem install bundlerRSpecで出ているエラーを解消する
デフォルトで追加されているRSpecのテストで落ちている部分をコメントアウトします
====>> Run rspec in parallel
  #!/bin/bash -eo pipefail
bundle exec rspec --profile 10 \
                  --format RspecJunitFormatter \
                  --out test_results/rspec.xml \
                  --format progress \
                  $(circleci tests glob "spec/**/*_spec.rb" | circleci tests split --split-by=timings)

Requested historical based timing, but they are not present.  Falling back to name based sorting
.F

Failures:

  1) DodonkiSample does something useful
     Failure/Error: expect(false).to eq(true)

       expected: true
            got: false

       (compared using ==)

       Diff:
       @@ -1,2 +1,2 @@
       -true
       +false

     # ./spec/dodonki_sample_spec.rb:7:in `block (2 levels) in <top (required)>'

Top 2 slowest examples (0.00955 seconds, 84.0% of total time):
  DodonkiSample does something useful
    0.00907 seconds ./spec/dodonki_sample_spec.rb:6
  DodonkiSample has a version number
    0.00047 seconds ./spec/dodonki_sample_spec.rb:2

Finished in 0.01137 seconds (files took 0.08332 seconds to load)
2 examples, 1 failure

Failed examples:

rspec ./spec/dodonki_sample_spec.rb:6 # DodonkiSample does something useful

Error: Exited with code 1
spec/gem名_spec.rbのファイル内の下記部分をコメントアウトしてくださいit "does something useful" do expect(false).to eq(true) endその他のエラーについて
ローカル実行の時は使用できない機能なのでこのエラーは無視します
====>> Restoring Cache
Error:
Skipping cache - error checking storage: not supported

Step failed

...

====>> Saving Cache
Error:
Skipping cache - error checking storage: not supported

Step failed

...

====>> Uploading test results
Archiving the following test results
  * /home/circleci/project/test_results

Error: Failed uploading test results directory
Error &errors.errorString{s:"not supported"}
気持ち悪い部分を修正する
- キャッシュファイルのキー名(
rails-demo-bundle-v2-)をいい感じに変更する修正後のconfig.yml
version: 2 # use CircleCI 2.0
jobs: # a collection of steps
  build: # runs not using Workflows must have a `build` job as entry point
    parallelism: 3 # run three instances of this job in parallel
    docker: # run the steps with Docker
      - image: circleci/ruby:2.4.2-jessie-node # ...with this image as the primary container; this is where all `steps` will run
        environment: # environment variables for primary container
          BUNDLE_JOBS: 3
          BUNDLE_RETRY: 3
          BUNDLE_PATH: vendor/bundle
    steps: # a collection of executable commands
      - checkout # special step to check out source code to working directory

      - run:
          name: install Bundler
          command: |
            echo 'export BUNDLER_VERSION=$(cat Gemfile.lock | tail -1 | tr -d " ")' >> $BASH_ENV
            source $BASH_ENV
            gem install bundler

      # Which version of bundler?
      - run:
          name: Which bundler?
          command: bundle -v

      # Restore bundle cache
      # Read about caching dependencies: https://circleci.com/docs/2.0/caching/
      - restore_cache:
          keys:
            - gem-sample-{{ checksum "Gemfile.lock" }}
            - gem-sample-

      - run: # Install Ruby dependencies
          name: Bundle Install
          command: bundle check --path vendor/bundle || bundle install --deployment

      # Store bundle cache for Ruby dependencies
      - save_cache:
          key: gem-sample-{{ checksum "Gemfile.lock" }}
          paths:
            - vendor/bundle

      - run:
          name: Run rspec in parallel
          command: |
            bundle exec rspec --profile 10 \
                              --format RspecJunitFormatter \
                              --out test_results/rspec.xml \
                              --format progress \
                              $(circleci tests glob "spec/**/*_spec.rb" | circleci tests split --split-by=timings)

      # Save test results for timing analysis
      - store_test_results: # Upload test results for display in Test Summary: https://circleci.com/docs/2.0/collect-test-data/
          path: test_results
      # See https://circleci.com/docs/2.0/deployment-integrations/ for example deploy configs
CircleCIでプロジェクトをセットアップする
CircleCIのアカウントが必要なので作成していない人はSignupページにアクセスしアカウントを作成してください
プロジェクトの追加を行う
Add Projectsページにアクセスし
Set Up Projectをクリックします
Start buildingをクリックします
結果を確認する
Start buildingをクリックすることで初めてCircleCIが実行されます
master / workflowをクリックします
buildをクリックすることでCircleCIの実行結果を確認することができます
テストが実行されていることを確認できます
これでGithubにpush、mergeするたびにCircleCIが実行され自動テストされるようになりました
実際に試してみる
何でもいいのでファイルを修正してGithubにpushしてみましょう。push後、commit履歴から実行されたCircleCIを確認できます
CircleCIのテストを充実させテスト結果を確認しやすくしよう
RuboCopの導入
CircleCIにRuboCop(静的解析ツール)を追加し一定のコード品質を保てるようにします
CircleCIの実行時にRuboCopが実行されるようにする
下記の設定をconfig.ymlにRSpecの前に追加してください
      # run rubocop!
      - run:
          name: run rubocop
          command: |
            bundle exec rubocop
追加後の
config.ymlversion: 2 # use CircleCI 2.0 jobs: # a collection of steps build: # runs not using Workflows must have a `build` job as entry point parallelism: 3 # run three instances of this job in parallel docker: # run the steps with Docker - image: circleci/ruby:2.4.2-jessie-node # ...with this image as the primary container; this is where all `steps` will run environment: # environment variables for primary container BUNDLE_JOBS: 3 BUNDLE_RETRY: 3 BUNDLE_PATH: vendor/bundle steps: # a collection of executable commands - checkout # special step to check out source code to working directory - run: name: install Bundler command: | echo 'export BUNDLER_VERSION=$(cat Gemfile.lock | tail -1 | tr -d " ")' >> $BASH_ENV source $BASH_ENV gem install bundler # Which version of bundler? - run: name: Which bundler? command: bundle -v # Restore bundle cache # Read about caching dependencies: https://circleci.com/docs/2.0/caching/ - restore_cache: keys: - gem-sample-{{ checksum "Gemfile.lock" }} - gem-sample- - run: # Install Ruby dependencies name: Bundle Install command: bundle check --path vendor/bundle || bundle install --deployment # Store bundle cache for Ruby dependencies - save_cache: key: gem-sample-{{ checksum "Gemfile.lock" }} paths: - vendor/bundle # run rubocop! - run: name: run rubocop command: | bundle exec rubocop - run: name: Run rspec in parallel command: | bundle exec rspec --profile 10 \ --format RspecJunitFormatter \ --out test_results/rspec.xml \ --format progress \ $(circleci tests glob "spec/**/*_spec.rb" | circleci tests split --split-by=timings) # Save test results for timing analysis - store_test_results: # Upload test results for display in Test Summary: https://circleci.com/docs/2.0/collect-test-data/ path: test_results # See https://circleci.com/docs/2.0/deployment-integrations/ for example deploy configsRuboCopが成功するようにする
circleci buildを実行すると大量にエラーが出ていると思います
今回の記事ではRuboCopについては詳しくは説明しないので私のRuboCop導入時のCommit履歴と同じように修正すればRuboCopでエラーがでなくなりますRuboCopの動作確認
circleci buildを実行し下記のような表示があれば導入OKです$ circleci build ...... ====>> run rubocop #!/bin/bash -eo pipefail bundle exec rubocop Inspecting 8 files ........修正した内容をpushしてCircleCIの動作を確認します
RuboCopの導入完了です
SimpleCovの導入
CircleCIにSimpleCov(テストカバレッジ確認ツール)を追加しテストカバレッジを確認できるようにします
CircleCIの実行時にSimpleCovが実行されるようにする
spec/spec_helper.rbに下記コードを追加しますrequire 'simplecov' # SimpleCovのロード処理(RSpecのファイルは除外する) SimpleCov.start do add_filter '/spec/' endCircleCI上でカバレッジを確認できるようにする
CircleCIの
ArtifactsにSimpleCovのファイルが出力されるようにします
ついでにRSpecのテスト結果も出力されるようにしますCircleCIの公式のドキュメントにも導入方法が記載されています
下記の設定を
store_test_resultsの後に記述します- store_artifacts: # テスト結果をtest-resultsディレクトリに吐き出す path: test_results destination: test-results - store_artifacts: # カバレッジの結果をcoverage-resultsディレクトリに吐き出す path: coverage destination: coverage-results追加後の
config.ymlversion: 2 # use CircleCI 2.0 jobs: # a collection of steps build: # runs not using Workflows must have a `build` job as entry point parallelism: 3 # run three instances of this job in parallel docker: # run the steps with Docker - image: circleci/ruby:2.4.2-jessie-node # ...with this image as the primary container; this is where all `steps` will run environment: # environment variables for primary container BUNDLE_JOBS: 3 BUNDLE_RETRY: 3 BUNDLE_PATH: vendor/bundle steps: # a collection of executable commands - checkout # special step to check out source code to working directory - run: name: install Bundler command: | echo 'export BUNDLER_VERSION=$(cat Gemfile.lock | tail -1 | tr -d " ")' >> $BASH_ENV source $BASH_ENV gem install bundler # Which version of bundler? - run: name: Which bundler? command: bundle -v # Restore bundle cache # Read about caching dependencies: https://circleci.com/docs/2.0/caching/ - restore_cache: keys: - gem-sample-{{ checksum "Gemfile.lock" }} - gem-sample- - run: # Install Ruby dependencies name: Bundle Install command: bundle check --path vendor/bundle || bundle install --deployment # Store bundle cache for Ruby dependencies - save_cache: key: gem-sample-{{ checksum "Gemfile.lock" }} paths: - vendor/bundle # run rubocop! - run: name: run rubocop command: | bundle exec rubocop - run: name: Run rspec in parallel command: | bundle exec rspec --profile 10 \ --format RspecJunitFormatter \ --out test_results/rspec.xml \ --format progress \ $(circleci tests glob "spec/**/*_spec.rb" | circleci tests split --split-by=timings) # Save test results for timing analysis - store_test_results: # Upload test results for display in Test Summary: https://circleci.com/docs/2.0/collect-test-data/ path: test_results - store_artifacts: # テスト結果をtest-resultsディレクトリに吐き出す path: test_results destination: test-results - store_artifacts: # カバレッジの結果をcoverage-resultsディレクトリに吐き出す path: coverage destination: coverage-results # See https://circleci.com/docs/2.0/deployment-integrations/ for example deploy configs修正した内容はこちらのコミット履歴を参照してください
SimpleCov・RSpecのテスト結果が出力されているかの動作確認
circleci buildを実行し下記のような表示があれば導入OKです$ circleci build ...... ====>> Uploading artifacts Uploading /home/circleci/project/test_results to test-results Uploading /home/circleci/project/test_results/rspec.xml (420 B): Error: FAILED with error not supported ====>> Uploading artifacts Uploading /home/circleci/project/coverage to coverage-results Uploading /home/circleci/project/coverage/.last_run.json (50 B): Error: FAILED with error not supported ......修正した内容をpushしCircleCIの動作を確認します
Artifactsの画面で画像のように出力されていれば導入完了です
index.htmlをクリックすることでテストのカバレッジを確認できるようになります
CircleCIでドキュメントが自動生成されるようにする
YARDの導入
YARD(ドキュメント自動生成ツール)を追加し自動でドキュメントが作成されるようにします
必要のない人はYARDの導入は飛ばしてもらって構いませんCircleCIの実行時にドキュメントが自動生成されるようにする
下記の設定をRSpecの処理の後に追加してください
      # create document
      - run:
          name: create document
          command: |
            bundle exec yard
下記の設定をカバレッジの結果の吐き出す処理の後に追加してください
      - store_artifacts:
          # ドキュメントの結果をyard-resultsディレクトリに吐き出す
          path: ./doc
          destination: yard-results
追加後の
config.ymlversion: 2 # use CircleCI 2.0 jobs: # a collection of steps build: # runs not using Workflows must have a `build` job as entry point parallelism: 3 # run three instances of this job in parallel docker: # run the steps with Docker - image: circleci/ruby:2.4.2-jessie-node # ...with this image as the primary container; this is where all `steps` will run environment: # environment variables for primary container BUNDLE_JOBS: 3 BUNDLE_RETRY: 3 BUNDLE_PATH: vendor/bundle steps: # a collection of executable commands - checkout # special step to check out source code to working directory - run: name: install Bundler command: | echo 'export BUNDLER_VERSION=$(cat Gemfile.lock | tail -1 | tr -d " ")' >> $BASH_ENV source $BASH_ENV gem install bundler # Which version of bundler? - run: name: Which bundler? command: bundle -v # Restore bundle cache # Read about caching dependencies: https://circleci.com/docs/2.0/caching/ - restore_cache: keys: - gem-sample-{{ checksum "Gemfile.lock" }} - gem-sample- - run: # Install Ruby dependencies name: Bundle Install command: bundle check --path vendor/bundle || bundle install --deployment # Store bundle cache for Ruby dependencies - save_cache: key: gem-sample-{{ checksum "Gemfile.lock" }} paths: - vendor/bundle # run rubocop! - run: name: run rubocop command: | bundle exec rubocop - run: name: Run rspec in parallel command: | bundle exec rspec --profile 10 \ --format RspecJunitFormatter \ --out test_results/rspec.xml \ --format progress \ $(circleci tests glob "spec/**/*_spec.rb" | circleci tests split --split-by=timings) # create document - run: name: create document command: | bundle exec yard # Save test results for timing analysis - store_test_results: # Upload test results for display in Test Summary: https://circleci.com/docs/2.0/collect-test-data/ path: test_results - store_artifacts: # テスト結果をtest-resultsディレクトリに吐き出す path: test_results destination: test-results - store_artifacts: # カバレッジの結果をcoverage-resultsディレクトリに吐き出す path: coverage destination: coverage-results - store_artifacts: # ドキュメントの結果をyard-resultsディレクトリに吐き出す path: ./doc destination: yard-results # See https://circleci.com/docs/2.0/deployment-integrations/ for example deploy configs修正した内容はこちらのコミット履歴を参照してください
YARDの動作確認
circleci buildを実行し下記のような表示があれば導入OKです...... ====>> create document #!/bin/bash -eo pipefail bundle exec yard Files: 2 Modules: 1 ( 1 undocumented) Classes: 0 ( 0 undocumented) Constants: 1 ( 1 undocumented) Attributes: 0 ( 0 undocumented) Methods: 1 ( 1 undocumented) 0.00% documented ...... ====>> Uploading artifacts Uploading /home/circleci/project/doc to yard-results Uploading /home/circleci/project/doc/DodonkiSample.html (3.7 kB): Error: FAILED with error not supported ......修正した内容をpushしCircleCIの動作を確認します
yard-resultsディレクトリができていれば導入完了です
yard-results/index.htmlをクリックすることでドキュメントを見ることができます
RubyGemsへ自動デプロイ機能(CD/継続的デリバリー)を追加する
RubyGemsのデプロイで使用する環境変数をCircleCIに登録する
プロジェクトページの
Environment Variablesをクリックします
Add VariableをクリックしNameとValueに値をセットしAdd Variableをクリックします
RUBYGEMS_PASSWORD、RUBYGEMS_EMAILという環境変数を追加してください
Name Value RUBYGEMS_PASSWORD RubyGemsにログインするパスワード RUBYGEMS_EMAIL GitHubに登録しているメールアドレス デプロイ機能を追加する
様々な環境へのデプロイ方法が公式のドキュメントに書かれているので参考にしましょう
Configuring Deploys - CircleCI
デプロイ用のjobを追加する
config.ymlの一番下に下記コードを追加してくださいdeploy: docker: # run the steps with Docker - image: circleci/ruby:2.4.2-jessie-node # ...with this image as the primary container; this is where all `steps` will run steps: # a collection of executable commands - checkout # special step to check out source code to working directory - run: name: install Bundler command: | echo 'export BUNDLER_VERSION=$(cat Gemfile.lock | tail -1 | tr -d " ")' >> $BASH_ENV source $BASH_ENV gem install bundler # Which version of bundler? - run: name: Which bundler? command: bundle -v # Restore bundle cache # Read about caching dependencies: https://circleci.com/docs/2.0/caching/ - restore_cache: keys: - gem-deploy-{{ checksum "Gemfile.lock" }} - gem-deploy- - run: # Install Ruby dependencies name: Bundle Install command: bundle check --path vendor/bundle || bundle install # Store bundle cache for Ruby dependencies - save_cache: key: gem-deploy-{{ checksum "Gemfile.lock" }} paths: - vendor/bundle - run: name: deploy command: | curl -u dodonki1223:$RUBYGEMS_PASSWORD https://rubygems.org/api/v1/api_key.yaml > ~/.gem/credentials; chmod 0600 ~/.gem/credentials git config user.name dodonki1223 git config user.email $RUBYGEMS_EMAIL bundle exec rake build bundle exec rake releasenameが
deployのところが実際のデプロイ処理になります
それより前がデプロイコマンドを実行するための準備ですgemコマンドが使えるようにするため、下記コマンドを実行します(ここで
RUBYGEMS_PASSWORDの環境変数を使用しています)curl -u dodonki1223:$RUBYGEMS_PASSWORD https://rubygems.org/api/v1/api_key.yaml > ~/.gem/credentials; chmod 0600 ~/.gem/credentials連携先のGitの情報をセットします(ここでRUBYGEMS_EMAILを使用しています)
git config user.name dodonki1223 git config user.email $RUBYGEMS_EMAILRubyGemsのデプロイコマンドを実行します
git tagの情報がpushされるためデプロイコマンドの前でGit情報をセットしていますbundle exec rake build bundle exec rake releaseデプロイのjobがmasterブランチでのみ実行されるようWorkflowで制御する
Workflowについては下記の記事を参考にしてください
- ジョブの実行を Workflow で制御する - CircleCI
config.ymlの一番下に下記コードを追加してくださいworkflows: version: 2 build-and-deploy: jobs: - build - deploy: requires: - build filters: branches: only: master最終的なconfig.yml
version: 2 # use CircleCI 2.0 jobs: # a collection of steps build: # runs not using Workflows must have a `build` job as entry point parallelism: 3 # run three instances of this job in parallel docker: # run the steps with Docker - image: circleci/ruby:2.4.2-jessie-node # ...with this image as the primary container; this is where all `steps` will run environment: # environment variables for primary container BUNDLE_JOBS: 3 BUNDLE_RETRY: 3 BUNDLE_PATH: vendor/bundle steps: # a collection of executable commands - checkout # special step to check out source code to working directory - run: name: install Bundler command: | echo 'export BUNDLER_VERSION=$(cat Gemfile.lock | tail -1 | tr -d " ")' >> $BASH_ENV source $BASH_ENV gem install bundler # Which version of bundler? - run: name: Which bundler? command: bundle -v # Restore bundle cache # Read about caching dependencies: https://circleci.com/docs/2.0/caching/ - restore_cache: keys: - gem-sample-{{ checksum "Gemfile.lock" }} - gem-sample- - run: # Install Ruby dependencies name: Bundle Install command: bundle check --path vendor/bundle || bundle install --deployment # Store bundle cache for Ruby dependencies - save_cache: key: gem-sample-{{ checksum "Gemfile.lock" }} paths: - vendor/bundle # run rubocop! - run: name: run rubocop command: | bundle exec rubocop - run: name: Run rspec in parallel command: | bundle exec rspec --profile 10 \ --format RspecJunitFormatter \ --out test_results/rspec.xml \ --format progress \ $(circleci tests glob "spec/**/*_spec.rb" | circleci tests split --split-by=timings) # create document - run: name: create document command: | bundle exec yard # Save test results for timing analysis - store_test_results: # Upload test results for display in Test Summary: https://circleci.com/docs/2.0/collect-test-data/ path: test_results - store_artifacts: # テスト結果をtest-resultsディレクトリに吐き出す path: test_results destination: test-results - store_artifacts: # カバレッジの結果をcoverage-resultsディレクトリに吐き出す path: coverage destination: coverage-results - store_artifacts: # ドキュメントの結果をyard-resultsディレクトリに吐き出す path: ./doc destination: yard-results # See https://circleci.com/docs/2.0/deployment-integrations/ for example deploy configs deploy: docker: # run the steps with Docker - image: circleci/ruby:2.4.2-jessie-node # ...with this image as the primary container; this is where all `steps` will run # - image: circleci/ruby:2.6.0-node-browsers steps: # a collection of executable commands - checkout # special step to check out source code to working directory - run: name: install Bundler command: | echo 'export BUNDLER_VERSION=$(cat Gemfile.lock | tail -1 | tr -d " ")' >> $BASH_ENV source $BASH_ENV gem install bundler # Which version of bundler? - run: name: Which bundler? command: bundle -v # Restore bundle cache # Read about caching dependencies: https://circleci.com/docs/2.0/caching/ - restore_cache: keys: - gem-deploy-{{ checksum "Gemfile.lock" }} - gem-deploy- - run: # Install Ruby dependencies name: Bundle Install command: bundle check --path vendor/bundle || bundle install # Store bundle cache for Ruby dependencies - save_cache: key: gem-deploy-{{ checksum "Gemfile.lock" }} paths: - vendor/bundle - run: name: deploy command: | curl -u dodonki1223:$RUBYGEMS_PASSWORD https://rubygems.org/api/v1/api_key.yaml > ~/.gem/credentials; chmod 0600 ~/.gem/credentials git config user.name dodonki1223 git config user.email $RUBYGEMS_EMAIL bundle exec rake build bundle exec rake release workflows: version: 2 build-and-deploy: jobs: - build - deploy: requires: - build filters: branches: only: master
circleci buildコマンドがWorkflowに対応していないので今回はローカルでの実行はしませんCircleCIからGitHubに連携できるようにする
RubyGemsへのデプロイコマンドで
git tagの情報がpushされるためCircleCIからGitHubに連携できるようにする必要があります設定していないと下記のようなエラーが出てデプロイができません
dodonki_sample 0.1.5 built to pkg/dodonki_sample-0.1.5.gem.
dodonki_sample 0.1.5 built to pkg/dodonki_sample-0.1.5.gem.
Tagged v0.1.5.
Untagging v0.1.5 due to error.
rake aborted!
Couldn't git push. `git push ' failed with the following output:

warning: push.default is unset; its implicit value has changed in
Git 2.0 from 'matching' to 'simple'. To squelch this message
and maintain the traditional behavior, use:

  git config --global push.default matching

To squelch this message and adopt the new behavior now, use:

  git config --global push.default simple

When push.default is set to 'matching', git will push local branches
to the remote branches that already exist with the same name.

Since Git 2.0, Git defaults to the more conservative 'simple'
behavior, which only pushes the current branch to the corresponding
remote branch that 'git pull' uses to update the current branch.

See 'git help config' and search for 'push.default' for further information.
(the 'simple' mode was introduced in Git 1.7.11. Use the similar mode
'current' instead of 'simple' if you sometimes use older versions of Git)

ERROR: The key you are authenticating with has been marked as read only.
fatal: Could not read from remote repository.

Please make sure you have the correct access rights
and the repository exists.
SETTINGSの画面からProjectsをクリックします
対象のプロジェクトの設定ボタンをクリックします
Checkout SSH keysの画面からAuthorize With GitHubをクリックします
Create and add ユーザー名 user_keyをクリックします
下記のようにKeyが追加されていれば準備OKです
自動デプロイ動作確認
バージョンをアップする
lib/dodonki_sample/version.rbのファイルを修正しますバージョンを
0.1.0から0.1.1に上げますVERSION = '0.1.1'bundle installする
バージョンを上げることにより
bundle installするとGemfile.loackに変更がかかります自動デプロイの動作確認
masterブランチで今までの変更をcommitしpushしてみましょう
GitHubのCommit履歴を確認するとCircleCIのjobが2つ表示されていることが確認できます
CircleCI上でログを確認しましょう
無事、デプロイされたことを確認できました
master以外のブランチの時デプロイされないことの動作確認
別のブランチを作成しpushしてみましょう
GitHubのCommit履歴を確認するとなぜかjobが2つ表示されています。謎です……
CircleCIのjob一覧を確認すると
buildのjobのみ実行されていてdeployのjobは実行されていないことが確認できます
CircleCIでなんだかエラーになるぞエラーを特定しよう
CircleCIでエラーになった時はsshでCircleCIのコンテナに接続し直接コマンドを叩いて確認した方が効率が良いです
いちいちpushして確認するのはアホらしいので……CircleCIのコンテナに接続するための準備
こちらの記事を参考にSSHキーをGitHubアカウントに追加しておいてください
CircleCIのコンテナに接続する
SSH を使用したデバッグ - CircleCIに詳しく書かれています
基本的に失敗したjobの画面の右上の
Return job with SShをクリックするだけです
一番下にsshで接続するためのコマンドが出てくるのでこれを実行すればログインできます$ ssh -p 64535 18.208.137.163
私の場合は秘密鍵ファイル名を変更しているので上記コマンドではコンテナに入ることができません
秘密鍵のファイルを直接指定して入るようにしています$ ssh -i ~/.ssh/github_rsa -p 64535 18.208.137.163SlackとCircleCI、GitHubを連携させ開発しやすくしよう
CircleCIを導入したことによりCircleCIのページやGitHubのページを頻繁に見に行く必要が出てきました……なんかいろいろとめんどくさいですよね
私はGitHubへのcommit履歴やCircleCIの結果をSlackに通知するように設定しています
テストが成功したかどうかはSlackに通知されるのでいちいちCircleCIにアクセスしたりしないで済む様になりましたGitHubとSlackを連携させる
slackに
github-actionのチャンネルを作り、そこに履歴が残るように設定しています
Slackの公式ページに連携方法が書かれているので参考にすると良いでしょうCirleCIとSlackを連携させる
slackに
circle-ciのチャンネルを作りそこにCirlceCIの実行結果が通知されるようにしています
下記の記事にわかりやすく書かれているので参考にすると良いでしょうRubyDoc.infoに作成したgemのリファレンスを公開する
今回のタイトルとはあまり関係ないですがgemのリファレンスを簡単に公開できるので紹介します
RubyDoc.infoに公開
RubyDoc.infoにアクセスし
Add Projectボタンをクリックしgemのリポジトリを指定してGoのボタンをクリックするだけで簡単に公開できます
公開すると下記の画像のようになります
公開しているドキュメントはこちら
最後に
自動テスト、自動デプロイ最高ですね!!
今回の作成したプログラムはdodonki1223/dodonki_sample: RubyのgemをCirlcleCiでデプロイするサンプル用プログラムこちらで公開しています
AWSのCodeDploy、CodeBuild、CodePipelineやGitHubのGitHub ActionsなどCircleCIの代替もあるので今後はどうなっていくのでしょうか……


- 投稿日:2019-08-21T07:18:20+09:00
rails N+1問題の対策(includes)
N+1問題
- 複数テーブルに跨る情報を表示する際などに、ループ処理の中で都度SQLを発行してしまいパフォーマンスが低下してしまう問題。
- SQLクエリが 「データ量N + 1回 」走ってしまうことからこのように名付けられている
- 以下をかなり参考にさせていただきました。
N+1問題が発生しうる具体例
- Qiitaのような記事投稿を例にとると...
- 記事の表示
- 記事に対するコメントの表示
- フォロー・フォロワーの表示
などがあります。
パターン
- 1 対 N パターン
- N 対 1 対 N パターン(ちょっとムズいのでまずは
1 対 Nパターンから1 対 Nパターン例
引続きQiitaライクなサービスを想像してください。
UserとArticleの2つのモデル間で以下のようなアソシエーションが組まれることになるのが一般的。
-Userは複数のArticle(記事)を持つ
-Article(記事)はUserに属するmodels/user.byclass User < ActiveRecord::Base has_many :articles endmodels/article.rbclass Article < ActiveRecord::Base belongs_to :user endこの状態で全記事のタイトルと書いた人の一覧画面を表示しようとすると以下のような実装となる。
article_controller.rbclass ArticlesController < ApplicationController def index @articles = Article.limit(10)#今回は10人取得しとく end endarticles/index.html.slim- @articles.each do |article| = article.title = article.user.nameこんな感じにするとActiveRecordの機能により以下のようなSQLが発行される
# Article.all の実行で記事を取得
SELECT 'articles'.* FROM 'articles'

# そしてarticlesのuser.name を10回取得するので以下のように10回SQLを発行することになる
SELECT 'users'.* FROM 'users' WHERE 'users'.'id' = 1 LIMIT 1
SELECT 'users'.* FROM 'users' WHERE 'users'.'id' = 2 LIMIT 1
SELECT 'users'.* FROM 'users' WHERE 'users'.'id' = 3 LIMIT 1
.
.
.
省略
SELECT 'users'.* FROM 'users' WHERE 'users'.'id' = 10 LIMIT 1
このように
article.user.nameをN(10)人取り出そうとN + 1回のSQLを発行しパフォーマンスが落ちる原因となる。蛇足
※この記事を書くまでアソシエーションによって参照できるデータは
親→子の一方通行だと思ってた。。。両方可能なのね。。。恥
- アソシエーション (modelの関連付け)に関してはこちらincludesで関連付けを一括読み込みする
結論から
articles_controller.rbclass ArticlesController < ApplicationController def index @articles = Article.includes(:user).limit(10)#includesを追加 endこうすることで、関連付けを一括で読み込んでくれて発行されるSQLがこうなるらしい。
# Article.all の実行で記事を取得
SELECT 'articles'.* FROM 'articles'

# 一括で読み込んでくれる
SELECT addresses.* FROM addresses WHERE WHERE `users`.`id` IN (1,2,3,4,5,6,7,8,9,10))
N対1対Nパターン
今回の場合はユーザが記事とコメントをhas_manyしている場合がありそう。
先ほどのuserモデルに追加する形で以下のようにする。models/user.rbclass User < ActiveRecord::Base has_many :articles has_many :comments endmodels/comment.rbclass Comment < ActiveRecord::Base belongs_to :user endarticles.index.html.slim- @articles.each do |article| = article.title = article.user.name #記事に対するコメントは複数があり得るため、`each`を入れ子にして表示している。 - article.user.comments.each do |comment| = comment.content登場人物が3人になったためarticle_controller側を変更しないとN+1問題が再び襲来する
以下のように変更する。articles_controller.rbclass ArticlesController < ApplicationController def index @articles = Article.all.includes(user: :comments).limit(10)#commentsを追加 endこれでN+1問題は解決する。
- 投稿日:2019-08-21T06:36:27+09:00
ActiveRecordを使ってFROM句のサブクエリを書く方法
ActiveRecordで複数テーブルを
JOINしてGROUP BYする処理を書く時、GROUP BYする前に重複排除を目的としたDISTINCTをする必要があり「FROM句のサブクエリを書く」というシチュエーションに遭遇しました。SQLだと簡単に書けるのですがActiveRecordだとどう書くべきかわからなかったので、まとめます。
結論
先にサブクエリに相当する処理をActiveRecordで記述し変数に代入しておき、
ModelClass.from("(#{subquery.to_sql}) AS sub").select('sub.columnA, sub.columnB')のように
fromメソッドを呼び出すことでFROM句のサブクエリとして処理できます。遭遇したシチュエーション
各テーブルは以下のようになっています。
要約するとこういった状況です。
- 和食とイタリアンを扱うレストラン(大衆系レストラン)とイタリアンのみ扱うレストラン(高級レストラン)がある
- それぞれ3件ずつの予約が入っている
- イタリアンを扱うレストランの予約件数(3+3=6)と和食を扱うレストランの予約件数(3)を取得したい
SELECT id, restaurant_id, guest_name, reserved_at FROM reservations;
1|1|岩瀬 好近|2019-08-01 13:00:00
2|1|戸田 良市|2019-08-01 14:00:00
3|2|森 信好|2019-08-01 15:00:00
4|2|平山 利次|2019-08-01 11:00:00
5|1|金城 義勝|2019-08-01 18:00:00
6|2|関 知実|2019-08-01 19:00:00

SELECT id, name FROM restaurants;
1|大衆系レストラン
2|高級レストラン

SELECT id, restaurant_id, name FROM courses;
1|1|焼き魚コース
2|1|串カツ三昧
3|1|寿司セット
4|1|コラボピザ
5|2|高級ピッツア
6|2|色とりどりのパスタ
7|2|イタリアンフルコース

SELECT id, restaurant_id, name, category_id FROM courses;
1|1|焼き魚コース|1
2|1|串カツ三昧|1
3|1|寿司セット|1
4|1|コラボピザ|2
5|2|高級ピッツア|2
6|2|色とりどりのパスタ|2
7|2|イタリアンフルコース|2

SELECT id, name  FROM categories;
1|和食
2|イタリアン
解決方法
各テーブルをJOINして、
categories.nameとreservations.idをSELECT DISTINCTするサブクエリを定義します。(subquery変数に代入)
fromメソッドにsubqueryをサブクエリに展開して渡し、group→selectを呼ぶことでカテゴリ別の予約件数を取得できました。subquery = Reservation.all .joins(restaurant: { courses: :category }) .select(%( distinct categories.name AS category_name, reservations.id AS reservation_id )) reservations = Reservation.from("(#{subquery.to_sql}) AS reservations") .group('reservations.category_name') .select(%( reservations.category_name AS category_name, COUNT(reservations.reservation_id) AS reservation_count )) reservations.map do|reservation| [reservation.category_name, reservation.reservation_count] end => [["イタリアン", 6], ["和食", 3]](2019/8/21 13:38追記)
@jnchito さんがCOUNT(DISTINCT some_column)を使った方法をコメントくださいました。
確かに、こちらの方がスッキリ書けます。ありがとうございます。Reservation .joins(restaurant: { courses: :category }) .group('categories.name') .distinct .count(:id)(参考)サブクエリを使わず誤った値を取得してしまった事例
参考までに最初に書いたコードを晒します。 このコードは正しい予約件数を取得できません。
reservations = Reservation.all
                          .joins(restaurant: { courses: :category })
                          .group('categories.name')
                          .select(%(
                            categories.name AS category_name,
                            COUNT(reservations.id) AS reservation_count
                          ))

reservations.map do|reservation|
  [reservation.category_name, reservation.reservation_count]
end
=> [["イタリアン", 12], ["和食", 9]]
原因はGROUP BYする直前のテーブルを参照すると一目瞭然です。
1つのレストランに複数のコースが存在することで、JOINした時に各レストランのコースの数だけレコードが重複してしまうことが原因です。SELECT reservations.id, restaurants.NAME, courses.NAME, categories.NAME FROM "reservations" INNER JOIN "restaurants" ON "restaurants"."id" = "reservations"."restaurant_id" INNER JOIN "courses" ON "courses"."restaurant_id" = "restaurants"."id" INNER JOIN "categories" ON "categories"."id" = "courses"."category_id"; 1|大衆系レストラン|焼き魚コース|和食 2|大衆系レストラン|焼き魚コース|和食 5|大衆系レストラン|焼き魚コース|和食 1|大衆系レストラン|串カツ三昧|和食 2|大衆系レストラン|串カツ三昧|和食 5|大衆系レストラン|串カツ三昧|和食 1|大衆系レストラン|寿司セット|和食 2|大衆系レストラン|寿司セット|和食 5|大衆系レストラン|寿司セット|和食 1|大衆系レストラン|コラボピザ|イタリアン 2|大衆系レストラン|コラボピザ|イタリアン 5|大衆系レストラン|コラボピザ|イタリアン 3|高級レストラン|高級ピッツア|イタリアン 4|高級レストラン|高級ピッツア|イタリアン 6|高級レストラン|高級ピッツア|イタリアン 3|高級レストラン|色とりどりのパスタ|イタリアン 4|高級レストラン|色とりどりのパスタ|イタリアン 6|高級レストラン|色とりどりのパスタ|イタリアン 3|高級レストラン|イタリアンフルコース|イタリアン 4|高級レストラン|イタリアンフルコース|イタリアン 6|高級レストラン|イタリアンフルコース|イタリアン前項のようにサブクエリで
DISTINCTした上でGROUP BYすることで、重複を排除した件数を取得できます。参考

- 投稿日:2019-08-21T06:22:43+09:00
SES で受信したメールを AWS Lambda で gmail に転送する Ruby スクリプト
下記記事を参考にしたが、
PythonだったのでRubyで書き直した。SESのリージョンは
us-east-1を利用。require 'aws-sdk' require 'mail' AWS_ACCESS_KEY_ID = "あなたの AWS_ACCESS_KEY_ID" AWS_SECRET_ACCESS_KEY = "あなたの AWS_SECRET_ACCESS_KEY" BUCKET_NAME = "mail が保存されている s3 のバケット名" TO_ADDRESSES = ["mail@example.com"] # 送信したいメールアドレスの配列 SOURCE = "info@example.com" # 送信元メールアドレス def aws_config_update(region) Aws.config.update({ region: region, credentials: Aws::Credentials.new(AWS_ACCESS_KEY_ID, AWS_SECRET_ACCESS_KEY) }) end def send_mail(ses, subject, body) ses.send_email( { destination: { to_addresses: TO_ADDRESSES }, message: { subject: { charset: "UTF-8", data: subject, }, body: { text: { charset: "UTF-8", data: body, } }, }, source: SOURCE } ) end def lambda_handler(event:, context:) aws_config_update("ap-northeast-1") key = event["Records"][0]["s3"]["object"]["key"] s3 = Aws::S3::Client.new body = s3.get_object(bucket: BUCKET_NAME, key: key).body.string mail = Mail.new(body) aws_config_update("us-east-1") ses = Aws::SES::Client.new send_mail(ses, mail.subject, mail.decoded) rescue => e aws_config_update("us-east-1") ses = Aws::SES::Client.new send_mail(ses, "メール送信エラー", e.message) end
mail gemが必要なので、zipで固めてアップロードする。# Gemfile source "https://rubygems.org" git_source(:github) {|repo_name| "https://github.com/#{repo_name}" } gem "mail"
bundle install --path vendor/bundlezip -r function.zip lambda_function.rb vendoraws lambda update-function-code --function-name lambdaのfunction名 --zip-file fileb://function.zip