- 投稿日:2019-08-21T23:38:06+09:00
laravelで検索機能を実装する
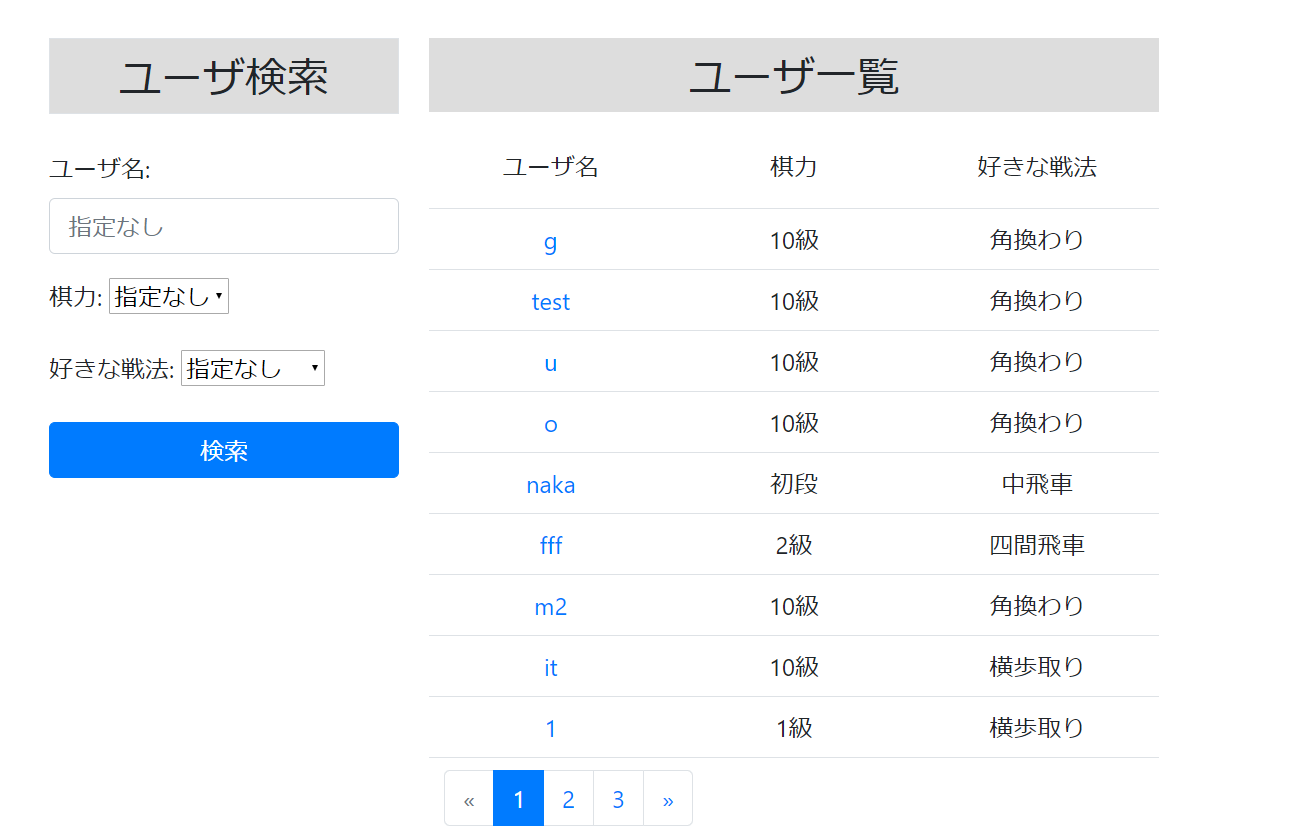
今回は文字列を入力して部分一致検索、プルダウンメニューから選択して検索を行う機能を実装します。具体的には下記の画面でユーザ名、棋力、好きな戦法による検索を行います。
Userモデルは以下のように name(ユーザ名)、stength(棋力)、tactics(好きな戦法)というカラムを定義します。
class User extends Authenticatable
{
    protected $fillable = [
        'name','strength','tactics',
    ];
}
コントローラは以下のようなindexメソッドを定義します。
class SearchController extends Controller
{
    public function index(Request $request){
        $query = User::query();

     //$request->input()で検索時に入力した項目を取得します。
        $search1 = $request->input('strength');
        $search2 = $request->input('tactics');
        $search3 = $request->input('name');

         // プルダウンメニューで指定なし以外を選択した場合、$query->whereで選択した棋力と一致するカラムを取得します
        if ($request->has('strength') && $search1 != ('指定なし')) {
            $query->where('strength', $search1)->get();
        }

         // プルダウンメニューで指定なし以外を選択した場合、$query->whereで選択した好きな戦法と一致するカラムを取得します
        if ($request->has('tactics') && $search2 != ('指定なし')) {
            $query->where('tactics', $search2)->get();
        }

        // ユーザ名入力フォームで入力した文字列を含むカラムを取得します
        if ($request->has('name') && $search3 != '') {
            $query->where('name', 'like', '%'.$search3.'%')->get();
        }

    //ユーザを1ページにつき10件ずつ表示させます
        $data = $query->paginate(10);

        return view('users.search',[
            'data' => $data
        ]);
    }
}
検索ボタンを押したときのルーティングを以下のように記述します。
//検索ボタンを押すとコントローラのindexメソッドを実行します
Route::get('Search','SearchController@index')->name('search');
ユーザ検索ページのビューを以下のように記述します。
    <div class="row">
        <div class="col-sm-4">
            <div class="text-center my-4">
                <h3 class="brown border p-2">ユーザ検索</h3>
            </div>
            {!! Form::open(['route' => 'search', 'method' => 'get']) !!}
                <div class="form-group">
                    {!! Form::label('text', 'ユーザ名:') !!}
                    {!! Form::text('name' ,'', ['class' => 'form-control', 'placeholder' => '指定なし'] ) !!}
                </div>
                <div class="form-group">
                    {!! Form::label('strength', '棋力:') !!}
                    {!! Form::select('strength', ['指定なし' => '指定なし'] + Config::get('strength.kiryoku') ,'指定なし') !!}
                </div>
                <div class="form-group">
                    {!! Form::label('tactics', '好きな戦法:') !!}
                    {!! Form::select('tactics', ['指定なし' => '指定なし'] + Config::get('tactics.senpou') , '指定なし') !!}
                </div>
                {!! Form::submit('検索', ['class' => 'btn btn-primary btn-block']) !!}
            {!! Form::close() !!}
        </div>
        <div class="col-sm-8">
            <div class="text-center my-4">
                <h3 class="brown p-2">ユーザ一覧</h3>
            </div>

            <div class="container">
                <!--検索ボタンが押された時に表示されます-->
                @if(!empty($data))
                    <div class="my-2 p-0">
                        <div class="row  border-bottom text-center">
                            <div class="col-sm-4">
                                <p>ユーザ名</p>
                            </div>
                            <div class="col-sm-4">
                                <p>棋力</p>
                            </div>
                            <div class="col-sm-4">
                                <p>好きな戦法</p>
                            </div>
                        </div>
              //検索条件に一致したユーザを表示します
                        @foreach($data as $item)
                                <div class="row py-2 border-bottom text-center">
                                    <div class="col-sm-4">
                                        <a href="">{{ $item->name }}</a>
                                    </div>
                                    <div class="col-sm-4">
                                        {{ $item->strength }}
                                    </div>
                                    <div class="col-sm-4">
                                        {{ $item->tactics }}
                                    </div>
                                </div>
                        @endforeach
                    </div>
                    {{ $data->appends(request()->input())->render('pagination::bootstrap-4') }}
                @endif
            </div>
        </div>
    </div>
ここでは以下のように、あらかじめconfigディレクトリにstrength.phpを作成して'kiryoku'という配列を定義しています。上記のビューではconfig::get('strength.kiryoku')でその配列を取得して、プルダウンメニューを作成しています。さらに
['指定なし' => '指定なし'] + config::get('strength.kiryoku')としてkiryoku配列に「指定なし」という要素を追加しています。config/strength.php
<?php
return array(
    'kiryoku' => array(
  '10級' => '10級',
  '9級' => '9級',
  '8級' => '8級',
  '7級' => '7級',
  '6級' => '6級',
  '5級' => '5級',
  '4級' => '4級',
  '3級' => '3級',
  '2級' => '2級',
  '1級' => '1級',
  '初段' => '初段',
  '二段' => '二段',
  '三段' => '三段',
  '四段' => '四段',
  '五段' => '五段',
  '六段' => '六段',
  ),
);
?>
config::get('tactics.senpou')も同様です。
config/tactics.php<?php return array( 'senpou' => array( '角換わり' => '角換わり', '矢倉' => '矢倉', '相掛かり' => '相掛かり', '横歩取り' => '横歩取り', '向かい飛車' => '向かい飛車', '三間飛車' => '三間飛車', '四間飛車' => '四間飛車', '中飛車' => '中飛車' ), ); ?>ユーザ名のみで検索すると、以下のように正しく表示されました。
また棋力、好きな戦法で検索した場合も、以下のように正しく表示されました。
今回の検索機能のポイントは、コントローラの
$request->inputメソッドと$query->whereメソッドかなと思いました。あとプルダウンメニューの実装はconfigファイルを使用しましたが、意外と躓きました。プルダウンメニューはほかの方法でより簡単に実装できるのかもしれません。


- 投稿日:2019-08-21T19:33:02+09:00
Node.jsにてMySQLのORM:sequelize
はじめに
JAVAではRDBのデータのCURD処理はJDBC経由で操作できます。自由度が高い反面、SQL書く際に可読性、保守性が弱い問題があります。
ORMの発達でHibernate、MyBatis、jOOQなどのライブラリを利用して仕組み上はよくなります。Node.jsからMySQLなどのRDBを操作する場合もORMを利用したほうが良いと思います。
特にテーブルのカラム数が多い場合は、?の数など一致しないミスが発生しやすいからです。また、SQLインジェクションも注意する必要があります。Node.jsのMySQLのORMとしてSequelizeは有名です。
SequelizeはMySQL、MariaDB、PostgreSQL、SQL Serverもサポートします。Sequelize:https://sequelize.org/
インストール
npm install --save sequelize
npm install --save mysql2使い方
sequelize定義
const Sequelize = require('sequelize');

const sequelize = new Sequelize('database', 'username', 'password', {
  dialect: 'mysql'
})
sequelizeプールの場合
const sequelize = new Sequelize('database', 'username', 'password', {
  dialect: 'mysql',
  host: 'localhost',
  pool: {
    max: 5,
    min: 0,
    acquire: 30000,
    idle: 10000
  }
});
モデル定義
const UserModel = sequelize.define( 'users', { userId: { field: 'user_id', type: Sequelize.INTEGER(11), primaryKey: true, autoIncrement: true }, // INT(11) NOT NULL PRIMARY KEY AUTO_INCREMENT lastName: { field: 'last_name', type: Sequelize.STRING(32), allowNull: true }, firstName: { field: 'first_name', type: Sequelize.STRING(32), allowNull: true } }, { timestamps: true, createdAt: false, //デフォルト項目を生成しないように updatedAt: false //デフォルト項目を生成しないように } )データタイプ:https://sequelize.org/master/manual/data-types.html
CURDメソッドを用意
exports.find = async function(whereData) { return await UserModel.findAll({ where: whereData }) } exports.get = async function(userId) { return await UserModel.findByPk(userId) } exports.update = async function(updateData, whereCondition, updateFields) { return await UserModel.update(updateData, { where: whereCondition, fields: updateFields }) } exports.create = async function(userData) { return await UserModel.create(userData) }詳しく説明:https://sequelize.org/master/manual/models-definition.html
ユーザー更新例
  const whereCondition = {
    userId: 10000  //更新条件
  }
  const updateFields = ['lastName', 'firstName']  //指定したカラムのみ更新
  const updateData = { lastName: 'yamata', firstName: 'tarou' } //更新データ

  const result = await mysqlUser.update(updateData, whereCondition, updateFields)
updateのSQLを書くより楽です。
以上
- 投稿日:2019-08-21T16:17:01+09:00
Macでローカル環境構築(MAMP + MySQLWorkbench)
- 投稿日:2019-08-21T15:52:25+09:00
よく使うコマンド集
csvの特定行抽出
「foo.csv」の中身を、カンマ区切りで8,27番目の文字を抽出し、
1-3行目を無視して、「bar.txt」に出力するcut -d ',' -f 8,27 foo.csv > | sed -e '1,3d' | bar.txt容量の多いディレクト検索
カレントディレクトリから1階層目までの深さまでの容量を計測し、
10番目まで重いディレクトリとサマリー容量を表示する(若干処理が重いので巨大なディレクトリは要注意)sudo du -h -d 1 ./* | sort -nr | head -10コマンドラインから、mysqlに接続する
対話式でパスワードを問い合わし、mysqlをコンソールから叩けるようにする
mysql -h <host_ip> -P <port> -u <user_id> -pシェルからmysqlを実行する
hogehoge.shを叩くと、1-40までループし、sqlを実行する
hogehoge.sh#!/bin/sh for i in `seq 1 40` do echo <sqlの書かれたファイル名>.sql $i mysql -uroot <user_id> < <sqlの書かれたファイル名>.sql sleep 3 done
- 投稿日:2019-08-21T14:57:31+09:00
MySQL(MariaDB)の表データからElasticsearchのインデックスにデータをインポートする
MariaDBの表データからPythonスクリプトでElasticsearchにインポートする方法を記載します。
RDBのデータをインデックス化する時の参考になればと思います。MariaDBのインストールとサンプルデータの準備は下記を参照しました。
Ubuntu 18.04 LTS に MariaDB 10.3 をインストール
https://qiita.com/cherubim1111/items/61cbc72673712431d06e
【SQL】MySQL公式サンプルデータベースを使う
https://qiita.com/yukibe/items/fc6016348ecf4f3b10bf
MySQL Serverに外部から接続する
https://qiita.com/tocomi/items/0c009d7299584df49378上記のサンプルデータベースのcityテーブルを丸ごとインポートすることを目指したいと思います。
0. 事前準備
事前にPython3とpython3-pipが導入されているものとします。
スクリプトで使用するMySQL(MariaDB)とElasticsearchのPythonライブラリをインストールします。
なお、MySQLのPythonライブラリはいくつかありますが、個人的にはpymysqlが最も安定しているように感じました。pip3 install pymysql pip3 install elasticsearch1. cityインデックスのmapping定義
cityテーブルの構造は下記の通りです。
MariaDB [world]> desc city;
+-------------+----------+------+-----+---------+----------------+
| Field       | Type     | Null | Key | Default | Extra          |
+-------------+----------+------+-----+---------+----------------+
| ID          | int(11)  | NO   | PRI | NULL    | auto_increment |
| Name        | char(35) | NO   |     |         |                |
| CountryCode | char(3)  | NO   | MUL |         |                |
| District    | char(20) | NO   |     |         |                |
| Population  | int(11)  | NO   |     | 0       |                |
+-------------+----------+------+-----+---------+----------------+
5 rows in set (0.005 sec)
mapping定義するにあたり、Name、CountryCode、Districtはのtypeはkeywordに、Populationのtypeはintegerとします。
keywordではなくtextと定義することも考えられますが、国名などは文章ではないのでkeywordで十分だと考えます。
なお、IDはドキュメントIDとして使用する想定で、mappingの定義内容には含みません。cityインデックスのmappingを定義するPythonスクリプトは下記のとおりとなります。
putCityMapping.py#!/usr/bin/python3 from elasticsearch import Elasticsearch from pprint import pprint # Elasticsearch接続設定 es = Elasticsearch(['XX.XX.XX.XX:9200']) #ElasticsearchサーバーのIPアドレス # mappingの定義クエリ city = {} city["settings"] = {} city["settings"]["number_of_shards"] = 3 city["settings"]["number_of_replicas"] = 1 city["mappings"] = {} city["mappings"]["properties"] = {} city["mappings"]["properties"]["Name"] = {} city["mappings"]["properties"]["Name"]["type"] = "keyword" city["mappings"]["properties"]["CountryCode"] = {} city["mappings"]["properties"]["CountryCode"]["type"] = "keyword" city["mappings"]["properties"]["District"] = {} city["mappings"]["properties"]["District"]["type"] = "keyword" city["mappings"]["properties"]["Population"] = {} city["mappings"]["properties"]["Population"]["type"] = "integer" # クエリの内容を表示 pprint("クエリの内容を表示") pprint(city) print() # クエリの実行 response = es.indices.create(index='city',body=city) # クエリのレスポンスの表示 pprint("レスポンスの内容を表示") pprint(response)このスクリプトを実行すると下記のような結果が得られます。
$ ./putCityMapping.py
'クエリの内容を表示'
{'mappings': {'properties': {'CountryCode': {'type': 'keyword'},
                             'District': {'type': 'keyword'},
                             'Name': {'type': 'keyword'},
                             'Population': {'type': 'integer'}}},
 'settings': {'number_of_replicas': 1, 'number_of_shards': 3}}

'レスポンスの内容を表示'
{'acknowledged': True, 'index': 'city', 'shards_acknowledged': True}
2. cityインデックスのmappingの定義内容の取得
続いて、作成したmappingの定義内容を表示するスクリプトを作成します。
内容は下記の通りです。getCityMapping.py#!/usr/bin/python3 from elasticsearch import Elasticsearch from pprint import pprint # Elasticsearch接続設定 es = Elasticsearch(['XX.XX.XX.XX:9200']) #ElasticsearchサーバーのIPアドレス response = es.indices.get_mapping(index='city') pprint(response)このスクリプトを実行すると下記のような結果が得られます。
$ ./getCityMapping.py
{'city': {'mappings': {'properties': {'CountryCode': {'type': 'keyword'},
                                      'District': {'type': 'keyword'},
                                      'Name': {'type': 'keyword'},
                                      'Population': {'type': 'integer'}}}}}
3. cityドキュメントの作成(1つだけ)
作成したcityインデックスにドキュメントを1つだけ作成します。
いきなりCityテーブルから全データをインポートするのではなく、SQLで表示したデータを使用することにします。ドキュメント化するデータは下記の通りです。
MariaDB [world]> select  * from city where id=1;
+----+-------+-------------+----------+------------+
| ID | Name  | CountryCode | District | Population |
+----+-------+-------------+----------+------------+
|  1 | Kabul | AFG         | Kabol    |    1780000 |
+----+-------+-------------+----------+------------+
1 row in set (0.004 sec)
このデータのドキュメントを作成するスクリプトは下記の通りです。
putKabulDoc.py#!/usr/bin/python3 from elasticsearch import Elasticsearch from pprint import pprint # Elasticsearch接続設定 es = Elasticsearch(['XX.XX.XX.XX:9200']) #ElasticsearchサーバーのIPアドレス index_id = "1" kabul_doc = {} kabul_doc["Name"] = "Kabul" kabul_doc["CountryCode"] = "AFG" kabul_doc["District"] = "Kabol" kabul_doc["Population"] = 1780000 pprint(kabul_doc) print() response = es.index(index="city", doc_type="_doc", id=index_id,body=kabul_doc) pprint(response)このスクリプトを実行すると下記のような結果が得られます。
$ ./putKabulDoc.py
{'CountryCode': 'AFG',
 'District': 'Kabol',
 'Name': 'Kabul',
 'Population': 1780000}

{'_id': '1',
 '_index': 'city',
 '_primary_term': 1,
 '_seq_no': 0,
 '_shards': {'failed': 0, 'successful': 1, 'total': 2},
 '_type': '_doc',
 '_version': 1,
 'result': 'created'}
4. ドキュメントの表示
KabulドキュメントをElasticsearchから取得するスクリプトを作成します。
ここでは検索クエリではなく、id=1のドキュメントを取得するクエリとします。getId1Doc.py#!/usr/bin/python3 from elasticsearch import Elasticsearch from pprint import pprint # Elasticsearch接続設定 es = Elasticsearch(['XX.XX.XX.XX:9200']) #ElasticsearchサーバーのIPアドレス response = es.get(index='city',id='1') pprint(response)このスクリプトを実行すると下記のような結果が得られます。
$ ./getId1Doc.py
{'_id': '1',
 '_index': 'city',
 '_primary_term': 1,
 '_seq_no': 0,
 '_source': {'CountryCode': 'AFG',
             'District': 'Kabol',
             'Name': 'Kabul',
             'Population': 1780000},
 '_type': '_doc',
 '_version': 1,
 'found': True}
5.cityテーブルからPythonでデータを取得する
cityテーブルから全データをインポートする前に、テーブルからデータを取得する方法を確認したいと思います。
getCityTable.py#!/usr/bin/python3 import pymysql.cursors from pprint import pprint # MySQL(MariaDB)接続設定 db = pymysql.connect(host="XX.XX.XX.XX", user="ユーザー名", password="パスワード") cursor=db.cursor(pymysql.cursors.DictCursor) cursor.execute("USE world") db.commit() sql = 'SELECT * FROM city' cursor.execute(sql) city = cursor.fetchall() pprint(city)このスクリプトを実行すると下記のような結果が得られます。
$ ./getCityTable.py
[{'CountryCode': 'AFG',
  'District': 'Kabol',
  'ID': 1,
  'Name': 'Kabul',
  'Population': 1780000},
 {'CountryCode': 'AFG',
  'District': 'Qandahar',
  'ID': 2,
  'Name': 'Qandahar',
  'Population': 237500},
 {'CountryCode': 'AFG',
  'District': 'Herat',
  'ID': 3,
  'Name': 'Herat',
  'Population': 186800},

(省略)

 {'CountryCode': 'PSE',
  'District': 'Rafah',
  'ID': 4079,
  'Name': 'Rafah',
  'Population': 92020}]
6.全データのインポート
ようやくですが、cityテーブルの全データをスクリプトでインポートしたいと思います。
スクリプトの内容は下記の通りです。importFromCityTable.py#!/usr/bin/python3 import pymysql.cursors from elasticsearch import Elasticsearch from pprint import pprint # MySQL接続設定 db = pymysql.connect(host="XX.XX.XX.XX", user="ユーザーID", password="パスワード") cursor=db.cursor(pymysql.cursors.DictCursor) cursor.execute("USE world") db.commit() # Elasticsearch接続設定 es = Elasticsearch(['XX.XX.XX.XX:9200']) # MySQLからcityデータをまるごと取得 sql = 'SELECT * FROM city' cursor.execute(sql) city_table = cursor.fetchall() # cityデータをレコード単位でループ for city_record in city_table: index_id = str(city_record["ID"]) city_doc = {} city_doc["Name"] = city_record["Name"] city_doc["CountryCode"] = city_record["CountryCode"] city_doc["District"] = city_record["District"] city_doc["Population"] = city_record["Population"] response = es.index(index="city", doc_type="_doc", id=index_id, body=city_doc) print(response)このスクリプトを実行すると下記のような結果が得られます。
# ./importFromCityTable.py
{'_index': 'city', '_type': '_doc', '_id': '1', '_version': 2, 'result': 'updated', '_shards': {'total': 2, 'successful': 1, 'failed': 0}, '_seq_no': 1, '_primary_term': 1}
{'_index': 'city', '_type': '_doc', '_id': '2', '_version': 1, 'result': 'created', '_shards': {'total': 2, 'successful': 1, 'failed': 0}, '_seq_no': 0, '_primary_term': 1}
{'_index': 'city', '_type': '_doc', '_id': '3', '_version': 1, 'result': 'created', '_shards': {'total': 2, 'successful': 1, 'failed': 0}, '_seq_no': 1, '_primary_term': 1}

(省略)

{'_index': 'city', '_type': '_doc', '_id': '4078', '_version': 1, 'result': 'created', '_shards': {'total': 2, 'successful': 1, 'failed': 0}, '_seq_no': 1350, '_primary_term': 1}
{'_index': 'city', '_type': '_doc', '_id': '4079', '_version': 1, 'result': 'created', '_shards': {'total': 2, 'successful': 1, 'failed': 0}, '_seq_no': 1379, '_primary_term': 1}
インポートしたデータの確認はここでは省略したいと思います。
getId1Doc.pyを編集するか、Kibanaコンソールから確認して下さい。7. Bulk APIを使ったインポート
cityテーブル程度のサイズでしたらimportFromCityTable.pyのように1つのドキュメントごとにPUTしてもそこまで時間はかかりませんが、都度通信が発生するためレコード数や1レコードのサイズが大きくなると時間がかかってしまいます。
そのような時は、Bulk APIを使用してドキュメントを配列形式でまとめてPUTした方がインポートの時間が短くて済みます。
Bulk APIを使用したスクリプトは下記のようになります。bulkImportFromCityTable.py#!/usr/bin/python3 import pymysql.cursors from elasticsearch import Elasticsearch from elasticsearch import helpers from pprint import pprint # MySQL接続設定 db = pymysql.connect(host="XX.XX.XX.XX", user="ユーザーID", password="パスワード") cursor=db.cursor(pymysql.cursors.DictCursor) cursor.execute("USE world") db.commit() # Elasticsearch接続設定 es = Elasticsearch(['XX.XX.XX.XX:9200']) # MySQLからcityデータをまるごと取得 sql = 'SELECT * FROM city' cursor.execute(sql) city_table = cursor.fetchall() # Bulk送信用のドキュメントの配列 bulk_doc = [] # bulkで送信するドキュメント数とカウンター bulk_number = 1000 n = 1 # cityデータをレコード単位でループ for city_record in city_table: index_id = str(city_record["ID"]) city_doc = {} city_doc["Name"] = city_record["Name"] city_doc["CountryCode"] = city_record["CountryCode"] city_doc["District"] = city_record["District"] city_doc["Population"] = city_record["Population"] # bulk配列に追加 bulk_doc.append({"_index":"city", "_type":"_doc", "_id":index_id, "_source":city_doc}) # 格納数がbulk_numberに達したら送信、未達なら次のcity_doc生成とbulk配列へのappendに進む if n < bulk_number: n = n + 1 else : response = helpers.bulk(es, bulk_doc) pprint(response) n = 1 bulk_index = [] # bulk_numberに達しなうでループが終わってしまった分を送信 response = helpers.bulk(es, bulk_doc) pprint(response)このスクリプトを実行すると下記のような結果が得られます。
$ ./bulkImportFromCityTable.py
(1000, [])
(2000, [])
(3000, [])
(4000, [])
(4079, [])
実行環境にもよりますが、こちらの方が速くインポートが完了すると思います。
- 投稿日:2019-08-21T14:05:23+09:00
すでにあるMySQLのテーブルにパーティションを追加してみる。2019年夏。パフォーマンス確認
概要
MySQLで「過去データをサクッと消したい」という要望があります。
drop partitionを利用したことがないので「drop partitionは本当に早いのか」を検証します。そのメモです。
ついでにテスト用データのインポートがてらパーティションの有無でinsertの速度が変わるのかゆるく検証してみます。環境
テーブル定義
CREATE TABLE `example_table` (
  `user_id` varchar(36) NOT NULL,
  `item_id` int(11) NOT NULL,
  `batch_date` date NOT NULL,
  PRIMARY KEY (`user_id`,`item_id`,`batch_date`),
  KEY `item_id_batch_date_index` (`item_id`,`batch_date`)
) ENGINE=InnoDB DEFAULT CHARSET=utf8
パーティションの追加
alter table example_table
partition by range (to_days(batch_date))
(
  partition p201812 values less than (to_days('2019-01-01')),
  partition p201901 values less than (to_days('2019-02-01')),
  partition p201902 values less than (to_days('2019-03-01')),
  partition p201903 values less than (to_days('2019-04-01')),
  partition p201904 values less than (to_days('2019-05-01')),
  partition p201905 values less than (to_days('2019-06-01')),
  partition p201906 values less than (to_days('2019-07-01')),
  partition p201907 values less than (to_days('2019-08-01')),
  partition p201908 values less than (to_days('2019-09-01')),
  partition p201909 values less than (to_days('2019-10-01')),
  partition p201910 values less than (to_days('2019-11-01')),
  partition p201911 values less than (to_days('2019-12-01')),
  partition p201912 values less than (to_days('2020-01-01')),
  partition p202001 values less than (to_days('2020-02-01'))
);
追加後に
show create tableした結果CREATE TABLE `example_table` ( `user_id` varchar(36) NOT NULL, `item_id` int(11) NOT NULL, `batch_date` date NOT NULL, PRIMARY KEY (`user_id`,`item_id`,`batch_date`), KEY `item_id_batch_date_index` (`item_id`,`batch_date`) ) ENGINE=InnoDB DEFAULT CHARSET=utf8 /*!50100 PARTITION BY RANGE (to_days(batch_date)) (PARTITION p201812 VALUES LESS THAN (737425) ENGINE = InnoDB, PARTITION p201901 VALUES LESS THAN (737456) ENGINE = InnoDB, PARTITION p201902 VALUES LESS THAN (737484) ENGINE = InnoDB, PARTITION p201903 VALUES LESS THAN (737515) ENGINE = InnoDB, PARTITION p201904 VALUES LESS THAN (737545) ENGINE = InnoDB, PARTITION p201905 VALUES LESS THAN (737576) ENGINE = InnoDB, PARTITION p201906 VALUES LESS THAN (737606) ENGINE = InnoDB, PARTITION p201907 VALUES LESS THAN (737637) ENGINE = InnoDB, PARTITION p201908 VALUES LESS THAN (737668) ENGINE = InnoDB, PARTITION p201909 VALUES LESS THAN (737698) ENGINE = InnoDB, PARTITION p201910 VALUES LESS THAN (737729) ENGINE = InnoDB, PARTITION p201911 VALUES LESS THAN (737759) ENGINE = InnoDB, PARTITION p201912 VALUES LESS THAN (737790) ENGINE = InnoDB, PARTITION p202001 VALUES LESS THAN (737821) ENGINE = InnoDB) */検証で使うデータ
select count(*)で 12,550,978 件- 期間: 約4ヶ月分
- 1日あたり9万から11万件程度
例)
mysql> select batch_date, count(*)
from example_table
group by batch_date;
+------------+----------+
| batch_date | count(*) |
+------------+----------+
| 2018-12-31 |   105525 |
| 2019-01-01 |    98958 |
| 2019-01-02 |    91431 |
| 2019-01-03 |   101750 |
| 2019-01-04 |    95111 |
| 2019-01-05 |    93807 |
...
| 2019-04-28 |   100994 |
| 2019-04-29 |    92203 |
| 2019-04-30 |   103806 |
| 2019-05-01 |    95683 |
| 2019-05-02 |   104395 |
| 2019-05-03 |    90513 |
| 2019-05-04 |    99946 |
+------------+----------+
insert
load data infileで空のテーブルにデータをinsert。
それにどのくらいかかるかゆるく計測
対象ファイルの行数は 12,550,978 行結果
パーティションの有無で大きく時間が変わることはなかった
どちらもだいたい50分削除の検証
delete文
delete前確認
mysql> select date_format(batch_date, '%Y-%m') d, count(*)
from  example_table
group by d;
+---------+----------+
| d       | count(*) |
+---------+----------+
| 2018-12 |   105525 |
| 2019-01 |  3061619 |
| 2019-02 |  2824514 |
| 2019-03 |  3141687 |
| 2019-04 |  3027096 |
| 2019-05 |   390537 |
+---------+----------+
6 rows in set (8.97 sec)
delete
mysql> delete from example_table
where batch_date between '2019-01-01' and '2019-01-31';
Query OK, 3061619 rows affected (55.01 sec)
今回のデータ量だと1分弱
delete後確認
mysql> select date_format(batch_date, '%Y-%m') d, count(*)
from  example_table
group by d;
+---------+----------+
| d       | count(*) |
+---------+----------+
| 2018-12 |   105525 |
| 2019-02 |  2824514 |
| 2019-03 |  3141687 |
| 2019-04 |  3027096 |
| 2019-05 |   390537 |
+---------+----------+
5 rows in set (5.74 sec)
1月だけ消えた
drop partition
drop前確認
mysql> select date_format(batch_date, '%Y-%m') d, count(*)
from  example_table
group by d;
+---------+----------+
| d       | count(*) |
+---------+----------+
| 2018-12 |   105525 |
| 2019-01 |  3061619 |
| 2019-02 |  2824514 |
| 2019-03 |  3141687 |
| 2019-04 |  3027096 |
| 2019-05 |   390537 |
+---------+----------+
6 rows in set (7.62 sec)
drop partition
mysql> alter table example_table drop partition p201901;
Query OK, 0 rows affected (0.11 sec)
Records: 0  Duplicates: 0  Warnings: 0
一瞬で消えた。
drop後確認
mysql> select date_format(batch_date, '%Y-%m') d, count(*)
from  example_table
group by d;
+---------+----------+
| d       | count(*) |
+---------+----------+
| 2018-12 |   105525 |
| 2019-02 |  2824514 |
| 2019-03 |  3141687 |
| 2019-04 |  3027096 |
| 2019-05 |   390537 |
+---------+----------+
5 rows in set (5.92 sec)
1月だけ消えた
まとめ
delete
drop partitionで一瞬で消せた
よかったinsert
真面目に検証してないけど、パーティションの有無でinsertの速度はそれほど変わらなそう
真面目に細かく確認したら差が出るのかな関連
- 投稿日:2019-08-21T11:19:12+09:00
ローカルのPHPからsshトンネルを使ってサーバーへmysql接続
ちょっとしたクエリを試したいときなどローカルから直接アクセスできないDBサーバーへ接続したいときがあるかと思います。
mysqlクライアントツールなど使えば簡単にできるのですが、今回はphpの処理も絡めて行いたかったのでローカルのPHPプログラムからサーバのDBにアクセスできるようにしました。ポートフォワードさせる(sshトンネル)
ターミナルで以下のコマンドを実行させます。
ssh -N -L {任意のポート番号}:{DBエンドポイント} -i {鍵ファイル} -p {踏み台のsshポート番号} {ユーザ名}@{踏み台サーバのホスト}上記コマンドの波括弧部分を変えます。任意のポート番号は使用されていないものならなんでも良いです。このポート番号にアクセスするとポートフォワードされるようになります。
オプションですが
N...リモートコマンドを実行しない
L...指定されたようにポートフォワードさせる
のようになっています。PDO
$pdo = new PDO('mysql:host='. "127.0.0.1:{任意のポート番号}" .';dbname=' . "db_name" .';charset=utf8', "user_name", "password");PDOはいつもの通りですが、hostがサーバーではなくローカルを指すようにします。その際、sshコマンドで入力したポートを利用します。
これでテスト的にプログラムを実行したいときに便利になりました。
- 投稿日:2019-08-21T10:59:03+09:00
webarenaでubuntu その23
概要
webarenaでubuntu18.04やってみた。
cheetanやってみた。使用したライブラリー
https://github.com/ohisama/cheetan
create
<?php
    require_once 'config.php';
    require_once 'cheetan/cheetan.php';

    function action(&$c) {
        if (count($_POST))
        {
            $c->test->insert($c->data['test']);
        }
    }
?>
<form method="post" action="create.php"> name<br /> <input type="text" name="test/name" /><br /> age<br /> <input type="text" name="test/age" /><br /> <input type="submit" value="new" /> </form>read
<?php
    require_once './config.php';
    require_once './cheetan/cheetan.php';

    function action(&$c) {
        $c->set('datas', $c->test->find());
    }
?>
<h1>manager</h1> <p> <a href="./create.php">Write new</a> </p> <table border="1" width="98%"> <tr> <td>id</td> <td>name</td> <td>age</td> <td>r_time</td> <td>edit/del</td> </tr> <?php foreach ($data["datas"] as $data) { ?> <tr> <td><?php print $data["id"]; ?></td> <td><?php print $data["name"]; ?></td> <td><?php print $data["age"]; ?></td> <td><?php print $data["r_time"]; ?></td> <td> <a href="./update.php?id=<?php print $data["id"]; ?>">Edit</a> <a href="./delete.php?id=<?php print $data["id"]; ?>">Del</a> </td> </tr> <?php } ?> </table>update
<?php
    require_once 'config.php';
    require_once 'cheetan/cheetan.php';

    function action(&$c) {
        if (count($_POST))
        {
            $c->test->update($c->data['test']);
        }
        $c->set('data', $c->test->findone('id=' . $_GET['id']));
    }
?>
<form method="post" action="update.php"> name<br /> <input type="text" name="test/name" value="<?php echo $data['data']['name']; ?>" /><br /> age<br /> <input type="text" name="test/age" value="<?php echo $data['data']['age']; ?>" /><br /> <input type="hidden" name="test/id" value="<?php echo $data['data']['id']; ?>" /> <input type="submit" value="update" /> </form>delete
<?php
    require_once 'config.php';
    require_once 'cheetan/cheetan.php';

    function action(&$c) {
        if (count($_POST))
        {
            $c->test->del('id=' . $_POST['id']);
        }
        $c->set('data', $c->test->findone('id=' . $_GET['id']));
    }
?>
<form method="post" action="delete.php"> name<br /> <?php echo $data['data']['name'];?><br /> age<br /> <?php echo $data['data']['age'];?><br /> <input type="hidden" name="id" value="<?php echo $data['data']['id']; ?>" /> <input type="submit" value="del" /> </form>以上。
- 投稿日:2019-08-21T08:14:12+09:00
webarenaでubuntu その22
概要
webarenaでubuntu18.04やってみた。
mysql5.7やってみた。
crudやってみた。Create
<?php
    $db = new PDO("mysql:host=localhost;dbname=mydb;", 'arena', 'pass');
    $sql = 'insert into test values(null, "name", 20, now())';
    $res = $db->query($sql);
    if ($res) print "ok\n";
?>
Read
<?php
    $db = new PDO("mysql:host=localhost;dbname=mydb;", 'arena', 'pass');
    $sql = 'select * from test';
    $res = $db->query($sql);
    if ($res) print "ok\n";
?>
Update
<?php
    $db = new PDO("mysql:host=localhost;dbname=mydb;", 'arena', 'pass');
    $sql = 'update test set age=80 where id=1';
    $res = $db->query($sql);
    if ($res) print "ok\n";
?>
Delete
<?php
    $db = new PDO("mysql:host=localhost;dbname=mydb;", 'arena', 'pass');
    $sql = 'delete from test where id=1';
    $res = $db->query($sql);
    if ($res) print "ok\n";
?>
以上。
- 投稿日:2019-08-21T00:33:52+09:00
【Go/goose】HerokuでDBマイグレーション【MySQL】
リリースしたら自動でマイグレーションコマンドが実行されてDBスキーマが更新されるようにします。
開発用 PC は mac を想定です。以下、淡々と。
console# ディレクトリ作成と移動 # 作成するディレクトリは GOPATH 配下ではないようにする cd heroku-go-migration && cd $_ # go.mod の作成 go mod init $(basename `pwd`) # main.goの作成 touch main.gomain.gopackage main import ( "net/http" "os" "github.com/labstack/echo/v4" ) var e = createMux() func init() { e.GET("/", func(c echo.Context) error { return c.String(http.StatusOK, "Hello World!") }) } func main() { port := os.Getenv("PORT") if port == "" { e.Logger.Fatal("$PORT must be set") } e.Logger.Fatal(e.Start(":" + port)) } func createMux() *echo.Echo { e := echo.New() return e }console# 利用 module を判定 go mod tidy # direnv のインストール brew install direnv # direnv 用の設定を追記 echo 'eval "$(direnv hook bash)"' >> ~/.bash_profile # シェルを再読み込みして設定を反映 exec $SHELL -l # .envrc の作成 echo 'export PORT=3000' >> .envrc # (一応) .gitignoreの作成 echo '.envrc' >> .gitignore # direnv で環境変数の読み込み direnv allow # アプリケーションのテスト起動(バックグラウンド) go run main.go & # ブラウザで表示 open http://localhost:3000 # アプリケーションのプロセスを終了 kill $(ps | grep "go run main.go" | cut -d " " -f 1 | head -n 1) kill $(ps | grep "go-build" | cut -d " " -f 1 | head -n 1) # heroku-cli のインストール brew tap heroku/brew && brew install heroku # heroku にサインアップ open https://signup.heroku.com/ # heroku-cli で heroku にログイン heroku login -i # アプリケーション名を変数に格納 # (注)ごちゃごちゃやってますが任意の文字列で構いません。 # (注)大文字は使えません。 export HEROKU_APP_NAME=$(echo `whoami`-`basename $(pwd)` | awk '{print tolower($0)}') # アプリケーション名を確認 echo $HEROKU_APP_NAME # heroku アプリケーションの作成 heroku create $HEROKU_APP_NAME --buildpack heroku/go # Procfile の作成 echo "web: $(basename `pwd`)" > Procfile # git リポジトリの作成 git init git add . git commit -m "Initial commit" # push 先を登録 heroku git:remote --app $HEROKU_APP_NAME # デプロイ git push heroku master # 確認 heroku open --app $HEROKU_APP_NAME # heroku mysql addon を追加 heroku addons:add cleardb # DATABASE_URL の確認 heroku config | grep DATABASE_URL # DATABASE_URLは次のような構造になっている。 # mysql://ユーザ名:パスワード@ホスト名/データベース名?reconnect=true # ユーザ名・パスワード・ホスト名・データベース名をそれぞれ抽出して以下の環境変数に設定する heroku config:set USER="ユーザ名" heroku config:set PASSWORD="パスワード" heroku config:set Host="ホスト名" heroku config:set DBNAME="データベース名" heroku config:set GOOSE_CONNECTION="tcp:ホスト名:3306*データベース名/ユーザ名/パスワード" # 環境変数の確認 heroku config # goose のダウンロード go get -u bitbucket.org/liamstask/goose/cmd/goose # ディレクトリ作成 mkdir db # 設定ファイルのサンプルをコピーして配置 # 途中のパスは各々の環境に合わせること cp $GOPATH/pkg/mod/bitbucket.org/liamstask/goose@vX.X.X-XXXXXXXX-XXXXXXXX/db-sample/dbconf.yml db/
db/dbconf.ymlの production の箇所を次のように編集する。db/dbconf.yml・・・・・・ production: driver: mymysql open: $GOOSE_CONNECTION ・・・・・・console# マイグレーションファイルを作成 goose create create_table_users sql作成された
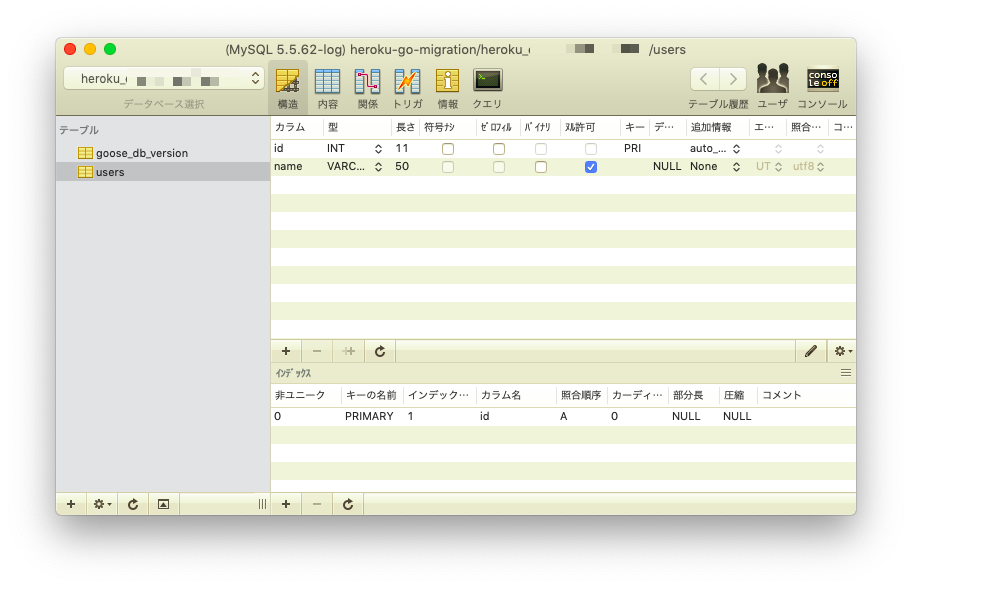
db/migrations/xxxxxxxx_create_table_users.sqlを編集する。db/migrations/xxxxxxxx_create_table_users.sql-- +goose Up -- SQL in section 'Up' is executed when this migration is applied CREATE TABLE users ( id INT AUTO_INCREMENT, name VARCHAR(50), PRIMARY KEY(id) ); -- +goose Down -- SQL section 'Down' is executed when this migration is rolled back DROP TABLE users;console# go.mod を整理 go mod tidy
go.modの 1, 2 行目に次のように追記する。go.mod+ // +heroku install ./... bitbucket.org/liamstask/goose/cmd/goose + module heroku-go-migration go 1.12 require github.com/labstack/echo/v4 v4.1.10console# Procfile の 2 行目にリリース時に実行したいコマンドを追記 echo 'release: goose -env production up' >> Procfile # ここまでの変更内容をコミット git add . git commit -m "Second commit" # デプロイ git push heroku masterデプロイ時のログに次のような内容があることを確認する。
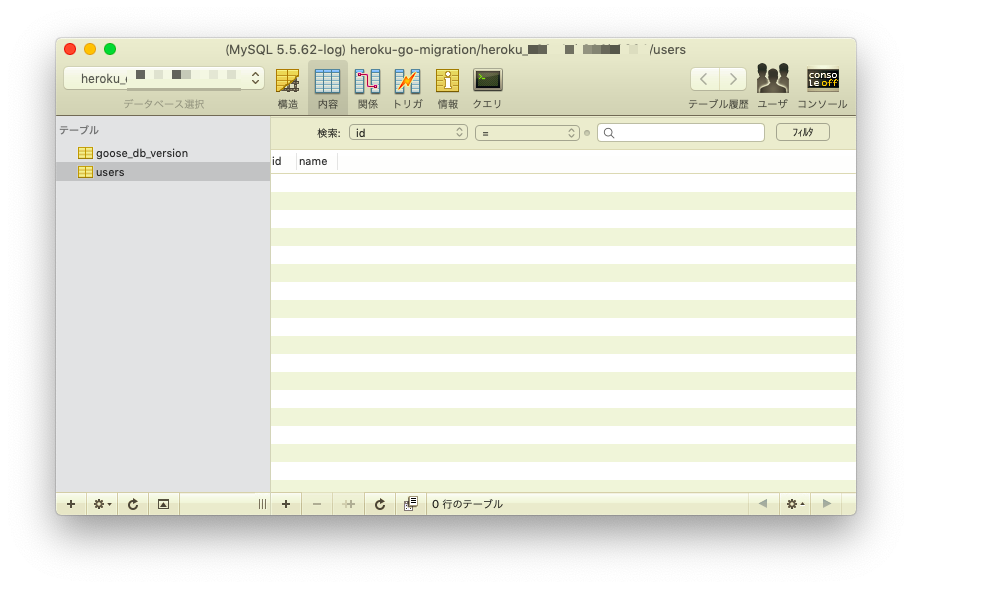
remote: Verifying deploy... done.
remote: Running release command...
remote:
remote: goose: migrating db environment 'production', current version: 0, target: xxxxxxxxxxxxxx
remote: OK    xxxxxxxxxxxxxx_create_table_users.sql
remote: Waiting for release.... done.
控えたユーザ名・パスワード・ホスト名・データベース名を利用して、SQLクライアントからデータベースに接続して確認する。