- 投稿日:2019-07-19T19:20:44+09:00
doker docsにあるサンプルのRails+Postglesを使って環境構築をしてみた
知り合いと飲んだ勢いで、簡単なwebアプリを作成することになったので、
開発環境として、docker docsのRails+Postglesのサンプルを元に、
開発環境を作成してみたら、簡単にできたので、投稿してみました。プロジェクトのディレクトリを作成する
/hoge_project
Dockerfileを作成する/hoge_project |_ DockerfileDockerfileFROM ruby:2.6.3 RUN apt-get update -qq && apt-get install -y nodejs postgresql-client RUN mkdir /myapp WORKDIR /myapp COPY Gemfile /myapp/Gemfile COPY Gemfile.lock /myapp/Gemfile.lock RUN bundle install COPY . /myapp # Add a script to be executed every time the container starts. COPY entrypoint.sh /usr/bin/ RUN chmod +x /usr/bin/entrypoint.sh ENTRYPOINT ["entrypoint.sh"] EXPOSE 3000 # Start the main process. CMD ["rails", "server", "-b", "0.0.0.0"]
Gemfileを作成する/hoge_project |_ Dockerfile |_ GemfileGemfilesource 'https://rubygems.org' gem 'rails', '5.2.3'
Gemfile.lockを作成する/hoge_project |_ Dockerfile |_ Gemfile |_ Gemfile.lock
entrypoint.shを作成する/hoge_project |_ Dockerfile |_ Gemfile |_ Gemfile.lock |_ entrypoint.shentrypoint.sh#!/bin/bash set -e # Remove a potentially pre-existing server.pid for Rails. rm -f /myapp/tmp/pids/server.pid # Then exec the container's main process (what's set as CMD in the Dockerfile). exec "$@"
server.pidがあるかないかでサーバーを再起動させないようにするらしい
docker-compose.ymlを作成する/hoge_project |_ Dockerfile |_ Gemfile |_ Gemfile.lock |_ entrypoint.sh |_ docker-compose.ymldocker-compose.ymlversion: '3' services: db: image: postgres volumes: - ./tmp/db:/var/lib/postgresql/data ports: - "8000:5432" web: build: . command: bash -c "rm -f tmp/pids/server.pid && bundle exec rails s -p 3000 -b '0.0.0.0'" volumes: - .:/myapp ports: - "3000:3000" depends_on: - db
doker docsでのサンプルではpostgresのポートが明示的に設定されていないので、
下記のように設定しました。ports: - "8000:5432"
docker-compose runでプロジエクトを作成する下記のコマンドを実行すると...
docker-compose run web rails new . --force --no-deps --database=postgresqlプロジェクトができる!!!
/hoge_project
        |_ app
        |_ bin
        |_ config
        |_ db
        |_ lib
        |_ log
        |_ public
        |_ storage
        |_ test
        |_ tmp
        |_ vendor
        |_ .gitignore
        |_ .ruby-version
        |_ config.ru
        |_ docker-compose.yml
        |_ Dockerfile
        |_ entrypoint.sh
        |_ Gemfile
        |_ Gemfile.lock
        |_ package.json
        |_ Rakefile
        |_ README.md
Gemfileが更新されたので、再度、イメージを作成するdocker-compose build作成するデータベースと向き先を変更する
config/database.ymldefault: &default adapter: postgresql encoding: unicode host: db username: postgres password: pool: 5 development: <<: *default database: myapp_development test: <<: *default database: myapp_test
docker-compose upでコンテナを起動するdocker-compose upデータベースを作成する
docker-compose run web rake db:createアクセスできるか、確認する
Railshttp://localhost:3000PostgreSQLhost:localhost port:8000 Database:myapp_development user:postgres password:完成〜
まだまだ設定しないといけない部分はありますが、
簡単に動くものなら、意外と簡単にできるので、
みなさんもやってみてください〜
- 投稿日:2019-07-19T19:20:44+09:00
doker docsにあるサンプルのRails+Postglesを使って開発環境を構築してみた
知り合いと飲んだ勢いで、簡単なwebアプリを作成することになったので、
開発環境として、docker docsのRails+Postglesのサンプルを元に、
開発環境を作成してみたら、簡単にできたので、投稿してみました。プロジェクトのディレクトリを作成する
/hoge_project
Dockerfileを作成する/hoge_project |_ DockerfileDockerfileFROM ruby:2.6.3 RUN apt-get update -qq && apt-get install -y nodejs postgresql-client RUN mkdir /myapp WORKDIR /myapp COPY Gemfile /myapp/Gemfile COPY Gemfile.lock /myapp/Gemfile.lock RUN bundle install COPY . /myapp # Add a script to be executed every time the container starts. COPY entrypoint.sh /usr/bin/ RUN chmod +x /usr/bin/entrypoint.sh ENTRYPOINT ["entrypoint.sh"] EXPOSE 3000 # Start the main process. CMD ["rails", "server", "-b", "0.0.0.0"]
Gemfileを作成する/hoge_project |_ Dockerfile |_ GemfileGemfilesource 'https://rubygems.org' gem 'rails', '5.2.3'
Gemfile.lockを作成する/hoge_project |_ Dockerfile |_ Gemfile |_ Gemfile.lock
entrypoint.shを作成する/hoge_project |_ Dockerfile |_ Gemfile |_ Gemfile.lock |_ entrypoint.shentrypoint.sh#!/bin/bash set -e # Remove a potentially pre-existing server.pid for Rails. rm -f /myapp/tmp/pids/server.pid # Then exec the container's main process (what's set as CMD in the Dockerfile). exec "$@"
server.pidがあるかないかでサーバーを再起動させないようにするらしい
docker-compose.ymlを作成する/hoge_project |_ Dockerfile |_ Gemfile |_ Gemfile.lock |_ entrypoint.sh |_ docker-compose.ymldocker-compose.ymlversion: '3' services: db: image: postgres volumes: - ./tmp/db:/var/lib/postgresql/data ports: - "8000:5432" web: build: . command: bash -c "rm -f tmp/pids/server.pid && bundle exec rails s -p 3000 -b '0.0.0.0'" volumes: - .:/myapp ports: - "3000:3000" depends_on: - db
doker docsでのサンプルではpostgresのポートが明示的に設定されていないので、
下記のように設定しました。ports: - "8000:5432"
docker-compose runでプロジエクトを作成する下記のコマンドを実行すると...
docker-compose run web rails new . --force --no-deps --database=postgresqlプロジェクトができる!!!
/hoge_project
        |_ app
        |_ bin
        |_ config
        |_ db
        |_ lib
        |_ log
        |_ public
        |_ storage
        |_ test
        |_ tmp
        |_ vendor
        |_ .gitignore
        |_ .ruby-version
        |_ config.ru
        |_ docker-compose.yml
        |_ Dockerfile
        |_ entrypoint.sh
        |_ Gemfile
        |_ Gemfile.lock
        |_ package.json
        |_ Rakefile
        |_ README.md
Gemfileが更新されたので、再度、イメージを作成するdocker-compose build作成するデータベースと向き先を変更する
config/database.ymldefault: &default adapter: postgresql encoding: unicode host: db username: postgres password: pool: 5 development: <<: *default database: myapp_development test: <<: *default database: myapp_test
docker-compose upでコンテナを起動するdocker-compose upデータベースを作成する
docker-compose run web rake db:createアクセスできるか、確認する
Railshttp://localhost:3000PostgreSQLhost:localhost port:8000 Database:myapp_development user:postgres password:完成〜
まだまだ設定しないといけない部分はありますが、
簡単に動くものなら、意外と簡単にできるので、
みなさんもやってみてください〜
- 投稿日:2019-07-19T19:20:44+09:00
doker docsのサンプルにあるRails+Postglesを使って開発環境を構築してみた
知り合いと飲んだ勢いで、簡単なwebアプリを作成することになったので、
開発環境として、docker docsのRails+Postglesのサンプルを元に、
開発環境を作成してみたら、簡単にできたので、投稿してみました。プロジェクトのディレクトリを作成する
/hoge_project
Dockerfileを作成する/hoge_project |_ DockerfileDockerfileFROM ruby:2.6.3 RUN apt-get update -qq && apt-get install -y nodejs postgresql-client RUN mkdir /myapp WORKDIR /myapp COPY Gemfile /myapp/Gemfile COPY Gemfile.lock /myapp/Gemfile.lock RUN bundle install COPY . /myapp # Add a script to be executed every time the container starts. COPY entrypoint.sh /usr/bin/ RUN chmod +x /usr/bin/entrypoint.sh ENTRYPOINT ["entrypoint.sh"] EXPOSE 3000 # Start the main process. CMD ["rails", "server", "-b", "0.0.0.0"]
Gemfileを作成する/hoge_project |_ Dockerfile |_ GemfileGemfilesource 'https://rubygems.org' gem 'rails', '5.2.3'
Gemfile.lockを作成する/hoge_project |_ Dockerfile |_ Gemfile |_ Gemfile.lock
entrypoint.shを作成する/hoge_project |_ Dockerfile |_ Gemfile |_ Gemfile.lock |_ entrypoint.shentrypoint.sh#!/bin/bash set -e # Remove a potentially pre-existing server.pid for Rails. rm -f /myapp/tmp/pids/server.pid # Then exec the container's main process (what's set as CMD in the Dockerfile). exec "$@"
server.pidがあるかないかでサーバーを再起動させないようにするらしい
docker-compose.ymlを作成する/hoge_project |_ Dockerfile |_ Gemfile |_ Gemfile.lock |_ entrypoint.sh |_ docker-compose.ymldocker-compose.ymlversion: '3' services: db: image: postgres:12 volumes: - ./tmp/db:/var/lib/postgresql/data ports: - "8000:5432" web: build: . command: bash -c "rm -f tmp/pids/server.pid && bundle exec rails s -p 3000 -b '0.0.0.0'" volumes: - .:/myapp ports: - "3000:3000" depends_on: - db
doker docsでのサンプルではpostgresのポートが明示的に設定されていないので、
下記のように設定しました。ports: - "8000:5432"
docker-compose runでプロジエクトを作成する下記のコマンドを実行すると...
docker-compose run web rails new . --force --no-deps --database=postgresqlプロジェクトができる!!!
/hoge_project
        |_ app
        |_ bin
        |_ config
        |_ db
        |_ lib
        |_ log
        |_ public
        |_ storage
        |_ test
        |_ tmp
        |_ vendor
        |_ .gitignore
        |_ .ruby-version
        |_ config.ru
        |_ docker-compose.yml
        |_ Dockerfile
        |_ entrypoint.sh
        |_ Gemfile
        |_ Gemfile.lock
        |_ package.json
        |_ Rakefile
        |_ README.md
Gemfileが更新されたので、再度、イメージを作成するdocker-compose build作成するデータベースと向き先を変更する
config/database.ymldefault: &default adapter: postgresql encoding: unicode host: db username: postgres password: pool: 5 development: <<: *default database: myapp_development test: <<: *default database: myapp_test
docker-compose upでコンテナを起動するdocker-compose upデータベースを作成する
docker-compose run web rake db:createアクセスできるか、確認する
Railshttp://localhost:3000PostgreSQLhost:localhost port:8000 Database:myapp_development user:postgres password:終わり
まだまだ設定しないといけない部分はありますが、
簡単に動くものなら、意外と簡単にできるので、
みなさんもやってみてください〜
- 投稿日:2019-07-19T16:24:42+09:00
AzureDevOps でDocker をAzure Container Registry にデプロイ!
Azure DevOps 触ってみた
Pipelineを作る
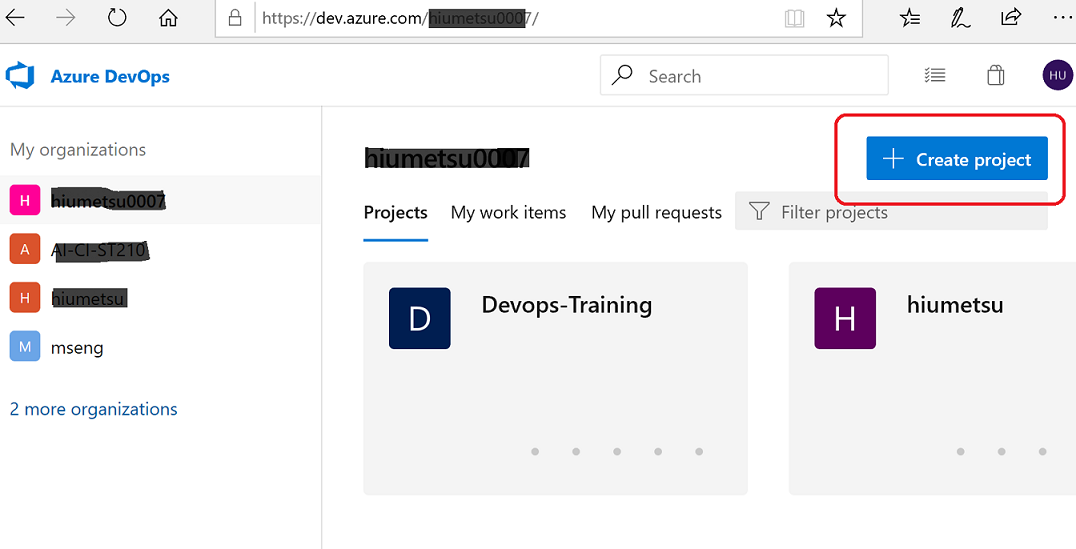
(1)まずはAzureDevOpsにログインし「Create Project」をクリック
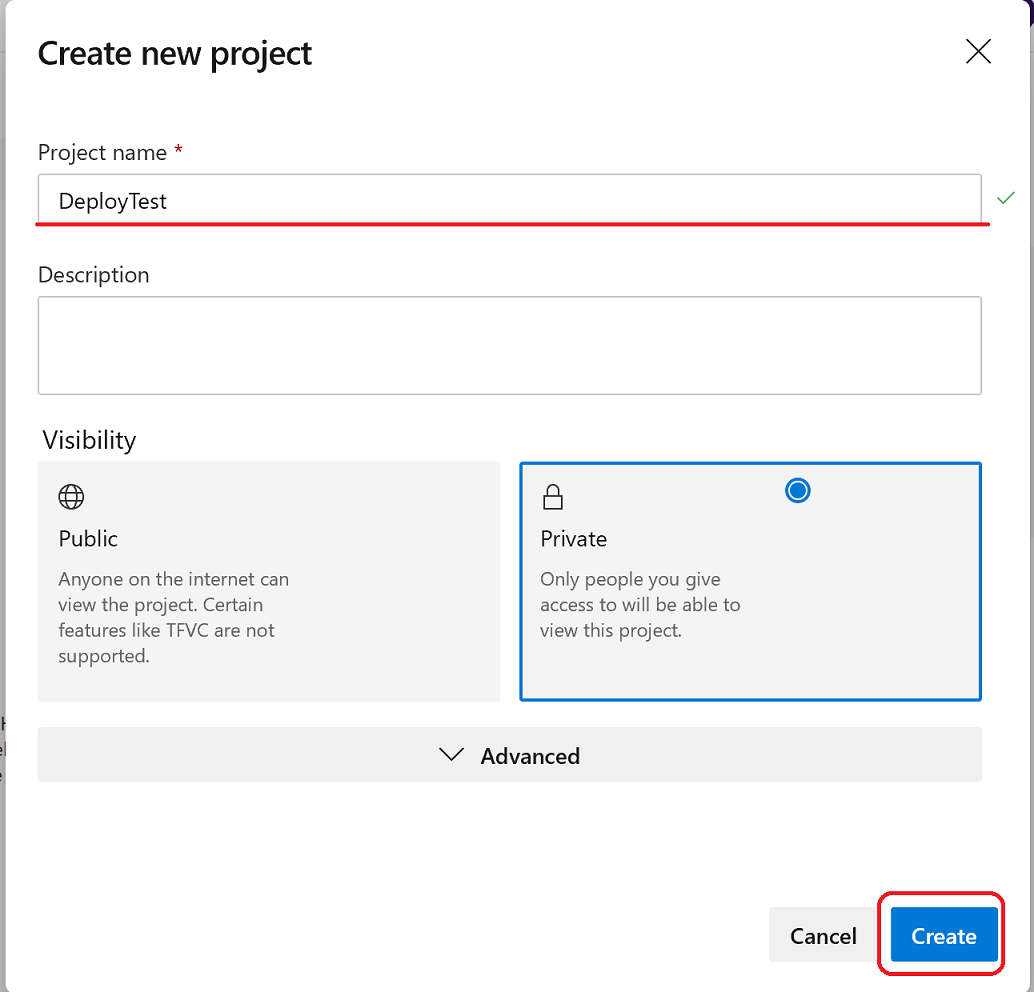
(2)適当に名前を付けて、「Create」をクリック
今回はとりあえず「Private」で作ります
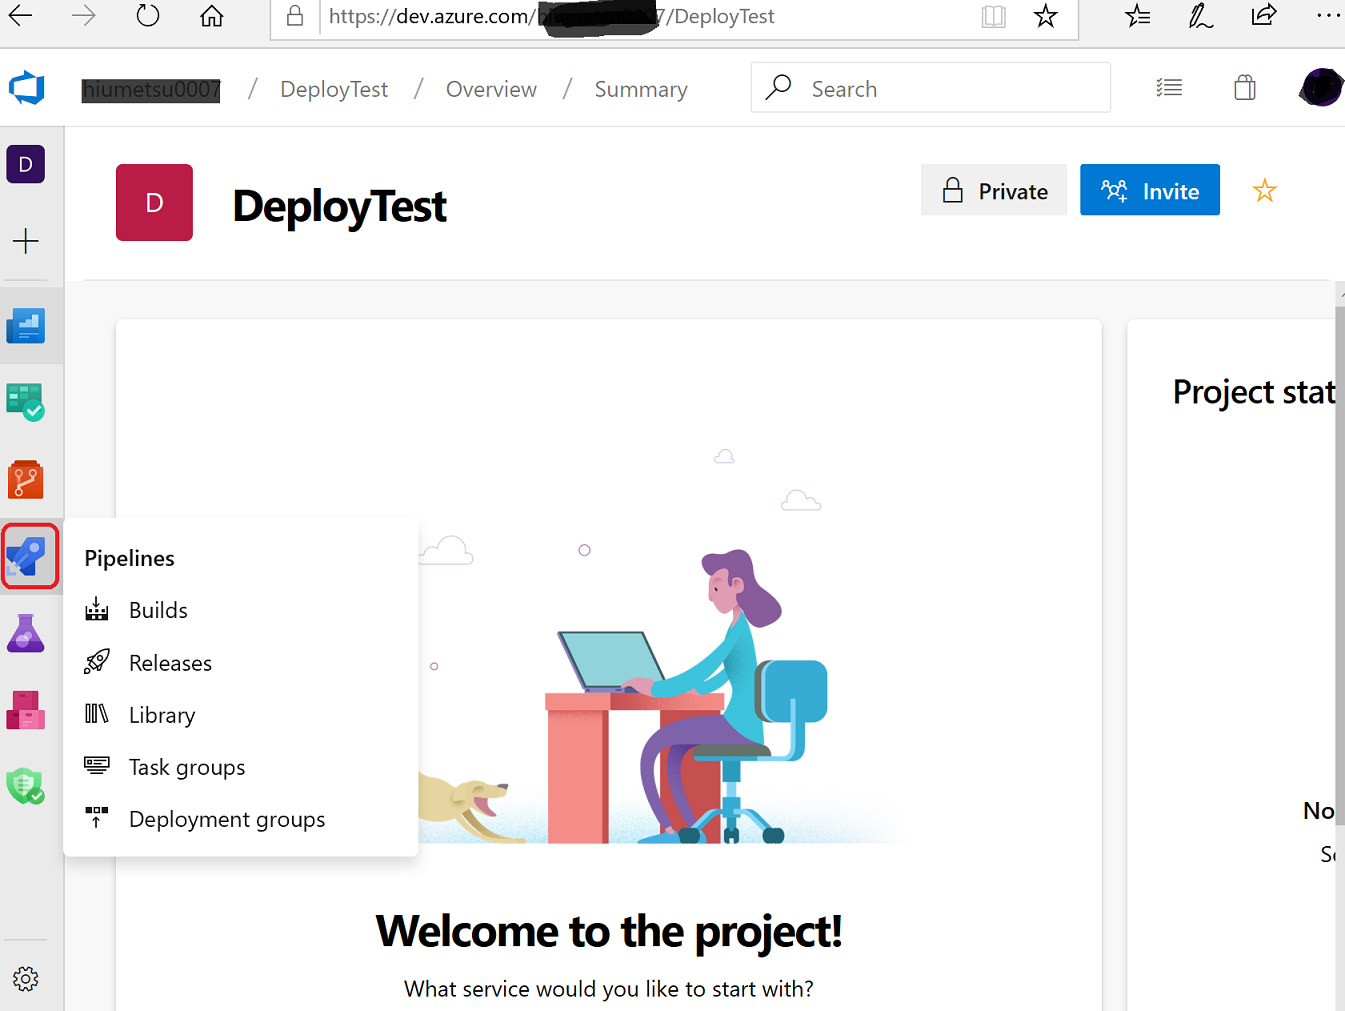
(3)出来上がったらロケットのマーク(Pipelines)をクリック
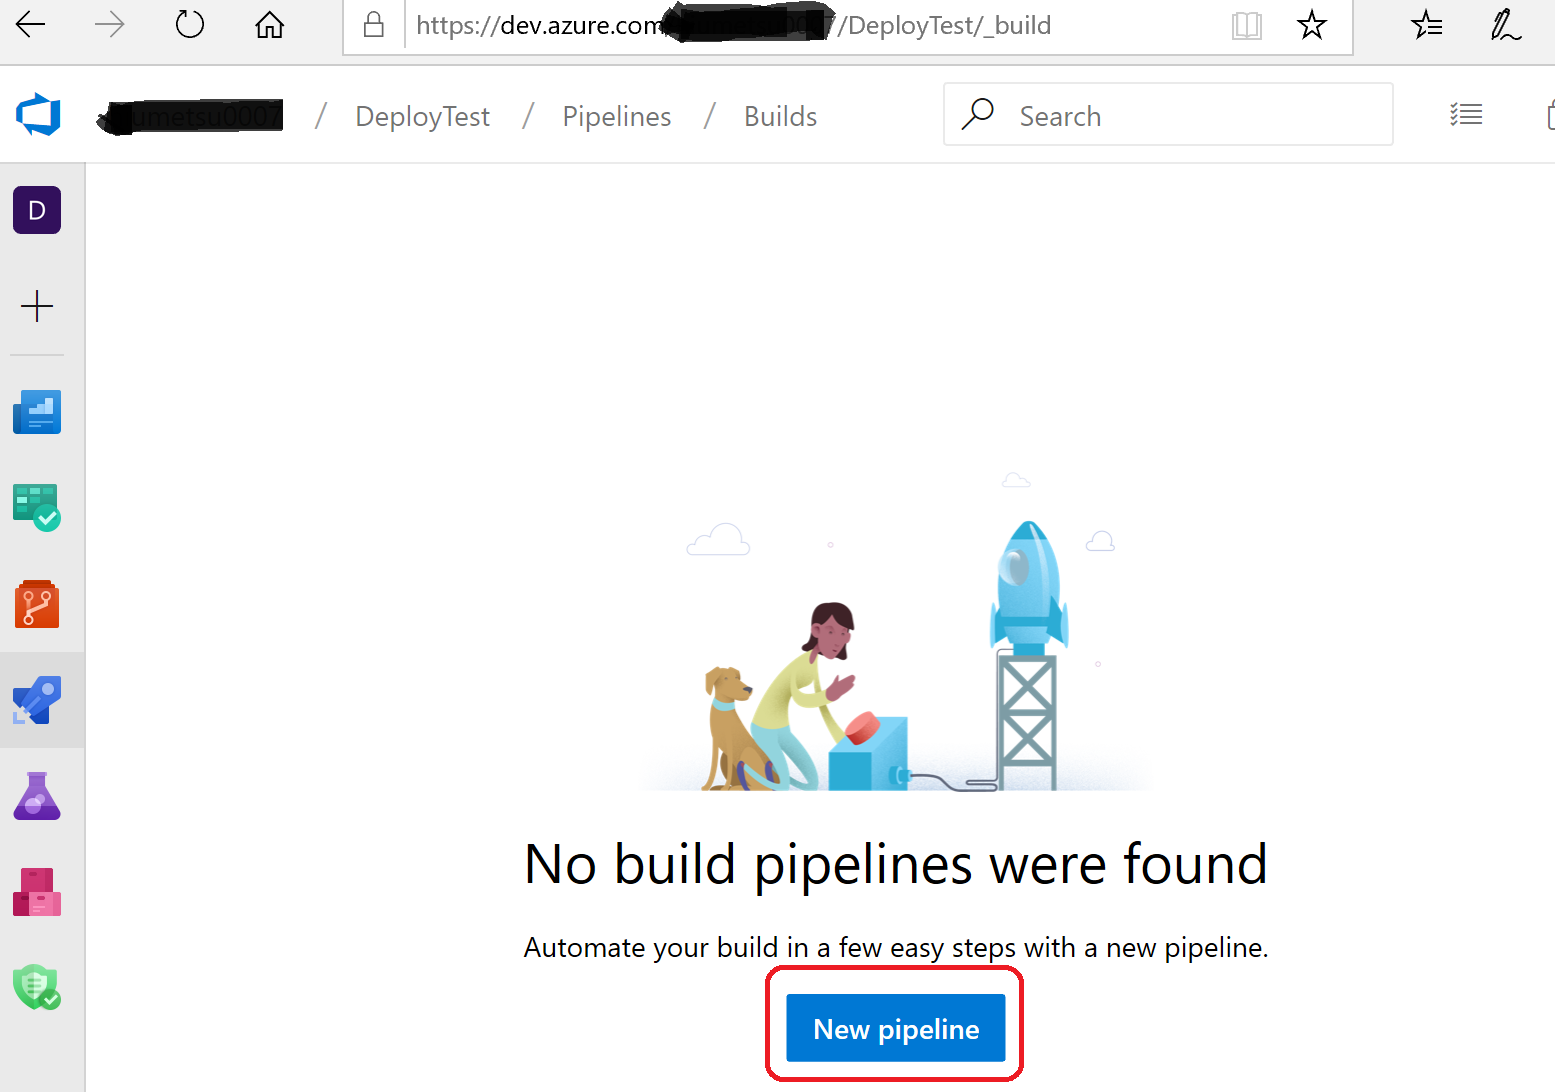
(4)「New Pipeline」をクリック
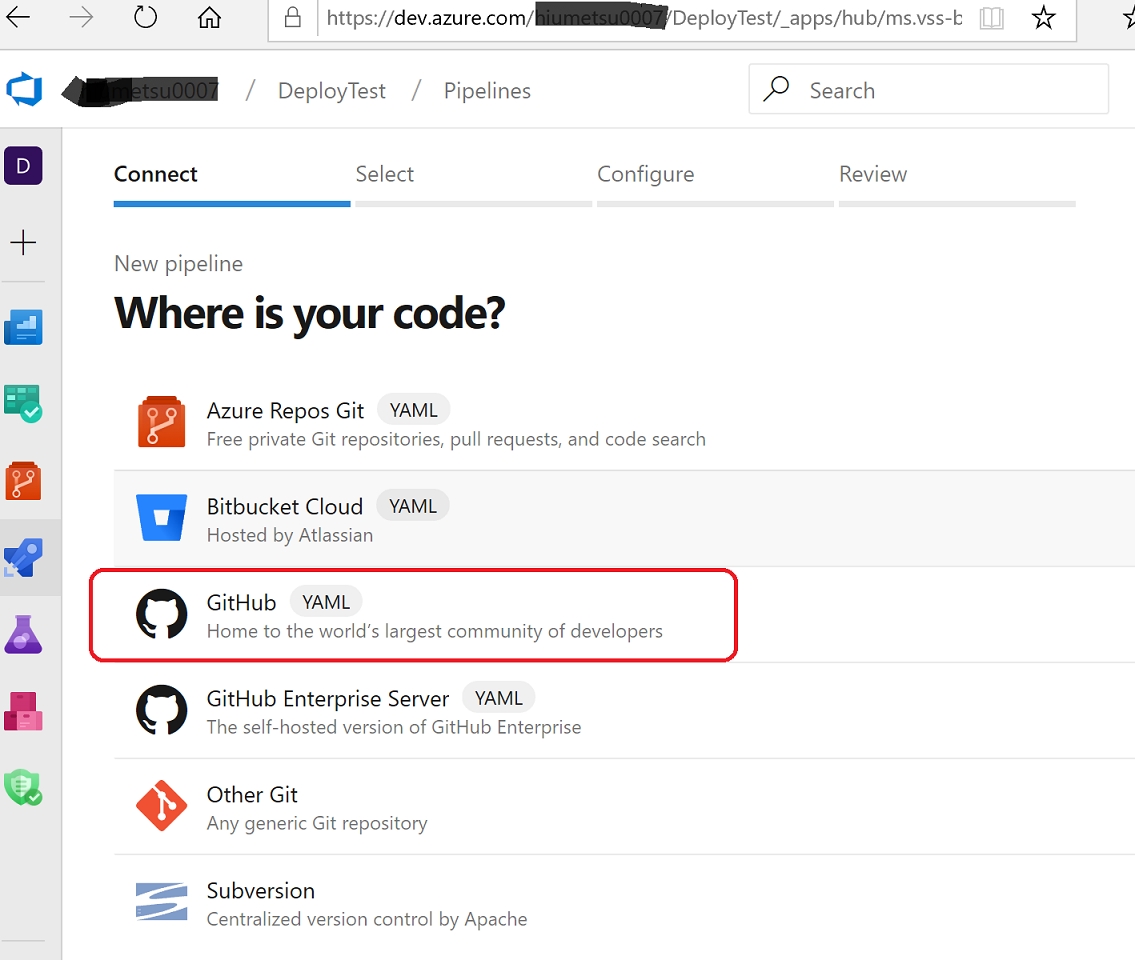
(5)ソースコードの置き場所として今回は「GitHub」を選択
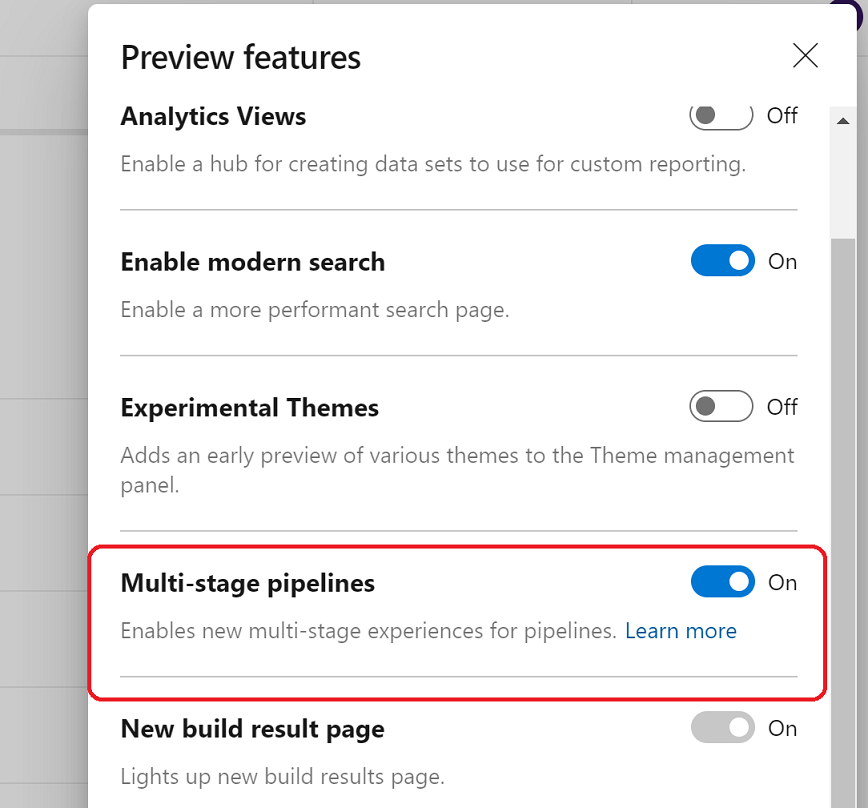
※Preiew future の 「Multi-Stage Pilelines」をOnにする
(Pipeline内のジョブを段階にまとめることができる)
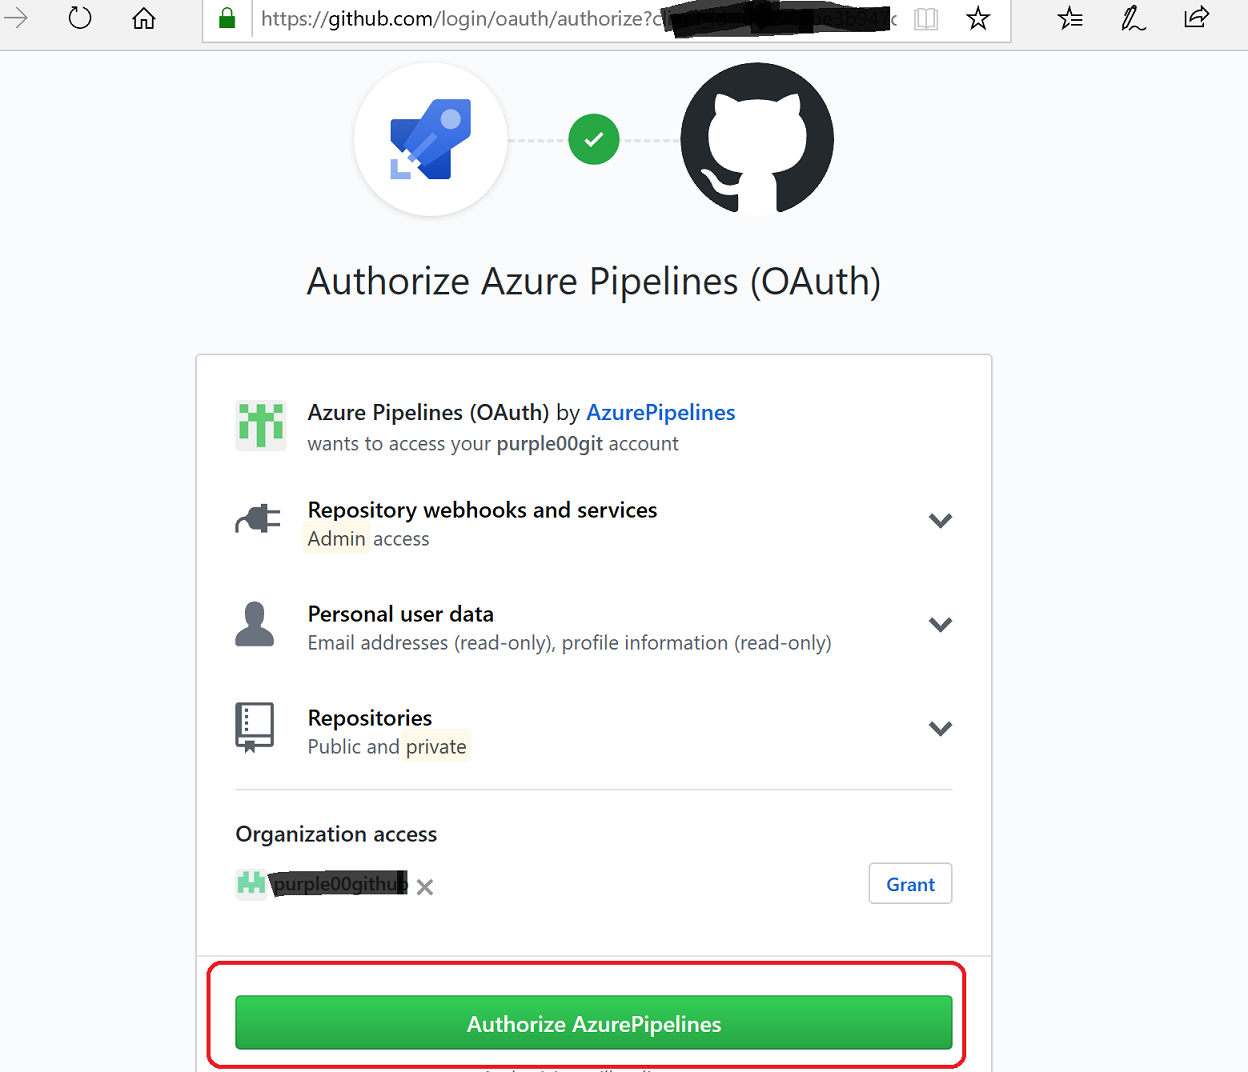
(6)GitHubの連携のため認証を行う
すでに連携してるGitHubアカウントがあれば「Grant」をクリック(要パスワード入力)
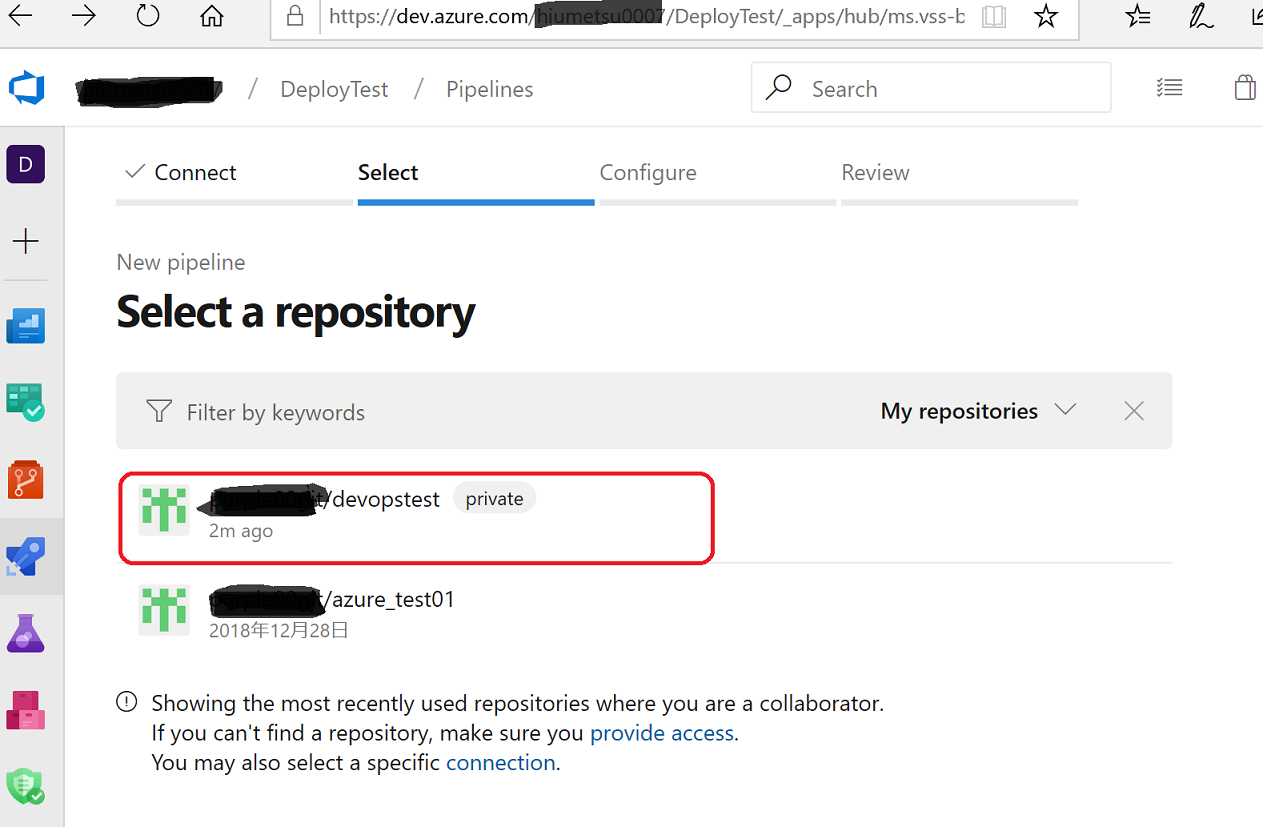
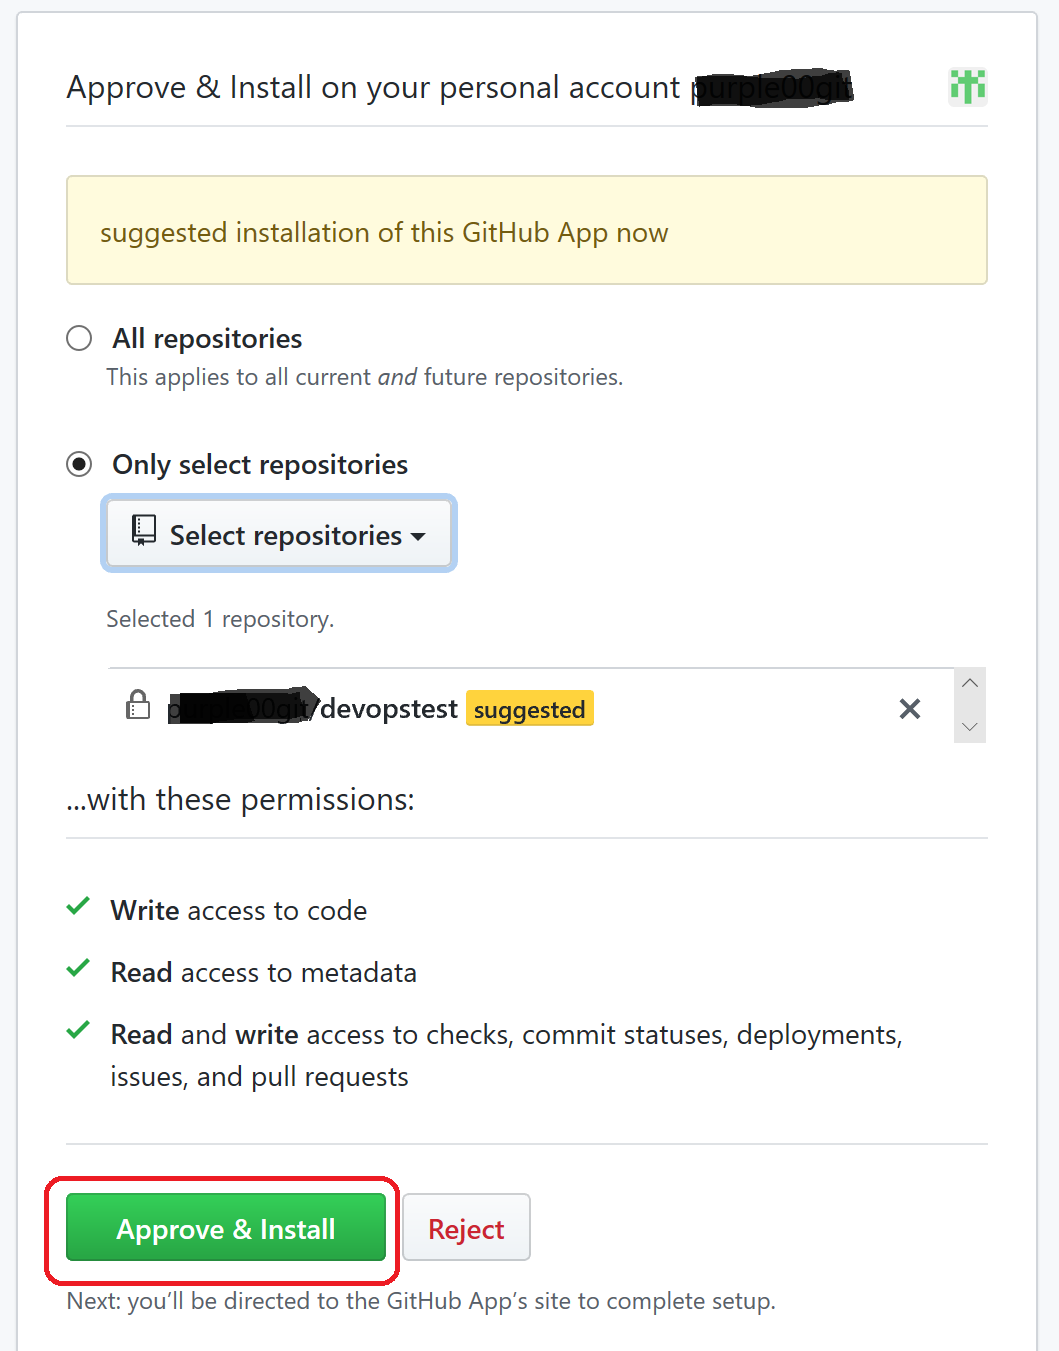
(7)連携できるとリポジトリが出てくるので、必要な方を選択する
(8)このプロジェクトでリポジトリを限定するかを選択し「Approve & Insall」をクリック
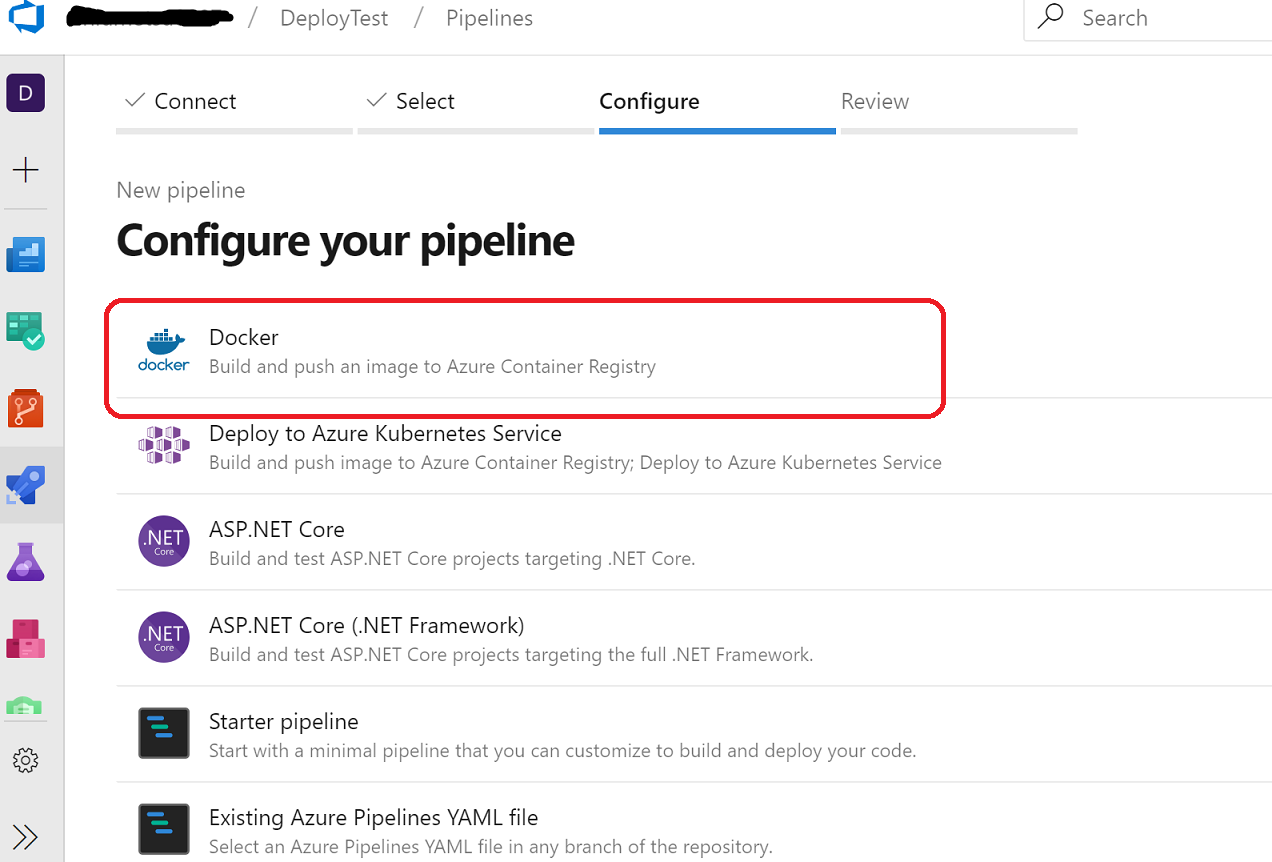
(9)「Docker」をクリック
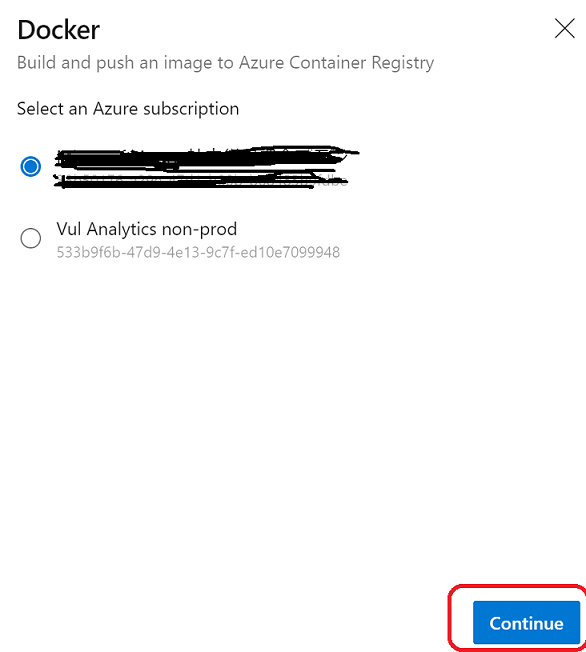
(10)今回Azure Container Registry を使うのでSubscription を選択
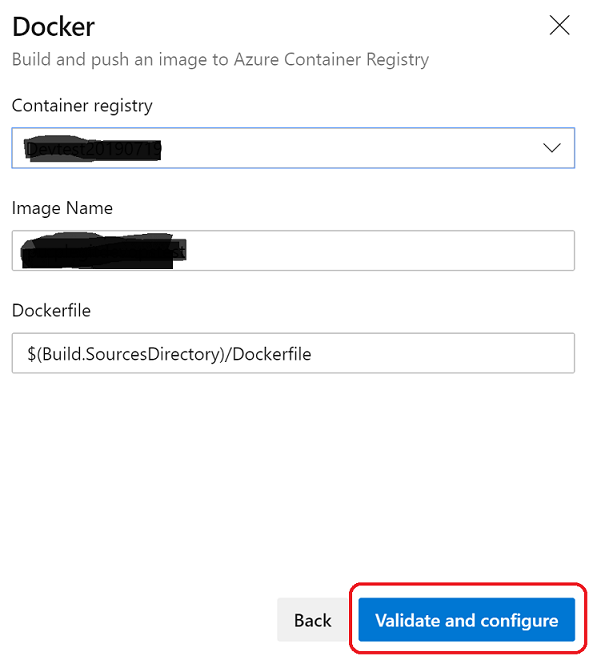
(11)保存するContainer Registry名を確認して「Validate and configure」をクリック
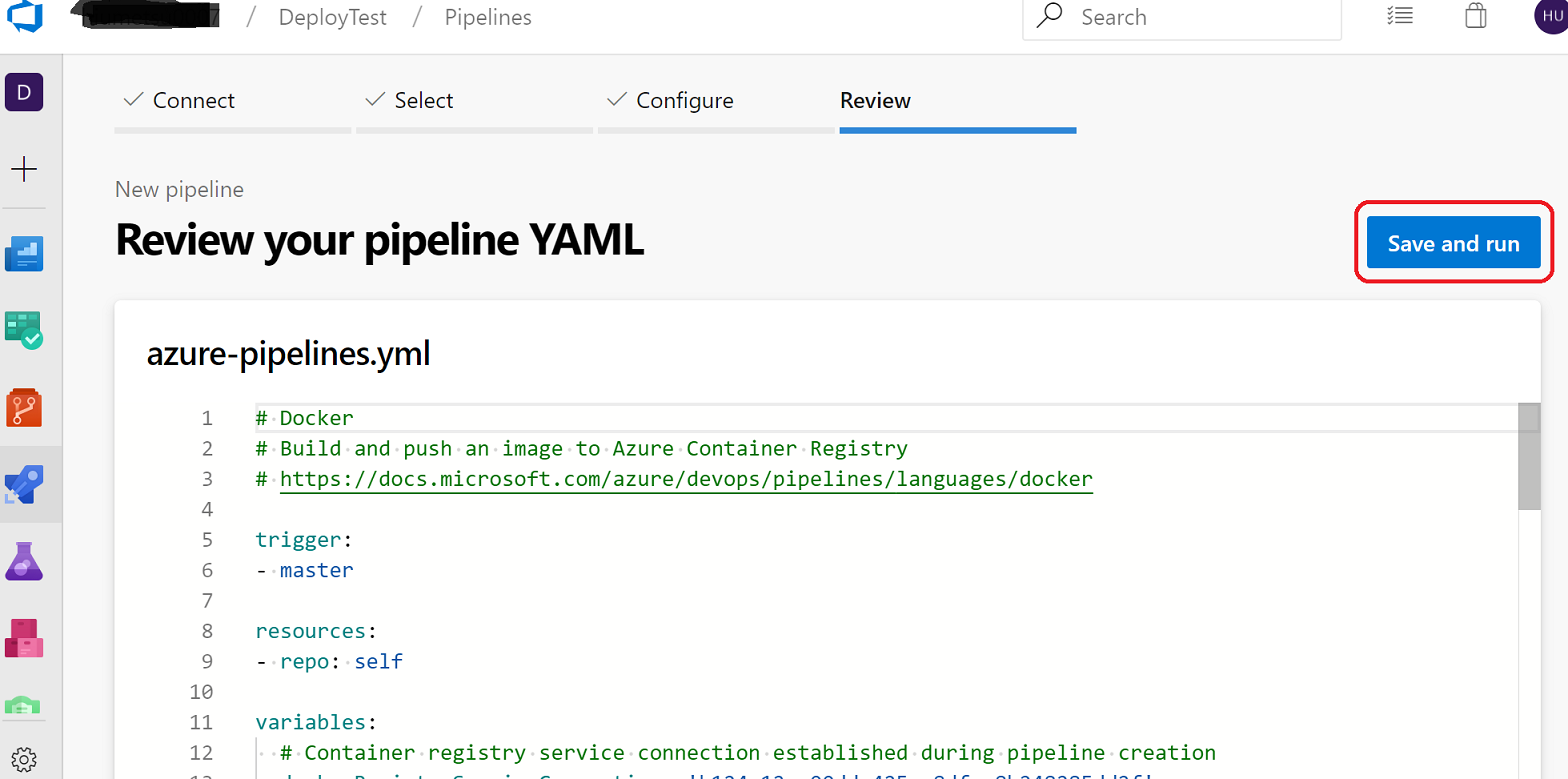
(12)yamlファイルが出来上がるので、問題なければ「Save & run」をクリック
(13)コミット時のメッセージとMasterとプルリクエストか選択して「Save & run」をクリック
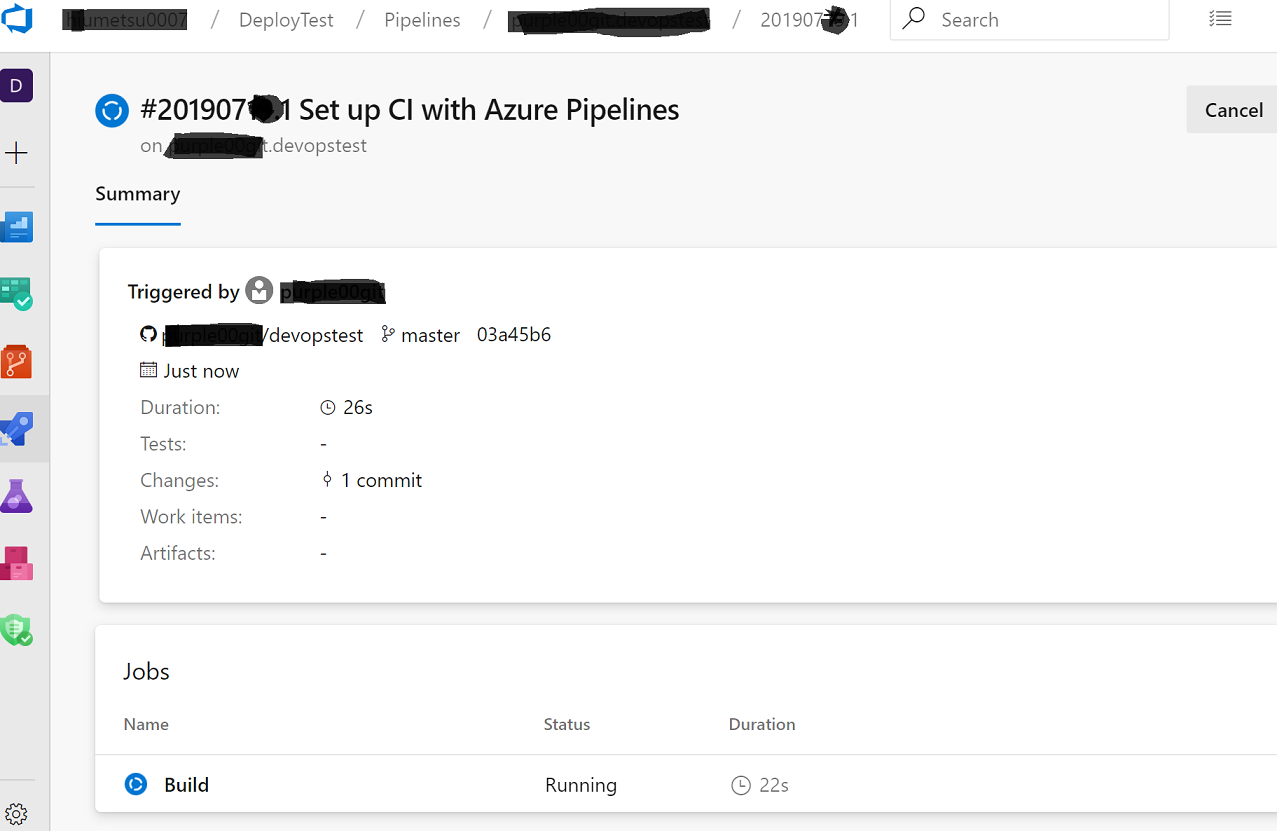
(14)実行されるとこんな画面になる。下にある「build」をクリック
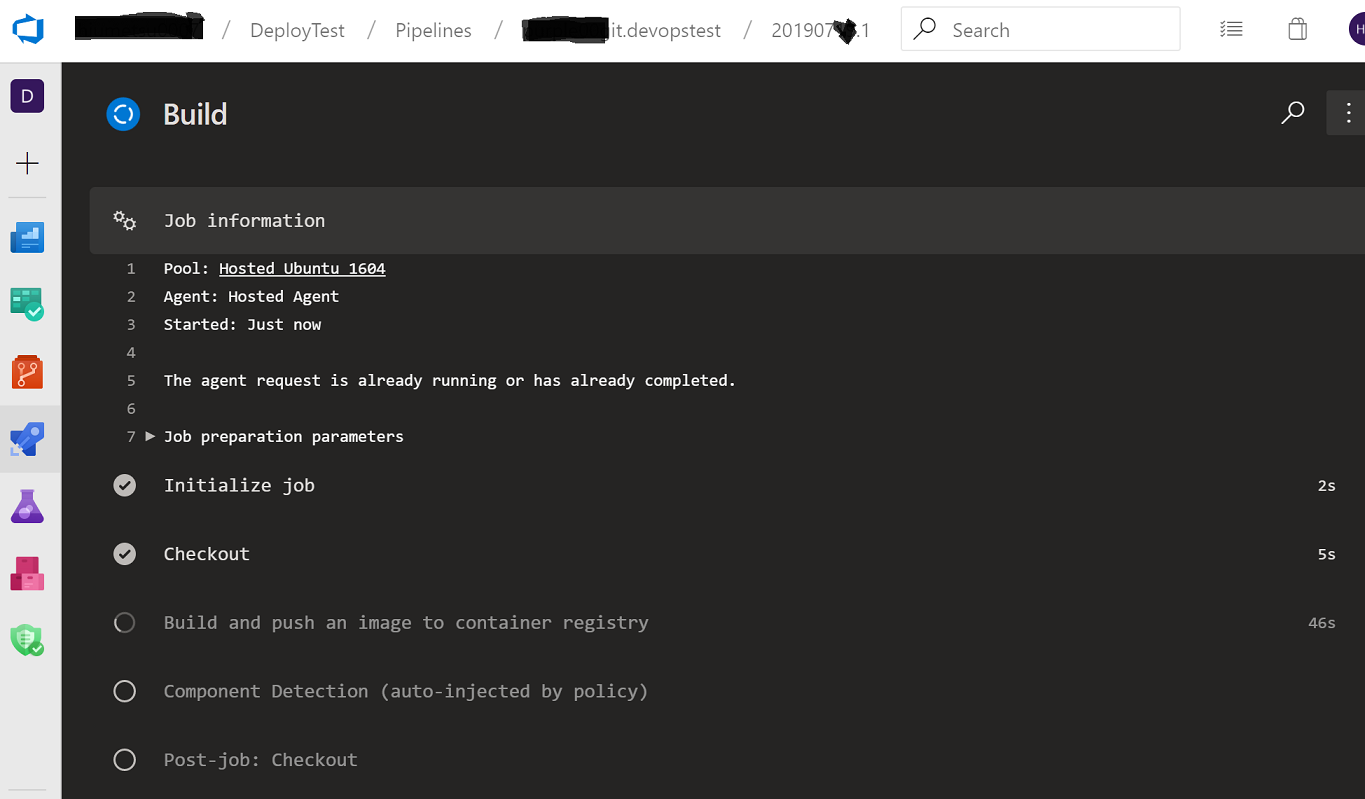
(15)なんとログも見ることができる!!
(16)Azure ポータル側からもデプロイされたことが確認できる!

- 投稿日:2019-07-19T16:01:22+09:00
LaravelのDocker環境開発で2つDB作ってWeb用と単体テスト用DBに分けといて開発中はコマンド1つで両方リセットしとく。
- DBをWeb用と単体テスト用の2つ用意する。
- 開発中はDB定義更新したらリセットして最新反映してWeb用のみシーダーを実行したい。
Dockerでテスト用のDBを作成する
テストDBを作成するSQLファイルを設置する
- ./mysql/init/createdb.sql
- test_databaseという名前のDBを作成
mysql/init/createdb.sqlCREATE DATABASE IF NOT EXISTS `test_database` COLLATE 'utf8_unicode_ci' ; GRANT ALL ON `test_database`.* TO `docker` ;
- dbのvolumesで./mysql/initディレクトリにdocker-entrypoint-initdb.dを割り当てる
docker-compose.yml...省略 db: image: mysql:5.7 command: mysqld --character-set-server=utf8 --collation-server=utf8_unicode_ci environment: MYSQL_ROOT_PASSWORD: root MYSQL_DATABASE: web_database MYSQL_USER: docker MYSQL_PASSWORD: docker volumes: - db-data:/var/lib/mysql - ./mysql/init:/docker-entrypoint-initdb.d <-ここです。 networks: - dockernetworks networks: docker-net: volumes: db-data:
- ボリュームを消して反映させる
docker-compose down
docker volume rm hoge_db-data
docker-compose up
単体テスト用DBの設定
.env.testing作成
env.testingAPP_ENV=testing APP_KEY=xxxxxxxxxx APP_DEBUG=true DB_CONNECTION=mysql DB_HOST=db DB_PORT=3306 DB_DATABASE=test_database DB_USERNAME=docker DB_PASSWORD=docker単体テスト実行
% docker-compose exec app php vendor/bin/phpunit開発中のDB更新
DBリフレッシュコマンド作成
% docker-compose exec app php artisan make:command DBRefreshCommandapp/Console/Commands/DBRefreshCommand.php<?php namespace App\Console\Commands; use Illuminate\Console\Command; class DBRefreshCommand extends Command { /** * The name and signature of the console command. * * @var string */ protected $signature = 'db:refresh'; /** * The console command description. * * @var string */ protected $description = 'DB Refresh'; /** * Create a new command instance. * * @return void */ public function __construct() { parent::__construct(); } /** * Execute the console command. * * @return mixed */ public function handle() { if (env('APP_ENV') === 'local' && env('APP_DEBUG') === true) { $this->info('Refresh DB [Web用]'); $this->call('migrate:refresh', ['--seed' => 1]); $this->info('Refresh DB [単体テスト用]'); $this->call('migrate:refresh', ['--env' => 'testing']); } else { $this->error('開発のみ使用のコマンドです。'); } } }app/Console/Kernel.php/** * The Artisan commands provided by your application. * * @var array */ protected $commands = [ App\Console\Commands\DBRefreshCommand::class, ];リフレッシュコマンド実行
% docker-compose exec app php artisan db:refresh
Refresh DB [Web用]
Rolling back: 2014_10_12_100000_create_password_resets_table
Rolled back:  2014_10_12_100000_create_password_resets_table (0.06 seconds)
Rolling back: 2014_10_12_000000_create_users_table
Rolled back:  2014_10_12_000000_create_users_table (0.01 seconds)
Migrating: 2014_10_12_000000_create_users_table
Migrated:  2014_10_12_000000_create_users_table (0.05 seconds)
Migrating: 2014_10_12_100000_create_password_resets_table
Migrated:  2014_10_12_100000_create_password_resets_table (0.04 seconds)
Database seeding completed successfully.
Refresh DB [単体テスト用]
Rolling back: 2014_10_12_100000_create_password_resets_table
Rolled back:  2014_10_12_100000_create_password_resets_table (0.02 seconds)
Rolling back: 2014_10_12_000000_create_users_table
Rolled back:  2014_10_12_000000_create_users_table (0.01 seconds)
Migrating: 2014_10_12_000000_create_users_table
Migrated:  2014_10_12_000000_create_users_table (0.03 seconds)
Migrating: 2014_10_12_100000_create_password_resets_table
Migrated:  2014_10_12_100000_create_password_resets_table (0.03 seconds)
- 投稿日:2019-07-19T16:01:22+09:00
LaravelのDocker環境開発で2つDB作ってWeb用と単体テスト用に分けといて開発中はコマンド1つで両方リセットしとく。
- DBをWeb用と単体テスト用の2つ用意する。
- 開発中はDB定義更新したらリセットして最新反映してWeb用のみシーダーを実行したい。
Dockerでテスト用のDBを作成する
テストDBを作成するSQLファイルを設置する
- ./mysql/init/createdb.sql
- test_databaseという名前のDBを作成
mysql/init/createdb.sqlCREATE DATABASE IF NOT EXISTS `test_database` COLLATE 'utf8_unicode_ci' ; GRANT ALL ON `test_database`.* TO `docker` ;
- dbのvolumesで./mysql/initディレクトリにdocker-entrypoint-initdb.dを割り当てる
docker-compose.yml...省略 db: image: mysql:5.7 command: mysqld --character-set-server=utf8 --collation-server=utf8_unicode_ci environment: MYSQL_ROOT_PASSWORD: root MYSQL_DATABASE: web_database MYSQL_USER: docker MYSQL_PASSWORD: docker volumes: - db-data:/var/lib/mysql - ./mysql/init:/docker-entrypoint-initdb.d <-ここです。 networks: - dockernetworks networks: docker-net: volumes: db-data:
- ボリュームを消して反映させる
docker-compose down
docker volume rm hoge_db-data
docker-compose up
単体テスト用DBの設定
.env.testing作成
env.testingAPP_ENV=testing APP_KEY=xxxxxxxxxx APP_DEBUG=true DB_CONNECTION=mysql DB_HOST=db DB_PORT=3306 DB_DATABASE=test_database DB_USERNAME=docker DB_PASSWORD=docker単体テスト実行
% docker-compose exec app php vendor/bin/phpunit開発中のDB更新
DBリフレッシュコマンド作成
% docker-compose exec app php artisan make:command DBRefreshCommandapp/Console/Commands/DBRefreshCommand.php<?php namespace App\Console\Commands; use Illuminate\Console\Command; class DBRefreshCommand extends Command { /** * The name and signature of the console command. * * @var string */ protected $signature = 'db:refresh'; /** * The console command description. * * @var string */ protected $description = 'DB Refresh'; /** * Create a new command instance. * * @return void */ public function __construct() { parent::__construct(); } /** * Execute the console command. * * @return mixed */ public function handle() { if (env('APP_ENV') === 'local' && env('APP_DEBUG') === true) { $this->info('Refresh DB [Web用]'); $this->call('migrate:refresh', ['--seed' => 1]); $this->info('Refresh DB [単体テスト用]'); $this->call('migrate:refresh', ['--env' => 'testing']); } else { $this->error('開発のみ使用のコマンドです。'); } } }app/Console/Kernel.php/** * The Artisan commands provided by your application. * * @var array */ protected $commands = [ App\Console\Commands\DBRefreshCommand::class, ];リフレッシュコマンド実行
% docker-compose exec app php artisan db:refresh
Refresh DB [Web用]
Rolling back: 2014_10_12_100000_create_password_resets_table
Rolled back:  2014_10_12_100000_create_password_resets_table (0.06 seconds)
Rolling back: 2014_10_12_000000_create_users_table
Rolled back:  2014_10_12_000000_create_users_table (0.01 seconds)
Migrating: 2014_10_12_000000_create_users_table
Migrated:  2014_10_12_000000_create_users_table (0.05 seconds)
Migrating: 2014_10_12_100000_create_password_resets_table
Migrated:  2014_10_12_100000_create_password_resets_table (0.04 seconds)
Database seeding completed successfully.
Refresh DB [単体テスト用]
Rolling back: 2014_10_12_100000_create_password_resets_table
Rolled back:  2014_10_12_100000_create_password_resets_table (0.02 seconds)
Rolling back: 2014_10_12_000000_create_users_table
Rolled back:  2014_10_12_000000_create_users_table (0.01 seconds)
Migrating: 2014_10_12_000000_create_users_table
Migrated:  2014_10_12_000000_create_users_table (0.03 seconds)
Migrating: 2014_10_12_100000_create_password_resets_table
Migrated:  2014_10_12_100000_create_password_resets_table (0.03 seconds)
- 投稿日:2019-07-19T14:52:23+09:00
OpenSSH_7.3p1 に対応した Ubuntu の Docker Image を作る
コンテナからSSHしたかったのでローカルマシンの ~/.ssh をマウントして
docker runしていたが、ubuntu:xenialの OpenSSH のバージョンがデフォだと 7.2p2 だった。これだと config ファイルを分割して include とかしてるとうまく動いてくれない。
※Include キーワードで ssh_config を分割できるようになった件とりあえず上記を解決したかったので OpenSSH_7.3p1 がインストール済の Docker Image を作ることにした(一気にバージョン上げるのは怖かった)。
Dockerfile
DockerfileFROM ubuntu:xenial # Required for install openssh RUN apt-get update && \ apt-get install -y \ wget \ git \ build-essential # Install OpenSSH_7.3p1 RUN wget https://launchpadlibrarian.net/277739251/openssh-client_7.3p1-1_amd64.deb \ https://launchpadlibrarian.net/298453050/libgssapi-krb5-2_1.14.3+dfsg-2ubuntu1_amd64.deb \ https://launchpadlibrarian.net/298453058/libkrb5-3_1.14.3+dfsg-2ubuntu1_amd64.deb \ https://launchpadlibrarian.net/298453060/libkrb5support0_1.14.3+dfsg-2ubuntu1_amd64.deb RUN dpkg -i libkrb5support0_1.14.3+dfsg-2ubuntu1_amd64.deb \ libkrb5-3_1.14.3+dfsg-2ubuntu1_amd64.deb \ libgssapi-krb5-2_1.14.3+dfsg-2ubuntu1_amd64.deb \ openssh-client_7.3p1-1_amd64.debdocker build & run
# Docker Image 構築
$ docker build -t openssh7.3 .

# OpneSSH_7.3p1 がインストールされていることを確認
$ docker run --rm -it openssh7.3 ssh -V
OpenSSH_7.3p1 Ubuntu-1, OpenSSL 1.0.2g  1 Mar 2016

# SSH接続してみる
$docker run -rm -it -v ="$HOME/.ssh":/root/.ssh openssh7.3 ssh [接続したいサーバー]
めでたし、めでたし。
- 投稿日:2019-07-19T13:49:26+09:00
Docker+Redash+MySQLでデータ可視化環境セットアップ手順
何を作るか
OSSのBIツールを試してみるために,有名どころのRedashを使ってみようと思いました。
今回は関東の人口のヒートマップを作ることを目的とします。
関東の人口を記述した表形式のデータをMySQLに保存します。
データソースとなるMySQLはDocker外に出します。環境
macOS High Sierra
バージョン 10.13.6インストールするもの
- Docker for Mac(https://qiita.com/kurkuru/items/127fa99ef5b2f0288b81)
- Docker compose(https://qiita.com/zembutsu/items/dd2209a663cae37dfa81)
- MySQL
- Node.js(https://qiita.com/kyosuke5_20/items/c5f68fc9d89b84c0df09)
手順概要
Redashの公式サイト(https://redash.io/help/open-source/dev-guide/docker)
を参考に、進めていく。1.Gitレポジトリのクローン
2.Dockerイメージのビルド
3.npmパッケージのインストール
4.RedashのPostgresデータベースの作成
5.Devサーバーの実行
6.MySQLデータベースへの接続
7.クエリーを取得して、地図に可視化1.Gitレポジトリのクローン
git clone https://github.com/getredash/redash.git
cd redash/
2.Dockerイメージのビルド
docker-compose up -dredashディレクトリにdocker-compose.ymlがインストールされている。
ビルド済みイメージ(Redash web server, worker, PostgreSQL and Redis)をフェッチし、Dockerイメージをビルドする。
今回は、特にdocker-compose.ymlファイルを編集はしなかった。3.npmパッケージのインストール
package.jsonを用いることで、インストールパッケージの種類やバージョンを指定できる。
npm install4.データベースの作成
テーブルの作成
docker-compose run --rm server create_dbテスト用のデータベースの作成(https://qiita-image-store.s3.ap-northeast-1.amazonaws.com/0/121324/284bfc6e-d03e-dff0-2f76-1ecbb04cd91f.png)
docker-compose run --rm postgres psql -h postgres -U postgres -c "create database tests"5.Devサーバーの実行
npm run buildnpm run starthttp://localhost:8080でアクセスできる
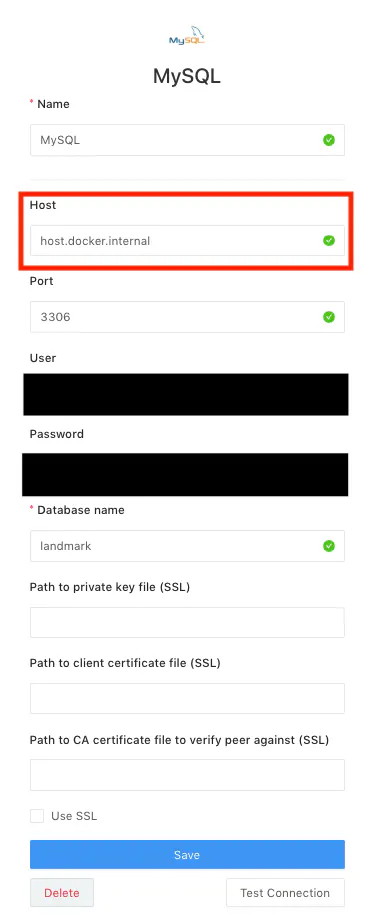
6.データベースの接続
MySQLを用いたデータベース接続は、別の資料を参考。
Docker for macで作成されたコンテナはLocalhostでは接続できないことを知らなかったため、一番苦労しました。
Docker for macでコンテナの中からホストに接続する方法はこちらのサイトを参照して解決。(https://cockscomb.hatenablog.com/entry/docker-for-mac-localhost)以下のようにデータベースを設定
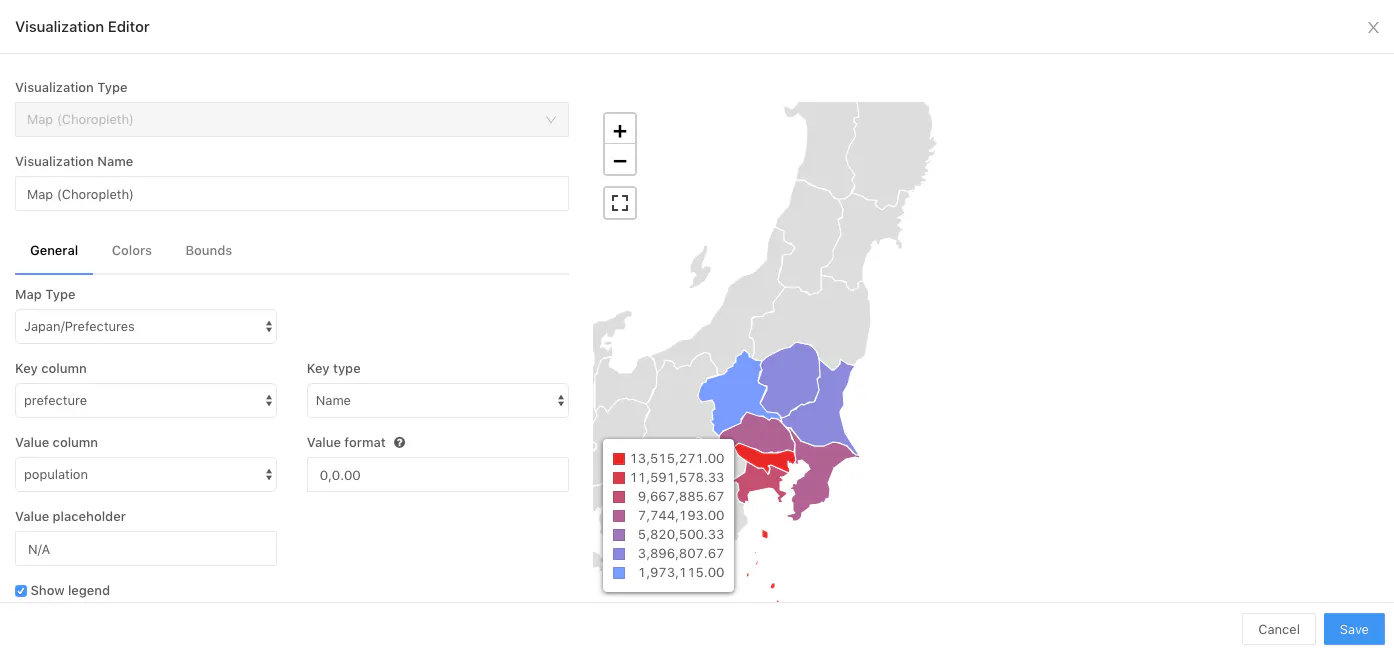
7.クエリーを取得して、地図に可視化
適当なテーブルからSELECT文で、クエリーを取得。
クエリーから以下を用いて、可視化の設定を行う。
※おまけ
東京のマクドナルドのデータを緯度、経度を指定し、表示
今後の展望
・県区切りではなく、県の市区町村区切りで、人口を可視化したい
→shapeファイルの設定の変更ができれば実現が可能・データソースを今回は,MySQLを使ったが、他のデータソースも使ってみたい
・メッシュコードに応じたコロプレス図、マーカー図を使ってみたい
・綺麗なダッシュボードの作成(https://github.com/kakakakakku/redash-hands-on/blob/master/README.md)

- 投稿日:2019-07-19T10:49:32+09:00
DockerにLaravel環境を構築する
Docker/Laravel環境構築の備忘録です。
ゴールは、Docker上でLaravelが動くまでです。Macで実施します。
フォルダ構成/ファイルについて
今回は、以下のディレクトリ構成としました。
treeproject ├── docker │ ├── db │ │ ├── Dockerfile ① │ │ ├── conf.d │ │ │ └── my.cnf ② │ │ ├── data ③ │ │ └── initdb.d ④ │ ├── docker-compose.yml ⑤ │ └── web │ ├── Dockerfile ⑥ │ ├── conf.d │ │ └── 000-default.conf ⑦ │ └── ini │ └── php.ini ⑧ └── laravel ⑨順番に説明します。
① project/docker/db/Dockerfile
Dockerコンテナの構成内容を記述します。
ここでは、Dockerイメージとして、MySQLを指定しています。project/docker/db/DockerfileFROM mysql:5.7② project/docker/db/conf.d/my.cnf
MySQLの設定ファイルです。
⑤にて、/etc/mysql/conf.d にマウントします。project/docker/db/conf.d/my.cnf[mysqld] character-set-server=utf8mb4 explicit-defaults-for-timestamp=1 [client] default-character-set=utf8mb4③ project/docker/db/data
ディレクトリです。
⑤にて、/var/lib/mysql にマウントします。
/var/lib/mysql は、MySQLのデータディレクトリとなります。
(Dockerを停止しても消えないように)④ project/docker/db/initdb.d
こちらもディレクトリです。
⑤にて、/docker-entrypoint-initdb.d にマウントします。
現状、何も置いておりませんが、/docker-entrypoint-initdb.d にSQLやスクリプトを置くことで、初期データを設定可能です。
(そのうち使うかもということで用意しています)⑤ project/docker/docker-compose.yml
Dockerコンテナの起動オプションを記述するファイルです。
project/docker/docker-compose.ymlservices: web: build: ./web/ volumes: - ./web/ini/php.ini:/usr/local/etc/php/php.ini - ./web/conf.d/000-default.conf:/etc/apache2/sites-available/000-default.conf - ../laravel:/var/www/laravel ports: - 80:80 db: build: ./db/ environment: MYSQL_DATABASE: laravel_db MYSQL_USER: user MYSQL_PASSWORD: password MYSQL_ROOT_PASSWORD: rootpassword volumes: - ./db/initdb.d:/docker-entrypoint-initdb.d - ./db/conf.d:/etc/mysql/conf.d - ./db/data:/var/lib/mysql ports: - "3306:3306"以下、簡単ですが説明です。
- build:Dockerfileのあるディレクトリパスの指定
- environment:環境変数の指定(ここでは、MySQLに必要なものを定義)
- volumes:マウントの指定(ホスト:コンテナ)
- ports:ポートの指定(ホスト:コンテナ)
⑥ project/docker/web/Dockerfile
①と同様、Dockerコンテナの構成内容を記述します。
ここでは、Dockerイメージとして、PHPを指定しています。
また、RUNで必要なモジュールを追加しています。project/docker/web/DockerfileFROM php:7.3-apache RUN set -x && \ pecl install xdebug && \ docker-php-ext-enable xdebug && \ a2enmod rewrite && \ docker-php-ext-install pdo_mysql
- xdebug:PHPStormでリモートデバッグしたかったので追加
- rewrite:laravelの認証機能を追加した時、上手く動かなかったので追加
⑦ project/docker/web/conf.d/000-default.conf
Apacheの設定ファイルです。
⑤にて、/etc/apache2/sites-available/000-default.conf にマウントします。
Laravelの公開フォルダは、public のため、DocumentRoot を /var/www/laravel/public としています。
(laravelは、⑤で /var/www/laravel にマウントしています)project/docker/web/conf.d/000-default.conf<VirtualHost *:80> ServerAdmin webmaster@localhost DocumentRoot /var/www/laravel/public ErrorLog ${APACHE_LOG_DIR}/error.log CustomLog ${APACHE_LOG_DIR}/access.log combined </VirtualHost>⑧ project/docker/web/ini/php.ini
PHPの設定ファイルです。
⑤にて、/usr/local/etc/php/php.ini にマウントします。
ここでは、xdebugの設定を行なっています。project/docker/web/ini/php.ini; xdebug zend_extension=/usr/local/lib/php/extensions/no-debug-non-zts-20180731/xdebug.so xdebug.remote_enable = On xdebug.remote_autostart = On xdebug.remote_connect_back = Off xdebug.remote_host = docker.for.mac.localhost⑨ project/laravel
project直下で、以下のコマンドを投入すると、laravelディレクトリが作成されます。
中には、プロジェクト一式揃っています。$ composer create-project laravel/laravel --prefer-dist※ composerの導入は割愛します。
Dockerの起動
project/docker配下で実施します。まずは、buildから。
$ docker-compose build
Building web
Step 1/2 : FROM php:7.3-apache
 ---> 59d2cf691156
Step 2/2 : RUN set -x &&   pecl install xdebug &&   docker-php-ext-enable xdebug &&   a2enmod rewrite &&   docker-php-ext-install pdo_mysql
 ---> Using cache
 ---> bc81175279b3
Successfully built bc81175279b3
Successfully tagged docker_web:latest
Building db
Step 1/2 : FROM mysql:5.7
 ---> 7452c4ea4f17
Step 2/2 : RUN touch /var/log/mysql/mysqld.log
 ---> Using cache
 ---> 3c43b21359e9
Successfully built 3c43b21359e9
Successfully tagged docker_db:latest
次に起動します。
$ docker-compose up -d
Creating docker_db_1  ... done
Creating docker_web_1 ... done
念の為、起動していることを確認します。
$ docker-compose ps
    Name                  Command               State                 Ports
-----------------------------------------------------------------------------------------
docker_db_1    docker-entrypoint.sh mysqld      Up      0.0.0.0:3306->3306/tcp, 33060/tcp
docker_web_1   docker-php-entrypoint apac ...   Up      0.0.0.0:80->80/tcp
ブラウザから
http://localhost
にアクセスすると、laravelの画面が表示されます。最後に
ここでは書いていないですが、この環境にLaravelの認証機能を追加してみたところ、ユーザ追加が出来ました。
MySQLにも追加したユーザのデータがありましたので、DBアクセスも問題なさそうです。