- 投稿日:2019-01-27T21:12:10+09:00
これから始めたNext.js
Next.jsを触り始めたのでその過程を残しておこうと思います。書いたコードはgithubに上げてあります(natsuhikok/next-react)。Next.jsのexampleが充実してて迷わずに進めるところが好きでした。インストールして動かしてみます
インストールと
pages/index.jsだけで動くのでcreate-react-appするより、らくちんかもしれません。$ npm install --save next react react-dom
import React from 'react'が必要ないのは少しきもいです。pages/index.jsexport default () => <div>これから始めたNext.js</div>;起動スクリプトは以下としました。
package.json"scripts": { "start": "next" },
$ npm run startでlocalhost:3000にnext.jsアプリが起動します。この時点でホットリロードも効いています。後述にある
_document.jsなどを新しく追加した場合にはアプリのリロードが必要です。変更したけど反映されないなどの場合は、一度アプリを起動し直してみると変なところでつまずかずに済むと思います。ビルドとproductionサーバー
ビルドしての本番運用がつらいと
Next.jsでSSRする意味が薄いので先に試してみます。package.json"scripts": { "start": "next", "build": "next build", "production": "next start" },
next buildでビルドします。next startでbuildされた.nextからサーバーを起動してくれます。pm2による永続起動は以下です。package.json"scripts": { "start": "next", "build": "next build", "production": "next start", "pm2": "next build && pm2 start npm --name 'next' -- run production" }これで安心して他の部分を試していけます。
styled-components
NextJSで
styled-componentsを試したところ特定の条件下で以下のエラーがでてしまいました。Expected server HTML to contain a matching <tag> in <tag>...ExpressなどでReactをSSRしたときにも見かけるあれです。これは
babel-plugin-styled-componentsをbabelに追加することで解決できます。.babelrc{ "presets": ["next/babel"], "plugins": [["styled-components", { "ssr": true }]] }これでエラーは解決されますが、初回のロード時にスタイルが遅れてでるよ。状態になるので
_document.jsを追加します。公式のexample 通りです。_document.jsimport Document from 'next/document'; import { ServerStyleSheet } from 'styled-components'; export default class MyDocument extends Document { static async getInitialProps (ctx) { const sheet = new ServerStyleSheet(); const originalRenderPage = ctx.renderPage; try { ctx.renderPage = () => originalRenderPage({ enhanceApp: App => props => sheet.collectStyles(<App {...props} />), }); const initialProps = await Document.getInitialProps(ctx); return { ...initialProps, styles: [...initialProps.styles, ...sheet.getStyleElement()], }; } finally { sheet.seal(); } } }createGlobalStyleはどこでするべきか
Metaデータを納めるコンポーネントを作って各ページで読み込むのがよさそうです。
_app.jsで読み込むこともできそうですが_document.js,_app.jsはできる限り手を入れない方向で進めています。components/Meta.jsimport Head from 'next/head'; export default ({ title }) => ( <> <Head> <title>{title}</title> <meta name="viewport" content="initial-scale=1.0, width=device-width" /> <meta charSet="utf-8" /> </Head> <GlobalStyle /> </> ); import { createGlobalStyle } from 'styled-components'; import normalize from 'styled-normalize'; const GlobalStyle = createGlobalStyle` ${normalize} * { box-sizing: border-box; } html { font-size: 62.5%; font-family: -apple-system, BlinkMacSystemFont, "Helvetica Neue", "Yu Gothic", YuGothic, Verdana, Meiryo, "M+ 1p", sans-serif; } input { border-radius: 0; } body { font-size: 1.4rem; } p, h1, h2, h3, h4, h5, h6 { margin: 0; } ul { margin: 0; padding: 0; list-style-type: none; } `GlobalStyleはタイミングで別コンポーネントにすることが多いです。
redux
NextJSでReduxを使ってみます。生React+reduxとの違いは
_app.jsくらいかと思います。公式のexamleを参考にしました。_app.jsimport { Provider } from 'react-redux'; import App, { Container } from 'next/app'; import withRedux from 'next-redux-wrapper'; import makeStore from '../store/makeStore'; class ExtendedApp extends App { static getInitialProps = async ({ Component, ctx }) => ({ pageProps: (Component.getInitialProps ? await Component.getInitialProps(ctx) : {}) }) render () { const { Component, pageProps, store } = this.props; return ( <Container> <Provider store={store}> <Component {...pageProps} /> </Provider> </Container> ); } } export default withRedux(makeStore)(ExtendedApp);store/makeStore.jsimport { combineReducers, createStore } from 'redux'; import { message } from './message'; const rootReducer = combineReducers({ message }); export default initialState => createStore(rootReducer, initialState);recompose
NextJSの拡張である
getInitialPropsをrecomposeで扱います。pages/index.jsimport { connect } from 'react-redux'; import { compose, withState, setStatic, pure, withHandlers } from 'recompose'; import Navigation from '../components/Navigation'; import Meta from '../components/Meta'; import { updateMessage } from '../store/message'; const Index = ({ message, handleClick, inputValue, handleInputChange }) => ( <> <Meta title="これから始めたNext.js" /> <Navigation /> <Headline>これから始めたNext.js</Headline> <p>{message}</p> <input value={inputValue} onChange={handleInputChange} /> <button onClick={handleClick}>submit</button> </> ); export default compose( setStatic('getInitialProps', async props => { const { isServer } = props; if(!isServer) { console.log(props); } }), withState('inputValue', 'setInputValue', ''), connect( ({ message }) => ({ message: message.message }), dispatch => ({ updateMessage: value => dispatch(updateMessage(value)), }), ), withHandlers({ handleClick: ({ setInputValue, updateMessage, inputValue }) => () => { updateMessage(inputValue); setInputValue(''); }, handleInputChange: ({ setInputValue }) => e => setInputValue(e.target.value), }), pure, )(Index); import styled from 'styled-components'; const Headline = styled.h1` font-size: 32px; line-height: 1.8; border-bottom: 4px dotted blue; `;Dynamic URL
user/:idのような動的なルーティングが必要です。残念ながらNextJSでこれを実現するためにはserver.jsを追加するなど自前でカスタムサーバー・ルーティングする必要があります。ここでは最小限で実装できるuser?id=idの方式を試してみます。気持ちダサいですがSEO的には問題のない方法です。queryは
getInitialPropsから取得できるのでこれをViewに渡します。pages/users.jsimport { compose, setStatic, pure } from 'recompose'; import Navigation from '../components/Navigation'; import Meta from '../components/Meta'; const Posts = ({ id }) => ( <div> <Meta title="これから始めたNext.js" /> <Navigation /> <h1>これは{id}番目のユーザーページです。</h1> </div> ); export default compose( setStatic('getInitialProps', async props => { const { query: { id } } = props; return { id }; }), pure, )(Posts);
queryを指定したリンクはnext/Linkで作ることができます。components/Navigation.jsimport Link from 'next/link'; export default () => ( <ul> <li><Link href="/"><a>home</a></Link></li> <li><Link href="/about"><a>About</a></Link></li> <li> <Link href={{ pathname: '/users', query: { id: 3 } }}> <a>User</a> </Link> </li> </ul> );参考
zeit/next.js
Example app with styled-components
Redux example
how can I use next in pm2?
- 投稿日:2019-01-27T14:42:40+09:00
React.jsで、余分なdivを作らない方法 ~HOCを使ってみる~
HOCとは ドキュメントに載っていますが、最初のうちは目を通しても何を言っているのか分かりませんよね。自分もここを見落として、SPAを作っていましたが、この概念結構大切だなと思うので、今回まとめてみました。
環境情報
- npm 5.6.0
- node 8.11.1
- react.js 16.4.2
HOCとは
Hocコンポーネントとは、Higher Order Componentの略。他のコンポーネントをラップする高次元のコンポーネントを指します。
簡単な例
import React, { Component } from 'react';
import header from './header';
import footer from './footer';

class Layout extends Component {
  render () {
            return (
            <div>
                <header />
                <footer />
            </div>
        )
  }

export default Layout;
Reactではコンポーネントはdivで囲んであげなくてはあげません。しかし、クラスを付与する訳でもないのに、余分にdivタグを作るのは気持ち悪いなーと思うことはないでしょうか?
そんな時に、以下のようなHOCを作ってあげれば余分なdivタグが生まれなくなります。src/hoc/Aux/Aux.jsconst aux = (props) => props.children; export default aux;src/hoc/Layout/Layout.jsximport React, { Component } from 'react'; import Aux from '../Aux/Aux'; import header from './header'; import footer from './footer'; class Layout extends Component { render () { return ( <Aux> <header /> <footer /> </Aux> ) } export default Layout;このAuxコンポーネントを作り、Auxの子供にコンポーネントを渡すことによって、余分なdivタグを作られなくなります。
まとめ
すごく簡単な例ですが、他にもエラーのハンドリングなんかはこのHOCという概念を使ってあげて、コンポーネントをラップして実現させます。なかなか難しい。
- 投稿日:2019-01-27T01:43:08+09:00
typescript-eslintのversion1.x系がリリースされたので使ってみる
typescript-eslintのVersion 1.X系がリリースされましたので、サンプルアプリを使って試してみたいと思います。
typescript-eslintについて
typescript-eslint は、 @mysticatea さんの記事でもあったように、ESLintチームがTypeScriptのサポートする宣言があり、 1月20日にVersion 1.0.0がリリースされました。さらに3日後にはVersion1.1.0がリリースされています。
現在、TypeScriptが利用されているプロジェクトは、TypeScriptの普及により多くなってきたこともあり、後々TSLintからESLintへの移行が必須になるかと思います(しばらくは大丈夫だと思いますが...)。
そこで、今回は、TypeScript + React のサンプルアプリでtypescript-eslintを試してみたいと思います。また、既存のtslint.jsonを利用したサンプルも試してみたいと思います。
ESLintの導入
create-react-appを利用して、任意のサンプルを作ります。typescript-eslint $ create-react-app typescript-eslint-react-sample --scripts-version=react-scripts-tsサンプルアプリに移動して、以下のパッケージをインストールします。
- eslint
- @typescript-eslint/parser
- @typescript-eslint/typescript-estree
- @typescript-eslint/eslint-plugin
パッケージインストールtypescript-eslint $ yarn add eslint @typescript-eslint/parser @typescript-eslint/typescript-estree @typescript-eslint/eslint-plugin -DESLintの設定
eslintの必要最低限の設定をしていきます。
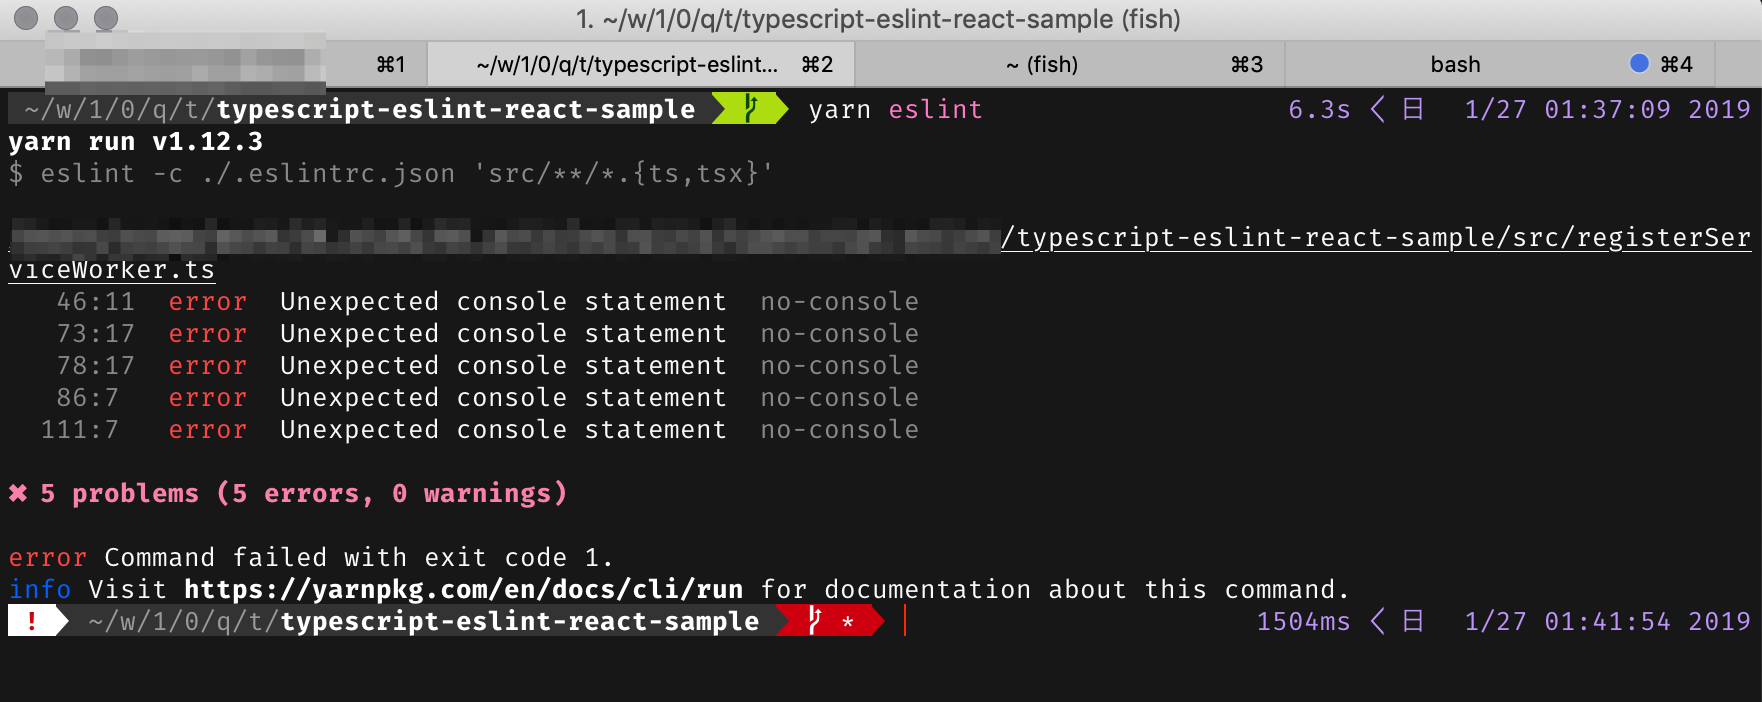
.eslintrc.json{ "root": true, "plugins": ["@typescript-eslint"], "parser": "@typescript-eslint/parser", "env": { "es6": true, "browser": true }, "rules": { "no-console": "error" // console.logなどのコンソール出力に対してエラーを出す設定 }, "parserOptions": { "sourceType": "module", "ecmaFeatures": { "jsx": true } } }package.json{ // ... "scripts": { "eslint": "eslint -c ./.eslintrc.json 'src/**/*.{ts,tsx}'" }, // ... }上記、設定が完了したら、コンソールに対するエラーが出るか確認してみます。
servicework用のtsが引っかかっているのが確認できましたので、最低限の設定に問題がないことを確認できました。
tslintの設定を利用する
既存のプロジェクトでTSLintを利用している場合、その設定をそのまま利用したくなる場合があるかと思います。今回は、tslint.jsonがある場合を想定して試してみたいと思います。
まず、以下のパッケージを追加します。
- @typescript-eslint/eslint-plugin-tslin
次に、
.eslintrc.jsonの設定を変更します。.eslintrc.json{ "root": true, "plugins": ["@typescript-eslint", "@typescript-eslint/tslint"], // <- 追加 // .. "rules": { // <- 追加(先ほどのconsoleのルールは削除して、このルールだけにします) "@typescript-eslint/tslint/config": [ "warn", { "lintFile": "./tslint.json" } ] }, "parserOptions": { "sourceType": "module", "ecmaFeatures": { "jsx": true }, "project": "./tsconfig.json"// <- 追加 } }次に、
tslint.jsonを変更します。今回は、varキーワードの使用に対するチェックを追加します。tslint.json{ "extends": ["tslint:recommended", "tslint-react", "tslint-config-prettier"], "linterOptions": { "exclude": [ "config/**/*.js", "node_modules/**/*.ts", "coverage/lcov-report/*.js" ] }, "rules": { // <-追加 "no-var-keyword": true } }次に、適当なファイルを修正します。今回は適当な関数を追加して、その中で
varを宣言しています。App.tsx// .. class App extends React.Component { public fn = () => { // <- 追加 var arg = "aaa"; return arg.toUpperCase(); }; public render() { return ( <div className="App"> <header className="App-header"> <img src={logo} className="App-logo" alt="logo" /> <h1 className="App-title">Welcome to React</h1> </header> <p className="App-intro"> To get started, edit <code>src/App.tsx</code> and save to reload. </p> {this.fn()} // <- 追加 </div> ); } } // ..最後に、
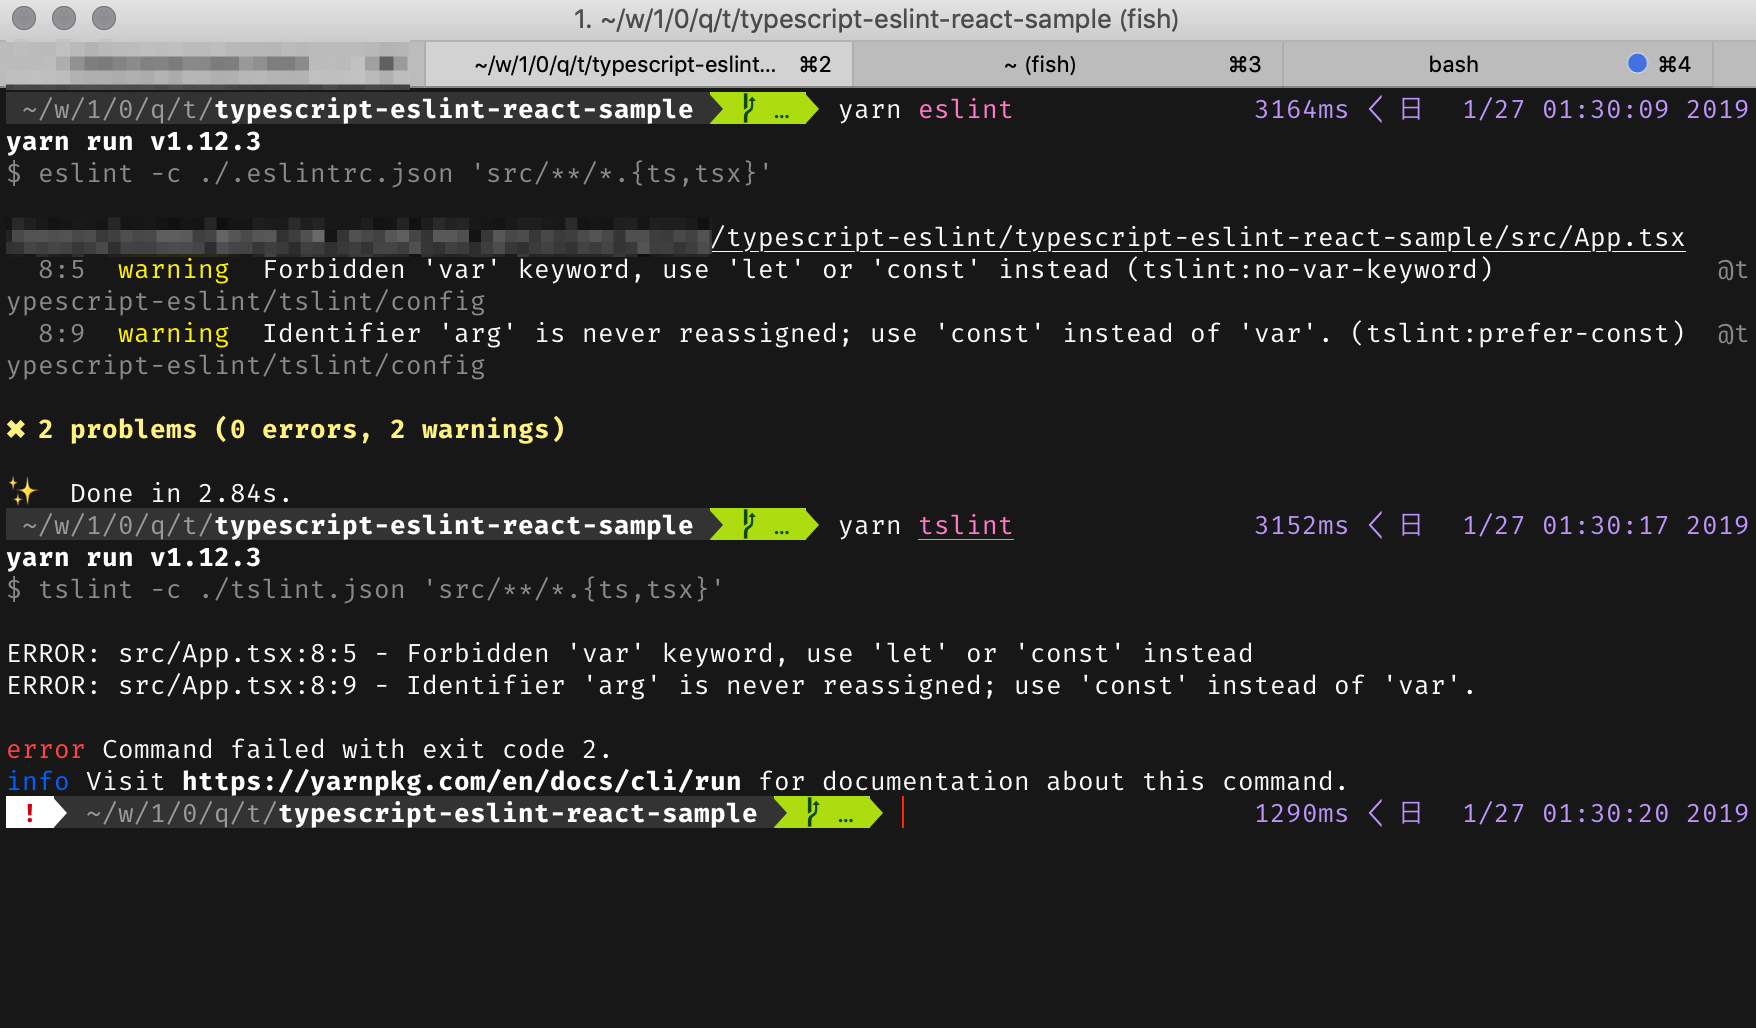
yarn eslintで追加したルールが機能しているか確認します。
上がESLintの実行結果で、下が、TSLintの実行結果です。
同じエラーが出ていることが確認できたので、正常にtslint.jsonが機能していることが確認できました。最後に
今回は必要最低限の設定のみで実践しましたが、ルールを整備したり、オリジナルのルールを追加する必要があります。が、導入自体のハードルはそんなに高くないように感じました。
今回作成したリポジトリは、こちらです。
ESLint、TSLintに対するご指摘などがありましたら、ご連絡ください。