- 投稿日:2020-11-15T23:42:35+09:00
SharedFlow、StateFlow、Channelなどを比較して、LiveDataやEvent通知の置き換えを考える
(ちょっと早いですが、時間が取れなかった場合、これをアドベントカレンダーのネタにするかもです)
このパターンでこれだとうまく動かない、こういう方法があるなど、何か指摘などあればぜひ教えて下さい。
どうやら、これからはStateFlowやSharedFlowの時代のようです。
新しいコードで意図的にLiveDataを選択する理由はありません。ということが書かれていました。
Twitterなどで話題になっていました。
https://twitter.com/codinginflow/status/1326628159077412866
(Kotlin LangのSlackより)
最初にまとめ
以下にLifecycleCoroutineScope.launchWhenStarted()を組み合わせて使います。
LiveData.postValueの挙動に近い
MutableStateFlow<String>("initial value")
最新のデータをViewに反映したいだけならこれです。LiveData.setValueでの挙動に近い
MutableSharedFlow(replay = 1)
ちゃんと一つ一つのデータを流す必要があり、Viewに反映したいならMutableSharedFlow(replay = 1)Event通知
Flowで素直にやる方法が今の所ないみたいです。
以下の2つのやり方が一応あります。
Eventクラスでラップして、このEventが消費されたかを保持する方法- 通知後にEmptyのオブジェクトを入れてを入れてなんとかする方法
Channel(capacity = UNLIMITED).receiveAsFlow()他にもこんな方法でいけるとか、間違っているみたいなのがあれば教えていただきたいです。
以下考察
どんな動きが理想か?
LiveData
- observe時に今STARTED以降の状態であれば値を流し、そうでなければ次にSTARTED以降の状態になったときに値を流します。これは確実にViewに値を反映させつつ、FragmentなどonStart以降でしか動かすことができない(Exceptionが投げられる)AndroidのAPIがあってもうまく動かすためです。
liveData.observe(viewLifecycleOwer) { value ->
...
}
- LiveData#postValue(value)では複数回投げられると最新の1つの値で動きます。もし完全な表示のためのデータを持っているのであれば最新のデータを反映するだけでいいので、この仕様でもうまく動くはずです。
postValueのJavaDoc
If you called this method multiple times before a main thread executed a posted task, only the last value would be dispatched.
つまり以下ではobserverに"b"だけが通知されます。
liveData.postValue("a")
liveData.postValue("b")
LiveData#setValue(value)ではpostValue()のような制約なしに以下で"a"、"b"両方をobserverで実行することができます。しかし、"a"を流す必要ない場合もあるので、良し悪しがあります。liveData.setValue("a") liveData.setValue("b")
- 値が一緒でも流すという性質があります。これに関してはイベント通知として使っていると必要になるパターンがあるかもしれません。
Event
例えばSnackbarを表示したい、ダイアログを表示したいといったものです。
これに対応するAndroidのコンポーネントはないので、いろんなパターンで実装されてきたため、正確にこうというのはないですが、以下の仕様が良いででしょう。
- observe時には通知されない。例えば画面回転時にダイアログやSnackbarがまた出てしまうとつらいです。
- onStart以降で動かす。
- observeしていないときのイベントもobserve時に流れる。画面回転時にイベントが失われないようにするため。
- 複数回postしても、LiveData.postValueのように消えずに、ちゃんと全部が流れる。
- 同じ値を2回入れたときでも2回流れる。
FlowをSTARTED以降の状態で動かすには
LifecycleCoroutineScope.launchWhenStarted()を使うとCoroutinesの処理をpause、resumeしてくれます。
LifecycleCoroutineScope.launchWhenStarted()、なかなかおもしろい。。 pic.twitter.com/43zYUqD5ZD
— takahirom (@new_runnable) May 16, 2019そのため、onStart以降でしか動かないようにする方法としてKotlin LangのSlackでIan Lakeさんが以下の方法を紹介していました。 これを使えば、onStart以降だけ動かすようにできそうです。
/**
 * Similar to [kotlinx.coroutines.flow.launchIn] but using
 * [androidx.lifecycle.LifecycleCoroutineScope.launchWhenStarted].
 */
fun <T> Flow<T>.launchWhenStartedIn(
        lifecycleOwner: LifecycleOwner
) = lifecycleOwner.lifecycleScope.launchWhenStarted {
    collect()
}
viewModel.yourFlow.onEach { items -> // Do something with the items }.launchWhenStartedIn(viewLifecycleOwner)検証コード
基本的に複数の種類のFlowに対してそれぞれforEach{}で同じプログラムで、チェックしているだけです。
ここから動作見られます。
https://pl.kotl.in/9lm5AT-8Nimport kotlinx.coroutines.* import kotlinx.coroutines.channels.BufferOverflow import kotlinx.coroutines.channels.Channel import kotlinx.coroutines.channels.Channel.Factory.UNLIMITED import kotlinx.coroutines.flow.* class App { /** * public fun <T> MutableSharedFlow( * replay: Int = 0, * extraBufferCapacity: Int = 0, * onBufferOverflow: BufferOverflow = BufferOverflow.SUSPEND ) */ val sharedFlow1 = MutableSharedFlow<String>() val sharedFlow2 = MutableSharedFlow<String>(replay = 1) val sharedFlow3 = MutableSharedFlow<String>(extraBufferCapacity = 1) val sharedFlow4 = MutableSharedFlow<String>( extraBufferCapacity = 1, onBufferOverflow = BufferOverflow.DROP_LATEST ) val sharedFlow5 = MutableSharedFlow<String>( replay = 1, extraBufferCapacity = 1, onBufferOverflow = BufferOverflow.DROP_OLDEST ) val sharedFlow6 = MutableSharedFlow<String>(extraBufferCapacity = 1, onBufferOverflow = BufferOverflow.DROP_OLDEST) // The resulting flow can be collected just once and throws // * [IllegalStateException] when trying to collect it more than once. // val channelConsumeAsFlow = Channel<String>(capacity = UNLIMITED) // val flowChannelConsumeAsFlow = channelConsumeAsFlow.consumeAsFlow() val channelReceiveAsFlow = Channel<String>(capacity = UNLIMITED) val flowChannelReceiveAsFlow = channelReceiveAsFlow.receiveAsFlow() data class Event<T>(var isConsumed: Boolean, val value: T) val mutableSharedFlowForWrapEvent = MutableSharedFlow<Event<String>>(replay = 1) val flowWrapWithEvent = mutableSharedFlowForWrapEvent val sharedFlowSetEmptyWhenCollect = MutableSharedFlow<String>(replay = 1) val stateFlow = MutableStateFlow("initial value") } open class FlowCheck<T>( open val name: String, open val collect: suspend ((T) -> Unit) -> Unit, open val emit: suspend (String) -> Unit ) class DefaultFlowCheck<T>( name: String, flow: Flow<T> ) : FlowCheck<T>( name = name, collect = { collectFun -> flow.collect { value -> collectFun(value) } }, emit = { value -> flow as MutableSharedFlow<String> flow.emit(value) } ) suspend fun main(args: Array<String>) { val app = App() val flows = listOf<FlowCheck<*>>( DefaultFlowCheck( "MutableSharedFlow(replay = 0, extraBufferCapacity = 0, onBufferOverflow = BufferOverflow.SUSPEND) default MutableSharedFlow", app.sharedFlow1 ), DefaultFlowCheck( "MutableSharedFlow(replay = 1, extraBufferCapacity = 0, onBufferOverflow = BufferOverflow.SUSPEND)", app.sharedFlow2 ), DefaultFlowCheck( "MutableSharedFlow(replay = 0, extraBufferCapacity = 1, onBufferOverflow = BufferOverflow.SUSPEND)", app.sharedFlow3 ), DefaultFlowCheck( "MutableSharedFlow(replay = 0, extraBufferCapacity = 1, onBufferOverflow = BufferOverflow.DROP_OLDEST)", app.sharedFlow6 ), DefaultFlowCheck( "MutableSharedFlow(replay = 0, extraBufferCapacity = 1, onBufferOverflow = BufferOverflow.DROP_LATEST)", app.sharedFlow4 ), DefaultFlowCheck( "MutableSharedFlow(replay = 1, extraBufferCapacity = 1, onBufferOverflow = BufferOverflow.DROP_OLDEST)", app.sharedFlow5 ), FlowCheck( "Event", collect = { function: (App.Event<String>) -> Unit -> app.flowWrapWithEvent.collect { event -> if (!event.isConsumed) { event.isConsumed = true function(event) } } }, emit = { app.mutableSharedFlowForWrapEvent.emit(App.Event(false, it)) } ), // DefaultFlowCheck( // "channel.consumeAsFlow()", // app.flowChannelConsumeAsFlow, // { s: String -> app.channelConsumeAsFlow.send(s) } // ), FlowCheck<String>( "channel.receiveAsFlow()", collect = { collectFun -> app.flowChannelReceiveAsFlow.collect { collectFun(it) } }, emit = { s: String -> app.channelReceiveAsFlow.send(s) } ), FlowCheck<String>( "SharedFlowSetEmptyWhenCollect", collect = { collectFun -> app.sharedFlowSetEmptyWhenCollect.collect { if (it.isNotEmpty()) { collectFun(it) app.sharedFlowSetEmptyWhenCollect.tryEmit("") } } }, emit = { s: String -> app.sharedFlowSetEmptyWhenCollect.emit(s) } ), DefaultFlowCheck( "MutableStateFlow<String>(\"initial value\")", app.stateFlow ), ) flows.forEach { flowCheck -> println("----") println("start ${flowCheck.name}") println("#1 collect and emit") val job = GlobalScope.launch { flowCheck.collect { println("- #1 received: $it") } } delay(30) flowCheck.emit("hello 1") delay(30) job.cancel() delay(30) println("#2 emit and collect") flowCheck.emit("hello 2") delay(30) val job2 = GlobalScope.launch { flowCheck.collect { println("- #2 received: $it") } } delay(30) job2.cancel() delay(30) println("#3 collect and emit × 3") delay(30) val job3 = GlobalScope.launch { flowCheck.collect { println("- #3 received: $it") } } delay(30) flowCheck.emit("hello 3-1") flowCheck.emit("hello 3-2") flowCheck.emit("hello 3-3") delay(30) job3.cancel() println("#4 just collect") delay(30) val job4 = GlobalScope.launch { flowCheck.collect { println("- #4 received: $it") } } delay(30) job4.cancel() delay(30) println("#5 collect and same emit × 2") val job5 = GlobalScope.launch { flowCheck.collect { println("- #5 received: $it") } } delay(30) flowCheck.emit("hello 5") delay(30) flowCheck.emit("hello 5") delay(30) job5.cancel() delay(30) println("#6 same emit × 2 and collect") flowCheck.emit("hello 6") delay(30) flowCheck.emit("hello 6") delay(30) val job6 = GlobalScope.launch { flowCheck.collect { println("- #6 received: $it") } } delay(30) job6.cancel() delay(30) } delay(30) }---- start MutableSharedFlow(replay = 0, extraBufferCapacity = 0, onBufferOverflow = BufferOverflow.SUSPEND) default MutableSharedFlow #1 collect and emit - #1 received: hello 1 #2 emit and collect #3 collect and emit × 3 - #3 received: hello 3-1 - #3 received: hello 3-2 - #3 received: hello 3-3 #4 just collect #5 collect and same emit × 2 - #5 received: hello 5 - #5 received: hello 5 #6 same emit × 2 and collect ---- start MutableSharedFlow(replay = 1, extraBufferCapacity = 0, onBufferOverflow = BufferOverflow.SUSPEND) #1 collect and emit - #1 received: hello 1 #2 emit and collect - #2 received: hello 2 #3 collect and emit × 3 - #3 received: hello 2 - #3 received: hello 3-1 - #3 received: hello 3-2 - #3 received: hello 3-3 #4 just collect - #4 received: hello 3-3 #5 collect and same emit × 2 - #5 received: hello 3-3 - #5 received: hello 5 - #5 received: hello 5 #6 same emit × 2 and collect - #6 received: hello 6 ---- start MutableSharedFlow(replay = 0, extraBufferCapacity = 1, onBufferOverflow = BufferOverflow.SUSPEND) #1 collect and emit - #1 received: hello 1 #2 emit and collect #3 collect and emit × 3 - #3 received: hello 3-1 - #3 received: hello 3-2 - #3 received: hello 3-3 #4 just collect #5 collect and same emit × 2 - #5 received: hello 5 - #5 received: hello 5 #6 same emit × 2 and collect ---- start MutableSharedFlow(replay = 0, extraBufferCapacity = 1, onBufferOverflow = BufferOverflow.DROP_OLDEST) #1 collect and emit - #1 received: hello 1 #2 emit and collect #3 collect and emit × 3 - #3 received: hello 3-3 #4 just collect #5 collect and same emit × 2 - #5 received: hello 5 - #5 received: hello 5 #6 same emit × 2 and collect ---- start MutableSharedFlow(replay = 0, extraBufferCapacity = 1, onBufferOverflow = BufferOverflow.DROP_LATEST) #1 collect and emit - #1 received: hello 1 #2 emit and collect #3 collect and emit × 3 - #3 received: hello 3-1 #4 just collect #5 collect and same emit × 2 - #5 received: hello 5 - #5 received: hello 5 #6 same emit × 2 and collect ---- start MutableSharedFlow(replay = 1, extraBufferCapacity = 1, onBufferOverflow = BufferOverflow.DROP_OLDEST) #1 collect and emit - #1 received: hello 1 #2 emit and collect - #2 received: hello 2 #3 collect and emit × 3 - #3 received: hello 2 - #3 received: hello 3-2 - #3 received: hello 3-3 #4 just collect - #4 received: hello 3-3 #5 collect and same emit × 2 - #5 received: hello 3-3 - #5 received: hello 5 - #5 received: hello 5 #6 same emit × 2 and collect - #6 received: hello 6 ---- start Event #1 collect and emit - #1 received: Event(isConsumed=true, value=hello 1) #2 emit and collect - #2 received: Event(isConsumed=true, value=hello 2) #3 collect and emit × 3 - #3 received: Event(isConsumed=true, value=hello 3-1) - #3 received: Event(isConsumed=true, value=hello 3-2) - #3 received: Event(isConsumed=true, value=hello 3-3) #4 just collect #5 collect and same emit × 2 - #5 received: Event(isConsumed=true, value=hello 5) - #5 received: Event(isConsumed=true, value=hello 5) #6 same emit × 2 and collect - #6 received: Event(isConsumed=true, value=hello 6) ---- start channel.receiveAsFlow() #1 collect and emit - #1 received: hello 1 #2 emit and collect - #2 received: hello 2 #3 collect and emit × 3 - #3 received: hello 3-1 - #3 received: hello 3-2 - #3 received: hello 3-3 #4 just collect #5 collect and same emit × 2 - #5 received: hello 5 - #5 received: hello 5 #6 same emit × 2 and collect - #6 received: hello 6 - #6 received: hello 6 ---- start SharedFlowSetEmptyWhenCollect #1 collect and emit - #1 received: hello 1 #2 emit and collect - #2 received: hello 2 #3 collect and emit × 3 - #3 received: hello 3-1 - #3 received: hello 3-2 - #3 received: hello 3-3 #4 just collect #5 collect and same emit × 2 - #5 received: hello 5 - #5 received: hello 5 #6 same emit × 2 and collect - #6 received: hello 6 ---- start MutableStateFlow<String>("initial value") #1 collect and emit - #1 received: initial value - #1 received: hello 1 #2 emit and collect - #2 received: hello 2 #3 collect and emit × 3 - #3 received: hello 2 - #3 received: hello 3-3 #4 just collect - #4 received: hello 3-3 #5 collect and same emit × 2 - #5 received: hello 3-3 - #5 received: hello 5 #6 same emit × 2 and collect - #6 received: hello 6結果
LiveData.postValueに近いもの(observe時に値が流れ、かつ、最新以外が失われるもの)
MutableSharedFlow(replay = 1, extraBufferCapacity = 1, onBufferOverflow = BufferOverflow.DROP_OLDEST)かMutableStateFlow<String>("initial value")ですが、この結果であれば、MutableStateFlowで良さそうに思えます。
MutableSharedFlow(replay = 1, extraBufferCapacity = 1, onBufferOverflow = BufferOverflow.DROP_OLDEST)ではreplay=1によって、observe時(collect時)に保持している値が流れ、BufferOverflow.DROP_OLDESTによって最新の値が使われることによって、LiveData.postValue()に近い動きが実現されています。
MutableStateFlow<String>("initial value")はデフォルトでそのような動きになっているようで、理想的な動きになっています。start MutableSharedFlow(replay = 1, extraBufferCapacity = 1, onBufferOverflow = BufferOverflow.DROP_OLDEST) #1 collect and emit - #1 received: hello 1 #2 emit and collect - #2 received: hello 2 #3 collect and emit × 3 - #3 received: hello 2 - #3 received: hello 3-2 - #3 received: hello 3-3 #4 just collect - #4 received: hello 3-3 #5 collect and same emit × 2 - #5 received: hello 3-3 - #5 received: hello 5 - #5 received: hello 5 #6 same emit × 2 and collect - #6 received: hello 6 --- start MutableStateFlow<String>("initial value") #1 collect and emit - #1 received: initial value - #1 received: hello 1 #2 emit and collect - #2 received: hello 2 #3 collect and emit × 3 - #3 received: hello 2 - #3 received: hello 3-3 #4 just collect - #4 received: hello 3-3 #5 collect and same emit × 2 - #5 received: hello 3-3 - #5 received: hello 5 #6 same emit × 2 and collect - #6 received: hello 6LiveData.setValueに近いもの(observe時に値が流れ、かつ、情報が失われないもの)
MutableSharedFlow(replay = 1)がそのような挙動になります。start MutableSharedFlow(replay = 1, extraBufferCapacity = 0, onBufferOverflow = BufferOverflow.SUSPEND) #1 collect and emit - #1 received: hello 1 #2 emit and collect - #2 received: hello 2 #3 collect and emit × 3 - #3 received: hello 2 - #3 received: hello 3-1 - #3 received: hello 3-2 - #3 received: hello 3-3 #4 just collect - #4 received: hello 3-3 #5 collect and same emit × 2 - #5 received: hello 3-3 - #5 received: hello 5 - #5 received: hello 5 #6 same emit × 2 and collect - #6 received: hello 6イベント通知(observe時に値が流れず、observeしていないときのイベントも流れる)
これは以下が考えられます。Channel APIがちょっと複雑というか理解するべきことが増えるので、厄介だというのがあるので、Eventがいいかもしれません。
Eventクラスでラップして、このEventが消費されたかを保持する方法- 通知後にEmptyのオブジェクトを入れてなんとかする方法
Channel(capacity = UNLIMITED).receiveAsFlow()しかし、一つ問題があって、Channelを使うやり方でないとcollectされていない状態で複数イベントが通知された場合に1つしか動きません。
Channel(capacity = UNLIMITED)を使うとLinkedListChannelが使われ、linked-listで管理されているBufferがうまく動いてくれるようです。start Event #1 collect and emit - #1 received: Event(isConsumed=true, value=hello 1) #2 emit and collect - #2 received: Event(isConsumed=true, value=hello 2) #3 collect and emit × 3 - #3 received: Event(isConsumed=true, value=hello 3-1) - #3 received: Event(isConsumed=true, value=hello 3-2) - #3 received: Event(isConsumed=true, value=hello 3-3) #4 just collect #5 collect and same emit × 2 - #5 received: Event(isConsumed=true, value=hello 5) - #5 received: Event(isConsumed=true, value=hello 5) #6 same emit × 2 and collect - #6 received: Event(isConsumed=true, value=hello 6) ---- start channel.receiveAsFlow() #1 collect and emit - #1 received: hello 1 #2 emit and collect - #2 received: hello 2 #3 collect and emit × 3 - #3 received: hello 3-1 - #3 received: hello 3-2 - #3 received: hello 3-3 #4 just collect #5 collect and same emit × 2 - #5 received: hello 5 - #5 received: hello 5 #6 same emit × 2 and collect - #6 received: hello 6 - #6 received: hello 6 ---- start SharedFlowSetEmptyWhenCollect #1 collect and emit - #1 received: hello 1 #2 emit and collect - #2 received: hello 2 #3 collect and emit × 3 - #3 received: hello 3-1 - #3 received: hello 3-2 - #3 received: hello 3-3 #4 just collect #5 collect and same emit × 2 - #5 received: hello 5 - #5 received: hello 5 #6 same emit × 2 and collect - #6 received: hello 6


- 投稿日:2020-11-15T22:29:57+09:00
【Android】adb shell でエミュレーターの SQLite にアクセスする方法
はじめに
Android 開発で SQLite の中身を確認したいとき、データをローカルに持ってきて DB Browser for SQLite を使う方法もありますが、何度も確認したいときにこれをやるのは少々手間になります。
CLI で DB の中身をササッと確認する方法を調べたのでメモしておきたいと思います。
1. エミュレーターの起動
起動させるエミュレーターは Google Play が実装されていないものを選びます。
市販の端末や Google Play が実装されているエミュレーターを使用すると、権限の問題で sqlite3 コマンドが実行できません。
Google Play が実装されているエミュレーターに
adb shellで入り、sqlite3コマンドを叩いてもnot foundとなります。$ sqlite3 $ /system/bin/sh: sqlite3: not foundPlay Store にマークがついていないエミュレーターを選択してください(私はここでハマりました...)。
参考:
https://teratail.com/questions/186703https://teratail.com/questions/186703
https://developer.android.com/studio/run/managing-avds?hl=ja#system-image2. シェルの起動
プロジェクトのディレクトリに移動して以下のコマンドを叩くと、エミュレーターに対してシェルを実行できる状態になります。
$ cd /path/to/project
$ adb shell
3. 内部ストレージに移動
sqlite ファイルは端末内の以下のディレクトリに保存されています。
/data/data/パッケージ名/databases/
adb shellを実行した段階ではこのディレクトリへのアクセス権限がないため、次のコマンドを叩いて権限を取得します(com.example.packagenameの部分は自分のパッケージ名に置き換えてください。)。$ run-as com.example.packagenameすると
/data/data/パッケージ名/まで自動的に移動され、databasesディレクトリにもアクセスできるようになります。4. SQLite の実行
最後に以下のコマンドで SQLite が立ち上がるかと思います(
my_databaseは自分のデータベース名に置き換えてください)。$ sqlite3 databases/my_database SQLite version 3.22.0 2018-12-19 01:30:22 Enter ".help" for usage hints. sqlite>これで好きなように SQLite コマンドを叩くことができます!

- 投稿日:2020-11-15T18:47:56+09:00
【Android】GooglePlayのアプリを更新しようとしたらkeystoreのパスワードを忘れていた件
半年以上ぶりでアプリを更新しようとしたら、keystoreのパスワードを完全に忘れていました。
検索すると、下記ページを発見!
【Android】Androidアプリ開発でkeystoreのパスワードをど忘れした場合
https://alice3.net/android/post-1731そこを読むと、パスワードを忘れた時に使えるGoogle提供のツールがあるらしい!
Android_Keystore_Password_Recover_1.07.jarをダウンロード
https://code.google.com/archive/p/android-keystore-password-recover/コマンドプロンプトでパスを叩くも、「内部コマンドまたは外部コマンド、操作可能なプログラムまたはバッチファイルとして認識されていません。」と出る
javaが入ってないらしいので「jdk-15.0.1_windows-x64_bin.exe」をインストール
超久々にコマンドプロンプトを使ってみる、使ったコマンドは下記。
cd C:\test
java -jar Android_Keystore_Password_Recover_1.07.jar -m 3 -k user.keystore -d word.txt
※user.keystoreの前半部分は人によって違うかなちなみにパス生成プログラムはある程度パスワードにあたりつけて試すものだったみたいで、
word.txtにキーワードを書いて置くと、それを元に推測してくれるらしいです。
自分の場合は完全に忘れてしまっていたので、時間がかかって難しそうでした。ある程度、キーワードとかが思い出せる人には参考になるかも?程度ですが、一応記録しておきます。
- 投稿日:2020-11-15T16:57:03+09:00
【ゲームアプリとベジェ曲線:その③(完結)】パーツによる絵のバリエーション
はじめに
このシリーズでは iOS/Android ゲームアプリの描画手法として、ベジェ曲線の可能性を模索します。
第三回目は、素材をパーツ単位で作成することで、手軽に絵のバリエーションを増やす手法について探っていきます。サンプルアプリのプロジェクトは GitHub にあります。
https://github.com/hakumai-iida/BezierSample
前回:【その②:ストローク(線)による表現の付け足し】パーツ分けのメリット
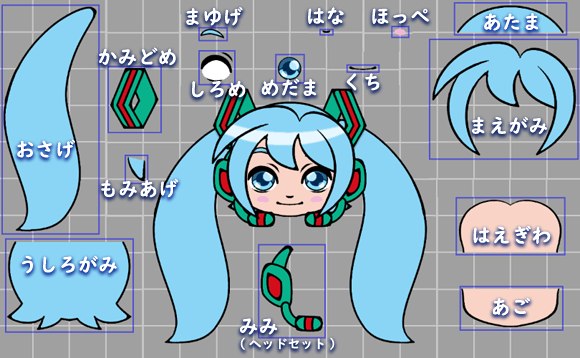
↓の画像は、【その①:環境準備とアンカーポイント(点)による形の変化】で作成したミクさんの顔です。
白目や目玉、口や鼻、顔や頭など、構成要素をパーツごとに作成しておき、アプリ上で組み合わせて描画することで、顔の絵を構成しています。でも、なぜこんな面倒なことをするのでしょう?
アプリで処理する際、顔なら顔として1回の描画で済むように、データ上で1つにまとめておいたほうが無駄がないはずです。
絵をバラバラにしておくメリットとはなんでしょうか?メリット1:パーツの差し替えによるバリエーション
例えば、下記のような素材があるとします。
これらの画像は全てアプリ上で描画されたものですが、先に説明したミクさんと同様、顔や体の要素がバラバラに作成されています。
(※ミクさんの顔に追加されている陰影やタッチについては【その②:ストローク(線)による表現の付け足し】をご覧ください)そして、各パーツが共通のルールで作成されているため、目なら目、前髪なら前髪、手足なら手足として、パーツ間で互換性があります。
言い換えると、パーツどうしを差し替えられるということです。
一見するとこれらの絵は、一枚一枚が個別の素材に見えますが、基本素材のパーツをアプリ上でランダムに組み合わせて描画したものになります。素材を部位毎に作成することで入れ替えが可能となり、『手軽に絵のバリエーションを生み出せる』のがパーツ分けの1つめのメリットです。
メリット2:パーツの変化によるアニメーション
ベジェ曲線として作成したデータは実行時に線を計算して描画するため、拡大/縮小&回転しても絵的に劣化しないという特性があります。
この強みのおかげで、パーツ単位で拡大/縮小&回転をフルに活用できます。例えば、体、腕、脚などのパーツを横方向に大きくすることで、キャラクタの見た目を太らせることができます。
同様に、パーツを縦方向に大きくすることで背を高く、小さくすることで背を低く見せることもできます。さらに腕や脚などのパーツを、関節を中心に回転させることでちょっとした動きをつけることもできます。
上記は、キャラクタの体型を変えつつ、手足の関節を曲げることで、素材的には1枚の絵をアニメーションさせています。
(※体型や関節の動きについては【その①:環境準備とアンカーポイント(点)による形の変化】をご覧ください)各部位を個別に変化させることで、『手軽に絵を動かせる』のがパーツ分けの2つ目のメリットです。
パーツ分けにおける課題
素材をパーツ単位で分けて作る際、パーツ同士をどう馴染ませるかが課題になります。
いかにパーツをつなげるか?
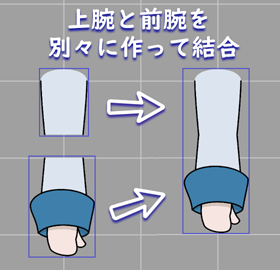
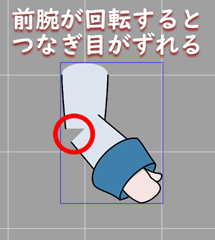
例えば、腕のパーツを「上腕」と「前腕」に分けて作るとします。
仮に上記のようなパーツがあったとして、肘を曲げる動きをつけようとしましょう。
絵的になんの調整もせずに前腕だけを回転させてしまうと、肘の部分で線が綺麗につながらず、見た目に違和感がでてしまいます。
形状が一致しないパーツ同士をくっつける場合、いかに線をつなげて違和感のない形状にするかが課題となります。いかにパーツの向きを判定するか?
パーツに対して体型的な操作をしようとした場合、拡大/縮小を適用する方向の判断が必要になってきます。
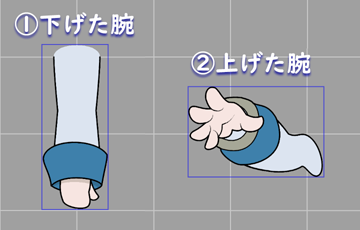
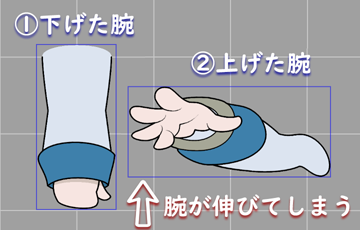
例えば上記画像において、①の下げた腕であればX方向に拡大することで腕を太く見せられますが、②の上げた腕をX方向に拡大すると腕が伸びて見えてしまいます。
パーツの大きさを変える際、どの向きに拡大/縮小するかの判定も課題となります。パーツ分けに対するベジェ曲線的アプローチ
さて、ベジェ曲線における描画では、点(アンカーポイント)を計算しつつ形状を構成していきます。
この時、アンカーポイントに色々な情報を紐付けておくことで、状況に応じて形を変化させることが可能です。
(※アンカーポイントについては【その①:環境準備とアンカーポイント(点)による形の変化】をご覧ください)上述の課題の解決には、このアンカーポイントが活躍します。
では、ベジェ曲線的なアプローチを見ていきましょう。フックによるストロークの接続
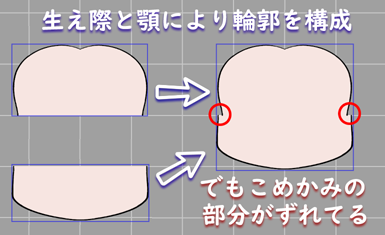
サンプルデータでは、顔の輪郭は「顔の上部=生え際からこめかみ」と「顔の下部=こめかみからアゴ」の2つのパーツで構成されます。
ですが、データ上でストローク間の座標が微妙にずれていて、パーツを縦に並べてただけでは、こめかみのラインがきれいに繋がってくれません。
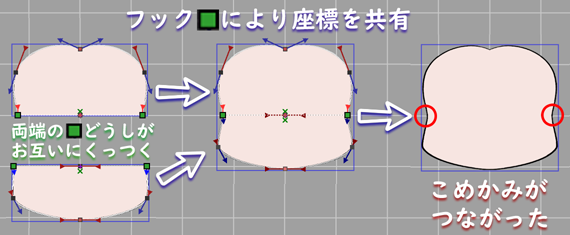
そこで、この2つのパーツのストロークの両端(アンカーポイント)に座標を共有するためのIDを設定し、パーツが描画される際にこめかみの所で線がフック(接続)されるようにします。
上記画像において、緑の四角がフック指定されたアンカーポイントとなります。
これらがIDによりフックされることで、きれいにこめかみが繋がりました。パーツ間のストロークを接続するためのアプローチ、それがフックとなります。
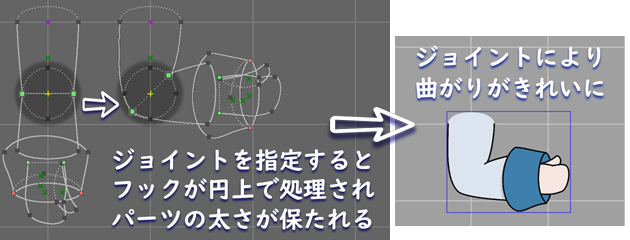
ジョイントによる太さの維持
ここで、上腕と前腕のパーツに話しを戻しましょう。
これらのパーツもフックにより接続されるのですが、単純にアンカーポイントの座標が共有されただけでは、前腕のパーツが回転した場合に肘の太さが潰れてしまいます。
そこで、パーツ間で角度に差がでることが想定される場合(言い換えるとパーツのどちらかが独自に回転する可能性がある場合)、パーツの接続部分を円にみたててジョイント(関節)情報を設定します。この時ジョイントはその直径により、二本のストローク間で保たれるべき「太さ」の役割を担います。
具体的には、パーツ間の角度の差分をジョイントが把握し、ストローク端を円上で回転させてからフックします。
パーツ間の太さを維持するためのアプローチ、それがジョイントとなります。呼び出し位置によるパーツの伸縮
サンプルデータでは、「腹」パーツが描画の起点となり、「上半身」と「下半身」を呼び出します。
その後、上半身は「上腕」と「首」を呼び出し、上腕は「前腕」を、首は「頭」を呼び出します。
さらに、前腕が「手」を呼び出し、さらに、さらに、と言うように、体の中心に近いパーツが末端へ向けてパーツを呼び出すことで、キャラクタの絵が構成されます。
さて、パーツの呼び出しはとても簡単です。
適当な位置にアンカーポイントを置いて、呼び出すパーツの種別を設定するだけです。そして、先に説明した通り、パーツ間のストロークはフック指定によって自動で繋がってくれるため、パーツの呼び出し位置を遠ざけることでパーツ間の見た目を伸ばしたり、近づけることで縮ませることが可能となります。
パーツの伸縮にはこの特性を利用します。
体型による変化のパラメータをアンカーポイントに設定することで、パーツの呼び出し位置を補正し、キャラクタの体を伸ばしたり縮めたりすることが可能となります。
(※実際には、体型パラメータは呼び出し位置だけではなくストロークの座標=あらゆる形状に影響します. 詳しくは【その①:環境準備とアンカーポイント(点)による形の変化】をご覧ください)試しに、パーツの呼び出し位置を極端にしてみた画像が下記となります。
この例では、「頭」、「前腕」、「下腿」、「つま先」パーツが、親パーツからかなり離れた位置に呼び出された結果、キリンのような見た目になりました。最終手段のカバー
さて、今までは、パーツ同士をいかに結合させるかを考えてきました。
ですが、「見た目の親和性=絵としてのなじみ具合」の観点から結合が厳しい場合もでてきます。例えば、ミクさんは「絵的にノースリーブ」です。
一方で、他のキャラクタ達は「絵的に袖のあるシャツ」を着ています。処理上は、ミクさんの上半身に他のキャラの上腕を接続しても何の問題もありませんが、肌の露出した肩口に袖を接続さてしまうと「見た目的に変な絵」になってしまいます。
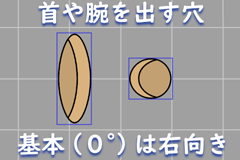
段ボールやネギの着ぐるみの場合はさらに深刻で、そのままパーツを呼び出すと、首や上腕の付け根が絵的になじまず、違和感が顕著になります。
そこで、パーツ間の絵的な親和性が低そうな場合、見苦しい部分を誤魔化すためにカバー(粗隠し)を適用します。例えば、段ボールを上半身として利用する時のカバーとして、「首や上腕を通す穴」のようなパーツを追加で作成します。
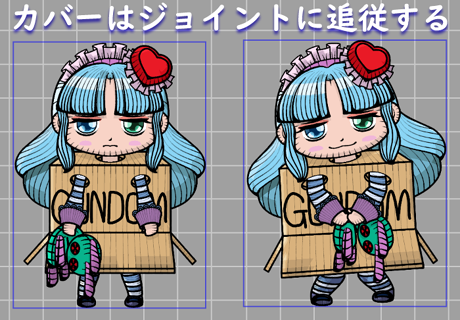
そして、段ボールが上腕を呼び出した際、カバーを対象パーツのジョイントに紐づけることで、違和感のある付け根部分を、文字通り覆い隠してしまいます。この時、カバーは紐づけられたジョイントから情報を受け取り、対象パーツの太さと向きにあわせて拡大/縮小&回転して表示されます。
絵的にどうしようもない時の最終手段、それがカバーとなります。ごまかしとの戦い
以上がパーツ分け描画に対する、ベジェ曲線的なアプローチとなります。
とはいえまだまだ完璧というわけではありません。
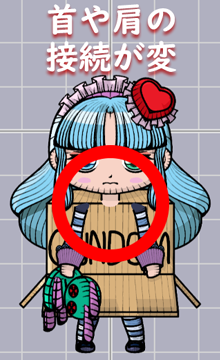
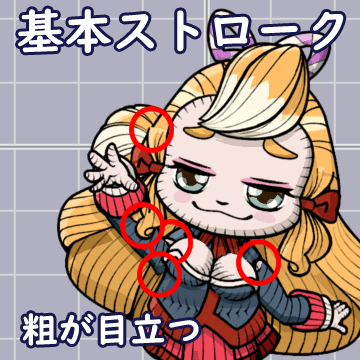
サンプルアプリで「ランダム」生成を試してみると、粗の目立つ画像がコレでもかという具合に出てきてしまいます。データ的には問題ないけど、見た目的に厳しい部分。
これをどう回避していくのかは今後の課題でもあります。
例えば基本ストロークで描画された上記の絵は、細かな粗がいくつも目につきます。
・右耳のおさげの付け根が頭のラインをハミ出している
・右耳のおさげが前腕の前にきてしまっている
・両肩の接続が変(前述したミクさんのノースリーブに袖を接続した状態)
・右脇と上腕の接続が変(おそらくフックの設定漏れ)こういった粗は、データで丁寧に修正していくのが本来なのですが、一括で抑え込むことができたら楽ですし保険にもなります。
例えばストロークの種類をブレ線にしてみたり鉛筆線にしてみると細かな描写が潰れるため、いくつかの粗が目立たなくなったりします。
絵のニュアンスが大きく変わるので功罪ではありますが、これもある意味、ベジェ曲線的なアプローチと言えるかもしれません。データの作り方、パーツの構成、それを支えるシステム。
まだまだ試行錯誤の余地がありそうです。ベジェ曲線の可能性
さて、ゲームアプリの描画におけるベジェ曲線の可能性について、3回にわたって探ってきました。
当初想定していた機能の実装&検証が終わった今、ベジェ曲線の可能性として1番に感じていることは、色々な素材をゴチャ混ぜにして、1つのニュアンス(解像度+ストローク+塗り)の絵として表示できる点です。
とくにベジェ曲線は、素材を再利用するアプローチが豊富なため、少ない素材でバリエーションを容易に生み出せます。
さらにこの強みは、素材の数に対して加速度的に増していきます。
(※基本素材を100種類ぐらい用意できたら、そこから生成されるランダム画像のバリエーションは物凄いことになりそうです)キャラクタの見た目の変化を前面に押し出すようなジャンル等、ベジェ曲線は十分にゲーム描画で活用できると思います。
例えば「女の子を合成するゲーム」とか。
あるいは「女の子が着ぐるみに身を包んで闘って、負けたら爆ぜて素体に戻るゲーム」とか。やばい、ドキドキしてきた!
では、このシリーズはこれにて完結となります。
お読みいただきありがとうございました。


- 投稿日:2020-11-15T16:41:19+09:00
POSTパラメータで安易に@Query使ったら泥沼にハマった
はじめに
読んだ書籍をリスト管理するアプリを作成するべく、書籍追加のAPI実装をしておりましたが
どんな画像を選択しても画像取得エラーとなり追加できませんでした。
ようやく泥沼から抜け出せたので備忘録として記録しておきます。
原因
LogResponse{protocol=http/1.1, code=414, message=Request-URI Too LargeどうやらURIが長すぎるよう。でも何でそんな長くなるの?
原因はリクエストでデータを送信する方法に問題があった。ApiInterface.javapublic interface ApiInterface { @Headers(HEADERS) @POST("/books") Call<BookInfoResponse> addBook( @Header("Authorization") String token, // ↓原因 @Query("name") String bookTitle, @Query("image") String stringImage, @Query("price") int bookPrice, @Query("purchase_date") String purchaseDate );@Queryとは
データベースに送るクエリ文の指定法。URLに情報が記載される。
つまり書籍名やら画像パスやら追加するブックの情報全てがURLに含める設定にしてたわけです。
そりゃ長くなるわ。
原則として
・Postリクエストは@Body
・GETリクエストは@Query (※GETリクエストで@Bodyは使えない)
とのこと。ということで@Bodyに変更したらうまくいきました!
ApiInterface.javapublic interface ApiInterface { @Headers(HEADERS) @POST("/books") Call<BookInfoResponse> addBook( @Header("Authorization") String token, // @Bodyに変更 @Body BookRequest bookRequest );BookRequest.javapublic class BookRequest { @SerializedName("name") private String title; @SerializedName("price") private int price; @SerializedName("purchase_date") private String purchaseDate; @SerializedName("image") private String image; public BookRequest(String title, int price, String purchaseDate, String image) { this.title = title; this.price = price; this.purchaseDate = purchaseDate; this.image = image; } }勉強させてもらったサイト
最後に
皆さんからしたら、そもそもなんで@Queryにしてたの?って感じなんでしょうね。笑
完全な知識不足です。勉強になりました〜。

- 投稿日:2020-11-15T11:47:57+09:00
簡単なレコーダーアプリを作る【Android/Kotlin】
レコーダーアプリを作ってみました。
録音機能だけみたいときはバックエンドの章だけみていただきたいです。環境
macOS Big Sur version 11.0.1
Android Studio 4.1.1
kotlin 1.4.10
実機: Pixel 4a (5G)参考文献:
レコーダーアプリ
権限の追加
録音機能を使うには、まず、アプリのマニフェストファイルに権限を追加する必要があるらしいです。
公式によると、
RECORD_AUDIO はユーザーのプライバシーを危険にさらすおそれがあるため、「危険な」権限とみなされます。Android 6.0(API レベル 23)以降、危険な権限を使用するアプリでは、ランタイムにユーザーの承認を求める必要があります。
とのことなので追加してあげましょう。
AndroidManifest.xml<?xml version="1.0" encoding="utf-8"?> <manifest xmlns:android="http://schemas.android.com/apk/res/android" package="com.example.ru_1218.myrecoder"> <uses-permission android:name="android.permission.RECORD_AUDIO" /> <application android:allowBackup="true" android:icon="@mipmap/ic_launcher" android:label="@string/app_name" android:roundIcon="@mipmap/ic_launcher_round" android:supportsRtl="true" android:theme="@style/Theme.MyRecoder"> <activity android:name=".MainActivity"> <intent-filter> <action android:name="android.intent.action.MAIN" /> <category android:name="android.intent.category.LAUNCHER" /> </intent-filter> </activity> </application> </manifest>manifestタグの直下に書いてやれば良いです。
フロントエンド
フロントエンドを作っていきますが、最低限のボタンだけ配置します。
上から録音開始ボタン、録音停止ボタン、再生ボタンの3つだけ用意してやれば良いです。
位置とか結構適当なのでごめんなさい。
Buttonのidごとに処理を分けますので、idも適当なものをセットしてあげましょう。
コードにすると以下のようになります。activity_main.xml<?xml version="1.0" encoding="utf-8"?> <androidx.constraintlayout.widget.ConstraintLayout xmlns:android="http://schemas.android.com/apk/res/android" xmlns:app="http://schemas.android.com/apk/res-auto" xmlns:tools="http://schemas.android.com/tools" android:layout_width="match_parent" android:layout_height="match_parent" tools:context=".MainActivity"> <Button android:id="@+id/redord" android:layout_width="wrap_content" android:layout_height="wrap_content" android:layout_marginStart="120dp" android:layout_marginTop="50dp" android:text="@string/record_button" app:layout_constraintStart_toStartOf="parent" app:layout_constraintTop_toTopOf="parent" /> <Button android:id="@+id/stop" android:layout_width="wrap_content" android:layout_height="wrap_content" android:layout_marginStart="120dp" android:layout_marginTop="12dp" android:text="@string/stop_button" app:layout_constraintStart_toStartOf="parent" app:layout_constraintTop_toBottomOf="@+id/redord" /> <Button android:id="@+id/playback" android:layout_width="wrap_content" android:layout_height="wrap_content" android:layout_marginStart="120dp" android:layout_marginTop="50dp" android:text="@string/PLAYBACK" app:layout_constraintStart_toStartOf="parent" app:layout_constraintTop_toBottomOf="@+id/stop" /> </androidx.constraintlayout.widget.ConstraintLayout>これで雑ですがフロントエンドは完成とします。
バックエンド
録音機能を実装していきましょう!
まずコードの全体です。
MainActivity.ktpackage com.example.ru_1218.myrecoder import android.Manifest import androidx.appcompat.app.AppCompatActivity import android.os.Bundle import android.view.View import android.content.pm.PackageManager import android.media.MediaPlayer import android.media.MediaRecorder import java.io.IOException import android.util.Log import android.widget.Button import androidx.core.app.ActivityCompat private const val LOG_TAG = "AudioRecordTest" private const val REQUEST_RECORD_AUDIO_PERMISSION = 200 class MainActivity : AppCompatActivity() { private var recorder: MediaRecorder? = null private var fileName: String = "" private var player: MediaPlayer? = null private var permissionToRecordAccepted = false private var permissions: Array<String> = arrayOf(Manifest.permission.RECORD_AUDIO) override fun onRequestPermissionsResult( requestCode: Int, permissions: Array<String>, grantResults: IntArray ) { super.onRequestPermissionsResult(requestCode, permissions, grantResults) permissionToRecordAccepted = if (requestCode == REQUEST_RECORD_AUDIO_PERMISSION) { grantResults[0] == PackageManager.PERMISSION_GRANTED } else { false } if (!permissionToRecordAccepted) finish() } private fun onRecord(start: Boolean) = if (start) { startRecording() } else { stopRecording() } private fun onPlay(start: Boolean) = if (start) { startPlaying() } else { stopPlaying() } private fun startPlaying() { player = MediaPlayer().apply { try { setDataSource(fileName) prepare() start() } catch (e: IOException) { Log.e(LOG_TAG, "prepare() failed") } } } private fun stopPlaying() { player?.release() player = null } private fun startRecording() { recorder = MediaRecorder().apply { setAudioSource(MediaRecorder.AudioSource.MIC) setOutputFormat(MediaRecorder.OutputFormat.THREE_GPP) setOutputFile(fileName) setAudioEncoder(MediaRecorder.AudioEncoder.AMR_NB) try { prepare() } catch (e: IOException) { Log.e(LOG_TAG, "prepare() failed") } start() } } private fun stopRecording() { recorder?.apply { stop() release() } recorder = null } override fun onCreate(savedInstanceState: Bundle?) { fileName = "${externalCacheDir?.absolutePath}/audiorecordtest.3gp" super.onCreate(savedInstanceState) setContentView(R.layout.activity_main) ActivityCompat.requestPermissions(this, permissions, REQUEST_RECORD_AUDIO_PERMISSION) val record = findViewById<Button>(R.id.redord) //録音オブジェクト取得 val stop = findViewById<Button>(R.id.stop) //録音停止オブジェクト取得 val playback = findViewById<Button>(R.id.playback) //再生オブジェクト取得 val listener = RecordButton() //レコードボタンリスナのインスタンス生成 record.setOnClickListener(listener) //レコードボタンリスナの設定 stop.setOnClickListener(listener) playback.setOnClickListener(listener) } //クリックイベントの設定 private inner class RecordButton : View.OnClickListener { override fun onClick(v: View?) { Log.i(LOG_TAG, "クリック成功") Log.i(LOG_TAG, fileName) if(v != null){ when(v.id){ //録音開始ボタン R.id.redord -> { onRecord(true) Log.i(LOG_TAG, "録音開始") } //録音停止ボタン R.id.stop -> { onRecord(false) Log.i(LOG_TAG, "録音終了") } R.id.playback -> { onPlay(true) Log.i(LOG_TAG, "再生中") } } } } } }ほぼほぼ公式の丸写しなのですが簡単に解説していきます。
認証許可
override fun onRequestPermissionsResult(
        requestCode: Int,
        permissions: Array<String>,
        grantResults: IntArray
    ) {
        super.onRequestPermissionsResult(requestCode, permissions, grantResults)
        permissionToRecordAccepted = if (requestCode == REQUEST_RECORD_AUDIO_PERMISSION) {
            grantResults[0] == PackageManager.PERMISSION_GRANTED
        } else {
            false
        }
        if (!permissionToRecordAccepted) finish()
    }
雑に説明するとrequestCodeを受け取ってそれが200なら
grantResults[0] == PackageManager.PERMISSION_GRANTEDでbool値を求め、permissionToRecordAcceptedに代入します。
結果、permissionToRecordAcceptedがtrueならオブジェクト取得->リスナのインスタンス生成->リスナの設定と処理が進んでいきます。
リスナ
今回は、録音、停止、再生の3つのリスナを設定していきます。
record.setOnClickListener(listener) stop.setOnClickListener(listener) playback.setOnClickListener(listener)ただし、【Lv1】イベントとリスナ【Android/Kotlin】のボタンイベント
同様、whenを使ってidごとに処理を分けていきます。when(v.id){ //録音開始ボタン R.id.redord -> { onRecord(true) Log.i(LOG_TAG, "録音開始") } //録音停止ボタン R.id.stop -> { onRecord(false) Log.i(LOG_TAG, "録音終了") } R.id.playback -> { onPlay(true) Log.i(LOG_TAG, "再生中") } }録音処理
private fun onRecord(start: Boolean) = if (start) {
    startRecording()
} else {
    stopRecording()
}
onRecordメソッドはbool値を取るので、trueな録音開始、falseなら停止とハンドラを分けることができます。
開始に使うstartRecordingメソッドはこれです。
公式通りですね。private fun startRecording() { recorder = MediaRecorder().apply { setAudioSource(MediaRecorder.AudioSource.MIC) setOutputFormat(MediaRecorder.OutputFormat.THREE_GPP) setOutputFile(fileName) setAudioEncoder(MediaRecorder.AudioEncoder.AMR_NB) try { prepare() } catch (e: IOException) { Log.e(LOG_TAG, "prepare() failed") } start() } }必要なオプション?をセットして、start()で録音開始です。
start() は、android.media.MediaRecorderのパブリックメソッドです。今回は、録音開始と、
fileName = "${externalCacheDir?.absolutePath}/audiorecordtest.3gp"
setOutputFile(fileName)
録音したデータを符号化して保存する役割を持ちます。
ただし、事前にprepare()を呼び出しておくことが条件なようです。録音停止はシンプルですね。
private fun stopRecording() { recorder?.apply { stop() release() } recorder = null }stop()を呼び出してnullを代入しています。
音声の再生
音声の再生には、MediaPlayerを用います。
MediaRecorderのサンプルにMediaPlayerを用いて音声を再生するサンプルも含まれています。
そのまんま使っております。
    private fun startPlaying() {
        player = MediaPlayer().apply {
            try {
                setDataSource(fileName)
                prepare()
                start()
            } catch (e: IOException) {
                Log.e(LOG_TAG, "prepare() failed")
            }
        }
    }
startRecordingメソッドより非常にシンプルです。
fileName = "${externalCacheDir?.absolutePath}/audiorecordtest.3gp"
setOutputFile(fileName)
で符号化したファイルを
setDataSource(fileName)で読み込みます。
それからMediaPlayerのstartメソッドで再生します。
まとめ
android studioが補完機能強くて使いやすいし、公式にサンプルが結構転がってるのでいろいろ遊べて楽しいです。
