- 投稿日:2020-08-03T23:24:07+09:00
VNRecognizedObjectObservationのboundingboxの座標をCGRectに合わせる。
BoundingBoxがうまく表示されないときは座標をチェック
Visionの物体検出の結果(VNRecognizedObjectObservation)は、0~1の数字に正規化されています。
これを画像上の座標に直すにはVNImageRectForNormalizedRectメソッドを使います。rectInImage = VNImageRectForNormalizedRect(observation.boundingBox, Int(image.size.width), Int(image.size.height))また、boundingboxのy座標は、CGRectのyと上下逆(一番下が0)なので、BoundingBoxをViewで表示するときは、上下を逆にする必要があります。
yInImage = image.size.height - rectInImage.minY - rectInImage.height
- 投稿日:2020-08-03T23:06:17+09:00
Create remote にて、画面を押せない対処法。
Githubのリポジトリ作成で、コケた箇所。
先程、Githubに初pushできた㊗︎。
ちょっと顛末をまとめます。結論
Create remote on Githubでcreateが押せなかった。
下は、create操作可能になってからのスクリーンショット。
解決策は、こちら。XcodeのCreate remote on Githubでcreateが押せない補足をちょっとまとめます。
?pushまでの基本手順はこちら。XcodeとGitHubの連携方法 (※1)
補足をちょっとまとめます。
- Xcodeタブの場所
(前述のサイト引用)
Xcode > Preferences > Accountsから自分のGithubアカウントを選択すると、
ディスプレイ左上、?の隣の『Xcode』。
-Xcodeを選択している状態なら、『Xcode』
-Chromeを選択している状態なら、『Chrome』
-Apple Musicを選択している状態なら、『ミュージック』が表示されます。- personal access tokenってなんジャ?
画面右下の「+」マークを押し、下記画像になり、Githubを選択したら、
githubAccountName と、personal access tokenが求められると思います。
青い文字の「create personal access token」を選択。
そこから先は、こちらを参考にどうぞ。
Creating a personal access token※1?
pushまでの基本手順はこちら。XcodeとGitHubの連携方法 (※1) に関して、
2.Git Repositoriesを作成する
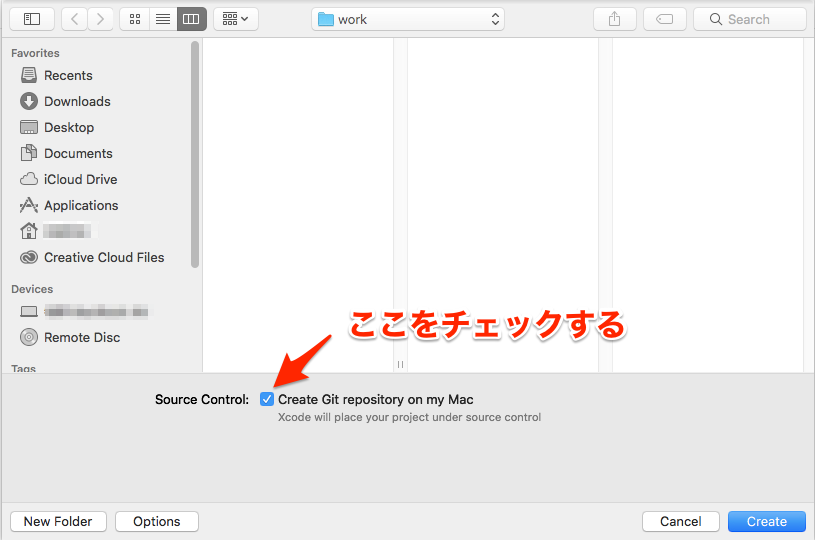
のMasterブランチは、下記画像をチェックしたらプロジェクト生成した直後に自動生成されるみたい。
initial Commitって言うらしい?
(プロジェクト作成時の画像↓)
追記:
後日GitHubを確認したところ、初期サンプルコードしかpushされてなくて、撃沈。GitHub
なるほど、だからinitial Commitって言うのか〜?import UIKit class ViewController: UIViewController { override func viewDidLoad() { super.viewDidLoad() // Do any additional setup after loading the view. } }XcodeとGitHubの連携方法の手順通りに、また今度やってみます。
おまけ
gitに関してあれやこれやは、こちら。
いまさらだけどGitを基本から分かりやすくまとめてみたんー、詳しい事は分からないけど、まあその内覚えるかなぁ...ということで保留。
綺麗にまとめて下さっているので、いつか学び直したい。
とりあえず今は、Swift言語やりたい。参考サイト
XcodeとGitHubの連携方法
Xcodeでgit操作(ブランチを作ってみる)
いまさらだけどGitを基本から分かりやすくまとめてみた


- 投稿日:2020-08-03T21:29:13+09:00
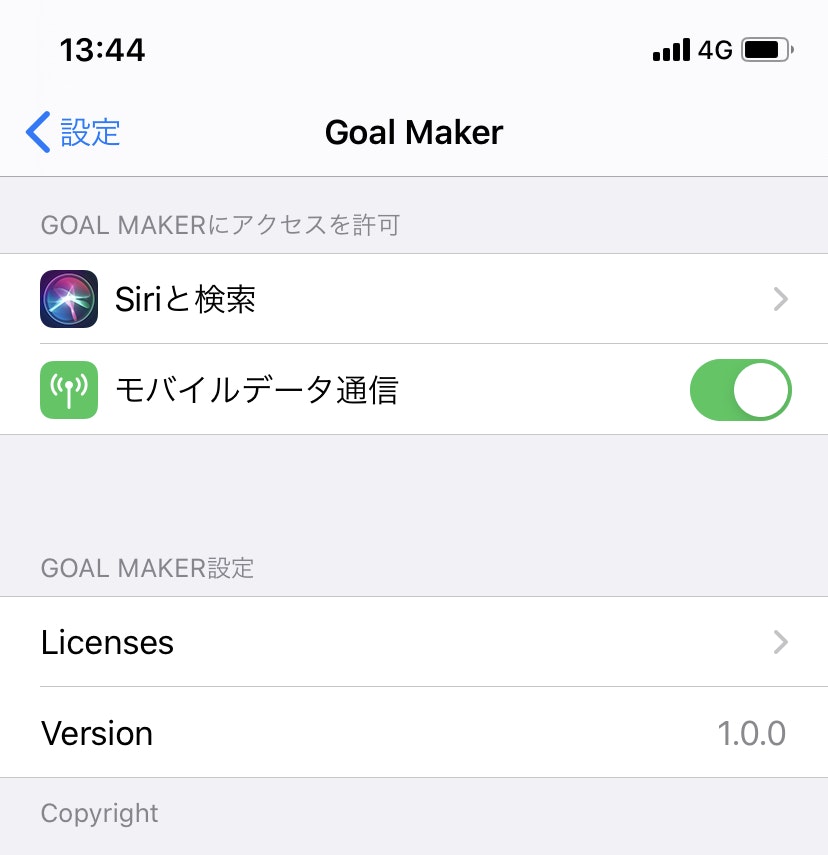
【iOSアプリ】ライセンス一覧を設定アプリに自動表記する方法【LicensePlist】
今回はアプリ内で利用したライブラリのライセンス一覧を、簡単に設定アプリに表記する方法を紹介します。
ライブラリを新しく追加しても更新されるのでとても便利です。
LicensePlistというライブラリを活用する
ライセンス一覧を手軽に表記することができる、かなりオススメのライブラリです。
有名なアプリでも結構使われているみたいです、開発者の方いつもお世話になっています!https://github.com/mono0926/LicensePlist
①インストール
Cocoapodsを使いました。
pod ‘LicensePlist’とPodfileに入れてinstallします。②Run Scriptを編集
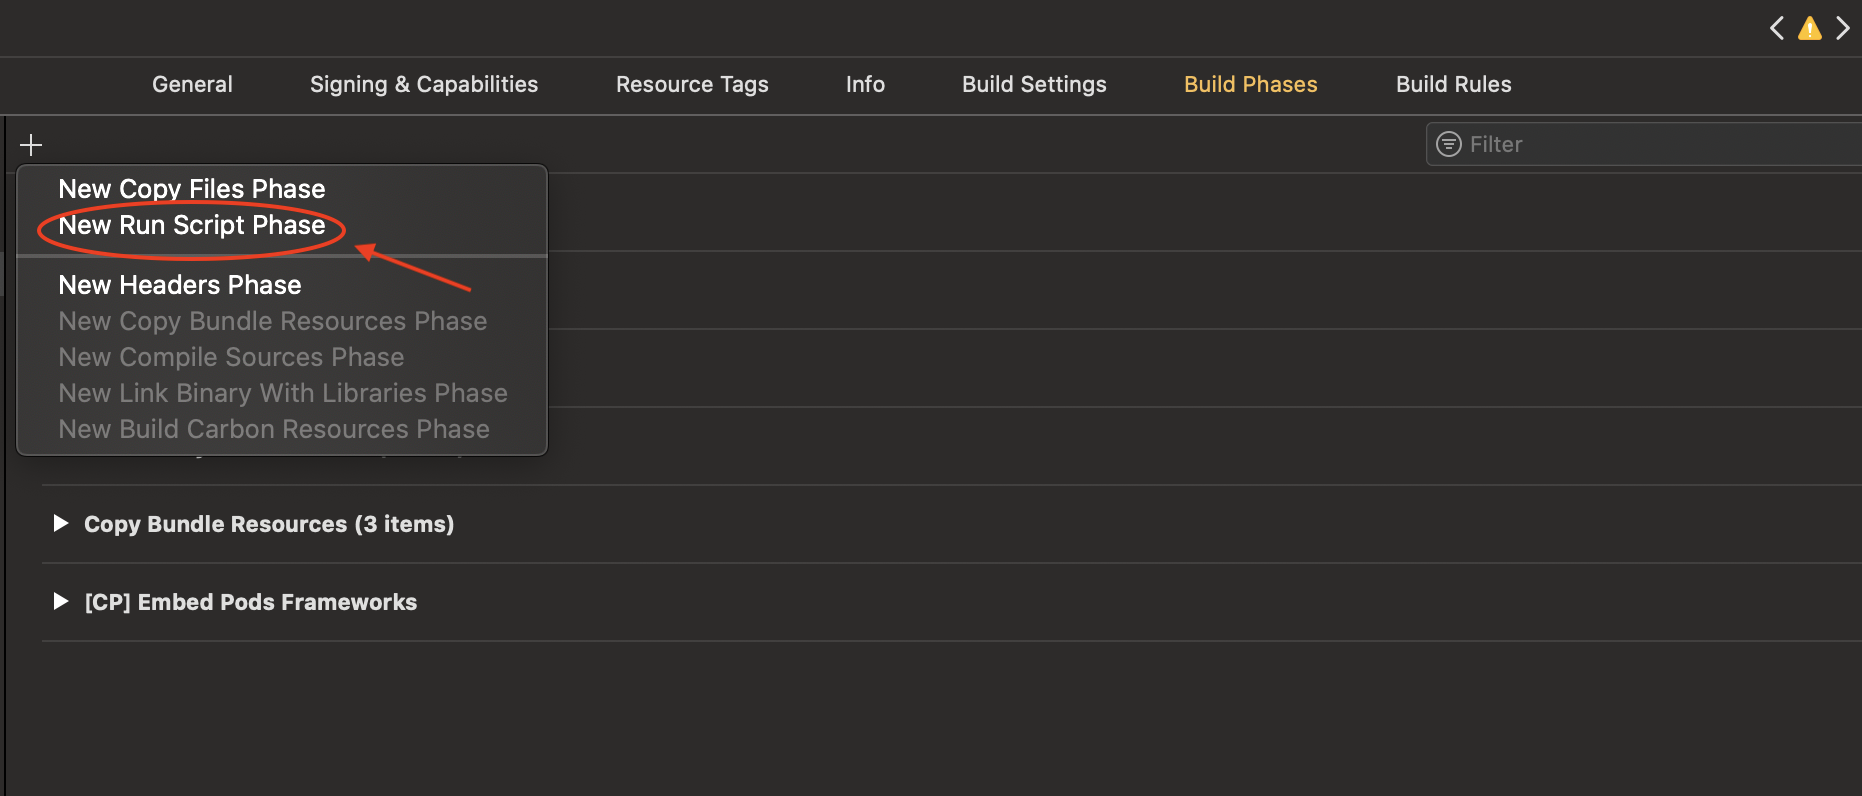
Xcodeの Build Phases のRun Script Phase に
下記を追加します。if [ $CONFIGURATION = "Debug" ]; then ${PODS_ROOT}/LicensePlist/license-plist --output-path $PRODUCT_NAME/Settings.bundle fi③Settings.bundleを追加
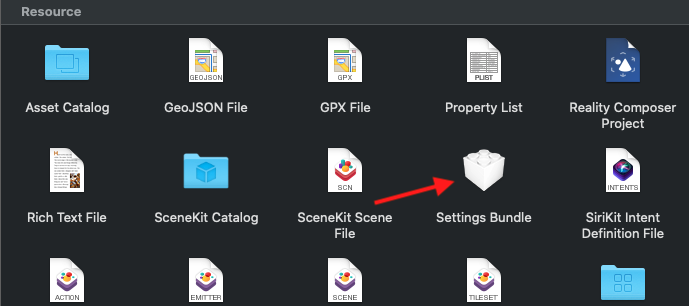
新規ファイルでSettings.bundleを追加します。
Settings.bundleの中に作られるen.lprojというフォルダは必要ないので削除して、Root.plistだけを残します。
④Root.plistを編集
Root.plistを好きなエディタで開き、下記の様に編集します。
<?xml version="1.0" encoding="UTF-8"?>
<!DOCTYPE plist PUBLIC "-//Apple//DTD PLIST 1.0//EN" "http://www.apple.com/DTDs/PropertyList-1.0.dtd">
<plist version="1.0">
    <dict>
        <key>PreferenceSpecifiers</key>
        <array>
            <dict>
                <key>Title</key>
                <string>Licenses</string>
                <key>Type</key>
                <string>PSChildPaneSpecifier</string>
                <key>File</key>
                <string>com.mono0926.LicensePlist</string>
            </dict>
        </array>
        <key>StringsTable</key>
        <string>Root</string>
    </dict>
</plist>
⑤ビルドする
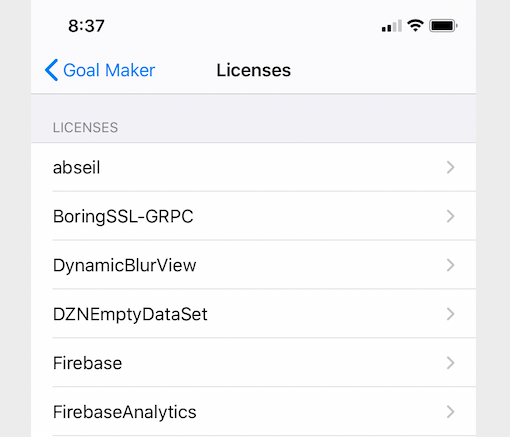
ビルドが完了するとSettings.bundleの中に、ライブラリのライセンスを表示するためのフォルダが追加されます。
設定アプリを見ると、ライセンス一覧が確認できます。
※表示されない場合は再度ビルドして下さい
参考
https://github.com/mono0926/LicensePlist
https://medium.com/swift-column/license-plist-c0363a008c67
https://tomoyaonishi.hatenablog.jp/entry/2018/09/19/133447
- 投稿日:2020-08-03T21:29:13+09:00
【iOS】ライセンス一覧を設定アプリに自動表記する方法【LicensePlist】
今回はアプリ内で利用したライブラリのライセンス一覧を、簡単に設定アプリに表記する方法を紹介します。
ライブラリを新しく追加しても更新されるのでとても便利です。
LicensePlistというライブラリを活用する
ライセンス一覧を手軽に表記することができる、かなりオススメのライブラリです。
有名なアプリでも結構使われているみたいです、開発者の方いつもお世話になっています!https://github.com/mono0926/LicensePlist
①インストール
Cocoapodsを使いました。
pod ‘LicensePlist’とPodfileに入れてinstallします。②Run Scriptを編集
Xcodeの Build Phases のRun Script Phase に
下記を追加します。if [ $CONFIGURATION = "Debug" ]; then ${PODS_ROOT}/LicensePlist/license-plist --output-path $PRODUCT_NAME/Settings.bundle fi③Settings.bundleを追加
新規ファイルでSettings.bundleを追加します。
Settings.bundleの中に作られるen.lprojというフォルダは必要ないので削除して、Root.plistだけを残します。
④Root.plistを編集
Root.plistを好きなエディタで開き、下記の様に編集します。
<?xml version="1.0" encoding="UTF-8"?>
<!DOCTYPE plist PUBLIC "-//Apple//DTD PLIST 1.0//EN" "http://www.apple.com/DTDs/PropertyList-1.0.dtd">
<plist version="1.0">
    <dict>
        <key>PreferenceSpecifiers</key>
        <array>
            <dict>
                <key>Title</key>
                <string>Licenses</string>
                <key>Type</key>
                <string>PSChildPaneSpecifier</string>
                <key>File</key>
                <string>com.mono0926.LicensePlist</string>
            </dict>
        </array>
        <key>StringsTable</key>
        <string>Root</string>
    </dict>
</plist>
⑤ビルドする
ビルドが完了するとSettings.bundleの中に、ライブラリのライセンスを表示するためのフォルダが追加されます。
設定アプリを見ると、ライセンス一覧が確認できます。
※表示されない場合は再度ビルドして下さい
参考
https://github.com/mono0926/LicensePlist
https://medium.com/swift-column/license-plist-c0363a008c67
https://tomoyaonishi.hatenablog.jp/entry/2018/09/19/133447
- 投稿日:2020-08-03T20:46:51+09:00
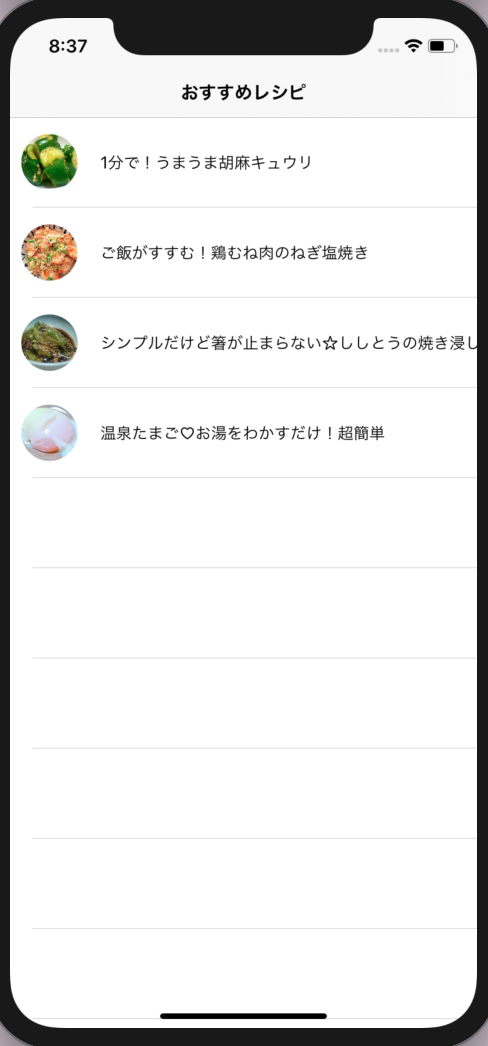
TableviewにAPI を反映〜Swiftで楽天レシピAPIを表示させてみた〜
やること
前回の続き
APIをTableviewに反映tableviewのデリゲートのメソットの設定
この前作ったtableviewのデリゲートのメソットを少し変更します。
その前にprivate var recips = [ResultList]()をprivate let cellId = "cellId"の下でもいいので追加tableviewのデリゲートのメソットの変更
①cellの高さを変えるコードを追加
    func tableView(_ tableView: UITableView, heightForRowAt indexPath: IndexPath) -> CGFloat {
        return 80
    }
②numberOfRowsInSectionのところを変更
return 10のところを下記に変更if (recips.count == 0) { return recips.count } else { return recips[0].result.count } }③cellForRowAtのところを変更
cell.backgroundColor = .blueコードを消してあげる。
let cell = ...のコードの後ろにas! RTableViewCell追加
下にcell.recip = self.recips[0].result[indexPath.row]のコードを追加func tableView(_ tableView: UITableView, cellForRowAt indexPath: IndexPath) -> UITableViewCell { let cell = tableView.dequeueReusableCell(withIdentifier: cellId, for: indexPath) as! RTableViewCell cell.recip = self.recips[0].result[indexPath.row] return cell }recipsにresultList情報を入れてあげる
getRApiメソッドのdo-catch文の中に、resultListが作成された際にrecipsにresultList情報を入れるコードを追加
self.recips = [resultList]メインスレットで必要なコードを追加
    DispatchQueue.main.async {
             self.tableView.reloadData()
                   }
シミュレーター
うまく表示されました!!達成感ー!!!
課題
・Codableを使い方をいまいちうまく使いこなせてない感じから色々なAPIをCodableを使ってJson変換させてみる。
ここまで読んでくださって有り難うございます。
勉強記録として残しておきます。
初心者なので、これがベストなコードかわからないのですが、もっといい方法があればご教示頂ける有り難いです!!今までのコード
struct ResultList: Codable {

    let result: [User]

struct User: Codable {
    let foodImageUrl :String
    let recipeTitle  :String
}
}

class ViewController: UIViewController {

    private let cellId = "cellId"
    private var recips = [ResultList]()
    //tableviewを作っていく
    let tableView: UITableView = {
        let tv = UITableView()
        return tv
    }()

    override func viewDidLoad() {
        super.viewDidLoad()

        view.addSubview(tableView)
        tableView.frame.size = view.frame.size


        tableView.delegate = self
        tableView.dataSource = self
        tableView.register(RTableViewCell.self, forCellReuseIdentifier: cellId)
        navigationItem.title = "おすすめレシピ"

      getRApi()
    }

     private func getRApi(){
            guard let url = URL(string: "楽天API") else {return}

            let task = URLSession.shared.dataTask(with: url) { (data, response, err)in
                if let err = err {
                    print("情報の取得に失敗しました。:", err)
                    return
                }
                if let data = data{
                    do{
                        let resultList = try JSONDecoder().decode(ResultList.self, from: data)
                        self.recips = [resultList]
                        DispatchQueue.main.async {
                                               self.tableView.reloadData()
                                           }
                        print("json: ", resultList)
                    }catch(let err){
                         print("情報の取得に失敗しました。:", err)

                    }
                }
            }
            task.resume()
        }
    }
extension ViewController: UITableViewDelegate,UITableViewDataSource{


    func tableView(_ tableView: UITableView, heightForRowAt indexPath: IndexPath) -> CGFloat {
        return 80
    }

        func tableView(_ tableView: UITableView, numberOfRowsInSection section: Int) -> Int {
            if (recips.count == 0) {
                    return recips.count
                } else {
                    return recips[0].result.count
                }
            }

    func tableView(_ tableView: UITableView, cellForRowAt indexPath: IndexPath) -> UITableViewCell {
        let cell = tableView.dequeueReusableCell(withIdentifier: cellId, for: indexPath) as! RTableViewCell
        cell.recip = self.recips[0].result[indexPath.row]

        return cell
    }

}

class RTableViewCell: UITableViewCell {

    let bodyTextLabel: UILabel = {
        let label = UILabel()
        label.text = "something in here"
        label.font = .systemFont(ofSize: 15)
        label.translatesAutoresizingMaskIntoConstraints = false
        return label
    }()

    let userImageView: UIImageView = {
       let iv = UIImageView()
        iv.contentMode = .scaleAspectFill
        iv.translatesAutoresizingMaskIntoConstraints = false
        iv.clipsToBounds = true
        return iv
    }()

    var recip: ResultList.User? {
        didSet {
            bodyTextLabel.text = recip?.recipeTitle
            let url = URL(string: recip?.foodImageUrl ?? "")
            do {
                let data = try Data(contentsOf: url!)
                let image = UIImage(data: data)
                userImageView.image = image
            }catch let err {
                print("Error : \(err.localizedDescription)")
            }
        }
    }


    override init(style: UITableViewCell.CellStyle, reuseIdentifier: String?) {
        super.init(style: style, reuseIdentifier: reuseIdentifier)

        addSubview(userImageView)
        addSubview(bodyTextLabel)
        [
            userImageView.leadingAnchor.constraint(equalTo: leadingAnchor, constant: 10),
            userImageView.centerYAnchor.constraint(equalTo: centerYAnchor),
            userImageView.widthAnchor.constraint(equalToConstant: 50),
            userImageView.heightAnchor.constraint(equalToConstant: 50),

            bodyTextLabel.leadingAnchor.constraint(equalTo: userImageView.trailingAnchor, constant: 20),
            bodyTextLabel.centerYAnchor.constraint(equalTo: centerYAnchor),

            ].forEach{ $0.isActive = true }

        userImageView.layer.cornerRadius = 50 / 2
    }

    required init?(coder: NSCoder) {
        fatalError("init(coder:) has not been implemented")
    }
}
- 投稿日:2020-08-03T20:46:51+09:00
TableviewにAPI を反映〜Swiftで楽天レシピAPIを表示させてみた④〜
やること
前回の続き
APIをTableviewに反映tableviewのデリゲートのメソットの設定
この前作ったtableviewのデリゲートのメソットを少し変更します。
その前にprivate var recips = [ResultList]()をprivate let cellId = "cellId"の下でもいいので追加tableviewのデリゲートのメソットの変更
①cellの高さを変えるコードを追加
    func tableView(_ tableView: UITableView, heightForRowAt indexPath: IndexPath) -> CGFloat {
        return 80
    }
②numberOfRowsInSectionのところを変更
return 10のところを下記に変更if (recips.count == 0) { return recips.count } else { return recips[0].result.count } }③cellForRowAtのところを変更
cell.backgroundColor = .blueコードを消してあげる。
let cell = ...のコードの後ろにas! RTableViewCell追加
下にcell.recip = self.recips[0].result[indexPath.row]のコードを追加func tableView(_ tableView: UITableView, cellForRowAt indexPath: IndexPath) -> UITableViewCell { let cell = tableView.dequeueReusableCell(withIdentifier: cellId, for: indexPath) as! RTableViewCell cell.recip = self.recips[0].result[indexPath.row] return cell }recipsにresultList情報を入れてあげる
getRApiメソッドのdo-catch文の中に、resultListが作成された際にrecipsにresultList情報を入れるコードを追加
self.recips = [resultList]メインスレットで必要なコードを追加
    DispatchQueue.main.async {
             self.tableView.reloadData()
                   }
シミュレーター
うまく表示されました!!達成感ー!!!
課題
・Codableを使い方をいまいちうまく使いこなせてない感じから色々なAPIをCodableを使ってJson変換させてみる。
ここまで読んでくださって有り難うございます。
勉強記録として残しておきます。
初心者なので、これがベストなコードかわからないのですが、もっといい方法があればご教示頂ける有り難いです!!今までのコード
struct ResultList: Codable {

    let result: [User]

struct User: Codable {
    let foodImageUrl :String
    let recipeTitle  :String
}
}

class ViewController: UIViewController {

    private let cellId = "cellId"
    private var recips = [ResultList]()
    //tableviewを作っていく
    let tableView: UITableView = {
        let tv = UITableView()
        return tv
    }()

    override func viewDidLoad() {
        super.viewDidLoad()

        view.addSubview(tableView)
        tableView.frame.size = view.frame.size


        tableView.delegate = self
        tableView.dataSource = self
        tableView.register(RTableViewCell.self, forCellReuseIdentifier: cellId)
        navigationItem.title = "おすすめレシピ"

      getRApi()
    }

     private func getRApi(){
            guard let url = URL(string: "楽天API") else {return}

            let task = URLSession.shared.dataTask(with: url) { (data, response, err)in
                if let err = err {
                    print("情報の取得に失敗しました。:", err)
                    return
                }
                if let data = data{
                    do{
                        let resultList = try JSONDecoder().decode(ResultList.self, from: data)
                        self.recips = [resultList]
                        DispatchQueue.main.async {
                                               self.tableView.reloadData()
                                           }
                        print("json: ", resultList)
                    }catch(let err){
                         print("情報の取得に失敗しました。:", err)

                    }
                }
            }
            task.resume()
        }
    }
extension ViewController: UITableViewDelegate,UITableViewDataSource{


    func tableView(_ tableView: UITableView, heightForRowAt indexPath: IndexPath) -> CGFloat {
        return 80
    }

        func tableView(_ tableView: UITableView, numberOfRowsInSection section: Int) -> Int {
            if (recips.count == 0) {
                    return recips.count
                } else {
                    return recips[0].result.count
                }
            }

    func tableView(_ tableView: UITableView, cellForRowAt indexPath: IndexPath) -> UITableViewCell {
        let cell = tableView.dequeueReusableCell(withIdentifier: cellId, for: indexPath) as! RTableViewCell
        cell.recip = self.recips[0].result[indexPath.row]

        return cell
    }

}

class RTableViewCell: UITableViewCell {

    let bodyTextLabel: UILabel = {
        let label = UILabel()
        label.text = "something in here"
        label.font = .systemFont(ofSize: 15)
        label.translatesAutoresizingMaskIntoConstraints = false
        return label
    }()

    let userImageView: UIImageView = {
       let iv = UIImageView()
        iv.contentMode = .scaleAspectFill
        iv.translatesAutoresizingMaskIntoConstraints = false
        iv.clipsToBounds = true
        return iv
    }()

    var recip: ResultList.User? {
        didSet {
            bodyTextLabel.text = recip?.recipeTitle
            let url = URL(string: recip?.foodImageUrl ?? "")
            do {
                let data = try Data(contentsOf: url!)
                let image = UIImage(data: data)
                userImageView.image = image
            }catch let err {
                print("Error : \(err.localizedDescription)")
            }
        }
    }


    override init(style: UITableViewCell.CellStyle, reuseIdentifier: String?) {
        super.init(style: style, reuseIdentifier: reuseIdentifier)

        addSubview(userImageView)
        addSubview(bodyTextLabel)
        [
            userImageView.leadingAnchor.constraint(equalTo: leadingAnchor, constant: 10),
            userImageView.centerYAnchor.constraint(equalTo: centerYAnchor),
            userImageView.widthAnchor.constraint(equalToConstant: 50),
            userImageView.heightAnchor.constraint(equalToConstant: 50),

            bodyTextLabel.leadingAnchor.constraint(equalTo: userImageView.trailingAnchor, constant: 20),
            bodyTextLabel.centerYAnchor.constraint(equalTo: centerYAnchor),

            ].forEach{ $0.isActive = true }

        userImageView.layer.cornerRadius = 50 / 2
    }

    required init?(coder: NSCoder) {
        fatalError("init(coder:) has not been implemented")
    }
}
- 投稿日:2020-08-03T20:36:47+09:00
【iOS13】UIActivityViewControllerの不具合とそのワークアラウンド
共有を完了したときに起こる不具合
テキストやファイルなどを共有するときに使用するUIActivityViewControllerですが、iOS13の環境では共有が終了したタイミングでUIActivityViewControllerを表示した親のUIViewControllerまでdismissしてしまう不具合があるようです。
参考: iOS 13 UIActivityViewController automatically present previous VC after image saving
発生条件は曖昧?
上記のstack overflowの記事では特に言及がないようですが、僕が遭遇した不具合の発生条件は以下でした。
発生条件
1. iPadでのみ起こる
2. キャンセル時にのみ発生(共有シートの外をタップしたり、ファイルに保存 > キャンセルを選択するなど)不具合
1. 親のUIViewControllerのdismissメソッドが勝手に呼ばれる
2. 実際にはdismissしない(dismissメソッドをオーバーライドして別の処理を追加していたため不具合が顕在化した)ワークアラウンド
上記のstack overflowの記事の回答をひとつを参考にしました。
透明のUIViewControllerを生成して、その上にUIActivityViewControllerを表示します。そして、UIActivityViewControllerの完了ハンドラ内で透明のUIViewControllerをdismissします。
完了ハンドラ内でdismissするだけでほとんどのケースは問題なかったのですが、なぜか「マークアップ > PDFを削除」のフローの場合だけ、dismissを呼んでも残り続けたので、さらにdismissの完了ハンドラ内でdismissを呼んでいます。
func onGeneratedPDF(at url: URL) {
    let transparentVC = UIViewController()
    transparentVC.modalPresentationStyle = .overFullScreen

    let acv = UIActivityViewController(activityItems: [url], applicationActivities: nil)
    acv.completionWithItemsHandler = { [weak transparentVC] _, _, _, _ in
        transparentVC?.dismiss(animated: false, completion: { [weak self] in
            if let transparentVC = transparentVC,
                transparentVC.presentingViewController == self {
                // 「マークアップ > PDFを削除」のフローの場合、ここに来てもVCが残っているので、もう一度呼ぶ
                transparentVC.dismiss(animated: false, completon: nil)
            }
         })
    }

    present(transparentVC, animated: false, completion: {
        let v = transparentVC.view!
        acv.popoverPresentationController?.sourceView = v
        acv.popoverPresentationController?.sourceRect =
            .init(origin: v.bounds.size.toPoint().half, size: .square(0))
        transparentVC.present(acv, animated: true, completion: nil)
    })
}
- 投稿日:2020-08-03T12:32:52+09:00
iOSの In App Purchase アプリ内課金 消耗型 購入処理
iOSアプリ内課金の消耗型アイテムの実装方法に関する話です。
アプリ内課金実装時にやりがちな失敗例を解説した後に正しい処理の流れを解説します。
間違った購入処理の流れ
※購入処理を書くうえで以下の実装処理は完全なる間違いです。絶対に以下のような流れで実装してはいけません。大変なことになります。
1'. 商品情報の取得
2'. 商品を購入トランザクションに追加
3'. ユーザー側での処理(アカウント情報確認や購入の確認)
4'. Appleのサーバーでの購入処理の完了
5'. 商品情報を購入トランザクションから削除
6'. レシート検証
7'. ユーザーへの報酬(コイン追加等)間違った実装で生じる問題
もしも6'のレシート検証の時点でイレギュラーな事態が発生して処理が終わってしまった場合、報酬を受け取ることができず、ユーザーのお金だけが消えてしまうという事態になります。
レシート検証は多くの場合クライアント側ではなくWebサーバーを用意してその中で行い、その結果を持ってユーザーに報酬を与えます。
Appleでの購入処理が成功したあと、
レシート検証の時点で通信が切断してしまった場合、もしくはアプリが落ちてしまった場合
ユーザーは報酬を受け取ることができず、ユーザーのお金だけが消滅します。やってはいけないこと
間違った流れの中で最もやってはいけなかったのが
5',6'の流れです。5'. 商品情報を購入トランザクションから削除
6'. レシート検証問題なのはレシート検証が成功する前に購入トランザクションから商品情報を削除してしまったことです。
つまりSKPaymentQueueのfinishTransactionを呼んでしまうことです。
コードにすると以下のようになりますAkanPurchaseManager.swift// ※この実装には間違いが含まれています func paymentQueue(_ queue: SKPaymentQueue, updatedTransactions transactions: [SKPaymentTransaction]) { for t in transactions { switch t.transactionState { case .purchased: // トランザクション処理終了 ここが間違い SKPaymentQueue.default().finishTransaction(t) // レシート検証 ここが間違い self.validateReceipt() { [unowned self] in self.delegate.success() } case .failed: SKPaymentQueue.default().finishTransaction(t) default: break } } } // ※この実装には間違いが含まれています正しい購入処理の流れ
上記の問題へ対応するための正しい実装処理の流れは以下のようになります。
- 購入トランザクションの監視の開始
- 未処理のトランザクションのチェック
- 未送信のレシート情報を保存しているかチェック
- 商品情報の取得
- 商品を購入トランザクションに追加
- ユーザー側での処理(アカウント情報確認や購入の確認)
- Appleのサーバーでの購入処理の完了
- レシート情報を暗号化して保存(KeyChainAccess等)
- レシート検証
- 商品情報を購入トランザクションから削除
- ユーザーへの報酬(コイン追加等)
- レシート検証で成功したレシート情報を削除
やるべきこと
問題に対応するために、中断してしまった場合の処理を再開させるという実装をします。
そのポイントとなるのが、正しい流れの中の1,2,3と8,9,10の処理になります。まず8,9,10に関して
8, レシート情報を暗号化して保存(KeyChainAccess等)
9, レシート検証
10, 商品情報を購入トランザクションから削除レシート検証がサーバー側で成功するまでfinishTransactionを呼び出さなければSKPaymentQueueの内容を
次回のアプリ起動時もしくはログイン時まで持ち越すことができる
ため、途中の処理を復元することができます。更なる注意点
しかし弊社デバッグチームが100回ほどの購入処理テストを行ったところ、30回に1回ほどそれでも復元できないという事例が出ていました。
それに対応するために8の処理でレシート情報を保存して次回のログイン時に失敗したレシート情報を確認してサーバー側で検証するという処理を入れています。
これによって弊社デバッグチームの鬼のような回数の検証にも耐え抜き、購入を途中中断からの復元を100%成功させるということができました。
コード例
コードは以下になります。
OKPurchaseManager.swiftfunc paymentQueue(_ queue: SKPaymentQueue, updatedTransactions transactions: [SKPaymentTransaction]) { for t in transactions { switch t.transactionState { case .purchased: self.saveReceipt() // 未送信レシート保存 // レシート検証 self.validateReceipt() { [unowned self] in // トランザクション処理終了 SKPaymentQueue.default().finishTransaction(t) self.deleteReceipt() // 送信済成功レシートの削除 self.delegate.success() } case .failed: SKPaymentQueue.default().finishTransaction(t) default: break } } }続いて1,2,3の処理
- 購入トランザクションの監視の開始
- 未処理のトランザクションのチェック
- 未送信のレシート情報を保存しているかチェック
アプリ起動時、もしくはログイン時に行う購入復元処理は以下になります。
OKPurchaseManager.swiftfunc resumePurchase() { if SKPaymentQueue.default().transactions.count > 0 { for t in SKPaymentQueue.default().transactions { switch t.transactionState { case .purchasing, .deferred: // 購入処理中 SKPaymentQueue.default().add(t.payment) SKPaymentQueue.default().add(self) break case .purchased: // 購入済み self.validateReceipt() { [unowned self] in SKPaymentQueue.default().finishTransaction(t) self.delegate.resumeSuccess() } case .failed: SKPaymentQueue.default().finishTransaction(t) default: break } } } else { // トランザクションには何も処理が無い状態だが、未送信のレシート情報が保存してあるかをチェック if let receipt = self.getSavedReceipt { self.validateReceipt(receipt) { [unowned self] in self.delegate.resumeSuccess() } } } }終わりです
最後までお読みくださりありがとうございました。
Brewus,Inc.
株式会社ブリューアス
https://brewus.co.jp