- 投稿日:2020-08-03T22:28:33+09:00
React Routerについて
React Routerについて初心者がまだ理解できていませんが、メモしています。
V3,V4で大分変わったらしい
- v3のreact-routerとv4のreact-router-domのコンポーネントの比較 v3とv4では破壊的変更があり、簡単には移行ができない
- v4では、v3とは異なり、Routerコンポーネントの小要素には、好きなコンポーネントを配置できるようにな
- v3でと書いていましたが、v4でbrowserHistoryが廃止となります。v4では、単純な実装な場合はRouterからBrowserRouterに書き換えるだけになる
その前に
Routerとは?
v4で大きく3つのRouterコンポーネンネントが提供された
BrowserRouterはHistoryAPIを使用してUIをURLと同期させるRouterを作成、
- BrowserRouterは、historyを生成してRouterコンポーネントをレンダリングするコンポーネント
HashRouterは履歴をwindow.location.hashを使ってUIをURLと同期させるRouterを作成、
MemoryRouterは履歴をメモリ管理するRouterを作成
n4.js<BrowserRouter> <div> <Route path='/about' component={About} /> <Route path='/contact' component={Contact} /> </div> </BrowserRouter>
- 注意点としてRouterは、一つしか小要素を持つことができないので、RouterコンポーネントにRouteを使うときはdivタグなどでRouteコンポーネントを加工必要がある
- 投稿日:2020-08-03T13:43:19+09:00
React初心者覚書 コンポジション vs 継承
コンポジション vs 継承
を参考に初心者がわからないけど覚書を書いています。React は強力なコンポジションモデルを備えており、コンポーネント間のコードの再利用には継承よりもコンポジションをお勧めしています。
コンポジションって何?
参考
- Reactにおけるコンポジションとは?
Reactでアプリを作成する場合、ヘッダ・フッタ・サイドバー・メニューなどの部品をコンポーネントによって作成します。Reactでアプリを作成する際には、コンポーネントをどのように分割して構成するかが重要となります。これを「Reactコンポーネントのコンポジション」と呼びます。
(わかりやすい解説)
- ひとつひとつの Reactコンポーネントは関数のようなものですが、それらを組み合わせてコンポジションによってカスタマイズできる
- どんな子要素が入るのか決まっていないコンポーネントがある場合
- children という特別な機能を持つ props を使うことができます。childrenは 子要素を渡すための専用の props
- childrenに任せた!みたいな感じ?
子要素の出力 (Containment)
- コンポーネントの中には事前には子要素を知らないものもある。“入れ物(Sidebar,Dialogなど)” をあらわすコンポーネントではよく使われる
- JSX タグの内側のあらゆる要素は FancyBorder に children という props として渡される
index.jsimport React from 'react'; import ReactDOM from 'react-dom'; import * as serviceWorker from './serviceWorker'; import './index.css'; function FancyBorder(props) { return( <div className ={'FancyBorder FancyBorder-' + props.color}> {props.children} </div> ); } function Dialog(props) { return( <FancyBorder color="blue"> <h1 className="Dialog-title"> {props.title} </h1> <p className="Dialog-message"> {props.message} </p> </FancyBorder> ); } function WelcomeDialog(){ return( <Dialog title="ようこそ!" message="you are welcome!!" /> ); } ReactDOM.render( <WelcomeDialog />, document.getElementById('root') ); // If you want your app to work offline and load faster, you can change // unregister() to register() below. Note this comes with some pitfalls. // Learn more about service workers: https://bit.ly/CRA-PWA serviceWorker.unregister();index.css.FancyBorder{ padding: 10px; border: solid 10px; text-align:center; } .FancyBorder-blue{ border-color: #00f; } .Dialog-title{ margin:0; font-family:sans-serif; /* text-align:center; */ }複数の箇所に子要素を追加したいケース(一般的ではない)
- や のような React の要素はただのオブジェクトなので、他のあらゆるデータと同様に props として渡すことができる
- 他のライブラリでいうと、slot に似ている
- propsに渡せるものに制限はない
function SplitPane(props){
  return(
    <div className="SplitPane">
      <div className="SplitPane-left">
        {props.left}
      </div>
      <div className="SplitPane-right">
        {props.right}
      </div>
    </div>
  );
}

function App(){
  return(
    <SplitPane
      left={
        <Contacts />
      }
      right={
        <Chat />
      } />
  );
}
特化したコンポーネント (Specialization)
?何が特化なのかよくわからなかった
function Dialog(props){
  return(
    <FancyBorder color="blue">
      <h1 className="Dialog-title">
       {props.title}
      </h1>
      <p className="Dialog-message">
       {props.message}
      </p>
    </FancyBorder>
  );
}

function WelcomeDialog(){
  return(
    <Dialog
      title="Welcome"
      message="Thank you for visiting our spacecraft!" />
  );
}
function Dialog(props){ return( <FancyBorder color="blue"> <h1 className="Dialog-title"> {props.title} </h1> <p className="Dialog-message"> {props.message} </p> </FancyBorder> ); } class SignUpDialog extends React.Component{ constructor(props){ super(props); this.handleChange = this.handleChange.bind(this); this.handleSignUp = this.handleSignUp.bind(this); this.state = {login: ''}; } render(){ return( <Dialog title="Mars Exploration Program" message="How should we refer to you?"> <input value={this.state.login} onChange={this.handleChange} /> <button onClick={this.handleSignUp}> Sign Me Up! </button> </Dialog> ); } handleChange(e){ this.setState({login: e.target.value}); } handleSignUp(){ alert(`Welcome abroad, ${this.state.login}!`); } }継承は?
コンポーネント継承による階層構造が推奨されるケースは全く見つかっていない
?ここもよくわからなかったコンポーネントはどのような props でも受け付けることができ、それはプリミティブ値でも、React 要素でも、あるいは関数であってもよい、ということに留意
コンポーネント間で非 UI 機能を再利用したい場合は、それを別の JavaScript モジュールに抽出することをお勧めする
- 投稿日:2020-08-03T09:12:49+09:00
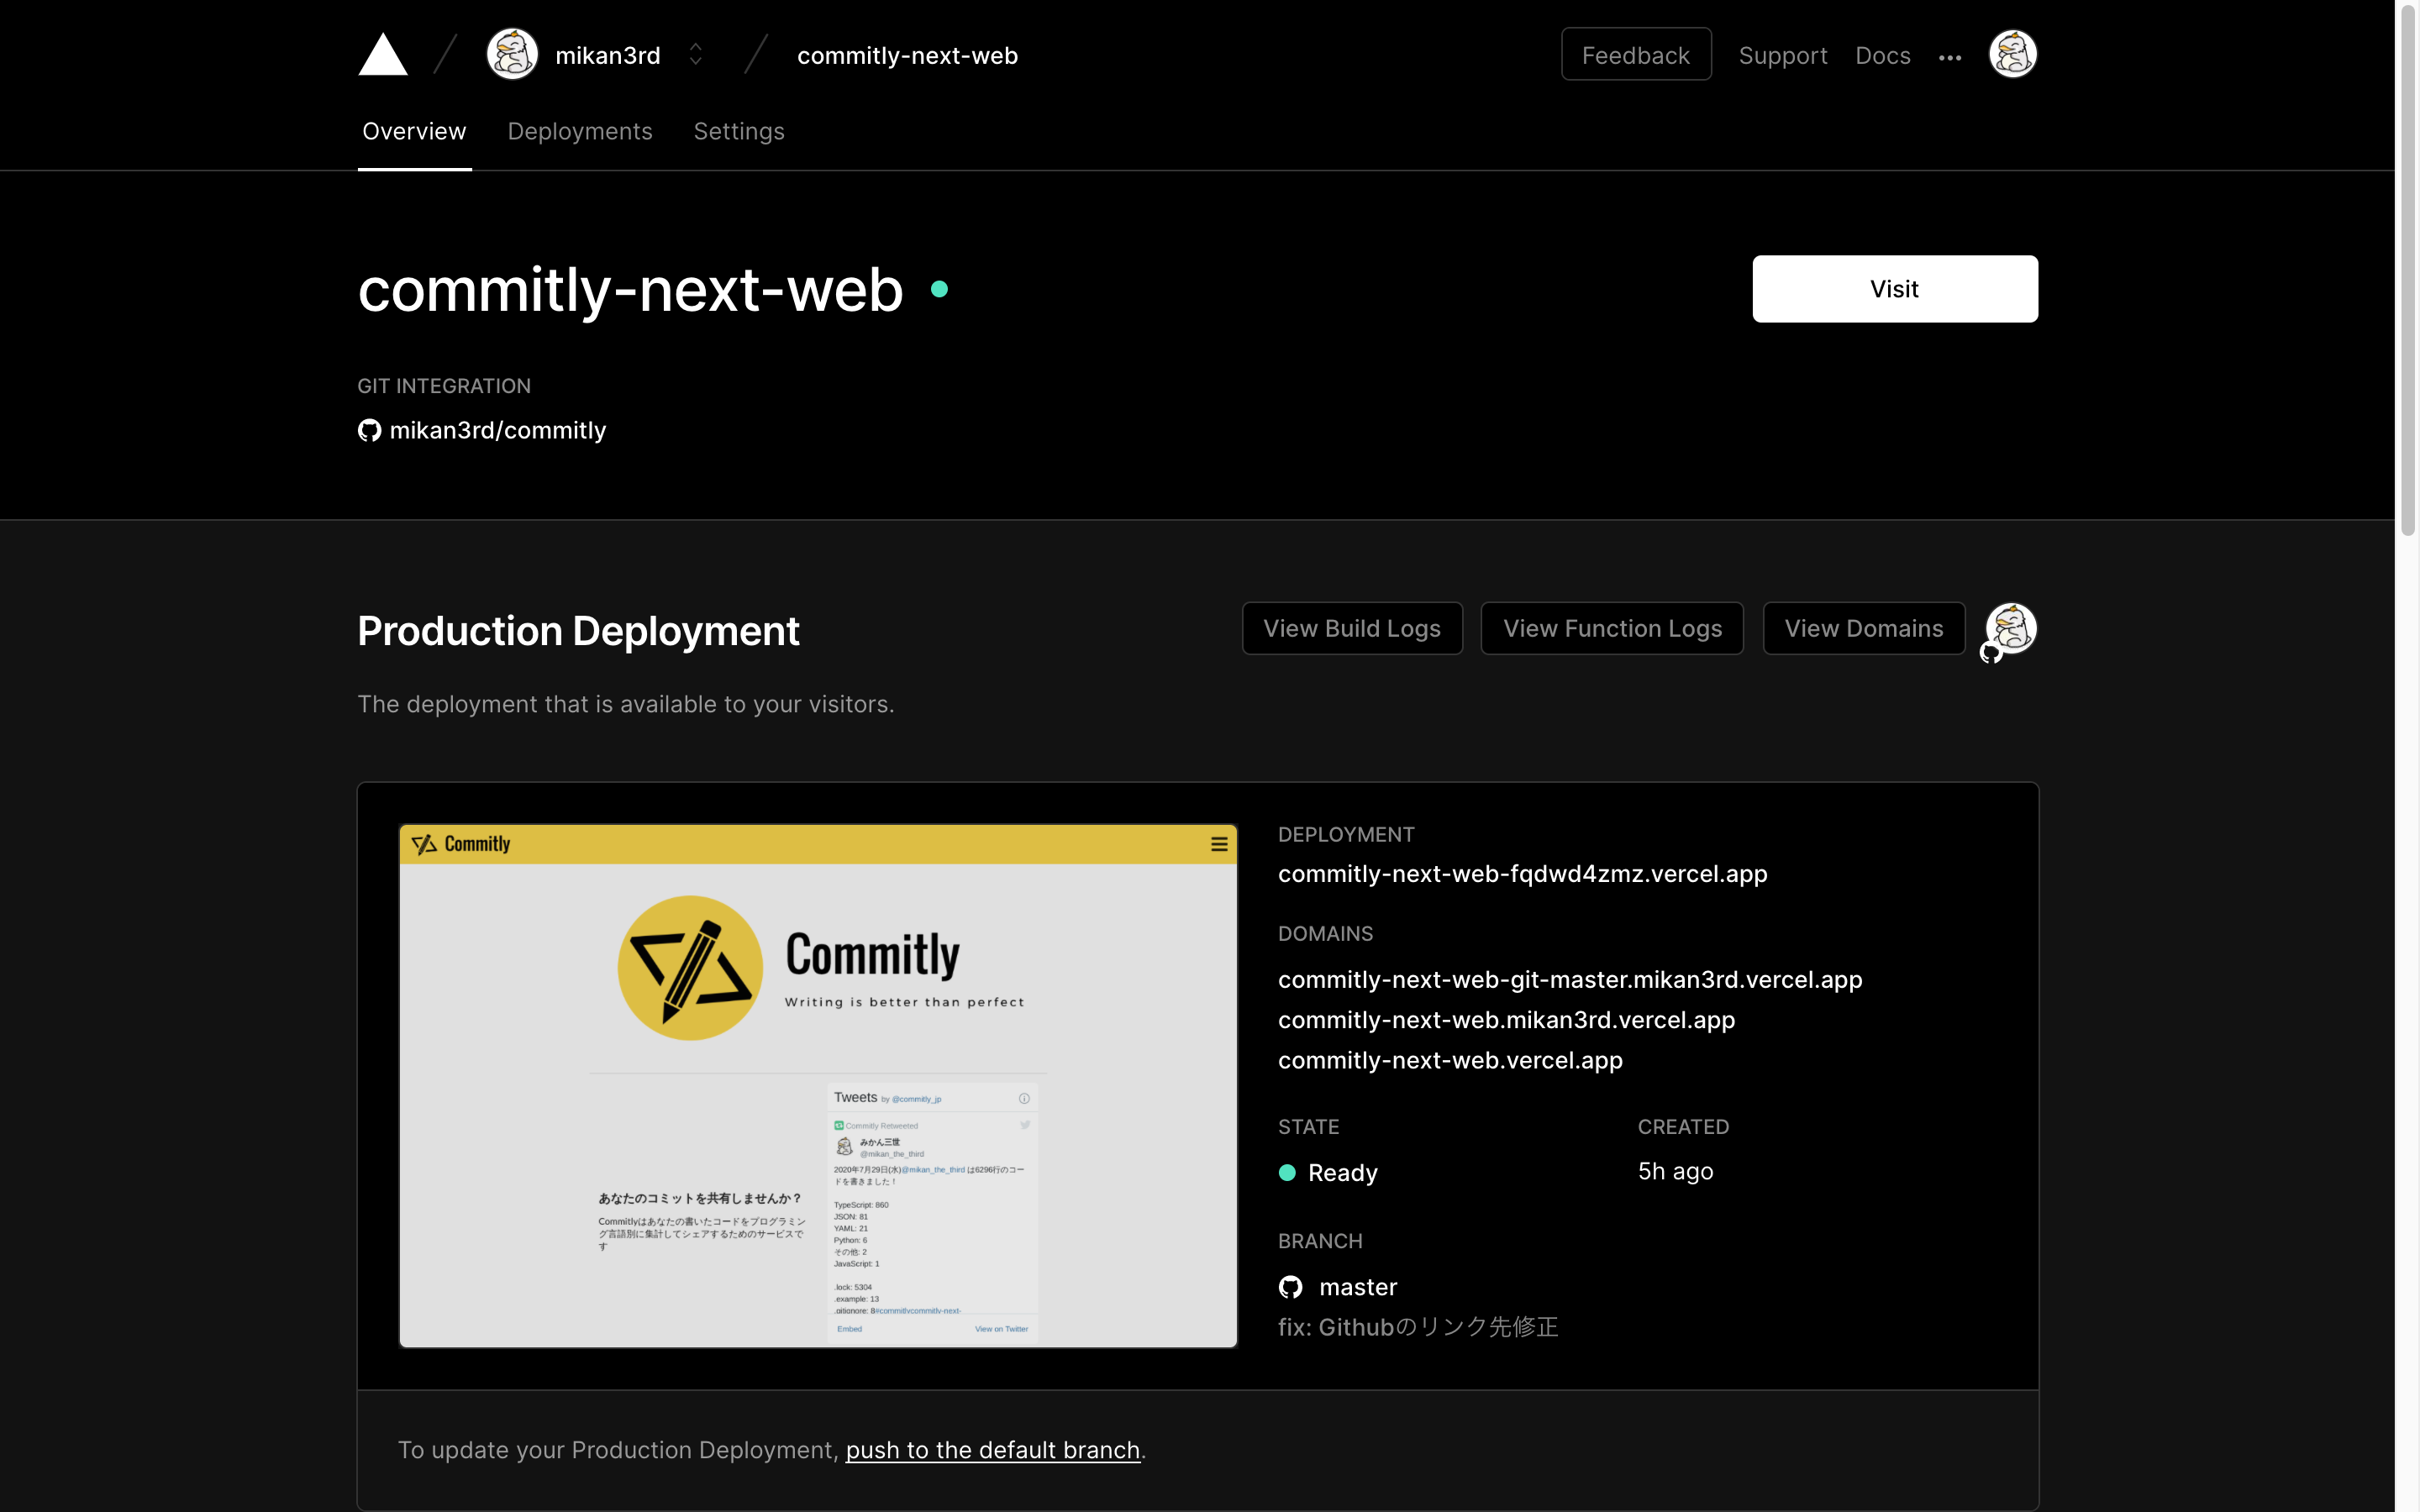
書いたコードを言語別に集計してシェアするサービス「Commitly」を作ってみた
作ったもの
https://commitly-next-web.vercel.app
次のようにGitHubにコミットしたコードについて、どの言語を何行書いたかツイートするサービスです
2020年8月1日(土)@mikan_the_third は12438行のコードを書きました!
— みかん三世 (@mikan_the_third) August 2, 2020
TypeScript: 633
YAML: 344
JSON: 242
Markdown: 24
JavaScript: 2
.lock: 11176
.gitignore: 17#commitlyhttps://t.co/nPgFirPd14
なぜ作ったか
- エンジニアとして日々コードを書くモチベーションになればと、個人的に作ったものをサービス化しました
- もちろんコード量が多いほど良いわけではありませんが、エンジニアとして生きていくのであればコードを書き続けることになるはずで、そういったエンジニア同士で知り合えるきっかけにもなってほしいというの理由です
- こうしてQiitaなどで記事を書くのも良いのですが、日々のコーディングの成果が自然とアウトプットになるようにしたいということで、このように自動化しました
- また、一言にエンジニアと言っても担当領域や使用する言語によってグループ化されると思うので、どのような言語についてコミットしているのか分かるようにしました
技術スタック
オープンソースなので参考にしたい方はどうぞ
https://github.com/mikan3rd/commitlyReact + TypeScript
- 普段からReact + TypeScriptのSPAを作っており、自分としては(今は)最善手だと思っているのでいつもこの構成で作っています
- VueやAngularもやってみようかなと調べてみたのですが、やはりテンプレート構文というところに型定義の限界と状態管理の限界を感じたため、引き続きJSXで書けるReactを選択しました
- 自分が共感した記事
No Redux
- 逆に使ってないのはReduxです
- これまでログインユーザー情報などグローバルな状態管理のためになんだかんだReduxを使ってきましたが、
React.createContextReact.useContextによりhooksで同等の実装ができるようになったので試してみました- また、これまで非同期処理についてredux-thunkやredux-sagaを使ってきましたが、これも不要になりました
- 自分も「結局Reduxでやることと一緒ならRedux使えばいいかな?」と思ってましたが、コードもスッキリしてredux関連のライブラリも不要になったので、試しに使ってみるのがおすすめです(サービスの性質にもよるとは思いますが)
example.tsximport React from "react"; type UserContextType = { user: firebase.User | null; loadingUser: boolean; login: () => Promise<void>; logout: () => Promise<void>; export const UserContext = React.createContext<UserContextType>(undefined); export default function UserContextComp({ children }) { const [user, setUser] = React.useState<firebase.User | null>(null); const [loadingUser, setLoadingUser] = React.useState(true); const login = async () => { // pass }; const logout = async () => { // pass }; return ( <UserContext.Provider value={{ user, loadingUser, login, logout, }} > {children} </UserContext.Provider> ); } export const useUser = () => React.useContext(UserContext);immer
- これまでイミュータブルなデータの取り扱いに
immutable.jsを使っていたのですが2018年10月にv4.0.0-rc.12がリリースされて以降ほとんど音沙汰がなくなってしまいましたimmutable.jsのRecordでモデルクラスを作ってデータを操作するのが個人的には使いやすかったので残念ですが、固有メソッドが多く使い方に慣れる必要があるなどとっつきにくい点もあったため、代替としてimmerを検討してみました- まだそんなに本格的に使えてはいませんが、
immerはimmutable.jsに比べるとシンプルなAPIでイミュータブルなデータ操作ができ、アップグレードも定期的に行われているようなので今後はこっちを使ってみようかなと思っていますNext.js
- ツイートした時にOGPの表示に対応させたかったため、SSR対応しやすいNext.jsを選択しました
- 以前、仕事でSSR対応した時にSSRとSPAの両方の挙動に対応した作りにしないといけなくて面倒だったイメージがあり抵抗があったのですが、最新版では
getServerSidePropsが用意されているなど問題なく実装でき、Reactに慣れていれば困るポイントはそこまでなかったです- 実は最初は 静的サイトジェネレーター Gatsby で作っていました
- 前々から興味があったのと動的ページも作れそうという見込みで使ったのですが、あくまでbuild時に動的ページを全てgenerateする(Static Generation)というだけで、アクセス時に静的ページが用意される(Server-side Rendering)のは難しそうだったのでNext.jsに移行しました
- ブログやLPページなどをReactで作りたいのであればGatsbyで良かったと思うのですが、webアプリを作る場合はやはりNext.jsの方が良さげです
- 残骸: https://github.com/mikan3rd/commitly-gatsby-web
emotion
- 以前は自分もscssをBEM記法で書いてましたが、DOMとstyleを別々に記述することや、別々のファイルにあるものをclass名でつなぎ合わせる作業が面倒なので、自分は CSS in JS が好きです
- スタイルのスコープがグローバルな場合はclass名の競合に気をつけないといけなかったり、そもそもclass名の設計を考えること自体が面倒だったりチーム開発の場合は命名規則がズレがち
- styled-componentsの場合はコンポーネントごとにファイルを分けている場合は名前の競合は基本発生しない
- 最近はstyled-componentsで記述していたのですが、Gatsbyがemotionを採用していたこともあり使ってみました
- styled-componentsで個人的に気になる点としてはちょっとスタイルを当てたいだけでも
styled.XXXを書かないといけないのと、その記述がJSXの記述の前後にあると長くなってしまうことでした- emotionの場合はstyled-componentと同等の機能が直感的にインラインスタイルで書けるのが普通に便利だったので今後も使いたい
- 自分が共感した記事
Semantic UI React
- 自分でコンポーネントのスタイルのデザインができないのと、さっと作りたいやっぱりこういうのを使っちゃってます
- BootstrapやMaterial UIよりかっこい気がする(主観的な意見です)
- 問題点はCSSの当て方が
.parent > .childみたいな親子関係で指定されているとoverrideし辛い(!importantを使うハメになる)ことですねFirebase
- イメージ的にはGCPのweb/mobileアプリ向け簡易セットみたいな感じなので、スモールスタートで何か作るにはちょうどいいと思います
- DBはFirestoreを使っていますが、NoSQLなのとドキュメント呼び出しごとの従量課金となるので、設計や使い方は考えておかないとサービスに合わなくなってしまいます(無料枠はありますが)
- バックエンドはCloud Functionで実装しており、フロントと同じくTypeScriptでサッと書けるのが自分としては嬉しいです
- Cloud FunctionではCloud Schedulerを使った定期処理やPubSubをトリガーにした処理も書けるのでやりたいことは問題なくできた
firebase.analytics()firebase.performance()でアナリティクスやパフォーマンスチェックも手軽に有効にできる- SSRの場合、client用の
firebaseとnode用のfirebase-adminを使い分ける必要があるのが微妙Vercel
- Firebaseを使っていたので最初はFirebase Hosting + Cloud Function でSSRのホスティングをしたのですが、体感でも結構遅かったのでやめました(たぶんregionが
us-central1しか対応してないせい)- Next.js公式からおすすめされている通りVercelを使ってホスティングしたらGitHubと連携するだけで簡単にホスティングができました
- また、PRを作るとPreviewとしてPRの内容を反映したホスティングも自動でしてくれるのも良い
GitHub Actions
- Next.jsのデプロイのみVercelのGitHubインテグレーションで行っていますが、型チェック・lintチェック・buildチェック・build結果の保存・buildしたファイルのデプロイなどについてはGitHub Actionsで動かしています
example.yamlname: Node.js CI on: [push] jobs: functions-build: runs-on: macos-latest strategy: matrix: node-version: [12.x] steps: - uses: actions/checkout@main - name: Use Node.js ${{ matrix.node-version }} uses: actions/setup-node@v1 with: node-version: ${{ matrix.node-version }} - name: Get yarn cache directory path id: yarn-cache-dir-path run: echo "::set-output name=dir::$(yarn cache dir)" - uses: actions/cache@v2 id: yarn-cache with: path: ${{ steps.yarn-cache-dir-path.outputs.dir }} key: ${{ runner.os }}-yarn-${{ hashFiles('**/yarn.lock') }} restore-keys: ${{ runner.os }}-yarn- - run: yarn install working-directory: ./functions - run: yarn lint working-directory: ./functions - run: yarn build working-directory: ./functions - name: Archive Production Artifact uses: actions/upload-artifact@main with: name: functions-build-files path: functions/lib functions-deploy: if: github.ref == 'refs/heads/master' needs: functions-build runs-on: macos-latest strategy: matrix: node-version: [12.x] steps: - uses: actions/checkout@main - name: Download Artifact uses: actions/download-artifact@main with: name: functions-build-files path: functions/lib - name: Use Node.js ${{ matrix.node-version }} uses: actions/setup-node@v1 with: node-version: ${{ matrix.node-version }} - name: Get yarn cache directory path id: yarn-cache-dir-path run: echo "::set-output name=dir::$(yarn cache dir)" - uses: actions/cache@v2 id: yarn-cache with: path: ${{ steps.yarn-cache-dir-path.outputs.dir }} key: ${{ runner.os }}-yarn-${{ hashFiles('**/yarn.lock') }} restore-keys: ${{ runner.os }}-yarn- - run: yarn install working-directory: ./functions - name: deploy to Firebase Functions working-directory: ./functions run: yarn deploy:prod --token=${{ secrets.FIREBASE_TOKEN }} env: FIREBASE_TOKEN: ${{ secrets.FIREBASE_TOKEN }}
困ったところ
- GitHub APIの仕様上、GitHub Appを作らないと今回の要件(privateリポジトリを含めたコミットの行数の取得)ができなかったなど、外部のAPIに対する理解と依存する部分とサービスのすり合わせ
- 今回の技術スタックで見本になるようなものが少なかったこと(Reactは書き慣れていたがそれ以外は新しい物を試しに使っていたりしたので)
- 言語別のコミットランキング
- QiitaのようにOGP画像を動的に生成する
- GraphQL + Apollo or NestJS
- 投稿日:2020-08-03T07:09:19+09:00
AWS Amplify での Cognito アクセスは React Context.Provider を使って認証処理を Hooks 化しよう
AWS Cognito は認証・認可を提供している AWS のサービスです。Amplify と統合することで、超高速に構築できます。Cognito を使用することで、API Gateway や S3 など他の AWS サービスとの統合がより簡単にできるようになります。
本記事では、Cognito を使用した React アプリケーションの実装例を紹介します。Cognito へのアクセスには amplify-js というライブラリを使用します。さらに React の Context.Provider という機能を使うことで認証に関連する処理をカスタムフックに集約する方法を考察します。
本記事で実装されたアプリケーションは以下のような動作をします。ログイン、ログアウト、サインアップ、確認メールなど。
本アプリケーションは Vercel にデプロイされています。
https://task-app.geeawa.vercel.app/loginまた、以下の GitHub リポジトリにホストしています。
https://github.com/daisuke-awaji/task-appamplify-js でも React Hooks を使いたい
先週は React アプリに Auth0 でシュッと認証を組み込んで Vercel に爆速デプロイする という記事を書きました。Auth0 のクライアントライブラリは非常に使い勝手がよく、
<Auth0Provider>という Provider で包むだけでuseAuth0フックを使用できるようになります。index.tsximport React from "react"; import ReactDOM from "react-dom"; import { Auth0Provider } from "@auth0/auth0-react"; import "bootstrap/dist/css/bootstrap.min.css"; import { App } from "./App"; ReactDOM.render( <Auth0Provider domain={process.env.REACT_APP_AUTH0_DOMAIN!} clientId={process.env.REACT_APP_AUTH0_CLIENT_ID!} redirectUri={window.location.origin} > <App /> </Auth0Provider>, document.querySelector("#root") );一方で amplify-js にはこのような機能はありません。認証系処理のメソッドは
Authモジュールから取り出して使う必要があります。以下はサインアップするメソッドです。参考: 公式 Sign up, Sign in & Sign outimport { Auth } from "aws-amplify"; async function signUp() { try { const user = await Auth.signUp({ username, password, attributes: { email, phone_number, }, }); console.log({ user }); } catch (error) { console.log("error signing up:", error); } }メソッドしか用意されておらず、ログインユーザの情報などを React アプリでグローバルに保持する仕組みは自分で用意する必要があります。amplify-js でも Auth0 のような使いやすい DX(開発者体験)にしたい! ということが本記事のモチベーションです。つまり、以下のように使用したいわけです。
index.tsximport React from "react"; import ReactDOM from "react-dom"; import App from "./App"; import * as serviceWorker from "./serviceWorker"; import "./index.css"; import CognitoAuthProvider from "./cognito/CognitoAuthProvider"; ReactDOM.render( <CognitoAuthProvider> <App /> </CognitoAuthProvider>, document.getElementById("root") );
<App/>コンポーネントを<CognitoAuthProvider>でラップするだけで、認証系の処理やログインユーザのステートを取り出すuseAuthフックが使えるようにしていきます。LogoutButton.tsximport React from "react"; import { useAuth } from "../../cognito/CognitoAuthProvider"; export default function LogoutButton(props: any) { const { isAuthenticated, signOut } = useAuth(); if (!isAuthenticated) return null; return <Button onClick={() => signOut()} {...props} />; }React.Context とは
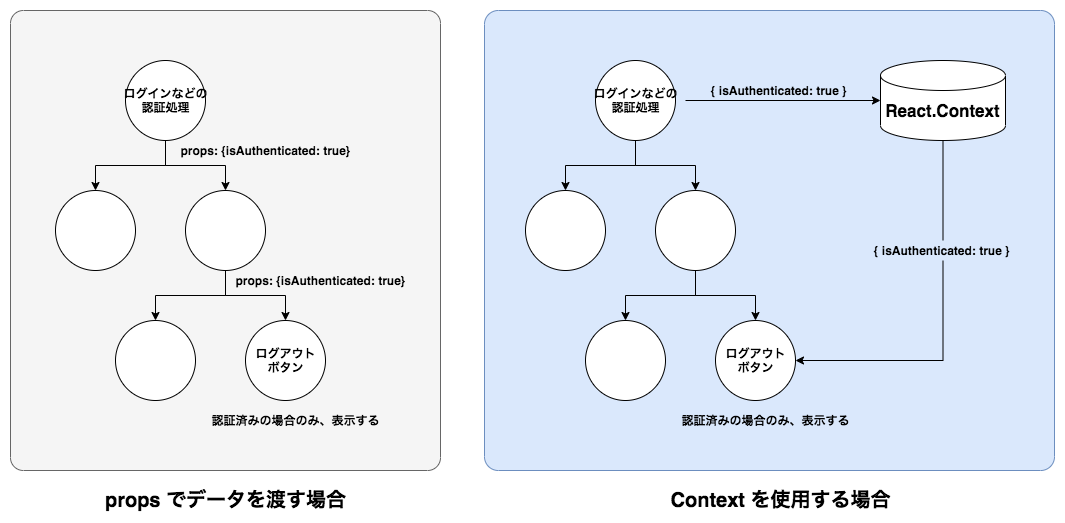
React の Context は配下の子コンポーネントにデータを渡すための便利な方法です。従来は
propsを使用することで、子コンポーネントにデータを渡していましたが、コンポーネントのネストが深くなると非常に面倒で複雑になります。 Context を使用することで 認証 や UI テーマ など多くのコンポーネントが使用する情報を共有して保持・取得できます。
React.createContext
Context オブジェクトを作成します。React がこの Context オブジェクトが登録されているコンポーネントをレンダーする場合、ツリー内の最も近い上位の一致する Provider から現在の Context の値を読み取ります。
const MyContext = React.createContext(defaultValue);Context.Provider
全ての Context オジェクトには Context.Provider コンポーネントが付属しています。これにより Context.Consumer コンポーネントは Context の変更を購読できます。実際のユースケースでは Consumer ではなく、useContext フックを使用することが多いでしょう。
<MyContext.Provider value={/* 何らかの値 */}>useContext
Context オブジェクトを受け取り、その Context の value を返します。
<MyContext.Provider/>が更新されると、このフックはMyContext.Providerに渡された value を使用してコンポーネントを再レンダーします。const value = useContext(MyContext);認証情報を Context に集約する
さて、認証情報として以下のようなメソッドとステートを保持する Context を作っていきます。これらの値があればログイン、ログアウト、サインアップ、確認コード入力の一連の流れが実装できます。
項目 概要 isAuthenticated ログインしているか isLoading ローディング中か(画面制御で使用) user ログインしているユーザの情報 error ログイン処理、サインアップ処理などでエラーがあれば詰める signIn サインインする。 signUp サインアップする。 confirmSignUp サインアップ確認コードを入力する signOut サインアウトする。 State
Context が保持するステートの定義(インタフェース)を作成します。
import { CognitoUser } from "amazon-cognito-identity-js";
export interface AuthState {
  isAuthenticated: boolean;
  isLoading: boolean;
  user?: CognitoUser;
  error?: any;
}
const initialState: AuthState = {
  isAuthenticated: false,
  isLoading: false,
};
const stub = (): never => {
  throw new Error(
    "You forgot to wrap your component in <CognitoAuthProvider>."
  );
};
export const initialContext = {
  ...initialState,
  signIn: stub,
  signUp: stub,
  confirmSignUp: stub,
  signOut: stub,
};
Context
Context オブジェクトを作成します。各コンポーネントから取り出すためのカスタムフック
useAuth()を合わせて作成しておきます。import React, { useContext } from "react"; import { SignUpParams } from "@aws-amplify/auth/lib-esm/types"; import { CognitoUser } from "amazon-cognito-identity-js"; import { AuthState, initialContext } from "./AuthState"; import { LoginOption } from "./CognitoAuthProvider"; interface IAuthContext extends AuthState { signIn: (signInOption: LoginOption) => Promise<void>; signUp: (params: SignUpParams) => Promise<CognitoUser | undefined>; confirmSignUp: (params: any) => Promise<void>; signOut: () => void; } export const AuthContext = React.createContext<IAuthContext>(initialContext); export const useAuth = () => useContext(AuthContext);Provider
最後に Provider には Cognito とやりとりする処理と、認証情報を保持する処理を実装します。
import React from "react";

import { useState, useEffect } from "react";
import { SignUpParams } from "@aws-amplify/auth/lib-esm/types";
import { CognitoUser } from "amazon-cognito-identity-js";

import { Auth } from "aws-amplify";
import Amplify from "aws-amplify";
import { AuthContext } from "./AuthContext";

export type LoginOption = {
  username: string;
  password: string;
};
interface ICognitoAuthProviderParams {
  amplifyConfig: {
    aws_project_region: string;
    aws_cognito_identity_pool_id: string;
    aws_cognito_region: string;
    aws_user_pools_id: string;
    aws_user_pools_web_client_id: string;
    oauth: {
      domain: string;
      scope: string[];
      redirectSignIn: string;
      redirectSignOut: string;
      responseType: string;
    };
    federationTarget: string;
  };
  children: any;
}

export default function CognitoAuthProvider(props: ICognitoAuthProviderParams) {
  Amplify.configure(props.amplifyConfig);
  const [isAuthenticated, setIsAuthenticated] = useState(false);
  const [isLoading, setIsLoading] = useState(true);
  const [error, setError] = useState(null);
  const [user, setUser] = useState<CognitoUser>();

  useEffect(() => {
    checkAuthenticated();
    currentAuthenticatedUser();
  }, []);

  const checkAuthenticated = () => {
    setIsLoading(true);
    Auth.currentSession()
      .then((data) => {
        if (data) setIsAuthenticated(true);
      })
      .catch((err) => console.log("current session error", err))
      .finally(() => {
        setIsLoading(false);
      });
  };

  const currentAuthenticatedUser = async (): Promise<void> => {
    const user: CognitoUser = await Auth.currentAuthenticatedUser();

    setUser(user);
  };

  const signIn = async ({ username, password }: LoginOption): Promise<void> => {
    setIsLoading(true);
    try {
      await Auth.signIn(username, password);
      setIsAuthenticated(true);
    } catch (error) {
      console.log("error signing in", error);
      setError(error);
      setIsAuthenticated(false);
    }
    setIsLoading(false);
  };

  const signUp = async (
    param: SignUpParams
  ): Promise<CognitoUser | undefined> => {
    setIsLoading(true);
    let result;
    try {
      result = await Auth.signUp(param);
      setUser(result.user);
    } catch (error) {
      console.log("error signing up", error);
      setError(error);
    }
    setIsLoading(false);
    return result?.user;
  };

  const confirmSignUp = async ({ username, code }: any): Promise<void> => {
    setIsLoading(true);
    try {
      await Auth.confirmSignUp(username, code);
      setIsAuthenticated(true);
    } catch (error) {
      console.log("error confirming sign up", error);
      setError(error);
    }
    setIsLoading(false);
  };

  const signOut = () => {
    setIsLoading(true);
    Auth.signOut()
      .then(() => {
        setIsAuthenticated(false);
      })
      .catch((err) => console.log("error signing out: ", err))
      .finally(() => {
        setIsLoading(false);
      });
  };

  return (
    <AuthContext.Provider
      value={{
        isAuthenticated,
        isLoading,
        signIn,
        signUp,
        confirmSignUp,
        signOut,
        user,
        error,
      }}
    >
      {props.children}
    </AuthContext.Provider>
  );
}
使用方法
ここまで準備ができれば使用する側はこの
CognitoAuthProviderでコンポーネントをラップすることでuseAuth()フック経由で各種ステートの値またはメソッドを使用できます。amplifyConfig として設定値は外部ファイルで保持しています。
import React from "react";
import ReactDOM from "react-dom";
import App from "./App";
import "./index.css";
import CognitoAuthProvider from "./cognito/CognitoAuthProvider";
import awsconfig from "./aws-exports";

ReactDOM.render(
  <CognitoAuthProvider amplifyConfig={awsconfig}>
    <App />
  </CognitoAuthProvider>,
  document.getElementById("root")
);
amplifyConfig は以下のようなファイルになります。
const amplifyConfig = {
  aws_project_region: "ap-northeast-1",
  aws_cognito_identity_pool_id: "ap-northeast-1:12345678909876543234567890",
  aws_cognito_region: "ap-northeast-1",
  aws_user_pools_id: "ap-northeast-1_xxxxxxxx",
  aws_user_pools_web_client_id: "xxxxxxxxxxxxxxx",
  oauth: {
    domain: "mydomain.auth.ap-northeast-1.amazoncognito.com",
    scope: [
      "phone",
      "email",
      "openid",
      "profile",
      "aws.cognito.signin.user.admin",
    ],
    redirectSignIn: "http://localhost:3000/",
    redirectSignOut: "http://localhost:3000/logout/",
    responseType: "code",
  },
  federationTarget: "COGNITO_USER_POOLS",
};

export default amplifyConfig;
ログアウトボタンのコンポーネントです。コードベースをシンプルにできました。
LogoutButton.tsximport React from "react"; import { useAuth } from "../../cognito/CognitoAuthProvider"; export default function LogoutButton(props: any) { const { isAuthenticated, signOut } = useAuth(); if (!isAuthenticated) return null; return <Button onClick={() => signOut()} {...props} />; }さいごに
React の Context を使用することで、認証情報などのグローバルな値を一元的に管理できるようになります。
ただ、 Context は多くのコンポーネントからアクセスされる場合に使用することとしましょう。
Context はコンポーネントの再利用をより難しくする為、慎重に利用してください。本記事で紹介した React.Context を使用したカスタムフックを使用するという発想はそのうち amplify-js に PullRequest しようと思います。Cognito ユーザ(または Amplify ユーザ)が個別にこのような実装をしなくとも、ライブラリとして提供し、すぐに簡単なインタフェースで認証処理を実現できるようにしていきたいですね。

- 投稿日:2020-08-03T02:47:32+09:00
【CSSinJS】 emotionまとめ
概要
create-react-app(ts)での実装でcomponentのstyleをemotionを使って実現したのでそれの共有。
そもそもemotionって何?
JSXファイルの中にスタイルを直接書き込むタイプのCSSinJSライブラリの一つ
最近だとstyled-componentsはよく聞きますよね。。その中で注目度上げてきてるemotionを発見!!
emotionの機能としてとてもCSS prop形式というのがあるんですが、
なんとstyled-componentsと比べてコンポーネントのマウント速度で約4倍、レンダリング速度で約3倍は速いらしい!
使わないわけにいかないと思い使ってみました。決まり事
emotionをreactで使うにあたって決まりごとがある
- emotionを使う場合は、`JSX Pragma`が必要
- emotionを使っているコンポーネントではフラグメントを使えない
ここだけ守ればemotionは通常に動作するはずです。
二つ目はなんとなくわかると思うので、一つ目を少し詳しく説明すると
JSX Pragmaとは簡単にいうと「僕, emotionで使ってJSX書いてるよ。少し特殊だからEmotion用のコンパイラ通します」
っていうのを明示的に表しています。emotionを使って書いたJSXファイルの冒頭に下記のように記述する感じです!/** @jsx jsx */ import { jsx } from '@emotion/core';※ [注意] 親コンポーネントで JSX Pragma を使 用したら、子のコンポーネントでも JSX Pragma を使わなければなりません
基本的な使い方
適用したいスタイルを定義する。
その変数を適用したいElementにCSS prop形式を使って渡してあげる。
これだけです!!/** @jsx jsx */ import React from 'react'; import { css, jsx } from '@emotion/core'; const heading = css` color: #000; `; export const Sample: React.FC = () => { return <p css={heading}>サンプル</p> }共通スタイル適用
少し使い方を工夫すると以下のように、
共通のスタイルを他のスタイルの変数にextendsみたいなことができます!
直感的でわかりやすいですよね!/** @jsx jsx */ import React from 'react'; import { css, jsx } from '@emotion/core'; const base = css` margin: 0; `; const heading = css` ${base} color: #000; `; export const Sample: React.FC = () => { return <p css={heading}>サンプル</p> }その他の情報
メディアクエリだって簡単!
/** @jsx jsx */
import React from 'react';
import { css, jsx } from '@emotion/core';

const heading = css`
  font-size: 30px;
  @media (min-width: 420px) {
    font-size: 50px;
  }
`;

export const Sample: React.FC = () => {
  return <p css={heading}>サンプル</p>
}
イベントだって簡単!!
/** @jsx jsx */
import React from 'react';
import { css, jsx } from '@emotion/core';

const heading = css`
  opacity: 1;
  &:hover {
    opacity: 0.5;
  }
`;

export const Sample: React.FC = () => {
  return <p css={heading}>サンプル</p>
}
アニメーションだって簡単!!!
/** @jsx jsx */
import React from 'react';
import { css, jsx } from '@emotion/core';

const heading = css`
  animation: fadeIn 1s linear;
  @keyframes fadeIn {
    0% {
      opacity: 0;
    }
    100% {
      opacity: 1;
    }
  }
`;

export const Sample: React.FC = () => {
  return <p css={heading}>サンプル</p>
}
- 投稿日:2020-08-03T02:09:51+09:00
遺伝的アルゴリズムをブラウザで実行できるフレームワークの実装
遺伝的アルゴリズムをブラウザで実行するためのJavaScript用フレームワークを実装しました。
GA Framework
https://github.com/technote-space/ga-frameworkテンプレートリポジトリ
https://github.com/technote-space/ga-framework-template技術・特徴
Web Worker
遺伝的アルゴリズムの計算を同じプロセスで行うとブラウザの動作が固まってしまうので Web Woker を使用して別プロセスで計算します。
欠失・挿入
遺伝子長の変化を伴う突然変異を考慮しています。
島モデル
多様性の保持のための島モデルを標準でサポートしています。
またテンプレートリポジトリには異文化型島モデルの考えを採用した世代交代モデルも実装しており、島のいくつかに混ぜることでより多様性が必要なネットワーク構造を持つモデルなどで有効な可能性があります(未検証)。Minimal Generation Gap
テンプレートリポジトリには世代交代として MGG が実装されています。
淘汰圧の強い SGA は普段使わないので用意してないですが、実装して使用することはできます。デモ
Hello,World! 文字列の作成
- 遺伝子型:整数列
- 表現型:文字列
HSP3で遺伝的アルゴリズムをした話 〜遺伝的アルゴリズムの概略と「ムダにクリエイティブ」な"Hello,World!"〜
こちらの記事の例と似たものをこのフレームワークで実装したものです。
「Hello,World!」 という文字列を作成します。デモ
https://technote-space.github.io/ga-framework/samples/hello-genetic-algorithm/実装
https://github.com/technote-space/hello-genetic-algorithm
離れていても心は一つ
- 遺伝子型:実数列
- 表現型:画像
遺伝的アルゴリズムを使って「離れていても心は一つ」を自動化してみた in Python
こちらの記事の例と似たものをこのフレームワークで実装したものです。
いくつかの円で入力画像に近い画像を作成します。デモ
https://technote-space.github.io/ga-framework/samples/auto-figure-ground/
アルゴリズム自動生成
- 遺伝子型:整数列
- 表現型:グラフ構造
研究中のアルゴリズム生成自動化技術をこのフレームワークで実装したものです。
階乗、フィボナッチなどを求めるプログラムを自動生成します。デモ
https://technote-space.github.io/ga-framework/samples/automatic-programming/
利用方法の詳細
Under Construction...