- 投稿日:2020-07-31T22:45:24+09:00
[Swift]ContainerView周りの値渡し
意外とContainerViewでの値渡しに関する記事が少なかったので、書いておきます...
親ビュー -> 子ビュー
ParentViewController.swift//値を渡したい処理で以下を実行 let child = self.children[0] as! ChildController child.textValue = "Hoge"ChildController.swiftvar textValue: String = "Huga" //実行後 print(textValue) //->Hoge子ビュー -> 親ビュー
ParentViewController.swiftvar textValue: String = "huga" //実行後 print(textValue) //->hogeChildViewController.swift//値を渡したい処理で以下を実行 let parent = self.parent as! ParentViewController parent.textValue = "hoge"子ビュー -> 子ビュー
FirstViewController.swift//値を渡したい処理で以下を実行 //一度親を通す let parent = self.parent as! ParentViewController let second = parent.children[0] as! SecondViewController second.textValue = "Hoge!"SecondViewController.swiftvar textValue = "Huga?" //実行後 print(textValue) //-> Hoge!最後に
子ビューを制定する、
parent.swiftlet child = self.children[0] as! ChildViewControllerのようなコードの数字(上のは0)はなんでもいいと思います。もしエラーが出たらその都度変えてみてください。(競合するとエラーが出る)
間違えているところがあったら教えてください。
- 投稿日:2020-07-31T22:45:24+09:00
[Swift]Container View周りの値渡し
意外とContainerViewでの値渡しに関する記事が少なかったので、書いておきます...
親ビュー -> 子ビュー
ParentViewController.swift//値を渡したい処理で以下を実行 let child = self.children[0] as! ChildController child.textValue = "Hoge"ChildController.swiftvar textValue: String = "Huga" //実行後 print(textValue) //->Hoge子ビュー -> 親ビュー
ParentViewController.swiftvar textValue: String = "huga" //実行後 print(textValue) //->hogeChildViewController.swift//値を渡したい処理で以下を実行 let parent = self.parent as! ParentViewController parent.textValue = "hoge"子ビュー -> 子ビュー
FirstViewController.swift//値を渡したい処理で以下を実行 //一度親を通す let parent = self.parent as! ParentViewController let second = parent.children[0] as! SecondViewController second.textValue = "Hoge!"SecondViewController.swiftvar textValue = "Huga?" //実行後 print(textValue) //-> Hoge!最後に
子ビューを制定する
parent.swiftlet child = self.children[0] as! ChildViewControllerのようなコードの数字(上のは0)はなんでもいいと思います。もしエラーが出たらその都度変えてみてください。(競合するとエラーが出る)
間違えているところがあったら教えてください。
- 投稿日:2020-07-31T21:19:32+09:00
TextViewの編集箇所がキーボードで隠れないようにする
このコードをコピーするだけで実装できます。
override func viewDidLoad() {
        super.viewDidLoad()
        // Do any additional setup after loading the view.

        let notificationCenter = NotificationCenter.default
            notificationCenter.addObserver(self, selector: #selector(adjustForKeyboard), name: UIResponder.keyboardWillHideNotification, object: nil)
            notificationCenter.addObserver(self, selector: #selector(adjustForKeyboard), name: UIResponder.keyboardWillChangeFrameNotification, object: nil)
}

@objc func adjustForKeyboard(notification: Notification) {
        guard let keyboardValue = notification.userInfo?[UIResponder.keyboardFrameEndUserInfoKey] as? NSValue else { return }
        let keyboardScreenEndFrame = keyboardValue.cgRectValue
        let keyboardViewEndFrame = view.convert(keyboardScreenEndFrame, from: view.window)

        if notification.name == UIResponder.keyboardWillHideNotification {
            textView.contentInset = .zero
        } else {
            //textViewの下にキーボードの高さ分の余白を作る
            textView.contentInset = UIEdgeInsets(top: 0, left: 0, bottom: keyboardViewEndFrame.height - view.safeAreaInsets.bottom, right: 0)
        }
        //スクロールインジゲーターが表示される長さ
        textView.scrollIndicatorInsets = textView.contentInset
        //編集箇所の高さ
        let selectedRange = textView.selectedRange
        //編集箇所が見えるようにする
        textView.scrollRangeToVisible(selectedRange)
    }
コメントで説明を書いていますが、Swiftの経験が浅いため、間違いがあるかもしれません。
英語の記事
- 投稿日:2020-07-31T12:49:49+09:00
【Swift5】UserDefaultsを使ったTodoアプリ
はじめに
だいぶ前に書いた前回の記事の情報が古くなり、また掲載しているコードも今ならもう少し綺麗にできるなと思ったので更新記事を書くことにしました。
注意点
UserDefaults.synchronize()について
いつの間にか公式ドキュメントにて「使うべきではない」と明示されてました。どうやらiOS12のリリースノートでも告知されていたようですね。なので本記事でも使わないことにします。
ただ、同期が少し遅い気がします。例えばチェックマークをつけて即座にキルすると次回起動時に反映されたりされてなかったりします(TODOの追加、編集、削除も同様です)。手元の環境では大体5秒くらい待てば確実にストレージに保存されてる気がします(僕のコードの問題かもしれませんが・・・)。
Todoタイトルをアラート内で記入させることについて
あまり話をややこしくしないために、前回の「新しいTodoのタイトルはアラートで記入する」という仕様はそのままにして、今回は「Todoタイトルの編集もアラートで行う」という仕様も追加しました。
ただし、このようにアラートをmodal viewの如く扱うのはHuman Interface Guidelines的にはあまりよくないかもしれません。あくまでアプリに関する重要な情報や問題を伝えるためのものであり、そもそもTODOを追加したり編集するたびにアラート(やmodal view)を表示させるのもUXとして好ましくはないでしょう。
設計
今回はなるべく「単一責務の原則」を意識しました。各オブジェクトが変更されるとしたら、その理由はただひとつでなければなりません。
UserDefaultsとアプリの間のやりとりは
TodoRepositoryを介して行います。取得したTODOはViewModelで保持され、view層に適宜展開されます。TODOの変更はViewModelを介してリポジトリまで通知され、ストレージに書き込まれます。ソースコード
Todo前回はTodoモデルをclassで実装していましたが、参照型である必要はないので今回はstructで実装します。
Todo.swiftimport Foundation struct Todo: Codable { static let storeKey = "Todo" let id: String let title: String let isDone: Bool init(id: String = UUID().uuidString, title: String, isDone: Bool) { self.id = id self.title = title self.isDone = isDone } }
storeKeyはUserDefaultsに保存するためのキーで、idは個々のTODOを区別するためのものです。この辺はもしかしたら工夫の余地があるかもしれません。
TodoRepositoryUserDefaultsに対するCRUD操作を担うclassです。エラーは全て
guard let hoge = try? ...という形で潰しています。TodoRepository.swiftimport Foundation final class TodoRepository { private let userDefaults = UserDefaults.standard private let jsonEncoder = JSONEncoder() private let jsonDecoder = JSONDecoder() func allTodos() -> [Todo] { guard let data = userDefaults.data(forKey: Todo.storeKey), let todos = try? jsonDecoder.decode([Todo].self, from: data) else { return [] } return todos } func save(todos: [Todo]) { guard let data = try? jsonEncoder.encode(todos) else { return } userDefaults.set(data, forKey: Todo.storeKey) } }
ViewModel今回の設計では、TODOの追加、変更、削除はどれも
currentTodosの変更に置き換えられ、都度リポジトリはcurrentTodosを丸ごと保存します。ViewModel.swiftimport Foundation final class ViewModel { private let repository: TodoRepository private(set) var currentTodos: [Todo] { didSet { repository.save(todos: currentTodos) } } init() { repository = TodoRepository() currentTodos = repository.allTodos() } func add(todo: Todo) { currentTodos.append(todo) } func deleteTodo(for id: String) { guard let index = currentTodos.firstIndex(where: { $0.id == id }) else { return } currentTodos.remove(at: index) } func updateTodo(for id: String, to newTodo: Todo) { guard let index = currentTodos.firstIndex(where: { $0.id == id }) else { return } currentTodos[index] = newTodo } }
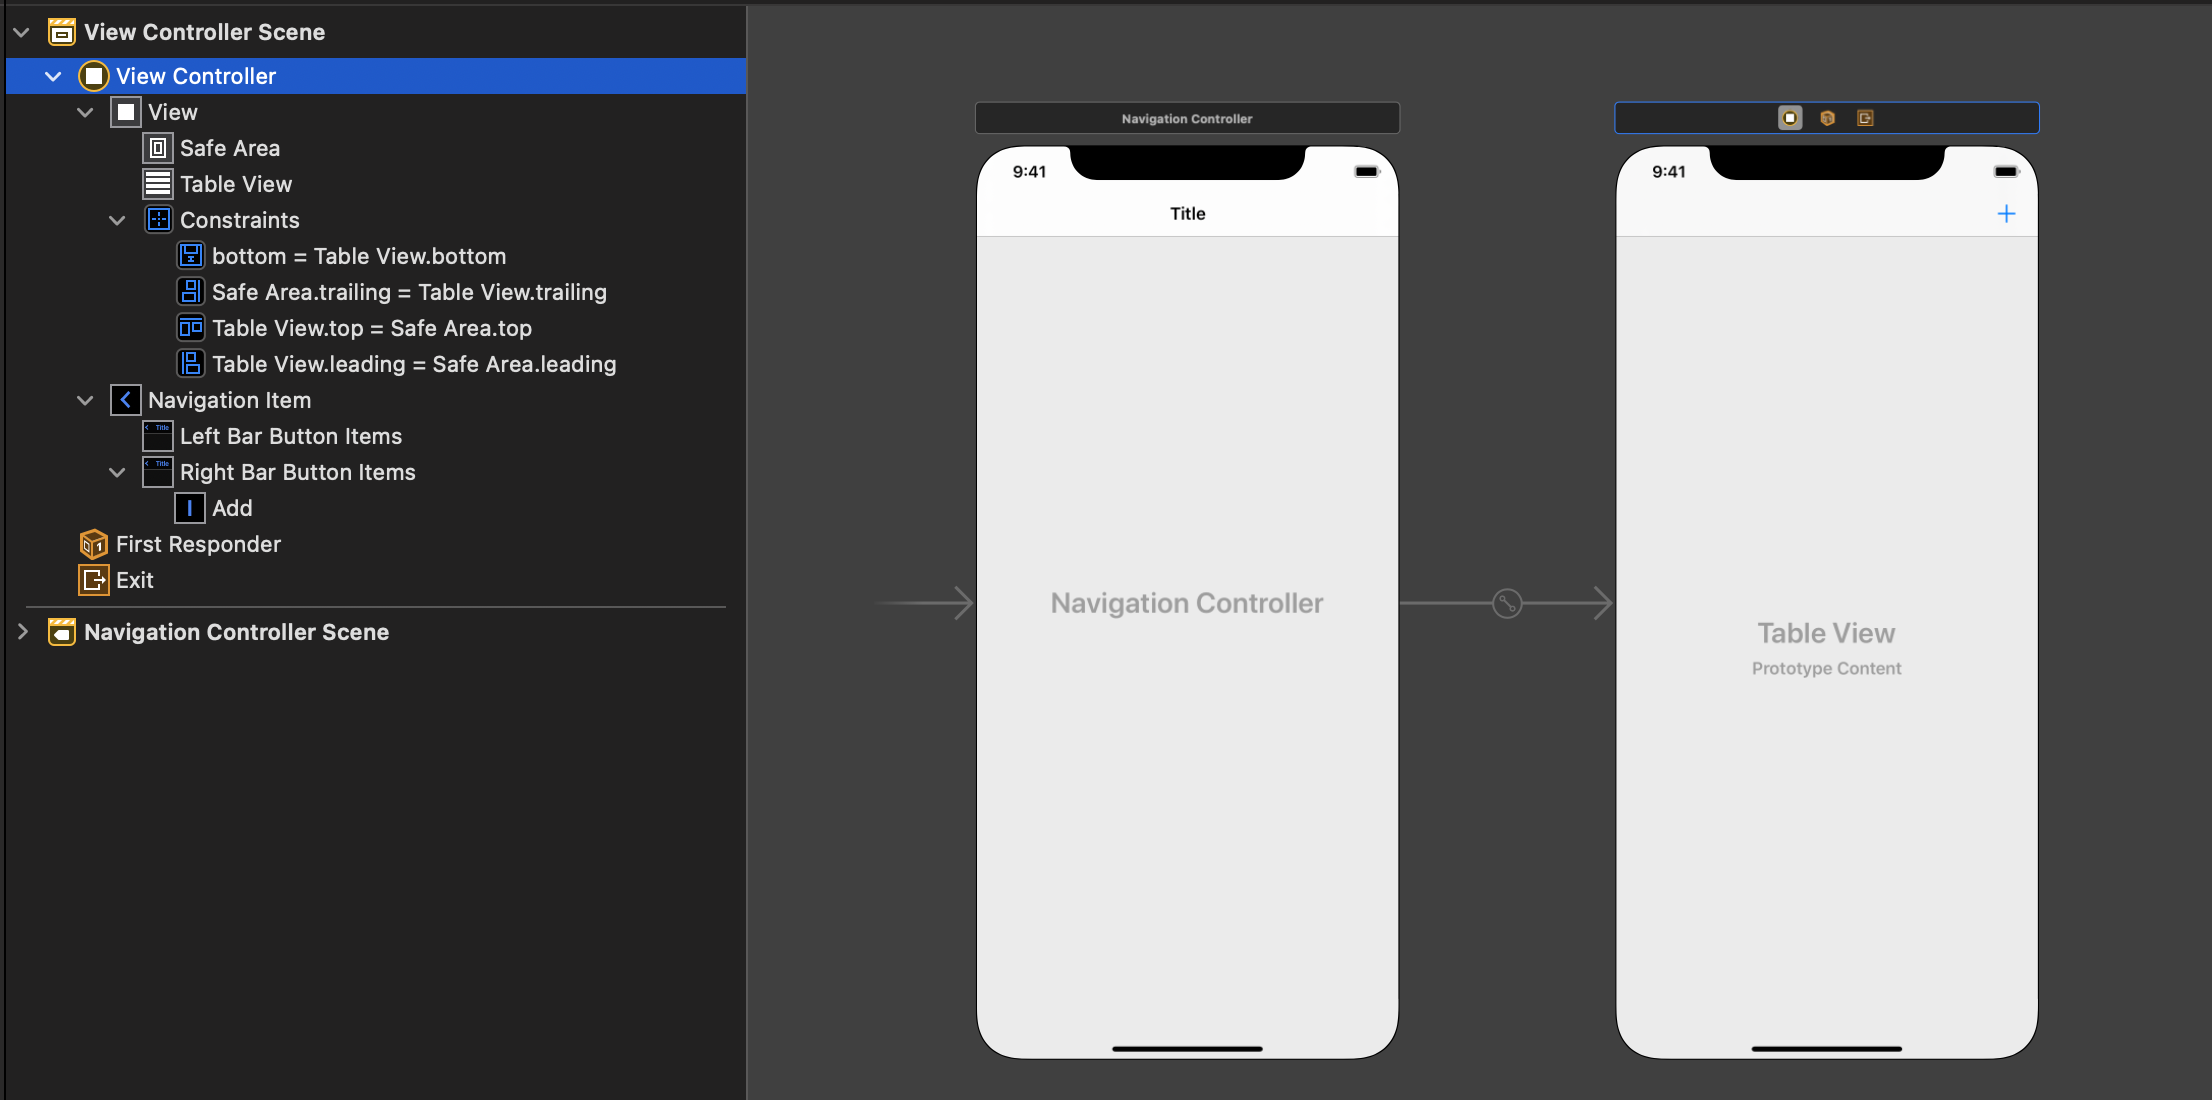
Main.storyboardこんな感じです:
以前は
UITableViewControllerを使ってましたが、今回はUIViewControllerにtable viewを設置しました。どちらでも大差ないと思います。
UIAlertController+Extensionテキストフィールド付きのアラートの扱いが少し面倒くさかったので少し便利なExtensionを実装してみました。
UIAlertController+Extension.swiftimport UIKit extension UIAlertController { static func makeAlertWithTextField(title: String?, message: String?, textFieldConfig: ((UITextField) -> Void)?) -> UIAlertController { let alert = UIAlertController(title: title, message: message, preferredStyle: .alert) alert.addTextField(configurationHandler: textFieldConfig) return alert } func addDefaultActionWithText(title: String?, textHandler: ((String) -> Void)?) -> UIAlertController { let action = UIAlertAction(title: title, style: .default) { [weak self] _ in guard let text = self?.textFields?.first?.text else { preconditionFailure("The Alert Controller has no text fields") } textHandler?(text) } addAction(action) return self } func addCancelAction() -> UIAlertController { addAction(UIAlertAction(title: "Cancel", style: .cancel, handler: nil)) return self } func present(from viewController: UIViewController) { viewController.present(self, animated: true, completion: nil) } }後にも登場しますが、こんな感じで使うことができます:
UIAlertController
    .makeAlertWithTextField(title: "Add Todo", message: nil, textFieldConfig: { $0.placeholder = "Title" })
    .addDefaultActionWithText(title: "OK") { [weak self] text in
        guard !text.isEmpty else { return }
        self?.add(todo: Todo(title: text, isDone: false))
}
.addCancelAction()
.present(from: self)
ViewController少し長いので分割します。
冒頭はこんな感じです:
ViewController.swiftimport UIKit final class ViewController: UIViewController { @IBOutlet private weak var tableView: UITableView! private var viewModel: ViewModel! private let reuseCellId = "TodoCell" override func viewDidLoad() { super.viewDidLoad() viewModel = ViewModel() tableView.delegate = self tableView.dataSource = self } @IBAction private func onAddButtonTapped(_ sender: Any) { UIAlertController .makeAlertWithTextField(title: "Add Todo", message: nil, textFieldConfig: { $0.placeholder = "Title" }) .addDefaultActionWithText(title: "OK") { [weak self] text in guard !text.isEmpty else { return } self?.add(todo: Todo(title: text, isDone: false)) } .addCancelAction() .present(from: self) } }次にviewレベルでの各種TODO操作のメソッドを実装します。
ViewController.swiftprivate extension ViewController { func todo(forRowAt indexPath: IndexPath) -> Todo { viewModel.currentTodos[indexPath.row] } func add(todo: Todo) { viewModel.add(todo: todo) tableView.reloadData() } func updateTodo(forRowAt indexPath: IndexPath, to newTodo: Todo) { viewModel.updateTodo(for: todo(forRowAt: indexPath).id, to: newTodo) tableView.reloadData() } func deleteTodo(forRowAt indexPath: IndexPath) { viewModel.deleteTodo(for: todo(forRowAt: indexPath).id) tableView.reloadData() } }余談ですが、僕はこのようにextensionを使ってグルーピングするのが大好きです。拡張してる感が良いですね。
次にtable viewのdelegateが来ます。チェックマークの切り替えやタイトルの編集は全てTODOオブジェクトを新たに作り直しています。
ViewController.swiftextension ViewController: UITableViewDelegate { func tableView(_ tableView: UITableView, didSelectRowAt indexPath: IndexPath) { let selectedTodo = todo(forRowAt: indexPath) let newTodo = Todo( id: selectedTodo.id, title: selectedTodo.title, isDone: !selectedTodo.isDone ) updateTodo(forRowAt: indexPath, to: newTodo) } func tableView(_ tableView: UITableView, leadingSwipeActionsConfigurationForRowAt indexPath: IndexPath) -> UISwipeActionsConfiguration? { let deleteAction = UIContextualAction( style: .destructive, title: "Delete" ) { [weak self] (_, _, _) in self?.deleteTodo(forRowAt: indexPath) } return .init(actions: [deleteAction]) } func tableView(_ tableView: UITableView, trailingSwipeActionsConfigurationForRowAt indexPath: IndexPath) -> UISwipeActionsConfiguration? { let oldTodo = todo(forRowAt: indexPath) let editAction = UIContextualAction(style: .normal, title: "Edit") { [weak self] (_, _, _) in guard let self = self else { return } UIAlertController .makeAlertWithTextField(title: "Edit Todo", message: nil, textFieldConfig: { $0.placeholder = "New Title" }) .addDefaultActionWithText(title: "OK") { [weak self] newTitle in guard !newTitle.isEmpty else { return } let newTodo = Todo(id: oldTodo.id, title: newTitle, isDone: oldTodo.isDone) self?.updateTodo(forRowAt: indexPath, to: newTodo) } .addCancelAction() .present(from: self) } editAction.backgroundColor = .systemGreen return .init(actions: [editAction]) } }最後にdata sourceです。
ViewController.swiftextension ViewController: UITableViewDataSource { func tableView(_ tableView: UITableView, numberOfRowsInSection section: Int) -> Int { viewModel.currentTodos.count } func tableView(_ tableView: UITableView, cellForRowAt indexPath: IndexPath) -> UITableViewCell { let cell = UITableViewCell(style: .default, reuseIdentifier: reuseCellId) cell.textLabel?.text = todo(forRowAt: indexPath).title cell.accessoryType = todo(forRowAt: indexPath).isDone ? .checkmark : .none return cell } }もし何かあれば遠慮なく指摘していただけると幸いです。
参考
- https://qiita.com/uhooi/items/429cac9b798b9c0937ae
- https://developer.apple.com/documentation/foundation/userdefaults/1414005-synchronize
- https://developer.apple.com/documentation/macos-release-notes/foundation-release-notes?preferredLanguage=occ
- https://developer.apple.com/design/human-interface-guidelines/ios/views/alerts/
- 投稿日:2020-07-31T07:57:42+09:00
initとは
ググったら一発でわかりやすい記事が出てくるswiftのinitについて。
Modelでファイル作ってプロパティ定義した後にいつもこいつがいる。
initっていうんだからとりあえず初期化してんだろーなーとは勘で考えますが、なんか気になったので書きます。
【イニシャライザ】
型(クラス、構造体、列挙体)のインスタンスを初期化(initialize)する特殊なメソッドのこと
class User {
    var id: String
    var fullName: String

    init(id: String, fullName: String) {
        self.id = id
        self.fullName = fullName
    }
}
init(){}の中括弧の中で、宣言した値を初期化してます。
- 投稿日:2020-07-31T07:24:05+09:00
字幕をAR空間に飛ばす SFSpeechRecognizer
字幕をAR空間に飛ばす pic.twitter.com/ZNKWLu0art
— MLBoy_Daisuke (@JackdeS11) July 30, 2020実装
SFSpeechRecognizerのrecognitionTaskの結果を完了ハンドラ内でSCNTextにして、SCNActionで動かします。
let speechRecognizer = SFSpeechRecognizer(locale: Locale(identifier: "ja-JP"))
speechRecognizer?.delegate = self
let recognitionRequest = SFSpeechAudioBufferRecognitionRequest()

let recognitionTask = speechRecognizer?.recognitionTask(with: recognitionRequest) { result, error in
      //認識タスク完了時に呼ばれる
      let recognizedText = result.bestTranscription.formattedString
      let text = SCNText(string: cutText, extrusionDepth: 2)
      let textNode = SCNNode(geometry: text)
      text.firstMaterial?.diffuse.contents = UIColor.randomColor
      self.sceneView.scene.rootNode.addChildNode(textNode)
      //ランダムな位置にテキストを置いて、動かす
      let random = Float.random(in: -100...100)
      let random2 = Float.random(in: -100...100)
      let random3 = Float.random(in: -200 ... -50)
      textNode.position = SCNVector3(x: 20, y: random2, z: random3)
      textNode.runAction(SCNAction.move(to: SCNVector3(x: -100, y: random, z: random3), duration: 5),completionHandler: {
      textNode.removeFromParentNode()
      })
機械学習やAR関連の技術情報を発信しています。
MLBoysだいすけ https://twitter.com/JackdeS11
MLBoysゆうじ https://twitter.com/oka_yuujiCore MLやCreate ML、Vision、ARKitを使ったアプリを作っています。
rockyshikoku@gmail.com
- 投稿日:2020-07-31T07:24:05+09:00
字幕をAR空間に飛ばす with Speech Recognizer。
コエカタマリン
字幕をAR空間に飛ばす pic.twitter.com/ZNKWLu0art
— MLBoy_Daisuke (@JackdeS11) July 30, 2020Speech Recognizerで発話認識。
iOS13から、デバイス上での発話認識が可能です。
ViewController.swiftprivate var speechRecognizer:SFSpeechRecognizer? private var recognitionRequest: SFSpeechAudioBufferRecognitionRequest? private var recognitionTask: SFSpeechRecognitionTask? private var audioEngine:AVAudioEngine? private func speech(){ speechRecognizer = SFSpeechRecognizer(locale: Locale.current) ?? SFSpeechRecognizer(locale: Locale(identifier: "ja-JP")) speechRecognizer?.delegate = self audioEngine = AVAudioEngine() //InfoPlistでスピーチの許可が必要です。 SFSpeechRecognizer.requestAuthorization { authStatus in OperationQueue.main.addOperation { switch authStatus { case .authorized: self.suggestAnimation("Say something") case .denied: self.suggestAnimation("Please allow access to speech recognition") case .restricted: self.suggestAnimation("Speech recognition restricted on this device") case .notDetermined: self.suggestAnimation("Please allow access to speech recognition") default: break } } } do { try startRecording() } catch { suggestAnimation("Could not recording") } } private func startRecording() throws { // 前のタスクがあった場合キャンセル recognitionTask?.cancel() self.recognitionTask = nil // オーディオセッションの定義 let audioSession = AVAudioSession.sharedInstance() try audioSession.setCategory(.record, mode: .measurement, options: .duckOthers) try audioSession.setActive(true, options: .notifyOthersOnDeactivation) let inputNode = audioEngine!.inputNode // speech recognition request. recognitionRequest = SFSpeechAudioBufferRecognitionRequest() guard let recognitionRequest = recognitionRequest else { fatalError("Unable to create a SFSpeechAudioBufferRecognitionRequest object") } recognitionRequest.shouldReportPartialResults = true // デバイス上での処理が可能なのはiOS13以上。 if #available(iOS 13, *) { recognitionRequest.requiresOnDeviceRecognition = false } // 認識タスクを作る。完了ハンドラ内で、テキストをARにするファンクションを。 recognitionTask = speechRecognizer?.recognitionTask(with: recognitionRequest) { result, error in var isFinal = false if let result = result { // Update the text view with the results. isFinal = result.isFinal print("Text \(result.bestTranscription.formattedString)") let recognizedText = result.bestTranscription.formattedString self.setText(recognizedText) } if error != nil || isFinal { // Stop recognizing speech if there is a problem. self.audioEngine?.stop() inputNode.removeTap(onBus: 0) self.recognitionRequest = nil self.recognitionTask = nil } } // マイクのインプットを設定。完了ハンドラ内でSppech Reconizerに音声インプットを渡す。そしてオーディオエンジンをスタート。 let recordingFormat = inputNode.outputFormat(forBus: 0) inputNode.installTap(onBus: 0, bufferSize: 1024, format: recordingFormat) { (buffer: AVAudioPCMBuffer, when: AVAudioTime) in self.recognitionRequest?.append(buffer) } audioEngine?.prepare() try audioEngine?.start() // Let the user know to start talking. }認識結果をSCNNodeにして飛ばす
そのままだと、オーディオエンジンのスタート時からの発話全てが毎回結果として返ってきて、同じテキストが大量に返ってきたので、差分だけ表示するようにしてます。
認識結果をSCNTextにして、SCNNodeとして、SCNActionで動かしています。
ViewContoroller.swiftprivate var reccentTextCount:Int = 0 private func setText(_ result:String){ switch speechMode { // ニコニコみたいに横に流す場合 case .horizontal: if result.count >= reccentTextCount { let index = result.index(result.startIndex, offsetBy: reccentTextCount) let cutText = result[index...] reccentTextCount = result.count let text = SCNText(string: cutText, extrusionDepth: 2) text.flatness = 0.3 text.chamferRadius = 0.3 let textNode = SCNNode(geometry: text) text.firstMaterial?.diffuse.contents = UIColor.randomColor self.sceneView.scene.rootNode.addChildNode(textNode) let random = Float.random(in: -100...100) let random2 = Float.random(in: -100...100) let random3 = Float.random(in: -200 ... -50) textNode.position = SCNVector3(x: 20, y: random2, z: random3) textNode.runAction(SCNAction.move(to: SCNVector3(x: -100, y: random, z: random3), duration: 5),completionHandler: { textNode.removeFromParentNode() }) } // 雨みたいに降らす場合 case .rain: if result.count >= reccentTextCount { if reccentTextCount == 0 { reccentTextCount = result.count let text = SCNText(string: result, extrusionDepth: 5) text.flatness = 0.5 text.chamferRadius = 0.5 let textNode = SCNNode(geometry: text) text.firstMaterial?.diffuse.contents = UIColor.randomColor self.sceneView.scene.rootNode.addChildNode(textNode) let random2 = Float.random(in: -100...100) let random3 = Float.random(in: -200 ... -50) textNode.position = SCNVector3(x: 0, y: 100, z: random3) textNode.runAction(SCNAction.move(to: SCNVector3(x: random2, y: 0, z: random3), duration: 5),completionHandler: { textNode.removeFromParentNode() }) }else{ let randomNumber = Int.random(in: 0...(reccentTextCount - 1)) let randomStartIndex = result.index(result.startIndex,offsetBy: randomNumber) let randomEndIndex = result.index(randomStartIndex,offsetBy: Int.random(in: 1...(result.count - randomNumber)) - 1) let cutText = result[randomStartIndex...randomEndIndex] reccentTextCount = result.count let text = SCNText(string: cutText, extrusionDepth: 5) text.flatness = 0.5 text.chamferRadius = 0.5 let textNode = SCNNode(geometry: text) text.firstMaterial?.diffuse.contents = UIColor.randomColor self.sceneView.scene.rootNode.addChildNode(textNode) let random2 = Float.random(in: -100...100) let random3 = Float.random(in: -500 ... -50) textNode.position = SCNVector3(x: random2, y: 100, z: random3) textNode.runAction(SCNAction.move(to: SCNVector3(x: random2, y: 0, z: random3), duration: 3),completionHandler: { textNode.removeFromParentNode() }) } } // ランダム case .laser: if result.count >= reccentTextCount { let index = result.index(result.startIndex, offsetBy: reccentTextCount) let cutText = result[index...] reccentTextCount = result.count let text = SCNText(string: cutText, extrusionDepth: 2) text.flatness = 0.3 text.chamferRadius = 0.3 let textNode = SCNNode(geometry: text) text.firstMaterial?.diffuse.contents = UIColor.randomColor self.sceneView.scene.rootNode.addChildNode(textNode) let random = Float.random(in: -100...100) let random2 = Float.random(in: -100...100) let random3 = Float.random(in: -200 ... -50) textNode.position = SCNVector3(x: 20, y: random2, z: random3) textNode.runAction(SCNAction.move(to: SCNVector3(x: -100, y: random, z: random3), duration: 5),completionHandler: { textNode.removeFromParentNode() }) } } }MLBoys Make Your World Beautiful with ML
MLBoysのTwitterをフォローしてください。お願いします。
だいすけ https://twitter.com/JackdeS11
ゆうじ https://twitter.com/oka_yuujiCore MLやCreate ML、Vision、ARKitを使ったアプリを作っています。
エッジデバイス(iOS)で機械学習のモデルを使いたい、などありましたら、こちらのメールまでご相談ください。
rockyshikoku@gmail.comLooks Good To Me(わるくないね)おねがいします。
↓
そんじゃーね。
- 投稿日:2020-07-31T07:24:05+09:00
字幕をAR空間に飛ばす with SFSpeechRecognizer。
字幕をAR空間に飛ばす pic.twitter.com/ZNKWLu0art
— MLBoy_Daisuke (@JackdeS11) July 30, 2020実装
SFSpeechRecognizerのrecognitionTaskの結果を完了ハンドラ内でSCNTextにして、SCNActionで動かします。
let speechRecognizer = SFSpeechRecognizer(locale: Locale(identifier: "ja-JP"))
speechRecognizer?.delegate = self
let recognitionRequest = SFSpeechAudioBufferRecognitionRequest()

let recognitionTask = speechRecognizer?.recognitionTask(with: recognitionRequest) { result, error in
      //認識タスク完了時に呼ばれる
      let recognizedText = result.bestTranscription.formattedString
      let text = SCNText(string: cutText, extrusionDepth: 2)
      let textNode = SCNNode(geometry: text)
      text.firstMaterial?.diffuse.contents = UIColor.randomColor
      self.sceneView.scene.rootNode.addChildNode(textNode)
      //ランダムな位置にテキストを置いて、動かす
      let random = Float.random(in: -100...100)
      let random2 = Float.random(in: -100...100)
      let random3 = Float.random(in: -200 ... -50)
      textNode.position = SCNVector3(x: 20, y: random2, z: random3)
      textNode.runAction(SCNAction.move(to: SCNVector3(x: -100, y: random, z: random3), duration: 5),completionHandler: {
      textNode.removeFromParentNode()
      })
機械学習やAR関連の技術情報を発信しています。
MLBoysだいすけ https://twitter.com/JackdeS11
MLBoysゆうじ https://twitter.com/oka_yuujiCore MLやCreate ML、Vision、ARKitを使ったアプリを作っています。
rockyshikoku@gmail.com