- 投稿日:2020-07-04T20:49:40+09:00
Kobiton でスマートフォンのリモートテストを試してみた
概要
昨今のテレワーク推進の中、スマートフォン開発における課題となるのが実機による動作検証です。
多種多様なスマートフォン端末の準備・利用は、利用者それぞれがテレワークしていると難しくなります。今回は上記課題を解決しうるリモート実機動作検証サービス Kobiton について調査しました。
TL; DR
- Kobiton https://kobiton.com/ はリモート実機検証できるサービス
- ブラウザからリモートの実機を操作して手動・自動での動作検証が可能
- デスクトップアプリを利用すると、自分たちで用意した実機を使っての動作検証も可能
- 30日間無料トライアル
リモートの実機による動作検証
Kobiton がクラウド上に用意した実機を使って動作確認を行うことができます。
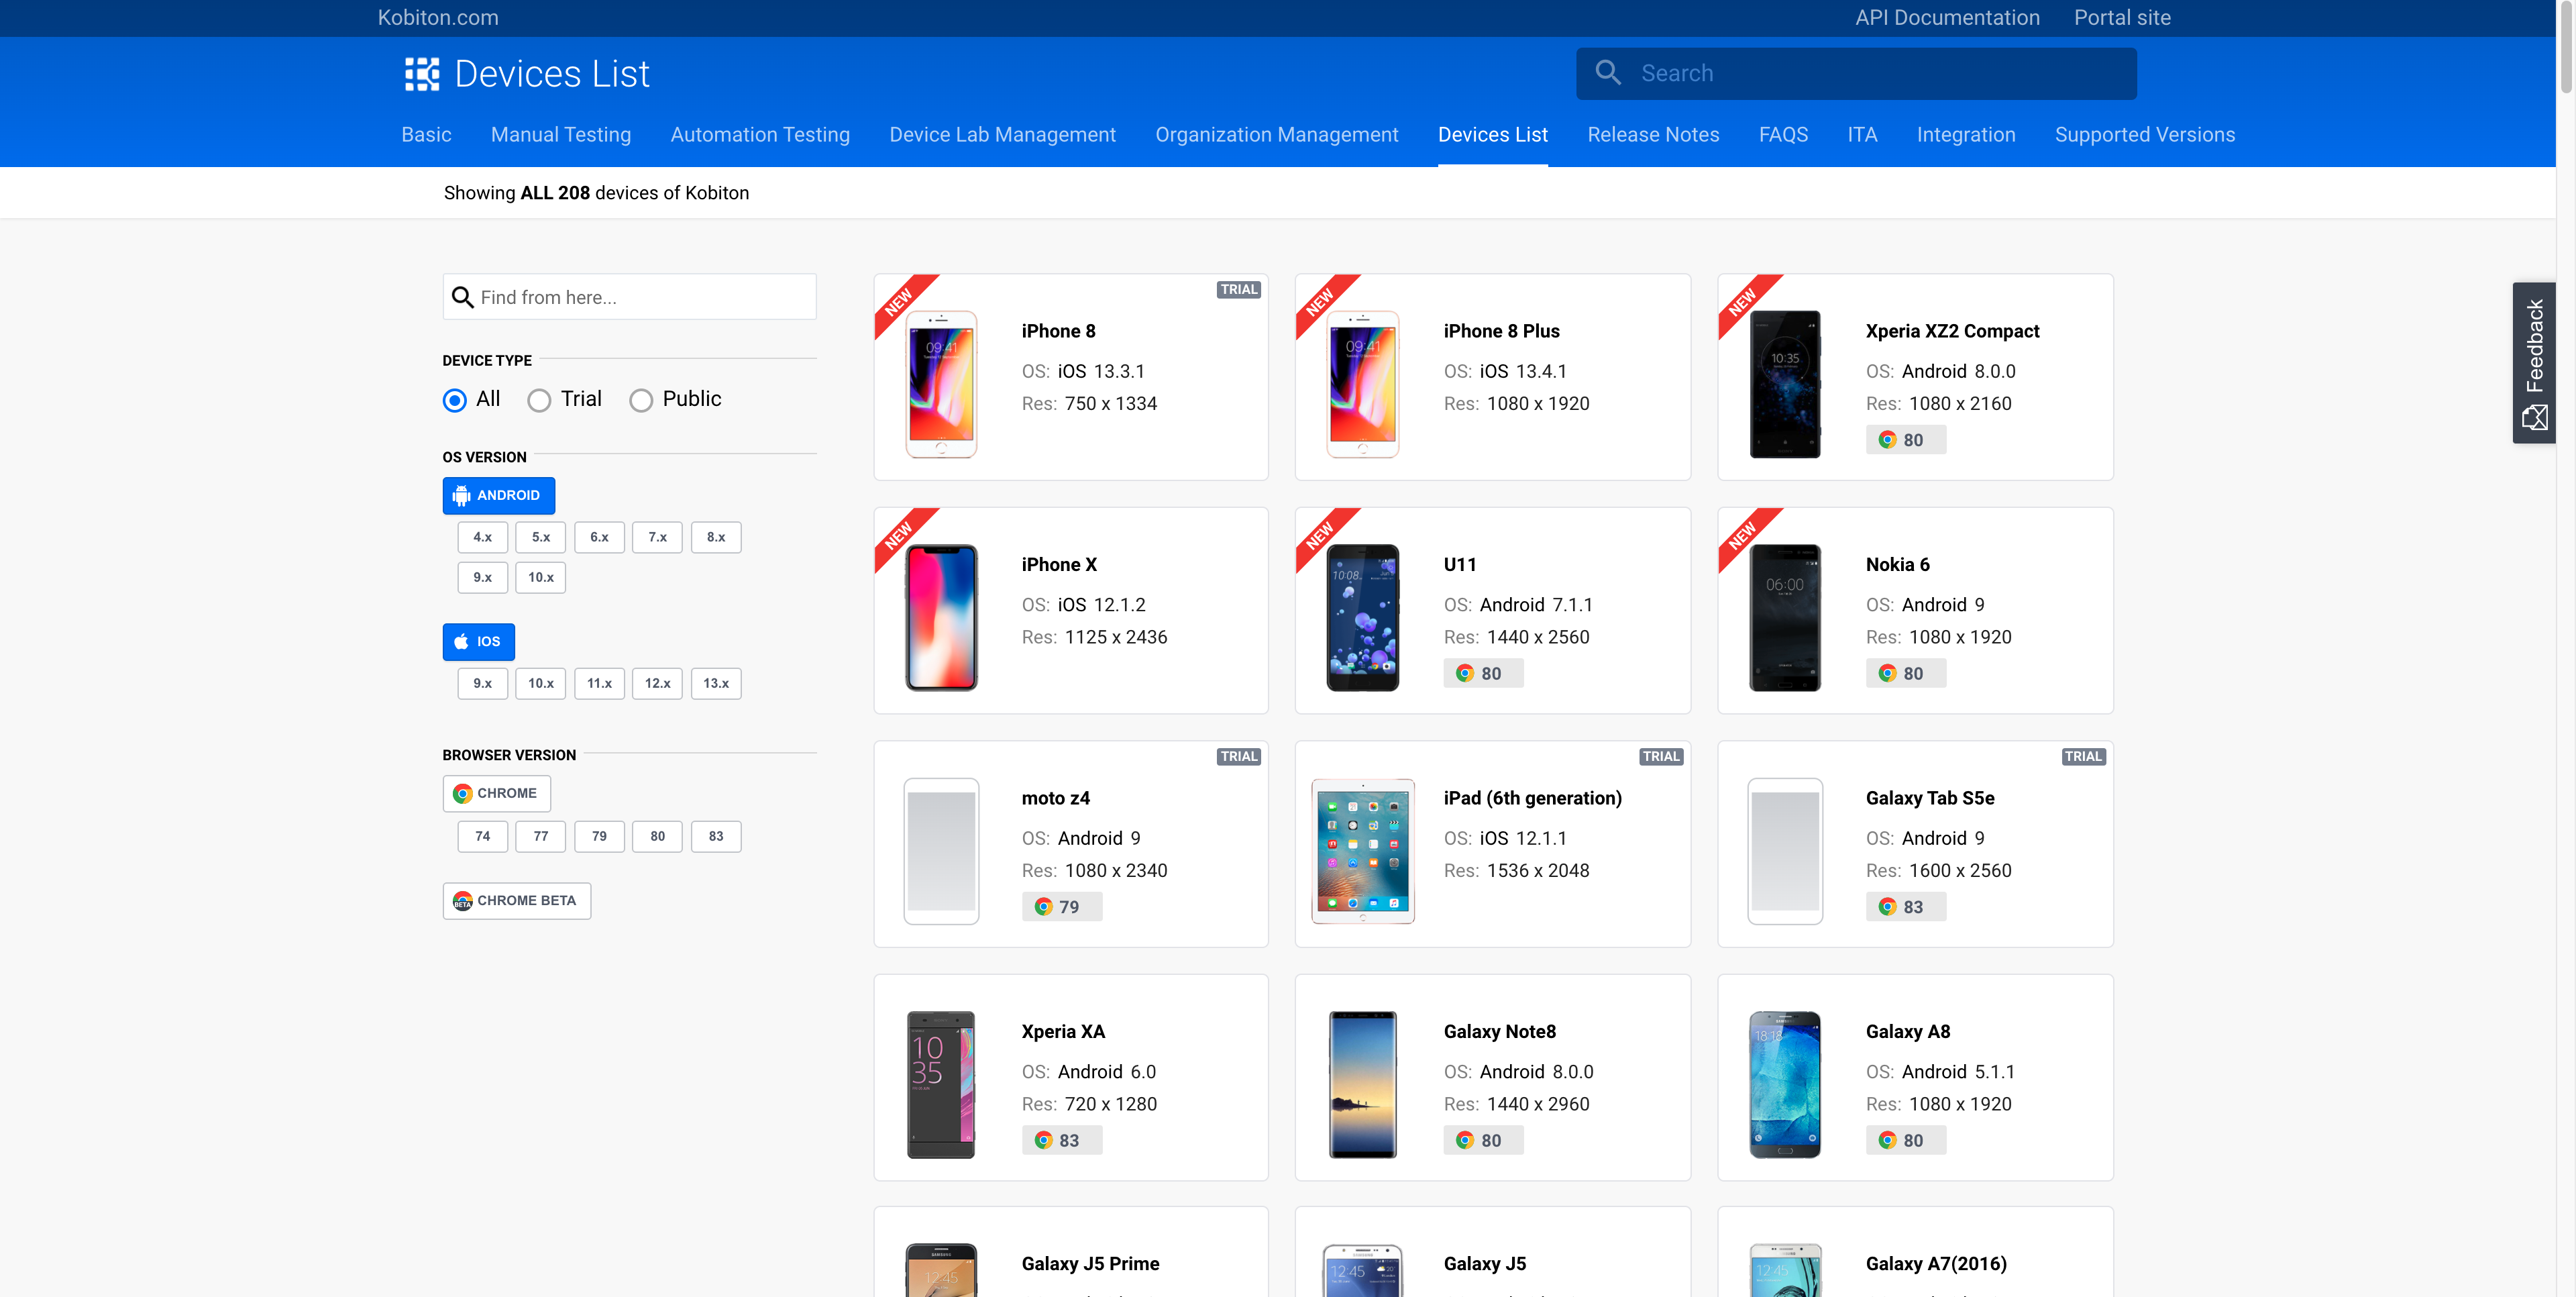
利用可能な端末
利用可能な実機の一覧は以下のURLから参照できます。
https://docs.kobiton.com/devices-list/
2020年7月4日時点で208種類のAndroid・iOS端末を利用できます。
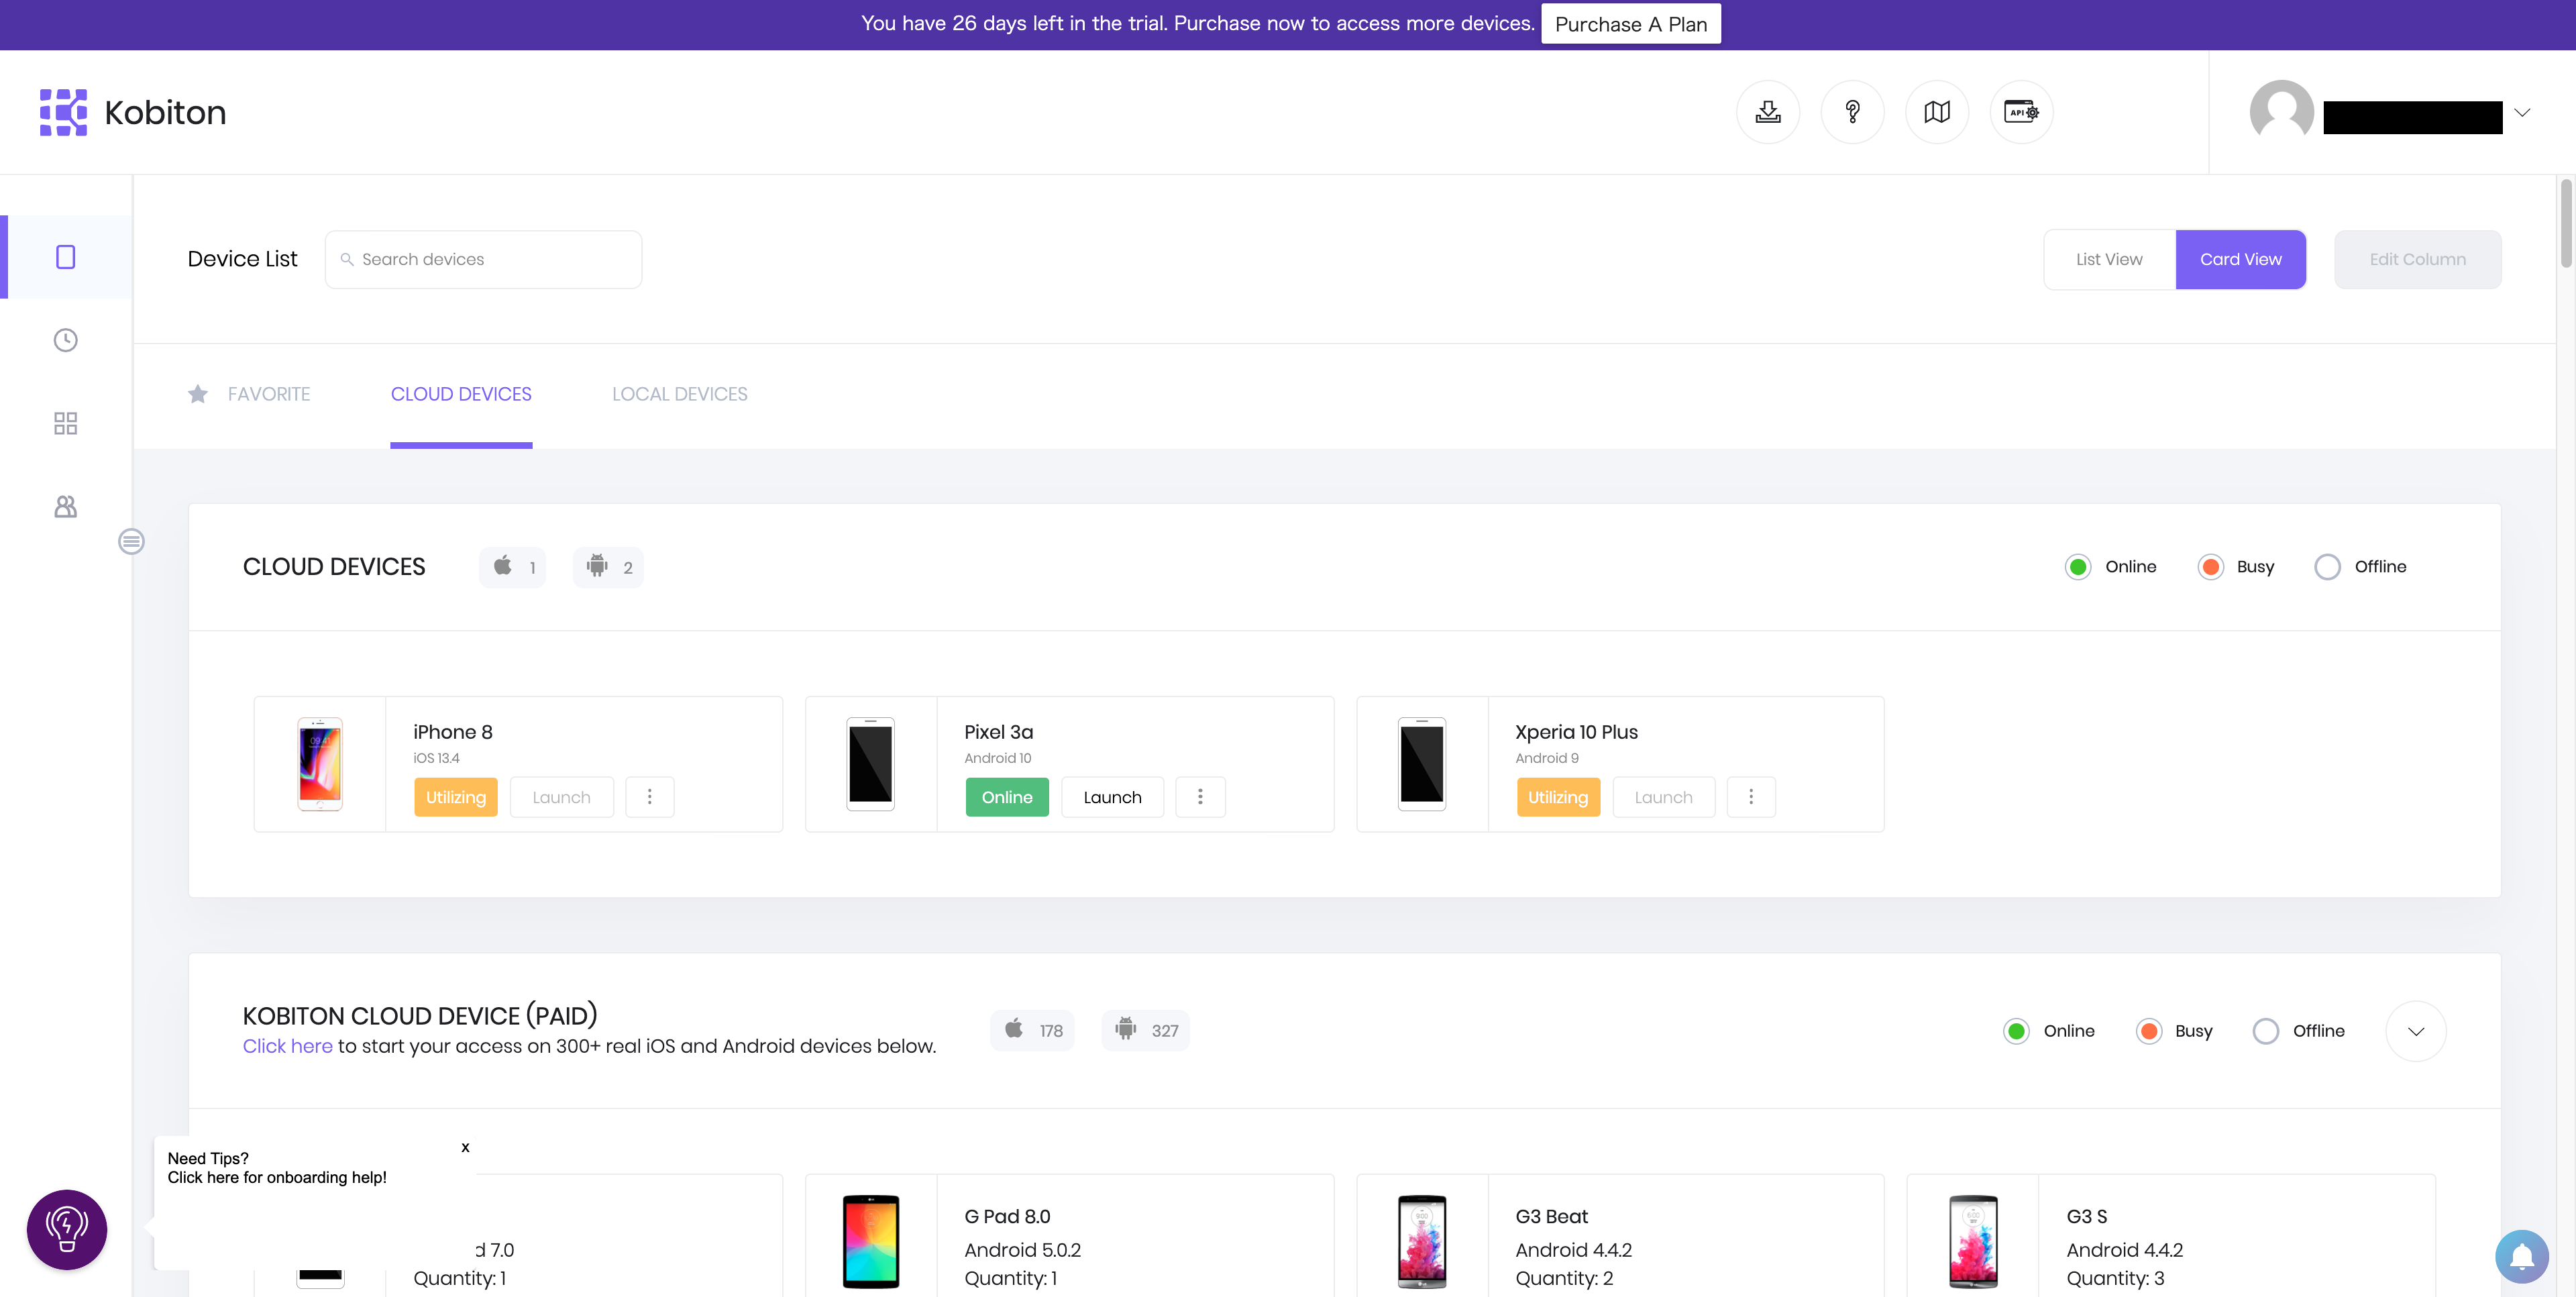
ログイン後には以下のような画面から利用する端末を選ぶことができます。
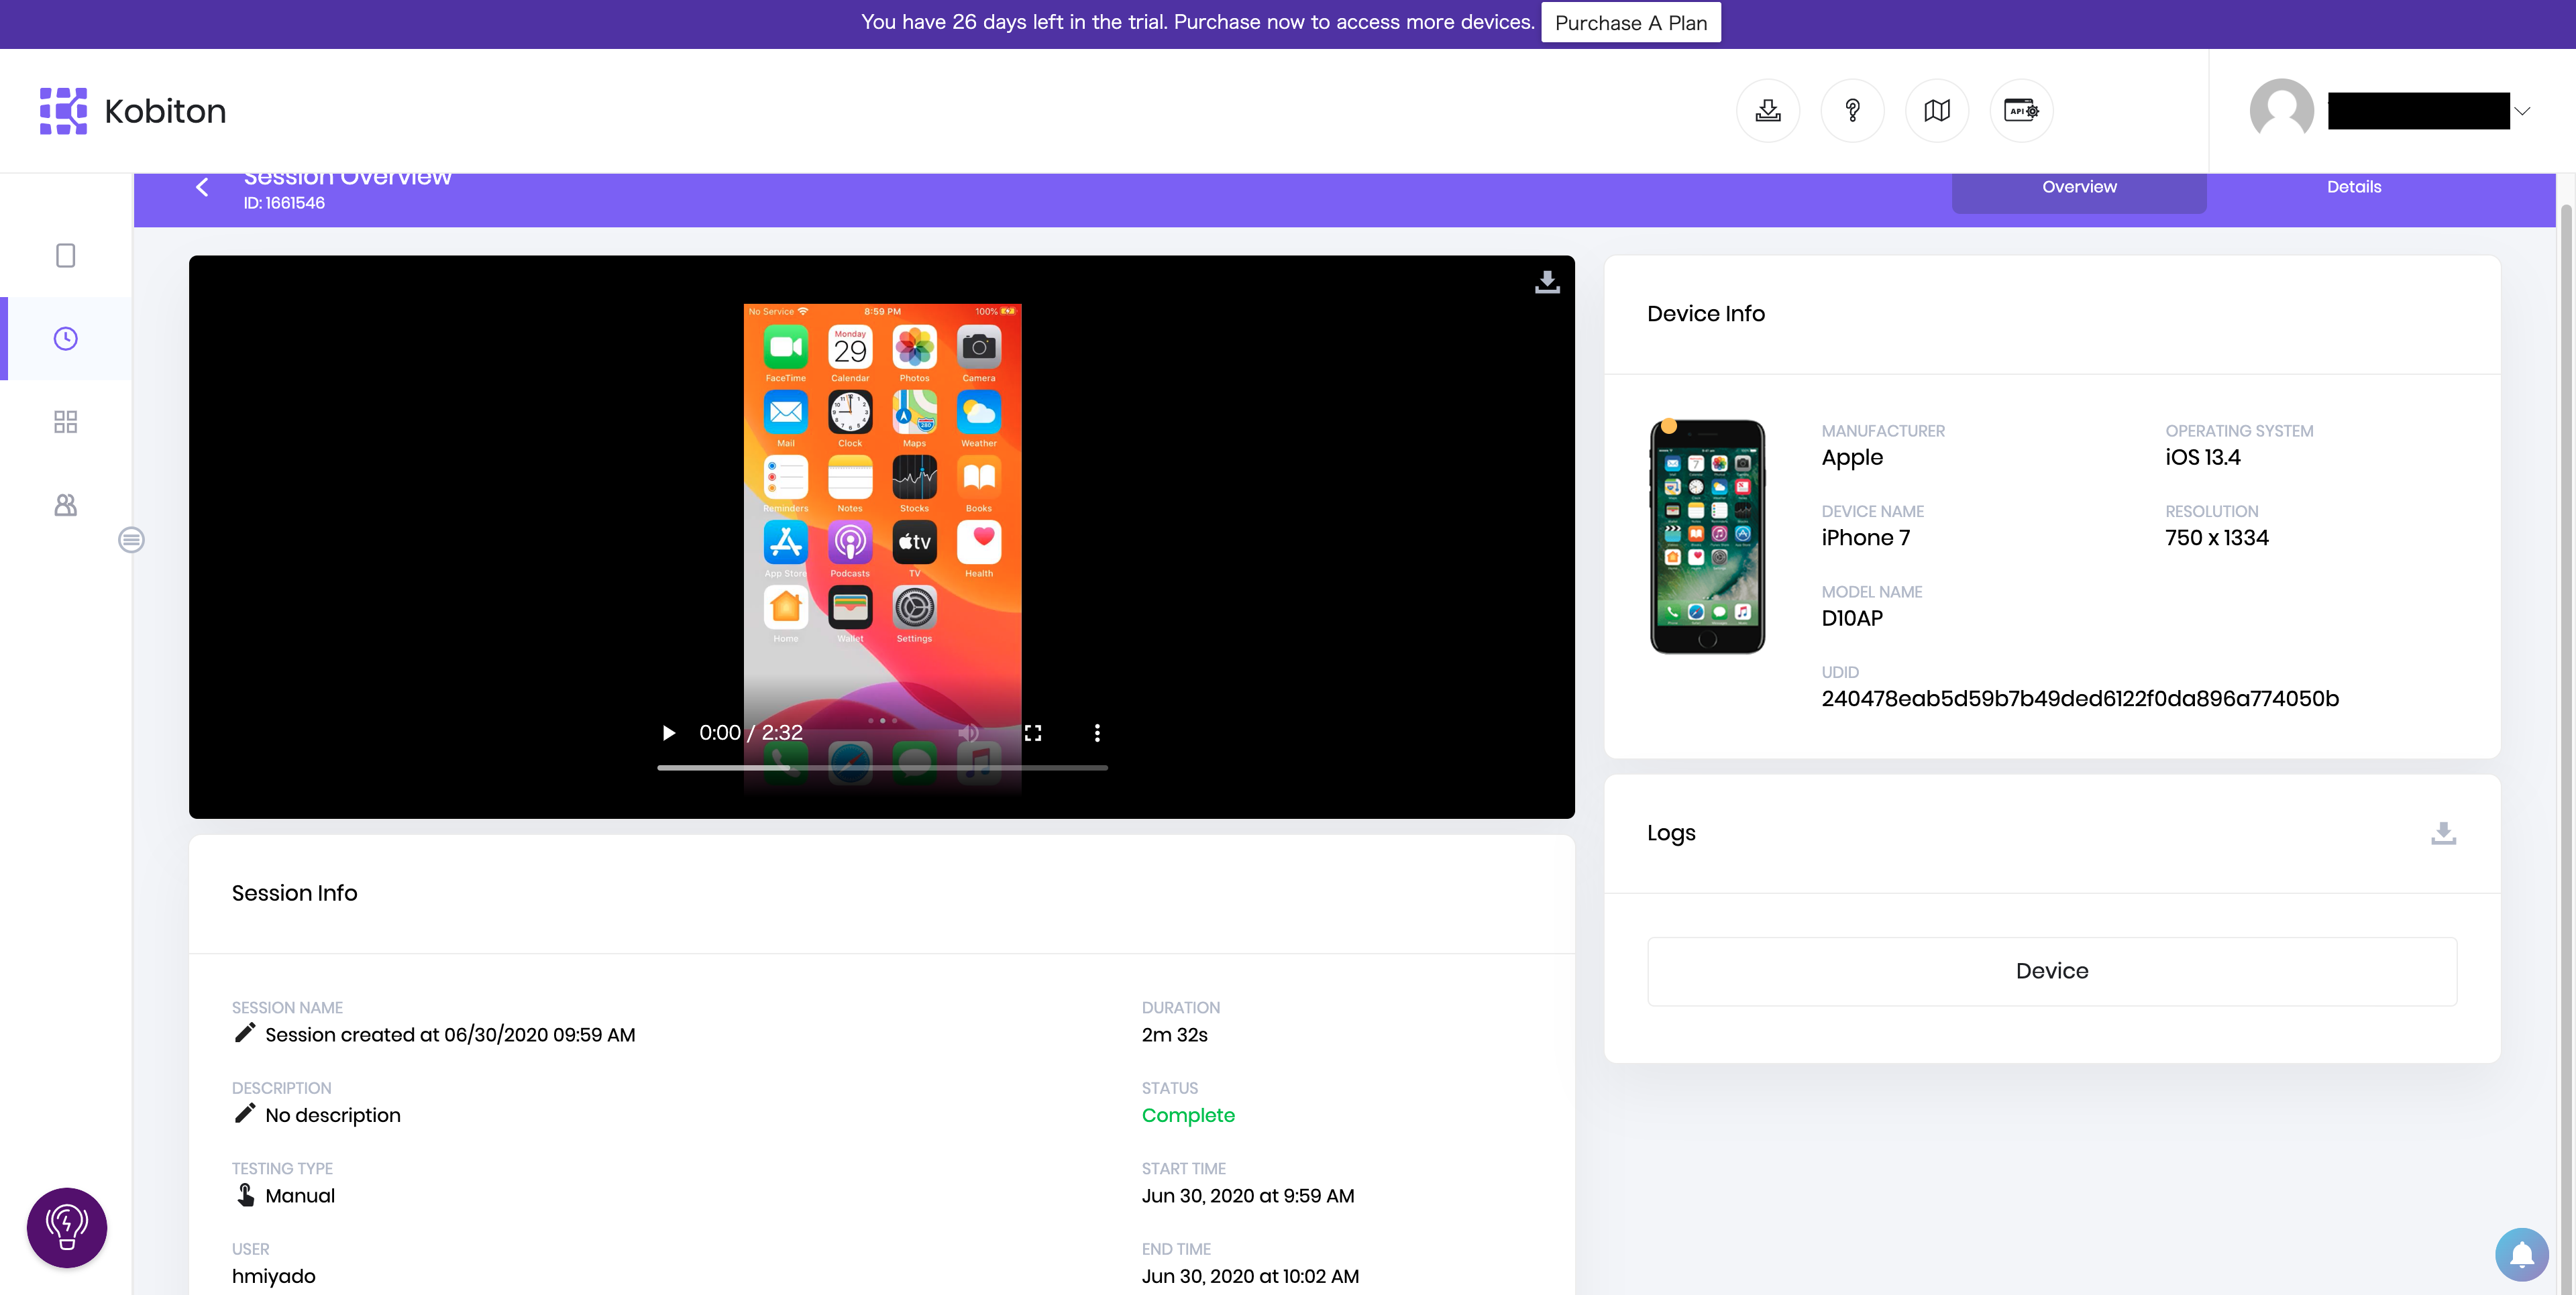
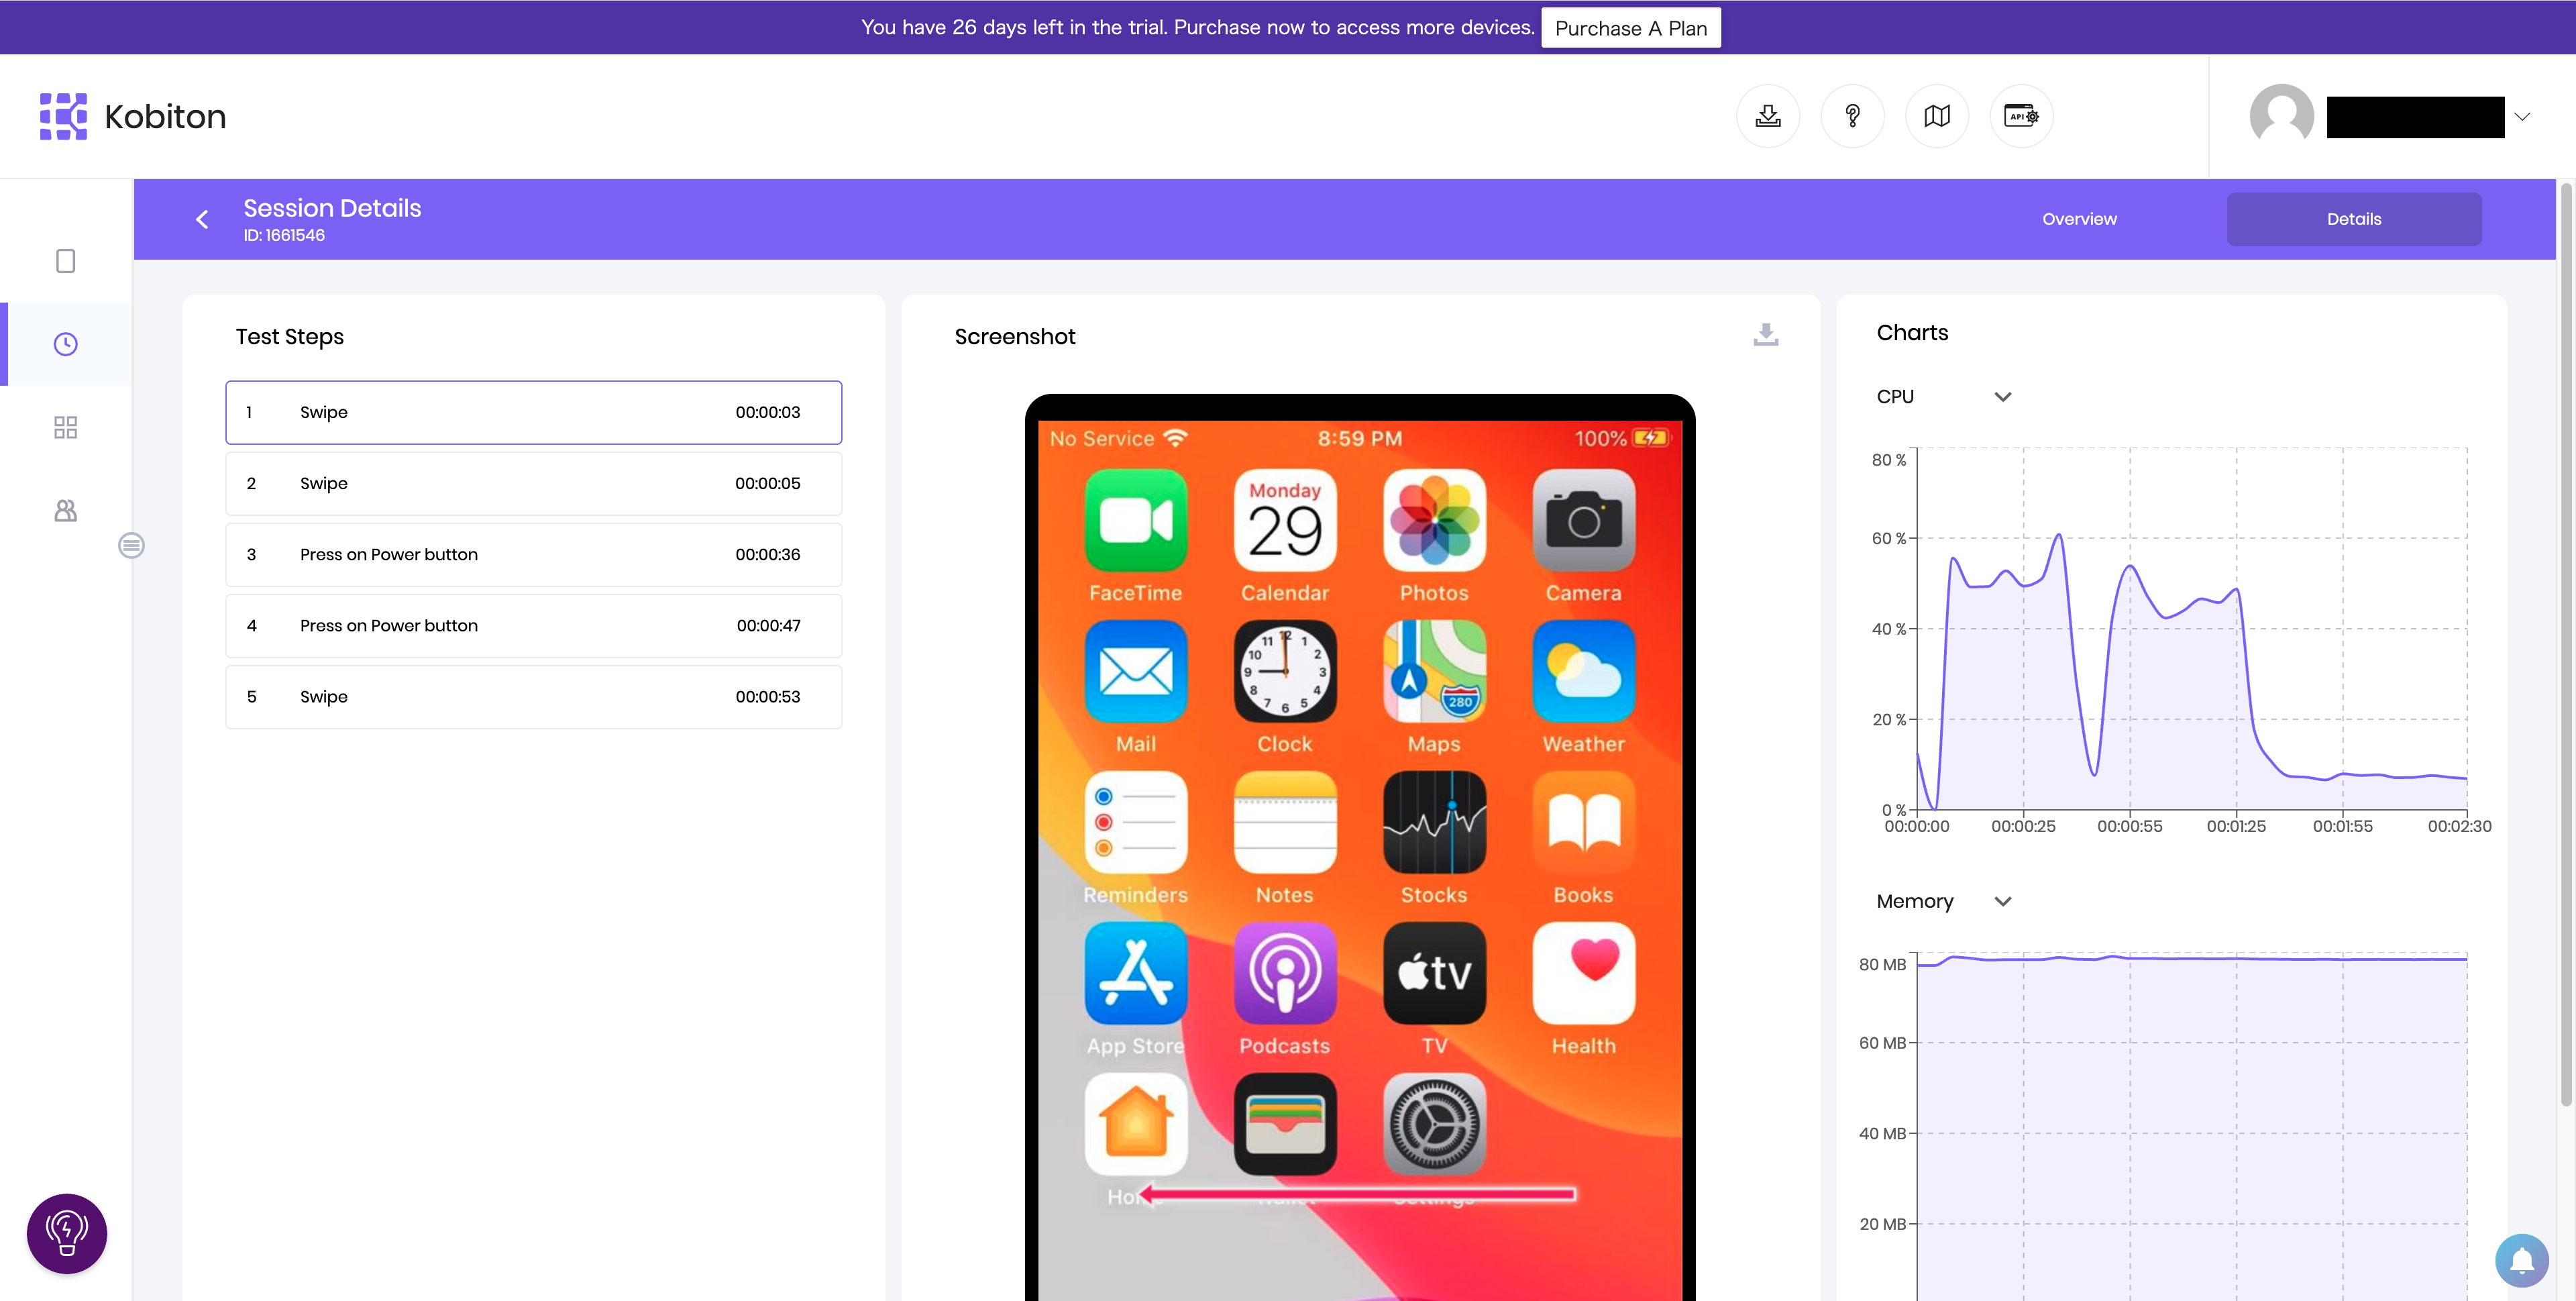
動作検証セッション
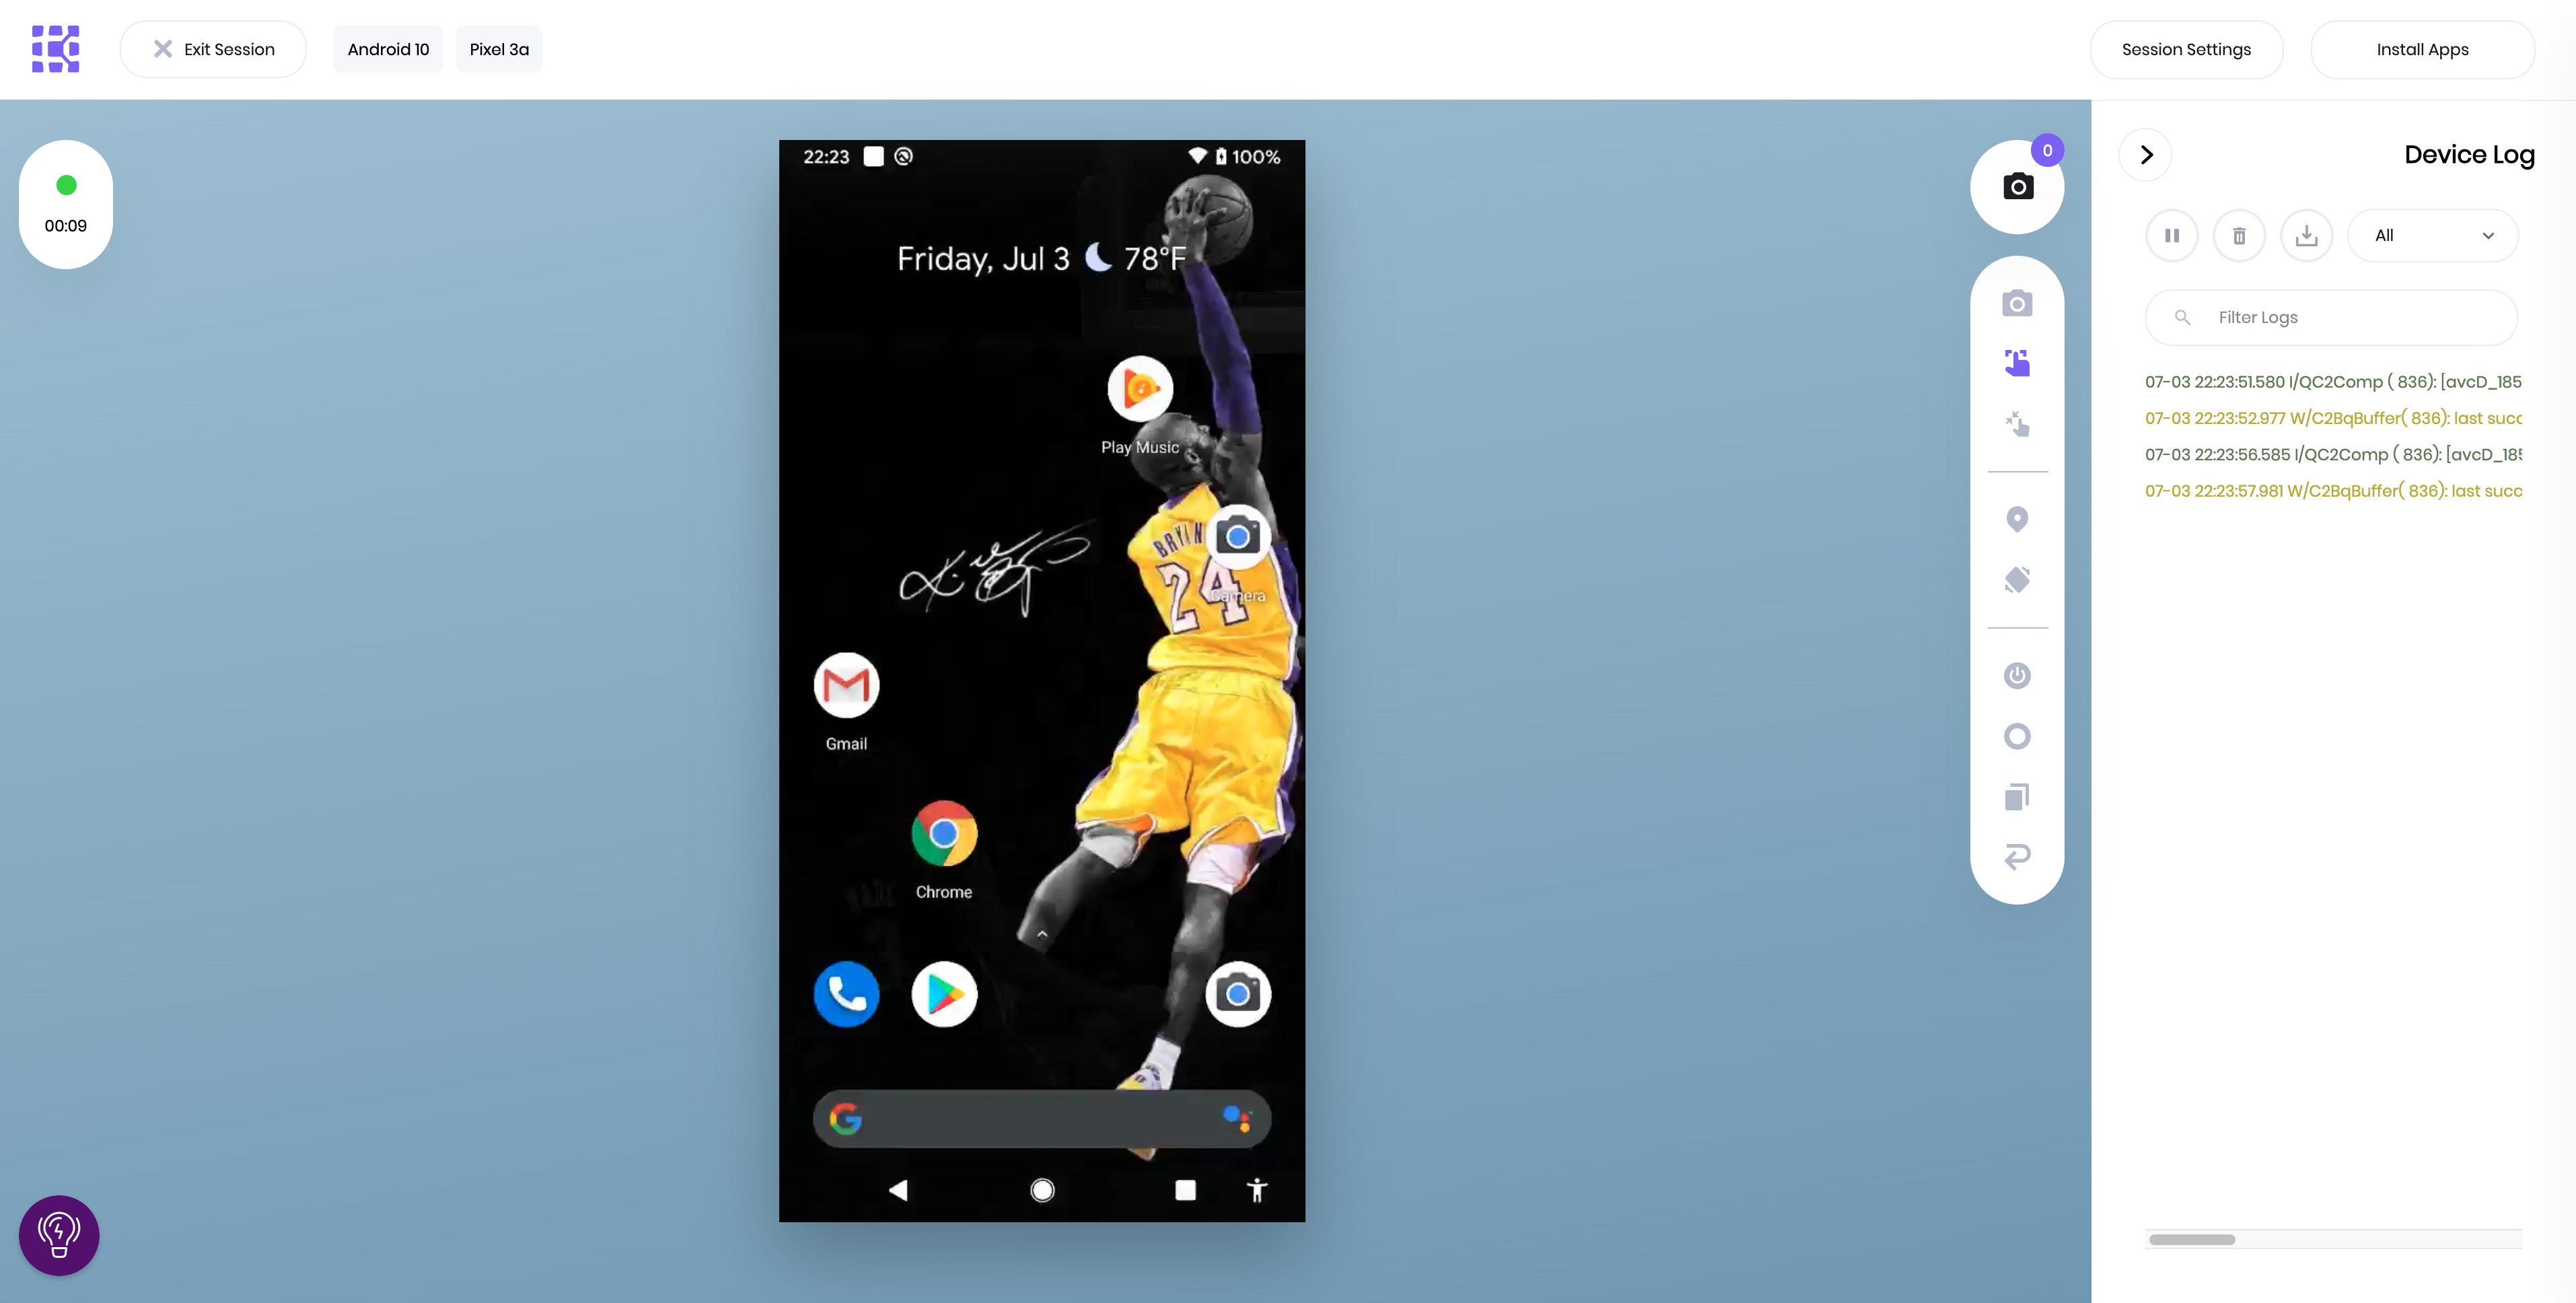
セッション中
動作検証中のセッションは以下のような画面です(以下の画面はAndroidの場合です)。
スワイプ等の操作は少々ラグがありますが、ブラウザから操作できていることを考えると十分でしょう。
右上の「Install Apps」ボタンから、自分で登録したアプリをインストールすることができます。
これで自分で開発したアプリの動作確認ができます。セッションログ
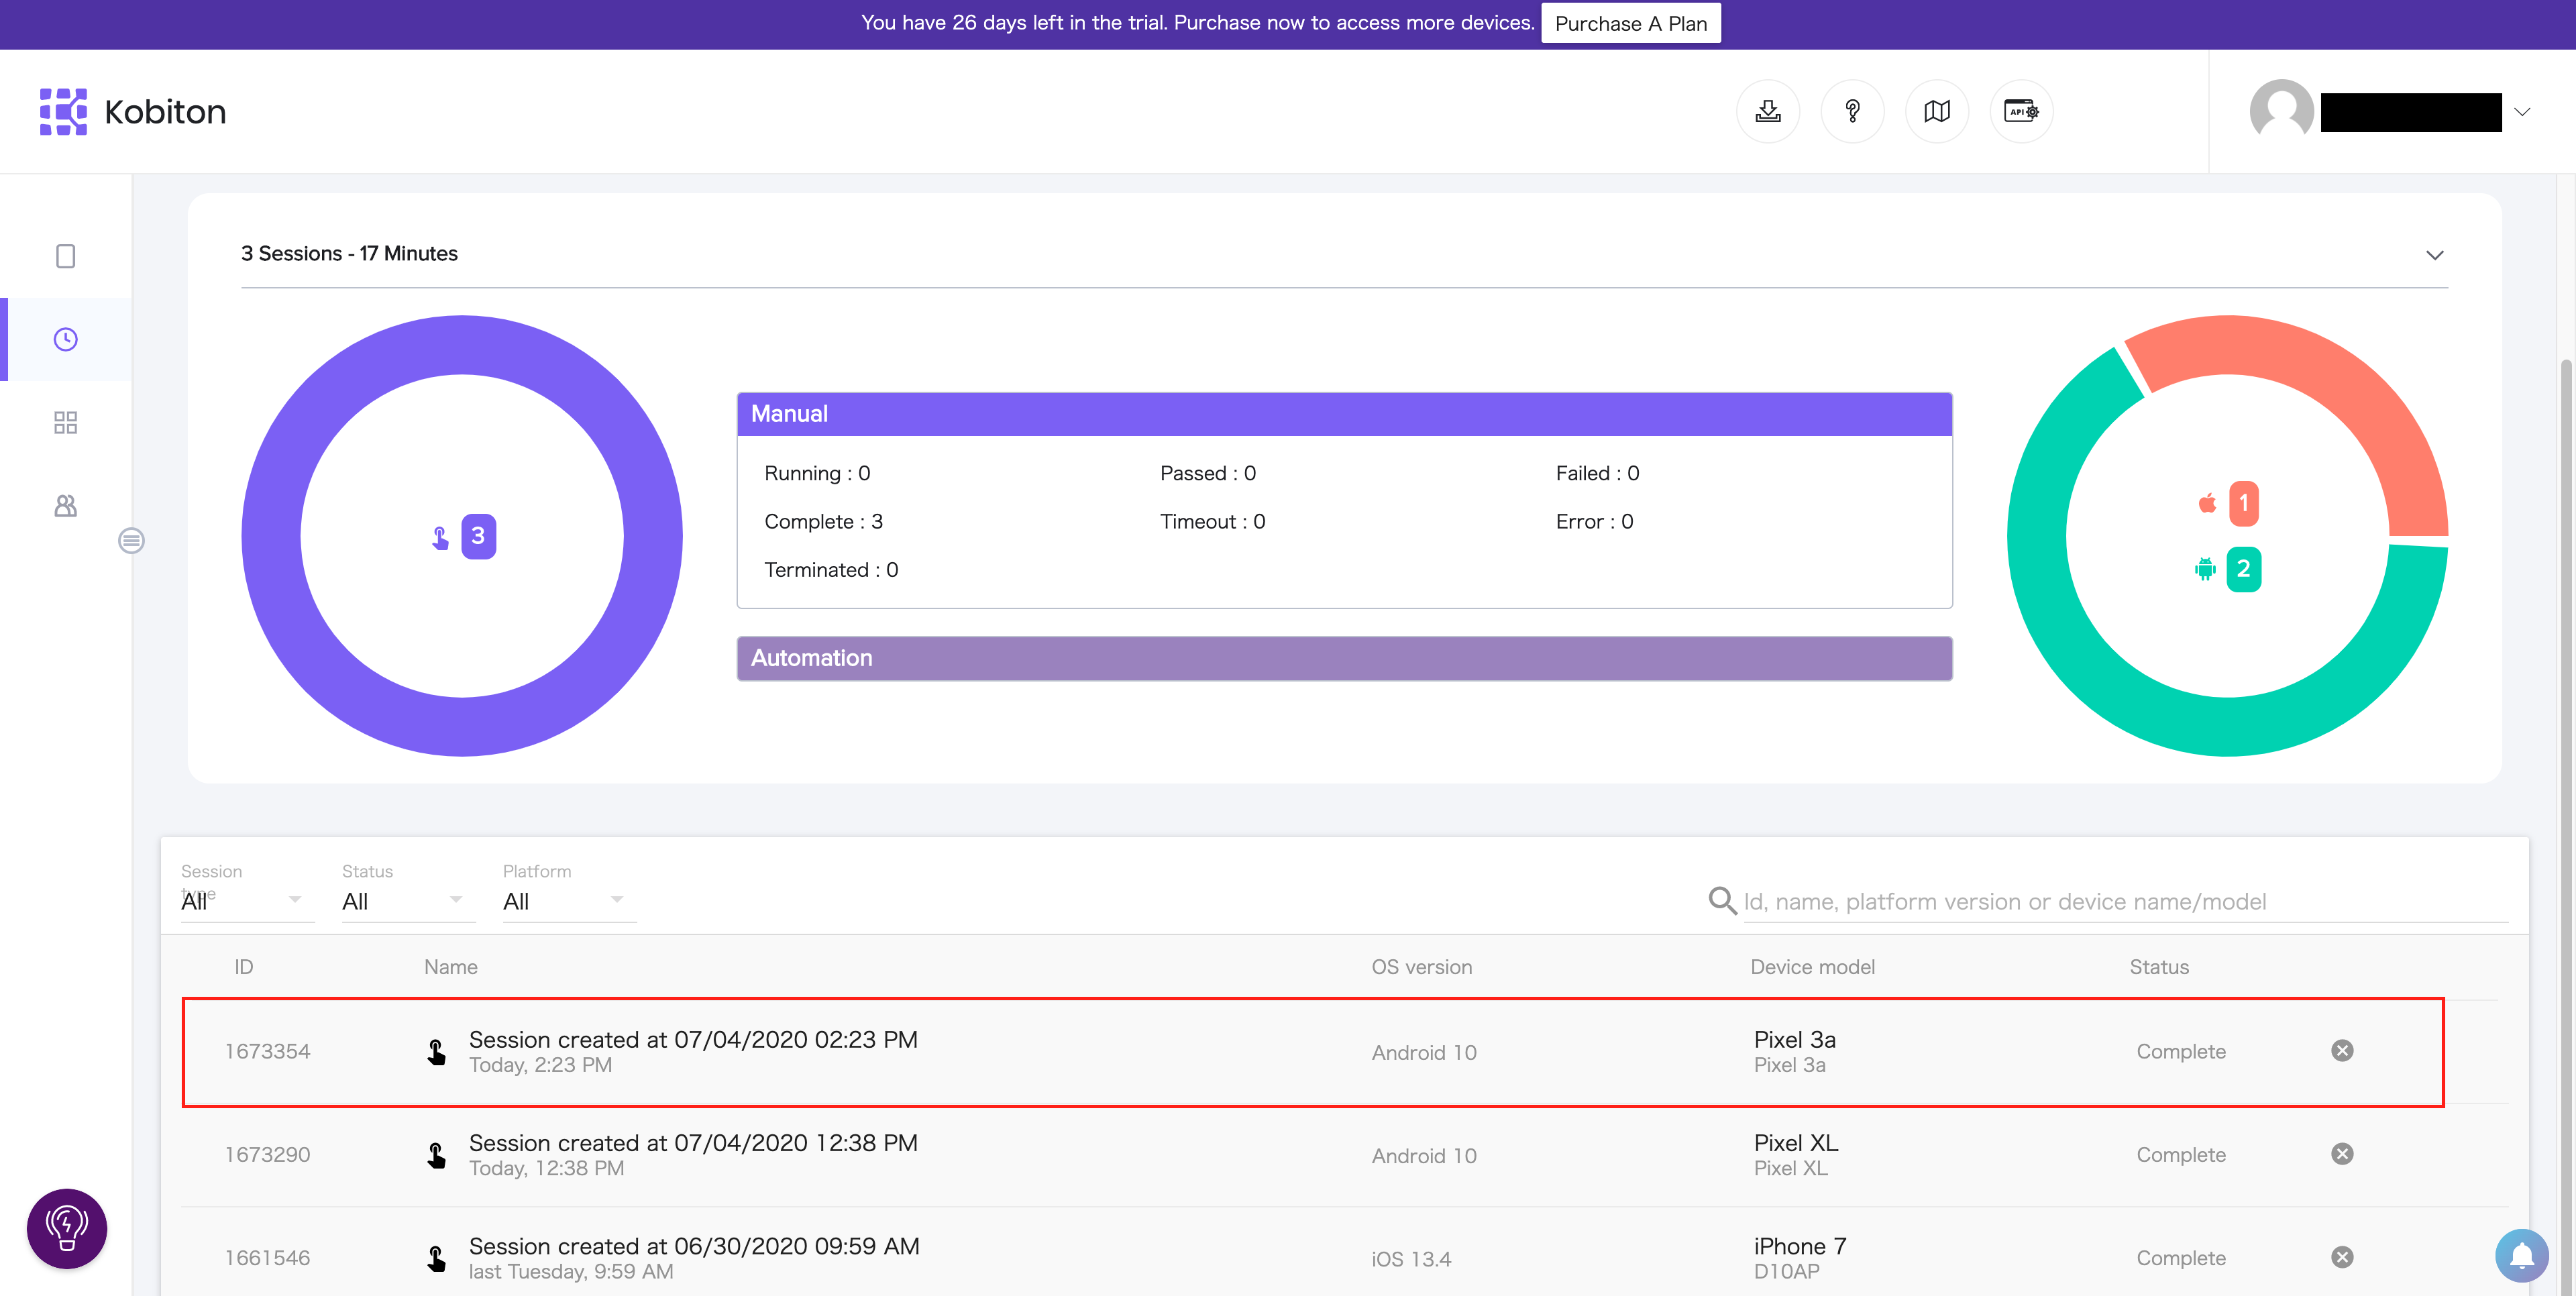
セッション終了後はログが残ります。
動作確認した動画も自動で残ります。
セッションの詳細では、どの時点でどんな操作をしたか閲覧することもできます。
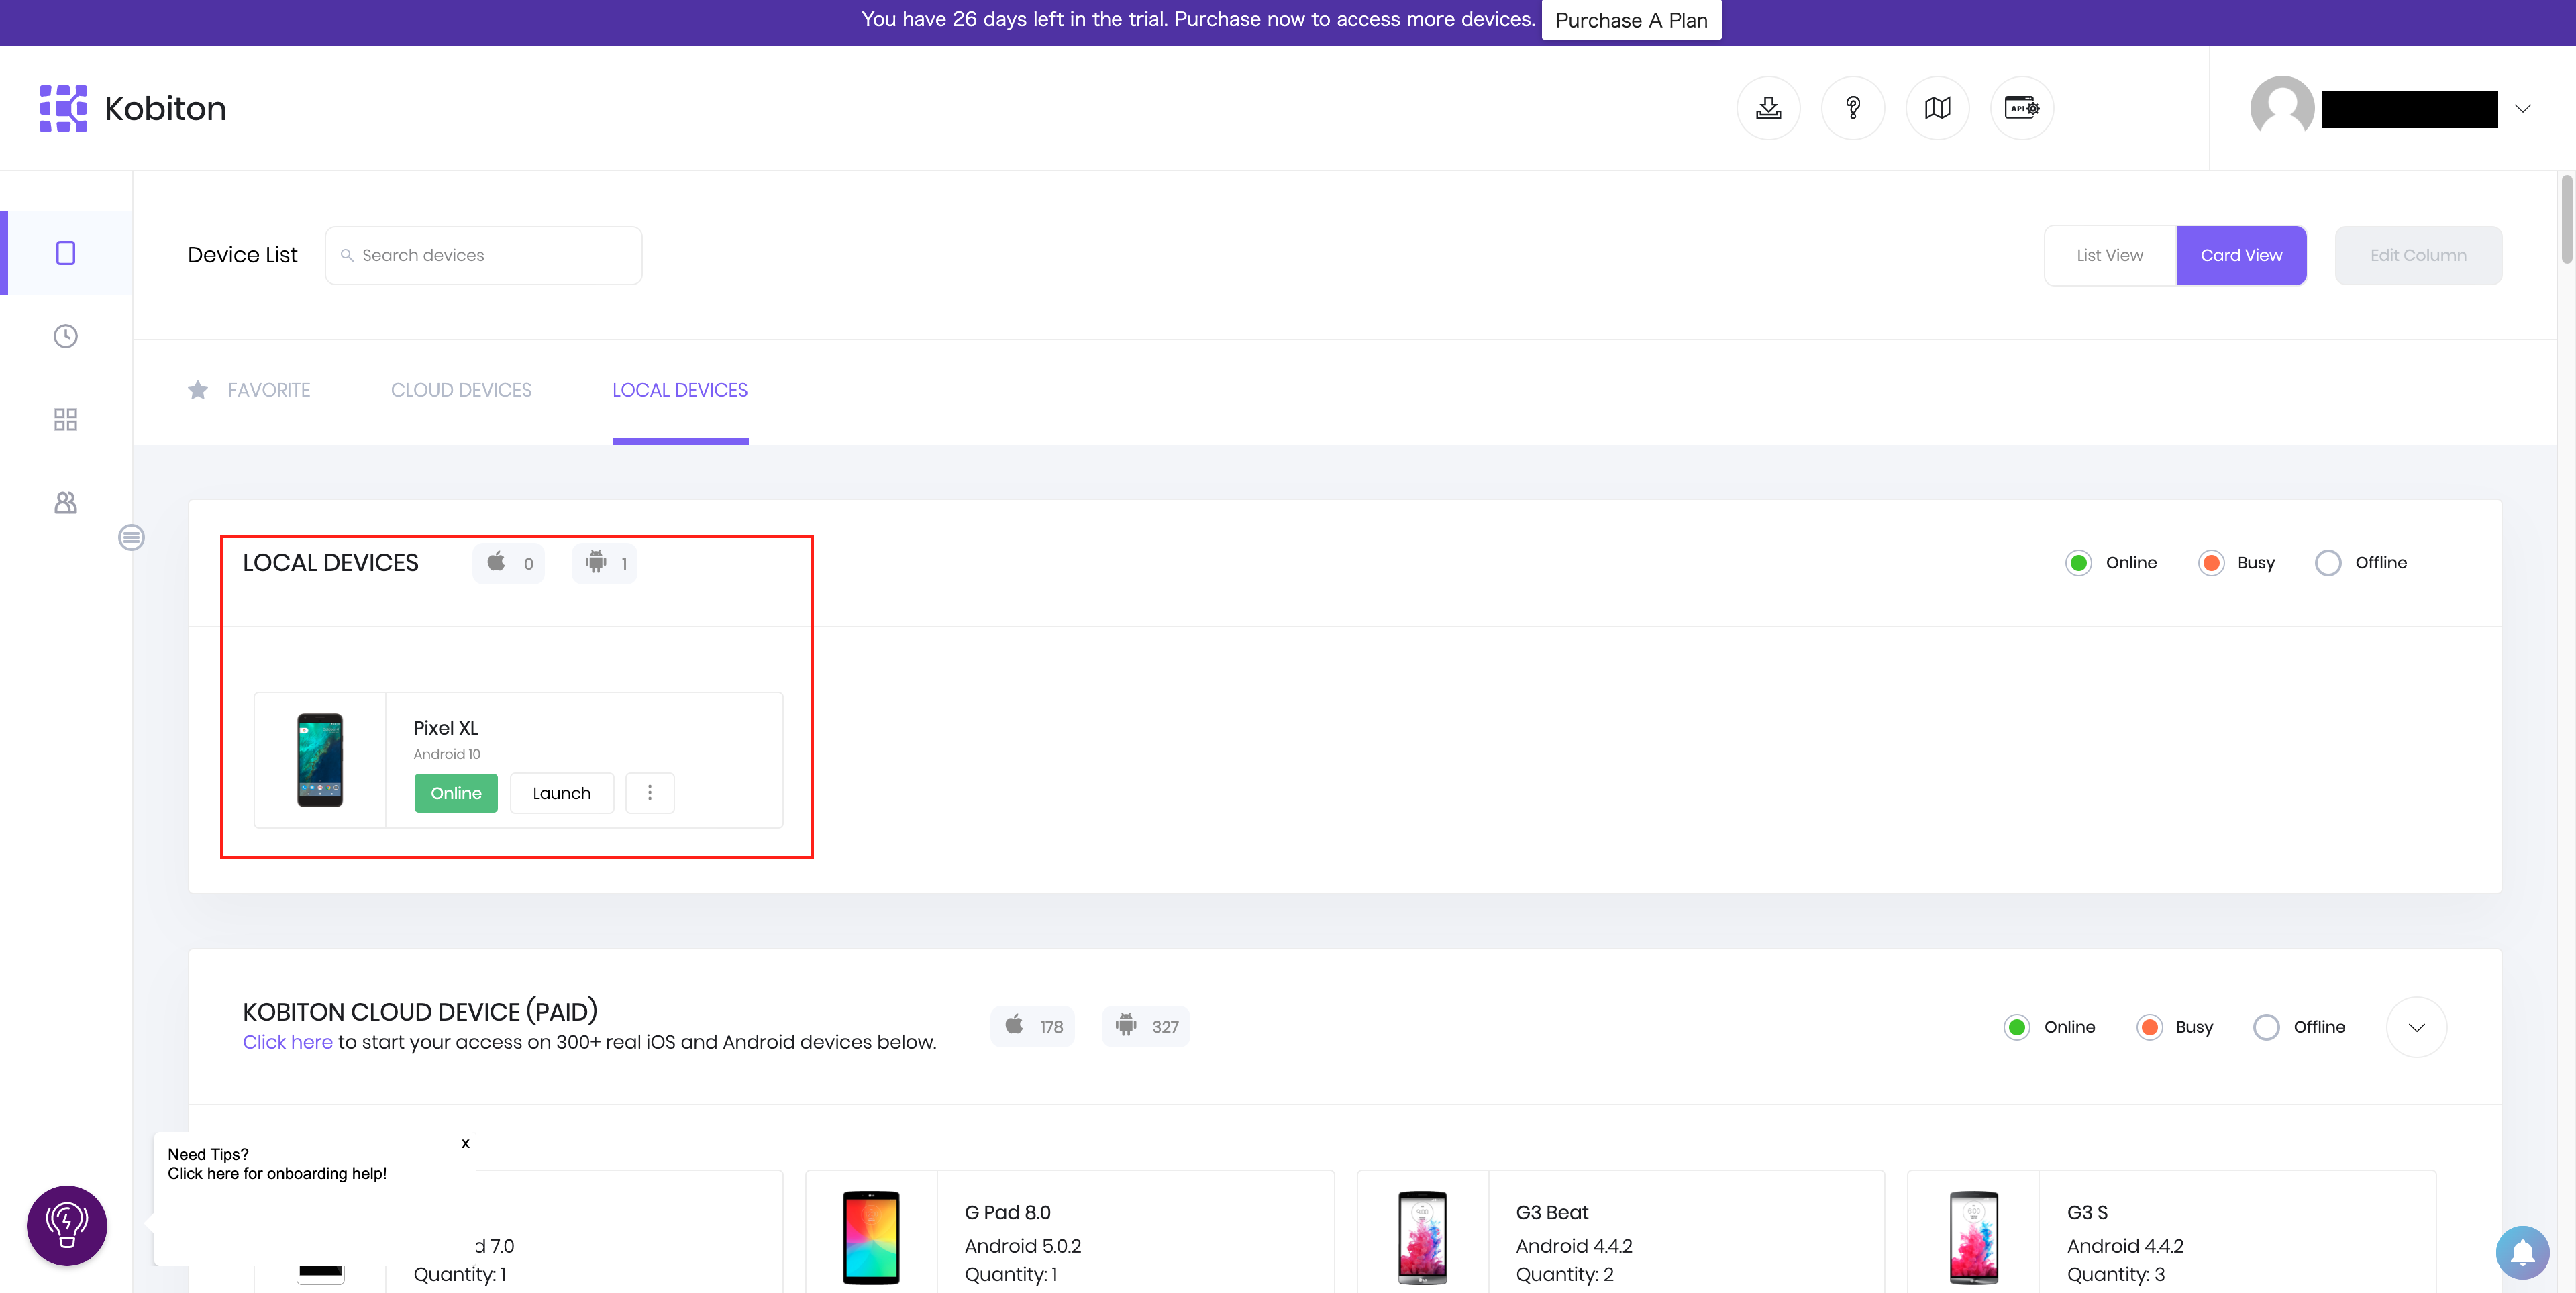
自分たちで用意した実機による動作検証
Kobiton がクラウド上に準備した端末は種類も多く便利ですが、不便な点もあります。
他の人が使用中だと使えなかったり、パブリックなネットワークにしかアクセスできなかったりします。これらの問題点を解決するため、Kobiton のデスクトップアプリを介して自分たちで用意した実機を使用することができます。
上記の問題点を解決しつつ、端末の管理は Kobiton のクラウド上の端末と同様に行うことができます。デスクトップアプリの準備
詳細は公式のドキュメントを見ていただくとよいかと思います。
Kobiton のデスクトップアプリは Mac OS でのみ使うことができます。
Windows アプリはないようです。
iOS 端末にも対応するためでしょうか。その後、 Android と iOS の設定を行います。
Android であれば JDK および Android SDK のパスを指定します。
iOS であれば Xcode のパスおよび証明書・プロビジョニングプロファイルの設定を行います。端末の登録
端末を接続すると、 Kobiton のアプリケーションが端末にインストールされます。
基本的にはこれだけで問題ないです。私が設定したときは、 追加で端末のデバイスロックを解除しておく必要がありました。
AndroidおよびiOSのトラブルシューティングのドキュメントが整備されているので、設定がうまくいかないときはご確認ください。端末の利用
設定が終われば、あとは Kobiton が提供する端末と同じように自分のローカル端末で動作確認を行うことができます。
まとめ
今回は Kobiton による実機端末を利用した動作確認について簡単に紹介しました。
Kobiton が提供する端末に加えて、自分の端末を利用することができます。Kobiton ではさらにテストの自動実行や各種便利APIの利用ができるようです。
Free Trial もあるため、興味が湧きましたらぜひ試して記事を公開してください
- 投稿日:2020-07-04T15:08:58+09:00
[Modern Android] Jetpack Compose その5
こんにちは!7月にになりましたね。
前回に引き続きJetNewを続いて見ながら、
Jetpack Composeを理解しようと思います。
出来ればFlutterと比べながらみようと思います。今回
HomeScreenのbodyContentを見てみましょう。
drawerContent、topAppBarは前回に確認しました。bodyContent = { modifier ->
HomeScreenContent(postsRepository, modifier)
}@Composable fun HomeScreen( postsRepository: PostsRepository, scaffoldState: ScaffoldState = remember { ScaffoldState() } ) { Scaffold( scaffoldState = scaffoldState, drawerContent = { AppDrawer( currentScreen = Screen.Home, closeDrawer = { scaffoldState.drawerState = DrawerState.Closed } ) }, topAppBar = { TopAppBar( title = { Text(text = "Jetnews") }, navigationIcon = { IconButton(onClick = { scaffoldState.drawerState = DrawerState.Opened }) { Icon(vectorResource(R.drawable.ic_jetnews_logo)) } } ) }, bodyContent = { modifier -> HomeScreenContent(postsRepository, modifier) } ) }HomeScreenContent
- HomeScreenContentもComposable関数である。
- PostsRepositoryからデータをひきLoadingHomeScreen()とSwipeToRefreshLayout()で処理する。
@Composable
private fun HomeScreenContent(
    postsRepository: PostsRepository,
    modifier: Modifier = Modifier
) {
    val (postsState, refreshPosts) = refreshableUiStateFrom(postsRepository::getPosts)

    if (postsState.loading && !postsState.refreshing) {
        LoadingHomeScreen()
    } else {
        SwipeToRefreshLayout(
            refreshingState = postsState.refreshing,
            onRefresh = { refreshPosts() },
            refreshIndicator = {
                Surface(elevation = 10.dp, shape = CircleShape) {
                    CircularProgressIndicator(Modifier.preferredSize(50.dp).padding(4.dp))
                }
            }
        ) {
            HomeScreenBodyWrapper(
                modifier = modifier,
                state = postsState,
                onErrorAction = {
                    refreshPosts()
                }
            )
        }
    }
}
LoadingHomeScreen
- CircularProgressIndicator()はFlutterと同じである。
- https://api.flutter.dev/flutter/material/CircularProgressIndicator-class.html
- https://developer.android.com/reference/kotlin/androidx/ui/material/package-summary#circularprogressindicator
@Composable
private fun LoadingHomeScreen() {
    Box(modifier = Modifier.fillMaxSize().wrapContentSize(Alignment.Center)) {
        CircularProgressIndicator()
    }
}
Box
- BoxはFlutterのContainerと似てるけど、ちょっと違う感じ。
- Containerと同じですと思ったら、コメントお願いします。
/**
 * A convenience composable that combines common layout and draw logic.
 *
 * In order to define the size of the [Box], the [androidx.ui.layout.LayoutWidth],
 * [androidx.ui.layout.LayoutHeight] and [androidx.ui.layout.LayoutSize] modifiers can be used.
 * The [Box] will try to be only as small as its content. However, if it is constrained
 * otherwise, [Box] will allow its content to be smaller and will position the content inside,
 * according to [gravity].
 *
 * The specified [padding] will be applied inside the [Box]. In order to apply padding outside
 * the [Box], the [androidx.ui.layout.LayoutPadding] modifier should be used.
 *
 * @sample androidx.ui.foundation.samples.SimpleCircleBox
 *
 * @param modifier The modifier to be applied to the Box
 * @param shape The shape of the box
 * @param backgroundColor The [Color] for background with. If [Color.Transparent], there will be no
 * background
 * @param border [Border] object that specifies border appearance, such as size and color. If
 * `null`, there will be no border
 * @param padding The padding to be applied inside Box, along its edges. Unless otherwise
 * specified, content will be padded by the [Border.size], if [border] is provided
 * @param paddingStart sets the padding of the start edge. Setting this will override [padding]
 * for the start edge
 * @param paddingTop sets the padding of the top edge. Setting this will override [padding] for
 * the top edge
 * @param paddingEnd sets the padding of the end edge. Setting this will override [padding] for
 * the end edge
 * @param paddingBottom sets the padding of the bottom edge. Setting this will override [padding]
 * for the bottom edge
 * @param gravity The gravity of the content inside Box
 */
@Composable
fun Box(
    modifier: Modifier = Modifier,
    shape: Shape = RectangleShape,
    backgroundColor: Color = Color.Transparent,
    border: Border? = null,
    padding: Dp = border?.size ?: 0.dp,
    paddingStart: Dp = Dp.Unspecified,
    paddingTop: Dp = Dp.Unspecified,
    paddingEnd: Dp = Dp.Unspecified,
    paddingBottom: Dp = Dp.Unspecified,
    gravity: ContentGravity = ContentGravity.TopStart,
    children: @Composable () -> Unit = emptyContent()
) {
    val borderModifier =
        if (border != null) Modifier.drawBorder(border, shape) else Modifier
    val backgroundModifier =
        if (backgroundColor != Color.Transparent) {
            Modifier.drawBackground(backgroundColor, shape)
        } else {
            Modifier
        }
    val paddingModifier =
        if (needsPadding(padding, paddingStart, paddingTop, paddingEnd, paddingBottom)) {
            Modifier.padding(
                if (paddingStart != Dp.Unspecified) paddingStart else padding,
                if (paddingTop != Dp.Unspecified) paddingTop else padding,
                if (paddingEnd != Dp.Unspecified) paddingEnd else padding,
                if (paddingBottom != Dp.Unspecified) paddingBottom else padding
            )
        } else {
            Modifier
        }
    // TODO(malkov): support ContentColor prorogation (b/148129218)

    val columnArrangement = gravity.toColumnArrangement()
    val columnGravity = gravity.toColumnGravity()
    Column(
        modifier = modifier + backgroundModifier + borderModifier + paddingModifier,
        verticalArrangement = columnArrangement,
        horizontalGravity = columnGravity
    ) {
        children()
    }
}
CircularProgressIndicator
- package androidx.ui.materialのProgressIndicator.㏏中にあるComposable関数である。
- LinearProgressIndicatorも見える
- Semantics→Trainsition→Canvas→drawLinearIndicatorBackground→drawLinearIndicatorの感じ。
- 以外に簡単じゃない。
/**
 * An indeterminate circular progress indicator that represents continual progress without a defined
 * start or end point.
 *
 * @param color The color of the progress indicator.
 * @param strokeWidth The stroke width for the progress indicator.
 */
@Composable
fun CircularProgressIndicator(
    modifier: Modifier = Modifier,
    color: Color = MaterialTheme.colors.primary,
    strokeWidth: Dp = ProgressIndicatorConstants.DefaultStrokeWidth
) {
    // TODO(b/154875304) create IndeterminateProgressIndicator in foundation and move the
    //  semantics there
    Semantics(container = true, properties = { accessibilityValue = Strings.InProgress }) {
        val stroke = with(DensityAmbient.current) {
            Stroke(width = strokeWidth.toPx().value, cap = StrokeCap.square)
        }
        Transition(
            definition = CircularIndeterminateTransition,
            initState = 0,
            toState = 1
        ) { state ->
            val currentRotation = state[IterationProp]
            val baseRotation = state[BaseRotationProp]

            val currentRotationAngleOffset = (currentRotation * RotationAngleOffset) % 360f

            var startAngle = state[TailRotationProp]
            val endAngle = state[HeadRotationProp]
            // How long a line to draw using the start angle as a reference point
            val sweep = abs(endAngle - startAngle)

            // Offset by the constant offset and the per rotation offset
            startAngle += StartAngleOffset + currentRotationAngleOffset
            startAngle += baseRotation

            Canvas(
                modifier.padding(CircularIndicatorPadding)
                    .preferredSize(CircularIndicatorDiameter)
            ) {
                drawIndeterminateCircularIndicator(startAngle, strokeWidth, sweep, color, stroke)
            }
        }
    }
}
SwipeToRefreshLayout
- SwipeToRefreshLayout⇒HomeScreenBodyWrapperの感じ。
- SwipeToRefreshLayoutもUIのComposable関数である。
- StateDraggableからは次に。。
@Composable
fun SwipeToRefreshLayout(
    refreshingState: Boolean,
    onRefresh: () -> Unit,
    refreshIndicator: @Composable() () -> Unit,
    content: @Composable() () -> Unit
) {
    val size = with(DensityAmbient.current) { SWIPE_DISTANCE_SIZE.toPx().value }
    // min is below negative to hide
    val min = -size
    val max = size * SWIPE_DOWN_OFFSET
    StateDraggable(
        state = refreshingState,
        onStateChange = { shouldRefresh -> if (shouldRefresh) onRefresh() },
        anchorsToState = listOf(min to false, max to true),
        animationBuilder = TweenBuilder(),
        dragDirection = DragDirection.Vertical,
        minValue = min,
        maxValue = max
    ) { dragPosition ->
        val dpOffset = with(DensityAmbient.current) {
            (dragPosition.value * 0.5).px.toDp()
        }
        Stack {
            content()
            Box(Modifier.gravity(Alignment.TopCenter).offset(0.dp, dpOffset)) {
                if (dragPosition.value != min) {
                    refreshIndicator()
                }
            }
        }
    }
}
終わりに
次はStateDraggableから始めようと思います。
今回はここまでメモします。
つづく今日分かったこと
CircularProgressIndicatorはFlutterと同じ名で使える。
- 投稿日:2020-07-04T12:05:15+09:00
Firebase Remote Configの挙動について
RemoteConfigは便利なんですが雰囲気で使うと思ったように動かなかったりするのでちゃんとまとめようと思います.
※ QiitaのほうがSEO強そうなのでブログに書いた内容の転載ですが同じものを投稿しておきます
-> https://iwsksky.hatenablog.com/entry/2020/07/04/114815TL;DL
- fetchAndActivateをするとremoteの値がローカルに保存され参照可能となる
- ローカルキャッシュの期限は最短でも12分でそれ以上の頻度では更新できない
- 参照は通信結果ではなく常にローカルキャッシュの値
概要
https://firebase.google.com/docs/remote-config/images/param-precedence.png?hl=ja
図1. RemoteConfig概要図[1]抑えておきたい概念は以下の通り
- cache
- fetch/activate
- interval
1個ずつ見ていきます.
cache
RemoteConfigは常にremoteから値を取得するわけではなく,後述するfetchIntervalにlimitがありそれ以上の頻度ではremoteの値を取得できない仕組みになっています.なので基本的にはローカルのキャッシュを参照してたまにremoteの値を取得すると思ってもらって良いです.Device File Explorerでローカルフォルダを見に行くと以下のようにjsonが保存されていて参照するときはこの値を見ています.(any_key_nameとなってるところがRemoteConfigで設定したフィールド名で今回はboolを設定していると思ってください)
frc_1/xxxxxxxxxxx/android/xxxxxxxxxxx_firebase_activate.json{"configs_key":{"any_key_name":"true"},"fetch_time_key":1593480378652,"abt_experiments_key":[]}
ex.ktremoteConfig.getBoolean("any_key_name")fetchの設定やログもxmlで保持しています.
frc_1/xxxxxxxxxxx/android/xxxxxxxxxxx_firebase_settings.xml<?xml version='1.0' encoding='utf-8' standalone='yes' ?> <map> <long name="fetch_timeout_in_seconds" value="5" /> <int name="last_fetch_status" value="-1" /> <boolean name="is_developer_mode_enabled" value="false" /> <long name="minimum_fetch_interval_in_seconds" value="1800" /> <long name="backoff_end_time_in_millis" value="-1" /> <long name="last_fetch_time_in_millis" value="1593480378652" /> <int name="num_failed_fetches" value="0" /> </map>fetch/activate
cacheの項目でアプリはactivateされたcacheを参照すると記述しましたがfetchを行っただけではjsonファイルは作成されません.fetchをした段階では以下のようなファイルがローカルのdataディレクトリに作成されます,このjsonはremoteの情報を反映したものです.
frc_1/xxxxxxxxxxx/android/xxxxxxxxxxx_firebase_fetch.json{"configs_key":{"any_key_name":"false"},"fetch_time_key":1593829520560,"abt_experiments_key":[]}以下のようにactivateすることで初めてfirebase_activate.jsonが作成されます.
return activatedConfigsCache .put(fetchedContainer) .continueWith(executor, this::processActivatePutTask);return Tasks.call(executorService, () -> storageClient.write(configContainer))interval
上述のとおりintervalはremoteからフェッチする間隔であり公式によると最短で1時間5回(=12分)のようです.
アプリが短期間に何度もフェッチすると、フェッチ呼び出しが抑制され、SDK から FirebaseRemoteConfigFetchThrottledException が返されます。バージョン 17.0.0 よりも前の SDK では、フェッチ リクエストは 60 分間に 5 回までと制限されていました(新しいバージョンでは制限が緩和されています)。
https://firebase.google.com/docs/remote-config/use-config-android?hl=jaデフォルトではインターバルは12時間に設定されます.
public static final long DEFAULT_MINIMUM_FETCH_INTERVAL_IN_SECONDS = HOURS.toSeconds(12);キャッシュの有効期限(=インターバル)が切れていなければローカルの値を読みます.
if (cachedFetchConfigsTask.isSuccessful() && areCachedFetchConfigsValid(minimumFetchIntervalInSeconds, currentTime)) { // Keep the cached fetch values if the cache has not expired yet. return Tasks.forResult(FetchResponse.forLocalStorageUsed(currentTime)); }また,なんらかの理由でremoteのfetchに失敗した場合はエクスポネンシャルバックオフでスロットリングがかかるのでその場合もfetchは行われないようです(exceptionが吐かれる)
Date backoffEndTime = getBackoffEndTimeInMillis(currentTime); if (backoffEndTime != null) { // TODO(issues/260): Provide a way for users to check for throttled status so exceptions // aren't the only way for users to determine if they're throttled. fetchResponseTask = Tasks.forException( new FirebaseRemoteConfigFetchThrottledException( createThrottledMessage(backoffEndTime.getTime() - currentTime.getTime()), backoffEndTime.getTime())); } else {まとめ
仕組みがわかれば特に難しいことはないんですが雰囲気で使うとremoteの値が取得できないとか思った結果と違うものが取得できたみたいなことになりやすいです.最短でも12分間隔でしかfetchできないというのがミソなのでリアルタイム性が求められるような情報はRemoteConfigとはあまり相性が良くないと言えるかもしれません.
refs
[1] [https://firebase.google.com/docs/remote-config?hl=ja:title]
- 投稿日:2020-07-04T12:05:15+09:00
Firebase RemoteConfigの挙動について
RemoteConfigは便利なんですが雰囲気で使うと思ったように動かなかったりするのでちゃんとまとめようと思います.
※ QiitaのほうがSEO強そうなのでブログに書いた内容の転載ですが同じものを投稿しておきます
-> https://iwsksky.hatenablog.com/entry/2020/07/04/114815TL;DL
- fetchAndActivateをするとremoteの値がローカルに保存され参照可能となる
- ローカルキャッシュの期限は最短でも12分でそれ以上の頻度では更新できない
- 参照は通信結果ではなく常にローカルキャッシュの値
概要
https://firebase.google.com/docs/remote-config/images/param-precedence.png?hl=ja
図1. RemoteConfig概要図[1]抑えておきたい概念は以下の通り
- cache
- fetch/activate
- interval
1個ずつ見ていきます.
cache
RemoteConfigは常にremoteから値を取得するわけではなく,後述するfetchIntervalにlimitがありそれ以上の頻度ではremoteの値を取得できない仕組みになっています.なので基本的にはローカルのキャッシュを参照してたまにremoteの値を取得すると思ってもらって良いです.Device File Explorerでローカルフォルダを見に行くと以下のようにjsonが保存されていて参照するときはこの値を見ています.(any_key_nameとなってるところがRemoteConfigで設定したフィールド名で今回はboolを設定していると思ってください)
frc_1/xxxxxxxxxxx/android/xxxxxxxxxxx_firebase_activate.json{"configs_key":{"any_key_name":"true"},"fetch_time_key":1593480378652,"abt_experiments_key":[]}
ex.ktremoteConfig.getBoolean("any_key_name")fetchの設定やログもxmlで保持しています.
frc_1/xxxxxxxxxxx/android/xxxxxxxxxxx_firebase_settings.xml<?xml version='1.0' encoding='utf-8' standalone='yes' ?> <map> <long name="fetch_timeout_in_seconds" value="5" /> <int name="last_fetch_status" value="-1" /> <boolean name="is_developer_mode_enabled" value="false" /> <long name="minimum_fetch_interval_in_seconds" value="1800" /> <long name="backoff_end_time_in_millis" value="-1" /> <long name="last_fetch_time_in_millis" value="1593480378652" /> <int name="num_failed_fetches" value="0" /> </map>fetch/activate
cacheの項目でアプリはactivateされたcacheを参照すると記述しましたがfetchを行っただけではjsonファイルは作成されません.fetchをした段階では以下のようなファイルがローカルのdataディレクトリに作成されます,このjsonはremoteの情報を反映したものです.
frc_1/xxxxxxxxxxx/android/xxxxxxxxxxx_firebase_fetch.json{"configs_key":{"any_key_name":"false"},"fetch_time_key":1593829520560,"abt_experiments_key":[]}以下のようにactivateすることで初めてfirebase_activate.jsonが作成されます.
return activatedConfigsCache .put(fetchedContainer) .continueWith(executor, this::processActivatePutTask);return Tasks.call(executorService, () -> storageClient.write(configContainer))interval
上述のとおりintervalはremoteからフェッチする間隔であり公式によると最短で1時間5回(=12分)のようです.
アプリが短期間に何度もフェッチすると、フェッチ呼び出しが抑制され、SDK から FirebaseRemoteConfigFetchThrottledException が返されます。バージョン 17.0.0 よりも前の SDK では、フェッチ リクエストは 60 分間に 5 回までと制限されていました(新しいバージョンでは制限が緩和されています)。
https://firebase.google.com/docs/remote-config/use-config-android?hl=jaデフォルトではインターバルは12時間に設定されます.
public static final long DEFAULT_MINIMUM_FETCH_INTERVAL_IN_SECONDS = HOURS.toSeconds(12);キャッシュの有効期限(=インターバル)が切れていなければローカルの値を読みます.
if (cachedFetchConfigsTask.isSuccessful() && areCachedFetchConfigsValid(minimumFetchIntervalInSeconds, currentTime)) { // Keep the cached fetch values if the cache has not expired yet. return Tasks.forResult(FetchResponse.forLocalStorageUsed(currentTime)); }また,なんらかの理由でremoteのfetchに失敗した場合はエクスポネンシャルバックオフでスロットリングがかかるのでその場合もfetchは行われないようです(exceptionが吐かれる)
Date backoffEndTime = getBackoffEndTimeInMillis(currentTime); if (backoffEndTime != null) { // TODO(issues/260): Provide a way for users to check for throttled status so exceptions // aren't the only way for users to determine if they're throttled. fetchResponseTask = Tasks.forException( new FirebaseRemoteConfigFetchThrottledException( createThrottledMessage(backoffEndTime.getTime() - currentTime.getTime()), backoffEndTime.getTime())); } else {まとめ
仕組みがわかれば特に難しいことはないんですが雰囲気で使うとremoteの値が取得できないとか思った結果と違うものが取得できたみたいなことになりやすいです.最短でも12分間隔でしかfetchできないというのがミソなのでリアルタイム性が求められるような情報はRemoteConfigとはあまり相性が良くないと言えるかもしれません.
refs
[1] [https://firebase.google.com/docs/remote-config?hl=ja:title]