- 投稿日:2020-06-30T22:57:49+09:00
Swift UISliderの使い方
初めまして。
初回はUISliderの使い方について書こうと思います。まず、componentをViewControllerに接続してください。
ViewController.swiftimport UIKit class ViewController: UIViewController { @IBOutlet weak var label: UILabel! @IBOutlet weak var sliderValue: UISlider! override func viewDidLoad() { super.viewDidLoad() } @IBAction func slider(_ sender: Any) { } }接続後はこんな感じのコードになるかと思います。
ここからはsliderの値をlabelに表示していきます。
ViewController.swift@IBAction func slider(_ sender: Any) { //slider.valueはFloatなのでStringにキャストしなければいけない label.text = String(slider.value) }このままだと少数まで表示されてしまうので
label.text = String(Int(slider.value))
にしましょう。今回はこれで終わります。
- 投稿日:2020-06-30T21:18:55+09:00
WKWebViewを利用した実装でメモリリークしやすいパターン2つ
WKWebViewを利用したアプリを開発していてメモリリークの問題に当たったので、その原因を整理してメモしておく
メモリリークするパターン
以下のように、
TabというクラスがWKWebViewのインスタンスを強参照しているとする。class Tab { var webView: WKWebView }WKWebViewをインスタンス化してプロダクト専用の処理や設定を構成する過程で、特に注意せずに実装するとWKWebViewインスタンスが
Tabクラスを強参照することになるパターンがある。
そうなると、WKWebViewインスタンスとTabクラスがお互いを強参照する循環参照の状態となり、Tabを破棄したつもりでもメモリ上に残ったままとなり、メモリリークが発生してしまう。このようなパターンの具体的な例を、以下に2つ挙げる。
KVO登録
WKWebViewにKVOの仕組みを用いて、特定のプロパティが変化したときに
Tab内の特定の処理を呼び出すという実装を行うとき、メモリリークが発生しやすい。ここでは、ページ読み込み完了の割合を取得できる
estimatedProgressのKVOを登録する例を示す。メモリリークするパターンclass Tab { var webView: WKWebView var webViewKeyValueObservers: NSKeyValueObservation? func configure() { self.webViewKeyValueObservers = webView.observe(\.estimatedProgress) { (webView, _) in // 普通に self と書くと強参照になる self.estimatedProgressDidChange(webView) } } func estimatedProgressDidChange(_ webView: WKWebView) { // ... } }上記のパターンでは、KVO登録時のクロージャ内で
selfつまりTabクラスを強参照しているため、WKWebViewインスタンスがTabを強参照することになる。そのため、循環参照が発生し、メモリリークが発生する。解決策としては、以下のようにクロージャ内で
selfを弱参照にする実装が挙げられる。メモリリークしないパターンclass Tab { var webView: WKWebView var webViewKeyValueObservers: NSKeyValueObservation? func configure() { self.webViewKeyValueObservers = webView.observe(\.estimatedProgress) { [weak self] (webView, _) in // [weak self] を付与することで self が弱参照になる self?.estimatedProgressDidChange(webView) } } func estimatedProgressDidChange(_ webView: WKWebView) { // ... } }上記のようにすることで、WKWebViewが
Tabを強参照しなくなり、循環参照が発生せず、メモリリークが発生しない。UserContentController登録
WKWebViewからネイティブの処理を実行する仕組み
UserContentControllerを使う時、ネイティブの実装としてTabを指定する場合に、メモリリークが発生しやすい。メモリリークするパターンclass Tab { var webView: WKWebView func configure() { // 普通に self を渡すと強参照になる webView.configuration.userContentController.add(self, name: "test") } } extension Tab: WKScriptMessageHandler { func userContentController(_ userContentController: WKUserContentController, didReceive message: WKScriptMessage) { guard message.name == "test" else { return } // ... } }UserContentControllerの
addは引数に指定したインスタンスを強参照する仕様になっており、上記のパターンでは、WKWebViewのインスタンスがselfつまりTabクラスを強参照することになる。そのため、循環参照が発生し、メモリリークが発生してしまう。解決策としては、このページの流用となるが、以下のように
Tabを一旦弱参照にするクラスをブリッジとして入れる実装が挙げられる。メモリリークしないパターンclass Tab { var webView: WKWebView func configure() { // self を弱参照にして渡す webView.configuration.userContentController.add( WKScriptMessageHandlerWithWeakReference(to: self), name: "test") } } extension Tab: WKScriptMessageHandler { func userContentController(_ userContentController: WKUserContentController, didReceive message: WKScriptMessage) { guard message.name == "test" else { return } // ... } } class WKScriptMessageHandlerWithWeakReference: NSObject, WKScriptMessageHandler { private weak var delegate: WKScriptMessageHandler? init(to delegate: WKScriptMessageHandler) { self.delegate = delegate super.init() } func userContentController(_ userContentController: WKUserContentController, didReceive message: WKScriptMessage) { self.delegate?.userContentController(userContentController, didReceive: message) } }上記のようにすることで、WKWebViewが
Tabを強参照しなくなり、循環参照が発生せず、メモリリークが発生しない。参考
- 投稿日:2020-06-30T20:30:50+09:00
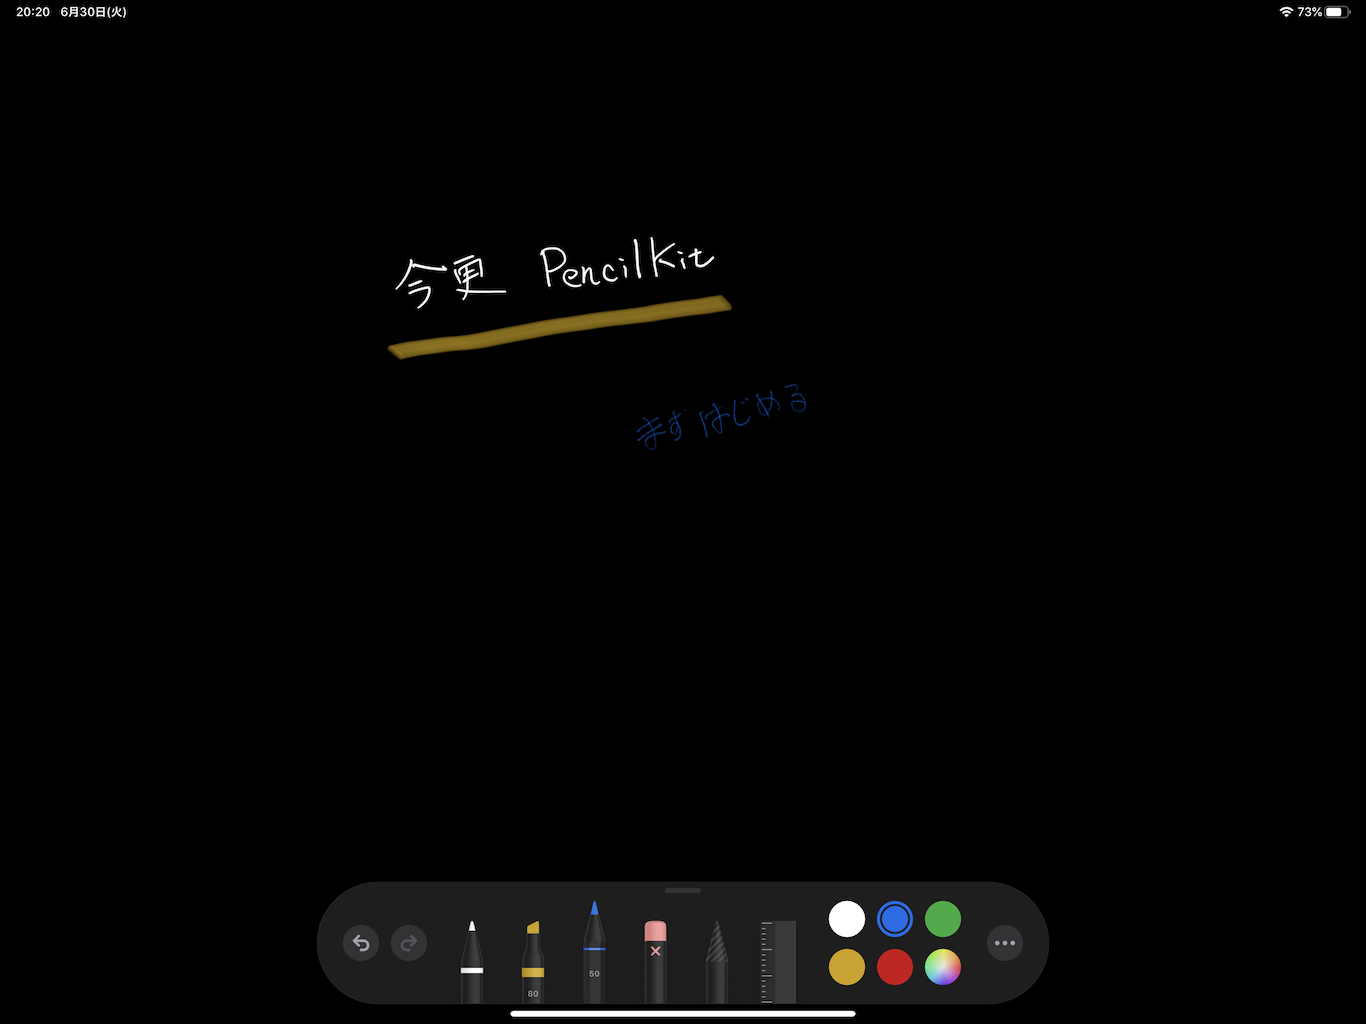
Swift 今更!?PencilKit
WWDC2020「PencilKitの新機能」を見て、PencilKitを使っていないと思い立ち始める。
PencilKitを使って作りたいものが過去からあり、そこに向かって、最初の最初、スタートライン前。とりあえずPencilKitを使う
StoryBoardでPKCanvasView配置
ViewController.swift
import UIKit
import PencilKit

class ViewController: UIViewController, PKToolPickerObserver {

    @IBOutlet weak var pkCanvasView: PKCanvasView!

    var toolPicker: PKToolPicker!

    override func viewDidLoad() {
        super.viewDidLoad()
        pkCanvasView.allowsFingerDrawing = false
    }

    override func viewWillAppear(_ animated: Bool) {
        super.viewWillAppear(animated)
    }

    override func viewDidAppear(_ animated: Bool) {
        super.viewDidAppear(animated)
        if let window = self.pkCanvasView.window {
            let toolPicker = PKToolPicker.shared(for: window)
            toolPicker?.addObserver(pkCanvasView)
            toolPicker?.setVisible(true, forFirstResponder: pkCanvasView)
            pkCanvasView.becomeFirstResponder()
            print("PKToolPicker Set")
        }
    }
}
これだけでここまで出来る

- 投稿日:2020-06-30T19:03:03+09:00
Swift:メニューバー(NSStatusBarButton)をクリックしたときの動作を左右クリックで分ける
AppDelegate.swift@NSApplicationMain class AppDelegate: NSObject, NSApplicationDelegate { let statusItem = NSStatusBar.system.statusItem(withLength: NSStatusItem.variableLength) var button: NSStatusBarButton! func applicationDidFinishLaunching(_ aNotification: Notification) { button = statusItem.button! button.title = "?" button.action = #selector(clicked(_:)) // ここで受け取るイベントを登録しておく button.sendAction(on: [.leftMouseDown, .rightMouseDown]) } @objc func clicked(_ sender: NSStatusBarButton) { let event = NSApp.currentEvent! switch event.type { case .rightMouseUp: print("right click") case .leftMouseUp: print("left click") default: break } } }
- 投稿日:2020-06-30T16:51:09+09:00
Alamofire5.2のAuthenticationInterceptorでトークンリフレッシュを試す
AuthenticationInterceptor
先月Alamofire 5.2がリリースされました。
https://github.com/Alamofire/Alamofire/releases/tag/5.2.0新機能の1つとして、「AuthenticationInterceptor」があります。
(Release)
https://github.com/Alamofire/Alamofire/releases/tag/5.2.0
(PR)
https://github.com/Alamofire/Alamofire/pull/3164クレデンシャルを使用したリクエストのAdaptとRetryを容易にするために導入されたとされています。
AuthenticationInterceptorは、AdaptとRetryの処理におけるスレッドやキューイングの管理を意識せずに実装するための仕組みのようです。経緯
導入の発端?となったのはこのissueのようです。
https://github.com/Alamofire/Alamofire/issues/3086今までAdvanced Usageに記載されていたOAuthのトークンリフレッシュ処理のexampleが突然削除されたのはなぜか?という趣旨のissueです。
従来Alamofireで行われていたトークンリフレッシュの実装はこんな感じでした。(上記issueより抜粋)
  // MARK: - RequestRetrier

    func should(_ manager: SessionManager, retry request: Request, with error: Error, completion: @escaping RequestRetryCompletion) {
        lock.lock() ; defer { lock.unlock() }

        if let response = request.task?.response as? HTTPURLResponse, response.statusCode == 401 {
            requestsToRetry.append(completion)

            if !isRefreshing {
                refreshTokens { [weak self] succeeded, accessToken, refreshToken in
                    guard let strongSelf = self else { return }

                    strongSelf.lock.lock() ; defer { strongSelf.lock.unlock() }

                    if let accessToken = accessToken, let refreshToken = refreshToken {
                        strongSelf.accessToken = accessToken
                        strongSelf.refreshToken = refreshToken
                    }

                    strongSelf.requestsToRetry.forEach { $0(succeeded, 0.0) }
                    strongSelf.requestsToRetry.removeAll()
                }
            }
        } else {
            completion(false, 0.0)
        }
    }
RequestRetrierを用いる方法ですが、上記のようなコードが今まではAlamofireのAdvanced Usageには記載がありました。
それが最近突如削除されたので、既存のサンプルコードが何かまずい動作をしていたのではないかと心配になった開発者の方々がいたようですね。
私もRequestRetrierを実際に利用していましたが、「lock.lock()処理がサンプルに入っているけど、入れても他に影響ないかな?」みたいなことを考えた記憶があります。Alamofireの開発サイドとしては、どうやら掲載していたサンプルコードは本番で動く想定のものではなかったとのことです。しかしその意図と反して本番プロジェクトにも利用されることが増えてしまったため、Advanced Usageから削除したとコメントされています。実際、ネット上で見るRequestRetrierの実装の紹介の多くが上記のような実装になっていますよね。
こういった状況を踏まえ、スレッドの管理やlock処理について意識した実装をする必要のない仕組みの導入に至ったようです。
使い方
クレデンシャル情報をプロパティに持つstructを定義します。(公式のサンプルから抜粋)
struct OAuthCredential: AuthenticationCredential {
    let accessToken: String
    let refreshToken: String
    let userID: String
    let expiration: Date

    // Require refresh if within 5 minutes of expiration
    var requiresRefresh: Bool { Date(timeIntervalSinceNow: 60 * 5) > expiration }
}
次にAuthenticatorクラスを実装します。
applyメソッドでは、クレデンシャル情報の適用(headerにトークン付与)、refreshメソッドではリフレッシュ処理を行います。class OAuthAuthenticator: Authenticator { func apply(_ credential: OAuthCredential, to urlRequest: inout URLRequest) { urlRequest.headers.add(.authorization(bearerToken: credential.accessToken)) } func refresh(_ credential: OAuthCredential, for session: Session, completion: @escaping (Result<OAuthCredential, Error>) -> Void) { // トークンリフレッシュ処理 requestToRefreshToken() // 新しいクレデンシャルの作成 completion(.success(newCredential)) } func didRequest(_ urlRequest: URLRequest, with response: HTTPURLResponse, failDueToAuthenticationError error: Error) -> Bool { return response.statusCode == 401 } func isRequest(_ urlRequest: URLRequest, authenticatedWith credential: OAuthCredential) -> Bool { let bearerToken = HTTPHeader.authorization(bearerToken: credential.accessToken).value return urlRequest.headers["Authorization"] == bearerToken } }上記のようにrefreshメソッド内でトークンリフレッシュ処理を行い、新しいクレデンシャル情報をcompletion(.success)に渡してあげると、それ以降の通信は新しいクレデンシャルをapplyメソッドで適用してくれるようになります。
使い方はこんな感じです。 (公式のAdvancedUsageより抜粋)
// Generally load from keychain if it exists
let credential = OAuthCredential(accessToken: "a0",
                                 refreshToken: "r0",
                                 userID: "u0",
                                 expiration: Date(timeIntervalSinceNow: 60 * 60))

// Create the interceptor
let authenticator = OAuthAuthenticator()
let interceptor = AuthenticationInterceptor(authenticator: authenticator,
                                            credential: credential)

// Execute requests with the interceptor
let session = Session()
let urlRequest = URLRequest(url: URL(string: "https://api.example.com/example/user")!)
session.request(urlRequest, interceptor: interceptor)
手軽にトークンリフレッシュ機能を実装することが可能でした。
尚、Authenticatorクラスの「didRequest」「isRequest」メソッドですが、下記のような定義がコメントで書かれているものの、手元でこのメソッドに到達するケースを見つけることができませんでした。
    func didRequest(_ urlRequest: URLRequest,
                    with response: HTTPURLResponse,
                    failDueToAuthenticationError error: Error) -> Bool {
        // If authentication server CANNOT invalidate credentials, return `false`
        return false

        // If authentication server CAN invalidate credentials, then inspect the response matching against what the
        // authentication server returns as an authentication failure. This is generally a 401 along with a custom
        // header value.
        // return response.statusCode == 401
    }

    func isRequest(_ urlRequest: URLRequest, authenticatedWith credential: OAuthCredential) -> Bool {
        // If authentication server CANNOT invalidate credentials, return `true`
        return true

        // If authentication server CAN invalidate credentials, then compare the "Authorization" header value in the
        // `URLRequest` against the Bearer token generated with the access token of the `Credential`.
        // let bearerToken = HTTPHeader.authorization(bearerToken: credential.accessToken).value
        // return urlRequest.headers["Authorization"] == bearerToken
    }
issueでも質問をしてみていますが、引き続き調査をしつつ判明したことがあったら追記をしていきます。
以上、AuthenticationInterceptorを使ってみた際のメモでした。
- 投稿日:2020-06-30T15:50:39+09:00
systemLayoutSizeFittingでViewの高さを計算する
UICollectionViewCellなどで、表示する内容とAutoLayoutの制約から高さを計算したいことは、よくあると思います。
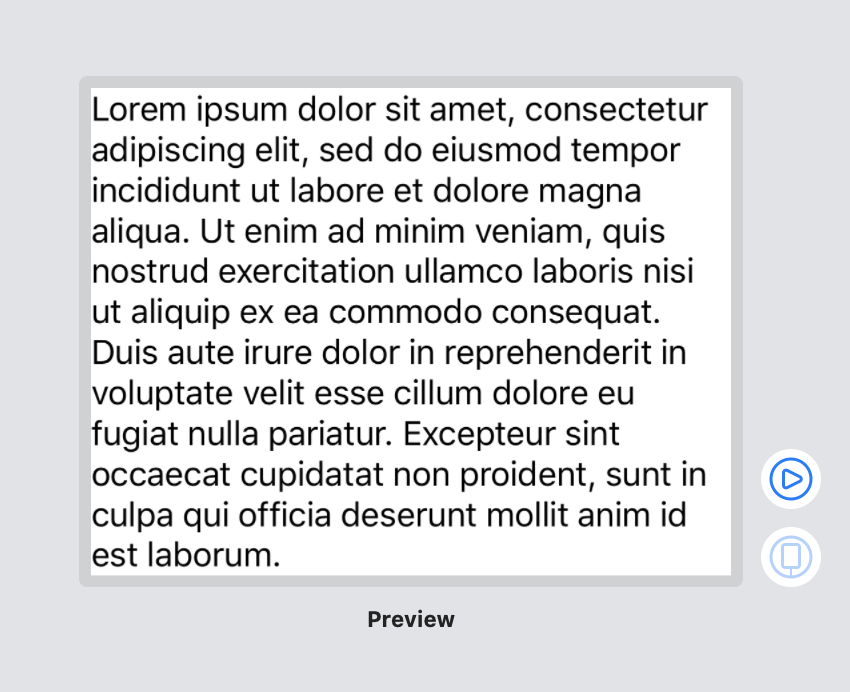
そのような時は以下のようにsystemLayoutSizeFittingSize:を使うだけで、簡単に高さを得ることができます。class SampleCell: UICollectionViewCell { @IBOutlet weak var label: UILabel! private static var layoutCell: SampleCell = { UINib(nibName: "SampleCell", bundle: nil) .instantiate(withOwner: nil, options: nil)[0] as! SampleCell }() static func fittingSize(from model: String, with containerWidth: CGFloat) -> CGSize { layoutCell.label.text = model layoutCell.frame.size = CGSize(width: containerWidth, height: .greatestFiniteMagnitude) layoutCell.setNeedsLayout() layoutCell.layoutIfNeeded() return layoutCell.systemLayoutSizeFitting(UIView.layoutFittingCompressedSize) } }
上記のxibとコードを、Xcode Previewsで次のように確認すると高さの計算がうまくいってることがわかります。
struct SampleCell_Previews: PreviewProvider {
    static var model = "Lorem ipsum dolor sit amet, consectetur adipiscing elit, sed do eiusmod tempor incididunt ut labore et dolore magna aliqua. Ut enim ad minim veniam, quis nostrud exercitation ullamco laboris nisi ut aliquip ex ea commodo consequat. Duis aute irure dolor in reprehenderit in voluptate velit esse cillum dolore eu fugiat nulla pariatur. Excepteur sint occaecat cupidatat non proident, sunt in culpa qui officia deserunt mollit anim id est laborum."

    static var previews: some View {
        let cell = UINib(nibName: "SampleCell", bundle: nil)
            .instantiate(withOwner: nil, options: nil)[0] as! SampleCell
        cell.label.text = model
        let view = Wrap(uiView: cell)
        return view
            .previewLayout(
                .fixed(
                    width: 320,
                    height: SampleCell.fittingSize(from: model, with: 320).height
                )
            )
    }
}

struct Wrap<T: UIView>: UIViewRepresentable {
    var uiView: T
    func makeUIView(context: Context) -> T { uiView }
    func updateUIView(_ view: T, context: Context) {}
}
このように多くの場合はsystemLayoutSizeFittingSize:で期待した通りの高さを得ることができます。ただし、Aspect Ratio制約を使っている場合は注意が必要です。
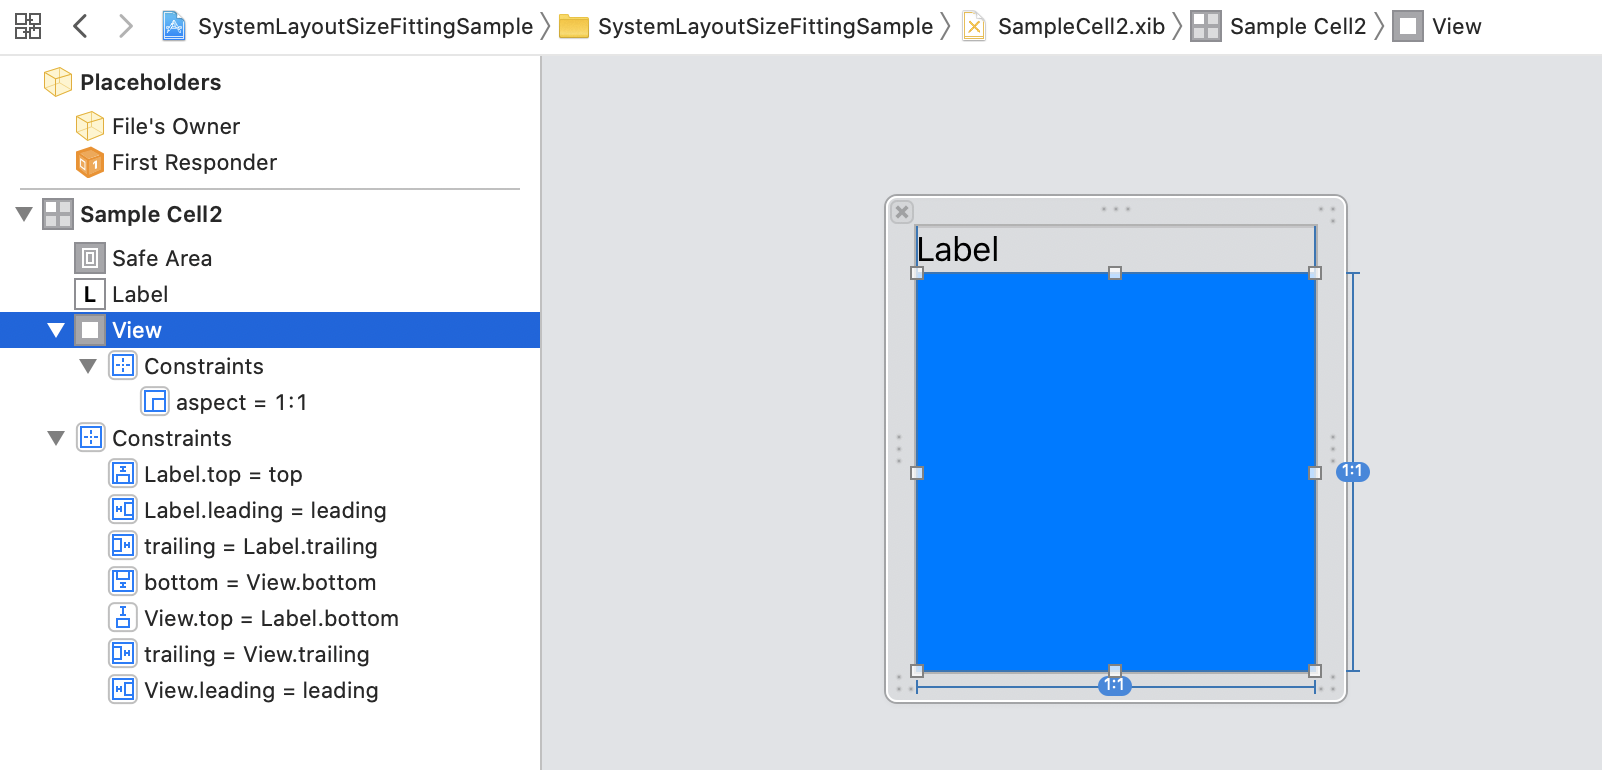
例えば以下のようなViewの場合です。(青い正方形のViewに1:1のAspect Ratio制約をかけています)
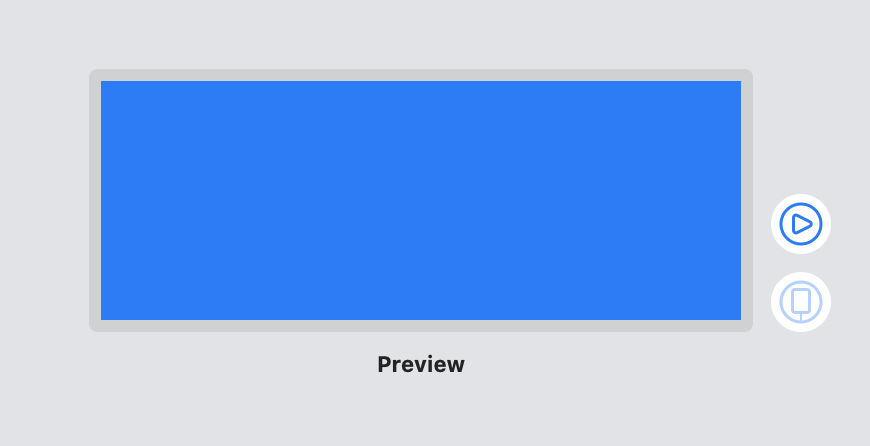
このUILabelに入る文字列の長さや指定した幅の大きさによっては、小さいサイズに縮小されてしまい、期待する高さを得られないことがあります。
class SampleCell2: UICollectionViewCell {
    @IBOutlet weak var label: UILabel!

    private static var layoutCell: SampleCell2 = {
        UINib(nibName: "SampleCell2", bundle: nil)
            .instantiate(withOwner: nil, options: nil)[0] as! SampleCell2
    }()

    static func fittingSize(from model: String, with containerWidth: CGFloat) -> CGSize {
        layoutCell.label.text = model
        layoutCell.frame.size = CGSize(width: containerWidth, height: .greatestFiniteMagnitude)
        layoutCell.setNeedsLayout()
        layoutCell.layoutIfNeeded()
        return layoutCell.systemLayoutSizeFitting(UIView.layoutFittingCompressedSize)
    }
}

struct SampleCell2_Previews: PreviewProvider {
    static var model = "Lorem ipsum"

    static var previews: some View {
        let cell = UINib(nibName: "SampleCell2", bundle: nil)
            .instantiate(withOwner: nil, options: nil)[0] as! SampleCell2
        cell.label.text = model
        let view = Wrap(uiView: cell)
        return view
            .previewLayout(
                .fixed(
                    width: 320,
                    height: SampleCell2.fittingSize(from: model, with: 320).height
                )
            )
    }
}
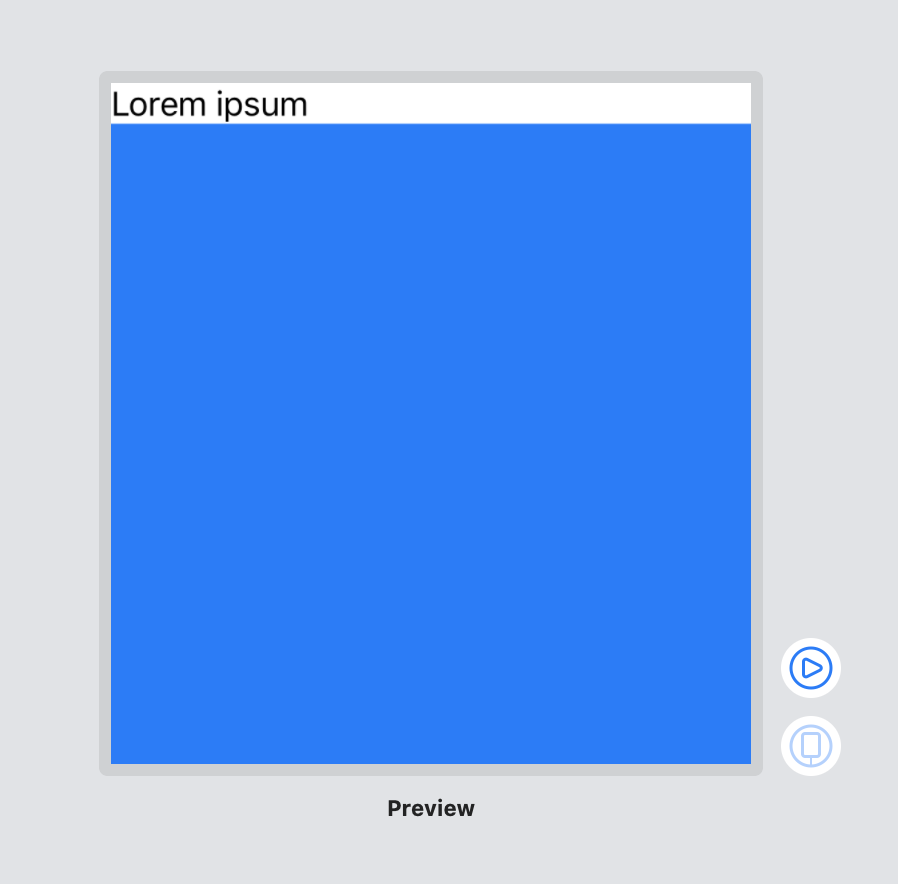
そのような場合はsystemLayoutSizeFittingSize:withHorizontalFittingPriority:verticalFittingPriority:を使い、HorizontalFittingPriorityをrequiredにすると指定した幅が優先されます。これでUILabelに入る文字列の長さや指定した幅に依存せず、期待した高さを得ることができます。
    static func fittingSize(from model: String, with containerWidth: CGFloat) -> CGSize {
        layoutCell.label.text = model
        layoutCell.frame.size = CGSize(width: containerWidth, height: .greatestFiniteMagnitude)
        layoutCell.setNeedsLayout()
        layoutCell.layoutIfNeeded()
//        return layoutCell.systemLayoutSizeFitting(UIView.layoutFittingCompressedSize)
        return layoutCell.systemLayoutSizeFitting(
            UIView.layoutFittingCompressedSize,
            withHorizontalFittingPriority: .required,
            verticalFittingPriority: .fittingSizeLevel
        )
    }
こちらにこれらのコードを含んだサンプルプロジェクトを公開しました。気になる方は、ぜひ確認してみてください。
https://github.com/maoyama/SystemLayoutSizeFittingSample

- 投稿日:2020-06-30T13:00:32+09:00
iOS12でもXcode Previewsを使いたい!
はじめに
ある日、下記のような条件によって表示する項目が変わるカスタム View を修正することになりました。(実際はもっと項目が多い)
final class PiyoView: UIStackView {

    struct Config {
        let isAlertShown: Bool
        let alert: String?
        let isInfoShown: Bool
        let info: String?
        let message: String
    }

    private var alertBackgroundView: UIView = {
        let view = UIView()
        view.backgroundColor = UIColor(named: "alert_red_bg")
        view.translatesAutoresizingMaskIntoConstraints = false
        return view
    }()

    private var alertContainerView: UIStackView = {
        let stack = UIStackView()
        stack.axis = .horizontal
        stack.spacing = 8
        stack.alignment = .center
        stack.translatesAutoresizingMaskIntoConstraints = false
        return stack
    }()

    private var alertImageView: UIImageView = {
        let image = UIImageView()
        image.tintColor = UIColor(named: "alert_red")
        if #available(iOS 13.0, *) {
            image.image = UIImage(systemName: "exclamationmark.shield.fill")
            image.translatesAutoresizingMaskIntoConstraints = false
            NSLayoutConstraint.activate([
                image.heightAnchor.constraint(equalToConstant: 25),
                image.widthAnchor.constraint(equalToConstant: 25)
            ])
        } else {
            // Fallback on earlier versions
        }
        return image
    }()

    private var alertLabel: UILabel = {
        let label = UILabel()
        label.textColor = UIColor(named: "alert_red")
        label.font = .systemFont(ofSize: 16)
        label.numberOfLines = 0
        label.translatesAutoresizingMaskIntoConstraints = false
        label.setContentHuggingPriority(.init(750), for: .vertical)
        return label
    }()

    private var infoBackgroundView: UIView = {
        let view = UIView()
        view.backgroundColor = UIColor(named: "info_blue_bg")
        view.translatesAutoresizingMaskIntoConstraints = false
        return view
    }()

    private var infoContainerView: UIStackView = {
        let stack = UIStackView()
        stack.axis = .horizontal
        stack.spacing = 8
        stack.alignment = .center
        stack.translatesAutoresizingMaskIntoConstraints = false
        return stack
    }()

    private var infoImageView: UIImageView = {
        let image = UIImageView()
        image.tintColor = UIColor(named: "info_blue")
        if #available(iOS 13.0, *) {
            image.image = UIImage(systemName: "info.circle.fill")
            image.translatesAutoresizingMaskIntoConstraints = false
            NSLayoutConstraint.activate([
                image.heightAnchor.constraint(equalToConstant: 25),
                image.widthAnchor.constraint(equalToConstant: 25)
            ])
        } else {
            // Fallback on earlier versions
        }
        return image
    }()

    private var infoLabel: UILabel = {
        let label = UILabel()
        label.textColor = UIColor(named: "info_blue")
        label.font = .systemFont(ofSize: 16)
        label.numberOfLines = 0
        label.translatesAutoresizingMaskIntoConstraints = false
        label.setContentHuggingPriority(.init(750), for: .vertical)
        return label
    }()

    private var messageBackgroundView: UIView = {
        let view = UIView()
        view.backgroundColor = .white
        view.translatesAutoresizingMaskIntoConstraints = false
        return view
    }()

    private var messageContainerView: UIStackView = {
        let stack = UIStackView()
        stack.axis = .horizontal
        stack.spacing = 8
        stack.alignment = .center
        stack.translatesAutoresizingMaskIntoConstraints = false
        return stack
    }()

    private var messageLabel: UILabel = {
        let label = UILabel()
        label.font = .systemFont(ofSize: 12)
        label.numberOfLines = 0
        label.translatesAutoresizingMaskIntoConstraints = false
        return label
    }()

    override init(frame: CGRect) {
        super.init(frame: .zero)
        commonInit()
    }

    required init(coder: NSCoder) {
        super.init(coder: coder)
        commonInit()
    }

    private func commonInit() {
        axis = .vertical
        spacing = 0

        alertContainerView.addArrangedSubview(alertImageView)
        alertContainerView.addArrangedSubview(alertLabel)
        alertBackgroundView.addSubview(alertContainerView)
        addArrangedSubview(alertBackgroundView)
        NSLayoutConstraint.activate([
            alertContainerView.topAnchor.constraint(equalTo: alertBackgroundView.topAnchor, constant: 8),
            alertContainerView.bottomAnchor.constraint(equalTo: alertBackgroundView.bottomAnchor, constant: -8),
            alertContainerView.leadingAnchor.constraint(equalTo: alertBackgroundView.leadingAnchor, constant: 16),
            alertContainerView.trailingAnchor.constraint(equalTo: alertBackgroundView.trailingAnchor, constant: -16)
        ])

        infoContainerView.addArrangedSubview(infoImageView)
        infoContainerView.addArrangedSubview(infoLabel)
        infoBackgroundView.addSubview(infoContainerView)
        addArrangedSubview(infoBackgroundView)
        NSLayoutConstraint.activate([
            infoContainerView.topAnchor.constraint(equalTo: infoBackgroundView.topAnchor, constant: 8),
            infoContainerView.bottomAnchor.constraint(equalTo: infoBackgroundView.bottomAnchor, constant: -8),
            infoContainerView.leadingAnchor.constraint(equalTo: infoBackgroundView.leadingAnchor, constant: 16),
            infoContainerView.trailingAnchor.constraint(equalTo: infoBackgroundView.trailingAnchor, constant: -16)
        ])

        messageContainerView.addArrangedSubview(messageLabel)
        messageBackgroundView.addSubview(messageContainerView)
        addArrangedSubview(messageBackgroundView)
        NSLayoutConstraint.activate([
            messageContainerView.topAnchor.constraint(equalTo: messageBackgroundView.topAnchor, constant: 8),
            messageContainerView.bottomAnchor.constraint(equalTo: messageBackgroundView.bottomAnchor, constant: -8),
            messageContainerView.leadingAnchor.constraint(equalTo: messageBackgroundView.leadingAnchor, constant: 16),
            messageContainerView.trailingAnchor.constraint(equalTo: messageBackgroundView.trailingAnchor, constant: -16)
        ])
    }

    func configure(_ config: Config) {
        alertBackgroundView.isHidden = !config.isAlertShown
        alertLabel.text = config.alert
        infoBackgroundView.isHidden = !config.isInfoShown
        infoLabel.text = config.info
        messageLabel.text = config.message
    }
}
いや!xib ねーし表示パターン多過ぎてわかんねぇーよ!!ってなりました
チェックめんどくさいなぁと思ってたらそういえば以前レイアウトチェックに Xcode Previews 使ってるっていうのを聞いたので今回導入してみました。問題
Xcode Previews を導入するには
import SwiftUIする必要があるのですが該当プロジェクトの Deployment Target が iOS 12 。。。解決策
こちら Xcode Previewsを用いたUIKitベースのプロジェクトの開発効率化 を参考に Preview 用ターゲットを追加することで実現できました
導入方法
- Duplicate でターゲットを複製
- ターゲット名を変更(ex. ~Preview とか)

- Deployment Target を iOS 13.0 にする

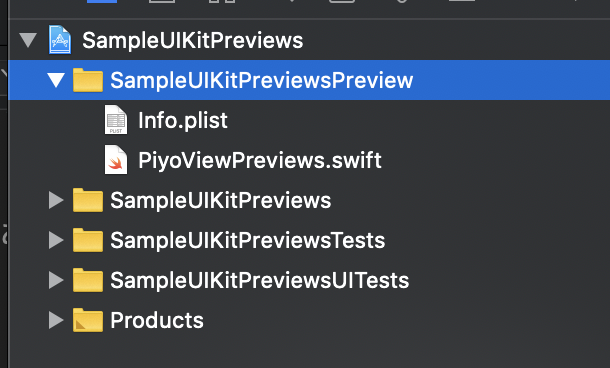
- Preview 用ディレクトリ作成
- 上記ディレクトリに Info.plist 移動
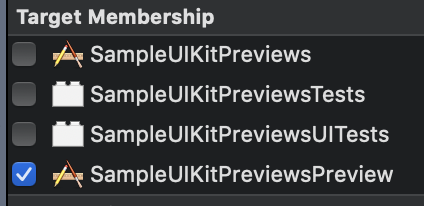
- 上記ディレクトリに PiyoViewPreviews.swift 追加(Target Membership は Preview 用のみにする)
PiyoViewPreviews.swift はこんな感じ。
import SwiftUI

struct PiyoViewWrapper: UIViewRepresentable {

    let config: PiyoView.Config
    init(config: PiyoView.Config) {
        self.config = config
    }
    func makeUIView(context: UIViewRepresentableContext<PiyoViewWrapper>) -> PiyoView {
        return PiyoView()
    }
    func updateUIView(_ uiView: PiyoView, context: UIViewRepresentableContext<PiyoViewWrapper>) {
        uiView.configure(config)
    }
}

struct PiyoViewWrapper_Previews: PreviewProvider {
    static var previews: some View {
        Group {
            PiyoViewWrapper(config: .init(isAlertShown: true, alert: "アラート", isInfoShown: true, info: "インフォメーション", message: "メッセージ")).previewDisplayName("全表示")

            PiyoViewWrapper(config: .init(isAlertShown: false, alert: nil, isInfoShown: true, info: "インフォメーション", message: "メッセージ")).previewDisplayName("アラート非表示")

            PiyoViewWrapper(config: .init(isAlertShown: true, alert: "アラート", isInfoShown: false, info: nil, message: "メッセージ")).previewDisplayName("インフォ非表示")

            PiyoViewWrapper(config: .init(isAlertShown: false, alert: nil, isInfoShown: false, info: nil, message: "メッセージ")).previewDisplayName("メッセージのみ表示")

            PiyoViewWrapper(config: .init(isAlertShown: true, alert: "アラート\nアラート", isInfoShown: true, info: "インフォメーション\nインフォメーション", message: "メッセージ\nメッセージ")).previewDisplayName("複数行表示")

        }.previewLayout(.fixed(width: 375, height: 160))
    }
}
これで Previews を起動するとこんな感じ
パラメータを変更すればすぐに反映されるしサイズを変えたりして (
.previewLayout(.fixed(width: 375, height: 160))<- ここ)すぐに SE 用とかも確認できる
元のソースはいじらなくていいしすばらしいその他Tips(2020/07/02追記)
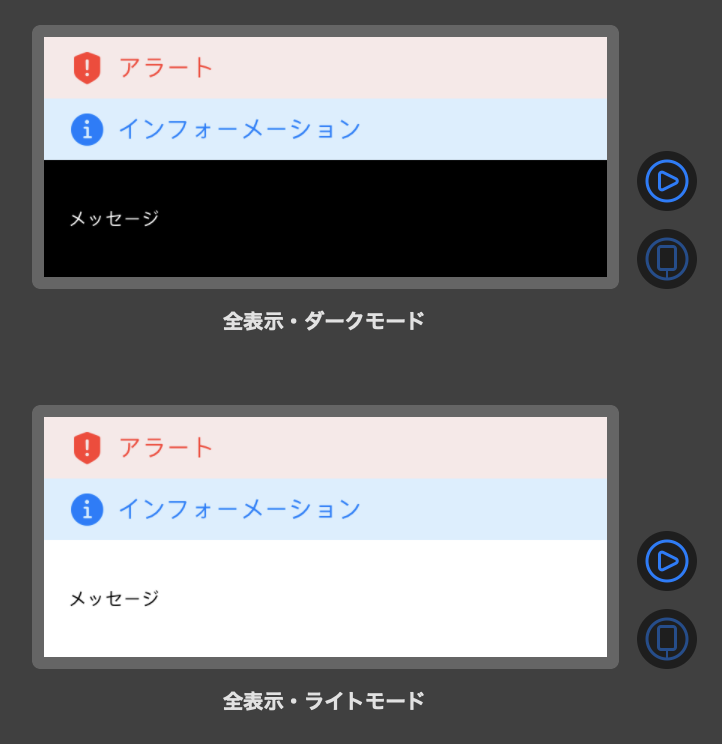
ダークモード表示
struct PiyoViewWrapper_Previews: PreviewProvider {
    static var previews: some View {
        Group {
            PiyoViewWrapper(config: .init(isAlertShown: true, alert: "アラート", isInfoShown: true, info: "インフォーメーション", message: "メッセージ"))
                .environment(\.colorScheme, .dark)
                .previewDisplayName("全表示・ダークモード")

            PiyoViewWrapper(config: .init(isAlertShown: true, alert: "アラート", isInfoShown: true, info: "インフォーメーション", message: "メッセージ"))
                .environment(\.colorScheme, .light)
                .previewDisplayName("全表示・ライトモード")
        }.previewLayout(.fixed(width: 375, height: 160))
    }
}
上記のように
.environment(\.colorScheme, .dark)でダークモード表示もできる。
こんな感じ
ローカライズ表示
残念ながらローカライズは
LocalizedStringKeyを使わないといけないみたいなのであきらめました
こんなんやってみたけど無理だった...extension String { func localized() -> String { return NSLocalizedString(self, comment: "") } } struct PiyoViewWrapper_Previews: PreviewProvider { static var previews: some View { Group { PiyoViewWrapper(config: .init(isAlertShown: true, alert: "alert".localized(), isInfoShown: true, info: "info".localized(), message: "message".localized())) .environment(\.locale, .init(identifier: "ja")) .previewDisplayName("全表示") }.previewLayout(.fixed(width: 375, height: 160)) } }どうしても Previews でみたければ Edit Scheme... -> Run -> Options -> Application Language を変えてみるしかないと思います。
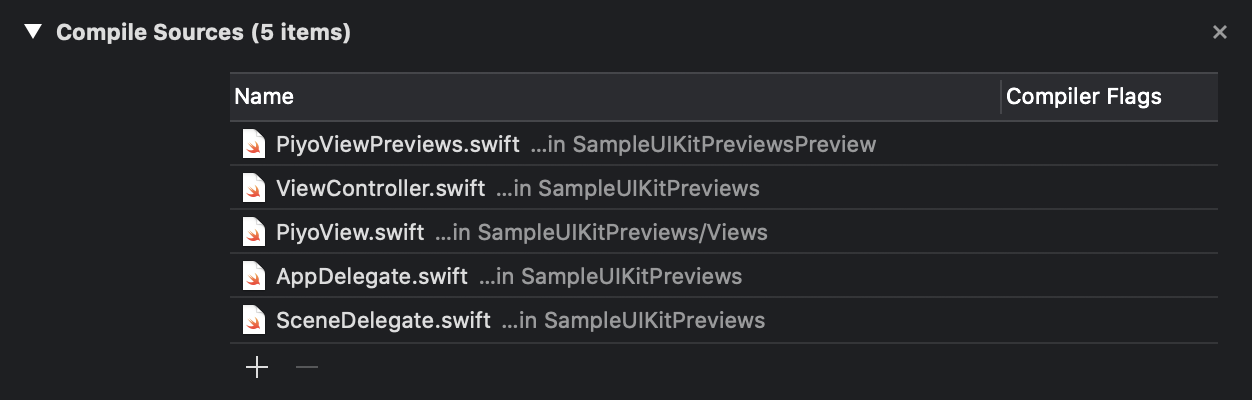
Segmentation fault 11
Segmentation fault 11...ビルドはできるけど Xcode Previews はこんなエラーでむり...っていうことがありました。きっと運がよければ Derived Data 削除とかクリーンでいけるかもしれませんが私はむりだったので Compile Sources からファイルを全部削除して Previews に必要なものだけ追加するようにするととりあえず動きました。(Segmentation fault 11<- こいつはほんとにわからない。。。)
Xcode Previewsが消えた場合
Xcode Previews が消えた場合は右上の Adjust Editor Options -> Canvas で表示できます。
おわりに
いちいちシミュレータ起動しなくていいし快適!今まで SwiftUI じゃねぇし Previews とかしらねぇわと思ってましたがわりといいんじゃないかと思います
参考