- 投稿日:2019-08-27T19:50:30+09:00
【Laravel】e-mail confirmationの使い方まとめ
Laravel5.7からの新機能でe-mail-confirmationという
メール認証機能がありましたので
自分用のメモもかねて記事を書きます。前提
Laravel5.7以上
※「laravel new」すれば問題ないかと思います。
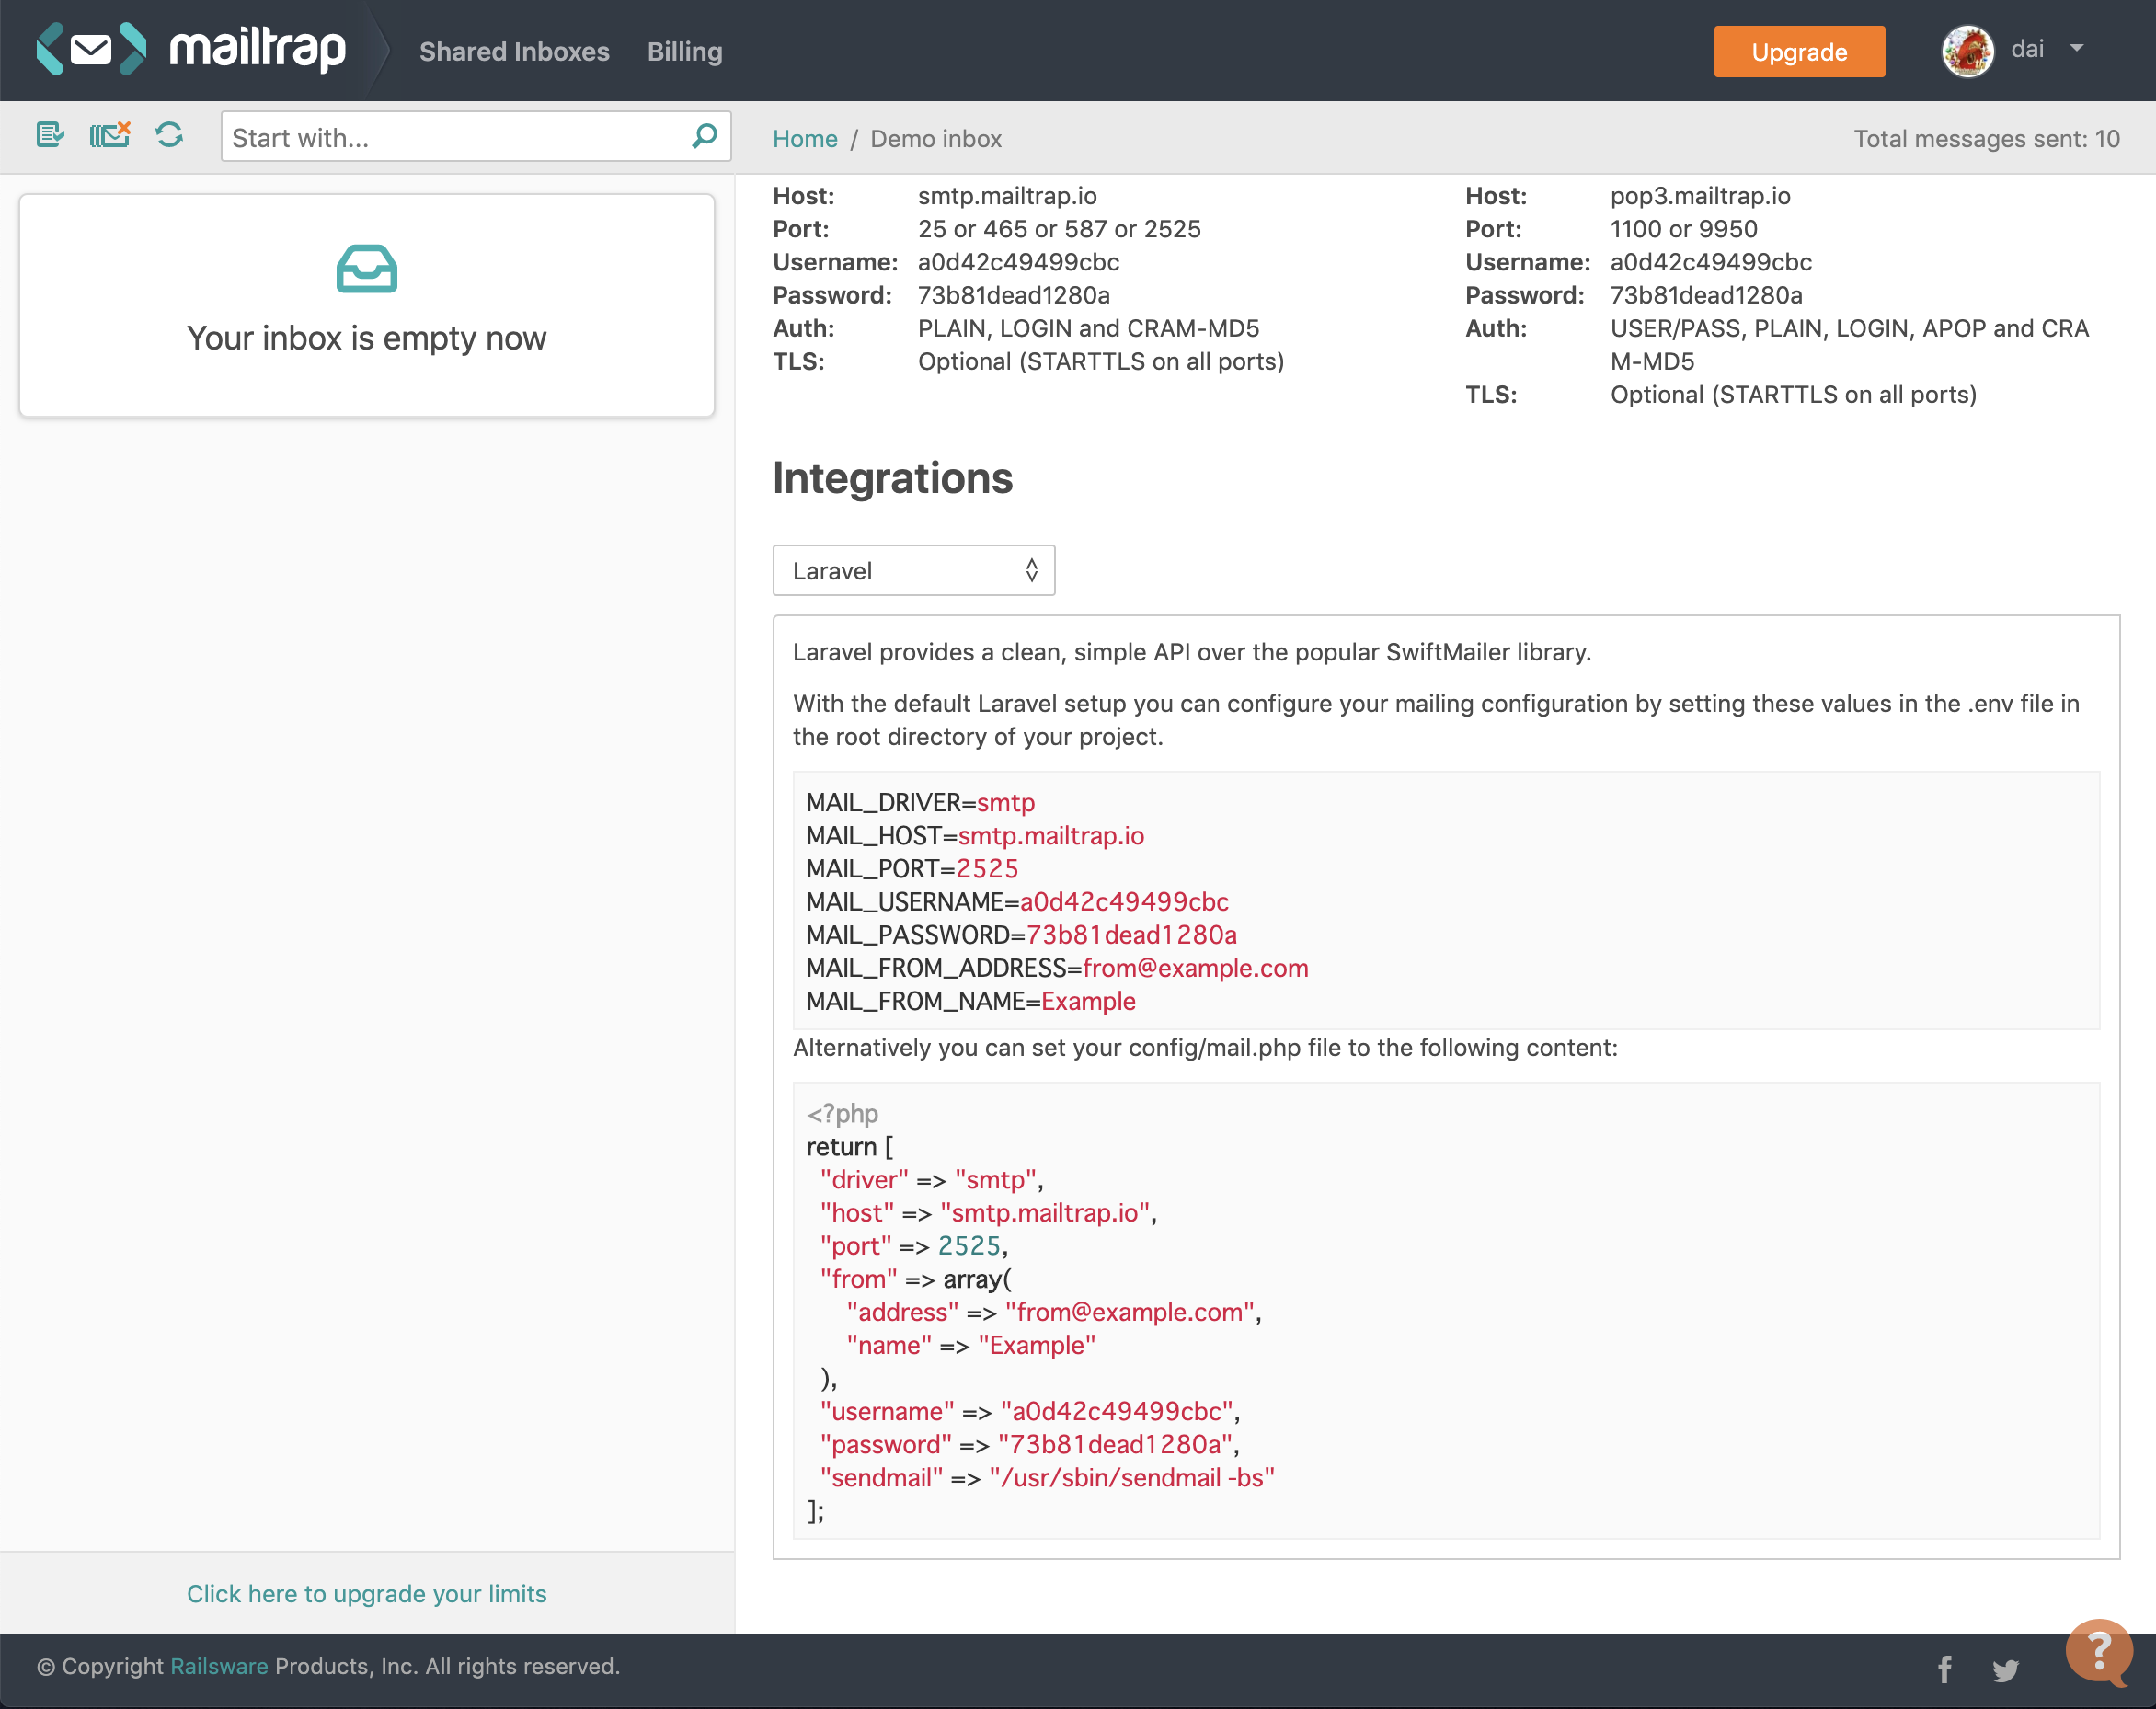
メールの確認用にはLaravel公式ドキュメントでも紹介されているmailtrap使用
Integrationsの部分、Laravelに選択すると、以下の情報が出てくるので、
表示させておいてください。
1.準備: Laravel構築、認証機能構築
参考: Laravel構築チートシート
php artisan make:auth
php artisan migrate2.Userモデル修正
app/User.php// 中略 // - use Illuminate\Contracts\Auth\MustVerifyEmail; use Illuminate\Contracts\Auth\MustVerifyEmail as MustVerifyEmailContract; use Illuminate\Auth\MustVerifyEmail; // 中略 // - class User extends Authenticatable class User extends Authenticatable implements MustVerifyEmailContract { // - use Notifiable; use MustVerifyEmail, Notifiable; // 中略 }2.ルーティング修正
routes/web.php// 中略 // - Auth::routes(); Auth::routes(['verify' => true]); // - Route::get('/home', 'HomeController@index')->name('home'); Route::get('/home', 'HomeController@index')->name('home')->middleware('verified');3.envファイルとmail.phpの設定
今回はローカル開発なので上記のMailtrapというWebアプリを使用します。
各自表示されている値に書き換え.envファイル修正
中略 MAIL_DRIVER=smtp MAIL_HOST=smtp.mailtrap.io MAIL_PORT=2525 MAIL_USERNAME=a0d42c49499cbc MAIL_PASSWORD=73b81dead1280a MAIL_FROM_ADDRESS=from@example.com MAIL_FROM_NAME=Example 中略config/mail.php<?php return [ "driver" => "smtp", "host" => "smtp.mailtrap.io", "port" => 2525, "from" => array( "address" => "from@example.com", "name" => "Example" ), "username" => "a0d42c49499cbc", "password" => "73b81dead1280a", "sendmail" => "/usr/sbin/sendmail -bs" ];ここまでで、メール認証は実装完了です。
ただし今のままだと英語のままになっているかと思います。4.日本語に設定
□ビューファイル修正
こちらは各自でカスタマイズしてみてください。resources/views/auth/verify.blade.php@extends('layouts.app') @section('content') <div class="container"> <div class="row justify-content-center"> <div class="col-md-8"> <div class="card"> <div class="card-header">本登録</div> <div class="card-body"> @if (session('resent')) <div class="alert alert-success" role="alert"> 新しい本登録メッセージが送信されました。 </div> @endif メールアドレスの認証をお願いします。<br> もしメールを受け取ってないなら、<a href="{{ route('verification.resend') }}">ここをクリックしてください</a>。 </div> </div> </div> </div> </div> @endsection□本登録メール
php artisan make:notification VerifyEmailJapaneseそっくりそのまま書き換え
日本語で書いている部分は書き換えてもらってかまいません。app/Notifications/VerifyEmailJapanese.php<?php namespace App\Notifications; use Illuminate\Support\Carbon; use Illuminate\Support\Facades\URL; use Illuminate\Support\Facades\Lang; use Illuminate\Notifications\Notification; use Illuminate\Notifications\Messages\MailMessage; class VerifyEmailJapanese extends Notification { /** * The callback that should be used to build the mail message. * * @var \Closure|null */ public static $toMailCallback; /** * Get the notification's channels. * * @param mixed $notifiable * @return array|string */ public function via($notifiable) { return ['mail']; } /** * Build the mail representation of the notification. * * @param mixed $notifiable * @return \Illuminate\Notifications\Messages\MailMessage */ public function toMail($notifiable) { if (static::$toMailCallback) { return call_user_func(static::$toMailCallback, $notifiable); } return (new MailMessage) ->subject(Lang::getFromJson('本登録メール')) ->line(Lang::getFromJson('以下の認証リンクをクリックして本登録を完了させてください。')) ->action( Lang::getFromJson('メールアドレスを認証する'), $this->verificationUrl($notifiable) ) ->line(Lang::getFromJson('もしこのメールに覚えが無い場合は破棄してください。')); } /** * Get the verification URL for the given notifiable. * * @param mixed $notifiable * @return string */ protected function verificationUrl($notifiable) { return URL::temporarySignedRoute( 'verification.verify', Carbon::now()->addMinutes(60), ['id' => $notifiable->getKey()] ); } /** * Set a callback that should be used when building the notification mail message. * * @param \Closure $callback * @return void */ public static function toMailUsing($callback) { static::$toMailCallback = $callback; } }最後にUserモデルに一部追加
app/User.phpclass User extends Authenticatable implements MustVerifyEmailContract { // 中略 public function sendEmailVerificationNotification() { $this->notify(new \App\Notifications\VerifyEmailJapanese); } }以上で日本語化完了です。
Registerページから登録ボタンを押すと本当にMailtrapにメールが飛んできます。これは感動します!
- 投稿日:2019-08-27T17:46:49+09:00
ChocolatyでLaravelの実行環境を作成する
今北産業
Laravelで作成したプロジェクトを、Windows Server 2012R2にChocolatyを使用してデプロイした。
構成は Nginx, PHP, MySQL, プロセス管理はNSSMで、キューの使用もあるのでお楽しみに。
これは作業内容の記録である。作業内容
Chocolateyのインストール
管理者モードのPowerShellを使用したのでコマンドはこちら。
これ以降の各手順は、powershellは常に管理者モードの想定で。Set-ExecutionPolicy Bypass -Scope Process -Force; iex ((New-Object System.Net.WebClient).DownloadString('https://chocolatey.org/install.ps1'))
- 最新のインストールコマンドは、Chocolateyの公式サイトを参照のこと。古いインストールコマンドに注意。
一旦コンソールを閉じると、PATHが適用される。
各種パッケージをインストール
1つずつやるのは面倒なので、一括でバージョン指定できるxmlを使用。
しかしインストールできるバージョンが限られていたため、バージョン指定はMySQLだけにしておいた。
現在どのバージョンがインストールされるかは、公式サイトのリポジトリで確認すると良い。MySQLに必要なvisual studio runtime 2013が無くてエラーになるので、vcredist2013を手動で指定する必要がある模様。
package.config<?xml version="1.0" encoding="utf-8"?> <packages> <package id="vcredist2013" /> <package id="php" /> <package id="php-service" /> <package id="nodejs-lts" /> <package id="composer" /> <package id="nginx-service" /> <package id="git" /> <package id="mysql" version="5.7.18" /> </packages>上記を適当なフォルダに保存し、そのフォルダへ移動。
choco install package.config -y利便性を高めるため、あとからこれも入れた。
cinst nano # コンソールからテキスト編集したいので
cinst conemu # コンソールが使いづらいので
cinst sakuraeditor # テキストファイルの編集に
cinst googlechrome # モダンブラウザが必要だった
設定ファイルの編集
php.ini
今回のファイルの場所は、
"C:\tools\php73\php.ini"
になった。extension= で検索し、下記のようにした。mbstringとopensslはデフォルトでONになっているので、ここでオンにしたらWARNINGが出たので消した。
php.iniextension=bz2 extension=curl extension=fileinfo extension=gd2 extension=gettext ;extension=gmp ;extension=intl ;extension=imap ;extension=interbase ;extension=ldap ;extension=mbstring extension=exif ; Must be after mbstring as it depends on it extension=mysqli ;extension=oci8_12c ; Use with Oracle Database 12c Instant Client ;extension=odbc ;extension=openssl ;extension=pdo_firebird extension=pdo_mysql ;extension=pdo_oci ;extension=pdo_odbc ;extension=pdo_pgsql extension=pdo_sqlite ;extension=pgsql ;extension=shmopCURLを使用できるように、cacert.pemを入手し、下記のようにする。
php.ini[curl] ; A default value for the CURLOPT_CAINFO option. This is required to be an ; absolute path. curl.cainfo ="C:\tools\cacert.pem" [openssl] ; The location of a Certificate Authority (CA) file on the local filesystem ; to use when verifying the identity of SSL/TLS peers. Most users should ; not specify a value for this directive as PHP will attempt to use the ; OS-managed cert stores in its absence. If specified, this value may still ; be overridden on a per-stream basis via the "cafile" SSL stream context ; option. openssl.cafile="C:\tools\cacert.pem"Nginxの設定ファイル
デフォルトで
"C:\tools\nginx\conf.d\server.default.conf"にある。root指定のパスの区切り文字に注意
server.default.confserver { listen 80; server_name example.com; root C:/YOUR/PROJECT/ROOT/public; charset utf-8; index index.php; #access_log logs/host.access.log main; location / { try_files $uri $uri/ /index.php?$query_string; } location = /favicon.ico { access_log off; log_not_found off; } location = /robots.txt { access_log off; log_not_found off; } error_page 404 /index.php; #error_page 404 /404.html; # proxy the PHP scripts to Apache listening on 127.0.0.1:80 # location ~ \.php$ { fastcgi_pass 127.0.0.1:9000; fastcgi_index index.php; fastcgi_param SCRIPT_FILENAME $realpath_root$fastcgi_script_name; include fastcgi_params; } location ~ /\.(?!well-known).* { deny all; } }サービス再起動
phpとnginxのサービスを再起動する。
MySQLの準備
コンソールでログインする
mysql -u root/* DBを作成 */ CREATE DATABASE your_db DEFAULT CHARACTER SET utf8; CREATE USER 'your_user'@'%' IDENTIFIED BY 'your_password'; /* 権限を付与 */ GRANT ALL PRIVILEGES ON your_db.* TO 'your_user'@'%' IDENTIFIED BY 'your_password';プロジェクトの設定
基本設定
GitのSSHまたはHTTPSの認証設定をしたら、適当なフォルダにプロジェクトを落としてくる。
.env.exampleをコピーして.env にし、修正する。
修正内容はプロジェクトによって適宜。cd /your/project/root cp .env.example .env nano .env終わったら、そのままプロジェクトルートで色々実行
# javascriptのコンパイル
npm i
npm run prod
# phpライブラリのインストール
composer install --optimize-autoloader --no-dev
# キーの作成
php artisan key:generate
# マイグレーションの実行
php artisan migrate --seed
# 設定のキャッシュ
php artisan config:cache
キューワーカーの設定
今回のプロジェクトにはキューの使用がある。。
nginx-service や php-service は nssm で管理されているようなので、
nssm でやっちゃうことにする。(laravel-echo-serverも似たような要領でできるはず)
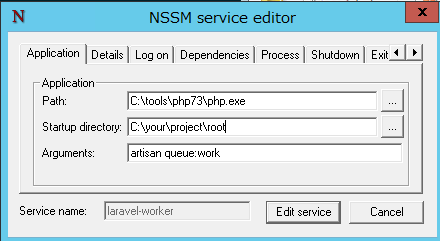
nssm install laravel-worker
# 名称は何でもいい。↑がサービス名になる。
アクセスが拒否された場合は、管理者モードで実行しているか確認。
対話式の画面が立ち上がるので、以下のようにする。
* H/Cは編集モードで立ち上げているのでボタン名称は異なる。
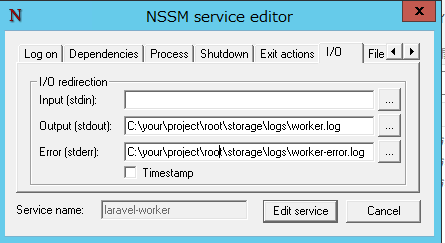
I/Oタブも編集
Installを押すとサービスが登録される。次回以降は自動起動する構成だが、最初の起動は手動の模様。
確認
ブラウザでアクセスし、表示されれば動作確認して完了。
- 投稿日:2019-08-27T17:46:49+09:00
ChocolatyでちょこっとLaravelの実行環境を作成する
今北産業
Laravelで作成したプロジェクトを、Windows Server 2012R2にChocolatyを使用してデプロイした。
構成は Nginx, PHP, MySQL, プロセス管理はNSSMで、キューの使用もあるのでお楽しみに。
ちょこっと参考にしても構わないけど、間違ってても責任は取らないよ❤作業内容
Chocolateyのインストール
管理者モードのPowerShellを使用したのでコマンドはこちら。
これ以降の各手順は、powershellは常に管理者モードの想定で。Set-ExecutionPolicy Bypass -Scope Process -Force; iex ((New-Object System.Net.WebClient).DownloadString('https://chocolatey.org/install.ps1'))
- 最新のインストールコマンドは、Chocolateyの公式サイトを参照のこと。古いインストールコマンドに注意。
一旦コンソールを閉じると、PATHが適用される。
各種パッケージをインストール
1つずつやるのは面倒なので、一括でバージョン指定できるxmlを使用。
しかしインストールできるバージョンが限られていたため、バージョン指定はMySQLだけにしておいた。
現在どのバージョンがインストールされるかは、公式サイトのリポジトリで確認すると良い。MySQLに必要なvisual studio runtime 2013が無くてエラーになるので、vcredist2013を手動で指定する必要がある模様。
package.config<?xml version="1.0" encoding="utf-8"?> <packages> <package id="vcredist2013" /> <package id="php" /> <package id="php-service" /> <package id="nodejs-lts" /> <package id="composer" /> <package id="nginx-service" /> <package id="git" /> <package id="mysql" version="5.7.18" /> </packages>上記を適当なフォルダに保存し、そのフォルダへ移動。
choco install package.config -y利便性を高めるため、あとからこれも入れた。
cinst nano # コンソールからテキスト編集したいので
cinst conemu # コンソールが使いづらいので
cinst sakuraeditor # テキストファイルの編集に
cinst googlechrome # モダンブラウザが必要だった
設定ファイルの編集
php.ini
今回のファイルの場所は、
"C:\tools\php73\php.ini"
になった。extension= で検索し、下記のようにした。mbstringとopensslはデフォルトでONになっているので、ここでオンにしたらWARNINGが出たので消した。
php.iniextension=bz2 extension=curl extension=fileinfo extension=gd2 extension=gettext ;extension=gmp ;extension=intl ;extension=imap ;extension=interbase ;extension=ldap ;extension=mbstring extension=exif ; Must be after mbstring as it depends on it extension=mysqli ;extension=oci8_12c ; Use with Oracle Database 12c Instant Client ;extension=odbc ;extension=openssl ;extension=pdo_firebird extension=pdo_mysql ;extension=pdo_oci ;extension=pdo_odbc ;extension=pdo_pgsql extension=pdo_sqlite ;extension=pgsql ;extension=shmopCURLを使用できるように、cacert.pemを入手し、下記のようにする。
php.ini[curl] ; A default value for the CURLOPT_CAINFO option. This is required to be an ; absolute path. curl.cainfo ="C:\tools\cacert.pem" [openssl] ; The location of a Certificate Authority (CA) file on the local filesystem ; to use when verifying the identity of SSL/TLS peers. Most users should ; not specify a value for this directive as PHP will attempt to use the ; OS-managed cert stores in its absence. If specified, this value may still ; be overridden on a per-stream basis via the "cafile" SSL stream context ; option. openssl.cafile="C:\tools\cacert.pem"Nginxの設定ファイル
デフォルトで
"C:\tools\nginx\conf.d\server.default.conf"にある。root指定のパスの区切り文字に注意
server.default.confserver { listen 80; server_name example.com; root C:/YOUR/PROJECT/ROOT/public; charset utf-8; index index.php; #access_log logs/host.access.log main; location / { try_files $uri $uri/ /index.php?$query_string; } location = /favicon.ico { access_log off; log_not_found off; } location = /robots.txt { access_log off; log_not_found off; } error_page 404 /index.php; #error_page 404 /404.html; # proxy the PHP scripts to Apache listening on 127.0.0.1:80 # location ~ \.php$ { fastcgi_pass 127.0.0.1:9000; fastcgi_index index.php; fastcgi_param SCRIPT_FILENAME $realpath_root$fastcgi_script_name; include fastcgi_params; } location ~ /\.(?!well-known).* { deny all; } }サービス再起動
phpとnginxのサービスを再起動する。
MySQLの準備
コンソールでログインする
mysql -u root/* DBを作成 */ CREATE DATABASE your_db DEFAULT CHARACTER SET utf8; CREATE USER 'your_user'@'%' IDENTIFIED BY 'your_password'; /* 権限を付与 */ GRANT ALL PRIVILEGES ON your_db.* TO 'your_user'@'%' IDENTIFIED BY 'your_password';プロジェクトの設定
基本設定
GitのSSHまたはHTTPSの認証設定をしたら、適当なフォルダにプロジェクトを落としてくる。
.env.exampleをコピーして.env にし、修正する。
修正内容はプロジェクトによって適宜。cd /your/project/root cp .env.example .env nano .env終わったら、そのままプロジェクトルートで色々実行
# javascriptのコンパイル
npm i
npm run prod
# phpライブラリのインストール
composer install --optimize-autoloader --no-dev
# キーの作成
php artisan key:generate
# マイグレーションの実行
php artisan migrate --seed
# 設定のキャッシュ
php artisan config:cache
キューワーカーの設定
今回のプロジェクトにはキューの使用がある。。
nginx-service や php-service は nssm で管理されているようなので、
nssm でやっちゃうことにする。(laravel-echo-serverも似たような要領でできるはず)
nssm install laravel-worker
# 名称は何でもいい。↑がサービス名になる。
アクセスが拒否された場合は、管理者モードで実行しているか確認。
対話式の画面が立ち上がるので、以下のようにする。
* H/Cは編集モードで立ち上げているのでボタン名称は異なる。
I/Oタブも編集
Installを押すとサービスが登録される。次回以降は自動起動する構成だが、最初の起動は手動の模様。
確認
ブラウザでアクセスし、表示されれば動作確認して完了。
おわり
足りないところや指摘は編集リクエストしてちょ。
- 投稿日:2019-08-27T13:07:51+09:00
【Laravel5.8】Laravel Homesteadでの開発環境構築
内容
Laravel Homesteadを利用してLaravel5.8の開発環境を構築する
環境
- Windows10 / macOS Mojave 10.14.6
- VirtualBox 6.0.10
- Vagrant 2.2.5
- git version 2.23.0.windows.1
- git version 2.20.1 (Apple Git-117)
- laravel/homestead (virtualbox, 8.0.1)
- Laravel Framework 5.8.33
各種インストール
まず初めに、今回は必要なものを一式ダウンロードインストール
- VirtualBox
仮想環境を作るためのツールのひとつ
ダウンロードをするとインストーラーが開くので指示通りにインストールを進める
https://www.virtualbox.org/wiki/Downloads
- Vagrant
該当するOSを選択してダウンロードインストール
https://www.vagrantup.com/downloads.html
- gitとGit Bash(Windows10)
gitのインストールと合わせてGit Bashのインストールもする。
Git Bashを導入することでUnixコマンドでWindowsのファイルを操作できたりするようになる
※以下、Git Bashを利用してコマンドを実行する
https://gitforwindows.org/
- git(macOS)
・インストーラをダウンロードしてインストールする方法
下記リンクより "click here to download manually" を選択してダウンロード
https://git-scm.com/download/macもしくは
・Homebrewからインストール方法
# Homebrewがあるか確認
$ brew list

# listが表示されればインストール
$ brew update
$ brew install git
Homebrewがない場合こちらが参考になるかと思います
https://tracpath.com/bootcamp/git-install-to-mac.htmlLaravel Homesteadの追加
Vagrantへのboxの追加
下記コマンドを実行し、何か聞かれたらvirtualboxをチョイスする
~\> vagrant box add laravel/homesteadboxを追加したらLaravel Homsteadをダウンロードする
今回はホームディレクトリの中にMyVagrantを作成し、その中にCodeというディレクトリを作成して管理することにする~\# ホームディレクトリにMyVagrant作成し、その中にCodeを作成し移動 > mkdir MyVagrant > cd MyVagrant > mkdir Code > cd Code # リポジトリをクローン > git clone https://github.com/laravel/homestead.git Homestead完了すると、作成した
~\MyVagrant\Code\下にHomesteadディレクトリが生成される設定ファイルの生成
生成されたHomesteadディレクトリに移動し、設定ファイルを生成するコマンドを実行する
~\MyVagrant\Code\# Homesteadディレクトリに移動 > cd Homestead # 設定ファイル生成 (Windows..) > init.bat # 設定ファイル生成 (Mac / Linux..) $ bash init.sh完了するとHomestead.yamlが生成される。生成されたファイルをエディタで開き、folders項目を編集。
mapがWindowsもしくはMac側のディレクトリ、toが仮想環境のディレクトリであり、これらが同期されるようになる~\MyVagrant\Code\Homestead\Homestead.yaml--- ip: "192.168.10.10" memory: 2048 cpus: 2 provider: virtualbox authorize: ~/.ssh/id_rsa.pub keys: - ~/.ssh/id_rsa folders: # - map: ~/code # 変更前 - map: ~/MyVagrant # 変更後 to: /home/vagrant/code sites: - map: homestead.test # to: /home/vagrant/code/public # 変更前 to: /home/vagrant/Laravel/public # 変更後(後ほどプロジェクト名をLaravelとするため) databases: - homestead features: - mariadb: false - ohmyzsh: false - webdriver: false # ports: # - send: 50000 # to: 5000 # - send: 7777 # to: 777 # protocol: udpSSH鍵ファイルの作成
~\MyVagrant\Code\Homestead# SSH鍵ファイルを作成するコマンド > ssh-keygen -t rsahostsファイルの編集
192.168.10.10に対して http://homestead.app でアクセスできるようにhostsの設定変更が必要
権限で編集できない場合は一度デスクトップに落としてエディタで編集して再度戻せばOK
- Macの場合
- /private/etc/hosts
- Windowsの場合
- C:\windows\system32\drivers\etc\hosts
\windows\system32\drivers\etc\hosts# Copyright (c) 1993-2009 Microsoft Corp. # # This is a sample HOSTS file used by Microsoft TCP/IP for Windows. # # This file contains the mappings of IP addresses to host names. Each # entry should be kept on an individual line. The IP address should # be placed in the first column followed by the corresponding host name. # The IP address and the host name should be separated by at least one # space. # # Additionally, comments (such as these) may be inserted on individual # lines or following the machine name denoted by a '#' symbol. # # For example: # # 102.54.94.97 rhino.acme.com # source server # 38.25.63.10 x.acme.com # x client host # localhost name resolution is handled within DNS itself. # 127.0.0.1 localhost # ::1 localhost 192.168.10.10 homestead.test #追記(ipの後に半角スペースを空ける)以上で環境構築は終了。
仮想マシンを起動しSSH接続
仮想マシンの起動
~\MyVagrant\Code\Homestead\# 仮想マシン起動コマンド > vagrant up # Homestead.yamlやhostsなどの設定値を後から変更した場合は、それらを反映させるためプロビジョナの実行が必要となる > vagrant reload --provision # 立ち上がっているか、仮想マシンの状態を確認する > vagrant status # 次のように出力されればOK(running) Current machine states homestead running (virtualbox)SSH接続
~\MyVagrant\Code\Homestead\> vagrant ssh # 次のように表示されれば接続完了 Welcome to Ubuntu 18.04.2 LTS (GNU/Linux 4.15.0-55-generic x86_64) Thanks for using _ _ _ | | | | | | | |__ ___ _ __ ___ ___ ___| |_ ___ __ _ __| | | '_ \ / _ \| '_ ` _ \ / _ \/ __| __/ _ \/ _` |/ _` | | | | | (_) | | | | | | __/\__ \ || __/ (_| | (_| | |_| |_|\___/|_| |_| |_|\___||___/\__\___|\__,_|\__,_| * Homestead v9.0.0 released * Settler v8.0.0 released 0 packages can be updated. 0 updates are security updates.プロジェクト作成
composerは既にインストールされているため、composerコマンドを使用してlaravelをインストールする
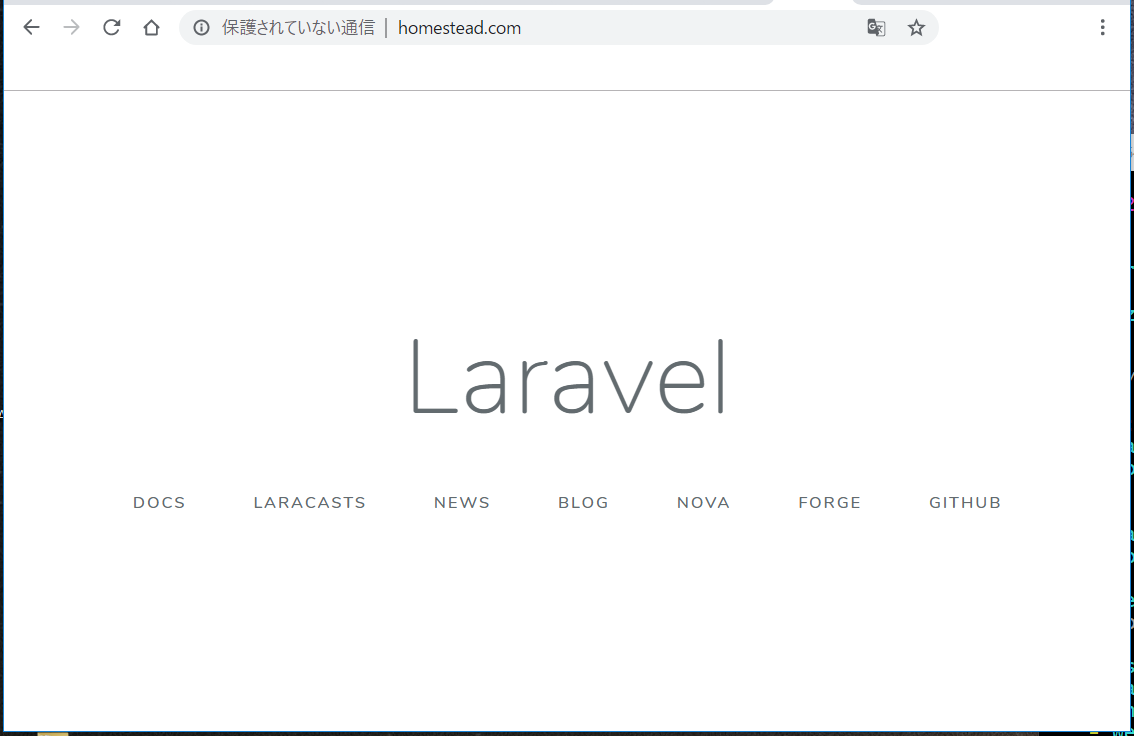
/home/vagrant/$ composer create-project laravel/laravel --prefer-dist {プロジェクト名} # Laravelというプロジェクト名の場合 $ composer create-project laravel/laravel --prefer-dist Laravel以上で、hostsで設定した http://homestead.test にアクセスすればおなじみの画面が表示される
- 投稿日:2019-08-27T12:27:12+09:00
Mac - Laravel 開発環境を構築 チートシート
毎回Laravelを構築するにあたって記事を行ったり来たりするのがめんどくさかったので
自分用にチートシート作りました。Step 1 Vagrant と VirtualBox のダウンロードとインストール
Step 2 Homestead vagrant box のダウンロード上記stepは【Laravel 5.5 or latest】Homestead で mac に Laravel 開発環境を構築を参照
Step 3 Homestead のダウンロード
cd
mkdir laravel-xxxx
cd laravel-xxxx
mkdir code
git clone https://github.com/laravel/homestead.git Homestead
cd Homestead
git checkout v7.0.1
bash init.sh
Homestead.yaml が生成/修正
folders:
    - map: ~/laravel-xxxx/code
scripts/homestead.rb内修正
homestead-7と記載のある場所を全て任意の名称に変更(一括で変更すると楽)
ここが仮想サーバー名になる
(注)仮想サーバー名がかぶるとvagrant up時エラーになるvagrant up vagrant ssh cd code laravel new or composer create-project --prefer-dist laravel/laravel blog "5.5.*"code内にblogフォルダでダウンロードされるので
blog内データをcode直下に移動。その後blogフォルダ削除laravel newした場合は.env一部修正
中略
DB_CONNECTION=mysql
DB_HOST=127.0.0.1
DB_PORT=3306
DB_DATABASE=homestead
DB_USERNAME=homestead
DB_PASSWORD=secret
中略
構築完了
- 投稿日:2019-08-27T12:15:30+09:00
Laravelのプロジェクトをgit pullしたときに実行するキャッシュクリア系のコマンドをワンライナーでするやつ
Laravelのプロジェクトを
git pullしたときに実行するキャッシュクリア系のコマンド(Artisan)をワンライナーでするやつです。
【Laravel】わりとよく使うArtisanコマンド集 - Qiita のコマンドを順に実行します。コマンド
composer dump-autoload && php artisan cache:clear && php artisan config:clear && php artisan view:clear && php artisan route:clear参考URL
- 投稿日:2019-08-27T12:14:42+09:00
ログインユーザー以外のユーザーを抜き出したい(Laravel)
- 投稿日:2019-08-27T11:59:07+09:00
Laravel で PHPUnit 実行時に .env.testing を見てくれない?
環境
- PHP 7.1
- Laravel 5.7
- PHPUnit 7.5.15
起きた事
.envにAPP_ENV=local、.env.testingにAPP_ENV=testingを記述してある状態。phpunit.xmlでは特にAPP_ENVの指定なし。- PHPUnit の処理中で
config('app.env')を実行したらlocalが返ってしまった。原因と対処
.envの値がキャッシュされてました。せっかくなので、
TestCase.phpのsetUp()で全てのキャッシュを消すようにしました。~/tests/TestCase.phppublic function setUp() { parent::setUp(); Artisan::call('cache:clear'); Artisan::call('config:clear'); Artisan::call('optimize:clear'); Artisan::call('route:clear'); // ... }