- 投稿日:2019-08-27T22:48:08+09:00
【PHP】interfaceを利用してテストコードを書く
@suin さんにコメントを頂いています。
大変参考になりますので是非コメントも合わせて読んでください。
https://qiita.com/tkek321/items/5803e7affc256de7a735#commentsDB接続やファイルの削除(unlink)をしているクラスにテストを書きたかった
アップロードしたファイルをディレクトリに保存し、
ファイル名をDBに保存してあるシステムがあるとします。DBからファイル名を削除すると、ディレクトリの中からもファイルが消えて欲しい。
DBからファイル名を配列で取得し、unlink関数を利用してディレクトリ内のファイルを削除しているクラス
DB: table
id filename 1 hogehoge.img 2 foobar.img ディレクトリ構成
src/ img/ hogehoge.img foobar.img FileRemover.phpFilesRemover.php<?php /** * 現在使用している画像ファイルがDBに登録されている。 * DBからファイル名を取得して使用していないファイルを削除する。 */ class FilesRemover { private const DIR_PATH = __DIR__ . '/img'; private $pdo; public function __construct(PDO $pdo) { $this->pdo = $pdo; } public function remove(): void { $this->removeFiles($this->getNotRemoveFilePaths()); } /** * 配列に含まれていないファイルを削除する */ private function removeFiles(array $array): void { $filePaths = glob($this->dirPath.'/*'); foreach ($filePaths as $filePath) { $fileName = basename($filePath); if (in_array($fileName, $notRemoveFiles, true) === false) { unlink(self::DIR_PATH . '/' . $fileName); } } } /** * DBから使用されているファイル名を取得 */ private function getNotRemoveFilePaths(): array { $stmt = $this->pdo->query('SELECT file_name FROM table'); $results = $stmt->fetchAll(\PDO::FETCH_ASSOC); $fileNames = []; foreach ($results as $result) { $fileNames[] = $result['file_name']; } return $fileNames; } }このままではテストしづらいのでinterfaceを利用してテストコードを書けるようにしていきたい。
インターフェースに依存するコードに書き直す
まずはテストが書きづらい、DBに接続しているコードとunlink関数を使用しているコードをインターフェースに依存する形に書き直します。
Filesystem.php<?php namespace App; interface Filesystem { public function remove(string $fileName): void; public function getFileNames(): array; }FilesRemover.php<?php namespace App; class FilesRemover { private $filesystem; private $dirPath; /** * Filesystemインターフェースを外部から注入 * Filesystemの関数を利用してファイル名の取得、削除を行う */ public function __construct(Filesystem $filesystem, string $dirPath = __DIR__ . '/img') { $this->filesystem = $filesystem; $this->dirPath = $dirPath; } public function remove(): void { $this->removeFiles($this->filesystem->getFileNames()); } private function removeFiles(array $notRemoveFiles): void { $filePaths = glob($this->dirPath.'/*'); foreach ($filePaths as $filePath) { $fileName = basename($filePath); if (in_array($fileName, $notRemoveFiles, true) === false) { $this->filesystem->remove($this->dirPath . '/' . $fileName); } } } }RealFilesystem<?php namespace App; class RealFilesystem implements Filesystem { private $pdo; public function __construct(\PDO $pdo) { $this->pdo = $pdo; } public function remove(string $fileName): void { unlink($fileName); } public function getFileNames(): array { $stmt = $this->pdo->query('SELECT file_name FROM foo'); $results = $stmt->fetchAll(\PDO::FETCH_ASSOC); $fileNames = []; foreach ($results as $result) { $fileNames[] = $result['file_name']; } return $fileNames; } }インターフェースを利用してテストを書く(インターフェースを継承したMockクラスを作成する)
ディレクトリ構成
src/ img/ FileRemover.php Filesystem.php RealFilesystem.php tests/ mock-img/ mock-file-a.txt mock-file-b.txt mock-file-del-a.txt mock-file-del-b.txt FileRemoveTest.php MockFilesystem.phpテスト用に
mock-imgディレクトリとファイルを作成する。MockFilesystem.php<?php use App\Filesystem; /** * テスト用のMockクラス */ class MockFilesystem implements Filesystem { private $removedFiles = []; /** * ファイルの削除ではなく実際のコードではunlink関数に渡されるファイル名を * 配列として保存している。 * つまり、配列に保存されるファイル名が本来であれば削除されるファイル名。 */ public function remove(string $name): void { $this->removedFiles[] = $name; } /** * 単純に削除しない予定のファイル名の配列を返すだけの関数。 */ public function getFileNames(): array { return [ 'mock-file-a.txt', 'mock-file-b.txt', ]; } /** * 保存したファイル名の配列を取得するための関数。 */ public function getRemoveFiles() { return $this->removedFiles; } }FilesRemoverTest<?php require_once __DIR__.'/../vendor/autoload.php'; require_once __DIR__.'/MockFilesystem.php'; use PHPUnit\Framework\TestCase; class FilesRemoverTest extends TestCase { /** * @test */ public function 配列に含まれていないファイルを削除する() { // MockFilesystemをFilesRemoverに渡す $filesystem = new MockFilesystem(); $remover = new App\FilesRemover($filesystem, __DIR__.'/mock-img'); $remover->remove(); // MockFilesystem::remove()で保存したファイル名を確認する $this->assertSame( [ __DIR__.'/mock-img/mock-file-del-a.txt', __DIR__.'/mock-img/mock-file-del-b.txt' ], $filesystem->getRemoveFiles() ); } }テストがかけた。
- 投稿日:2019-08-27T21:58:54+09:00
最高にラブリー?なHello world 【php編】
はじめに
何ヶ月前でしょうか、私はjsfuckに夢中でした。jsfuckとは記号プログラミングの一種で、通常6種類の記号(
!,+,[,],(,))のみを使用してjavascriptのコードとして動作させようという試みです。へ、変態だ…。そして、ある日ふと思ったのです。jsfuckがあるならphpfuckだってあるだろ、と。レシピ
Arrayという文字列を手に入れる。$Array = $dummy[] .= $dummy; // Array
ArrayからA,r,yを取り出す。リテラルをboolean型に変換するとfalseになります。falseは整数値型に変換すると0になります。trueなら1です。配列の添字に使います。echo +!_; // 0 echo +!!_; // 1 $A = $Array[!_]; // A $r = $Array[!!_]; // r $y = $Array[-!!_]; // y
A,r,yからp,I,n,T,fを作り出す。 $p = $r & $y; $I = $y & ~$r | $A; $m = $r & ~$A ^ _; $n = ++$m; $T = $r ^ _ ^ $y; $f = $p ^ $I ^ _;
A,r,y,p,I,TからH,e,l,o,w,dとスペースを作り出す。 $H = $A ^ $y & ~$r; $e = $p ^ $T | $A; $l = $A ^ $r ^ _; $o = $y ^ _ ^ $I; $space = $p & ~$T; $v = $r | $y ^ _; $w = ++$v; $d = $e & $l;実行
$printf = $p . $r . $I . $n . $T . $f; $helloworld = $H . $e . $l . $l . $o . $space . $w . $o . $r . $l . $d; $printf($helloworld);すべて記号に置き換える。
$__:Arrayを退避$$_: 作り出した文字を退避$___: 作り出した文字を結合してprInTfにする
$$___: 作り出した文字を結合してHello worldにする$__=$_[].=$_; // Array $___.=$$_[!_]=$__[!!_]&$__[-!!_]; // $$_[!_] <-- p $___.=$__[!!_]; // r $___.=$$_[!!_]=$__[-!!_]&~$__[!!_]|$__[!_]; // $$_[!!_] <-- I $$_[_]=$__[!!_]&~$__[!_]^_; // $$_[_] <-- m $___.=++$$_[_]; // n $___.=$$_[$__[!_]]=$__[!!_]^_^$__[-!!_]; // $$_[$__[!_]] <-- T $___.=$$_[!_]^$$_[!!_]^_; // f $$___=$__[!_]^$__[-!!_]&~$__[!!_]; // H $$___.=$$_[$__[!!_]]=$$_[!_]^$$_[$__[!_]]|$__[!_]; // $$_[$__[!!_]] <-- e $$___.=$$_[$__[-!!_]]=$__[!_]^$__[!!_]^_; // $$_[$__[-!!_]] <-- l $$___.=$$_[$__[-!!_]]; // l $$___.=$$_[$$_[!_]]=$__[-!!_]^_^$$_[!!_]; // $$_[$$_[!_]] <-- o $$___.=$$_[!_]&~$$_[$__[!_]]; // スペース $$_[$$_[!!_]]=$__[!!_]|$__[-!!_]^_; // $$_[$$_[!!_]] <-- v $$___.=++$$_[$$_[!!_]].$$_[$$_[!_]].$__[!!_].$$_[$__[-!!_]]; // worl $$___.=$$_[$__[!!_]]&$$_[$__[-!!_]]; // d $___($$___); // prInTf(Hello world)
一行にまとめれば完成
$__=$_[].=$_;$___.=$$_[!_]=$__[!!_]&$__[-!!_];$___.=$__[!!_];$___.=$$_[!!_]=$__[-!!_]&~$__[!!_]|$__[!_];$$_[_]=$__[!!_]&~$__[!_]^_;$___.=++$$_[_];$___.=$$_[$__[!_]]=$__[!!_]^_^$__[-!!_];$___.=$$_[!_]^$$_[!!_]^_;$$___=$__[!_]^$__[-!!_]&~$__[!!_];$$___.=$$_[$__[!!_]]=$$_[!_]^$$_[$__[!_]]|$__[!_];$$___.=$$_[$__[-!!_]]=$__[!_]^$__[!!_]^_;$$___.=$$_[$__[-!!_]];$$___.=$$_[$$_[!_]]=$__[-!!_]^_^$$_[!!_];$$___.=$$_[!_]&~$$_[$__[!_]];$$_[$$_[!!_]]=$__[!!_]|$__[-!!_]^_;$$___.=++$$_[$$_[!!_]].$$_[$$_[!_]].$__[!!_].$$_[$__[-!!_]];$$___.=$$_[$__[!!_]]&$$_[$__[-!!_]];$___($$___);おまけ
文字の作り方
$chr = ['A', 'r', 'y', '~A', '~r', '~y']; $opr = ['^', '&', '|']; for ($i=0; $i<count($chr); $i++) { for ($j=0; $j<count($opr); $j++) { for ($k=0; $k<count($chr); $k++) { $str = $chr[$i] . $opr[$j] . $chr[$k]; $exec = 'echo ' . $str . ';'; eval($exec); echo ' --> ' . $str . "\n"; } } }参考
元ネタは下記。もっとマニアックなテクニックを知り、phpfuckを極めたい方はこちらを。
- 投稿日:2019-08-27T20:46:56+09:00
test
test test test test test test test test
- 投稿日:2019-08-27T19:56:34+09:00
Laravel + Blade + Vue.jsで、Vue.jsのコンポーネントの属性に渡す変数が正しくエスケープされていないとエラーが出る
環境と背景事情
- LaravelでVue.jsを使用している(セットアップはこのページを参考にしました)
- bladeテンプレート内に、直接Vue.jsのマークアップを表記している。
- 上記のbladeテンプレには、Vue.jsコンポーネントを使用しており、属性でテキストデータを渡している。
- 上記のコンポーネントで、ユーザが入力したテキストデータを表示させている。
問題
ユーザが入力データに引用符やHTMLコードを用いると、Vue.jsのページのコンパイル時にエラーが発生して、ページが表示されない。
解決策
Vue.jsコンポーネントのテキストデータを渡す属性値に、PHP関数の"json_encode"を用いてエンコードした。
エラー表示例
[Vue warn]: Error compiling template:HTMLコードをそのままコピペした場合:
avoid using JavaScript keyword as property name: "if"引用符が混じっているテキスト:
invalid expression: Invalid or unexpected token inその他:
invalid expression: Unexpected number ininvalid expression: Unexpected string in問題があったコード例
bladeテンプレートに記述されたVue.jsのマークアップ
<project-list-items :title="{{ $project->title }}" :description="{{$project->description }}" />エンコードも何もせずにそのまま値を渡している。
問題解決後のコード例
json_encodeを用いてエンコードした。
<project-list-items :title="{{ json_encode($project->title) }}" :description="{{ json_encode($project->description) }}" />
- 投稿日:2019-08-27T17:46:49+09:00
ChocolatyでLaravelの実行環境を作成する
今北産業
Laravelで作成したプロジェクトを、Windows Server 2012R2にChocolatyを使用してデプロイした。
構成は Nginx, PHP, MySQL, プロセス管理はNSSMで、キューの使用もあるのでお楽しみに。
これは作業内容の記録である。作業内容
Chocolateyのインストール
管理者モードのPowerShellを使用したのでコマンドはこちら。
これ以降の各手順は、powershellは常に管理者モードの想定で。Set-ExecutionPolicy Bypass -Scope Process -Force; iex ((New-Object System.Net.WebClient).DownloadString('https://chocolatey.org/install.ps1'))
- 最新のインストールコマンドは、Chocolateyの公式サイトを参照のこと。古いインストールコマンドに注意。
一旦コンソールを閉じると、PATHが適用される。
各種パッケージをインストール
1つずつやるのは面倒なので、一括でバージョン指定できるxmlを使用。
しかしインストールできるバージョンが限られていたため、バージョン指定はMySQLだけにしておいた。
現在どのバージョンがインストールされるかは、公式サイトのリポジトリで確認すると良い。MySQLに必要なvisual studio runtime 2013が無くてエラーになるので、vcredist2013を手動で指定する必要がある模様。
package.config<?xml version="1.0" encoding="utf-8"?> <packages> <package id="vcredist2013" /> <package id="php" /> <package id="php-service" /> <package id="nodejs-lts" /> <package id="composer" /> <package id="nginx-service" /> <package id="git" /> <package id="mysql" version="5.7.18" /> </packages>上記を適当なフォルダに保存し、そのフォルダへ移動。
choco install package.config -y利便性を高めるため、あとからこれも入れた。
cinst nano # コンソールからテキスト編集したいので cinst conemu # コンソールが使いづらいので cinst sakuraeditor # テキストファイルの編集に cinst googlechrome # モダンブラウザが必要だった設定ファイルの編集
php.ini
今回のファイルの場所は、
"C:\tools\php73\php.ini"
になった。extension= で検索し、下記のようにした。mbstringとopensslはデフォルトでONになっているので、ここでオンにしたらWARNINGが出る。
php.iniextension=bz2 extension=curl extension=fileinfo extension=gd2 extension=gettext ;extension=gmp ;extension=intl ;extension=imap ;extension=interbase ;extension=ldap ;extension=mbstring extension=exif ; Must be after mbstring as it depends on it extension=mysqli ;extension=oci8_12c ; Use with Oracle Database 12c Instant Client ;extension=odbc ;extension=openssl ;extension=pdo_firebird extension=pdo_mysql ;extension=pdo_oci ;extension=pdo_odbc ;extension=pdo_pgsql extension=pdo_sqlite ;extension=pgsql ;extension=shmopCURLを使用できるように、cacert.pemを入手し、下記のようにする。
php.ini[curl] ; A default value for the CURLOPT_CAINFO option. This is required to be an ; absolute path. curl.cainfo ="C:\tools\cacert.pem" [openssl] ; The location of a Certificate Authority (CA) file on the local filesystem ; to use when verifying the identity of SSL/TLS peers. Most users should ; not specify a value for this directive as PHP will attempt to use the ; OS-managed cert stores in its absence. If specified, this value may still ; be overridden on a per-stream basis via the "cafile" SSL stream context ; option. openssl.cafile="C:\tools\cacert.pem"Nginxの設定ファイル
デフォルトで
"C:\tools\nginx\conf.d\server.default.conf"にある。root指定のパスの区切り文字に注意
server.default.confserver { listen 80; server_name example.com; root C:/YOUR/PROJECT/ROOT/public; charset utf-8; index index.php; #access_log logs/host.access.log main; location / { try_files $uri $uri/ /index.php?$query_string; } location = /favicon.ico { access_log off; log_not_found off; } location = /robots.txt { access_log off; log_not_found off; } error_page 404 /index.php; #error_page 404 /404.html; # proxy the PHP scripts to Apache listening on 127.0.0.1:80 # location ~ \.php$ { fastcgi_pass 127.0.0.1:9000; fastcgi_index index.php; fastcgi_param SCRIPT_FILENAME $realpath_root$fastcgi_script_name; include fastcgi_params; } location ~ /\.(?!well-known).* { deny all; } }サービス再起動
phpとnginxのサービスを再起動する。
MySQLの準備
コンソールでログインする
mysql -u root/* DBを作成 */ CREATE DATABASE your_db DEFAULT CHARACTER SET utf8; CREATE USER 'your_user'@'%' IDENTIFIED BY 'your_password'; /* 権限を付与 */ GRANT ALL PRIVILEGES ON your_db.* TO 'your_user'@'%' IDENTIFIED BY 'your_password';プロジェクトの設定
基本設定
GitのSSHまたはHTTPSの認証設定をしたら、適当なフォルダにプロジェクトを落としてくる。
.env.exampleをコピーして.env にし、修正する。
修正内容はプロジェクトによって適宜。cd /your/project/root cp .env.example .env nano .env終わったら、そのままプロジェクトルートで色々実行
# javascriptのコンパイル npm i npm run prod # phpライブラリのインストール composer install --optimize-autoloader --no-dev # キーの作成 php artisan key:generate # マイグレーションの実行 php artisan migrate --seed # 設定のキャッシュ php artisan config:cacheキューワーカーの設定
今回のプロジェクトにはキューの使用がある。。
nginx-service や php-service は nssm で管理されているようなので、
nssm でやっちゃうことにする。(laravel-echo-serverも似たような要領でできるはず)
nssm install laravel-worker # 名称は何でもいい。↑がサービス名になる。アクセスが拒否された場合は、管理者モードで実行しているか確認。
対話式の画面が立ち上がるので、以下のようにする。
* H/Cは編集モードで立ち上げているのでボタン名称は異なる。I/Oタブも編集
Installを押すとサービスが登録される。次回以降は自動起動する構成だが、最初の起動は手動の模様。
確認
ブラウザでアクセスし、表示されれば動作確認して完了。
- 投稿日:2019-08-27T17:46:49+09:00
ChocolatyでちょこっとLaravelの実行環境を作成する
今北産業
Laravelで作成したプロジェクトを、Windows Server 2012R2にChocolatyを使用してデプロイした。
構成は Nginx, PHP, MySQL, プロセス管理はNSSMで、キューの使用もあるのでお楽しみに。
ちょこっと参考にしても構わないけど、間違ってても責任は取らないよ❤作業内容
Chocolateyのインストール
管理者モードのPowerShellを使用したのでコマンドはこちら。
これ以降の各手順は、powershellは常に管理者モードの想定で。Set-ExecutionPolicy Bypass -Scope Process -Force; iex ((New-Object System.Net.WebClient).DownloadString('https://chocolatey.org/install.ps1'))
- 最新のインストールコマンドは、Chocolateyの公式サイトを参照のこと。古いインストールコマンドに注意。
一旦コンソールを閉じると、PATHが適用される。
各種パッケージをインストール
1つずつやるのは面倒なので、一括でバージョン指定できるxmlを使用。
しかしインストールできるバージョンが限られていたため、バージョン指定はMySQLだけにしておいた。
現在どのバージョンがインストールされるかは、公式サイトのリポジトリで確認すると良い。MySQLに必要なvisual studio runtime 2013が無くてエラーになるので、vcredist2013を手動で指定する必要がある模様。
package.config<?xml version="1.0" encoding="utf-8"?> <packages> <package id="vcredist2013" /> <package id="php" /> <package id="php-service" /> <package id="nodejs-lts" /> <package id="composer" /> <package id="nginx-service" /> <package id="git" /> <package id="mysql" version="5.7.18" /> </packages>上記を適当なフォルダに保存し、そのフォルダへ移動。
choco install package.config -y利便性を高めるため、あとからこれも入れた。
cinst nano # コンソールからテキスト編集したいので cinst conemu # コンソールが使いづらいので cinst sakuraeditor # テキストファイルの編集に cinst googlechrome # モダンブラウザが必要だった設定ファイルの編集
php.ini
今回のファイルの場所は、
"C:\tools\php73\php.ini"
になった。extension= で検索し、下記のようにした。mbstringとopensslはデフォルトでONになっているので、ここでオンにしたらWARNINGが出たので消した。
php.iniextension=bz2 extension=curl extension=fileinfo extension=gd2 extension=gettext ;extension=gmp ;extension=intl ;extension=imap ;extension=interbase ;extension=ldap ;extension=mbstring extension=exif ; Must be after mbstring as it depends on it extension=mysqli ;extension=oci8_12c ; Use with Oracle Database 12c Instant Client ;extension=odbc ;extension=openssl ;extension=pdo_firebird extension=pdo_mysql ;extension=pdo_oci ;extension=pdo_odbc ;extension=pdo_pgsql extension=pdo_sqlite ;extension=pgsql ;extension=shmopCURLを使用できるように、cacert.pemを入手し、下記のようにする。
php.ini[curl] ; A default value for the CURLOPT_CAINFO option. This is required to be an ; absolute path. curl.cainfo ="C:\tools\cacert.pem" [openssl] ; The location of a Certificate Authority (CA) file on the local filesystem ; to use when verifying the identity of SSL/TLS peers. Most users should ; not specify a value for this directive as PHP will attempt to use the ; OS-managed cert stores in its absence. If specified, this value may still ; be overridden on a per-stream basis via the "cafile" SSL stream context ; option. openssl.cafile="C:\tools\cacert.pem"Nginxの設定ファイル
デフォルトで
"C:\tools\nginx\conf.d\server.default.conf"にある。root指定のパスの区切り文字に注意
server.default.confserver { listen 80; server_name example.com; root C:/YOUR/PROJECT/ROOT/public; charset utf-8; index index.php; #access_log logs/host.access.log main; location / { try_files $uri $uri/ /index.php?$query_string; } location = /favicon.ico { access_log off; log_not_found off; } location = /robots.txt { access_log off; log_not_found off; } error_page 404 /index.php; #error_page 404 /404.html; # proxy the PHP scripts to Apache listening on 127.0.0.1:80 # location ~ \.php$ { fastcgi_pass 127.0.0.1:9000; fastcgi_index index.php; fastcgi_param SCRIPT_FILENAME $realpath_root$fastcgi_script_name; include fastcgi_params; } location ~ /\.(?!well-known).* { deny all; } }サービス再起動
phpとnginxのサービスを再起動する。
MySQLの準備
コンソールでログインする
mysql -u root/* DBを作成 */ CREATE DATABASE your_db DEFAULT CHARACTER SET utf8; CREATE USER 'your_user'@'%' IDENTIFIED BY 'your_password'; /* 権限を付与 */ GRANT ALL PRIVILEGES ON your_db.* TO 'your_user'@'%' IDENTIFIED BY 'your_password';プロジェクトの設定
基本設定
GitのSSHまたはHTTPSの認証設定をしたら、適当なフォルダにプロジェクトを落としてくる。
.env.exampleをコピーして.env にし、修正する。
修正内容はプロジェクトによって適宜。cd /your/project/root cp .env.example .env nano .env終わったら、そのままプロジェクトルートで色々実行
# javascriptのコンパイル npm i npm run prod # phpライブラリのインストール composer install --optimize-autoloader --no-dev # キーの作成 php artisan key:generate # マイグレーションの実行 php artisan migrate --seed # 設定のキャッシュ php artisan config:cacheキューワーカーの設定
今回のプロジェクトにはキューの使用がある。。
nginx-service や php-service は nssm で管理されているようなので、
nssm でやっちゃうことにする。(laravel-echo-serverも似たような要領でできるはず)
nssm install laravel-worker # 名称は何でもいい。↑がサービス名になる。アクセスが拒否された場合は、管理者モードで実行しているか確認。
対話式の画面が立ち上がるので、以下のようにする。
* H/Cは編集モードで立ち上げているのでボタン名称は異なる。I/Oタブも編集
Installを押すとサービスが登録される。次回以降は自動起動する構成だが、最初の起動は手動の模様。
確認
ブラウザでアクセスし、表示されれば動作確認して完了。
おわり
足りないところや指摘は編集リクエストしてちょ。
- 投稿日:2019-08-27T17:16:26+09:00
Composerをつかってlumenプロジェクトを作成する。
https://lumen.laravel.com/docs/5.1
ここ読んでもなんかうまく行かなかったので、ネット上の先人が残してくれた記事を読んでみた。
composer create-project --prefer-dist laravel/lumen sampleを実行してもエラーで弾かれる。どうやらPHPのみをインストールしているだけではパッケージが足りないらしい。
結果的に2つ追加しました。
1つめはext-domが足りないとか。- phpunit/phpunit 7.1.0 requires ext-dom * -> the requested PHP extension dom is missing from your system. - phpunit/phpunit 7.0.3 requires ext-dom * -> the requested PHP extension dom is missing from your system. - phpunit/phpunit 7.0.2 requires ext-dom * -> the requested PHP extension dom is missing from your system. - phpunit/phpunit 7.0.1 requires ext-dom * -> the requested PHP extension dom is missing from your system. - phpunit/phpunit 7.0.0 requires ext-dom * -> the requested PHP extension dom is missing from your system.これは
php-xmlを入れると大丈夫らしい
sudo apt install php-xml2つめは
ext-mbstringが足りないと。- phpunit/phpunit 7.0.3 requires ext-mbstring * -> the requested PHP extension mbstring is missing from your system. - phpunit/phpunit 7.0.2 requires ext-mbstring * -> the requested PHP extension mbstring is missing from your system. - phpunit/phpunit 7.0.1 requires ext-mbstring * -> the requested PHP extension mbstring is missing from your system. - phpunit/phpunit 7.0.0 requires ext-mbstring * -> the requested PHP extension mbstring is missing from your system.
sudo apt install php-mbstringこれで回避できました。
やっつけですみません。
- 投稿日:2019-08-27T13:07:51+09:00
【Laravel5.8】Laravel Homesteadでの開発環境構築
内容
Laravel Homesteadを利用してLaravel5.8の開発環境を構築する
環境
- Windows10 / macOS Mojave 10.14.6
- VirtualBox 6.0.10
- Vagrant 2.2.5
- git version 2.23.0.windows.1
- git version 2.20.1 (Apple Git-117)
- laravel/homestead (virtualbox, 8.0.1)
- Laravel Framework 5.8.33
各種インストール
まず初めに、今回は必要なものを一式ダウンロードインストール
- VirtualBox
仮想環境を作るためのツールのひとつ
ダウンロードをするとインストーラーが開くので指示通りにインストールを進める
https://www.virtualbox.org/wiki/Downloads
- Vagrant
該当するOSを選択してダウンロードインストール
https://www.vagrantup.com/downloads.html
- gitとGit Bash(Windows10)
gitのインストールと合わせてGit Bashのインストールもする。
Git Bashを導入することでUnixコマンドでWindowsのファイルを操作できたりするようになる
※以下、Git Bashを利用してコマンドを実行する
https://gitforwindows.org/
- git(macOS)
・インストーラをダウンロードしてインストールする方法
下記リンクより "click here to download manually" を選択してダウンロード
https://git-scm.com/download/macもしくは
・Homebrewからインストール方法
# Homebrewがあるか確認 $ brew list # listが表示されればインストール $ brew update $ brew install gitHomebrewがない場合こちらが参考になるかと思います
https://tracpath.com/bootcamp/git-install-to-mac.htmlLaravel Homesteadの追加
Vagrantへのboxの追加
下記コマンドを実行し、何か聞かれたらvirtualboxをチョイスする
~\> vagrant box add laravel/homesteadboxを追加したらLaravel Homsteadをダウンロードする
今回はホームディレクトリの中にMyVagrantを作成し、その中にCodeというディレクトリを作成して管理することにする~\# ホームディレクトリにMyVagrant作成し、その中にCodeを作成し移動 > mkdir MyVagrant > cd MyVagrant > mkdir Code > cd Code # リポジトリをクローン > git clone https://github.com/laravel/homestead.git Homestead完了すると、作成した
~\MyVagrant\Code\下にHomesteadディレクトリが生成される設定ファイルの生成
生成されたHomesteadディレクトリに移動し、設定ファイルを生成するコマンドを実行する
~\MyVagrant\Code\# Homesteadディレクトリに移動 > cd Homestead # 設定ファイル生成 (Windows..) > init.bat # 設定ファイル生成 (Mac / Linux..) $ bash init.sh完了するとHomestead.yamlが生成される。生成されたファイルをエディタで開き、folders項目を編集。
mapがWindowsもしくはMac側のディレクトリ、toが仮想環境のディレクトリであり、これらが同期されるようになる~\MyVagrant\Code\Homestead\Homestead.yaml--- ip: "192.168.10.10" memory: 2048 cpus: 2 provider: virtualbox authorize: ~/.ssh/id_rsa.pub keys: - ~/.ssh/id_rsa folders: # - map: ~/code # 変更前 - map: ~/MyVagrant # 変更後 to: /home/vagrant/code sites: - map: homestead.test # to: /home/vagrant/code/public # 変更前 to: /home/vagrant/Laravel/public # 変更後(後ほどプロジェクト名をLaravelとするため) databases: - homestead features: - mariadb: false - ohmyzsh: false - webdriver: false # ports: # - send: 50000 # to: 5000 # - send: 7777 # to: 777 # protocol: udpSSH鍵ファイルの作成
~\MyVagrant\Code\Homestead# SSH鍵ファイルを作成するコマンド > ssh-keygen -t rsahostsファイルの編集
192.168.10.10に対して http://homestead.app でアクセスできるようにhostsの設定変更が必要
権限で編集できない場合は一度デスクトップに落としてエディタで編集して再度戻せばOK
- Macの場合
- /private/etc/hosts
- Windowsの場合
- C:\windows\system32\drivers\etc\hosts
\windows\system32\drivers\etc\hosts# Copyright (c) 1993-2009 Microsoft Corp. # # This is a sample HOSTS file used by Microsoft TCP/IP for Windows. # # This file contains the mappings of IP addresses to host names. Each # entry should be kept on an individual line. The IP address should # be placed in the first column followed by the corresponding host name. # The IP address and the host name should be separated by at least one # space. # # Additionally, comments (such as these) may be inserted on individual # lines or following the machine name denoted by a '#' symbol. # # For example: # # 102.54.94.97 rhino.acme.com # source server # 38.25.63.10 x.acme.com # x client host # localhost name resolution is handled within DNS itself. # 127.0.0.1 localhost # ::1 localhost 
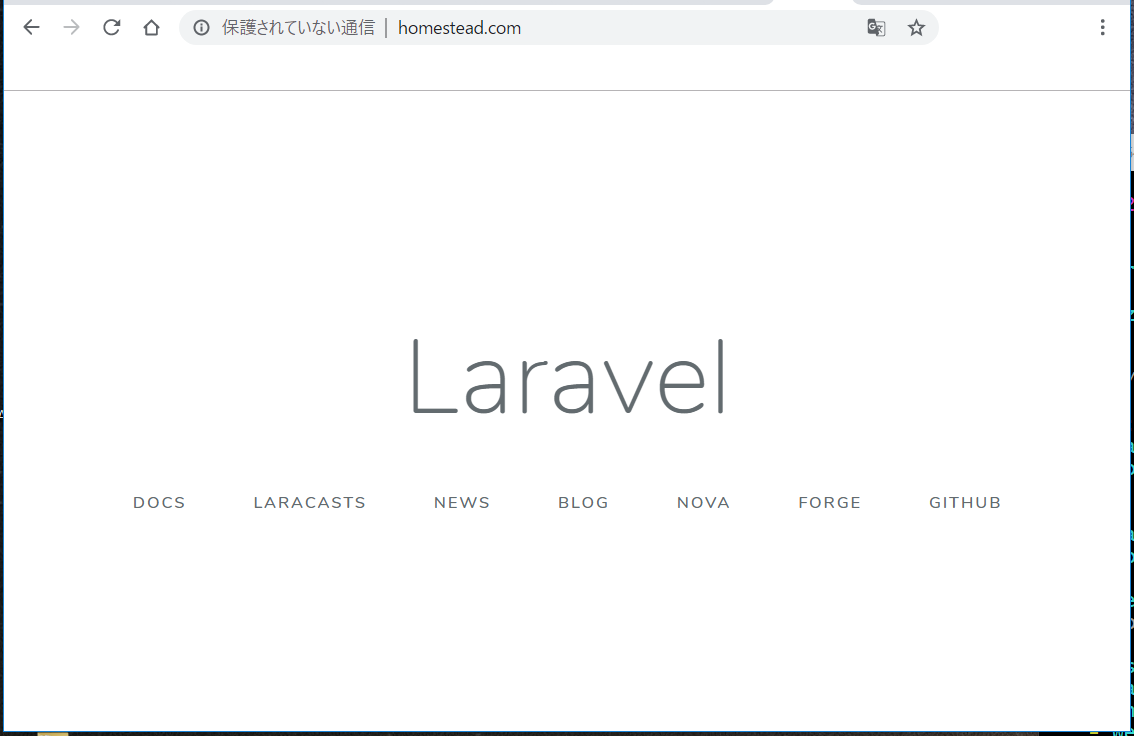
192.168.10.10 homestead.test #追記(ipの後に半角スペースを空ける)以上で環境構築は終了。
仮想マシンを起動しSSH接続
仮想マシンの起動
~\MyVagrant\Code\Homestead\# 仮想マシン起動コマンド > vagrant up # Homestead.yamlやhostsなどの設定値を後から変更した場合は、それらを反映させるためプロビジョナの実行が必要となる > vagrant reload --provision # 立ち上がっているか、仮想マシンの状態を確認する > vagrant status # 次のように出力されればOK(running) Current machine states homestead running (virtualbox)SSH接続
~\MyVagrant\Code\Homestead\> vagrant ssh # 次のように表示されれば接続完了 Welcome to Ubuntu 18.04.2 LTS (GNU/Linux 4.15.0-55-generic x86_64) Thanks for using _ _ _ | | | | | | | |__ ___ _ __ ___ ___ ___| |_ ___ __ _ __| | | '_ \ / _ \| '_ ` _ \ / _ \/ __| __/ _ \/ _` |/ _` | | | | | (_) | | | | | | __/\__ \ || __/ (_| | (_| | |_| |_|\___/|_| |_| |_|\___||___/\__\___|\__,_|\__,_| * Homestead v9.0.0 released * Settler v8.0.0 released 0 packages can be updated. 0 updates are security updates.プロジェクト作成
composerは既にインストールされているため、composerコマンドを使用してlaravelをインストールする
/home/vagrant/$ composer create-project laravel/laravel --prefer-dist {プロジェクト名} # Laravelというプロジェクト名の場合 $ composer create-project laravel/laravel --prefer-dist Laravel以上で、hostsで設定した http://homestead.test にアクセスすればおなじみの画面が表示される
- 投稿日:2019-08-27T12:14:42+09:00
ログインユーザー以外のユーザーを抜き出したい(Laravel)
- 投稿日:2019-08-27T11:59:07+09:00
Laravel で PHPUnit 実行時に .env.testing を見てくれない?
環境
- PHP 7.1
- Laravel 5.7
- PHPUnit 7.5.15
起きた事
.envにAPP_ENV=local、.env.testingにAPP_ENV=testingを記述してある状態。phpunit.xmlでは特にAPP_ENVの指定なし。- PHPUnit の処理中で
config('app.env')を実行したらlocalが返ってしまった。原因と対処
.envの値がキャッシュされてました。せっかくなので、
TestCase.phpのsetUp()で全てのキャッシュを消すようにしました。~/tests/TestCase.phppublic function setUp() { parent::setUp(); Artisan::call('cache:clear'); Artisan::call('config:clear'); Artisan::call('optimize:clear'); Artisan::call('route:clear'); // ... }
- 投稿日:2019-08-27T11:27:23+09:00
かっこ+漢字+かっこ を正規表現で除外
$output = preg_replace("/[(][\p{Han}]*[)]/u", "", $input);[] : この中にある文字にマッチする
[\p{Han}]:漢字にマッチ
* : 前の文字が1文字以上続く(続かなくてもOK)
[\p{Han}]* : かっこの間に漢字が1文字以上入るという意味
- 投稿日:2019-08-27T07:59:56+09:00
webarenaでubuntu その35
概要
webarenaでubuntu18.04やってみた。
apache2.4,php7.2やってみた。
imgのcorsやってみた。サンプルコード
<?php header("Access-Control-Allow-Origin: *"); header('Content-type: image/png'); $fp = fopen("./png/test.png", "r"); while (!feof($fp)) { $line = fgets($fp); print($line); } fclose($fp); ?>サンプルコード
<html> <head> <link rel="stylesheet" href="style.css"> <script src="//code.jquery.com/jquery-1.8.3.min.js"></script> </head> <body> <h1>Hello Plunker!</h1> <img src="http:///test22.php" alt="" crossOrigin="anonymous"> <script> $(window).load(function() { $("img").each(function() { var canvas = document.createElement("canvas"); var ctx = canvas.getContext("2d"); var img = new Image(); img.crossOrigin = ''; img.src = $(this).attr("src"); canvas.width = img.width; canvas.height = img.height; ctx.drawImage(img, 0, 0); var pixels = ctx.getImageData(0, 0, canvas.width, canvas.height); for (var y = 0; y < pixels.height; y++) { for (var x = 0; x < pixels.width; x++) { var i = (y * 4) * pixels.width + x * 4; var rgb = parseInt((pixels.data[i] + pixels.data[i + 1] + pixels.data[i + 2]) / 3, 10); pixels.data[i] = rgb; pixels.data[i + 1] = rgb; pixels.data[i + 2] = rgb; } } ctx.putImageData(pixels, 0, 0, 0, 0, pixels.width, pixels.height); $(this).attr("src", canvas.toDataURL()); }); }); </script> </body> </html>成果物
https://embed.plnkr.co/VkCRzbrKjMqx4vpYzvbw/
以上。


