- 投稿日:2019-08-27T23:08:38+09:00
いきなり!TDD(当方テスト初心者でいきなりTDD!) 3日目
はじめに
前回の、いきなり!TDD(当方テスト初心者でいきなりTDD!) 2日目では、
- 仮実装
- 三角測量
について学びました。今回は「明白な実装」について学びます。
開発環境
- Xcode 10.3
- Swift
- XCTest
作るもの
ポーカー
明白な実装
必ずしも小さな歩幅でテストと開発を繰り返す必要はなく、確実性、自信のもてるコードがあると判断した場合には、仮実装をせずに、直接コードに落とし込む「明白な実装」を使い分けながら、TDDは進めていくのが通常です。
実装
現在のCardオブジェクトのnotationは、3♥のように記号が後にきている事に対し、現在の初期化は、
Card(suit:, rank:)
と、suit、rankの順になっているため、この順序が一致するように修正してみます。
Card.swiftstruct Card { //順序を入れ替えた enum Rank: String { // (省略) } enum Suit: String { // (省略) } //順序を入れ替えた let rank: Rank let suit: Suit // (省略) }ここで、Command + U でテストを実行します。
結果はレッドになります。グリーンにするために、続けて、TDDPokerBySwiftTests.swiftも修正していきます。TDDPokerBySwiftTests.swiftclass TDDPokerBySwiftTests: XCTestCase { func testInitializeCard() { var card: Card card = Card(rank: .three, suit: .heart) //順序を入れ替えた XCTAssertEqual(card.suit, .heart) XCTAssertEqual(card.rank, .three) card = Card(rank: .jack, suit: .spade) //順序を入れ替えた XCTAssertEqual(card.suit, .spade) XCTAssertEqual(card.rank, .jack) } func testCardNotation() { var card: Card card = Card(rank: .three, suit: .heart) //順序を入れ替えた XCTAssertEqual(card.notation, "3♥") card = Card(rank: .jack, suit: .spade) //順序を入れ替えた XCTAssertEqual(card.notation, "J♠") } }Card.swiftの、
let rank
let suitの変数定義を入れ替えたことで、初期化も、
Card(rank:, suit:)
の順に変更されました。
これは、swiftのstructは、プロパティの宣言順序に応じて、初期化の引数の順序が変わります。この機能を考慮しない場合、
Card.swiftlet rank: Rank let suit: Suit init(rank: Rank, suit: Suit) { self.rank = rank self.suit = suit }というように記述すべきですが、こういった機能を確実に理解しているのであれば、記述を省略することができますし、仮実装も省略して構いません。こういった考え方が「明白な実装」になります。
不要なテストを削除する(テストのリファクタリング)
notationは初期化時に渡したrankとすいtに応じて文字列を返却するプロパティになるため、Cardの初期化が成功し、同時にrankとすいtが期待通りインスタンスに保持されることが証明できています。
よって、既存のテストケースであるtestInitializeCard()は必要ないということになり、これを削除したテストコードが、以下になります。TDDPokerBySwiftTests.swiftimport XCTest @testable import TDDPokerBySwift class TDDPokerBySwiftTests: XCTestCase { func testCardNotation() { var card: Card card = Card(rank: .three, suit: .heart) XCTAssertEqual(card.notation, "3♥") card = Card(rank: .jack, suit: .spade) XCTAssertEqual(card.notation, "J♠") } }ToDoリストも更新しましょう。
- Cardを定義して、インスタンスを作成する
- CardはSuitを持つ
- CardはRankを持つ
- Cardのインスタンスから文字列表記(notation)を取得する
終わりに
今回は、
- 明白な実装
- テストのリファクタリング
について学びました。次回から、本格的なSwiftの設計、実装を踏まえながら、引き続きTDDを学びます。
出典
- 投稿日:2019-08-27T23:08:20+09:00
いきなり!TDD(当方テスト初心者でいきなりTDD!) 2日目
はじめに
前回は、TDDの概要と、簡単なinitをサンプルに、
レッド(テストを書く) > グリーン (プロダクトコードを書く) > リファクタリング(コードを整理する)
まで行いました。引き続き、TDDを行なっていきます。
開発環境
- Xcode 10.3
- Swift
- XCTest
作るもの
ポーカー
現在のTODOリスト
[TODOリスト]
- Cardを定義して、インスタンスを作成する
- CardはSuitを持つ
- CardはRankを持つ
- Cardのインスタンスから文字列表記(notation)を取得する
それでは、最下段のTODOから再開していきましょう。
実装
まずは、レッドからです。TDDPokerBySwiftTests.swiftに以下を追加します。
TDDPokerBySwiftTests.swiftclass TDDPokerBySwiftTests: XCTestCase { (省略) func testCardNotation() { let card = Card(suit: .heart, rank: .three) XCTAssertEqual(card.notation, "3♥") } }Command + U でテストを実行してみましょう。
Cardにnotationプロパティが存在していないため、当然エラーになります。これはテストエラーではなく、単純にコンパイルエラーです。
それでは、早速、Cardにnotationプロパティを追加して、テストをグリーンにしていきましょう。
仮実装
Card.swiftに以下を追加します。
Card.swiftstruct Card { (省略) var notation: String { return "3♥" } }Command + U でテストを実行してみましょう。
テストが成功すると思います。このnotationプロパティは、initで代入されるrankとsuitから生成されるものなので、外から代入された値を保持するStored Propertyではなく、Computed Propertyによる実装になっています。Stored Property (保持型プロパティ)
今回で言う所の、Cardクラスのsuitとrankがそうですね。willSet、didSetなどで監視もでき、lazy修飾詞も使用可能です。
Card.swiftlet suit: Suit let rank: RankComputed Property (計算型プロパティ)
それ自体は値を保持せず、setter/getterで値を計算し(set)または返す(get)プロパティです。上記notationの定義がそれになるのですが、上記は、getのみのreadonly定義になっており、get{}が省略されています。省略しない場合には、以下のようになります。
Card.swiftvar notation: String { get { return "3♥" } }setterを記述する場合には、
var notation: String {
    get {
        return "3♥"
    }

    set(t) {
        print("セット!\(t)");
    }
}
や、
var notation: String {
    get {
        return "3♥"
    }

    set {
        print("セット!\(newValue)");
    }
}
で、notationの値がセットされた時に、setが呼ばれます。set{}内では、Stored Propertyを含めた計算なども可能です。
具体的な使い方の例です。
class Person {
    var birthday: NSDate    // 生年月日
    var age: Int {          // 年齢
        get {
            let components = self.calendar.components(.CalendarUnitYear, fromDate: birthday, toDate: NSDate.date(), options: .allZeros)
            return components.year
        }
        set(newAge) {
            let diff = self.age - newAge
            if diff != 0 {
                self.birthday = self.calendar.dateByAddingUnit(.CalendarUnitYear, value: diff, toDate: self.birthday, options: .allZeros)
            }
        }
    }
    let dateFormatter: NSDateFormatter  // 日付フォーマッタ
    let calendar: NSCalendar            // カレンダー
    // イニシャライザ
    init(birthday: String) {
        self.dateFormatter = NSDateFormatter();
        self.dateFormatter.dateFormat = "Y/M/d"
        self.calendar = NSCalendar.currentCalendar()
        self.birthday = self.dateFormatter.dateFromString(birthday)!
    }
}

let p = Person(birthday: "1980/12/31")
print(p.age)
p.age = p.age - 2
print(p.birthday)     // 1982/12/31
三角測量
話を戻します。現在、notationは"3♥"を静的に返しているだけなので、一般化が保証されてません。テストを修正して、別のケースも追加します。
TDDPokerBySwiftTests.swiftclass TDDPokerBySwiftTests: XCTestCase { (省略) func testCardNotation() { let card1 = Card(suit: .heart, rank: .three) XCTAssertEqual(card1.notation, "3♥") let card2 = Card(suit: .spade, rank: .jack) XCTAssertEqual(card2.notation, "J♠") } }このように2つ以上のテストケースを用意することで、機能の一般化を導き出すテクニックを「三角測量」と言います。テストがグリーンになるように、Card.swiftを書き換えます。enumをStringで定義し直し、各caseに文字列を代入します。取り出す際には、rawValueで取り出せます。
Card.swiftstruct Card { enum Suit: String { case spade = "♠" case heart = "♥" case club = "♣" case diamond = "♦" } enum Rank: String { case ace = "A" case two = "2" case three = "3" case four = "4" case five = "5" case six = "6" case seven = "7" case eight = "8" case nine = "9" case ten = "10" case jack = "J" case queen = "Q" case king = "K" } enum CardType { case other } let suit: Suit let rank: Rank var notation: String { return rank.rawValue + suit.rawValue } }Command + U でテストを実行しましょう。テストが成功すれば、グリーンのステップを終えたことになるので、リファクタリングを行います。今回も、cardの変数をテストケースごとに初期化して、共通利用できるようにするだけです。
TDDPokerBySwiftTests.swiftclass TDDPokerBySwiftTests: XCTestCase { (省略) func testCardNotation() { var card: Card card = Card(suit: .heart, rank: .three) XCTAssertEqual(card.notation, "3♥") card = Card(suit: .spade, rank: .jack) XCTAssertEqual(card.notation, "J♠") } }まとめ
今回は、
- 仮実装
- 三角測量
について学びました。
次回は、「明白な実装」というものについて、学んで行きたいと思います。参考
プロパティ
https://tea-leaves.jp/swift/content/%E3%83%97%E3%83%AD%E3%83%91%E3%83%86%E3%82%A3

- 投稿日:2019-08-27T23:08:05+09:00
いきなり!TDD(当方テスト初心者でいきなりTDD!) 1日目
TDDとは
Test-Driven Developmentのこと。ある機能に対して期待する結果を、プロダクトコードより先に”失敗するテスト”として書き(テストファースト)、実装のゴールを目指す開発スタイル。同時に、「テストしやすい」 == 「よい設計」と捉えるならば、よい設計手法とも言えます。「心理的安全を得たままにプロダクトコードの改善をすること」が目的の1つとなります。
■メリット
- メンテナンスがしやすい
- デバッグにかける時間を減らせる
- 素早い設計判断、設計改善を行える
■デメリット
- チームの成熟度やプロジェクトの状況によっては、アダとなることがある
- 仕様変更が生じたと時は、テストのメンテナンスも発生する
- ビルド時間がテストファーストの負荷を上げる
レッド/グリーン/リファクタリング
1、レッド:これから作るもののゴールを定める(テストを書く)
2、グリーン:期待する結果を満たす足場を作る(プロダクトコードを書く)
3、リファクタリング:作った羽柴を保ちながら改良を行う(コード整理、共通化、設計見直し)開発環境
- Xcode 10.3
- Swift
- XCTest
作るもの
ポーカー
まずは、実装したいことをTODOリストに書き起こす
[目的]
-スート(suit)とランク(rank)を与えて、カード(card)を生成する
-生成したカードから文字列表記(notation)を取得する↓TODOリストに置き換える
[TODOリスト]
- Cardを定義して、インスタンスを作成する
- CardはSuitを持つ
- CardはRankを持つ
- Cardのインスタンスから文字列表記(notation)を取得する
プロジェクト作成
1.Xcode > Create a new Xcode Project > Single View App
2.プロジェクト名:TDDPokerBySwift
3.Include Unit Testsのチェックをオン
4.Next > ディレクトリ指定 > Create初回テスト
Command + U でテスト実行
Build SuccessでOK
実際にテストを作成する
TDDPokerBySwiftTests.swiftを開いて、以下のように修正する
TDDPokerBySwiftTests.swiftimport XCTest @testable import TDDPokerBySwift class TDDPokerBySwiftTests: XCTestCase { func testInitializeCard() { let card1 = Card(suit: .heart, rank: .three) XCTAssertEqual(card1.suit, .heart) XCTAssertEqual(card1.rank, .three) let card2 = Card(suit: .spade, rank: .jack) XCTAssertEqual(card2.suit, .spade) XCTAssertEqual(card2.rank, .jack) } }Command + U でテスト実行してみましょう。
当然、エラーになります。これは、テストコードのエラーでなはく、単純にCardクラスが存在しないためのコンパイルエラーです。
Cardクラスを作成しましょう。今回もMVVMで作成していければと思いますので、
Project Navigator > TDDPokerBySwiftグループ > 右クリック > New Groupで、
- Models
- Views
- ViewControllers
を作成して、Models/Card.swiftを作成します。
Card.swiftimport Foundation struct Card { enum Suit { case spade case heart case club case diamond } enum Rank { case ace case two case three case four case five case six case seven case eight case nine case ten case jack case queen case king } let suit: Suit let rank: Rank }それでは、Command + U でテスト実行してみましょう。
Build Succeeded > Test Succeeded となれば成功です。ここまでで、レッド > グリーンまで作業しました。
仕上げに、リファクタリングです。テストコードを以下に書き換えましょう。
TDDPokerBySwiftTests.swiftimport XCTest @testable import TDDPokerBySwift class TDDPokerBySwiftTests: XCTestCase { func testInitializeCard() { var card: Card card = Card(suit: .heart, rank: .three) XCTAssertEqual(card.suit, .heart) XCTAssertEqual(card.rank, .three) card = Card(suit: .spade, rank: .jack) XCTAssertEqual(card.suit, .spade) XCTAssertEqual(card.rank, .jack) } }ローカル変数cardに統一したことで、直前に代入しているカードにアサーションをかけていると読めるようになりました。
それでは、Command + U でテスト実行してみましょう。問題なければ、TODOリストにチェックを入れます。
- Cardを定義して、インスタンスを作成する
- CardはSuitを持つ
- CardはRankを持つ
- Cardのインスタンスから文字列表記(notation)を取得する
今回やったこと、理解したこと
- TODOリストを書いて、取り組むべき問題を細分化した
- テストの失敗か環境によるものかを切り分ける為に、テストを書き始める前にプロジェクトのテストを一度実行した
- テストケースから考えることで、型をうまく利用し、考慮しなければならないテストケースを減らした
- レッド > グリーン > リファクタリング まで一貫して行った
まとめ
今回やったことのようなシンプルなinitは、実際、テスト対象にはならないようなものだそうです。次節において、本格的なTDDが始まると思いますので、引き続き、頑張っていきましょう。
参考
演習問題
http://devtesting.jp/tddbc/?TDDBC%E4%BB%99%E5%8F%B007%2F%E8%AA%B2%E9%A1%8Chttps://dev.classmethod.jp/event/twadatddworkshopsappororeport/
- 投稿日:2019-08-27T22:32:07+09:00
[Swift]2以上の刻みで増加させるforのループ方法
はじめに
Objctive-CからSwiftへ書き換える上で、forの使い方が大きく変化しています。
インデックス情報が不要ならば、for-inの使いかたはそれほど変わっていないのでObjective-CやJavaなどの経験があればとくに困ることはないと思います。しかし、インデックス情報が必要になる場合は、Swiftのお作法を覚える必要がでてきたので、備忘録として残しておきます。
なお環境は、Xcode10.2.1です。1ずつ増加する
for (i, value) in 0..<10.enumerated() {
}
ちなみに、dropfirst()で作成された配列には、元のインデックス情報が残っているので、インデックス情報を合わせるためにzip()を使用する必要があります。
1以外の数値を増加する
Objective-Cなどの伝統的なforの記載で、1以外の値を増加させる方法は以下のようなやり方です。
// 伝統的なforの記述方法はSwiftでは使えない!
// 2づつ増加させる
for (int i=0; i < 10; i * 2) {
}
しかしSwiftではどうやってこれを実現するのでしょうか。
その方法は、stride()を使用します。ちなみにstrideの意味は「大股に歩く」だそうです。ナイスネーミング!stride()で開区間( < )と閉区間( <= )はどうすればいいのでしょうか。
toではなくthroughに変更します。含めない場合 ( < )
for i in stride(from: 0, to: 10, by: 2) {
    print("index=\(i)") // 0, 2, 4, 6, 8
}
含めたい場合 ( <=)
for i in stride(from: 0, through: 10, by: 2) {
    print("index=\(i)") // 0, 2, 4, 6, 8, 10
}
参照
- 投稿日:2019-08-27T22:20:43+09:00
[iOS]よく使うSwiftライブラリ SnapKit編
#はじめに
ここまではRxSwift、Rx系のSwiftライブラリを見てきましたが、前回のRxKeyboardのプロジェクトで出てきた、SnapKitというのが、かなり有用だそうなので、こちらを取り上げていきたいと思います。作るもの
環境
Xcode10.3
Swift5.0.1
RxSwift 5.0.0
RxCocoa 5.0.0
SnapKit 5.0.0準備
1.プロジェクト作成
-Xcodeを起動
-Create a new Xcode project
>Single View App
>Product Name:SnapKitSample
>完了。すぐにプロジェクトを閉じます。2.ターミナルを起動して、ディレクトリに移動
$ cd SnapKitSample3.Podfile作成/編集
$ pod init
$ vi Podfile
今回はたくさんのライブラリを使います
Podfiletarget 'SnapKitSample' do use_frameworks! pod 'RxSwift' pod 'RxCocoa' pod 'SnapKit' end4.ライブラリのインストール
$ pod install5.プロジェクトを開く
.xcworkspaceから起動するStoryboardを削除
今回は、Storyboardもxibも使わずに、プログラムに直書きでレイアウトを表示します。
1.Main.storyboardの削除
/Main.storyboardをDelete > Move to Trash2.Info.plist
Info.plistを開く > Main storyboard file base nameの項目を削除(マイナスボタン)実装
AppDelegateを以下のように修正します。
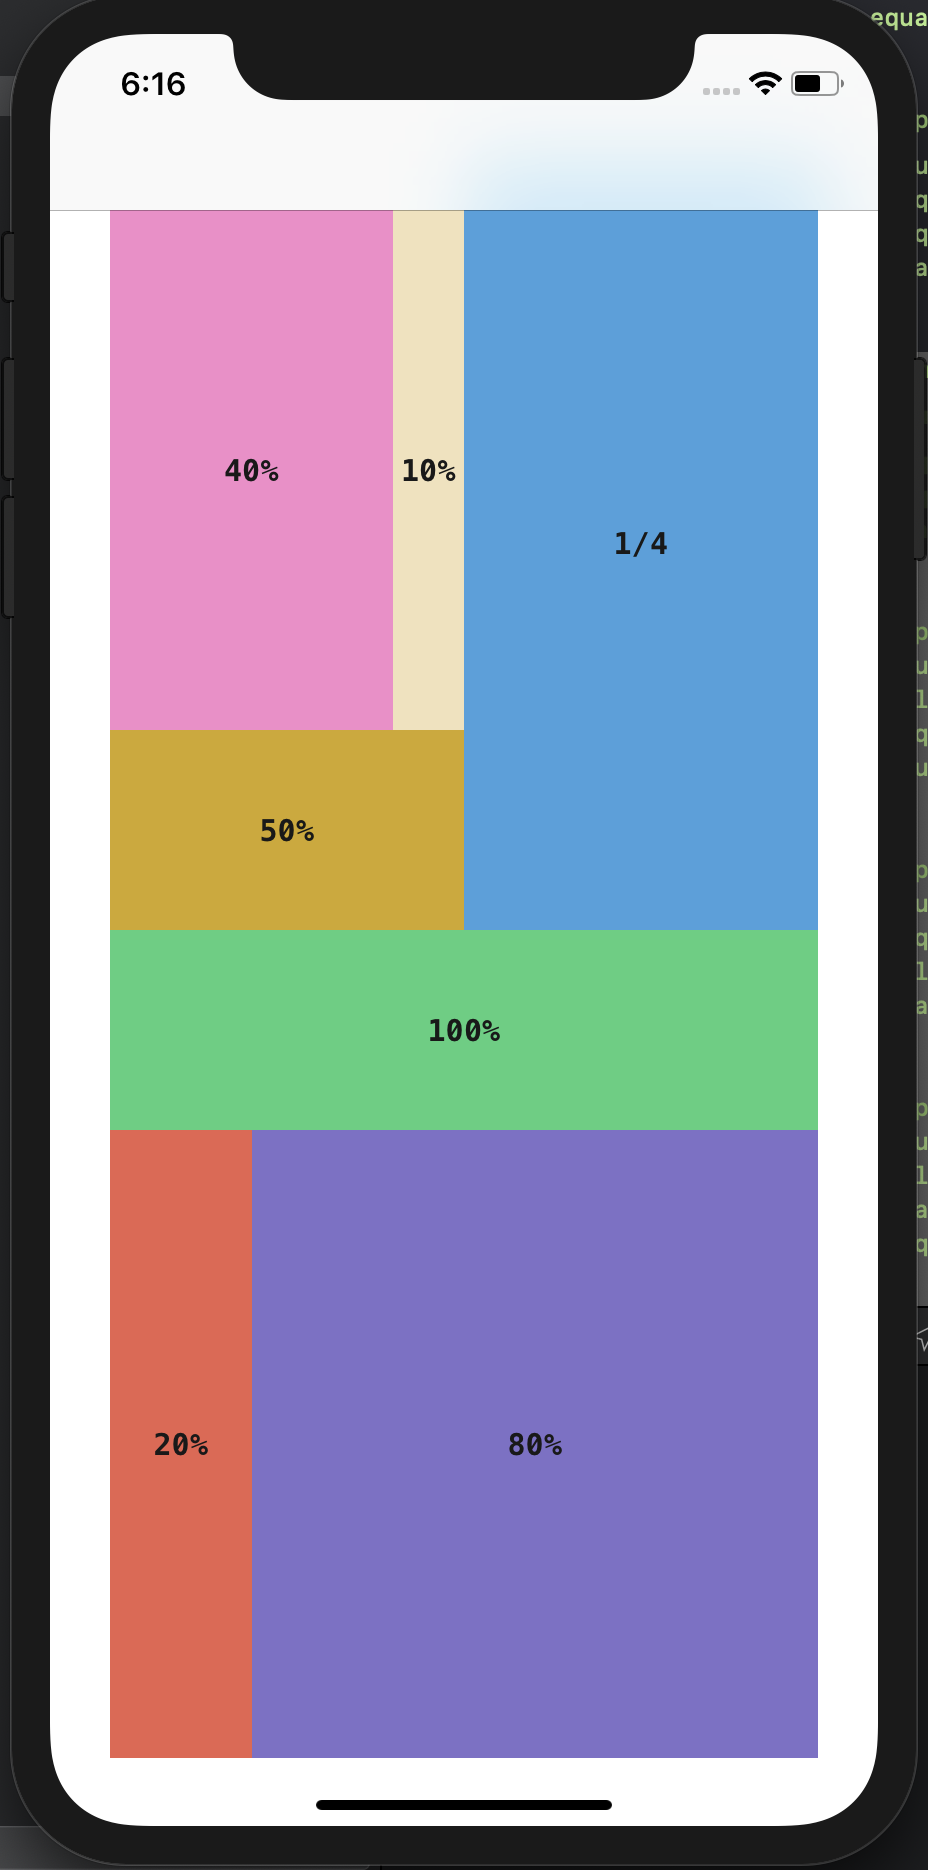
AppDelegate.swiftimport UIKit @UIApplicationMain class AppDelegate: UIResponder, UIApplicationDelegate { var window: UIWindow? //こうすることでSwift4.1以下でもdidFinishLaunchingWithOptionsが呼ばれるようにできる #if swift(>=4.2) typealias ApplicationLaunchOptionsKey = UIApplication.LaunchOptionsKey #else typealias ApplicationLaunchOptionsKey = UIApplicationLaunchOptionsKey #endif func application( _ application: UIApplication, didFinishLaunchingWithOptions launchOptions: [ApplicationLaunchOptionsKey: Any]? ) -> Bool { let window = UIWindow(frame: UIScreen.main.bounds) window.backgroundColor = .white window.makeKeyAndVisible() let viewController = ViewController() let navigationController = UINavigationController(rootViewController: viewController) window.rootViewController = navigationController self.window = window return true } }ViewController.swiftimport UIKit import SnapKit class ViewController: UIViewController { var didSetupConstraints: Bool = false let container: UIView = UIView() let labelFullWidth: UILabel = UILabel() let labelHalfWidth: UILabel = UILabel() let labelQuarter: UILabel = UILabel() let label80Percent: UILabel = UILabel() let label20Percent: UILabel = UILabel() let label40Percent: UILabel = UILabel() let label10Percent: UILabel = UILabel() override func viewDidLoad() { super.viewDidLoad() self.setupViews() } fileprivate func setupViews() { //エイリアス定義 typealias Content = (title: String, label: UILabel, color: UIColor) let font: UIFont? = UIFont(name: "Menlo-Bold", size: 15) let green: UIColor = UIColor(hue: 0.40, saturation: 0.77, brightness: 0.80, alpha: 1.0) let yellow: UIColor = UIColor(hue: 0.13, saturation: 0.99, brightness: 0.80, alpha: 1.0) let blue: UIColor = UIColor(hue: 0.57, saturation: 0.76, brightness: 0.86, alpha: 1.0) let purple: UIColor = UIColor(hue: 0.70, saturation: 0.52, brightness: 0.77, alpha: 1.0) let red: UIColor = UIColor(hue: 0.02, saturation: 0.74, brightness: 0.91, alpha: 1.0) let pink: UIColor = UIColor(hue: 0.90, saturation: 0.49, brightness: 0.96, alpha: 1.0) let navy: UIColor = UIColor(hue: 0.12, saturation: 0.25, brightness: 0.94, alpha: 1.0) let contents: [Content] = [ ("100%", labelFullWidth, green), ("50%", labelHalfWidth, yellow), ("1/4", labelQuarter, blue), ("80%", label80Percent, purple), ("20%", label20Percent, red), ("40%", label40Percent, pink), ("10%", label10Percent, navy), ] //すべてのラベルの共通設定 for content in contents { let label = content.label label.font = font label.textAlignment = .center label.backgroundColor = content.color label.textColor = .black label.layer.opacity = 0.9 label.text = content.title container.addSubview(label) } view.addSubview(container) view.backgroundColor = .white view.setNeedsUpdateConstraints() } override func updateViewConstraints() { if !didSetupConstraints { container.snp.makeConstraints{ make in //inset:内側余白 > padding make.edges.equalToSuperview().inset( UIEdgeInsets( top:view.safeAreaInsets.top, left: 30, bottom: view.safeAreaInsets.bottom, right: 30) ) //親ビューの中心と同じ位置に make.center.equalToSuperview() } labelFullWidth.snp.makeConstraints { make in make.width.equalToSuperview() make.height.equalTo(100) //オブジェクトの上辺をメインビューの中心Yに make.top.equalTo(view.snp.centerY) //widthが親ビューと一緒なので、左端から右端まで100%になる make.left.equalToSuperview() } labelHalfWidth.snp.makeConstraints { make in make.width.equalToSuperview().multipliedBy(0.5) //倍率表示 make.height.equalTo(100) make.bottom.equalTo(view.snp.centerY) make.left.equalToSuperview() } labelQuarter.snp.makeConstraints { make in make.width.equalToSuperview().dividedBy(2) //横2分割と make.height.equalToSuperview().dividedBy(2) //縦2分割の大きさで1/4の面積になる make.bottom.equalTo(view.snp.centerY) make.left.equalTo(view.snp.centerX) } label80Percent.snp.makeConstraints { make in make.width.equalToSuperview().multipliedBy(0.8) make.top.equalTo(labelFullWidth.snp.bottom) make.bottom.equalToSuperview() make.right.equalToSuperview() } label20Percent.snp.makeConstraints { make in make.width.equalToSuperview().multipliedBy(0.2) make.height.equalTo(label80Percent) make.top.equalTo(labelFullWidth.snp.bottom) make.left.equalToSuperview() } label40Percent.snp.makeConstraints { make in make.width.equalToSuperview().multipliedBy(0.4) make.top.equalToSuperview() make.left.equalToSuperview() make.bottom.equalTo(labelHalfWidth.snp.top) } label10Percent.snp.makeConstraints { make in make.width.equalToSuperview().multipliedBy(0.1) make.top.equalToSuperview() make.left.equalTo(label40Percent.snp.right) make.bottom.equalTo(labelHalfWidth.snp.top) } didSetupConstraints = true } super.updateViewConstraints() } }参考
https://tech.ryukyu-i.co.jp/2016/12/02/easy-to-use-snapkit/
https://github.com/tdkn/EasyToUseSnapKit/blob/master/EasyToUseSnapKit/Sample02ViewController.swift
- 投稿日:2019-08-27T22:18:53+09:00
[iOS]いきなり!RxSwift (当方はSwift初心者でいきなりRxSwift!) よく使うRxSwift系ライブラリ RxKeyboard編
はじめに
前回に引き続き、よく使うRxSwift系ライブラリとして、RxKeyboardをみていきたいと思います。
環境
Xcode10.3
Swift5.0.1
RxSwift 5.0.0
RxCocoa 5.0.0
RxKeyboard 1.0.0
SwiftyImage 1.1
SwiftyColor 1.2.0
CGFloatLiteral 0.5.0
ManualLayout 1.3.0
SnapKit 5.0.0
Then 2.5.0
ReusableKit 3.0.0
UITextView+Placeholder 1.2.1つくるもの
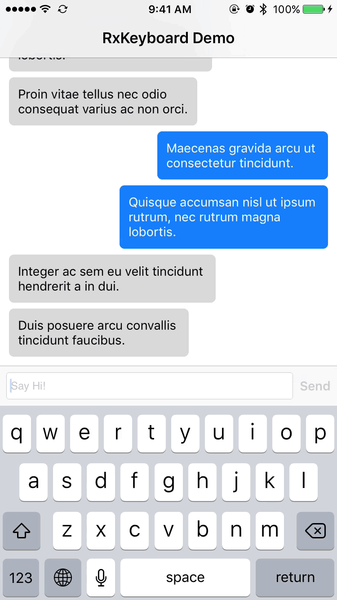
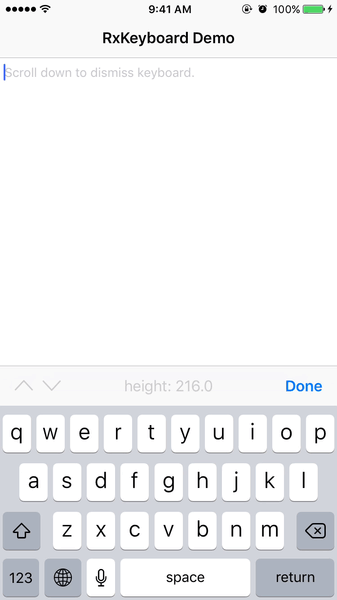
iOSのMessageアプリのようなメッセージ形式のタイムライン&入力フォームのアプリケーションになります。
準備
1.プロジェクト作成
-Xcodeを起動
-Create a new Xcode project
>Single View App
>Product Name:RxKeyboardSample
>完了。すぐにプロジェクトを閉じます。2.ターミナルを起動して、ディレクトリに移動
$ cd RxKeyboardSample3.Podfile作成/編集
$ pod init
$ vi Podfile
今回はたくさんのライブラリを使います
Podfiletarget 'RxKeyboardSample' do use_frameworks! pod 'RxSwift' pod 'RxCocoa' pod 'RxKeyboard' pod 'ReusableKit' pod 'SwiftyImage' pod 'SwiftyColor' pod 'CGFloatLiteral' pod 'ManualLayout' pod 'SnapKit' pod 'Then' pod 'UITextView+Placeholder' end4.ライブラリのインストール
$ pod install5.プロジェクトを開く
.xcworkspaceから起動するStoryboardを削除
今回は、Storyboardもxibも使わずに、プログラムに直書きでレイアウトを表示します。
1.Main.storyboardの削除
/Main.storyboardをDelete > Move to Trash2.Info.plist
Info.plistを開く > Main storyboard file base nameの項目を削除(マイナスボタン)3.AppDelegateの修正
AppDelegate.swiftimport UIKit import CGFloatLiteral import ManualLayout import SnapKit import SwiftyColor import Then import UITextView_Placeholder @UIApplicationMain class AppDelegate: UIResponder, UIApplicationDelegate { var window: UIWindow? //こうすることでSwift4.1以下でもdidFinishLaunchingWithOptionsが呼ばれるようにできる #if swift(>=4.2) typealias ApplicationLaunchOptionsKey = UIApplication.LaunchOptionsKey #else typealias ApplicationLaunchOptionsKey = UIApplicationLaunchOptionsKey #endif func application( _ application: UIApplication, didFinishLaunchingWithOptions launchOptions: [ApplicationLaunchOptionsKey: Any]? ) -> Bool { let window = UIWindow(frame: UIScreen.main.bounds) window.backgroundColor = .white window.makeKeyAndVisible() let viewController = MessageListViewController() let navigationController = UINavigationController(rootViewController: viewController) window.rootViewController = navigationController self.window = window return true } }MVVM用のグループを作成
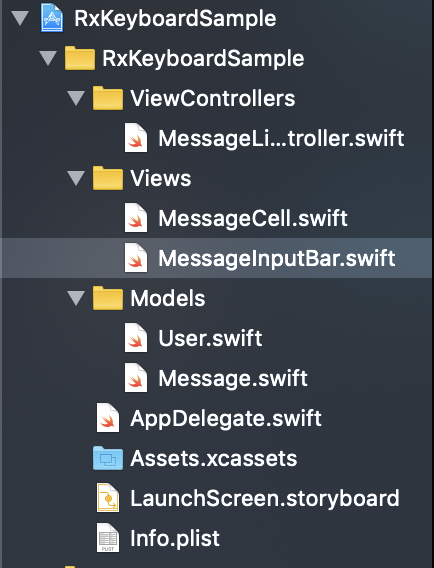
Project Navigator - プロジェクトフォルダ上で右クリック - New Group
より、Models、Views、ViewControllersの3つのグループを作成し、/ViewControllers
・ViewController.swiftをViewControllersフォルダに移動
・ファイル名を、MessageListViewController.swiftに変更
・クラス名を、MessageListViewControllerに変更/Views
・MessageCell.swift
・MessageInputBar.swift
を作成/Models
・User.swift
・Message.swift
を作成
Model
User、MessageのModel編集します。
User.swiftenum User { case other case me }Message.sweftstruct Message { var user: User var text: String }View
MessageCell.swiftimport Foundation import UIKit import SwiftyImage final class MessageCell: UICollectionViewCell { // MARK: Types fileprivate enum BalloonAlignment { case left case right } // MARK: Constants struct Metric { static let maximumBalloonWidth = 240.f static let balloonViewInset = 10.f } struct Font { static let label = UIFont.systemFont(ofSize: 14.f) } // MARK: Properties fileprivate var balloonAlignment: BalloonAlignment = .left // MARK: UI //SwiftyImageによる拡張でオブジェクト作成 fileprivate let otherBalloonViewImage = UIImage.resizable() .corner(radius: 5) .color(0xD9D9D9.color) .image //SwiftyImageによる拡張でオブジェクト作成 fileprivate let myBalloonViewImage = UIImage.resizable() .corner(radius: 5) .color(0x1680FA.color) .image let balloonView = UIImageView() let label = UILabel().then { $0.font = Font.label $0.numberOfLines = 0 } // MARK: Initializing override init(frame: CGRect) { super.init(frame: frame) self.contentView.addSubview(self.balloonView) self.contentView.addSubview(self.label) } required init?(coder aDecoder: NSCoder) { fatalError("init(coder:) has not been implemented") } // MARK: Configuring func configure(message: Message) { self.label.text = message.text switch message.user { case .other: self.balloonAlignment = .left self.balloonView.image = self.otherBalloonViewImage self.label.textColor = .black case .me: self.balloonAlignment = .right self.balloonView.image = self.myBalloonViewImage self.label.textColor = .white } self.setNeedsLayout() //再読み込み } // MARK: Size class func size(thatFitsWidth width: CGFloat, forMessage message: Message) -> CGSize { let labelWIdth = Metric.maximumBalloonWidth - Metric.balloonViewInset * 2 let constraintSize = CGSize(width: labelWIdth, height: CGFloat.greatestFiniteMagnitude) let options: NSStringDrawingOptions = [.usesLineFragmentOrigin, .usesFontLeading] let rect = message.text.boundingRect(with: constraintSize, options: options, attributes: [.font: Font.label], context: nil) let labelHeight = ceil(rect.height) return CGSize(width: width, height: labelHeight + Metric.balloonViewInset * 2) } // MARK: Layout override func layoutSubviews() { super.layoutSubviews() //ManualLayout によるプロパティ操作 self.label.width = Metric.maximumBalloonWidth - Metric.balloonViewInset * 2 self.label.sizeToFit() self.balloonView.width = self.label.width + Metric.balloonViewInset * 2 self.balloonView.height = self.label.height + Metric.balloonViewInset * 2 switch self.balloonAlignment { case .left: self.balloonView.left = 10 case .right: self.balloonView.right = self.contentView.width - 10 } self.label.top = self.balloonView.top + Metric.balloonViewInset self.label.left = self.balloonView.left + Metric.balloonViewInset } }MessageInputBar.swiftimport Foundation import UIKit import RxCocoa import RxSwift import RxKeyboard final class MessageInputBar: UIView { // MARK: Properties private let disposeBag = DisposeBag() // MARK: UI let toolbar = UIToolbar() let textView = UITextView().then { $0.placeholder = "Say Hi!" $0.isEditable = true $0.showsVerticalScrollIndicator = false $0.layer.borderColor = UIColor.lightGray.withAlphaComponent(0.6).cgColor $0.layer.borderWidth = 1 / UIScreen.main.scale $0.layer.cornerRadius = 3 } let sendButton = UIButton(type: .system).then { $0.titleLabel?.font = UIFont.boldSystemFont(ofSize: UIFont.systemFontSize) $0.setTitle("Send", for: .normal) } // MARK: Initializing override init(frame: CGRect) { super.init(frame: frame) self.addSubview(self.toolbar) self.addSubview(self.textView) self.addSubview(self.sendButton) //snp:SnapKit は AutoLayout の DSL self.toolbar.snp.makeConstraints { make in make.edges.equalTo(0) } self.textView.snp.makeConstraints { make in make.top.left.equalTo(7) make.right.equalTo(self.sendButton.snp.left).offset(-7) make.bottom.equalTo(-7) } self.sendButton.snp.makeConstraints { make in make.top.equalTo(7) make.bottom.equalTo(-7) make.right.equalTo(-7) } self.textView.rx.text .map { text in //1行記述はreturnを省略できる text?.isEmpty == false //textViewのtextを監視し、textが空でなければ } .bind(to: self.sendButton.rx.isEnabled) //ボタンを押せるように .disposed(by: self.disposeBag) RxKeyboard.instance.visibleHeight .map{ $0 > 0} .distinctUntilChanged().drive(onNext: { [weak self] (visible) in guard let self = self else { return } var bottomInset = 0.f if #available(iOS 11.0, *), !visible, let bottom = self.superview?.safeAreaInsets.bottom { bottomInset = bottom } self.toolbar.snp.remakeConstraints({ (make) in make.left.right.top.equalTo(0) make.bottom.equalTo(bottomInset) }) }) .disposed(by: disposeBag) } @available(iOS 11.0, *) override func safeAreaInsetsDidChange() { super.safeAreaInsetsDidChange() guard let bottomInset = self.superview?.safeAreaInsets.bottom else { return } self.toolbar.snp.remakeConstraints { make in make.top.left.right.equalTo(0) make.bottom.equalTo(bottomInset) } } required init?(coder aDecoder: NSCoder) { fatalError("init(coder:) has not been implemented") } // MARK: Size //自身のサイズを返す override var intrinsicContentSize: CGSize { return CGSize(width: self.width, height: 44) } } // MARK: - Reactive //Rasctive extension Reactive where Base: MessageInputBar { //base変数の型がMessageInputBarになる var sendButtonTap: ControlEvent<String> { let source: Observable<String> = self.base.sendButton.rx.tap.withLatestFrom(self.base.textView.rx.text.asObservable()) .flatMap { text -> Observable<String> in if let text = text, !text.isEmpty { return .just(text) } else { return .empty() } } .do(onNext: { [weak base = self.base] _ in base?.textView.text = nil }) return ControlEvent(events: source) } }ViewController
MessageListViewController.swiftimport UIKit import ReusableKit import RxKeyboard import RxSwift class MessageListViewController: UIViewController { // MARK: Constants struct Reusable { static let messageCell = ReusableCell<MessageCell>() //ReusableCell:ReusableKitのクラス } // MARK: Properties private var didSetupViewConstaraints = false private var disposeBag = DisposeBag() fileprivate var messages: [Message] = [ Message(user: .other, text: "Lorem ipsum dolor sit amet, consectetur adipiscing elit."), Message(user: .other, text: "Morbi et eros elementum, semper massa eu, pellentesque sapien."), Message(user: .me, text: "Aenean sollicitudin justo scelerisque tincidunt venenatis."), Message(user: .me, text: "Ut mollis magna nec interdum pellentesque."), Message(user: .me, text: "Aliquam semper nibh nec quam dapibus, a congue odio consequat."), Message(user: .other, text: "Nullam iaculis nisi in justo feugiat, at pharetra nulla dignissim."), Message(user: .me, text: "Fusce at nulla luctus, posuere mauris ut, viverra nunc."), Message(user: .other, text: "Nam feugiat urna non tortor ornare viverra."), Message(user: .other, text: "Donec vitae metus maximus, efficitur urna ac, blandit erat."), Message(user: .other, text: "Pellentesque luctus eros ac nisi ullamcorper pharetra nec vel felis."), Message(user: .me, text: "Duis vulputate magna quis urna porttitor, tempor malesuada metus volutpat."), Message(user: .me, text: "Duis aliquam urna quis metus tristique eleifend."), Message(user: .other, text: "Cras quis orci quis nisi vulputate mollis ut vitae magna."), Message(user: .other, text: "Fusce eu urna eu ipsum laoreet lobortis."), Message(user: .other, text: "Proin vitae tellus nec odio consequat varius ac non orci."), Message(user: .me, text: "Maecenas gravida arcu ut consectetur tincidunt."), Message(user: .me, text: "Quisque accumsan nisl ut ipsum rutrum, nec rutrum magna lobortis."), Message(user: .other, text: "Integer ac sem eu velit tincidunt hendrerit a in dui."), Message(user: .other, text: "Duis posuere arcu convallis tincidunt faucibus."), ] // MARK: UI let collectionView = UICollectionView(frame: .zero, collectionViewLayout: UICollectionViewFlowLayout()).then { $0.alwaysBounceVertical = true $0.keyboardDismissMode = .interactive $0.backgroundColor = .clear $0.register(Reusable.messageCell) ($0.collectionViewLayout as? UICollectionViewFlowLayout)?.do({ $0.minimumLineSpacing = 6 $0.sectionInset.top = 10 $0.sectionInset.bottom = 10 }) } let messageInputBar = MessageInputBar() // MARK: Initializing init() { super.init(nibName: nil, bundle: nil) self.title = "RxKeyboard Example" } required init?(coder aDecoder: NSCoder) { fatalError("init(coder:) has not been implemented") } override func viewDidLoad() { super.viewDidLoad() self.view.addSubview(self.collectionView) self.view.addSubview(self.messageInputBar) self.collectionView.dataSource = self self.collectionView.delegate = self DispatchQueue.main.async { let indexPath = IndexPath(item: self.messageInputBar.accessibilityElementCount() - 1, section: 0) self.collectionView.scrollToItem(at: indexPath, at: [], animated: true) } RxKeyboard.instance.visibleHeight .drive(onNext: { [weak self] keyboardVisibleHeight in guard let self = self, self.didSetupViewConstaraints else { return } self.messageInputBar.snp.updateConstraints { make in if #available(iOS 11.0, *) { make.bottom.equalTo(self.view.safeAreaLayoutGuide.snp.bottom).offset(-keyboardVisibleHeight) } else { make.bottom.equalTo(self.bottomLayoutGuide.snp.top).offset(-keyboardVisibleHeight) } } self.view.setNeedsLayout() UIView.animate(withDuration: 0) { self.collectionView.contentInset.bottom = keyboardVisibleHeight + self.messageInputBar.height self.collectionView.scrollIndicatorInsets.bottom = self.collectionView.contentInset.bottom self.view.layoutIfNeeded() } }) .disposed(by: self.disposeBag) RxKeyboard.instance.willShowVisibleHeight .drive(onNext: { keyboardVisibleHeight in self.collectionView.contentOffset.y += keyboardVisibleHeight }) .disposed(by: self.disposeBag) self.messageInputBar.rx.sendButtonTap .subscribe(onNext: { [weak self] text in guard let self = self else { return } let message = Message(user: .me, text: text) self.messages.append(message) let indexPath = IndexPath(item: self.messages.count - 1, section: 0) self.collectionView.insertItems(at: [indexPath]) self.collectionView.scrollToItem(at: indexPath, at: [], animated: true) }) .disposed(by: disposeBag) } override func updateViewConstraints() { super.updateViewConstraints() guard !self.didSetupViewConstaraints else { return } self.didSetupViewConstaraints = true self.collectionView.snp.makeConstraints { make in make.edges.equalTo(0) } self.messageInputBar.snp.makeConstraints { make in make.left.right.equalTo(0) if #available(iOS 11.0, *) { make.bottom.equalTo(self.view.safeAreaLayoutGuide.snp.bottom) } else { make.bottom.equalTo(self.bottomLayoutGuide.snp.top) } } } override func viewDidLayoutSubviews() { super.viewDidLayoutSubviews() if self.collectionView.contentInset.bottom == 0 { self.collectionView.contentInset.bottom = self.messageInputBar.height self.collectionView.scrollIndicatorInsets.bottom = self.collectionView.contentInset.bottom } } } // MARK: - UICOllectionViewDataSource extension MessageListViewController: UICollectionViewDataSource { func collectionView(_ collectionView: UICollectionView, numberOfItemsInSection section: Int) -> Int { return self.messages.count } func collectionView(_ collectionView: UICollectionView, cellForItemAt indexPath: IndexPath) -> UICollectionViewCell { let cell = collectionView.dequeue(Reusable.messageCell, for: indexPath) cell.configure(message: self.messages[indexPath.item]) return cell } } // MARK: - UICollectionViewDelegateFlowLayout extension MessageListViewController: UICollectionViewDelegateFlowLayout { func collectionView(_ collectionView: UICollectionView, layout collectionViewLayout: UICollectionViewLayout, sizeForItemAt indexPath: IndexPath) -> CGSize { let message = self.messages[indexPath.item] return MessageCell.size(thatFitsWidth: collectionView.width, forMessage: message) } }参考
- 投稿日:2019-08-27T22:18:41+09:00
[iOS]いきなり!RxSwift (当方はSwift初心者でいきなりRxSwift!) よく使うRxSwiftライブラリ RxDataSources編
はじめに
前回までは、カウンターアプリ、WebViewアプリなどのサンプルアプリを実装してきました。今回は、よく使うRxSwift系ライブラリのひとつとしてRxDataSourcesを、実装しながら見ていきたいと思います。
環境
Xcode10.3
Swift5.0.1
RxSwift 5.0.0
RxCocoa 5.0.0<今回初めて使うライブラリ>
RxDataSources 4.0.1準備
1.プロジェクト作成
-Xcodeを起動
-Create a new Xcode project
>Single View App
>Product Name:RxSwiftLibSample
>完了。すぐにプロジェクトを閉じます。2.ターミナルを起動して、ディレクトリに移動
$ cd RxDataSourcesSample3.Podfile作成/編集
$ pod init $ vi PodfilePodfile# platform :ios, '9.0' target 'RxDataSourcesSample' do use_frameworks! pod 'RxSwift' pod 'RxCocoa' pod 'RxDataSources' end4.ライブラリのインストール
$ pod install5.プロジェクトを開く
.xcworkspaceから起動するStoryboardを削除
1.Main.storyboardの削除
/Main.storyboardをDelete > Move to Trash2.Info.plist
Info.plistを開く > Main storyboard file base nameの項目を削除(マイナスボタン)3.AppDelegateの修正
AppDelegate.swiftfunc application(_ application: UIApplication, didFinishLaunchingWithOptions launchOptions: [UIApplication.LaunchOptionsKey: Any]?) -> Bool { /* 追加 ここから */ self.window = UIWindow(frame: UIScreen.main.bounds) let navigationController = UINavigationController(rootViewController: ViewController()) self.window?.rootViewController = navigationController self.window?.makeKeyAndVisible() /* 追加 ここまで */ return true }4.ViewController.xibの作成
- New File > View > Save As: ViewController.xib > Create
- ViewController.xibを開く
- Placeholders > File's Ownerを選択
- ClassにViewControllerを指定
- OutletのviewとXibのViewを接続
- Build & Run > 成功でOK実装
SettingsViewModel.swiftimport Foundation import RxSwift import RxCocoa import RxDataSources class SettingsViewModel { let items = BehaviorRelay<[SettingsSectionModel]> (value: []) var itemsObservable: Observable<[SettingsSectionModel]> { return items.asObservable() } func setup() { updateItems() } func updateItems() { let sections: [SettingsSectionModel] = [ accountSection(), commonSection() ] items.accept(sections) } private func accountSection() -> SettingsSectionModel { let items: [SettingsItem] = [ .account, .security, .notification, .contents ] return SettingsSectionModel(model: .account, items: items) } private func commonSection() -> SettingsSectionModel { let items: [SettingsItem] = [ .sounds, .dataUsing, .accessibility, .description(text: "基本設定はこの端末でログインしている全てのアカウントに適用されます。") ] return SettingsSectionModel(model: .common, items: items) } }SettingsSectionModel.swiftimport Foundation import UIKit import RxDataSources typealias SettingsSectionModel = SectionModel<SettingsSection, SettingsItem> enum SettingsSection { case account case common case other var headerHeight: CGFloat { return 40.0 } var footerHeight: CGFloat { return 1.0 } } enum SettingsItem { //account section case account case security case notification case contents //common section case sounds case dataUsing case accessibility //other case description(text: String) var title: String? { switch self { case .account: return "アカウント" case .security: return "セキュリティ" case .notification: return "通知" case .contents: return "コンテンツ設定" case .sounds: return "サウンド設定" case .dataUsing: return "データ利用時の設定" case .accessibility: return "アクセシビリティ" case .description: return nil } } var rowHeight: CGFloat { switch self { case .description: return 72.0 default: return 48.0 } } var accessoryType: UITableViewCell.AccessoryType { switch self { case .account, .security, .notification, .contents, .sounds, .dataUsing, .accessibility: return .disclosureIndicator case .description: return .none } } }ViewController.swiftimport UIKit import RxSwift import RxDataSources class ViewController: UIViewController { @IBOutlet weak var tableView: UITableView! private var disposeBag = DisposeBag() private lazy var dataSource = RxTableViewSectionedReloadDataSource<SettingsSectionModel>(configureCell: configureCell) private lazy var configureCell: RxTableViewSectionedReloadDataSource<SettingsSectionModel>.ConfigureCell = { [weak self] (dataSource, tableView, indexPath, _) in let item = dataSource[indexPath] switch item { case .account, .security, .notification, .contents, .sounds, .dataUsing, .accessibility: let cell = tableView.dequeueReusableCell(withIdentifier: "cell", for: indexPath) cell.textLabel?.text = item.title cell.accessoryType = item.accessoryType return cell case .description(let text): let cell = tableView.dequeueReusableCell(withIdentifier: "cell", for: indexPath) cell.textLabel?.text = text cell.isUserInteractionEnabled = false return cell } } private var viewModel: SettingsViewModel! override func viewDidLoad() { super.viewDidLoad() setupViewController() setupTableView() setupViewModel() } private func setupViewController() { navigationItem.title = "設定" } private func setupTableView() { tableView.register(UITableViewCell.self, forCellReuseIdentifier: "cell") tableView.contentInset.bottom = 12.0 tableView.backgroundColor = UIColor(red: 0.9, green: 0.9, blue: 0.9, alpha: 1.0) tableView.rx.setDelegate(self).disposed(by: disposeBag) tableView.rx.itemSelected .subscribe(onNext: { [weak self] indexPath in guard let item = self?.dataSource[indexPath] else { return } self?.tableView.deselectRow(at: indexPath, animated: true) switch item { case .account: //遷移させる処理 //コンパイルエラー回避のためにbreakを書いていますが処理を書いていればbreakは入りません break case .security: //遷移させる処理 break case .notification: //遷移させる処理 break case .contents: //遷移させる処理 break case .sounds: //遷移させる処理 break case .dataUsing: //遷移させる処理 break case .accessibility: //遷移させる処理 break case .description: break } }) .disposed(by: disposeBag) } private func setupViewModel() { viewModel = SettingsViewModel() viewModel.items .bind(to: tableView.rx.items(dataSource: dataSource)) .disposed(by: disposeBag) viewModel.updateItems() } } extension ViewController : UITableViewDelegate { func tableView(_ tableView: UITableView, heightForRowAt indexPath: IndexPath) -> CGFloat { let item = dataSource[indexPath] return item.rowHeight } func tableView(_ tableView: UITableView, heightForHeaderInSection section: Int) -> CGFloat { let section = dataSource[section] return section.model.headerHeight } func tableView(_ tableView: UITableView, heightForFooterInSection section: Int) -> CGFloat { let section = dataSource[section] return section.model.footerHeight } func tableView(_ tableView: UITableView, viewForHeaderInSection section: Int) -> UIView? { let headerView = UIView() headerView.backgroundColor = .clear return headerView } func tableView(_ tableView: UITableView, viewForFooterInSection section: Int) -> UIView? { let footerView = UIView() footerView.backgroundColor = .clear return footerView } }lazy プロパティ
・参照されるときに初めて初期値が設定されるプロパティ
・レイジープロパティに代入する値は、変数に限らず、メソッドを呼び出して値を設定することができる[備考]
・クロージャを使ってレイジープロパティを設定することもできるvar price = 5000 class MyItem { lazy var price:Int = { price * 2 }() }
- 投稿日:2019-08-27T21:20:38+09:00
【アプリ開発】はじめての個人開発に意気込み過ぎたら色々しくじった
はじめに
とある受託企業でiOS開発をしています。
個人開発のしくじり記事です。noteとqiitaで迷いましたが、Gitの共有もしたいのでこの場をお借りして書かせて頂きます。開発の経緯
業務である程度のことなら開発ができるようになってきたということもあり、個人開発にチャレンジしたいと思い立つ。
それと同時に最近ピーター・ドラッカーの"フィードバック分析"を紙ベースで行なっていたので、どうせならアプリ化しようと思い開発に取り掛かる。
フィードバック分析とは
自分の強みを知り、その強みを伸ばしていくためのメソッド。ピーター・ドラッカー自身も長年このメソッドを取り入れていた。開発前の準備
特に何もしていません。
思い立ったら即行動。開発初期
~ なんでもできる万能感 ~
TwitterやFacebookのUIをみて、自前で全部作れるわとか思っていた頃。
また、フィードバック分析のアプリがなかったということもあり、市場のパイオニアのような感覚だった。これがブルーオーシャンww
とか思っていた。とにかくイタすぎた。
開発中期
~ 割と楽しかった ~
妄想フェーズは終わって、現実的にデータベース設計とかアーキテクチャの学習とかやっていた。
市場のパイオニア感をモチベーションに難しい実装も幾度となく乗り越え、その度に達成感に包まれた。
この頃が一番精神的に豊かだった。開発後期
~ モチベーション氷河期 ~
モチベーション大暴落。側から見たら情緒不安定。
理由1. こんなアプリじゃない感
なぜかアプリがSNS寄りになっていく。そして指が勝手に動く。気づいたらSNSになっていた。
この時に、機能定義などは開発前に着手するべきだと痛感した。理由2. 先が見えない
後半から気づき始めたが、初期フェーズの個人が出すアプリにしては規模がデカすぎる。
何も考えず開発を続けていると、あれもこれも必要なんじゃないか とか こんな機能がほしい と、つい目的から遠ざかってしまう。それが行き過ぎたのが俺だ。
これに関しても事前準備である程度は回避できたはずだ。
そして自分は一体なんのために戦っているのか、何と戦っているのかわからなくなってきた。しかし、一つだけ目的があった。
それが"リリース"。
自分で作ったアプリを市場に出せば何かが変わるんじゃないかという想いで無心で頑張った。
それはまるで仲間を失い生贄の烙印を押されながらも、グリフィスを倒すというただ一つの目的のために戦い続けるガッツのように。反省点
・ アプリは小さく始める
今回の記事で一番主張したい。調子に乗るなと。一人のエンジニアのリソースで世の有名アプリと張り合えるアプリなど作り出せない。
誰でも最初はすごいものを作りたい。その気持ちはわかる。だが、"過ぎ去るは及ばざるが如し"というように、そんなことをするとコードの前に精神が破綻する。それが俺だ。・ 画面遷移図やデータの流れをざっくりとでも書き起こす
ざっくりとでもデータの流れや画面遷移の流れを書き起こすべきだった。自分の場合局所的に必要なデータや画面を都度書き起こしたりしていて時間と労力の無駄が多かった。
・ 個人開発者の記事をいくつか見て取り組むべきだった
すでに世の中には沢山のしくじり先生がいる。
同じ失敗をする必要はなかった。技術的な反省点
・ Viewの管理
アプリで同じようなviewを使い回す場面が多かった。しかしそれはあらかじめ把握できたものだ。自分は愚策にもBaseViewなるものを作ってこの問題を解決してしまった。反省はしている
BaseViewControllerは作りたくない・ 変数名をもっとしっかりつけるべきだった
最初は具体的な変数名をしっかりつけていたが、いつの間にか
・token
・documentIDなどという抽象的な変数名をつけるようになった。一周回ってこんな変数名つける俺かっこいいとか思ってたけど後からコード全体見渡したら地獄絵図だった。
変数名は長くなってもわかりやすく。
リーダブルコード・ どういう目的でどこに処理を書くか
どこにどういう目的で処理を書くかなど最初は何も考えなかった。
しかし、規模が大きくなるとそれらの負債は自分を襲ってくる。
やられる前に対策しよう。
ひどいコードをメンテしてきたからこそ実感する、良いコードや良い設計の大切さ
コーディング原則
デザインパターン・ deinitが走らない(循環参照)
deinitとは
クラスインスタンス解放時に呼ばれる関数。この関数が呼ばれなければ、クラスのインスタンスがメモリ上にまだ残っていることを示唆している。メモリリークの原因になる。
ある時インスタンスが破棄されたタイミングで処理を走らせたい場面があった。
しかしdeinitが走らない(循環参照)、冷や汗をかいた、そしてLintの大切さをしみじみと感じた。
デバックは出来たもののその時間はもう帰ってこない。
それ以外にもLintを導入する理由は数えきれない。
(Lintを入れたらいいのではと思われるかもしれないが、入れた際の地獄絵図を想像するだけでも泣きそうになるから入れなかった。今回だけ許して)
ハマりがちな循環参照について
SwiftLint
私がLintを愛する3つの理由その後
一応完成はしたものの、リリースは見送る形にしました。
理由は以下です。
・フィードバック分析機能がもはや機能していない。と言うよりも存在にすら気づかない。
・結果SNSになり、それでもリリースしようと思ったが、同じようなアプリはかなりある。
・次に作りたいものがあるので、申請に時間を費やしたくない。
・etc..しかし、そのままでは何かすごくモヤモヤした気持ちが残るので、せめてこれからiOSで個人開発に取り掛かろうと思っている方々にこれを活用してほしいと思い、Githubに公開しています。
*諸々修正はしましたので、ある程度参考にできるコードにはなっていると思います。
よかったらご覧ください。最後に
以上しくじりでした。
しかし今回の開発で学んだことは計り知れす、ナレッジも沢山溜まりました。
今回の反省点を全て活かし、これからもめげずにアプリ開発を続けていきます!
その度に個人開発の開発・運用状況なども共有していきたいと思っているのでTwitterもフォローしていただければ嬉しいです。
YUKI_個人アプリ開発&MobileEngineer
- 投稿日:2019-08-27T20:43:55+09:00
iOSアプリが立ち上がるまでの処理内容
目的
iOSがbuildされて、どのように立ち上がっているのかという根本的な仕組みを見直す。
iPhoneアプリが起動するまで
#import
#import "AppDelegate.h"

int main(int argc, char *argv[]) {
  @autoreleasepool {
  //AppDelegateのクラス名を指定
    return UIApplicationMain(argc, argv, nil, NSStringFromClass([AppDelegate class]));
  }
}
上記のように、main関数を実行することによりアプリが起動します。この点に関しては、CやC++のソースコードと同じになります。
UIApplicationMain関数を実行する際に、AppDelegateのクラス名を指定しているため、AppDelegateでアプリ起動時・起動後に処理を実行できるようになります。
次にAppDelegateクラスの処理内容です。
この処理で、アプリの起動後やアプリがバックグラウンドに移動する際などに、処理を実行することを可能にします。// AppDelegate.swift import UIKit // Main関数の自動実装 @UIApplicationMain class AppDelegate: UIResponder, UIApplicationDelegate { var window: UIWindow? //アプリを起動する際に呼ばれるメソッド func application(application: UIApplication, didFinishLaunchingWithOptions launchOptions: [NSObject: AnyObject]?) -> Bool { // Override point for customization after application launch. return true } // 中略 }上記がAppDelegateのソースコードです。
上から4行目を見ると、@UIApplicationMainという記述があります。これはmain関数を自動実装してくれるものであり、iOSアプリではmain.swift ファイルを用意しなくても、このコードを記述することでmain.swiftファイルを省略できます。そのため最初に記述した、main.swiftのファイルは実際はxcode上にない場合もあるので注意してください。
- 投稿日:2019-08-27T17:59:43+09:00
【Flutter】Kotlin/Swift から Flutter の処理を呼び出す
Flutter から Kotlin/Swift を呼び出す方法は公式にも書いてありますが、 Kotlin/Swift 側から Flutter の処理を呼び出す方法が見つからなかったので、メモとして残しておきます。
Flutter -> Kotlin/Swift では、Flutter 側で invokeMethod 呼び出し、Kotlin/Swift 側で Handler を設定しますが、基本的にこれが逆になって Kotlin/Swift 側で invokeMethod 呼び出し、Flutter 側で Handler を設定となるだけです。
Flutter 側の処理
MethodChannel を作成するところまでは、 Flutter -> Kotlin/Swift 呼び出しと同じです。
import 'dart:async';

import 'package:flutter/material.dart';
import 'package:flutter/services.dart';

...

class _MyHomePageState extends State<MyHomePage> {
  static const platform = const MethodChannel('ChannelName');
}
MethodCallHandler を設定する
platform.setMethodCallHandler(_handleMethod);

...

Future<dynamic> _handleMethod(MethodCall call) async {
  switch(call.method) {
    case 'methodName':
      // ここに Flutter 側で実行したい処理を書く。
      debugPrint(call.arguments); // 引数は arguments から取得可能
      return Future.value('');
  }
}
Kotlin 側の処理
val channel = MethodChannel(flutterView, "ChannelName")
channel.invokeMethod("methodName", "message from kotlin")
Swift 側の処理
let controller : FlutterViewController = window?.rootViewController as! FlutterViewController
let channel = FlutterMethodChannel(name: "ChannelName", binaryMessenger: controller)
channel.invokeMethod("methodName", arguments: "message from swift")
サンプル
アプリを起動して10秒後に Kotlin/Swift から Flutter にメッセージを送信して Flutter 側で表示するだけのサンプルコードです。
Flutter
main.dartimport 'package:flutter/material.dart'; import 'package:flutter/services.dart'; void main() => runApp(MyApp()); class MyApp extends StatelessWidget { @override Widget build(BuildContext context) { return MaterialApp( title: 'Flutter Demo', theme: ThemeData( primarySwatch: Colors.blue, ), home: MyHomePage(title: 'Flutter Demo Home Page'), ); } } class MyHomePage extends StatefulWidget { MyHomePage({Key key, this.title}) : super(key: key); final String title; @override _MyHomePageState createState() => _MyHomePageState(); } class _MyHomePageState extends State<MyHomePage> { static const platform = const MethodChannel('ChannelName'); String _message = "ここに Kotlin/Swift 側から送られてきたメッセージが表示されます。"; @override void initState() { super.initState(); platform.setMethodCallHandler(_handleMethod); } Future<dynamic> _handleMethod(MethodCall call) async { switch(call.method) { case 'methodName': final String message = call.arguments; setState(() { _message = message; }); return Future.value(''); } } @override Widget build(BuildContext context) { return Scaffold( appBar: AppBar( title: Text(widget.title), ), body: Center( child: Column( mainAxisAlignment: MainAxisAlignment.center, children: <Widget>[ Text( '$_message', ), ], ), ), ); } }Kotlin
MainActivity.ktpackage com.example.native_to_flutter import android.os.Bundle import android.os.Handler import android.os.Looper import io.flutter.app.FlutterActivity import io.flutter.plugin.common.MethodChannel import io.flutter.plugins.GeneratedPluginRegistrant import java.util.* import kotlin.concurrent.schedule class MainActivity: FlutterActivity() { override fun onCreate(savedInstanceState: Bundle?) { super.onCreate(savedInstanceState) GeneratedPluginRegistrant.registerWith(this) Timer().schedule(10 * 1000) { Thread(Runnable { val channel = MethodChannel(flutterView, "ChannelName") Handler(Looper.getMainLooper()).post { channel.invokeMethod("methodName", "Kotlin からのメッセージ") } }).start() } } }
Handler(Looper.getMainLooper()).post{}の中に処理を書いているのは、 Flutterはシングルスレッドなので、Kotlin 側がサブスレッドで invokeMethod を実行してしまうと例外で落ちてしまうので、メインスレッドで実行させるために、このようにしています。Swift
AppDelegate.swiftimport UIKit import Flutter @UIApplicationMain @objc class AppDelegate: FlutterAppDelegate { override func application( _ application: UIApplication, didFinishLaunchingWithOptions launchOptions: [UIApplicationLaunchOptionsKey: Any]? ) -> Bool { Timer.scheduledTimer(timeInterval: 10, target: self, selector: #selector(AppDelegate.timer), userInfo: nil, repeats: false) GeneratedPluginRegistrant.register(with: self) return super.application(application, didFinishLaunchingWithOptions: launchOptions) } @objc func timer() { let controller : FlutterViewController = window?.rootViewController as! FlutterViewController let channel = FlutterMethodChannel(name: "ChannelName", binaryMessenger: controller) DispatchQueue.main.async { channel.invokeMethod("methodName", arguments: "Swift からのメッセージ") } } }こちらもメインスレッドで実行させるため
DispatchQueue.main.async{}の中に処理を書いています。
- 投稿日:2019-08-27T14:39:47+09:00
[Swift] Arrayに入ったstructの特定のプロパティの重複を削除したい distinct
例えば
struct Receipt {
   let buyer: String
   let product: String
   let date: Date
   let price: Int
}
というデータの配列があった時、buyerプロパティだけ重複を取り除くという時に使います。
Arrayのextensionとして実装しました。
extension Array {
    func distinct<Value: Hashable>(keyPath: KeyPath<Element, Value>) -> Array {
        var set = Set<Value>()
        return filter { set.insert($0[keyPath: keyPath]).inserted }
    }
}
使い方は単純に
let receipts: [Receipt] = // ここに入ってる

receipts.distinct(keyPath: \.buyer)
とするだけです。
簡単ですね。ちょっと複雑に「各々の人について最も高い買い物の商品名順リスト」を取得するには
let receipts: [Receipt] = // ここに入ってる

let expensiveList = receipts
    .sorted { $0.price > $1.price }
    .distinct(keyPath: \.buyer)
    .sorted { $0.product < $1.product }
という感じになります。
すっきり。
- 投稿日:2019-08-27T01:03:52+09:00
iOS UIKitによるPopoverの表示およびカスタマイズ
はじめに
Popover の表示とカスタマイズ方法について調査したので、備忘のために残しておきます。
環境
- Xcode 10.3 (iOS SDK 12.4)
- Swift 5
サンプルコード
https://github.com/imamurh/PopoverExample
Popover の表示
UIPopoverPresentationController を利用します。UIViewController のプロパティからアクセスできます。
UIViewController@available(iOS 8.0, *) open var popoverPresentationController: UIPopoverPresentationController? { get }UIBarButtonItem に Popover を表示する場合は、
barButtonItemプロパティを使用します。Popoverの表示(UIBarButtonItem)class ViewController: UIViewController { @IBAction func barButtonItemTapped(_ sender: UIBarButtonItem) { let vc = ... // Popover で表示したい ViewController を生成 vc.modalPresentationStyle = .popover vc.popoverPresentationController?.barButtonItem = sender vc.popoverPresentationController?.permittedArrowDirections = .up // 矢印の向きを制限する場合 vc.popoverPresentationController?.delegate = self // Phone で Popover を表示するために必要 present(vc, animated: true) } }UIButton など任意の UIView に Popover を表示する場合は、
sourceRectプロパティとsourceViewプロパティを使用します。Popoverの表示(UIView)class ViewController: UIViewController { @IBAction func buttonTapped(_ sender: UIButton) { let vc = ... // Popover で表示したい ViewController を生成 vc.modalPresentationStyle = .popover vc.popoverPresentationController?.sourceView = sender.superview vc.popoverPresentationController?.sourceRect = sender.frame vc.popoverPresentationController?.permittedArrowDirections = .up // 矢印の向きを制限する場合 vc.popoverPresentationController?.delegate = self // Phone で Popover を表示するために必要 present(vc, animated: true) } }Phone で Popover を表示するためには、UIPopoverPresentationControllerDelegate(が継承しているUIAdaptivePresentationControllerDelegate)の下記メソッドの実装が必要になります。
extension ViewController: UIPopoverPresentationControllerDelegate {
    // Phone で Popover を表示するために必要
    func adaptivePresentationStyle(for controller: UIPresentationController,
                                   traitCollection: UITraitCollection) -> UIModalPresentationStyle {
        return .none
    }
}
以上が基本的な Popover の表示方法になります。
Popover のカスタマイズ
ここからが本題。
背景色
まずは背景色のカスタマイズです。
UIPopoverPresentationController// Set popover background color. Set to nil to use default background color. Default is nil. @NSCopying open var backgroundColor: UIColor?UIPopoverPresentationController に
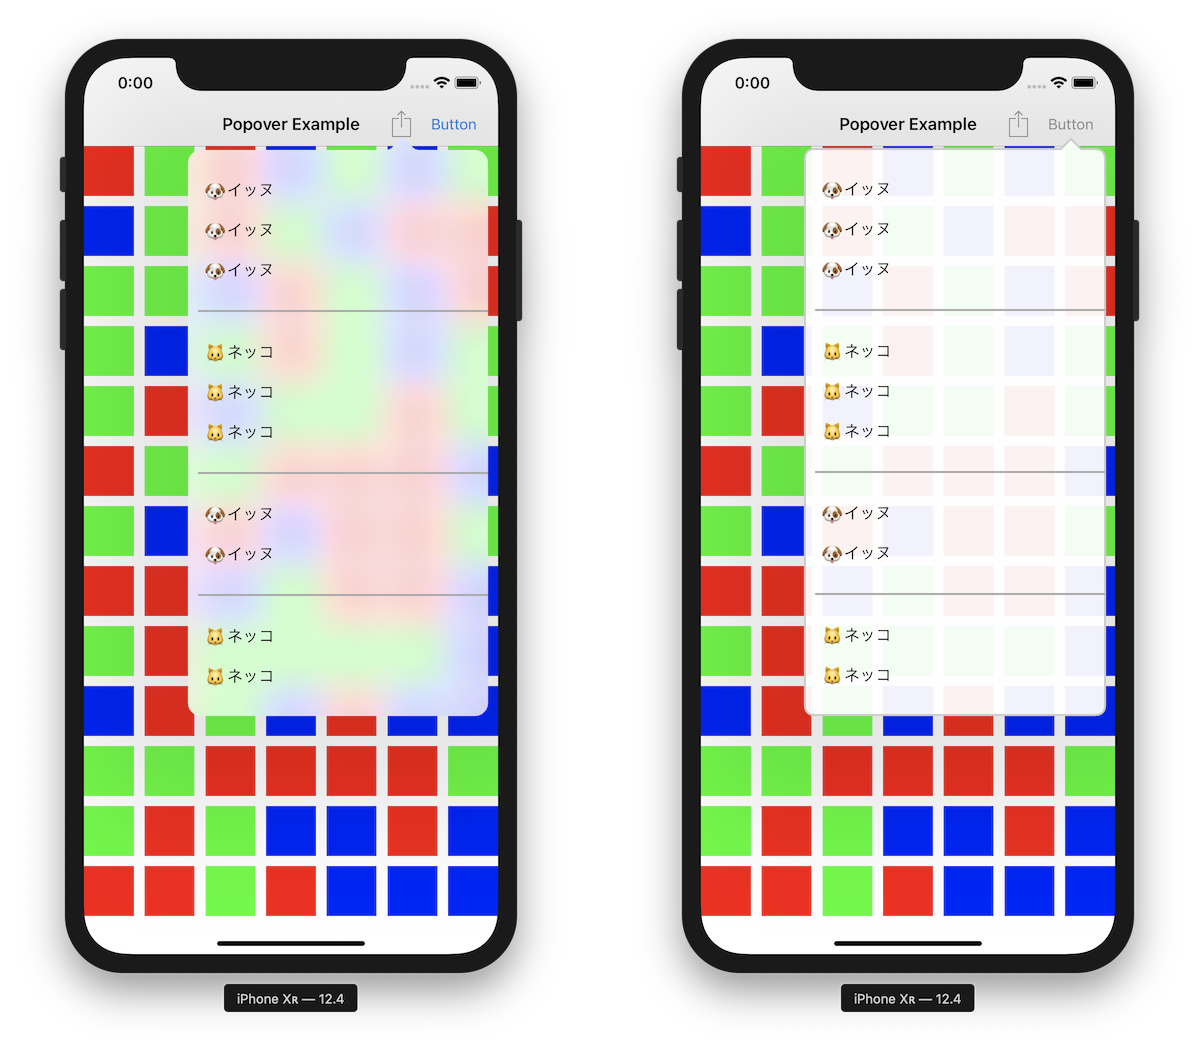
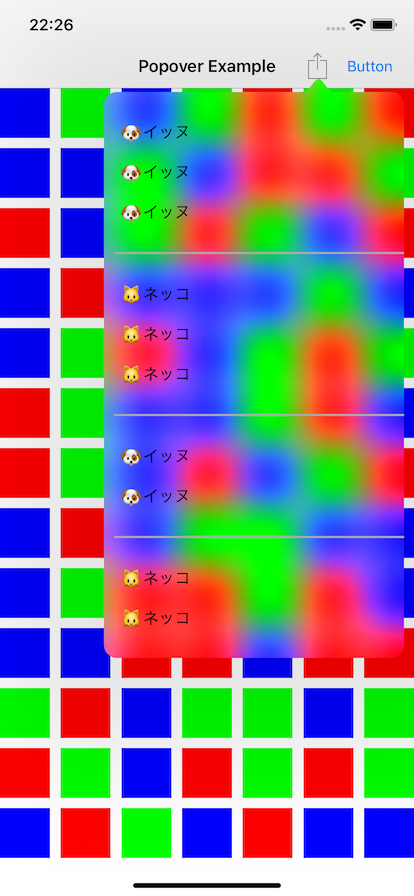
backgroundColorというプロパティがあるので、これを設定することで背景色を変更できます。背景色を指定vc.modalPresentationStyle = .popover vc.popoverPresentationController?.barButtonItem = sender vc.popoverPresentationController?.permittedArrowDirections = .any + vc.popoverPresentationController?.backgroundColor = .red vc.popoverPresentationController?.delegate = selfbackgroundColor を設定しても、表示するコンテンツの背景色を透過にしなければ下記のように矢印部分しか赤くなりません。(当然といえば当然ですが...)
View の階層は下記の通り。
Popover で表示する ViewController の背景色を透過にすれば、下記の通り全体が背景色つきで表示されます。
なお、背景の View には UIVisualEffectView が使用されているため、透過色を指定した場合ブラーがかかります。(下記は UIColor.clear を指定した場合)
ブラーがかかっても問題ない場合は backgroundColor プロパティを使用すれば十分ですが、ブラーを避けたい場合は次に紹介する BackgroundView をカスタマイズする方法を選択する必要があります。
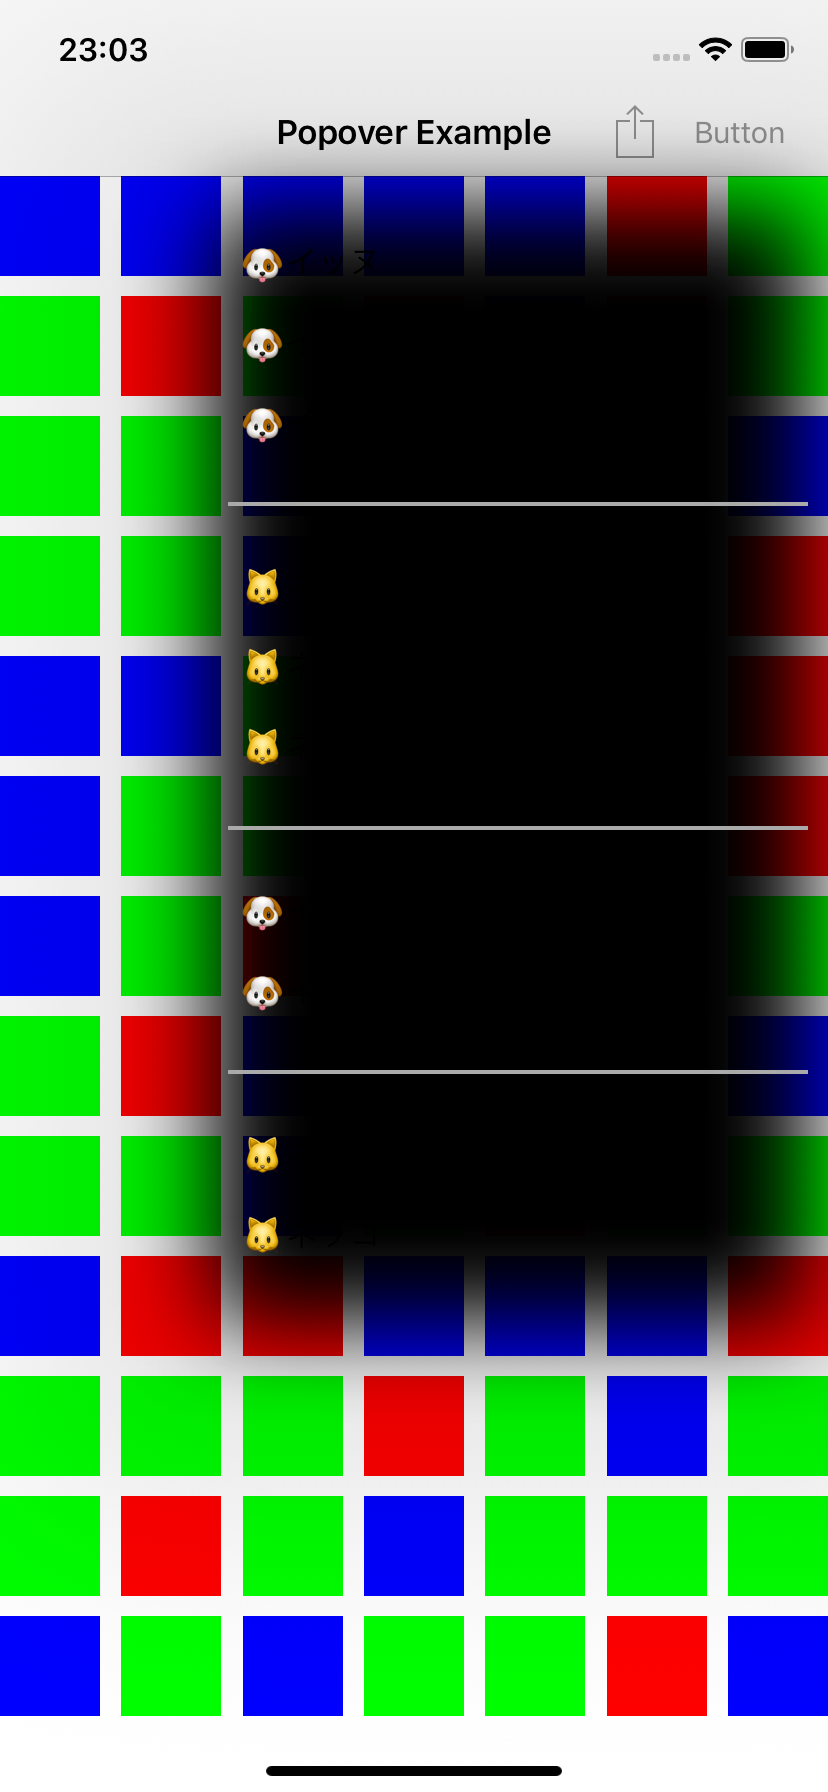
BackgroundView のカスタマイズ
UIPopoverBackgroundView のサブクラスを作成し、UIPopoverPresentationController の
popoverBackgroundViewClassに指定することで、独自の BackgroundView を利用することができます。UIPopoverPresentationController// Clients may customize the popover background chrome by providing a class which subclasses `UIPopoverBackgroundView` // and which implements the required instance and class methods on that class. open var popoverBackgroundViewClass: UIPopoverBackgroundViewMethods.Type?カスタムBackgroundViewクラスを指定vc.modalPresentationStyle = .popover vc.popoverPresentationController?.barButtonItem = sender vc.popoverPresentationController?.permittedArrowDirections = .any + vc.popoverPresentationController?.popoverBackgroundViewClass = MyPopoverBackgroundView.self vc.popoverPresentationController?.delegate = selfカスタム BackgroundView クラスでは、適宜必要なメソッドを override する必要があります。最低限必要なメソッドは下記の通りです。(これらを実装しないと実行時にクラッシュします)
class MyPopoverBackgroundView: UIPopoverBackgroundView {

    // MARK: - UIPopoverBackgroundViewMethods

    override static func arrowBase() -> CGFloat {
        return 20
    }

    override static func arrowHeight() -> CGFloat {
        return 10
    }

    override static func contentViewInsets() -> UIEdgeInsets {
        return .zero
    }

    // MARK: - UIPopoverBackgroundView properties

    private var _arrowOffset: CGFloat = 0
    override var arrowOffset: CGFloat {
        get { return _arrowOffset }
        set { _arrowOffset = newValue }
    }

    private var _arrowDirection: UIPopoverArrowDirection = .unknown
    override var arrowDirection: UIPopoverArrowDirection {
        get { return _arrowDirection }
        set { _arrowDirection = newValue }
    }
}
上記最小構成だけ実装した場合の Popover は下記の通りです。
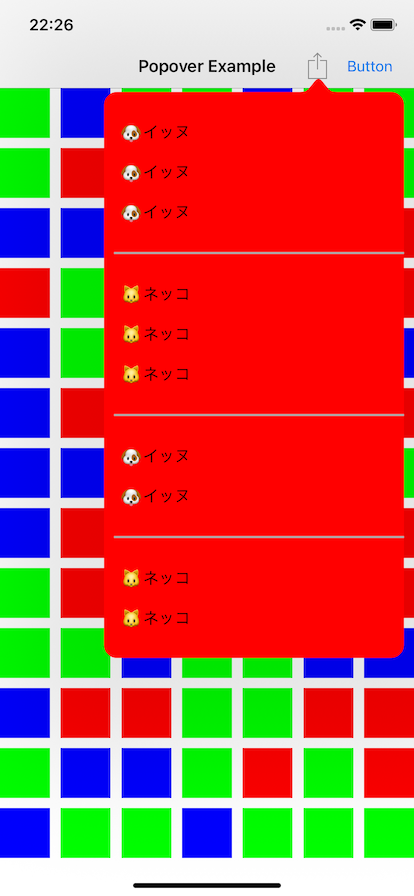
(なんか黒い...)
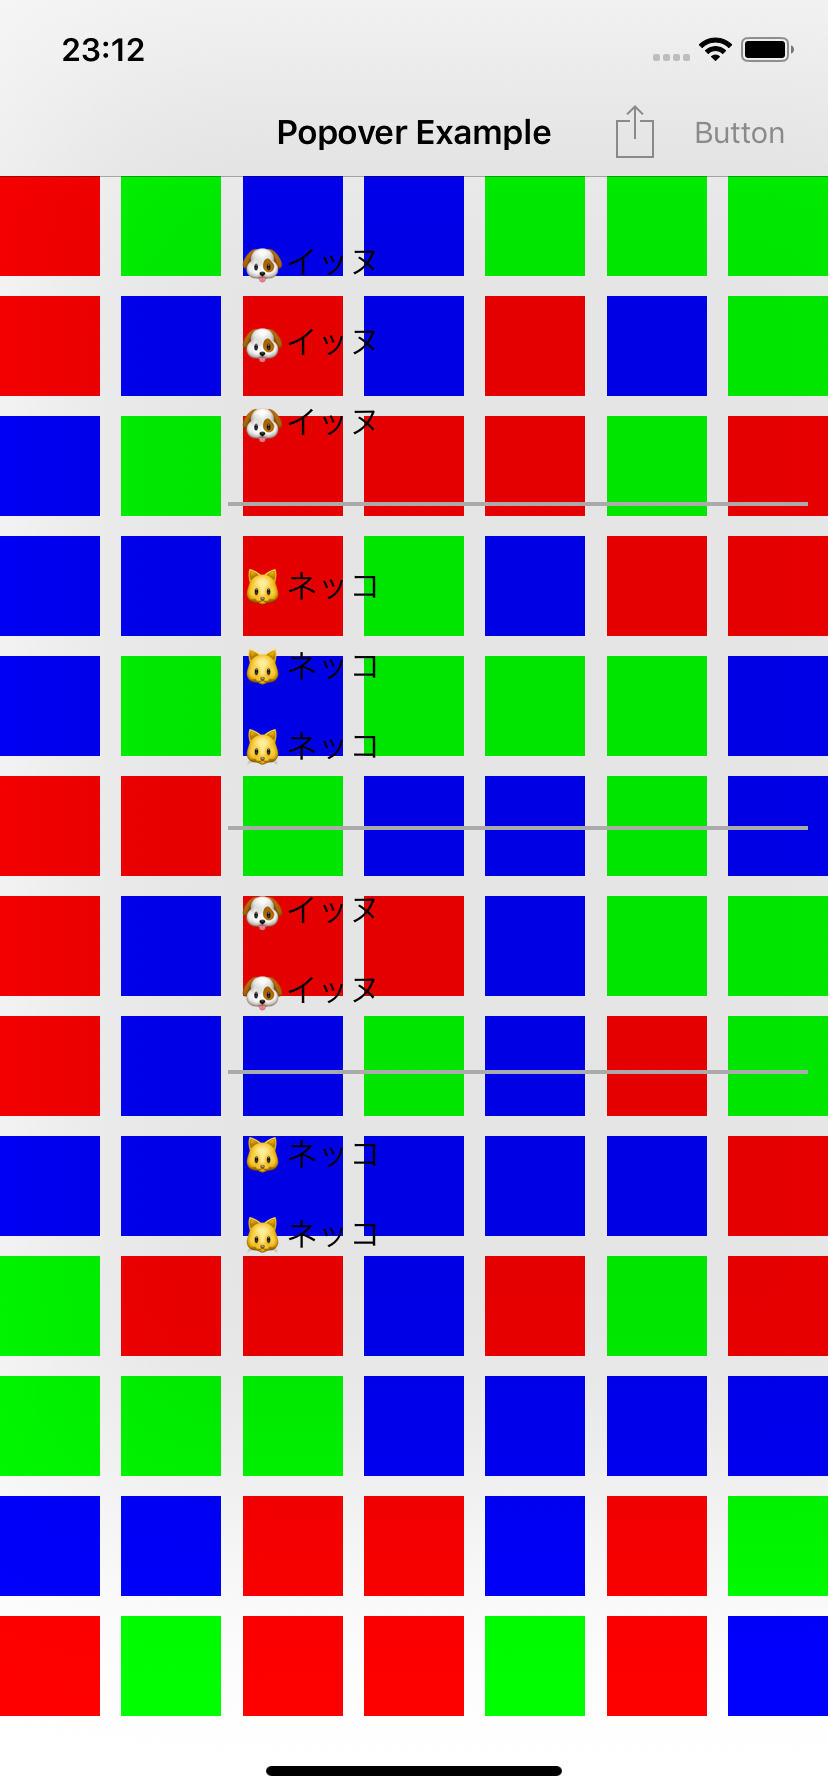
デフォルトで layer の shadowOpacity が設定されるので、layoutSubviews などで 0 を設定します。影を消すclass MyPopoverBackgroundView: UIPopoverBackgroundView { override func layoutSubviews() { super.layoutSubviews() layer.shadowOpacity = 0 } }
さらに backgroundColor を指定します。
backgroundColoroverride func layoutSubviews() { super.layoutSubviews() layer.shadowOpacity = 0 + backgroundColor = UIColor(white: 1, alpha: 0.9) }
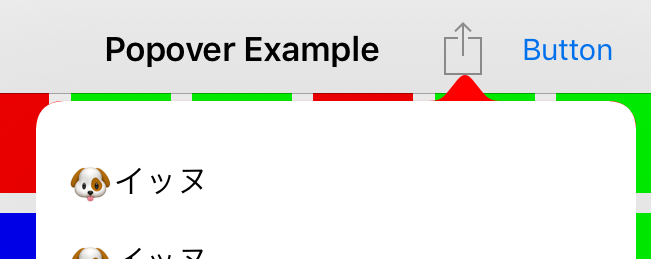
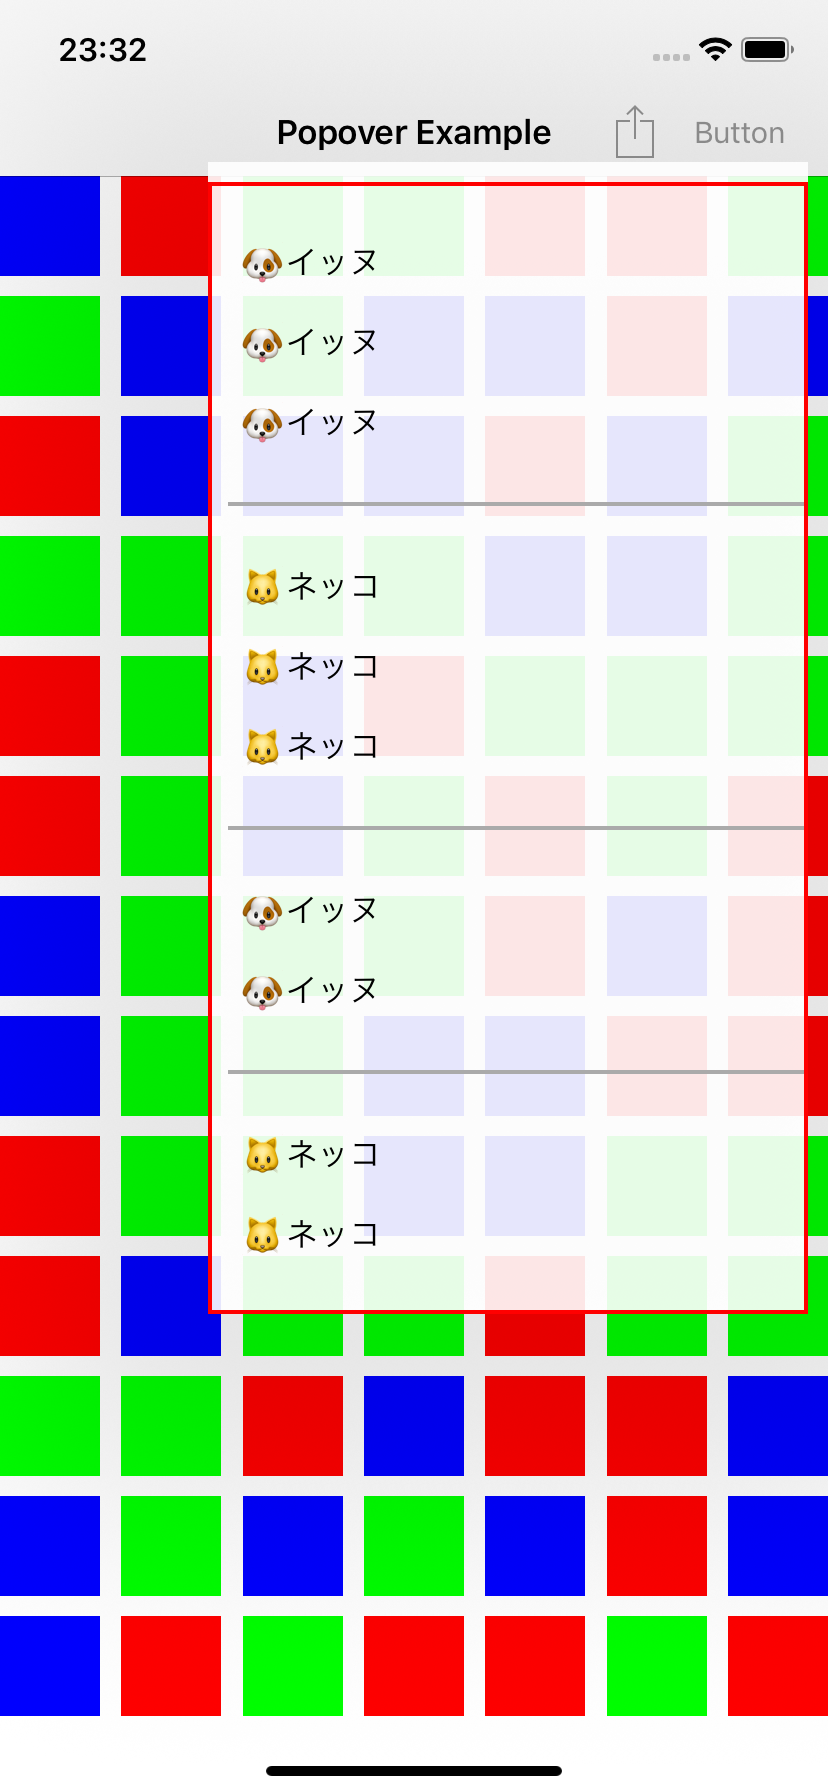
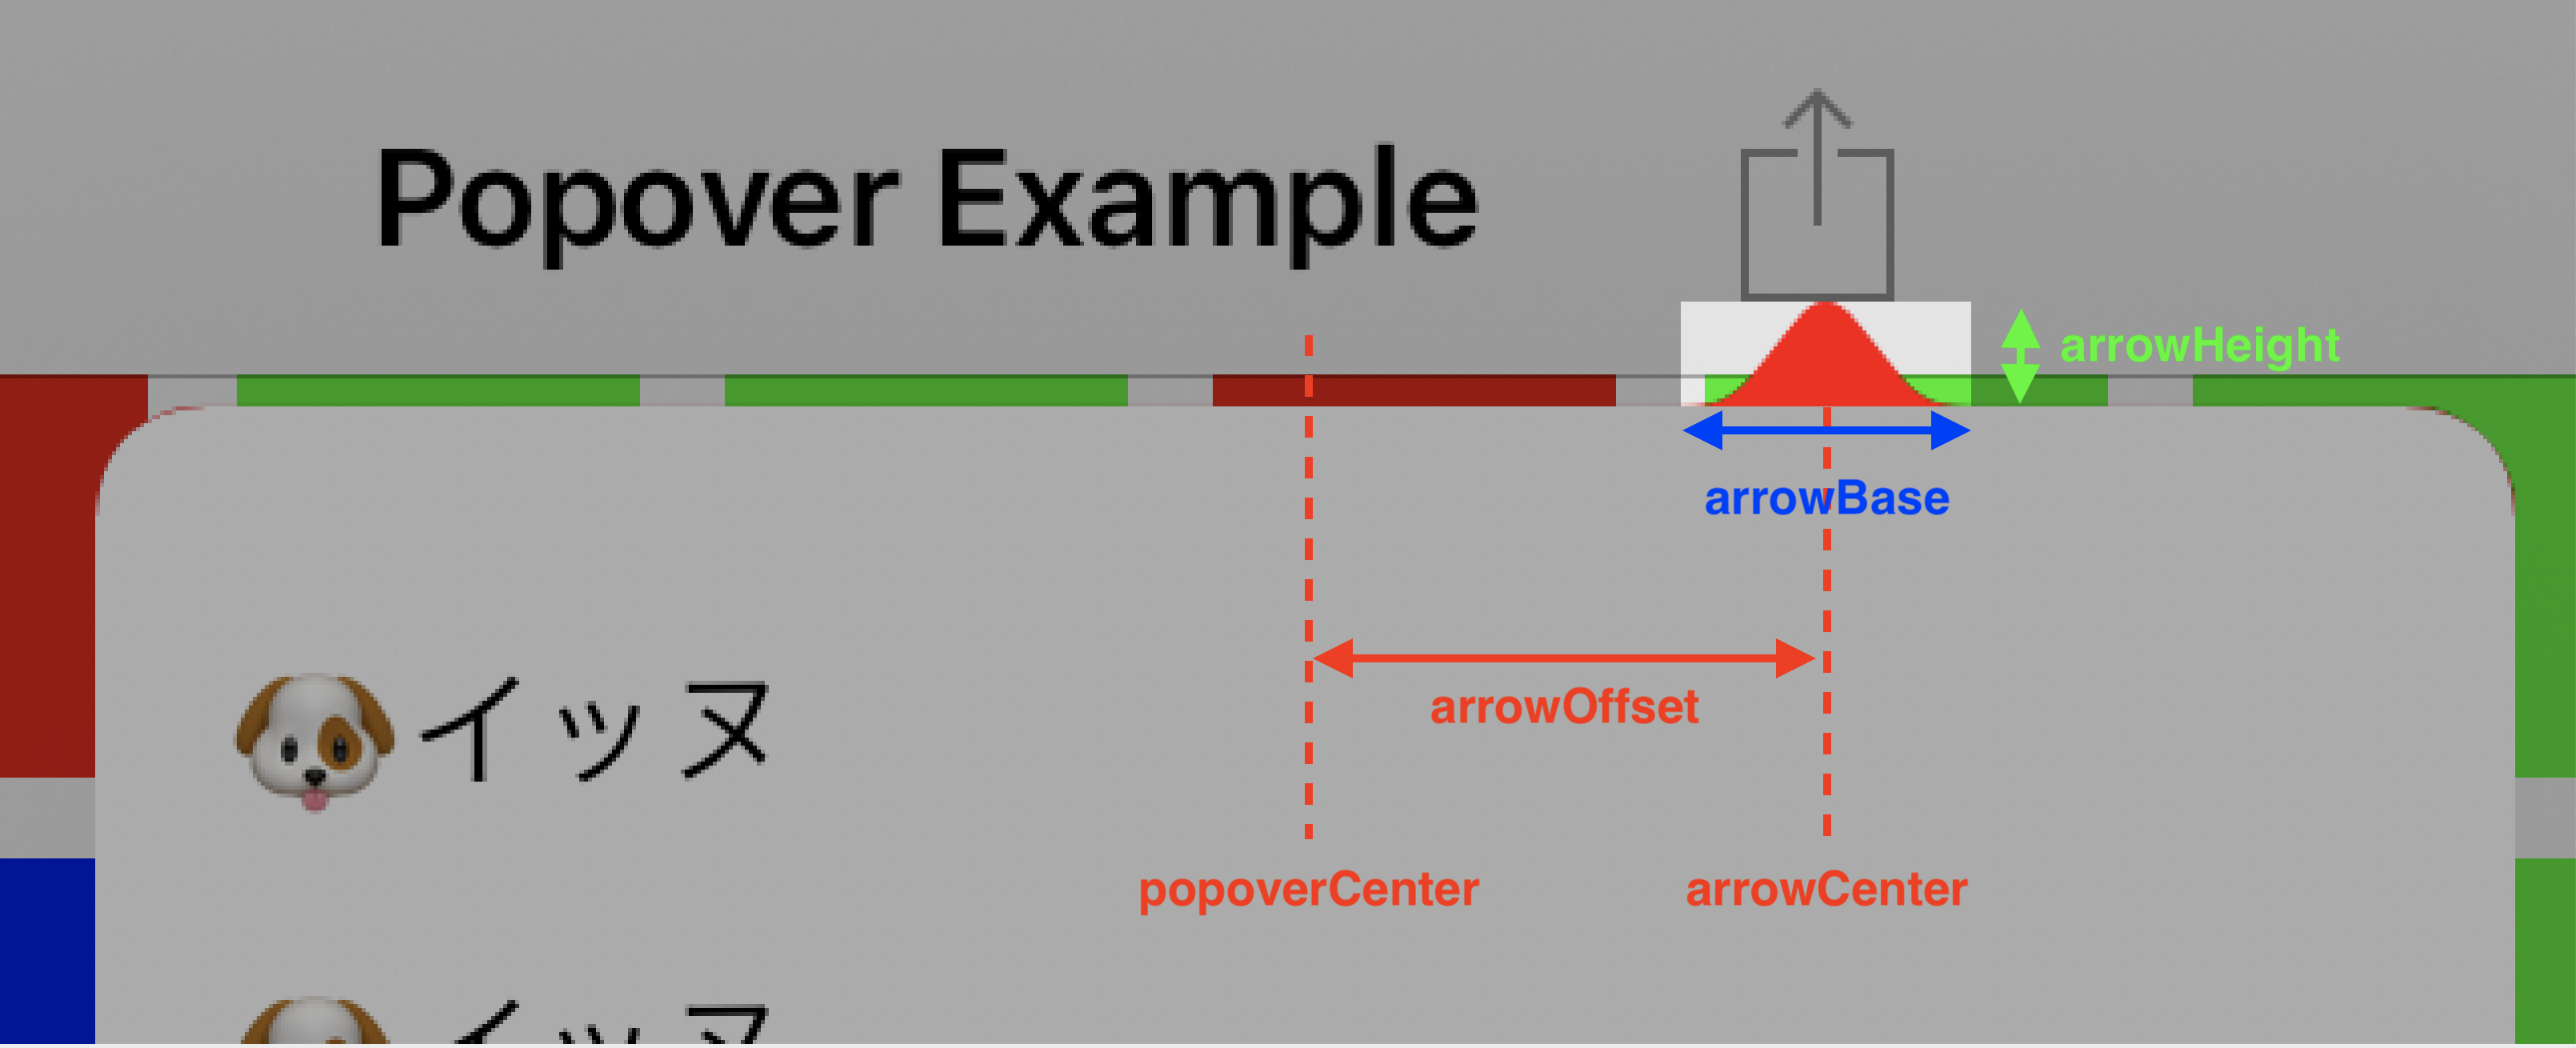
ここで、実際の Popover のコンテンツの領域は下記赤枠で囲われた部分になります。上の余白は、矢印を描画するための領域となります。
矢印の大きさ(arrowHeight および arrowBase)は、カスタム BackgroundView クラスで実装したクラスメソッドの固定値となります。矢印を描画する方向(arrowDirection)と位置(arrowOffset)は状況に応じて Popover コントローラにより設定されるため、これらの値をもとに矢印を描画します。
下記は CAShapeLayer を用いて角丸と矢印を描画するサンプルになります。(矢印は上方向のみ対応)
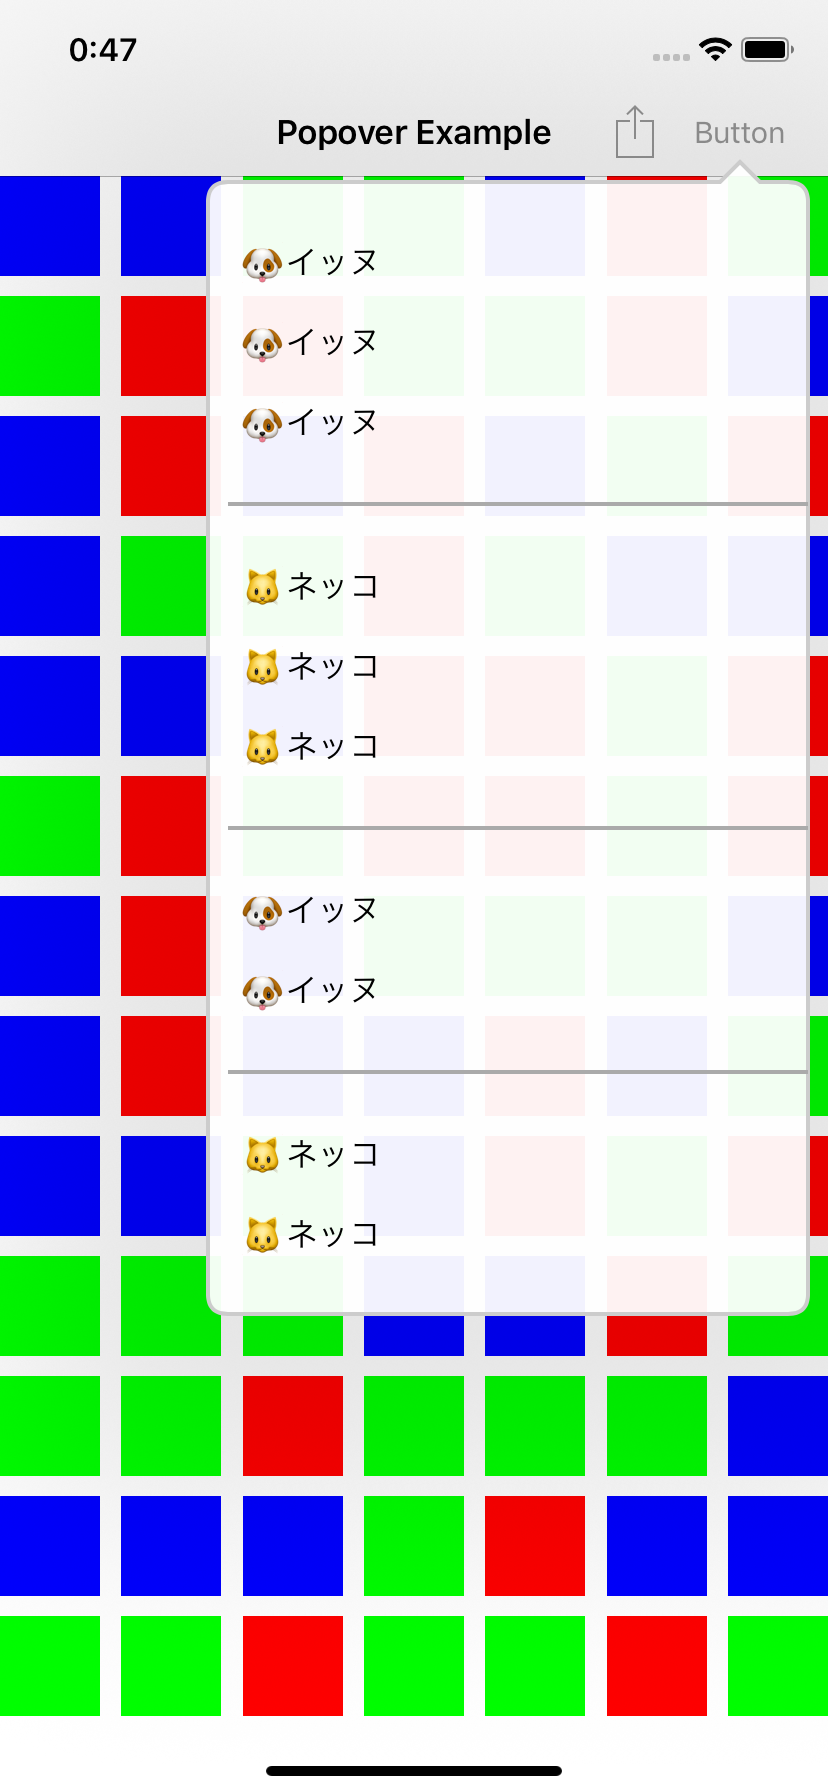
class MyPopoverBackgroundView: UIPopoverBackgroundView {

    override func layoutSubviews() {
        super.layoutSubviews()
        layer.shadowOpacity = 0
        setupPathLayer()
    }

    // MARK: - UIPopoverBackgroundViewMethods

    override static func arrowBase() -> CGFloat {
        return 20
    }

    override static func arrowHeight() -> CGFloat {
        return 10
    }

    override static func contentViewInsets() -> UIEdgeInsets {
        return .zero
    }

    // MARK: - Overriding UIPopoverBackgroundView properties

    private var _arrowOffset: CGFloat = 0
    override var arrowOffset: CGFloat {
        get { return _arrowOffset }
        set { _arrowOffset = newValue }
    }

    private var _arrowDirection: UIPopoverArrowDirection = .up
    override var arrowDirection: UIPopoverArrowDirection {
        get { return _arrowDirection }
        set { _arrowDirection = newValue }
    }

    // MARK: - Drawing

    private func setupPathLayer() {
        layer.sublayers?.forEach { $0.removeFromSuperlayer() }

        let rect = bounds
        let pathLayer = CAShapeLayer()
        pathLayer.frame = rect
        pathLayer.path = generatePath(rect, cornerRadius: 10).cgPath
        pathLayer.fillColor = UIColor(white: 1, alpha: 0.95).cgColor
        pathLayer.strokeColor = UIColor(white: 0.8, alpha: 1).cgColor
        pathLayer.lineWidth = 2
        layer.addSublayer(pathLayer)
    }

    private func generatePath(_ rect: CGRect, cornerRadius: CGFloat) -> UIBezierPath {
        let insets: UIEdgeInsets = {
            var insets = MyPopoverBackgroundView.contentViewInsets()
            if _arrowDirection == .up {
                insets.top += MyPopoverBackgroundView.arrowHeight()
            }
            return insets
        }()
        let topLeft     = CGPoint(x: insets.left,               y: insets.top)
        let topRight    = CGPoint(x: rect.maxX - insets.right,  y: insets.top)
        let bottomRight = CGPoint(x: rect.maxX - insets.right,  y: rect.maxY - insets.bottom)
        let bottomLeft  = CGPoint(x: insets.left,               y: rect.maxY - insets.bottom)

        let path = UIBezierPath()
        path.move(to: CGPoint(x: topLeft.x + cornerRadius, y: topLeft.y))
        if _arrowDirection == .up {
            let arrowBase = MyPopoverBackgroundView.arrowBase()
            let arrowCenterX = rect.size.width / 2 + _arrowOffset
            path.addLine(to: CGPoint(x: arrowCenterX - arrowBase / 2, y: insets.top))
            path.addLine(to: CGPoint(x: arrowCenterX, y: 0))
            path.addLine(to: CGPoint(x: arrowCenterX + arrowBase / 2, y: insets.top))
        }
        path.addLine(to: CGPoint(x: topRight.x - cornerRadius, y: topRight.y))
        path.addQuadCurve(to: CGPoint(x: topRight.x, y: topRight.y + cornerRadius), controlPoint: topRight)

        path.addLine(to: CGPoint(x: bottomRight.x, y: bottomRight.y - cornerRadius))
        path.addQuadCurve(to: CGPoint(x: bottomRight.x - cornerRadius, y: bottomRight.y), controlPoint: bottomRight)

        path.addLine(to: CGPoint(x: bottomLeft.x + cornerRadius, y: bottomLeft.y))
        path.addQuadCurve(to: CGPoint(x: bottomLeft.x, y: bottomLeft.y - cornerRadius), controlPoint: bottomLeft)

        path.addLine(to: CGPoint(x: topLeft.x, y: topLeft.y + cornerRadius))
        path.addQuadCurve(to: CGPoint(x: topLeft.x + cornerRadius, y: topLeft.y), controlPoint: topLeft)

        return path
    }
}
実行結果
以上です。