- 投稿日:2019-08-27T23:08:38+09:00
いきなり!TDD(当方テスト初心者でいきなりTDD!) 3日目
はじめに
前回の、いきなり!TDD(当方テスト初心者でいきなりTDD!) 2日目では、
- 仮実装
- 三角測量
について学びました。今回は「明白な実装」について学びます。
開発環境
- Xcode 10.3
- Swift
- XCTest
作るもの
ポーカー
明白な実装
必ずしも小さな歩幅でテストと開発を繰り返す必要はなく、確実性、自信のもてるコードがあると判断した場合には、仮実装をせずに、直接コードに落とし込む「明白な実装」を使い分けながら、TDDは進めていくのが通常です。
実装
現在のCardオブジェクトのnotationは、3♥のように記号が後にきている事に対し、現在の初期化は、
Card(suit:, rank:)
と、suit、rankの順になっているため、この順序が一致するように修正してみます。
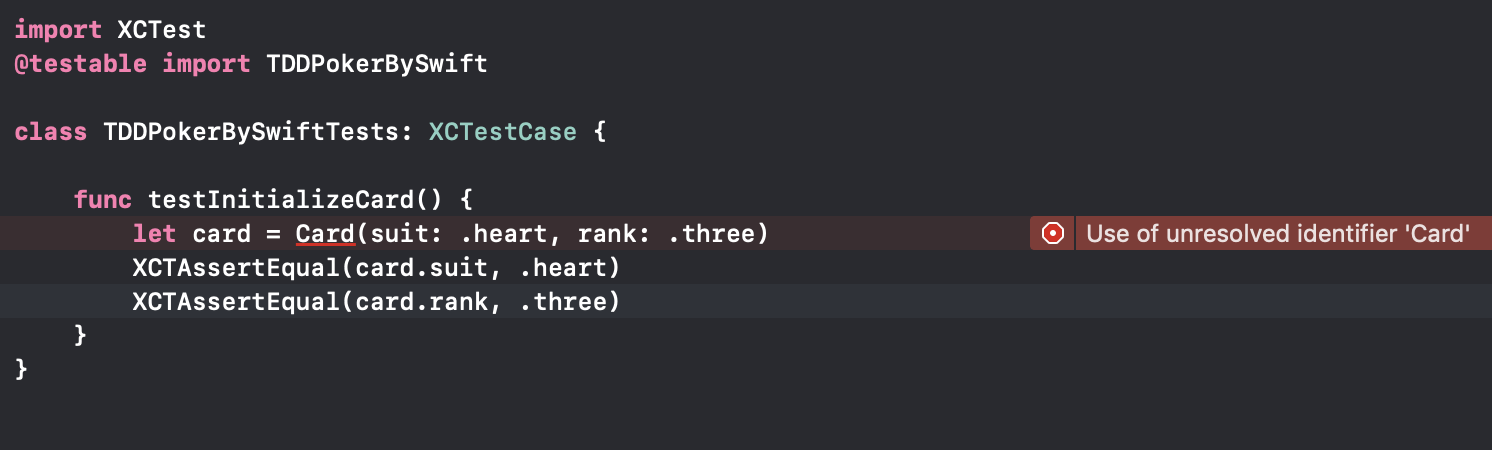
Card.swiftstruct Card { //順序を入れ替えた enum Rank: String { // (省略) } enum Suit: String { // (省略) } //順序を入れ替えた let rank: Rank let suit: Suit // (省略) }ここで、Command + U でテストを実行します。
結果はレッドになります。グリーンにするために、続けて、TDDPokerBySwiftTests.swiftも修正していきます。TDDPokerBySwiftTests.swiftclass TDDPokerBySwiftTests: XCTestCase { func testInitializeCard() { var card: Card card = Card(rank: .three, suit: .heart) //順序を入れ替えた XCTAssertEqual(card.suit, .heart) XCTAssertEqual(card.rank, .three) card = Card(rank: .jack, suit: .spade) //順序を入れ替えた XCTAssertEqual(card.suit, .spade) XCTAssertEqual(card.rank, .jack) } func testCardNotation() { var card: Card card = Card(rank: .three, suit: .heart) //順序を入れ替えた XCTAssertEqual(card.notation, "3♥") card = Card(rank: .jack, suit: .spade) //順序を入れ替えた XCTAssertEqual(card.notation, "J♠") } }Card.swiftの、
let rank
let suitの変数定義を入れ替えたことで、初期化も、
Card(rank:, suit:)
の順に変更されました。
これは、swiftのstructは、プロパティの宣言順序に応じて、初期化の引数の順序が変わります。この機能を考慮しない場合、
Card.swiftlet rank: Rank let suit: Suit init(rank: Rank, suit: Suit) { self.rank = rank self.suit = suit }というように記述すべきですが、こういった機能を確実に理解しているのであれば、記述を省略することができますし、仮実装も省略して構いません。こういった考え方が「明白な実装」になります。
不要なテストを削除する(テストのリファクタリング)
notationは初期化時に渡したrankとすいtに応じて文字列を返却するプロパティになるため、Cardの初期化が成功し、同時にrankとすいtが期待通りインスタンスに保持されることが証明できています。
よって、既存のテストケースであるtestInitializeCard()は必要ないということになり、これを削除したテストコードが、以下になります。TDDPokerBySwiftTests.swiftimport XCTest @testable import TDDPokerBySwift class TDDPokerBySwiftTests: XCTestCase { func testCardNotation() { var card: Card card = Card(rank: .three, suit: .heart) XCTAssertEqual(card.notation, "3♥") card = Card(rank: .jack, suit: .spade) XCTAssertEqual(card.notation, "J♠") } }ToDoリストも更新しましょう。
- Cardを定義して、インスタンスを作成する
- CardはSuitを持つ
- CardはRankを持つ
- Cardのインスタンスから文字列表記(notation)を取得する
終わりに
今回は、
- 明白な実装
- テストのリファクタリング
について学びました。次回から、本格的なSwiftの設計、実装を踏まえながら、引き続きTDDを学びます。
出典
- 投稿日:2019-08-27T23:08:20+09:00
いきなり!TDD(当方テスト初心者でいきなりTDD!) 2日目
はじめに
前回は、TDDの概要と、簡単なinitをサンプルに、
レッド(テストを書く) > グリーン (プロダクトコードを書く) > リファクタリング(コードを整理する)
まで行いました。引き続き、TDDを行なっていきます。
開発環境
- Xcode 10.3
- Swift
- XCTest
作るもの
ポーカー
現在のTODOリスト
[TODOリスト]
- Cardを定義して、インスタンスを作成する
- CardはSuitを持つ
- CardはRankを持つ
- Cardのインスタンスから文字列表記(notation)を取得する
それでは、最下段のTODOから再開していきましょう。
実装
まずは、レッドからです。TDDPokerBySwiftTests.swiftに以下を追加します。
TDDPokerBySwiftTests.swiftclass TDDPokerBySwiftTests: XCTestCase { (省略) func testCardNotation() { let card = Card(suit: .heart, rank: .three) XCTAssertEqual(card.notation, "3♥") } }Command + U でテストを実行してみましょう。
Cardにnotationプロパティが存在していないため、当然エラーになります。これはテストエラーではなく、単純にコンパイルエラーです。
それでは、早速、Cardにnotationプロパティを追加して、テストをグリーンにしていきましょう。
仮実装
Card.swiftに以下を追加します。
Card.swiftstruct Card { (省略) var notation: String { return "3♥" } }Command + U でテストを実行してみましょう。
テストが成功すると思います。このnotationプロパティは、initで代入されるrankとsuitから生成されるものなので、外から代入された値を保持するStored Propertyではなく、Computed Propertyによる実装になっています。Stored Property (保持型プロパティ)
今回で言う所の、Cardクラスのsuitとrankがそうですね。willSet、didSetなどで監視もでき、lazy修飾詞も使用可能です。
Card.swiftlet suit: Suit let rank: RankComputed Property (計算型プロパティ)
それ自体は値を保持せず、setter/getterで値を計算し(set)または返す(get)プロパティです。上記notationの定義がそれになるのですが、上記は、getのみのreadonly定義になっており、get{}が省略されています。省略しない場合には、以下のようになります。
Card.swiftvar notation: String { get { return "3♥" } }setterを記述する場合には、
var notation: String {
    get {
        return "3♥"
    }

    set(t) {
        print("セット!\(t)");
    }
}
や、
var notation: String {
    get {
        return "3♥"
    }

    set {
        print("セット!\(newValue)");
    }
}
で、notationの値がセットされた時に、setが呼ばれます。set{}内では、Stored Propertyを含めた計算なども可能です。
具体的な使い方の例です。
class Person {
    var birthday: NSDate    // 生年月日
    var age: Int {          // 年齢
        get {
            let components = self.calendar.components(.CalendarUnitYear, fromDate: birthday, toDate: NSDate.date(), options: .allZeros)
            return components.year
        }
        set(newAge) {
            let diff = self.age - newAge
            if diff != 0 {
                self.birthday = self.calendar.dateByAddingUnit(.CalendarUnitYear, value: diff, toDate: self.birthday, options: .allZeros)
            }
        }
    }
    let dateFormatter: NSDateFormatter  // 日付フォーマッタ
    let calendar: NSCalendar            // カレンダー
    // イニシャライザ
    init(birthday: String) {
        self.dateFormatter = NSDateFormatter();
        self.dateFormatter.dateFormat = "Y/M/d"
        self.calendar = NSCalendar.currentCalendar()
        self.birthday = self.dateFormatter.dateFromString(birthday)!
    }
}

let p = Person(birthday: "1980/12/31")
print(p.age)
p.age = p.age - 2
print(p.birthday)     // 1982/12/31
三角測量
話を戻します。現在、notationは"3♥"を静的に返しているだけなので、一般化が保証されてません。テストを修正して、別のケースも追加します。
TDDPokerBySwiftTests.swiftclass TDDPokerBySwiftTests: XCTestCase { (省略) func testCardNotation() { let card1 = Card(suit: .heart, rank: .three) XCTAssertEqual(card1.notation, "3♥") let card2 = Card(suit: .spade, rank: .jack) XCTAssertEqual(card2.notation, "J♠") } }このように2つ以上のテストケースを用意することで、機能の一般化を導き出すテクニックを「三角測量」と言います。テストがグリーンになるように、Card.swiftを書き換えます。enumをStringで定義し直し、各caseに文字列を代入します。取り出す際には、rawValueで取り出せます。
Card.swiftstruct Card { enum Suit: String { case spade = "♠" case heart = "♥" case club = "♣" case diamond = "♦" } enum Rank: String { case ace = "A" case two = "2" case three = "3" case four = "4" case five = "5" case six = "6" case seven = "7" case eight = "8" case nine = "9" case ten = "10" case jack = "J" case queen = "Q" case king = "K" } enum CardType { case other } let suit: Suit let rank: Rank var notation: String { return rank.rawValue + suit.rawValue } }Command + U でテストを実行しましょう。テストが成功すれば、グリーンのステップを終えたことになるので、リファクタリングを行います。今回も、cardの変数をテストケースごとに初期化して、共通利用できるようにするだけです。
TDDPokerBySwiftTests.swiftclass TDDPokerBySwiftTests: XCTestCase { (省略) func testCardNotation() { var card: Card card = Card(suit: .heart, rank: .three) XCTAssertEqual(card.notation, "3♥") card = Card(suit: .spade, rank: .jack) XCTAssertEqual(card.notation, "J♠") } }まとめ
今回は、
- 仮実装
- 三角測量
について学びました。
次回は、「明白な実装」というものについて、学んで行きたいと思います。参考
プロパティ
https://tea-leaves.jp/swift/content/%E3%83%97%E3%83%AD%E3%83%91%E3%83%86%E3%82%A3

- 投稿日:2019-08-27T23:08:05+09:00
いきなり!TDD(当方テスト初心者でいきなりTDD!) 1日目
TDDとは
Test-Driven Developmentのこと。ある機能に対して期待する結果を、プロダクトコードより先に”失敗するテスト”として書き(テストファースト)、実装のゴールを目指す開発スタイル。同時に、「テストしやすい」 == 「よい設計」と捉えるならば、よい設計手法とも言えます。「心理的安全を得たままにプロダクトコードの改善をすること」が目的の1つとなります。
■メリット
- メンテナンスがしやすい
- デバッグにかける時間を減らせる
- 素早い設計判断、設計改善を行える
■デメリット
- チームの成熟度やプロジェクトの状況によっては、アダとなることがある
- 仕様変更が生じたと時は、テストのメンテナンスも発生する
- ビルド時間がテストファーストの負荷を上げる
レッド/グリーン/リファクタリング
1、レッド:これから作るもののゴールを定める(テストを書く)
2、グリーン:期待する結果を満たす足場を作る(プロダクトコードを書く)
3、リファクタリング:作った羽柴を保ちながら改良を行う(コード整理、共通化、設計見直し)開発環境
- Xcode 10.3
- Swift
- XCTest
作るもの
ポーカー
まずは、実装したいことをTODOリストに書き起こす
[目的]
-スート(suit)とランク(rank)を与えて、カード(card)を生成する
-生成したカードから文字列表記(notation)を取得する↓TODOリストに置き換える
[TODOリスト]
- Cardを定義して、インスタンスを作成する
- CardはSuitを持つ
- CardはRankを持つ
- Cardのインスタンスから文字列表記(notation)を取得する
プロジェクト作成
1.Xcode > Create a new Xcode Project > Single View App
2.プロジェクト名:TDDPokerBySwift
3.Include Unit Testsのチェックをオン
4.Next > ディレクトリ指定 > Create初回テスト
Command + U でテスト実行
Build SuccessでOK
実際にテストを作成する
TDDPokerBySwiftTests.swiftを開いて、以下のように修正する
TDDPokerBySwiftTests.swiftimport XCTest @testable import TDDPokerBySwift class TDDPokerBySwiftTests: XCTestCase { func testInitializeCard() { let card1 = Card(suit: .heart, rank: .three) XCTAssertEqual(card1.suit, .heart) XCTAssertEqual(card1.rank, .three) let card2 = Card(suit: .spade, rank: .jack) XCTAssertEqual(card2.suit, .spade) XCTAssertEqual(card2.rank, .jack) } }Command + U でテスト実行してみましょう。
当然、エラーになります。これは、テストコードのエラーでなはく、単純にCardクラスが存在しないためのコンパイルエラーです。
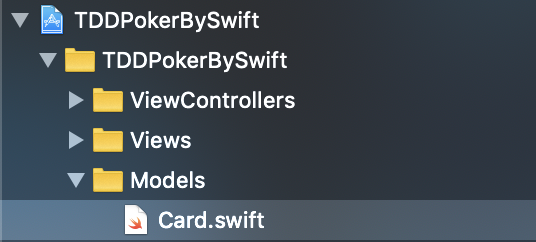
Cardクラスを作成しましょう。今回もMVVMで作成していければと思いますので、
Project Navigator > TDDPokerBySwiftグループ > 右クリック > New Groupで、
- Models
- Views
- ViewControllers
を作成して、Models/Card.swiftを作成します。
Card.swiftimport Foundation struct Card { enum Suit { case spade case heart case club case diamond } enum Rank { case ace case two case three case four case five case six case seven case eight case nine case ten case jack case queen case king } let suit: Suit let rank: Rank }それでは、Command + U でテスト実行してみましょう。
Build Succeeded > Test Succeeded となれば成功です。ここまでで、レッド > グリーンまで作業しました。
仕上げに、リファクタリングです。テストコードを以下に書き換えましょう。
TDDPokerBySwiftTests.swiftimport XCTest @testable import TDDPokerBySwift class TDDPokerBySwiftTests: XCTestCase { func testInitializeCard() { var card: Card card = Card(suit: .heart, rank: .three) XCTAssertEqual(card.suit, .heart) XCTAssertEqual(card.rank, .three) card = Card(suit: .spade, rank: .jack) XCTAssertEqual(card.suit, .spade) XCTAssertEqual(card.rank, .jack) } }ローカル変数cardに統一したことで、直前に代入しているカードにアサーションをかけていると読めるようになりました。
それでは、Command + U でテスト実行してみましょう。問題なければ、TODOリストにチェックを入れます。
- Cardを定義して、インスタンスを作成する
- CardはSuitを持つ
- CardはRankを持つ
- Cardのインスタンスから文字列表記(notation)を取得する
今回やったこと、理解したこと
- TODOリストを書いて、取り組むべき問題を細分化した
- テストの失敗か環境によるものかを切り分ける為に、テストを書き始める前にプロジェクトのテストを一度実行した
- テストケースから考えることで、型をうまく利用し、考慮しなければならないテストケースを減らした
- レッド > グリーン > リファクタリング まで一貫して行った
まとめ
今回やったことのようなシンプルなinitは、実際、テスト対象にはならないようなものだそうです。次節において、本格的なTDDが始まると思いますので、引き続き、頑張っていきましょう。
参考
演習問題
http://devtesting.jp/tddbc/?TDDBC%E4%BB%99%E5%8F%B007%2F%E8%AA%B2%E9%A1%8Chttps://dev.classmethod.jp/event/twadatddworkshopsappororeport/
- 投稿日:2019-08-27T22:20:43+09:00
[iOS]よく使うSwiftライブラリ SnapKit編
#はじめに
ここまではRxSwift、Rx系のSwiftライブラリを見てきましたが、前回のRxKeyboardのプロジェクトで出てきた、SnapKitというのが、かなり有用だそうなので、こちらを取り上げていきたいと思います。作るもの
環境
Xcode10.3
Swift5.0.1
RxSwift 5.0.0
RxCocoa 5.0.0
SnapKit 5.0.0準備
1.プロジェクト作成
-Xcodeを起動
-Create a new Xcode project
>Single View App
>Product Name:SnapKitSample
>完了。すぐにプロジェクトを閉じます。2.ターミナルを起動して、ディレクトリに移動
$ cd SnapKitSample3.Podfile作成/編集
$ pod init
$ vi Podfile
今回はたくさんのライブラリを使います
Podfiletarget 'SnapKitSample' do use_frameworks! pod 'RxSwift' pod 'RxCocoa' pod 'SnapKit' end4.ライブラリのインストール
$ pod install5.プロジェクトを開く
.xcworkspaceから起動するStoryboardを削除
今回は、Storyboardもxibも使わずに、プログラムに直書きでレイアウトを表示します。
1.Main.storyboardの削除
/Main.storyboardをDelete > Move to Trash2.Info.plist
Info.plistを開く > Main storyboard file base nameの項目を削除(マイナスボタン)実装
AppDelegateを以下のように修正します。
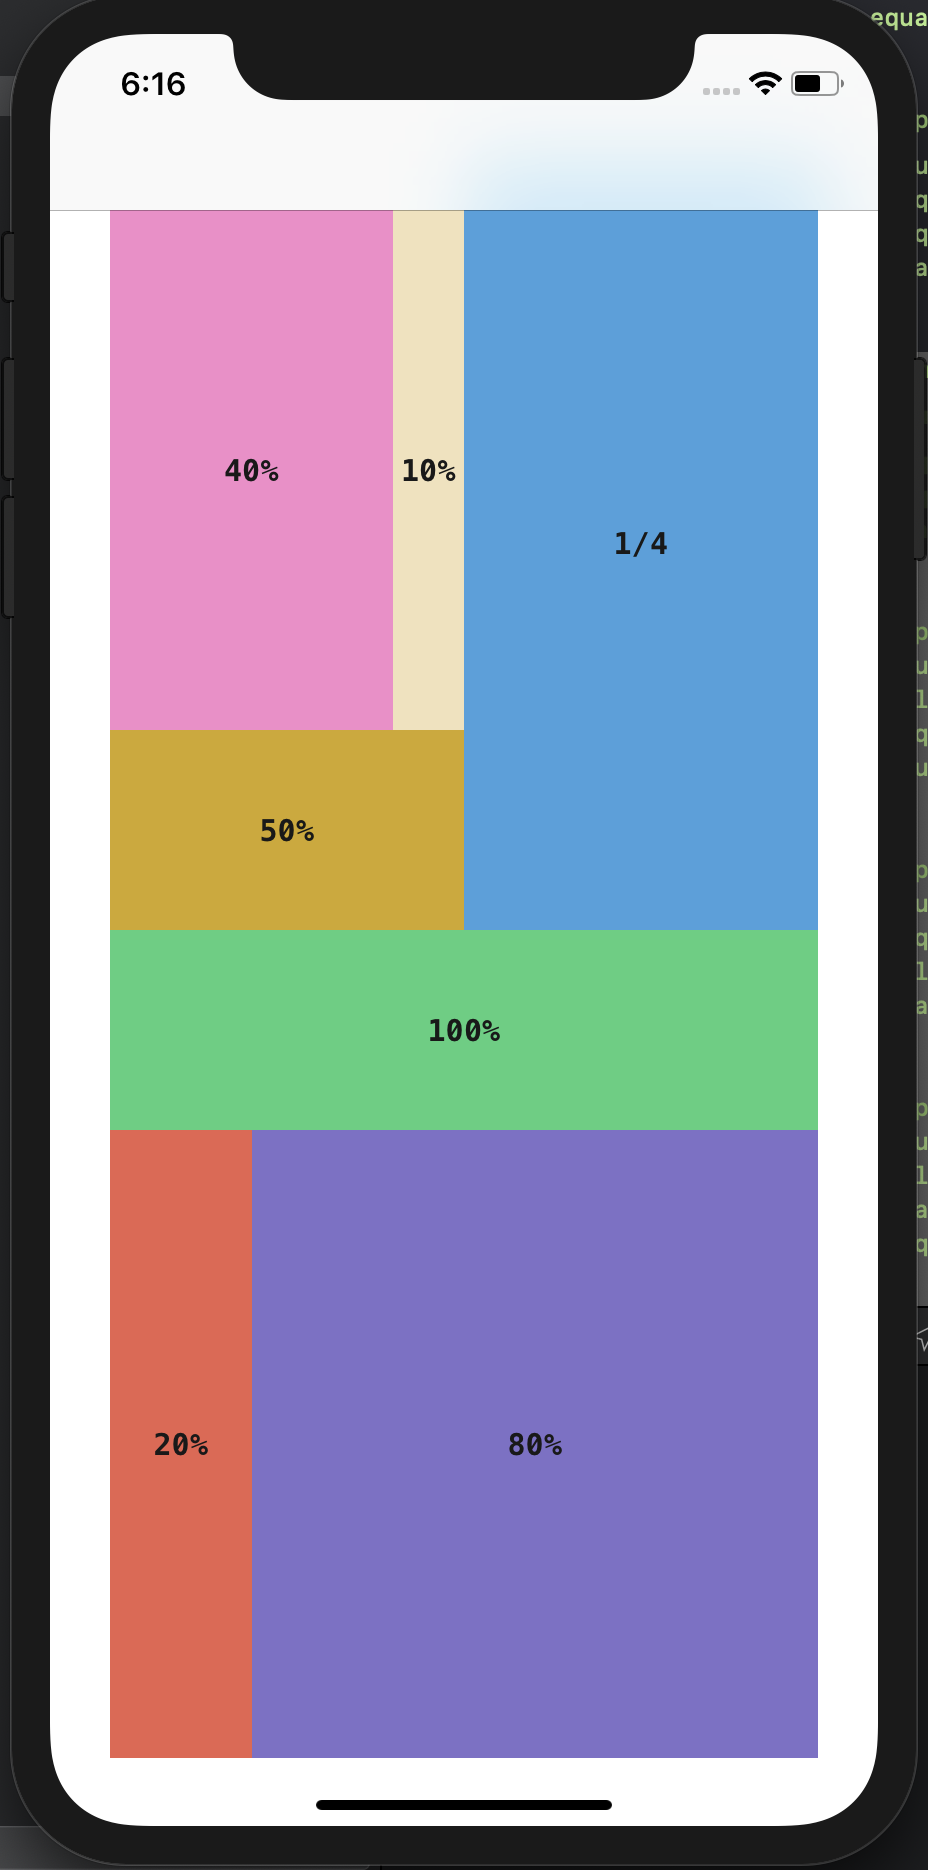
AppDelegate.swiftimport UIKit @UIApplicationMain class AppDelegate: UIResponder, UIApplicationDelegate { var window: UIWindow? //こうすることでSwift4.1以下でもdidFinishLaunchingWithOptionsが呼ばれるようにできる #if swift(>=4.2) typealias ApplicationLaunchOptionsKey = UIApplication.LaunchOptionsKey #else typealias ApplicationLaunchOptionsKey = UIApplicationLaunchOptionsKey #endif func application( _ application: UIApplication, didFinishLaunchingWithOptions launchOptions: [ApplicationLaunchOptionsKey: Any]? ) -> Bool { let window = UIWindow(frame: UIScreen.main.bounds) window.backgroundColor = .white window.makeKeyAndVisible() let viewController = ViewController() let navigationController = UINavigationController(rootViewController: viewController) window.rootViewController = navigationController self.window = window return true } }ViewController.swiftimport UIKit import SnapKit class ViewController: UIViewController { var didSetupConstraints: Bool = false let container: UIView = UIView() let labelFullWidth: UILabel = UILabel() let labelHalfWidth: UILabel = UILabel() let labelQuarter: UILabel = UILabel() let label80Percent: UILabel = UILabel() let label20Percent: UILabel = UILabel() let label40Percent: UILabel = UILabel() let label10Percent: UILabel = UILabel() override func viewDidLoad() { super.viewDidLoad() self.setupViews() } fileprivate func setupViews() { //エイリアス定義 typealias Content = (title: String, label: UILabel, color: UIColor) let font: UIFont? = UIFont(name: "Menlo-Bold", size: 15) let green: UIColor = UIColor(hue: 0.40, saturation: 0.77, brightness: 0.80, alpha: 1.0) let yellow: UIColor = UIColor(hue: 0.13, saturation: 0.99, brightness: 0.80, alpha: 1.0) let blue: UIColor = UIColor(hue: 0.57, saturation: 0.76, brightness: 0.86, alpha: 1.0) let purple: UIColor = UIColor(hue: 0.70, saturation: 0.52, brightness: 0.77, alpha: 1.0) let red: UIColor = UIColor(hue: 0.02, saturation: 0.74, brightness: 0.91, alpha: 1.0) let pink: UIColor = UIColor(hue: 0.90, saturation: 0.49, brightness: 0.96, alpha: 1.0) let navy: UIColor = UIColor(hue: 0.12, saturation: 0.25, brightness: 0.94, alpha: 1.0) let contents: [Content] = [ ("100%", labelFullWidth, green), ("50%", labelHalfWidth, yellow), ("1/4", labelQuarter, blue), ("80%", label80Percent, purple), ("20%", label20Percent, red), ("40%", label40Percent, pink), ("10%", label10Percent, navy), ] //すべてのラベルの共通設定 for content in contents { let label = content.label label.font = font label.textAlignment = .center label.backgroundColor = content.color label.textColor = .black label.layer.opacity = 0.9 label.text = content.title container.addSubview(label) } view.addSubview(container) view.backgroundColor = .white view.setNeedsUpdateConstraints() } override func updateViewConstraints() { if !didSetupConstraints { container.snp.makeConstraints{ make in //inset:内側余白 > padding make.edges.equalToSuperview().inset( UIEdgeInsets( top:view.safeAreaInsets.top, left: 30, bottom: view.safeAreaInsets.bottom, right: 30) ) //親ビューの中心と同じ位置に make.center.equalToSuperview() } labelFullWidth.snp.makeConstraints { make in make.width.equalToSuperview() make.height.equalTo(100) //オブジェクトの上辺をメインビューの中心Yに make.top.equalTo(view.snp.centerY) //widthが親ビューと一緒なので、左端から右端まで100%になる make.left.equalToSuperview() } labelHalfWidth.snp.makeConstraints { make in make.width.equalToSuperview().multipliedBy(0.5) //倍率表示 make.height.equalTo(100) make.bottom.equalTo(view.snp.centerY) make.left.equalToSuperview() } labelQuarter.snp.makeConstraints { make in make.width.equalToSuperview().dividedBy(2) //横2分割と make.height.equalToSuperview().dividedBy(2) //縦2分割の大きさで1/4の面積になる make.bottom.equalTo(view.snp.centerY) make.left.equalTo(view.snp.centerX) } label80Percent.snp.makeConstraints { make in make.width.equalToSuperview().multipliedBy(0.8) make.top.equalTo(labelFullWidth.snp.bottom) make.bottom.equalToSuperview() make.right.equalToSuperview() } label20Percent.snp.makeConstraints { make in make.width.equalToSuperview().multipliedBy(0.2) make.height.equalTo(label80Percent) make.top.equalTo(labelFullWidth.snp.bottom) make.left.equalToSuperview() } label40Percent.snp.makeConstraints { make in make.width.equalToSuperview().multipliedBy(0.4) make.top.equalToSuperview() make.left.equalToSuperview() make.bottom.equalTo(labelHalfWidth.snp.top) } label10Percent.snp.makeConstraints { make in make.width.equalToSuperview().multipliedBy(0.1) make.top.equalToSuperview() make.left.equalTo(label40Percent.snp.right) make.bottom.equalTo(labelHalfWidth.snp.top) } didSetupConstraints = true } super.updateViewConstraints() } }参考
https://tech.ryukyu-i.co.jp/2016/12/02/easy-to-use-snapkit/
https://github.com/tdkn/EasyToUseSnapKit/blob/master/EasyToUseSnapKit/Sample02ViewController.swift
- 投稿日:2019-08-27T20:43:55+09:00
iOSアプリが立ち上がるまでの処理内容
目的
iOSがbuildされて、どのように立ち上がっているのかという根本的な仕組みを見直す。
iPhoneアプリが起動するまで
#import
#import "AppDelegate.h"

int main(int argc, char *argv[]) {
  @autoreleasepool {
  //AppDelegateのクラス名を指定
    return UIApplicationMain(argc, argv, nil, NSStringFromClass([AppDelegate class]));
  }
}
上記のように、main関数を実行することによりアプリが起動します。この点に関しては、CやC++のソースコードと同じになります。
UIApplicationMain関数を実行する際に、AppDelegateのクラス名を指定しているため、AppDelegateでアプリ起動時・起動後に処理を実行できるようになります。
次にAppDelegateクラスの処理内容です。
この処理で、アプリの起動後やアプリがバックグラウンドに移動する際などに、処理を実行することを可能にします。// AppDelegate.swift import UIKit // Main関数の自動実装 @UIApplicationMain class AppDelegate: UIResponder, UIApplicationDelegate { var window: UIWindow? //アプリを起動する際に呼ばれるメソッド func application(application: UIApplication, didFinishLaunchingWithOptions launchOptions: [NSObject: AnyObject]?) -> Bool { // Override point for customization after application launch. return true } // 中略 }上記がAppDelegateのソースコードです。
上から4行目を見ると、@UIApplicationMainという記述があります。これはmain関数を自動実装してくれるものであり、iOSアプリではmain.swift ファイルを用意しなくても、このコードを記述することでmain.swiftファイルを省略できます。そのため最初に記述した、main.swiftのファイルは実際はxcode上にない場合もあるので注意してください。
- 投稿日:2019-08-27T20:27:30+09:00
【lightbox2】disableScrolling を true にしても、スマホでスクロールできてしまう問題【jQuery】
前回、こんなこと があり、2.10.0 で試しています。
lightbox2 のオプションには
disableScrollingがあり、trueにすると Litebox が開いてる間はスクロールできなくなります。オプションの参考:簡単に画像のポップアップ!「Lightbox」の実装方法
しかし、
trueにしても、スマホではスクロールできるバグ?があります。
htmlやbodyタグにoverflow: hiddenを指定するとスクロールできなくなります。ただし、これはPCのみでスマホではスクロールできてしまいます。
そのため、JavaScriptで制御する必要があります。
preventDefault();を使うスクロールを無効化できましたが、新しいブラウザでは効かないようです。新しいブラウザで
preventDefault()を使いたいときは、passive:falseにする必要があります。具体的に言うと
addEventListenerの第3引数に{passive: false}を指定します。スクロール禁止・再開を関数化したのが下記です。
function scroll_control(event) {
    event.preventDefault();
}
function no_scroll(){
    document.addEventListener("mousewheel", scroll_control, {passive: false});
    document.addEventListener("touchmove", scroll_control, {passive: false});
}
function return_scroll(){
    document.removeEventListener("mousewheel", scroll_control, {passive: false});
    document.removeEventListener('touchmove', scroll_control, {passive: false});
}
no_scroll()を呼び出せばスクロールが禁止され、return_scroll()を呼び出せばスクロール禁止してたのを再開できます。これらを、
litebox.js(v2.10.0) に追記します。追加箇所の抜粋です。
litebox.js(最初に関数を記述)/*! * Lightbox v2.10.0 * by Lokesh Dhakar * * More info: * http://lokeshdhakar.com/projects/lightbox2/ * * Copyright 2007, 2018 Lokesh Dhakar * Released under the MIT license * https://github.com/lokesh/lightbox2/blob/master/LICENSE * * @preserve */ // scroll control function scroll_control(event) { event.preventDefault(); } function no_scroll(){ document.addEventListener("mousewheel", scroll_control, {passive: false}); document.addEventListener("touchmove", scroll_control, {passive: false}); } function return_scroll(){ document.removeEventListener("mousewheel", scroll_control, {passive: false}); document.removeEventListener('touchmove', scroll_control, {passive: false}); }litebox.js(ライトボックスがスタートするときにno_scroll()を実行)// Show overlay and lightbox. If the image is part of a set, add siblings to album array. Lightbox.prototype.start = function($link) { no_scroll(); // この1行を追記しました。 var self = this; var $window = $(window); $window.on('resize', $.proxy(this.sizeOverlay, this)); $('select, object, embed').css({ visibility: 'hidden' }); this.sizeOverlay(); this.album = []; var imageNumber = 0; function addToAlbum($link) { self.album.push({ alt: $link.attr('data-alt'), link: $link.attr('href'), title: $link.attr('data-title') || $link.attr('title') }); }litebox.js(ライトボックスが終了するときにreturn_scroll()を実行)// Closing time. :-( Lightbox.prototype.end = function() { return_scroll(); // この1行を追記しました。 this.disableKeyboardNav(); $(window).off('resize', this.sizeOverlay); this.$lightbox.fadeOut(this.options.fadeDuration); this.$overlay.fadeOut(this.options.fadeDuration); $('select, object, embed').css({ visibility: 'visible' }); if (this.options.disableScrolling) { $('html').removeClass('lb-disable-scrolling'); } };
- 投稿日:2019-08-27T11:37:32+09:00
升級 CircleCI 的 Xcode 到 10.3.0 後發生的 Ruby 找不到版本的問題
最近終於有空來升一下手上專案的 Swift 的版本了
今天在換 CircleCI Xcode 映像檔到10.3.0之後,
在執行 Ruby 相關指令的時候發生這個問題 (節錄自 CircleCI 的 console output)ruby: unknown Ruby: 2.4設定檔節錄:
command: echo "ruby-2.4" > .ruby-version覺得都沒有動怪怪的,就去看了一下文件,就發現原來換了 Xcode 之後支援的 Ruby 版本也不同了!看起來 2.4 在 Xcode
10.3.0已經不被支援了,所以就只能換一下了Xcode 10.2.1
The system Ruby is unchanged at 2.3.7p456. We also have Ruby 2.4.6 and 2.5.5 available to use via chruby.
Xcode 10.3.0
The system ruby is 2.3.7; Ruby 2.5.5 and 2.6.3 are available to chruby.
更換
換成映像檔可以支援的 Ruby 版本就順利建置成功了!
command: echo "ruby-2.6.3" > .ruby-version
- 投稿日:2019-08-27T01:03:52+09:00
iOS UIKitによるPopoverの表示およびカスタマイズ
はじめに
Popover の表示とカスタマイズ方法について調査したので、備忘のために残しておきます。
環境
- Xcode 10.3 (iOS SDK 12.4)
- Swift 5
サンプルコード
https://github.com/imamurh/PopoverExample
Popover の表示
UIPopoverPresentationController を利用します。UIViewController のプロパティからアクセスできます。
UIViewController@available(iOS 8.0, *) open var popoverPresentationController: UIPopoverPresentationController? { get }UIBarButtonItem に Popover を表示する場合は、
barButtonItemプロパティを使用します。Popoverの表示(UIBarButtonItem)class ViewController: UIViewController { @IBAction func barButtonItemTapped(_ sender: UIBarButtonItem) { let vc = ... // Popover で表示したい ViewController を生成 vc.modalPresentationStyle = .popover vc.popoverPresentationController?.barButtonItem = sender vc.popoverPresentationController?.permittedArrowDirections = .up // 矢印の向きを制限する場合 vc.popoverPresentationController?.delegate = self // Phone で Popover を表示するために必要 present(vc, animated: true) } }UIButton など任意の UIView に Popover を表示する場合は、
sourceRectプロパティとsourceViewプロパティを使用します。Popoverの表示(UIView)class ViewController: UIViewController { @IBAction func buttonTapped(_ sender: UIButton) { let vc = ... // Popover で表示したい ViewController を生成 vc.modalPresentationStyle = .popover vc.popoverPresentationController?.sourceView = sender.superview vc.popoverPresentationController?.sourceRect = sender.frame vc.popoverPresentationController?.permittedArrowDirections = .up // 矢印の向きを制限する場合 vc.popoverPresentationController?.delegate = self // Phone で Popover を表示するために必要 present(vc, animated: true) } }Phone で Popover を表示するためには、UIPopoverPresentationControllerDelegate(が継承しているUIAdaptivePresentationControllerDelegate)の下記メソッドの実装が必要になります。
extension ViewController: UIPopoverPresentationControllerDelegate {
    // Phone で Popover を表示するために必要
    func adaptivePresentationStyle(for controller: UIPresentationController,
                                   traitCollection: UITraitCollection) -> UIModalPresentationStyle {
        return .none
    }
}
以上が基本的な Popover の表示方法になります。
Popover のカスタマイズ
ここからが本題。
背景色
まずは背景色のカスタマイズです。
UIPopoverPresentationController// Set popover background color. Set to nil to use default background color. Default is nil. @NSCopying open var backgroundColor: UIColor?UIPopoverPresentationController に
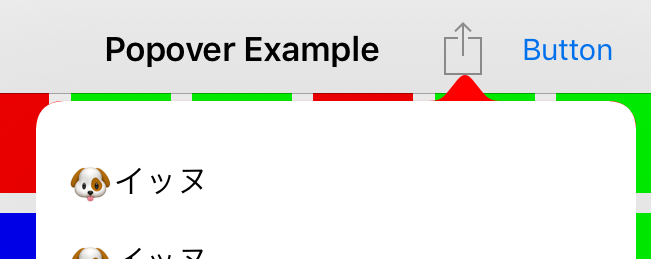
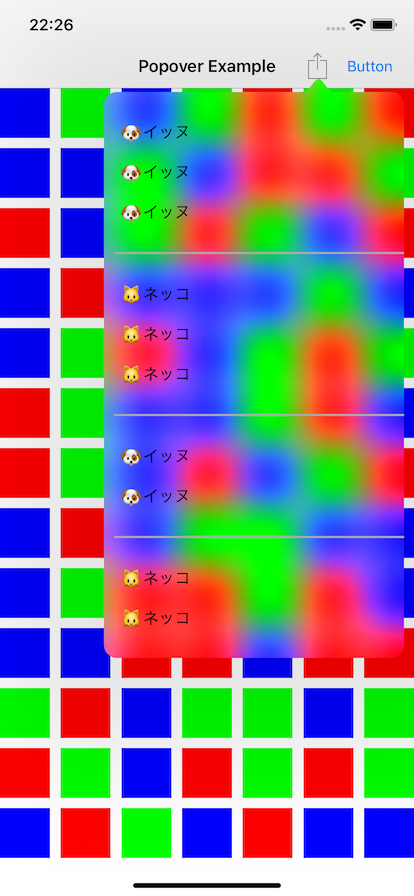
backgroundColorというプロパティがあるので、これを設定することで背景色を変更できます。背景色を指定vc.modalPresentationStyle = .popover vc.popoverPresentationController?.barButtonItem = sender vc.popoverPresentationController?.permittedArrowDirections = .any + vc.popoverPresentationController?.backgroundColor = .red vc.popoverPresentationController?.delegate = selfbackgroundColor を設定しても、表示するコンテンツの背景色を透過にしなければ下記のように矢印部分しか赤くなりません。(当然といえば当然ですが...)
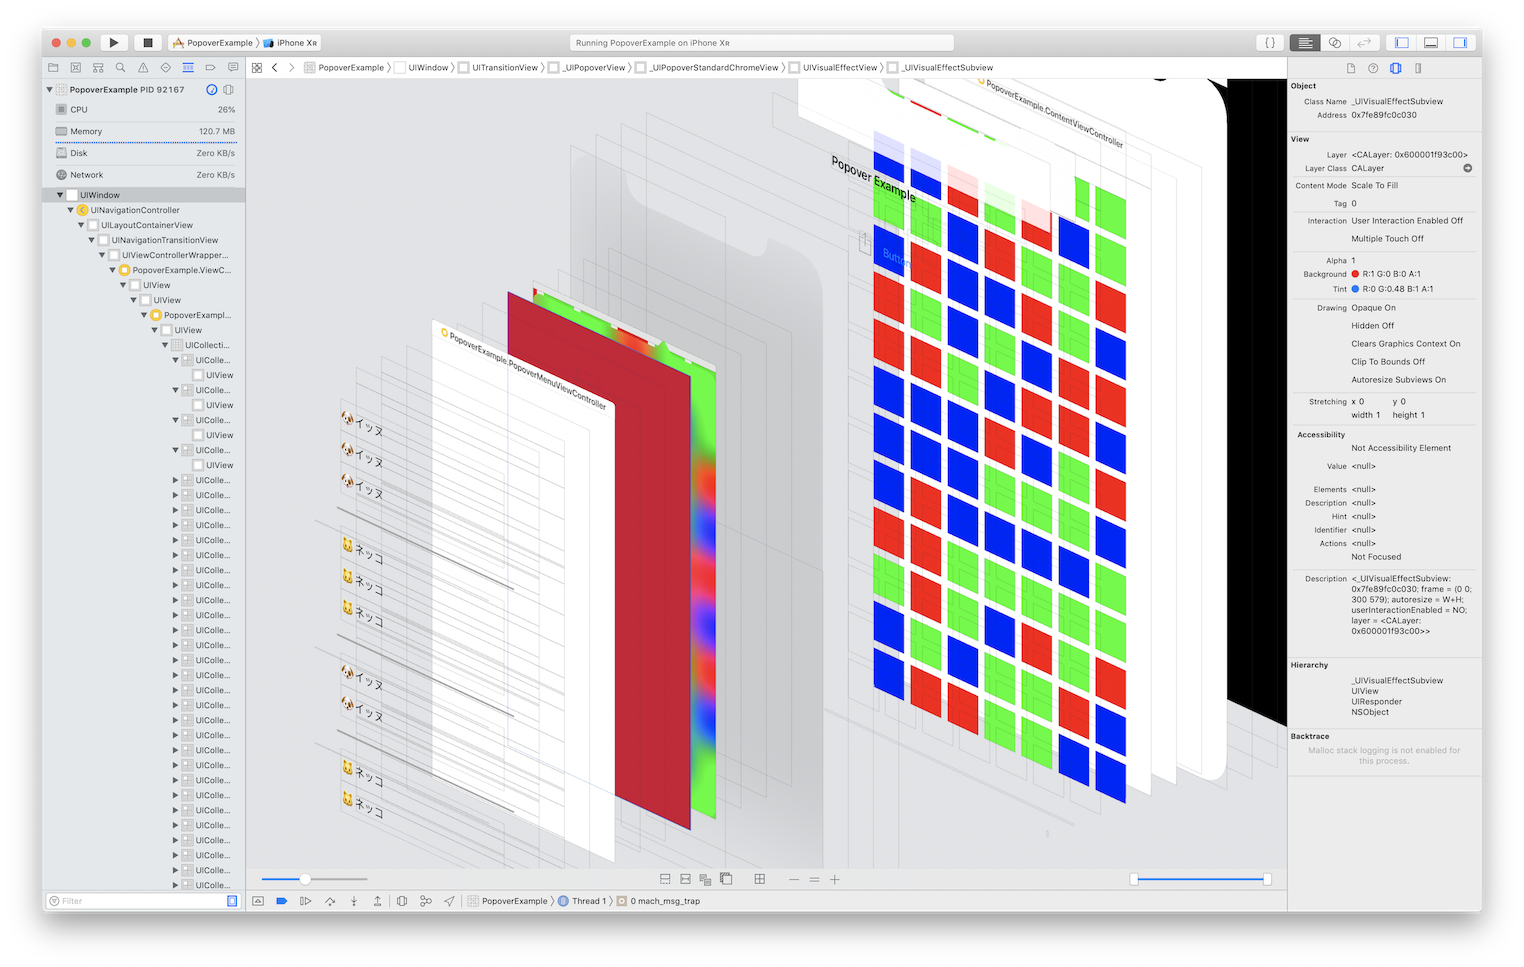
View の階層は下記の通り。
Popover で表示する ViewController の背景色を透過にすれば、下記の通り全体が背景色つきで表示されます。
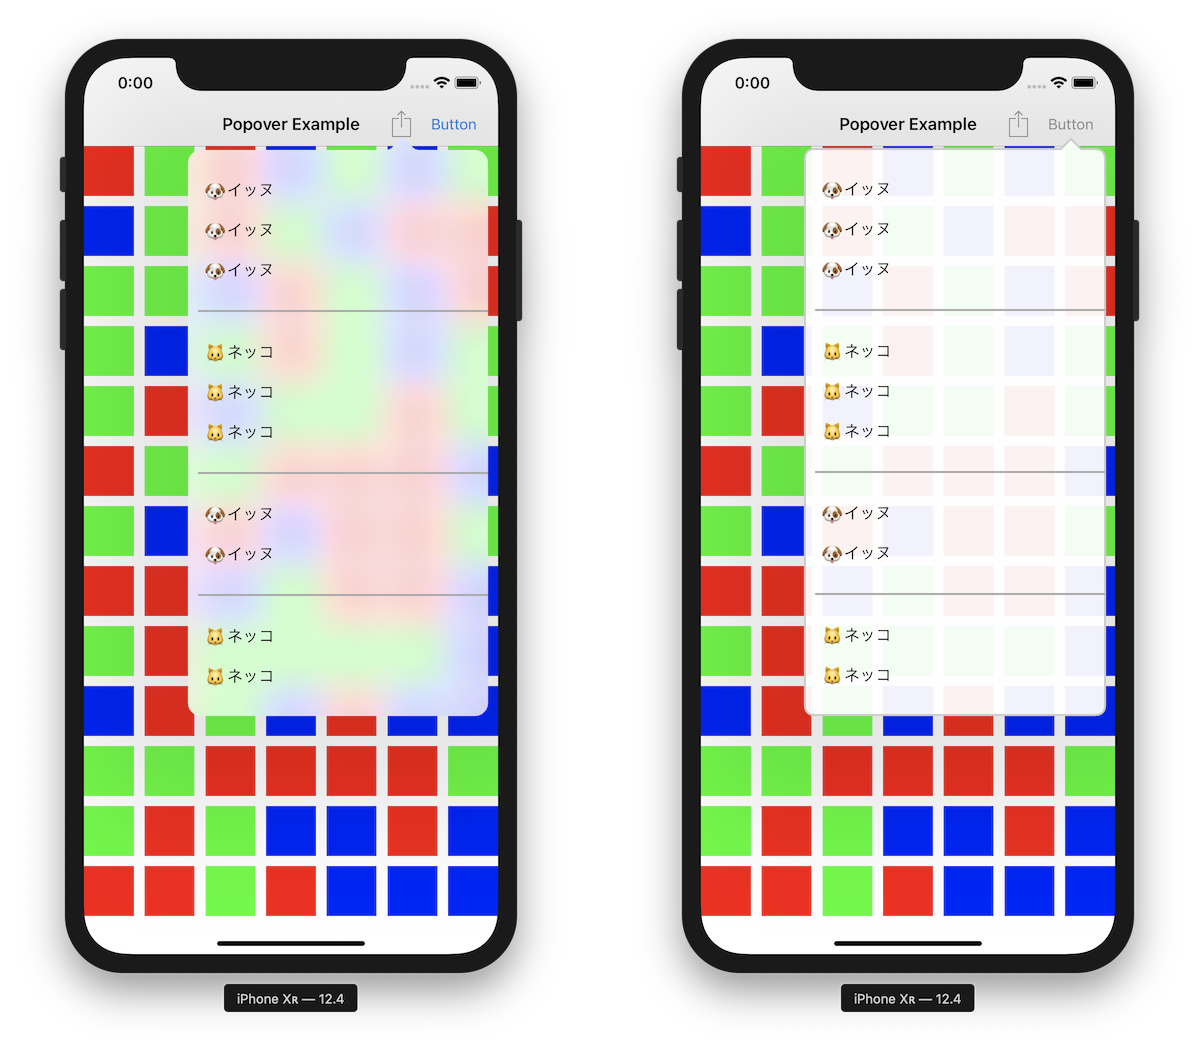
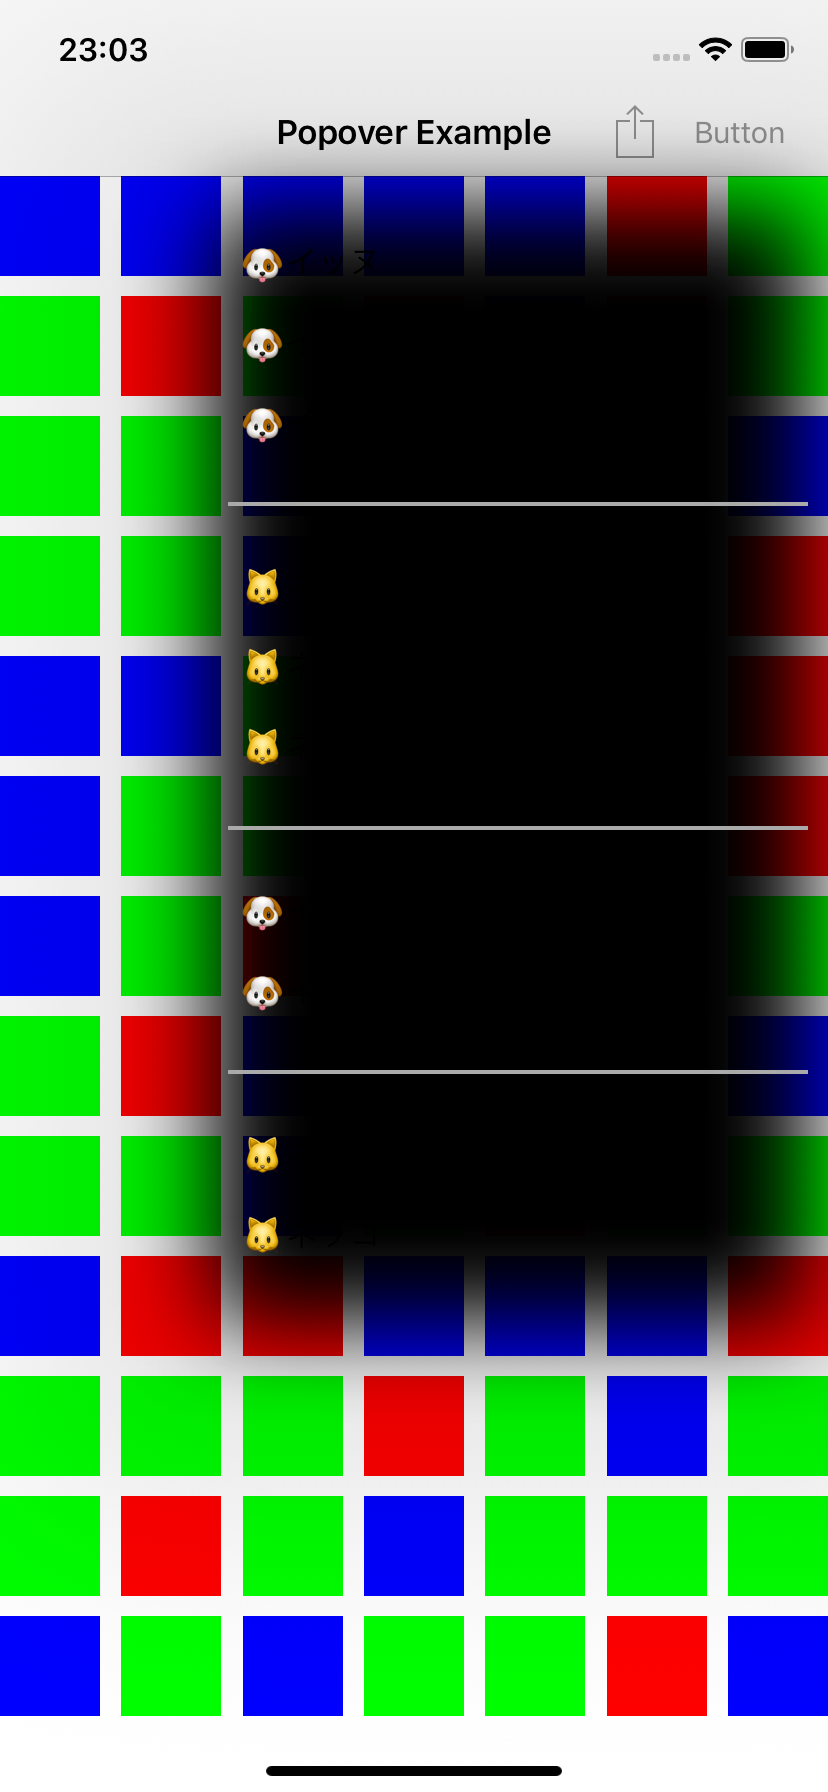
なお、背景の View には UIVisualEffectView が使用されているため、透過色を指定した場合ブラーがかかります。(下記は UIColor.clear を指定した場合)
ブラーがかかっても問題ない場合は backgroundColor プロパティを使用すれば十分ですが、ブラーを避けたい場合は次に紹介する BackgroundView をカスタマイズする方法を選択する必要があります。
BackgroundView のカスタマイズ
UIPopoverBackgroundView のサブクラスを作成し、UIPopoverPresentationController の
popoverBackgroundViewClassに指定することで、独自の BackgroundView を利用することができます。UIPopoverPresentationController// Clients may customize the popover background chrome by providing a class which subclasses `UIPopoverBackgroundView` // and which implements the required instance and class methods on that class. open var popoverBackgroundViewClass: UIPopoverBackgroundViewMethods.Type?カスタムBackgroundViewクラスを指定vc.modalPresentationStyle = .popover vc.popoverPresentationController?.barButtonItem = sender vc.popoverPresentationController?.permittedArrowDirections = .any + vc.popoverPresentationController?.popoverBackgroundViewClass = MyPopoverBackgroundView.self vc.popoverPresentationController?.delegate = selfカスタム BackgroundView クラスでは、適宜必要なメソッドを override する必要があります。最低限必要なメソッドは下記の通りです。(これらを実装しないと実行時にクラッシュします)
class MyPopoverBackgroundView: UIPopoverBackgroundView {

    // MARK: - UIPopoverBackgroundViewMethods

    override static func arrowBase() -> CGFloat {
        return 20
    }

    override static func arrowHeight() -> CGFloat {
        return 10
    }

    override static func contentViewInsets() -> UIEdgeInsets {
        return .zero
    }

    // MARK: - UIPopoverBackgroundView properties

    private var _arrowOffset: CGFloat = 0
    override var arrowOffset: CGFloat {
        get { return _arrowOffset }
        set { _arrowOffset = newValue }
    }

    private var _arrowDirection: UIPopoverArrowDirection = .unknown
    override var arrowDirection: UIPopoverArrowDirection {
        get { return _arrowDirection }
        set { _arrowDirection = newValue }
    }
}
上記最小構成だけ実装した場合の Popover は下記の通りです。
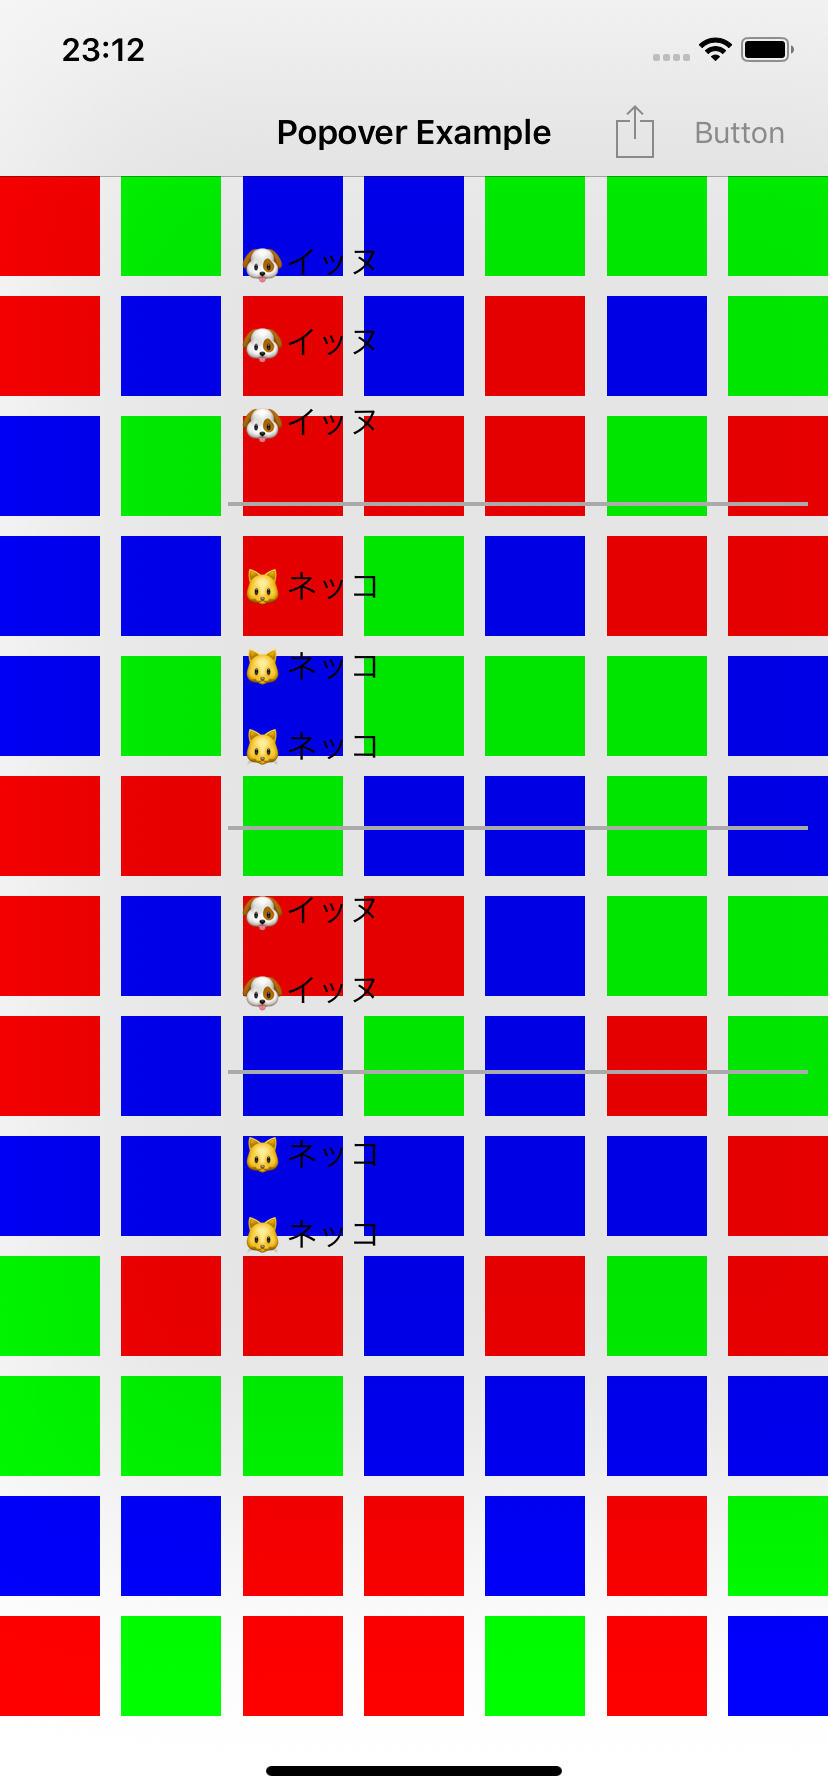
(なんか黒い...)
デフォルトで layer の shadowOpacity が設定されるので、layoutSubviews などで 0 を設定します。影を消すclass MyPopoverBackgroundView: UIPopoverBackgroundView { override func layoutSubviews() { super.layoutSubviews() layer.shadowOpacity = 0 } }
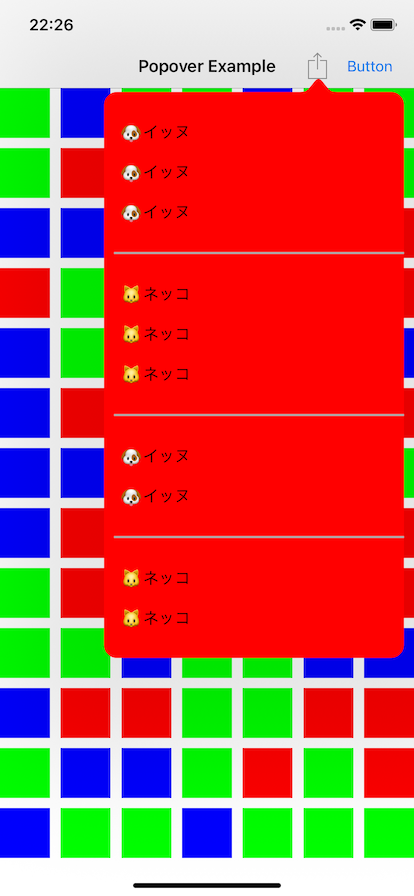
さらに backgroundColor を指定します。
backgroundColoroverride func layoutSubviews() { super.layoutSubviews() layer.shadowOpacity = 0 + backgroundColor = UIColor(white: 1, alpha: 0.9) }
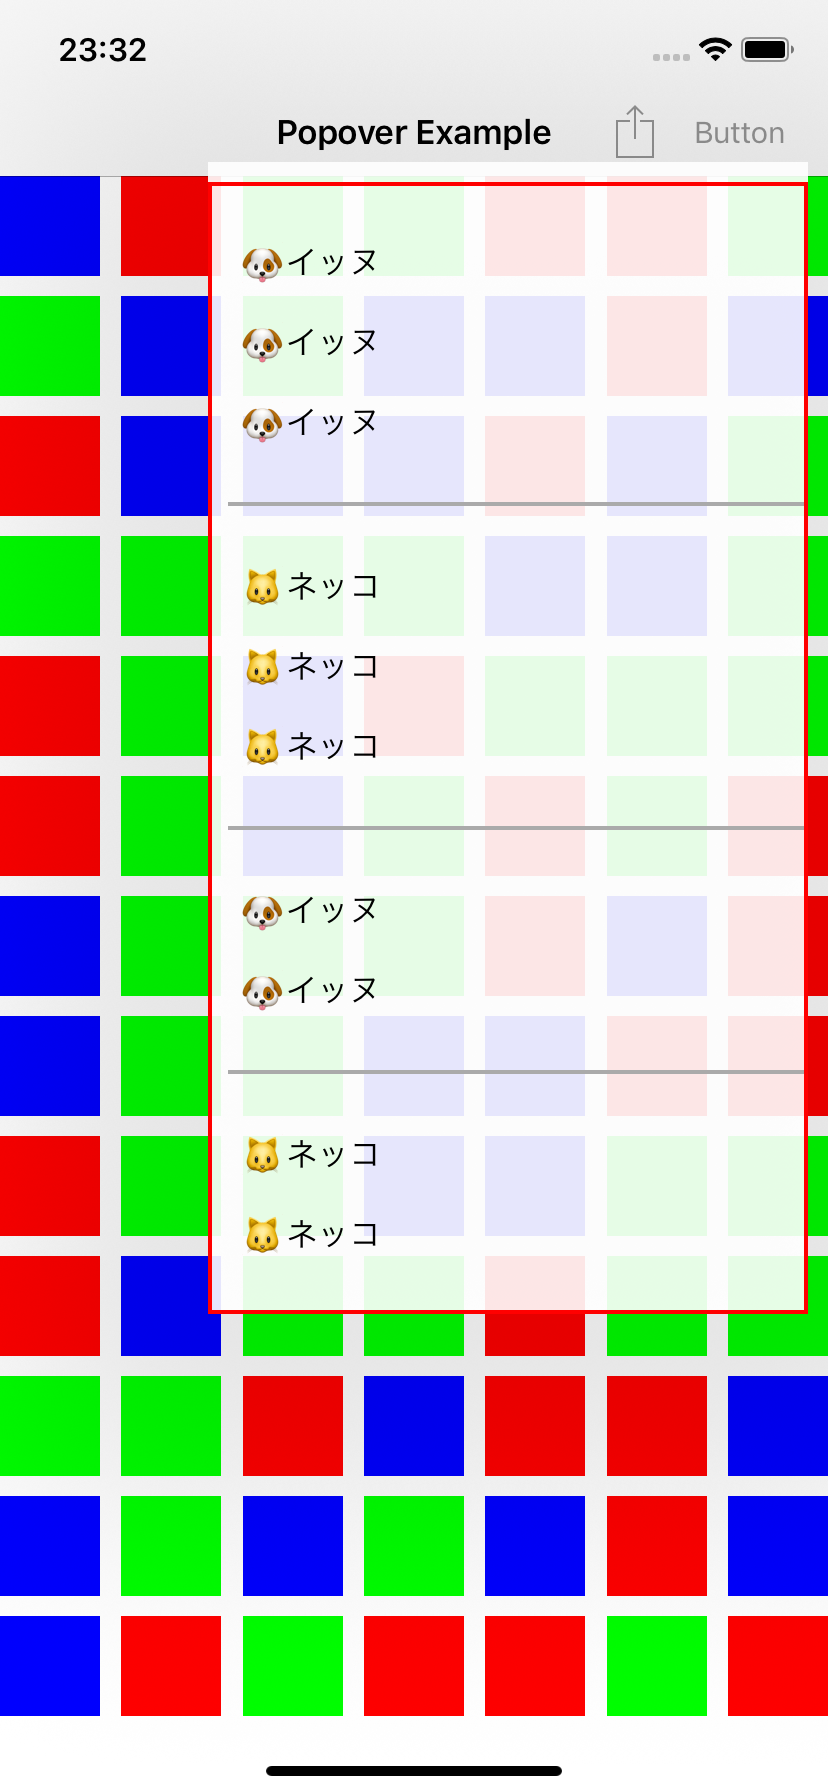
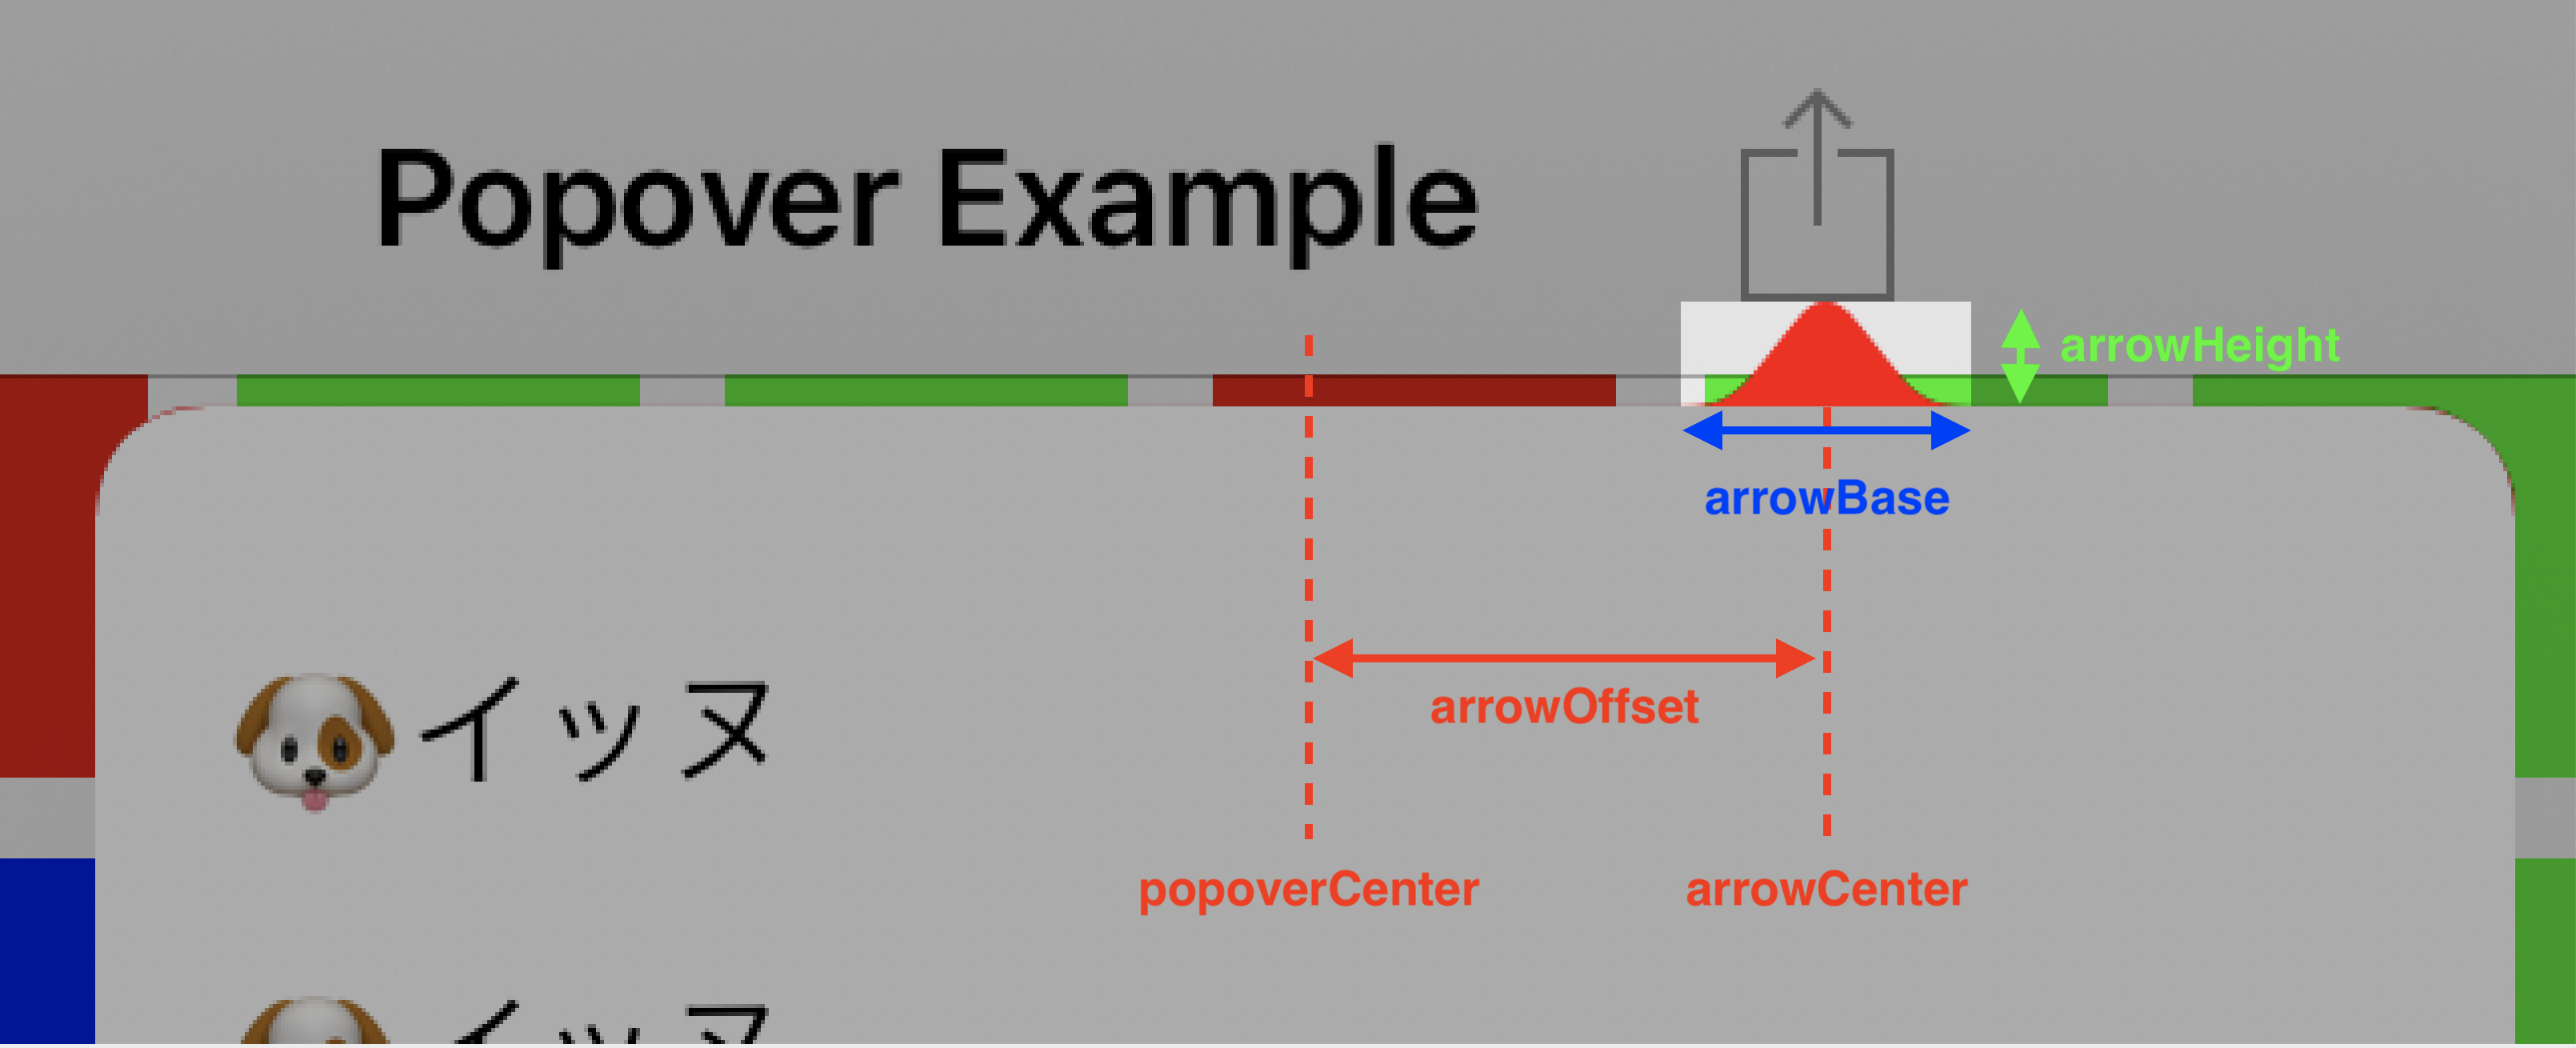
ここで、実際の Popover のコンテンツの領域は下記赤枠で囲われた部分になります。上の余白は、矢印を描画するための領域となります。
矢印の大きさ(arrowHeight および arrowBase)は、カスタム BackgroundView クラスで実装したクラスメソッドの固定値となります。矢印を描画する方向(arrowDirection)と位置(arrowOffset)は状況に応じて Popover コントローラにより設定されるため、これらの値をもとに矢印を描画します。
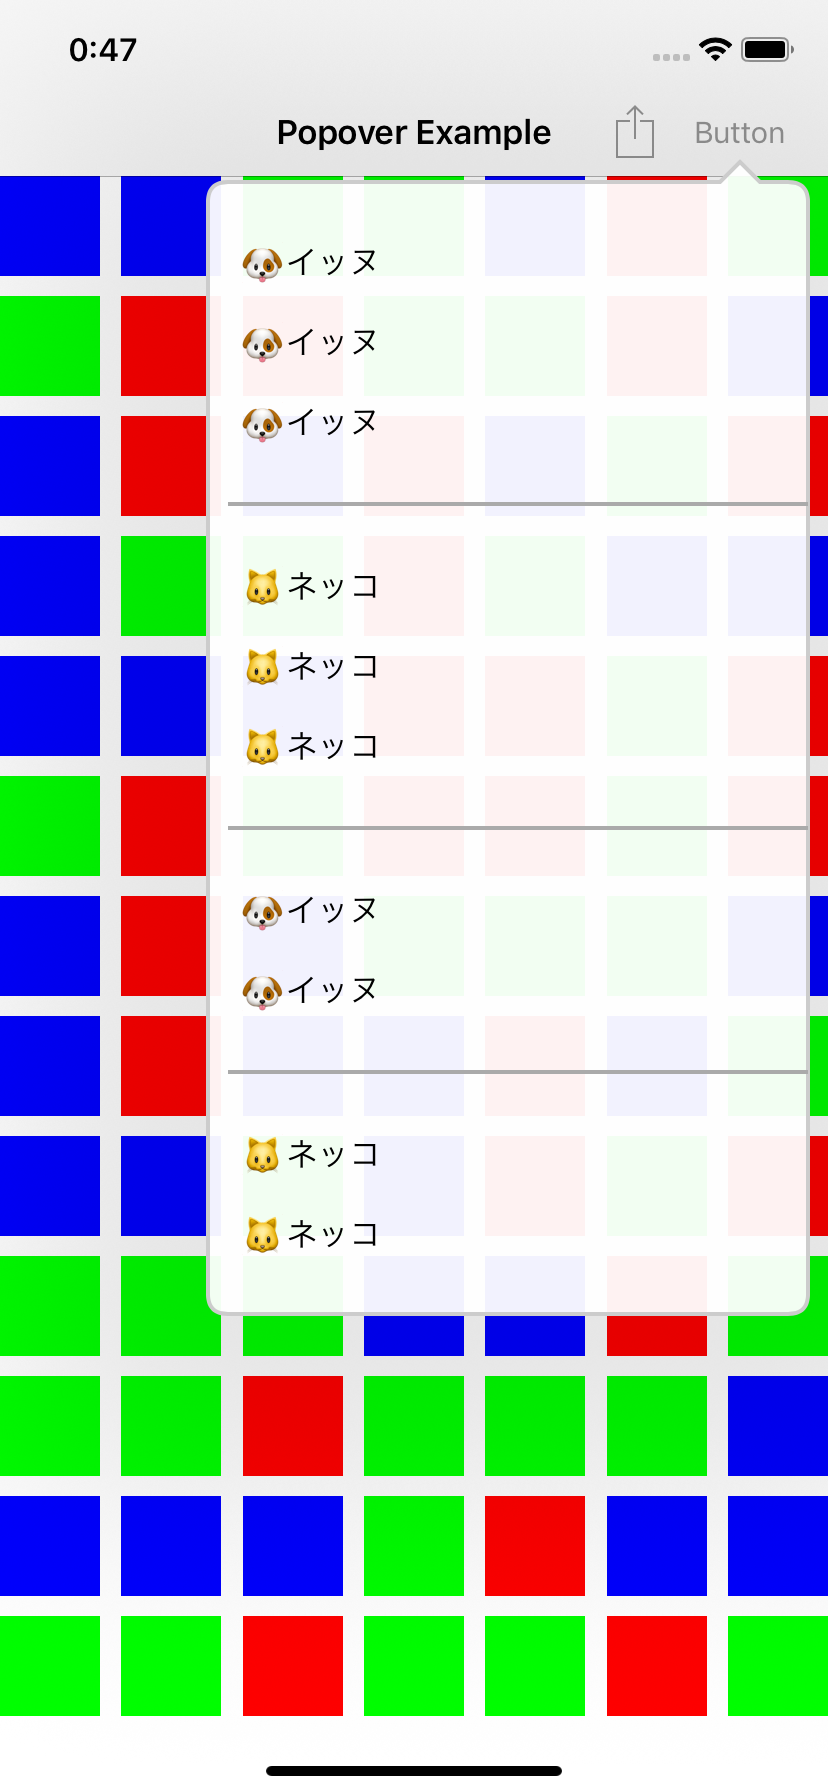
下記は CAShapeLayer を用いて角丸と矢印を描画するサンプルになります。(矢印は上方向のみ対応)
class MyPopoverBackgroundView: UIPopoverBackgroundView {

    override func layoutSubviews() {
        super.layoutSubviews()
        layer.shadowOpacity = 0
        setupPathLayer()
    }

    // MARK: - UIPopoverBackgroundViewMethods

    override static func arrowBase() -> CGFloat {
        return 20
    }

    override static func arrowHeight() -> CGFloat {
        return 10
    }

    override static func contentViewInsets() -> UIEdgeInsets {
        return .zero
    }

    // MARK: - Overriding UIPopoverBackgroundView properties

    private var _arrowOffset: CGFloat = 0
    override var arrowOffset: CGFloat {
        get { return _arrowOffset }
        set { _arrowOffset = newValue }
    }

    private var _arrowDirection: UIPopoverArrowDirection = .up
    override var arrowDirection: UIPopoverArrowDirection {
        get { return _arrowDirection }
        set { _arrowDirection = newValue }
    }

    // MARK: - Drawing

    private func setupPathLayer() {
        layer.sublayers?.forEach { $0.removeFromSuperlayer() }

        let rect = bounds
        let pathLayer = CAShapeLayer()
        pathLayer.frame = rect
        pathLayer.path = generatePath(rect, cornerRadius: 10).cgPath
        pathLayer.fillColor = UIColor(white: 1, alpha: 0.95).cgColor
        pathLayer.strokeColor = UIColor(white: 0.8, alpha: 1).cgColor
        pathLayer.lineWidth = 2
        layer.addSublayer(pathLayer)
    }

    private func generatePath(_ rect: CGRect, cornerRadius: CGFloat) -> UIBezierPath {
        let insets: UIEdgeInsets = {
            var insets = MyPopoverBackgroundView.contentViewInsets()
            if _arrowDirection == .up {
                insets.top += MyPopoverBackgroundView.arrowHeight()
            }
            return insets
        }()
        let topLeft     = CGPoint(x: insets.left,               y: insets.top)
        let topRight    = CGPoint(x: rect.maxX - insets.right,  y: insets.top)
        let bottomRight = CGPoint(x: rect.maxX - insets.right,  y: rect.maxY - insets.bottom)
        let bottomLeft  = CGPoint(x: insets.left,               y: rect.maxY - insets.bottom)

        let path = UIBezierPath()
        path.move(to: CGPoint(x: topLeft.x + cornerRadius, y: topLeft.y))
        if _arrowDirection == .up {
            let arrowBase = MyPopoverBackgroundView.arrowBase()
            let arrowCenterX = rect.size.width / 2 + _arrowOffset
            path.addLine(to: CGPoint(x: arrowCenterX - arrowBase / 2, y: insets.top))
            path.addLine(to: CGPoint(x: arrowCenterX, y: 0))
            path.addLine(to: CGPoint(x: arrowCenterX + arrowBase / 2, y: insets.top))
        }
        path.addLine(to: CGPoint(x: topRight.x - cornerRadius, y: topRight.y))
        path.addQuadCurve(to: CGPoint(x: topRight.x, y: topRight.y + cornerRadius), controlPoint: topRight)

        path.addLine(to: CGPoint(x: bottomRight.x, y: bottomRight.y - cornerRadius))
        path.addQuadCurve(to: CGPoint(x: bottomRight.x - cornerRadius, y: bottomRight.y), controlPoint: bottomRight)

        path.addLine(to: CGPoint(x: bottomLeft.x + cornerRadius, y: bottomLeft.y))
        path.addQuadCurve(to: CGPoint(x: bottomLeft.x, y: bottomLeft.y - cornerRadius), controlPoint: bottomLeft)

        path.addLine(to: CGPoint(x: topLeft.x, y: topLeft.y + cornerRadius))
        path.addQuadCurve(to: CGPoint(x: topLeft.x + cornerRadius, y: topLeft.y), controlPoint: topLeft)

        return path
    }
}
実行結果
以上です。