- 投稿日:2019-07-08T22:29:26+09:00
EC-CUBE3で管理画面にログインできなくなった・・・
ローカルにEC-CUBE3の開発環境を作り、さあ管理画面にアクセスしようと思ったがログインできない・・・。
ってときに取り急ぎ認証を無視してログインできるようにします。
vendor/symfony/security/Core/Authentication/Provider/UserAuthenticationProvider.php: try { $this->userChecker->checkPreAuth($user); // $this->checkAuthentication($user, $token); ←コメントアウト $this->userChecker->checkPostAuth($user); } catch (BadCredentialsException $e) { if ($this->hideUserNotFoundExceptions) { throw new BadCredentialsException('Bad credentials.', 0, $e); } throw $e; } :これで適当なログイン情報でログインできます。
ログインしたら管理者のパスワードを変更し、コメントアウトした部分を元に戻しましょう。
- 投稿日:2019-07-08T22:00:02+09:00
PHP の小数演算で結果がおかしくなるパターンと対応策
株式会社オズビジョンのユッコ (@terra_yucco) です。
先週は一週間有休をいただき、漆黒の FF14 をがっつりプレイしてきました。
今週からまた、ぽつぽつ Qiita を更新していきます。小数演算
人間の計算は基本的に 10 進数の上に成り立ちますが、コンピュータは内部的には値を 2 進数で保持します。
その結果、小数の演算では、想定する値が算出されないことがあります。不具合のあるコード
以下は元値 (1000) と係数 (0.7 や 0.6) によりパーセントで該当する値を求めたいコードになります。
$ php -a
Interactive shell

php > echo floor(1000 * (0.7 / 100));
6
php > echo floor(1000 * (0.6 / 100));
6
1 例目は個人的には 7 になってほしいです。というか皆さんそうだと思います。
対応するには
他にもいくつか解はあるようですが、この問題に対応した際には、改修コストなどを考えて string キャストを選択しました。
php > echo floor((string)(1000 * 0.6) / 100);
6
php > echo floor((string)(1000 * 0.7) / 100);
7
無事に 7 になりました。
影響範囲を調査するためのコード
結果は膨大になってしまうので割愛しますが、どのような係数を指定したときに値が想定からずれるのかを調べるため、以下のテストコードを書いて範囲を調べました。
(これがこの記事のメイン)
- 内部を 0-50 50-100 の 2 つに分割しているのは、1 つにすると vagrant のメモリが不足したため
- 今から見返すと 50 が 2 回登場している (ノ∀`)アチャー
最初の方だけ列挙すると、以下のケースで、string キャストありなしで差分が出ました。
- 0.7
- 1.4
- 2.8
- 4.1
- 5.6
- 7.1
- 7.3
- 8.2
- 9.7
- 11.2
<?php

/**
 * 小数計算処理全般のテスト
 */
class CalculatorTest extends CIUnit_TestCase
{
    /**
     * @param $計算元値
     * @param $係数
     * @param $計算結果小数
     *
     * @dataProvider 小数算出処理のバリエーション用データ_0_50
     */
    public function 小数算出処理のテスト_0_50($計算元値, $係数, $計算結果小数)
    {
        $target = new Calculator();
        $this->assertEquals(
            $計算結果小数,
            $target->decimals(
                $計算元値,
                $係数
            )
        );
    }

    /**
     * @return array
     */
    public function 小数算出処理のバリエーション用データ_0_50()
    {
        $data = array();
        for ($i = 0; $i <= 50; $i = round($i + 0.1, 2)) {
            array_push($data, array(
                '計算元値' => 1000,
                '係数' => $i,
                '計算結果小数' => (string)(1000 * $i) / 100)
            );
        }
        return $data;
    }

    /**
     * @param $計算元値
     * @param $係数
     * @param $計算結果小数
     *
     * @dataProvider 小数算出処理のバリエーション用データ_50_100
     */
    public function 小数算出処理のテスト_50_100($計算元値, $係数, $計算結果小数)
    {
        $target = new Calculator();
        $this->assertEquals(
            $計算結果小数,
            $target->decimals(
                $計算元値,
                $係数
            )
        );
    }

    /**
     * @return array
     */
    public function 小数算出処理のバリエーション用データ_50_100()
    {
        $data = array();
        for ($i = 50; $i <= 100; $i = round($i + 0.1, 2)) {
            array_push($data, array(
                '計算元値' => 1000,
                '係数' => $i,
                '計算結果小数' => (string)(1000 * $i) / 100)
            );
        }
        return $data;
    }
}
Conclusion
小数の計算をする場合には、こういうケースもあるので気を付けよう、というお話でした。
きちんとやるのであれば BCMath を入れるのが本来はよさそうです。
- 投稿日:2019-07-08T20:42:49+09:00
Laravelのマイグレーションファイル名は形式が決まっているようなのでメモ
Laravelでcreated_users_table.phpというマイグレーションファイルを作成して、実行したところ、エラーがでた。
database/migrations/create_users_table.php作成$ php artisan migrate Symfony\Component\Debug\Exception\FatalThrowableError : Class '' not found 436| public function resolve($file) 437| { 438| $class = Str::studly(implode('_', array_slice(explode('_', $file), 4))); 439| > 440| return new $class; 441| } 442| 443| /** 444| * Get all of the migration files in a given path.ああ、マイグレーションファイル名の形式は指定されているみたい。。
正しいファイル名は下記を参考
2019_07_05_052836_create_users_table.phpついでに、
$class = Str::studly(implode('_', array_slice(explode('_', $file), 4)));が何をしているかっていうと、
Str::studlyはLaravelのヘルパ関数で、文字列をアッパーキャメルケースに変換。
https://readouble.com/laravel/5.7/ja/helpers.html#method-studly-caseimplodeは指定の文字列で連結
explodeは指定の文字列で分割
array_sliceは配列の一部を展開流れを出力してみると、
$file = "2019_07_05_052836_create_users_table"; $file = explode('_', $file); var_dump($file); $file = array_slice($file, 4); var_dump($file); $file = implode('_', $file); var_dump($file);出力結果array(7) { [0]=> string(4) "2019" [1]=> string(2) "07" [2]=> string(2) "05" [3]=> string(6) "052836" [4]=> string(6) "create" [5]=> string(5) "users" [6]=> string(5) "table" } array(3) { [0]=> string(6) "create" [1]=> string(5) "users" [2]=> string(5) "table" } string(18) "create_users_table"取得できた
create_users_tableに対して、Str::studlyでアッパーキャメルケース(CreateUsersTable)に変換して、return new $class;インスタンスを生成しているのですなぁ。
これは、自分でも使えそうなので、覚えておく。
- 投稿日:2019-07-08T19:36:38+09:00
【PHP7.4】波括弧による文字列|配列アクセスが削除される
大改修が入ることはないでしょうと言ったな、あれは嘘だ。
2019/07/22の仕様凍結を目前に、いくつかのRFCが駆け足で投票に入っています。
そのうちのひとつで、あらゆるPHPプログラムに影響する可能性のある変更が入りました。Deprecate curly brace syntax for accessing array elements and string offsetsというRFCが投票中です。
2019/07/03投票開始、2019/07/17投票終了、受理には2/3+1の賛成が必要です。
2019/07/08時点では賛成23反対6で、おそらく受理されます。Deprecate curly brace syntax for accessing array elements and string offsets
Introduction
PHPは、配列要素と文字列オフセットへのアクセスに、角括弧と波括弧の両方を使用することができます。
    $array = [1, 2];
    echo $array[1]; // 2
    echo $array{1}; // こっちも2

    $string = "foo";
    echo $string[0]; // "f"
    echo $string{0}; // こっちも"f"
しかし、これら両方の構文のサポートは、混乱をもたらす可能性があります。
波括弧構文は角括弧構文と同じ動作ですか?
パフォーマンスに違いはありますか?
波括弧はスコープを分ける標準的な方法ですが、波括弧構文にもスコープを切る機能はありますか?
そもそも波括弧構文はどうして存在しているのですか?マニュアルにほんの少しある注釈を除いて、波括弧構文はほぼ文書化されていません。
さらに、通常の角括弧構文より機能は少なくなっています。
たとえば配列への要素の追加に波括弧を使うことはできません。$array[] = 3; echo $array[2]; // 3 $array{} = 3; // Parse error: syntax error, unexpected '}'配列の作成もできません。
$array = [1, 2]; // OK $array = {1, 2}; // Parse error: syntax error, unexpected '{'list短縮構文にも使えません。
[$one, $two] = $array; // OK

{$one, $two} = $array; // Parse error: syntax error, unexpected ','
Proposal
波括弧構文による配列と文字列オフセットへのアクセスを非推奨にします。
PHP7.4$arr = [1, 2, 3]; var_dump($arr{1}); // Warning: Array and string offset access syntax with curly braces is deprecatedDiscussion
Wasn't the curly brace syntax deprecated once before?
波括弧構文、前いちどDeprecatedにならなかったっけ?
2008年6月の議論によると、波括弧構文はPHP5.1のRC5時点では非推奨でしたが、最終リリース前に非推奨警告は削除されました。
2006年8月のPHPマニュアルには「PHP6以降廃止予定」と書かれていましたが、PHP6はなくなったのでリリースされることはありませんでした。Is the curly brace syntax valuable for differentiating string and array offset access?
波括弧構文は、文字列アクセスと配列オフセットアクセスを区別するのに役立たないかな?
重複した構文があれば、文字列アクセスと配列オフセットアクセスを区別することができます。
問題は言語によって使い分けが強制されず、どちらの構文も文字列と配列の両方に使用できることです。
その結果、あるコードベースでは文字列アクセスに常に$str[0]、配列アクセスに常に$arr{0}を使うようにすることはできますが、他のコードベースでは逆の規則になっているかもしれません。How frequently is the curly brace syntax used?
波括弧構文はどれだけ使われている?
Composerパッケージのトップ2000ライブラリについてNikitaが調べたところ、2.2k箇所で使用され、これは全ての配列アクセス888.3kのうち0.25%でした。
しかし、これは調査したパッケージが重複しているため、実体より多少多く出ています。
たとえばWordPressコアリポジトリのコピーが二つあり、それぞれが182箇所で使用しています。
使用された波括弧の92%は、トップ2000のうちわずか25リポジトリに集中していました。Will it be too much work for people to migrate code away from the curly brace syntax?
移行は大変?
パッチと一緒に移行スクリプトが公開されています。
Backward Incompatible Changes
文字列・配列に波括弧構文でアクセスすると非推奨の警告が発生するようになります。
Future Scope
PHP8もしくはその後のどこかで、波括弧構文を完全に削除します。
それ以降、波括弧構文はコンパイルエラーになります。References
・現行スレッド:https://externals.io/message/104744
・2008年6月の議論スレッド:https://externals.io/message/38153
・2005年11月の議論スレッド:https://externals.io/message/20143感想
消したいという話は14年も前から出ていたようですが、最近のPHP構文刷新の流れに乗ってついに可決されます。
色々なライブラリを見てきましたがこの書き方を見たことないですし、そもそもこの構文を知らない人も多いかもしれません。
なくなっても問題ないですね。むしろ何故存在していたのかがわからない。
このRFCでは今後の予定は決まっておらず、後の人に任された状態になっています。
素直にPHP8以降で削除されればいいのですが、このまま宙ぶらりんになると困っちゃいますね。
- 投稿日:2019-07-08T18:17:16+09:00
nginx + Laravel でホーム以外のページの404エラー解決
はじめに
前回はnginx + MySQL + Laravelの環境構築をしてトップページの表示まで行いました。さて、もりもり開発始めるぞー!と思った が矢先、、 ログイン認証してみようと思ったら404エラー。なんでや、、と頭を抱えました。ルーティングに何もおかしいところはないし、どうしたものか、と思ったのですが原因はlaravel側ではなくnginxの設定だったようです。記事書いた時にnginxわかんないなぁ〜って放置したのはダメだったようです。わからないとこはちゃんと潰しておこう。。。。修正前の元のファイル
さて、元のnginxのファイルであるdefault.confを見てみます。
default.confserver { listen 80; index index.php index.html; root /var/www/beer/public/; location / { root /var/www//beer/public; index index.html index.php; } location ~ \.php$ { try_files $uri =404; fastcgi_split_path_info ^(.+\.php)(/.+)$; fastcgi_pass php:9000; fastcgi_index index.php; include fastcgi_params; fastcgi_param SCRIPT_FILENAME $document_root$fastcgi_script_name; fastcgi_param PATH_INFO $fastcgi_path_info; } }結論から言ってしまうとこれダメダメすぎますね。数日前の自分が恥ずかしい。
記述の意味の理解と修正
まず、このファイルをディレクティブごとに読み解いていきます。
listen 80;
    index index.php index.html;
    root /var/www/beer/public/;
ここではサーバーのIPアドレスとポート番号を宣言し、そのあとに公開するディレクトリを宣言しています。
IPアドレスとポート番号は、listen IPアドレス:ポート番号のように書きます。
しかし今回はIPアドレスが記載されていませんよね。この書き方は、listen *:ポート番号と同じ意味を表しており、IPアドレスにはデフォルト値が用いられることになります。
root /var/www/beer/public/;は公開するディレクトリの宣言、
index index.php index.html;はリクエストuriが/で終わっている時にインデックスとして返されるファイルを表しています。index.phpが存在すればindex.phpを返し、存在しなければindex.htmlを返します。どちらも存在しない場合のリダイレクト先を設定したい場合は、index index.php index.html /ファイルがどちらもない場合のリダイレクト先;のようにします。locationディレクティブ
location / {
    root /var/www/beer/public;
    index  index.html index.php;
    }
さて、問題はここにありました。まずはこのlocationディレクティブについてです。
locationディレクティブではuriのパスごとの設定を記述することができます。つまりこれは、「ホスト名/ にアクセスしたら、/var/www/beer/public と言うファイルパスを返す」と言う意味になります。
rootは先ほど宣言しているものと同じ公開ディレクトリのため、宣言する必要がないので消します。また、ここでindexを指定してしまうとこの二つのファイルしか開かないという設定になってしまうので修正します。そこで、location / { try_files $uri $uri/ /index.php?$query_string; }とします。これは、「ホスト名/ にアクセスしたら、まずリクエストURIで処理、次にindex.phpで処理を試みる」という意味です。こうすることで全てのURIに対応できます。
locationディレクティブその2
location ~ \.php$ {

    try_files $uri =404;
    fastcgi_split_path_info ^(.+\.php)(/.+)$;
    fastcgi_pass php:9000;
    fastcgi_index index.php;
    include fastcgi_params;
      fastcgi_param SCRIPT_FILENAME $document_root$fastcgi_script_name;
      fastcgi_param PATH_INFO $fastcgi_path_info;
  }
try_files $uri =404;なんて記述のせいでindexの指定ファイルがなかったら404返されてたんですね。アホらしいです。大反省です。消します。残りの行ですが、これはphpの処理を行うのに必要な記述だそうです。ここの解説はまた今度(まだよくわからない)
最終的にdefault.confはこんな感じになります。
default.confserver { listen 80; root /var/www//beer/public; index index.html index.php; location / { try_files $uri $uri/ /index.php?$query_string; } location ~ \.php$ { fastcgi_split_path_info ^(.+\.php)(/.+)$; fastcgi_pass php:9000; fastcgi_index index.php; include fastcgi_params; fastcgi_param SCRIPT_FILENAME $document_root$fastcgi_script_name; fastcgi_param PATH_INFO $fastcgi_path_info; } }最後に
nginxは奥が深い。
ディレクティブの修飾子とか優先順位とかについても今度書きたいな。
参考文献
nginx実践入門
https://www.amazon.co.jp/nginx%E5%AE%9F%E8%B7%B5%E5%85%A5%E9%96%80-WEB-DB-PRESS-plus/dp/4774178667
- 投稿日:2019-07-08T16:16:43+09:00
Top 5 Databases for PHP Web Application Development
Top 5 Databases for PHP Web Application Development
PHP has turned out to be the most popular platforms for web development today. Not only websites, as well as enterprise applications like ERP, web-based based open source CRM for SMEs and e-Commerce solutions, are also quite famous today. The vast majority of us tend to think that MySQL is the only database which connects with PHP. Others are aware that PHP supports other databases but don’t know which ones. In many cases, customers are choosy about the database they would need for their usage.
This article is meant for PHP developers, web development organizations and other people who need to understand the databases which are supported by PHP. Please note that the information contained in this article may become outdated with time, however it would nevertheless be useful.
Popular Databases for PHP Web Application Development
We have attempted to list down the databases as decreasing order of use cases with PHP. Therefore database which is most popular is listed on the top and the ones which are not that popular are listed further down. We would also attempt and keep up this article as and when new databases are included.
Here is the list below
** MySQL:** No points for guessing this. MySQL stays the most popular database for PHP applications. The database is the world's most popular open source database. The enterprise version of the database is accessible too and is aTop 5 Databases for PHP Web Application Development paid one. Numerous well-known applications like SugarCRM, Magento, WordPress, and Drupal use MySQL. Big websites like Wikipedia, Facebook and Google are also its customers. The MySQL workspace database provides a web-based user interface to manage the database.
PostgreSQL: PostgreSQL was launched in 1995 and focused on compliance and standards. Compared to MySQL, it is rich and the database is currently under its Release 9.3 compared to MySQL release 5.6.
PostGrey has advanced optimization and compression features which put it in parallel with Oracle. Popular applications using PostgreSQL are OpenBravo and PostERP among others. However, PostgreSQL is believed to be a fraction slower than MySQL.
If your users are accustomed to Windows and you already have related infrastructure. you might need to utilize MS-SQL. Yet, web development using .Net and.ASP technologies may cost you more.So some customers still use PHP and connect it to MS-SQL. However, it should be noted that this works only for PHP version 5+
** SYBASE:** Founded in Berkley in 1984, SYBASE is currently part of SAP AG. Solution enterprise is a popular choice for database management.
It is also proven to perform under extreme load and is suitable where an association needs a major database. It interfaces with PHP utilizing sasql_connect() command similar to MySQL.
** IBM-DB2:** This came into existence in 1983 through the establishment work for this began in the 1970s. This was utilized widely in conjunction with mainframe systems. The database is now being utilized in numerous huge scale ERP and E-Commerce implementations. For connecting it with PHP you would require PECL extension.
Oracle Database: One of the most prevalent databases of our occasions, Oracle database is similarly well known for Windows and Linux based servers. It is hard to run over associations which don't utilize this database. For connecting with PHP applications, OCI8 extension is required. When the extension is in place oci_connect function can be utilized to interface with the database. Function oci_close() can be used to disconnect the connection.
Other supported databases
Different databases which can be connected with PHP are listed below. Some of them are proprietary and others are open source. You can get more information about them by going to their home page. This list has been arranged in alphabetical order.
Cubrid
DB++
dBase
filePro
FireBird/InterBase
FrontBase
Informix
Ingres
MaxDB
Mongo
mSQL
Obrimos SQL
Paradox
SQLite
SQLite3
SQLSRV
Tokyo Tyrant
PHP programming ideas for handling database
Some of the most proficient PHP developers treat the database as an external entity to ensure the best performance for their application. The following are the best practices we suggest
Minimize the number of selects you write in your PHP program. Try selecting the data in a single shot and filter using arrays.
Utilize fields which characterize the keys while selecting the data.
Joining more than 3 tables is not advisable.
Select just the fields that you require for processing instead of using SELECT *.
Avoid aggregate functions like SUM, AVERAGE, MAX. Use them if they are not optional and in case the database is small.
Summary of the Article
Having understood the different database choices PHP gives you can take an informed decision regarding which database you might need to use in your case. We hope that the best practices mentioned above will help you in achieving performance optimized deliverables for your client.
Want to know more about PHP, Visit website - PHP training in Chandigarh
- 投稿日:2019-07-08T11:55:05+09:00
PHP7の書き方メモ 「?型」
- 投稿日:2019-07-08T08:16:09+09:00
PHP リフレクション メモ
概要
情報工学においてリフレクション (reflection) とは、プログラムの実行過程でプログラム自身の構造を読み取ったり書き換えたりする技術のことである。
目的
自由にコンストラクタ等を扱えること
PHPメモ
(PHP 5, PHP 7)
ReflectionClass::newInstance — 指定した引数でクラスの新しいインスタンスを作成するhttps://www.php.net/manual/ja/reflectionclass.newinstance.php
(PHP 5, PHP 7)
ReflectionClass::getConstructor — クラスのコンストラクタを取得するhttps://www.php.net/manual/ja/reflectionclass.getconstructor.php
参考
オブジェクト指向的には以下のjavaの例があるため、上記PHPメモの関数に置き換えて考えれば実現可能
https://qiita.com/manahirosan/items/32da2cc9f5f03dc454ca
PHP リフレクションについて(公式)
- 投稿日:2019-07-08T08:03:57+09:00
php-master-changes 2019-07-07
今日は Azure Pipelines の設定修正、ドキュメントの更新、ビルドシステムのリファクタリングがあった!
2019-07-07
nikic: Disable jit on msan job
- https://github.com/php/php-src/commit/8e948204f971c5bf6b8eea4dfb1c8ba7a80b30a2
- Azure Pipelines の設定で、msan 有効のジョブでは JIT を無効化するよう修正
- こけ始めたので無効化することにしたけど、instrumentation 効かないので逆に何でこれまで動いてたんだみたいなのがあるみたい
nikic: Mention that zend_parse_parameters should not be tested
- https://github.com/php/php-src/commit/7514b5d91c01eee72837727e853183869a156a7f
- [7.4~]
- CONTRIBUTING.md で、ZPP のテストはもうこれ以上要らないよと追記し、
--CREDITS--セクションも git で書いた人取るので要らないよというむね追記petk: Remove some more Apache 1 left overs
- https://github.com/php/php-src/commit/49cc2a63b31f9b749f1fb3b26f568ad87c3ff17d
- [7.4~]
- ビルドシステムで、apache 1 だの 2.0 だのへ言及している古い記述を修正
petk: Remove PHP_DEBUG_MACRO
- https://github.com/php/php-src/commit/3bde4838f47c4800ac4b9efb23e320d9fdcec638
- [7.4~]
- ビルドシステムで、使われていないマクロ PHP_DEBUG_MACRO を削除
- 投稿日:2019-07-08T00:38:10+09:00
Dockerコンテナのフロントテスト環境構築(Selenium-Grid×docker-compose)
概要
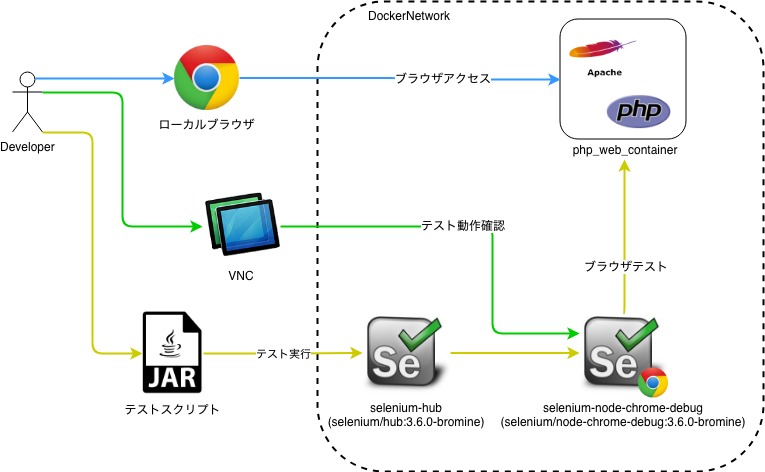
フロントエンドコンテナとSelenium-Gridコンテナをdoccker-composeで構築、連携し、ローカルDockerでフロントテストを実行
背景
・ローカルのdocker環境のフロントのテストをしたい。
・なんとなくSeleniumGridを触ってみたい。構成
▽用意するコンテナ
・フロントページのコンテナ(PHP)→以前作成したPHP×Apacheのコンテナ
・SeleniumHubコンテナ →公式イメージをそのまま使う
・SeleniumNodeコンテナ →公式イメージをそのまま使う↑に同じdocker-networkを設定、対象IPとドメイン名をhosts設定
ディレクトリ構成
front-test-env ├ php_web_container // ウェブコンテナモジュール() ├ frontTest-1.0-SNAPSHOT.jar // フロントテストスクリプト └ docker-compose.ymlversion: "3" services: web_container: container_name: php_web_container build: ./php_web_container ports: - "443:443" - "80:80" volumes: - ./php_web_container/src:/var/www/html environment: ENVIRONMENT: development extra_hosts: - "nishimu.com:127.0.0.1" networks: container_net: ipv4_address: 172.16.238.6 selenium-hub: image: selenium/hub:3.6.0-bromine ports: - "4444:4444" networks: container_net: ipv4_address: 172.16.238.7 selenium-node-chrome-debug: image: selenium/node-chrome-debug:3.6.0-bromine ports: - "0.0.0.0:32768:5900" environment: - HUB_PORT_4444_TCP_ADDR=172.16.238.7 - HUB_PORT_4444_TCP_PORT=4444 networks: container_net: extra_hosts: - "nishimu.com:172.16.238.6" # Connect 'vnc://localhost:32768/', default pass to 'secret'. networks: container_net: driver: bridge ipam: driver: default config: - subnet: 172.16.238.0/24コンテナ起動
# コンテナビルド
docker-compose build

# コンテナ起動
docker-compose up -d

# コンテナ起動確認
docker-compose ps
$ docker-compose ps
                     Name                                    Command               State                         Ports
---------------------------------------------------------------------------------------------------------------------------------------------
nishimu_containers_selenium-hub_1                 /opt/bin/entry_point.sh          Up      0.0.0.0:4444->4444/tcp
nishimu_containers_selenium-node-chrome-debug_1   /opt/bin/entry_point.sh          Up      0.0.0.0:32768->5900/tcp
php_web_container                                 /bin/sh -c /usr/sbin/httpd ...   Up      0.0.0.0:443->443/tcp, 0.0.0.0:80->80/tcp, 8000/tcp

※Web(php_web_container), Hub(nishimu_containers_selenium-hub_1), Node(nishimu_containers_selenium-node-chrome-debug_1) のコンテナが立ち上がっていることを確認
VNC起動
hostsに以下を設定
127.0.0.1 localhost
127.0.0.1 nishimu.com
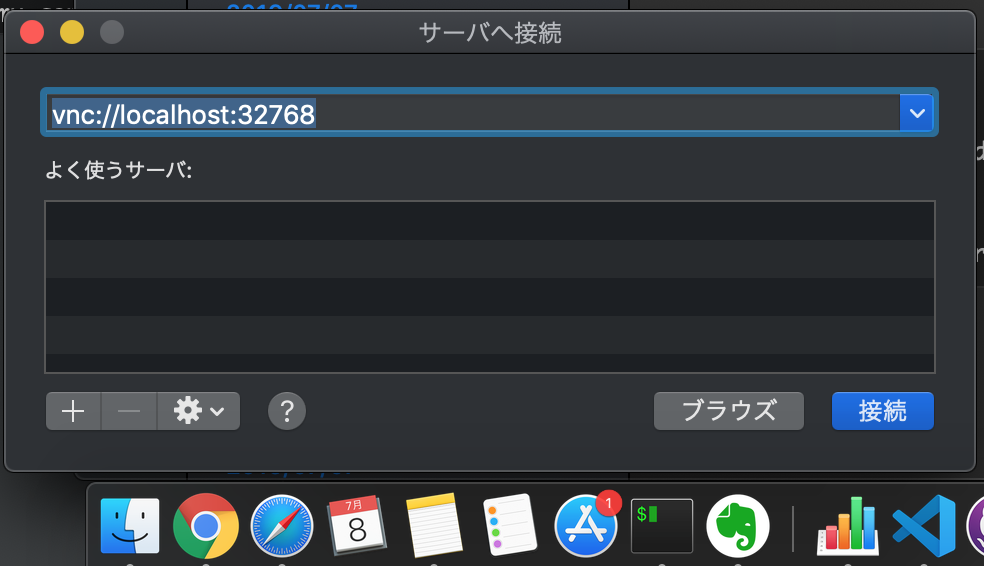
[Finder]を右クリック→[サーバへ接続]を押下 →
vnc://localhost:32768
※画面共有でnishimu_containers_selenium-node-chrome-debug_1にVNC接続テストスクリプト
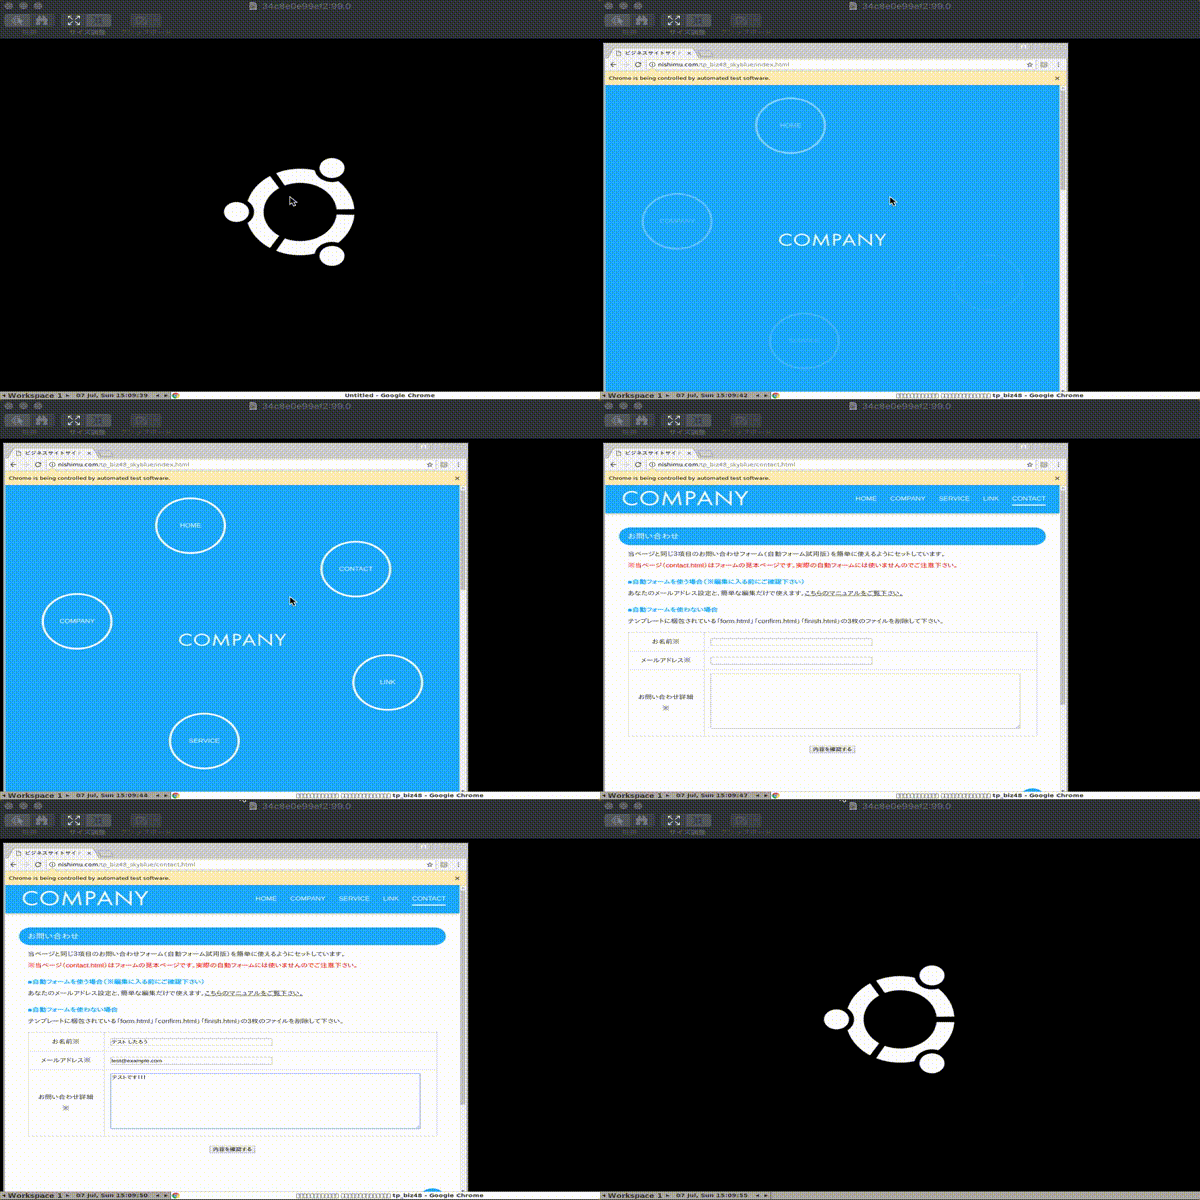
テキトーにリンクを押して、フォーム入力するスクリプトをKotlin作成。。
package com.nishimu.seleniumtest

import org.springframework.boot.autoconfigure.SpringBootApplication
import org.springframework.boot.runApplication
import org.openqa.selenium.remote.DesiredCapabilities
import org.openqa.selenium.remote.RemoteWebDriver
import java.net.URL


@SpringBootApplication
class SeleniumTestApplication

fun main(args: Array<String>) {
    runApplication<SeleniumTestApplication>(*args)

    val driver = RemoteWebDriver(URL("http://127.0.0.1:4444/wd/hub"), DesiredCapabilities.chrome())
    try {
        driver.run {

            // HOME
            get("http://nishimu.com/tp_biz48_skyblue/index.html")
            Thread.sleep(3000)
            findElementById("menu5").click()

            Thread.sleep(3000)

            // CONTACT
            findElementByName("お名前").sendKeys("テスト したろう")
            findElementByName("メールアドレス").sendKeys("test@example.com")
            findElementByName("お問い合わせ詳細").sendKeys("テストです!!!")
            Thread.sleep(3000)
            close()
            println("[INFO]:Test successfully passed!!")
        }
    } catch (e: Exception) {
        println("[ERROR]:" + e.message)
    } finally {
        driver.quit()
    }
}
実行結果


