- 投稿日:2019-07-08T22:26:55+09:00
【Kotlin】 Mock Web Server を使ったAPIユニットテストの書き方
Overview
検索ウインドウに検索キーワードを入力し、検索ボタンを押すと、API経由で画像を表示する簡単なAndroidアプリケーションを作成しました。
設計は次の図の通りです。
Viewレイヤーでは、キーワードを受け取り、ボタンのイベントが発火したら、Presenterに通知します。
Presenterレイヤーでは、Viewから渡されたキーワードをパラメーターに、ServiceレイヤーのAPIメソッドを呼び出します。
Serviceレイヤーでは、外部のAPI(https://api.unsplash.com)から画像のURIを取得します。
APIの結果に応じて、Presenterが持っているデータソースを更新します。
Presenterは、データソースの更新をViewに通知し、Viewをアップデートさせます。
Serviceレイヤーのユニットテストに、okhttp3のMockWebServerを使いました。
その際にちょっと詰まったので、使い方を残します。
必要な設定
1. ライブラリの導入
これらをモジュールのbuild.gradleに追加します。
androidTestImplementation 'com.squareup.okhttp3:mockwebserver:4.0.0'
androidTestImplementation 'com.android.support.test:runner:1.0.2'
2. 設定
2.1 ネットワークパーミッションの追加
AndroidManifest.xmlに、ネットワークのパーミッションを追加します。
<uses-permission android:name="android.permission.INTERNET" />2.2 localhostとの通信を許可
localhostとの通信を許可するために、AndroidManifest.xmlのapplicationに次の設定を追加します。
<application
  ...
  android:usesCleartextTraffic="true"
  ...>
(option) 2.3 testInstrumentRunnerの設定
モジュールのbuild.gradle内の
testInstrumentationRunnerが
"android.support.test.runner.AndroidJUnitRunner"になっている場合は、"androidx.test.runner.AndroidJUnitRunner"に変更します。これは、サポートするテストフレームワークに依存します。詳細はこちら。
ここまでできたら、一度リビルドします。
3. テストファイルの作成
テスト対象となるクラス(今回はserviceクラス)をcmd+shift+tで、テストファイルを作ります。
今回は
androidのJUnitRUnnerを使うのでandroidTest以下に追加します。4. テストの作成
mock web server を使うには、大きく4つのステップがあります。
- mockサーバー立てる
- レスポンスのインスタンスを作成する
- mockサーバーにインスタンスをenqueueする
- エンドポイントを叩く
順に解説します。
4.1 mockサーバーのインスタンスを作成する
テストクラスのコンストラクタ内で、モックサーバーをインスタンスを生成します。
private val webServer = MockWebServer()@Beforeなどで、モックサーバーをlisten状態にします。
webServer.start(8080)これで、localhost:8080で、モックサーバーが待ち受けている状態になります。
4.2 レスポンスのインスタンスを作成する。
MockResponse()で、レスポンスクラスを生成します。private val successResponse = MockResponse().apply { setResponseCode(200) setHeader("Content-Type", "application/json") setHeader("Server", "Cowboy") setBody(sampleSuccessResponseData) } private val failResponse = MockResponse().apply { setResponseCode(401) setHeader("Content-Type", "application/json") setBody(sampleFailedResponseData) } private val sampleSuccessResponseData = """ { "hoge": "fuga" } """.trimIndent() private val sampleFailedResponseData = """ { "err": "unauthorized" } """.trimIndent()setResponseCodeで、レスポンスコードを設定できます。
setHeaderで、ヘッダーを設定できます。
setBodyで、レスポンスボディを設定できます。
4.3 mockサーバーにレスポンスをenqueueする
webServer.enqueue(successResponse)
webServer.enqueue(failResponse)
アクセスの度に、1つずつレスポンスがdequeueされます。
4.4 エンドポイントを叩く
Serviceクラスに、エンドポイントをセットします。
私の場合、RetroFit2.0を使っていたので、次のようにしました。
object UnsplashService {

    var END_POINT = "https://api.unsplash.com/"

    fun getImageURL(completion: <コールバック処理>, query: String) {
        Retrofit
            .Builder()
            .baseUrl(END_POINT)
            .addConverterFactory(GsonConverterFactory.create())
            .build()
            .create(UnsplashAPI::class.java)
            .getImage(query)
            .enqueue(<コールバック処理>)
    }

    fun setEndPoint(url: String) {
        END_POINT = url
    }
}
setEndPointメソッドを生やしておいて、testするときは、UnsplashService.setEndPoint("http://localhost:8080")として、モックサーバーを叩くように変更しました。
また、テスト処理の後にはサーバーを落とすようにした方が、お行儀がいいみたいです。
@After
fun cleanUp() {
  webServer.shutdown()
}
補足
モックサーバーに送られてきたリクエストが正しいかどうかをテストしたい場合は、以下のようにしてリクエストを取り出すことができます。
webServer.takeRequest().headers[<ヘッダー名>]
- 投稿日:2019-07-08T18:43:15+09:00
【Android】SDカードに保存する
この記事は
AndroidでSDカードに何かを保存したい
使うものは
使わないものは
- getExternalDirectoryとか
まずコード
SDカードへのアクセス権限をユーザに求めるprivate fun requestSecondaryStorageAccess() { val sm = getSystemService(STORAGE_SERVICE) as StorageManager sm.storageVolumes.find { storageVolume -> storageVolume.isRemovable }.let { val intent = it.createAccessIntent(null) startActivityForResult(intent, REQUEST_SDCARD_ACCESS) } }権限付与されたURIをごにょごにょするoverride fun onActivityResult(requestCode: Int, resultCode: Int, data: Intent?) { super.onActivityResult(requestCode, resultCode, data) if (requestCode == REQUEST_SDCARD_ACCESS && resultCode == RESULT_OK) { data?.data?.let { contentResolver.takePersistableUriPermission( it, Intent.FLAG_GRANT_READ_URI_PERMISSION or Intent.FLAG_GRANT_WRITE_URI_PERMISSION ) val outUri = DocumentFile.fromTreeUri(this, it)?.createFile("text/plain", "sample")?.uri outUri?.let{ contentResolver.openOutputStream(it)?.use{ it.write("hoge".toByteArray()) } } } }細かく
    val sm = getSystemService(STORAGE_SERVICE) as StorageManager
    sm.storageVolumes.find { storageVolume -> storageVolume.isRemovable }.let {
        val intent = it.createAccessIntent(null)
        startActivityForResult(intent, REQUEST_SDCARD_ACCESS)
    }
- StorageManagerのgetStorageVolumes()で、利用可能な全てのStorageVolumeを取得し、isRemovable()で取り外し可能であることをチェックする(=SDカードである)
- SDカードであるStorageVolumeに対してcreateAccessIntent(null)でディレクトリアクセス権を要求するIntentを生成し、発行する
- createAccessIntentの引数にnullを与えるとルート権限、その他色々指定できる
- Android Q非対応(後述)
    data?.data?.let {
        contentResolver.takePersistableUriPermission(
            it,
            Intent.FLAG_GRANT_READ_URI_PERMISSION or Intent.FLAG_GRANT_WRITE_URI_PERMISSION
        )
- ユーザがアクセス権限を与えたディレクトリのUriがdataに格納される
- このUriはそのままだと揮発するが、ContentResolverのtakePersistableUriPermissionでシステムにUriを覚えさせておくことが可能
- 端末を再起動するまで有効。一度覚えると再度ユーザに権限許可を求めずRESULT_OKが返される。
    val outUri = DocumentFile.fromTreeUri(this, it)?.createFile("text/plain", "sample")?.uri
    outUri?.let{
        contentResolver.openOutputStream(it)?.use{
            it.write("hoge".toByteArray())
        }
    }
- DocumentFileのfromTreeUriで「アクセス許可されたUri」からDocumentFileオブジェクトを生成
- この場合、SDカードのルートディレクトリを指す
- DocumentFileのcreateFileでmimeTypeとfilenameを指定してDocumentFileを生成し、Uriを取得
- 新ファイルのoutputStreamを生成し、hogeと書き込んだ
Android Q
createAccessIntentがDeprecatedとなった。
余計なことしやがって!ディレクトリピッカーを開いてユーザに権限を付けてもらうval intent = Intent(Intent.ACTION_OPEN_DOCUMENT_TREE) startActivityForResult(intent, REQUEST_OPEN_DOCUMENT)
- SDカードの権限を付けますよ~という方法が封じられ、ユーザがディレクトリを指定することが必要になった。
- 因みにAndroidQでは見送られたが、来年(=2020?)にはSAFに完全移行しないとファイル周りは使えなくなるらしい。どこかに書いてあったけどソースは忘れました。ごめんなさい。
- 投稿日:2019-07-08T18:38:47+09:00
CircleCI での Firebase Test Lab ロボテスト自動化
CircleCI で Android の
apkをビルドしたときに、 Firebase Test Lab にテストを投げたいときのやりかたです。大体は CircleCI 公式ページの https://circleci.com/docs/2.0/language-android/#testing-with-firebase-test-lab に載ってる流れです。
概要
- ビルドされた
apkをgcloudコマンドを使って投げ- 結果が出力されるまで待つ
- 結果が Google Cloud Storage バケットに保存される
- 結果をバケットから取り出して Artifact として保存
という流れになります。
CircleCI の Android ビルド用の イメージには Test Lab の実行に必要な
gcloudコマンドが入ってるので
これを使っている場合は別のイメージを使ったりする必要はないです。通常のビルドで使ってるconfig.ymlに、
Test Lab に送るジョブを追加すれば OK です。前提
まずリリースビルドを行う job がこういう感じだったとします:
.circleci/config.ymljobs: buildRelease: <<: *defaults steps: - attach_workspace: at: ~/code - deploy: name: Build Release Apk command: ./gradlew :app:assembleRelease - store_artifacts: path: app/build/outputs/apk/ - persist_to_workspace: root: ~/code paths: - app/build/outputs/apk後に別ジョブで Test Lab に
apkを送れるように
ここでpersist_to_workspaceをして、ビルドした apk をワークスペースで共通に参照できるようにしておくことが必要です。Test Lab のジョブを追加
次に Test Lab でテストするジョブを追加します:
.circleci/config.ymljobs: runRoboTest: <<: *defaults steps: - attach_workspace: at: ~/code - run: name: Authorize with gcloud command: | echo ${GCLOUD_SERVICE_KEY} | sudo gcloud auth activate-service-account --key-file=- sudo gcloud --quiet config set project ${GOOGLE_PROJECT_ID} - run: name: Invoke Robo Test on Firebase Test Lab command: > sudo gcloud firebase test android run \ --app app/build/outputs/apk/release/app-release.apk \ --type robo \ --device model=hwALE-H,version=21,locale=ja,orientation=portrait \ --device model=j1acevelte,version=22,locale=ja,orientation=portrait \ --device model=shamu,version=23,locale=ja,orientation=portrait \ --device model=lucye,version=24,locale=ja,orientation=portrait \ --device model=sailfish,version=25,locale=ja,orientation=portrait \ --device model=sailfish,version=26,locale=ja,orientation=portrait \ --device model=walleye,version=27,locale=ja,orientation=portrait \ --device model=walleye,version=28,locale=ja,orientation=portrait \ --results-bucket cloud-test-${GOOGLE_PROJECT_ID} \ --timeout 5m - run: name: Collect Artifacts command: | sudo pip install -U crcmod sudo mkdir test_lab_results sudo gsutil \ -m cp \ -r -U `sudo gsutil ls gs://cloud-test-${GOOGLE_PROJECT_ID} | tail -1` test_lab_results/ \ | true - store_artifacts: path: test_lab_results/認証してテストを実行し、結果を Artifacts として保存するジョブです。
ここで
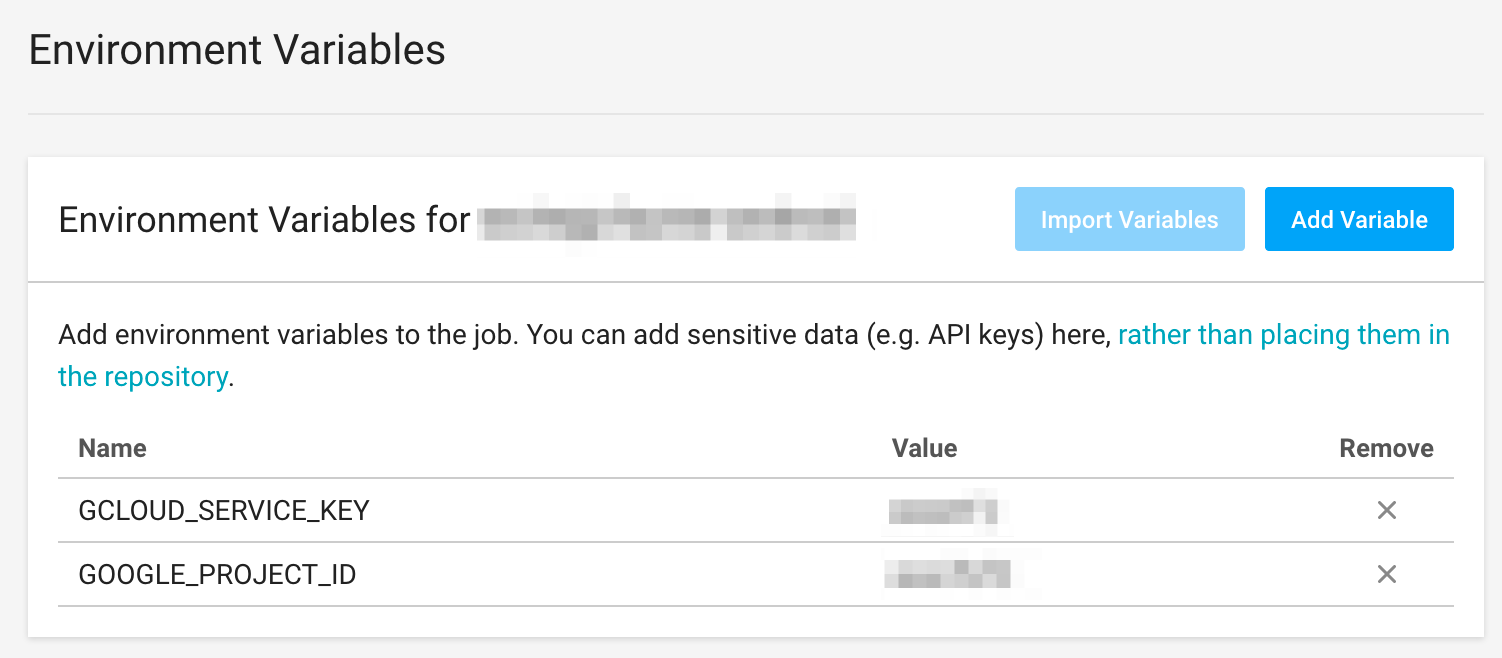
${GCLOUD_SERVICE_KEY}やら${GOOGLE_PROJECT_ID}ならの謎の環境変数が登場していますね。これはあらかじめ、認証情報として Firebase の認証鍵の JSON と Google Cloud Platform のプロジェクト ID を
CircleCI のプロジェクト環境変数にコンソールから設定しておく必要があります:
GOOGLE_PROJECT_IDは GCP のプロジェクト ID を、GCLOUD_SERVICE_KEYには認証情報の JSON を入れます。あとは Google Developer Console で
Cloud Testing APIとCloud Tools Results APIを有効にしておきましょう:結果
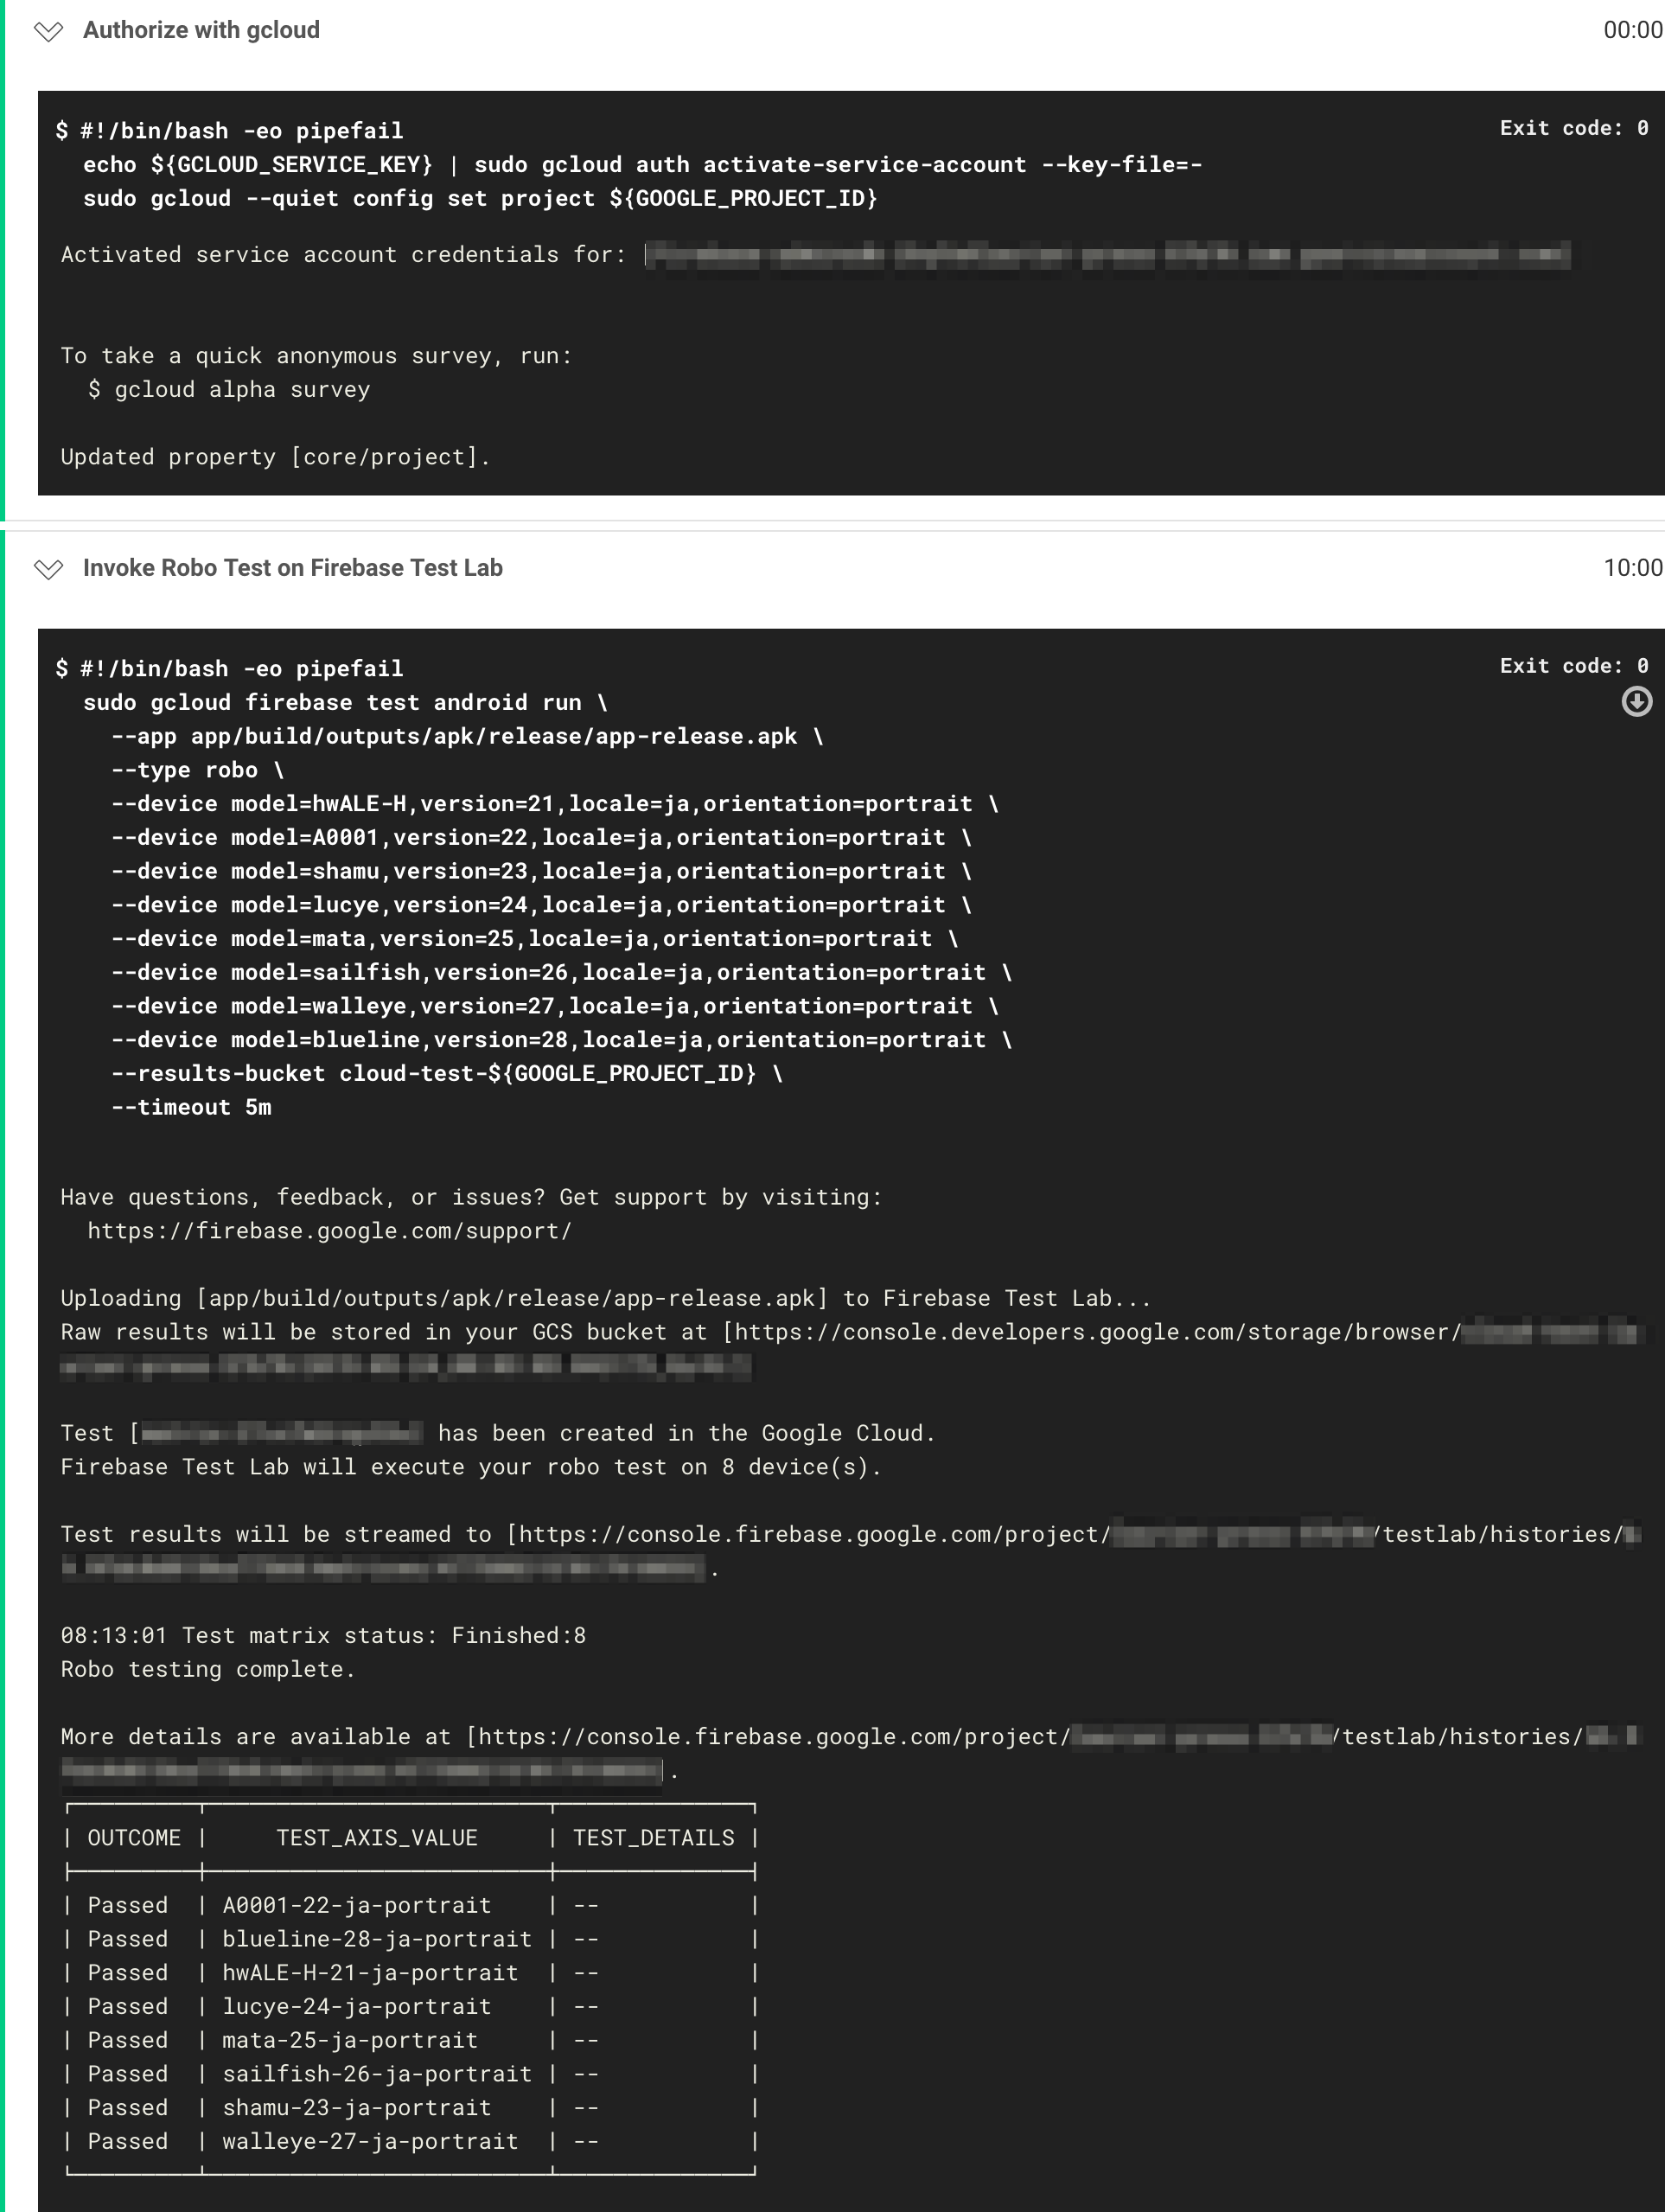
ひととおり設定が終わったら、ビルドを走らせてみます:
認証を行ってから Test Lab を実行するジョブが走っていることが確認できますね。
実行中でもジョブのログに記載されている Firebase Test Lab の詳細ページで確認することができます
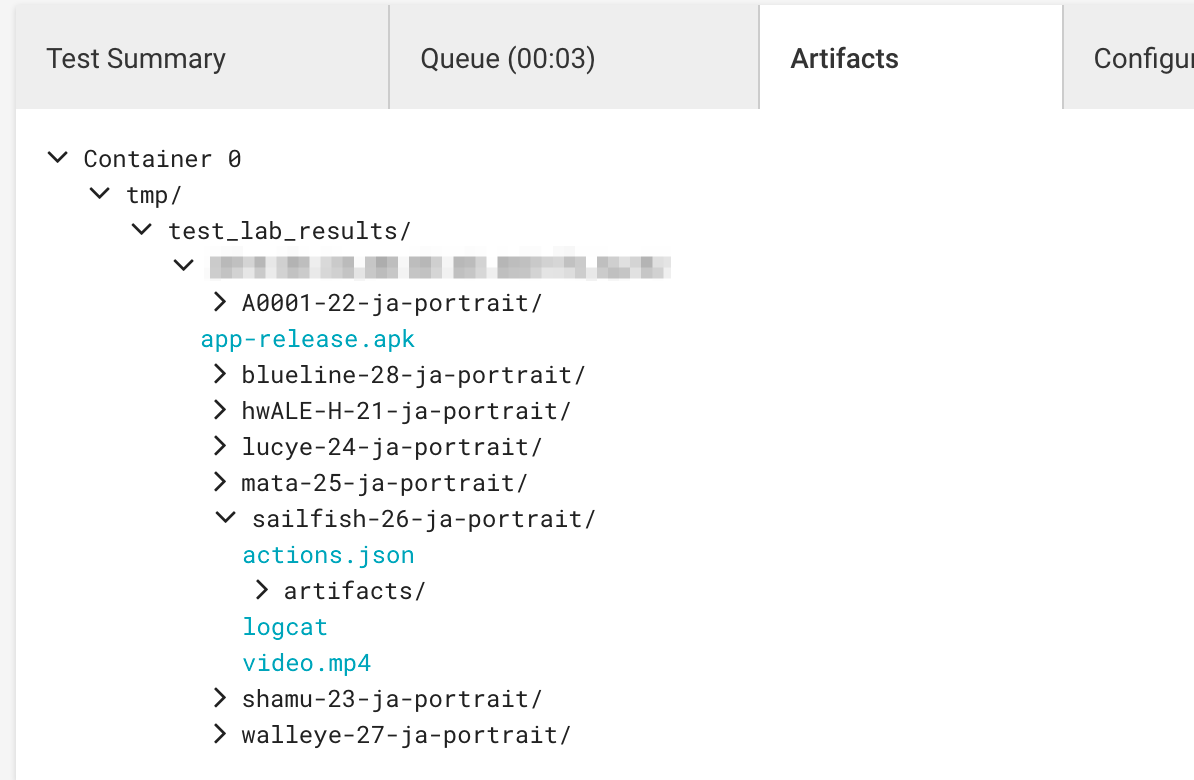
(Test results will be streamed to [...]で示された URL です)。テスト終了後の結果は詳細ページに加えて、Artifacts としても保存されます:
注意点
Test Lab のジョブのコマンドのうち
--device model=<MODEL_ID>,... --device model=<MODEL_ID>,...の部分でテスト対象のデバイスを複数指定できますが、ここの
MODEL_IDの確認方法はgcloud firebase test android models listコマンドで取得できるMODEL_IDです。たとえば Pixel 2 でも、物理デバイスの
MODEL_IDはwalleyeで、仮想デバイスのほうはPixel2だったりします。Pixel2だろうと決めてかかったら、このコマンドの結果を見ないと絶対わからないので注意です。
gcloudまわりの使い方については https://firebase.google.com/docs/test-lab/android/command-line を参照するのがいいでしょう。テストに時間がかかったり、謎に失敗する端末もあるので、ここは一度試して試行錯誤する必要がありそうです。
- 投稿日:2019-07-08T14:29:23+09:00
TensorFlowLiteで1枚の画像の物体認識するたぶん最小構成 for Android
はじめに
前にTensorFlow Mobileでの物体認識はやったんですが、今やるならTensorFlowLiteでしょうということでやってみた
検証環境
- Android Studio 3.2.1
- CompileSdkVersion:28
- MinSdkVersion:18
- TargetSdkVersion:28
- TensorFlowLite
プロジェクト作成
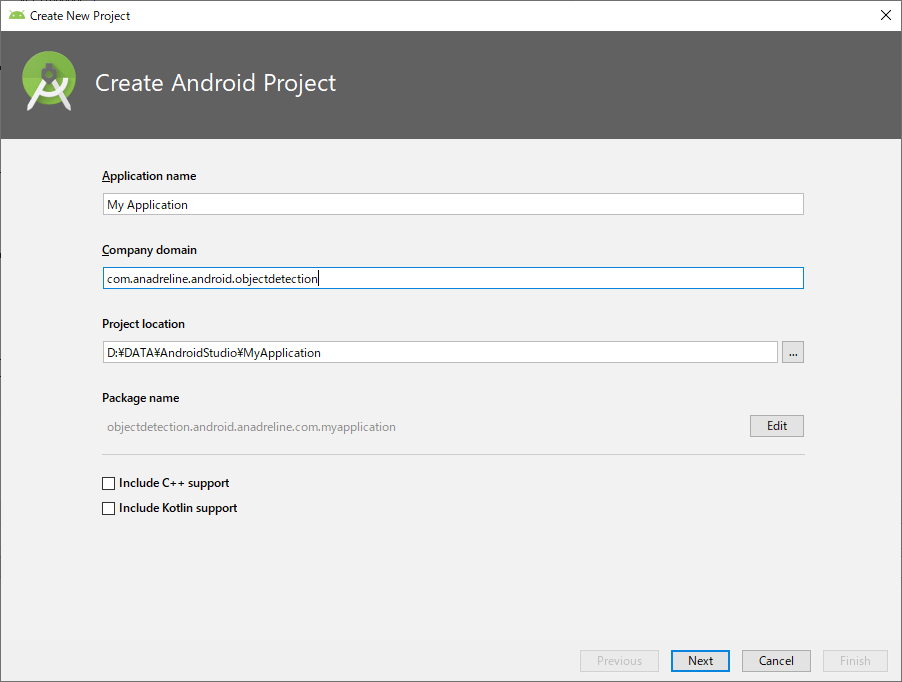
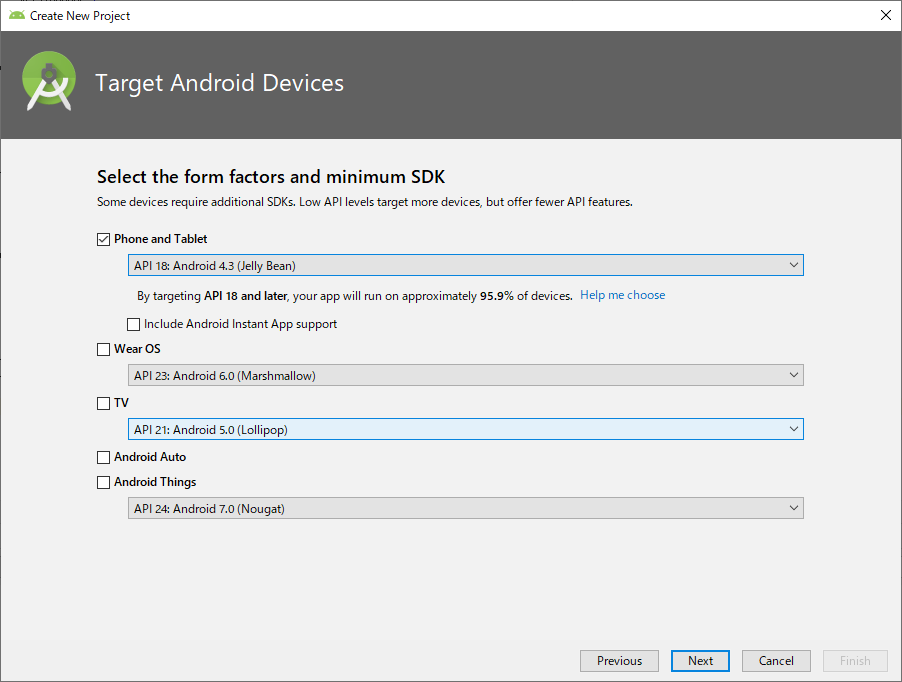
まずはプロジェクトの作成お好きなプロジェクト名で
minumum SDKはAPI 18未満だとエラーが出るんで、18以上を選択
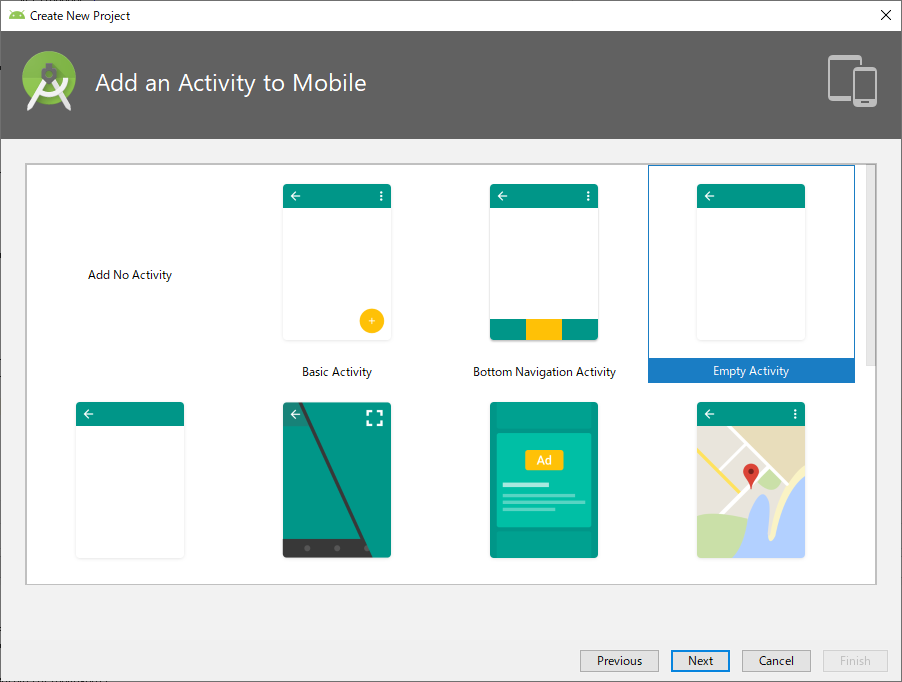
初期Activityは何でもいいですが、ここでは最小構成ということでEmpty Activity
build.gradleの設定
build.gradle(app)apply plugin: 'com.android.application' android { compileSdkVersion 28 defaultConfig { applicationId "com.anadreline.android.peopleaicounter" minSdkVersion 18 targetSdkVersion 28 versionCode 1 versionName "1.0" testInstrumentationRunner "android.support.test.runner.AndroidJUnitRunner" } buildTypes { release { minifyEnabled false proguardFiles getDefaultProguardFile('proguard-android.txt'), 'proguard-rules.pro' } } aaptOptions { noCompress "tflite" } } dependencies { implementation fileTree(dir: 'libs', include: ['*.jar']) implementation 'com.android.support:appcompat-v7:28.0.0' implementation 'com.android.support.constraint:constraint-layout:1.1.3' implementation 'org.tensorflow:tensorflow-lite:0.0.0-nightly' implementation 'org.tensorflow:tensorflow-lite-gpu:0.0.0-nightly' testImplementation 'junit:junit:4.12' androidTestImplementation 'com.android.support.test:runner:1.0.2' androidTestImplementation 'com.android.support.test.espresso:espresso-core:3.0.2' }ポイントは2つだけ
TensorFlowLiteの依存設定と
implementation 'org.tensorflow:tensorflow-lite:0.0.0-nightly'
implementation 'org.tensorflow:tensorflow-lite-gpu:0.0.0-nightly'
tfliteファイルを圧縮させないためのnoCompress設定
aaptOptions {
noCompress "tflite"
}認識関連クラス
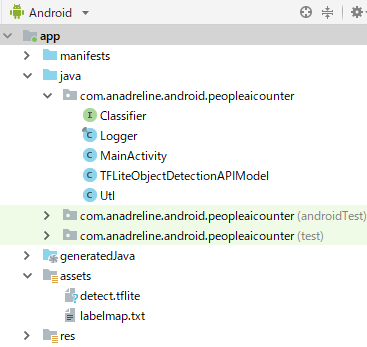
公式のサンプルからClassifier.javaとTensorFlowObjectDetectionAPIModel.javaとLogger.javaの3つ
それにassetsフォルダに公式サイトのモデルファイル(detect.tflite)とラベルファイル(label_map.txt)を入れますレイアウト
あとは画像選択させるためMainActivityにボタンを設置してー
activity_main.xml<?xml version="1.0" encoding="utf-8"?> <android.support.constraint.ConstraintLayout xmlns:android="http://schemas.android.com/apk/res/android" xmlns:app="http://schemas.android.com/apk/res-auto" xmlns:tools="http://schemas.android.com/tools" android:layout_width="match_parent" android:layout_height="match_parent" tools:context=".MainActivity"> <Button android:layout_width="wrap_content" android:layout_height="wrap_content" android:text="Detect" android:onClick="onClick" app:layout_constraintBottom_toBottomOf="parent" app:layout_constraintLeft_toLeftOf="parent" app:layout_constraintRight_toRightOf="parent" app:layout_constraintTop_toTopOf="parent" /> </android.support.constraint.ConstraintLayout>物体認識
最後に画像を取得して認識する処理を作成して完成
MainActivity.javapackage com.anadreline.android.objectdetection; import android.content.Intent; import android.graphics.Bitmap; import android.graphics.Canvas; import android.graphics.Paint; import android.graphics.Rect; import android.net.Uri; import android.os.Build; import android.os.Bundle; import android.support.v7.app.AppCompatActivity; import android.util.Log; import android.view.View; import android.widget.Toast; import java.io.IOException; import java.util.List; public class MainActivity extends AppCompatActivity { private static final int TF_OD_API_INPUT_SIZE = 300; private static final boolean TF_OD_API_IS_QUANTIZED = true; private static final String TF_OD_API_MODEL_FILE = "detect.tflite"; private static final String TF_OD_API_LABELS_FILE = "file:///android_asset/labelmap.txt"; private final int REQUEST_FILE = 1; private final int REQUEST_CAMERA = 2; @Override protected void onCreate(Bundle savedInstanceState) { super.onCreate(savedInstanceState); setContentView(R.layout.activity_main); } public void onClick(View view) { Intent intentGallery; if (Build.VERSION.SDK_INT < 19) { intentGallery = new Intent(Intent.ACTION_GET_CONTENT); intentGallery.setType("image/*"); } else { intentGallery = new Intent(Intent.ACTION_OPEN_DOCUMENT); intentGallery.addCategory(Intent.CATEGORY_OPENABLE); intentGallery.setType("image/*"); } startActivityForResult(intentGallery, REQUEST_FILE); } @Override protected void onActivityResult(int requestCode, int resultCode, Intent data) { super.onActivityResult(requestCode, resultCode, data); if (resultCode == RESULT_OK) { Uri resultUri = data.getData(); if (resultUri == null) { return;} Bitmap image = Utl.decodeUri(this, resultUri, 1200, 0); int height = image.getHeight(); int width = image.getWidth(); Bitmap crop = Bitmap.createBitmap(TF_OD_API_INPUT_SIZE, TF_OD_API_INPUT_SIZE, Bitmap.Config.ARGB_8888); Canvas canvas = new Canvas(crop); canvas.drawBitmap(image, new Rect(0, 0, width, height), new Rect(0, 0, TF_OD_API_INPUT_SIZE, TF_OD_API_INPUT_SIZE), new Paint()); try { Classifier detector = TFLiteObjectDetectionAPIModel.create( getAssets(), TF_OD_API_MODEL_FILE, TF_OD_API_LABELS_FILE, TF_OD_API_INPUT_SIZE, TF_OD_API_IS_QUANTIZED); final List<Classifier.Recognition> results = detector.recognizeImage(crop); for (final Classifier.Recognition result : results) { Log.v("Detect", "Title:" + result.getTitle()); Log.v("Detect", "Confidence:" + result.getConfidence()); Log.v("Detect", "Location:" + result.getLocation()); } } catch (final IOException e) { e.printStackTrace(); Toast toast = Toast.makeText(getApplicationContext(), "Classifier could not be initialized", Toast.LENGTH_SHORT); toast.show(); finish(); } } } }ここでのポイントは認識クラスに投げる画像は決められたサイズにする必要があること
上記のこのへんで変形してますMainActivity.java//TF_OD_API_INPUT_SIZE=300; Bitmap crop = Bitmap.createBitmap(TF_OD_API_INPUT_SIZE, TF_OD_API_INPUT_SIZE, Bitmap.Config.ARGB_8888); Canvas canvas = new Canvas(crop); canvas.drawBitmap(image, new Rect(0, 0, width, height), new Rect(0, 0, TF_OD_API_INPUT_SIZE, TF_OD_API_INPUT_SIZE), new Paint());以上TensorFlowLiteによる物体認識のたぶん最小構成

