- 投稿日:2019-07-08T23:50:02+09:00
JavaFX ボタンとラベル
Main.javaimport javafx.application.Application; import javafx.fxml.FXMLLoader; import javafx.scene.Parent; import javafx.scene.Scene; import javafx.stage.Stage; public class Main extends Application { @Override public void start(Stage primaryStage) throws Exception{ Parent root = FXMLLoader.load(getClass().getResource("sample.fxml")); primaryStage.setTitle("Hello World"); primaryStage.setScene(new Scene(root, 300, 275)); primaryStage.show(); } public static void main(String[] args) { launch(args); } }Contololler.javapackage sample; import javafx.scene.control.Button; import javafx.scene.control.Label; public class Controller { public Button btn01; public Label lb01; public void onButtonClicked() { String string; string = "Button clicked"; lb01.setText(string); } }sample.fxml<?xml version="1.0" encoding="UTF-8"?> <?import javafx.scene.control.Button?> <?import javafx.scene.control.Label?> <?import javafx.scene.layout.GridPane?> <GridPane alignment="center" hgap="10" vgap="10" xmlns="http://javafx.com/javafx/8.0.172-ea" xmlns:fx="http://javafx.com/fxml/1" fx:controller="sample.Controller"> <Button fx:id="btn01" mnemonicParsing="false" onAction="#onButtonClicked" text="Button" GridPane.columnIndex="1" GridPane.rowIndex="1" /> <Label fx:id="lb01" prefHeight="17.0" prefWidth="86.0" text="Label" /> </GridPane>Mainでボタンをつけなくてよい
ボタンをおすとラベルがかわる
- 投稿日:2019-07-08T23:06:20+09:00
JAVAFX コンボボックス
アンカーペインにコンボボックス入れた図
sample.fxml<?xml version="1.0" encoding="UTF-8"?> <?import javafx.scene.control.ComboBox?> <?import javafx.scene.layout.AnchorPane?> <?import javafx.collections.FXCollections?> <?import java.lang.String?> <AnchorPane maxHeight="-Infinity" maxWidth="-Infinity" minHeight="-Infinity" minWidth="-Infinity" prefHeight="400.0" prefWidth="600.0" xmlns:fx="http://javafx.com/fxml/1"> <ComboBox layoutX="36.0" layoutY="50.0" prefWidth="150.0" > <items> <FXCollections fx:factory="observableArrayList"> <String fx:value="項目1" /> <String fx:value="項目2" /> <String fx:value="項目3" /> <String fx:value="項目4" /> <String fx:value="項目5" /> </FXCollections> </items> </ComboBox> </AnchorPane>FXMLでコンボボックスの中身を書くことができる
- 投稿日:2019-07-08T23:00:12+09:00
Java Servlet LifeCycle Example
If you are all set to attend an interview related to J2EE/Java Web application development then, it is recommended to brush up this important concept.I witnessed this question in telephonic round interview. Today I am documenting it for future reference and for others.
What is Servlet ?: A Servlet is a Java program that runs within a servlet container. Servlets receive and respond to requests from Web clients. Servlets could in principle communicate over any client–server protocol, but they are most often used with the HTTP protocol. Thus "servlet" is often used as shorthand for "HTTP servlet". As every object is having a life-cycle so as of servlet instance.
The life-cycle of a servlet is controlled by the container in which the servlet has been deployed. Life cycle of servlet can be broadly divided into three stages :
1. Initialization stage - init() - Executed only once
2. Service stage - service() - For each request
3. Destroy stage. - destroy() - Executed only once
We can represent all three method executing in servlet container as follows :
1. Initialization phase: In this stage web-container initializes the servlet instance by calling the init() method and ONE instance per JVM for each servlet is created. It is important to note that the init() method can be invoked in either of two ways :
1. On-demand basis - On arrival of a first HTTP request for the given servlet.
On Servlet container start: - When servlet container start,it reads the web.xml ,finds the declared servlets in the classpath and if is configured with an integer value 0 or more then for the given servlet one instance of that servlet will be created and are stored in memory and reused every time the request arrives. (Always remember REUSED !!).Sample code for servlet config of load-on-startup:
controlServlet
//Mapping details …..
1
Note : load-on-startup can specify an (optional) integer value. If the value is greater than 0, it indicates an order for servlets to be loaded, servlets with higher numbers get loaded after servlets with lower numbers.
Please note, init(ServletConfig) is being called by the servlet container to indicate a servlet that the servlet is being placed into service.We can override this init() method .
public void init(ServletConfig config) throws ServletException
{
//some initialization - like getting database connection,
// resource management etc.
}
hERE is a visual explanation of Instantiation phase, in layman terminology.
Notes :
init() is not the entry point of a servlet. servlet constructor is executed before execution of init() but it is not recommended to use constructor for any Servlet.
The container would decide how many instances of servlet would be instantiated upfront to cater the requests.This is container implementation..(Confused !! But it's fact)Service phase : In this stage for every new request a new thread is created or allocated from a pool to invoke that servlet instance which was created in earlier stage . The HttpRequest and HttpResponse objects will be new for each new request.
GET response");
One commonly asked question in interview : How HTTP request coming from web client is served by servlet ?
On request arrival web container(servlet container) calls service() method of servlet and the service() method determines the kind of request and calls the appropriate method (doGet() or doPost() for handling the request and sends response to the client using response object. Lets consider following code blocks:
public class SimpleHttpServlet extends HttpServlet {
protected void doGet( HttpServletRequest request,
HttpServletResponse response)
throws ServletException, IOException {
response.getWriter().write("
}
protected void doPost( HttpServletRequest request,
HttpServletResponse response)
throws ServletException, IOException {
response.getWriter().write("GET/POST response");
}
}
HttpServlet(javax.servlet.http.HttpServle) class reads the HTTP request(coming from client), and determines if the request is an HTTP GET, POST, PUT, DELETE, HEAD etc. and calls one the corresponding method.
Notes :
It is important to note that each request is served by a new thread if and only if our servlet is not implementing SingleThreadModel interface. It is not recommended to use SingleThreadModel interface.
Is servlet threadsafe ? Answer is : No, but we can make by it thread-safe by following some standard so that it can serve multiple request in thread safe manner.Destroy phase : When a servlet is unloaded by the servlet container, its destroy() method is called. It is executed only once in servlet life cycle. A servlet is unloaded by the container if the container shuts down, or if the container reloads the whole web application at run-time.
Related blog:
- 投稿日:2019-07-08T20:22:09+09:00
Eclipseでフォーマット機能を指定箇所だけオフ
Eclipse IDE for Enterprise Java Developers 2019-06 (4.12.0)で確認。
Window -> Preferences -> Java -> Code Style -> Formatter -> Edit -> Off/On Tagsを開いてEnable Off/On tagsにチェックを入れる。
ソースコードで、フォーマットのOFF開始が
//@formatter:off、ONで再開させるのに//@formatter:onを使用する。以下のような感じ。//@formatter:off list .stream() .filter(s -> s.endsWith(".txt")) .map(s -> NumberUtils.toInt(s)) .collect(Collectors.toList()); //@formatter:on
- 投稿日:2019-07-08T19:25:41+09:00
Eclipseのマニアックな保存アクション
Eclipseのマニアックな保存アクション
Eclipseの保存アクションで、importの編成とか、ソースの整形辺りは使う人も多いかと思います。
が、Eclipseの保存アクションには他にも追加アクションが用意されています。
中々面白いものもあるので、紹介していきたいと思います。どこから設定するか
設定>Java>エディタ>保管アクション>追加アクション>構成
から設定できます。forループを拡張forループに変更する
こんな感じです。
        String[] a = { "hoge", "fuga", "piyo" };
        for (int i = 0; i < a.length; i++) {
            String s = a[i];
            System.out.println(s);
        }
///変換後
        for (String s : a) {
            System.out.println(s);
        }
i をループ内で利用している場合や、i=0から始まらない場合などは変換しない中々頭の良いやつです。
が、絶妙に残念なことにListなどについては変更してくれません。確かに拡張forループに渡せるものはIterableの継承クラスなので、
厳密には配列のような単純変換をして100%挙動を保証は出来ません。ただ、今更配列を使ってforループを回す機会なんてほとんどないので、多分設定してもほとんど役に立つことはないでしょう。悲しい。
関数型インターフェースインスタンスに変換
javaのラムダ式は匿名クラスと相互変換できますが、
これをsaveAction時にどちらかに統一する設定です。使うとしたらラムダ式に変換の方でしょうか。
ただ、「匿名クラスを使用」の方を選択した上で、StreamAPIをガリガリ使っているコードで
SaveActionを起こすとコードが一気に増殖して見た目的に楽しいです。
PredicateとかConsumerとかBiFunctionとか普段意識せずに書いている無名クラスがたくさん見られます。
実用性があるのかと言われると皆無ですが。不要なコード>冗長な型変数を除去
変数をnewした場合などの型宣言で、自動的にダイヤモンド演算子を使ってくれます。
ここまで実用性に乏しい機能ばかり紹介してきましたが、
これはそれなりに使えるかと思います。
EclipseのコードアシストはList<String> l = new ArrLi//ここでコードアシストを使うと List<String> l = new ArrayList<String>();//こうなるこんな感じにダイヤモンド演算子を使ってくれませんが、これをONにしておくとSaveActionで消してくれます。
(どうせなら最初からやれと言いたいところですが)
- 投稿日:2019-07-08T18:25:03+09:00
Spring Retry の include, exclude, ExhaustedRetryException の挙動を確認する
概要
- Spring Boot + Spring Retry によるサンプルプログラムで挙動を確認する
- @Retryable アノテーションにてリトライ対象の例外を include で指定する
- @Retryable アノテーションにてリトライ対象ではない例外を exclude で指定する
- @Recover で捕捉できない例外がある場合に ExhaustedRetryException が発生するのを確認する
サンプルプログラムのソースコード一覧
├── pom.xml
└── src
    └── main
        └── java
            └── info
                └── maigo
                    └── lab
                        └── sample
                            └── retry
                                └── exhausted
                                    ├── HogeApplication.java
                                    ├── HogeController.java
                                    ├── HogeException.java
                                    ├── HogeHogeException.java
                                    └── HogeService.java
動作確認環境
- macOS Mojave
- OpenJDK 11.0.2
- Spring Boot 2.2.0 M4
- Spring Retry 1.2.4
Maven のビルド用ファイル pom.xml
今回は Maven でビルドを実行する。
pom.xml は Spring Initializr で生成したものをベースとした。
Spring Retry を使用するため dependencies に spring-retry を追加する。
また、実行時に AOP クラスが必要なため spring-boot-starter-aop を追加する。<?xml version="1.0" encoding="UTF-8"?> <project xmlns="http://maven.apache.org/POM/4.0.0" xmlns:xsi="http://www.w3.org/2001/XMLSchema-instance" xsi:schemaLocation="http://maven.apache.org/POM/4.0.0 http://maven.apache.org/xsd/maven-4.0.0.xsd"> <modelVersion>4.0.0</modelVersion> <parent> <groupId>org.springframework.boot</groupId> <artifactId>spring-boot-starter-parent</artifactId> <version>2.2.0.M4</version> <relativePath/> <!-- lookup parent from repository --> </parent> <groupId>info.maigo.lab</groupId> <artifactId>sample.retry.exhausted</artifactId> <version>0.0.1-SNAPSHOT</version> <name>sample.retry.exhausted</name> <description>Demo project for Spring Boot</description> <properties> <java.version>11</java.version> </properties> <dependencies> <dependency> <groupId>org.springframework.boot</groupId> <artifactId>spring-boot-starter-web</artifactId> </dependency> <!-- https://mvnrepository.com/artifact/org.springframework.retry/spring-retry --> <dependency> <groupId>org.springframework.retry</groupId> <artifactId>spring-retry</artifactId> <version>1.2.4.RELEASE</version> </dependency> <!-- https://mvnrepository.com/artifact/org.springframework.boot/spring-boot-starter-aop --> <dependency> <groupId>org.springframework.boot</groupId> <artifactId>spring-boot-starter-aop</artifactId> </dependency> </dependencies> <build> <plugins> <plugin> <groupId>org.springframework.boot</groupId> <artifactId>spring-boot-maven-plugin</artifactId> </plugin> </plugins> </build> <repositories> <repository> <id>spring-snapshots</id> <name>Spring Snapshots</name> <url>https://repo.spring.io/snapshot</url> <snapshots> <enabled>true</enabled> </snapshots> </repository> <repository> <id>spring-milestones</id> <name>Spring Milestones</name> <url>https://repo.spring.io/milestone</url> </repository> </repositories> <pluginRepositories> <pluginRepository> <id>spring-snapshots</id> <name>Spring Snapshots</name> <url>https://repo.spring.io/snapshot</url> <snapshots> <enabled>true</enabled> </snapshots> </pluginRepository> <pluginRepository> <id>spring-milestones</id> <name>Spring Milestones</name> <url>https://repo.spring.io/milestone</url> </pluginRepository> </pluginRepositories> </project>ビルドとサーバ起動
mvn package コマンドで JAR ファイルを生成する。
$ mvn packagejava コマンドで JAR ファイルを指定してサーバを起動する。
$ java -jar target/sample.retry.exhausted-0.0.1-SNAPSHOT.jar

  .   ____          _            __ _ _
 /\\ / ___'_ __ _ _(_)_ __  __ _ \ \ \ \
( ( )\___ | '_ | '_| | '_ \/ _` | \ \ \ \
 \\/  ___)| |_)| | | | | || (_| |  ) ) ) )
  '  |____| .__|_| |_|_| |_\__, | / / / /
 =========|_|==============|___/=/_/_/_/
 :: Spring Boot ::             (v2.2.0.M4)
ソースコード
HogeApplication.java
Spring Boot による起動エントリクラス。
Spring Retry を使用するため @EnableRetry アノテーションを指定している。package info.maigo.lab.sample.retry.exhausted; import org.springframework.boot.SpringApplication; import org.springframework.boot.autoconfigure.SpringBootApplication; import org.springframework.retry.annotation.EnableRetry; @SpringBootApplication @EnableRetry public class HogeApplication { public static void main(String[] args) { SpringApplication.run(HogeApplication.class, args); } }HogeController.java
HTTPリクエストを受け取ってレスポンスを返す Controller クラス。
例外が発生した際は @ExceptionHandler アノテーションを指定したメソッドにて処理する。package info.maigo.lab.sample.retry.exhausted; import java.util.HashMap; import java.util.Map; import javax.servlet.http.HttpServletRequest; import org.springframework.beans.factory.annotation.Autowired; import org.springframework.web.bind.annotation.ExceptionHandler; import org.springframework.web.bind.annotation.RequestMapping; import org.springframework.web.bind.annotation.RequestParam; import org.springframework.web.bind.annotation.RestController; @RestController public class HogeController { @Autowired private HogeService hogeService; @RequestMapping("/") public Map<String, Object> index(@RequestParam(name = "name", defaultValue = "java.lang.RuntimeException") String name) throws Exception { return new HashMap<String, Object>() { { put("result", hogeService.invoke(name)); } }; } @ExceptionHandler(Exception.class) public Map<String, Object> handleException(HttpServletRequest req, Exception e) { return new HashMap<String, Object>() { { put("handleException", e.getClass().getName() + " / " + e.getMessage()); } }; } }HogeException.java
Exception を継承しているだけの例外クラス。
package info.maigo.lab.sample.retry.exhausted;

public class HogeException extends Exception {
}
HogeHogeException.java
HogeException を継承している例外クラス。
package info.maigo.lab.sample.retry.exhausted;

public class HogeHogeException extends HogeException {
}
HogeService.java
Service クラス。
invoke メソッドでは、指定された文字列を元に例外オブジェクトを生成し throw する。
invoke メソッドには @Retryable アノテーションを指定している。include でリトライ対象となる例外の型を指定し、exclude でリトライ対象としない例外の型を指定している。maxAttempts でリトライ回数を指定。backoffでリトライまでの待ち時間を指定。
@Recover アノテーションを指定したメソッドは、指定回数試行しても例外が発生してしまった場合にコールされる (リトライ対象でない例外でも型に合えばこのメソッドをコールする)。package info.maigo.lab.sample.retry.exhausted; import java.lang.reflect.Constructor; import org.springframework.retry.annotation.Backoff; import org.springframework.retry.annotation.Retryable; import org.springframework.stereotype.Service; import org.springframework.retry.annotation.Recover; @Service public class HogeService { @Retryable( include = {HogeException.class}, exclude = {HogeHogeException.class}, maxAttempts = 3, backoff = @Backoff(delay = 1000)) public String invoke(String name) throws Exception { System.out.println("HogeService#invoke: " + name); Class cls = Class.forName(name); Constructor cnst = cls.getDeclaredConstructor(); Exception e = (Exception) cnst.newInstance(); throw e; } @Recover public String recover(HogeException e, String name) { System.out.println("HogeService#recover: " + name); return "HogeService#recover: " + e.getClass().getName(); } }実行例
HogeException を発生させてリトライさせる
起動したサーバに curl でアクセスすると JSON が出力される。
HogeException が発生するよう指定する。
recover メソッドで HogeException の文字列表現が返されている。$ curl http://localhost:8080/?name=info.maigo.lab.sample.retry.exhausted.HogeException {"result":"HogeService#recover: info.maigo.lab.sample.retry.exhausted.HogeException"}サーバ側の標準出力ログを見る。
リトライが実行されて invoke メソッドが3回コールされたあと、recover メソッドがコールされていることがわかる。HogeService#invoke: info.maigo.lab.sample.retry.exhausted.HogeException HogeService#invoke: info.maigo.lab.sample.retry.exhausted.HogeException HogeService#invoke: info.maigo.lab.sample.retry.exhausted.HogeException HogeService#recover: info.maigo.lab.sample.retry.exhausted.HogeExceptionHogeException は @Retryable アノテーションの include に指定されているため、リトライ処理が実行される。
最後のリトライで例外が発生した場合には @Recover アノテーションが指定されたメソッドがコールされる。HogeHogeException を発生させてリトライさせない
HogeHogeException が発生するよう指定して curl でアクセスする。
recover メソッドで HogeHogeException の文字列表現が返されている。$ curl http://localhost:8080/?name=info.maigo.lab.sample.retry.exhausted.HogeHogeException {"result":"HogeService#recover: info.maigo.lab.sample.retry.exhausted.HogeHogeException"}サーバ側の標準出力ログを見る。
invoke メソッドが1回だけコールされたあと、recover メソッドがコールされていることがわかる。HogeService#invoke: info.maigo.lab.sample.retry.exhausted.HogeHogeException HogeService#recover: info.maigo.lab.sample.retry.exhausted.HogeHogeExceptionHogeHogeException は @Retryable アノテーションの exclude に指定されているため、リトライ処理はされない。
invoke メソッドを1回コールして HogeHogeException が発生し、 recover メソッドがコールされて結果の文字列が返されている。
また、HogeHogeException は @Retryable アノテーションの include で指定されている HogeException のサブクラスのため、exclude にて HogeHogeException を指定していなければリトライ対象となる。@Recover で捕捉できない例外が投げられると ExhaustedRetryException が発生する
java.lang.Exception が発生するよう指定して curl でアクセスする。
recover メソッドで捕捉できずに org.springframework.retry.ExhaustedRetryException 例外が投げられる。$ curl http://localhost:8080/?name=java.lang.Exception {"handleException":"org.springframework.retry.ExhaustedRetryException / Cannot locate recovery method; nested exception is java.lang.Exception"}サーバ側の標準出力ログを見る。
invoke メソッドが1回だけコールされていることがわかる。recover メソッドはコールされていない。HogeService#invoke: java.lang.Exceptionjava.lang.Exception は @Retryable アノテーションの include に指定されていないため、リトライ処理はされない。
また、 @Recover アノテーションが指定されたメソッドにて捕捉できる例外の型ではないため、ExhaustedRetryException が投げられる。
今回の場合、ExhaustedRetryException クラスの getCause メソッドで、原因となった例外 java.lang.Exception のオブジェクトを取得することができる。参考資料
- GitHub - spring-projects/spring-retry
- org.springframework.retry:spring-retry:1.2.4.RELEASE API Doc :: Javadoc.IO
- Retryable (Spring Retry 1.2.4.RELEASE API)
- ExhaustedRetryException (Spring Retry 1.2.4.RELEASE API)
- @Retryable exclude option does not work as expected · Issue #47 · spring-projects/spring-retry · GitHub
- Spring Retry を利用して宣言型のリトライ処理を実装する - Qiita
- 投稿日:2019-07-08T17:01:15+09:00
Java 制御構文
学習ログ
文を実行させる順番のことを制御構造といい、主に「順次」「分岐」「繰り返し」がある。
制御構文の構成要素
[条件式]分岐条件や繰り返しを続ける条件を示した式
[ブロック]分岐や繰り返しで実行する一連の文の集まり・分岐構文 if(条件式) { ブロック } else { ブロック } ・繰り返しの構文 while(条件式){ ブロック }分岐構文のバリエーション
・3種類のif構文
▪︎if-else構文(基本形)
//例
if(age >= 20) {
  canDrink = true;  //条件がtrueの場合ここのブロックの処理が動く。
} else {
  canDrink = false; //条件がfalseの場合ここのブロックの処理が動く。
}

▪︎ifのみ構文
//例
if( age >= 20) {
  canDrink = true;
}

▪︎if-else if-else構文
//例
if( height >= 170) {
  size = 'L';
} else if(height >= 155){
  size = 'M';
} else if(height >= 140){
  size = 'S';
} else {
  size = '?';
}
switch 構文
switch文に書き換えることができる条件
①全ての条件式が「変数==値」や「変数==変数」のように左辺や右辺が一致するか比較する式しか使用できない(<,>,!=,などは使用できない)
②比較する値が整数(byte型、short型、int型のいずれか)、文字列(String型)または文字(char型)であり、少数や真偽値ではない。//例 switch(fortune){ case 1: System.out.println("大吉"); break; case 2: System.out.println("中吉"); break; case 3: System.out.println("吉"); break; default: // caseのどれにも当てはまらなかった場合の処理(いらないなら省略可) System.out.println("凶"); }・switch文は当てはまるcaseにジャンプするだけなのでbreakを記述しないと特定のcaseまで飛んだ後そこからまた順次プログラムを読み込んでしまう。
※break文とは: 処理を中断し終了させるメソッド。繰り返し構文のバリエーション
・2種類のwhile文
▪︎while構文(基本形)
//例
while(temp > 25) {
  temp--;
  System.out.println("温度を1度下げました");
}

▪︎do-while構文
//例
do{
  temp--;
  System.out.println("温度を1度下げました");
} while(temp > 25);
・for文による繰り返し
for (ウンタ変数の初期化処理; 繰り返し条件; カウンタ変数の増減処理) {
  繰り返す処理
}
//例
for( int i = 0; i < 10; i++) {
  System.out.println(i);
}
//変数iを初期化して0を代入している。iが10より大きくなるまでブロック内の処理を行う。
//処理を行うたびにi++(変数iに1を足す)という処理を行う。
制御構造のネスト
「分岐の中に分岐」や「繰り返しの中に分岐」など、このような多重構造を「入れ子」や「ネスト」という。
▪︎分岐処理の中の分岐処理
//例
if(height > 170){
  if(eye > 1.0){
    System.out.println("合格");
  }
}

▪︎繰り返しの中の分岐処理
//例
do{
  if(i % # == 0){
    System.out.println(i);
  }
  i++
} while(i < 100);
・break文(繰り返し自体を中断)
for(int i = 1; i < 10; i++) {
  if(i == 3){
    break;
  }
  System.out.println(i);
}
・continue文(今回の文だけを中断し、次の周へ)
for(int i = 1; i < 10; i++) {
  if(i == 3){
    continue;
  }
  System.out.println(i);
}
- 投稿日:2019-07-08T15:37:25+09:00
Java 基本文法
学習ログ
プログラムの流れ
- ソースコードを書く。
- ソースコードをコンパイラでコンパイルしてバイトコードに変換する。
- インタプリタはバイトコードをマシン語に変換してCPUを動かす
- javaファイルの拡張子は.javaになる。
クラス名.javapublic class クラス名 { public static void メソッド名 (String[] args) { //処理 } }クラスの中をクラスブロック、メソッドの中をメソッドブロックと呼ぶ。
- System.out.println();
引数に取った値を出力させる。
変数の定義
変数宣言の文
データ型 変数名;

//例えば
int age;  //最初に変数を宣言しておく。
age = 30; //次に変数にデータを代入する。
また変数の宣言と代入を同時に行うこともできる。
(変数の初期化という)データ型 変数名 = 値; //例えば int age = 30;データ型の種類
分類 型名 格納するデータ 例 整数 long 大きな整数 long worldPeople; //世界の人口 int 普通の整数 int salary; //給与金額 short 小さな整数 short age; //年齢 byte さらに小さな整数 byte glasses; //所持する眼鏡の数 少数 double 普通の小数 double pi; //円周率 float 少し曖昧でもいい小数 float weight//体重 真偽値 boolean trueかfalse boolean isMarried;//既婚か否か 文字 char 1つの文字 char initial; //イニシャル1文字 文字列 String 文字の並び String name; //自分の名前 オペランド・演算子
age = 20 + 5; //演算子である=や+以外のageや20、5(変数や値のこと)がオペランドと呼ばれる。
//全ての式はこの2つの要素だけで構成されている。
オペランドの中でも、変数に代入される値、ソースコード内に記述した数字、文字、文字列の値のことをリテラルと呼ぶ。
リテラルはそれぞれデータ型を持っている。
- 代入演算子
a = 10;  // =>10,右辺を左辺に代入する
a += 10; // =>a = a + 10、左辺と右辺を加算して左辺に代入、文字を加算の対象とした場合左辺と右辺が連結される
a -= 10; // =>a = a - 10、左辺と右辺を減算して左辺に代入
a *= 10; // =>a = a * 10、左辺と右辺を乗算して左辺に代入
a /= 10; // =>a = a / 10、左辺と右辺を除算して左辺に代入
a %= 10; // =>a = a % 10、左辺と右辺を除算してその余りを左辺に代入
- インクリメント・デクリメント演算子
a++(または++a); // =>a + 1、 aに対して1だけ加算される。
a--(または--a); // =>a -1、 aに対して1だけ減算される。
定数の初期化
変数は上書きできる。
しかし、税率だったり円周率は基本変わらないため上書きできると面倒なことになる。
そのため、そういった変数は定数にして代入する。データ型 定数名 = 値; final int PRICE = 100; //定数名は全て大文字にするのが一般的
- 投稿日:2019-07-08T12:39:17+09:00
Alexa SkillをJAVAで作る際の初期設定方法(Cloud9)
アレクサのスキルをジャバで作ってみたので備忘録を残しておきます。
環境はAWSのCloud9を使っています。[Cloud9]
1)
sudo yum -y update2)
sudo yum -y install java-1.8.0-openjdk-devel3)
sudo update-alternatives --config java

sudo update-alternatives --config javac
4)
java -version

javac -version
5)
mvn -version6)
sudo wget http://repos.fedorapeople.org/repos/dchen/apache-maven/epel-apache-maven.repo -O /etc/yum.repos.d/epel-apache-maven.repo

sudo sed -i s/\$releasever/6/g /etc/yum.repos.d/epel-apache-maven.repo

sudo yum install -y apache-maven
7)
mvn -version8)赤字は変更する
mvn archetype:generate -DgroupId=com.mycompany.app -DartifactId=my-app -DarchetypeArtifactId=maven-archetype-quickstart -DinteractiveMode=false*-DgroupId={group-id}
*-DartifactId={project-name}e.g)上記の場合、
"my-app
|- src
|- main- java
|
|- com- mycompany
|
|- app-App.java
|
|- test
|- java- com
|
|- mycompany- app
|
|- AppTest.java- pom.xml"
■アレクサ用pom.xml
" xsi:schemaLocation=""http://maven.apache.org/POM/4.0.0 http://maven.apache.org/maven-v4_0_0.xsd"">
4.0.0
alexa-skills-kit-samples
colorpicker
jar
1.0
colorpicker
http://developer.amazon.com/ask
The Apache License, Version 2.0
http://www.apache.org/licenses/LICENSE-2.0.txt
Alexa Skills Kit
ask-sdk-java@amazon.com
Alexa
http://developer.amazon.com/ask
scm:git:https://github.com/amzn/alexa-skills-kit-java.git
scm:git:https://github.com/amzn/alexa-skills-kit-java.git
https://github.com/amzn/alexa-skills-kit-java.git
com.amazon.alexa
ask-sdk
2.12.0
src
org.apache.maven.plugins
maven-compiler-plugin
3.7.0
1.8
1.8
true
"9)下記マニュアルに沿って作成
https://alexa-skills-kit-sdk-for-java.readthedocs.io/ja/latest/Developing-Your-First-Skill.html
mvn org.apache.maven.plugins:maven-assembly-plugin:2.6:assembly -DdescriptorId=jar-with-dependencies package10)tarファイルをラムダへアップロード
「with-dependencies」のファイル11)関数コードのハンドラーに以下を入れる
com.amazon.ask.onseisuijaku.OnseiSuijakuStreamHandler完了
- 投稿日:2019-07-08T10:17:23+09:00
Project Euler 第8問
別の投稿を見て気になって自分でやってみた。
問題は「1000個数字が並んでいる。そこから連続する13個の数字を取り出して、それら13個の数字の積を考える。その最大値を求めよ。」
というもの。
13個の掛け算を1000回近くやらせるのは癪に障るし、そのまま尺取り法のように考えると、除算が1000回近く起こってしまい、よろしくない。
多数の積を取るということから、対数を使おう。
$\log_a M$を$a$を底(てい)とする$M$の対数と呼び、次のように定められる。実数r,a>0, a\neq1,M>0に対し、\\ a^r=M \iff r= \log_a M簡単に言うと、正の数$M$をある1でない正の数$a$の累乗で表そうとした場合の指数を表すものである。
例えば$2^3=8$だから$\log_2 8 = 3$となる。
また、指数は実数全体まで拡張して考える。この考えのもとでは$2^{\frac{1}{2}}=\sqrt{2}$となるため、$\log_2\sqrt{2}=\frac{1}{2}$となる。指数には指数法則$a^x\times a^y = a^{x+y}$が成り立つ。指数がもともと掛け算の個数という立場に立てば、それらの掛け算は個数の合計分掛けたものという点では自然に理解できるのではないだろうか。これを対数の表現にするとこうなる。
a>0, a\neq1,M>0,N>0に対し、\\ \log_a {MN} = \log_a M + \log_a Nこの性質から、掛け算を対数の足し算に変換できる。また対数には
M>0,N>0とする。\\ a>1のとき、M<N \iff \log_a M < \log_a Nという性質がある。つまり、$a>1$では元の数の大小と対数を取った時の大小が一致する。これを利用して、掛け算を対数の足し算として、尺取り法で対数の和が最大になる区間を探すことによって求められる。
今回対数を取るために、JavaのMathクラスのメソッド
Math.log10(x)を使用する。$a=10$として引数の対数を取る、つまり$\log_{10}x$を求めるメソッドである。
(ちなみに、$a=10$として取る対数を常用対数と呼んだりする。)
必要な対数は0~9の10個の数字それぞれに対するものだけであるので、それをあらかじめ計算し配列に入れておく。しかし、0に対する対数は数学上定義されておらず、メソッドの定義としても「負の無限大」となるため、尺取り法でこれを加えてしまうと元に戻せなくなってしまう。そのため、0に対する対数として便宜上-1000を設定する。これにより、0を含む区間では必ず対数の和が負になり、最大の候補から外れるうえ、0が外れるときに元に戻すことも可能になる。
最大になる区間がわかったら、その積を実際に求める。対数の定義から求めようとすると、浮動小数点の誤差の問題で正確な値が出ない恐れがあるためである。その考えで書いたコードが以下になる。
import java.util.*;
import java.util.stream.*;

public class Main {
    private static final String NUMS
                        = "73167176531330624919225119674426574742355349194934"
                        + "96983520312774506326239578318016984801869478851843"
                        + "85861560789112949495459501737958331952853208805511"
                        + "12540698747158523863050715693290963295227443043557"
                        + "66896648950445244523161731856403098711121722383113"
                        + "62229893423380308135336276614282806444486645238749"
                        + "30358907296290491560440772390713810515859307960866"
                        + "70172427121883998797908792274921901699720888093776"
                        + "65727333001053367881220235421809751254540594752243"
                        + "52584907711670556013604839586446706324415722155397"
                        + "53697817977846174064955149290862569321978468622482"
                        + "83972241375657056057490261407972968652414535100474"
                        + "82166370484403199890008895243450658541227588666881"
                        + "16427171479924442928230863465674813919123162824586"
                        + "17866458359124566529476545682848912883142607690042"
                        + "24219022671055626321111109370544217506941658960408"
                        + "07198403850962455444362981230987879927244284909188"
                        + "84580156166097919133875499200524063689912560717606"
                        + "05886116467109405077541002256983155200055935729725"
                        + "71636269561882670428252483600823257530420752963450";
    public static void main(String[] args) {
        final int SPAN = 13;

        final double[] log10 = IntStream.range(0, 10).mapToDouble(Math::log10).toArray();
        log10[0] = -1000;

        double logMax = IntStream.range(0, SPAN).mapToDouble(i -> log10[getNum(i)]).sum();
        int head = 0;

        double partial = logMax;
        for (int i = 0, j = SPAN; j < NUMS.length(); i++, j++) {
            partial = partial - log10[getNum(i)] + log10[getNum(j)];
            if (partial > logMax) {
                logMax = partial;
                head = i + 1;
            }
        }

        long result = IntStream.range(head, head + SPAN)
                        .mapToLong(i -> getNum(i))
                        .reduce(1L, (x, y) -> x * y);

        System.out.println(result);

    }

    private static int getNum(int i) {
        return NUMS.charAt(i) - '0';
    }
}
- 投稿日:2019-07-08T08:13:27+09:00
ゼロから始めるAWS Elastic Beanstalk #2~ 独自ドメイン対応、HTTPS対応、HTTP→HTTPSへのリダイレクト対応、Auto Scaling設定 ~
概要
- ゼロから始めるJavaでAWS Elastic Beanstalk #1~ EB CLIを使ったJava Webアプリ環境構築 ~の続編です
Elastic Beanstalkで構築するWebアプリを以下のようにします
- HTTPS対応
- 独自ドメイン対応
- うっかりHTTPでリクエスト来たらHTTPSにリダイレクト
- Auto Scalingは不要
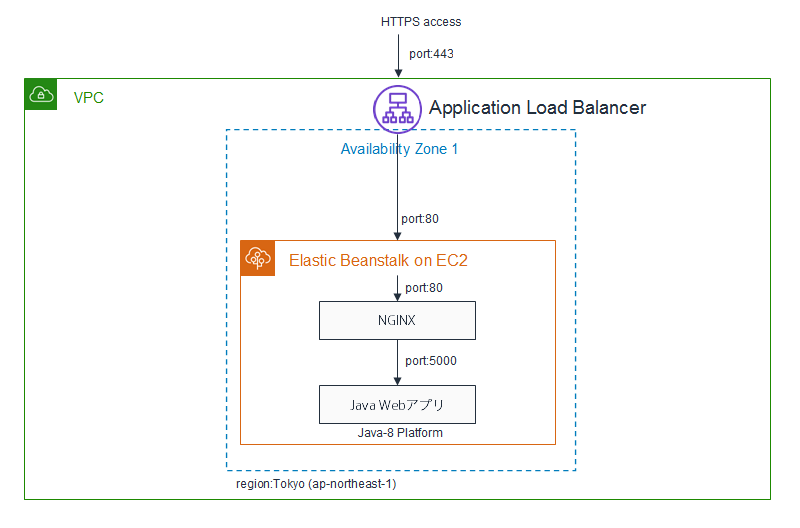
ということで、以下のように構成するときの設定例をみていきます
本編
ALB(Application Load Balancer)をHTTPSに対応する
Elastic BeanstalkでつくったWebアプリをHTTPSに対応させるため、拡張設定用のYAMLファイルを作る。
プロジェクトのルートに .ebextensionsというディレクトリをつくり、そこにalb-secure-listener.configというファイルを作成する。elastic-beantalk-java-app ├── .ebextensions │ └── alb-secure-listener.config ・ ・ その他のファイル達 ・alb-secure-listener.configは以下のようにする
alb-secure-listener.configoption_settings: aws:elbv2:listener:default: ListenerEnabled: 'false' aws:elbv2:listener:443: DefaultProcess: https ListenerEnabled: 'true' Protocol: HTTPS SSLCertificateArns: arn:aws:acm:ap-northeast-1:123456789:certificate/abcdef-01234-6123-caca-123456789b aws:elasticbeanstalk:environment:process:https: Port: '80' Protocol: HTTP
以下、設定内容の説明をしていく。設定その1:「HTTPは受け付けません」
aws:elbv2:listener:default: ListenerEnabled: 'false'aws:elbv2:listener:defaultはデフォルトのリスナー(ポート80)の設定を意味する。
ここでListenerEnabled: 'false'としていったんポート80、つまり、HTTPは利用不可とした。つまりHTTPでのアクセスを受け付けない設定にした。(「こういう設定もアリだよね」という例のためで、後で変更してHTTP(ポート80)でアクセス来たらHTTPS(ポート443)にリダイレクトするように構成する。)
設定その2:「HTTPSを受け付けます、証明書はこれです。」
aws:elbv2:listener:443: DefaultProcess: https ListenerEnabled: 'true' Protocol: HTTPS SSLCertificateArns: arn:aws:acm:ap-northeast-1:123456789:certificate/abcdef-01234-6123-caca-123456789baws:elbv2:listener:443はポート443の設定。
ここでは、HTTPSでつかうポート443についての設定で、HTTPSプロトコルで使うことを指定している。
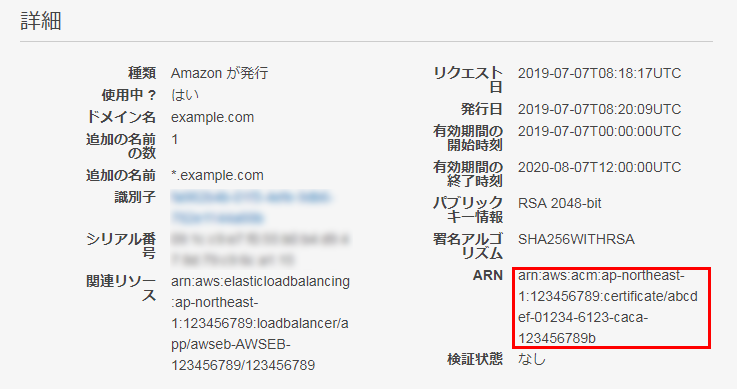
SSLCertificateArnsにはACM(Certificate Mangaer)で取得した証明書のARNを指定する設定その3:「ロードバランサーにHTTPSでアクセス来たら、ロードバランサーはEC2のポート80番にHTTPでつなぎます」
aws:elbv2:listener:443:以下にあったDefaultProcess: httpsの部分だが、
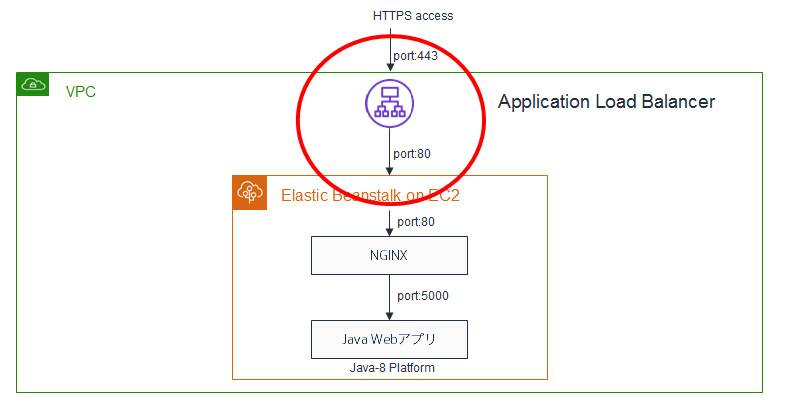
このhttpsというのは、以下の設定にあるaws:elasticbeanstalk:environment:process:https:のhttpsに対応している。つまり単なる名前。httpsじゃなくてもOK。aws:elasticbeanstalk:environment:process:https: Port: '80' Protocol: HTTPこれで、ロードバランサーにHTTPSでアクセスがきたら、その先にあるEC2の80番ポートにつなぎに行くという設定ができた。
つまり、以下の赤マルの部分の設定ができた。Auto Scalingを構成する
aws:autoscaling:asg: Availability Zones: Any MaxSize: '1' MinSize: '1'っこではaws:autoscaling:asgでAuto Scalingグループで使用するインスタンスの最小数と最大数を、それぞれ1に設定した。つまりこれはスケールしない設定。
最大数を2以上に設定した場合、Availability Zones: Anyになってるときは、使用可能なAvailability Zone間で均等にインスタンスを起動するようになる。
HTTPSのみ有効で、AutoScaleしないalb-secure-listener.configの内容
ここまでの内容まとめると
alb-secure-listener.configは以下のようにするファイルの置き場所elastic-beantalk-java-app ├── .ebextensions │ └── alb-secure-listener.config ・ ・ その他のファイル達 ・HTTPSのみ有効で、AutoScaleしないalb-secure-listener.configの内容
alb-secure-listener.configoption_settings: aws:elbv2:listener:default: ListenerEnabled: 'false' aws:elbv2:listener:443: DefaultProcess: https ListenerEnabled: 'true' Protocol: HTTPS SSLCertificateArns: arn:aws:acm:ap-northeast-1:456509554684:certificate/fa982b4b-01f3-4efe-9db6-782e1144a88b aws:elasticbeanstalk:environment:process:https: Port: '80' Protocol: HTTP aws:autoscaling:asg: Availability Zones: Any MaxSize: '1' MinSize: '1'アプリをデプロイする
さて、ここまで設定したところでアプリをデプロイする
eb create my-jetty-app-test2 --instance_type t2.small --elb-type application --vpc.id vpc-xxxxxxxxxxxxxxxxx --vpc.elbpublic --vpc.elbsubnets subnet-xxxxxxxxxxxxxxxxx,subnet-yyyyyyyyyyyyyyyyy --vpc.publicip --vpc.ec2subnets subnet-xxxxxxxxxxxxxxxxx,subnet-yyyyyyyyyyyyyyyyy独自ドメイン対応
アプリのデプロイが終わったら、Elastic Beanstalkを独自ドメインに対応する
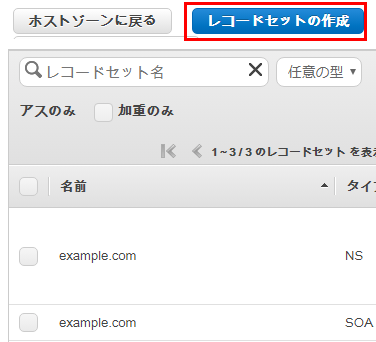
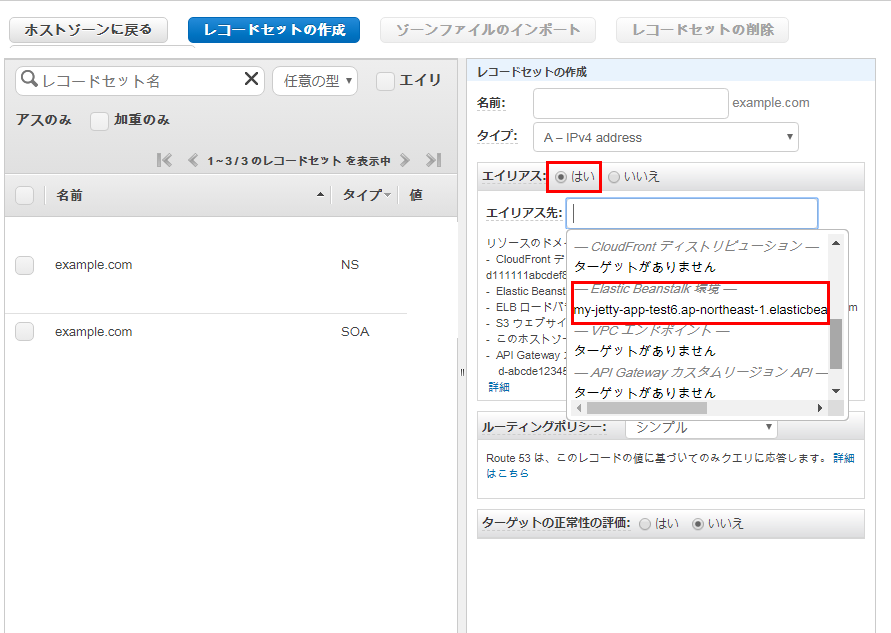
Webコンソールから Route 53 に行き、対象ドメインを選択してレコードセットの作成をクリック
エイリアス を選択し、エイリアス先から Elastic Beanstalk環境グループのなかから、このドメインを割り当てたい環境を選択し作成をクリックすればOK
これで、ドメインがElastic Beanstalkに作った環境にひもづいた。
ドメイン名は仮にexample.comとすると
で無事アプリが公開できた。
ここまでで独自ドメイン+HTTPS化が終了。HTTPアクセスのHTTPSへのリダイレクト対応
ALB(Application Loadbalancer)の機能アップにより、ALBの設定だけでHTTP→HTTPSへのダイレクトができるようになっている。
さきほどは、alb-secure-listener.configの設定で以下のようにHTTPを無効にしてしまったが、これを有効にする
alb-secure-listener.config(HTTP無効)option_settings: aws:elbv2:listener:default: ListenerEnabled: 'false'↓
alb-secure-listener.config(HTTP有効)option_settings: aws:elbv2:listener:default: ListenerEnabled: 'true'既にデプロイしているなら、Webコンソールから有効にしてもOK
Webコンソールから有効にするには、Elastic Beanstalkにアクセスし、
https://ap-northeast-1.console.aws.amazon.com/elasticbeanstalk
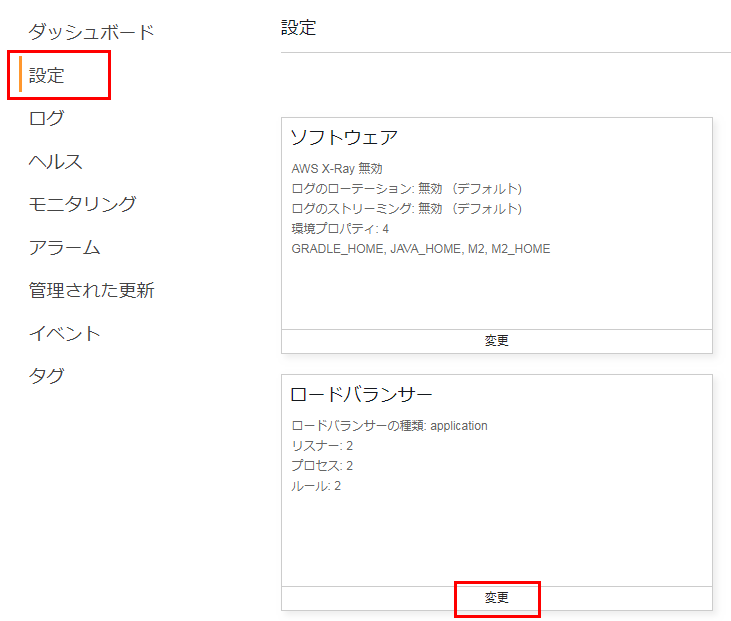
ElasticBeanstalk>変更したい環境>設定>ロードバランサーとメニューを選択して、変更をクリック
ロードバランサーの変更画面で、無効になっているポート80を有効にして、適用をクリックすればOK
5分程度まつと、構成の更新が終了する。
ポート80のリスナーが有効になったらロードバランサーのリダイレクト設定をする
https://ap-northeast-1.console.aws.amazon.com/ec2/v2/home?region=ap-northeast-1#LoadBalancers:
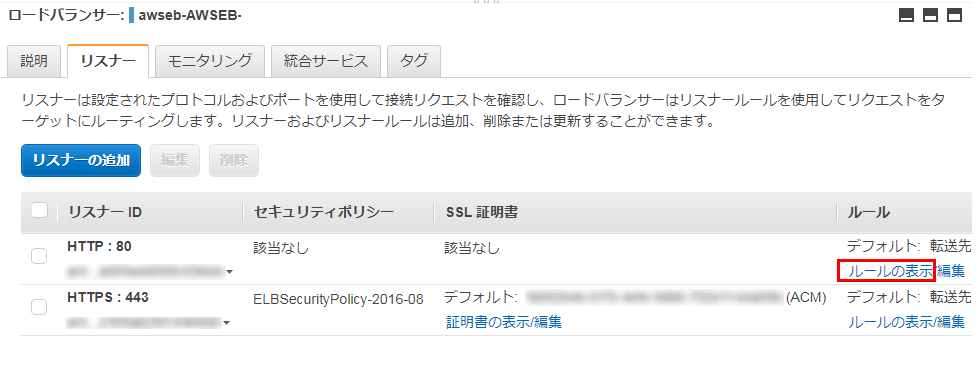
Elastic Beanstalkが自動生成したロードバランサーを選択し、リスナータブを選択する。
HTTP:80のリスナーのルールを表示をクリックする
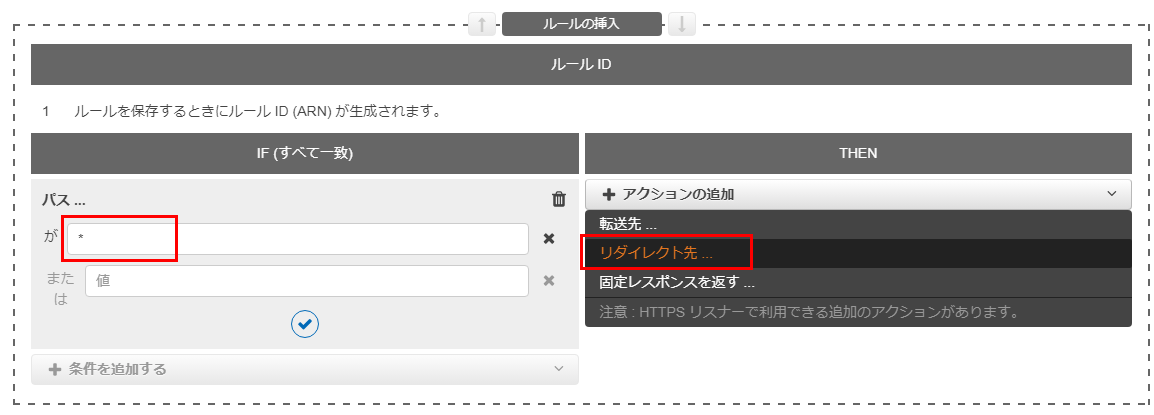
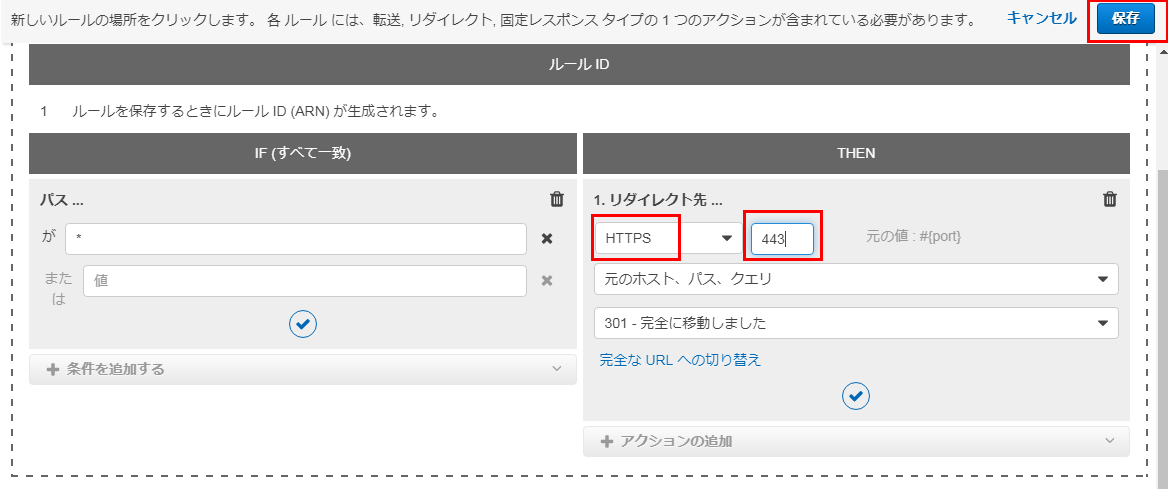
IFとTHENの条件式を設定できるので、
- IFにはパスが・・・を選択し、値として *(アスタリスク=ワイルドカード) を入力
- THENには、アクションの追加で リダイレクト先 を選択するリダイレクト先として HTTPSを選択し、ポート番号として443と入力する
できたら、保存をクリック。
これで、HTTPにアクセスが来たらHTTPSにリダイレクトする設定は完了。
実際に、
http://example.com にアクセスしてみると、ちゃんと https://example.com にリダイレクトされる。
まとめ
ゼロから始めるJavaでAWS Elastic Beanstalk #1~ EB CLIを使ったJava Webアプリ環境構築 ~の続編として、Elastic BeanstalkのWebアプリを独自ドメイン、HTTPS、HTTPからのリダイレクトに対応するための方法について説明しました
シンプルな設定・操作で実用に耐える環境を構築できるElastic Beanstalkは本番環境構築だけでなく、プロトタイピングなどのラピッドな開発にも向いており色々なシーンで重宝しそうです。
本稿で使用したソースコード
https://github.com/riversun/java-jetty-app-on-elasticbeanstalk/tree/https_conf_with_ebextensions_dir
- 投稿日:2019-07-08T08:10:14+09:00
ゼロから始めるJavaでAWS Elastic Beanstalk #1~ EB CLIを使ったJava Webアプリ環境構築 ~
概要
- AWS Elastic Beanstalkを使えば、EC2でのOSやミドルウェアのセットアップ不要でコマンド1つでWebアプリ実行環境を構築することができます。セキュリティパッチ等も自動適用できるため運用が軽くなるメリットもある上、ベースはEC2等AWSのコンポーネントの組み合わせなので、その気になれば色々カスタマイズもできるという、とても使い勝手の良いサービスです。
- 本稿ではEB CLIというツールをつかってコマンド1つでJava Web アプリの実行環境を構築します。
- Java Webアプリは、Tomcatで動作するWARではなく、Java SEでつくったスッピンのWebアプリ(JAR)が対象です。
(つまり概念さえ理解できればWebアプリFrameworkはSpring BootでもPlay frameworkでもかまいませんし、アプリサーバーもTomcatでもJettyでもGlassfishでもOKです)- また、続編で独自ドメイン対応、HTTPS対応、HTTP→HTTPSへのリダイレクト対応、Auto Scaling設定をします。
環境・構成
以下のような構成をコマンドラインから作ります
(コマンドラインから作るので環境の量産、再構築もカンタン)
- アプリ・プラットフォーム
- AWS Elastic Beanstalkの Java 8 プラットフォーム
- 本稿ではJSP/ServletのWebアプリをJetty9で実行
- クラウド環境
- サービス:AWS Elastic Beanstalk (EC2 + Application Loadbalancer on VPC)
- リージョン:東京(ap-northeast-1) →東京じゃなくてもOK
ソースコード
本稿で紹介する全ソースコードはこちらにあります
https://github.com/riversun/java-jetty-app-on-elasticbeanstalk本編
Elastic Beanstalk コマンドラインインターフェイス(EB CLI)のインストール
Elastic BeanstalkアプリはWeb GUIをつかっても構築できるが、環境構築の自動化など本番運用を考えるとコマンドラインを使うと同じような操作を何度もせずにすみ手間もへるし、アプリ・環境の構築・変更がコマンド一発で済のでCIに組み込むなどすれば安定した運用が可能となる。
1.EB CLIをインストールする
EB CLIのインストールにはPythonが必要となる。
もし、PCにPythonがインストールされていなければ、
https://www.anaconda.com/distribution/
などからインストールしておく。最新版をインストールしておけばOKPythonがインストールが完了していれば、以下のコマンドで EB CLI をインストールできる
pip install awsebcli --upgrade --user2.以下のコマンドでインストール終了チェック
EB CLIがインストールされ、コマンドラインで利用可能になっているかどうか、以下のコマンドで確認する
eb --version

EB CLI 3.15.2 (Python 3.7.1)
ちゃんとインストールできた模様
TIPS
Windows環境の場合、eb コマンドがみつからない場合がある。
そのときは、C:\Users\[ユーザー名]\AppData\Roaming\Python\Python37\Scriptsをパスに追加する
JavaでWebアプリを作る
Elastic Beanstalkで作るJavaアプリは FAT JAR形式で作る
Elastic BeanstalkでJava Webアプリを実行するにはいくつかの方法がある。
- warファイルをアップロード(Tomcatで実行する)
- JARファイルをアップロード(Java SE環境で実行する)
本稿では JARファイルをアップロード する方式を採用する。
JARファイルとは、Javaで作ったアプリ(Webアプリ)のソースコード+依存ファイルを1つのJARにまとめたモノの事を言う。全部1つにしてサイズの大きなJARを作るので「FAT JAR」とも言う。
JARを使うメリットは、作ったWebアプリをJARファイルにさえできれば、何でもOKということ。
FrameworkはPlay Frameworkでも、Spring Bootでも、Strutsでも、JSFでも良いし(もちろん素のJSP/ServletでもOK)、APサーバーもTomcatでもJettyでもGlassfishでもUndertow(Wildfly)でもOK。
ただしJARをつくってElastic Beanstalkで動かすには、「Elastic Beanstalkのお作法」があるので、そちらをみていく。
といっても、難しくはない。
Elastic Beanstalk用のJavaソースコード構成
Web APサーバーとしてJettyを使ったJava Webアプリを考える。
まず、全体像は以下のとおり。「★」印がついているところが Elastic Beanstalkのための構成
その他はJavaのMavenプロジェクトの標準的なソースコード構成となるElasticBeanstalk用Javaソースコード構成elastic-beantalk-java-app ├── src/main/java ・・・Javaのソースコードのルートディレクトリ │ └── myserver │ └── StartServer.java ├── src/main/resources │ └── webroot ・・・静的WebコンテンツやJSPのルートディレクトリ │ ├── index.html │ └── show.jsp ├── src/main/assembly │ └── zip.xml ・・・★elastic beanstalkにアップロードするZIPファイルの生成ルールを記述 ├── .elasticbeanstalk ・・・★Elastic Beanstalkへのデプロイ情報を格納するディレクトリ │ └── config.yml ・・・★Elastic Beanstalkへのデプロイ情報のYAMLファイル ├── target ・・・ビルドした結果(jarなど)が生成されるディレクトリ ├── Procfile ・・・★Elastic BeanstalkのEC2上でJARファイルを実行するためのスクリプトを記述する └── pom.xml ・・・Maven用設定ファイルソースコードや設定ファイル等の中身については後で説明するとして、
先にこのソースコードがどのようにビルドされて Elastic Beanstalkにアップロードされるかをみておく。Elastic BeanstalkにアップロードするZIPファイルの構造
本稿では、手元のPCでソースコードをビルドして、それを1つのJARファイルにパッケージし、さらにJARファイル以外にもElastic Beanstalkに必要なファイル含めてZIPファイルを生成する。
ここで、JavaのソースコードをビルドしてできたFAT JARのファイル名をeb-app-jar-with-dependencies.jarとする。(maven-assembly-pluginで生成する、後で説明)
ElasticBeanstalkにアップロードするためのZIPファイル名をmy-jetty-app-eb.zipとすると、そのZIPファイルの中身構造は以下となる。my-jetty-app-eb.zipの中身my-jetty-app-eb.zip ├── my-jetty-app-jar-with-dependencies.jar ・・・Javaのソースコードを1つのJARにパッケージしたもの └── Procfile ・・・Elastic BeanstalkのEC2内でJARを実行するためのスクリプトZIPファイルの中には、ソースをまとめたJARファイルと、実行スクリプトの書いてあるファイルであるProcfileの2つとなる。
ということで、この形式のZIPファイルをEB CLI経由でElastic Beanstalkにアップロードすればデプロイできる。
これが「Elastic Beanstalkのお作法」の1つということになる。次は、Javaアプリのソースをみていく。
とくに「Elastic Beanstalkのお作法」に関連する部分を中心に説明するJavaアプリのソースコードの作り方
これからJavaアプリを動かそうとしているElastic Beanstalk環境は以下のようなもので、Java Webアプリとしてケアしておくべき点はポート番号 5000をListenするところ
つまり、Javaでポート番号 5000をListenするサーバープログラムを作ってあげればひとまずOK
サンプルコード
ということでサンプルコードを以下のリポジトリに置いた
https://github.com/riversun/java-jetty-app-on-elasticbeanstalkこのサンプルはServlet/JSP/プッシュ通知機能をJetty上動作させている
このコードをクローンすると
clone https://github.com/riversun/java-jetty-app-on-elasticbeanstalk.git前述したとおり以下のようなソースコード構成となっている。
(一部ファイルは省略)ElasticBeanstalk用Javaソースコード構成elastic-beantalk-java-app ├── src/main/java ・・・Javaのソースコードのルートディレクトリ │ └── myserver │ └── StartServer.java ├── src/main/resources │ └── webroot ・・・静的WebコンテンツやJSPのルートディレクトリ │ ├── index.html │ └── show.jsp ├── src/main/assembly │ └── zip.xml ・・・★elastic beanstalkにアップロードするZIPファイルの生成ルールを記述 ├── .elasticbeanstalk ・・・★Elastic Beanstalkへのデプロイ情報を格納するディレクトリ │ └── config.yml ・・・★Elastic Beanstalkへのデプロイ情報のYAMLファイル ├── target ・・・ビルドした結果(jarなど)が生成されるディレクトリ ├── Procfile ・・・★Elastic BeanstalkのEC2上でJARファイルを実行するためのスクリプトを記述する └── pom.xml ・・・Maven用設定ファイル※「★」印がついているところが Elastic Beanstalkのための構成
Javaアプリとしてのメインクラス(エントリーポイント)は StartServer.javaとなる。
これをローカル実行して http://localhost:5000/ にアクセスすれば、以下のようになり
JSPやServletなどのシンプルな実装を試すことができるサンプルとなっている。ここからは、ソースコードで重要なところを以下に説明する
src/main/java myserver.StartServer.java
メインクラス。
Jettyを起動してServlet/JSPをホストしポート5000で待ち受ける/pom.xml
pom.xml(抜粋)<project xmlns="http://maven.apache.org/POM/4.0.0" xmlns:xsi="http://www.w3.org/2001/XMLSchema-instance" xsi:schemaLocation="http://maven.apache.org/POM/4.0.0 http://maven.apache.org/maven-v4_0_0.xsd"> <modelVersion>4.0.0</modelVersion> <groupId>org.riversun</groupId> <artifactId>my-jetty-app</artifactId> <version>1.0.0</version> <packaging>jar</packaging> <name>my-jetty-app</name> <description>jetty app on elastic beanstalk</description>pom.xml<project xmlns="http://maven.apache.org/POM/4.0.0" xmlns:xsi="http://www.w3.org/2001/XMLSchema-instance" xsi:schemaLocation="http://maven.apache.org/POM/4.0.0 http://maven.apache.org/maven-v4_0_0.xsd"> <modelVersion>4.0.0</modelVersion> <groupId>org.riversun</groupId> <artifactId>my-jetty-app</artifactId> <version>1.0.0</version> <packaging>jar</packaging> <name>my-jetty-app</name> <description>jetty app on elastic beanstalk</description> <properties> <project.build.sourceEncoding>UTF-8</project.build.sourceEncoding> <jetty-version>9.4.19.v20190610</jetty-version> </properties> <dependencies> <!-- for server --> <dependency> <groupId>javax.servlet</groupId> <artifactId>javax.servlet-api</artifactId> <version>3.1.0</version> </dependency> <dependency> <groupId>org.eclipse.jetty</groupId> <artifactId>jetty-annotations</artifactId> <version>${jetty-version}</version> </dependency> <dependency> <groupId>org.eclipse.jetty</groupId> <artifactId>jetty-webapp</artifactId> <version>${jetty-version}</version> </dependency> <dependency> <groupId>org.eclipse.jetty</groupId> <artifactId>apache-jsp</artifactId> <version>${jetty-version}</version> <type>jar</type> </dependency> <dependency> <groupId>org.eclipse.jetty</groupId> <artifactId>apache-jstl</artifactId> <version>${jetty-version}</version> <type>pom</type> </dependency> <dependency> <groupId>com.fasterxml.jackson.core</groupId> <artifactId>jackson-databind</artifactId> <version>2.9.9</version> </dependency> </dependencies> <build> <plugins> <plugin> <groupId>org.apache.maven.plugins</groupId> <artifactId>maven-compiler-plugin</artifactId> <version>3.8.1</version> <configuration> <source>1.8</source> <target>1.8</target> <excludes> <exclude>examples/**/*</exclude> </excludes> </configuration> </plugin> <plugin> <groupId>org.apache.maven.plugins</groupId> <artifactId>maven-javadoc-plugin</artifactId> <version>3.1.0</version> <executions> <execution> <id>attach-javadocs</id> <goals> <goal>jar</goal> </goals> </execution> </executions> <configuration> <author>true</author> <source>1.7</source> <show>protected</show> <encoding>UTF-8</encoding> <charset>UTF-8</charset> <docencoding>UTF-8</docencoding> <doclint>none</doclint> <additionalJOption>-J-Duser.language=en</additionalJOption> </configuration> </plugin> <!-- add source folders --> <plugin> <groupId>org.codehaus.mojo</groupId> <artifactId>build-helper-maven-plugin</artifactId> <version>3.0.0</version> <executions> <execution> <phase>generate-sources</phase> <goals> <goal>add-source</goal> </goals> <configuration> <sources> <source>src/main/java</source> </sources> </configuration> </execution> </executions> </plugin> <plugin> <groupId>org.apache.maven.plugins</groupId> <artifactId>maven-assembly-plugin</artifactId> <executions> <!-- ソースコードをfat-jar化する --> <execution> <id>package-jar</id> <phase>package</phase> <goals> <goal>single</goal> </goals> <configuration> <appendAssemblyId>true</appendAssemblyId> <archive> <manifest> <mainClass>myserver.StartServer</mainClass> </manifest> </archive> <finalName>${project.artifactId}</finalName> <descriptorRefs> <descriptorRef>jar-with-dependencies</descriptorRef> </descriptorRefs> </configuration> </execution> <!-- Elastic Beanstalkにアップロードするzip(fat.jarや関連ファイルを含む)を作成する --> <execution> <id>package-zip</id> <phase>package</phase> <goals> <goal>single</goal> </goals> <configuration> <appendAssemblyId>true</appendAssemblyId> <finalName>${project.artifactId}</finalName> <descriptors> <descriptor>src/main/assembly/zip.xml</descriptor> </descriptors> </configuration> </execution> </executions> </plugin> </plugins> <resources> <resource> <directory>src/main/resources</directory> </resource> </resources> </build> </project>以下、ポイントだけみていく。
mavenのartifactId
以下はartifactIdとしてmy-jetty-appとした。
この後のビルドで生成されるファイル名などもこのartifactIdの値が使われる<groupId>org.riversun</groupId> <artifactId>my-jetty-app</artifactId>maven-assembly-pluginの設定
以下はmaven-assembly-pluginの設定を行っている。
maven-assembly-pluginとは、配布用のjarファイルやzipファイルを作るためのmavenプラグイン。
このmaven-assembly-pluginには2つのタスクをさせている。<plugin> <groupId>org.apache.maven.plugins</groupId> <artifactId>maven-assembly-plugin</artifactId> <executions> <!-- ソースコードをfat-jar化する --> <execution> <id>package-jar</id> <phase>package</phase> <goals> <goal>single</goal> </goals> <configuration> <appendAssemblyId>true</appendAssemblyId> <archive> <manifest> <mainClass>myserver.StartServer</mainClass> </manifest> </archive> <finalName>${project.artifactId}</finalName> <descriptorRefs> <descriptorRef>jar-with-dependencies</descriptorRef> </descriptorRefs> </configuration> </execution> <!-- Elastic Beanstalkにアップロードするzip(fat.jarや関連ファイルを含む)を作成する --> <execution> <id>package-zip</id> <phase>package</phase> <goals> <goal>single</goal> </goals> <configuration> <appendAssemblyId>true</appendAssemblyId> <finalName>${project.artifactId}</finalName> <descriptors> <descriptor>src/main/assembly/zip.xml</descriptor> </descriptors> </configuration> </execution> </executions> </plugin>その1 JARファイル生成
まず前半の設定に注目。<execution> <id>package-jar</id> <phase>package</phase> <goals> <goal>single</goal> </goals> <configuration> <appendAssemblyId>true</appendAssemblyId> <archive> <manifest> <mainClass>myserver.StartServer</mainClass> </manifest> </archive> <finalName>${project.artifactId}</finalName> <descriptorRefs> <descriptorRef>jar-with-dependencies</descriptorRef> </descriptorRefs> </configuration> </execution>ここで記述しているのはJavaソースコードを1つのJARファイルにまとめること。
つまり、FAT JARを作るためのタスク設定となる。
<mainClass>myserver.StartServer</mainClass>はJARファイルを実行するときの起動クラス。
<finalName>${project.artifactId}</finalName>は、最終的にできあがるJARファイルのファイル名がartifactIdで指定された値=my-jetty-app-[AssemblyId].jarとなる。
<descriptorRef>jar-with-dependencies</descriptorRef>はmavenのdependenciesに記載した依存ライブラリも一緒にJARファイルとしてパッケージする。
<appendAssemblyId>true</appendAssemblyId>は、生成されるJARファイルのファイル名にAssemblyIdをつけるか否かをセットする。もしこれをtrueにすると、JARファイル名はmy-jetty-app-jar-with-dependencies.jarとなる。ここで設定した条件でJARファイルを生成するには
mvn packageとすればよい。するとtargetディレクトリにmy-jetty-app-jar-with-dependencies.jarが生成される
その2 ZIPファイルの生成
次は後半の設定
   <execution>
      <id>package-zip</id>
      <phase>package</phase>
      <goals>
        <goal>single</goal>
      </goals>
      <configuration>
        <appendAssemblyId>true</appendAssemblyId>
        <finalName>${project.artifactId}</finalName>
        <descriptors>
          <descriptor>src/main/assembly/zip.xml</descriptor>
        </descriptors>
      </configuration>
    </execution>
ここで記述しているのは、上でつくったJARファイルとElastic Beanstalk関連ファイル(Procfileなど)をZIPファイルにまとめるタスクとなる。
<finalName>${project.artifactId}</finalName>としているところはJARのときと同じく生成されるファイル名を指定している。ZIPの生成ルールは外だしされた設定ファイルである
<descriptor>src/main/assembly/zip.xml</descriptor>で設定する。src/main/assembly/zip.xml
さて、その外だしされた zip.xmlをみてみる。
これは最終的にZIPファイルを生成するときの生成ルールとなる。
<include>でJARファイルとProcfileなどを指定して、Elastic Beanstalkにアップロードする形式のZIPファイルの生成方法を指示している。zip.xml<?xml version="1.0" encoding="UTF-8"?> <assembly xmlns="http://maven.apache.org/plugins/maven-assembly-plugin/assembly/1.1.2" xmlns:xsi="http://www.w3.org/2001/XMLSchema-instance" xsi:schemaLocation="http://maven.apache.org/plugins/maven-assembly-plugin/assembly/1.1.2 http://maven.apache.org/xsd/assembly-1.1.2.xsd"> <id>eb</id> <baseDirectory>/</baseDirectory> <formats> <format>zip</format> </formats> <fileSets> <fileSet> <directory>${project.basedir}</directory> <outputDirectory>/</outputDirectory> <includes> <include>Procfile</include> <include>Buildfile</include> <include>.ebextensions/*</include> </includes> </fileSet> <fileSet> <directory>${project.build.directory}</directory> <outputDirectory>/</outputDirectory> <includes> <include>my-jetty-app-jar-with-dependencies.jar</include> <!-- <include>*.jar</include> --> </includes> </fileSet> </fileSets> </assembly>最終的に生成されるZIPファイルのファイル名はmy-jetty-app-[id].zipとなる。
zip.xmlでは、<id>eb</id>と指定しているので、生成されるZIPファイル名はmy-jetty-app-eb.zipとなる。まとめると必要パッケージを生成するためのmavenコマンド
mvn packageを実行するとmy-jetty-app-jar-with-dependencies.jarとmy-jetty-app-eb.zipの両方がtargetディレクトリ以下に生成されることになる。ここは、あとで実際にdeployファイルを生成するところでもう一度確認する。
/Procfile
ProcfileはElastic BeanstalkのEC2内でJARを実行するためのファイル。
Elastic BeanstalkのEC2上でアプリを起動するためのコマンドを
web:以下に記載する。Procfileweb: java -jar my-jetty-app-jar-with-dependencies.jar↓のように起動オプションを記述してもOK
web: java -jar my-jetty-app-jar-with-dependencies.jar -Xms256m詳細は公式参照
.elasticbeanstalk/config.yml
config.ymlにはデプロイ情報を記述する
ここにはElastic Beansalkにデプロイするファイルtarget/my-jetty-app-eb.zipを指定している。config.ymldeploy: artifact: target/my-jetty-app-eb.zipElastic Beanstalkにデプロイする際に、このファイルが参照される。
いまは
deploy:artifact:しか記述していないが、これからEB CLIをつかってElastic Beanstalkのデプロイ設定をしていく過程でこのconfig.ymlに必要な値が追加されていく。EB CLIを使ってアプリをデプロイする
ファイルの意味をざっくり理解できたところで、さっそくElastic Beanstalkにアプリをデプロイする。
EB CLIを使ってElastic BeanstalkアプリケーションをAWS上に作る
1.アプリのディレクトリに移動する
cd java-jetty-app-on-elasticbeanstalk2.Elastic BeanstalkにJava用の箱*を作る
(* 箱=アプリケーション)そのためのEB CLIのコマンドは以下の形式となる。
eb init アプリ名 --region リージョン名 --platform プラットフォーム ここではアプリ名をmy-eb-app、リージョンは東京リージョン(ap-northeast-1)、プラットフォームをjava-8とする
コマンドは以下のようになる。
eb init my-eb-app --region ap-northeast-1 --platform java-8すると
Application my-eb-app has been created.というメッセージがでて、
AWS Elasticbeanstalk上にアプリケーションの箱ができるさっそくWebコンソールで確認すると箱(アプリケーション)ができている
https://ap-northeast-1.console.aws.amazon.com/elasticbeanstalk/home
さて、ソースコードにある/.elasticbeanstalk/config.ymlを見てみる。
上記コマンドで、config.ymlも更新され、以下のようになっている。
config.ymlbranch-defaults: master: environment: null deploy: artifact: target/my-jetty-app-eb.zip global: application_name: my-eb-app branch: null default_ec2_keyname: null default_platform: java-8 default_region: ap-northeast-1 include_git_submodules: true instance_profile: null platform_name: null platform_version: null profile: eb-cli repository: null sc: git workspace_type: ApplicationTIPS
------------もし、Credential情報が登録されていなければ、以下のようにaws-access-idとaws-secret-keyを聞かれるので入力する。
eb init my-eb-app --region ap-northeast-1 --platform java-8
You have not yet set up your credentials or your credentials are incorrect
You must provide your credentials.
(aws-access-id): xxxxx
(aws-secret-key): xxxxx
Application my-eb-app has been created.
1回入力すれば、
[user]/.awsディレクトリ以下にconfigファイルができるので、次からは聞かれない。------------
デプロイ用のパッケージを作る
さきほどみてきたように、Elastic BeanstalkにデプロイするためのZIPファイルを生成する。
ZIP生成はMavenでやるので
maven packageコマンドをたたく(cleanもついでにやっておくと、コマンドは以下のとおり)
mvn clean package以下のようになり、無事 target/ディレクトリにmy-jetty-app-eb.zipが生成できた。
[INFO] --- maven-assembly-plugin:2.2-beta-5:single (package-zip) @ my-jetty-app ---
[INFO] Reading assembly descriptor: src/main/assembly/zip.xml
[INFO] Building zip: jetty-app-on-eb\target\my-jetty-app-eb.zip
[INFO] ------------------------------------------------------------------------
[INFO] BUILD SUCCESS
[INFO] ------------------------------------------------------------------------
[INFO] Total time: 32.984 s
[INFO] Finished at: 2019-07-01T15:55:14+09:00
[INFO] Final Memory: 37M/449M
[INFO] ------------------------------------------------------------------------
Elastic Beanstalkにデプロイし環境を構築する
いまから、つくったZIPファイルをEB CLIをつかってElastic Beanstalkにデプロイする
Elastic Beanstalkにデプロイするには、eb createコマンドを使う
eb createコマンドの使い方
eb createコマンドは以下のように指定する。
オプションは以下のとおり
eb create 環境の名前 [オプション][オプション]・・・[オプション]
オプション 説明 --cname URLのCNAMEを指定。
例 CNAMEにmy-jetty-app-test を指定すると
http://my-jetty-app-test.ap-northeast-1.elasticbeanstalk.com/
としてアクセスできる--instance_type インスタンスタイプ。
t2シリーズを指定する場合はVPC必須--elb-type ロードバランサーのタイプ
「application」を指定すると
アプリケーションロードバランサーになる。
あとで、独自ドメインやHTTPS対応するときにも
ロードバランサーあると楽--vpc.id VPCのID --vpc.elbpublic ロードバランサーを
パブリックサブネットに置く--vpc.elbsubnets ロードバランサーのサブネットIDを指定。
複数指定するときはカンマ区切り--vpc.publicip Elastic BeanstalkのEC2を
パブリックサブネットに置く--vpc.ec2subnets Elastic Beanstalkの
EC2のサブネットIDを指定。
複数指定するときはカンマ区切り詳しくは公式参照
それでは、
コマンドラインから以下を実行する。eb create my-jetty-app-test --cname my-jetty-app-test --instance_type t2.small --elb-type application --vpc.id vpc-xxxxxxxxxxxxxxxxx --vpc.elbpublic --vpc.elbsubnets subnet-xxxxxxxxxxxxxxxxx,subnet-yyyyyyyyyyyyyyyyy --vpc.publicip --vpc.ec2subnets subnet-xxxxxxxxxxxxxxxxx,subnet-yyyyyyyyyyyyyyyyy上記は実際のID等はダミーだが、環境名my-jetty-app-test、cnameがmy-jetty-app-testでEC2のインスタンスタイプがt2.small、ELB(ロードバランサー)がapplicationロードバランサー、VPCのIDがvpc-xxxxxxxxxxxxxxxxxとしてさきほどのZIPファイルをデプロイするコマンドとなる。
(どのZIPファイルがアップロードされるかは、.elasticbeanstalk/config.ymlで指定されているのでそれが参照される)
また、--vpc.elbpublic、--vpc.publicipはELB(ロードバランサー)とElastic BeanstalkのEC2が指定したVPC内のパブリックサブネットで実行されることを示している。--vpc.elbsubnetsと--vpc.ec2subnetsそれぞれおなじパブリック・サブネット(2つ)を指定してある。ELBはパブリックにアクセスできないとアプリにアクセスできないのでパブリックサブネットに置く。EC2側はパブリックサブネットに置く方法とプライベートサブネットにおく方法がある。本稿の例では、パブリックサブネットにおいているが、自動生成されたセキュリティグループによってELBからしかアクセスできないようになっている。ただし、パブリックIPは割り当てられる。
(よりセキュアにするにはEC2はプライベートサブネットに置くなど工夫ができるが、これはElastic BeanstalkというよりEC2,VPCまわりのセキュリティイシューなのでここでは割愛とする。)さて、上記コマンドを実行すると、以下のようにアップロードから環境構築までが自動的に実行される。
Uploading: [##################################################] 100% Done...

Environment details for: my-jetty-app-test
  Application name: my-eb-app
  Region: ap-northeast-1
  Deployed Version: app-1d5f-190705_00000
  Environment ID: e-2abc
  Platform: arn:aws:elasticbeanstalk:ap-northeast-1::platform/Java 8 running on 64bit Amazon Linux/2.8.6
  Tier: WebServer-Standard-1.0
  CNAME: my-jetty-app-test.ap-northeast-1.elasticbeanstalk.com
  Updated: 2019-07-01 07:08:01.989000+00:00

Printing Status:
2019-07-01 07:08:00    INFO    createEnvironment is starting.
2019-07-01 07:08:02    INFO    Using elasticbeanstalk-ap-northeast-1-000000000000 as Amazon S3 storage bucket for environment data.
2019-07-01 07:08:23    INFO    Created target group named: arn:aws:elasticloadbalancing:ap-northeast-1:000000000000:targetgroup/awseb-AWSEB-LMAAAA/000000000
2019-07-01 07:08:23    INFO    Created security group named: sg-11111111111111111
2019-07-01 07:08:39    INFO    Created security group named: sg-22222222222222222
2019-07-01 07:08:39    INFO    Created Auto Scaling launch configuration named: awseb-e-xxxxxxxxxx-stack-AWSEBAutoScalingLaunchConfiguration-3V
2019-07-01 07:09:41    INFO    Created Auto Scaling group named: awseb-e-xxxxxxxxxx-stack-AWSEBAutoScalingGroup-XXXXXXXXXXXX
2019-07-01 07:09:41    INFO    Waiting for EC2 instances to launch. This may take a few minutes.
2019-07-01 07:09:41    INFO    Created Auto Scaling group policy named: arn:aws:autoscaling:ap-northeast-1:000000000000:scalingPolicy:4e:autoScalingGroupName/awseb-e-
xxxxxxxxxx-stack-AWSEBAutoScalingGroup-XXXXXXXXXXXX:policyName/awseb-e-xxxxxxxxxx-stack-AWSEBAutoScalingScaleUpPolicy-FA
2019-07-01 07:09:42    INFO    Created Auto Scaling group policy named: arn:aws:autoscaling:ap-northeast-1:000000000000:scalingPolicy:8a:autoScalingGroupName/awseb-e-
xxxxxxxxxx-stack-AWSEBAutoScalingGroup-XXXXXXXXXXXX:policyName/awseb-e-xxxxxxxxxx-stack-AWSEBAutoScalingScaleDownPolicy-SSZW
2019-07-01 07:09:57    INFO    Created CloudWatch alarm named: awseb-e-xxxxxxxxxx-stack-AWSEBCloudwatchAlarmHigh-H0N
2019-07-01 07:09:57    INFO    Created CloudWatch alarm named: awseb-e-xxxxxxxxxx-stack-AWSEBCloudwatchAlarmLow-BX
2019-07-01 07:10:34    INFO    Created load balancer named: arn:aws:elasticloadbalancing:ap-northeast-1:000000000000:loadbalancer/app/awseb-AWSEB-1BQ
2019-07-01 07:10:34    INFO    Created Load Balancer listener named: arn:aws:elasticloadbalancing:ap-northeast-1:000000000000:listener/app/awseb-AWSEB-1BQ
2019-07-01 07:11:05    INFO    Application available at my-jetty-app-test.ap-northeast-1.elasticbeanstalk.com.
2019-07-01 07:11:05    INFO    Successfully launched environment: my-jetty-app-test
環境構築が開始されると、Webコンソールでも状況を把握することができる。
デプロイできた模様
無事アプリが http://my-jetty-app-test.ap-northeast-1.elasticbeanstalk.com/ にデプロイされた模様
アクセスすると、
ちゃんとJSPやServletも動いている模様
まとめ
Java SEをつかったWebアプリをEB CLIをつかって、AWS Elastic Beanstalkにデプロイするまでの手順をハンズオン方式で紹介しました
結果、以下のような構成をコマンドから構築することができました
紹介した全ソースコードはこちらです
https://github.com/riversun/java-jetty-app-on-elasticbeanstalk.git続編「ゼロから始めるAWS Elastic Beanstalk #2」では、独自ドメイン対応、HTTPS対応、HTTP→HTTPSへのリダイレクト対応、Auto Scaling設定について、取り扱います。
- 投稿日:2019-07-08T00:23:08+09:00
JavaFX 初期状態
JavaFX初期状態
Main.javaMain.javaimport javafx.application.Application; import javafx.fxml.FXMLLoader; import javafx.scene.Parent; import javafx.scene.Scene; import javafx.stage.Stage; public class Main extends Application { @Override public void start(Stage primaryStage) throws Exception{ Parent root = FXMLLoader.load(getClass().getResource("sample.fxml")); primaryStage.setTitle("Hello World"); primaryStage.setScene(new Scene(root, 300, 275)); primaryStage.show(); } public static void main(String[] args) { launch(args); } }Controller.java
Controller.javapackage sample; public class Controller { }sample.fxml
sample.fxml<?import javafx.scene.layout.GridPane?> <GridPane fx:controller="sample.Controller" xmlns:fx="http://javafx.com/fxml" alignment="center" hgap="10" vgap="10"> </GridPane>


