- 投稿日:2019-03-02T23:20:56+09:00
Protocolを使用してViewControllerに自身の使命以外を忘却させる [swift][iOS]
モチベーション
Viewの抽象度に合わせビジネスロジックも抽象化したい.
例えば,ViewがimageViewやlabelの中身を差し替えるだけで複数のEntityの表示が出来るような設計になっているのに,そのデータを差し込むところで具体的な実装に依存していると同じようなロジックがプロジェクト内に点在するようになってしまう ?
それを防ぐべく,Protocolを使っていろんなものを抽象化していき,同僚を,家族を,世界を笑顔にする.そんなコードにしたい.環境
Xcode10.1
swift4.2具体例
下記に示すコードを例に以降の説明を行います.
ある2つの異なるcollectionViewがあり,本と音楽の情報が羅列されています.
- 表示するcellはどちらのViewControllerでもConetntCellクラスです.cellをタップするとそれぞれのVCが持っているサービスクラスからAPIにPostします.
BookListViewController.swiftfunc collectionView(_ collectionView: UICollectionView, didSelectItemAt indexPath: IndexPath) { let book = self.books[indexPath.row] self.bookService.bookmark(id: book.id) } func collectionView(_ collectionView: UICollectionView, cellForItemAt indexPath: IndexPath) -> UICollectionViewCell { let cell = collectionView.dequeueReusableCell(withReuseIdentifier: "ContentCell", for: indexPath) as! ContentCell let book = self.books[indexPath.row] cell.update(title: book.title, thumbnailUrlString: book.thumbnailUrlString, description: book.description) return cell }MusicListViewController.swiftfunc collectionView(_ collectionView: UICollectionView, didSelectItemAt indexPath: IndexPath) { let music = self.musics[indexPath.row] self.musicService.bookmark(id: music.id) } func collectionView(_ collectionView: UICollectionView, cellForItemAt indexPath: IndexPath) -> UICollectionViewCell { let cell = collectionView.dequeueReusableCell(withReuseIdentifier: "ContentCell", for: indexPath) as! ContentCell let music = self.musics[indexPath.row] cell.update(title: music.title, thumbnailUrlString: music.thumbnailUrlString, description: music.description) return cell }
- cellに表示するデータソースはViewDidLoadでイニシャライズします. また,Entityの取得などを請け負うサービスクラスはinit(service:)で受け取ります.
BookListViewController.swiftinit(service: BookService) { self.service = service } override func viewDidLoad() { super.viewDidLoad() self.datasource = service.books() }MusicListViewController.swiftinit(service: MusicService) { self.service = service } override func viewDidLoad() { super.viewDidLoad() self.datasource = service.musics() }
- サービスはこんな感じをイメージしてください.
BookService.swiftstruct Book: Codable { var id: Int var title: String var description: String var author: String var thumbnailUrlString: String } final class BookService { private let api: MyAppAPI init(api: MyAppAPI) { self.api = api } func bookmark(id: String) -> Bool { return api.book(.bookmark(id)) } func books() -> [Book] { return api.book(.all) } }MusicService.swiftstruct Music: Codable { var id: Int var title: String var description: String var artist: String var thumbnailUrlString: String } final class MusicService { private let api: MyAppAPI init(api: MyAppAPI) { self.api = api } func bookmark(id: String) -> Bool { return api.music(.bookmark) } func musics() -> [Music] { return api.music(.all) } }ViewControllerはAPIの問い合わせ先が違うだけで,機能やレイアウトは殆ど同じといっていいです.
現在2つに分かれているViewControllerを1つにすることが出来れば保守コストを下げれそうです. 例えば,セルサイズの変更やActivityIndicatorの追加に強くなれそうだと思います.
外部からデータソースを受け渡しを行う事も可能ですが,やはり自分で表示するものは自分でもってきた方が見通しが良さそうなのでProtocolを使ってサービスクラスの受け渡しを行いたいと思います.改修
まず,プロトコルを作ります.
これで,ViewControllerのinit(service:)に受け取る型をContentServiceableに,保持するデータソースの型をContentableに変更することで,ViewControllerは実際にどこに問い合わせて何が返ってくるかを忘れました.ContentProtocols.swiftprotocol ContentServiceable { func bookmark(id: String) -> Bool func fetch(page: Int) -> [Contentable] } protocol Contentable { var id: Int { get set } var title: String { get set } var description: String { get set } var thumbnailUrlString: String { get set } }次に作成しプロトコルに準拠させます.
final class BookService: ContentServiceable {
    private let api: MyAppAPI
    init(api: MyAppAPI) {
        self.api = api
    }
    func bookmark(id: String) -> Bool {
        return api.book(.bookmark(id))
    }

    func books() -> [Book] {
        return api.book(.all)
    }
    // おなじ事するメソッドが増えるのはちょっと嫌......
    func fetch() -> [Contentable] {
        return books()
    }
}

final class MusicService: ContentServiceable  {
    private let api: MyAppAPI
    init(api: MyAppAPI) {
        self.api = api
    }
    func bookmark(id: String) -> Bool {
        return api.music(.bookmark)
    }

    func musics() -> [Music] {
        return api.music(.all)
    }

    func fetch() -> [Contentable] {
        return musics()
    }
}
以上でViewControllerに渡してあげるserviceをpresentするViewControllerで制御してあげることで,表示するコンテンツを切り分けることが出来るはずです.
おわりに
ReactorKitでめちゃくちゃ使い回されるCellのReactorクラスを書いてたときに思いつきました(内部に持っているボタンをタップされたとき,あるときはLikeをするしあるときはBookmarkをする,そんなCell).
ReactorKitに依存したコードを示すのもわかりにくいかなと思い,今回はViewControllerを使った例で紹介しました.
iOS勉強中なのでコメント頂けると嬉しいです.
- 投稿日:2019-03-02T23:20:56+09:00
Protocolを使用してViewControllerに自身の使命以外を忘却させる忘却の城ViewController [swift][iOS]
モチベーション
Viewの抽象度に合わせビジネスロジックも抽象化したい.
例えば,ViewがimageViewやlabelの中身を差し替えるだけで複数のEntityの表示が出来るような設計になっているのに,そのデータを差し込むところで具体的な実装に依存していると同じようなロジックがプロジェクト内に点在するようになってしまう ?
それを防ぐべく,Protocolを使っていろんなものを抽象化していき,同僚を,家族を,世界を笑顔にする.そんなコードにしたい.ゴール
APIへの問い合わせを行うサービスクラスやEntityをporotocolで抽象化して,2つに分かれているViewControllerを1つのViewControllerで表現してみる.
環境
Xcode10.1
swift4.2具体例
下記に示すコードを例に以降の説明を行います.
ある2つの異なるcollectionViewがあり,本と音楽の情報が羅列されています.
- 表示するcellはどちらのViewControllerでもConetntCellクラスです.cellをタップするとそれぞれのVCが持っているサービスクラスからAPIにPostします.
BookListViewController.swiftfunc collectionView(_ collectionView: UICollectionView, didSelectItemAt indexPath: IndexPath) { let book = self.books[indexPath.row] self.bookService.bookmark(id: book.id) } func collectionView(_ collectionView: UICollectionView, cellForItemAt indexPath: IndexPath) -> UICollectionViewCell { let cell = collectionView.dequeueReusableCell(withReuseIdentifier: "ContentCell", for: indexPath) as! ContentCell let book = self.books[indexPath.row] cell.update(title: book.title, thumbnailUrlString: book.thumbnailUrlString, description: book.description) return cell }MusicListViewController.swiftfunc collectionView(_ collectionView: UICollectionView, didSelectItemAt indexPath: IndexPath) { let music = self.musics[indexPath.row] self.musicService.bookmark(id: music.id) } func collectionView(_ collectionView: UICollectionView, cellForItemAt indexPath: IndexPath) -> UICollectionViewCell { let cell = collectionView.dequeueReusableCell(withReuseIdentifier: "ContentCell", for: indexPath) as! ContentCell let music = self.musics[indexPath.row] cell.update(title: music.title, thumbnailUrlString: music.thumbnailUrlString, description: music.description) return cell }
- cellに表示するデータソースはViewDidLoadでイニシャライズします. また,Entityの取得などを請け負うサービスクラスはinit(service:)で受け取ります.
BookListViewController.swiftinit(service: BookService) { self.service = service } override func viewDidLoad() { super.viewDidLoad() self.datasource = service.books() }MusicListViewController.swiftinit(service: MusicService) { self.service = service } override func viewDidLoad() { super.viewDidLoad() self.datasource = service.musics() }
- サービスはこんな感じをイメージしてください.
BookService.swiftstruct Book: Codable { var id: Int var title: String var description: String var author: String var thumbnailUrlString: String } final class BookService { private let api: MyAppAPI init(api: MyAppAPI) { self.api = api } func bookmark(id: String) -> Bool { return api.book(.bookmark(id)) } func books() -> [Book] { return api.book(.all) } }MusicService.swiftstruct Music: Codable { var id: Int var title: String var description: String var artist: String var thumbnailUrlString: String } final class MusicService { private let api: MyAppAPI init(api: MyAppAPI) { self.api = api } func bookmark(id: String) -> Bool { return api.music(.bookmark) } func musics() -> [Music] { return api.music(.all) } }ViewControllerはAPIの問い合わせ先が違うだけで,機能やレイアウトは殆ど同じといっていいです.
現在2つに分かれているViewControllerを1つにすることが出来れば保守コストを下げれそうです. 例えば,セルサイズの変更やActivityIndicatorの追加に強くなれそうだと思います.
外部からデータソースを受け渡しを行う事も可能ですが,やはり自分で表示するものは自分でもってきた方が見通しが良さそうなのでProtocolを使ってサービスクラスの受け渡しを行いたいと思います.改修
まず,プロトコルを作ります.
これで,ViewControllerのinit(service:)に受け取る型をContentServiceableに,保持するデータソースの型をContentableに変更することで,ViewControllerは実際にどこに問い合わせて何が返ってくるかを忘れました.ContentProtocols.swiftprotocol ContentServiceable { func bookmark(id: String) -> Bool func fetch(page: Int) -> [Contentable] } protocol Contentable { var id: Int { get set } var title: String { get set } var description: String { get set } var thumbnailUrlString: String { get set } }次に作成しプロトコルに準拠させます.
final class BookService: ContentServiceable {
    private let api: MyAppAPI
    init(api: MyAppAPI) {
        self.api = api
    }
    func bookmark(id: String) -> Bool {
        return api.book(.bookmark(id))
    }

    func books() -> [Book] {
        return api.book(.all)
    }
    // おなじ事するメソッドが増えるのはちょっと嫌......
    func fetch() -> [Contentable] {
        return books()
    }
}

final class MusicService: ContentServiceable  {
    private let api: MyAppAPI
    init(api: MyAppAPI) {
        self.api = api
    }
    func bookmark(id: String) -> Bool {
        return api.music(.bookmark)
    }

    func musics() -> [Music] {
        return api.music(.all)
    }

    func fetch() -> [Contentable] {
        return musics()
    }
}
以上でViewControllerに渡してあげるserviceをpresentするViewControllerで制御してあげることで,表示するコンテンツを切り分けることが出来るはずです.
このViewControllerはどのエンドポイントに問い合わせするとか,何のEntityを表示するとか,一切合切忘却しました.
おわりに
ReactorKitでめちゃくちゃ使い回されるCellのReactorクラスを書いてたときに思いつきました(内部に持っているボタンをタップされたとき,あるときはLikeをするしあるときはBookmarkをする,そんなCell).
ReactorKitに依存したコードを示すのもわかりにくいかなと思い,今回はViewControllerを使った例で紹介しました.
iOS勉強中なのでコメント頂けると嬉しいです.
- 投稿日:2019-03-02T23:20:56+09:00
Protocolを使用してViewControllerに自身の使命以外を忘却させる[swift][iOS][忘却の城ViewController]
モチベーション
Viewの抽象度に合わせビジネスロジックも抽象化したい.
例えば,ViewがimageViewやlabelの中身を差し替えるだけで複数のEntityの表示が出来るような設計になっているのに,そのデータを差し込むところで具体的な実装に依存していると同じようなロジックがプロジェクト内に点在するようになってしまう ?
それを防ぐべく,Protocolを使っていろんなものを抽象化していき,同僚を,家族を,世界を笑顔にする.そんなコードにしたい.ゴール
APIへの問い合わせを行うサービスクラスやEntityをporotocolで抽象化して,2つに分かれているViewControllerを1つのViewControllerで表現してみる.
環境
Xcode10.1
swift4.2具体例
下記に示すコードを例に以降の説明を行います.
ある2つの異なるcollectionViewがあり,本と音楽の情報が羅列されています.
- 表示するcellはどちらのViewControllerでもConetntCellクラスです.cellをタップするとそれぞれのVCが持っているサービスクラスからAPIにPostします.
BookListViewController.swiftfunc collectionView(_ collectionView: UICollectionView, didSelectItemAt indexPath: IndexPath) { let book = self.books[indexPath.row] self.bookService.bookmark(id: book.id) } func collectionView(_ collectionView: UICollectionView, cellForItemAt indexPath: IndexPath) -> UICollectionViewCell { let cell = collectionView.dequeueReusableCell(withReuseIdentifier: "ContentCell", for: indexPath) as! ContentCell let book = self.books[indexPath.row] cell.update(title: book.title, thumbnailUrlString: book.thumbnailUrlString, description: book.description) return cell }MusicListViewController.swiftfunc collectionView(_ collectionView: UICollectionView, didSelectItemAt indexPath: IndexPath) { let music = self.musics[indexPath.row] self.musicService.bookmark(id: music.id) } func collectionView(_ collectionView: UICollectionView, cellForItemAt indexPath: IndexPath) -> UICollectionViewCell { let cell = collectionView.dequeueReusableCell(withReuseIdentifier: "ContentCell", for: indexPath) as! ContentCell let music = self.musics[indexPath.row] cell.update(title: music.title, thumbnailUrlString: music.thumbnailUrlString, description: music.description) return cell }
- cellに表示するデータソースはViewDidLoadでイニシャライズします. また,Entityの取得などを請け負うサービスクラスはinit(service:)で受け取ります.
BookListViewController.swiftinit(service: BookService) { self.service = service } override func viewDidLoad() { super.viewDidLoad() self.datasource = service.books() }MusicListViewController.swiftinit(service: MusicService) { self.service = service } override func viewDidLoad() { super.viewDidLoad() self.datasource = service.musics() }
- サービスはこんな感じをイメージしてください.
BookService.swiftstruct Book: Codable { var id: Int var title: String var description: String var author: String var thumbnailUrlString: String } final class BookService { private let api: MyAppAPI init(api: MyAppAPI) { self.api = api } func bookmark(id: String) -> Bool { return api.book(.bookmark(id)) } func books() -> [Book] { return api.book(.all) } }MusicService.swiftstruct Music: Codable { var id: Int var title: String var description: String var artist: String var thumbnailUrlString: String } final class MusicService { private let api: MyAppAPI init(api: MyAppAPI) { self.api = api } func bookmark(id: String) -> Bool { return api.music(.bookmark) } func musics() -> [Music] { return api.music(.all) } }ViewControllerはAPIの問い合わせ先が違うだけで,機能やレイアウトは殆ど同じといっていいです.
現在2つに分かれているViewControllerを1つにすることが出来れば保守コストを下げれそうです. 例えば,セルサイズの変更やActivityIndicatorの追加に強くなれそうだと思います.
外部からデータソースを受け渡しを行う事も可能ですが,やはり自分で表示するものは自分でもってきた方が見通しが良さそうなのでProtocolを使ってサービスクラスの受け渡しを行いたいと思います.改修
まず,プロトコルを作ります.
これで,ViewControllerのinit(service:)に受け取る型をContentServiceableに,保持するデータソースの型をContentableに変更することで,ViewControllerは実際にどこに問い合わせて何が返ってくるかを忘れました.ContentProtocols.swiftprotocol ContentServiceable { func bookmark(id: String) -> Bool func fetch(page: Int) -> [Contentable] } //ContentCellでの使用を想定しているからこのような名前にしてみた protocol Contentable { var id: Int { get set } var title: String { get set } var description: String { get set } var thumbnailUrlString: String { get set } }次に作成しプロトコルに準拠させます.
final class BookService: ContentServiceable {
    private let api: MyAppAPI
    init(api: MyAppAPI) {
        self.api = api
    }
    func bookmark(id: String) -> Bool {
        return api.book(.bookmark(id))
    }

    func books() -> [Book] {
        return api.book(.all)
    }
    // おなじ事するメソッドが増えるのはちょっと嫌......
    func fetch() -> [Contentable] {
        return books()
    }
}

final class MusicService: ContentServiceable  {
    private let api: MyAppAPI
    init(api: MyAppAPI) {
        self.api = api
    }
    func bookmark(id: String) -> Bool {
        return api.music(.bookmark)
    }

    func musics() -> [Music] {
        return api.music(.all)
    }

    func fetch() -> [Contentable] {
        return musics()
    }
}
以上でViewControllerに渡してあげるserviceをpresentするViewControllerで制御してあげることで,表示するコンテンツを切り分けることが出来るはずです.
このViewControllerはどのエンドポイントに問い合わせするとか,何のEntityを表示するとか,一切合切忘却しました.
おわりに
ReactorKitでめちゃくちゃ使い回されるCellのReactorクラスを書いてたときに思いつきました(内部に持っているボタンをタップされたとき,あるときはLikeをするしあるときはBookmarkをする,そんなCell).
ReactorKitに依存したコードを示すのもわかりにくいかなと思い,今回はViewControllerを使った例で紹介しました.
iOS勉強中なのでコメント頂けると嬉しいです.
- 投稿日:2019-03-02T23:20:56+09:00
Protocolを使用してViewControllerに自身の使命以外を忘却させる[swift][iOS]
モチベーション
Viewの抽象度に合わせビジネスロジックも抽象化したい.
例えば,ViewがimageViewやlabelの中身を差し替えるだけで複数のEntityの表示が出来るような設計になっているのに,そのデータを差し込むところで具体的な実装に依存していると同じようなロジックがプロジェクト内に点在するようになってしまう ?
それを防ぐべく,Protocolを使っていろんなものを抽象化していき,同僚を,家族を,世界を笑顔にする.そんなコードにしたい.ゴール
APIへの問い合わせを行うサービスクラスやEntityをProtocolで抽象化して,2つに分かれているViewControllerを1つのViewControllerで表現してみる.
環境
Xcode10.1
swift4.2具体例
下記に示すコードを例に以降の説明を行います.
ある2つの異なるcollectionViewがあり,本と音楽の情報が羅列されています.
- 表示するcellはどちらのViewControllerでもConetntCellクラスです.cellをタップするとそれぞれのVCが持っているサービスクラスからAPIにPostします.
BookListViewController.swiftfunc collectionView(_ collectionView: UICollectionView, didSelectItemAt indexPath: IndexPath) { let book = self.books[indexPath.row] self.bookService.bookmark(id: book.id) } func collectionView(_ collectionView: UICollectionView, cellForItemAt indexPath: IndexPath) -> UICollectionViewCell { let cell = collectionView.dequeueReusableCell(withReuseIdentifier: "ContentCell", for: indexPath) as! ContentCell let book = self.books[indexPath.row] cell.update(title: book.title, thumbnailUrlString: book.thumbnailUrlString, description: book.description) return cell }MusicListViewController.swiftfunc collectionView(_ collectionView: UICollectionView, didSelectItemAt indexPath: IndexPath) { let music = self.musics[indexPath.row] self.musicService.bookmark(id: music.id) } func collectionView(_ collectionView: UICollectionView, cellForItemAt indexPath: IndexPath) -> UICollectionViewCell { let cell = collectionView.dequeueReusableCell(withReuseIdentifier: "ContentCell", for: indexPath) as! ContentCell let music = self.musics[indexPath.row] cell.update(title: music.title, thumbnailUrlString: music.thumbnailUrlString, description: music.description) return cell }
- cellに表示するデータソースはViewDidLoadでイニシャライズします. また,Entityの取得などを請け負うサービスクラスはinit(service:)で受け取ります.
BookListViewController.swiftinit(service: BookService) { self.service = service } override func viewDidLoad() { super.viewDidLoad() self.datasource = service.books() }MusicListViewController.swiftinit(service: MusicService) { self.service = service } override func viewDidLoad() { super.viewDidLoad() self.datasource = service.musics() }
- サービスはこんな感じをイメージしてください.MyAppAPの感じは見逃して下さい.
BookService.swiftstruct Book: Codable { var id: Int var title: String var description: String var author: String var thumbnailUrlString: String } final class BookService { private let api: MyAppAPI init(api: MyAppAPI) { self.api = api } func bookmark(id: String) -> Bool { return api.book(.bookmark(id)) } func books() -> [Book] { return api.book(.all) } }MusicService.swiftstruct Music: Codable { var id: Int var title: String var description: String var artist: String var thumbnailUrlString: String } final class MusicService { private let api: MyAppAPI init(api: MyAppAPI) { self.api = api } func bookmark(id: String) -> Bool { return api.music(.bookmark) } func musics() -> [Music] { return api.music(.all) } }ViewControllerはAPIの問い合わせ先が違うだけで,機能やレイアウトは殆ど同じといっていいです.
現在2つに分かれているViewControllerを1つにすることが出来れば保守コストを下げれそうです.
例えば,セルサイズの変更やActivityIndicatorの追加に強くなれそうだと思います.
外部からデータソースを受け渡しを行う事も可能ですが,やはり自分で表示するものは自分でもってきた方が見通しが良さそうなのでProtocolを使ってサービスクラスの受け渡しを行いたいと思います.改修
まず,プロトコルを作ります.
これで,ViewControllerのinit(service:)に受け取る型をContentServiceableに,保持するデータソースの型をContentableに変更することで,ViewControllerは実際にどこに問い合わせて何が返ってくるかを忘れました.ContentProtocols.swiftprotocol ContentServiceable { func bookmark(id: String) -> Bool func fetch(page: Int) -> [Contentable] } //ContentCellでの使用を想定しているからこのような名前にしてみた protocol Contentable { var id: Int { get set } var title: String { get set } var description: String { get set } var thumbnailUrlString: String { get set } }次に作成しプロトコルに準拠させます.
final class BookService: ContentServiceable {
    private let api: MyAppAPI
    init(api: MyAppAPI) {
        self.api = api
    }
    func bookmark(id: String) -> Bool {
        return api.book(.bookmark(id))
    }

    func books() -> [Book] {
        return api.book(.all)
    }
    // おなじ事するメソッドが増えるのはちょっと嫌......
    // extensionで切り分けると違和感ないかも.
    func fetch() -> [Contentable] {
        return books()
    }
}

final class MusicService: ContentServiceable  {
    private let api: MyAppAPI
    init(api: MyAppAPI) {
        self.api = api
    }
    func bookmark(id: String) -> Bool {
        return api.music(.bookmark)
    }

    func musics() -> [Music] {
        return api.music(.all)
    }

    func fetch() -> [Contentable] {
        return musics()
    }
}
以上でViewControllerに渡してあげるserviceをpresentするViewControllerで制御してあげることで,表示するコンテンツを切り分けることが出来るはずです.
同じふるまいをするViewControllerが1つになって,嬉しい.おわりに
ReactorKitでめちゃくちゃ使い回されるCellのReactorクラスを書いてたときに思いつきました(内部に持っているボタンをタップされたとき,あるときはLikeをするしあるときはBookmarkをする,そんなCell).
ReactorKitに依存したコードを示すのもわかりにくいかなと思い,今回はViewControllerを使った例で紹介しました.
iOS勉強中なのでコメント頂けると嬉しいです.
- 投稿日:2019-03-02T23:20:56+09:00
Protocolを使って汎用性のあるViewに汎用的なロジックを外部から入れる [swift]
モチベーション
Viewの抽象度に合わせビジネスロジックも抽象化したい.
例えば,ViewがimageViewやlabelの中身を差し替えるだけで複数のEntityの表示が出来るような設計になっているのに,そのデータを差し込むところで具体的な実装に依存していると同じようなロジックがプロジェクト内に点在するようになってしまう ?
それを防ぐべく,Protocolを使っていろんなものを抽象化していき,同僚を,家族を,世界を笑顔にする.そんなコードにしたい.具体例
下記に示すコードを例に以降の説明を行います.
ある2つの異なるcollectionViewがあり,本と音楽の情報が羅列されています.
- 表示するcellはどちらのViewControllerでもConetntCellクラスです.cellをタップするとそれぞれのVCが持っているサービスクラスからAPIにPostします.
BookListViewController.swiftfunc collectionView(_ collectionView: UICollectionView, didSelectItemAt indexPath: IndexPath) { let book = self.books[indexPath.row] self.bookService.bookmark(id: book.id) } func collectionView(_ collectionView: UICollectionView, cellForItemAt indexPath: IndexPath) -> UICollectionViewCell { let cell = collectionView.dequeueReusableCell(withReuseIdentifier: "ContentCell", for: indexPath) as! ContentCell let book = self.books[indexPath.row] cell.update(title: book.title, thumbnailUrlString: book.thumbnailUrlString, description: book.description) return cell }MusicListViewController.swiftfunc collectionView(_ collectionView: UICollectionView, didSelectItemAt indexPath: IndexPath) { let music = self.musics[indexPath.row] self.musicService.bookmark(id: music.id) } func collectionView(_ collectionView: UICollectionView, cellForItemAt indexPath: IndexPath) -> UICollectionViewCell { let cell = collectionView.dequeueReusableCell(withReuseIdentifier: "ContentCell", for: indexPath) as! ContentCell let music = self.musics[indexPath.row] cell.update(title: music.title, thumbnailUrlString: music.thumbnailUrlString, description: music.description) return cell }
- cellに表示するデータソースはViewDidLoadでイニシャライズします. また,Entityの取得などを請け負うサービスクラスはinit(service:)で受け取ります.
BookListViewController.swiftinit(service: BookService) { self.service = service } override func viewDidLoad() { super.viewDidLoad() self.datasource = service.books() }MusicListViewController.swiftinit(service: MusicService) { self.service = service } override func viewDidLoad() { super.viewDidLoad() self.datasource = service.musics() }
- サービスはこんな感じをイメージしてください.
BookService.swiftstruct Book: Codable { var id: Int var title: String var description: String var author: String var thumbnailUrlString: String } final class BookService { private let api: MyAppAPI init(api: MyAppAPI) { self.api = api } func bookmark(id: String) -> Bool { return api.book(.bookmark(id)) } func books() -> [Book] { return api.book(.all) } }MusicService.swiftstruct Music: Codable { var id: Int var title: String var description: String var artist: String var thumbnailUrlString: String } final class MusicService { private let api: MyAppAPI init(api: MyAppAPI) { self.api = api } func bookmark(id: String) -> Bool { return api.music(.bookmark) } func musics() -> [Music] { return api.music(.all) } }ViewControllerはAPIの問い合わせ先が違うだけで,機能やレイアウトは殆ど同じといっていいです.
現在2つに分かれているViewControllerを1つにすることが出来れば保守コストを下げれそうです. 例えば,セルサイズの変更やActivityIndicatorの追加に強くなれそうだと思います.
外部からデータソースを受け渡しを行う事も可能ですが,やはり自分で表示するものは自分でもってきた方が見通しが良さそうなのでProtocolを使ってサービスクラスの受け渡しを行いたいと思います.改修
まず,プロトコルを作ります.
これで,ViewControllerのinit(service:)に受け取る型をContentServiceableに,保持するデータソースの型をContentableに変更することで,ViewControllerは実際にどこに問い合わせて何が返ってくるかを忘れました.ContentProtocols.swiftprotocol ContentServiceable { func bookmark(id: String) -> Bool func fetch(page: Int) -> [Contentable] } protocol Contentable { var id: Int { get set } var title: String { get set } var description: String { get set } var thumbnailUrlString: String { get set } }次に作成しプロトコルに準拠させます.
final class BookService: ContentServiceable {
    private let api: MyAppAPI
    init(api: MyAppAPI) {
        self.api = api
    }
    func bookmark(id: String) -> Bool {
        return api.book(.bookmark(id))
    }

    func books() -> [Book] {
        return api.book(.all)
    }
    // おなじ事するメソッドが増えるのはちょっと嫌......
    func fetch() -> [Contentable] {
        return books()
    }
}

final class MusicService: ContentServiceable  {
    private let api: MyAppAPI
    init(api: MyAppAPI) {
        self.api = api
    }
    func bookmark(id: String) -> Bool {
        return api.music(.bookmark)
    }

    func musics() -> [Music] {
        return api.music(.all)
    }

    func fetch() -> [Contentable] {
        return musics()
    }
}
以上でViewControllerに渡してあげるserviceをpresentするViewControllerで制御してあげることで,表示するコンテンツを切り分けることが出来るはずです.
おわりに
ReactorKitでめちゃくちゃ使い回されるCellのReactorクラスを書いてたときに思いつきました.
ReactorKitに依存したコードを示すのもわかりにくいかなと思い,今回はViewControllerを使った例で紹介しました.
iOS勉強中なのでコメント頂けると嬉しいです.
- 投稿日:2019-03-02T22:04:37+09:00
ld: framework not found ****** clang: error: linker command failed with exit code 1 (use -v to see invocation)
エラーの再現
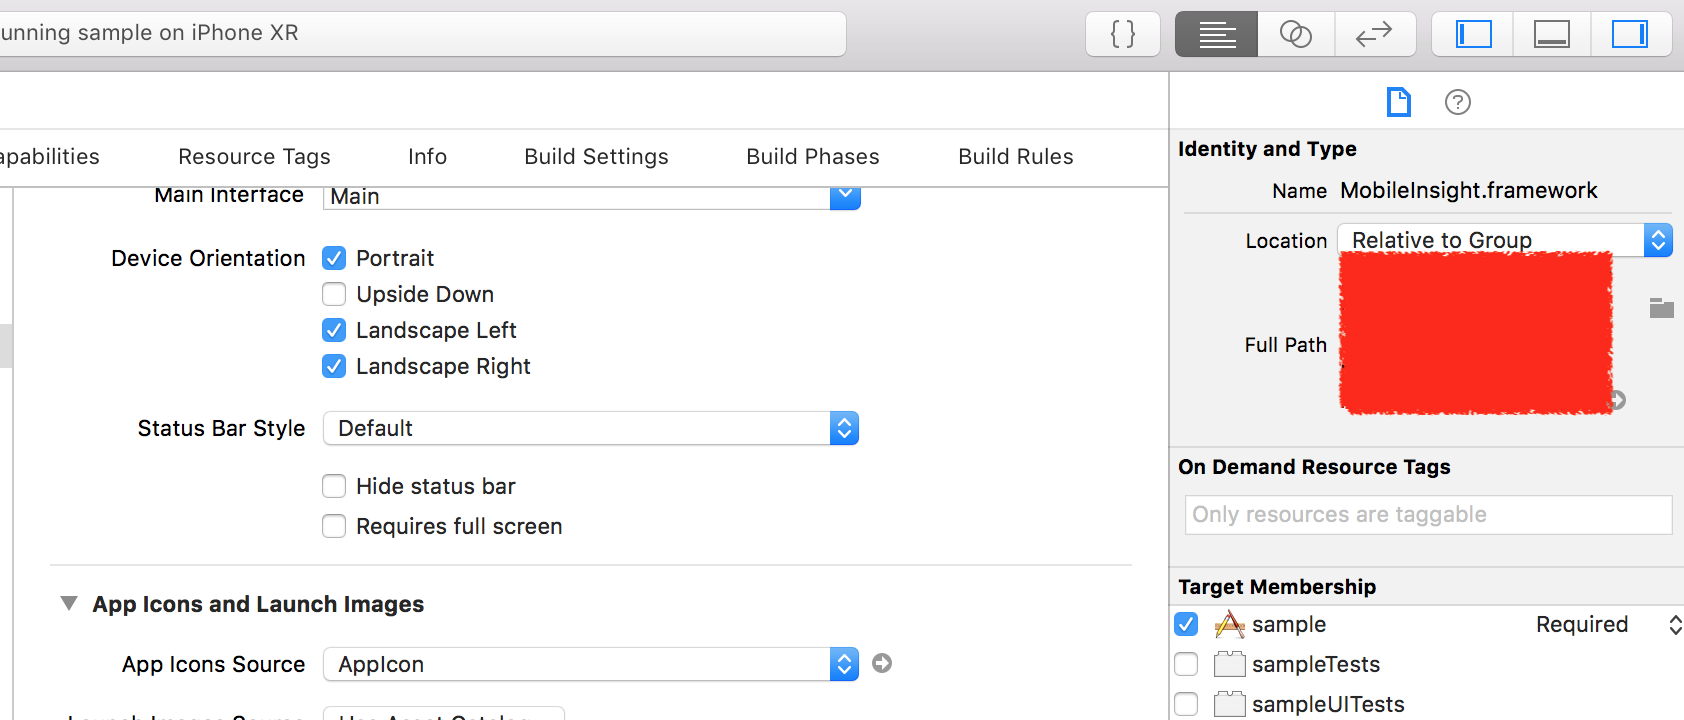
使いたいFrameWorkをXcodeのLinked FrameWorks and Librariesから入れてRunする。
以下参考画像
解決方法
これは、どうやらプロジェクト内にないと発生するようです。
ので、フレームワークのパスがプロジェクト内にない場合は、プロジェクト内にフレームワークをおく。そのあと、上記指定の時、そのプロジェクト内に入れたフレームワークを指定する。
注:一回最初に入れて置いたものは削除すること!!参考画像
これはプロジェクト内に入っていなかったものをプロジェクト内に入れたの画像
もう一言
ちなみに、この場合は直に入れていますが、ここにframeworkと言った名前のフォルダを入れて、
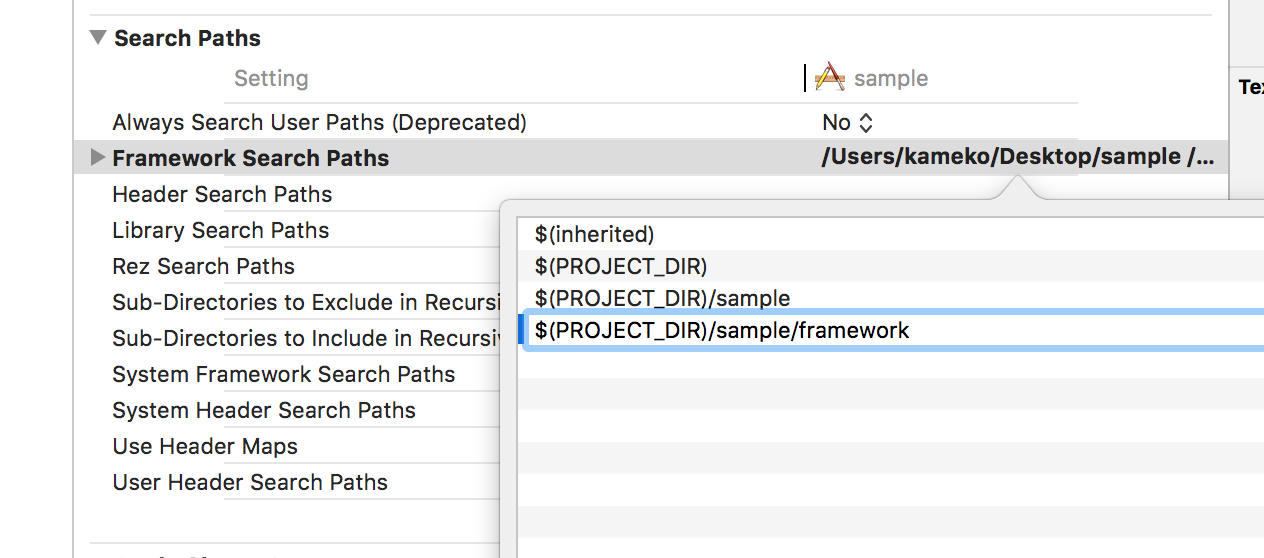
XcodeのFrameWorkSearchPathの中に$(PROJECT_DIR)/app名/frameworkと書いてあるプロジェクトもありました。以下参考画像
とりあえず大事なこと!
FrameWorkはプロジェクト中に。中に入れてからその中に入れたフレームワークを指定すること!それでもダメならパスの確認。
最後に
当たり前だろ!!と思うかもしれませんが、案外この当たり前のことを書いていないことがあり、これをちゃんとしっかり知らなかった私はかなり戸惑ったので書かさせていただきました。

- 投稿日:2019-03-02T18:51:05+09:00
react-native iOSアプリのビルド時の'glog/logging.h' file not foundエラーを解消する
エラー発生状況
下記の環境下でXcodeでiPhoneシミュレーターにビルドしようとしたところ、Xcode上で突然
'glog/logging.h' file not foundが発生しました。
このエラー解消にかなり苦戦したのでその対処法を記載しておきます。レアケースかもしれませんが、誰かのお役に立てたら幸いです。
- react-native:
0.52.0- Xcode:
10.1- Node.js:
8.10.0対処方法
対処した過程を書いていくので、やや冗長かもしれませんがお許しを
まずは
'glog/logging.h' file not foundでググると、StackOverflowで'glog/logging.h' file not foundというまさにという質問がヒット。
しかも解決済みっぽかったので早速以下を実行しようと試みると、、、~> cd node_modules/react-native/third-party/glog-0.3.4 │jest-haste-map: watch error: cd: The directory 'node_modules/react-native/third-party/glog-0.3.4' does not existなぜか対象のファイルがない、、、!
しかもよく調べてみるとthird-partyというディレクトリすら存在しない。
ということで、ひとまずrm -rf node_modules && yarn cache clean && yarn installしてみるも変わらず。再度ググっていると、Developers - Xcode 10: third-party: 'config.h' file not foundという記事に良さげな解決策が。
Share the steps I solved:
1.rm -rf node_modules/ && yarn cache clean && yarn installandrm -rf ~/.rncache
2. cd node_modules/react-native/scripts
3../ios-install-third-party.shIf your network is slow, you can download the packages separately and move them to the rncache folder 1. folly-2016.10.31.00 2. double-conversion-1.1.5 3. glog-0.3.4 4. boost_1_63_0
4.cd <Your-Project-Folder>/node_modules/react-native/third-party/glog-0.3.4
5../configure
6. Xcode Clean & Buildこの手順で実行しようと試みるも、またしても
third-partyがない途方にくれながらふと
node_modules/react-native/scripts配下を覗いてみると、なぜかここにthird-partyディレクトリを発見(なぜ?)ということで以下を実行。
~> cd node_modules/react-native/scripts/third-party/glog-0.3.4
~> ./configure
するとなぜか
node_modules/react-native/third-partyが出来上がったので、以下を実行すると無事エラーが解消されました。
cd <Your-Project-Folder>/node_modules/react-native/third-party/glog-0.3.4./configure- Xcode Clean & Build
※ 本当はこの後さらに
error: Build input file cannot be found: '/libfishhook.a'というエラーも出たのですが、これについては Xcode10アップデート後にreact-nativeのiOSビルドが通らなくなった人向けの記事で書いてくださった方法ですぐに解決しました。結論、Xcode辛いです...
- 投稿日:2019-03-02T17:03:52+09:00
iOSアプリリリースのためにDeveloper登録したら Provisioning Profileが通らなくなった
はじめに
表題のとおりですが、iOSリリースのために有料のDeveloper登録したら Provisioning Profileが通らなくなりました。bundleId がいけないよーという記事は多く見かけたのですが、解決策は違う内容だったのでメモに残します。
解決策
Apple の developer サイトの device 項目に実機の情報を登録すると解消しました。
apple developer
https://developer.apple.com/account/ios/device/最終的に、developer としては以下の3つを登録する必要があるみたいですね。
- Certificates
- Identifiers
- Devices
- 投稿日:2019-03-02T15:44:27+09:00
【SwiftChaining】 NotificationCenterからの通知を受け取る
SwiftChainingの解説記事その3です。
SwiftChainingとは何か?というのは、こちらの最初の記事を参考にしてください。
単に値を送信するクラスとして
Notifierがあるというのは最初の記事に書きましたが、自分で何かを通知するならそれで良いとして、NotifierはNotificationCenterの通知には対応していません。
NotificationCenterのイベントをSwiftChainingで扱えるようにするクラスは別に用意しています。コード例としては以下のようになります。import UIKit import Chaining class MyClass { static let name = Notification.Name("MyClassNotificationName") func post(value: String) { NotificationCenter.default.post(name: MyClass.name, object: self, userInfo: ["key": value]) } } let object = MyClass() let adapter = NotificationAdapter(MyClass.name, object: object, notificationCenter: .default) let observer = adapter.chain() .do { (notification: Notification) in // userInfo["key"]の値をログに出力 print(notification.userInfo!["key"]!) } .end() // userInfo["key"]に"test"を入れて通知を送り、"test"がログに出力される object.post(value: "test")解説
NotificationCenterのイベントを受け取ってSwiftChainingで扱えるようにするために、NotificationAdapterというクラスを用意しています。以下のように生成します。let adapter = NotificationAdapter(MyClass.name, object: object, notificationCenter: .default)ひとつめの引数には通知を受け取りたい
Notification.Nameを渡し、2つめのobjectには送信元のインスタンスを渡します。この辺りはNotificationCenterでaddObserverを呼ぶ場合と同じ意味です。3つめにはNotificationCenterを渡せますが、通常は.defaultで良いでしょう。なお、
objectとnotificationCenterは省略できます。省略すると、objectはnilになりどのオブジェクトからも関係なく受け取りますし、notificationCenterを省略したら.defaultになります。
NotificationAdapterにもchain()がありますので、通知を受け取った時の処理はNotifierと同じように書けます。let observer = adapter.chain() .do { (notification: Notification) in print(notification.userInfo!["key"]!) } .end()イベントで送られてくる値の型は
Notificationですので、上記のコードのようにdoで受け取れば、普通にaddObserverした時と同じような感じにクロージャで処理が書けます。とはいえ
doを使うだけだと敢えてライブラリを使っている意味がないので、もう少しバインディングする感じの使い方を紹介します。あくまで
userInfoに必要な値が入っていると言う前提ですが、以下のようにmapでuserInfoからStringの値を取り出してイベントの型を変換し、sendToで別のオブジェクトが受け取る感じの書き方ができます。// 受け取るオブジェクト let receiver = ValueHolder<String>("") let observer = adapter.chain() .map { (notification: Notification) -> String? in return notification.userInfo?["key"] as? String } .sendTo(receiver) .end() object.post(value: "test") // receiverの値は"test"になっている print(receiver.value)ちなみに、このコードを見て違和感を感じた方がいるかもしれません。値を受け取る
ValueHolderの型はStringなのに、mapで変換して送る値の型はオプショナルのString?で型が違っています。
sendTo関数はオプショナルの有無の違いであれば、値を送れるようにしています。今回のコードのようにオプショナルから非オプショナルの場合だと、nilが来たら無視するようになっています。注意点
上記のサンプルコードでは
NotificationAdapterをlet adapterでローカルで保持しているだけなのですが、実際には監視が必要な間はどこかしらのプロパティに保持してください。NotificatoinAdapterが破棄されてしまうとNotificationCenterの監視が外れてしまいます。そのあたりを意識せずに書いていると、インスタンスが作られたそばから解放されてて動いていないという事が起こってしまうと思います。Observerと合わせて保持し忘れることのないようご注意ください。
- 投稿日:2019-03-02T15:44:27+09:00
【SwiftChaining】NotificationCenterからの通知を受け取る
SwiftChainingの解説記事その3です。
SwiftChainingとは何か?というのは、こちらの最初の記事を参考にしてください。
単に値を送信するクラスとして
Notifierがあるというのは最初の記事に書きましたが、自分で何かを通知するならそれで良いとして、NotifierはNotificationCenterの通知には対応していません。
NotificationCenterのイベントをSwiftChainingで扱えるようにするクラスは別に用意しています。コード例としては以下のようになります。import UIKit import Chaining class MyClass { static let name = Notification.Name("MyClassNotificationName") func post(value: String) { NotificationCenter.default.post(name: MyClass.name, object: self, userInfo: ["key": value]) } } let object = MyClass() let adapter = NotificationAdapter(MyClass.name, object: object, notificationCenter: .default) let observer = adapter.chain() .do { (notification: Notification) in // userInfo["key"]の値をログに出力 print(notification.userInfo!["key"]!) } .end() // userInfo["key"]に"test"を入れて通知を送り、"test"がログに出力される object.post(value: "test")解説
NotificationCenterのイベントを受け取ってSwiftChainingで扱えるようにするために、NotificationAdapterというクラスを用意しています。以下のように生成します。let adapter = NotificationAdapter(MyClass.name, object: object, notificationCenter: .default)ひとつめの引数には通知を受け取りたい
Notification.Nameを渡し、2つめのobjectには送信元のインスタンスを渡します。この辺りはNotificationCenterでaddObserverを呼ぶ場合と同じ意味です。3つめにはNotificationCenterを渡せますが、通常は.defaultで良いでしょう。なお、
objectとnotificationCenterは省略できます。省略すると、objectはnilになりどのオブジェクトからも関係なく受け取りますし、notificationCenterを省略したら.defaultになります。
NotificationAdapterにもchain()がありますので、通知を受け取った時の処理はNotifierと同じように書けます。let observer = adapter.chain() .do { (notification: Notification) in print(notification.userInfo!["key"]!) } .end()イベントで送られてくる値の型は
Notificationですので、上記のコードのようにdoで受け取れば、普通にaddObserverした時と同じような感じにクロージャで処理が書けます。とはいえ
doを使うだけだと敢えてライブラリを使っている意味がないので、もう少しバインディングする感じの使い方を紹介します。あくまで
userInfoに必要な値が入っていると言う前提ですが、以下のようにmapでuserInfoからStringの値を取り出してイベントの型を変換し、sendToで別のオブジェクトが受け取る感じの書き方ができます。// 受け取るオブジェクト let receiver = ValueHolder<String>("") let observer = adapter.chain() .map { (notification: Notification) -> String? in return notification.userInfo?["key"] as? String } .sendTo(receiver) .end() object.post(value: "test") // receiverの値は"test"になっている print(receiver.value)ちなみに、このコードを見て違和感を感じた方がいるかもしれません。値を受け取る
ValueHolderの型はStringなのに、mapで変換して送る値の型はオプショナルのString?で型が違っています。
sendTo関数はオプショナルの有無の違いであれば、値を送れるようにしています。今回のコードのようにオプショナルから非オプショナルの場合だと、nilが来たら無視するようになっています。注意点
上記のサンプルコードでは
NotificationAdapterをlet adapterでローカルで保持しているだけなのですが、実際には監視が必要な間はどこかしらのプロパティに保持してください。NotificatoinAdapterが破棄されてしまうとNotificationCenterの監視が外れてしまいます。そのあたりを意識せずに書いていると、インスタンスが作られたそばから解放されてて動いていないという事が起こってしまうと思います。Observerと合わせて保持し忘れることのないようご注意ください。
- 投稿日:2019-03-02T14:48:06+09:00
iOSアプリ開発入門#2 ~UINavigationController~
目的
- よく使うであろうUINavigationControllerを使用したアプリをStoryboardありとなしでサクッと作れるようになる
- ありなしの両方を試すことで、Storyboardが何をやっているのかなんとなくイメージできるようになる
Step1. 爆速でUINavigationController管理化
前回のコード をベースに作業。
今回もひとまずStoryboardではなくコード側で実装してみる1.1. AppDelegateの修正
まずはAppDelegateを以下のように修正
AppDelegate.swift--- a/PracticeApp/AppDelegate.swift +++ b/PracticeApp/AppDelegate.swift @@ -16,6 +16,10 @@ class AppDelegate: UIResponder, UIApplicationDelegate { func application(_ application: UIApplication, didFinishLaunchingWithOptions launchOptions: [UIApplication.LaunchOptionsKey: Any]?) -> Bool { // Override point for customization after application launch. + let vc: ViewController = window?.rootViewController as! ViewController + let navc: UINavigationController = UINavigationController(rootViewController: vc) + window?.rootViewController = navc + return true }ポイントとしては
- AppDelegateのwindowはStoryboardを利用している場合、didFinishLaunchingWithOptions内部ではすでに諸々の初期化が済んでいるため、rootViewControllerはStoryboardで設定したViewControllerになっている
- 新たにUINavigationControllerをコンストラクトし、これをwindowのrootViewControllerに差し替えるとともに、もとのViewControllerをUINavigationController側のrootViewControllerに付け替える(linked listにおける挿入処理のイメージ)
- なお、素直にViewController()でコンストラクトすると、Storyboard上の設定が反映されない
もちろん、こんな妙な処理にしなくても、ViewControllerの初期化処理内でちゃんと表示系を実装してやればそれでいいのだが、あくまでStoryboardとソースコードとの関連を知るのが目的なので。
1.2. ViewControllerも一応修正
また、ViewController側もトップにそれっぽいタイトルを表示してみる
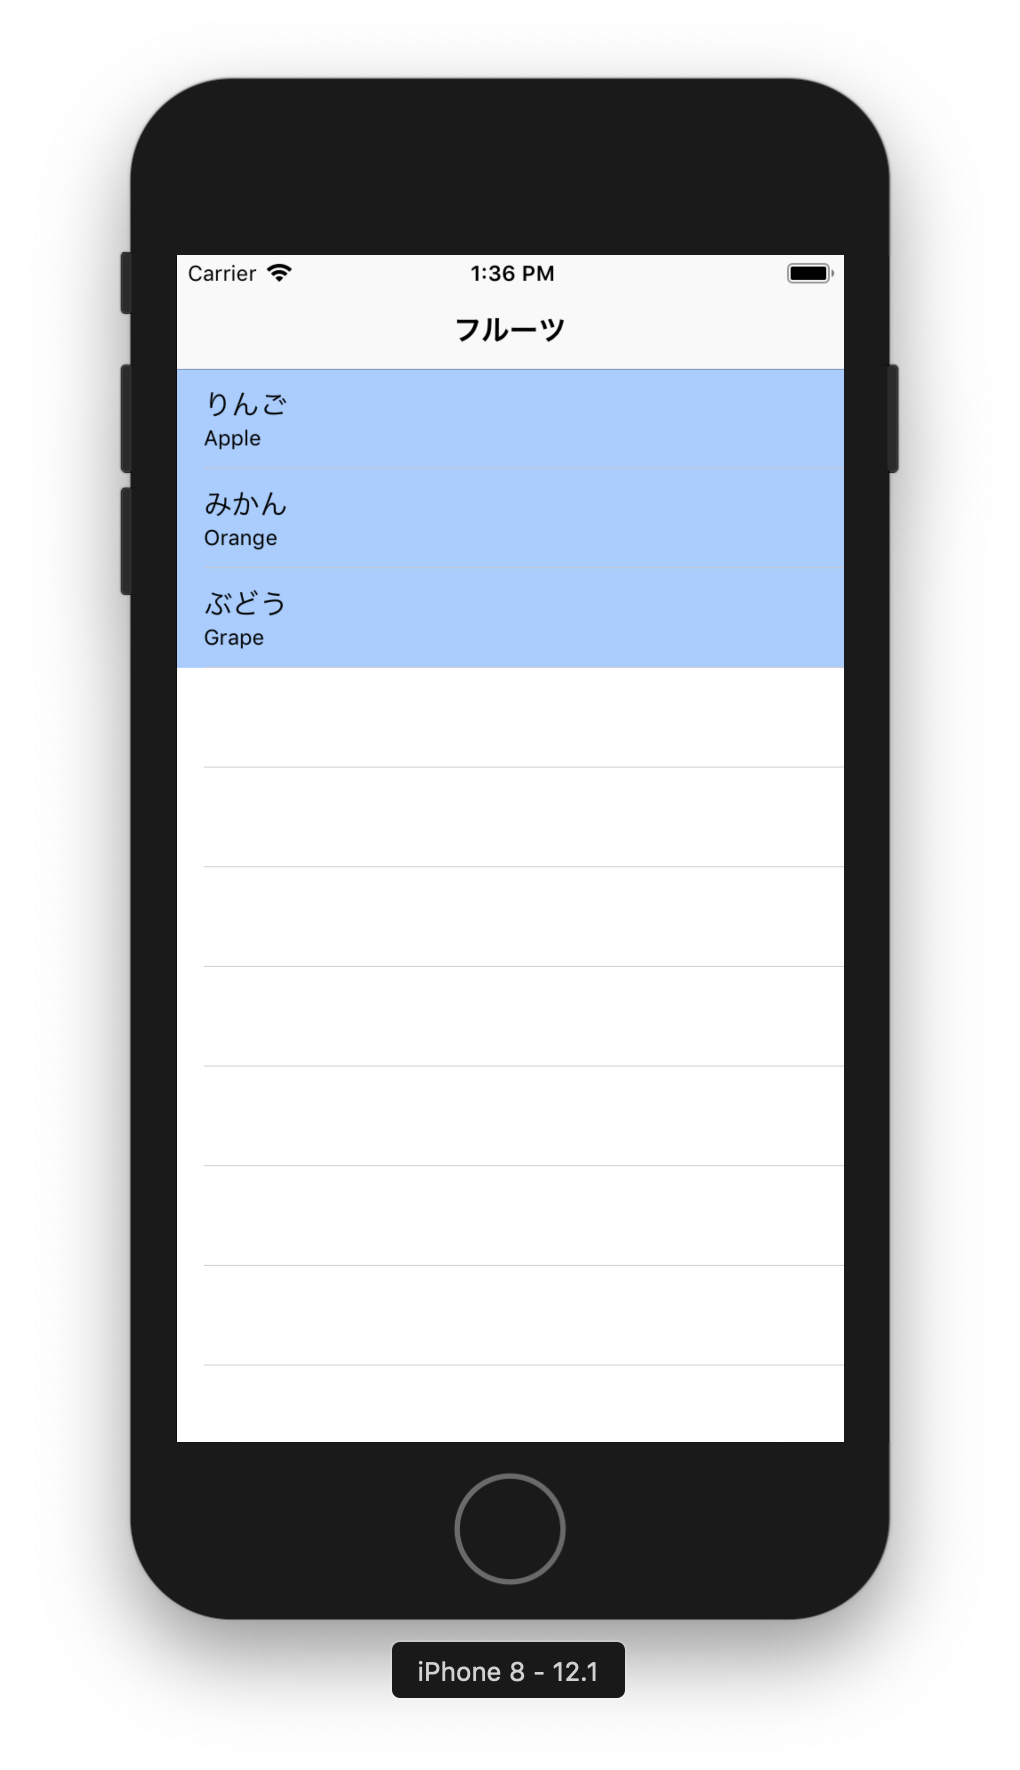
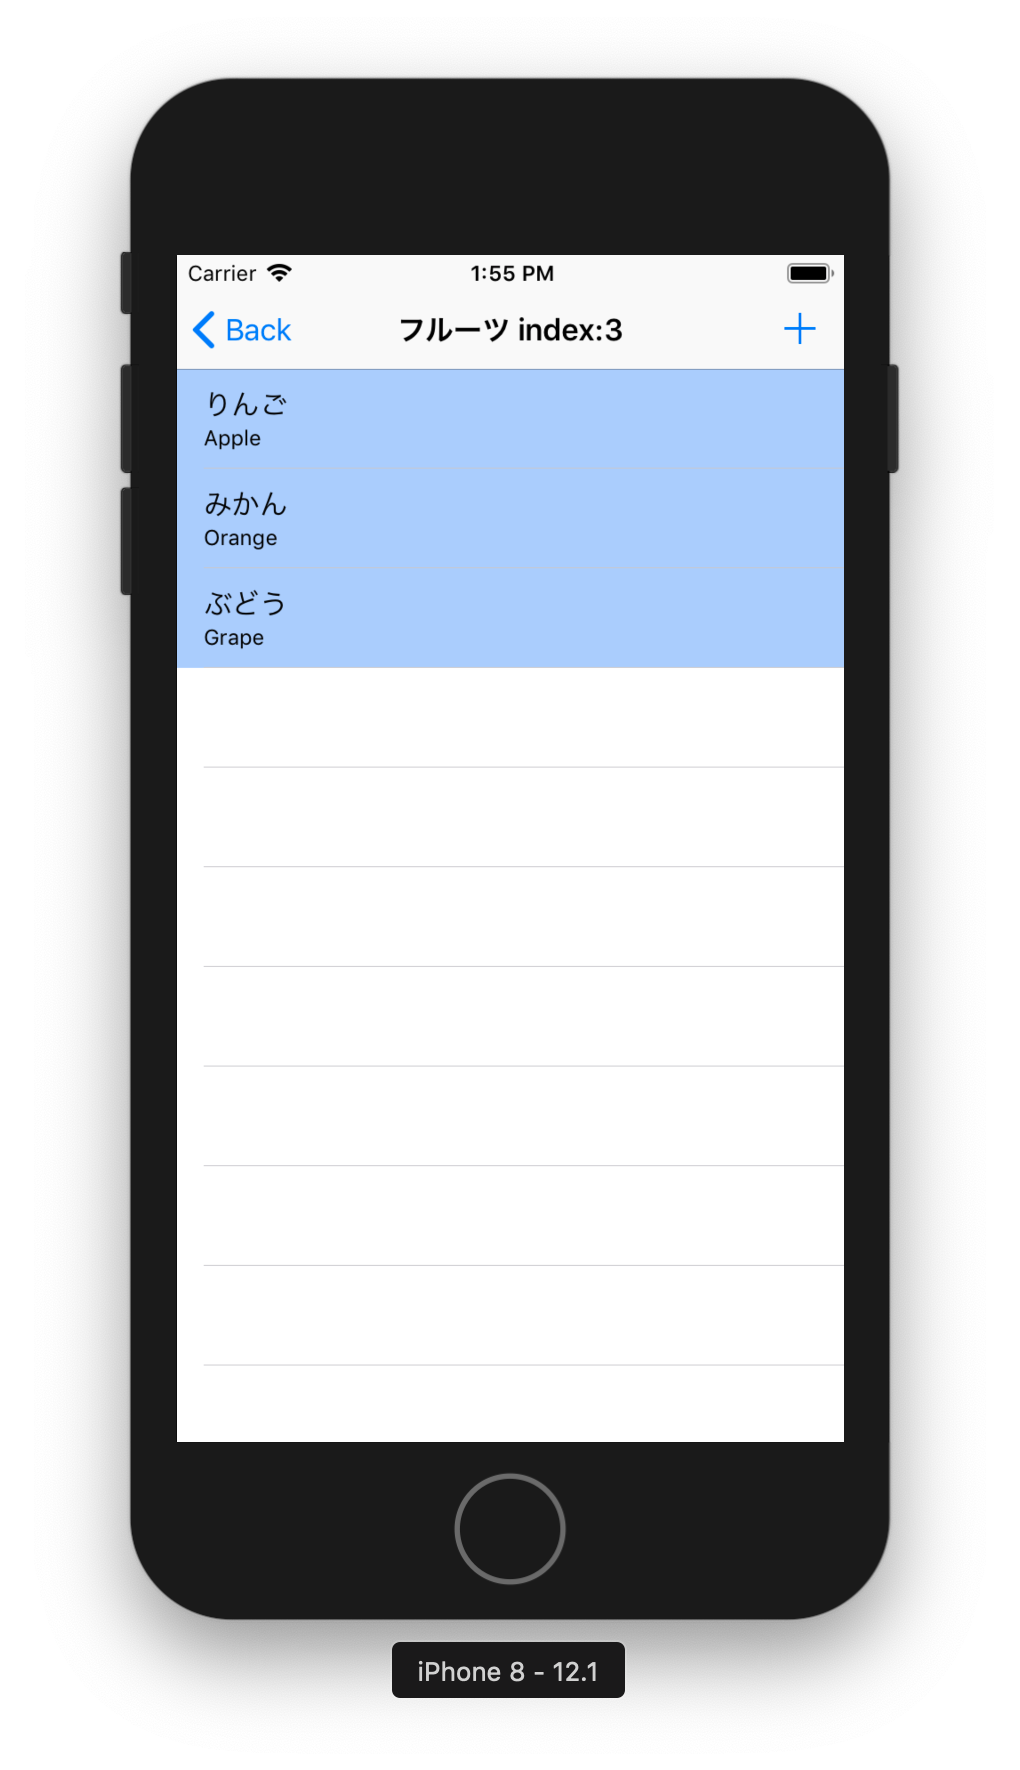
ViewController.swift--- a/PracticeApp/ViewController.swift +++ b/PracticeApp/ViewController.swift @@ -23,6 +23,8 @@ class ViewController: override func viewDidLoad() { super.viewDidLoad() + + self.title = "フルーツ" } // UITableViewDataSource1.3. 起動
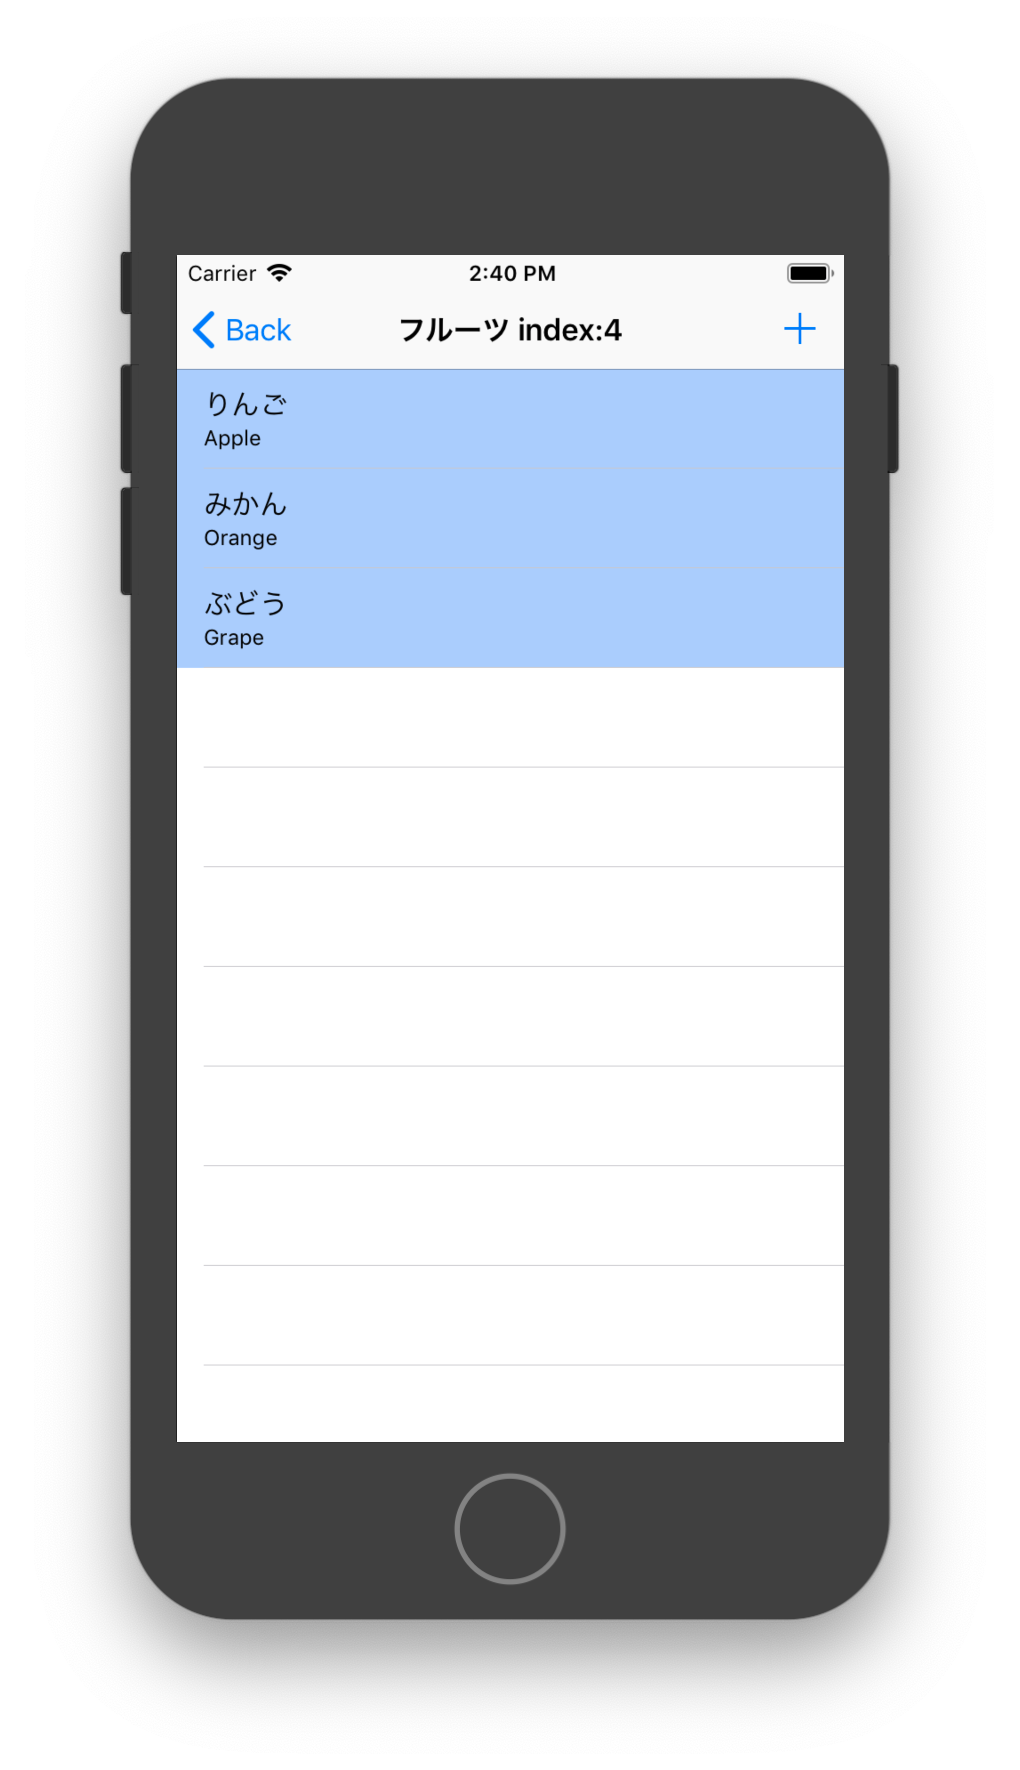
Runすると、一応それっぽくなる
Step2. BarButtonItem追加+画面遷移(スタック)
UINavigationControllerの機能だけでとりあえず画面遷移させてみる。
基本的な考え方としては
- UINavigationController管理下のUIViewControllerからNavigationController関連機能にアクセスする際は、インスタンス変数「navigationItem」、「navigationController」を使用する
- (UINavigationControllerの使用如何に関わらず、navigationItemやnavigationControllerといったpropertyがあるのはいかがなものかと思わなくもない)
- 画面が次に進む、前に戻るという挙動は、UINavigationControllerが管理するStackにpushする、popするという概念に対応づけられる
2.1. ViewControllerの修正
というわけで、以下のようにViewControllerを修正する。
ViewController.swift--- a/PracticeApp/ViewController.swift +++ b/PracticeApp/ViewController.swift @@ -21,10 +21,20 @@ class ViewController: ("ぶどう", "Grape"), ] + private var stackIndex = 0 + override func viewDidLoad() { super.viewDidLoad() - self.title = "フルーツ" + self.title = "フルーツ index:\(stackIndex)" + + self.navigationItem.backBarButtonItem = UIBarButtonItem(title: "Back", + style: .plain, + target: nil, + action: nil) + self.navigationItem.rightBarButtonItem = UIBarButtonItem(barButtonSystemItem: .add, + target: self, + action: #selector(onAddClick)) } // UITableViewDataSource @@ -46,5 +56,12 @@ class ViewController: cell.detailTextLabel?.text = data[rowIndex].1 return cell } + + @objc + func onAddClick() { + let vc: ViewController = self.storyboard!.instantiateInitialViewController() as! ViewController + vc.stackIndex = self.stackIndex + 1 + self.navigationController?.pushViewController(vc, animated: true) + } }ポイントとしては
- navigationControllerのpushViewControllerでpush操作
- popはデフォルトでbackBarButtonItemにバインドされている
- 子ViewControllerはこのクラス自身であり、Storyboard側で初期化を行なっているため、UIStoryboardのinstantiateInitialViewControllerで取得している
2.2. 起動
Runすると、「+」押下で同じ画面が次々にStackされていくのがわかる。
Step3. Storyboardを使ってみる
今回もコードで地道に書いているところをStoryboardにお任せする流れ
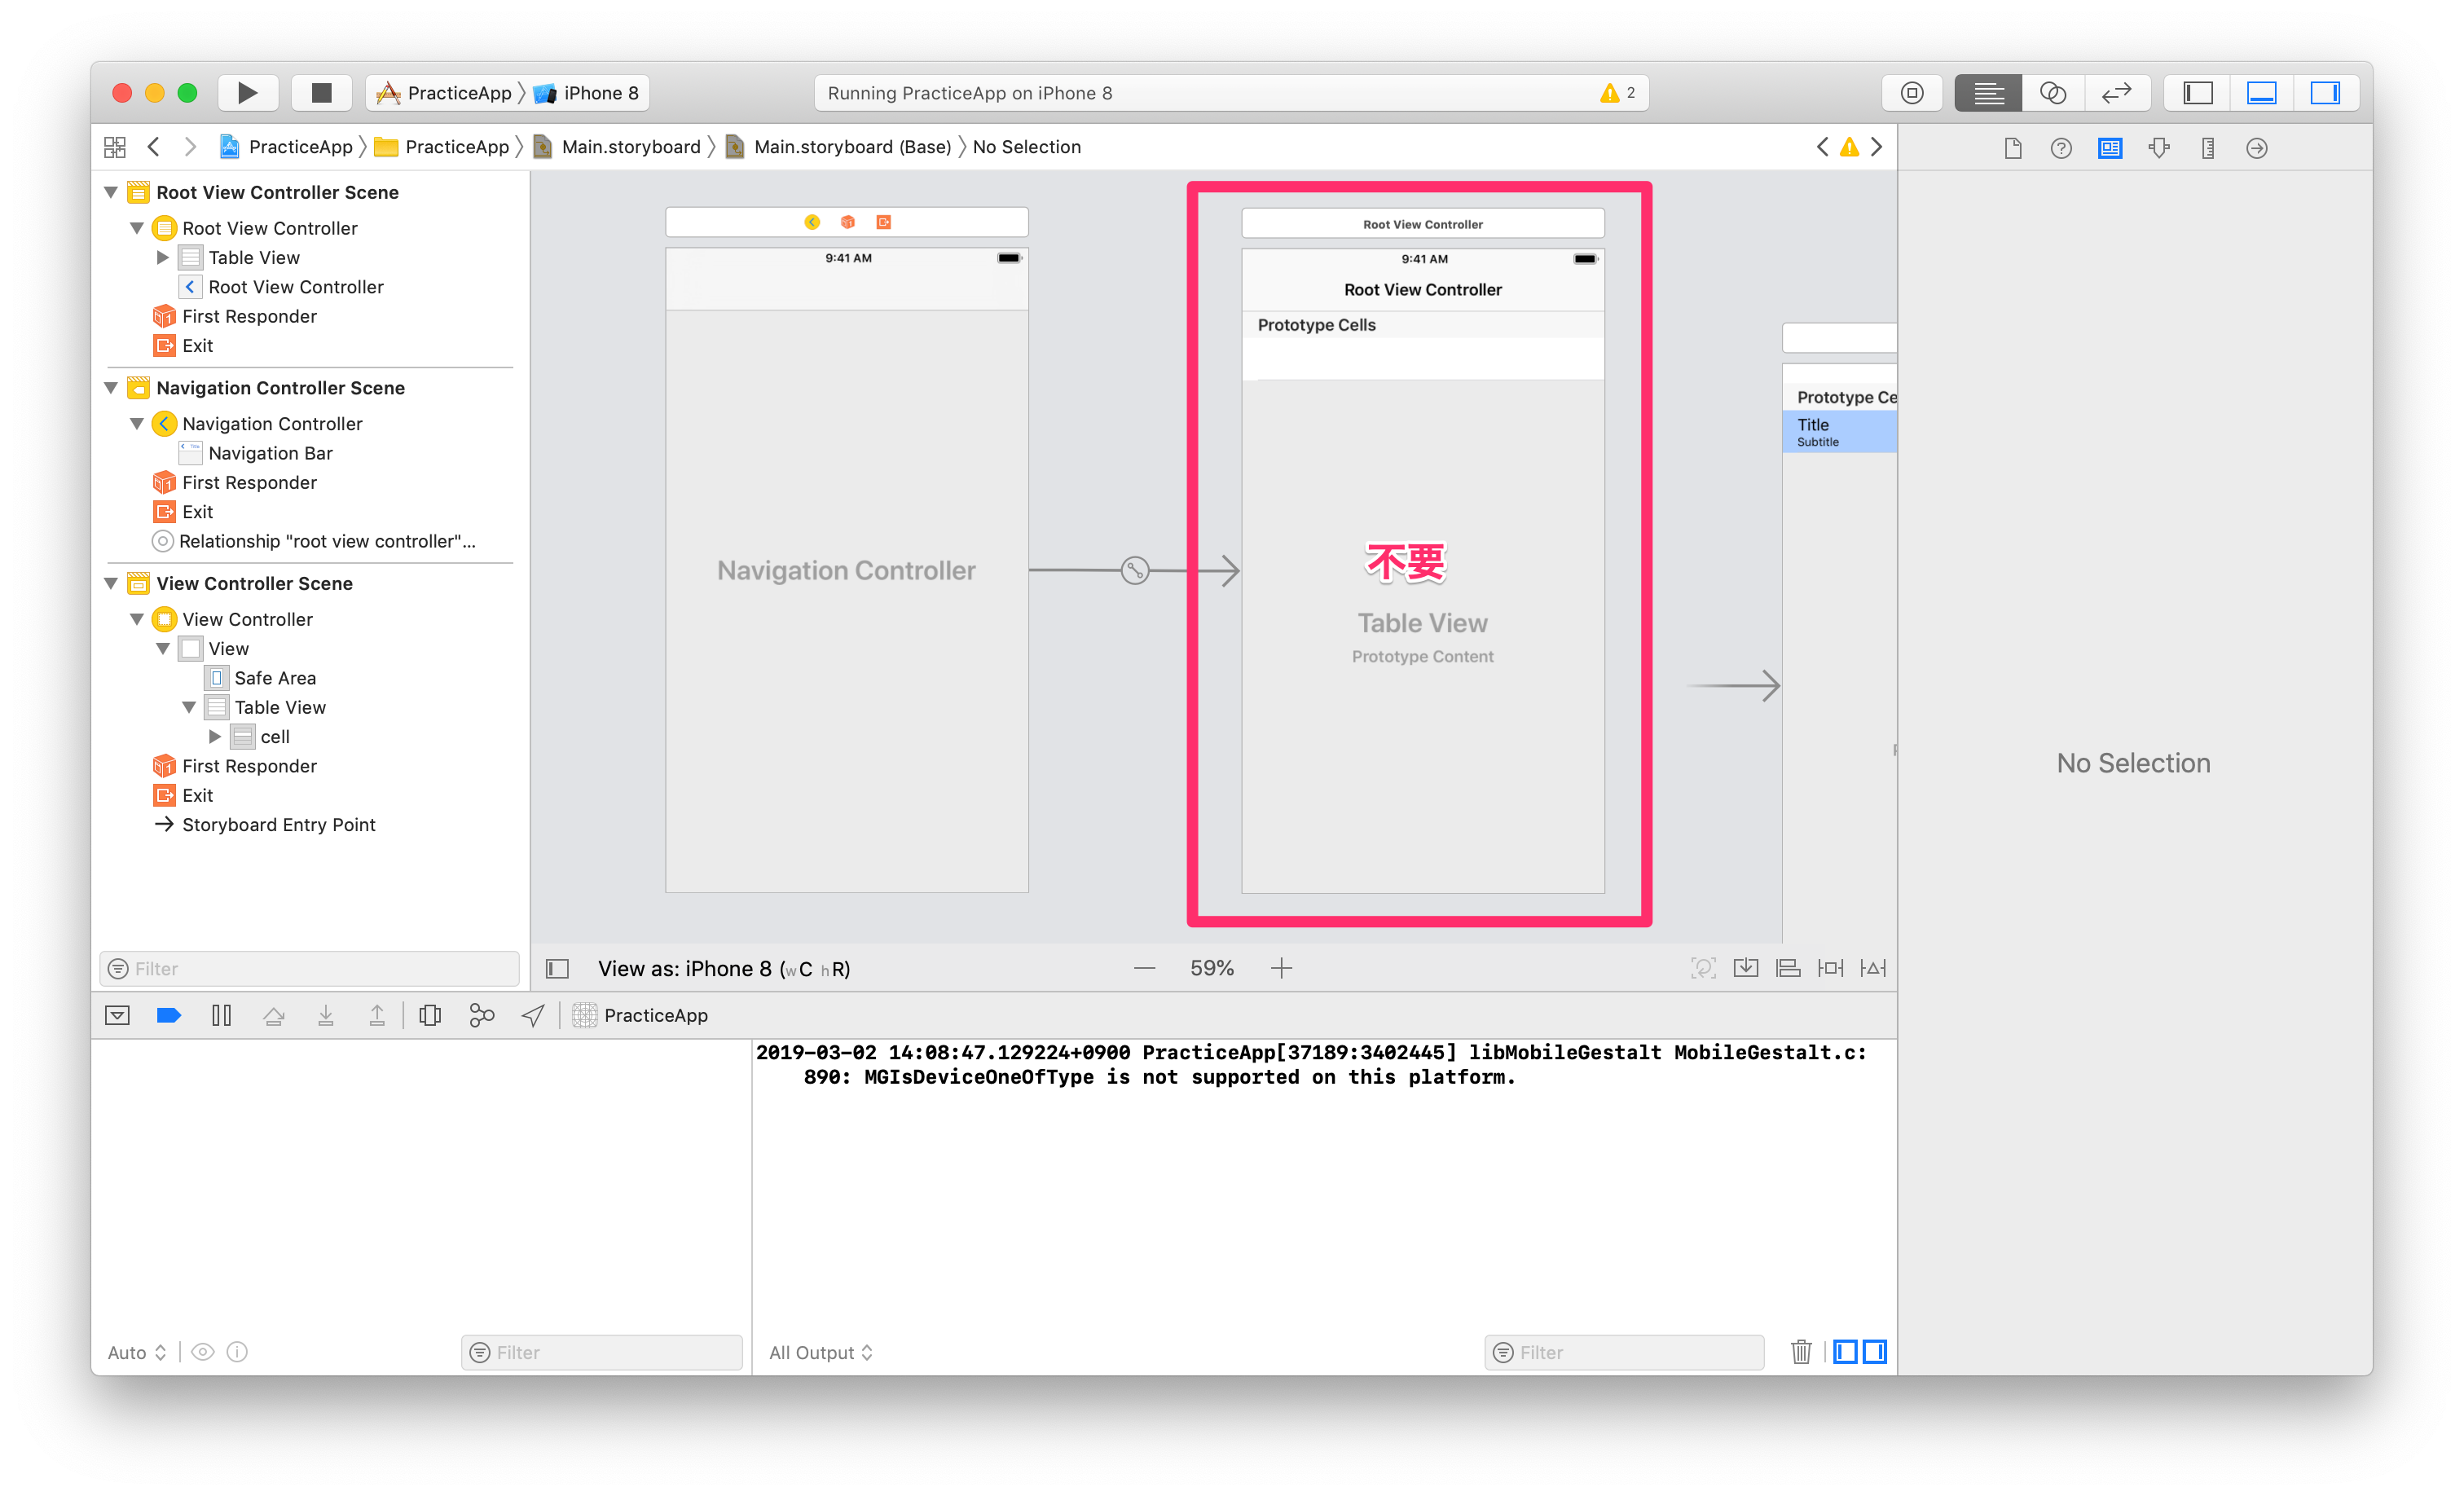
3.1. UINavigationControllerの追加
例によってStoryboard右上のボタンからコンポネント追加
ここから追加すると、RootViewControllerが紐づいた状態で配置されてとても邪魔。
爆速で消しにかかる。
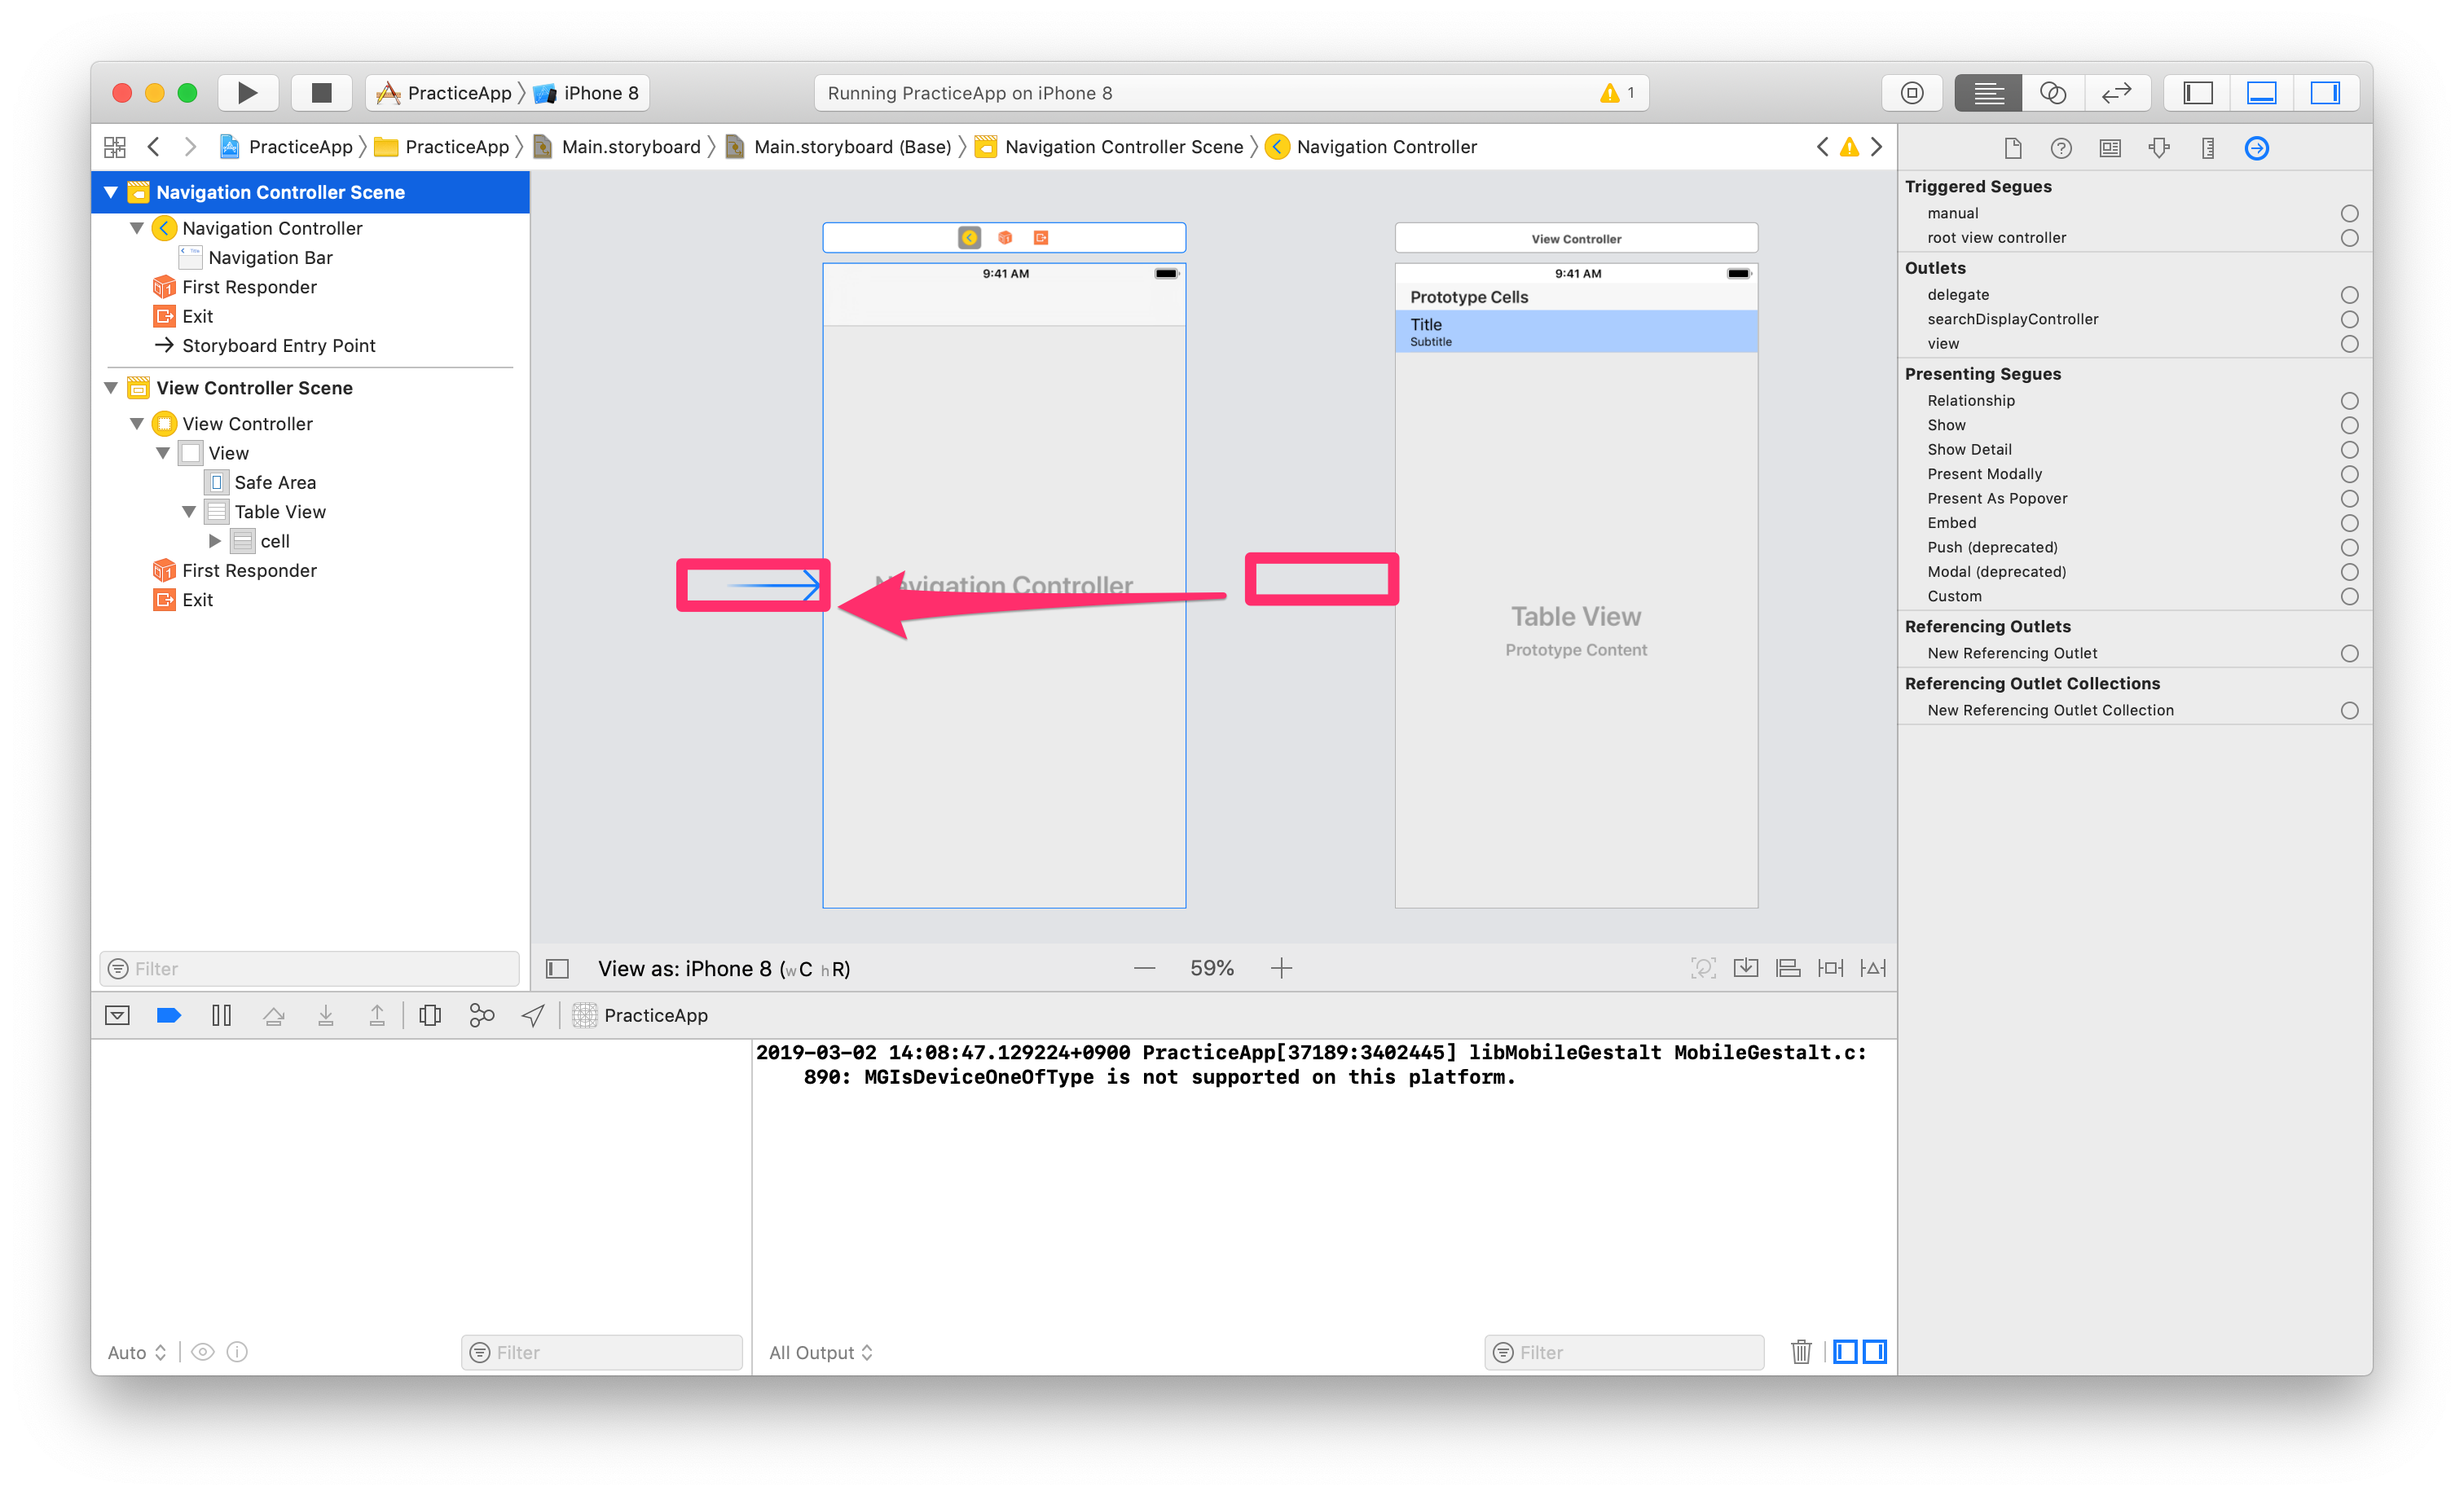
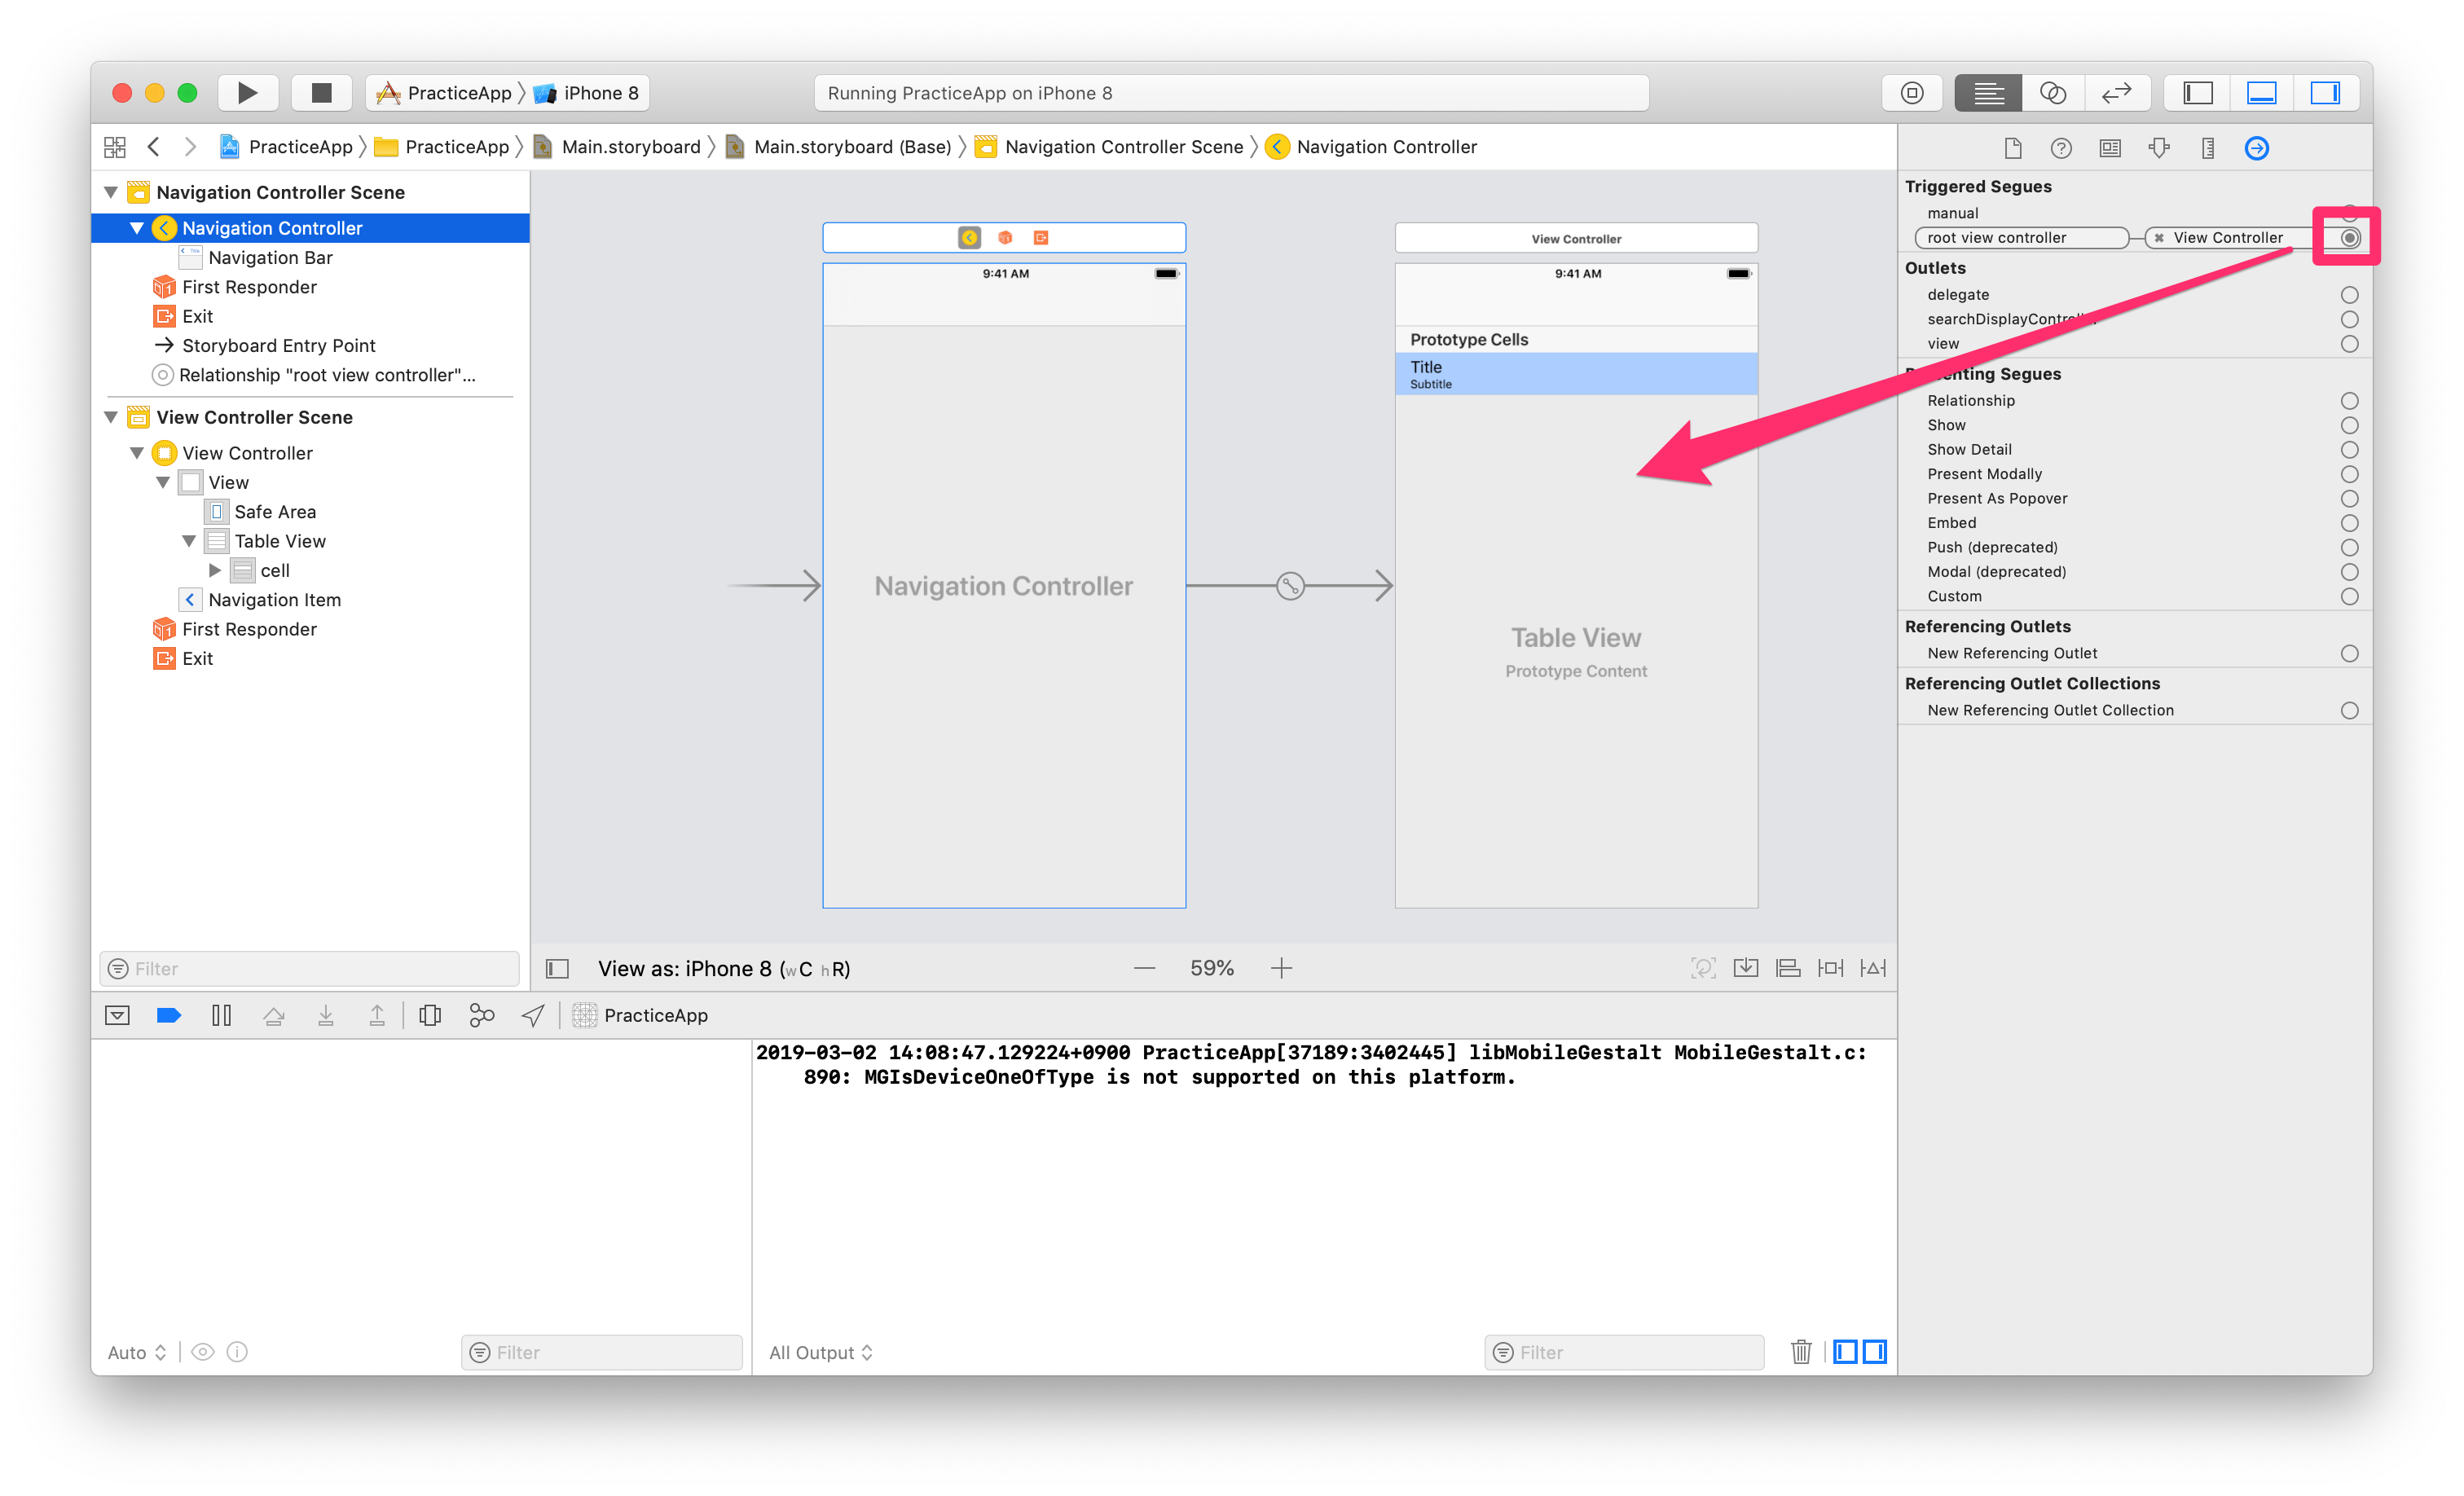
また、EntrypointをUINavigationController側に変更する
UINavigationControllerのrootViewControllerとして既存のViewControllerをバインドする
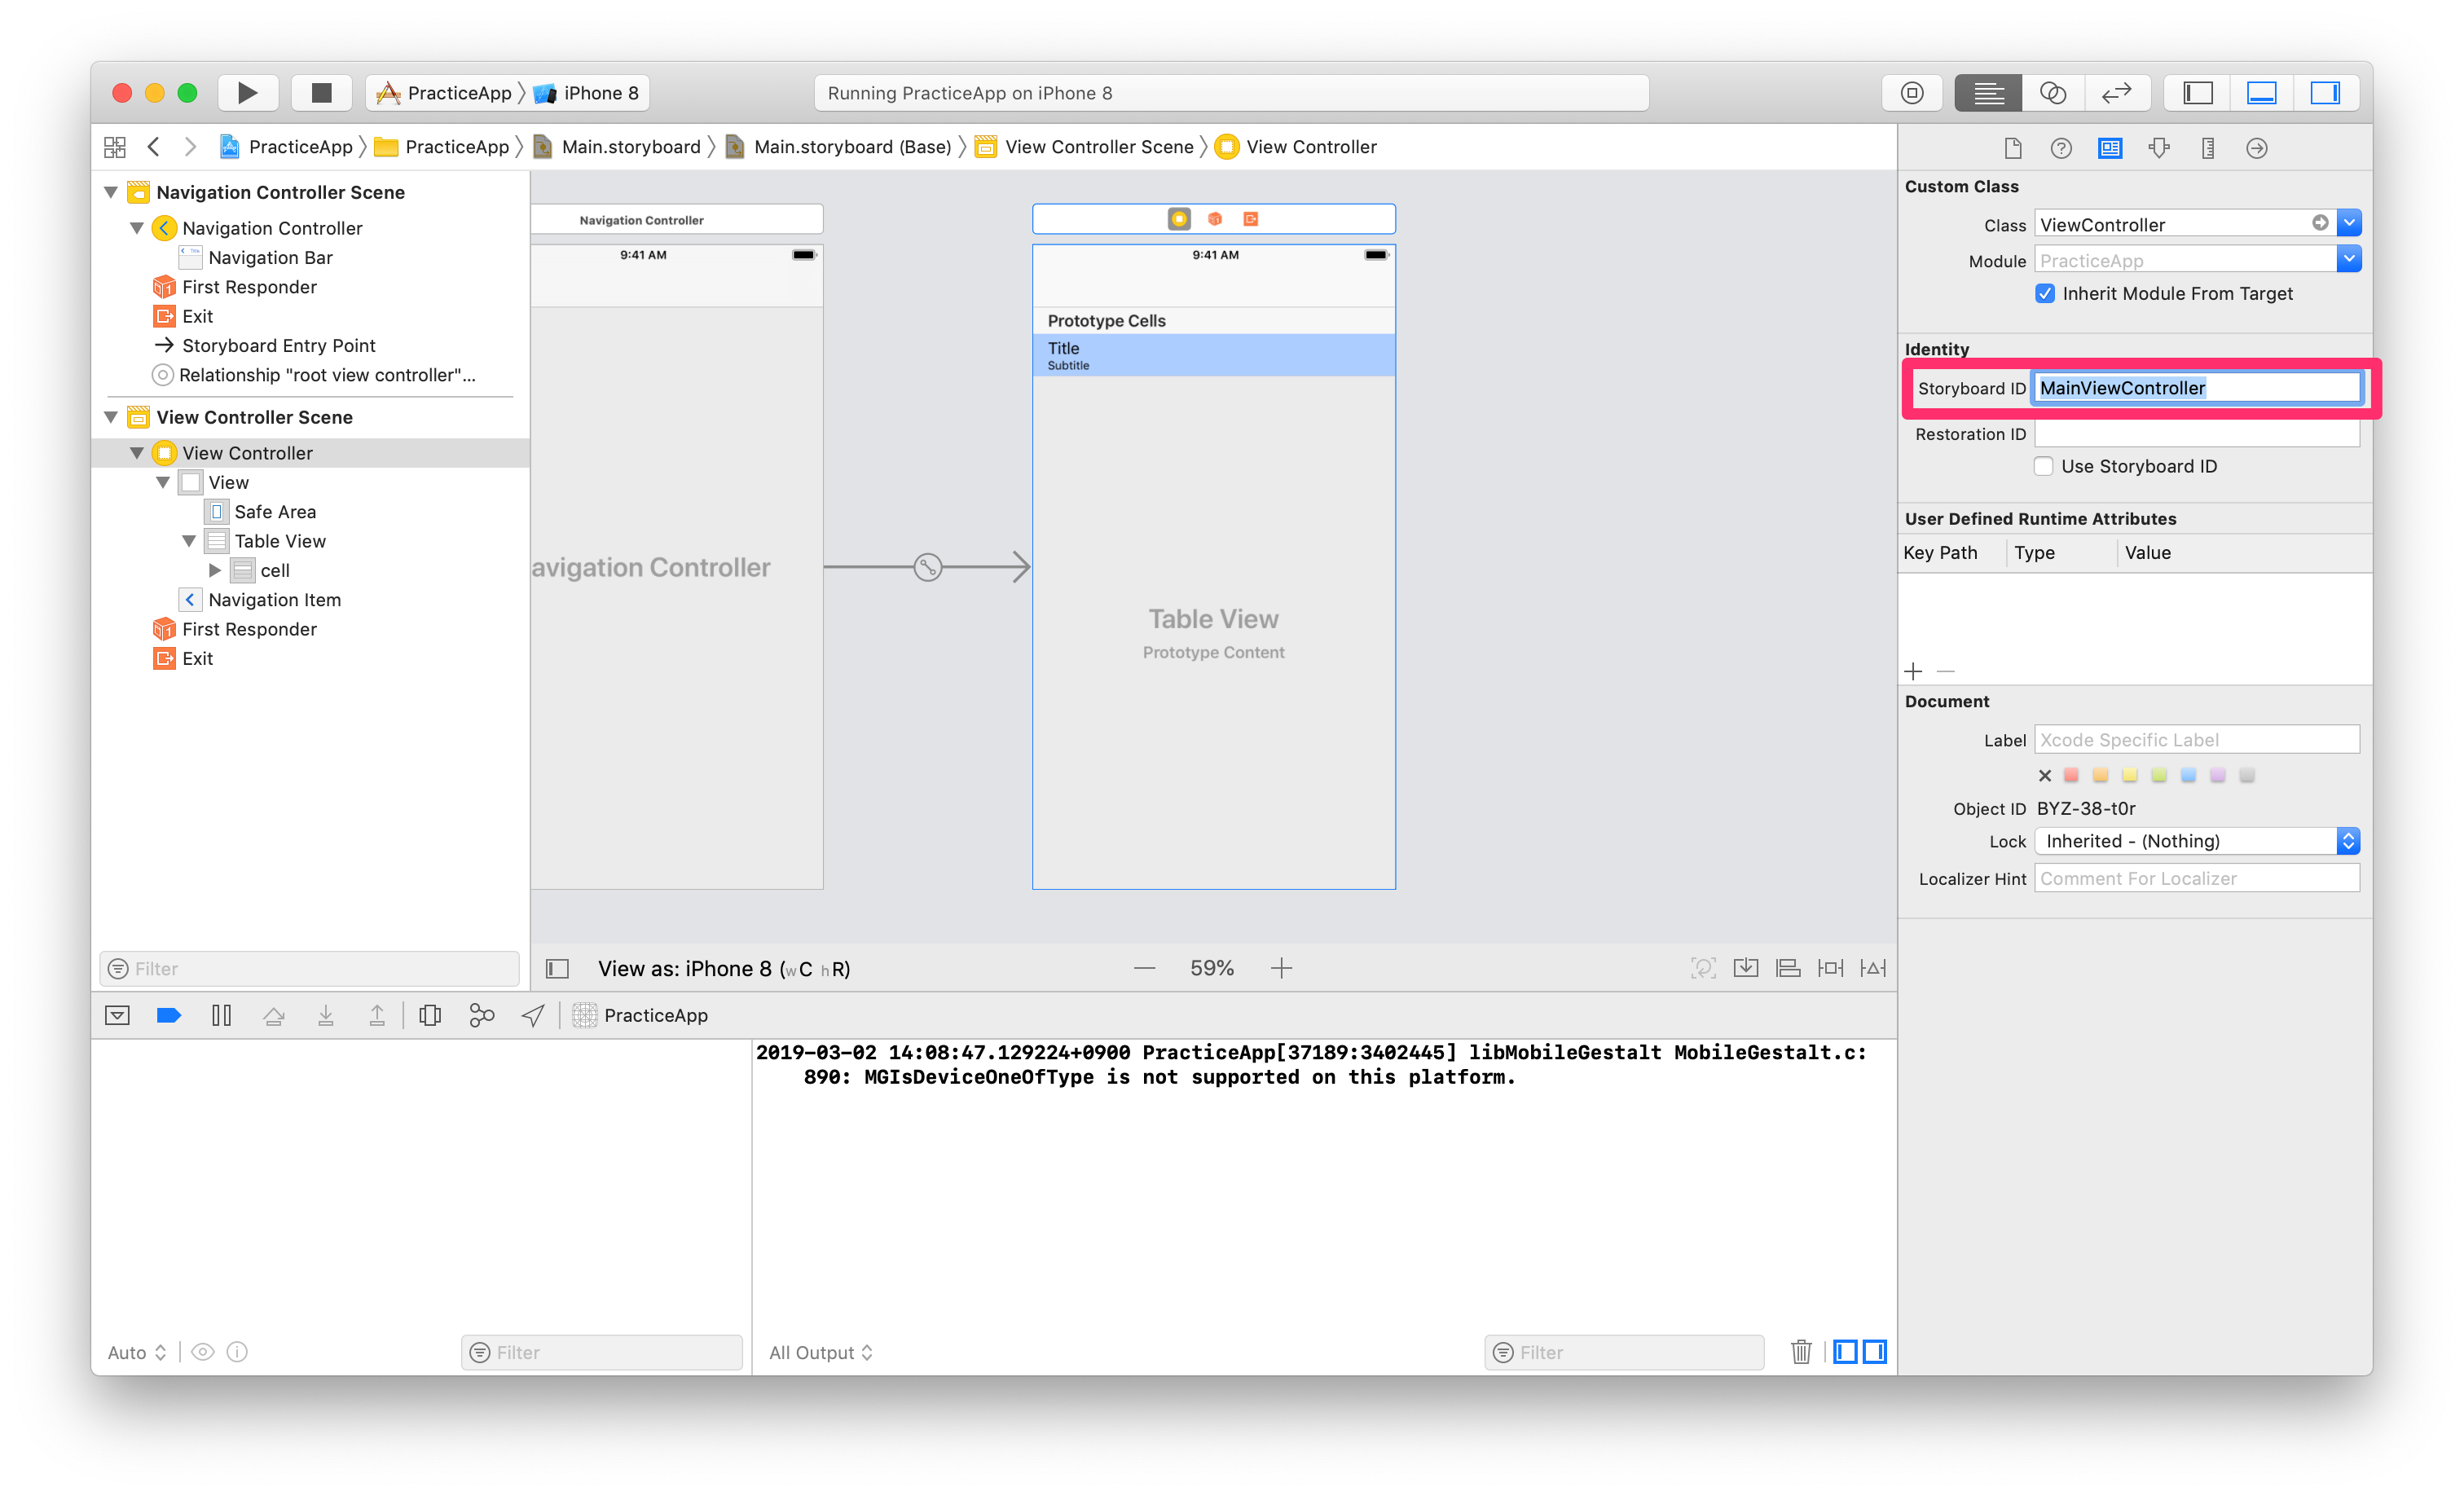
Storyboard経由でViewControllerを取得するために、identityも忘れずに設定しておく
3.2. コード修正
UI操作はこれだけ。
これによって以下のコードが削減できる。AppDelegate.swift--- a/PracticeApp/AppDelegate.swift +++ b/PracticeApp/AppDelegate.swift @@ -16,10 +16,6 @@ class AppDelegate: UIResponder, UIApplicationDelegate { func application(_ application: UIApplication, didFinishLaunchingWithOptions launchOptions: [UIApplication.LaunchOptionsKey: Any]?) -> Bool { // Override point for customization after application launch. - let vc: ViewController = window?.rootViewController as! ViewController - let navc: UINavigationController = UINavigationController(rootViewController: vc) - window?.rootViewController = navc - return true }ViewController.swift--- a/PracticeApp/ViewController.swift +++ b/PracticeApp/ViewController.swift @@ -59,7 +59,7 @@ class ViewController: @objc func onAddClick() { - let vc: ViewController = self.storyboard!.instantiateInitialViewController() as! ViewController + let vc: ViewController = self.storyboard!.instantiateViewController( + withIdentifier: "MainViewController") as! ViewController vc.stackIndex = self.stackIndex + 1 self.navigationController?.pushViewController(vc, animated: true) }ポイントとしては
- Storyboardからinitialと異なるViewControllerを取得するにはidentityの設定が必要
3.3. 起動
Runすると同じ動き
4. まとめ
最終的に以下のようなコードになるはず
ViewController.swiftimport UIKit class ViewController: UIViewController, UITableViewDelegate, UITableViewDataSource { @IBOutlet weak var tableView: UITableView! private let data: [(String,String)] = [ ("りんご", "Apple"), ("みかん", "Orange"), ("ぶどう", "Grape"), ] private var stackIndex = 0 override func viewDidLoad() { super.viewDidLoad() self.title = "フルーツ index:\(stackIndex)" self.navigationItem.backBarButtonItem = UIBarButtonItem(title: "Back", style: .plain, target: nil, action: nil) self.navigationItem.rightBarButtonItem = UIBarButtonItem(barButtonSystemItem: .add, target: self, action: #selector(onAddClick)) } // UITableViewDataSource func tableView(_ tableView: UITableView, numberOfRowsInSection section: Int) -> Int { return data.count } func tableView(_ tableView: UITableView, cellForRowAt indexPath: IndexPath) -> UITableViewCell { let cell: UITableViewCell = tableView.dequeueReusableCell(withIdentifier: "cell", for: indexPath) let rowIndex: Int = indexPath[1] cell.textLabel?.text = data[rowIndex].0 cell.detailTextLabel?.text = data[rowIndex].1 return cell } @objc func onAddClick() { let vc: ViewController = self.storyboard!.instantiateViewController( withIdentifier: "MainViewController") as! ViewController vc.stackIndex = self.stackIndex + 1 self.navigationController?.pushViewController(vc, animated: true) } }

- 投稿日:2019-03-02T14:46:19+09:00
【Swift】enumを活用したコードの書き方の考察
Swiftでは言語機能や標準ライブラリを使って様々な方法でコードを書くことができます。
中でもenumを活用できる場面はたくさんあると思っています。
一方でenumを使うことでちょっと扱いづらくなる部分も出てきます。この記事では
enumが活用できるところを考え
ちょっと扱いづらいかなと感じるところを見ていき
最後にそれを軽減する方法を検討してみたいと思います。過去の記事でもちょっとだけenumについて書かせて頂きました。
https://qiita.com/shiz/items/1ec94213f2af254226deenumのメリット
文字列よりも安全にアクセスできる
例えばURLRequestでHTTPメソッドを指定する場合は文字列を渡す必要があります。
var request = URLRequest(url: url)
request.httpMethod = "PUT"
しかし
スペルミスをしてしまった場合var request = URLRequest(url: url) request.httpMethod = "POT""POT"は存在しないためエラーになります。
そしてそれは実行時エラーになって気がつきます。さらに
変更が必要になった場合は全ての箇所に修正が入ります。Xcodeで一括置換できますが
もしかしたら抜け漏れがあるかもしれません。こういったリスクはできる限り減らしていきたいため
enumで置き換えてみます。enum HTTPMethod: String { case get = "GET" case post = "POST" case put = "PUT" case delete = "DELETE" } var request = URLRequest(url: url) request.httpMethod = HTTPMethod.put.rawValueこうすることで
間違えるリスク可能性や修正が必要な箇所を
1箇所に集約することができます。複数の型をまとめて扱うことができる
時として複数の型を一律に扱いたい場合があります。
例えば複数の動物がいるとします。
struct Dog {
    let name: String
    func bark() {
        print("ワン")
    }
}

struct Cat {
    let name: String
    func bark() {
        print("ニャー")
    }
}
これを一律に配列で扱いたいとします。
// Heterogeneous collection literal could only be inferred to '[Any]'; add explicit type annotation if this is intentional
let animals = [Dog(name: "Pochi"), Cat(name: "Tama")]
これはエラーになります。
Swiftでは異なる型を同じ配列に格納することができません。
エラーを解消するためにはメッセージに書いてあるように[Any]を明示します。let animals: [Any] = [Dog(name: "Pochi"), Cat(name: "Tama")]しかし
こうすると型の情報が失われてしまうため
各型のメソッドは呼ぶことができなくなります。// これはできる let dogs = [Dog(name: "taro"), Dog(name: "jiro")] dogs.forEach { $0.bark() } // Value of type 'Any' has no member 'bark' let animals: [Any] = [Dog(name: "Pochi"), Cat(name: "Tama")] animals.forEach { $0.bark() }こういった場合は型判定が必要になります。
animals.forEach {
    switch $0 {
    case let dog as Dog:
        dog.bark()
    case let cat as Cat:
        cat.bark()
    default: fatalError("No way!!")
    }
}
この場合
型のチェックがコンパイル時に働きません。
これは下記のような事態が起きる可能性があります。// 新しい動物を追加 struct Horse { let name: String func bark() { print("ヒヒーン") } } // Horseを追加 let animals: [Any] = [Dog(name: "Pochi"), Cat(name: "Tama"), Horse(name: "Pony")] // Horseの条件分岐を追加するのを忘れていた animals.forEach { switch $0 { case let dog as Dog: dog.bark() case let cat as Cat: cat.bark() default: fatalError("No way!!") } } // 実行すると、、、 // Fatal error: No way!!メソッドの呼び出しが限定的で近い場所にあれば良いですが
開発の規模が大きくなるにつれて呼び出し箇所を探すのが困難になっていくことは
あり得そうな話です。そこでenumを活用してみます。
enum Animal {
    case dog(Dog)
    case cat(Cat)
}

let animals: [Animal] = [.dog(Dog(name: "Pochi")), .cat(Cat(name: "Tama"))]
animals.forEach {
    switch $0 {
    case .dog(let dog):
        dog.bark()
    case .cat(let cat):
        cat.bark()
    }
}
Anyの時と同様にswitchで条件分岐が必要になりますが
コンパイル時に型チェックをすることができ
新規のcaseを追加した場合にも気がつくことができるようになります。enum Animal { case dog(Dog) case cat(Cat) case horse(Horse) } let animals: [Animal] = [.dog(Dog(name: "Pochi")), .cat(Cat(name: "Tama")), .horse(Horse(name: "Pony"))] animals.forEach { // error: switch must be exhaustive switch $0 { case .dog(let dog): dog.bark() case .cat(let cat): cat.bark() } }default文も不要です。
あれProtocolで良いのでは?
その通りで上記の場合ですと
同じ型と名前を持ったメソッドを呼んでいるため
同じProtocolに適合させることができます。protocol Animal { func bark() } struct Dog: Animal { let name: String func bark() { print("ワン") } } struct Cat: Animal { let name: String func bark() { print("ニャー") } } struct Horse: Animal { let name: String func bark() { print("ヒヒーン") } } let animals: [Animal] = [Dog(name: "Pochi"), Cat(name: "Tama"), Horse(name: "Pony")] animals.forEach { $0.bark() }enumの場合よりも簡潔で良さそうです。
しかし
それぞれが異なるメソッドを持っている場合は
Protocolに適合させることはできません。さらに
下記のようにするとProtocolでは実現できなくなります。protocol FeedType { var name: String { get } } struct AnimalFeed: FeedType { let name: String } protocol Animal { // ... associatedtype Feed: FeedType func eat(feed: Feed) } struct Dog: Animal { // ... typealias Feed = AnimalFeed func eat(feed: AnimalFeed) { print("\(name)の\(feed.name)") } } // error: protocol 'Animal' can only be used as a generic constraint because it has Self or associated type let animals: [Animal] = [Dog(name: "Pochi"), Cat(name: "Tama"), Horse(name: "Pony")] let petFood = AnimalFeed(name: "エサ") animals.forEach { $0.eat(feed: petFood) }これはProtocolの制約でassociatedtypeやSelfを使用すると
直接型として使用することができなくなります。enumの場合ですとこういった問題はありません。
enum AnimalEnum{
    case dog(Dog)
    case cat(Cat)
    case horse(Horse)
}

let animals: [AnimalEnum] = [.dog(Dog(name: "Pochi")), .cat(Cat(name: "Tama")), .horse(Horse(name: "Pony"))]
let petFood = AnimalFeed(name: "エサ")

animals.forEach {
    switch $0 {
    case .dog(let dog):
        dog.eat(feed: petFood)
    case .cat(let cat):
        cat.eat(feed: petFood)
    case .horse(let horse):
        horse.eat(feed: petFood)
    }
}

// Pochiのエサ
// Tamaのエサ
// Ponyのエサ
ただし
caseが増えていくような場合は
switch文の処理が増えて可読性が下がったり修正の負担が増加しますので
そういった際はtype eraserを使うなど他の方法の検討も考えるべきだと思います。不整合な状態を考慮しなくて良い
URLSessionとResult
よく挙げられる例として
URLSessionのdataTaskのcompletionHandlerの引数があります。今回はSwift5で導入されるResultの
Proposalに書かれている例から考えてみたいと思います。
https://github.com/apple/swift-evolution/blob/master/proposals/0235-add-result.md注:
これは実際にこうなるという訳ではなく
Resultを使うとこういう形にできるのではないかという話です。
現状では戻ってきた結果を
自分でResult型に変換するなどの共通の処理が必要になってきます。func dataTask(with request: URLRequest, completionHandler: @escaping (Data?, URLResponse?, Error?) -> Void) -> URLSessionDataTaskとなっていますが
実際に起こりうる結果を見てみると下記のようになります。
Data? URLResponse? Error? 戻り値としてあり得るか? nil nil nil No nil value nil No value nil nil No value nil value No value value value No nil value value Yes (※1) nil nil value Yes value value nil Yes この場合、実際にはあり得ない場合に対しても考慮が必要になってしまいます。
URLSession.shared.dataTask(with: url) { (data, response, error) in
    guard error != nil else { self.handleError(error!) }

    guard let data = data, let response = response else { return // Impossible? }

    handleResponse(response, data: data)
}
それをResultを活用することで不要な可能性を考慮する負担が減り
下記のように簡潔に書くことができます。URLSession.shared.dataTask(with: url) { (result: Result<(response: URLResponse, data: Data), Error>) in // Type added for illustration purposes.(※1) switch result { case let .success(success): handleResponse(success.response, data: success.data) case let .error(error): handleError(error) } }(※1)
実際にはResponseとErrorに値が入っているケースもあるらしく
下記のような形が正しいようです。Result<(Data, URLResponse), (Error, URLResponse?)>https://oleb.net/blog/2018/03/making-illegal-states-unrepresentable/
ただしこれだとSwift5のResultの型には合いません。画面の状態を管理する
他の例としてある画面の状態について考えてみたいと思います。
すごいざっくりとした例ですが
通信してデータを取得し表示する画面があるとします。下記は画面の状態を表現するデータ構造です。
struct ViewState {
    let isLoading: Bool
    let isEmpty: Bool
    let data: ViewData?
    let error: Error?
}

struct ViewData {
    let screenName: String
    let screenImage: String
}
こちらもURLSessionと同様に
あり得ない状態のチェックが必要になります。例えば
通信終了後、dataがあるのにisEmptyがtrueになっている
dataがあるのにerrorもあるなど
これを確認するためにはunitテストを書いたり
実際に動かして確認するなどが必要になり
コストが増えてしまいます。今回は極めてシンプルな状況ですが
これにリフレッシュやページングの処理が加わることで
必要な変数が増えたりするとどんどんコストが増加していきます。また、SomeDataやErrorはOptionalになっているため
所々でnilチェックをする必要も出てきます。では、これをenumで表現してみます。
enum ViewState {
  case empty
  case loading
  case data(ViewData)
  case failed(Error)
}
こうすることで
unitテストや動作確認が必要 -> コンパイラがチェックしてくれるので不要
nilチェックが必要 -> 必要なcaseで必ず値があることが保証されるので不要
といったメリットが生まれます。
enumにしたことで扱いづらくなるものもある
このようにenumにすることで恩恵を受けることができますが
逆に複雑さを増してしまうこともあります。Viewをコントロールする
例えば、通信中の場合はローディングを表示したいとします。
structの場合ですと
// ViewControllerの中だと思ってください

var state: ViewState!
var indicator: UIActivityIndicator = UIActivityIndicatorView()

self.indicator.isHidden = state.isLoading == false
enumの場合ですと
self.indicator.isHidden = {
  guard case .loading = state else {
    return false
  }
  return true
}
とちょっと複雑さが増してしまいます。
さらに
状況によってボタンのタイトルを変更するなどは
caseごとの表示方法の定義が必要になるかもしれません。Computed Propertyを活用してアクセスを楽にする
これを解消するためにComputed Propertyを定義します。
extension ViewState {
  var isLoading: Bool {
    guard case .loading = self else { return false }
    return true
  }

  var isEmpty: Bool {
    guard case .empty = self else { return false }
    return true
  }
  var data: ViewData? {
    guard let case .data(viewData) = self else { return nil }
    return viewData
  }
  var error: Error? {
    guard let case .error(error) = self else { return nil }
    return error
  }
}
こうすることでstructの時と同じようにアクセスをすることができるようになります。
一方でPropertyが増えるとコードも増えることになるので
必要なものだけ定義をするか
一部だけ宣言されていると「なぜここだけ?」となってしまうため
一律宣言するべきかは後々の悩みどころかもしれません。※ Sourceryなどでコード生成をしている人もいるようです。
まとめ
enumの性質を活用することで
リスクの軽減やデータの扱いやすさの向上が期待できるのではないかと考え
実際に活用している場面も多くあると感じています。一方で使いづらい状況というところもあり
一律にこれが良いということも言えないということの再認識を行えました。どういった時にどういう状況で使えるのか
日々考えながらちょうど良い落とし所を見つけられるようにしていきたいと思います。何か間違いなどありましたらご指摘頂けますと幸いです
- 投稿日:2019-03-02T14:24:46+09:00
iOSアプリ開発入門#1 ~TableView~
目的
- よく使うであろうTableViewを使用したアプリをStoryboardありとなしでサクッと作れるようになる
- ありなしの両方を試すことで、Storyboardが何をやっているのかなんとなくイメージできるようになる
Step1. 爆速でTableViewアプリ作成
ひとまず5分でTableViewアプリを作る。
初心者がstoryboardを使うと色々とハマる気がするので、storyboardなしの方が手っ取り早い。1.1. XCodeでProject作成
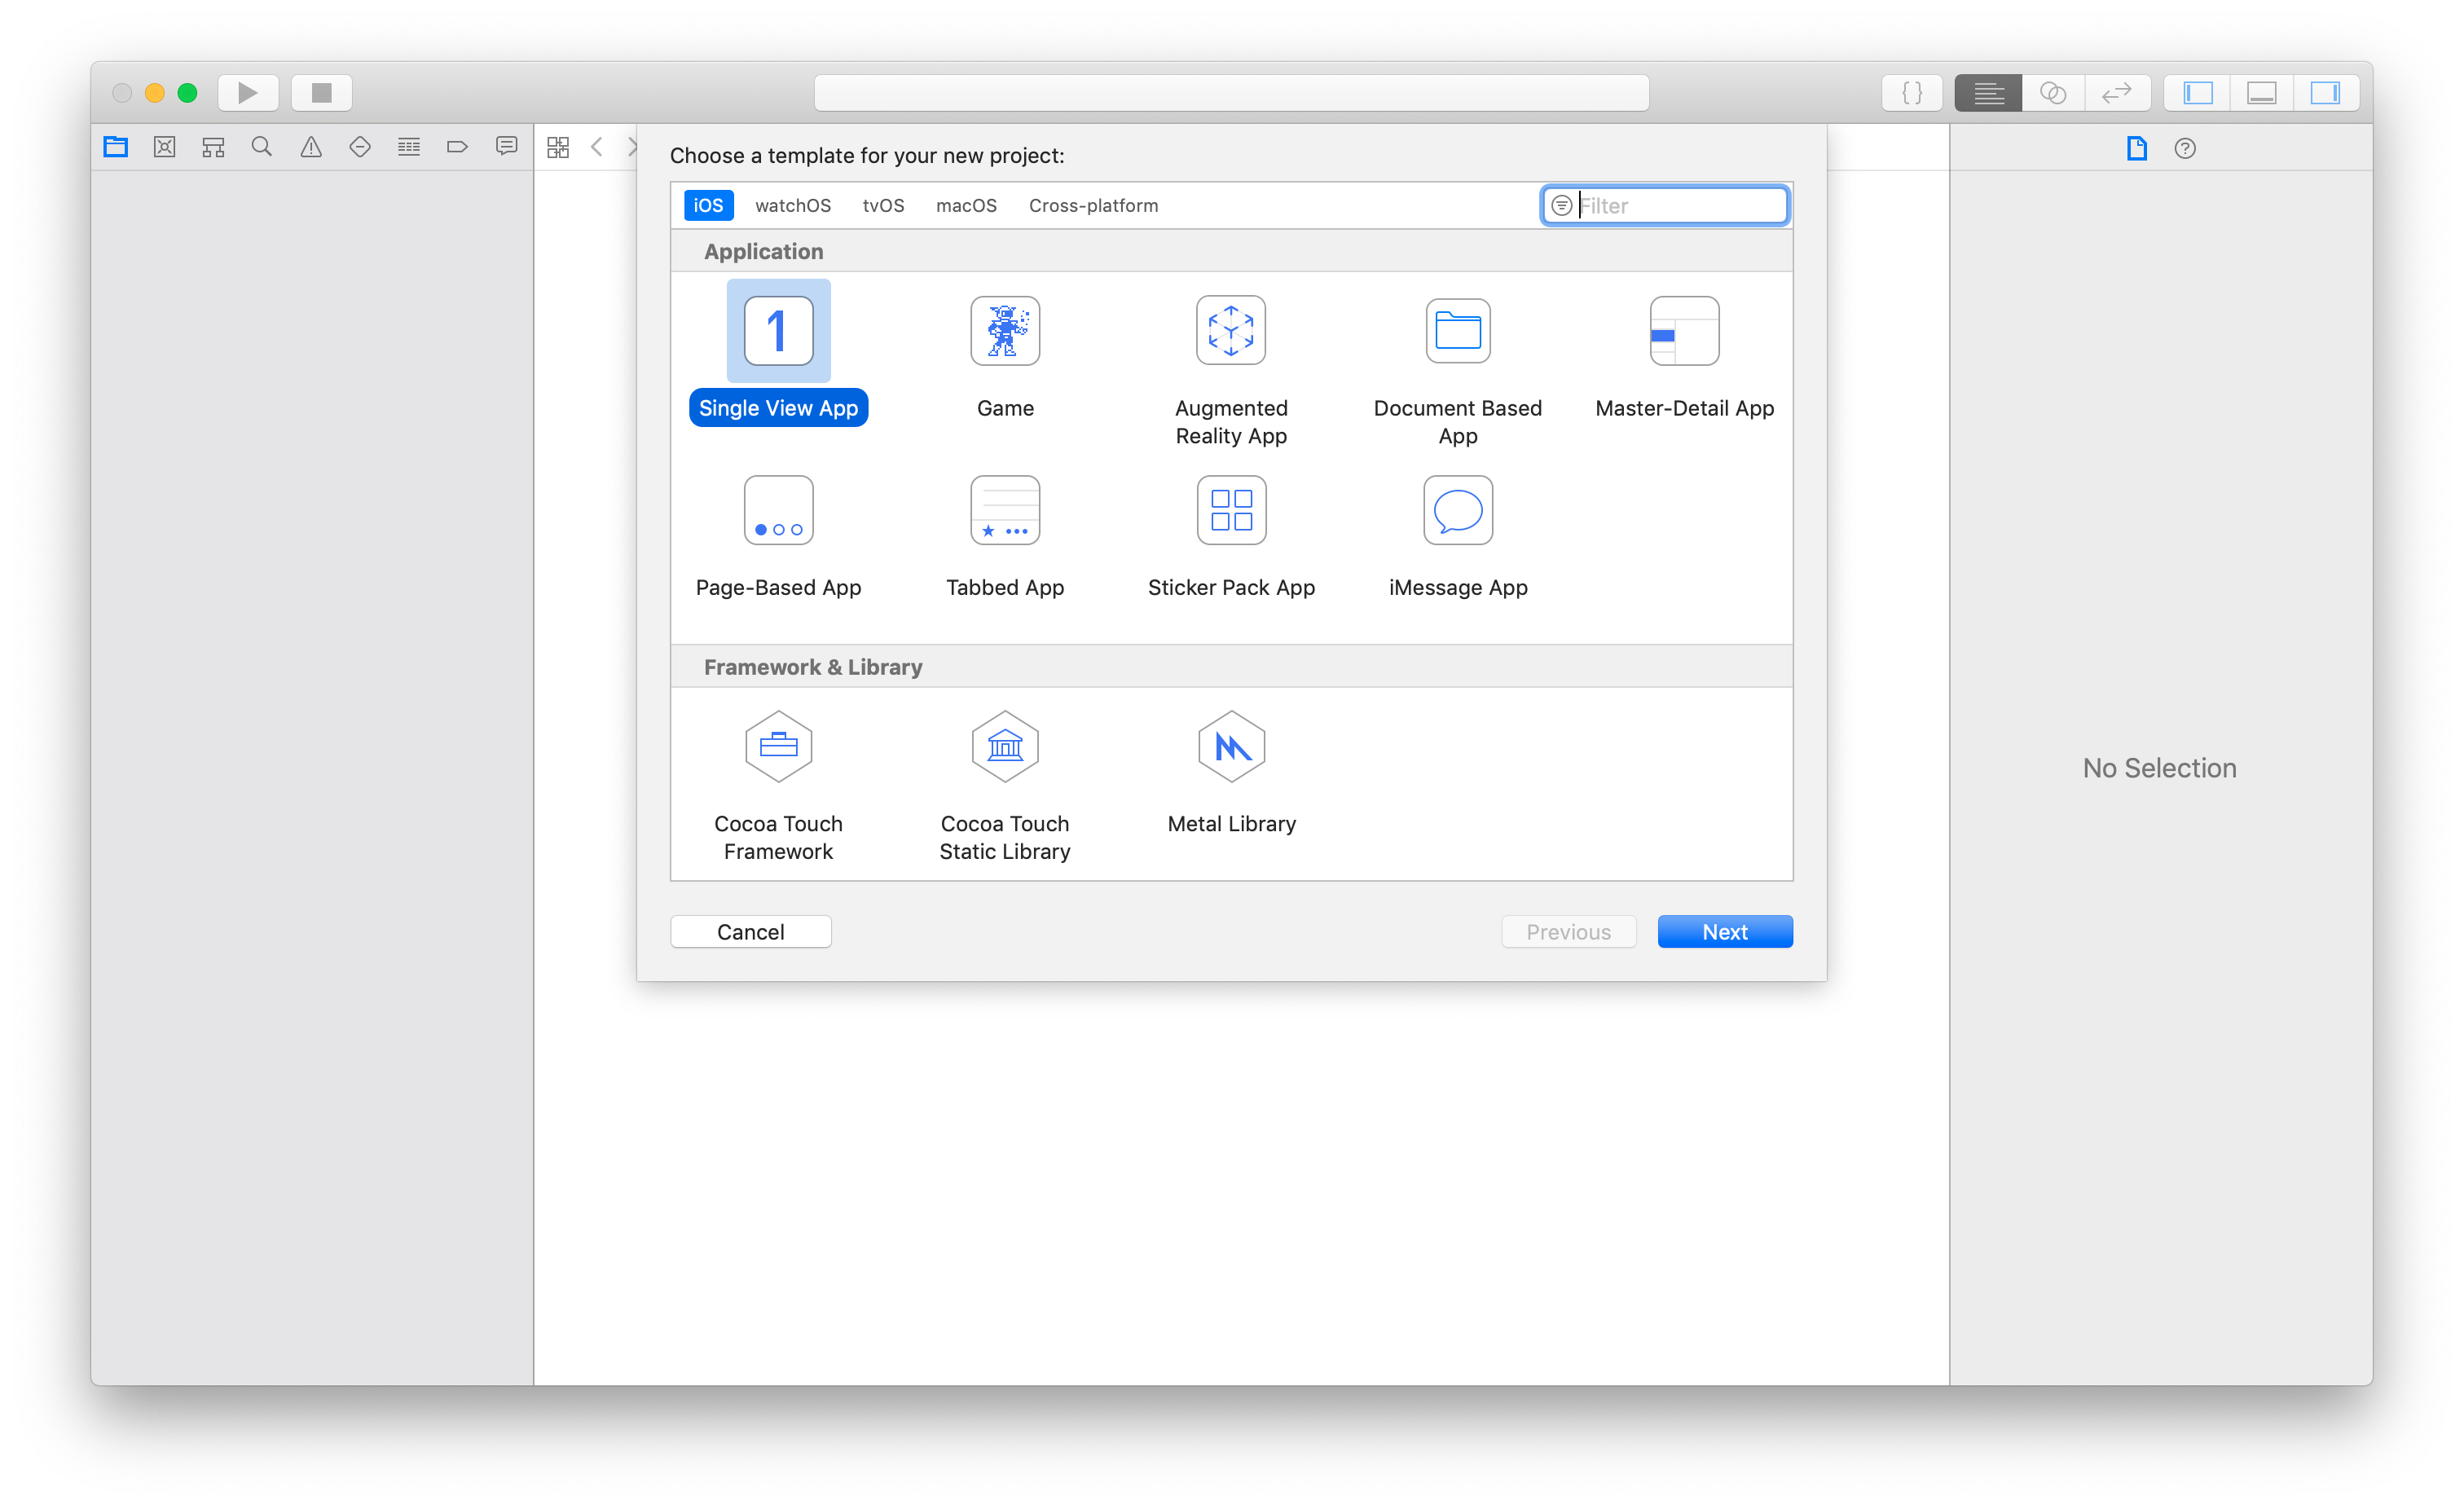
「Single View App」で「Next」
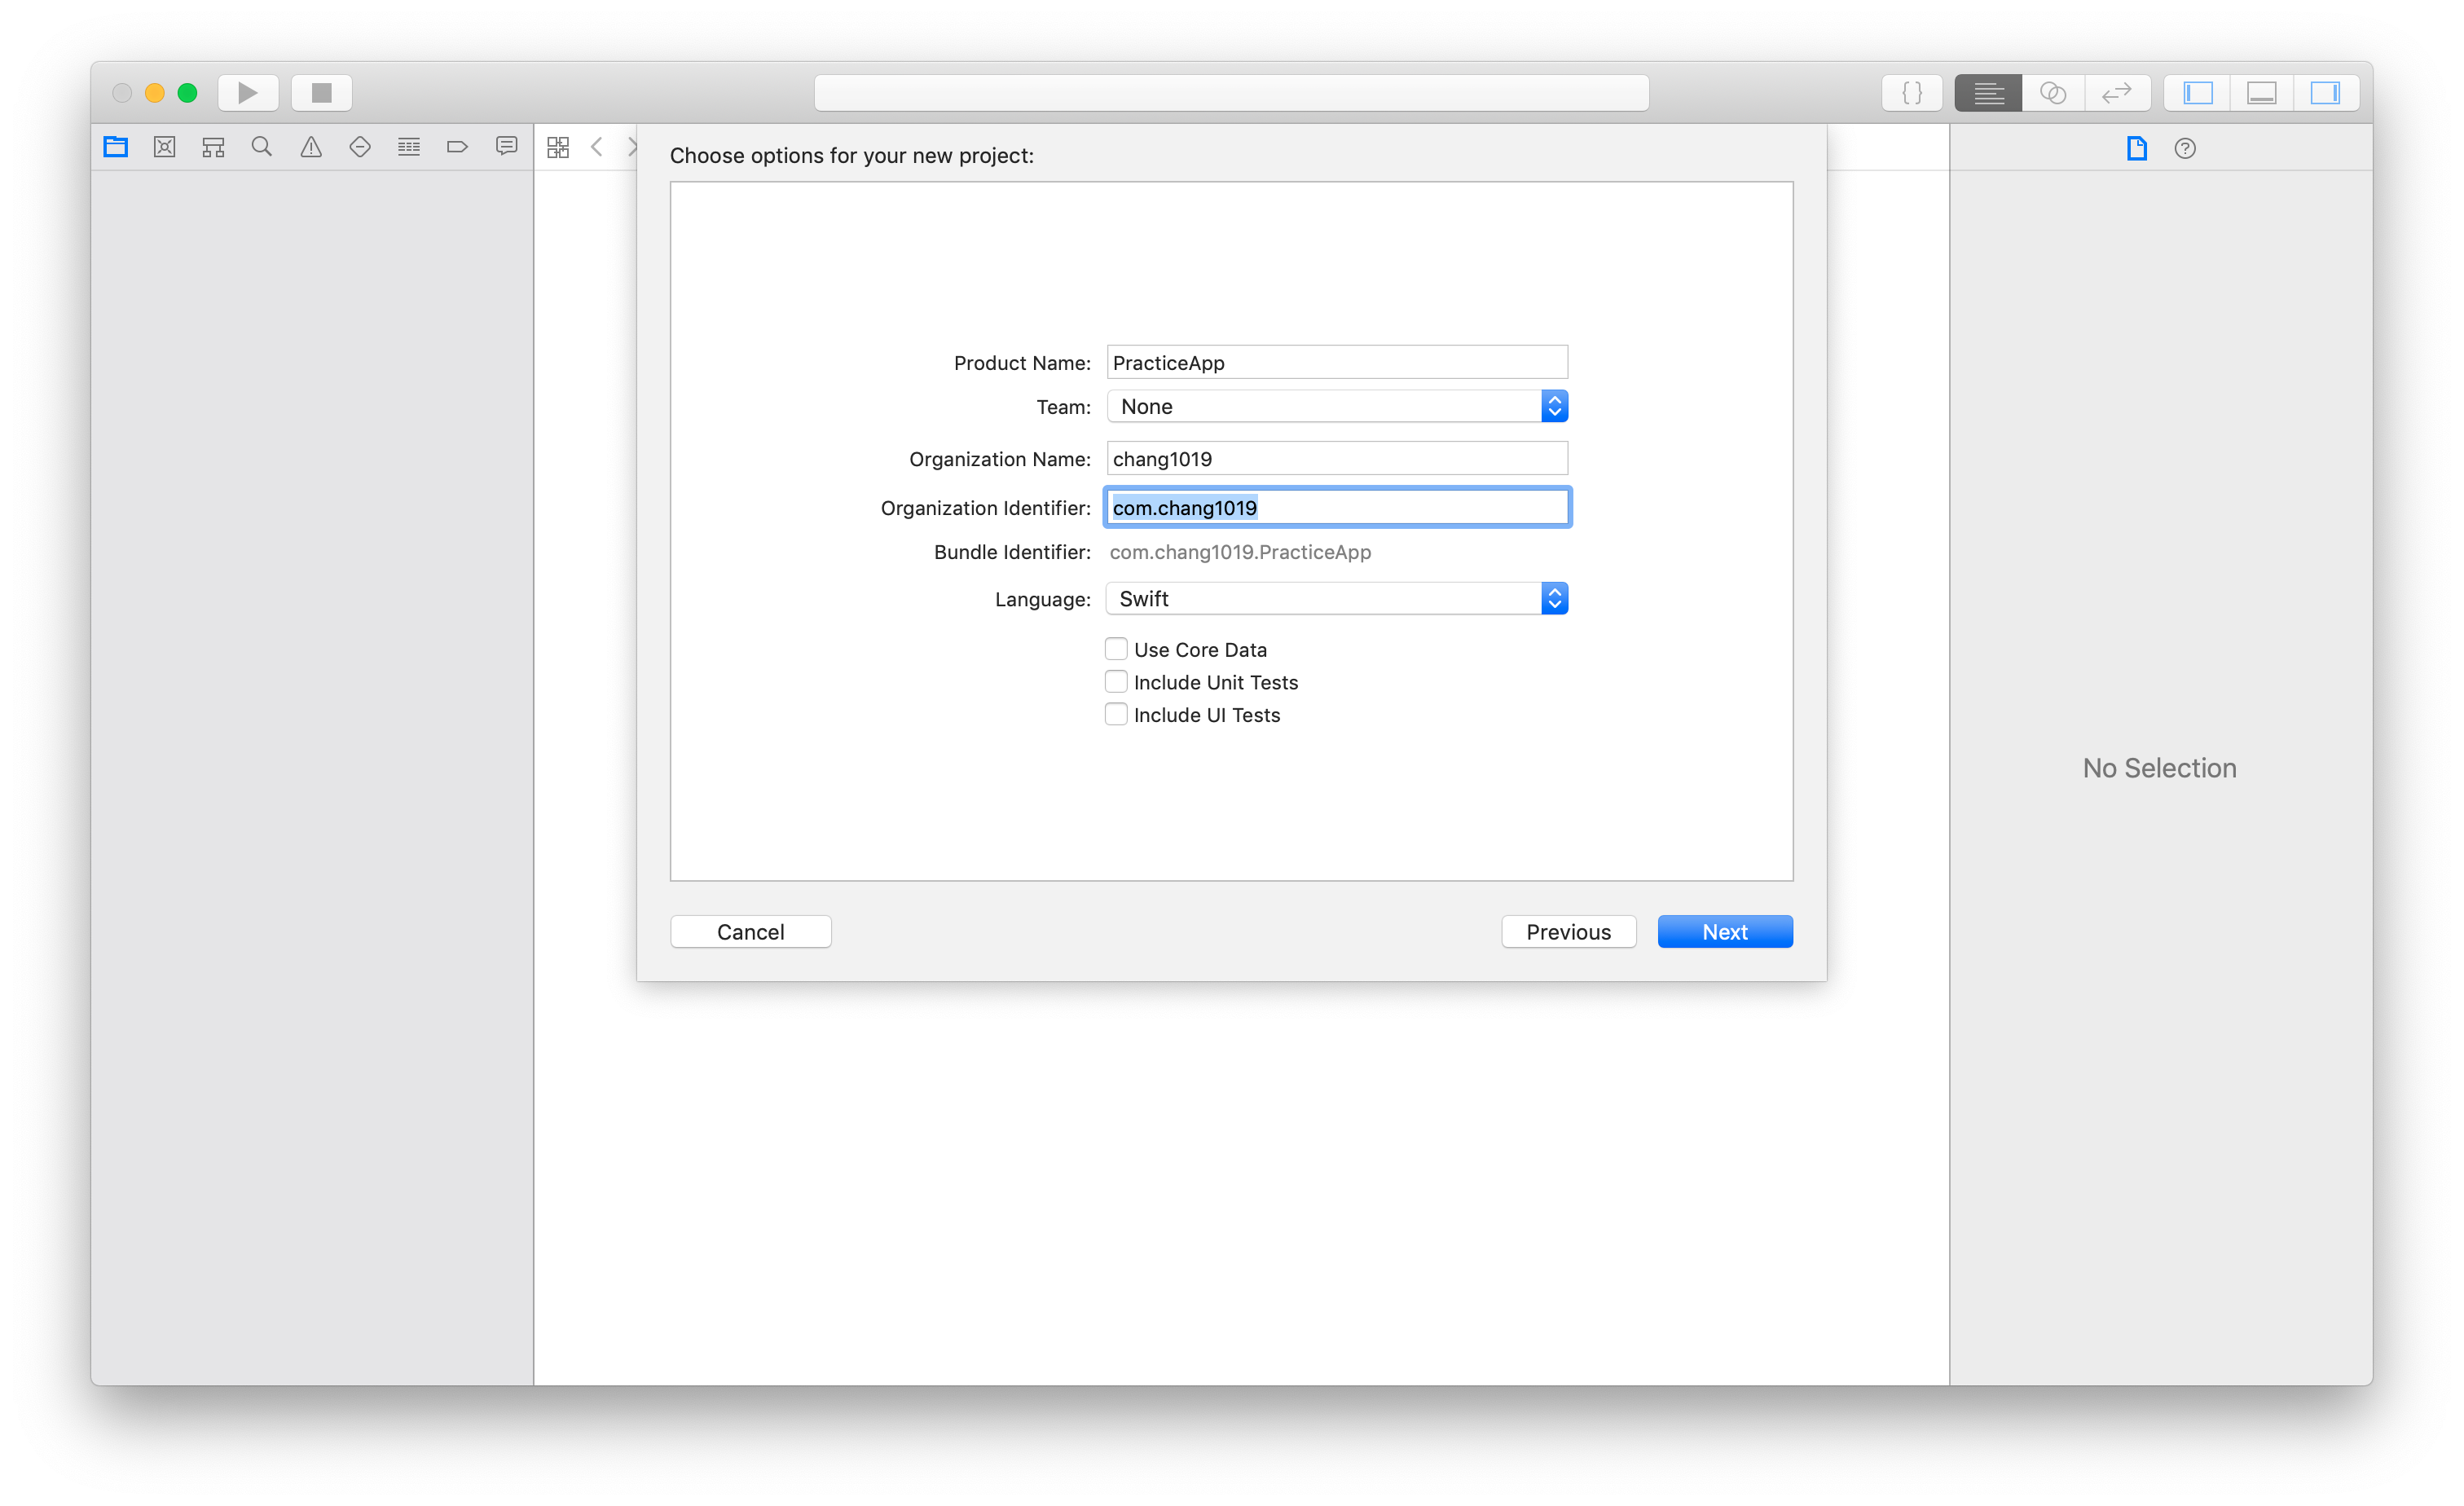
1.2. Project情報入力
適当にProject情報入力
1.3. いきなりViewController編集
爆速でいきたいので他の設定やファイルには目もくれずViewControllerを編集する
ViewController.swiftimport UIKit class ViewController: UIViewController, UITableViewDelegate, UITableViewDataSource { override func viewDidLoad() { super.viewDidLoad() let tableView: UITableView = UITableView(frame: view.frame, style: .plain) tableView.register(UITableViewCell.self, forCellReuseIdentifier: "cell") tableView.delegate = self tableView.dataSource = self view.addSubview(tableView) } // UITableViewDataSource func tableView(_ tableView: UITableView, numberOfRowsInSection section: Int) -> Int { return 10 } func tableView(_ tableView: UITableView, cellForRowAt indexPath: IndexPath) -> UITableViewCell { let cell: UITableViewCell = tableView.dequeueReusableCell(withIdentifier: "cell", for: indexPath) cell.textLabel?.text = "\(indexPath[1] + 1)行目" return cell } }ポイントとしては
- インスタンス変数「view」にaddSubViewで表示したいTableViewを追加する
- 追加するTableViewに表示したいTableViewCellをregisterする
- 追加するTableViewのdelegateとdataSourceに必要なインタフェースの実装(この場合はself)を渡す
- 各行の表示にはcellForRowAtで返却されるTableViewCellが使用される
- その際、dequeueReusableCellを使用することでTableViewCellインスタンスを再利用しつつ表示に利用できる
1.4. 起動
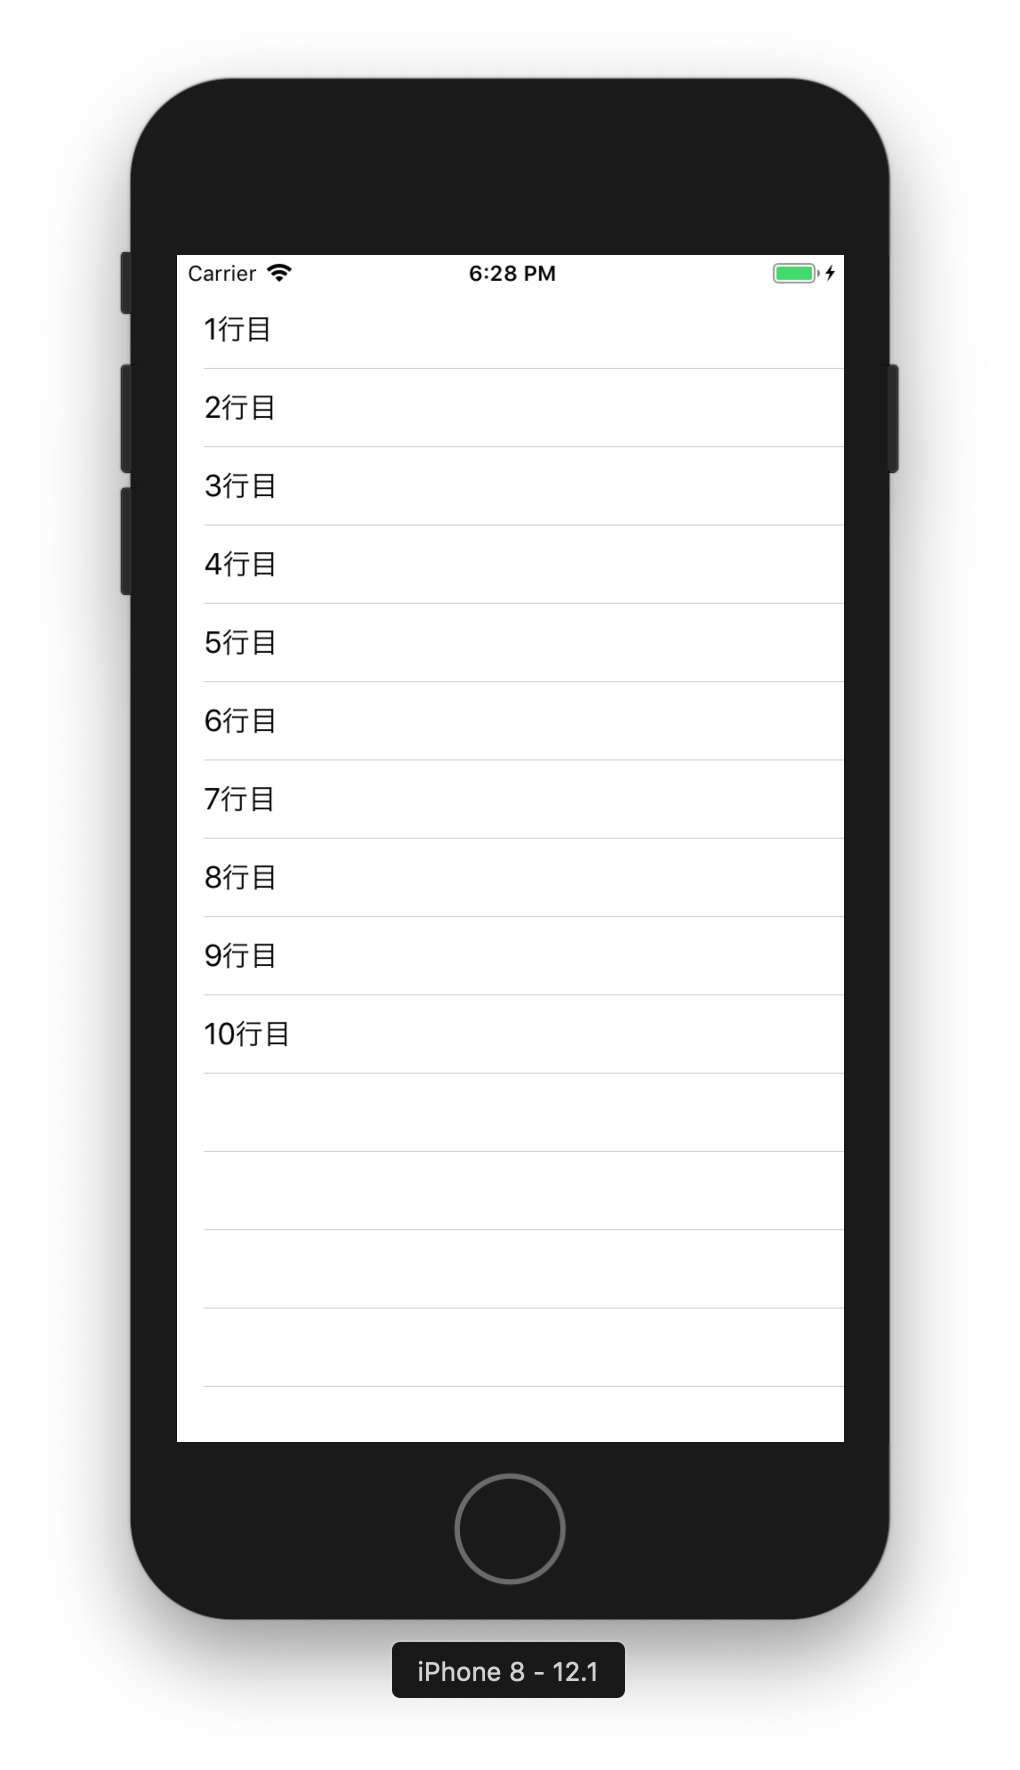
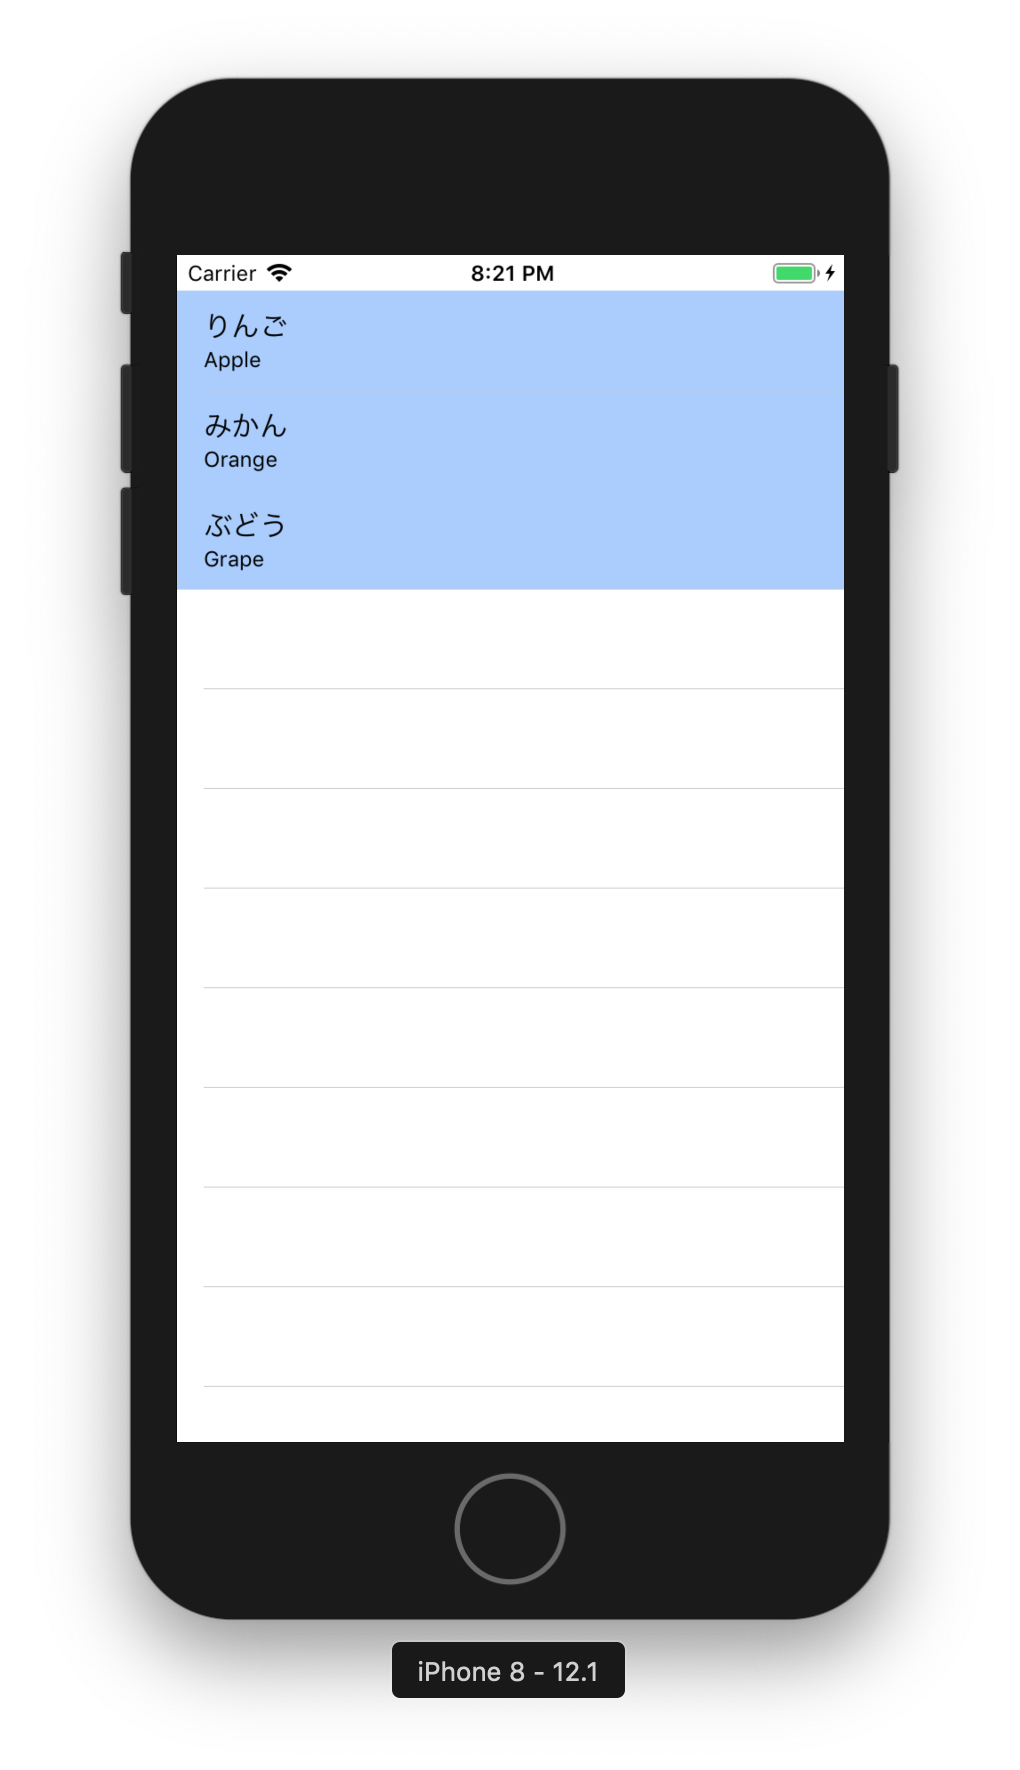
これで完了。シミュレータでRunすれば以下のような10行だけ表示されるアプリの完成。
Step2. Cellのカスタマイズ+動的レコード
Tableっぽくdataをもとに行数を動的に変更しつつ、UICellViewのカスタマイズをコードだけでやってみる。
2.1. ViewControllerをもう少し弄ってみる
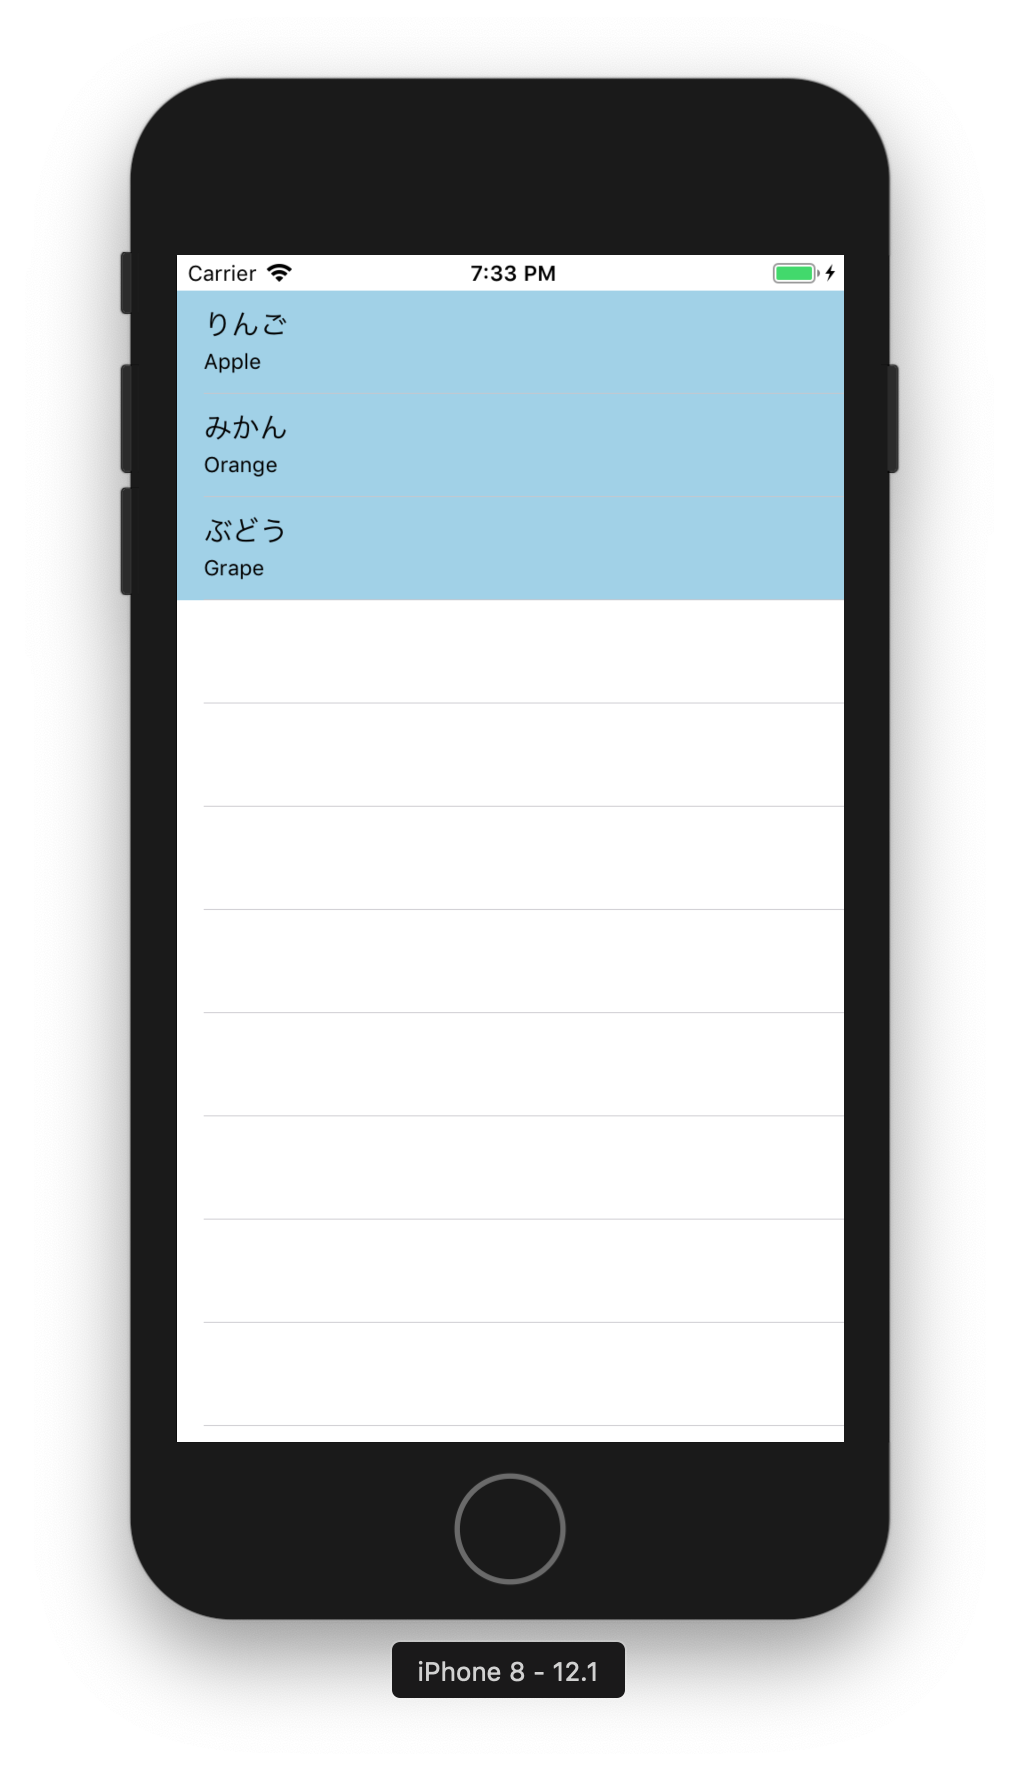
ViewController.swiftimport UIKit class ViewController: UIViewController, UITableViewDelegate, UITableViewDataSource { private let data: [(String,String)] = [ ("りんご", "Apple"), ("みかん", "Orange"), ("ぶどう", "Grape"), ] override func viewDidLoad() { super.viewDidLoad() let tableView: UITableView = UITableView(frame: view.frame, style: .plain) tableView.register(TableCellView.self, forCellReuseIdentifier: TableCellView.ID) tableView.delegate = self tableView.dataSource = self view.addSubview(tableView) } // UITableViewDataSource func tableView(_ tableView: UITableView, numberOfRowsInSection section: Int) -> Int { return data.count } func tableView(_ tableView: UITableView, cellForRowAt indexPath: IndexPath) -> UITableViewCell { let cell: TableCellView = tableView.dequeueReusableCell(withIdentifier: TableCellView.ID, for: indexPath) as! TableCellView let rowIndex: Int = indexPath[1] cell.setCellInfo(title: data[rowIndex].0, detail: data[rowIndex].1) return cell } } class TableCellView: UITableViewCell { static let ID: String = "cell" private let cellStyle: CellStyle = CellStyle.subtitle private let cellColor: UIColor = UIColor(red: 0.6, green: 0.8, blue: 0.9, alpha: 0.9) required init?(coder aDecoder: NSCoder) { fatalError("not implemented") } override init(style: UITableViewCell.CellStyle, reuseIdentifier: String?) { super.init(style: cellStyle, reuseIdentifier: reuseIdentifier) self.backgroundColor = cellColor } // original methods func setCellInfo(title: String, detail: String) { self.textLabel?.text = title self.detailTextLabel?.text = detail } }ポイントとしては
- registerしていたUITableViewCellを自作クラスのTableViewCellに変更
- TableViewCellはUITableViewCellのサブクラス
- overrideしたinitで表示ロジックを実装
2.2. 起動
Runする
Step3. Storyboardを使ってみる
コードで地道に書いているところをStoryboardにお任せしてみよう
3.1. TableViewをStoryboardへ
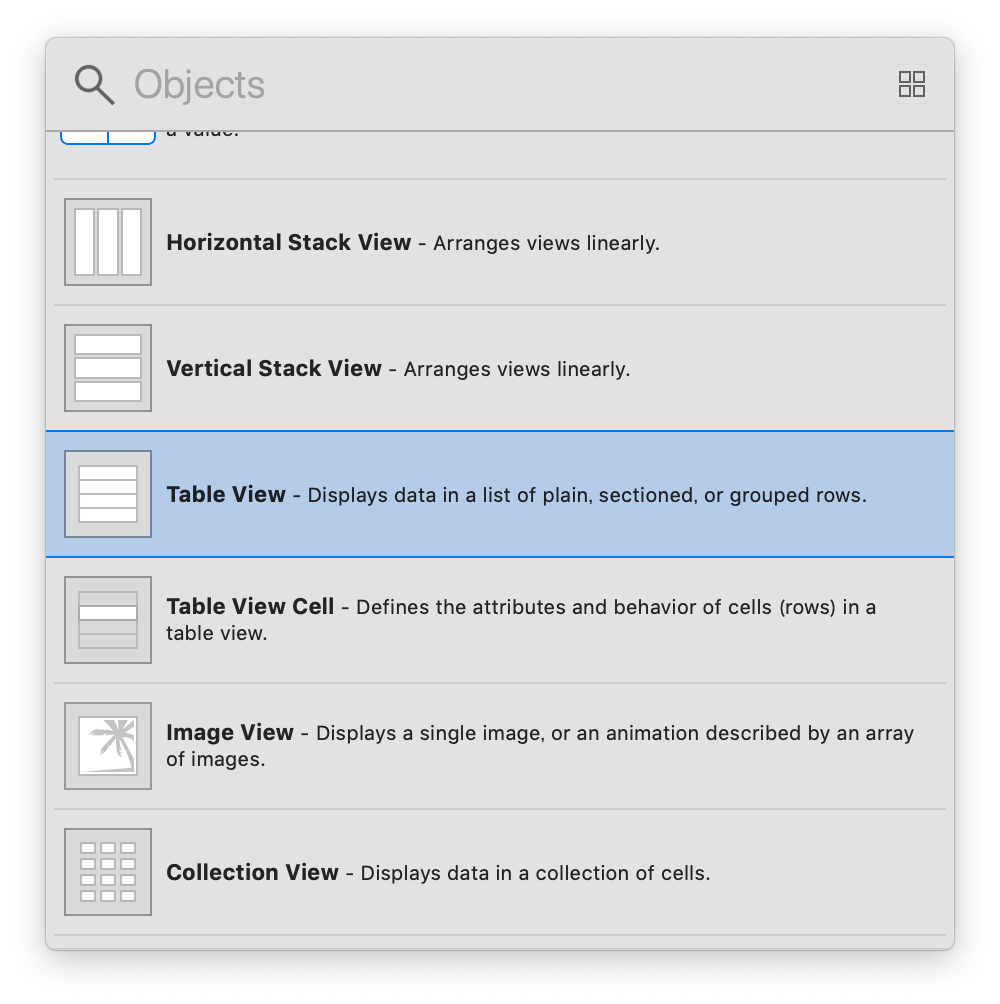
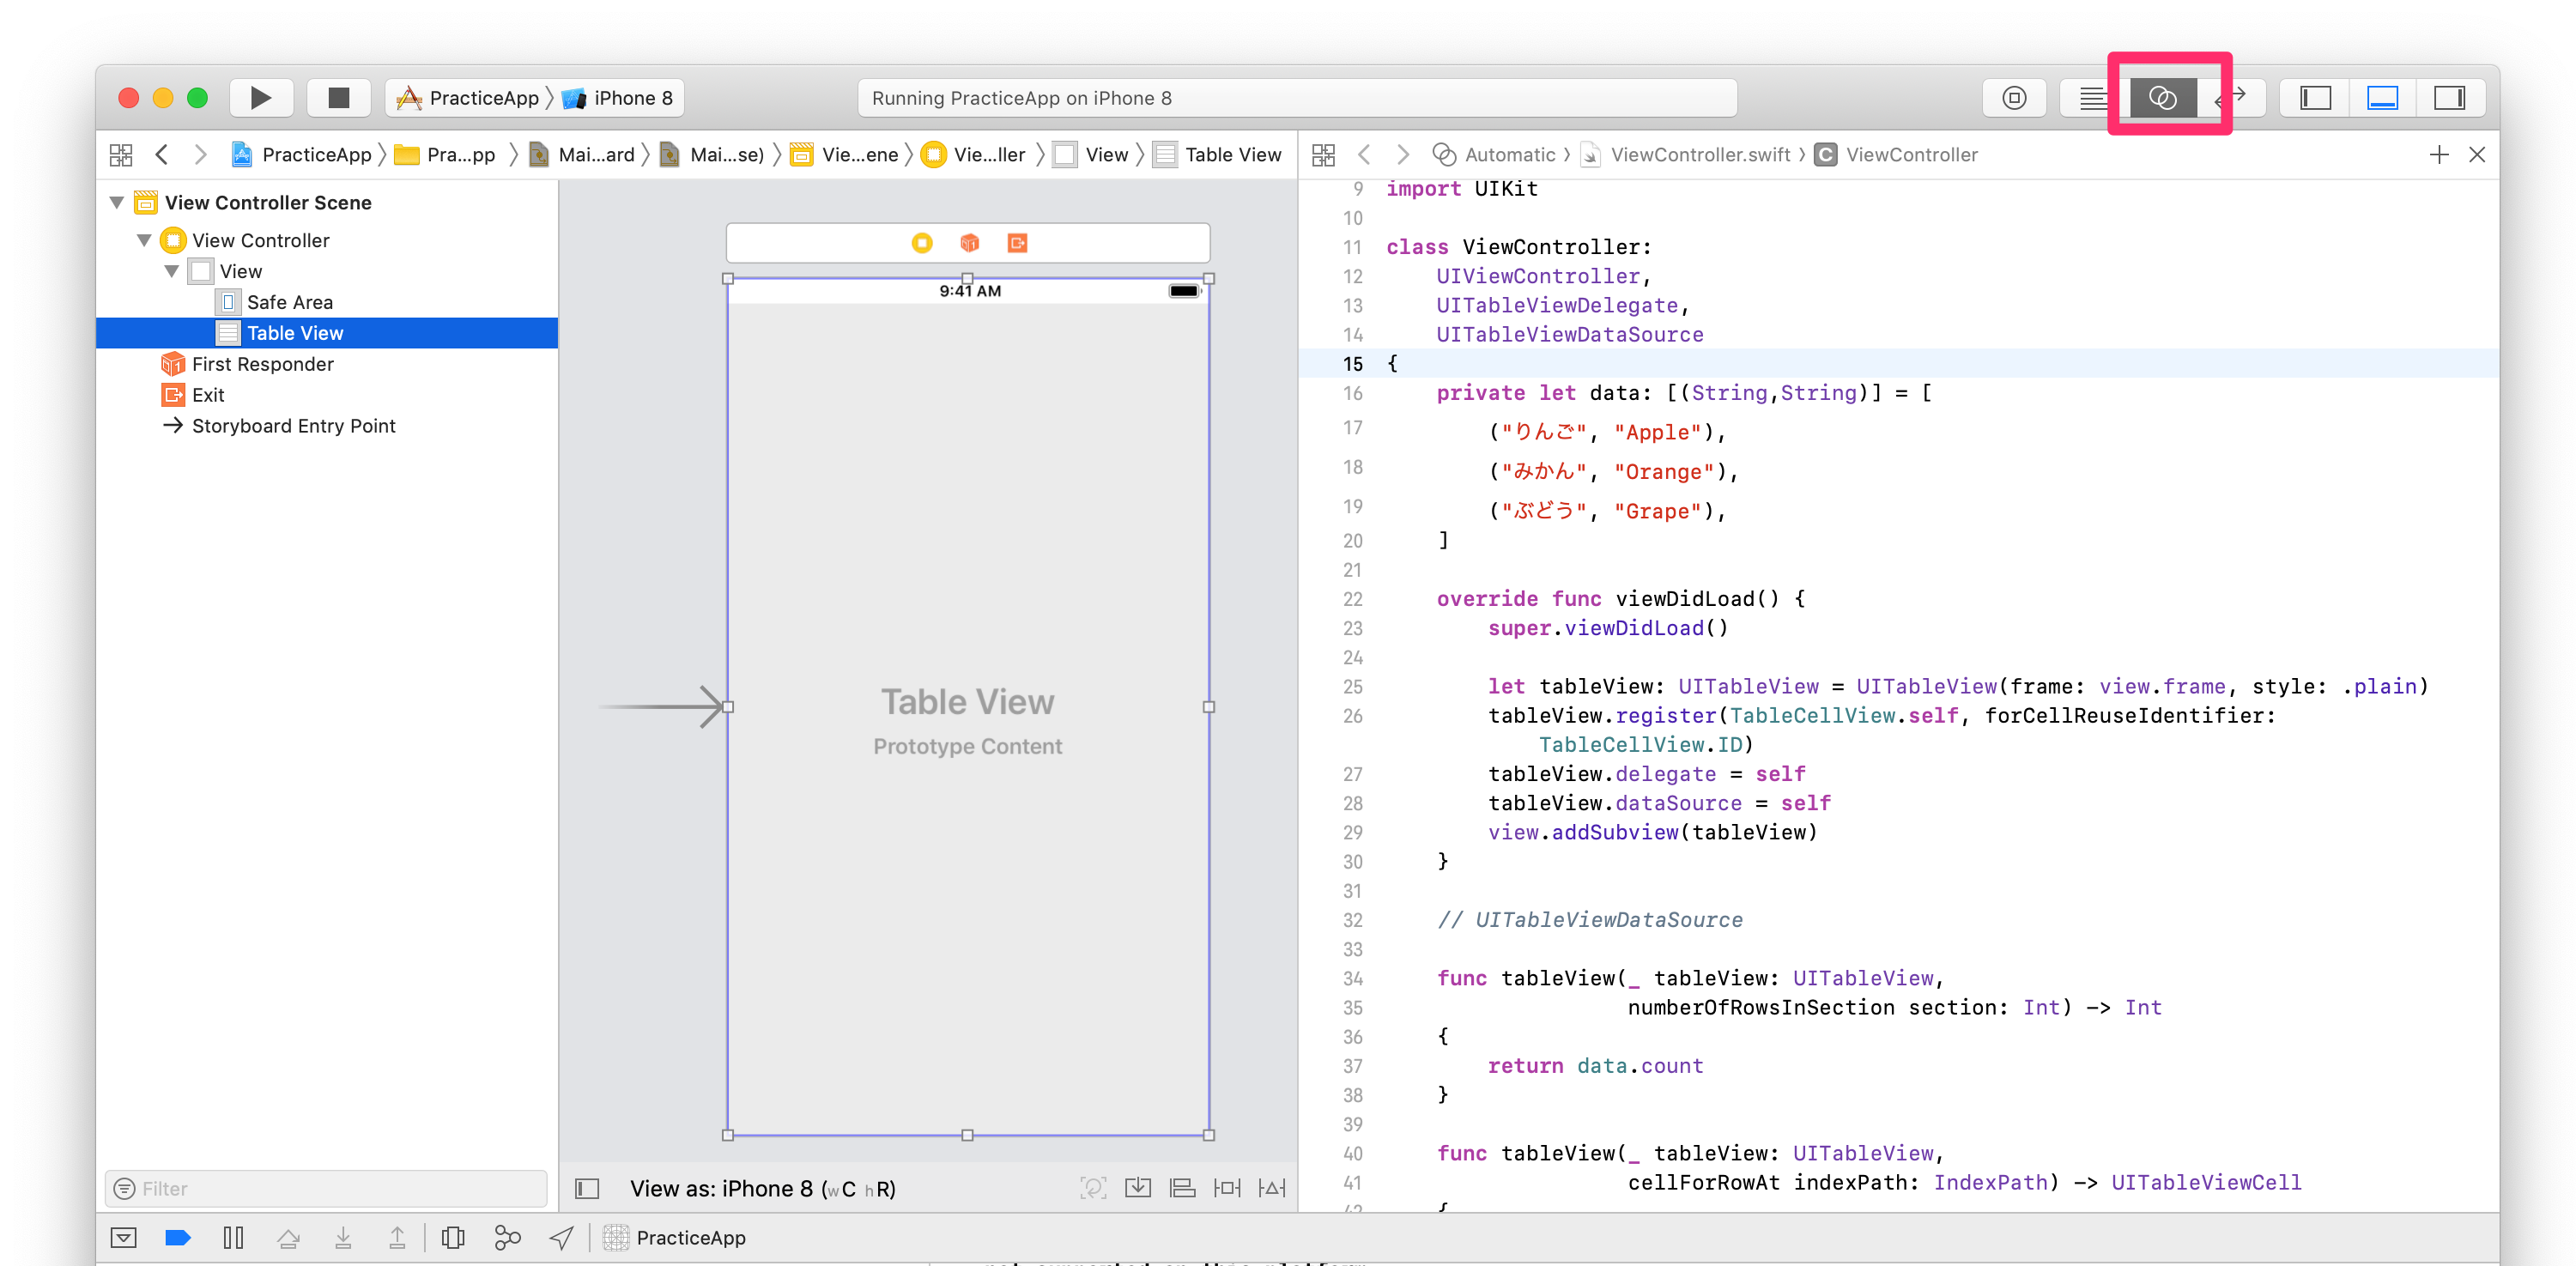
Main.storyboardを開き、View Controllerに対してTableViewを追加する。
画面右上のUIコンポネント追加ボタンから
TableViewを選択
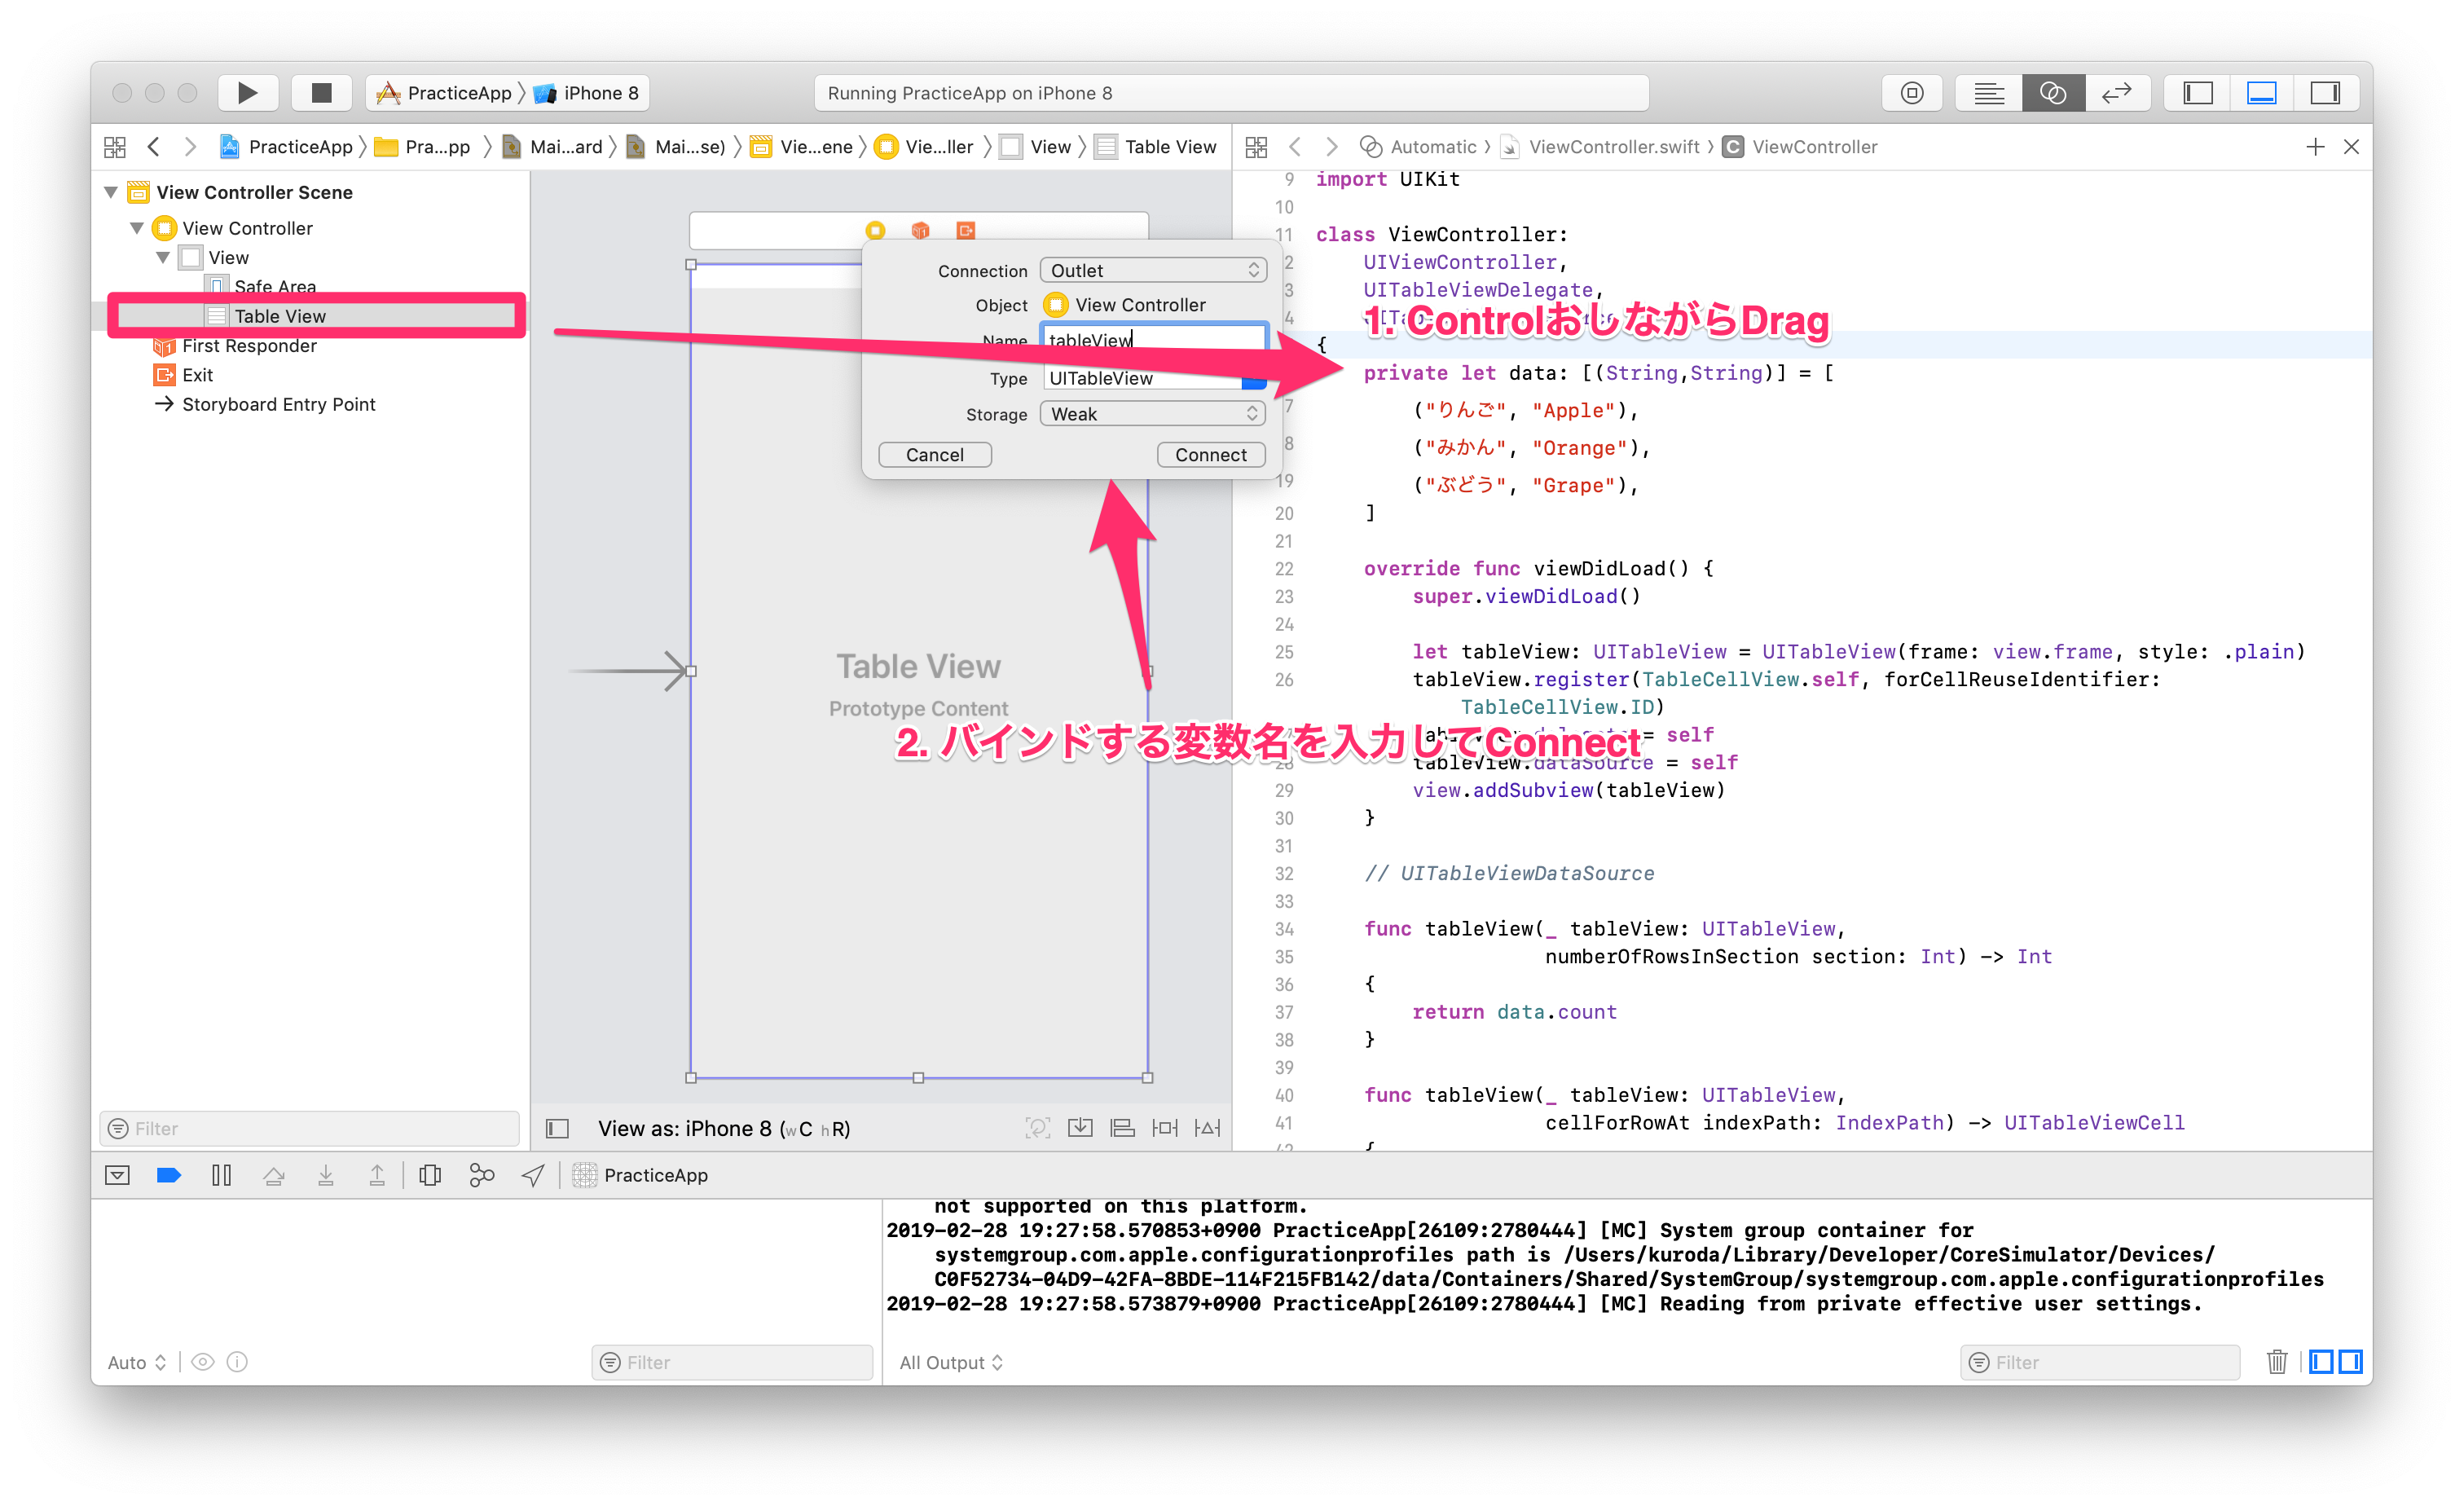
Codeと並べて表示
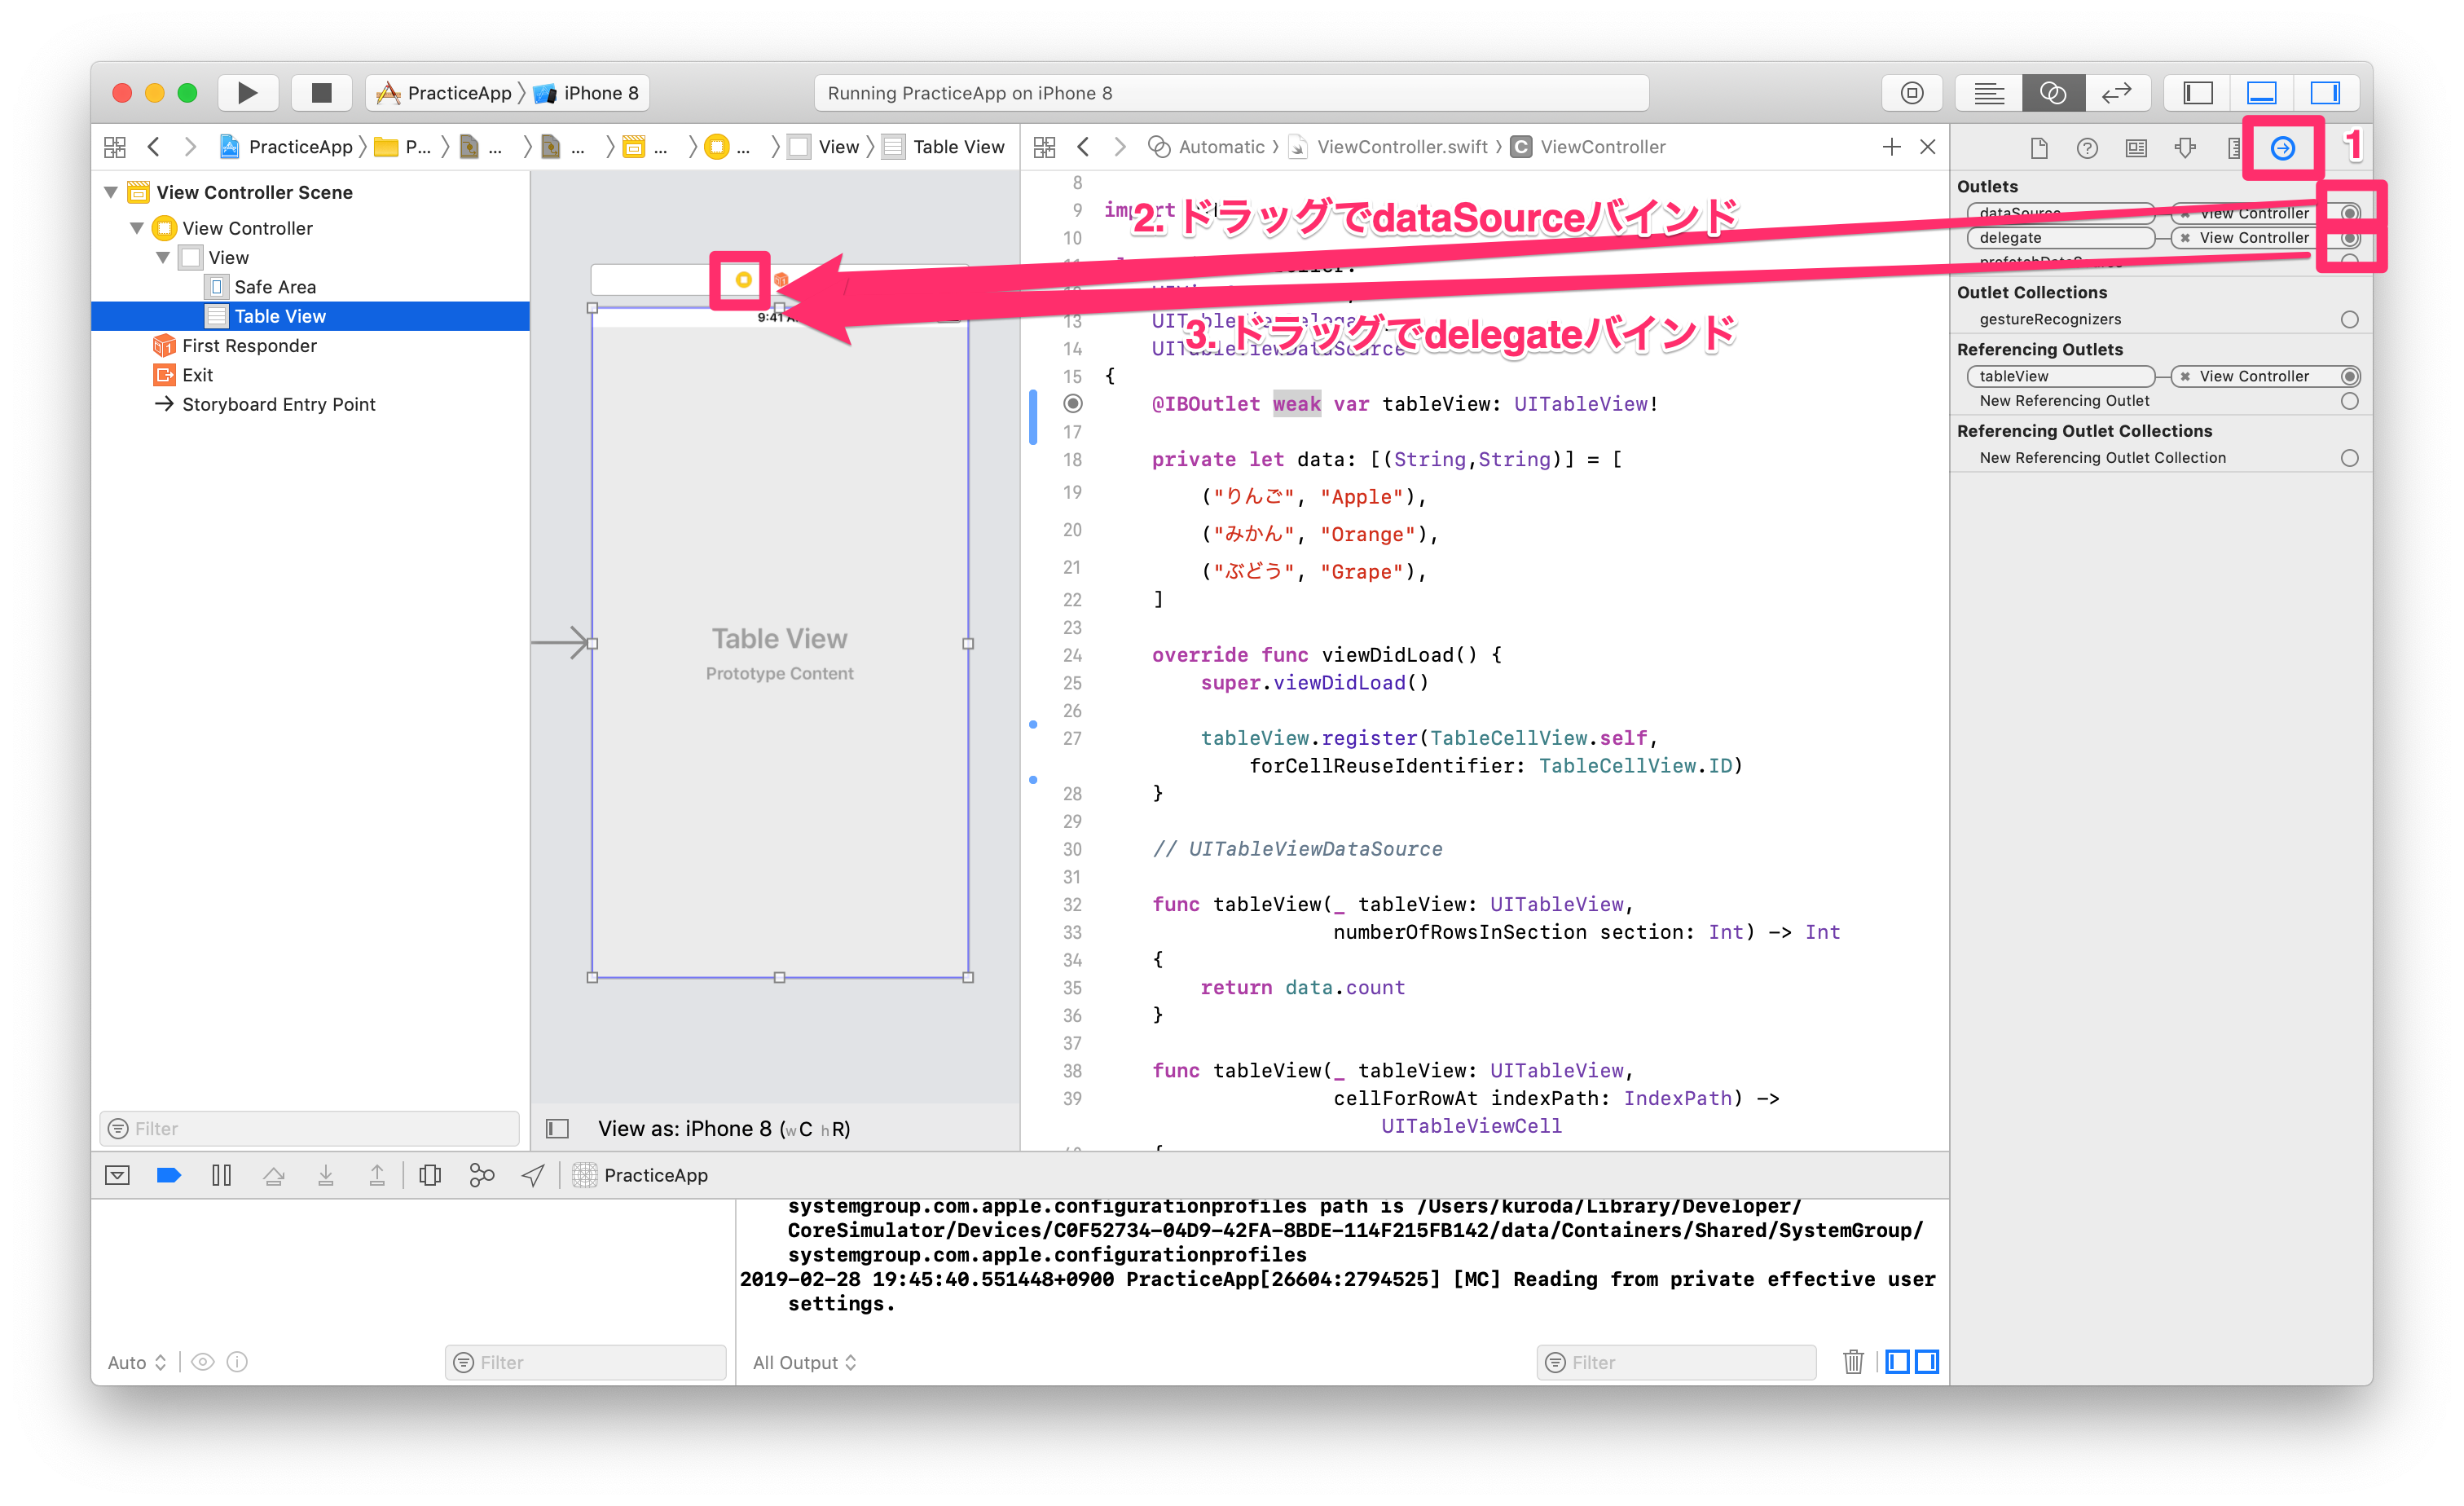
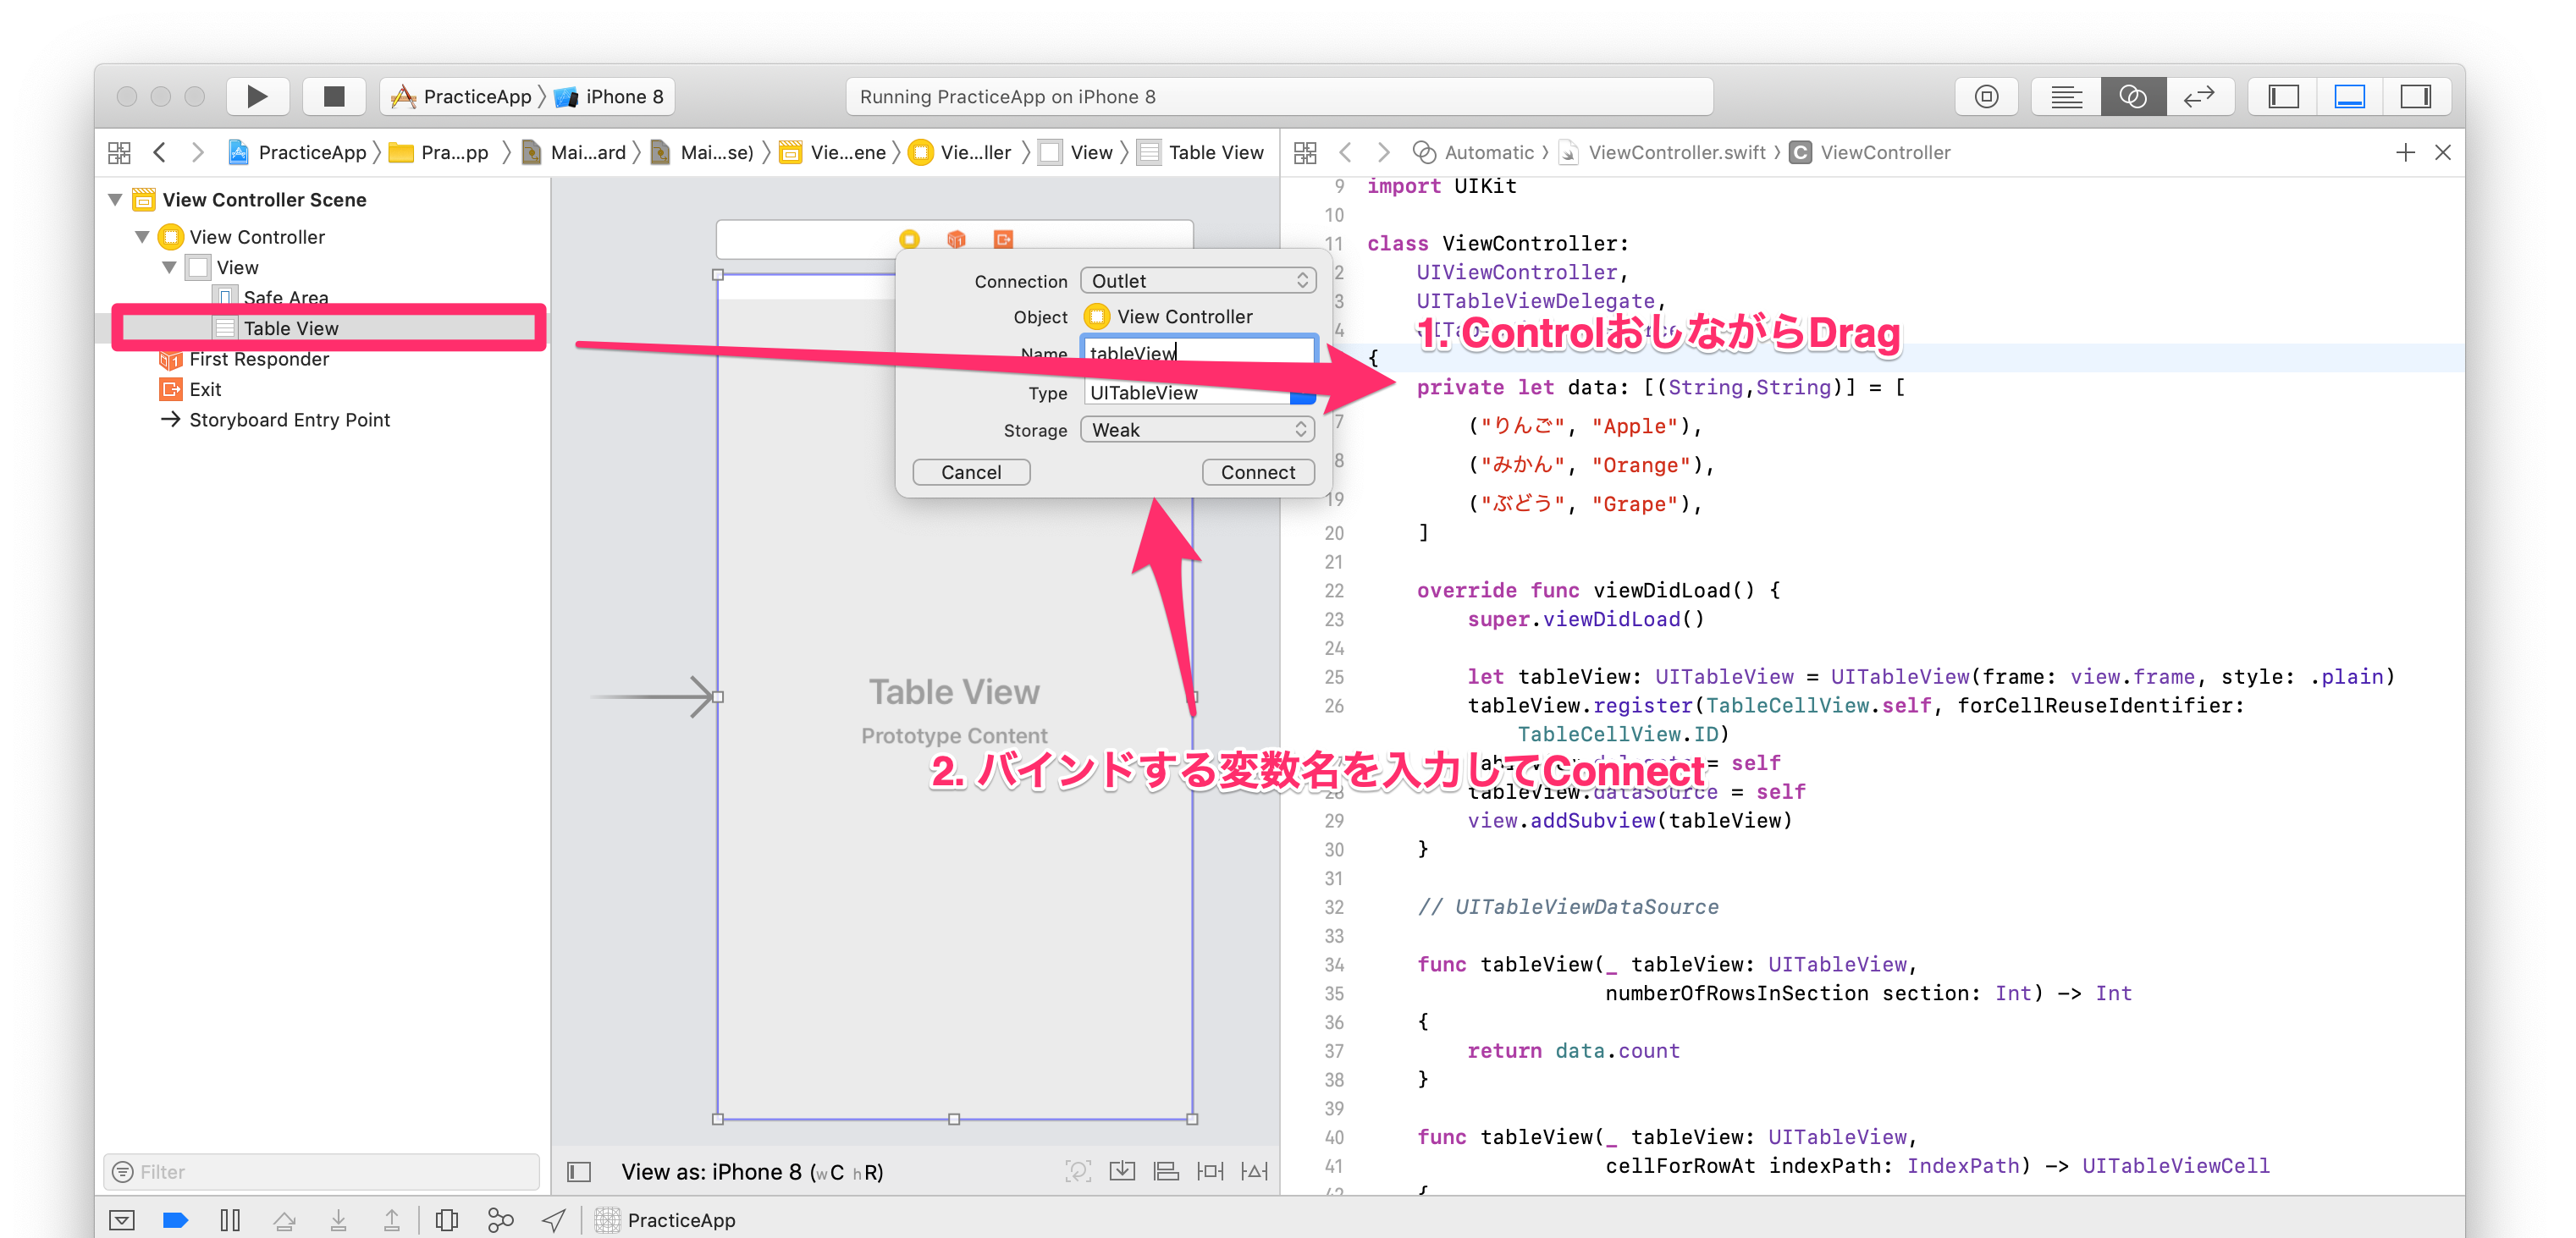
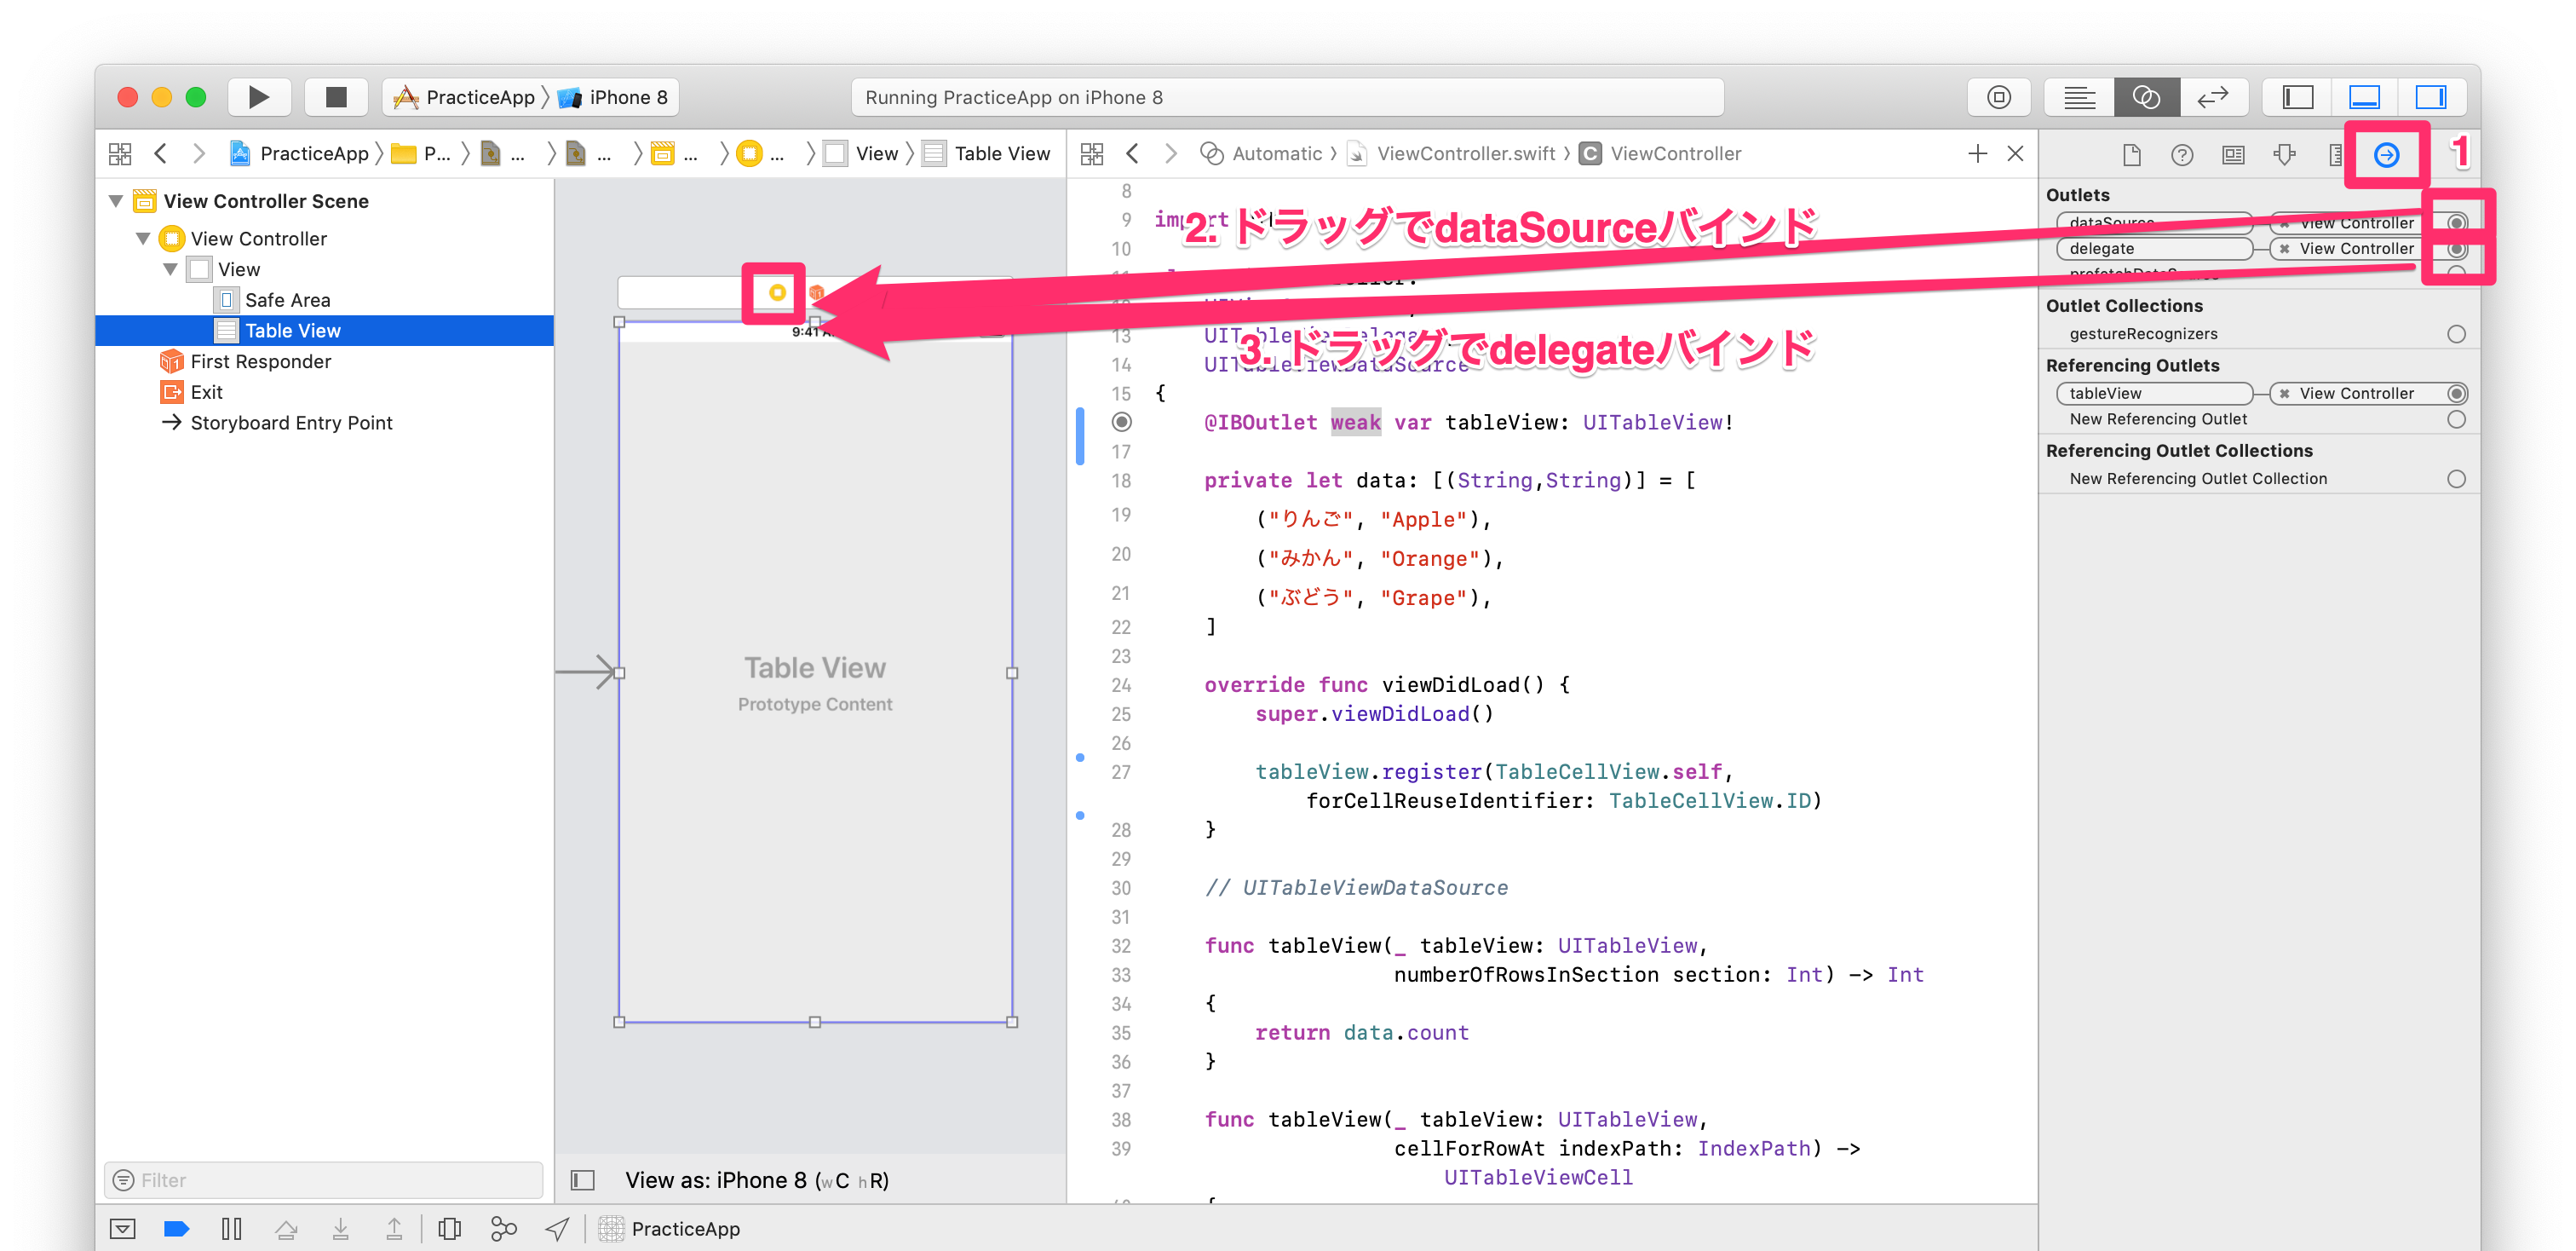
ここでCtrlキーを押したまま、TableViewからコードの方へドラッグ&ドロップすると、該当のTableViewとバインドされた変数が定義される。
さらにTableViewのOutletsについて、delegateとdataSourceをドラッグ&ドロップでView Controllerとバインドする(このあたり、慣れればどうってことないのだろうけど、初心者にやさしいかどうかは微妙な気がする)
これらの作業により、ViewController.swiftからは以下のコードが削減できる
--- a/PracticeApp/ViewController.swift
+++ b/PracticeApp/ViewController.swift
@@ -13,6 +13,8 @@ class ViewController:
     UITableViewDelegate,
     UITableViewDataSource
 {
+    @IBOutlet weak var tableView: UITableView!
+
     private let data: [(String,String)] = [
         ("りんご", "Apple"),
         ("みかん", "Orange"),
@@ -22,11 +24,7 @@ class ViewController:
     override func viewDidLoad() {
         super.viewDidLoad()

-        let tableView: UITableView = UITableView(frame: view.frame, style: .plain)
         tableView.register(TableCellView.self, forCellReuseIdentifier: TableCellView.ID)
-        tableView.delegate = self
-        tableView.dataSource = self
-        view.addSubview(tableView)
     }

     // UITableViewDataSource
正直、この程度のtableViewであればあまりstoryboardのありがたさが実感できないが、おそらくlayout変更とかstyle変更とか諸々盛り込んでいく過程でありがたくなるはずだと信じる。
3.2. TableViewCellをStoryboardへ
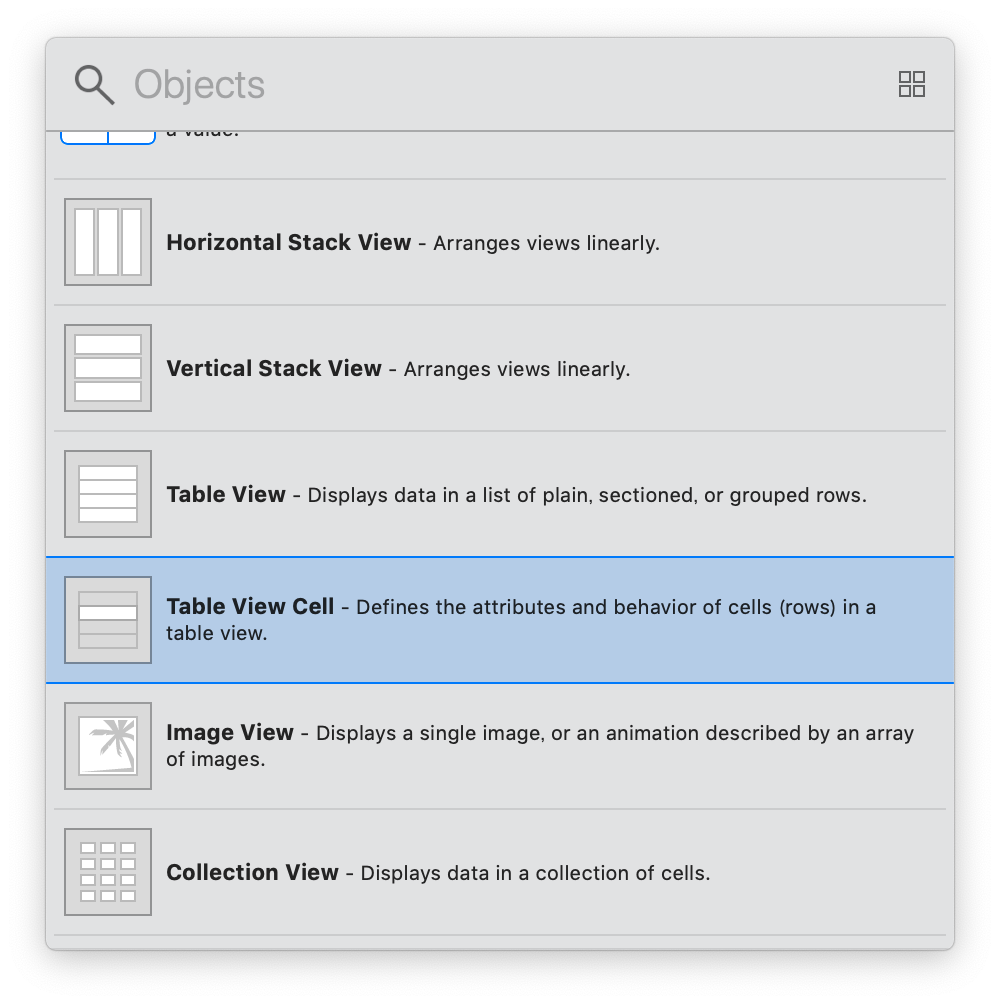
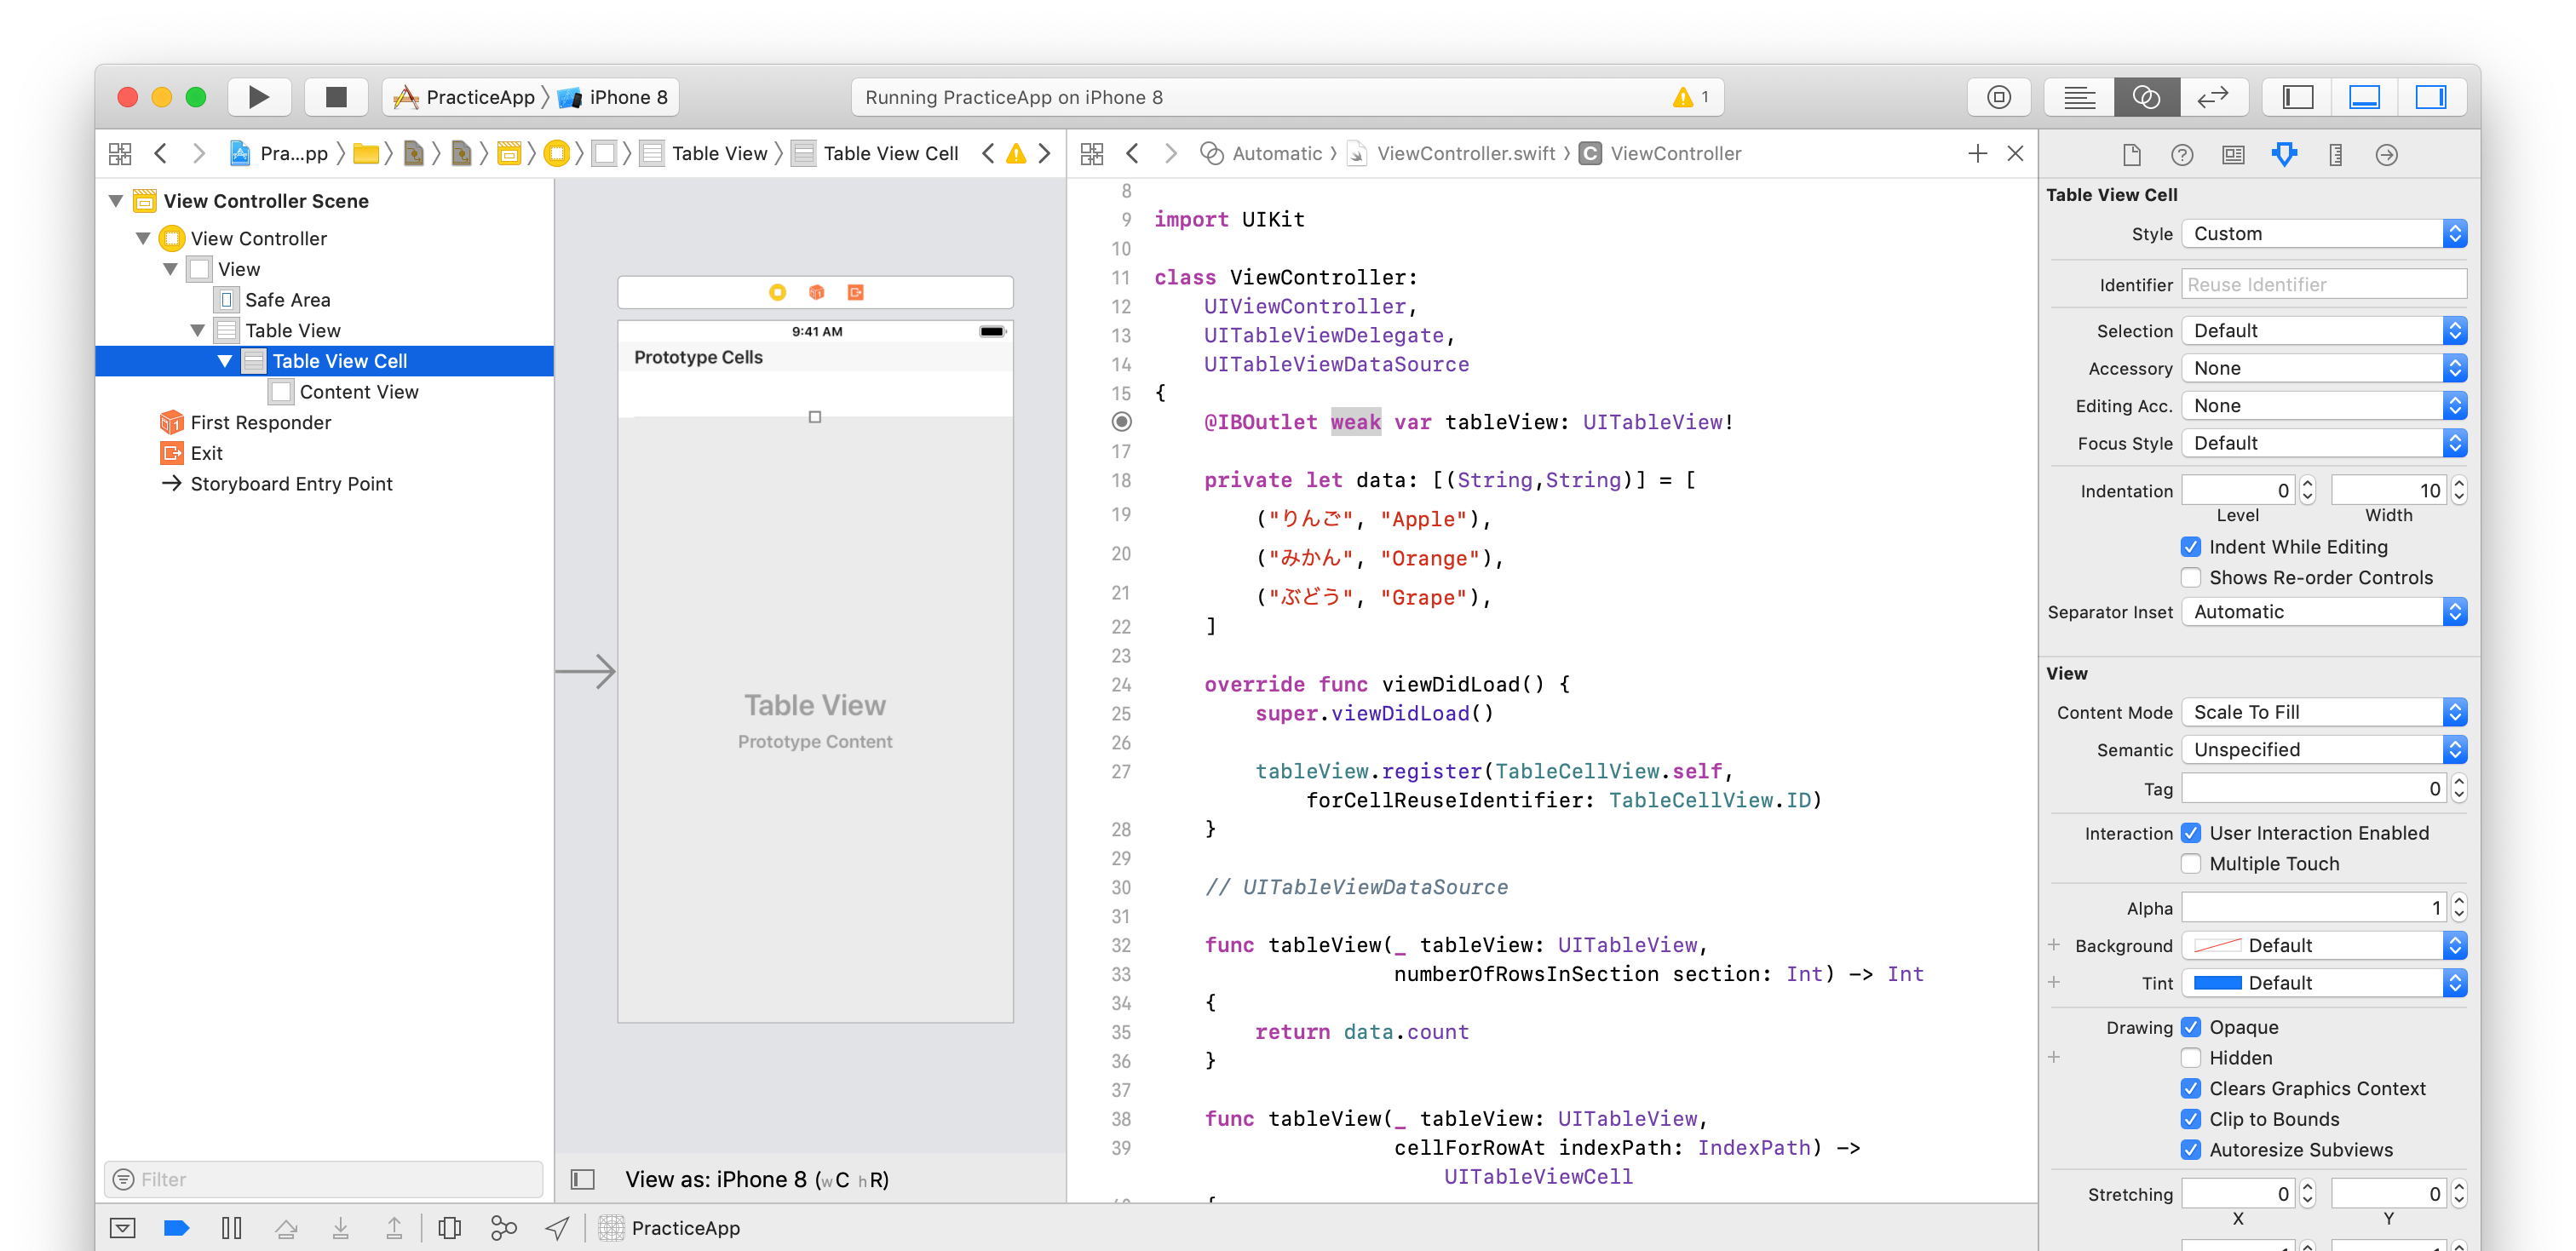
引き続きTableViewCellもStoryboardへ移行してみよう
さっきのノリで今度はMain.storyboardのTableView内部に対してTableViewCellを追加する
このようにPrototype Cellsと表示される
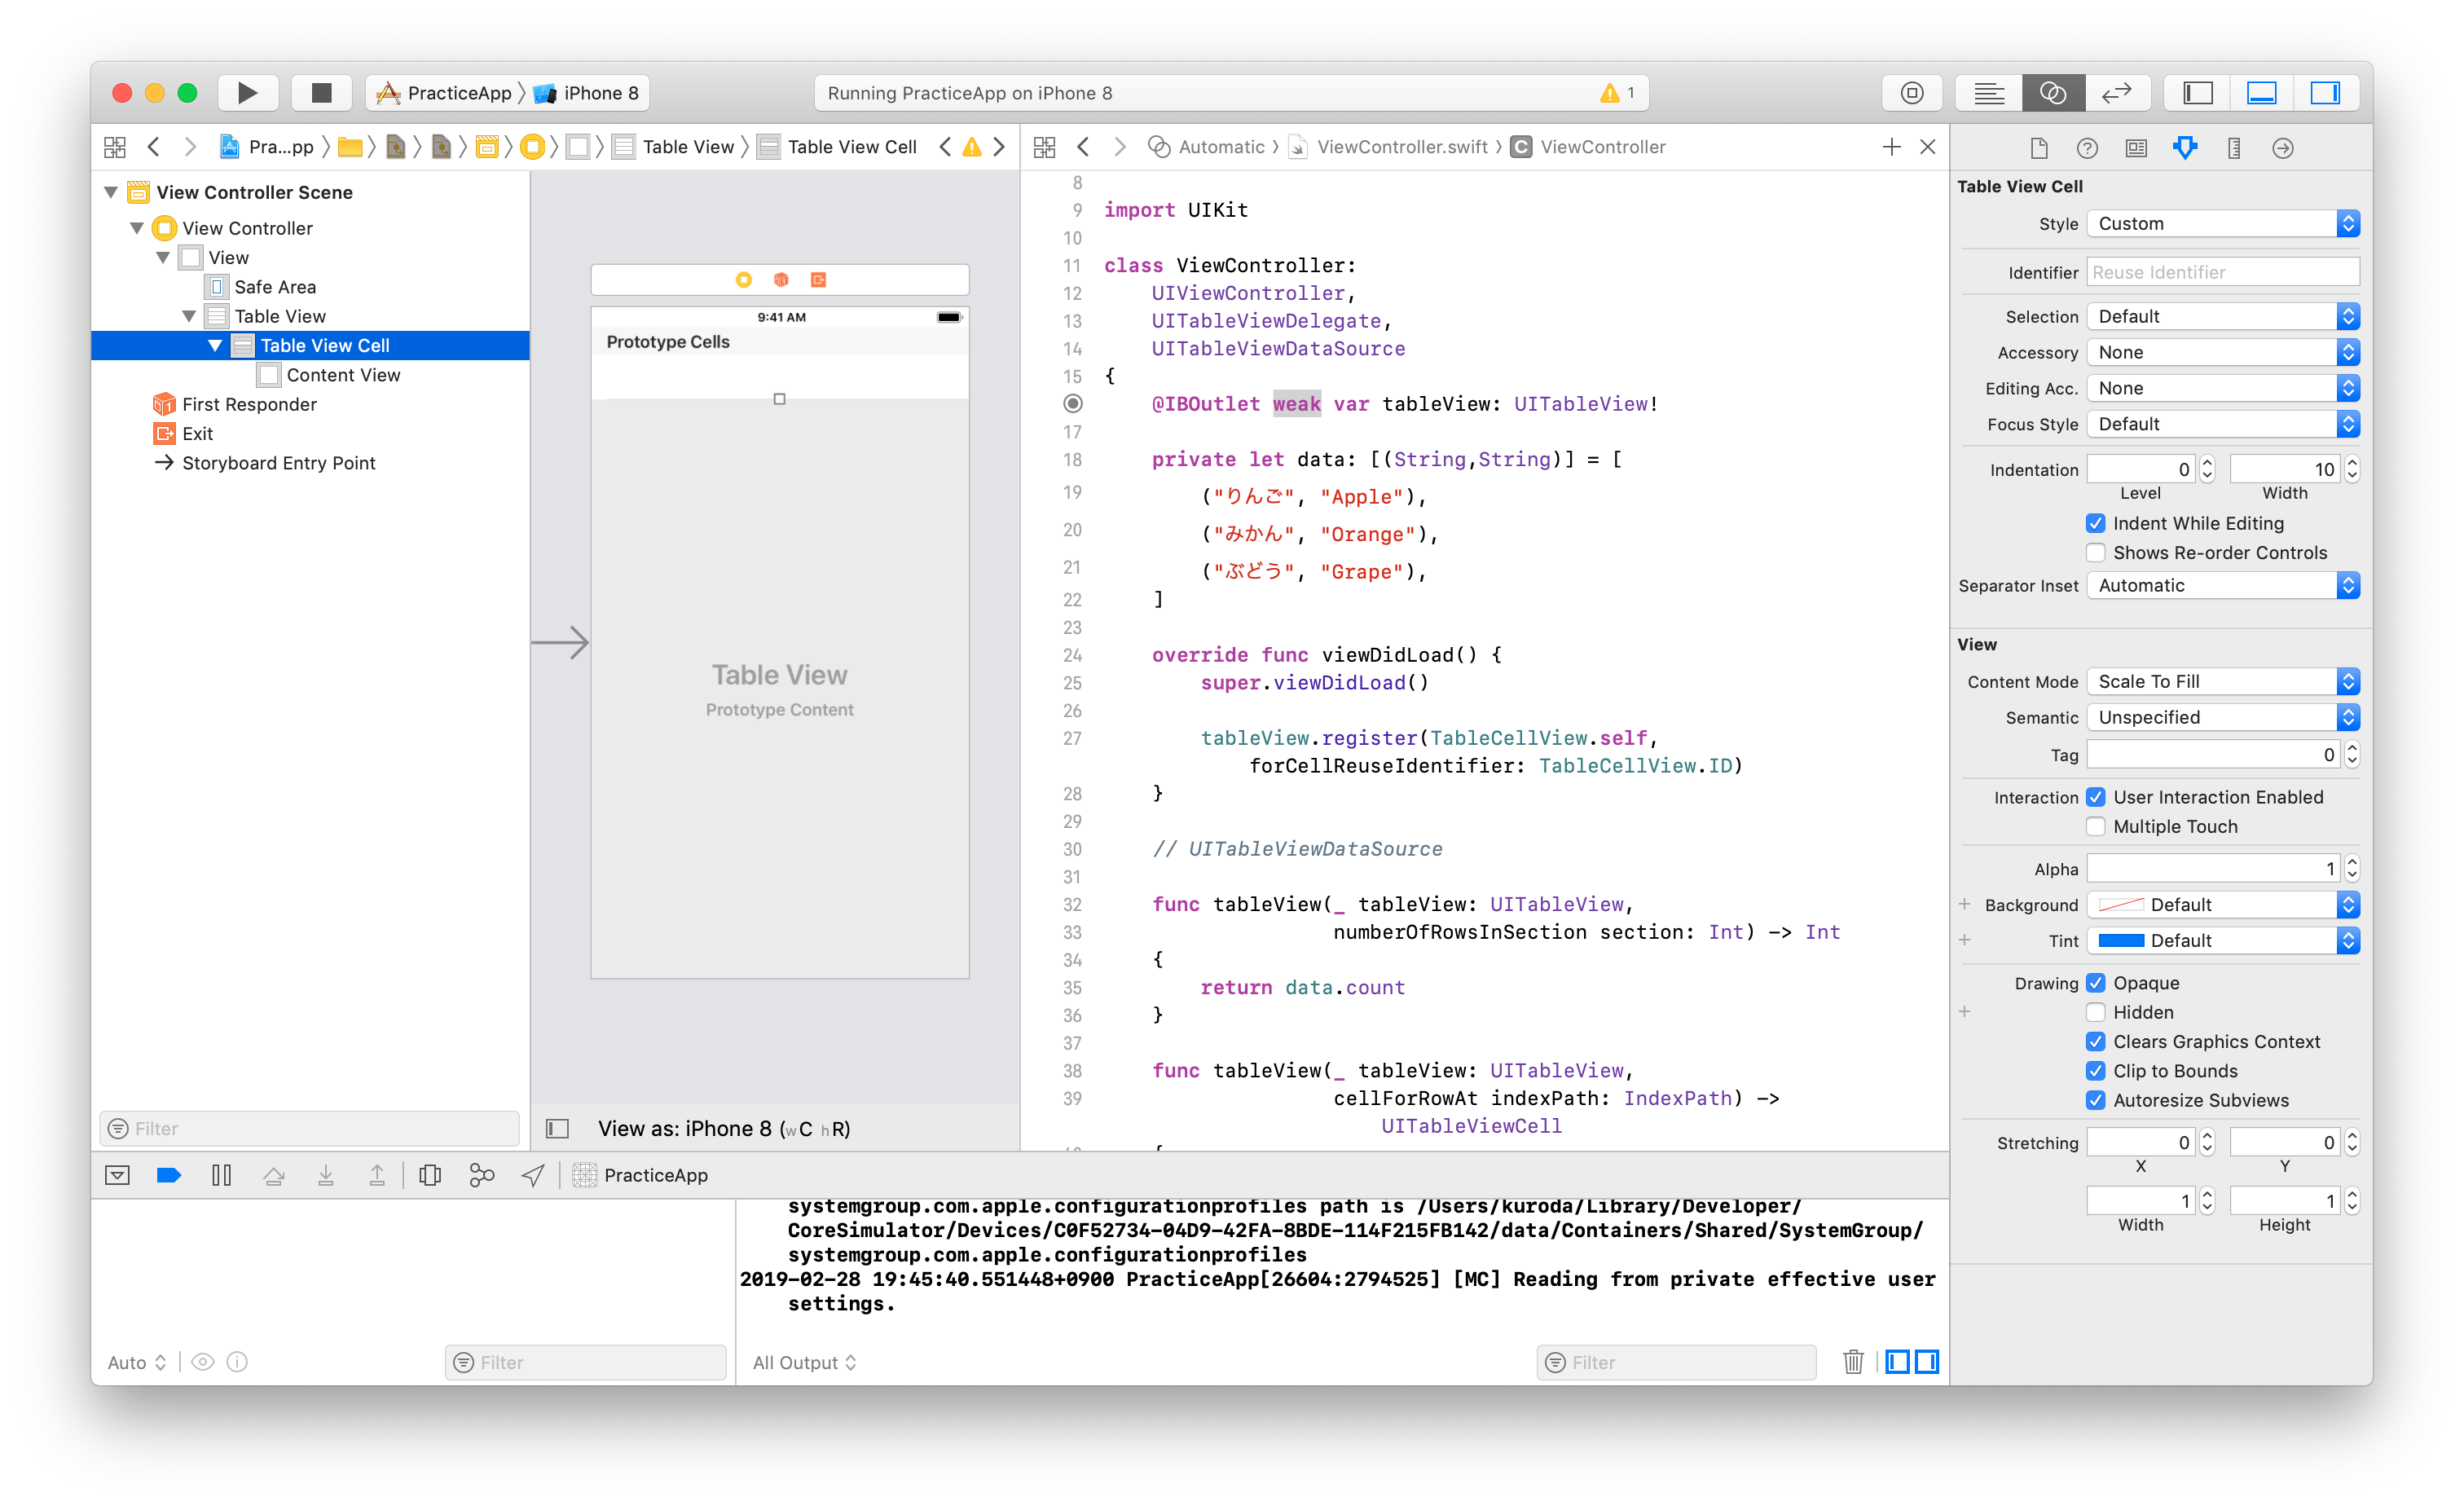
あとはStoryboard上でこのTableViewCellをさきほどと似せた感じで設定する。
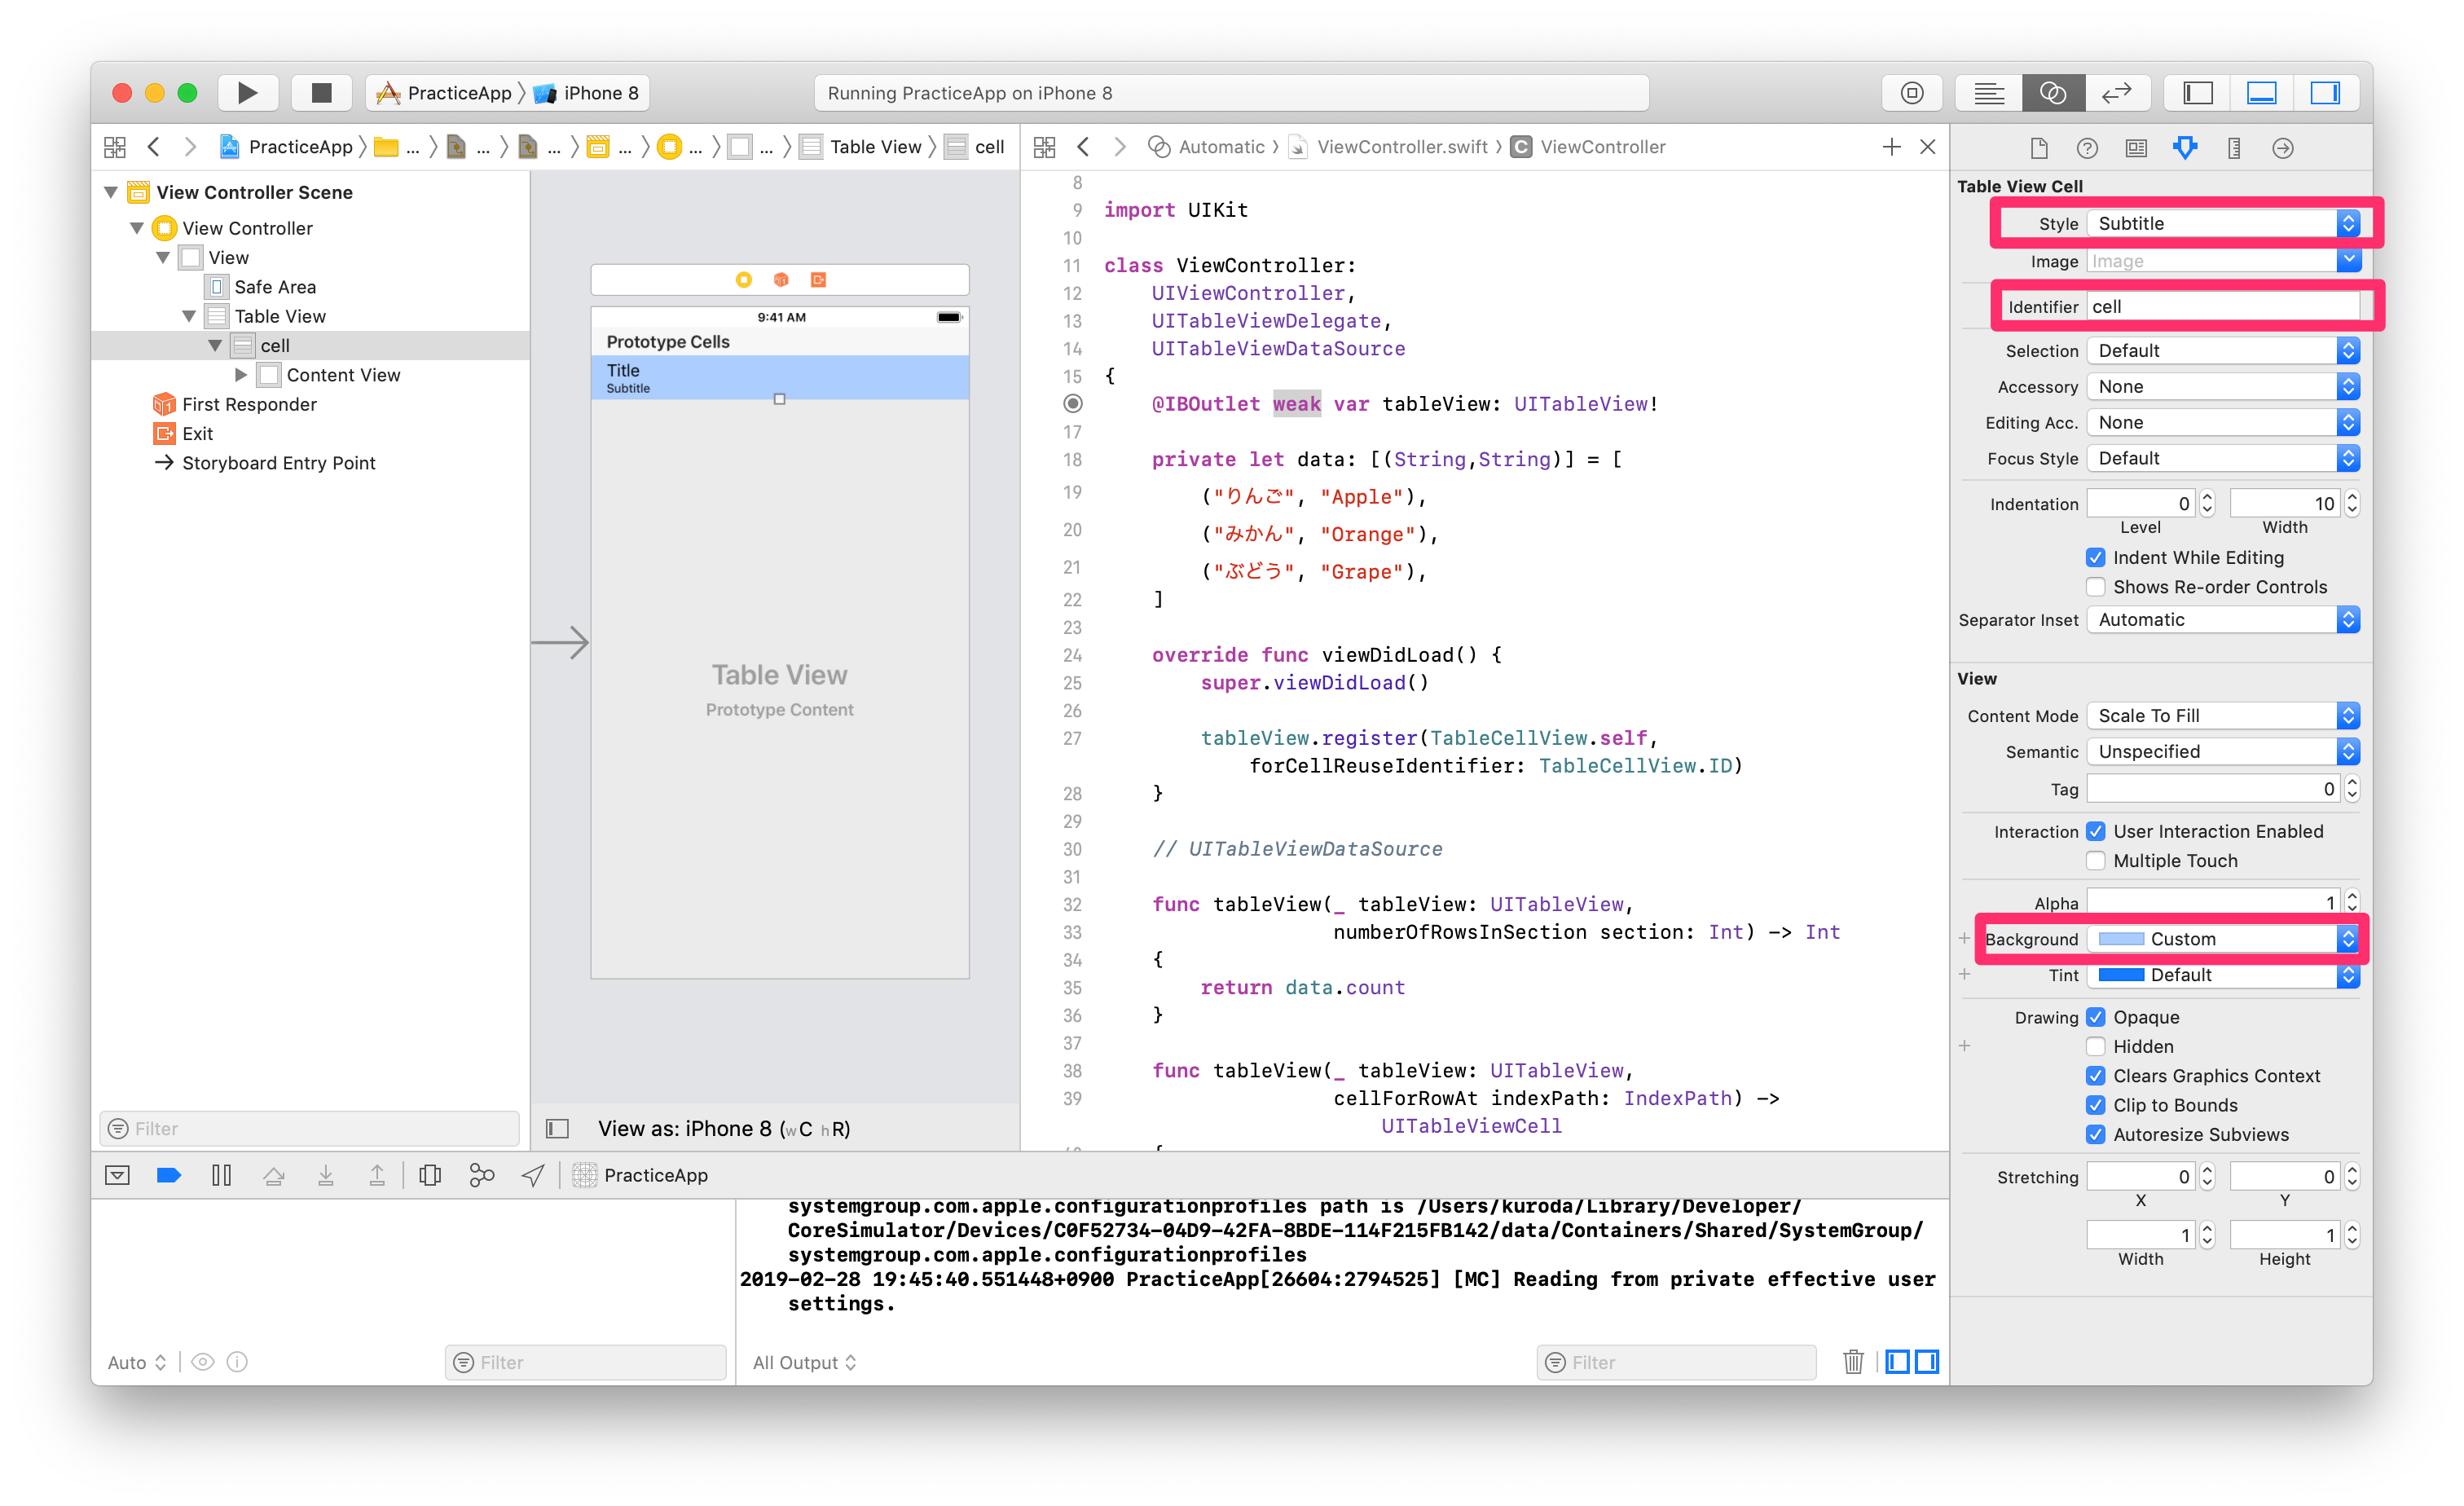
具体的には
- Style: Subtitle
- Identifier: cell
- Background: Customから適当に色選択
といった具合。
これによって、さらに以下のコードが削減できる。
--- a/PracticeApp/ViewController.swift
+++ b/PracticeApp/ViewController.swift
@@ -23,8 +23,6 @@ class ViewController:

     override func viewDidLoad() {
         super.viewDidLoad()
-
-        tableView.register(TableCellView.self, forCellReuseIdentifier: TableCellView.ID)
     }

     // UITableViewDataSource
@@ -38,34 +36,13 @@ class ViewController:
     func tableView(_ tableView: UITableView,
                    cellForRowAt indexPath: IndexPath) -> UITableViewCell
     {
-        let cell: TableCellView = tableView.dequeueReusableCell(withIdentifier: TableCellView.ID,
-                                                                for: indexPath) as! TableCellView
+        let cell: UITableViewCell = tableView.dequeueReusableCell(withIdentifier: "cell",
+                                                                  for: indexPath)

         let rowIndex: Int = indexPath[1]
-        cell.setCellInfo(title: data[rowIndex].0, detail: data[rowIndex].1)
+        cell.textLabel?.text = data[rowIndex].0
+        cell.detailTextLabel?.text = data[rowIndex].1
         return cell
     }
 }

-class TableCellView: UITableViewCell
-{
-    static let ID: String = "cell"
-    private let cellStyle: CellStyle = CellStyle.subtitle
-    private let cellColor: UIColor = UIColor(red: 0.6, green: 0.8, blue: 0.9, alpha: 0.9)
-
-    required init?(coder aDecoder: NSCoder) {
-        fatalError("not implemented")
-    }
-
-    override init(style: UITableViewCell.CellStyle, reuseIdentifier: String?) {
-        super.init(style: cellStyle, reuseIdentifier: reuseIdentifier)
-        self.backgroundColor = cellColor
-    }
-
-    // original methods
-
-    func setCellInfo(title: String, detail: String) {
-        self.textLabel?.text = title
-        self.detailTextLabel?.text = detail
-    }
-}
3.3. 起動
Runする
4. まとめ
最終的には以下のように、よくTableViewのチュートリアルで見かける風なコードになっているはず。
ViewController.swiftimport UIKit class ViewController: UIViewController, UITableViewDelegate, UITableViewDataSource { @IBOutlet weak var tableView: UITableView! private let data: [(String,String)] = [ ("りんご", "Apple"), ("みかん", "Orange"), ("ぶどう", "Grape"), ] override func viewDidLoad() { super.viewDidLoad() } // UITableViewDataSource func tableView(_ tableView: UITableView, numberOfRowsInSection section: Int) -> Int { return data.count } func tableView(_ tableView: UITableView, cellForRowAt indexPath: IndexPath) -> UITableViewCell { let cell: UITableViewCell = tableView.dequeueReusableCell(withIdentifier: "cell", for: indexPath) let rowIndex: Int = indexPath[1] cell.textLabel?.text = data[rowIndex].0 cell.detailTextLabel?.text = data[rowIndex].1 return cell } }

- 投稿日:2019-03-02T14:24:46+09:00
iOSアプリ開発入門#1 ~UITableViewController~
目的
- よく使うであろうTableViewを使用したアプリをStoryboardありとなしでサクッと作れるようになる
- ありなしの両方を試すことで、Storyboardが何をやっているのかなんとなくイメージできるようになる
Step1. 爆速でTableViewアプリ作成
ひとまず5分でTableViewアプリを作る。
初心者がstoryboardを使うと色々とハマる気がするので、storyboardなしの方が手っ取り早い。1.1. XCodeでProject作成
「Single View App」で「Next」
1.2. Project情報入力
適当にProject情報入力
1.3. いきなりViewController編集
爆速でいきたいので他の設定やファイルには目もくれずViewControllerを編集する
ViewController.swiftimport UIKit class ViewController: UIViewController, UITableViewDelegate, UITableViewDataSource { override func viewDidLoad() { super.viewDidLoad() let tableView: UITableView = UITableView(frame: view.frame, style: .plain) tableView.register(UITableViewCell.self, forCellReuseIdentifier: "cell") tableView.delegate = self tableView.dataSource = self view.addSubview(tableView) } // UITableViewDataSource func tableView(_ tableView: UITableView, numberOfRowsInSection section: Int) -> Int { return 10 } func tableView(_ tableView: UITableView, cellForRowAt indexPath: IndexPath) -> UITableViewCell { let cell: UITableViewCell = tableView.dequeueReusableCell(withIdentifier: "cell", for: indexPath) cell.textLabel?.text = "\(indexPath[1] + 1)行目" return cell } }ポイントとしては
- インスタンス変数「view」にaddSubViewで表示したいTableViewを追加する
- 追加するTableViewに表示したいTableViewCellをregisterする
- 追加するTableViewのdelegateとdataSourceに必要なインタフェースの実装(この場合はself)を渡す
- 各行の表示にはcellForRowAtで返却されるTableViewCellが使用される
- その際、dequeueReusableCellを使用することでTableViewCellインスタンスを再利用しつつ表示に利用できる
1.4. 起動
これで完了。シミュレータでRunすれば以下のような10行だけ表示されるアプリの完成。
Step2. Cellのカスタマイズ+動的レコード
Tableっぽくdataをもとに行数を動的に変更しつつ、UICellViewのカスタマイズをコードだけでやってみる。
2.1. ViewControllerをもう少し弄ってみる
ViewController.swiftimport UIKit class ViewController: UIViewController, UITableViewDelegate, UITableViewDataSource { private let data: [(String,String)] = [ ("りんご", "Apple"), ("みかん", "Orange"), ("ぶどう", "Grape"), ] override func viewDidLoad() { super.viewDidLoad() let tableView: UITableView = UITableView(frame: view.frame, style: .plain) tableView.register(TableCellView.self, forCellReuseIdentifier: TableCellView.ID) tableView.delegate = self tableView.dataSource = self view.addSubview(tableView) } // UITableViewDataSource func tableView(_ tableView: UITableView, numberOfRowsInSection section: Int) -> Int { return data.count } func tableView(_ tableView: UITableView, cellForRowAt indexPath: IndexPath) -> UITableViewCell { let cell: TableCellView = tableView.dequeueReusableCell(withIdentifier: TableCellView.ID, for: indexPath) as! TableCellView let rowIndex: Int = indexPath[1] cell.setCellInfo(title: data[rowIndex].0, detail: data[rowIndex].1) return cell } } class TableCellView: UITableViewCell { static let ID: String = "cell" private let cellStyle: CellStyle = CellStyle.subtitle private let cellColor: UIColor = UIColor(red: 0.6, green: 0.8, blue: 0.9, alpha: 0.9) required init?(coder aDecoder: NSCoder) { fatalError("not implemented") } override init(style: UITableViewCell.CellStyle, reuseIdentifier: String?) { super.init(style: cellStyle, reuseIdentifier: reuseIdentifier) self.backgroundColor = cellColor } // original methods func setCellInfo(title: String, detail: String) { self.textLabel?.text = title self.detailTextLabel?.text = detail } }ポイントとしては
- registerしていたUITableViewCellを自作クラスのTableViewCellに変更
- TableViewCellはUITableViewCellのサブクラス
- overrideしたinitで表示ロジックを実装
2.2. 起動
Runする
Step3. Storyboardを使ってみる
コードで地道に書いているところをStoryboardにお任せしてみよう
3.1. TableViewをStoryboardへ
Main.storyboardを開き、View Controllerに対してTableViewを追加する。
画面右上のUIコンポネント追加ボタンから
TableViewを選択
Codeと並べて表示
ここでCtrlキーを押したまま、TableViewからコードの方へドラッグ&ドロップすると、該当のTableViewとバインドされた変数が定義される。
さらにTableViewのOutletsについて、delegateとdataSourceをドラッグ&ドロップでView Controllerとバインドする(このあたり、慣れればどうってことないのだろうけど、初心者にやさしいかどうかは微妙な気がする)
これらの作業により、ViewController.swiftからは以下のコードが削減できる
--- a/PracticeApp/ViewController.swift
+++ b/PracticeApp/ViewController.swift
@@ -13,6 +13,8 @@ class ViewController:
     UITableViewDelegate,
     UITableViewDataSource
 {
+    @IBOutlet weak var tableView: UITableView!
+
     private let data: [(String,String)] = [
         ("りんご", "Apple"),
         ("みかん", "Orange"),
@@ -22,11 +24,7 @@ class ViewController:
     override func viewDidLoad() {
         super.viewDidLoad()

-        let tableView: UITableView = UITableView(frame: view.frame, style: .plain)
         tableView.register(TableCellView.self, forCellReuseIdentifier: TableCellView.ID)
-        tableView.delegate = self
-        tableView.dataSource = self
-        view.addSubview(tableView)
     }

     // UITableViewDataSource
正直、この程度のtableViewであればあまりstoryboardのありがたさが実感できないが、おそらくlayout変更とかstyle変更とか諸々盛り込んでいく過程でありがたくなるはずだと信じる。
3.2. TableViewCellをStoryboardへ
引き続きTableViewCellもStoryboardへ移行してみよう
さっきのノリで今度はMain.storyboardのTableView内部に対してTableViewCellを追加する
このようにPrototype Cellsと表示される
あとはStoryboard上でこのTableViewCellをさきほどと似せた感じで設定する。
具体的には
- Style: Subtitle
- Identifier: cell
- Background: Customから適当に色選択
といった具合。
これによって、さらに以下のコードが削減できる。
--- a/PracticeApp/ViewController.swift
+++ b/PracticeApp/ViewController.swift
@@ -23,8 +23,6 @@ class ViewController:

     override func viewDidLoad() {
         super.viewDidLoad()
-
-        tableView.register(TableCellView.self, forCellReuseIdentifier: TableCellView.ID)
     }

     // UITableViewDataSource
@@ -38,34 +36,13 @@ class ViewController:
     func tableView(_ tableView: UITableView,
                    cellForRowAt indexPath: IndexPath) -> UITableViewCell
     {
-        let cell: TableCellView = tableView.dequeueReusableCell(withIdentifier: TableCellView.ID,
-                                                                for: indexPath) as! TableCellView
+        let cell: UITableViewCell = tableView.dequeueReusableCell(withIdentifier: "cell",
+                                                                  for: indexPath)

         let rowIndex: Int = indexPath[1]
-        cell.setCellInfo(title: data[rowIndex].0, detail: data[rowIndex].1)
+        cell.textLabel?.text = data[rowIndex].0
+        cell.detailTextLabel?.text = data[rowIndex].1
         return cell
     }
 }

-class TableCellView: UITableViewCell
-{
-    static let ID: String = "cell"
-    private let cellStyle: CellStyle = CellStyle.subtitle
-    private let cellColor: UIColor = UIColor(red: 0.6, green: 0.8, blue: 0.9, alpha: 0.9)
-
-    required init?(coder aDecoder: NSCoder) {
-        fatalError("not implemented")
-    }
-
-    override init(style: UITableViewCell.CellStyle, reuseIdentifier: String?) {
-        super.init(style: cellStyle, reuseIdentifier: reuseIdentifier)
-        self.backgroundColor = cellColor
-    }
-
-    // original methods
-
-    func setCellInfo(title: String, detail: String) {
-        self.textLabel?.text = title
-        self.detailTextLabel?.text = detail
-    }
-}
3.3. 起動
Runする
4. まとめ
最終的には以下のように、よくTableViewのチュートリアルで見かける風なコードになっているはず。
ViewController.swiftimport UIKit class ViewController: UIViewController, UITableViewDelegate, UITableViewDataSource { @IBOutlet weak var tableView: UITableView! private let data: [(String,String)] = [ ("りんご", "Apple"), ("みかん", "Orange"), ("ぶどう", "Grape"), ] override func viewDidLoad() { super.viewDidLoad() } // UITableViewDataSource func tableView(_ tableView: UITableView, numberOfRowsInSection section: Int) -> Int { return data.count } func tableView(_ tableView: UITableView, cellForRowAt indexPath: IndexPath) -> UITableViewCell { let cell: UITableViewCell = tableView.dequeueReusableCell(withIdentifier: "cell", for: indexPath) let rowIndex: Int = indexPath[1] cell.textLabel?.text = data[rowIndex].0 cell.detailTextLabel?.text = data[rowIndex].1 return cell } }
- 投稿日:2019-03-02T14:24:46+09:00
iOSアプリ開発入門#1 ~UITableView~
目的
- よく使うであろうTableViewを使用したアプリをStoryboardありとなしでサクッと作れるようになる
- ありなしの両方を試すことで、Storyboardが何をやっているのかなんとなくイメージできるようになる
Step1. 爆速でTableViewアプリ作成
ひとまず5分でTableViewアプリを作る。
初心者がstoryboardを使うと色々とハマる気がするので、storyboardなしの方が手っ取り早い。1.1. XCodeでProject作成
「Single View App」で「Next」
1.2. Project情報入力
適当にProject情報入力
1.3. いきなりViewController編集
爆速でいきたいので他の設定やファイルには目もくれずViewControllerを編集する
ViewController.swiftimport UIKit class ViewController: UIViewController, UITableViewDelegate, UITableViewDataSource { override func viewDidLoad() { super.viewDidLoad() let tableView: UITableView = UITableView(frame: view.frame, style: .plain) tableView.register(UITableViewCell.self, forCellReuseIdentifier: "cell") tableView.delegate = self tableView.dataSource = self view.addSubview(tableView) } // UITableViewDataSource func tableView(_ tableView: UITableView, numberOfRowsInSection section: Int) -> Int { return 10 } func tableView(_ tableView: UITableView, cellForRowAt indexPath: IndexPath) -> UITableViewCell { let cell: UITableViewCell = tableView.dequeueReusableCell(withIdentifier: "cell", for: indexPath) cell.textLabel?.text = "\(indexPath[1] + 1)行目" return cell } }ポイントとしては
- インスタンス変数「view」にaddSubViewで表示したいTableViewを追加する
- 追加するTableViewに表示したいTableViewCellをregisterする
- 追加するTableViewのdelegateとdataSourceに必要なインタフェースの実装(この場合はself)を渡す
- 各行の表示にはcellForRowAtで返却されるTableViewCellが使用される
- その際、dequeueReusableCellを使用することでTableViewCellインスタンスを再利用しつつ表示に利用できる
1.4. 起動
これで完了。シミュレータでRunすれば以下のような10行だけ表示されるアプリの完成。
Step2. Cellのカスタマイズ+動的レコード
Tableっぽくdataをもとに行数を動的に変更しつつ、UICellViewのカスタマイズをコードだけでやってみる。
2.1. ViewControllerをもう少し弄ってみる
ViewController.swiftimport UIKit class ViewController: UIViewController, UITableViewDelegate, UITableViewDataSource { private let data: [(String,String)] = [ ("りんご", "Apple"), ("みかん", "Orange"), ("ぶどう", "Grape"), ] override func viewDidLoad() { super.viewDidLoad() let tableView: UITableView = UITableView(frame: view.frame, style: .plain) tableView.register(TableCellView.self, forCellReuseIdentifier: TableCellView.ID) tableView.delegate = self tableView.dataSource = self view.addSubview(tableView) } // UITableViewDataSource func tableView(_ tableView: UITableView, numberOfRowsInSection section: Int) -> Int { return data.count } func tableView(_ tableView: UITableView, cellForRowAt indexPath: IndexPath) -> UITableViewCell { let cell: TableCellView = tableView.dequeueReusableCell(withIdentifier: TableCellView.ID, for: indexPath) as! TableCellView let rowIndex: Int = indexPath[1] cell.setCellInfo(title: data[rowIndex].0, detail: data[rowIndex].1) return cell } } class TableCellView: UITableViewCell { static let ID: String = "cell" private let cellStyle: CellStyle = CellStyle.subtitle private let cellColor: UIColor = UIColor(red: 0.6, green: 0.8, blue: 0.9, alpha: 0.9) required init?(coder aDecoder: NSCoder) { fatalError("not implemented") } override init(style: UITableViewCell.CellStyle, reuseIdentifier: String?) { super.init(style: cellStyle, reuseIdentifier: reuseIdentifier) self.backgroundColor = cellColor } // original methods func setCellInfo(title: String, detail: String) { self.textLabel?.text = title self.detailTextLabel?.text = detail } }ポイントとしては
- registerしていたUITableViewCellを自作クラスのTableViewCellに変更
- TableViewCellはUITableViewCellのサブクラス
- overrideしたinitで表示ロジックを実装
2.2. 起動
Runする
Step3. Storyboardを使ってみる
コードで地道に書いているところをStoryboardにお任せしてみよう
3.1. TableViewをStoryboardへ
Main.storyboardを開き、View Controllerに対してTableViewを追加する。
画面右上のUIコンポネント追加ボタンから
TableViewを選択
Codeと並べて表示
ここでCtrlキーを押したまま、TableViewからコードの方へドラッグ&ドロップすると、該当のTableViewとバインドされた変数が定義される。
さらにTableViewのOutletsについて、delegateとdataSourceをドラッグ&ドロップでView Controllerとバインドする(このあたり、慣れればどうってことないのだろうけど、初心者にやさしいかどうかは微妙な気がする)
これらの作業により、ViewController.swiftからは以下のコードが削減できる
--- a/PracticeApp/ViewController.swift
+++ b/PracticeApp/ViewController.swift
@@ -13,6 +13,8 @@ class ViewController:
     UITableViewDelegate,
     UITableViewDataSource
 {
+    @IBOutlet weak var tableView: UITableView!
+
     private let data: [(String,String)] = [
         ("りんご", "Apple"),
         ("みかん", "Orange"),
@@ -22,11 +24,7 @@ class ViewController:
     override func viewDidLoad() {
         super.viewDidLoad()

-        let tableView: UITableView = UITableView(frame: view.frame, style: .plain)
         tableView.register(TableCellView.self, forCellReuseIdentifier: TableCellView.ID)
-        tableView.delegate = self
-        tableView.dataSource = self
-        view.addSubview(tableView)
     }

     // UITableViewDataSource
正直、この程度のtableViewであればあまりstoryboardのありがたさが実感できないが、おそらくlayout変更とかstyle変更とか諸々盛り込んでいく過程でありがたくなるはずだと信じる。
3.2. TableViewCellをStoryboardへ
引き続きTableViewCellもStoryboardへ移行してみよう
さっきのノリで今度はMain.storyboardのTableView内部に対してTableViewCellを追加する
このようにPrototype Cellsと表示される
あとはStoryboard上でこのTableViewCellをさきほどと似せた感じで設定する。
具体的には
- Style: Subtitle
- Identifier: cell
- Background: Customから適当に色選択
といった具合。
これによって、さらに以下のコードが削減できる。
--- a/PracticeApp/ViewController.swift
+++ b/PracticeApp/ViewController.swift
@@ -23,8 +23,6 @@ class ViewController:

     override func viewDidLoad() {
         super.viewDidLoad()
-
-        tableView.register(TableCellView.self, forCellReuseIdentifier: TableCellView.ID)
     }

     // UITableViewDataSource
@@ -38,34 +36,13 @@ class ViewController:
     func tableView(_ tableView: UITableView,
                    cellForRowAt indexPath: IndexPath) -> UITableViewCell
     {
-        let cell: TableCellView = tableView.dequeueReusableCell(withIdentifier: TableCellView.ID,
-                                                                for: indexPath) as! TableCellView
+        let cell: UITableViewCell = tableView.dequeueReusableCell(withIdentifier: "cell",
+                                                                  for: indexPath)

         let rowIndex: Int = indexPath[1]
-        cell.setCellInfo(title: data[rowIndex].0, detail: data[rowIndex].1)
+        cell.textLabel?.text = data[rowIndex].0
+        cell.detailTextLabel?.text = data[rowIndex].1
         return cell
     }
 }

-class TableCellView: UITableViewCell
-{
-    static let ID: String = "cell"
-    private let cellStyle: CellStyle = CellStyle.subtitle
-    private let cellColor: UIColor = UIColor(red: 0.6, green: 0.8, blue: 0.9, alpha: 0.9)
-
-    required init?(coder aDecoder: NSCoder) {
-        fatalError("not implemented")
-    }
-
-    override init(style: UITableViewCell.CellStyle, reuseIdentifier: String?) {
-        super.init(style: cellStyle, reuseIdentifier: reuseIdentifier)
-        self.backgroundColor = cellColor
-    }
-
-    // original methods
-
-    func setCellInfo(title: String, detail: String) {
-        self.textLabel?.text = title
-        self.detailTextLabel?.text = detail
-    }
-}
3.3. 起動
Runする
4. まとめ
最終的には以下のように、よくTableViewのチュートリアルで見かける風なコードになっているはず。
ViewController.swiftimport UIKit class ViewController: UIViewController, UITableViewDelegate, UITableViewDataSource { @IBOutlet weak var tableView: UITableView! private let data: [(String,String)] = [ ("りんご", "Apple"), ("みかん", "Orange"), ("ぶどう", "Grape"), ] override func viewDidLoad() { super.viewDidLoad() } // UITableViewDataSource func tableView(_ tableView: UITableView, numberOfRowsInSection section: Int) -> Int { return data.count } func tableView(_ tableView: UITableView, cellForRowAt indexPath: IndexPath) -> UITableViewCell { let cell: UITableViewCell = tableView.dequeueReusableCell(withIdentifier: "cell", for: indexPath) let rowIndex: Int = indexPath[1] cell.textLabel?.text = data[rowIndex].0 cell.detailTextLabel?.text = data[rowIndex].1 return cell } }


- 投稿日:2019-03-02T14:22:52+09:00
リリース前に知っておきたかった iOS / Android 自動更新購読(月額)の有効期限の罠
アプリの月額課金についてたくさん調べて実装し、ようやくリリースまでこぎつけて、リリース後大きな不具合もなく安心していたのも束の間、月初の昨日(3/1)に有効期限の罠にハマったので記録しておきます。
解決方法はまだ決定できていません。1ヶ月以外の購読期間についてはわからないです。
前提と事の発端
- アプリ内に開始日と有効期限日を表示している(例・開始は2/15 有効期限は3/15)
- 有効期限はストアから発行されたレシートの情報を元にしている
- アプリ内の注意書きに「有効期限は開始日の翌月同日まで」と表記している
- ここは日本
ユーザからの「3/1に開始したのに有効期限が3/29と表示されている。どういうことか」という問い合わせで何かが起きていることが発覚。調査を開始しました。
結論からいうと
プラットフォーム 開始日時 有効期限日 iOS 3/1 0:00~16:59 3/29 iOS 3/1 17:00~ 4/1 Android 3/1 0:00~8:59 3/29 Android 3/1 9:00~ 4/1 ※ プラットフォームごとに数時間のズレがあるため厳密には上の通りではありません。後述します。
どういうことかというと、ストア側とは国による時差があり上記時間帯ではストア側はまだ2/28。
iOSでは17時間(Apple本社がカリフォルニア州だから?)、Androidでは9時間(標準時)の時差がありました。
ストアとしては2/28に開始したのだから期限は当然3/28になり、時間によっては日本時間で3/29になります。たとえばiOSの場合、日本時間で16:59に開始したユーザと17:00に開始したユーザで有効期限に3日間も差があることに。
23:59と0:00で差ができるのはユーザとして納得しますが、今回のようなのは痛いです。
実装当時は考えが及びませんでした。解決案
チームでいくつかあがった解決案。どれも根本解決でないし、前述のとおりまだ方針は決定していません。
アプリ側で有効期限を設定する
ストアのレシート情報を無視して、開始日から1ヶ月分起算して期限を設定する案。
今回の場合は永遠にストアと3日の差が出続けます。
でもそうするべきだったのかもしれません。アプリ内の有効期限表示をなくす
完全に逃げ
余談
このようなイレギュラー(?)な場合にかかわらず、iOSとAndroidでは有効期限の時間に差があります。
- iOS:
開始日時 + 1ヶ月 - 1時間(例・2/15 14:00に開始 → 3/15 13:00が期限)- Android:
開始日時 + 1ヶ月 + 2時間(例・2/15 14:00に開始 → 3/15 16:00が期限)Androidの方がiOSに比べて3時間優しい仕様になっています。
22:00 ~ 1:00あたりの登録で日付に齟齬が生じることがあるので注意が必要です。この時間差については検証時のテストアカウントでは発見できません。
公式リファレンスに明記しておいてほしかったです。見逃したのかな?余談2
上で公式リファレンスを軽くdisっていますが、課金の実装で一番大切なのは公式リファレンスを読みまくることです。
大変わかりづらく書かれていたりしますが、何度も何度も読むことをおすすめします。
ちゃんと読むと必要なことは書かれています。
- 投稿日:2019-03-02T11:36:40+09:00
【Swift4.2】UILabelに行間を設定する
概要
iOSアプリ開発のUIでよく使われる
UILabelに行間を設定する2つの方法を紹介します前提
- Xcode 10.1
- Swift 4.2
Storyboardで設定する
まずは適当な
Storyboardorxib開き、UILabelを設置します。
画面右側の
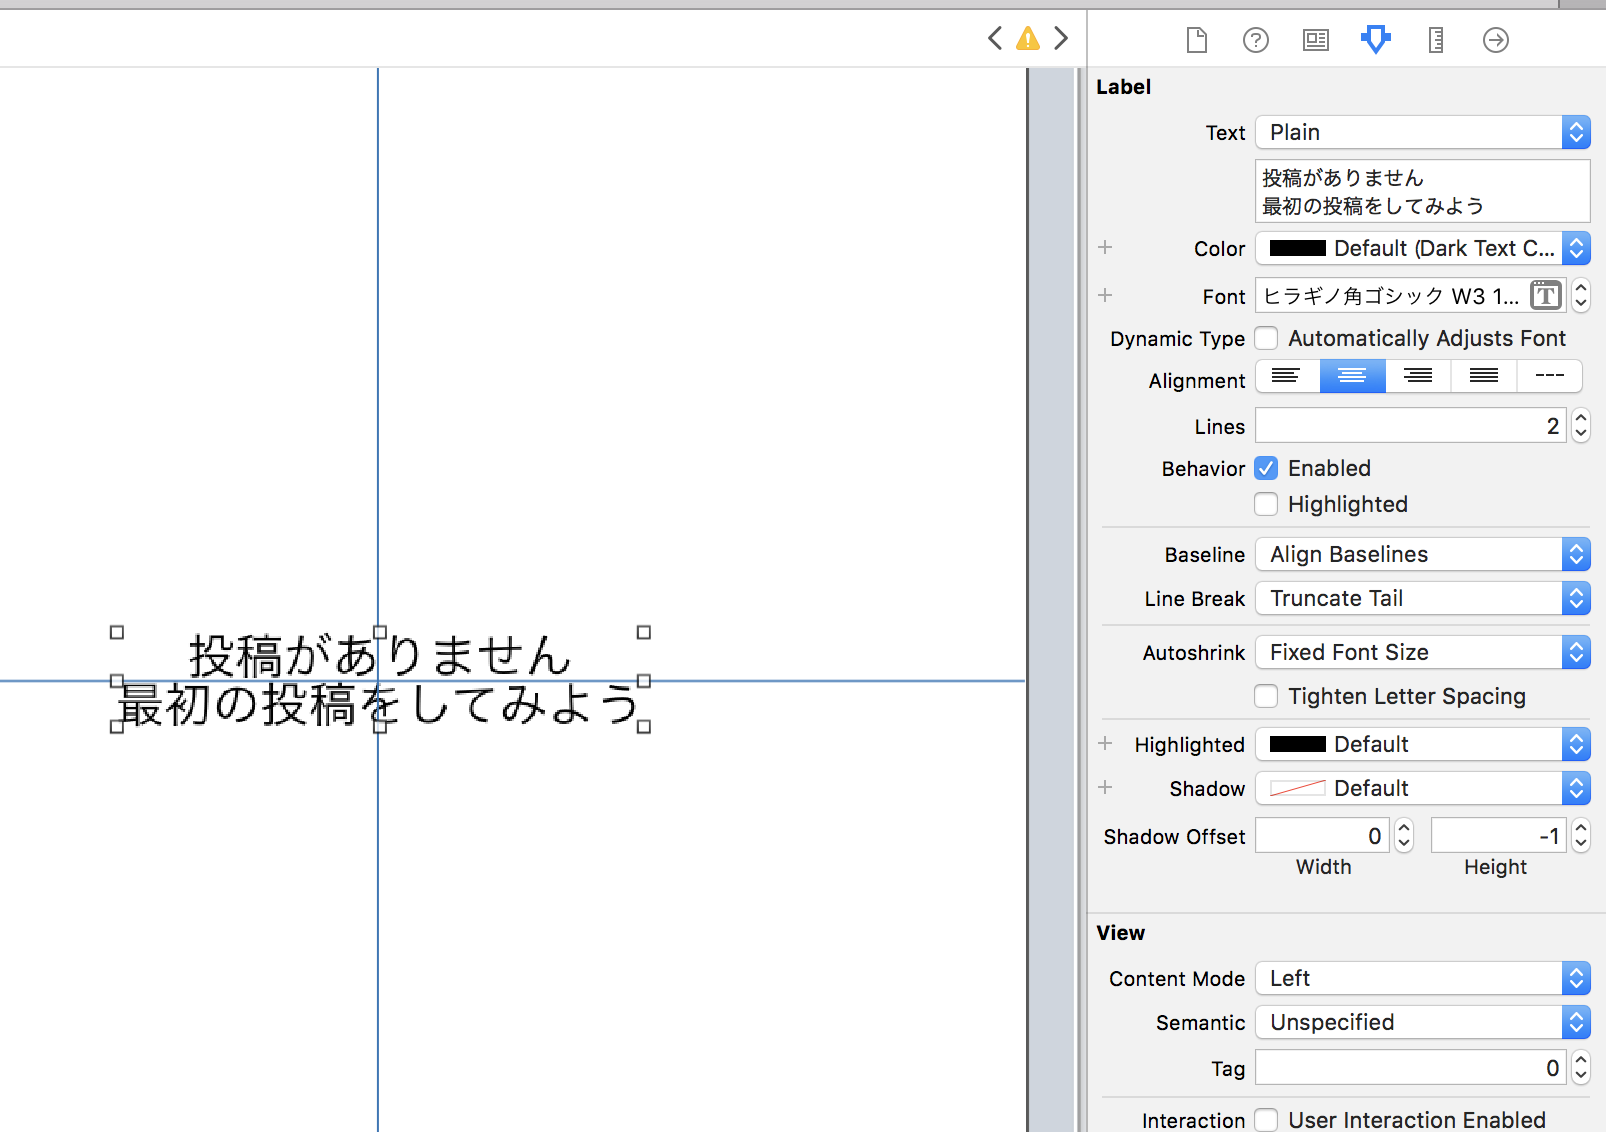
InspectorのAttribute Inspectorを見てみます
Label->TextがPlainの状態では行間を設定できないので、ここをattributedに変更します最後に、下記GIFのように設定すると行間を変更できます
コードから動的に変更する
- IBOutlet接続する
- UILabelのattributedText に
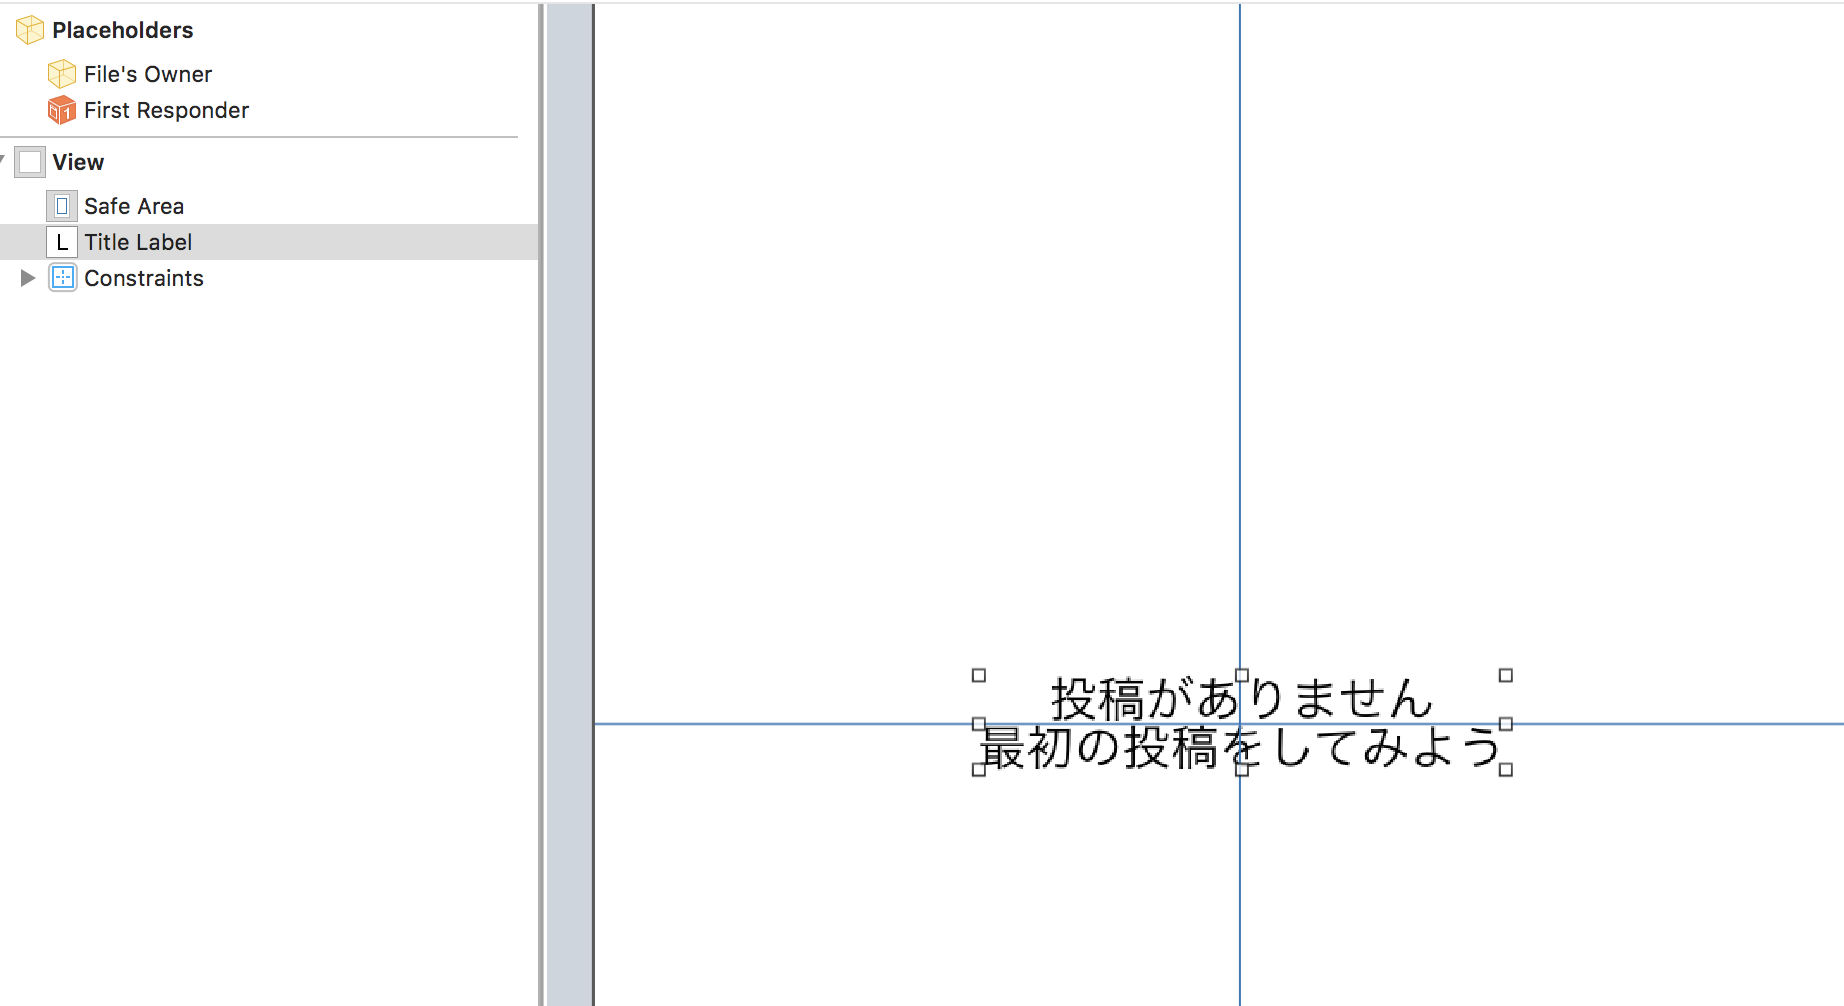
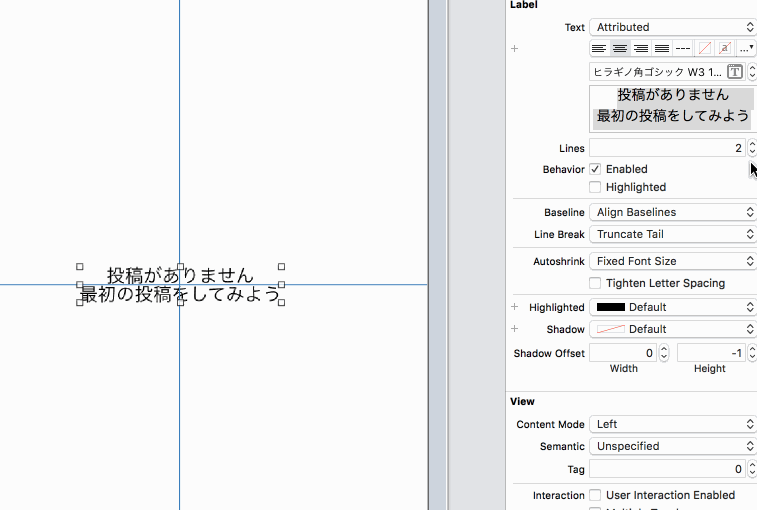
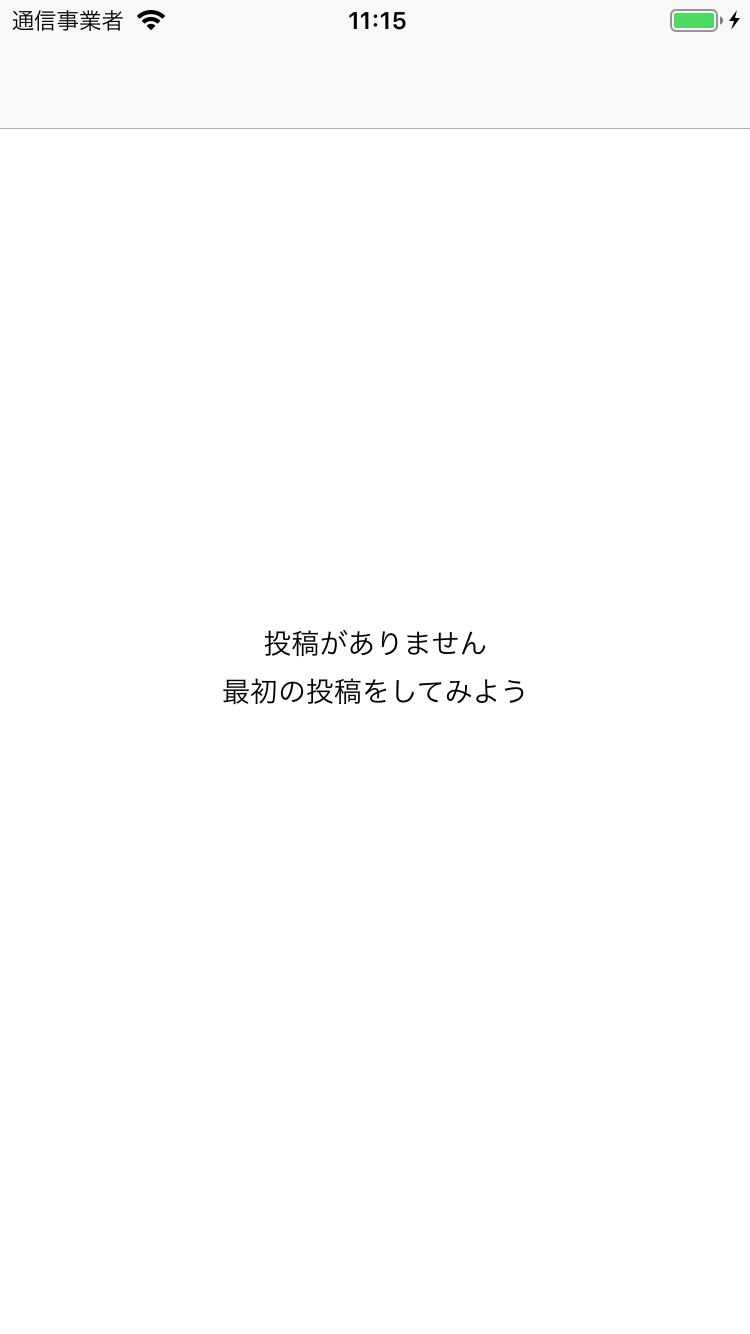
NSAttributedStringをセットするclass ViewController: UIViewController { @IBOutlet private weak var titleLabel: UILabel! override func viewDidLoad() { super.viewDidLoad() var attributes: [NSAttributedStringKey: Any] = [:] let paragraphStyle = NSMutableParagraphStyle() paragraphStyle.lineSpacing = 10.0 paragraphStyle.alignment = .center attributes.updateValue(paragraphStyle, forKey: .paragraphStyle) titleLabel.attributedText = NSAttributedString(string: "投稿がありません\n最初の投稿をしてみよう", attributes: attributes) } }他の画面でも簡単に使えるように、
NSAttributedStringのextensionに定義しておきましょうclass ViewController: UIViewController { @IBOutlet private weak var titleLabel: UILabel! override func viewDidLoad() { super.viewDidLoad() titleLabel.attributedText = NSAttributedString(string: "投稿がありません\n最初の投稿をしてみよう", lineSpacing: 10.0, alignment: .center) } } extension NSAttributedString { convenience init(string: String, lineSpacing: CGFloat, alignment: NSTextAlignment) { var attributes: [NSAttributedStringKey: Any] = [:] let paragraphStyle = NSMutableParagraphStyle() paragraphStyle.lineSpacing = lineSpacing paragraphStyle.alignment = alignment attributes.updateValue(paragraphStyle, forKey: .paragraphStyle) self.init(string: string, attributes: attributes) } }
- 投稿日:2019-03-02T10:43:12+09:00
React Nativeでピアノを作る
はじめに
React Nativeでピアノを作ったのでソースコードの説明をします。
Githubのリポジトリはこちらです。I made the piano with React Native !
— nabehide (@____nabehide) 2019年2月27日
React Nativeでピアノを実装しました!
ソースコードはGithubに置きました。https://t.co/3WHPpVzS4L pic.twitter.com/Mdb7iuqfc0プロジェクトの立ち上げ
react-nativeのコマンドでプロジェクトを作ります。
react-native init piano
cd piano
ピアノ音源の準備
mp3形式で音源を準備します。
Githubのリポジトリにアップロードしているので、こちらをお使いください。audio/ ├── A.mp3 ├── As.mp3 ├── B.mp3 ├── C.mp3 ├── Cs.mp3 ├── D.mp3 ├── Ds.mp3 ├── E.mp3 ├── F.mp3 ├── Fs.mp3 ├── G.mp3 └── Gs.mp3react-native-soundのインストール
React Nativeで音を鳴らすためのライブラリreact-native-soundをインストールします。
yarn add react-native-sound
react-native link react-native-sound
iOSではxcode上でプロジェクトファイルの中に音源をドラッグ&ドロップします。
Androidでは音源を android/app/src/main/res/raw のフォルダに入れます。
mkdir android/app/src/main/res/raw
cp audio/* android/app/src/main/res/raw/
ソースコード
ソースコードは以下になります。
順番に説明していきます。App.jsximport React from 'react'; import { StyleSheet, Text, TouchableOpacity, View, } from 'react-native'; import Sound from 'react-native-sound'; export default class App extends React.Component { constructor( props ){ super( props ); this.state = { colorC : "white", colorCs: "black", colorD : "white", colorDs: "black", colorE : "white", colorF : "white", colorFs: "black", colorG : "white", colorGs: "black", colorA : "white", colorAs: "black", colorB : "white", } this.sound = {}; const soundList = [ "C", "Cs", "D", "Ds", "E", "F", "Fs", "G", "Gs", "A", "As", "B" ] soundList.forEach(note => { this.sound[note] = new Sound( note + ".mp3", Sound.MAIN_BUNDLE, error => { if ( error ) { console.log("failed to load the sound.", error); } }) }); } stroke ( note ) { switch ( note ) { case "C": this.setState({ colorC: "rgba(1, 1, 1, 0.1)" }) break; case "Cs": this.setState({ colorCs: "rgba(0, 0, 0, 0.5)" }) break; case "D": this.setState({ colorD: "rgba(1, 1, 1, 0.1)" }) break; case "Ds": this.setState({ colorDs: "rgba(0, 0, 0, 0.5)" }) break; case "E": this.setState({ colorE: "rgba(1, 1, 1, 0.1)" }) break; case "F": this.setState({ colorF: "rgba(1, 1, 1, 0.1)" }) break; case "Fs": this.setState({ colorFs: "rgba(0, 0, 0, 0.5)" }) break; case "G": this.setState({ colorG: "rgba(1, 1, 1, 0.1)" }) break; case "Gs": this.setState({ colorGs: "rgba(0, 0, 0, 0.5)" }) break; case "A": this.setState({ colorA: "rgba(1, 1, 1, 0.1)" }) break; case "As": this.setState({ colorAs: "rgba(0, 0, 0, 0.5)" }) break; case "B": this.setState({ colorB: "rgba(1, 1, 1, 0.1)" }) break; } setTimeout( () => { this.sound[note].play(success => { if ( success ) { console.log("successfully finished playing."); } else { console.log("failed to play the sound."); } }); }, 1); } stop( note ) { switch ( note ) { case "C": this.setState( { colorC: "white" } ) break; case "Cs": this.setState( { colorCs: "black" } ) break; case "D": this.setState( { colorD: "white" } ) break; case "Ds": this.setState( { colorDs: "black" } ) break; case "E": this.setState( { colorE: "white" } ) break; case "F": this.setState( { colorF: "white" } ) break; case "Fs": this.setState( { colorFs: "black" } ) break; case "G": this.setState( { colorG: "white" } ) break; case "Gs": this.setState( { colorGs: "black" } ) break; case "A": this.setState( { colorA: "white" } ) break; case "As": this.setState( { colorAs: "black" } ) break; case "B": this.setState( { colorB: "white" } ) break; } setTimeout( () => { for (let i=0; i<2000; i++) { this.sound[note].setVolume( 1.0-i/2000. ); } this.sound[note].stop(); this.sound[note].setVolume( 1.0 ); }, 1 ) } render () { return ( <View style={styles.container}> <View style={{ flex: 1, flexDirection: "column", alignItems: "center" }}> <View style={{ flexDirection : "row", alignItems: "center", justifyContent: "center" }}> <View style={{ backgroundColor: "white", height: 100, width: 32, borderLeftWidth: 1, borderTopWidth: 1,}} > </View > <View onTouchStart={() => this.stroke("Cs")} onTouchEnd={() => this.stop("Cs")} style={{ backgroundColor: this.state.colorCs, height: 100, width: 32, borderTopWidth: 1, borderLeftWidth: 1,}} > </View > <View style={{ backgroundColor: "white", height: 100, width: 16, borderTopWidth: 1, }} > </View > <View onTouchStart={() => this.stroke("Ds")} onTouchEnd={() => this.stop("Ds")} style={{ backgroundColor: this.state.colorDs, height: 100, width: 32, borderTopWidth: 1, borderLeftWidth: 1,}} > </View > <View style={{ backgroundColor: "white", height: 100, width: 32, borderTopWidth: 1, }} > </View > <View style={{ backgroundColor: "white", height: 100, width: 32, borderTopWidth: 1, borderLeftWidth: 1, }} > </View > <View onTouchStart={() => this.stroke("Fs")} onTouchEnd={() => this.stop("Fs")} style={{ backgroundColor: this.state.colorFs, height: 100, width: 32, borderTopWidth: 1, }} > </View > <View style={{ backgroundColor: "white", height: 100, width: 16, borderTopWidth: 1, }} > </View > <View onTouchStart={() => this.stroke("Gs")} onTouchEnd={() => this.stop("Gs")} style={{ backgroundColor: this.state.colorGs, height: 100, width: 32, borderTopWidth: 1, }} > </View > <View style={{ backgroundColor: "white", height: 100, width: 16, borderTopWidth: 1, }} > </View > <View onTouchStart={() => this.stroke("As")} onTouchEnd={() => this.stop("As")} style={{ backgroundColor: this.state.colorAs, height: 100, width: 32, borderTopWidth: 1, }} > </View > <View style={{ backgroundColor: "white", height: 100, width: 32, borderRightWidth: 1, borderTopWidth: 1, }} > </View > </View> <View style={{ flexDirection : "row", alignItems: "center", justifyContent: "center" }}> <View onTouchStart={() => this.stroke("C")} onTouchEnd={() => this.stop("C")} style={{ backgroundColor: this.state.colorC, height: 100, width: 48, borderBottomWidth: 1, borderLeftWidth: 1 }} > </View > <View onTouchStart={() => this.stroke("D")} onTouchEnd={() => this.stop("D")} style={{ backgroundColor: this.state.colorD, height: 100, width: 48, borderBottomWidth: 1, borderLeftWidth: 1 }} > </View > <View onTouchStart={() => this.stroke("E")} onTouchEnd={() => this.stop("E")} style={{ backgroundColor: this.state.colorE, height: 100, width: 48, borderBottomWidth: 1, borderLeftWidth: 1 }} > </View > <View onTouchStart={() => this.stroke("F")} onTouchEnd={() => this.stop("F")} style={{ backgroundColor: this.state.colorF, height: 100, width: 48, borderBottomWidth: 1, borderLeftWidth: 1 }} > </View > <View onTouchStart={() => this.stroke("G")} onTouchEnd={() => this.stop("G")} style={{ backgroundColor: this.state.colorG, height: 100, width: 48, borderBottomWidth: 1, borderLeftWidth: 1 }} > </View > <View onTouchStart={() => this.stroke("A")} onTouchEnd={() => this.stop("A")} style={{ backgroundColor: this.state.colorA, height: 100, width: 48, borderBottomWidth: 1, borderLeftWidth: 1 }} > </View > <View onTouchStart={() => this.stroke("B")} onTouchEnd={() => this.stop("B")} style={{ backgroundColor: this.state.colorB, height: 100, width: 48, borderBottomWidth: 1, borderLeftWidth: 1, borderRightWidth: 1 }} > </View > </View> </View> </View> ); } } const styles = StyleSheet.create({ container: { flex: 1, justifyContent: 'center', alignItems: 'center', backgroundColor: '#F5FCFF', flexDirection: "row", }, });鍵盤の表示
Viewで鍵盤を作ってきます。
鍵盤に触れた時に音が鳴り、離した時に音が鳴り終わるように、OnTouchStartとOnTouchEndに処理を書いていきます。
また、鍵盤に触れている時にbackgroundColorを変えたいので、stateにしておきます。constructor( props ){ super( props ); this.state = { colorC : "white", colorCs : "black", ... } ... } render() { ... <View onTouchStart={() => this.stroke("Cs")} onTouchEnd={() => this.stop("Cs")} style={{ backgroundColor: this.state.colorCs, height: 100, width: 32, borderTopWidth: 1, borderLeftWidth: 1,}} > </View > .... }音を鳴らす(鍵盤に触れる)
コンストラクタで音源を読み込んでおきます。
鍵盤に触れた時、鍵盤のbackgroundColorをstateで変更して、音を鳴らします。
音が鳴らないことがあるため、setTimeoutが必要です。constructor( props ){ super( props ); ... this.sound = {}; const soundList = [ "C", "Cs", "D", "Ds", "E", "F", "Fs", "G", "Gs", "A", "As", "B" ] soundList.forEach(note => { this.sound[note] = new Sound( note + ".mp3", Sound.MAIN_BUNDLE, error => { if ( error ) { console.log("failed to load the sound.", error); } }) }); } stroke ( note ) { switch ( note ) { case "C": this.setState({ colorC: "rgba(1, 1, 1, 0.1)" }) break; ... } setTimeout( () => { this.sound[note].play(success => { if ( success ) { console.log("successfully finished playing."); } else { console.log("failed to play the sound."); } }); }, 1); }音を止める(鍵盤から指を離す)
同様にstateで鍵盤の色を元に戻します。
音をいきなり止めてしまうとブツッと鳴ってしまうので、徐々にボリュームを下げてから止めるようにします。
止めた後は、次に音を鳴らす時のためにボリュームを元に戻しておきます。stop( note ) { switch ( note ) { case "C": this.setState( { colorC: "white" } ) break; ... } setTimeout( () => { for (let i=0; i<2000; i++) { this.sound[note].setVolume( 1.0-i/2000. ); } this.sound[note].stop(); this.sound[note].setVolume( 1.0 ); }, 1 ) }まとめ
React Nativeでピアノを実装しました。
パフォーマンスは良いとは言えませんが、アプリにちょっとした鍵盤を実装したい場合(?)に試してみてください!
