- 投稿日:2019-03-02T14:50:11+09:00
GCP で tensorflow 遊び2
概要
GCP で tensorflow 遊び1の続き。
CNN の構造いじって正答率がどう変わるかみてみる。出題では、以下の IoU で正答率を評価するとしていた。
IoU = \frac{TP}{FN+TP+FP}判定で1回tensorflow回して、そのログとmaster.tsvのテストデータ部分を突き合わせる為に
以下のような評価用scriptを作って答え合わせをさせた。#! /usr/bin/env python ## usage ## grep train_ results.xxxx > results.xxxx.train ## Judge.py test_master.tsv results.xxxx.train import sys, os if __name__ == '__main__': if len(sys.argv) > 2: f = open(sys.argv[1]) filenames0 = f.readlines() f.close() header = filenames0.pop(0) filenamedic = {} for l in filenames0: ll = l.split() filenamedic[ll[0]] = ll[1] f = open(sys.argv[2]) filenames2 = f.readlines() f.close() X_0 = 0 X_1 = 1 T_0 = 0 T_1 = 1 F_10 = 0 F_01 = 0 for l in filenames2: ll = l.split() X = filenamedic[ll[0]] if X == '0': X_0 += 1 else: X_1 += 1 if ll[1] == '0': T_0 += 1 else: T_1 += 1 if X != ll[1]: print(ll[0], ll[1], 'truth', X) if X == '0': F_01 += 1 else: F_10 += 1 filenamedic.pop(ll[0]) print(X_0, X_1, T_0, T_1, F_01, F_10, T_1 / (T_1+F_01+F_10)) else: print('command filename dir/')結果
107125 4672 1472 105653 2497 2175 誤 正 正 誤 '0'を'1'と間違えた:1472/107125
'1'を'0'と間違えた:2175/4672今回のケースではtrueが’1’で
true positive (TP): 2497
true negative (TN): 2175
false positive (FP): 1472IoU = TP / (TP + TN + FP) = 2497/(2497+2175+1472) = 0.406
という結果だった。
計算繰り返すとどうなるか
上の過程を連続処理するために以下の script を作成。
#! /bin/sh

XXXX=`date "+%m%d"`
i=1

RES=results.${XXXX}.b${i}

while [ -f ${RES}.1 ];
do
    i=`expr ${i} + 1`
    RES=results.${XXXX}.b${i}
done

python3 RdTrn41.py train_master_X1.tsv > ${RES}.1 2>&1
python3 RdTrn41.py /data/test > ${RES}.2 2>&1
grep train_ ${RES}.2 > ${RES}.3
python3 Judge.py test_master.tsv ${RES}.3 | tail -n 2
学習させて、判定させて、判定結果をgrepして、それと正答ファイルの突き合わせで値を出す。
(TF) > sh ex.sh&& sh ex.sh&& sh ex.sh&& sh ex.sh
train_292275.tif 0 truth 1
107123 4674 109011 2786 585 2473 0.47672826830937715
train_245573.tif 1 truth 0
107123 4674 106275 5522 2252 1404 0.601656134234038
train_292275.tif 0 truth 1
107123 4674 109164 2633 266 2307 0.5057625816365732
train_205150.tif 0 truth 1
107123 4674 109842 1955 59 2778 0.40797161936560933
(何故か1回目の答えが上と違うが)2回目で一番成績が良くてあとは劣化してゆく。過学習しているのか。(CNN2)
CNN の構造いじる
CNN3
最初の conv matrix を 3x3x7x16 にしたもの
(TF) > sh ex.sh && sh ex.sh && sh ex.sh && sh ex.sh
train_205150.tif 0 truth 1
107123 4674 107616 4181 1685 2178 0.5197662854301343
train_292275.tif 0 truth 1
107123 4674 109189 2608 229 2295 0.5081839438815277
train_292275.tif 0 truth 1
107123 4674 108494 3303 477 1848 0.5868869936034116
train_292275.tif 0 truth 1
107123 4674 109409 2388 122 2408 0.4855632370882473
CNN4
以下のようなCNNを作成
## CNN4
## [32,32,7]pixel
## -> [3,3,7,16] kernel -> [32,32,16]pixel -> [16,16,16]pixel
## -> [3,3,16,32] kernel -> [16,16,32]pixel -> [8,8,32]pixel
## -> [3,3,32,32] kernel -> [8,8,32]pixel -> [4,4,32]pixel
## -> [128]FC
## -> 2
結果
(TF) > sh ex.sh && sh ex.sh && sh ex.sh && sh ex.sh
train_205150.tif 0 truth 1
107123 4674 109083 2714 319 2279 0.5109186746987951
train_292275.tif 0 truth 1
107123 4674 108744 3053 418 2039 0.5540834845735028
train_292275.tif 0 truth 1
107123 4674 107781 4016 800 1458 0.6401020082881734
train_260276.tif 0 truth 1
107123 4674 108362 3435 895 2134 0.5314047029702971

(TF) > tail -n 3 results.0220.b*.1
==> results.0220.b1.1 <==
elapsed time 842.9950246810913
read 330.89023065567017 compute 464.7211787700653
read 323.0126678943634 6.838194370269775

==> results.0220.b2.1 <==
elapsed time 796.4773766994476
read 289.16141080856323 compute 459.1523313522339
read 281.32930421829224 6.8193583488464355

==> results.0220.b3.1 <==
elapsed time 798.7965080738068
read 288.9158399105072 compute 461.96511721611023
read 280.86145520210266 6.996886253356934

==> results.0220.b4.1 <==
elapsed time 809.6086728572845
read 288.3313133716583 compute 473.4954888820648
read 280.08322978019714 7.173512697219849
CNN5
もう1段深いCNN
## CNN5
## [32,32,7]pixel
## -> [3,3,7,16] kernel -> [32,32,16]pixel -> [16,16,16]pixel
## -> [3,3,16,32] kernel -> [16,16,32]pixel -> [8,8,32]pixel
## -> [3,3,32,32] kernel -> [8,8,32]pixel -> [4,4,32]pixel
## -> [3,3,32,32] kernel -> [4,4,32]pixel -> [2,2,32]pixel
## -> [48]FC
## -> 2
結果
(TF) > sh ex.sh && sh ex.sh && sh ex.sh && sh ex.sh train_205150.tif 0 truth 1 107123 4674 110941 856 15 3833 0.18197278911564627 train_205150.tif 0 truth 1 107123 4674 109902 1895 330 3109 0.3552680914885639 train_292275.tif 0 truth 1 107123 4674 108979 2818 210 2066 0.5531998429524931 train_292275.tif 0 truth 1 107123 4674 107730 4067 1249 1856 0.5670663692136084 (TF) > sh ex.sh train_292275.tif 0 truth 1 107123 4674 108629 3168 396 1902 0.579582875960483 (TF) > sh ex.sh&&sh ex.sh train_292275.tif 0 truth 1 107123 4674 108421 3376 498 1796 0.5954144620811287 train_292275.tif 0 truth 1 107123 4674 108754 3043 330 1961 0.5704911886014248(TF) > tail -n 3 results.0220.b*.1 ==> results.0220.b1.1 <== elapsed time 844.8499901294708 read 288.78743410110474 compute 502.61161279678345 read 280.8021218776703 6.919800519943237 ==> results.0220.b2.1 <== elapsed time 841.389762878418 read 291.50068950653076 compute 495.2584443092346 read 283.44011330604553 7.000304698944092 ==> results.0220.b3.1 <== elapsed time 835.3306441307068 read 291.6633448600769 compute 489.4258255958557 read 283.714097738266 6.93343448638916 ==> results.0220.b4.1 <== elapsed time 837.7277889251709 read 292.404869556427 compute 491.8565492630005 read 284.63338708877563 6.76350736618042 ==> results.0220.b5.1 <== elapsed time 877.9375958442688 read 326.73156785964966 compute 496.6949234008789 read 318.76070833206177 6.893429517745972 ==> results.0221.b3.1 <== elapsed time 855.1045415401459 read 331.36289262771606 compute 471.52830243110657 read 323.2426028251648 7.098251581192017 ==> results.0221.b4.1 <== elapsed time 846.691953420639 read 316.5083978176117 compute 478.75846767425537 read 308.60532331466675 6.889764308929443CNN6
convolution matrixを、画像の縦横で1/2にする代わりに面数4倍で変換してゆくものとして実験
## CNN6 ## [32,32,7]pixel ## -> [3,3,7,32] kernel -> [32,32,32]pixel -> [16,16,32]pixel ## -> [3,3,32,128] kernel -> [16,16,128]pixel -> [8,8,128]pixel ## -> [3,3,128,512] kernel -> [8,8,512]pixel -> [4,4,512]pixel ## -> [512]FC ## -> 2(TF) > sh ex.sh && sh ex.sh && sh ex.sh && sh ex.sh && sh ex.sh && sh ex.sh train_225348.tif 1 truth 0 107123 4674 108332 3465 823 2032 0.5482594936708861 train_225348.tif 1 truth 0 107123 4674 104440 7357 3651 968 0.6143119572478289 train_240013.tif 1 truth 0 107123 4674 107350 4447 1574 1801 0.5685246739964204 train_292275.tif 0 truth 1 107123 4674 109428 2369 63 2368 0.49354166666666666CNN7
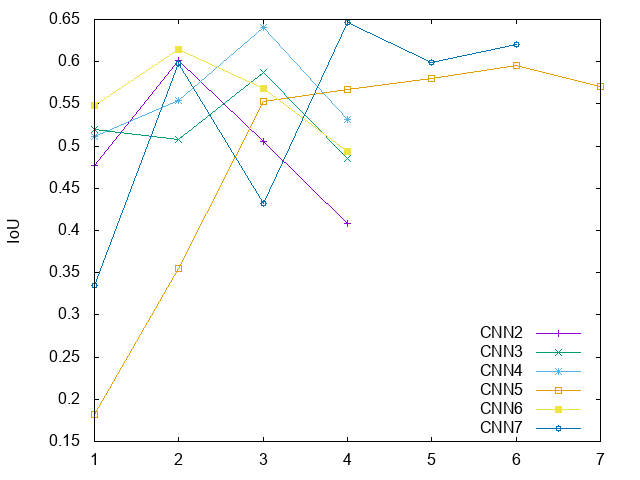
## CNN7 ## [32,32,7]pixel ## -> [3,3,7,32] kernel -> [32,32,32]pixel -> [16,16,32]pixel ## -> [3,3,32,128] kernel -> [16,16,128]pixel -> [8,8,128]pixel ## -> [3,3,128,512] kernel -> [8,8,512]pixel -> [4,4,512]pixel ## -> [3,3,512,2048] kernel -> [4,4,2048]pixel -> [2,2,2048]pixel ## -> [512]FC ## -> 2(TF) > sh ex.sh && sh ex.sh && sh ex.sh && sh ex.sh && sh ex.sh && sh ex.sh train_205150.tif 0 truth 1 107123 4674 110203 1594 44 3124 0.33473330533389334 train_292275.tif 0 truth 1 107123 4674 108538 3259 391 1806 0.5973240469208211 train_260276.tif 0 truth 1 107123 4674 109672 2125 123 2672 0.43191056910569103 train_278555.tif 0 truth 1 107123 4674 106814 4983 1514 1205 0.6469748117372112 train_292275.tif 0 truth 1 107123 4674 108450 3347 458 1785 0.5987477638640429 train_234551.tif 1 truth 0 107123 4674 106721 5076 1754 1352 0.6203862136396969結果をまとめると以下のようになった。
- 投稿日:2019-03-02T14:49:53+09:00
GCP で tensorflow 遊び1
概要
2018年に出題されていた SIGNATE の衛星画像の識別コンペの、データだけ取ってあったのでそれで遊んでみる。
環境
GCP 上にインスタンスを用意。
tensorflow が CUDA9 を要求していて、 CUDA の方は9だと ubuntu 17.10 か 16.04LTS にしかならないので諦めてこれ用に 16.04 でインスタンス作成。venv 環境で pip インストール。別に
scikit-imageも pip でインストールする。cuDNN も必用なので developer 登録して 7.0.5 の tar ball を取得して
/usr/local/以下に展開。env LD_LIBRARY_PATH=${LD_LIBRARY_PATH}:/usr/local/cuda/lib64 python3 ../files/RdTrn4.py train\_master\_X1.tsvとして利用することにする。
GCPと手元で両方でファイルをいじるので作業ディレクトリはhg管理する。
(hgだとworking directoryであるGCPに直接pushできる)。GCP上では、 train1.zip を展開して
train/に、train2.zip を展開してtest/にしてある。
train/で学習してtest/で答え合わせをする予定。
train_master.tsvから各々のディレクトリにあるファイルの行だけ抽出してtrain_master_X1.tsv,test_master.tsvを作った。
手元でscript修正して確認用に300ファイルだけ手元でも展開してtrain_master_mini.tsvも作成。結局こんな抽出scriptを書いた。
#! /usr/bin/env python

import sys, os

if __name__ == '__main__':
    if len(sys.argv) > 2:
        f = open(sys.argv[1])
        filenames0 = f.readlines()
        f.close()
        header = filenames0.pop(0)
        filenamedic = {}
        for l in filenames0:
            ll = l.split()
            filenamedic[ll[0]] = l
        filenames2 = os.listdir(sys.argv[2])
        print(header.strip())
        for l in filenames2:
            print(filenamedic[l].strip())

    else:
        print('command filename dir/')
script
去年時点でこんな script 書いて動かすところまではやっていた。
チュートリアルにあった MNIST の CNN の丸コピー。
100ファイル取ってきて1バッチとして50回イテレーションして次の100ファイルに移って、を繰り返して、全部ファイルを舐めたら1ステップ終了するようにループを組んでいる。
サルベージしてきてこれをベースに作業を進める。#! /usr/bin/env python # Read Training Data # usage # python RdTrn.py train_master10.tsv ## head -n 11 train_master.tsv > train_master10.tsv TARGETDIR = 'Train_all/' BATCHSIZE=100 MODE2='CONT' #MODE2='RESET' NUM_STEP = 50 SHUFFLE=True # CNN # [32,32,7]pixel -> [5,5,7,16] kernel -> [32,32,16]pixel -> [16,16,16]pixel # -> [3,3,16,32] kernel -> [16,16,32]pixel -> [8,8,32]pixel -> [512]FC import tensorflow as tf def weight_variable(shape): initial = tf.truncated_normal(shape, stddev=0.1) return tf.Variable(initial) def bias_variable(shape): initial = tf.constant(0.1, shape=shape) return tf.Variable(initial) def conv2d(x, W): return tf.nn.conv2d(x, W, strides=[1,1,1,1], padding='SAME') def max_pool_2x2(x): return tf.nn.max_pool(x, ksize=[1,2,2,1], strides=[1,2,2,1], padding='SAME') x = tf.placeholder(tf.float32, shape=[None, 32,32,7]) y_ = tf.placeholder(tf.float32, shape=[None,2]) #x_image = x / 256.0 x_image = x ## 1st layer W_conv1 = weight_variable([5,5,7,16]) b_conv1 = bias_variable([16]) h_conv1 = tf.nn.relu(conv2d(x_image, W_conv1) + b_conv1) h_pool1 = max_pool_2x2(h_conv1) ## 2nd layer W_conv2 = weight_variable([3,3,16,32]) b_conv2 = bias_variable([32]) h_conv2 = tf.nn.relu(conv2d(h_pool1, W_conv2) + b_conv2) h_pool2 = max_pool_2x2(h_conv2) ## 3rd, full-connection W_fc1 = weight_variable([8 * 8 * 32, 512]) b_fc1 = bias_variable([512]) h_pool2_flat = tf.reshape(h_pool2, [-1, 8*8*32]) h_fc1 = tf.nn.relu(tf.matmul(h_pool2_flat, W_fc1) + b_fc1) keep_prob = tf.placeholder(tf.float32) h_fc1_drop = tf.nn.dropout(h_fc1, keep_prob) ## 4th, W_fc2 = weight_variable([512,2]) b_fc2 = bias_variable([2]) y_conv = tf.matmul(h_fc1_drop, W_fc2) + b_fc2 residual = y_ - y_conv residual2 = tf.nn.softmax_cross_entropy_with_logits(labels=y_, logits=y_conv) cross_entropy = tf.reduce_mean( tf.nn.softmax_cross_entropy_with_logits(labels=y_, logits=y_conv)) train_step = tf.train.AdamOptimizer(1e-4).minimize(cross_entropy) correct_prediction = tf.equal(tf.argmax(y_conv, 1), tf.argmax(y_, 1)) accuracy = tf.reduce_mean(tf.cast(correct_prediction, tf.float32)) import random import sys, os from skimage import io filenames = [] if os.path.isfile(sys.argv[1]): MODE = 'TRAIN' f = open(sys.argv[1]) filenames = f.readlines() f.close() filenames.pop(0) if SHUFFLE: random.shuffle(filenames) elif os.path.isdir(sys.argv[1]): MODE = 'TEST' filenames = os.listdir(sys.argv[1]) with tf.Session() as sess: sess.run(tf.global_variables_initializer()) saver = tf.train.Saver() if MODE2 != 'RESET': if os.path.exists("./model.ckpt.meta"): saver.restore(sess, "./model.ckpt") while len(filenames)>0: filenames_x = filenames[:min(BATCHSIZE, len(filenames))] del filenames[:min(BATCHSIZE, len(filenames))] #print(filenames_x, filenames) if MODE == 'TRAIN': filenames_y = [l.split()[0] for l in filenames_x] else: filenames_y = filenames_x Train = [] Label = [] for l in filenames_x: l2 = l.split() Train.append(io.imread(TARGETDIR+l2[0])) if MODE == 'TRAIN' and l2[1] == '0': Label.append([1, 0]) else: Label.append([0, 1]) a, b = Train[-1].min(), Train[-1].max() if (b-a > 0): Train[-1] = (Train[-1] - a) / (b - a) #print(l2[0],a,b) else: Train.pop(-1) Label.pop(-1) #print(Train) #print(Train[0]) #print(Train[0].dtype, Train[0].shape) print(Label) Label0 = [[0, 1] for i in Train] if MODE == 'TRAIN': for i in range(NUM_STEP): if i % 10 == 0: train_accuracy = accuracy.eval(feed_dict={ x: Train, y_: Label, keep_prob: 1.0}) print('step %d, training accuracy %g' % (i, train_accuracy)) #print(residual2.eval(feed_dict={ # x: Train, y_: Label, keep_prob: 1.0})) train_step.run(feed_dict={x: Train, y_: Label, keep_prob: 0.5}) #print(y_conv.eval(feed_dict={ # x: Train, y_: Label, keep_prob: 1.0})) print(residual2.eval(feed_dict={ x: Train, y_: Label, keep_prob: 1.0})) answer = correct_prediction.eval(feed_dict={ x: Train, y_: Label0, keep_prob: 1.0}) for i in range(len(answer)): print(filenames_y[i], 0 if answer[i]==False else 1) saver.save(sess, "./model.ckpt")とりあえず動くところまでは持って行ってみたが、猛烈に遅い。
上の script の1ステップで4000秒くらいかかる。
とてもやってられない。
何が遅いのかと思って調べてみたら imread が遅い。
imreadを非同期並行処理にできないか調べたが、file readがコルーチンでないので無理そう。こんなに遅いんじゃ機械学習成立しないじゃんみんなどうしてんだ?
調べてみるとgcpの通常のディスクは 0.75 IOPS という説https://cloud.google.com/compute/docs/disks/performance?hl=ja
アクセスが激しい用途なら別に SSD を増設しておかないとダメっぽい
SSD上にデータを置いて
1回学習データに対して、
判定・学習・判定> tail -n 2 results.0218* ==> results.0218 <== read 310.85166597366333 compute 8.858093976974487 read 302.8673777580261 7.035254001617432 ==> results.0218_2 <== read 314.44825434684753 compute 537.2505786418915 read 306.3731019496918 7.047821760177612 ==> results.0218_3 <== read 325.11989974975586 compute 14.689516067504883 read 317.0948975086212 7.06338095664978 HDD 時代の1回学習に対する判定 read 3403.6323153972626 compute 17.437681198120117 read 3393.889718055725 8.453051567077637
read compute IoU 学習1(HDD) (4112) 0.946 判定1(HDD) 3403.63 17.43 判定1(SSD) 310.85 8.85 0.521 学習2 314.45 537.25 0.964 判定2 325.12 14.69 0.576 3000秒が300秒になったのでよしとする。
学習に使ったデータに対しては高い正答率が出るのに、未知データだと正答率が低いんでそれっぽいなーという感じ。
- 投稿日:2019-03-02T11:01:19+09:00
[Tensorflow] Tensorflow 2.0がくる
Tensorflowに公式による2.0からの変化点。
Upgrade code to TensorFlow 2.0
TensorFlow 2.0 includes many API changes, such as reordering arguments, renaming symbols, and changing default values for parameters. Manually performing all of these modifications would be tedious and prone to error. To streamline the changes, and to make your transition to TF 2.0 as seamless as possible, the TensorFlow team has created the
tf_upgrade_v2utility to help transition legacy code to the new API.The
tf_upgrade_v2utility is included automatically with apip installof TF 2.0. It will accelerate your upgrade process by converting existing TensorFlow 1.x Python scripts to TensorFlow 2.0.The conversion script automates as much as possible, but there are still syntactical and stylistic changes that cannot be performed by the script.
Compatibility module
Certain API symbols can not be upgraded simply by using a string replacement. To ensure your code is still supported in TensorFlow 2.0, the upgrade script includes a
compat.v1module. This module replaces TF 1.x symbols liketf.foowith the equivalenttf.compat.v1.fooreference. While the compatibility module is nice, we recommend that you manually proofread replacements and migrate them to new APIs in thetf.*namespace instead oftf.compat.v1.*namespace as quickly as possible.Because of TensorFlow 2.x module deprecations (for example,
tf.flagsandtf.contrib), some changes can not be worked around by switching tocompat.v1. Upgrading this code may require using an additional library (for example,absl.flags) or switching to a package in tensorflow/addons.Upgrade script
To convert your code from TensorFlow 1.x to TensorFlow 2.x, follow these instructions:
Run the script from the pip package
First,
pip installthetf-nightly-2.0-previewortf-nightly-gpu-2.0-previewpackage.Note:
tf_upgrade_v2is installed automatically for TensorFlow 1.13 and later (including the nightly TF 2.0 builds).The upgrade script can be run on a single Python file:
tf_upgrade_v2 --infile tensorfoo.py --outfile tensorfoo-upgraded.pyThe script will print errors if it can not find a fix for the code. You can also run it on a directory tree:
# upgrade the .py files and copy all the other files to the outtree
tf_upgrade_v2 --intree coolcode --outtree coolcode-upgraded

# just upgrade the .py files
tf_upgrade_v2 --intree coolcode --outtree coolcode-upgraded --copyotherfiles False
Detailed report
The script also reports a list of detailed changes, for example:
'tensorflow/tools/compatibility/testdata/test_file_v1_12.py' Line 65
--------------------------------------------------------------------------------

Added keyword 'input' to reordered function 'tf.argmax'
Renamed keyword argument from 'dimension' to 'axis'

    Old:         tf.argmax([[1, 3, 2]], dimension=0))
                                        ~~~~~~~~~~
    New:         tf.argmax(input=[[1, 3, 2]], axis=0))
All of this information is included in the
report.txtfile that will be exported to your current directory. Oncetf_upgrade_v2has run and exported your upgraded script, you can run your model and check to ensure your outputs are similar to TF 1.x.Caveats
Do not update parts of your code manually before running this script. In particular, functions that have had reordered arguments like
tf.argmaxortf.batch_to_spacecause the script to incorrectly add keyword arguments that mismap your existing code.This script does not reorder arguments. Instead, the script adds keyword arguments to functions that have their arguments reordered.
To report upgrade script bugs or make feature requests, please file an issue on GitHub. And if you’re testing TensorFlow 2.0, we want to hear about it! Join the TF 2.0 Testing community and send questions and discussion to testing@tensorflow.org.
+
Upgrade your existing code for TensorFlow 2.0 (Coding TensorFlow)