- 投稿日:2021-02-13T23:28:32+09:00
Docker + Rails(Ruby)をバージョンアップ(アップグレード)したお話
Docker環境でRails(Ruby)アプリをアップグレードした記事がない!?
非Docker環境でRubyとRailsをアップグレードする方法はすぐに見つかりました。
伊藤さんが書かれてる下記の記事が本当にわかりやすいです。
ちなみに私は
Docker Rails アップデート、Docker Rails バージョンアップなどでググりましたが見つかりませんでした。ワードが違いますもんねw「じゃあDocker環境でRubyとRailsをアップグレードする記事もすぐ見つかるでしょ」
そう思ったのですが
- 思ったよりも見つからない
- Rubyのアップグレード方法がいくつかパターンがあるみたい
- rbenvを利用してアップグレードする方法(docker-composeによるrails5の開発環境構築時のエラーまとめ【公式通りはうまくいかない】 - よしゆきライフ)
- DockerfileのRubyのバージョンを変更してアップグレードする(個人開発アプリをDockerでコンテナ化してみた - アクトインディ開発者ブログ)
といういくつかのパターンがある印象を受けました。
それがこの投稿に至った理由です。
進め方、参考リンク
基本的には永久保存版!?伊藤さん式・Railsアプリのアップグレード手順 - Qiitaが全体のベースとして進めます。
後々同じことを繰り返さないために遭遇したWARNINGログやエラーログも書いていこうと思います。
読んで欲しい人
- Docker + Railsアプリ作れた人(RSpecでテスト書いてあったら最高!!)
- Docker + Ruby + Rails の環境をアップグレードしようとしている人
今回はRubyの公式からイメージを取得する方法で行なっています。
rbenvでRubyを設定、アップデートする方法は想定していません、ご了承ください(m_ _m)動作環境
version
(アップグレード前)version
(アップグレード後)MacOS Mojave Mojave Ruby 2.5.7 2.7.2 Rails 5.1.7 6.0.3.5 MySQL 5.7 5.7 注意点
あくまでアプリをアップグレードした私の備忘録です。完璧ではありません。
違う部分があればアドバイスいただけると助かります。現在はサンプルアプリのリンクはありませんが、後々作成する予定です。
本題
手順1. 現在使用しているgemを最新にする
RubyとRailsアップグレードを進める前にDockerコンテナ内のgemをアップデートしておきます。
おなじみのコマンドですね。shelldocker-compose run --rm web bundle update私の場合はここで下記のログが表示されました。
shellIgnoring bigdecimal-1.3.5 because its extensions are not built. Try: gem pristine bigdecimal --version 1.3.5 Ignoring bootsnap-1.5.1 because its extensions are not built. Try: gem pristine bootsnap --version 1.5.1 Ignoring mini_racer-0.3.1 because its extensions are not built. Try: gem pristine mini_racer --version 0.3.1 Ignoring msgpack-1.4.0 because its extensions are not built. Try: gem pristine msgpack --version 1.4.0 Ignoring msgpack-1.3.3 because its extensions are not built. Try: gem pristine msgpack --version 1.3.3 Ignoring puma-5.1.1 because its extensions are not built. Try: gem pristine puma --version 5.1.1 Ignoring websocket-driver-0.7.3 because its extensions are not built. Try: gem pristine websocket-driver --version 0.7.3 : :この後は通常の
bundle install、bundle updateと同じ表示がされていました。
これはリンクの通りに下記のコマンドを実行することでbundle installを実行しても上記のログも表示されなくなりました。shelldocker-compose run --rm web gem pristine --all手順2. 最新ではないgemを探して、できる限りバージョンアップする
docker-compose run --rm web bundle outdatedコマンドで最新バージョンを使っていないgemを確認できます。shell$ docker-compose run --rm web bundle outdated Creating app_for_job_change_web_run ... done Fetching https://github.com/thoughtbot/shoulda-matchers.git Fetching gem metadata from https://rubygems.org/......... Fetching gem metadata from https://rubygems.org/. Resolving dependencies................................................ Outdated gems included in the bundle: * actioncable (newest 6.1.1, installed 5.1.7) * actionmailer (newest 6.1.1, installed 5.1.7) * actionpack (newest 6.1.1, installed 5.1.7) * actionview (newest 6.1.1, installed 5.1.7) * activejob (newest 6.1.1, installed 5.1.7) * activemodel (newest 6.1.1, installed 5.1.7) * activerecord (newest 6.1.1, installed 5.1.7) * activesupport (newest 6.1.1, installed 5.1.7) * arel (newest 9.0.0, installed 8.0.0) * childprocess (newest 4.0.0, installed 3.0.0) * listen (newest 3.4.1, installed 3.1.5, requested >= 3.0.5, < 3.2) in groups "development" * polyamorous (newest 2.3.2, installed 2.3.0) * puma (newest 5.2.0, installed 3.12.6, requested ~> 3.7) in groups "default" * rails (newest 6.1.1, installed 5.1.7, requested ~> 5.1.7) in groups "default" * rails-i18n (newest 6.0.0, installed 5.1.3) in groups "default" * railties (newest 6.1.1, installed 5.1.7) * ransack (newest 2.4.2, installed 2.3.0) in groups "default" * shoulda-matchers (newest 4.5.1, installed 3.1.2 4b160bd) in groups "test" * tzinfo (newest 2.0.4, installed 1.2.9) * web-console (newest 4.1.0, installed 3.7.0) in groups "development" * webpacker (newest 5.2.1, installed 4.3.0) in groups "default" * websocket-driver (newest 0.7.3, installed 0.6.5)ちなみに伊藤さんの記事で紹介されている
bundle_outdated_formatterというgemを使うと下記のように表示されます(emsk/bundle_outdated_formatter: Formatter forbundle outdatedcommand)。
結果表示までの時間もgemを使用したやりかたの方が早かったです!!
it's so beautiful!!shell# ローカルにインストールする $ gem install bundle_outdated_formatter $ docker-compose run --rm web bundle outdated | bof Creating app_for_job_change_web_run ... done ┌──────────────────┬────────┬───────────┬─────────────────┬─────────────┐ │ gem │ newest │ installed │ requested │ groups │ ├──────────────────┼────────┼───────────┼─────────────────┼─────────────┤ │ actioncable │ 6.1.1 │ 5.1.7 │ │ │ │ actionmailer │ 6.1.1 │ 5.1.7 │ │ │ │ actionpack │ 6.1.1 │ 5.1.7 │ │ │ │ actionview │ 6.1.1 │ 5.1.7 │ │ │ │ activejob │ 6.1.1 │ 5.1.7 │ │ │ │ activemodel │ 6.1.1 │ 5.1.7 │ │ │ │ activerecord │ 6.1.1 │ 5.1.7 │ │ │ │ activesupport │ 6.1.1 │ 5.1.7 │ │ │ │ arel │ 9.0.0 │ 8.0.0 │ │ │ │ childprocess │ 4.0.0 │ 3.0.0 │ │ │ │ listen │ 3.4.1 │ 3.1.5 │ >= 3.0.5, < 3.2 │ development │ │ polyamorous │ 2.3.2 │ 2.3.0 │ │ │ │ puma │ 5.2.0 │ 3.12.6 │ ~> 3.7 │ default │ │ rails │ 6.1.1 │ 5.1.7 │ ~> 5.1.7 │ default │ │ rails-i18n │ 6.0.0 │ 5.1.3 │ │ default │ │ railties │ 6.1.1 │ 5.1.7 │ │ │ │ ransack │ 2.4.2 │ 2.3.0 │ │ default │ │ shoulda-matchers │ 4.5.1 │ 3.1.2 │ │ test │ │ tzinfo │ 2.0.4 │ 1.2.9 │ │ │ │ web-console │ 4.1.0 │ 3.7.0 │ │ development │ │ webpacker │ 5.2.1 │ 4.3.0 │ │ default │ │ websocket-driver │ 0.7.3 │ 0.6.5 │ │ │ └──────────────────┴────────┴───────────┴─────────────────┴─────────────┘めっちゃ表示されました...
アプリを作成してからバージョンアップをこまめにしてこなかったのが原因です(m_ _m)ここで表示されている中で特に注目していただきたいのは 現状のRailsと同じバージョン番号を表示、使用しているgem と バージョン番号の先頭の数字が変わっているgem です。
Railsと同じバージョン番号のgemは、Railsアプリを作成するときに必須のgemであり、Rails本体ををアップグレードすれば一緒にバージョン番号が上がると考えて問題ないと思います(
actioncable,railtiesなど)。次にバージョン番号の先頭の数字が変わっているgem(今回の場合は
webpackerやregexp_parserなど)についてですが、こちらは伊藤さんが対処法を書かれていますので、一読していただければわかります。
ひどい時はアプリが動かなくなる可能性もあるみたいです。もしgemのバージョン指定の意味がわからない場合はこちらの記事でわかると思います。
ちなみに私の場合は上記の表示されるgemの数が減りませんでした(m_ _m)
Railsのバージョンを上げていくにつれて表示される数が減っていったので、もし頑張っても数が減らないならRailsのバージョンをアップするのもありかもしれません。手順3. developmentとtestグループのgemをバージョンアップする
ここで本番環境に影響の出ないdevelopment環境とtest環境のgemをバージョンアップします。
その前にGemfileにとても大事な変更を行います。
それはgemのバージョン指定の記述を削除することです(Railsは対象外)。
下記のように全てのgemに対してバージョン指定を削除しましょうというお話です。Gemfile- gem 'mysql2', '>= 0.3.18', '< 0.6.0' - gem 'puma', '~> 3.7' + gem 'mysql2' + gem 'puma' gem 'rails', '~> 5.1.7' # Railsのgemのバージョン指定は削除しないこと!!Rails以外のバージョンアップするにはshellで下記のコマンドを実行します。
developmentとtest環境からアップグレードします。shell$ docker-compose run --rm web bundle update -g development -g testshell$ docker-compose run --rm web bundle update -g development -g test Creating app_for_job_change_web_run ... done Fetching https://github.com/thoughtbot/shoulda-matchers.git Fetching gem metadata from https://rubygems.org/......... Fetching gem metadata from https://rubygems.org/. Resolving dependencies......... : # gemのインストールなどは省略します : : Bundler attempted to update awesome_print but its version stayed the same Bundler attempted to update byebug but its version stayed the same Bundler attempted to update factory_bot_rails but its version stayed the same Bundler attempted to update faker but its version stayed the same Bundler attempted to update gimei but its version stayed the same Bundler attempted to update pry-byebug but its version stayed the same Bundler attempted to update pry-rails but its version stayed the same Bundler attempted to update rails-flog but its version stayed the same Bundler attempted to update rspec-rails but its version stayed the same Bundler attempted to update capybara but its version stayed the same Bundler attempted to update launchy but its version stayed the same Bundler attempted to update rspec_junit_formatter but its version stayed the same Bundler attempted to update selenium-webdriver but its version stayed the same Bundler attempted to update shoulda-matchers but its version stayed the same Bundler attempted to update simplecov but its version stayed the same Bundler attempted to update vcr but its version stayed the same Bundler attempted to update webdrivers but its version stayed the same Bundler attempted to update webmock but its version stayed the same同じようなWARNINGがたくさん表示されました。
Bundler attempted to update xxx but its version stayed the same
をそのままググるとリンクのようにこの警告が原因で、Rails自体がアップグレードできない場合もあるみたいです。私の場合は色々試みましたがこの時点では解決できなかったので、放置して次の手順へ進みました。
一応念のため、RSpecでテストを実行して動作的に問題がないことを確認してから次に進めています。
(ちなみにアプリのアップグレードが完了した後もdocker-compose run --rm web bundle update -g development -g testを実行すると同じようにログが出ます... 解消できない...)手順4. Rails以外ののgemを全てバージョンアップする
今度は本番環境を含むgemをバージョンアップしましょう
ここもRailsは対象外です。
やっていることは上とほぼ同じなので割愛しますが
docker-compose run --rm web bundle updateを実行するdocker-compose run --rm web rspecでテストを実行するという手順をふみます。
問題なくバージョンアップできていれば次に進みます。
例のごとくRSpecでテストを実行して動作的に問題がないことを確認します。さぁ、
これで準備できたから
Railsをアップグレードするぞ!!とはなりません。
手順5. Rubyを(できるだけ)バージョンアップする
※Rubyのバージョンが最新安定版であれば問題ありません。次のRailsをアップグレードする手順へ進んでください。
Rubyを段階的にアップグレードします(
2.6.6->2.7.2みたいな感じ)。
ちなみに2021年1月現在の最新安定版のRubyバージョンは 3.0.0 です(Rubyのトップページ)。理由としては下記が挙げられます。
- Rubyをアップグレードすると仕様が変わることがある(アプリが動かなくなる原因にも)
- セキュリティやパフォーマンスに悪い影響が出る可能性がある
なのでアップグレードは定期的にしましょう!!
そして個人的に重要だと思うのはアップグレードすることに対して十分な時間と心のゆとりをもつことです。
それさえあればなんとかなります(なると思います)。私の場合は記事投稿地点でのRubyのバージョンが
2.5.7です。
最新のRubyバージョンまでアップするためには
2.5.7~>2.6.6~>2.7.2~>3.0.0と
32回のアップグレードが必要になります。では実際にアップグレードしていきます。
まず
Dockerfileの記述を変更します。Dockerfile- ARG RUBY_VERSION=2.5.7 + ARG RUBY_VERSION=2.6.6 FROM ruby:$RUBY_VERSIONちなみにここで指定しているイメージの数値は必ずDockerHubのRuby公式イメージに存在する数値に書き換えてください!!(ruby - Docker Hub)
私は2.6.6にすべき値を2.6.0とDockerHubを確認せずに変更して、エラーの原因がそれだと気づかず数日を浪費しました。話を戻しますが、
私はDockerfileで定義命令としてARGを使っているので上記の書き方になりますが、使っていなければDockerfile- FROM ruby:2.5.7 + FROM ruby:2.6.6という書き方になります。
その後下記コマンドを順に実行していきます。
shelldocker-compose build --no-cache docker-compose run --rm web bundle install # mv Gemfile.lock tmp <- bundle install がうまくいかないときに実行 # docker-compose run --rm web bundle install <- mv Gemfile.lock tmp を実行したら再度bundle installする docker-compose run --rm web gem pristine --all # これを実行すると Ignoring <gem_name>-<version> because its extensions are not built. Try: gem pristine <gem_name> --version <version> という警告が表示されなくなる上記のコマンドの意味は下記に書いておきます。
docker-compose build --no-cache: cacheを使わずにイメージをビルドする。cacheが有効になっていると設定変更がうまくされない場合があります(docker-compose build | Docker ドキュメント)。今回はかなり大きめな変更なので--no-cacheオプションを付加します。mv Gemfile.lock tmp: Gemfile.lockが原因でうまくgemが入らない時があります。そんなときはGemfile.lockの中の記述を空にする方法がありますが、それと同じ効果があります。docker-compose run --rm web bundle install: Rubyのアップグレードを行ったのでgemの対応バージョンも変化する場合があるので実行します。docker-compose run --rm web gem pristine --all:詳細はこのリンクに委ねます。そしてここでRSpecでテストします。
問題なければ、DockerのRubyイメージがちゃんと変更した新しいバージョンかチェックしましょう。
チェックするには下記のコマンドを実行します。shell$ docker-compose run --rm web ruby -v Creating app_for_job_change_web_run ... done ruby 2.6.6p146 (2020-03-31 revision 67876) [x86_64-linux]Dockerfileで変更した数値と合致していれば成功です。
最後に隠しファイルである.ruby-versionを開いてみてください。
私の場合は後から気づいたのですが、基本的には自動でRailsアプリで使用しているRubyのバージョンに自動で切り替わるらしいのですが、私の場合は切り替わらなかったので自分で修正しました。.ruby-version- 2.5.7 + 2.6.6これでRubyのアップグレードは(とりあえず)完了です。
そしてやっと本題のRailsのアップグレードに取り掛かります。ちなみに
- Rubyのイメージのバージョンを変更して(
docker-compose build --no-cache)、bundle installも問題なくできた場合、それ以降で発生するエラーは通常のRailsで発生するエラーと同じはずです。 じっくり、こつこつと修正していきましょう^ ^- 試していてわかったのですが、Rubyの
3.0.0とRailsの5.2.4.4は現在互換性がありません(調べ方はこのリンクの過去も含めた複数バージョンへのサポートを提供しているgemというところに書いてある)。- Rubyの
3.0.0と互換性のあるRailsのバージョンは6.1.0以上のようです(アプリケーションをRuby3にあげるときにやること - Qiita)。- この記事ではとりあげていませんが、CircleCIを使用されている場合はCircleCI側のRubyのバージョンも変更する必要があるので注意してください。
自分の事例をそのままま書くと下記になります。
アップグレード Ruby ver Rails ver 可否 初期状態 2.5.7 5.1.7 OK 1回目 2.6.6 5.1.7 OK 2回目 2.7.2 5.1.7 OK 3回目 2.7.2 5.2.4.4 OK 4回目 2.7.2 6.0.3.4 OK 5回目 3.0.0 6.0.3.4 NG 4回目 2.7.2(ダウングレード) 6.0.3.4 OK 手順6. Railsをバージョンアップする
ようやく本題、Railsのアップグレードにとりかかります。
ここで注意しなければならないことは、当たり前かもしれませんが
RubyとRailsの互換性を確認すること です。
これが合っていないと作成したアプリが壊れてしまいかねませんのでご注意ください。
確認方法はRails アップグレードガイド - Railsガイドに互換性のあるRubyとRailsのバージョンが記載されています。
ちなみに下記リンクはRailsの全バージョン履歴です(Rubyの全バージョン履歴わかれば誰か教えてください)。私の作成当初の構成は
- Ruby:
2.5.7- Rails:
5.1.7だったので
Railsはまず5.2.4.4にまで上げることにしました。Railsのバージョンを上げるためには Gemfile の記述を下記のように変更します。
Gemfile- gem 'rails', '~> 5.1.7' + gem 'rails', '5.2.4.4'バージョンは最新のパッチバージョンでカッチリ固定してあげてください。
準備ができたらshellで下記コマンドを実行してRailsも含めたバージョンアップを行いますshelldocker-compose run --rm web bundle updateバージョンアップが完了したらRspecでテストをします。
テストがOKならば無事Railsのアップグレードがひとまず完了です。手順7. load_defaultsやnew_framework_defaults_x_x.rbを設定する
伊藤さんの記事へのリンクをそのまま貼らせていただいてますが、
アップグレードによってデフォルトの挙動が変わったりする時があります。
それを前のバージョンのと同じように動作させるための設定をする必要がある場合もあります。config.load_defaultsとnew_framework_defaults_x_x.rbの関係を詳しく調べてみた - Qiita
Ruby、Railsのアップグレードの流れは完了
これでDocker + Ruby + Rails アップグレードの流れは理解できたと思います。
バージョンが古い場合は大変な労力と時間がかかりますが、手順の5から7を繰り返せばアップグレードはできると思います!!警告一覧
HEADS UP! i18n 1.1 changed fallbacks to exclude default locale. But that may break your application.
docker-compose run --rm web bundle updateをした時にgemDeviseから表示されました。
ログとしては下記のように表示されました。terminalHEADS UP! i18n 1.1 changed fallbacks to exclude default locale. But that may break your application. Please check your Rails app for 'config.i18n.fallbacks = true'. If you're using I18n (>= 1.1.0) and Rails (< 5.2.2), this should be 'config.i18n.fallbacks = [I18n.default_locale]'. If not, fallbacks will be broken in your app by I18n 1.1.x. For more info see: https://github.com/svenfuchs/i18n/releases/tag/v1.1.0
If you're using I18n (>= 1.1.0) and Rails (< 5.2.2), this should be 'config.i18n.fallbacks = [I18n.default_locale]'.でググると出てくる、下記の4つのリンクを読めば解決方法や詳細がわかります。
- bundle install(rails new)すると”HEADS UP! i18n 1.1 changed fallbacks to exclude default locale."と言われる - 真夜中エンジニアリング
- HEADS UP! i18n 1.1 changed fallbacks to exclude default locale. But that may break your application. - Qiita
- config.i18n.fallbacks の BREAKING CHANGE について | deadwood
- config.i18n.fallbacksのメッセージについて - Qiita
Ignoring bigdecimal-1.3.5 because its extensions are not built. Try: gem pristine bigdecimal --version 1.3.5
docker-compose build --no-cacheを実行してbundle installを実行したときに表示されました。
docker-compose run --rm web gem pristine --allを実行すれば表示されなくなります。The dependency tzinfo-data (>= 0) will be unused by any of the platforms Bundler is installing for. Bundler is installing for ruby but the dependency is only for x86-mingw32, x86-mswin32, x64-mingw32, java. To add those platforms to the bundle, run
bundle lock --add-platform x86-mingw32 x86-mswin32 x64-mingw32 java.
bundle install、bundle update時に表示される。
基本的にWindows以外の開発環境では必要ないと思われるので、
削除する or コメントアウトする という対処法で問題ないと思われます。
下記リンクに詳細が書いてあります。Bundler attempted to update rails but its version stayed the same
Rubyが2.7.2、Railsが6.0.3.4の時に
bundle update railsを実行しようとして表示された警告です。。
使っていたBundlerのバージョンが1.17.3と古く、バージョンアップしてくださいという警告です。
[Ruby] bundler 2 へのアップグレード方法 | DevelopersIOを参考に進めていきます。terminal$ docker-compose run --rm web bundle update --bundler Creating app_for_job_change_web_run ... done Using rake 13.0.3 Using concurrent-ruby 1.1.8 Using i18n 1.8.8 Using minitest 5.14.3 : : : Warning: the lockfile is being updated to Bundler 2, after which you will be unable to return to Bundler 1.上記のコマンドを使用して私の場合はBundlerのバージョンが 1.17.4 -> 2.1.4 に無事バージョンアップができました。
DEPRECATION WARNING: Uniqueness validator will no longer enforce case sensitive comparison in Rails 6.1. To continue case sensitive comparison on the :name attribute in Foodcategory model, passcase_sensitive: trueoption explicitly to the uniqueness validator.Railsを 5.2系 から 6.0系 へバージョンアップしたときに表示されます。
解決法(?)は下記がわかりやすいですエラー一覧
Your Ruby version is x.x.x, but your Gemfile specified y.y.y
GemfileにRubyのバージョンを明記している場合にエラーが発生します。
指定を修正してあげるだけでエラーが解消できます。Gemfile- ruby 'y.y.y' + ruby 'x.x.xwarning: already initialized constant Shoulda::Matchers::ActiveModel::ValidateInclusionOfMatcher::ARBITRARY_OUTSIDE_STRING
terminal上では下記のように表示されていました。
(Railsは5.1系のまま、)Rubyを2.6.6から2.7.2に上げた時にRSpecのテストで発生したエラーです。terminalFailure/Error: require File.expand_path('../config/environment', __dir__) NoMethodError: undefined method `new' for BigDecimal:Class # /usr/local/bundle/bundler/gems/shoulda-matchers-4b160bd19ecc/lib/shoulda/matchers/active_model/validate_inclusion_of_matcher.rb:273:in `<class:ValidateInclusionOfMatcher>'私の場合はtest環境に追加されているgemの
shoulda-matchersのオプション(?)を削除することで問題なく動作するようになりました(rails5系でもオプションを指定する必要がいつのまにかなくなっていました)。Gemfile- gem 'shoulda-matchers', - git: 'https://github.com/thoughtbot/shoulda-matchers.git', - branch: 'rails-5' + gem 'shoulda-matchers',undefined method `operations' for #<ActionDispatch::MiddlewareStack
wrong number of arguments (given 3, expected 2) というパターンもありました。
(Railsは5.1系のまま)Rubyを2.7.2から3.0.0に上げた時にRSpecのテストで発生したエラーです。
原因はRubyとRailsの互換性にありました。
Ruby3.0.0に対応しているRailsのバージョンは6.1.0以上のようです。
Rubyを2.7.2に戻せばエラーは解消されます。terminal上でのログは下記の通りです。
terminaldocker-compose run --rm web rspec Creating app_for_job_change_web_run ... done /usr/local/bundle/gems/bundler-1.17.3/lib/bundler/shared_helpers.rb:29: warning: Pathname#untaint is deprecated and will be removed in Ruby 3.2. /usr/local/bundle/gems/bundler-1.17.3/lib/bundler/shared_helpers.rb:118: warning: Pathname#untaint is deprecated and will be removed in Ruby 3.2. /usr/local/bundle/gems/bundler-1.17.3/lib/bundler/shared_helpers.rb:118: warning: Pathname#untaint is deprecated and will be removed in Ruby 3.2. /usr/local/bundle/gems/bundler-1.17.3/lib/bundler/shared_helpers.rb:35: warning: Pathname#untaint is deprecated and will be removed in Ruby 3.2. /usr/local/bundle/gems/bundler-1.17.3/lib/bundler/shared_helpers.rb:35: warning: Pathname#untaint is deprecated and will be removed in Ruby 3.2. /usr/local/bundle/gems/bundler-1.17.3/lib/bundler/shared_helpers.rb:44: warning: Pathname#untaint is deprecated and will be removed in Ruby 3.2. /usr/local/bundle/gems/bundler-1.17.3/lib/bundler/shared_helpers.rb:118: warning: Pathname#untaint is deprecated and will be removed in Ruby 3.2. /usr/local/bundle/gems/bundler-1.17.3/lib/bundler/shared_helpers.rb:35: warning: Pathname#untaint is deprecated and will be removed in Ruby 3.2. An error occurred while loading ./spec/features/foodcategory_spec.rb. Failure/Error: require File.expand_path('../config/environment', __dir__) ArgumentError: wrong number of arguments (given 3, expected 2) # /usr/local/bundle/gems/actionpack-5.1.7/lib/action_dispatch/middleware/static.rb:109:in `initialize' # /usr/local/bundle/gems/actionpack-5.1.7/lib/action_dispatch/middleware/stack.rb:35:in `new' # /usr/local/bundle/gems/actionpack-5.1.7/lib/action_dispatch/middleware/stack.rb:35:in `build' # /usr/local/bundle/gems/actionpack-5.1.7/lib/action_dispatch/middleware/stack.rb:99:in `block in build' # /usr/local/bundle/gems/actionpack-5.1.7/lib/action_dispatch/middleware/stack.rb:99:in `each' # /usr/local/bundle/gems/actionpack-5.1.7/lib/action_dispatch/middleware/stack.rb:99:in `inject' # /usr/local/bundle/gems/actionpack-5.1.7/lib/action_dispatch/middleware/stack.rb:99:in `build' # /usr/local/bundle/gems/railties-5.1.7/lib/rails/engine.rb:508:in `block in app' # /usr/local/bundle/gems/railties-5.1.7/lib/rails/engine.rb:504:in `synchronize' # /usr/local/bundle/gems/railties-5.1.7/lib/rails/engine.rb:504:in `app' # /usr/local/bundle/gems/railties-5.1.7/lib/rails/application/finisher.rb:45:in `block in <module:Finisher>' # /usr/local/bundle/gems/railties-5.1.7/lib/rails/initializable.rb:30:in `instance_exec' # /usr/local/bundle/gems/railties-5.1.7/lib/rails/initializable.rb:30:in `run' # /usr/local/bundle/gems/railties-5.1.7/lib/rails/initializable.rb:59:in `block in run_initializers' # /usr/local/bundle/gems/railties-5.1.7/lib/rails/initializable.rb:58:in `run_initializers' # /usr/local/bundle/gems/railties-5.1.7/lib/rails/application.rb:353:in `initialize!' # ./config/environment.rb:5:in `<top (required)>' # ./spec/rails_helper.rb:3:in `<top (required)>' # ./spec/features/foodcategory_spec.rb:1:in `<top (required)>' An error occurred while loading ./spec/models/cuisine_spec.rb. Failure/Error: require File.expand_path('../config/environment', __dir__) NoMethodError: undefined method `operations' for #<ActionDispatch::MiddlewareStack:0x000055c6d7c7e388 @middlewares=[Rack::Sendfile, ActionDispatch::Static, ActionDispatch::Executor, ActiveSupport::Cache::Strategy::LocalCache::Middleware, Rack::Runtime, Rack::MethodOverride, ActionDispatch::RequestId, ActionDispatch::RemoteIp, Rails::Rack::Logger, ActionDispatch::ShowExceptions, ActionDispatch::DebugExceptions, ActionDispatch::Callbacks, ActionDispatch::Cookies, ActionDispatch::Session::CookieStore, ActionDispatch::Flash, Rack::Head, Rack::ConditionalGet, Rack::ETag, Warden::Manager]> # /usr/local/bundle/gems/railties-5.1.7/lib/rails/configuration.rb:76:in `+' # /usr/local/bundle/gems/railties-5.1.7/lib/rails/application.rb:525:in `build_middleware' # /usr/local/bundle/gems/railties-5.1.7/lib/rails/engine.rb:507:in `block in app' # /usr/local/bundle/gems/railties-5.1.7/lib/rails/engine.rb:504:in `synchronize' # /usr/local/bundle/gems/railties-5.1.7/lib/rails/engine.rb:504:in `app' # /usr/local/bundle/gems/railties-5.1.7/lib/rails/application/finisher.rb:45:in `block in <module:Finisher>' # /usr/local/bundle/gems/railties-5.1.7/lib/rails/initializable.rb:30:in `instance_exec' # /usr/local/bundle/gems/railties-5.1.7/lib/rails/initializable.rb:30:in `run' # /usr/local/bundle/gems/railties-5.1.7/lib/rails/initializable.rb:59:in `block in run_initializers' # /usr/local/bundle/gems/railties-5.1.7/lib/rails/initializable.rb:58:in `run_initializers' # /usr/local/bundle/gems/railties-5.1.7/lib/rails/application.rb:353:in `initialize!' # ./config/environment.rb:5:in `<top (required)>' # /usr/local/bundle/gems/activesupport-5.1.7/lib/active_support/dependencies.rb:292:in `require' # /usr/local/bundle/gems/activesupport-5.1.7/lib/active_support/dependencies.rb:292:in `block in require' # /usr/local/bundle/gems/activesupport-5.1.7/lib/active_support/dependencies.rb:258:in `load_dependency' # /usr/local/bundle/gems/activesupport-5.1.7/lib/active_support/dependencies.rb:292:in `require' # ./spec/rails_helper.rb:3:in `<top (required)>' # /usr/local/bundle/gems/activesupport-5.1.7/lib/active_support/dependencies.rb:292:in `require' # /usr/local/bundle/gems/activesupport-5.1.7/lib/active_support/dependencies.rb:292:in `block in require' # /usr/local/bundle/gems/activesupport-5.1.7/lib/active_support/dependencies.rb:258:in `load_dependency' # /usr/local/bundle/gems/activesupport-5.1.7/lib/active_support/dependencies.rb:292:in `require' # ./spec/models/cuisine_spec.rb:1:in `<top (required)>' # /usr/local/bundle/gems/activesupport-5.1.7/lib/active_support/dependencies.rb:286:in `load' # /usr/local/bundle/gems/activesupport-5.1.7/lib/active_support/dependencies.rb:286:in `block in load' # /usr/local/bundle/gems/activesupport-5.1.7/lib/active_support/dependencies.rb:258:in `load_dependency' # /usr/local/bundle/gems/activesupport-5.1.7/lib/active_support/dependencies.rb:286:in `load'/config/boot.rb:4:in `require': cannot load such file -- bootsnap/setup (LoadError)
Ruby2.7.2の状態でRailsを5.2.4.4にアップグレードしたあとの動作確認中に発生したエラー。
Rails5.2からbootsnapが導入されましたが、Gemfileに自動的にbootsnapが追記されず、自分で追記していなかったことが原因です。
Gemfileに下記のように追記することでエラーが解消しました。
導入されたことがわかるのはRailsDiffが、
bootsnapについてはbootsnapのせいでRails5.2とかが動かない人へ - Qiita
がわかりやすいです。Gemfilegem 'bootsnap', '>= 1.1.0', require: falseCan't resolve image into URL: undefined method `to_model'
Ruby2.7.2の状態でRailsを5.2.4.4にアップグレードしたあとの動作確認中に発生したエラー。
画像アップロード用のgemとしてcarrierwaveを使用しており、それに伴うエラーです。そのままググると全く同じ状況のエラー解決法があったので(ruby on rails - Carrierwave: Can't resolve image into URL: undefined method `to_model' - Stack Overflow)参考にしたところ解決しました。
ちなみにActiveStrageでも同じようなことが起こる場合があるみたいです(【Rails】ActiveStorageを用いた画像複数枚投稿のエラー - Qiita)
Migrations are pending. To resolve this issue, run: rails db:migrate RAILS_ENV=development
Ruby2.7.2のときに
Railsを 5.2.4.4から 6.0.3.4 にアップグレードした際に発生したエラーです。
このアップグレードにはどうやら標準で搭載されているActiveStrageに対してのDB設計の修正が行われており、
アップグレードした際にマイグレーションファイルが追加されています。
追加されたmigrationファイルをDBに反映させてあげればいいだけなので下記コマンドを実行することでエラーが解消されます。terminaldocker-compose run --rm web rails db:migrate最後に
Qiita初投稿のこの記事を書くのに何日費やしたのかわかりません(カウントしておけばよかった...)。
普段から引用して問題解決などしていますが、良記事を投稿している方の偉大さがとても身にしみました。参考リンクなどなど
- Ruby系のコマンドでits extensions are not built
- 個人開発アプリをDockerでコンテナ化してみた - アクトインディ開発者ブログ
- 永久保存版!?伊藤さん式・Railsアプリのアップグレード手順 - Qiita
- railsのバージョンを確認しただけなのにWarningがでた件 - helen's blog
- emsk/bundle_outdated_formatter: Formatter for
bundle outdatedcommand- RubyGem のバージョンを決める時は Semantic Versioning に従おう - yu8mada
- Ruby - Ruby on Railsがアップグレードされない|teratail
- ダウンロード(Ruby公式)
セマンティック・バージョニングと、Gemfileのバージョン指定方法 - Gemfileでよく見る
~>を使いこなす - Qiita
- 投稿日:2021-02-13T23:20:14+09:00
[Rails] 新規登録画面のめっちゃシンプルなレイアウトテンプレート作ってみた [コード載ってます]
GOAL
※devise使ってます。
※bootstrap4使ってます。導入方法はこちらをどうぞ。
HTML
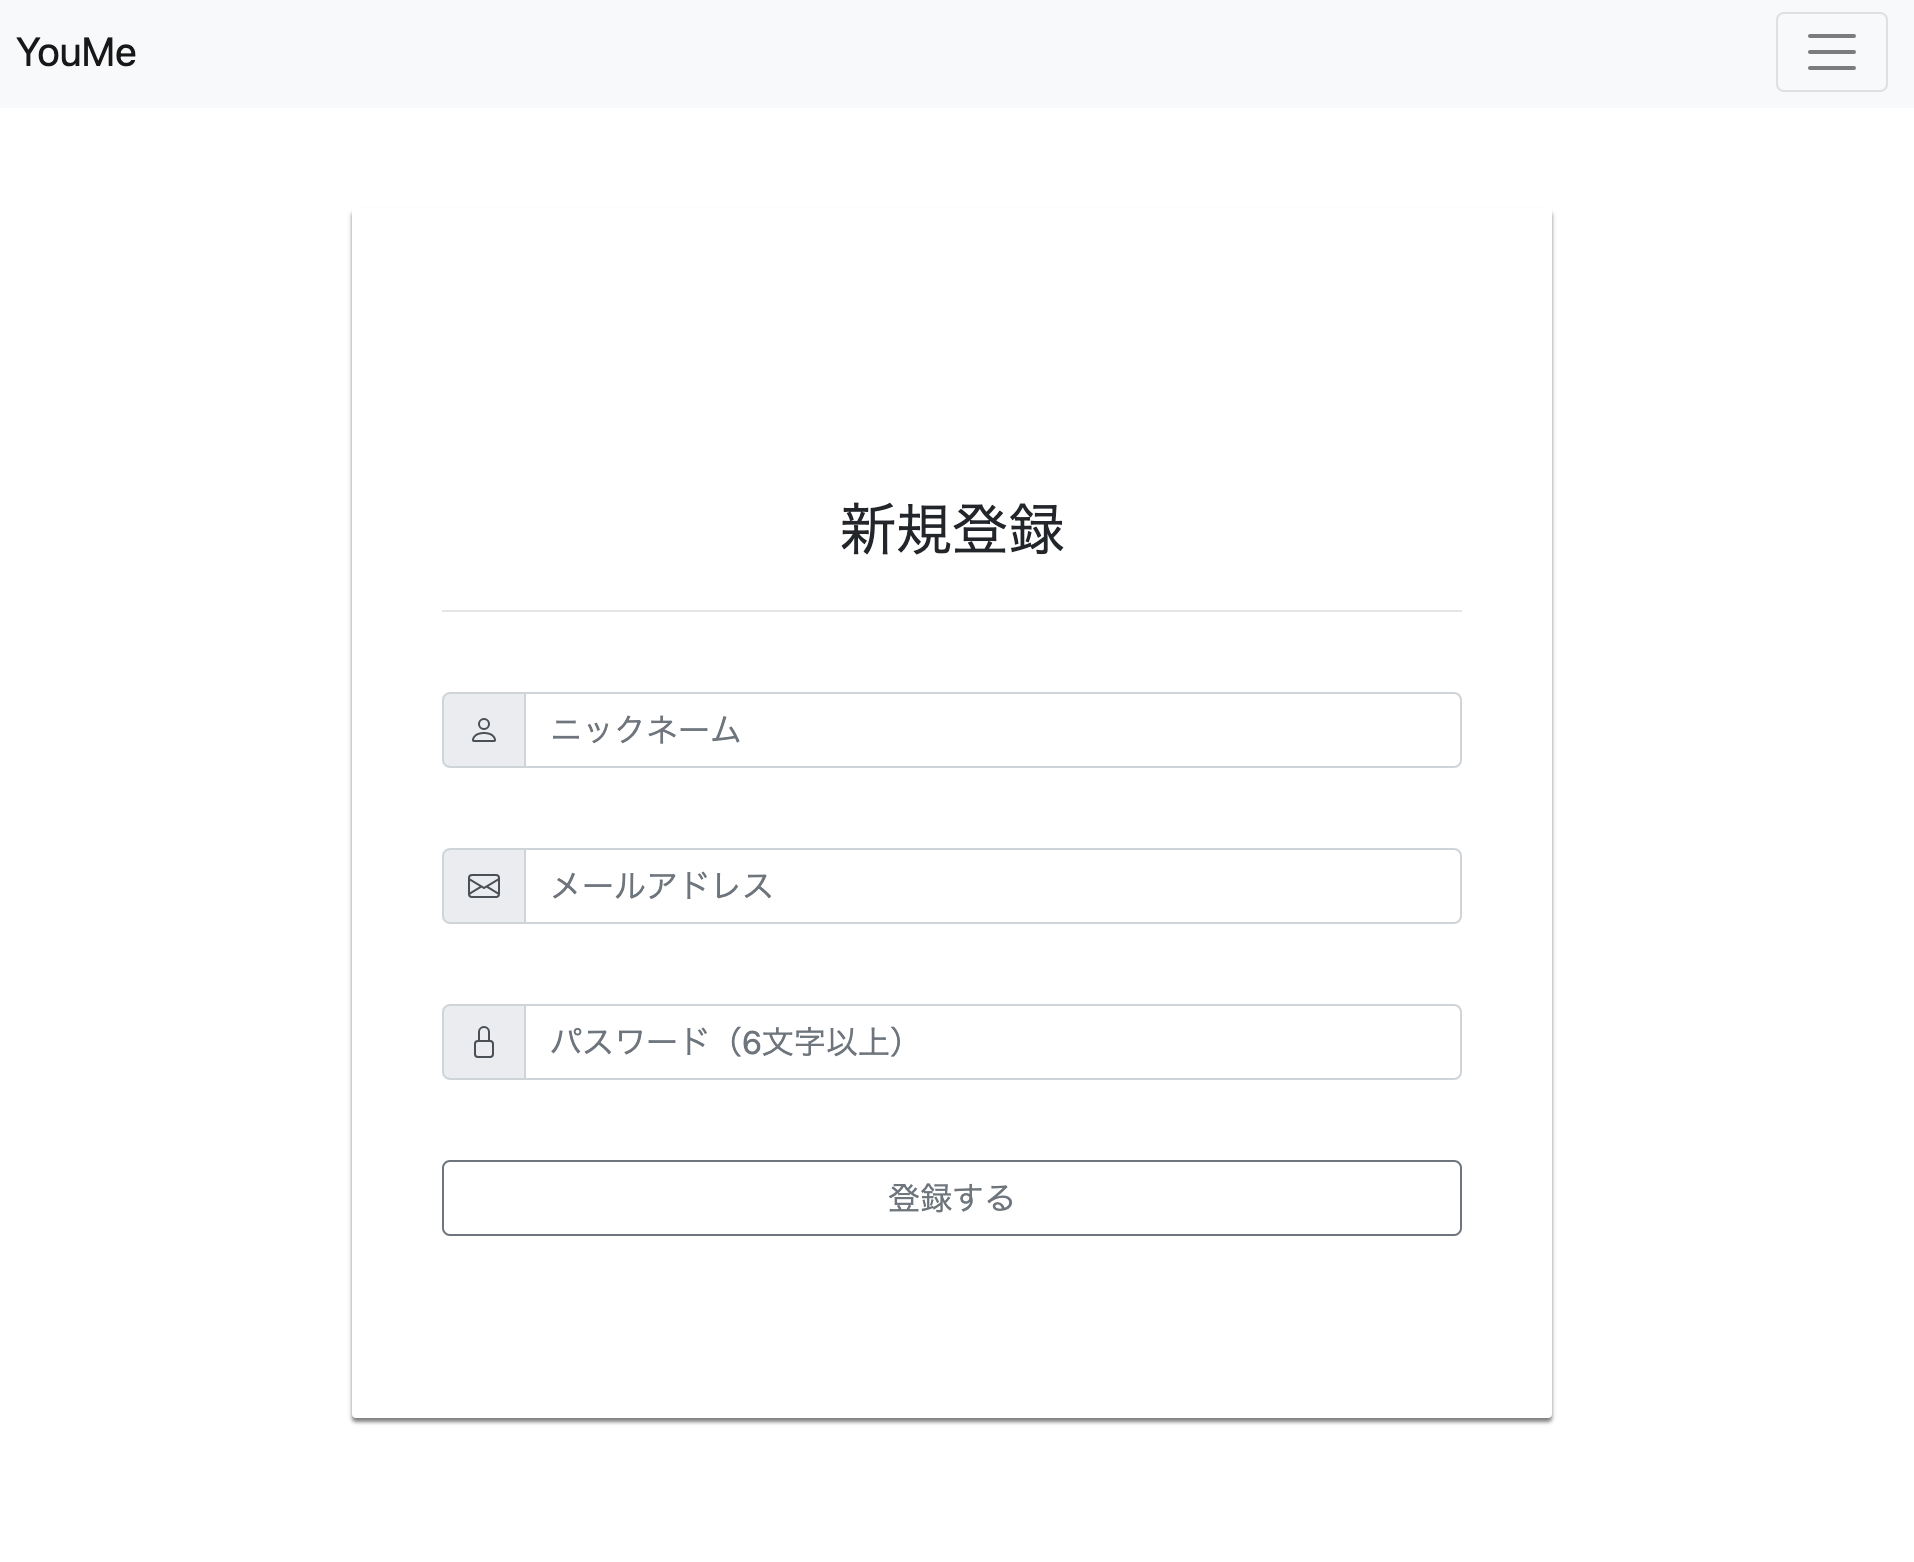
app/views/devise/registrations/new.html.erb<%= render 'articles/header' %> ? これはNavbarです <%= form_with model: @user, url: user_registration_path do |f| %> <%= render "devise/shared/error_messages", resource: resource %> <div class="container"> <div class="card-container"> <div class="card-body"> <h3 class="card-title text-center mb-4 mt-1">新規登録</h3> <hr> <form> <div class="form-group"> <div class="input-group"> <div class="input-group-prepend"> <span class="input-group-text"> <svg xmlns="http://www.w3.org/2000/svg" width="16" height="16" fill="currentColor" class="bi bi-person" viewBox="0 0 16 16"> <path d="M8 8a3 3 0 1 0 0-6 3 3 0 0 0 0 6zm2-3a2 2 0 1 1-4 0 2 2 0 0 1 4 0zm4 8c0 1-1 1-1 1H3s-1 0-1-1 1-4 6-4 6 3 6 4zm-1-.004c-.001-.246-.154-.986-.832-1.664C11.516 10.68 10.289 10 8 10c-2.29 0-3.516.68-4.168 1.332-.678.678-.83 1.418-.832 1.664h10z"/> </svg> </span> </div> <%= f.text_field :nickname, class: "form-control", placeholder: "ニックネーム", type: "nickname" %> </div> <!-- input-group.// --> </div> <!-- form-group// --> <div class="form-group"> <div class="input-group"> <div class="input-group-prepend"> <span class="input-group-text"> <svg xmlns="http://www.w3.org/2000/svg" width="16" height="16" fill="currentColor" class="bi bi-envelope" viewBox="0 0 16 16"> <path d="M0 4a2 2 0 0 1 2-2h12a2 2 0 0 1 2 2v8a2 2 0 0 1-2 2H2a2 2 0 0 1-2-2V4zm2-1a1 1 0 0 0-1 1v.217l7 4.2 7-4.2V4a1 1 0 0 0-1-1H2zm13 2.383l-4.758 2.855L15 11.114v-5.73zm-.034 6.878L9.271 8.82 8 9.583 6.728 8.82l-5.694 3.44A1 1 0 0 0 2 13h12a1 1 0 0 0 .966-.739zM1 11.114l4.758-2.876L1 5.383v5.73z"/> </svg> </span> </div> <%= f.email_field :email, autofocus: true, autocomplete: "email", class: "form-control", placeholder: "メールアドレス", type: "email" %> </div> <!-- input-group.// --> </div> <!-- form-group// --> <div class="form-group"> <div class="input-group"> <div class="input-group-prepend"> <span class="input-group-text"> <svg xmlns="http://www.w3.org/2000/svg" width="16" height="16" fill="currentColor" class="bi bi-lock" viewBox="0 0 16 16"> <path d="M8 1a2 2 0 0 1 2 2v4H6V3a2 2 0 0 1 2-2zm3 6V3a3 3 0 0 0-6 0v4a2 2 0 0 0-2 2v5a2 2 0 0 0 2 2h6a2 2 0 0 0 2-2V9a2 2 0 0 0-2-2zM5 8h6a1 1 0 0 1 1 1v5a1 1 0 0 1-1 1H5a1 1 0 0 1-1-1V9a1 1 0 0 1 1-1z"/> </svg> </span> </div> <%= f.password_field :password, autocomplete: "new-password", class: "form-control", placeholder: "パスワード(6文字以上)", type: "password" %> </div> <!-- input-group.// --> </div> <!-- form-group// --> <div class="form-group"> <%= f.submit "登録する", class: "btn btn-outline-secondary btn-block" %> </div> <!-- form-group// --> </form> </div> </div> </div> <% end %>CSS
app/assets/stylesheets/user.css.card-container { max-width: 600px; padding: 40px 40px; } .card-body { padding: 20px 25px 30px; margin: 0 auto 25px; margin-top: 100px; } .card-container { margin: 0 auto; padding: 20px 25px 30px; margin: 0 auto 25px; margin-top: 50px; -moz-box-shadow: 0px 2px 2px rgba(0, 0, 0, 0.3); -webkit-box-shadow: 0px 2px 2px rgba(0, 0, 0, 0.3); box-shadow: 0px 2px 2px rgba(0, 0, 0, 0.5); } .form-group { margin-top: 40px; }
- 投稿日:2021-02-13T23:17:35+09:00
Redmine パッチ会 #8 に参加しました
この記事はなに?
Redmineパッチ会オンライン #8 に参加しました。どんな感じだったのか? を書いていきます。
きっかけ
今のプロジェクトで、Bitnami Redmine 4.1.1 の利用を始めています。運用手順書を書いているうちに、あれっ、これ不具合っぽいな? と思ったことが何度かありました。でも、RubyもRailsも全然触ったことないし、一人でソースコード読んだりパッチ書いたりなんかできそうにない、なにか足がかりがほしいな、と思っていて、えいっと参加してみました。
過去にはtracというチケット管理システムを使っていて、ちょっとしたプラグインを作ったりしてました。また、6年前になるのですが、Redmine_LDRize というプラグインを作ったりしてました。ですが、Redmine本体を見るのは始めての機会です。
チーム編成まで
Github上の「redmineパッチ会」にある段取りですすみます。
オンライン会議ツールはDiscordでした。全体の流れは、まず自己紹介と近況を共有したあと、なにをやろうか相談で決めて、チームに分かれて作業し、最後にまた集まって状況を共有する、といった感じです。今回(第8回)は、2月13日(土)13:00に開始、14:00ごろから16:30までチーム作業、まとめは15分ほど延長して17:15に終了しました。自己紹介のとき「不具合っぽいものを二つ見つけたんだけど、バグかどうかわからなくて」なんて話をしたところ、取り組むネタ候補に入れてもらえました。
いくつかの取り組み候補のなかから、「既存パッチをレビューする」「プロジェクト公開権限を追加する」「不具合っぽいものを掘ってバグチケ化+対応」の3テーマをすすめることになりました。チーム1: 既存パッチレビュー
私が参加したチームでは「本家のIssueにパッチが投稿されているにも関わらず、レビューされてなくて塩漬けになっているケースがある。本体に取り込んで問題なさそうか、それとも直すべき点があるか、レビューコメントをつける」というテーマに取り組みました。ふだんからRailsやRedmineソースと向き合っているお二人とともに、#30121: Projects API should return only trackers, visible to the user をとりあげました。
「APIでプロジェクト属性を取得した際、閲覧権限を持っているトラッカーのみが表示されるべし」という内容です。Webのプロジェクト設定画面では表示されないのですが、API経由だと、閲覧権限を持っていないものも含めてどんなトラッカーがあるのかが返されていました。
まず、パッチを当てていない状態で事象が再現するか確認し、Issueに貼られたパッチを当てて、事象が解決するかを確認します。問題がなければ、LGTM (Looks Good To Me; いいと思うよ) というコメントを付ける、ということをやります。
VS Code Live Share でソースコードを共有しながら議論しようとしたのですが、うまく接続できず、結局、Discordの画面を共有していただきながらの作業となりました。パッチ適用前で事象を再現させます。最初、権限をどこで指定するのかわからずに設定画面を探し回り、ようやく「設定→ロールと権限」からロールを選択した画面の下のほうにあるのを発見しました。たしかに再現する。次に、パッチを適用して、さあ解決、を確認しようとしたのですが、解決していませんでした。あれれー。何度やってもダメです。
「非メンバー」「匿名ユーザー」の権限が効いちゃってるんじゃないか、と、このへんの権限もいろいろ変更してみたのですが、どうも意図したとおりに反映されません。どうもおかしい。でも、パッチに同梱されたテストはちゃんと動いている。テストコードも読んだけれど、問題はなさそう。なにかがおかしい。でも、なにがおかしい?
いったん休憩を挟んで頭を冷やしたあと、私が、Web経由とAPI経由で同じメソッドを使っていれば動作は同じになるはずですよね、比較してみませんか? と質問してみました。さっそくソースを読んで、ココと、ココ。ちょっと違うけど、だいたい同じになるようなパッチになってるね、ということを確認しました。
同じころ、同じチームの人がふと「これってもしかして匿名ユーザとしてテストしてない?」と指摘をしてくれまして。確かにユーザ認証通れていなかった。で、ちゃんとユーザ認証したうえでテストしたら、期待通りのテストになってました。LGTMです!
ちょっと気になったので「参照するときについてはLGTMですが、更新する場合はどうでしょうか、大丈夫ですかね?」と質問してみたら、さっそくテストコードを書いてくれて、動作確認をしたら、うーん、やっぱり直感とは異なる動作をする。ひきつづきソースを掘り返して、えーと、ここがこうなってるから、ここを通って、たしかになんか直感と異なるねぇ、ふむふむ、なるほどー。という感じです。
VS Code の Live Share はうまくつながりませんでしたが、Discordで画面共有しながら、がっっつりとモブプログラミングを経験させてもらえました。最終的には目標としていたとおり、Redmine.org に LGTMとコメント することもできました。(名前まで入れてもらった。OSS活動っぽい!!)
チーム3: 不具合のバグチケ化+対応
チーム1が30分を残して一段落したので、チーム3になだれ込みました。「活動タブのIssueの一番古い履歴のステータスが最新のそれと同じになる問題」に対応していただいていました。
途中からだったのですが、チーム1と同様、Discordで画面共有しながら、みんなでソースを読んでいました。外形的にはこのテーブルのここを表示している、それを実装しているのはコードのこの部分だ、これってどういう意味? とかいう議論をしていました。がっつりソースを読んでいる、すっっごく面白い!!
残念ながら、残り30分ではパッチを書ききることまではできなかったのですが、「もしかして、これってバグなのかな? 違うかな?」というぼんやりした認識が、みんなでソースを読むことで「たしかにヘンだ、これはissue相当だ。redmine.orgには該当するissueはなさそう。新たにissueを作成してよさそう」という認識になれたのは、個人的にはとてもうれしかったです。
参加してみて
13時~17時の4時間ちょっとでしたが、とても有意義な時間でした。私はRubyに慣れていないので、見て感心することと、モブプロしている人の発言をメモし続けること、ちょっとした気づきを発言するくらいしかできなかったのですが、それでも、とてもいい経験になりました。一人ではできないことも、チームで取り組めば、なんとかなるかも!! というう手応えがありました。ソースを読む、とてもいいきっかけをもらえたような気がします。
これからも少しずつですが貢献してきたいとおもいます。よろしくお願いしますm(__)m
学び・参照
- trunk環境のRedmineを動かす
- パッチを当てて動作を確認する
- デバッガで挙動を追いかける
テストコードを書いて、GitHubのCI (Github Actions)で確認する
connpassのイベントページ:https://redmine-patch.connpass.com/event/201730/
スクラップブック:redmine-patch/第8回
- 投稿日:2021-02-13T21:38:28+09:00
【Railsチュートリアル】第7章 ユーザー登録①
第7章 ユーザー登録
はじめに
本章の目的
- ユーザー登録機能の追加
- HTML フォームを使ってWebアプリケーションに登録情報を送信
- ユーザーを新規作成して情報をデータベースに保存
- ユーザーを表示するためのページを作成
- 統合テストに対して、 いくつかのテストを追加
7.1 ユーザーを表示する
本節では、ユーザーの名前とプロフィール写真を表示するためのページを作成していく。
ユーザープロフィールページの最終的な目標は、ユーザーのプロフィール写真と基本ユーザーデータ、そしてマイクロポストの一覧を表示すること。7.1.1 デバッグとRails環境
レイアウトにデバッグ情報を追加する。
app/views/layouts/application.html.erb#もしRails.env.development(development=開発環境)だったらデバッグ情報を表示せよ <%= debug(params) if Rails.env.development? %>演習 1
ブラウザから /about にアクセスし、デバッグ情報が表示されていることを確認してください。このページを表示するとき、どのコントローラとアクションが使われていたでしょうか?paramsの内容から確認してみましょう。
debug_info--- !ruby/object:ActionController::Parameters parameters: !ruby/hash:ActiveSupport::HashWithIndifferentAccess controller: static_pages action: about permitted: falseコントローラ: static_pages, アクション: about
演習 2
Railsコンソールを開き、データベースから最初のユーザー情報を取得し、変数userに格納してください。その後、puts user.attributes.to_yamlを実行すると何が表示されますか? ここで表示された結果と、yメソッドを使ったy user.attributesの実行結果を比較してみましょう。
console>> user = User.first (3.6ms) SELECT sqlite_version(*) User Load (3.4ms) SELECT "users".* FROM "users" ORDER BY "users"."id" ASC LIMIT ? [["LIMIT", 1]] => #<User id: 1, name: "Michael Hartl", email: "michael@example.com", created_at: "2021-02-09 06:34:49", updated_at: "2021-02-09 06:34:49", password_digest: [FILTERED]> >> puts user.attributes.to_yaml --- id: 1 name: Michael Hartl email: michael@example.com created_at: !ruby/object:ActiveSupport::TimeWithZone utc: &1 2021-02-09 06:34:49.836041000 Z zone: &2 !ruby/object:ActiveSupport::TimeZone name: Etc/UTC time: *1 updated_at: !ruby/object:ActiveSupport::TimeWithZone utc: &3 2021-02-09 06:34:49.836041000 Z zone: *2 time: *3 password_digest: "$2a$12$c6TWZz21VWw7m8bDorgz9uR3XMXaWbMdtzmV.r6krzwzy59OmF7gO" => nil >> y user.attributes --- id: 1 name: Michael Hartl email: michael@example.com created_at: !ruby/object:ActiveSupport::TimeWithZone utc: &1 2021-02-09 06:34:49.836041000 Z zone: &2 !ruby/object:ActiveSupport::TimeZone name: Etc/UTC time: *1 updated_at: !ruby/object:ActiveSupport::TimeWithZone utc: &3 2021-02-09 06:34:49.836041000 Z zone: *2 time: *3 password_digest: "$2a$12$c6TWZz21VWw7m8bDorgz9uR3XMXaWbMdtzmV.r6krzwzy59OmF7gO" => nil同じ
7.1.2 Usersリソース
ユーザー情報をWebアプリケーション上に表示する。
RESTアーキテクチャ
* データの作成、表示、更新、削除をリソース(Resources)として扱う。
* HTTP標準には、これらに対応する4つの基本操作(POST、GET、PATCH、DELETE)を各アクションに割り当てていく。ユーザーをリソースとみなす
= id=1のユーザーを参照する
= "/users/1というURLに対してGETリクエストを発行する"config/routes.rbresources :users #この行を追加するユーザーのURLを生成するための多数の名前付きルート(5.3.3)と共に、RESTfulなUsersリソースで必要となるすべてのアクションが利用できるようになる
演習 1
埋め込みRubyを使って、マジックカラム(created_atとupdated_at)の値をshowページに表示してみましょう(リスト 7.4)。
app/views/users/show.html.erb<%= @user.name %>, <%= @user.email %>, <%= @user.created_at %>, <%= @user.updated_at %>演習 2
埋め込みRubyを使って、Time.nowの結果をshowページに表示してみましょう。ページを更新すると、その結果はどう変わっていますか? 確認してみてください。
Michael Hartl, michael@example.com, 2021-02-09 06:34:49 UTC, 2021-02-09 06:34:49 UTC, 2021-02-12 23:11:30 +0900
(更新後)
Michael Hartl, michael@example.com, 2021-02-09 06:34:49 UTC, 2021-02-09 06:34:49 UTC, 2021-02-12 23:11:53 +0900更新をかけると、表示時間も更新される。
7.1.3 debuggerメソッド
debuggerメソッドを使う。
演習 1
showアクションの中にdebuggerを差し込み(リスト 7.6)、ブラウザから /users/1 にアクセスしてみましょう。その後コンソールに移り、putsメソッドを使ってparamsハッシュの中身をYAML形式で表示してみましょう。ヒント: 7.1.1.1の演習を参考にしてください。その演習ではdebugメソッドで表示したデバッグ情報を、どのようにしてYAML形式で表示していたでしょうか?
console(byebug) p = params <ActionController::Parameters {"controller"=>"users", "action"=>"show", "id"=>"1"} permitted: false> (byebug) puts p.to_yaml --- !ruby/object:ActionController::Parameters parameters: !ruby/hash:ActiveSupport::HashWithIndifferentAccess controller: users action: show id: '1' permitted: false nil演習 2
newアクションの中にdebuggerを差し込み、/users/new にアクセスしてみましょう。@userの内容はどのようになっているでしょうか? 確認してみてください。
console[1, 10] in /home/vagrant/work/sample_app2/app/controllers/users_controller.rb 1: class UsersController < ApplicationController 2: 3: def show 4: @user = User.find(params[:id]) 5: end 6: 7: def new 8: debugger => 9: end 10: end (byebug) @user nil7.1.4 Gravatar画像とサイドバー
* 各ユーザーのプロフィール写真のあたりをもう少し肉付けし、サイドバーも作り始める。
* Gravatar(Globally Recognized AVATAR)をプロフィールに導入する。app/views/users/show.html.erb<% provide(:title, @user.name) %> <h1> #gravatar_forヘルパーメソッドを使い@userのプロフィール画像を表示せよ <%= gravatar_for @user %> # @userのnameを表示 <%= @user.name %> </h1>console$ rails console >> user = User.first >> user.update(name: "Example User", ?> email: "example@railstutorial.org", ?> password: "foobar", ?> password_confirmation: "foobar") => trueemailでGravatar上とRailsチュートリアルのロゴを既に紐付けてある。
app/views/users/show.html.erb<% provide(:title, @user.name) %> <div class="row"> <aside class="col-md-4"> <section class="user_info"> <h1> <%= gravatar_for @user %> <%= @user.name %> </h1> </section> </aside> </div>演習 1
(任意)Gravatar上にアカウントを作成し、あなたのメールアドレスと適当な画像を紐付けてみてください。メールアドレスをMD5ハッシュ化して、紐付けた画像がちゃんと表示されるかどうか試してみましょう。
- Gravatar
- サイト下部の「Gravatarを作成」をクリック
- アカウント開設
- プロフィールの画像を変更
Rails consoleでuserにGravatarのメールアドレスをupdaterails s -b 0.0.0.0で確認。変更されていました。演習 2
7.1.4で定義したgravatar_forヘルパーをリスト 7.12のように変更して、sizeをオプション引数として受け取れるようにしてみましょう。うまく変更できると、gravatar_for user, size: 50といった呼び出し方ができるようになります。重要: この改善したヘルパーは10.3.1で実際に使います。忘れずに実装しておきましょう。
実装のみなので省略。
演習 3
オプション引数は今でもRubyコミュニティで一般的に使われていますが、Ruby 2.0から導入された新機能「キーワード引数(Keyword Arguments)」でも実現することができます。先ほど変更したリスト 7.12を、リスト 7.13のように置き換えてもうまく動くことを確認してみましょう。この2つの実装方法はどういった違いがあるのでしょうか? 考えてみてください。
動作確認のみなので省略。
コードが完結になるだけだろうか?
- 投稿日:2021-02-13T21:23:20+09:00
Rails:モデルの命名規則を破ったらエラーが出ました【NameError】【uninitialized constant】
Rails:モデルの命名規則を破ったらエラーが出ました【NameError】【uninitialized constant】
エラー画面
エラー説明
uninitialized constant:「定義したクラスを読むことができないよ」
(Railsでは定数やclassが定義されていないという意味のエラー)
NameError:「そんな名前は定義されてないよ」
(定義されていないローカル変数やメソッドが呼び出されている場合に、発生するRubyのエラー)原因
classの命名規則が正しくできていなかった
誤:「Deliver_fee」
正:「DeliverFee」RailsのDBモデルの命名規則
単語が1つの場合
例)モデルの名前が「Deliver」
モデル名:deliver
モデルクラス名:Deliver
ファイル名:deliver.rb
テーブル名:delivers単語が複数の場合
例)モデル名が「Deliver Fee」
モデル名:deliver fee
モデルクラス名:DeliverFee
ファイル名:deliver_fee.rb
テーブル名:deliver_fees
Railsは命名規則がきっちりしているので、ファイル名を命名規則に従わせないとファイルが見つからないとエラーが出てしまうようです。
気をつけましょう。以上です。
- 投稿日:2021-02-13T19:42:40+09:00
【Ruby on Rails】返すデータに制限をかけたりかけなかったりするために、七つのアクション以外を定義するのはやめよう...
なぜ書くか
これまたコードレビューの際にご指摘いただきました。
備忘録と、コツコツとプロの開発者としての思考を身につけるためにアウトプットさせていただきます。脱「動けばいい」精神
まず、前提としては、RailsはApiでのやり取り専用のコントローラ。
iOSアプリケーションからリクエストを受け取り、それぞれのリクエストに応じた処理が実行されます。実際に問題となった機能を実装する前は、コントローラは下記の様な状態でした。(コードは多少変更しています。)
module Api
  module V1
    class ProductController < ::Api::ApplicationController
      protect_from_forgery except: [:create]

      def index
        render json: Product.trader_filter(params[:trader_id])
      end

      def create
        render json: Product.new(product_params).save
      end

      private

      def product_params
        params.permit(:name, :price)
      end
    end
  end
end
しかしここでiOS側でのとあるページの都合で「その日、当日分の商品情報だけ欲しいな...」といったことが発生しました。(なんの当日分かは置いといて)
すかさず、Railsアプリケーションのコードを追加し、書いたコードは下記の様なコードです。module Api module V1 class ProductController < ::Api::ApplicationController protect_from_forgery except: [:create] def index render json: Product.trader_filter(params[:trader_id]) end def create render json: Product.new(product_params).save end def acquisition_of_product_data_on_the_day render json: Product.trader_release_date_filter(params[:trader_id], params[:release_date]) end private def product_params params.permit(:name, :price) end end end endルーティングにコレクションを使用し、七つのアクション以外のアクションを定義し、コントローラでモデルのスコープを呼び出しています。
この時は「もうindexは使っちゃってるしなぁ」と安直にアクションを追加し、これでいいと思っていました。しかし、先輩にレビュー依頼出したところ、ここが指摘されました。
理由としては、検索条件を追加するたびにいちいちアクションを追加していたら、コントローラのメソッドの数がえげつないことになり、いわゆる「fat Controller」になってしまいメンテナンスが難しくなってしまうということでした。
まさに「動くからええやん...」気分で書いたコードでした。
しかし実際に本当にその通りで、検索の内容が変わるたびに「get」のリクエストを増やしまくっていたのでは、いつか維持できなくなります。
「将来的にも追加はそこまでないからいいのでは?」と思ったりもしたのですが、とにかく同じようなメソッドを何個もコントローラーに書くのはスマートではないと。ではどうするか?
本来コントローラは左から右へ処理、命令を流すだけの役割です。
なので、当日分のデータを返したいのかそうでないのか?といったこともコントローラに考えさせるべきではありません。なのでindexで、全体取得、本日分のみの取得のリクエストも受け取り、モデルに判断させます。
module Api
  module V1
    class ProductController < ::Api::ApplicationController
      protect_from_forgery except: [:create]

      def index
        render json: Product.trader_filter(params[:trader_id], params[:release_date])
      end

      def create
        render json: Product.new(product_params).save
      end

      private

      def product_params
        params.permit(:name, :price)
      end
    end
  end
end
最初との違いは、indexメソッドに渡すparamsの中身を追加しただけです。つまり取得したい日付のデータですね。
そしてモデルのスコープは以下のように実装します。
scope :trader_filter, ->(trader_id, release_date) do
  if release_date.nil?
    #全件検索の処理
  else
    #当日分のデータ取得の処理
  end
end
これで、コントローラにアクションを増やすことなく、同じ動きを実現できました。
コントローラから、スコープを見に行くだけで、どのようなデータを返すようになっているかも一発で分かるので可読性もこちらの方が高いと思います。
- 投稿日:2021-02-13T19:20:31+09:00
ターミナル上でローカルサーバーを動かせなくなったとき
rubyメモ
Address already in use - bind(2) for "127.0.0.1" port 3000 (Errno::EADDRINUSE)
というポート3000がすでに使われているというエラーがターミナル上で出現した。原因はよくわかっていない。
%lsof -i:3000
でポート3000を使用しているプロセスを発見。
ruby    61207 nakagawasoma   11u  IPv6 0x16e108863b855d9d      0t0  TCP localhost:hbci (LISTEN)

ruby    61207 nakagawasoma   12u  IPv4 0x16e108864520de8d      0t0  TCP localhost:hbci (LISTEN)

ruby    61207 nakagawasoma   17u  IPv6 0x16e10886446ae3fd      0t0  TCP localhost:hbci->localhost:61780 (CLOSE_WAIT)

ruby    61207 nakagawasoma   18u  IPv6 0x16e10886446af0bd      0t0  TCP localhost:hbci->localhost:61778 (CLOSE_WAIT)
killコマンドを使い実行中のプロセスを削除
%kill -9 61207
lsof -i:3000でもう一度確認し、完了。
- 投稿日:2021-02-13T19:07:28+09:00
[Rails]gretelとパンくず(パンくずリストの作り方)
何を書くのか
railsのgem "gretel"を用いたパンくずリストの作り方
環境
Rails: 6.0.3.4
Ruby: 2.6.5結論
gretelの力でパンくずを作成し、それをビューで表示する。
パンくずリストとは
こういう風に、ヘッダーなどに「今どこどこにいますよ!」っていう表示を見た事があるでしょうか。これをパンくずリストと言います。今回は、これを作成していきます。
gretelの導入
今回使うのは、gemのgretelです。
gretelのGithub最初に、gretelの導入を行います。
Gemfileに記述し、bundle installします。
gem "gretel"と、記述し、ターミナルで
$ bundle installを実行します。
そしたらターミナルでこちらのコマンドを実行しましょう。
rails g gretel:installこれを実行すると、"breadcrumbs.rb"というファイルが生成されます。
ファイルの中は、こんな感じになっているかと思います。breadcrumbs.rbcrumb :root do link "Home", root_path end # crumb :projects do # link "Projects", projects_path # end # crumb :project do |project| # link project.name, project_path(project) # parent :projects # end # crumb :project_issues do |project| # link "Issues", project_issues_path(project) # parent :project, project # end # crumb :issue do |issue| # link issue.title, issue_path(issue) # parent :project_issues, issue.project # end # If you want to split your breadcrumbs configuration over multiple files, you # can create a folder named `config/breadcrumbs` and put your configuration # files there. All *.rb files (e.g. `frontend.rb` or `products.rb`) in that # folder are loaded and reloaded automatically when you change them, just like # this file (`config/breadcrumbs.rb`).これが確認できれば、準備は完了です。
breadcrumbs.rbの中身を作る
それでは、ここからはパンくずリストの中身、つまり表示する文字列だったりを決めます。
ここでは、gretelの公式で紹介されている例を参考に説明します。breadcrumbs.rb#トップページ crumb :root do link "Home", root_path end # 一覧表示ページ crumb :issues do link "All issues", issues_path end # 詳細表示ページ crumb :issue do |issue| link issue.title, issue parent :issues end説明を加えます。
breadcrumbs.rblink "Home", root_path基本の型は、'link "表示する文字列", パス'です。それを
breadcrumbs.rbcrumb :root do link "Home", root_path endのように、do~endで囲ってあげます。
ちなみに、:rootは、ビューの表示等で利用することになるので、自分が判断しやすい名称に設定しておきましょう。また、こういうこともできます。
breadcrumbs.rb#詳細表示ページ crumb :issue do |issue| link issue.title, issue parent :issues end詳細表示ページには、parent :issuesとあります。これは、「issuesを親に持つよ!」ということを示しています。
これがないと、ページ間のつながりを判断してもらえず、意味がなくなってしまいます。ビューに表示する
それでは、先ほど作ったパンくずリストの要素等を、ビューで表示していきます。
この例では、app/views/issues/show.html.erbを例にだします。
issues/show.html.erb<% breadcrumbs :issue, @issue> <%= breadcrumbs separator: " › " %> <%# 矢印を示すオプション %>基本的に、表示に必要なのは、この二つだけです。1行目で、(コントローラーから送られてきた)@issueを、先ほどcrumbの後ろにシンボルで記述した:issueのバリューとして定義します。あとは、自由にオプションをつけて、完成です。
補足
これは、初歩中の初歩です。公式Githubにはいろいろなオプションが確認できるので、ここからはそちらを参考してください。
最後に
最後まで読んでいただき、ありがとうございます。
ソースコード、記事の書き方について「もっとこうしたほうがいいよ!」というご意見、「そこどうなっているの?」というご質問など、お待ちしております。参考文献
- 投稿日:2021-02-13T18:35:43+09:00
sourceコマンドによるエラー
はじめに
オリアプの新規登録やログインなどにSNS認証を用いる実装を行おうとした際に予想外のエラーが発生したので、備忘録として載せておこうと思う。
結論として、今回のエラーはsourceコマンドに対しての知識不足が原因だった。1.エラー発生
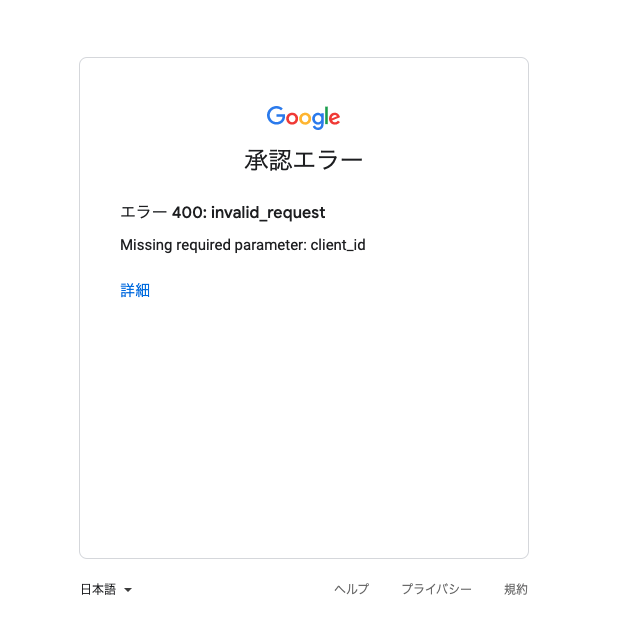
SNS認証の実装を行う中で、以下のエラーが発生した。
エラー内容としてはclient_idがないよというエラー。
2.エラー原因と解決
色々なサイトで原因と解決法を調べたが、なかなか解決することが出来なかった。
その中であるサイトに以下のようなことが記載されていた。
『複数タブを開いており、rails sをしているタブでsourceコマンドを入力していなかったためでした。』もしかして、これが原因か?と思い、sourceコマンドで環境変数を設定したタブでrails sをしてみたら…
無事解決!!!
今回学んだことは
ターミナルで複数のタブを開いている時に片方のタブでsourceコマンドで何かを設定しても、もう片方のタブに反映されない。
→タブごとに異なるzshが並列に起動しており、あるタブのzshでsourceした結果は並列して起動している別のタブのzshへは反映されない。
なので設定していないタブでもsource ~/.zshrcをしないといけない。最後に
原因を解決するまでは記述したコードが間違っているんだろうとしか考えておらず、なかなかエラーを解決することが出来なかった。
今回のエラーは自分が予想していない箇所に原因があり、そういった箇所に目を向けていなかった。
今後はここに原因があるのだろうといった決めつけをせず、もっと柔軟に原因を探る必要があると実感した。参考
- 投稿日:2021-02-13T18:10:23+09:00
【Rails】Zeitwork::NameError を解消する
1.はじめに
railsでアプリを作成し、サーバーを立ち上げ
rails sを行い、http://localhost:3000/XXにアクセスしました。
すると、Zeitwork::NameErrorと表示されました。2.使用環境
・mac.os バージョン10.15.6
・Ruby 2.6.6
・Rails 6.0.3.5
・psql (PostgreSQL) 12.63.実際のエラー
太字に着目するとPostsContrlllerの定義が変という旨が書かれていますね。
4.結論:スペルミスでした
ということで
Postscontrollerクラスの記述をしているposts_controller.rbを確認すると...posts_controller.rbclass Postcontroller < ApplicationController def index @posts = Post.all end end2箇所も間違えておりました。(下記が正しいものです。)
posts_controller.rbclass PostsController < ApplicationController def index @posts = Post.all end end5.まとめ:スペルミス気をつけます
とは言え、Rails6.0で新たに導入された
Zeitworkモードについて学ぶ良い機会となりました。6.参考リンク
Railsガイド-定数の自動読み込みと再読み込み (Zeitwerk)
7.最後に
記事の感想や意見、ご指摘等あれば伝えていただけるとありがたいです。
読んでいただき、ありがとうございました。
- 投稿日:2021-02-13T17:33:44+09:00
deviseのform_for をform_with に書き換える。
- 投稿日:2021-02-13T17:25:22+09:00
Deviseのログイン・ログアウト後に転送するURLを変更する
以下のように
after_sign_in_path_for、after_sign_out_path_forをオーバーライドします。
調べてるとapplicationControllerに追加するという記事ばかりで、複数のアカウントを扱う場合に制御しにくいなと(UserとAdminとか)。
SessionControllerに記述してあげましょう。
stored_location_forを書いておくと、フレンドリーフォワーディング(ログイン画面に転送されるまえにリクエストしたページへリダイレクト)にも対応します。class Hoge::SessionsController < Devise::SessionsController # 以下を追加 def after_sign_in_path_for(resource_or_scope) stored_location_for(resource_or_scope) || customized_root_path end def after_sign_out_path_for(resource) new_hoge_session_path end end参考
ソースのコメントに
Method used by sessions controllerって書いてますな。
- 投稿日:2021-02-13T16:42:04+09:00
【Rails】rails s したらAddress already in useのエラーが出たので解消する
1.はじめに
railsでアプリを作成し、サーバーを立ち上げ
rails sを行い、動作確認を試みました。
すると、Address already in useと表示されました。私:「
http://localhost:3000複数立ち上げてないはずだけど...」
複数回このエラーに遭遇したため、備忘録も兼ねてまとめていきます。2.使用環境
・mac.os バージョン10.15.6
・Ruby 2.6.6
・Rails 6.0.3.5
・psql (PostgreSQL) 12.63.実際のエラー
ターミナル.1: from /Users/hogehoge/.rbenv/versions/2.6.6/lib/ruby/gems/2.6.0/gems/puma-4.3.7/lib/puma/binder.rb:229:in `new' /Users/hogehoge/.rbenv/versions/2.6.6/lib/ruby/gems/2.6.0/gems/puma-4.3.7/lib/puma/binder.rb:229:in `initialize': Address already in use - bind(2) for "127.0.0.1" port 3000 (Errno::EADDRINUSE)「Rails Address already in use」などで調べ、エラーの解消を試みました。
4.解決策
① 別のポートを使う
・URLを
http://localhost:3000→ 例:http://localhost:3001に変更する
・コマンドをrails sからrails s -p 3001に変更するこれでしばらくできていたのですが、数回行った後に同様のエラーが出ていたことと、応急処置的な策だと思い、別の方法を試しました。
② 立ち上がっている別のrailsサーバーを落とす
ps -ax | grep rubyとコマンドを入力します。
略称 内容 ps process の略。
OS内部で現在実行されているプロセス一覧を表示するax a:端末を持つ全てのプロセスを表示する
x:端末を持たない全てのプロセスを表示するパイプ コマンドの出力結果を次に渡す処理をする grep ファイル中の文字列を検索する ※パイプは
|のことです。ターミナル.hogehoge@hogenoAir sample_app % ps -ax | grep ruby 13657 ?? 242:21.97 ruby -I /Users/hogehoge/.rbenv/versions/2.6.6/lib/ruby/gems/2.6.0/gems/bundler-2.1.4/lib -I /Users/hogehoge /.rbenv/versions/2.6.6/lib/ruby/gems/2.6.0/gems/spring-2.1.1/lib -e require 'spring/application/boot' 13666 ?? 0:01.28 /Users/hogehoge/.rbenv/versions/2.6.6/lib/ruby/gems/2.6.0/gems/rb-fsevent-0.10.4/bin/fsevent_watch --format =otnetstring --latency 0.2 /Users/hogehoge/Desktop/sample_app 13667 ?? 0:00.69 /Users/hogehoge/.rbenv/versions/2.6.6/lib/ruby/gems/2.6.0/gems/rb-fsevent-0.10.4/bin/fsevent_watch --format =otnetstring --latency 0.1 /Users/hogehoge/Desktop/sample_app/config/locales 13669 ?? 0:00.70 /Users/hogehoge/.rbenv/versions/2.6.6/lib/ruby/gems/2.6.0/gems/rb-fsevent-0.10.4/bin/fsevent_watch --format =otnetstring --latency 0.1 /Users/hogehoge/Desktop/sample_app/db /Users/hogehoge/Desktop/sample_app/app/channels /Users/ hogehoge/Desktop/sample_app/app/controllers /Users/hogehoge/Desktop/sample_app/app/helpers /Users/hogehoge/Desktop/sample_app/app/jobs /Users/hogehoge/Desktop/sample_app/app/mailers /Users/hogehoge/Desktop/sample_app/app/models 68459 ttys004 0:00.00 grep rubyプロセスを確認しrailsサーバーの場合はkillします。
(ない場合は、rails以外の別サービスが3000番ポートを使用していますのでそれを切ります。)killをする場合は、
kill 〇〇とコマンドを入力します。
※killは実行しているプロセスを終了するコマンドです。〇〇には、PID(プロセス番号)が入ります。今回は強制終了のシグナル
-9をつけて、killを行いました。ターミナル.hogehoge@hogenoAir sample_app % kill -9 13657 hogehoge@hogenoAir sample_app % kill -9 13666 kill: kill 13666 failed: no such process hogehoge@hogenoAir sample_app % kill -9 13667 kill: kill 13667 failed: no such process hogehoge@hogenoAir sample_app % kill -9 13669 kill: kill 13669 failed: no such process
13657のみ反応が返ってきていないものの、他は該当のプロセスはなかったようで、failed: no such processと怒られました。③ 3000番ポートを使用している他のプロセスを探してkillする
lsofコマンドを使用します。lsof [オプション] [パス名]という風に使います。
今回は、lsof -i:3000とコマンドを入力します。
略称 内容 lsof オープンしているファイルを一覧表示する -i 全てのネットワークソケットを対象にする
※「-i4」でIPv4,「-i6」でIPv6を指定できるターミナル.hogehoge@hogenoAir sample_app % lsof -i:3000 COMMAND PID USER FD TYPE DEVICE SIZE/OFF NODE NAME ruby 13924 hogehoge 23u IPv6 0xc40f37229745897b 0t0 TCP localhost:hbci->localhost:54998 (CLOSE_WAIT) ruby 13924 hogehoge 24u IPv6 0xc40f372296a66d3b 0t0 TCP localhost:hbci->localhost:55019 (CLOSE_WAIT) ruby 15604 hogehoge 12u IPv6 0xc40f372296a6735b 0t0 TCP localhost:hbci (LISTEN) ruby 15604 hogehoge 13u IPv4 0xc40f37228ef3cb4b 0t0 TCP localhost:hbci (LISTEN) ruby 15604 hogehoge 23u IPv6 0xc40f372291635d3b 0t0 TCP localhost:hbci->localhost:55859 (CLOSE_WAIT) ruby 15604 hogehoge 24u IPv6 0xc40f372297454c3b 0t0 TCP localhost:hbci->localhost:55879 (CLOSE_WAIT) ruby 15604 hogehoge 30u IPv6 0xc40f372291632c3b 0t0 TCP localhost:hbci->localhost:55904 (CLOSE_WAIT) ruby 15604 hogehoge 35u IPv6 0xc40f37229163261b 0t0 TCP localhost:hbci->localhost:55905 (CLOSE_WAIT) ruby 15604 hogehoge 37u IPv6 0xc40f37229b46e97b 0t0 TCP localhost:hbci->localhost:55911 (CLOSE_WAIT) ruby 15604 hogehoge 40u IPv6 0xc40f37229b46b25b 0t0 TCP localhost:hbci->localhost:55912 (CLOSE_WAIT)
13924と15604がヒットしたので、それぞれkillします。ターミナル.hogehoge@hogenoAir sample_app % kill 13924 hogehoge@hogenoAir sample_app % kill 15604再度確認してみます。
ターミナル.hogehoge@hogenoAir sample_app % lsof -i:3000 COMMAND PID USER FD TYPE DEVICE SIZE/OFF NODE NAME ruby 13924 hogehoge 23u IPv6 0xc40f37229745897b 0t0 TCP localhost:hbci->localhost:54998 (CLOSE_WAIT) ruby 13924 hogehoge 24u IPv6 0xc40f372296a66d3b 0t0 TCP localhost:hbci->localhost:55019 (CLOSE_WAIT) ruby 15604 hogehoge 12u IPv6 0xc40f372296a6735b 0t0 TCP localhost:hbci (LISTEN) ruby 15604 hogehoge 13u IPv4 0xc40f37228ef3cb4b 0t0 TCP localhost:hbci (LISTEN) ruby 15604 hogehoge 23u IPv6 0xc40f372291635d3b 0t0 TCP localhost:hbci->localhost:55859 (CLOSE_WAIT) ruby 15604 hogehoge 24u IPv6 0xc40f372297454c3b 0t0 TCP localhost:hbci->localhost:55879 (CLOSE_WAIT) ruby 15604 hogehoge 30u IPv6 0xc40f372291632c3b 0t0 TCP localhost:hbci->localhost:55904 (CLOSE_WAIT) ruby 15604 hogehoge 35u IPv6 0xc40f37229163261b 0t0 TCP localhost:hbci->localhost:55905 (CLOSE_WAIT) ruby 15604 hogehoge 37u IPv6 0xc40f37229b46e97b 0t0 TCP localhost:hbci->localhost:55911 (CLOSE_WAIT) ruby 15604 hogehoge 40u IPv6 0xc40f37229b46b25b 0t0 TCP localhost:hbci->localhost:55912 (CLOSE_WAIT)再度表示されたので、
kill -9でkillします。ターミナル.hogehoge@hogenoAir sample_app % kill -9 13924 hogehoge@hogenoAir sample_app % kill -9 15604 hogehoge@hogenoAir sample_app % [1] - killed rails s hogehoge@hogenoAir sample_app % lsof -i:3000 hogehoge@hogenoAir sample_app %killができたようなので、再度
rails sでサーバーを起動します。ターミナル.hogehoge@hogenoAir sample_app % rails s => Booting Puma => Rails 6.0.3.5 application starting in development => Run `rails server --help` for more startup options Puma starting in single mode... * Version 4.3.7 (ruby 2.6.6-p146), codename: Mysterious Traveller * Min threads: 5, max threads: 5 * Environment: development * Listening on tcp://127.0.0.1:3000 * Listening on tcp://[::1]:3000 Use Ctrl-C to stopということで、無事エラーを解決することができました。
5.参考リンク
1:【 ps 】コマンド――実行中のプロセスを一覧表示する
2: rails sが通らない
3:パイプでつないでgrep?: Railsチュートリアル備忘録 - 8章
4:grepコマンドの詳細まとめました【Linuxコマンド集】
5:プロセスを終了するkillコマンドの使い方まとめ!【Linuxコマンド集】
6:【kill】Linuxでプロセスを終了させるコマンド
7:【 lsof 】コマンド――オープンしているファイルを一覧表示する
8:知ったかぶりをしていたソケット通信の基礎を改めて学んでみる6.最後に
記事の感想や意見、ご指摘等あれば伝えていただけるとありがたいです。
読んでいただき、ありがとうございました。
- 投稿日:2021-02-13T15:58:35+09:00
vue.jsでaxiosを使用してログイン時にレスポンスからユーザ情報を取得する
初めに
RailsとVue.jsを使用してアプリを作成していて、ログイン時にvue側でユーザ情報を取得したいと思ったのでやってみた。
謎にハマってかなり時間がかかったので、備忘録として残しておく。
やり方
取得するときのvue.jsの処理。簡潔にするために色々と省略している。
methods: {
  loginUser: function () {
   axios.post('api/auth/sign_in', this.user).then((response) => {
  }, (error) => {
   console.log(error)
  })
}
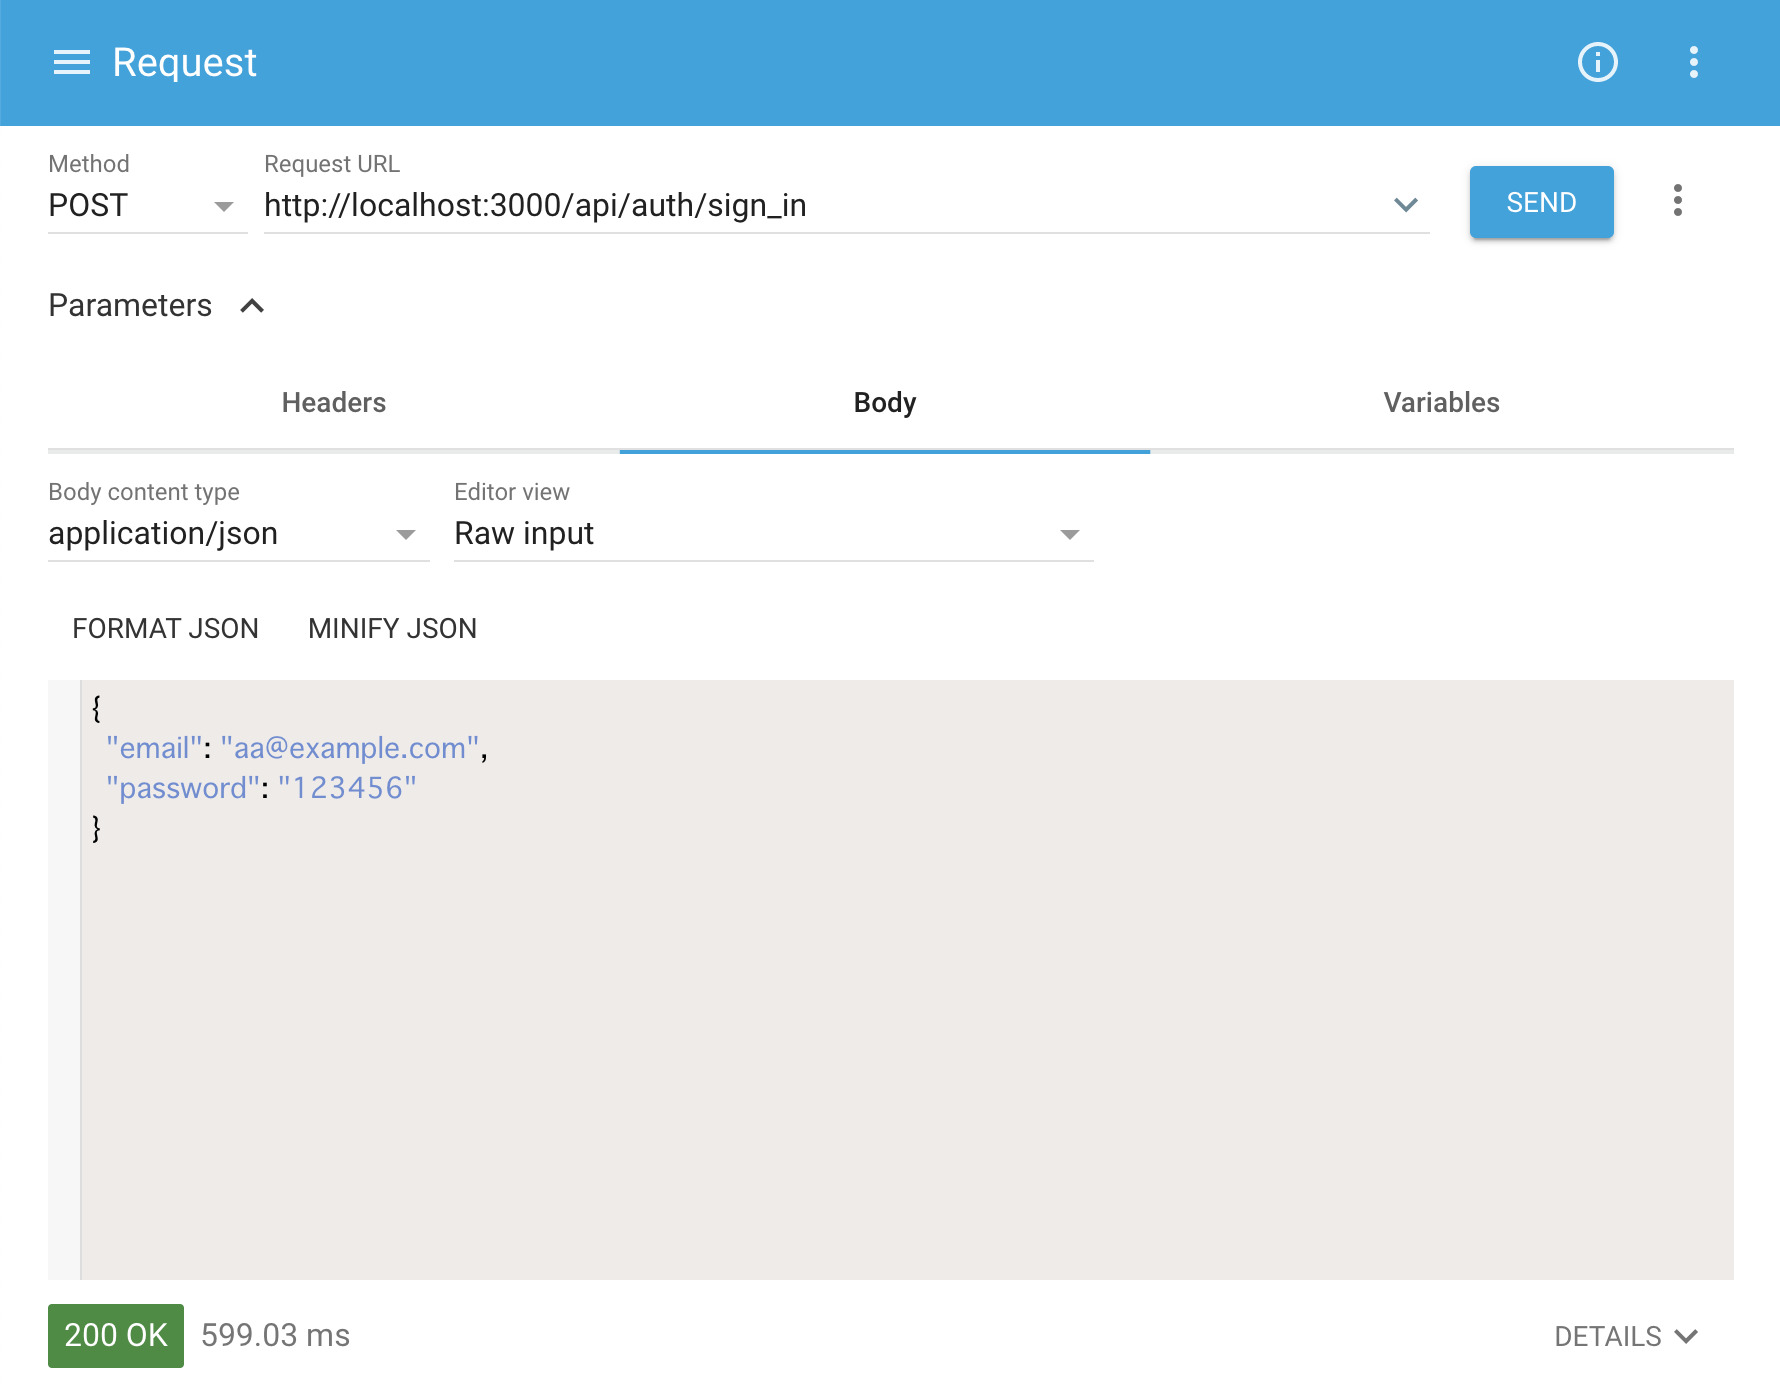
この処理を行うと以下の結果が返ってくる。今回はテストで「Advanced REST client」を使ってる。
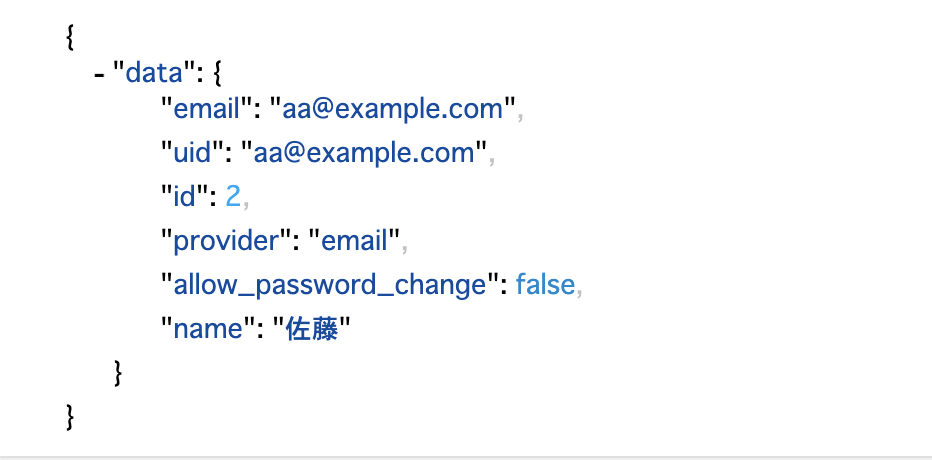
そうするとユーザ情報を持っているdataが返ってくる。まずdataは以下のコードで取得することができる。
response.data['data']これをさっきの処理に入れてコンソールに出力する。
methods: {
  loginUser: function () {
   axios.post('api/auth/sign_in', this.user).then((response) => {
    // 追加
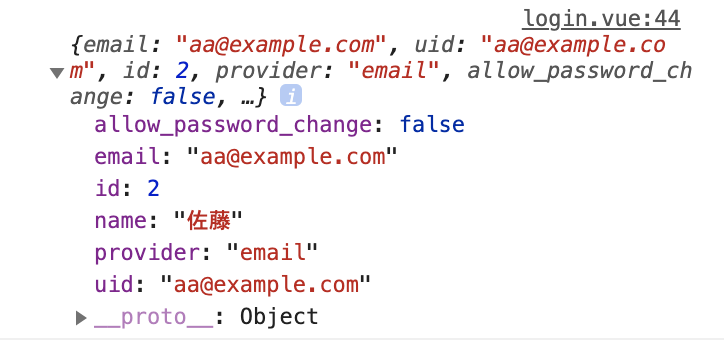
    console.log(response.data['data'])
  }, (error) => {
   console.log(error)
  })
}
画像のようにデータが取得できるので、この後は自分が欲しい値を選択するだけ。例えばidが欲しいならこんな感じ。末尾のキーを変更すればOK。
response.data['data'].id後はこれをlocalStrageとか実装で使ってるやつにうまく当てはめて使用すればいい。
response.dataの中にさらにdataあるとか思わなくてめちゃくちゃ沼って時間かかった。最初にresponse.data.idを試してデータが取得できなかった時点で丁寧にvalueとkeyを確認してやってくべきだった。
- 投稿日:2021-02-13T13:32:53+09:00
railsアプリをcapsitranoでdeployする時に自動でseedを実行する。けど必要な時だけする。
本記事のサマリ
capistranoでrailsアプリをdeployする際に、自動的にseedを流すようにすると、deployの運用的には楽になるが、seedの実行時間が待たされるので、seedファイルが描き変わった時だけ動くように工夫するといいかもという話です。
対象読者
- capistranoをつかって、railsアプリをデプロイしており、seedの実行は手動でやっているような方
- seedの実行をcapに任せているが、毎回時間かかっているような方
動作確認バージョン
Capistrano Version: 3.11.2 (Rake Version: 10.3.2)
Rails 5.1.6
ruby 2.6.6p146 (2020-03-31 revision 67876) [x86_64-darwin18]
経緯
capistranoでデプロイする際に、seedの実行は変更があったときに、手で実行するのは、面倒です。
なので、そういったものは、自動的にやるようにしたいというのが、怠惰なプログラマな正常な欲求です。
でも、自動的にやってみたのはいいものの、毎回実行していると、seedの肥大化に伴って、実行時間の待ち時間がもったいない。
ならば、seedの変更が会った時だけ実行するようにしようというのが敬意です。方針
やり方はいろいろあると思いますが、seedファイルの変更を検知するために、seedファイルのmd5のハッシュ値をとっておいて、それが切り替わったら実行するというやり方で実現してみました。
実物
以下のように、独自で定義したcapistranoのタスクを、
deploy:migrateの後で実行するようにします。deploy.rb# 〜中略〜 # deploy用のスクリプトで、migrateの後にdeploy:seedタスクを実行させる after 'deploy:migrate', 'deploy:seed' # 〜中略〜実際に、seedを実行するタスクは以下のようにして、seedファイルのmd5を保持しておき、それを比較して違っていたらseedを実行するような形で実現します。
deploy.cap# 〜中略〜 # seedの実行タスクは以下の通り # 前提となる情報 # release_path: deployされたアプリのパス # shared_path: 別のリリース時でも共有できる共有ディレクトリのパス # seedファイルは、実行されるたびに、トランザクションを貼って洗い替え(delete & insert)することで、冪等性を担保している。 desc 'Load seed data into database' task :seed do on roles(:db) do within release_path do with rails_env: fetch(:rails_env) do command = 'db:seed' # rakeのコマンドを元に、seedファイルの相対パスを組み立て seed_filepath = 'db/seed.rb' new_digest_filepath = shared_path.join("new_#{seed_filepath.gsub('/', '_')}.md5") digest_filepath = shared_path.join("#{seed_filepath.gsub('/', '_')}.md5") # digestがなかった時にエラーにしないために、事前にtouch execute :touch, digest_filepath execute :md5sum, "#{seed_filepath} > #{new_digest_filepath}" # md5が違っていたらseedを反映するコマンドを実行する execute "if [ \"`cat #{new_digest_filepath}`\" != \"`cat #{digest_filepath}`\" ]; then cd #{release_path}; RAILS_ENV=#{ fetch(:rails_env) } bundle exec rake #{command}; mv #{new_digest_filepath} #{digest_filepath}; fi" end end end end end
- 投稿日:2021-02-13T13:26:39+09:00
TailwindのFlexbox早見表
https://tailwindcss.com/docs/flex
ブラウザ確認
コード
slim.flex.w-full.bg-gray-300 .flex-1.bg-red-300.text-center.mt-1.mx-1 | flex-1 .flex-1.bg-yellow-300.text-center.mt-1.mx-1 | flex-1 .flex-1.bg-green-300.text-center.mt-1.mx-1 | flex-1 .flex.w-full.bg-gray-300 .flex-1.bg-red-300.text-center.mt-1.mx-1 | flex-1 .flex-1.bg-yellow-300.text-center.mt-1.mx-1 | flex-1 .flex-auto.bg-green-300.text-center.mt-1.mx-1 | flex-auto .flex.w-full.bg-gray-300 .flex-1.bg-red-300.text-center.mt-1.mx-1 | flex-1 .flex-1.bg-yellow-300.text-center.mt-1.mx-1 | flex-1 .flex-initial.bg-green-300.text-center.mt-1.mx-1 | flex-initial .flex.w-full.bg-gray-300 .flex-1.bg-red-300.text-center.mt-1.mx-1 | flex-1 .flex-auto.bg-yellow-300.text-center.mt-1.mx-1 | flex-auto .flex-1.bg-green-300.text-center.mt-1.mx-1 | flex-1 .flex.w-full.bg-gray-300 .flex-1.bg-red-300.text-center.mt-1.mx-1 | flex-1 .flex-auto.bg-yellow-300.text-center.mt-1.mx-1 | flex-auto .flex-auto.bg-green-300.text-center.mt-1.mx-1 | flex-auto .flex.w-full.bg-gray-300 .flex-1.bg-red-300.text-center.mt-1.mx-1 | flex-1 .flex-auto.bg-yellow-300.text-center.mt-1.mx-1 | flex-auto .flex-initial.bg-green-300.text-center.mt-1.mx-1 | flex-initial .flex.w-full.bg-gray-300 .flex-1.bg-red-300.text-center.mt-1.mx-1 | flex-1 .flex-initial.bg-yellow-300.text-center.mt-1.mx-1 | flex-initial .flex-1.bg-green-300.text-center.mt-1.mx-1 | flex-1 .flex.w-full.bg-gray-300 .flex-1.bg-red-300.text-center.mt-1.mx-1 | flex-1 .flex-initial.bg-yellow-300.text-center.mt-1.mx-1 | flex-initial .flex-auto.bg-green-300.text-center.mt-1.mx-1 | flex-auto .flex.w-full.bg-gray-300 .flex-1.bg-red-300.text-center.mt-1.mx-1 | flex-1 .flex-initial.bg-yellow-300.text-center.mt-1.mx-1 | flex-initial .flex-initial.bg-green-300.text-center.mt-1.mx-1 | flex-initial .flex.w-full.bg-gray-300 .flex-auto.bg-red-300.text-center.mt-1.mx-1 | flex-auto .flex-1.bg-yellow-300.text-center.mt-1.mx-1 | flex-1 .flex-1.bg-green-300.text-center.mt-1.mx-1 | flex-1 .flex.w-full.bg-gray-300 .flex-auto.bg-red-300.text-center.mt-1.mx-1 | flex-auto .flex-1.bg-yellow-300.text-center.mt-1.mx-1 | flex-1 .flex-auto.bg-green-300.text-center.mt-1.mx-1 | flex-auto .flex.w-full.bg-gray-300 .flex-auto.bg-red-300.text-center.mt-1.mx-1 | flex-auto .flex-1.bg-yellow-300.text-center.mt-1.mx-1 | flex-1 .flex-initial.bg-green-300.text-center.mt-1.mx-1 | flex-initial .flex.w-full.bg-gray-300 .flex-auto.bg-red-300.text-center.mt-1.mx-1 | flex-auto .flex-auto.bg-yellow-300.text-center.mt-1.mx-1 | flex-auto .flex-1.bg-green-300.text-center.mt-1.mx-1 | flex-1 .flex.w-full.bg-gray-300 .flex-auto.bg-red-300.text-center.mt-1.mx-1 | flex-auto .flex-auto.bg-yellow-300.text-center.mt-1.mx-1 | flex-auto .flex-auto.bg-green-300.text-center.mt-1.mx-1 | flex-auto .flex.w-full.bg-gray-300 .flex-auto.bg-red-300.text-center.mt-1.mx-1 | flex-auto .flex-initial.bg-yellow-300.text-center.mt-1.mx-1 | flex-initial .flex-1.bg-green-300.text-center.mt-1.mx-1 | flex-1 .flex.w-full.bg-gray-300 .flex-auto.bg-red-300.text-center.mt-1.mx-1 | flex-auto .flex-initial.bg-yellow-300.text-center.mt-1.mx-1 | flex-initial .flex-auto.bg-green-300.text-center.mt-1.mx-1 | flex-auto .flex.w-full.bg-gray-300 .flex-auto.bg-red-300.text-center.mt-1.mx-1 | flex-auto .flex-initial.bg-yellow-300.text-center.mt-1.mx-1 | flex-initial .flex-initial.bg-green-300.text-center.mt-1.mx-1 | flex-initial .flex.w-full.bg-gray-300 .flex-initial.bg-red-300.text-center.mt-1.mx-1 | flex-initial .flex-1.bg-yellow-300.text-center.mt-1.mx-1 | flex-1 .flex-1.bg-green-300.text-center.mt-1.mx-1 | flex-1 .flex.w-full.bg-gray-300 .flex-initial.bg-red-300.text-center.mt-1.mx-1 | flex-initial .flex-1.bg-yellow-300.text-center.mt-1.mx-1 | flex-1 .flex-auto.bg-green-300.text-center.mt-1.mx-1 | flex-auto .flex.w-full.bg-gray-300 .flex-initial.bg-red-300.text-center.mt-1.mx-1 | flex-initial .flex-1.bg-yellow-300.text-center.mt-1.mx-1 | flex-1 .flex-initial.bg-green-300.text-center.mt-1.mx-1 | flex-initial .flex.w-full.bg-gray-300 .flex-initial.bg-red-300.text-center.mt-1.mx-1 | flex-initial .flex-auto.bg-yellow-300.text-center.mt-1.mx-1 | flex-auto .flex-1.bg-green-300.text-center.mt-1.mx-1 | flex-1 .flex.w-full.bg-gray-300 .flex-initial.bg-red-300.text-center.mt-1.mx-1 | flex-initial .flex-auto.bg-yellow-300.text-center.mt-1.mx-1 | flex-auto .flex-auto.bg-green-300.text-center.mt-1.mx-1 | flex-auto .flex.w-full.bg-gray-300 .flex-initial.bg-red-300.text-center.mt-1.mx-1 | flex-initial .flex-auto.bg-yellow-300.text-center.mt-1.mx-1 | flex-auto .flex-initial.bg-green-300.text-center.mt-1.mx-1 | flex-initial .flex.w-full.bg-gray-300 .flex-initial.bg-red-300.text-center.mt-1.mx-1 | flex-initial .flex-initial.bg-yellow-300.text-center.mt-1.mx-1 | flex-initial .flex-1.bg-green-300.text-center.mt-1.mx-1 | flex-1 .flex.w-full.bg-gray-300 .flex-initial.bg-red-300.text-center.mt-1.mx-1 | flex-initial .flex-initial.bg-yellow-300.text-center.mt-1.mx-1 | flex-initial .flex-auto.bg-green-300.text-center.mt-1.mx-1 | flex-auto .flex.w-full.bg-gray-300 .flex-initial.bg-red-300.text-center.mt-1.mx-1 | flex-initial .flex-initial.bg-yellow-300.text-center.mt-1.mx-1 | flex-initial .flex-initial.bg-green-300.text-center.mt-1.mx-1 | flex-initial
- 投稿日:2021-02-13T13:25:54+09:00
credential.ymlを理解する(デプロイの練習)
これはなに?
awsでデプロイの練習をしています。
credentials.ymlについてわからないことが多かったので、ノートにまとめてみました。主に、以下の2つの記事から学習した内容をまとめています。
credential.yml.enc とは?
一言でいうと、環境変数を一つにまとめて書いておく場所。
Rails5.1までは、環境変数を複数の場所に書いておかなくてはいけなかった(らしい)。それらをyml形式で書いて、暗号化してまとめてある。言わば機密情報の集約ファイル。
暗号化されていて、直接編集はできない。
credentialw.yml.encは、以下のコマンドで生成され、編集できます。bin/rails credentials:edit生成された
credentialw.yml.encは暗号化されているので、直接編集はできません。config/credentials.yml.encMABIeuyDFIyrzi6BM2....editorを指定しないと、編集できない。
また、
credentialw.yml.encは環境変数:EDITORを指定しないと編集できません。$ export EDITOR="vi" $ echo $EDITOR #=> vi余談
こんな風にして、
export EDITOR="vi"を.bash_profileに登録して、ターミナルが起動するたびに環境変数が登録されるようにすると、毎回EDITORを指定しないでよくなります。$ echo 'export EDITOR="vi"' >> ~/.bash_profile $ source ~/.bash_profile $ echo $EDITOR #=> viconfig/master.keyとの関係
credentials.yml.encはmaster keyを利用して暗号化・復号されます。
master.keyがない状態で、credentials:editを実行すると、master.keyが生成されます。$ EDITOR="vi" bin/rails credentials:edit create config/master.key書き込むもの
今回は、AWSにアプリのデプロイを行ったのですが、書いた内容は「本番環境のデータベースのパスワード」(ローカルとは違う)
また、ローカルの
credential.yml.encとmaster.keyの組み合わせが、本番環境のそれと一致していないといけなかったのが、なかなかハマりどころだった。
- 投稿日:2021-02-13T12:56:39+09:00
Rails6.1開発ハンズオン(1)
ターゲット
- Rails、Rubyを全く知らない人
- 何らかのプログラミング言語でコードを書いたことがある人
- ある程度shellの操作に慣れている人
- macがなくてwindowsしかない人
目的
Rails6.1で基本的な機能を雑に触れながらそれっぽいアプリを作る
やること
- Gitの設定
- ログインなしで書き込めるネット掲示板を作る
- ベースはこれを使う + vscodeに拡張機能を入れて開発
1. 開発環境を整える
1-1. vscodeを整える
vscodeをインストールする。
Visual Studio Code - コード エディター | Microsoft Azure
これでWSLに接続して開発できる(これ以降の拡張機能は必要に応じてWSL上にインストールされる。)
Remote - WSL - Visual Studio Marketplace
日本語化
Japanese Language Pack for Visual Studio Code - Visual Studio Marketplace
アイコンをわかりやすく表示
Material Icon Theme - Visual Studio Marketplace
Ruby関連
Ruby - Visual Studio Marketplace
補完とかしてくれる言語サーバ solargraphさん
# solargraphをインストール
gem install solargraph
Ruby Solargraph - Visual Studio Marketplace
endを自動で入れてくれる
endwise - Visual Studio Marketplace
draw.ioを使いたい
Draw.io Integration - Visual Studio Marketplace
1-2. Gitを整える
first commit
git config --global user.email "you@example.com"
git config --global user.name "Your Name"
github SSH認証の準備
参考にさせていただくもの:
WSL2 から起動した VSCode DevContainer に SSH agent で Git の鍵を渡す - Qiitacd ~ ssh-keygen -t ed25519 -P "" # 何も入れずにEnter cd .ssh more id_ed25519.pub # 内容をコピーBuild software better, together
SSH and GPG keysで「New SSH Key」ボタンを押す。
わかりやすいTitle(WSL2とか)を入力、Keyにコピーした公開鍵を貼り付け、Add~/.bashrcを開いて以下のコードを追加
if [ -z "$SSH_AUTH_SOCK" ]; then
   # Check for a currently running instance of the agent
   RUNNING_AGENT="`ps -ax | grep 'ssh-agent -s' | grep -v grep | wc -l | tr -d '[:space:]'`"
   if [ "$RUNNING_AGENT" = "0" ]; then
        # Launch a new instance of the agent
        ssh-agent -s &> $HOME/.ssh/ssh-agent
   fi
   eval `cat $HOME/.ssh/ssh-agent`
fi

ssh-add $HOME/.ssh/id_ed25519
github上にリポジトリを新規作成、(ここでは「Rails6.1_hands_on」という名前)
git remote add origin git@github.com:hirorocky/Rails6.1_hands_on.git
git push -u origin master
# Rails6.1だとまだ”master”
2. 掲示板を作る
2-0. Railsの基礎知識:MVCモデル
詳しくは「Rails MVC」で検索!
私は正しく理解している自信はないですが、こんな図を描いてみました↓
リクエストが来たら、Rails上のroutes.rbがコントローラーとアクション(=メソッド)を決めて、コントローラー上のアクションでモデルからデータを取りながら、ビューを作って、その結果をブラウザに返すイメージです。2-1. 設計
◆モデル図
(拡張機能により、〇〇.drawioというファイルを作ればvscode上でdraw.ioが使える!)
◆ワイヤーフレーム(?詳しくない)
4枚のページが必要そう。
- communities_controller#index:トップページ
- communities_controller#new→#create:コミュニティ作成ページ
- communities_controller#show:1つのコミュニティ&コメント一覧
- comments_controller#new→#create:コメント投稿ページ
なぜこのコントローラー×アクションの組み合わせなのかは聞かないでください。
2-2. 実装
2-2-1. モデル
DB上に各テーブルを作る。
' rails generate model <モデル名> <カラム名>:<型>...'
でモデルに関するファイルを自動で作ってくれる。
rails generateはrails gと省略できる。※以降gで書きます。
rails g model Community title:string owner_name:string
rails g model Comment author_name:string content:text community:references
db/migrateフォルダ内に、2つのファイル(マイグレーションファイル)ができる。
以下のコマンドでDBにテーブルを作成する。
# sqlite上にRails用DBを作成
rails db:setup
# DB上にマイグレーションファイルをもとにテーブルを作成
rails db:migrate
app/models/community.rbにて
class Community < ApplicationRecord
  has_many :comments
end
app/models/comment.rbにて
class Comment < ApplicationRecord
  belongs_to :community
end
こうするだけで、RailsのORMがいい感じにしてくれる。
※ちょっと試すにはターミナルでrails console(rails cでも可)コマンド。
irb(main):001:0> commu = Community.create(title: 'コミュニティタイトルです', owner_name: 'たろう')
   (0.4ms)  SELECT sqlite_version(*)
  TRANSACTION (0.1ms)  begin transaction
  Community Create (0.5ms)  INSERT INTO "communities" ("title", "owner_name", "created_at", "updated_at") VALUES (?, ?, ?, ?)  [["title", "コミュニティタイトルです"], ["owner_name", "たろう"], ["created_at", "2021-02-13 02:21:28.386695"], ["updated_at", "2021-02-13 02:21:28.386695"]]
  TRANSACTION (5.0ms)  commit transaction
=> #<Community id: 1, title: "コミュニティタイトルです", owner_name: "たろう", created_at: "2021-02-13 02:21:28.386695000 +0000", updated_at: "2021-02-13 02:21:28.386695000 +0000">

irb(main):002:0> commu.title
=> "コミュニティタイトルです"

irb(main):003:0> commu.comments.create(author_name: 'じろう', content: "コメント\nああああ")
  TRANSACTION (0.1ms)  begin transaction
  Comment Create (0.5ms)  INSERT INTO "comments" ("author_name", "content", "community_id", "created_at", "updated_at") VALUES (?, ?, ?, ?, ?)  [["author_name", "じろう"], ["content", "コメント\nああああ"], ["community_id", 1], ["created_at", "2021-02-13 02:26:21.103087"], ["updated_at", "2021-02-13 02:26:21.103087"]]
  TRANSACTION (5.1ms)  commit transaction
=> #<Comment id: 1, author_name: "じろう", content: "コメント\nああああ", community_id: 1, created_at: "2021-02-13 02:26:21.103087000 +0000", updated_at: "2021-02-13 02:26:21.103087000 +0000">

irb(main):004:0> commu.comments.create(author_name: 'じろう', content: "コメント2\nああああ")
  TRANSACTION (0.1ms)  begin transaction
  Comment Create (0.5ms)  INSERT INTO "comments" ("author_name", "content", "community_id", "created_at", "updated_at") VALUES (?, ?, ?, ?, ?)  [["author_name", "じろう"], ["content", "コメント2\nああああ"], ["community_id", 1], ["created_at", "2021-02-13 02:26:35.918169"], ["updated_at", "2021-02-13 02:26:35.918169"]]
  TRANSACTION (7.1ms)  commit transaction
=> #<Comment id: 2, author_name: "じろう", content: "コメント2\nああああ", community_id: 1, created_at: "2021-02-13 02:26:35.918169000 +0000", updated_at: "2021-02-13 02:26:35.918169000 +0000">

irb(main):005:0> commu.comments
  Comment Load (0.2ms)  SELECT "comments".* FROM "comments" WHERE "comments"."community_id" = ? /* loading for inspect */ LIMIT ?  [["community_id", 1], ["LIMIT", 11]]
=> #<ActiveRecord::Associations::CollectionProxy [#<Comment id: 1, author_name: "じろう", content: "コメント\nああああ", community_id: 1, created_at: "2021-02-13 02:26:21.103087000 +0000", updated_at: "2021-02-13 02:26:21.103087000 +0000">, #<Comment id: 2, author_name: "じろう", content: "コメント2\nああああ", community_id: 1, created_at: "2021-02-13 02:26:35.918169000 +0000", updated_at: "2021-02-13 02:26:35.918169000 +0000">]>
ログを見ると、rubyのコードをSQLに変換して、DBを操作しているのがなんとなくわかると思います。
ここでは見ませんが、上記コードだけで、DBに1つのcommunityレコードと2つのcommentレコードができています。
2-2-2. Communityのコントローラー・ビュー
◆コントローラー
rails g controller communities index new create show設計段階で必要なコントローラーとビューがわかったので、
上記コマンドを入力。すると色々作成される(いらないものもできてしまう...※この辺は設定でいい感じにできますがここでは触れません)
app/controllers/communities_controller.rbのアクションの中にコードを入れる
class CommunitiesController < ApplicationController
  def index
    @communities = Community.all
  end

  def new
    @community = Community.new
  end

  def create
    @community = Community.new(community_params)
    if @community.save
      redirect_to communities_path
    else
      render :new
    end
  end

  def show
    @community = Community.find(params[:id])
    @comments = @community.comments
  end

  private

  def community_params
    params.require(:community).permit(:title, :owner_name)
  end
end
@hogeはインスタンス変数で、この文脈で必要な知識としては、「インスタンス変数はビューに渡せる」ということです。
community_paramsメソッドはStrong Parameterというやつです。セキュリティ的に必要なもので、詳しくはググってください。
◆ルーティング
Rails.application.routes.draw do
  root to: 'communities#index'
  resources :communities, only: %i[index new create show]
end
自動生成されたものは全部削除、ルートをcommunities_controllerのindexアクションに割りあて、resourcesメソッドでcommunities_controller関連のルーティングを一気に作成。
rails routesで設定されているルーティングを見ることができ、またもっと見やすくしたいときは、
ブラウザ上で「http://[::1]:3000/rails/info/routes」で見れる。
◆ビュー
ビュー関連はapp/viewsの中に入っている。
自動で作成されたcreate.html.erbはいらないので削除。
早くhamlを使いたい。一旦、見た目ガン無視の最低限の機能を実装する。
app/views/communities/index.html.erb
<h1>掲示板</h1>

<%= link_to 'コミュニティ作成', new_community_path %>

<% @communities.each do |community| %>
  <div>
    <p><%= link_to community.title, community_path(community) %></p>
    <p><%= community.created_at %></p>
    <p><%= community.owner_name %></p>
  </div>
<% end %>
<% %>の中にrubyのコードを入れることができる。
<%= %>はrubyの評価結果をそのままhtmlに書き出す。
=かそうじゃないかは慣れだと思う。
app/views/communities/new.html.erb
<h1>コミュニティ作成</h1>

<%= form_with model: @community do |form| %>
  <%= form.label :title %>
  <%= form.text_field :title %>
  <%= form.label :owner_name %>
  <%= form.text_field :owner_name %>

  <%= form.submit '作成' %>
<% end %>
※form_withは一時期デフォルトがremote: trueだったが、local: trueになった。
app/views/communities/show.html.erb
<h1><%= @community.title %></h1>

<% @comments.each do |comment| %>
  <div>
    <p><%= comment.author_name %></p>
    <p><%= simple_format(comment.content) %></p>
    <p><%= comment.created_at %></p>
  </div>
<% end %>
2-2-3. Commentのコントローラー・ビュー
◆コントローラー
rails g controller comments new createapp/controllers/comments_controller.rb
class CommentsController < ApplicationController
  before_action :set_community

  def new
    @comment = @community.comments.new
  end

  def create
    @comment = @community.comments.new(comment_params)
    if @comment.save
      redirect_to community_path(@community)
    else
      render :new
    end
  end

  private

  def set_community
    @community = Community.find(params[:community_id])
  end

  def comment_params
    params.require(:comment).permit(:author_name, :content)
  end
end
◆ルーティング
Rails.application.routes.draw do
  root to: 'communities#index'
  resources :communities, only: %i[index new create show] do
    resources :comments, only: %i[new create]
  end
end
rails routesコマンドでこうなる。
Prefix                Verb URI Pattern                                       Controller#Action
                 root GET  /                                                 communities#index
   community_comments POST /communities/:community_id/comments(.:format)     comments#create
new_community_comment GET  /communities/:community_id/comments/new(.:format) comments#new
          communities GET  /communities(.:format)                            communities#index
                      POST /communities(.:format)                            communities#create
        new_community GET  /communities/new(.:format)                        communities#new
            community GET  /communities/:id(.:format)                        communities#show
◆ビュー
app/views/communities/show.html.erb
<%= link_to '←戻る', communities_path %>
<h1><%= @community.title %></h1>

<%= link_to 'コメントする', new_community_comment_path(@community) %>

<% @comments.each do |comment| %>
  <div>
    <p><%= comment.author_name %></p>
    <p><%= simple_format(comment.content) %></p>
    <p><%= comment.created_at %></p>
  </div>
<% end %>
app/views/comments/new.html.erb
<%= link_to '←戻る', community_path(@community) %>
<h1>コメントする</h1>

<%= form_with model: [@community, @comment] do |form| %>
  <%= form.label :author_name %>
  <%= form.text_field :author_name %>

  <%= form.label :content %>
  <%= form.text_area :content %>

  <%= form.submit '投稿' %>
<% end %>
app/views/comments/create.html.erbは削除。
2-2-4. Gemfileの変更
左上に出ている表示が邪魔なので、rack-mini-profilerを削除。
デバッグ用にpry-railsを入れる。
source 'https://rubygems.org'
git_source(:github) { |repo| "https://github.com/#{repo}.git" }

ruby '3.0.0'

gem 'rails', '~> 6.1.2', '>= 6.1.2.1'
gem 'sqlite3', '~> 1.4'
gem 'puma', '~> 5.0'
gem 'sass-rails', '>= 6'
gem 'webpacker', '~> 5.0'
gem 'turbolinks', '~> 5'
gem 'jbuilder', '~> 2.7'
# gem 'redis', '~> 4.0'
# gem 'bcrypt', '~> 3.1.7'
gem 'bootsnap', '>= 1.4.4', require: false

group :development, :test do
  gem 'byebug', platforms: [:mri, :mingw, :x64_mingw]
  gem 'pry-rails'
end

group :development do
  gem 'web-console', '>= 4.1.0'
  # gem 'rack-mini-profiler', '~> 2.0'
  gem 'listen', '~> 3.3'
  gem 'spring'
end

gem 'tzinfo-data', platforms: [:mingw, :mswin, :x64_mingw, :jruby]
ひとまず完成。
次回(?)見た目をそれっぽく整えるの巻。
- 投稿日:2021-02-13T11:48:21+09:00
Railsポートフォリオ作成 #3 DB設計
こんにちは
今回はDB設計を行いました。(前回記事(#2 画面設計))私は、前職(ホテルの料飲部)における、コミュニケーションの課題を解決するアプリを作っているのですが、今回は、
DB設計を行いました
感じたこと
- 抜け漏れをなくするのがとても大変
今回私にとっては、今までにない数のテーブルが登場したため、マインドマップを使い、抜け漏れがないようにと意識しながら、機能、テーブル、カラムを洗い出しました。
しかし、おそらく抜け漏れがあって、後から泣くことになるだろうなあという感じです。。。- ER図を見やすく構成するのが大変
まず全てのテーブルを書き出し、その後リレーションを考えていってしまったため、最後に見やすく構成し直すという手間が発生してしまいました。
先に考えておくべきでした。。。意識したこと
- 色分け、場所分けで少しでもわかりやすいようにする
- 少しでもリレーションがごちゃごちゃしないようにする
次は、いよいよアプリケーションの雛形を作っていきます
- 投稿日:2021-02-13T11:24:08+09:00
RubyonRailsでRSpecによるテストコード実行手順メモ
初Qiita投稿で緊張しますが、自分用メモなのであんまり気張らずに書くようにします。
RubyonRailsでRSpecを使ってテストコード実行するときの簡単な手順メモです。
間違ってたり足りない部分があったら適宜アップデートします。1. Gemfile内のどこの行でもいいので gem 'pry-rails' を追加する。 ※たいていは一番下に追加
2. Gemfileの group :development, :test do 内に下記2行を追加する。
gem 'rspec-rails'
gem 'factory_bot_rails' ※FactoryBotを使わない場合は不要
3. ターミナルで bundle install を実行してGemを使えるようにする。
4. ターミナルで rails g rspec:install を実行してRSpecを使えるようにする。
5. .rspecファイルに --format documentation を追加してテストのログを見やすくする。
6. ターミナルでrails g rspec:model [モデル名] を実行してモデルの単体テストコード用ファイルを生成する。
7. spec/factories/モデル名.rb というファイルにFactoryBotで生成するデータを記述する。(要詳細化)
8. spec/models/[モデル名]_spec.rb に単体テストコードを書く。(要詳細化)
9. ターミナルで bundle exec rspec spec/models/モデル名spec.rb を実行する。要詳細化にしている部分は記載方法を詳しくメモする必要があるためまた今度・・・。
- 投稿日:2021-02-13T10:41:46+09:00
ActiveResourceを使ってRailsアプリ同士をAPI連携させる
ActiveResourceを使う機会があったので、使い方を備忘録として残します。
ActiveResource とは
簡単に言うと、Railsアプリケーション同士を簡単にAPI連携させる機能です。
フロントとバックを分けて実装したい時に使います。
バック側の実装
実装
apiモードでアプリケーションを作成しています。$ rails new back --api $ cd back $ bin/rails g scaffold bookmark title:string url:string comment:text $ rake db:migrate起動
$ rails sフロント側の実装
実装
DBは使わないのでmigrationを削除しています。
$ rails new front
$ cd front
$ bin/rails g scaffold bookmark title:string url:string comment:text
$ rm -f db/migrate/*
モデルクラス (app/models/bookmark.rb) を書き換える。
親クラスをActiveResource::Baseに変えて、連携先にhttp://localhost:3000/を指定しています。app/models/bookmark.rbclass Bookmark < ActiveResource::Base self.site = 'http://localhost:3000/' endGemを追加。
Gemfile
gem ‘activeresource'
$ bundle install # 起動 $ rails s -p 3001 #ポートは3001に指定動作確認
以上で実装、連携は完了です。
ブラウザで "http://localhost:3001/bookmarks" にアクセスして、いくつかブックマークを追加してみましょう。
<参考>
http://webos-goodies.jp/archives/how_to_use_activeresource_1.html
- 投稿日:2021-02-13T10:28:42+09:00
【Ruby on Rails】データベース操作まとめ(rails db:**)
データベース本体に関する操作
rails db:create
データベースの作成
<使用可能オプション>
- rails_ENV
環境を指定する(デフォルトはdevelopmentとtest)rails db:drop
データベースの削除
<使用可能オプション>
- rails_ENV
環境を指定する(デフォルトはdevelopmentとtest)テーブルに関する操作
rails db:migrate
migrationファイルを実行し、テーブルを作成する(全てのmigrationファイルが対象)
<使用可能オプション>
- rails_ENV
環境を指定する(デフォルトはdevelopmentとtest)- VERSION
指定したバージョン以前のmigrationを全てupに、それより後のmigrationを全てdownにするrails db:rollback
最新のmigrationを1つdownにする
<使用可能オプション>
- STEP
downにするmigrationの数を指定する- rails_ENV
環境を指定する(デフォルトはdevelopmentとtest)rails db:migrate:status
migrationの状態を表示する
<使用可能オプション>
- rails_ENV
環境を指定する(デフォルトはdevelopment)rails db:migrate:up
VERSIONオプションで指定したmigrationをupにする
<使用可能オプション>
- VERSION
- rails_ENV
環境を指定する(デフォルトはdevelopmentとtest)rails db:migrate:down
VERSIONオプションで指定したmigrationをdownにする
<使用可能オプション>
- VERSION
- rails_ENV
環境を指定する(デフォルトはdevelopmentとtest)rails db:schema:dump
現在のデータベースの状態に合わせて、db/schema.rbを更新する
<使用可能オプション>
- rails_ENV
環境を指定する(デフォルトはdevelopment)rails db:schema:load
db/schema.rbにあわせて、データベースを更新する(migrationファイルを参照しない)
<使用可能オプション>
- rails_ENV
環境を指定する(デフォルトはdevelopmentとtest)レコードに関する操作
rails db:seed
dbディレクトリのseeds.rbファイルを実行し、レコードを作成する
<使用可能オプション>
- rails_ENV
環境を指定する(デフォルトはdevelopment)rails r ファイルpath例:rails r db/seeds/test.rb
特定のseedファイルを実行し、レコードを作成する
いくつかの操作をまとめた物
rails db:setup
rails db:create
rails db:schema:load
rails db:seed
をまとめた物<使用可能オプション>
- rails_ENV
環境を指定する(デフォルトはdevelopmentとtest ※seedはdevelopmentのみ)rails db:reset
rails db:drop
rails db:create
rails db:schema:load
rails db:seed
をまとめた物<使用可能オプション>
- rails_ENV
環境を指定する(デフォルトはdevelopmentとtest ※seedはdevelopmentのみ)rails db:migrate:redo
rails db:rollback
rails db:migrate
をまとめた物<使用可能オプション>
- STEP
やり直すmigrationの数を指定する- rails_ENV
環境を指定する(デフォルトはdevelopmentとtest)- VERSION
対象のmigrationを指定するrails db:migrate:reset
rails db:drop
rails db:create
rails db:migrate
をまとめた物<使用可能オプション>
- rails_ENV
環境を指定する(デフォルトはdevelopmentとtest)- VERSION
指定したバージョン以前のmigrationを全てupに、それより後のmigrationを全てdownにする補足
rakeとrailsの違い
Ruby on Railsのデータベース操作のコマンドを調べていると、rails ~というものとrake ~というものの2種類が見つかります。
これらは、Railsのバージョン4まででは区別をして使用していた物を、バージョン5より区別がなくなったそうなので、バージョン5以降を使用する場合は、全てrails ~で実行できる、とのことです。schema.rbとは
migrationファイルは、それぞれのテーブルの設計図のような物です。
それに対してschema.rbは、現在のデータベースの構造を表した設計図のような物のようです。
すでに問題なく動いている環境をコピーする場合、migrationファイルではなくschema.rbを元にデータベースを構築した方が間違いの元を減らせる、という風にRailsの公式ドキュメントに記載があります。参考ページ
Active Record Migrations — Ruby on Rails Guides
Ruby on Railsでよく使う rake db コマンドまとめ13選 | caramelCase
- 投稿日:2021-02-13T00:23:34+09:00
[Ruby on Rails]編集ページでのエラーメッセージの出し方
自身の失敗を踏まえた備忘録を書いていきます。
エラーメッセージの読み込みの記述
上記の記述は別のファイルでエラー文の繰り返し処理を表した記述になります。
記入すべき所が空欄だったりしたら表示される文章を
エラー文と言います。new.htmlと一緒のエラー文を、
編集ページのedit.htmlでも表示させたい時に書く記述を書いていきます。
(例)
編集ページなのでeditとupdateアクションに定義してある
itemのインスタンス変数を使っていきます。
ここで大事なのはprefixの
item_pathを記述した後のメソッドのpatchです。
PATCH
編集をした情報を送信する際に使用するHTTPメソッドのことです。
editやupdateとややこしい所ですが、
今回のpatchは地味に大事なことなので自分も忘れないように覚えておこうと思います。
