- 投稿日:2021-02-13T23:28:32+09:00
Docker + Rails(Ruby)をバージョンアップ(アップグレード)したお話
Docker環境でRails(Ruby)アプリをアップグレードした記事がない!?
非Docker環境でRubyとRailsをアップグレードする方法はすぐに見つかりました。
伊藤さんが書かれてる下記の記事が本当にわかりやすいです。
ちなみに私は
Docker Rails アップデート、Docker Rails バージョンアップなどでググりましたが見つかりませんでした。ワードが違いますもんねw「じゃあDocker環境でRubyとRailsをアップグレードする記事もすぐ見つかるでしょ」
そう思ったのですが
- 思ったよりも見つからない
- Rubyのアップグレード方法がいくつかパターンがあるみたい
- rbenvを利用してアップグレードする方法(docker-composeによるrails5の開発環境構築時のエラーまとめ【公式通りはうまくいかない】 - よしゆきライフ)
- DockerfileのRubyのバージョンを変更してアップグレードする(個人開発アプリをDockerでコンテナ化してみた - アクトインディ開発者ブログ)
といういくつかのパターンがある印象を受けました。
それがこの投稿に至った理由です。
進め方、参考リンク
基本的には永久保存版!?伊藤さん式・Railsアプリのアップグレード手順 - Qiitaが全体のベースとして進めます。
後々同じことを繰り返さないために遭遇したWARNINGログやエラーログも書いていこうと思います。
読んで欲しい人
- Docker + Railsアプリ作れた人(RSpecでテスト書いてあったら最高!!)
- Docker + Ruby + Rails の環境をアップグレードしようとしている人
今回はRubyの公式からイメージを取得する方法で行なっています。
rbenvでRubyを設定、アップデートする方法は想定していません、ご了承ください(m_ _m)動作環境
version
(アップグレード前)version
(アップグレード後)MacOS Mojave Mojave Ruby 2.5.7 2.7.2 Rails 5.1.7 6.0.3.5 MySQL 5.7 5.7 注意点
あくまでアプリをアップグレードした私の備忘録です。完璧ではありません。
違う部分があればアドバイスいただけると助かります。現在はサンプルアプリのリンクはありませんが、後々作成する予定です。
本題
手順1. 現在使用しているgemを最新にする
RubyとRailsアップグレードを進める前にDockerコンテナ内のgemをアップデートしておきます。
おなじみのコマンドですね。shelldocker-compose run --rm web bundle update私の場合はここで下記のログが表示されました。
shellIgnoring bigdecimal-1.3.5 because its extensions are not built. Try: gem pristine bigdecimal --version 1.3.5 Ignoring bootsnap-1.5.1 because its extensions are not built. Try: gem pristine bootsnap --version 1.5.1 Ignoring mini_racer-0.3.1 because its extensions are not built. Try: gem pristine mini_racer --version 0.3.1 Ignoring msgpack-1.4.0 because its extensions are not built. Try: gem pristine msgpack --version 1.4.0 Ignoring msgpack-1.3.3 because its extensions are not built. Try: gem pristine msgpack --version 1.3.3 Ignoring puma-5.1.1 because its extensions are not built. Try: gem pristine puma --version 5.1.1 Ignoring websocket-driver-0.7.3 because its extensions are not built. Try: gem pristine websocket-driver --version 0.7.3 : :この後は通常の
bundle install、bundle updateと同じ表示がされていました。
これはリンクの通りに下記のコマンドを実行することでbundle installを実行しても上記のログも表示されなくなりました。shelldocker-compose run --rm web gem pristine --all手順2. 最新ではないgemを探して、できる限りバージョンアップする
docker-compose run --rm web bundle outdatedコマンドで最新バージョンを使っていないgemを確認できます。shell$ docker-compose run --rm web bundle outdated Creating app_for_job_change_web_run ... done Fetching https://github.com/thoughtbot/shoulda-matchers.git Fetching gem metadata from https://rubygems.org/......... Fetching gem metadata from https://rubygems.org/. Resolving dependencies................................................ Outdated gems included in the bundle: * actioncable (newest 6.1.1, installed 5.1.7) * actionmailer (newest 6.1.1, installed 5.1.7) * actionpack (newest 6.1.1, installed 5.1.7) * actionview (newest 6.1.1, installed 5.1.7) * activejob (newest 6.1.1, installed 5.1.7) * activemodel (newest 6.1.1, installed 5.1.7) * activerecord (newest 6.1.1, installed 5.1.7) * activesupport (newest 6.1.1, installed 5.1.7) * arel (newest 9.0.0, installed 8.0.0) * childprocess (newest 4.0.0, installed 3.0.0) * listen (newest 3.4.1, installed 3.1.5, requested >= 3.0.5, < 3.2) in groups "development" * polyamorous (newest 2.3.2, installed 2.3.0) * puma (newest 5.2.0, installed 3.12.6, requested ~> 3.7) in groups "default" * rails (newest 6.1.1, installed 5.1.7, requested ~> 5.1.7) in groups "default" * rails-i18n (newest 6.0.0, installed 5.1.3) in groups "default" * railties (newest 6.1.1, installed 5.1.7) * ransack (newest 2.4.2, installed 2.3.0) in groups "default" * shoulda-matchers (newest 4.5.1, installed 3.1.2 4b160bd) in groups "test" * tzinfo (newest 2.0.4, installed 1.2.9) * web-console (newest 4.1.0, installed 3.7.0) in groups "development" * webpacker (newest 5.2.1, installed 4.3.0) in groups "default" * websocket-driver (newest 0.7.3, installed 0.6.5)ちなみに伊藤さんの記事で紹介されている
bundle_outdated_formatterというgemを使うと下記のように表示されます(emsk/bundle_outdated_formatter: Formatter forbundle outdatedcommand)。
結果表示までの時間もgemを使用したやりかたの方が早かったです!!
it's so beautiful!!shell# ローカルにインストールする $ gem install bundle_outdated_formatter $ docker-compose run --rm web bundle outdated | bof Creating app_for_job_change_web_run ... done ┌──────────────────┬────────┬───────────┬─────────────────┬─────────────┐ │ gem │ newest │ installed │ requested │ groups │ ├──────────────────┼────────┼───────────┼─────────────────┼─────────────┤ │ actioncable │ 6.1.1 │ 5.1.7 │ │ │ │ actionmailer │ 6.1.1 │ 5.1.7 │ │ │ │ actionpack │ 6.1.1 │ 5.1.7 │ │ │ │ actionview │ 6.1.1 │ 5.1.7 │ │ │ │ activejob │ 6.1.1 │ 5.1.7 │ │ │ │ activemodel │ 6.1.1 │ 5.1.7 │ │ │ │ activerecord │ 6.1.1 │ 5.1.7 │ │ │ │ activesupport │ 6.1.1 │ 5.1.7 │ │ │ │ arel │ 9.0.0 │ 8.0.0 │ │ │ │ childprocess │ 4.0.0 │ 3.0.0 │ │ │ │ listen │ 3.4.1 │ 3.1.5 │ >= 3.0.5, < 3.2 │ development │ │ polyamorous │ 2.3.2 │ 2.3.0 │ │ │ │ puma │ 5.2.0 │ 3.12.6 │ ~> 3.7 │ default │ │ rails │ 6.1.1 │ 5.1.7 │ ~> 5.1.7 │ default │ │ rails-i18n │ 6.0.0 │ 5.1.3 │ │ default │ │ railties │ 6.1.1 │ 5.1.7 │ │ │ │ ransack │ 2.4.2 │ 2.3.0 │ │ default │ │ shoulda-matchers │ 4.5.1 │ 3.1.2 │ │ test │ │ tzinfo │ 2.0.4 │ 1.2.9 │ │ │ │ web-console │ 4.1.0 │ 3.7.0 │ │ development │ │ webpacker │ 5.2.1 │ 4.3.0 │ │ default │ │ websocket-driver │ 0.7.3 │ 0.6.5 │ │ │ └──────────────────┴────────┴───────────┴─────────────────┴─────────────┘めっちゃ表示されました...
アプリを作成してからバージョンアップをこまめにしてこなかったのが原因です(m_ _m)ここで表示されている中で特に注目していただきたいのは 現状のRailsと同じバージョン番号を表示、使用しているgem と バージョン番号の先頭の数字が変わっているgem です。
Railsと同じバージョン番号のgemは、Railsアプリを作成するときに必須のgemであり、Rails本体ををアップグレードすれば一緒にバージョン番号が上がると考えて問題ないと思います(
actioncable,railtiesなど)。次にバージョン番号の先頭の数字が変わっているgem(今回の場合は
webpackerやregexp_parserなど)についてですが、こちらは伊藤さんが対処法を書かれていますので、一読していただければわかります。
ひどい時はアプリが動かなくなる可能性もあるみたいです。もしgemのバージョン指定の意味がわからない場合はこちらの記事でわかると思います。
ちなみに私の場合は上記の表示されるgemの数が減りませんでした(m_ _m)
Railsのバージョンを上げていくにつれて表示される数が減っていったので、もし頑張っても数が減らないならRailsのバージョンをアップするのもありかもしれません。手順3. developmentとtestグループのgemをバージョンアップする
ここで本番環境に影響の出ないdevelopment環境とtest環境のgemをバージョンアップします。
その前にGemfileにとても大事な変更を行います。
それはgemのバージョン指定の記述を削除することです(Railsは対象外)。
下記のように全てのgemに対してバージョン指定を削除しましょうというお話です。Gemfile- gem 'mysql2', '>= 0.3.18', '< 0.6.0' - gem 'puma', '~> 3.7' + gem 'mysql2' + gem 'puma' gem 'rails', '~> 5.1.7' # Railsのgemのバージョン指定は削除しないこと!!Rails以外のバージョンアップするにはshellで下記のコマンドを実行します。
developmentとtest環境からアップグレードします。shell$ docker-compose run --rm web bundle update -g development -g testshell$ docker-compose run --rm web bundle update -g development -g test Creating app_for_job_change_web_run ... done Fetching https://github.com/thoughtbot/shoulda-matchers.git Fetching gem metadata from https://rubygems.org/......... Fetching gem metadata from https://rubygems.org/. Resolving dependencies......... : # gemのインストールなどは省略します : : Bundler attempted to update awesome_print but its version stayed the same Bundler attempted to update byebug but its version stayed the same Bundler attempted to update factory_bot_rails but its version stayed the same Bundler attempted to update faker but its version stayed the same Bundler attempted to update gimei but its version stayed the same Bundler attempted to update pry-byebug but its version stayed the same Bundler attempted to update pry-rails but its version stayed the same Bundler attempted to update rails-flog but its version stayed the same Bundler attempted to update rspec-rails but its version stayed the same Bundler attempted to update capybara but its version stayed the same Bundler attempted to update launchy but its version stayed the same Bundler attempted to update rspec_junit_formatter but its version stayed the same Bundler attempted to update selenium-webdriver but its version stayed the same Bundler attempted to update shoulda-matchers but its version stayed the same Bundler attempted to update simplecov but its version stayed the same Bundler attempted to update vcr but its version stayed the same Bundler attempted to update webdrivers but its version stayed the same Bundler attempted to update webmock but its version stayed the same同じようなWARNINGがたくさん表示されました。
Bundler attempted to update xxx but its version stayed the same
をそのままググるとリンクのようにこの警告が原因で、Rails自体がアップグレードできない場合もあるみたいです。私の場合は色々試みましたがこの時点では解決できなかったので、放置して次の手順へ進みました。
一応念のため、RSpecでテストを実行して動作的に問題がないことを確認してから次に進めています。
(ちなみにアプリのアップグレードが完了した後もdocker-compose run --rm web bundle update -g development -g testを実行すると同じようにログが出ます... 解消できない...)手順4. Rails以外ののgemを全てバージョンアップする
今度は本番環境を含むgemをバージョンアップしましょう
ここもRailsは対象外です。
やっていることは上とほぼ同じなので割愛しますが
docker-compose run --rm web bundle updateを実行するdocker-compose run --rm web rspecでテストを実行するという手順をふみます。
問題なくバージョンアップできていれば次に進みます。
例のごとくRSpecでテストを実行して動作的に問題がないことを確認します。さぁ、
これで準備できたから
Railsをアップグレードするぞ!!とはなりません。
手順5. Rubyを(できるだけ)バージョンアップする
※Rubyのバージョンが最新安定版であれば問題ありません。次のRailsをアップグレードする手順へ進んでください。
Rubyを段階的にアップグレードします(
2.6.6->2.7.2みたいな感じ)。
ちなみに2021年1月現在の最新安定版のRubyバージョンは 3.0.0 です(Rubyのトップページ)。理由としては下記が挙げられます。
- Rubyをアップグレードすると仕様が変わることがある(アプリが動かなくなる原因にも)
- セキュリティやパフォーマンスに悪い影響が出る可能性がある
なのでアップグレードは定期的にしましょう!!
そして個人的に重要だと思うのはアップグレードすることに対して十分な時間と心のゆとりをもつことです。
それさえあればなんとかなります(なると思います)。私の場合は記事投稿地点でのRubyのバージョンが
2.5.7です。
最新のRubyバージョンまでアップするためには
2.5.7~>2.6.6~>2.7.2~>3.0.0と
32回のアップグレードが必要になります。では実際にアップグレードしていきます。
まず
Dockerfileの記述を変更します。Dockerfile- ARG RUBY_VERSION=2.5.7 + ARG RUBY_VERSION=2.6.6 FROM ruby:$RUBY_VERSIONちなみにここで指定しているイメージの数値は必ずDockerHubのRuby公式イメージに存在する数値に書き換えてください!!(ruby - Docker Hub)
私は2.6.6にすべき値を2.6.0とDockerHubを確認せずに変更して、エラーの原因がそれだと気づかず数日を浪費しました。話を戻しますが、
私はDockerfileで定義命令としてARGを使っているので上記の書き方になりますが、使っていなければDockerfile- FROM ruby:2.5.7 + FROM ruby:2.6.6という書き方になります。
その後下記コマンドを順に実行していきます。
shelldocker-compose build --no-cache docker-compose run --rm web bundle install # mv Gemfile.lock tmp <- bundle install がうまくいかないときに実行 # docker-compose run --rm web bundle install <- mv Gemfile.lock tmp を実行したら再度bundle installする docker-compose run --rm web gem pristine --all # これを実行すると Ignoring <gem_name>-<version> because its extensions are not built. Try: gem pristine <gem_name> --version <version> という警告が表示されなくなる上記のコマンドの意味は下記に書いておきます。
docker-compose build --no-cache: cacheを使わずにイメージをビルドする。cacheが有効になっていると設定変更がうまくされない場合があります(docker-compose build | Docker ドキュメント)。今回はかなり大きめな変更なので--no-cacheオプションを付加します。mv Gemfile.lock tmp: Gemfile.lockが原因でうまくgemが入らない時があります。そんなときはGemfile.lockの中の記述を空にする方法がありますが、それと同じ効果があります。docker-compose run --rm web bundle install: Rubyのアップグレードを行ったのでgemの対応バージョンも変化する場合があるので実行します。docker-compose run --rm web gem pristine --all:詳細はこのリンクに委ねます。そしてここでRSpecでテストします。
問題なければ、DockerのRubyイメージがちゃんと変更した新しいバージョンかチェックしましょう。
チェックするには下記のコマンドを実行します。shell$ docker-compose run --rm web ruby -v Creating app_for_job_change_web_run ... done ruby 2.6.6p146 (2020-03-31 revision 67876) [x86_64-linux]Dockerfileで変更した数値と合致していれば成功です。
最後に隠しファイルである.ruby-versionを開いてみてください。
私の場合は後から気づいたのですが、基本的には自動でRailsアプリで使用しているRubyのバージョンに自動で切り替わるらしいのですが、私の場合は切り替わらなかったので自分で修正しました。.ruby-version- 2.5.7 + 2.6.6これでRubyのアップグレードは(とりあえず)完了です。
そしてやっと本題のRailsのアップグレードに取り掛かります。ちなみに
- Rubyのイメージのバージョンを変更して(
docker-compose build --no-cache)、bundle installも問題なくできた場合、それ以降で発生するエラーは通常のRailsで発生するエラーと同じはずです。 じっくり、こつこつと修正していきましょう^ ^- 試していてわかったのですが、Rubyの
3.0.0とRailsの5.2.4.4は現在互換性がありません(調べ方はこのリンクの過去も含めた複数バージョンへのサポートを提供しているgemというところに書いてある)。- Rubyの
3.0.0と互換性のあるRailsのバージョンは6.1.0以上のようです(アプリケーションをRuby3にあげるときにやること - Qiita)。- この記事ではとりあげていませんが、CircleCIを使用されている場合はCircleCI側のRubyのバージョンも変更する必要があるので注意してください。
自分の事例をそのままま書くと下記になります。
アップグレード Ruby ver Rails ver 可否 初期状態 2.5.7 5.1.7 OK 1回目 2.6.6 5.1.7 OK 2回目 2.7.2 5.1.7 OK 3回目 2.7.2 5.2.4.4 OK 4回目 2.7.2 6.0.3.4 OK 5回目 3.0.0 6.0.3.4 NG 4回目 2.7.2(ダウングレード) 6.0.3.4 OK 手順6. Railsをバージョンアップする
ようやく本題、Railsのアップグレードにとりかかります。
ここで注意しなければならないことは、当たり前かもしれませんが
RubyとRailsの互換性を確認すること です。
これが合っていないと作成したアプリが壊れてしまいかねませんのでご注意ください。
確認方法はRails アップグレードガイド - Railsガイドに互換性のあるRubyとRailsのバージョンが記載されています。
ちなみに下記リンクはRailsの全バージョン履歴です(Rubyの全バージョン履歴わかれば誰か教えてください)。私の作成当初の構成は
- Ruby:
2.5.7- Rails:
5.1.7だったので
Railsはまず5.2.4.4にまで上げることにしました。Railsのバージョンを上げるためには Gemfile の記述を下記のように変更します。
Gemfile- gem 'rails', '~> 5.1.7' + gem 'rails', '5.2.4.4'バージョンは最新のパッチバージョンでカッチリ固定してあげてください。
準備ができたらshellで下記コマンドを実行してRailsも含めたバージョンアップを行いますshelldocker-compose run --rm web bundle updateバージョンアップが完了したらRspecでテストをします。
テストがOKならば無事Railsのアップグレードがひとまず完了です。手順7. load_defaultsやnew_framework_defaults_x_x.rbを設定する
伊藤さんの記事へのリンクをそのまま貼らせていただいてますが、
アップグレードによってデフォルトの挙動が変わったりする時があります。
それを前のバージョンのと同じように動作させるための設定をする必要がある場合もあります。config.load_defaultsとnew_framework_defaults_x_x.rbの関係を詳しく調べてみた - Qiita
Ruby、Railsのアップグレードの流れは完了
これでDocker + Ruby + Rails アップグレードの流れは理解できたと思います。
バージョンが古い場合は大変な労力と時間がかかりますが、手順の5から7を繰り返せばアップグレードはできると思います!!警告一覧
HEADS UP! i18n 1.1 changed fallbacks to exclude default locale. But that may break your application.
docker-compose run --rm web bundle updateをした時にgemDeviseから表示されました。
ログとしては下記のように表示されました。terminalHEADS UP! i18n 1.1 changed fallbacks to exclude default locale. But that may break your application. Please check your Rails app for 'config.i18n.fallbacks = true'. If you're using I18n (>= 1.1.0) and Rails (< 5.2.2), this should be 'config.i18n.fallbacks = [I18n.default_locale]'. If not, fallbacks will be broken in your app by I18n 1.1.x. For more info see: https://github.com/svenfuchs/i18n/releases/tag/v1.1.0
If you're using I18n (>= 1.1.0) and Rails (< 5.2.2), this should be 'config.i18n.fallbacks = [I18n.default_locale]'.でググると出てくる、下記の4つのリンクを読めば解決方法や詳細がわかります。
- bundle install(rails new)すると”HEADS UP! i18n 1.1 changed fallbacks to exclude default locale."と言われる - 真夜中エンジニアリング
- HEADS UP! i18n 1.1 changed fallbacks to exclude default locale. But that may break your application. - Qiita
- config.i18n.fallbacks の BREAKING CHANGE について | deadwood
- config.i18n.fallbacksのメッセージについて - Qiita
Ignoring bigdecimal-1.3.5 because its extensions are not built. Try: gem pristine bigdecimal --version 1.3.5
docker-compose build --no-cacheを実行してbundle installを実行したときに表示されました。
docker-compose run --rm web gem pristine --allを実行すれば表示されなくなります。The dependency tzinfo-data (>= 0) will be unused by any of the platforms Bundler is installing for. Bundler is installing for ruby but the dependency is only for x86-mingw32, x86-mswin32, x64-mingw32, java. To add those platforms to the bundle, run
bundle lock --add-platform x86-mingw32 x86-mswin32 x64-mingw32 java.
bundle install、bundle update時に表示される。
基本的にWindows以外の開発環境では必要ないと思われるので、
削除する or コメントアウトする という対処法で問題ないと思われます。
下記リンクに詳細が書いてあります。Bundler attempted to update rails but its version stayed the same
Rubyが2.7.2、Railsが6.0.3.4の時に
bundle update railsを実行しようとして表示された警告です。。
使っていたBundlerのバージョンが1.17.3と古く、バージョンアップしてくださいという警告です。
[Ruby] bundler 2 へのアップグレード方法 | DevelopersIOを参考に進めていきます。terminal$ docker-compose run --rm web bundle update --bundler Creating app_for_job_change_web_run ... done Using rake 13.0.3 Using concurrent-ruby 1.1.8 Using i18n 1.8.8 Using minitest 5.14.3 : : : Warning: the lockfile is being updated to Bundler 2, after which you will be unable to return to Bundler 1.上記のコマンドを使用して私の場合はBundlerのバージョンが 1.17.4 -> 2.1.4 に無事バージョンアップができました。
DEPRECATION WARNING: Uniqueness validator will no longer enforce case sensitive comparison in Rails 6.1. To continue case sensitive comparison on the :name attribute in Foodcategory model, passcase_sensitive: trueoption explicitly to the uniqueness validator.Railsを 5.2系 から 6.0系 へバージョンアップしたときに表示されます。
解決法(?)は下記がわかりやすいですエラー一覧
Your Ruby version is x.x.x, but your Gemfile specified y.y.y
GemfileにRubyのバージョンを明記している場合にエラーが発生します。
指定を修正してあげるだけでエラーが解消できます。Gemfile- ruby 'y.y.y' + ruby 'x.x.xwarning: already initialized constant Shoulda::Matchers::ActiveModel::ValidateInclusionOfMatcher::ARBITRARY_OUTSIDE_STRING
terminal上では下記のように表示されていました。
(Railsは5.1系のまま、)Rubyを2.6.6から2.7.2に上げた時にRSpecのテストで発生したエラーです。terminalFailure/Error: require File.expand_path('../config/environment', __dir__) NoMethodError: undefined method `new' for BigDecimal:Class # /usr/local/bundle/bundler/gems/shoulda-matchers-4b160bd19ecc/lib/shoulda/matchers/active_model/validate_inclusion_of_matcher.rb:273:in `<class:ValidateInclusionOfMatcher>'私の場合はtest環境に追加されているgemの
shoulda-matchersのオプション(?)を削除することで問題なく動作するようになりました(rails5系でもオプションを指定する必要がいつのまにかなくなっていました)。Gemfile- gem 'shoulda-matchers', - git: 'https://github.com/thoughtbot/shoulda-matchers.git', - branch: 'rails-5' + gem 'shoulda-matchers',undefined method `operations' for #<ActionDispatch::MiddlewareStack
wrong number of arguments (given 3, expected 2) というパターンもありました。
(Railsは5.1系のまま)Rubyを2.7.2から3.0.0に上げた時にRSpecのテストで発生したエラーです。
原因はRubyとRailsの互換性にありました。
Ruby3.0.0に対応しているRailsのバージョンは6.1.0以上のようです。
Rubyを2.7.2に戻せばエラーは解消されます。terminal上でのログは下記の通りです。
terminaldocker-compose run --rm web rspec Creating app_for_job_change_web_run ... done /usr/local/bundle/gems/bundler-1.17.3/lib/bundler/shared_helpers.rb:29: warning: Pathname#untaint is deprecated and will be removed in Ruby 3.2. /usr/local/bundle/gems/bundler-1.17.3/lib/bundler/shared_helpers.rb:118: warning: Pathname#untaint is deprecated and will be removed in Ruby 3.2. /usr/local/bundle/gems/bundler-1.17.3/lib/bundler/shared_helpers.rb:118: warning: Pathname#untaint is deprecated and will be removed in Ruby 3.2. /usr/local/bundle/gems/bundler-1.17.3/lib/bundler/shared_helpers.rb:35: warning: Pathname#untaint is deprecated and will be removed in Ruby 3.2. /usr/local/bundle/gems/bundler-1.17.3/lib/bundler/shared_helpers.rb:35: warning: Pathname#untaint is deprecated and will be removed in Ruby 3.2. /usr/local/bundle/gems/bundler-1.17.3/lib/bundler/shared_helpers.rb:44: warning: Pathname#untaint is deprecated and will be removed in Ruby 3.2. /usr/local/bundle/gems/bundler-1.17.3/lib/bundler/shared_helpers.rb:118: warning: Pathname#untaint is deprecated and will be removed in Ruby 3.2. /usr/local/bundle/gems/bundler-1.17.3/lib/bundler/shared_helpers.rb:35: warning: Pathname#untaint is deprecated and will be removed in Ruby 3.2. An error occurred while loading ./spec/features/foodcategory_spec.rb. Failure/Error: require File.expand_path('../config/environment', __dir__) ArgumentError: wrong number of arguments (given 3, expected 2) # /usr/local/bundle/gems/actionpack-5.1.7/lib/action_dispatch/middleware/static.rb:109:in `initialize' # /usr/local/bundle/gems/actionpack-5.1.7/lib/action_dispatch/middleware/stack.rb:35:in `new' # /usr/local/bundle/gems/actionpack-5.1.7/lib/action_dispatch/middleware/stack.rb:35:in `build' # /usr/local/bundle/gems/actionpack-5.1.7/lib/action_dispatch/middleware/stack.rb:99:in `block in build' # /usr/local/bundle/gems/actionpack-5.1.7/lib/action_dispatch/middleware/stack.rb:99:in `each' # /usr/local/bundle/gems/actionpack-5.1.7/lib/action_dispatch/middleware/stack.rb:99:in `inject' # /usr/local/bundle/gems/actionpack-5.1.7/lib/action_dispatch/middleware/stack.rb:99:in `build' # /usr/local/bundle/gems/railties-5.1.7/lib/rails/engine.rb:508:in `block in app' # /usr/local/bundle/gems/railties-5.1.7/lib/rails/engine.rb:504:in `synchronize' # /usr/local/bundle/gems/railties-5.1.7/lib/rails/engine.rb:504:in `app' # /usr/local/bundle/gems/railties-5.1.7/lib/rails/application/finisher.rb:45:in `block in <module:Finisher>' # /usr/local/bundle/gems/railties-5.1.7/lib/rails/initializable.rb:30:in `instance_exec' # /usr/local/bundle/gems/railties-5.1.7/lib/rails/initializable.rb:30:in `run' # /usr/local/bundle/gems/railties-5.1.7/lib/rails/initializable.rb:59:in `block in run_initializers' # /usr/local/bundle/gems/railties-5.1.7/lib/rails/initializable.rb:58:in `run_initializers' # /usr/local/bundle/gems/railties-5.1.7/lib/rails/application.rb:353:in `initialize!' # ./config/environment.rb:5:in `<top (required)>' # ./spec/rails_helper.rb:3:in `<top (required)>' # ./spec/features/foodcategory_spec.rb:1:in `<top (required)>' An error occurred while loading ./spec/models/cuisine_spec.rb. Failure/Error: require File.expand_path('../config/environment', __dir__) NoMethodError: undefined method `operations' for #<ActionDispatch::MiddlewareStack:0x000055c6d7c7e388 @middlewares=[Rack::Sendfile, ActionDispatch::Static, ActionDispatch::Executor, ActiveSupport::Cache::Strategy::LocalCache::Middleware, Rack::Runtime, Rack::MethodOverride, ActionDispatch::RequestId, ActionDispatch::RemoteIp, Rails::Rack::Logger, ActionDispatch::ShowExceptions, ActionDispatch::DebugExceptions, ActionDispatch::Callbacks, ActionDispatch::Cookies, ActionDispatch::Session::CookieStore, ActionDispatch::Flash, Rack::Head, Rack::ConditionalGet, Rack::ETag, Warden::Manager]> # /usr/local/bundle/gems/railties-5.1.7/lib/rails/configuration.rb:76:in `+' # /usr/local/bundle/gems/railties-5.1.7/lib/rails/application.rb:525:in `build_middleware' # /usr/local/bundle/gems/railties-5.1.7/lib/rails/engine.rb:507:in `block in app' # /usr/local/bundle/gems/railties-5.1.7/lib/rails/engine.rb:504:in `synchronize' # /usr/local/bundle/gems/railties-5.1.7/lib/rails/engine.rb:504:in `app' # /usr/local/bundle/gems/railties-5.1.7/lib/rails/application/finisher.rb:45:in `block in <module:Finisher>' # /usr/local/bundle/gems/railties-5.1.7/lib/rails/initializable.rb:30:in `instance_exec' # /usr/local/bundle/gems/railties-5.1.7/lib/rails/initializable.rb:30:in `run' # /usr/local/bundle/gems/railties-5.1.7/lib/rails/initializable.rb:59:in `block in run_initializers' # /usr/local/bundle/gems/railties-5.1.7/lib/rails/initializable.rb:58:in `run_initializers' # /usr/local/bundle/gems/railties-5.1.7/lib/rails/application.rb:353:in `initialize!' # ./config/environment.rb:5:in `<top (required)>' # /usr/local/bundle/gems/activesupport-5.1.7/lib/active_support/dependencies.rb:292:in `require' # /usr/local/bundle/gems/activesupport-5.1.7/lib/active_support/dependencies.rb:292:in `block in require' # /usr/local/bundle/gems/activesupport-5.1.7/lib/active_support/dependencies.rb:258:in `load_dependency' # /usr/local/bundle/gems/activesupport-5.1.7/lib/active_support/dependencies.rb:292:in `require' # ./spec/rails_helper.rb:3:in `<top (required)>' # /usr/local/bundle/gems/activesupport-5.1.7/lib/active_support/dependencies.rb:292:in `require' # /usr/local/bundle/gems/activesupport-5.1.7/lib/active_support/dependencies.rb:292:in `block in require' # /usr/local/bundle/gems/activesupport-5.1.7/lib/active_support/dependencies.rb:258:in `load_dependency' # /usr/local/bundle/gems/activesupport-5.1.7/lib/active_support/dependencies.rb:292:in `require' # ./spec/models/cuisine_spec.rb:1:in `<top (required)>' # /usr/local/bundle/gems/activesupport-5.1.7/lib/active_support/dependencies.rb:286:in `load' # /usr/local/bundle/gems/activesupport-5.1.7/lib/active_support/dependencies.rb:286:in `block in load' # /usr/local/bundle/gems/activesupport-5.1.7/lib/active_support/dependencies.rb:258:in `load_dependency' # /usr/local/bundle/gems/activesupport-5.1.7/lib/active_support/dependencies.rb:286:in `load'/config/boot.rb:4:in `require': cannot load such file -- bootsnap/setup (LoadError)
Ruby2.7.2の状態でRailsを5.2.4.4にアップグレードしたあとの動作確認中に発生したエラー。
Rails5.2からbootsnapが導入されましたが、Gemfileに自動的にbootsnapが追記されず、自分で追記していなかったことが原因です。
Gemfileに下記のように追記することでエラーが解消しました。
導入されたことがわかるのはRailsDiffが、
bootsnapについてはbootsnapのせいでRails5.2とかが動かない人へ - Qiita
がわかりやすいです。Gemfilegem 'bootsnap', '>= 1.1.0', require: falseCan't resolve image into URL: undefined method `to_model'
Ruby2.7.2の状態でRailsを5.2.4.4にアップグレードしたあとの動作確認中に発生したエラー。
画像アップロード用のgemとしてcarrierwaveを使用しており、それに伴うエラーです。そのままググると全く同じ状況のエラー解決法があったので(ruby on rails - Carrierwave: Can't resolve image into URL: undefined method `to_model' - Stack Overflow)参考にしたところ解決しました。
ちなみにActiveStrageでも同じようなことが起こる場合があるみたいです(【Rails】ActiveStorageを用いた画像複数枚投稿のエラー - Qiita)
Migrations are pending. To resolve this issue, run: rails db:migrate RAILS_ENV=development
Ruby2.7.2のときに
Railsを 5.2.4.4から 6.0.3.4 にアップグレードした際に発生したエラーです。
このアップグレードにはどうやら標準で搭載されているActiveStrageに対してのDB設計の修正が行われており、
アップグレードした際にマイグレーションファイルが追加されています。
追加されたmigrationファイルをDBに反映させてあげればいいだけなので下記コマンドを実行することでエラーが解消されます。terminaldocker-compose run --rm web rails db:migrate最後に
Qiita初投稿のこの記事を書くのに何日費やしたのかわかりません(カウントしておけばよかった...)。
普段から引用して問題解決などしていますが、良記事を投稿している方の偉大さがとても身にしみました。参考リンクなどなど
- Ruby系のコマンドでits extensions are not built
- 個人開発アプリをDockerでコンテナ化してみた - アクトインディ開発者ブログ
- 永久保存版!?伊藤さん式・Railsアプリのアップグレード手順 - Qiita
- railsのバージョンを確認しただけなのにWarningがでた件 - helen's blog
- emsk/bundle_outdated_formatter: Formatter for
bundle outdatedcommand- RubyGem のバージョンを決める時は Semantic Versioning に従おう - yu8mada
- Ruby - Ruby on Railsがアップグレードされない|teratail
- ダウンロード(Ruby公式)
セマンティック・バージョニングと、Gemfileのバージョン指定方法 - Gemfileでよく見る
~>を使いこなす - Qiita
- 投稿日:2021-02-13T19:38:01+09:00
macOS で『はじめて読む486』の環境構築
はじめに
macOS で『はじめて読む486』のサンプルプログラムを動かすための環境構築についてまとめました。
末尾の参考リンクの記事と重複する部分がありますが、以下が本記事の特徴です。
- FreeDOS 1.2 のインストール手順を詳細に記載されている (※ YouTube 動画もあります)
- macOS での環境構築方法となっている
- ソースコードのコンパイル方法まで記載されている
FreeDOS 1.2 のインストール
$ brew install wget $ brew install qemu $ wget https://www.ibiblio.org/pub/micro/pc-stuff/freedos/files/distributions/1.2/FD12CD.iso $ qemu-img create -f raw freedos.img 200M $ qemu-system-x86_64 -cpu 486 -rtc base=localtime -drive file=freedos.img,format=raw -cdrom FD12CD.iso -boot dテキストだけだとわかりにくいので、YouTube 動画 (How to install FreeDOS) として残しておきました。
- "Welcome to FreeDOS 1.2" で [Install to harddisk] を選択
- "What is your preferred language?" で [English] を選択
- "Do you want to proceed?" で [Yes - Continue with the installation] を選択
- "Do you want to partition your drive?" で [Yes - Partition drive C:] を選択
- "Do you want to use large disk (FAT32) support (Y/N)?" で [Y] を選択
- "Enter choice" で [1] を選択 (Craete DOS partition or Logical DOS Drive)
- "Enter choice" で [1] を選択 (Create Primary DOS Partition)
- "Do you wish to use the maximum available size for a Primary DOS Partition and make the partition active (Y/N)?" で [Y] を選択
- Esc を 3 回押下
- "Do you want to reboot now?" で [Yes - Please reboot now] を選択
- "Welcome to FreeDOS 1.2" で [Install to harddisk now] を選択
- "What is your preferred language?" で [English] を選択
- "Welcome to the FreeDOS 1.2 installation program" で [Yes 1. Continue with the installation] を選択
- "Drive C: does not appear to be formated." で [Yes - Please erase and format drive C:] を選択
- "Formatting drive C:..." で Enter を押下
- "Please select your keyboard layout." で [US English (Default)] を選択
- "What FreeDOS packages do you want to install?" で [Full installation] を選択
- "Do you want to isntall now?" で [Yes - Please install FreeDOS 1.2] を選択
- "Installation of FreeDOS 1.2 is now complete." が出ればインストール成功
- 一旦、ウィンドウを閉じる (マウスカーソルが表示されていなくなっていたら、Ctrl + Alt + G で復活します。)
- FreeDOS を起動
$ qemu-system-x86_64 -cpu 486 -rtc base=localtime -drive file=freedos.img,format=rawしばらく待って "C:>" が表示されれば OK (次回以降も同じコマンドで起動できる)
Open Watcom C Compiler のインストール
C コンパイラとアセンブラを、Open Watcom からインストールする。
$ hdiutil attach freedos.img
/dev/disk2              FDisk_partition_scheme
/dev/disk2s1            DOS_FAT_16                      /Volumes/FREEDOS2016
$ wget http://www.ibiblio.org/pub/micro/pc-stuff/freedos/files/repositories/latest/devel/ow.zip
$ mkdir ow & unzip ow.zip -d ow/
$ cp -r ow/DEVEL /Volumes/FREEDOS2016
$ hdiutil detach /dev/disk2
$ qemu-system-x86_64 -cpu 486 -rtc base=localtime -drive file=freedos.img,format=raw
C:\AUTOEXEC.BATに以下の行を追加する。
テキストエディタは edit が利用できます。call C:\DEVEL\OW\OWSETENV.BATソースコードの実行
ソースコードのダウンロード
$ brew install git
$ git clone https://github.com/tkmc/486
$ hdiutil attach freedos.img
/dev/disk2              FDisk_partition_scheme
/dev/disk2s1            DOS_FAT_16                      /Volumes/FREEDOS2016
$ cp -r 486/SOURCE /Volumes/FREEDOS2016/
$ hdiutil detach /dev/disk2
$ qemu-system-x86_64 -cpu 486 -rtc base=localtime -drive file=freedos.img,format=raw
起動時のオプションで「3 - Load FreeDOS without drivers (Emergency Mode)」を選択する。
> cd SOURCE
> rename MAKEFILE.OW MAKEFILE
コンパイルと実行
エラトステネスのふるい
> wmake sieve_c.exe
> sieve_c 61701
...
6208 prime numbers in 2..61701
> sieve_c 64000
Can't alloc memory
リアルモードとプロテクトモード間の遷移
> wmake testprot.exe
> testprot
Now going to Protected mode...
Returned from Protected mode.
リアルモードのセグメントの確認
> wmake rmseg.exe
> rmseg
cs:1690 ds:188a es:1680 ss:188a
プロテクトモードのセグメントの確認
> wmake pmseg.exe
> pmseg
Before ***********
0008: Base=00016900 Lim=023FF         P dpl:0 seg ER-Code
0010: Base=00018D00 Lim=0FFFF         P dpl:0 seg RW-Data
0018: Base=00018D00 Lim=00000         P dpl:0 seg RW-Stack
0020: Base=00016900 Lim=0FFFF         P dpl:0 seg ER-Code
0028: Base=00018D00 Lim=0FFFF         P dpl:0 seg RW-Data
0030: Base=00000000 Lim=FFFFF G       P dpl:3 seg RW-Data
val:0
After  ***********
val:1
0008: Base=00016900 Lim=023FF         P dpl:0 seg ER-Code
0010: Base=00018D00 Lim=0FFFF         P dpl:0 seg RW-Data  A
0018: Base=00018D00 Lim=00000         P dpl:0 seg RW-Stack A
0020: Base=00016900 Lim=0FFFF         P dpl:0 seg ER-Code
0028: Base=00018D00 Lim=0FFFF         P dpl:0 seg RW-Data  A
0030: Base=00000000 Lim=FFFFF G       P dpl:3 seg RW-Data
32 ビットのアドレスサイズを使った例題プログラム
> wmake sieve32.exe
> wmake putpmem.exe
> wmake getpmem.exe
> sieve32 64000 > sieve.txt
> putpmem sieve.txt
> getpmem
...
6413 prime numbers in 2..64000
(残りのプログラムについても、順次更新予定)
おまけ
DEBUG コマンドの使い方
A [address](Assemble): アセンブリコードを入力するD [address] [address](Dump): メモリの内容をダンプするE address [list](Edit): メモリの内容を編集するG[=address] [address](Go): プログラムを実行するN(Name): ファイル名を指定するQ(Quit): 終了するR [register](Register): レジスタを表示もしくは設定するT [address]: 指定したメモリのプログラムを 1 命令実行し、全レジスタの内容と次に実行する命令を表示するU [address] [address](Unassemble): 逆アセンブルを行うW(Write): メモリ内容をファイルに出力する?(Help): ヘルプ画面を表示するOpen Watcom C Compiler の使い方
※ FreeDOS を QEMU で動かす と同一の内容です。
- コンパイル:
wcc -ecc -ms a.c
-ecc: 呼び出し規約として cdecl を使用-ms: small memory model- アセンブル:
wasm -ms b.asm- コンパイルとリンク:
wcl -ecc -fe=c.exe b.obj c.c
-fe: 出力実行ファイル名- ディスアセンブル:
wdis -l=d.lst d.obj
-l: 出力ファイル名参考リンク
- 投稿日:2021-02-13T18:59:01+09:00
Big Surにアップデート後、Google Meetが使えなくなった場合の対処法
はじめに
macOSをBig Surにアップデートした後、Google Meetで相手からの映像、音声が全く届かなくなってしまい、しばらくGoogle Meetを使うときのみ別のPCを使用していたのですが、ようやく原因および対処法がわかりましたので、紹介したいと思います。事象としては、Big Sur Google Meet Bug (YouTube) が分かりやすいと思います。
確認環境
- macOS Big Sur (11.2.1)
- Google Chrome (88.0.4324.150)
- Safari (14.0.3)
- Firefox (85.0.1)
原因
以下の条件が重なった場合にこの不具合が再現します。
- macOSがBig Surである
- ブラウザがGoogle Chrome、もしくはSafariである
- 有線LANでインターネット接続してる
対処法
対処法としては、以下の3つで解消することを確認しています。
- IPv6の設定をリンクローカルのみにする
- インターネット接続を有線LANからWifiに切り替える
- Chrome/Safariではなく、Firefoxを使用する
IPv6の設定をリンクローカルのみに設定するには
「システム環境設定」→「ネットワーク」→「USB 10/100/1000 LAN」を選択し「詳細」をクリックします。「TCP/IP」タブにある、「IPv6の設定」を「リンクローカルのみ」に変更し、「OK」をクリックします。その後、「適用」をクリックすることで設定が反映されます。
参考
- 投稿日:2021-02-13T17:56:52+09:00
MacでiPadを遠隔操作し、Kindleのページ送りをしてみた
はじめに
初めて電子書籍買ってみたけど、「キーボードから手放したくないけど、iPadのページめくりたい」ってタイミングが多かったので、スワイプ機能だけキーボード遠隔操作できるようにしてみた。ハンズオンの書籍学習捗りそう。 pic.twitter.com/rkGzLvPXQl
— 村上 (@rocketboy555) September 12, 20202014年にiPad Air2を購入しまして、今更なんですが、先日初めて電子書籍を購入しました。
紙の書籍の方がなんだか実感が沸く感じがして、電子は敬遠していたのですが、持ち運びとか考えるとやはり便利ですね、電子。電子書籍を使っていて思ったのが、
「キーボードから手を離したくないけど、ページめくりたいなぁ」
ってタイミングが多いなーってことです。特にハンズオン系の書籍を読んでいるときは、常にキーボードに手を置いていたい。
紙媒体の書籍は、キーボードから手を離して「めくる」という行為を半ば強制されるのでこんなことを思いもしなかったのですが、電子書籍ならば「遠隔でキーボード操作でめくれないか?」と思い調べてみました。特別にアプリを導入することもなく、Appleデバイス標準の機能だけで出来ました。
アクティビティ機能便利ですね。意外とネット上に同様の記事がなかったので共有します。
やりたいこと
・遠隔でiPadの電子書籍のページをめくりたい
・キーボードの一部だけを遠隔操作に割り当てたい
・このためだけに特別にアプリは導入したくない環境
・iPad air2(ios:13.5.1)
・MacBook Air (Retina, 13-inch, 2020) (macOS Catalina 10.15.6)
・MacとiPadをBluetoothで接続しておくやりかた
Mac側
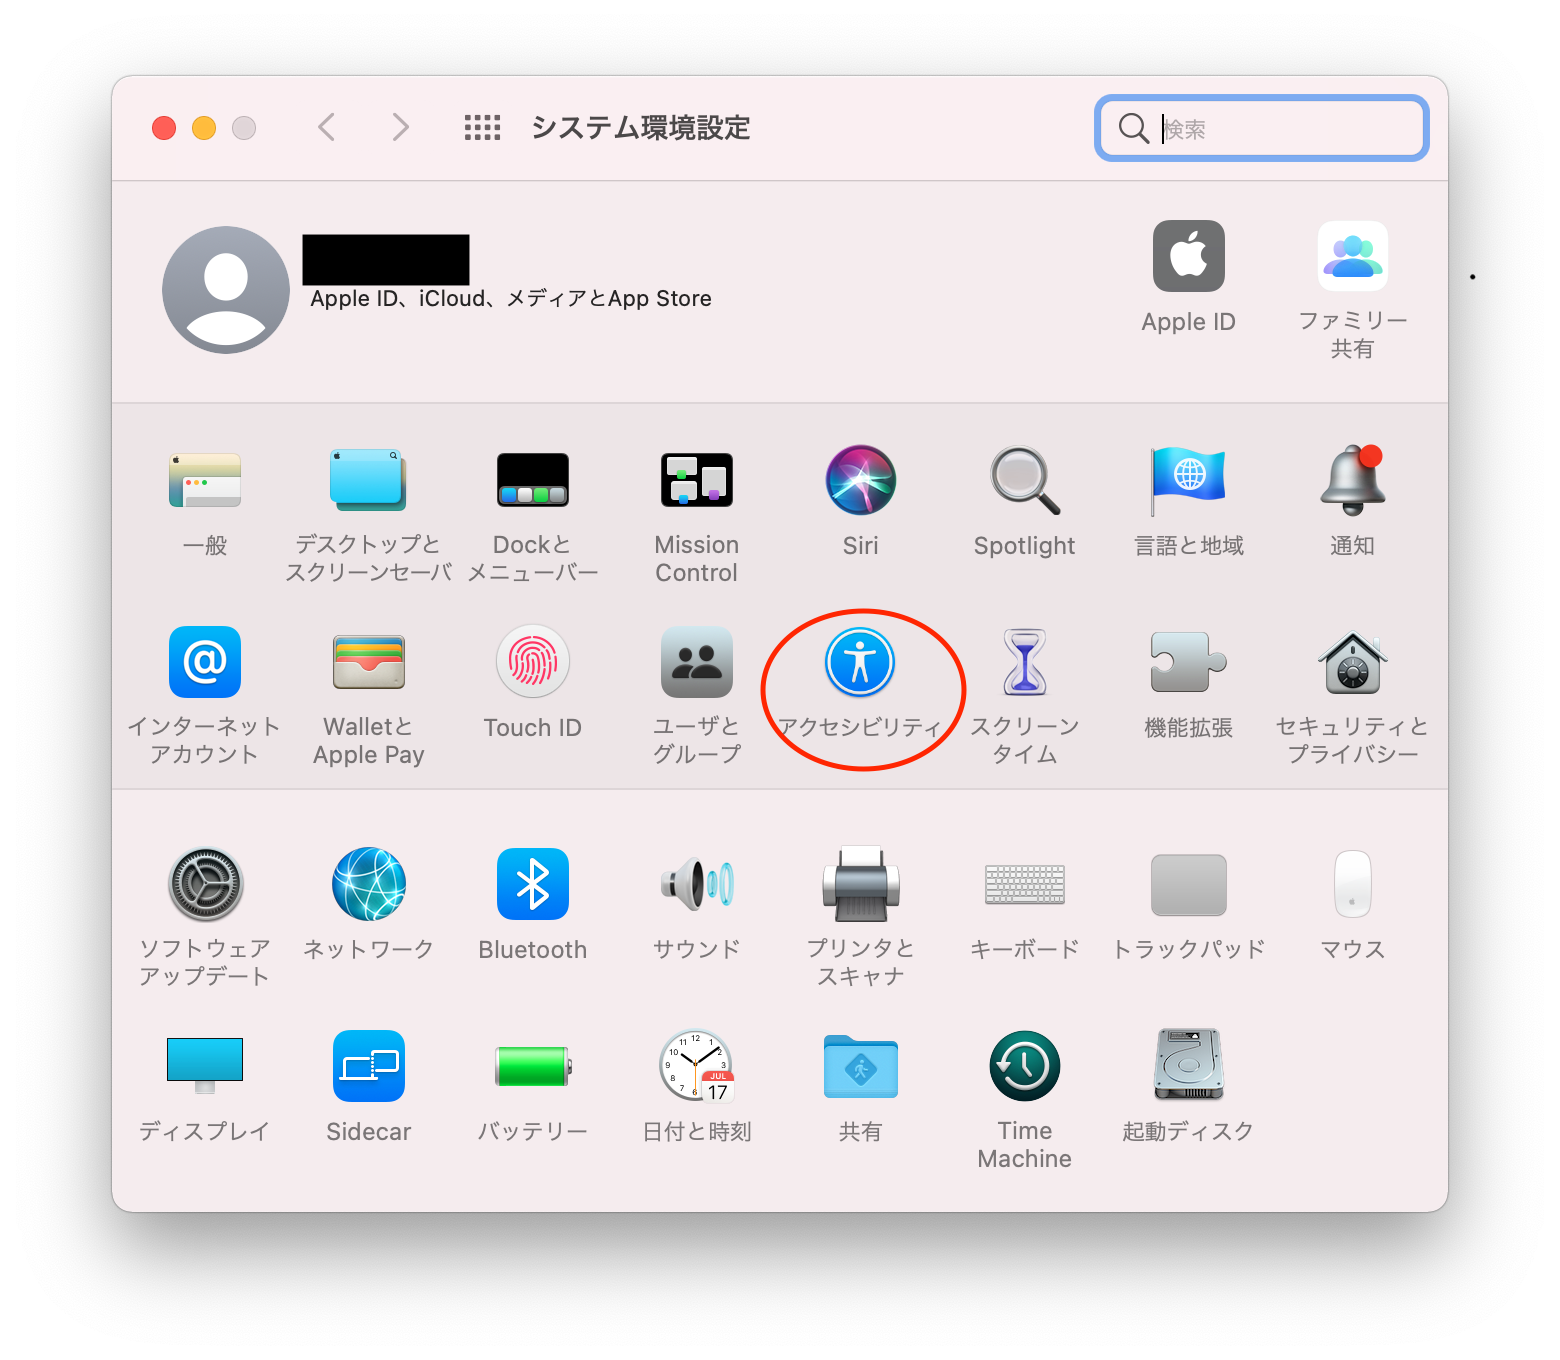
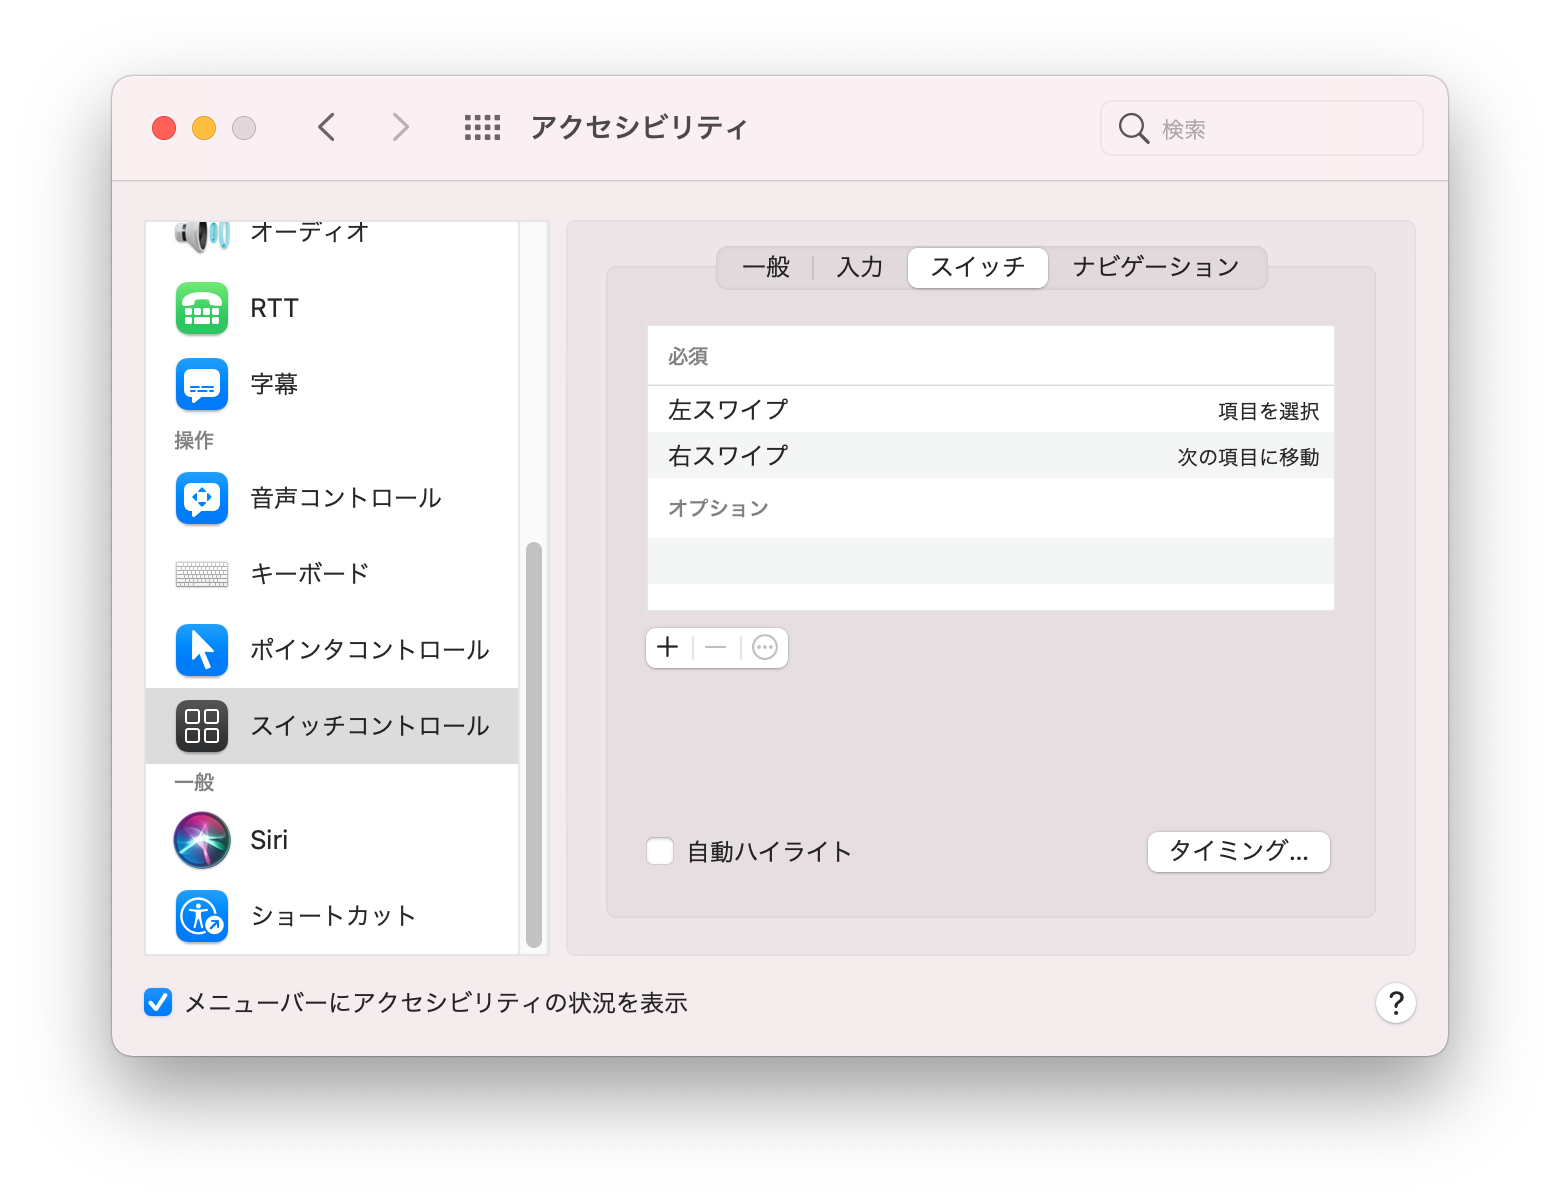
スイッチ作成
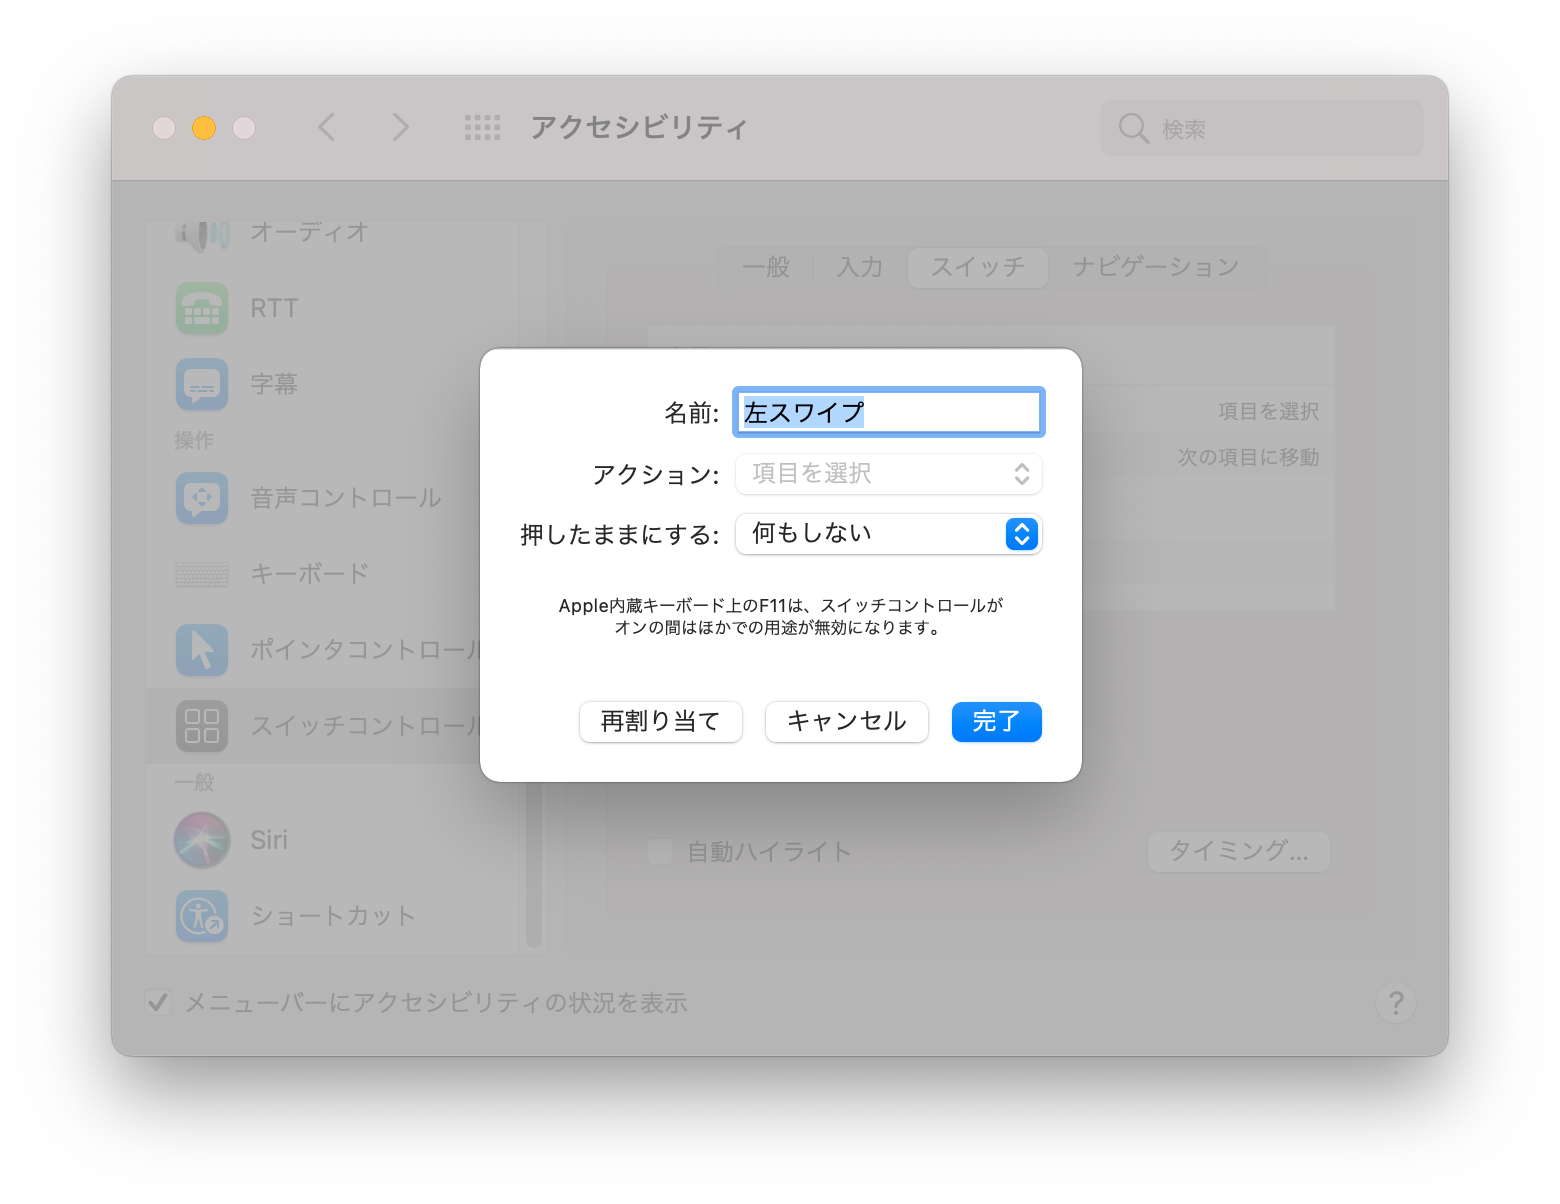
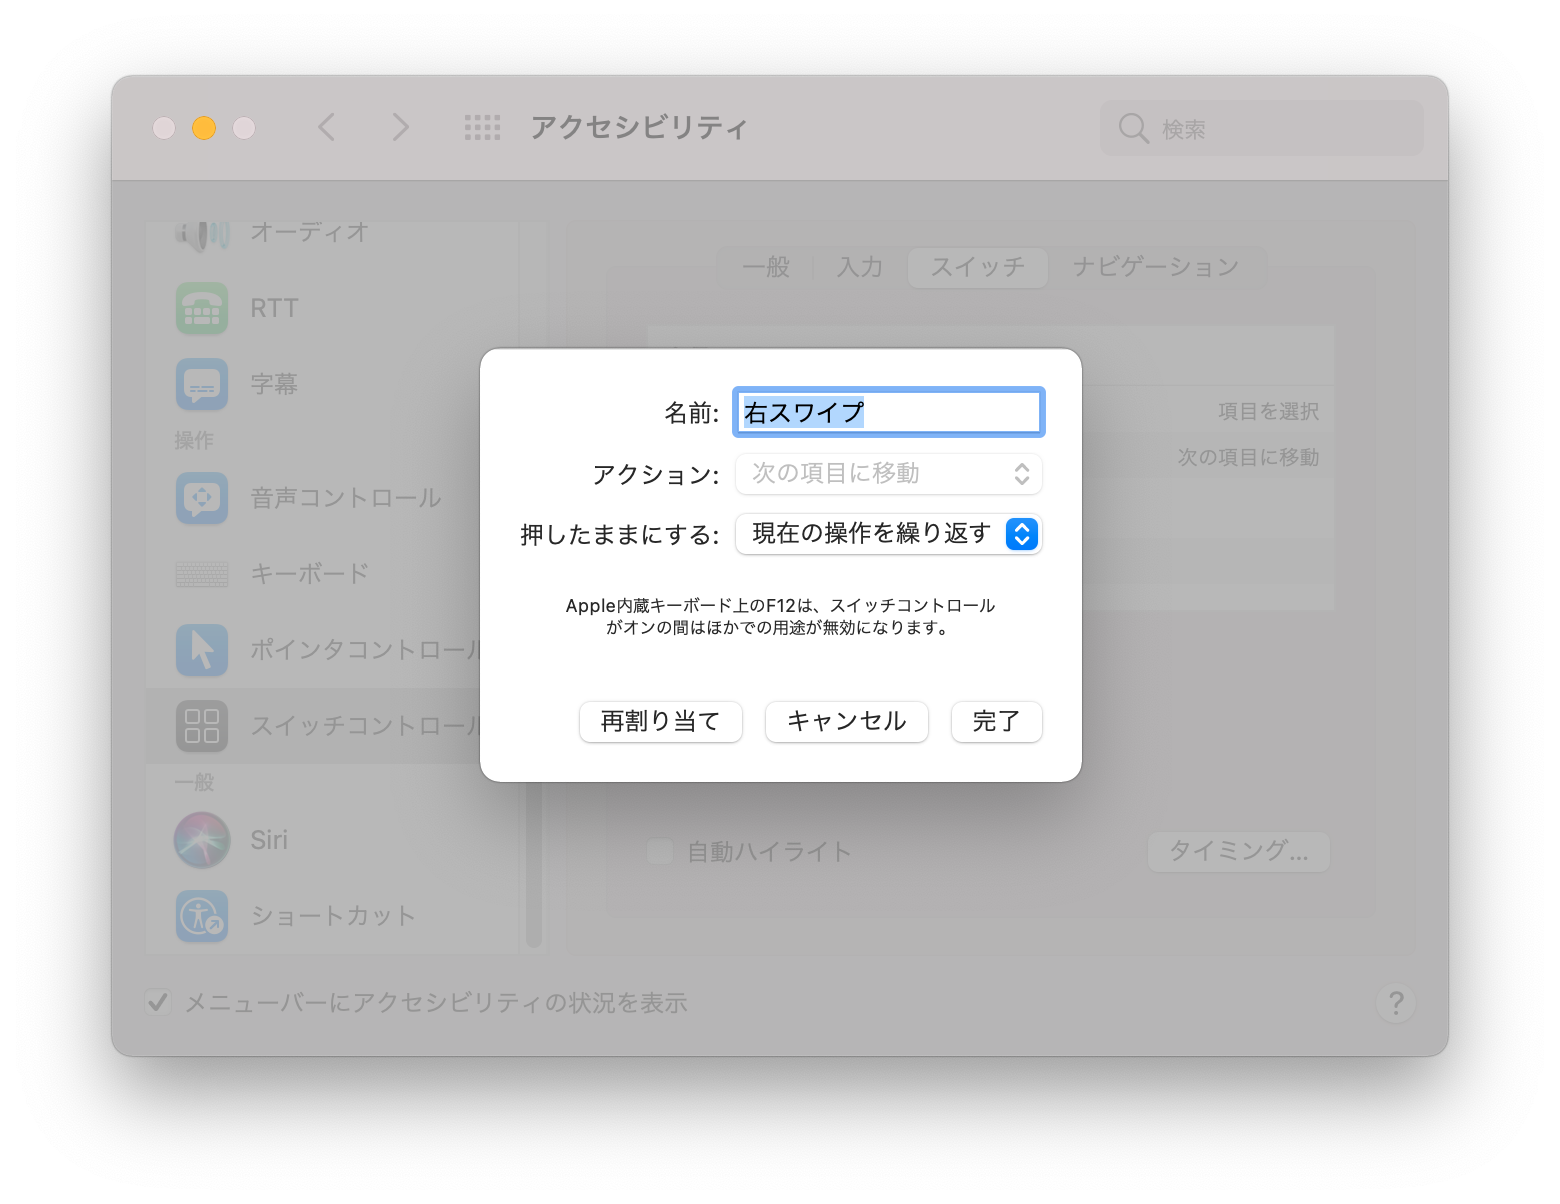
スイッチを作成する。
今回は
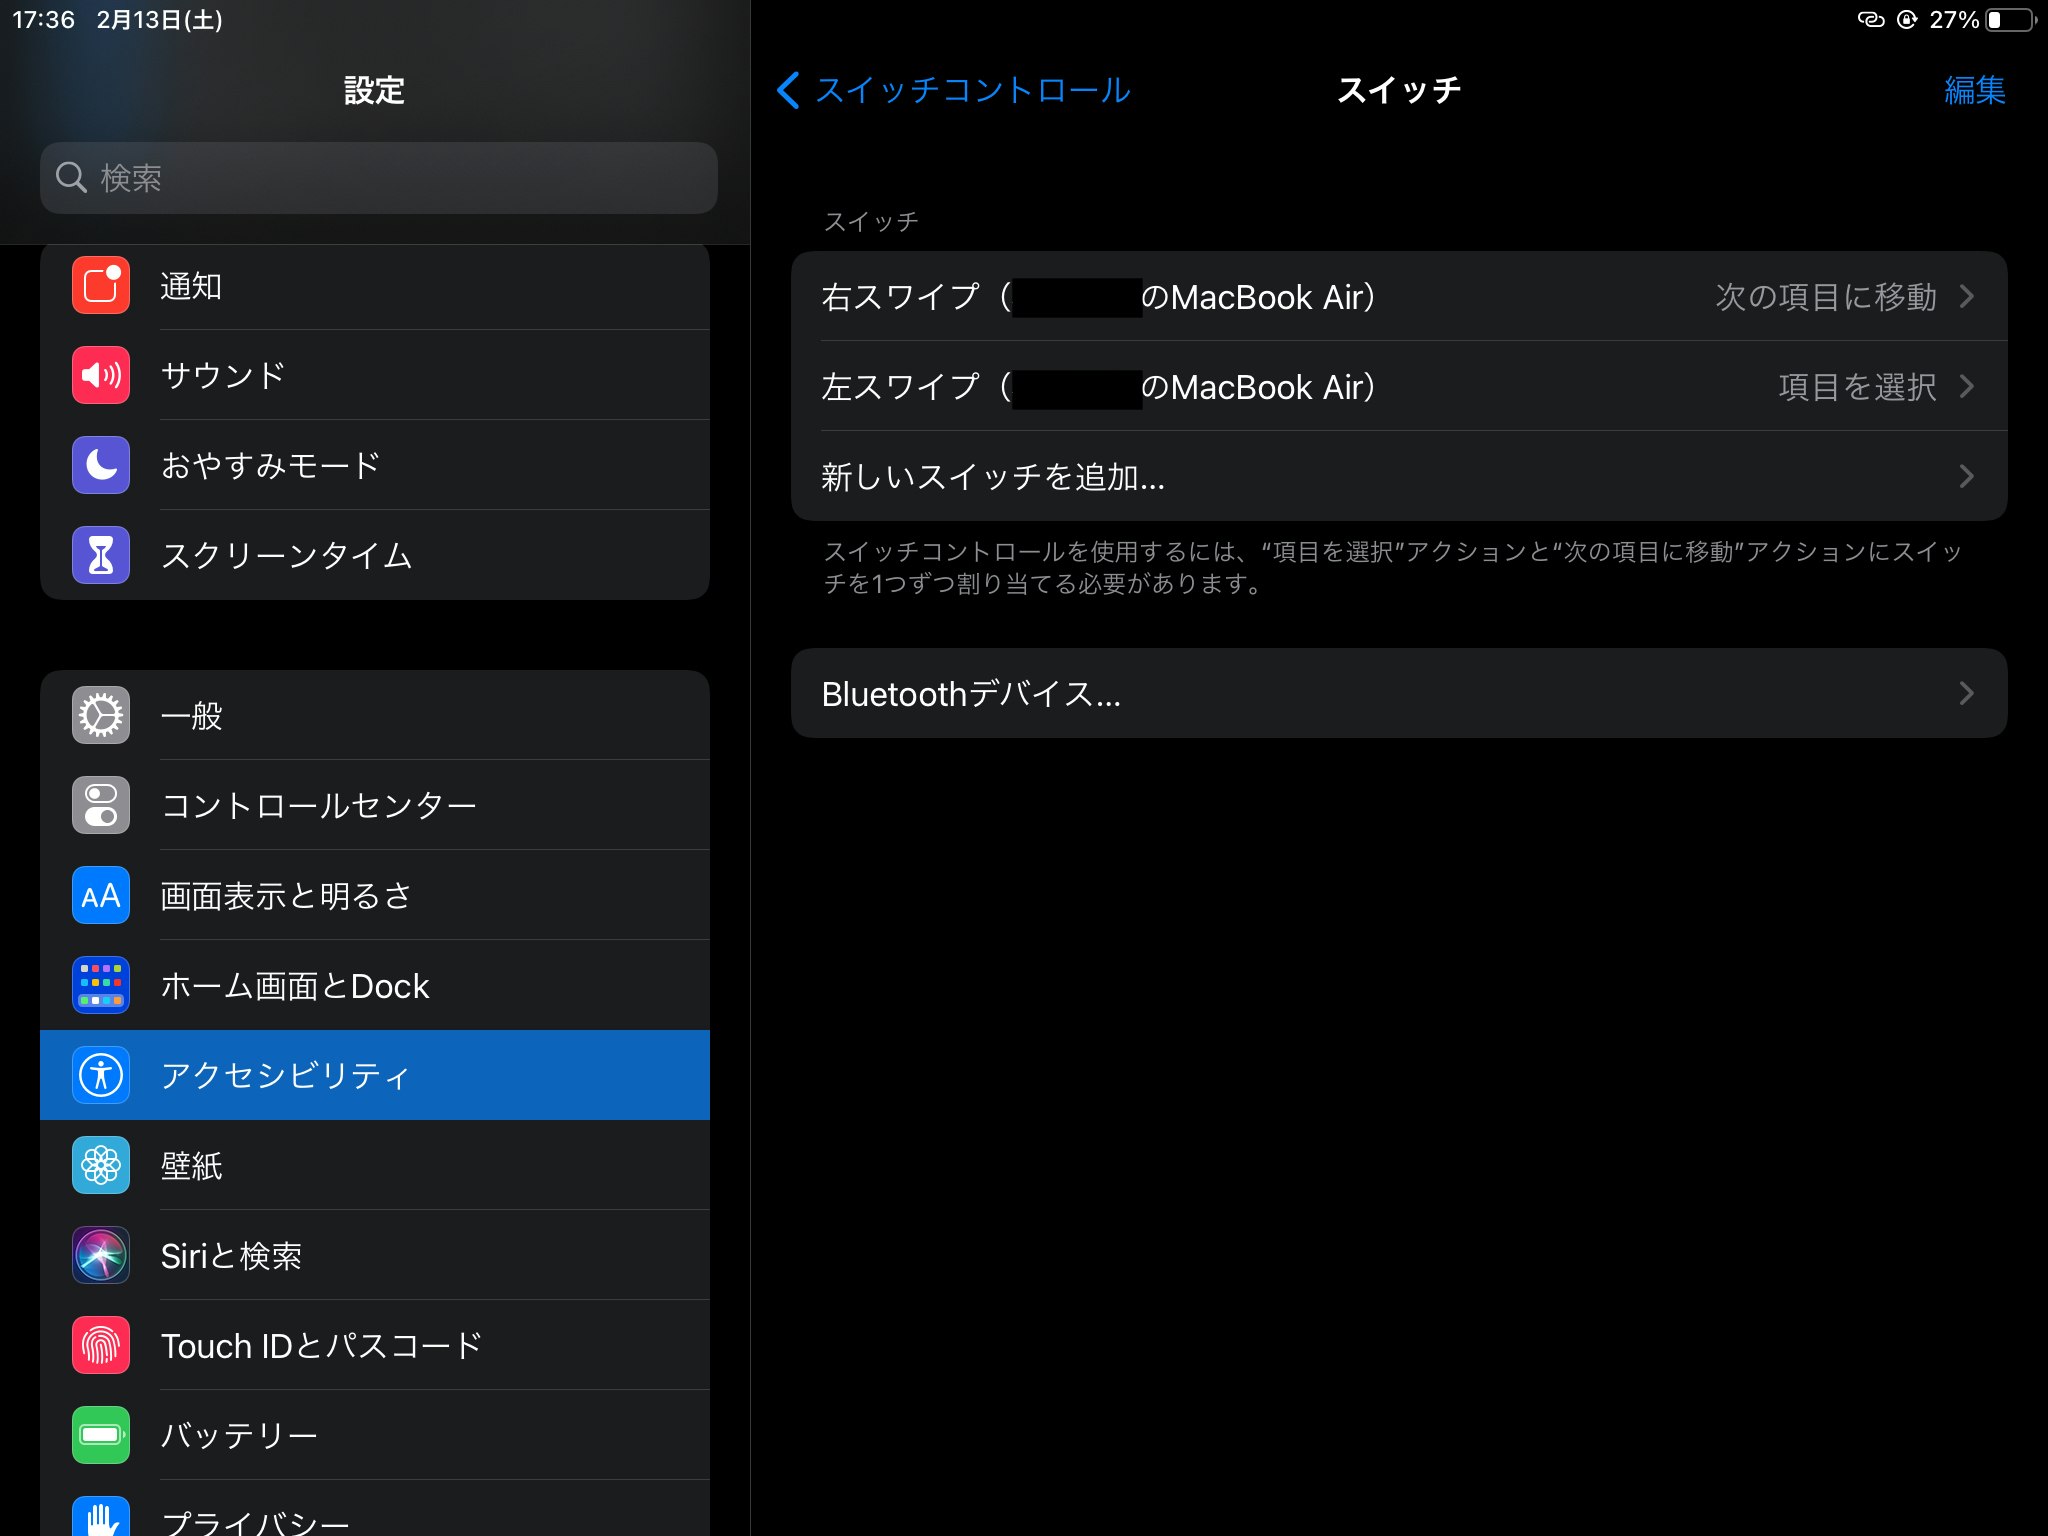
キーボードの「F11」を左スワイプ
キーボードの「F12」を右スワイプ
としている。
iPad側設定
スイッチコントロールをオンにする
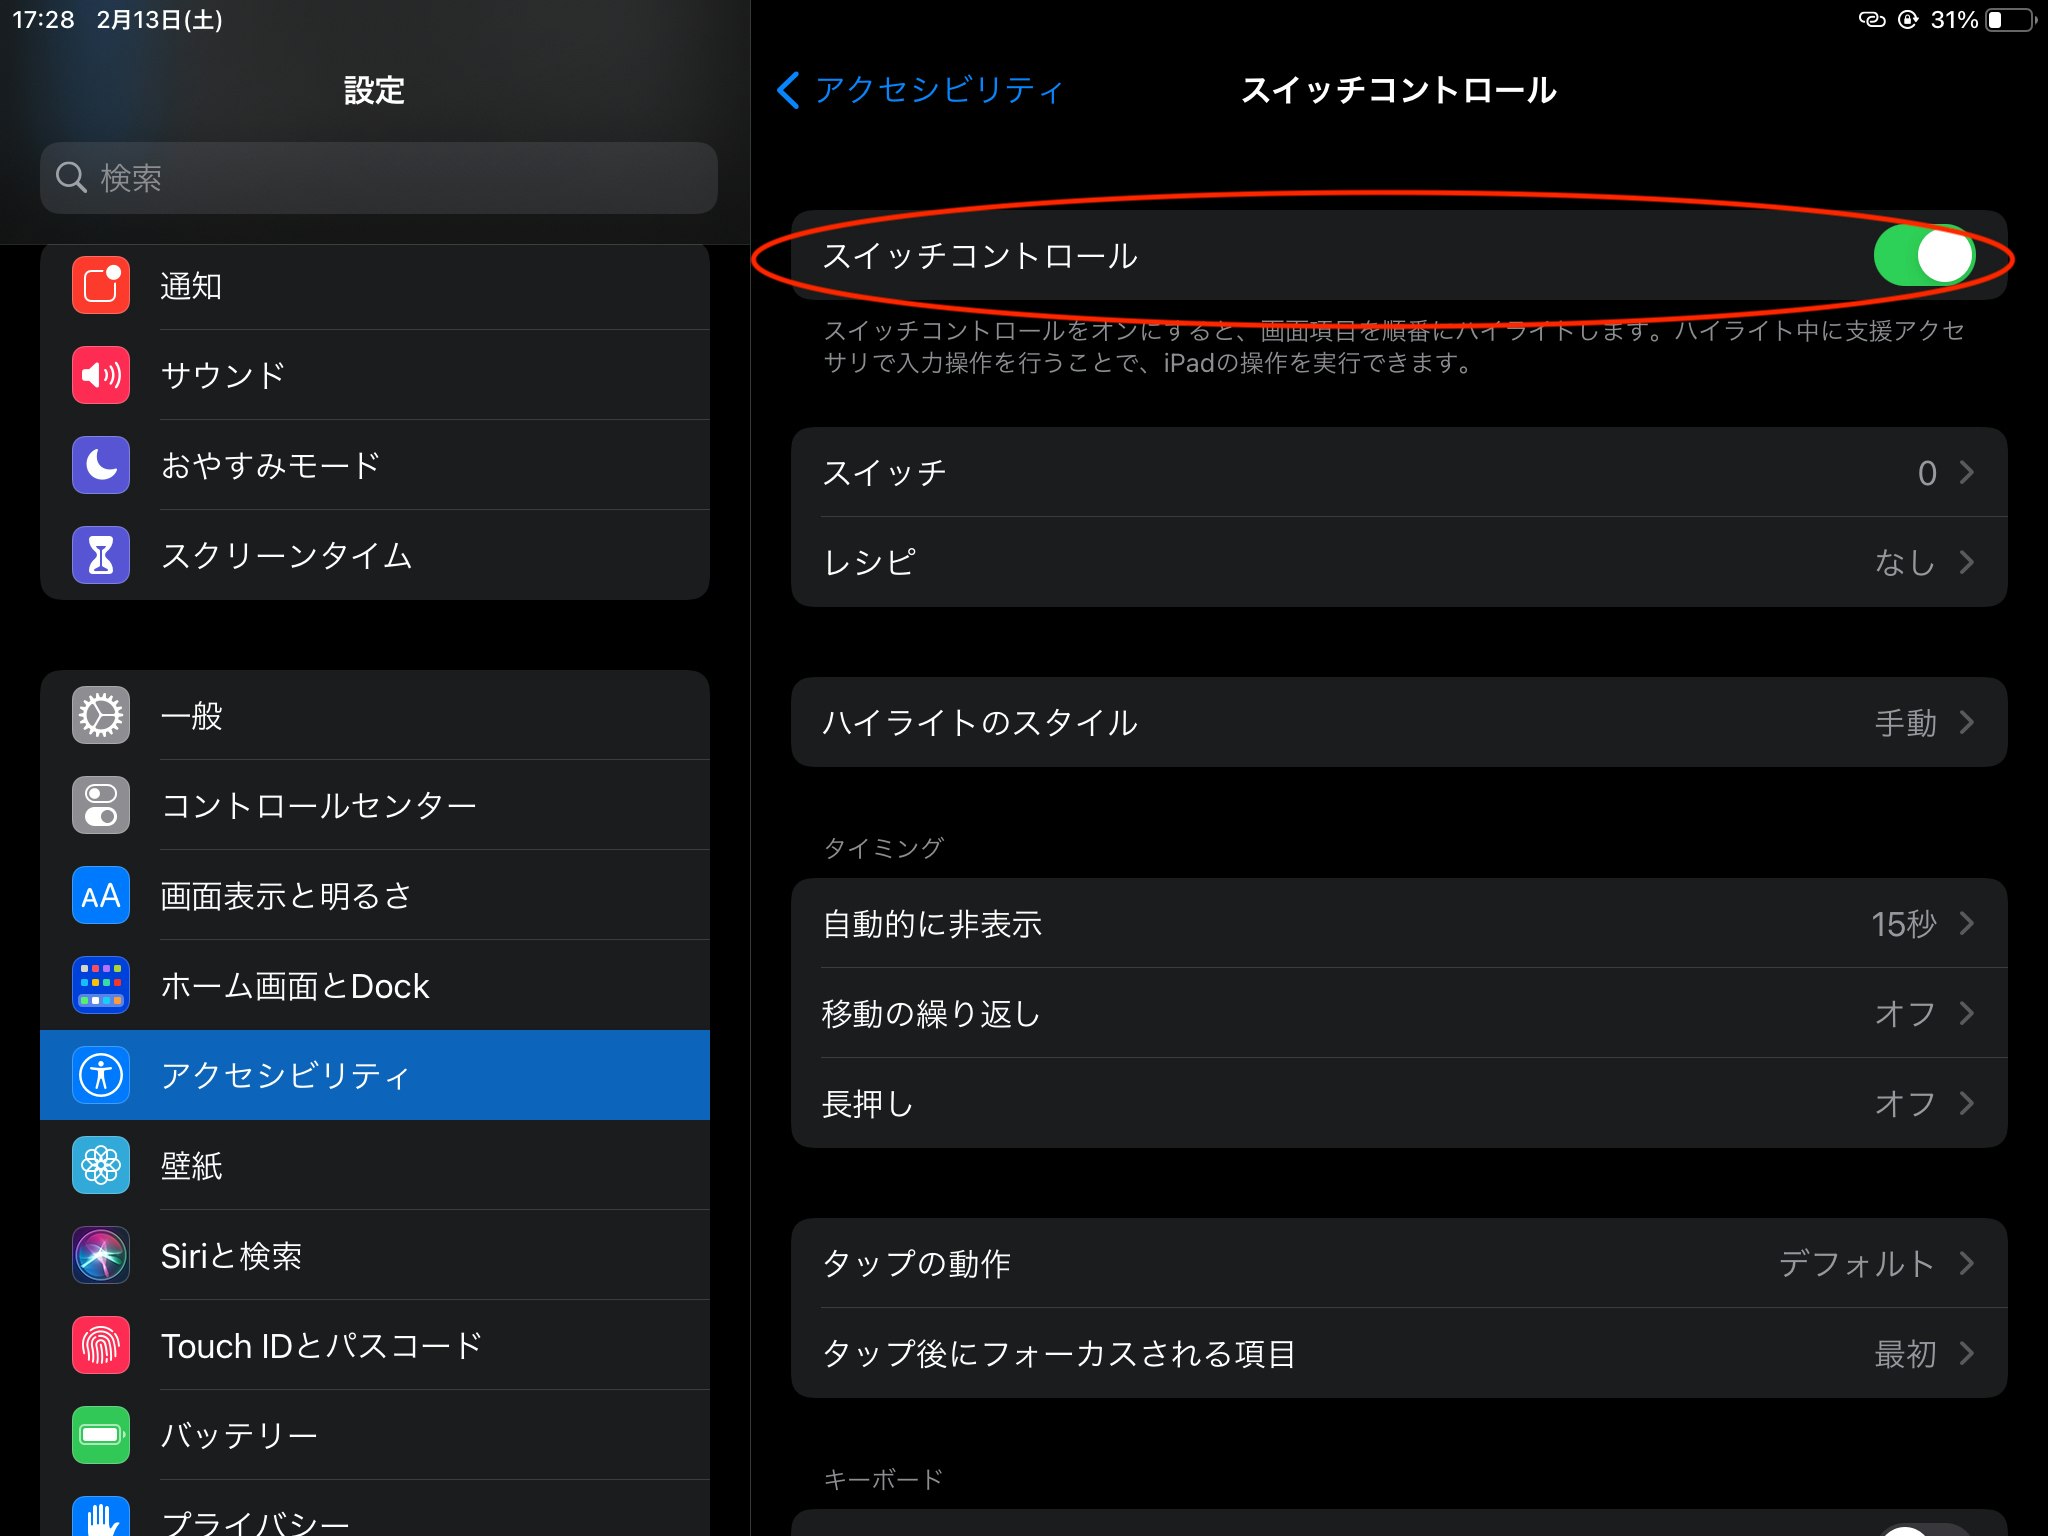
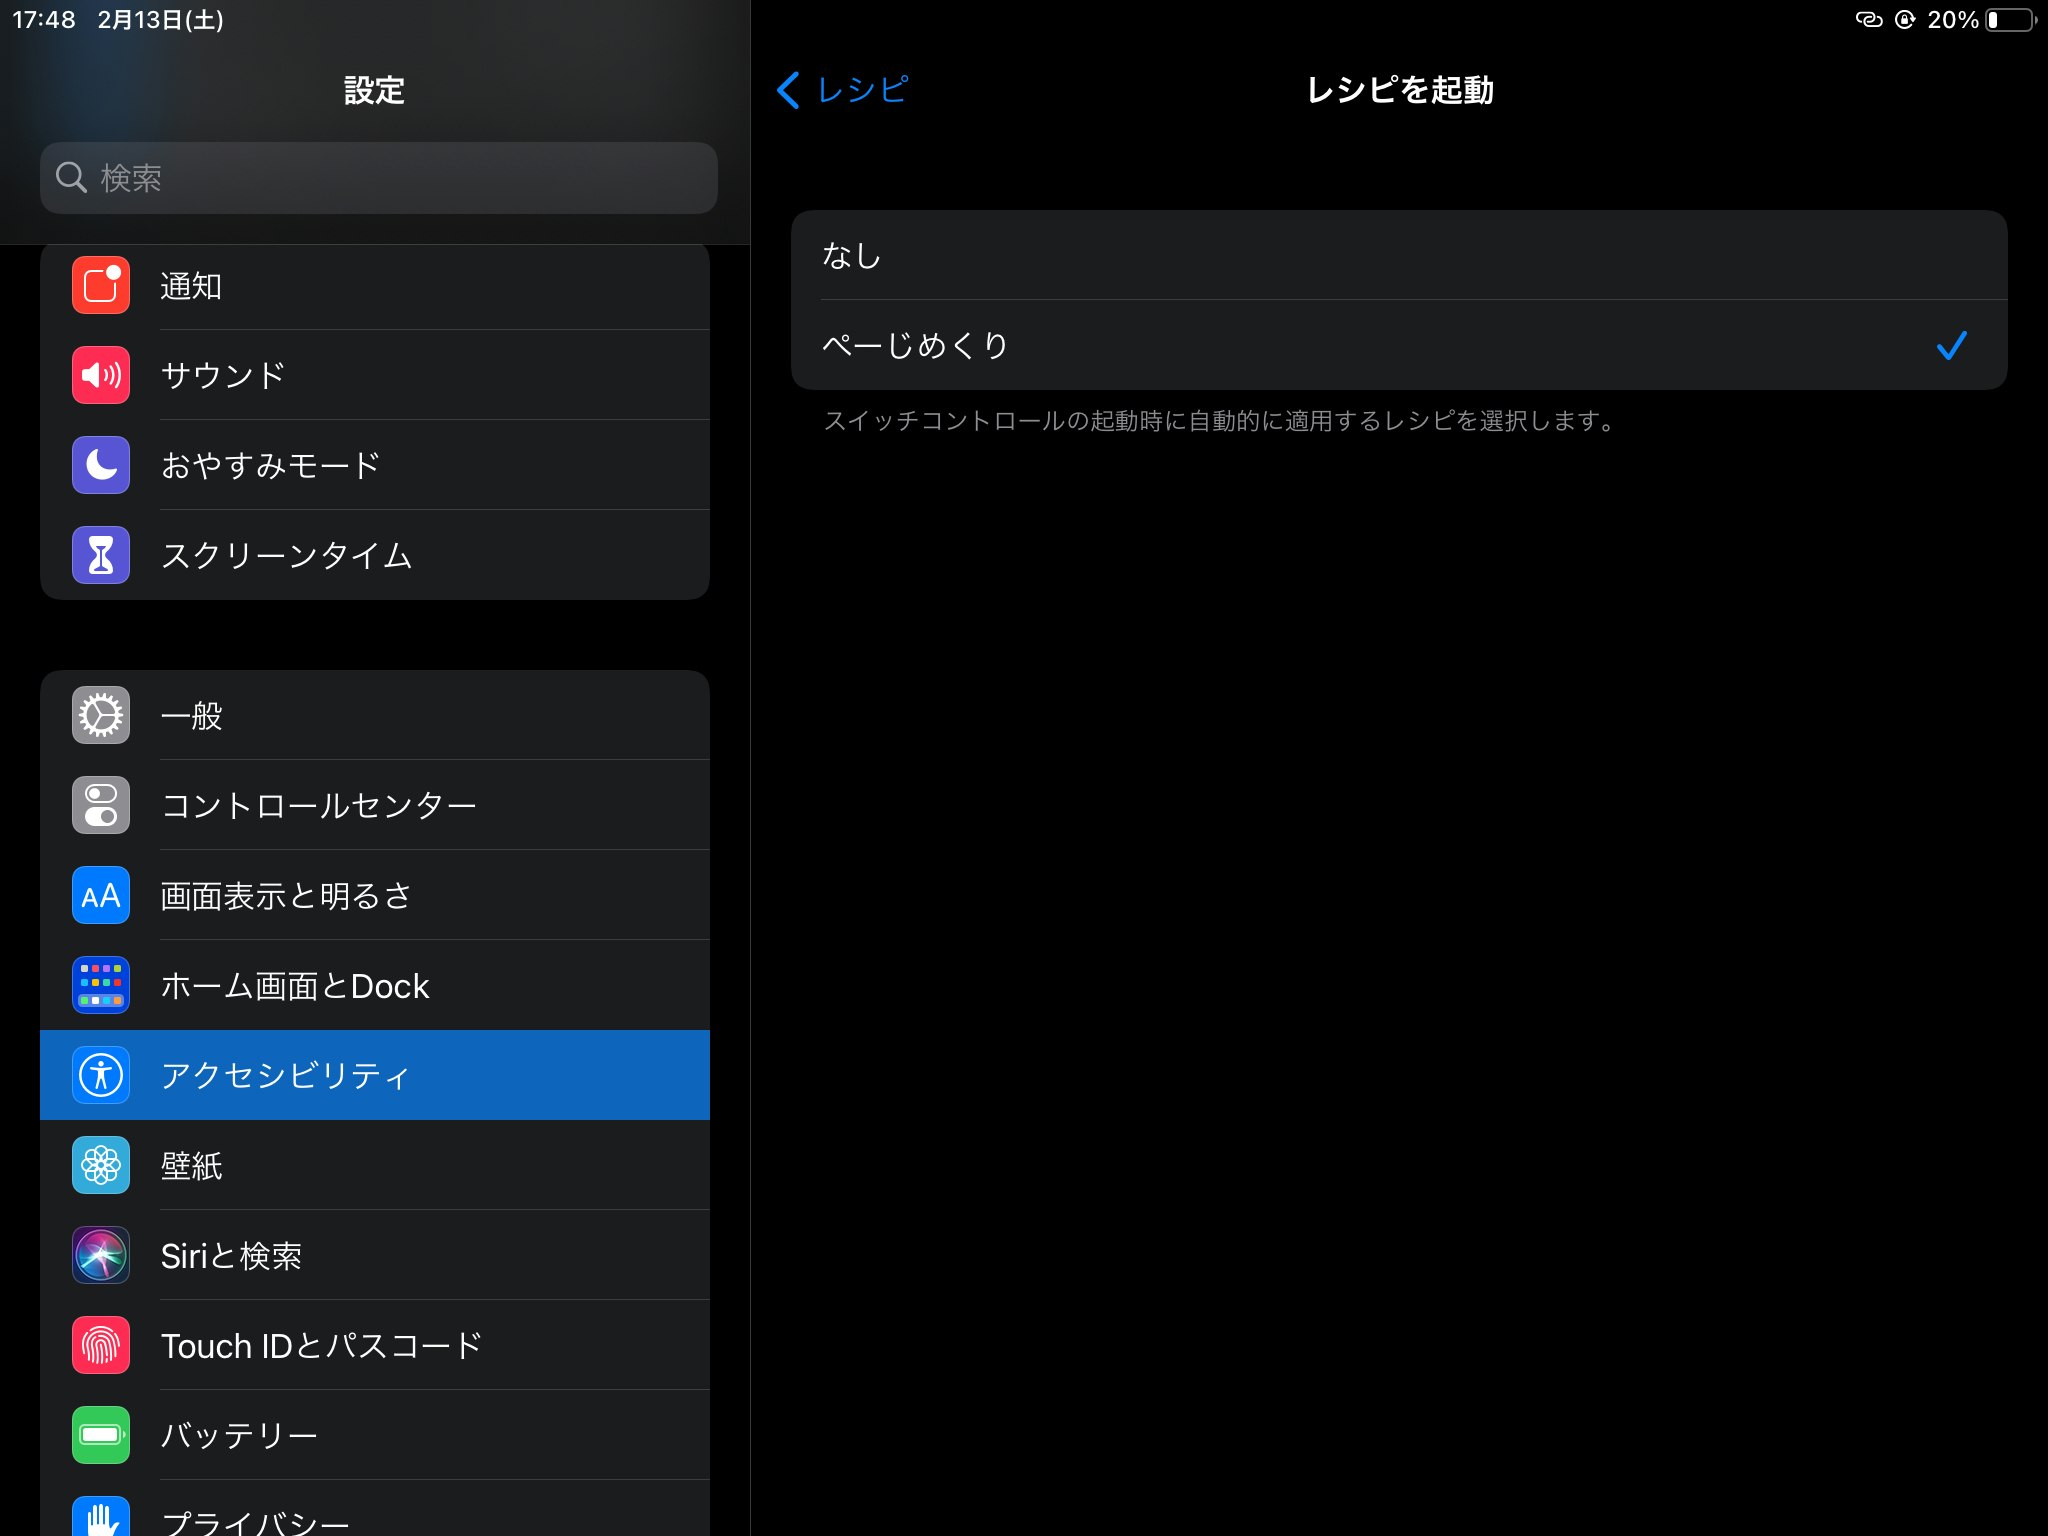
「設定」→「アクセシビリティ」→「スイッチコントロール」をオン
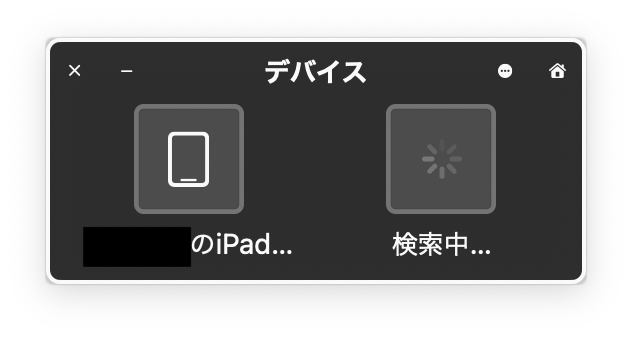
MacとiPadを接続
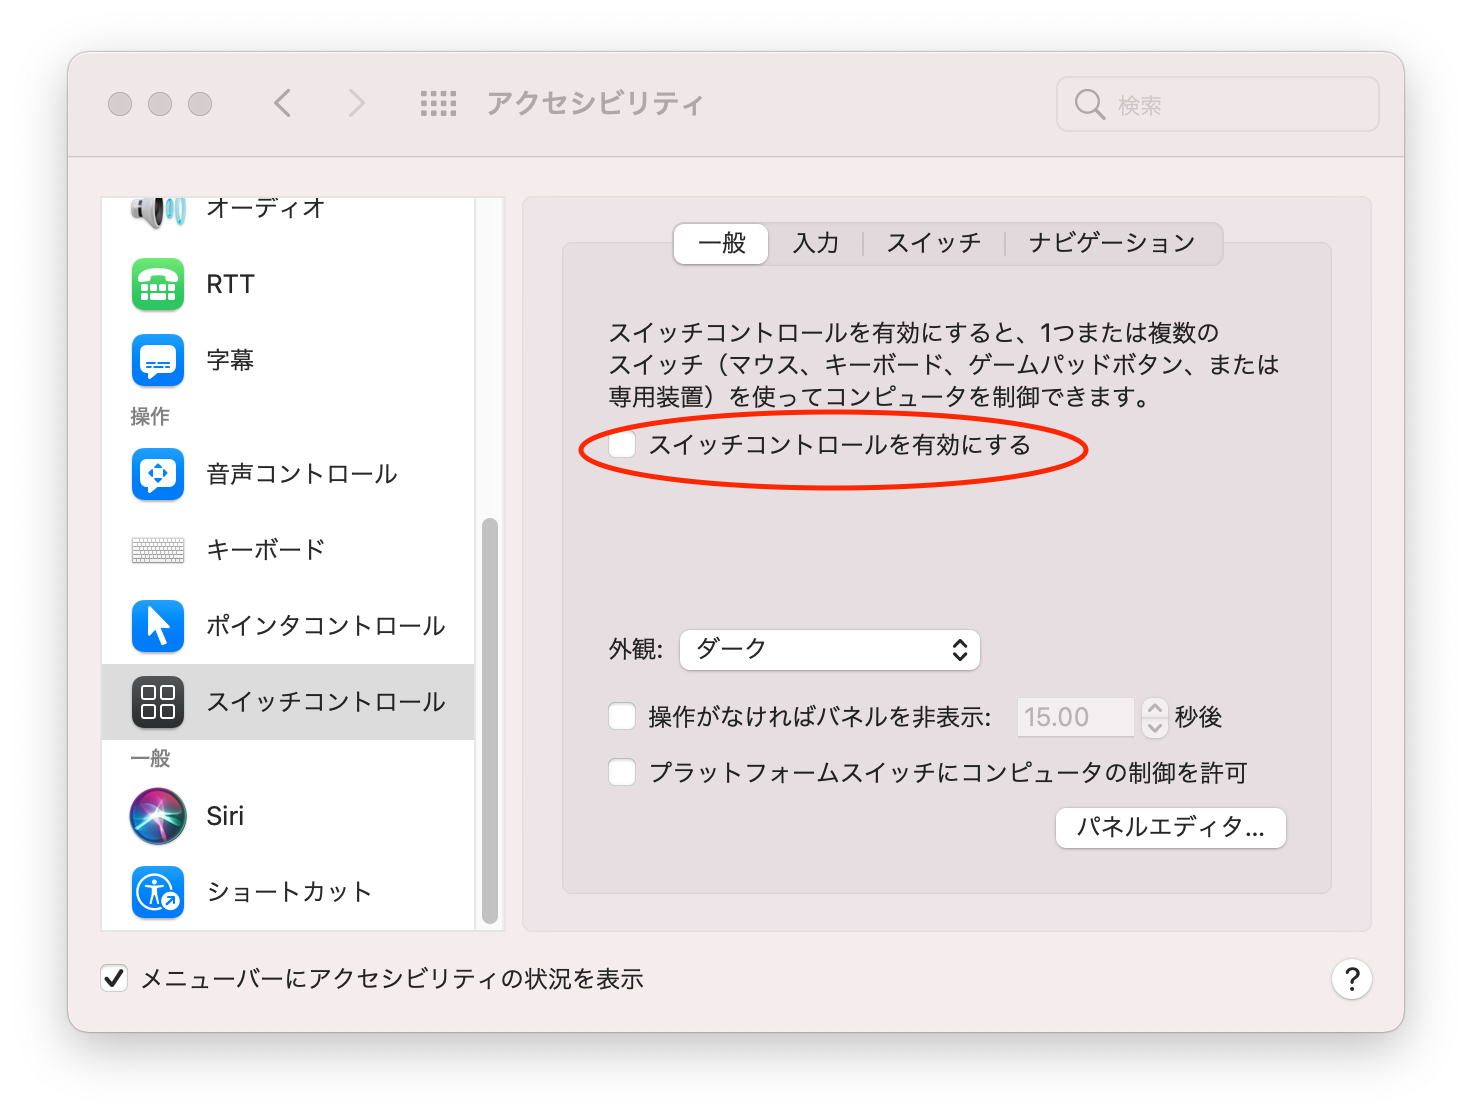
Macのアクセシビリティからスイッチコントロールをオンにする
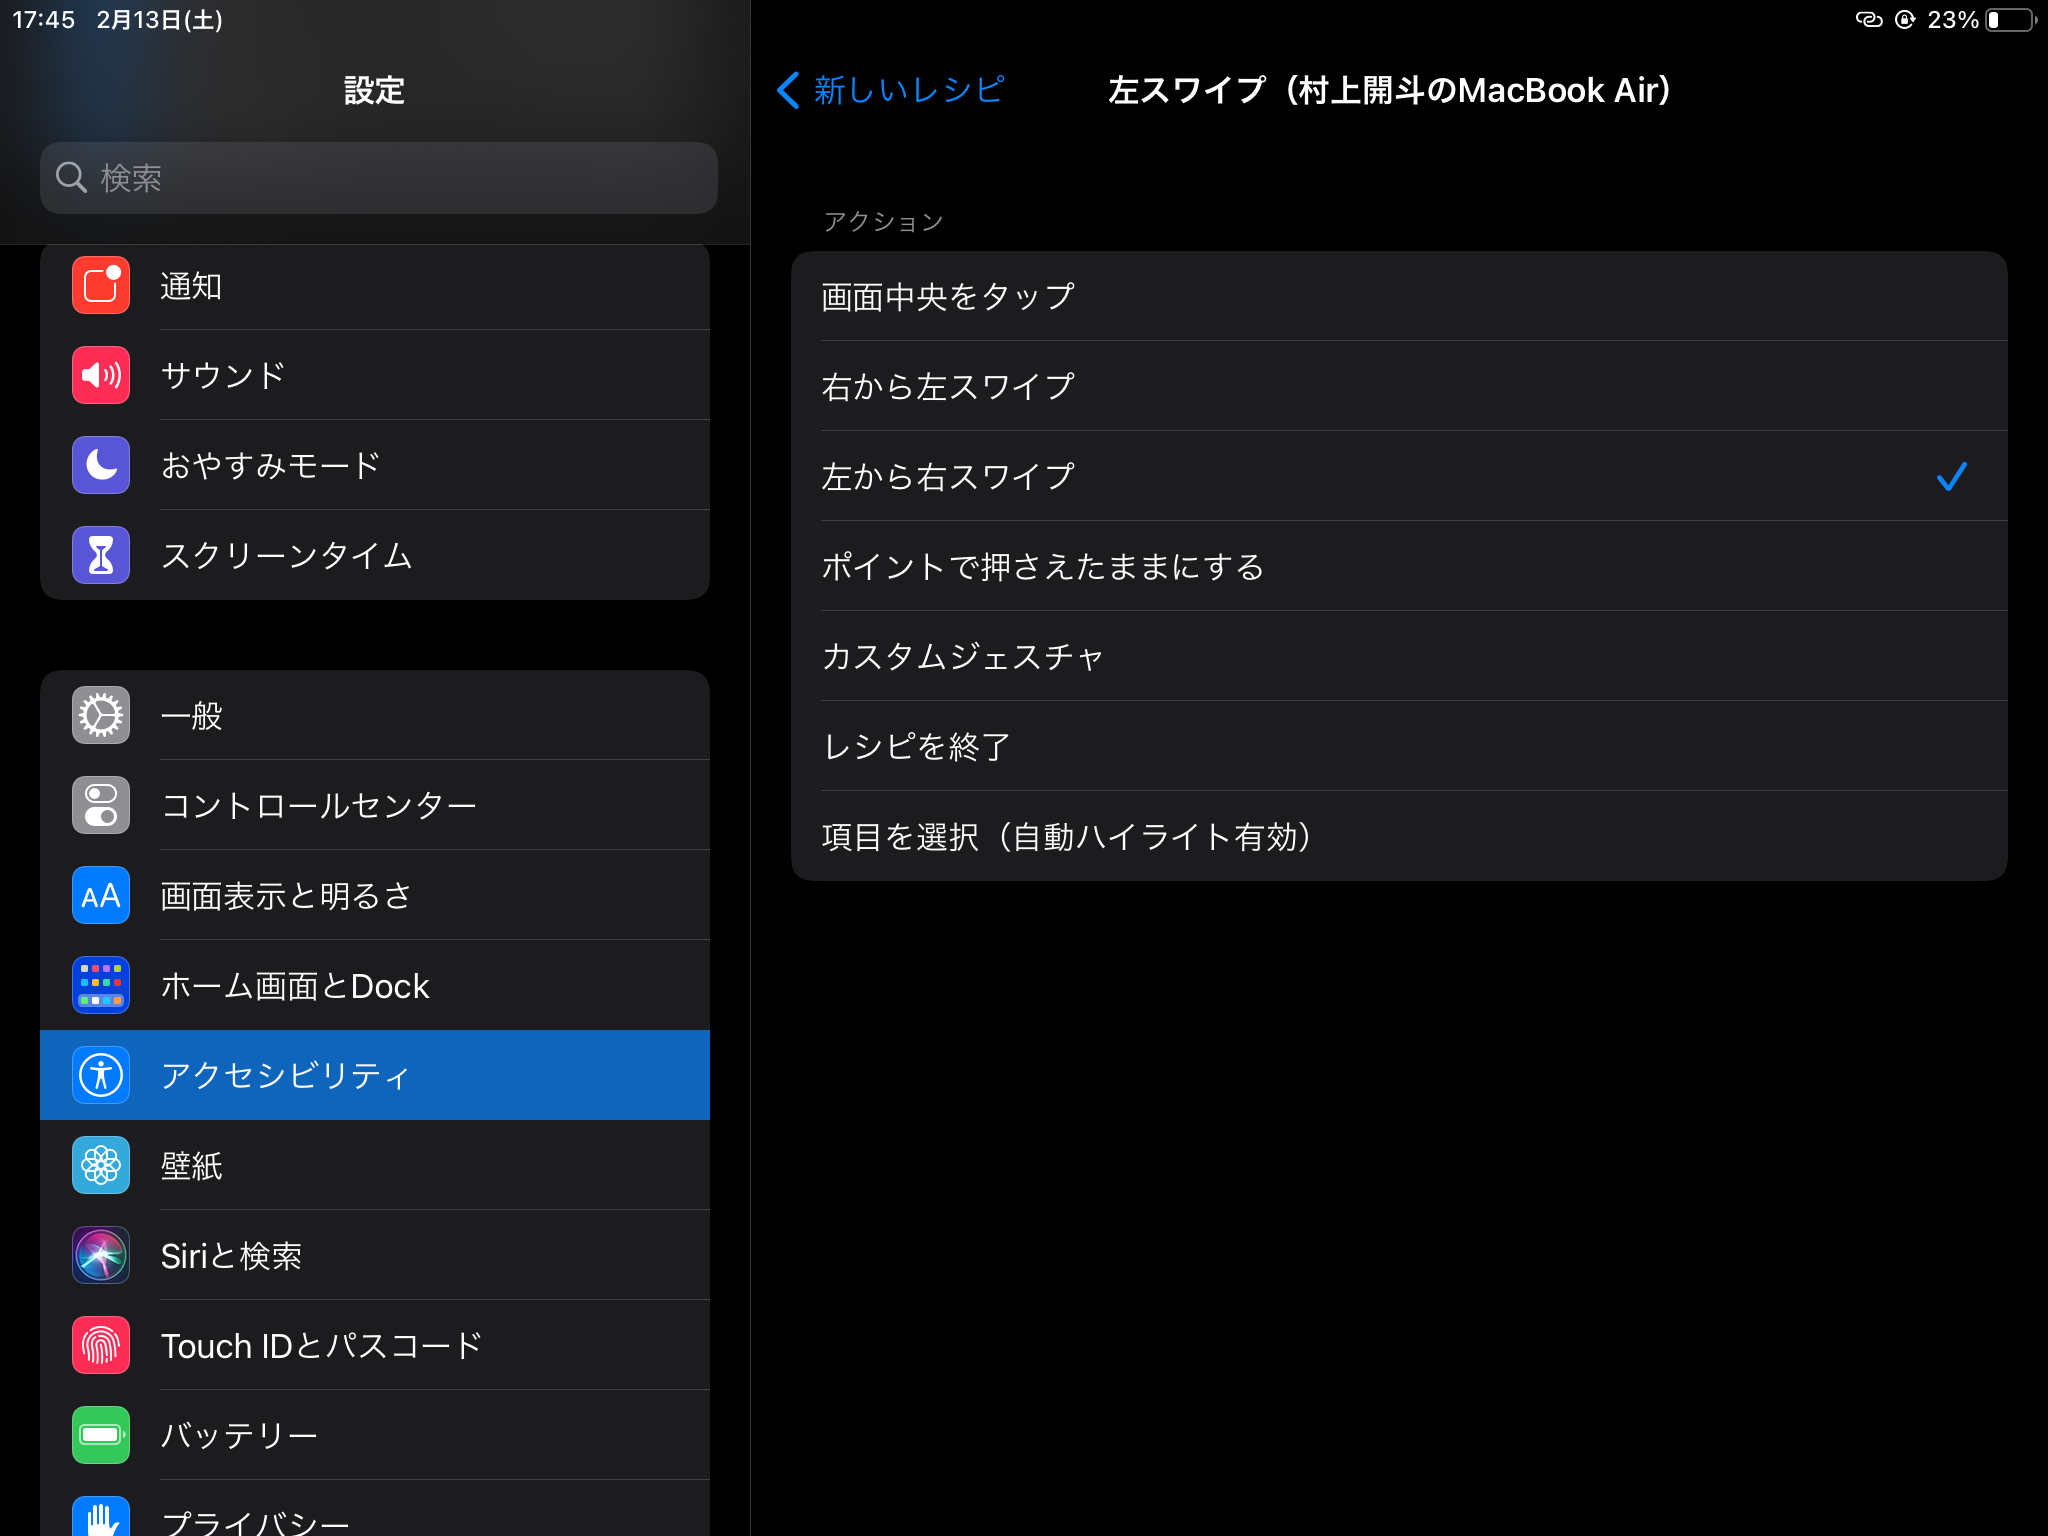
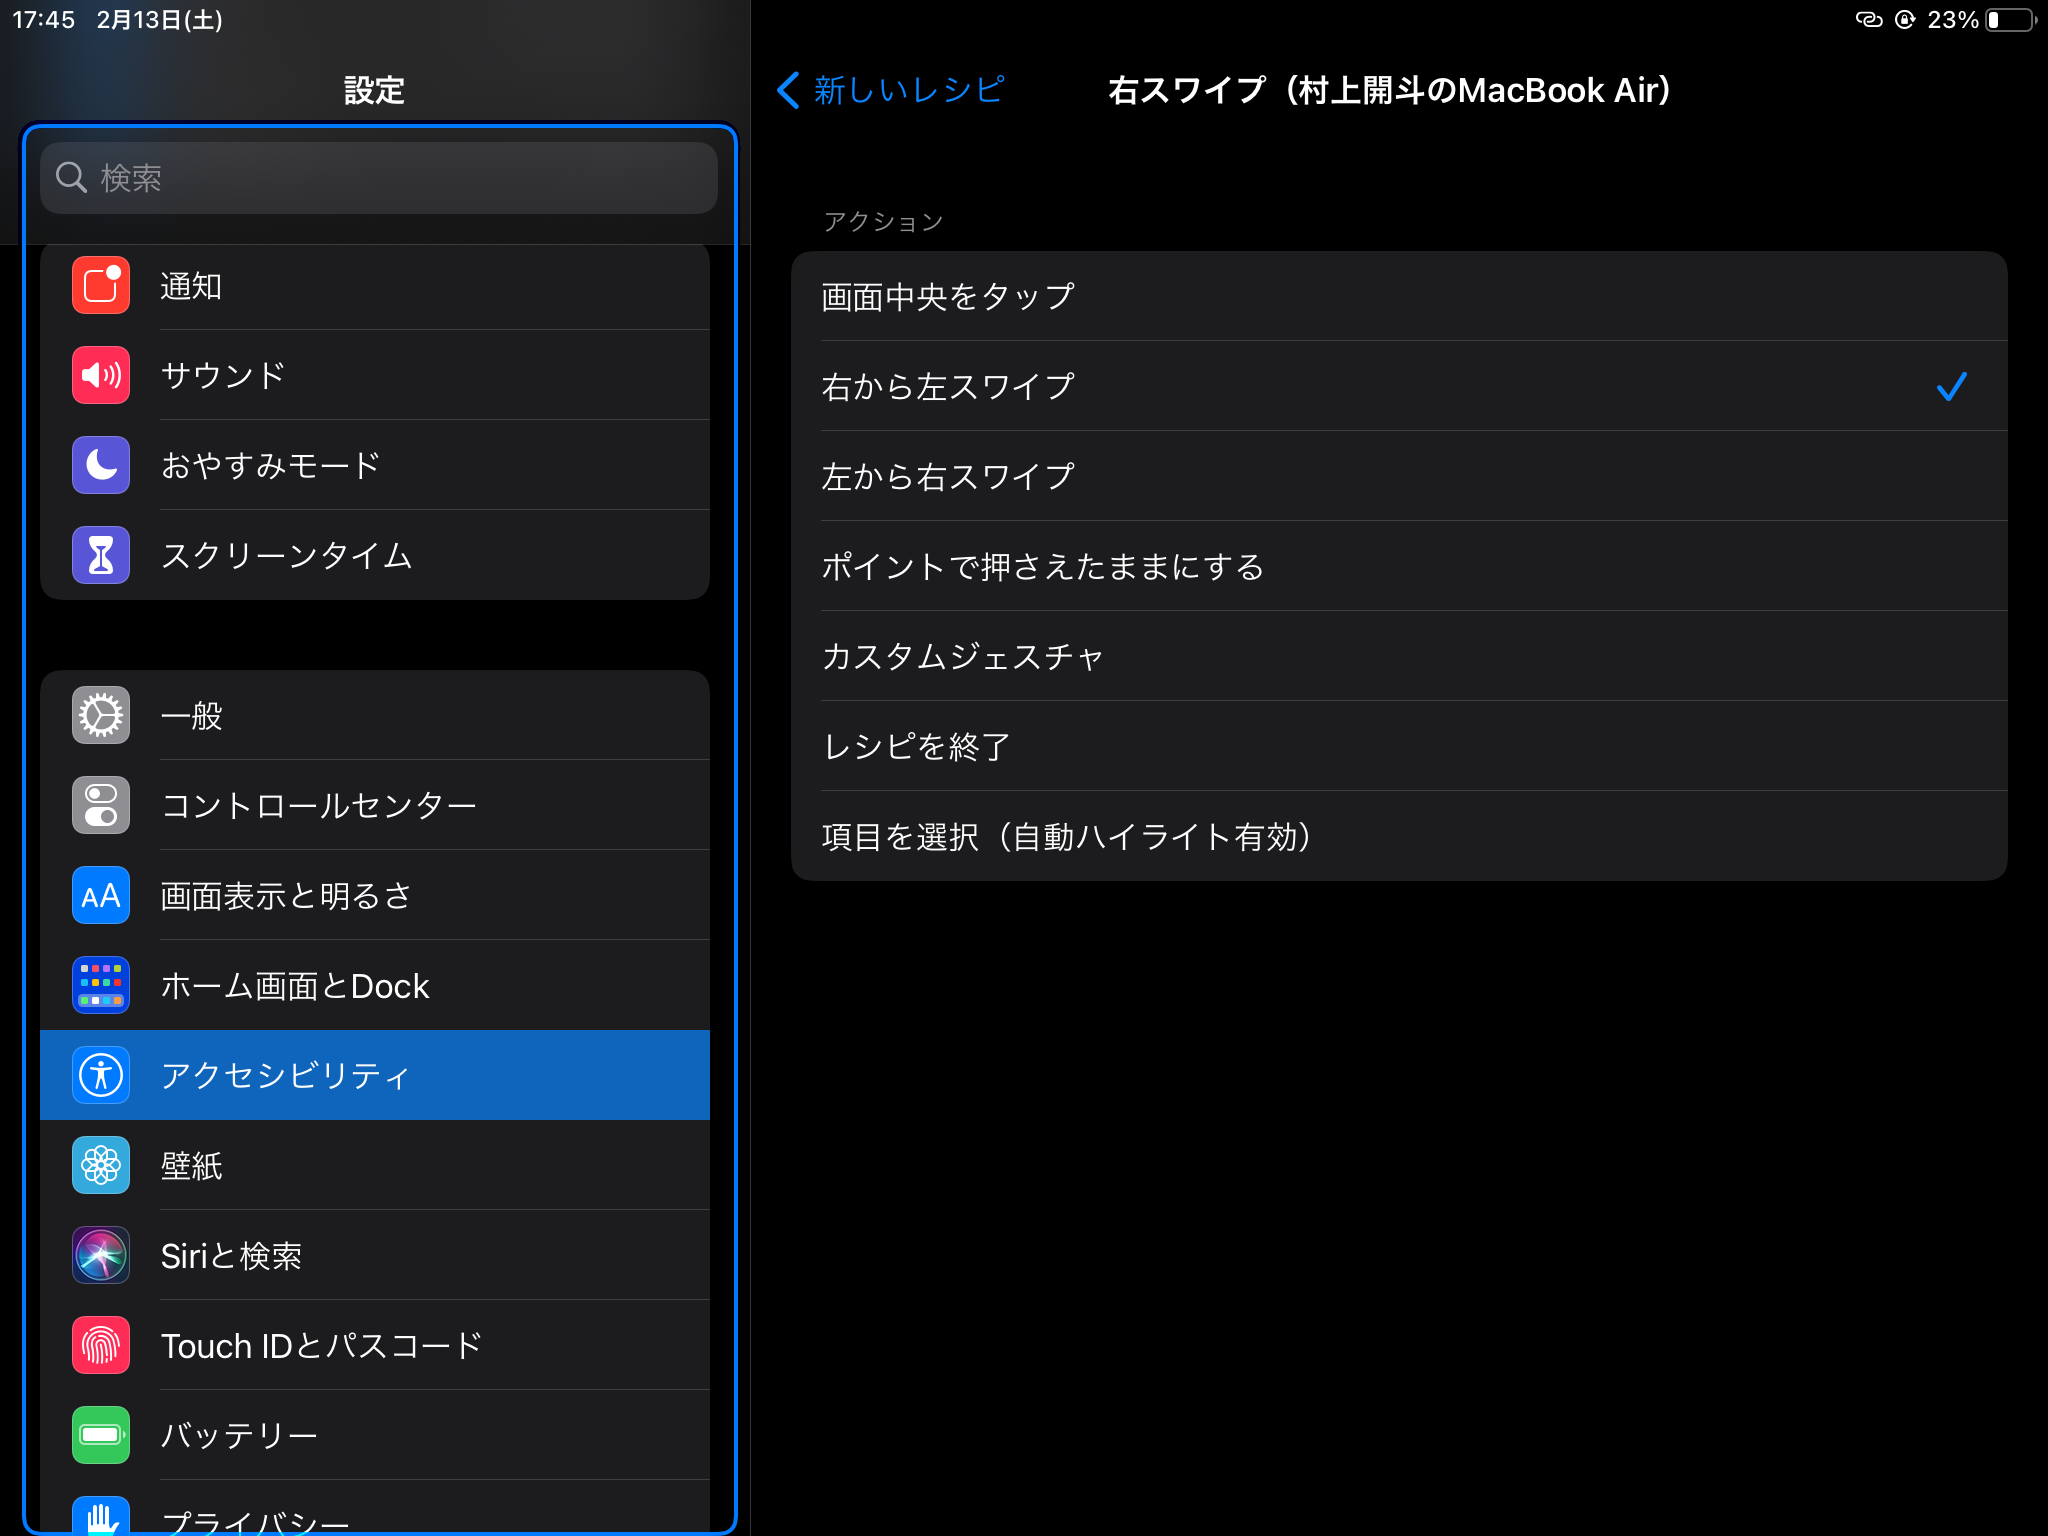
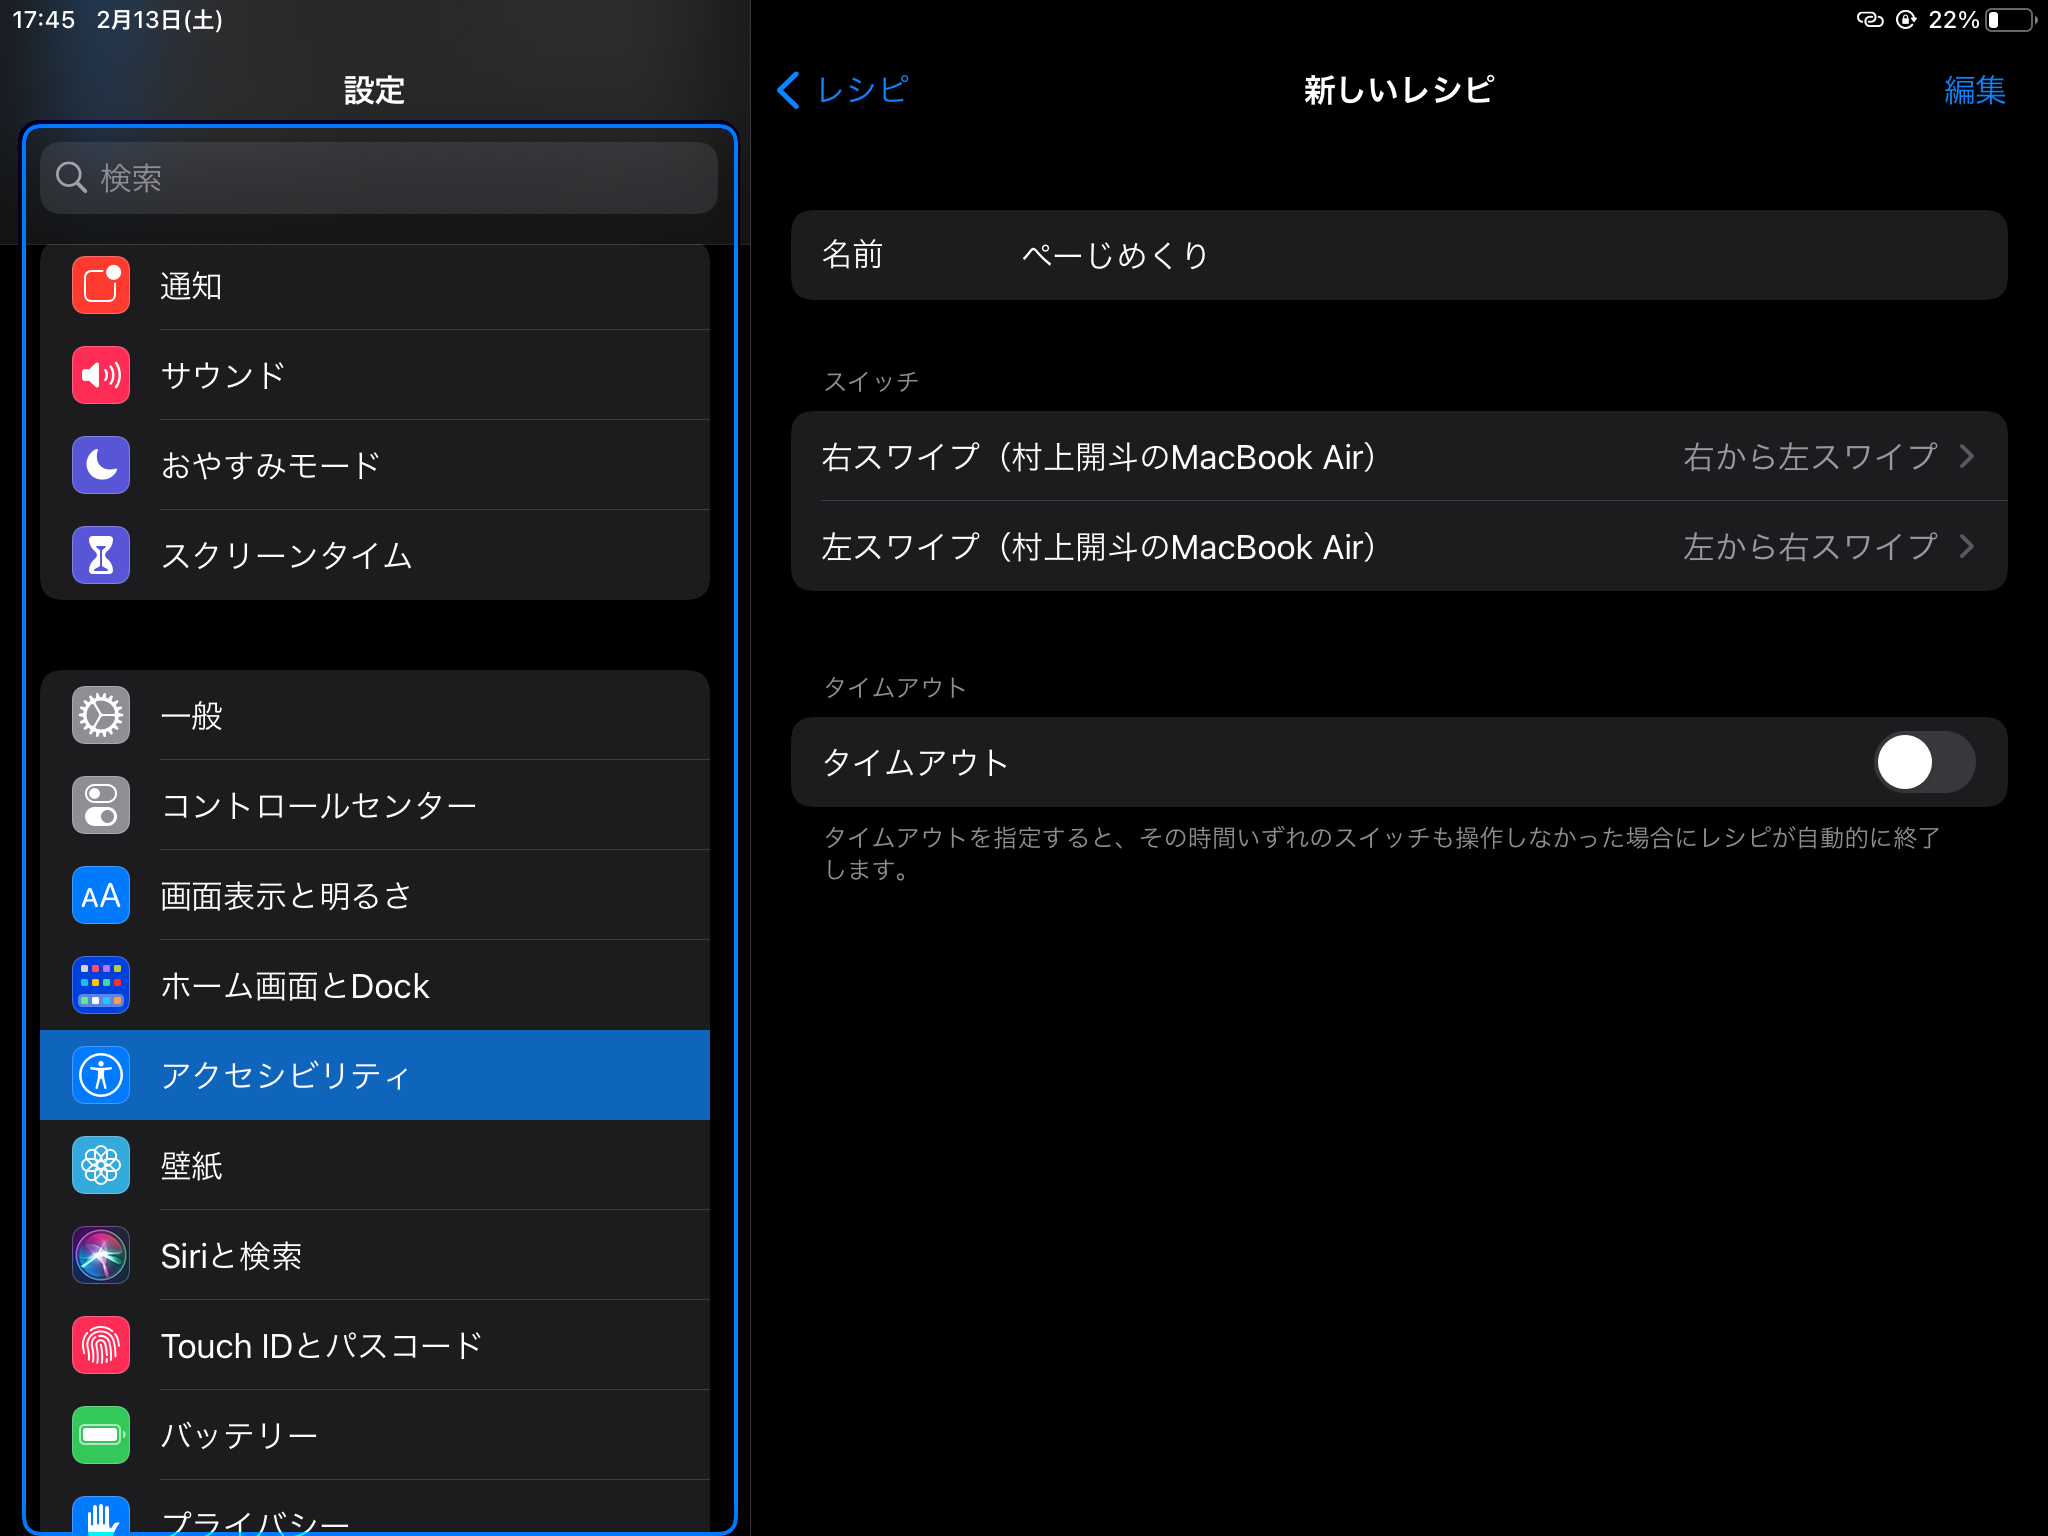
iPad側のアクセシビリティでMacで作成したスイッチが追加されていることを確認
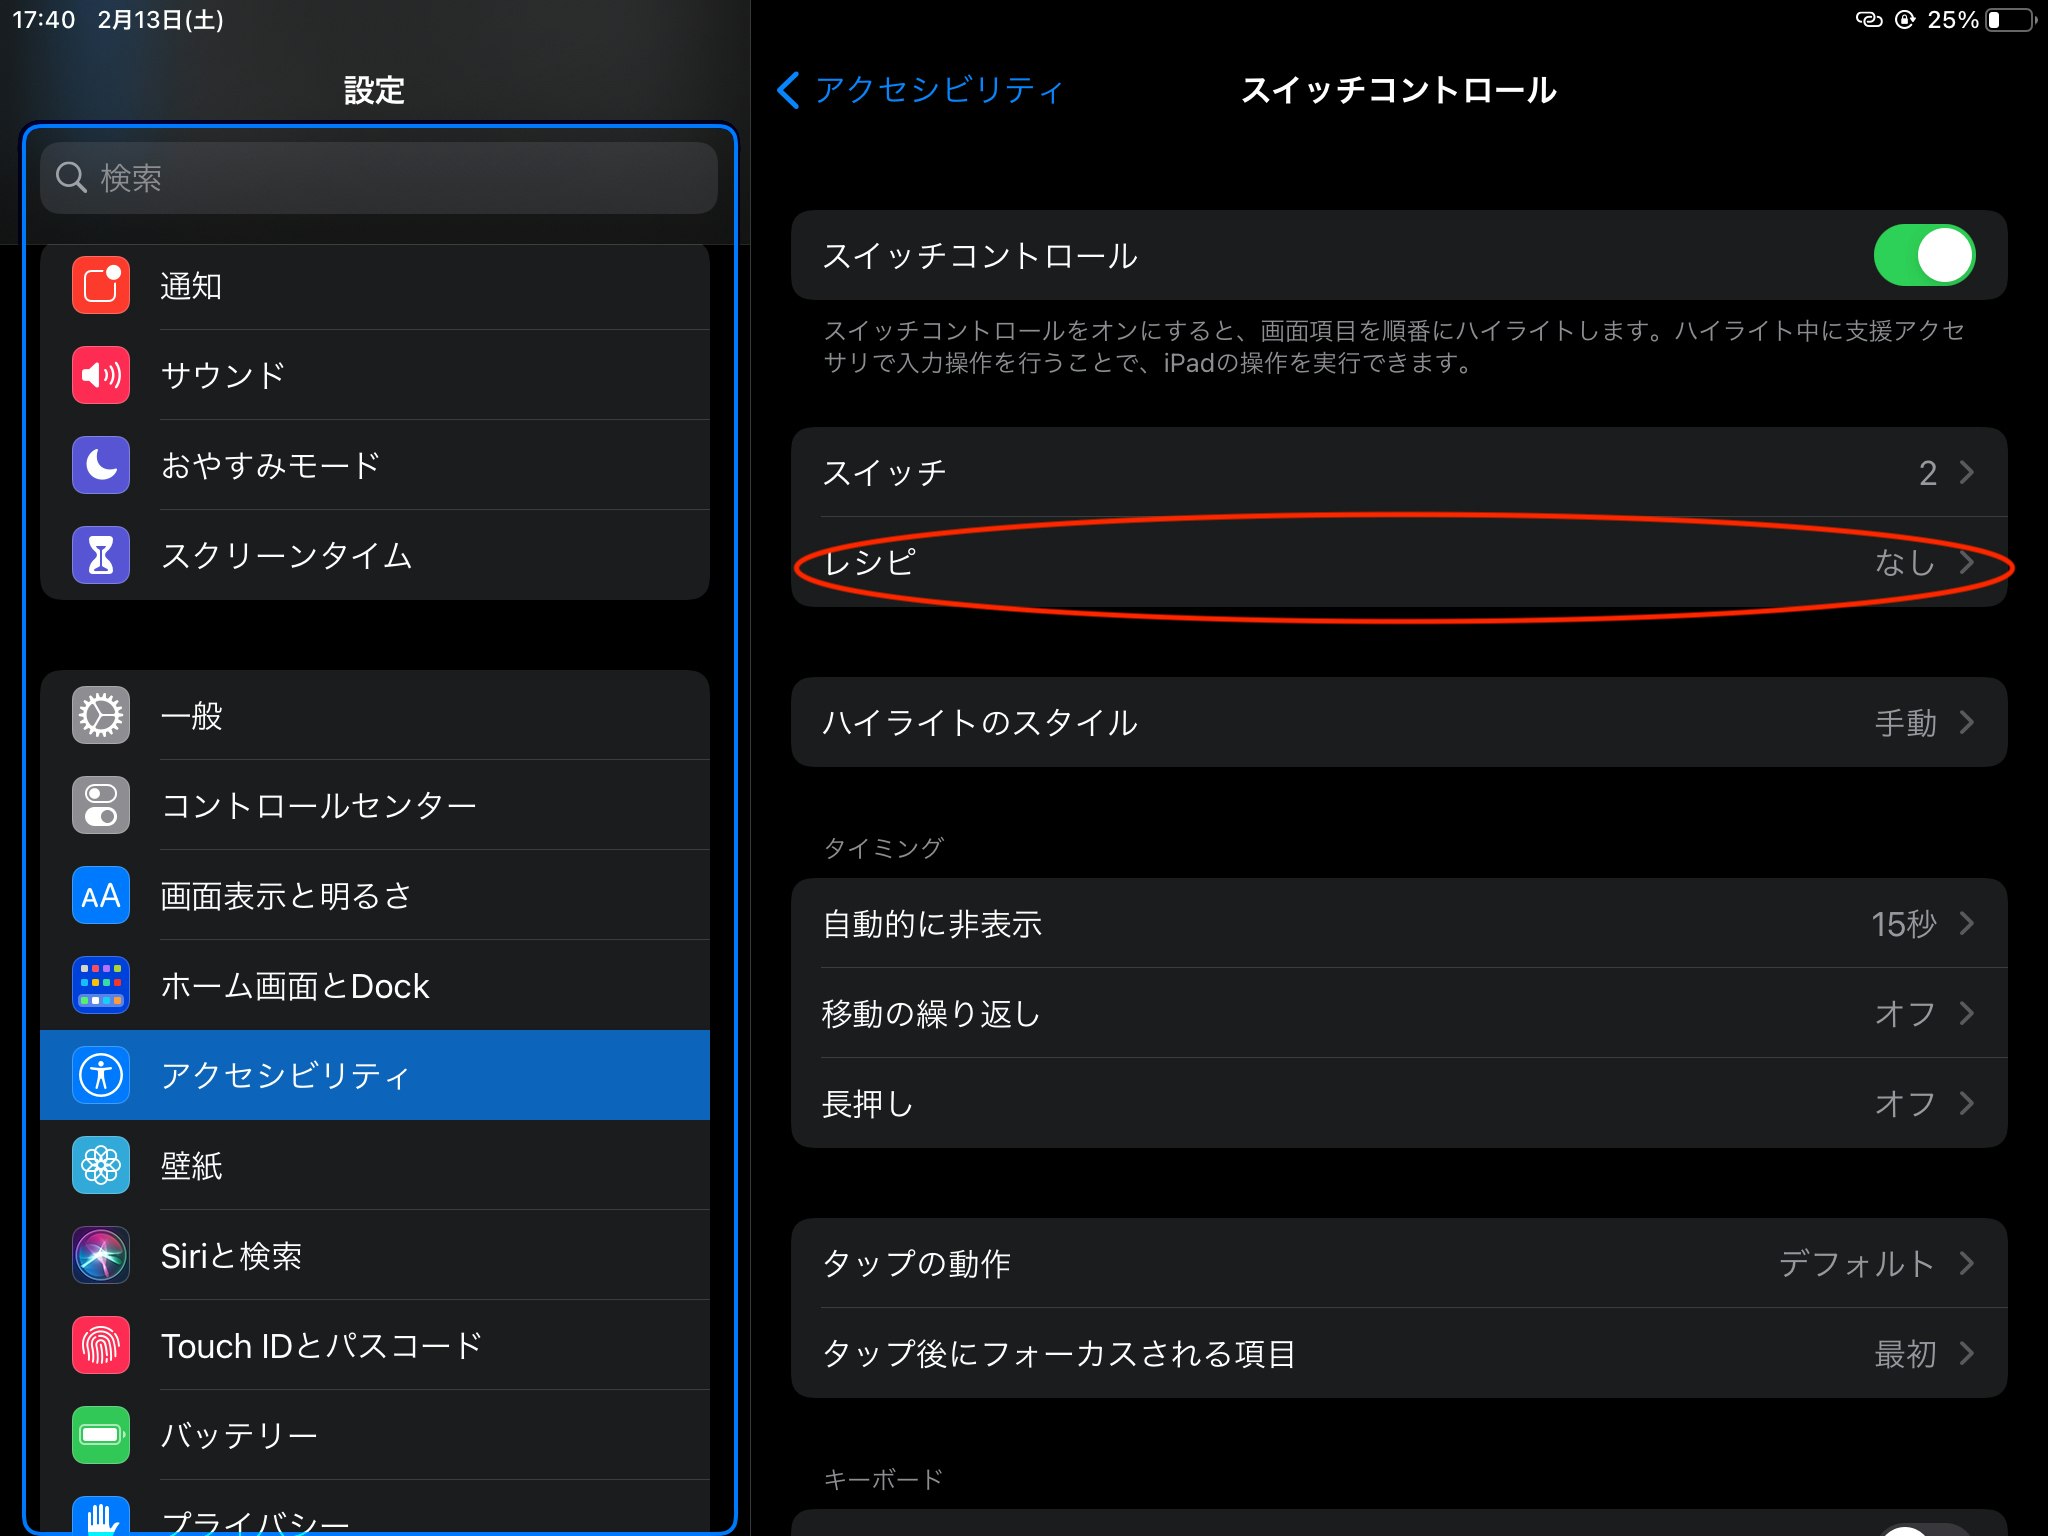
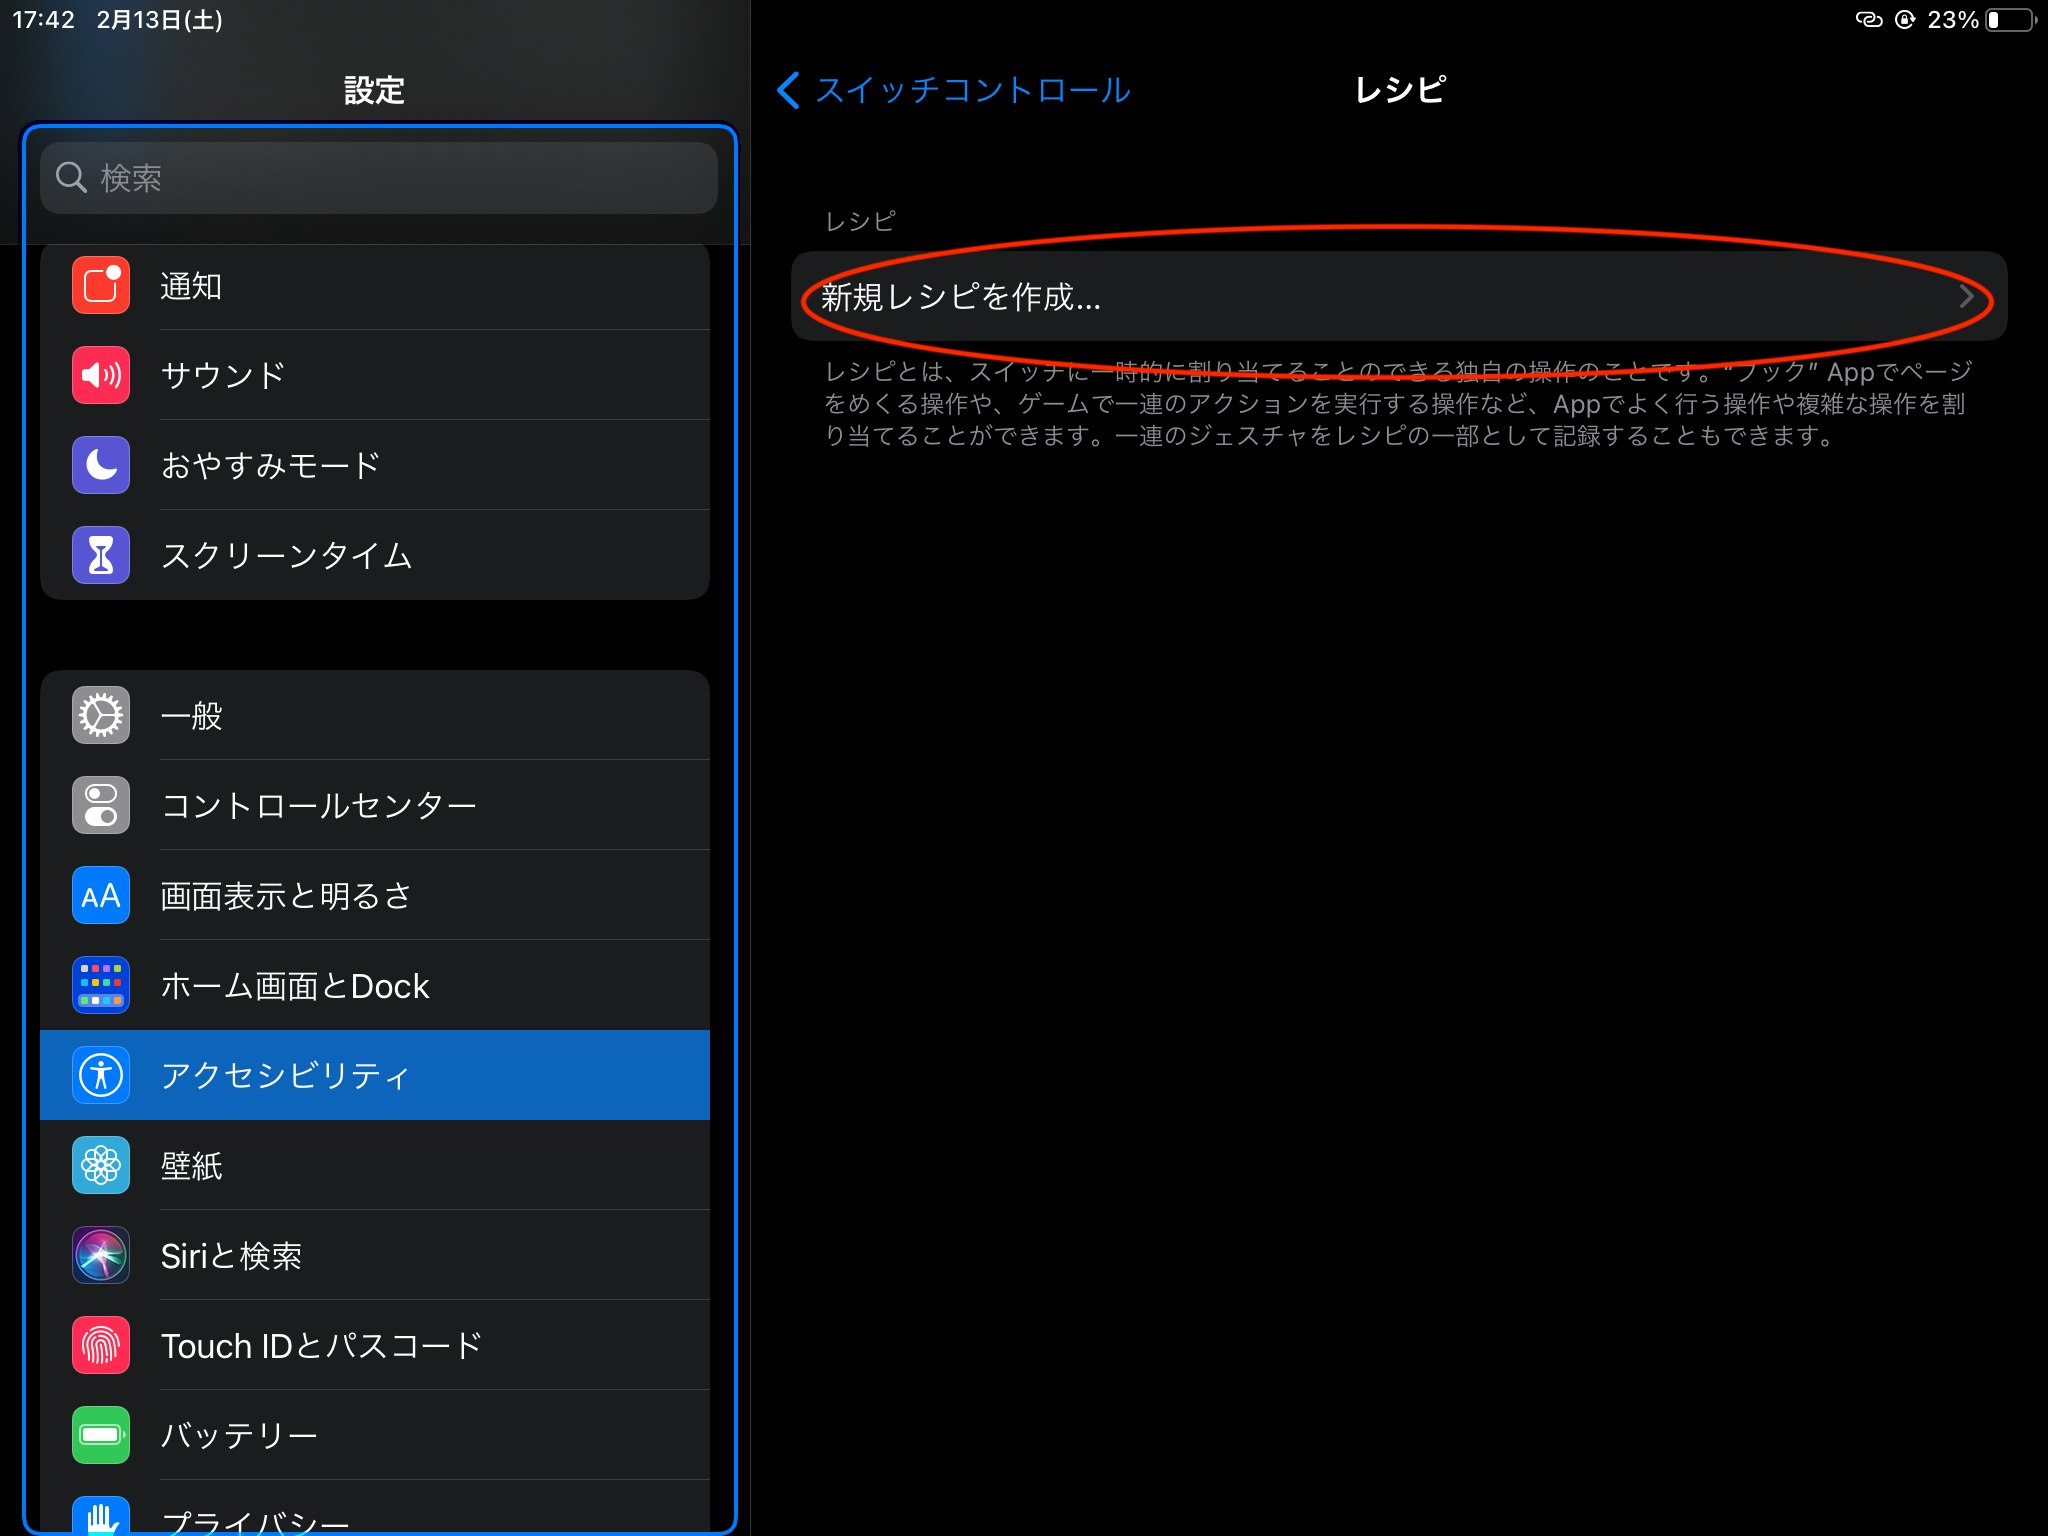
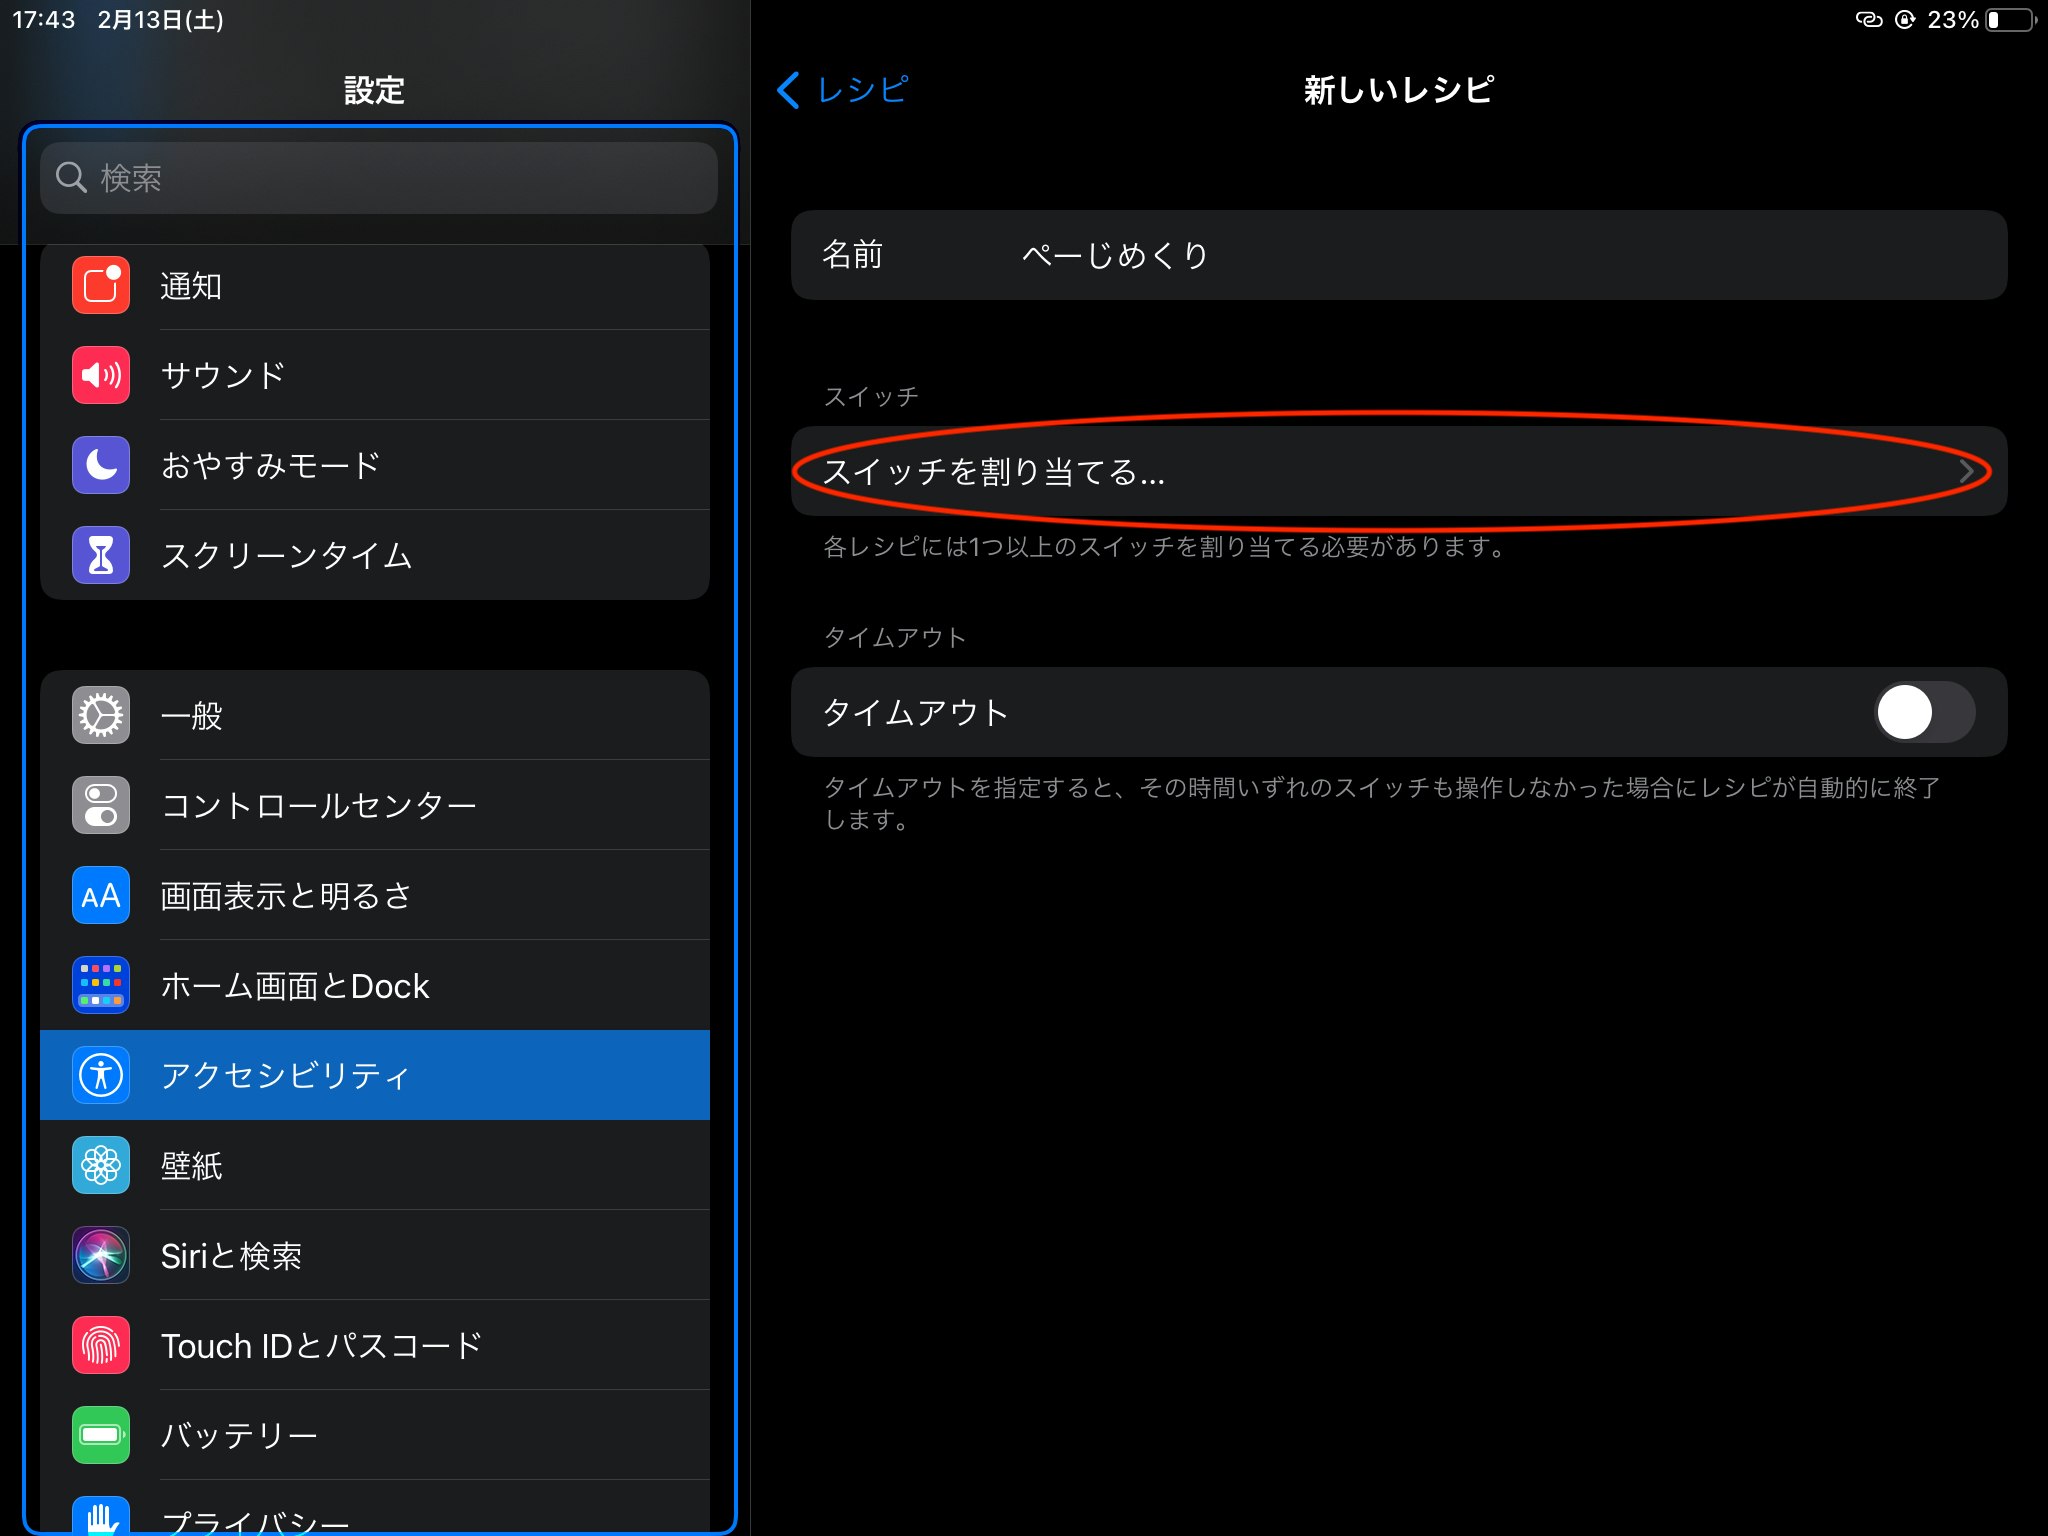
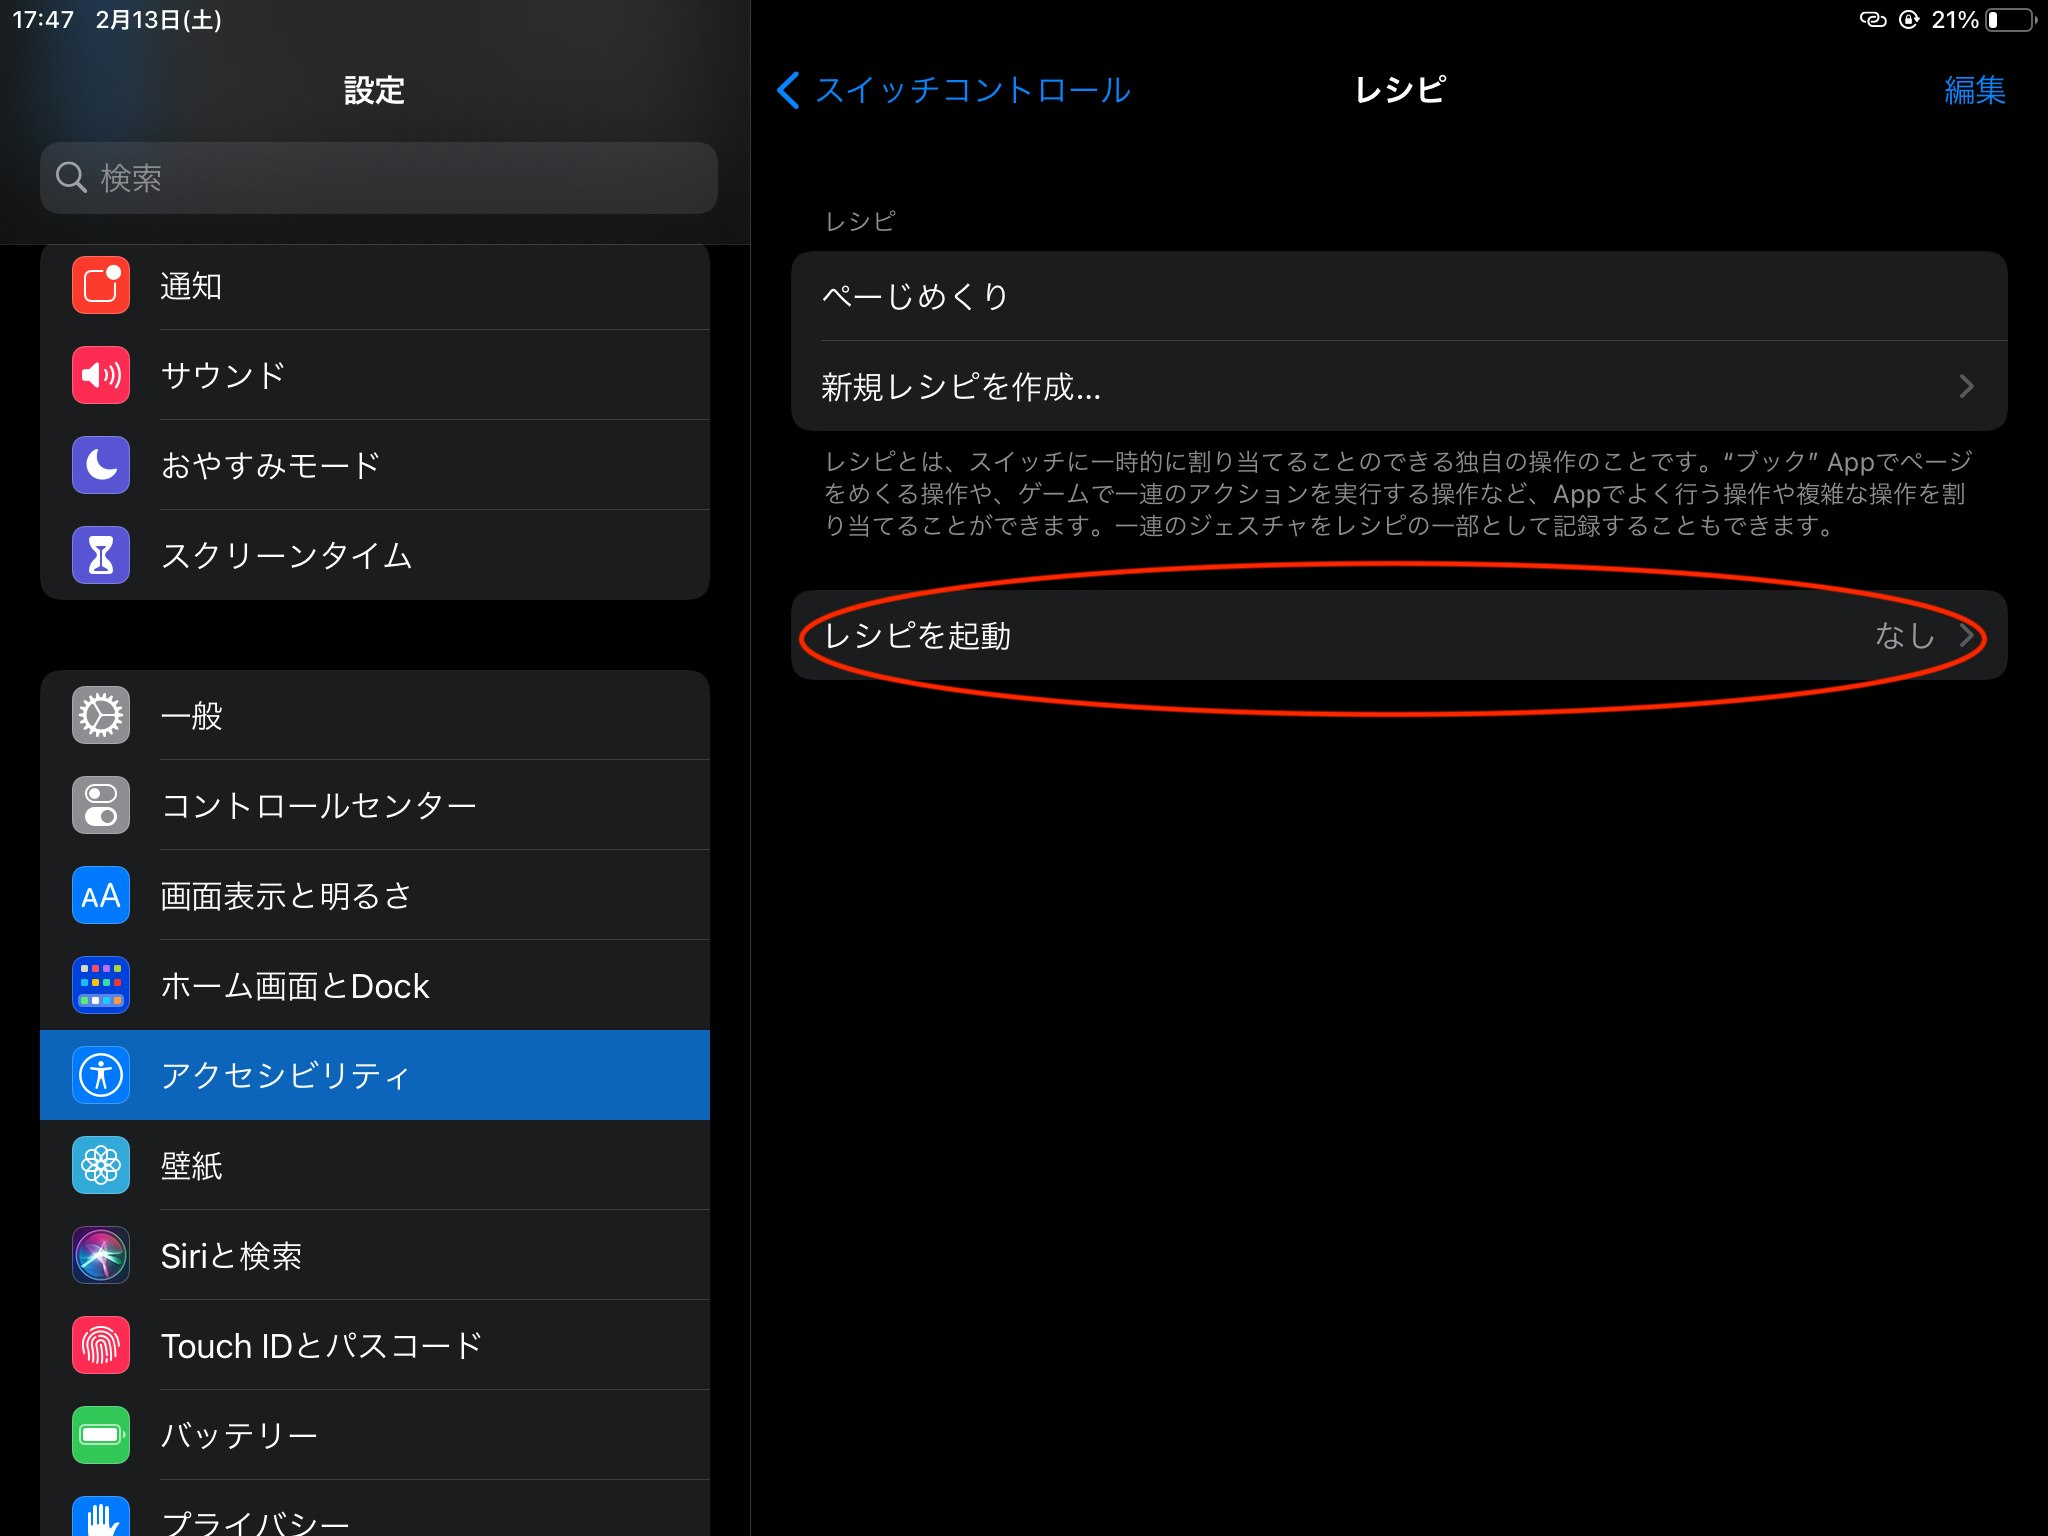
レシピの作成
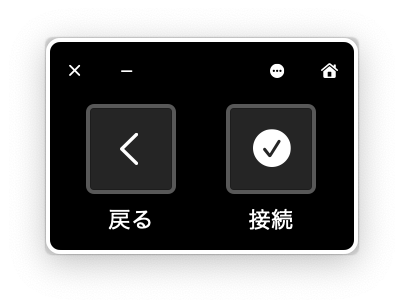
再接続する。
動作確認を行う
初めて電子書籍買ってみたけど、「キーボードから手放したくないけど、iPadのページめくりたい」ってタイミングが多かったので、スワイプ機能だけキーボード遠隔操作できるようにしてみた。ハンズオンの書籍学習捗りそう。 pic.twitter.com/rkGzLvPXQl
— 村上 (@rocketboy555) September 12, 2020ファンクションキーを設定した場合は、「fnキー」+「F11」と入力すると、機能します。
- 投稿日:2021-02-13T12:39:04+09:00
M1 Macbook airにhomebrewをインストールする
homebrewのインストール
2020/11/6からApple Silicon、Big Surに対応しているようです。
brew公式ページの手順に従ってインストール
brewのインストール/bin/bash -c "$(curl -fsSL https://raw.githubusercontent.com/Homebrew/install/HEAD/install.sh)"インストールが完了したら、下記のコマンドを実行してZshのパスにbrewを追加する。
Path通しecho 'eval $(/opt/homebrew/bin/brew shellenv)' >> /Users/ryo/.zprofile eval $(/opt/homebrew/bin/brew shellenv)確認$ brew doctor Your system is ready to brew.brew doctorが実行できればOK
- 投稿日:2021-02-13T11:42:35+09:00
lessコマンドでテキストを表示する時に行番号を表示する
- 投稿日:2021-02-13T07:50:52+09:00
M1 MacでCIR115-NTTComを使用する方法
確定申告の時期がやってきましたね。
新しいコンピュータを購入された方も多いと思いますが、M1 Macで今まで使っていたカードリーダー(CIR115-NTTCom)が使えなくなったので、使用する方法を探ってみました。
メーカーサポート外なので、自己責任でお願いします。
- チップ製造メーカーのホームページから、ドライバをダウンロードします。
- AB Circle製だったので、同じ型番を持つ以下のページから、Mac用のドライバ(USB Mac Installer)をダウンロードします。
(記事作成時のドライババージョンはV2.0.5で、M1 Macに対応していることを解凍後のReadme.txtで確認できます)
https://abcircle.com/en/product/1/CIR115A/contact-smart-card-reader/- 通常通りドライバのzipファイルを解凍し、dmgファイルをダブルクリックして、ドライバをインストールします。
- ドライバインストール完了後、再起動しますので、カードリーダーを接続して、マイナンバーカードが読み取れることを確認します。
ネット上にもあまり情報がなかったようなので、エントリを作成しました。
困っている方の参考になれば幸いです。
- 投稿日:2021-02-13T04:13:26+09:00
MacでM5stack Core2 for AWS
0. はじめに
なんとなーく、スイッチサイエンスを徘徊していたら、
M5Stack Core2 for AWS - ESP32 IoT開発キットとかいう面白そうなデバイスを発見!
AWSを使ってIoTのお勉強ができるっぽい。
〜ポチ!〜2日後に着〜そこそこハマりどころがあるので、メモがてら投稿
例によって初心者なので間違っていたらゴメンナサイ?
環境はMacOS Catalina 10.15.71. はじめはサラサラと
スイッチサイエンスの商品ページには詳細が英語しかないように書かれていますが、
日本語ページもあります! やったねというわけで、上のページを見ながら進めていきました。
※ドキュメントはよくできているので、以降ハマったところを書いています1-1. ドライバのインストール
macOS 10.9+を開くとMavericks以降はすでに組み込み済みとのこと。
念のために確認!% kextstat | grep usb.serial 186 1 0xffffff7f8470d000 0x6000 0x6000 com.apple.driver.usb.serial (6.0.0) 8D86815D-64E8-39C5-A879-263C5052B11B <61 21 6 5 3 1>なんか出たから大丈夫っぽい。
1-2. Visual Studio Codeのインストール
ここから
1-3. PlatformIO のインストール
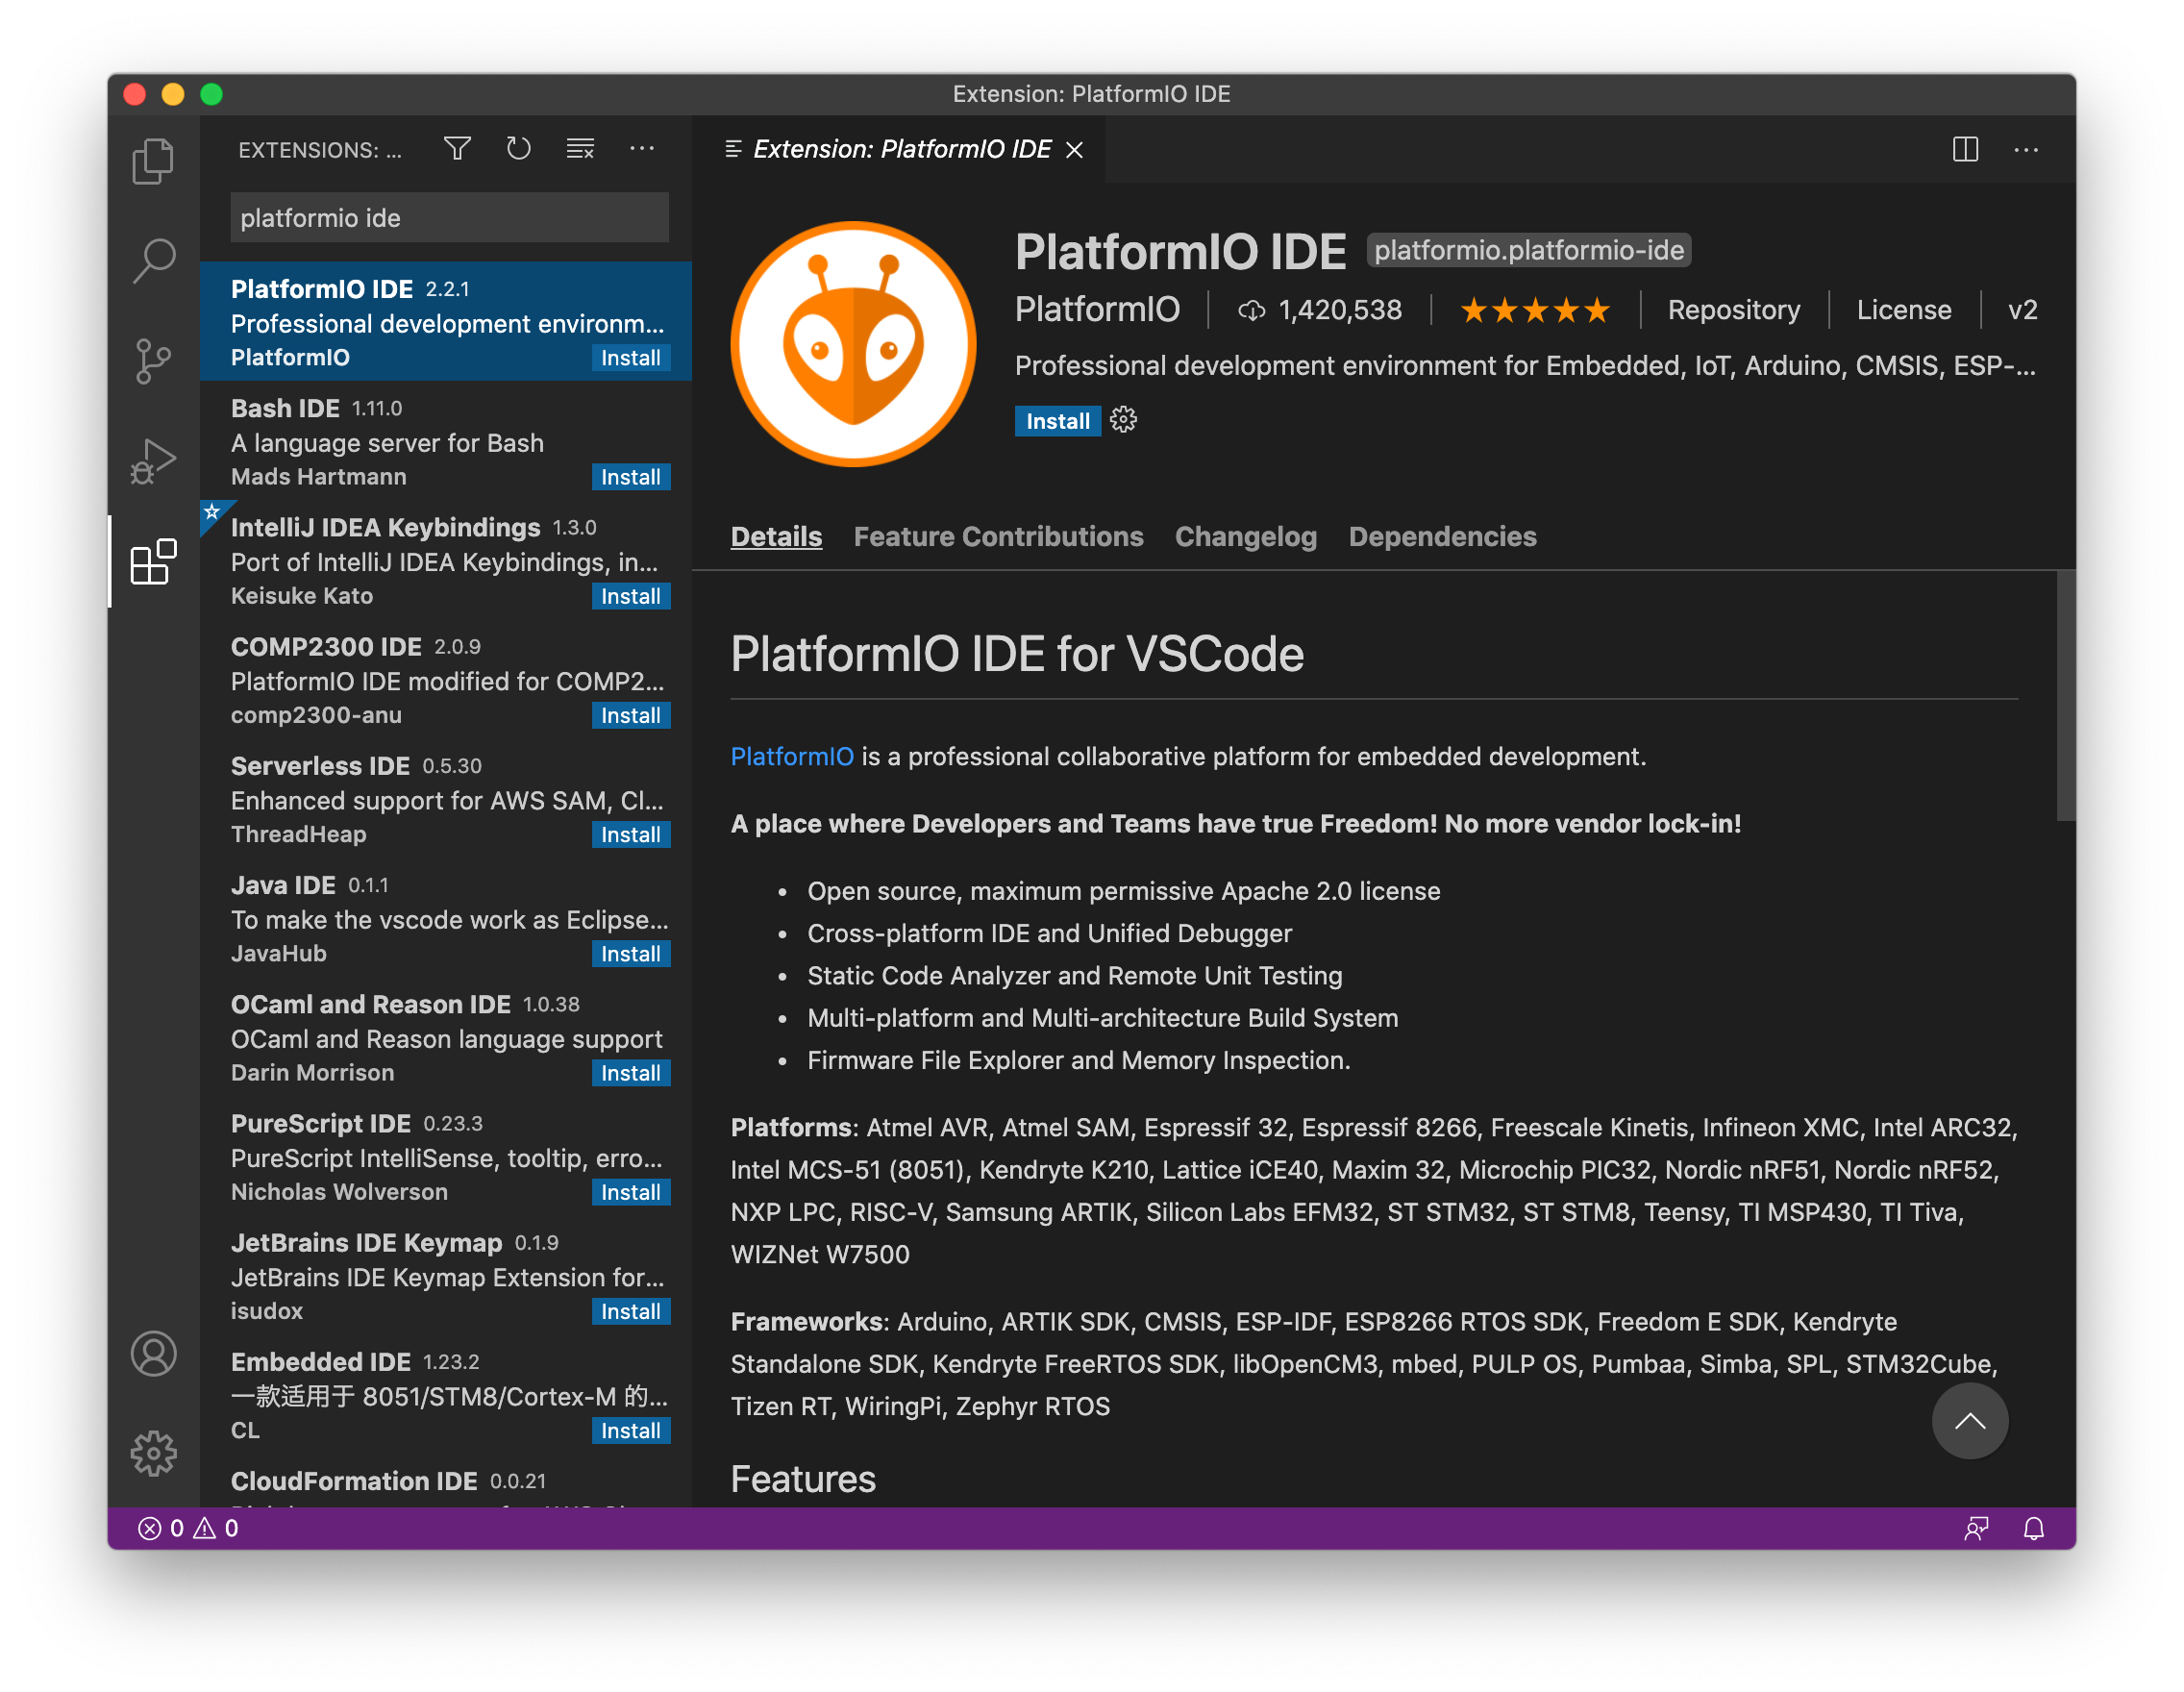
1.Visual Studio Codeを起動したら、Extensionsを開く
(左側の□が4つあるアイコンをクリックするかcommand+shift+x)
2.platformio ideを検索
3.青いinstallをクリック
1-4. あとは
あとはドキュメント通り、
・スマホにESP RainMakerをインストール
・Githubからソースを持ってくる
・MacとM5StackをUSB接続
ここまでは迷うとこはないですな2. ESP RainMaker Agent の実行
2-1. 第1のつまずき
ドキュメント通りに進めていって、
RainMaker Agent ファームウェアのビルドとアップロードの
buildまでは普通に進みましたが、Upload & Monitorでエラー発生!
スクショ取り忘れましたが
/dev/cu.SLAB_USBtoUARTなんてないよ
みたいなエラーだったと。。。
というわけでterminalで% ls /dev/cu.SLAB_USBtoUART ls: /dev/cu.SLAB_USBtoUART: No such file or directoryたしかにない。。。
じゃあコレは?% ls /dev/cu.* /dev/cu.Bluetooth-Incoming-Port /dev/cu.usbserial-0225F023どうも/dev/cu.usbserial-0225F023が正解っぽい
というわけで、platformio.iniファイルのupload_portを変更platformio.ini; PlatformIO Project Configuration File ; ; Build options: build flags, source filter, extra scripting ; Upload options: custom port, speed and extra flags ; Library options: dependencies, extra library storages ; ; Please visit documentation for the other options and examples ; http://docs.platformio.org/page/projectconf.html [env:core2foraws] platform = espressif32@2.1.0 framework = espidf board = esp32dev ;upload_port = /dev/cu.SLAB_USBtoUART upload_port = /dev/cu.usbserial-0225F023 monitor_speed = 115200 board_build.partitions = partitions_4MB_sec.csv board_build.embed_txtfiles = components/esp_rainmaker/server_certs/mqtt_server.crt components/esp_rainmaker/server_certs/claim_service_server.crt components/esp_rainmaker/server_certs/ota_server.crtもう一回buildしてからUpload & Monitor!
> Executing task: pio run --target upload --target monitor --environment core2foraws <

Processing core2foraws (platform: espressif32@2.1.0; framework: espidf; board: esp32dev)
-----------------------------------------------------------------------------------------------------------------------------
Verbose mode can be enabled via `-v, --verbose` option
CONFIGURATION: https://docs.platformio.org/page/boards/espressif32/esp32dev.html
PLATFORM: Espressif 32 (2.1.0) > Espressif ESP32 Dev Module
HARDWARE: ESP32 240MHz, 320KB RAM, 4MB Flash
DEBUG: Current (esp-prog) External (esp-prog, iot-bus-jtag, jlink, minimodule, olimex-arm-usb-ocd, olimex-arm-usb-ocd-h, olimex-arm-usb-tiny-h, olimex-jtag-tiny, tumpa)
PACKAGES:
 - framework-espidf 3.40100.200827 (4.1.0)
 - tool-cmake 3.16.4
 - tool-esptoolpy 1.30000.201119 (3.0.0)
 - tool-mkspiffs 2.230.0 (2.30)
 - tool-ninja 1.9.0
 - toolchain-esp32ulp 1.22851.191205 (2.28.51)
 - toolchain-xtensa32 2.80200.200827 (8.2.0)
Reading CMake configuration...
LDF: Library Dependency Finder -> http://bit.ly/configure-pio-ldf
LDF Modes: Finder ~ chain, Compatibility ~ soft
Found 0 compatible libraries
Scanning dependencies...
No dependencies
Building in release mode
Retrieving maximum program size .pio/build/core2foraws/firmware.elf
Checking size .pio/build/core2foraws/firmware.elf
Advanced Memory Usage is available via "PlatformIO Home > Project Inspect"
RAM:   [===       ]  26.8% (used 87864 bytes from 327680 bytes)
Flash: [========= ]  95.0% (used 1555753 bytes from 1638400 bytes)
Configuring upload protocol...
AVAILABLE: esp-prog, espota, esptool, iot-bus-jtag, jlink, minimodule, olimex-arm-usb-ocd, olimex-arm-usb-ocd-h, olimex-arm-usb-tiny-h, olimex-jtag-tiny, tumpa
CURRENT: upload_protocol = esptool
Looking for upload port...
Use manually specified: /dev/cu.usbserial-0225F023
Uploading .pio/build/core2foraws/firmware.bin
esptool.py v3.0
Serial port /dev/cu.usbserial-0225F023
Connecting.....
Chip is ESP32-D0WDQ6-V3 (revision 3)
Features: WiFi, BT, Dual Core, 240MHz, VRef calibration in efuse, Coding Scheme None
Crystal is 40MHz
MAC: 24:0a:c4:f9:9f:ac
Uploading stub...
Running stub...
Stub running...
Changing baud rate to 460800
Changed.
Configuring flash size...
Auto-detected Flash size: 16MB
Flash params set to 0x0240
Compressed 26912 bytes to 16214...
Writing at 0x00001000... (100 %)
Wrote 26912 bytes (16214 compressed) at 0x00001000 in 0.4 seconds (effective 538.6 kbit/s)...
Hash of data verified.
Compressed 3072 bytes to 159...
Writing at 0x00008000... (100 %)
Wrote 3072 bytes (159 compressed) at 0x00008000 in 0.0 seconds (effective 1370.5 kbit/s)...
Hash of data verified.
Compressed 8192 bytes to 31...
Writing at 0x00016000... (100 %)
Wrote 8192 bytes (31 compressed) at 0x00016000 in 0.0 seconds (effective 4094.4 kbit/s)...
Hash of data verified.
Compressed 1555872 bytes to 889938...
Writing at 0x00020000... (1 %)
Writing at 0x00024000... (3 %)
Writing at 0x00028000... (5 %)
Writing at 0x0002c000... (7 %)
Writing at 0x00030000... (9 %)
Writing at 0x00034000... (10 %)
Writing at 0x00038000... (12 %)
Writing at 0x0003c000... (14 %)
Writing at 0x00040000... (16 %)
Writing at 0x00044000... (18 %)
Writing at 0x00048000... (20 %)
Writing at 0x0004c000... (21 %)
Writing at 0x00050000... (23 %)
Writing at 0x00054000... (25 %)
Writing at 0x00058000... (27 %)
Writing at 0x0005c000... (29 %)
Writing at 0x00060000... (30 %)
Writing at 0x00064000... (32 %)
Writing at 0x00068000... (34 %)
Writing at 0x0006c000... (36 %)
Writing at 0x00070000... (38 %)
Writing at 0x00074000... (40 %)
Writing at 0x00078000... (41 %)
Writing at 0x0007c000... (43 %)
Writing at 0x00080000... (45 %)
Writing at 0x00084000... (47 %)
Writing at 0x00088000... (49 %)
Writing at 0x0008c000... (50 %)
Writing at 0x00090000... (52 %)
Writing at 0x00094000... (54 %)
Writing at 0x00098000... (56 %)
Writing at 0x0009c000... (58 %)
Writing at 0x000a0000... (60 %)
Writing at 0x000a4000... (61 %)
Writing at 0x000a8000... (63 %)
Writing at 0x000ac000... (65 %)
Writing at 0x000b0000... (67 %)
Writing at 0x000b4000... (69 %)
Writing at 0x000b8000... (70 %)
Writing at 0x000bc000... (72 %)
Writing at 0x000c0000... (74 %)
Writing at 0x000c4000... (76 %)
Writing at 0x000c8000... (78 %)
Writing at 0x000cc000... (80 %)
Writing at 0x000d0000... (81 %)
Writing at 0x000d4000... (83 %)
Writing at 0x000d8000... (85 %)
Writing at 0x000dc000... (87 %)
Writing at 0x000e0000... (89 %)
Writing at 0x000e4000... (90 %)
Writing at 0x000e8000... (92 %)
Writing at 0x000ec000... (94 %)
Writing at 0x000f0000... (96 %)
Writing at 0x000f4000... (98 %)
Writing at 0x000f8000... (100 %)
Wrote 1555872 bytes (889938 compressed) at 0x00020000 in 22.2 seconds (effective 561.3 kbit/s)...
Hash of data verified.

Leaving...
Hard resetting via RTS pin...
=============================================== [SUCCESS] Took 40.56 seconds ===============================================
--- Available filters and text transformations: colorize, debug, default, direct, esp32_exception_decoder, hexlify, log2file, nocontrol, printable, send_on_enter, time
--- More details at http://bit.ly/pio-monitor-filters
--- Miniterm on /dev/cu.usbserial-0225F023  115200,8,N,1 ---
--- Quit: Ctrl+C | Menu: Ctrl+T | Help: Ctrl+T followed by Ctrl+H ---
␛[0;32mI (719) esp_image: segment 5: paddr=0x00185710 vaddr=0x40087fa4 size=0x16664 ( 91748) load␛[0m
␛[0;32mI (777) boot: Loaded app from partition at offset 0x20000␛[0m
␛[0;32mI (832) boot: Set actual ota_seq=1 in otadata[0]␛[0m
␛[0;32mI (832) boot: Disabling RNG early entropy source...␛[0m
␛[0;32mI (833) psram: This chip is ESP32-D0WD␛[0m
␛[0;32mI (837) spiram: Found 64MBit SPI RAM device␛[0m
␛[0;32mI (841) spiram: SPI RAM mode: flash 80m sram 80m␛[0m
␛[0;32mI (846) spiram: PSRAM initialized, cache is in low/high (2-core) mode.␛[0m
␛[0;32mI (854) cpu_start: Pro cpu up.␛[0m
␛[0;32mI (857) cpu_start: Application information:␛[0m
␛[0;32mI (862) cpu_start: Project name:     AWS_IoT_EduKit-Getting_Started␛[0m
␛[0;32mI (869) cpu_start: App version:      3c5aa62-dirty␛[0m
␛[0;32mI (875) cpu_start: Compile time:     Feb 12 2021 23:41:21␛[0m
␛[0;32mI (881) cpu_start: ELF file SHA256:  9747349fbca1eb77...␛[0m
␛[0;32mI (887) cpu_start: ESP-IDF:          3.40100.200827␛[0m
␛[0;32mI (892) cpu_start: Starting app cpu, entry point is 0x400830b0␛[0m
␛[0;32mI (0) cpu_start: App cpu up.␛[0m
␛[0;32mI (1396) spiram: SPI SRAM memory test OK␛[0m
␛[0;32mI (1396) heap_init: Initializing. RAM available for dynamic allocation:␛[0m
␛[0;32mI (1396) heap_init: At 3FFAFF10 len 000000F0 (0 KiB): DRAM␛[0m
␛[0;32mI (1402) heap_init: At 3FFB6388 len 00001C78 (7 KiB): DRAM␛[0m
␛[0;32mI (1408) heap_init: At 3FFB9A20 len 00004108 (16 KiB): DRAM␛[0m
␛[0;32mI (1415) heap_init: At 3FFBDB5C len 00000004 (0 KiB): DRAM␛[0m
␛[0;32mI (1421) heap_init: At 3FFD3298 len 0000CD68 (51 KiB): DRAM␛[0m
␛[0;32mI (1427) heap_init: At 3FFE0440 len 00003AE0 (14 KiB): D/IRAM␛[0m
␛[0;32mI (1434) heap_init: At 3FFE4350 len 0001BCB0 (111 KiB): D/IRAM␛[0m
␛[0;32mI (1440) heap_init: At 4009E608 len 000019F8 (6 KiB): IRAM␛[0m
␛[0;32mI (1446) cpu_start: Pro cpu start user code␛[0m
␛[0;32mI (1451) spiram: Adding pool of 4096K of external SPI memory to heap allocator␛[0m
␛[0;32mI (1471) spi_flash: detected chip: generic␛[0m
␛[0;32mI (1472) spi_flash: flash io: qio␛[0m
␛[0;32mI (1472) cpu_start: Starting scheduler on PRO CPU.␛[0m
␛[0;32mI (0) cpu_start: Starting scheduler on APP CPU.␛[0m
␛[0;32mI (1481) spiram: Reserving pool of 32K of internal memory for DMA/internal allocations␛[0m
␛[0;32mI (1511) gpio: GPIO[39]| InputEn: 1| OutputEn: 0| OpenDrain: 0| Pullup: 1| Pulldown: 1| Intr:3 ␛[0m
␛[0;32mI (1711) ILI9341: Initialization.␛[0m
␛[0;32mI (1911) ILI9341: Display orientation: LANDSCAPE␛[0m
␛[0;32mI (1911) ILI9341: 0x36 command value: 0x08␛[0m
I (2011) wifi:wifi driver task: 3ffd6044, prio:23, stack:6656, core=0
␛[0;32mI (2011) system_api: Base MAC address is not set, read default base MAC address from BLK0 of EFUSE␛[0m
␛[0;32mI (2011) system_api: Base MAC address is not set, read default base MAC address from BLK0 of EFUSE␛[0m
I (2211) wifi:wifi firmware version: 3ea4c76
I (2211) wifi:config NVS flash: enabled
I (2211) wifi:config nano formating: disabled
I (2211) wifi:Init dynamic tx buffer num: 32
I (2211) wifi:Init data frame dynamic rx buffer num: 16
I (2221) wifi:Init management frame dynamic rx buffer num: 16
I (2221) wifi:Init management short buffer num: 32
I (2231) wifi:Init static tx buffer num: 8
I (2231) wifi:Init static rx buffer size: 1600
I (2231) wifi:Init static rx buffer num: 4
I (2241) wifi:Init dynamic rx buffer num: 16
␛[0;32mI (2251) esp_claim: Initialising Assisted Claiming. This may take time.␛[0m
␛[0;33mW (2251) esp_claim: Generating the private key. This may take time.␛[0m
␛[0;32mI (67941) esp_rmaker_node: Node ID ----- 240AC4F99FAC␛[0m
␛[0;32mI (67941) display: configuring the house␛[0m
␛[0;32mI (67941) display: house configured␛[0m
␛[0;32mI (67951) display: lights off␛[0m
␛[0;32mI (69361) display: configuring the temperature␛[0m
␛[0;32mI (69361) display: temperature configured␛[0m
␛[0;32mI (69451) display: configuring the fan␛[0m
␛[0;32mI (69451) display: configured fan_object␛[0m
␛[0;32mI (69451) display: configured fan_strength_slider␛[0m
␛[0;32mI (69451) display: configured fan_sw1␛[0m
␛[0;32mI (69451) display: fan configured␛[0m
␛[0;32mI (69461) esp_rmaker_time_sync: Initializing SNTP. Using the SNTP server: pool.ntp.org␛[0m
␛[0;32mI (69471) esp_rmaker_core: Starting RainMaker Core Task␛[0m
␛[0;32mI (69481) esp_claim: Waiting for assisted claim to finish.␛[0m
␛[0;32mI (69481) wifi_prov_scheme_ble: BT memory released␛[0m
␛[0;32mI (69481) app_wifi: Starting provisioning␛[0m
␛[0;33mW (69501) phy_init: failed to load RF calibration data (0x1102), falling back to full calibration␛[0m
␛[0;32mI (69631) phy: phy_version: 4180, cb3948e, Sep 12 2019, 16:39:13, 0, 2␛[0m
I (69691) wifi:mode : sta (24:0a:c4:f9:9f:ac)
␛[0;32mI (69701) BTDM_INIT: BT controller compile version [219866f]␛[0m
␛[0;32mI (69701) system_api: Base MAC address is not set, read default base MAC address from BLK0 of EFUSE␛[0m
␛[0;32mI (69881) protocomm_nimble: BLE Host Task Started␛[0m
␛[0;32mI (69891) wifi_prov_mgr: Provisioning started with service name : PROV_02167d ␛[0m
␛[0;32mI (69891) app_wifi: Provisioning started␛[0m
␛[0;32mI (69891) app_wifi: Scan this QR code from the phone app for Provisioning.␛[0m
GAP procedure initiated: advertise; disc_mode=2 adv_channel_map=0 own_addr_type=0 adv_filter_policy=0 adv_itvl_min=256 adv_itvl_max=256

  █▀▀▀▀▀█ ▄█ ▄▄ █▄▀ ▀▀██▀▀█ █▀▀▀▀▀█
  █ ███ █ ▄█▀█ ▄ ▄▄▄▀ ▄▀▀▀▀ █ ███ █
  █ ▀▀▀ █ ▄ █ ▀▄ ▄█ █▀ ▀█▀█ █ ▀▀▀ █
  █▀████▀▄▀█▄█▀▀ █ ▀█▄▄▄█▄ █▀▄  ▄█
    ▀█▀ ▀█▀█▄▀▄▀ ▀██▀▄▀▄▀▀ ▀▄▀▀ ▄▀▄
   ▀ ▀▀ ▄▀▀▄▄▄█▀▀ ▀▄ ▀▄ ▄ ▄  ▄█▀ ▄▀▄
  ▄▀▀█▄█▀▄  ▄▀▄█▀ ▄▀██▀  ▀▀▄▄█▀ ▄ ▄
    ▀ ██▀▄▄▄▀ ▀▀▀▀█▀▄▄ ▄    ▄▀▀▀ █▄
  █  ▀▄█▀▄▄   ▄ ▀█▀▀█▄ █▀▄█ █▀▄▄▄▄▄
  ▀ ▀  ▀▀▀█▀█ ▀▀▀▀▄██▄ ▄ ▄█▀▀▀██▄▄█
  █▀▀▀▀▀█ ▀███▀ █▀  ▄  ▄ ▄█ ▀ █ ▄▀
  █ ███ █ █▀█▀█▀ ▀█▀█▄█▄█ █▀▀██▀▄▀
  █ ▀▀▀ █ █ ▀  ▀ █▄▀█▄██ ▄█ ▀█▄▀█▀
  ▀▀▀▀▀▀▀ ▀  ▀ ▀▀▀▀▀ ▀  ▀▀▀ ▀▀   ▀
なんとかQRコード表示までうまくいったようです
アスキーアートでQRコードが出るとは思わなかったw
ターミナルでの表示なので確かに絵はでないか。。。
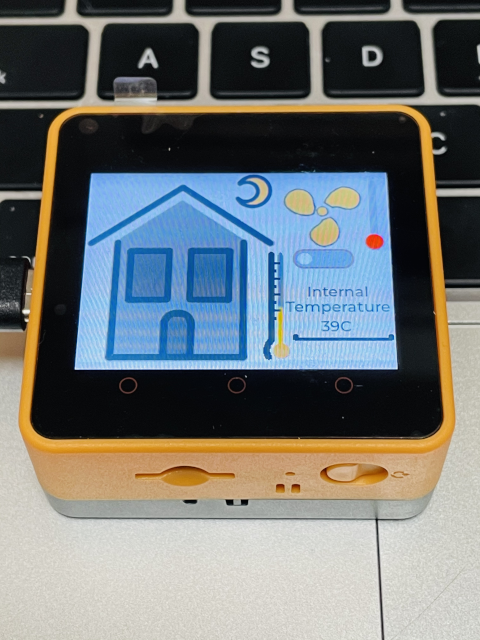
ちなみに上のQRコードは加工しています。おそらくM5Stackの画面はこんな感じになっていると思います。
ファンのアイコンの下のスライドスイッチあたり触ると
「ぶーーん」とファンが回りますw
2-2. あとは
あとはドキュメント通り、ESP RainMakerにデバイス登録すれば、
スマホ側からFanのOn/Offとか明るさ変えたりとかできると思います^^3. ESP-IDF v4.2 のインストール
3-1. やっぱりココでもつまづく
ドキュメントにある下のコマンドを実行!!!
/bin/bash -c "$(curl -fsSL https://raw.githubusercontent.com/Homebrew/install/HEAD/install.sh)" brew install cmake ninja dfu-util mkdir $HOME/esp cd $HOME/esp git clone -b release/v4.2 --recursive https://github.com/espressif/esp-idf.git cd $HOME/esp/esp-idf . $HOME/esp/esp-idf/install.sh . $HOME/esp/esp-idf/export.shそしてエラー
〜〜〜いろいろ省略〜〜〜
Installing Python environment and packages
Creating a new Python environment in /Users/オレ/.espressif/python_env/idf4.2_py2.7_env
Installing virtualenv
/System/Library/Frameworks/Python.framework/Versions/2.7/Resources/Python.app/Contents/MacOS/Python: No module named pip
Traceback (most recent call last):
  File "/Users/オレ/esp/esp-idf/tools/idf_tools.py", line 1492, in <module>
    main(sys.argv[1:])
  File "/Users/オレ/esp/esp-idf/tools/idf_tools.py", line 1488, in main
    action_func(args)
  File "/Users/オレ/esp/esp-idf/tools/idf_tools.py", line 1205, in action_install_python_env
    stdout=sys.stdout, stderr=sys.stderr)
  File "/System/Library/Frameworks/Python.framework/Versions/2.7/lib/python2.7/subprocess.py", line 190, in check_call
    raise CalledProcessError(retcode, cmd)
subprocess.CalledProcessError: Command '['/System/Library/Frameworks/Python.framework/Versions/2.7/Resources/Python.app/Contents/MacOS/Python', '-m', 'pip', 'install', '--user', 'virtualenv']' returned non-zero exit status 1

[プロセスが完了しました]
う〜ん、どうするかな。。。
。。。とりあえずpython3にしちゃおうw
コケているのは、
. $HOME/esp/esp-idf/install.sh
brewはインストールされている
ということで、、、pyenvをインストール
% brew install pyenv
Updating Homebrew...
==> Auto-updated Homebrew!
Updated 1 tap (homebrew/core).
==> Updated Formulae
Updated 11 formulae.

==> Downloading https://homebrew.bintray.com/bottles/autoconf-2.69.catalina.bottle.4.tar.gz
==> Downloading from https://d29vzk4ow07wi7.cloudfront.net/ca510b350e941fb9395522a03f9d2fb5df276085d806ceead763acb95889a368?response-content-
######################################################################## 100.0%
==> Downloading https://homebrew.bintray.com/bottles/pkg-config-0.29.2_3.catalina.bottle.tar.gz
==> Downloading from https://d29vzk4ow07wi7.cloudfront.net/80f141e695f73bd058fd82e9f539dc67471666ff6800c5e280b5af7d3050f435?response-content-
######################################################################## 100.0%
==> Downloading https://homebrew.bintray.com/bottles/pyenv-1.2.22.catalina.bottle.tar.gz
==> Downloading from https://d29vzk4ow07wi7.cloudfront.net/b4f3038e29acde1d99579104ae100777621b9716fe797e7917dad1e9795d3473?response-content-
######################################################################## 100.0%
==> Installing dependencies for pyenv: autoconf and pkg-config
==> Installing pyenv dependency: autoconf
==> Pouring autoconf-2.69.catalina.bottle.4.tar.gz
?  /usr/local/Cellar/autoconf/2.69: 67 files, 3.0MB
==> Installing pyenv dependency: pkg-config
==> Pouring pkg-config-0.29.2_3.catalina.bottle.tar.gz
?  /usr/local/Cellar/pkg-config/0.29.2_3: 11 files, 623.8KB
==> Installing pyenv
==> Pouring pyenv-1.2.22.catalina.bottle.tar.gz
?  /usr/local/Cellar/pyenv/1.2.22: 721 files, 2.6MB
で、python3は何をいれようかなー
最新はいくつかな〜% pyenv install --list Available versions: 2.1.3 2.2.3 2.3.7 〜〜〜中略〜〜〜 3.9.0 3.9-dev 3.9.1 3.10-dev activepython-2.7.14 activepython-3.5.4 〜〜〜以下略〜〜〜ということで3.9.1に決定!
早速インストール% pyenv install 3.9.1 python-build: use openssl@1.1 from homebrew python-build: use readline from homebrew Downloading Python-3.9.1.tar.xz... -> https://www.python.org/ftp/python/3.9.1/Python-3.9.1.tar.xz Installing Python-3.9.1... python-build: use readline from homebrew python-build: use zlib from xcode sdk Installed Python-3.9.1 to /Users/オレ/.pyenv/versions/3.9.1無事インストール完了
ちゃんとpyenvでみられるか確認して、3.9.1を使うように。。。% pyenv versions * system (set by /Users/オレ/.pyenv/version) 3.9.1 % pyenv global 3.9.1 % pyenv rehash % pyenv versions system * 3.9.1 (set by /Users/オレ/.pyenv/version)で、.bash_profileに
.bash_profilePYENV_ROOT="$HOME/.pyenv" export PATH="$PYENV_ROOT/bin:$PATH" eval "$(pyenv init -)"shellがzshなので
% bash
The default interactive shell is now zsh.
To update your account to use zsh, please run `chsh -s /bin/zsh`.
For more details, please visit https://support.apple.com/kb/HT208050.

bash-3.2$ cd
bash-3.2$ source .bash_profile
bash-3.2$ python --version
Python 3.9.1
ということでpythonを実行すると3.9.1が起動するように〜
とりあえずpipも最新にしておこbash-3.2$ pip install --upgrade pip Collecting pip Using cached pip-21.0.1-py3-none-any.whl (1.5 MB) Installing collected packages: pip Attempting uninstall: pip Found existing installation: pip 20.2.3 Uninstalling pip-20.2.3: Successfully uninstalled pip-20.2.3 Successfully installed pip-21.0.1やっとこさ環境がそろったので
コケていたinstall.shを〜bash-3.2$ cd $HOME/esp/esp-idf bash-3.2$ . $HOME/esp/esp-idf/install.sh Installing ESP-IDF tools Installing tools: xtensa-esp32-elf, xtensa-esp32s2-elf, esp32ulp-elf, esp32s2ulp-elf, openocd-esp32 Skipping xtensa-esp32-elf@esp-2020r3-8.4.0 (already installed) Skipping xtensa-esp32s2-elf@esp-2020r3-8.4.0 (already installed) Skipping esp32ulp-elf@2.28.51-esp-20191205 (already installed) Skipping esp32s2ulp-elf@2.28.51-esp-20191205 (already installed) Skipping openocd-esp32@v0.10.0-esp32-20200709 (already installed) Installing Python environment and packages Creating a new Python environment in /Users/オレ/.espressif/python_env/idf4.2_py3.9_env Installing virtualenv Collecting virtualenv Downloading virtualenv-20.4.2-py2.py3-none-any.whl (7.2 MB) |████████████████████████████████| 7.2 MB 6.7 MB/s Collecting distlib<1,>=0.3.1 Downloading distlib-0.3.1-py2.py3-none-any.whl (335 kB) |████████████████████████████████| 335 kB 30.1 MB/s Collecting six<2,>=1.9.0 Downloading six-1.15.0-py2.py3-none-any.whl (10 kB) 〜〜〜省略〜〜〜 Successfully installed Flask-0.12.5 Flask-Compress-1.8.0 Flask-SocketIO-2.9.6 Jinja2-2.11.3 MarkupSafe-1.1.1 Pygments-2.7.4 Werkzeug-0.16.1 bidict-0.21.2 bitstring-3.1.7 brotli-1.0.9 cffi-1.14.5 click-7.1.2 cryptography-3.4.4 ecdsa-0.16.1 future-0.18.2 gdbgui-0.13.2.0 gevent-1.5.0 greenlet-1.0.0 itsdangerous-1.1.0 pycparser-2.20 pyelftools-0.27 pygdbmi-0.9.0.2 pyparsing-2.3.1 pyserial-3.5 python-engineio-4.0.0 python-socketio-5.0.4 reedsolo-1.5.4 six-1.15.0 All done! You can now run: . ./export.shインストールできた模様?
あとはexport.shbash-3.2$ . $HOME/esp/esp-idf/export.sh Adding ESP-IDF tools to PATH... Using Python interpreter in /Users/オレ/.espressif/python_env/idf4.2_py3.9_env/bin/python Checking if Python packages are up to date... Python requirements from /Users/オレ/esp/esp-idf/requirements.txt are satisfied. Added the following directories to PATH: /Users/オレ/esp/esp-idf/components/esptool_py/esptool /Users/オレ/esp/esp-idf/components/espcoredump /Users/オレ/esp/esp-idf/components/partition_table /Users/オレ/esp/esp-idf/components/app_update /Users/オレ/.espressif/tools/xtensa-esp32-elf/esp-2020r3-8.4.0/xtensa-esp32-elf/bin /Users/オレ/.espressif/tools/xtensa-esp32s2-elf/esp-2020r3-8.4.0/xtensa-esp32s2-elf/bin /Users/オレ/.espressif/tools/esp32ulp-elf/2.28.51-esp-20191205/esp32ulp-elf-binutils/bin /Users/オレ/.espressif/tools/esp32s2ulp-elf/2.28.51-esp-20191205/esp32s2ulp-elf-binutils/bin /Users/オレ/.espressif/tools/openocd-esp32/v0.10.0-esp32-20200709/openocd-esp32/bin /Users/オレ/.espressif/python_env/idf4.2_py3.9_env/bin /Users/オレ/esp/esp-idf/tools Done! You can now compile ESP-IDF projects. Go to the project directory and run: idf.py build bash-3.2$ idf idf.py idf_monitor.py idf_size.py idf_tools.py bash-3.2$というわけで、idf.pyできるようになった!(っぽい)?
Qiita書くのに疲れたので次回につづく。。。?
