- 投稿日:2020-03-14T22:50:56+09:00
ため息が出るほど美しいライフゲーム
はじめに
ライフゲームというものをご存知でしょうか。
詳しくはwikipediaを読んでほしいですが、要はシミュレーションの一種。
https://ja.wikipedia.org/wiki/%E3%83%A9%E3%82%A4%E3%83%95%E3%82%B2%E3%83%BC%E3%83%A0
ほんの僅かな単純な規則から、驚くほど複雑で、まるで生命をもっているかのようなふるまいをすることから、ライフゲームと呼ばれています。
最近、reactを使う現場に入ったこともあり、それまでモダンなJavaScriptをほとんど書いたことがなかったため、いい機会だと思い、ライフゲームを作ってみました。
作成したアプリはこちらのリンクから飛べます。
https://lifegame00001.netlify.com/
ライフゲームとは
ライフゲームは極めてシンプル。ルールはたったの4つだけ。
誕生: 死んでいるセルに隣接する生きたセルがちょうど3つあれば、次の世代が誕生する
生存: 生きているセルに隣接する生きたセルが2つか3つならば、次の世代でも生存する
過疎: 生きているセルに隣接する生きたセルが1つ以下ならば、過疎により死滅する
過密: 生きているセルに隣接する生きたセルが4つ以上ならば、過密により死滅する
ルールはたったこれだけなのに、実に奥が深くて、面白い挙動をするんですね。
https://lifegame00001.netlify.com/
僕が作ってみたアプリです。↓で紹介するパターンとかを色々ためしてみると面白いですよ。
ライフゲームの面白いパターンを解説
ライフゲームの中で生成されるパターンには、すぐに死滅するもの、一定の法則性をもつもの、無限に増えるもの、などなど色々なものがあります。
生き延びる場合のパターンは、おおまかに4つに類別されます。
固定物体
振動子
移動物体
繁殖型
です。一個ずつサンプルを紹介していきます。
固定物体
ブロック。ずーっとこの形をキープしています。寡黙なやつです。
振動子
ブリンカーって名前のやつです。blink(まばたき)してるように見えるからでしょうね。
移動物体
グライダー
繁殖型
宇宙船。四角形のパターンが固定砲台となり、そこから延々と宇宙船が発射されていくさまが観測できます。美しいですね。
https://ja.wikipedia.org/wiki/%E3%83%A9%E3%82%A4%E3%83%95%E3%82%B2%E3%83%BC%E3%83%A0
から転載
中二病的解説
エンジニアは中二病気質な人間が多いのか、ライフゲームの中で生まれるパターンのなかには、「イカす」名前をもったものが何個か存在します。これを紹介せずにはいられません。痺れます。
銀河
遷移をするさまはまるで銀河のよう。その美しい規則性とダイナミックな動きには圧巻、の一言に尽きます。
https://ja.wikipedia.org/wiki/%E3%83%A9%E3%82%A4%E3%83%95%E3%82%B2%E3%83%BC%E3%83%A0
から転載
ダイハード
Die hardは不死身、とか、しぶとい、という意味ですが、そのぐらい長く残り続ける配置のことです。
↓ダイハード
メトセラ
ある特定の配置においては、非常に長い世代を経ないと、死滅しないものが存在します。そういう配置のことを、聖書の*メトセラという996歳まで生きた、と言われている人物になぞり、長寿型(メトセラ)*と名称がついています。かっこいいですよね。
一つ前で紹介した、ダイハードはメトセラの一つです。
↓メトセラ
エデンの園配置
ライフゲームにおいて、最初からそのように設定しない限り、絶対にその配置にはならない配置のことを指します。
聖書で登場するエデンの園が、神がつくったのでなければ、絶対に生まれることはなかったであろう楽園であることから、ライフゲームでのそういう配置のことを「エデンの園配置」と呼ぶそうです。
英名は *Garden of Eden pattern*
https://ja.wikipedia.org/wiki/%E3%83%A9%E3%82%A4%E3%83%95%E3%82%B2%E3%83%BC%E3%83%A0
から転載
感想
遊んでみると、意外と奥が深く、自分でアプリを作ってQiitaで解説記事を書くほどのめり込んでしまいました。エデンの園配置とか、メトセラとか、名前のセンスが素敵すぎますよね。


- 投稿日:2020-03-14T22:18:41+09:00
reglとReactでWebGLのシェーダを簡単に扱う
reglとは
WebGLでお絵描きをしたいとき、大きく分けて以下の2つの方向性がある。1
- three.jsなどの高レベルなライブラリを使う
- GLSLでシェーダを記述し、WebGL APIをそのまま扱う
後者のようにGLSLを扱えると自由度が高い一方で、WebGL APIに関連して "おまじない" 的なコードが大量に必要になってしまうという問題があった。
この記事で扱う regl は、WebGLのwrapperに相当する。初見でもWebGL APIと1:1に対応づけられる程度には原型を維持することで自由度を担保しつつ、大量の "おまじない" や煩雑な状態管理を単純化し、コードの可読性を大幅に向上してくれる。
公式GitHubでは
Functional WebGLと謳っているが、おそらく「変数を入れると(GLSLに基づいて)描画が得られる」ことを指してFunctionalと言っているのだと思われる。ReactでいうところのstatelessなFunction Componentみたいなイメージか。Reactでreglを扱う
GitHubにいくつかサンプルコードがあるものの、Reactで扱っている例はググってもあまり見当たらなかった。Reactでのシンプルなコードを以下に記載する。
このコードには基本的なシェーダの扱いとアニメーションの方法が含まれており、静止した三角形の色が時間とともに変化する。
Samnple.jsimport React, { useEffect } from "react"; import createRegl from "regl"; const Sample = () => { const regl = createRegl(); // No arguments: create a full screen canvas const drawTriangle = regl({ frag: ` precision mediump float; uniform vec4 color; void main() { gl_FragColor = color; }`, vert: ` precision mediump float; attribute vec2 position; void main() { gl_Position = vec4(position, 0, 1); }`, attributes: { position: [[0, -1], [-1, 0.5], [1, 1]] // No need to flatten }, uniforms: { color: regl.prop("color") }, // Number of vertices to draw in this command count: 3 }); useEffect(() => { regl.frame(({ time }) => { regl.clear({ color: [0, 0, 0, 0], depth: 1 }); drawTriangle({ color: [ Math.cos(time * 1.0), Math.sin(time * 0.8), Math.cos(time * 3.0), 1 ] }); }); return () => { regl.destroy() }; // Clean up when unmounted }, []); return <></>; }; export default Sample;ポイント
初期化
const regl = createRegl()のところで引数をしていないため、全画面のcanvasが新たに作成される(reglの仕様)。
既存のcanvasを使用したい場合等は引数で指定できる(公式ドキュメント参照)描画
drawTriangle()は、frag,vertに文字列として記載されたGLSLに基づいて三角形を描画する関数。ここで、color: regl.prop("color")という部分に注目。
drawTriangle()に引数colorを渡すことで動的に描画内容を変えられるようになっている。副作用フック
useEffectによって、Reactコンポーネントの副作用として描画を実行している。
useEffectの第二引数が[]なので副作用は一度だけ実行されるが、その中でregl.frame()が呼ばれることによりアニメーションが開始する。副作用のclean up
return () => { regl.destroy() };
useEffectのなかで上記のようなreturn文がある。今回はcomponentと無関係に全画面のcanvasが作成されているので、このように副作用のclean upを行わないと、別コンポーネントに画面表示を切り替えた後にもcanvasが残ってしまう。※ そもそもコンポーネント外にcanvasを作成するのは良くないので、component内に予め用意したcanvasをcreateReglに渡すのが良い気がする
three.jsでシェーダを扱う方法もあります ↩
- 投稿日:2020-03-14T20:43:36+09:00
【初学者向け】Reactで世界時計を作ってみた
背景
「React勉強し始めた」「Reactで簡単に動くものを作ってみたい」という方向けに、『世界時計』を作ってみました。
JavaScriptで時計を作る記事はよく見かけますが、Reactで作っている記事は見つからなかったので、初学者の参考になればと思っています。
仕様
- 初期表示は、東京の時間が表示されている
- セレクトボックスで国を選ぶと、画面遷移が起きずに時刻が変わる
※サマータイムは考慮していません。
コード
App.jsimport React, { Component } from 'react' import Selectbox from './components/Selectbox' import Clock from './components/Clock' class App extends Component { constructor(props) { super(props) this.state = { timelag: '', nowTime: '' } } // コンポーネントがマウントされた後に実行 componentDidMount() { // ----------- ① setInterval(() => { this.setState({ nowTime: this.getTime(this.state.timelag) }); }, 1000) } // 日付と時刻を取得する(ex. 2020年 3月 14日 12:00:00) getTime(timelag = 0) { let japanTime = new Date().getTime() let nowTime = new Date(japanTime + timelag*60*60*1000) let year = nowTime.getFullYear() let month = nowTime.getMonth() + 1 let date = nowTime.getDate() let hours = nowTime.getHours() let minutes = nowTime.getMinutes() let seconds = nowTime.getSeconds() if (hours < 10) hours = `0${hours}` if (minutes < 10) minutes = `0${minutes}` if (seconds < 10) seconds = `0${seconds}` const time = `${year}年 ${month}月 ${date}日 ${hours}:${minutes}:${seconds}` return time } doChange = (e) => { // ----------- ② e.preventDefault() this.setState({ timelag: e.target.value }) } render() { return ( <> <Selectbox doChange={this.doChange} /> <Clock time={this.state.nowTime} /> </> ) }; } export default App① componentDidMount()
コンポーネントがマウントされた(ツリーに挿入された)直後に呼び出されます。DOM ノードを必要とする初期化はここで行われるべきです。
イベントハンドラで直接ステートにセットすると時刻を変えるたびに、setInterval()が呼び出されてしまうので、今回はcomponentDidMount()を使いました。
[React公式ドキュメント]
https://ja.reactjs.org/docs/react-component.html#componentdidmount② バインド
初学者は引っかかりがちだと思います。(私は引っかかりました)バインドするか、アロー関数で書くかしないとうまく動きません。
Selectbox.jsimport React, { Component } from 'react' class Selectbox extends Component { render() { const cities = [ {timelag:'0', name:'東京'}, {timelag:'-1', name:'シンガポール'}, {timelag:'-7', name:'ヘルシンキ'}, // ただのフィンランド好きなだけ {timelag:'-8', name:'パリ'}, {timelag:'-13', name:'ニューヨーク'} ] return ( <select name='city' onChange={this.props.doChange}> {cities.map((city) => { return <option key={city.timelag} value={city.timelag}>{city.name}</option> })} </select> ) } } export default Selectboxここで、国と時差を入れることができます。
Clock.jsimport React, { Component } from 'react' class Clock extends Component { render() { return ( <h2>{this.props.time}</h2> ) } } export default ClockClockは描画するだけです。Reactにおいて、コンポーネントに分けることはとても重要らしいので。
まとめ
だらだらコードを書くだけになってしまいましたが、Reactを始めたばかりの方の参考教材になれば大満足です。ところどころに、React(もしくはES6)に必要なスキルを散りばめているので、わからない部分は調べてみてください。
ps
material-uiでかっこよくしていきたいです。
https://material-ui.com

- 投稿日:2020-03-14T18:37:06+09:00
React.jsについて学んだことを書いてみた
React.jsって何?
Facebookが作ったJavaScriptっていう言語のライブラリ。
JavaScriptとは:Web上で動きをつけるためによく使われるプログラム言語
ライブラリとは:プログラムの部品の寄せ集め
例:Bootstrapフレームワークとは:システム開発を楽にするための型の一種
例:Laravel、React Native強みは?
編集中
弱みは?
編集中
まとめ
編集中
参考資料
React公式サイト
http://facebook.github.io/react/index.htmlReactチュートリアル
http://facebook.github.io/react/docs/tutorial.html
- 投稿日:2020-03-14T17:51:18+09:00
webサービスを運営してみた(2020/3/14)
はじめに
アルバイトの勤怠管理を無料でできるサービスTimestampを個人で運営しています。
アクティブなアカウント数0人の当サービスでまずは売上1円を上げることが目標です?
フルタイムで仕事をしながら個人でサービス運営できるかの実験だったり技術向上が目的だったりしていて
ここでは運営や開発に関する記録を残していきます。ユーザー数
googleアナリティクスから過去1ヶ月のユーザ数の推移です。
3月8日にユーザが伸びているのはクラウドワークスに依頼を掲載したからですね。
海外からちょこちょこアクセスされて驚きました。
あいかわらずアクティブなアカウント0?雑記
LPデザインを外注しました
LPデザインをクラウドワークスで外注してみました。
結構な数の応募がありまして「高校生で実績もないので格安で構いません」とか「ドバイで会社を立ち上げて頑張ってます!」みたいな人もいましたね。
金額は5万円で設定しているのですが、これぐらいの出費なら個人開発でも許容範囲じゃないでしょうか。
個人開発に外注を交えるのは現実的な手段に思えます。リリース情報
- アカウントを登録しなくてもサービスを試せるようにしました。こちらからどうぞ。
- アルバイトのシフトを作成できる機能をリリースしました。


- 投稿日:2020-03-14T17:21:45+09:00
react-reduxを読む - 更新処理編
はじめに
前回はconnect関数が返すConnectFunctionのうち、初めに表示される際の処理について見てきました。今回はReduxのStateが更新される際にどのような動作が行われ、表示が更新されるのかについて見ていきましょう。
Reduxの更新処理
Reduxについてはご存知という前提ですが簡単に確認しましょう。Reduxには以下の要素があります。
- Store
Stateを保持するオブジェクト。- Action
Storeに対する変更要求。Storeのdispatchメソッドを使って送信する。- Reducer
現在のStateとActionから次のStateを作成する関数。この記事ではあまり出てこない。またStoreにはsubscribeメソッドがあり、Actionがdispatchされたら呼び出されるコールバックを登録することができます。このsubscribeが今回の鍵となります。
Provider
前回も少し見たProviderコンポーネントから始めましょう。
Provider.js抜粋function Provider({ store, context, children }) { const contextValue = useMemo(() => { const subscription = new Subscription(store) subscription.onStateChange = subscription.notifyNestedSubs return { store, subscription } }, [store]) const previousState = useMemo(() => store.getState(), [store]) useEffect(() => { const { subscription } = contextValue subscription.trySubscribe() if (previousState !== store.getState()) { subscription.notifyNestedSubs() } return () => { subscription.tryUnsubscribe() subscription.onStateChange = null } }, [contextValue, previousState])まずSubscriptionオブジェクトが作られています。この中身はこの後で見ていきます。
その次のuseEffectはまたよくわからない書き方です。このuseEffectはuseMemoと同じようにReactが提供する関数ですが、少し毛色が異なります。useEffectは副作用のある処理を行いたい場合に使うようです。ドキュメントにあるように「データの購読(英語ページだとsubscriptions)」は副作用があるためuseEffectを使う必要があるようです。useEffectを含めたuseシリーズはReact 16.8で導入されたフックAPIです。フックは「クラスを使わずに関数で、クラスを定義して行っていたState管理(ReduxのではなくReact本体のstate)等を実装する機能」です。
その中でuseEffectはクラス定義のコンポーネントで言うcomponentDidMountとcomponentWillUnmount に相当するものだそうです。「useEffectに渡す関数」がcomponentDidMount、「useEffectに渡す関数がreturnする関数」がcomponentWillUnmount。
「購読の開始と解除を並べて書けるからいいでしょ」とドキュメントに書かれてますが、個人的にはインデントレベルが変わるのが微妙…(それとuseEffectのことを知らない人が見たときに理解するのに時間がかかる)という気がします。Subscription
さて、Subscriptionに移ります。utils/Subscription.jsに定義されています。
Subscription.js抜粋export default class Subscription { constructor(store, parentSub) { this.store = store this.parentSub = parentSub this.unsubscribe = null this.listeners = nullListeners this.handleChangeWrapper = this.handleChangeWrapper.bind(this) } trySubscribe() { if (!this.unsubscribe) { this.unsubscribe = this.parentSub ? this.parentSub.addNestedSub(this.handleChangeWrapper) : this.store.subscribe(this.handleChangeWrapper) this.listeners = createListenerCollection() } } handleChangeWrapper() { if (this.onStateChange) { this.onStateChange() } } notifyNestedSubs() { this.listeners.notify() }Providerコンポーネントで作られるSubscriptionオブジェクトはparentSubを渡していないのでStoreに対してsubscribeが行われます。Storeからコールバック(handleChangeWrapperメソッド)が呼ばれるとonStateChangeが呼ばれます。今の場合onStateChangeに設定されているのはnotifyNestedSubsです。自身のlistenerに対して変更があったことを伝えるという一般的なPub/Subモデルですね。
ここでnotifyされる対象は誰なのか、その後どう動くのか、ということについて調べるために、ConnectFunction関数の前回読み飛ばした部分に進みましょう。
ConnectFunction再び
ConnectFunctionではchildPropsSelectorを作った後に以下のコードがあります。githubでの表示はこちら。
connectAdvanced.js抜粋const [subscription, notifyNestedSubs] = useMemo(() => { if (!shouldHandleStateChanges) return NO_SUBSCRIPTION_ARRAY // This Subscription's source should match where store came from: props vs. context. A component // connected to the store via props shouldn't use subscription from context, or vice versa. const subscription = new Subscription( store, didStoreComeFromProps ? null : contextValue.subscription ) // `notifyNestedSubs` is duplicated to handle the case where the component is unmounted in // the middle of the notification loop, where `subscription` will then be null. This can // probably be avoided if Subscription's listeners logic is changed to not call listeners // that have been unsubscribed in the middle of the notification loop. const notifyNestedSubs = subscription.notifyNestedSubs.bind( subscription ) return [subscription, notifyNestedSubs] }, [store, didStoreComeFromProps, contextValue])Subscriptionオブジェクトが作られていますが今度は第2引数、つまりparentSubが渡されています(正確にはコンテキストのStoreを使う場合は、ということになりますが通常はコンテキストを使うでしょう)
このsubscriptionがどこで使われているか見ていくと以下のコードがあります。少し読み飛ばしており「この変数何?」というものがいますがそこについては後から説明します。
connectAdvanced.js抜粋// Our re-subscribe logic only runs when the store/subscription setup changes useIsomorphicLayoutEffectWithArgs( subscribeUpdates, [ shouldHandleStateChanges, store, subscription, childPropsSelector, lastWrapperProps, lastChildProps, renderIsScheduled, childPropsFromStoreUpdate, notifyNestedSubs, forceComponentUpdateDispatch ], [store, subscription, childPropsSelector] )useIsomorphicLayoutEffectWithArgsはconnectAdvanced.jsの上の方に定義されています。ブラウザでの実行かサーバサイドレンダリング(SSR)かで呼ぶ関数を切り替えるということが行われていますがまあ結局useEffect、つまりrenderした後に実行される関数を登録しているという点ではあまり違いはありません。ということでsubscribeUpdatesに進みます。
subscribeUpdates
subscribeUpdatesはconnectAdvanced.jsの上の方に定義されていますがこれもまた難解です。
connectAdvanced.js抜粋function subscribeUpdates( // 省略。上の配列に入ってるものが渡されてきます ) { // 省略 // We'll run this callback every time a store subscription update propagates to this component const checkForUpdates = () => { // 後で見ます } // Actually subscribe to the nearest connected ancestor (or store) subscription.onStateChange = checkForUpdates subscription.trySubscribe() // 省略 }上から読んでいくとややこしくなるのでまた先に構造を眺めてみました。今度はonStateChangeとしてsubscribeUpdates内に定義されているcheckForUpdatesが設定されています。
その後にtrySubscribeメソッド呼び出し。今度はparentSubがtruthy1なのでparentSubのaddNestedSubが実行されます。addNestedSubの先は淡々と頑張ってるだけなので省略します。Subscription.js抜粋trySubscribe() { if (!this.unsubscribe) { this.unsubscribe = this.parentSub ? this.parentSub.addNestedSub(this.handleChangeWrapper) : this.store.subscribe(this.handleChangeWrapper) this.listeners = createListenerCollection() } }以上のことからStoreにActionがdispatchされると次のように動作することがわかりました。
- Storeにdispatch
- Providerで作ったsubscriptionが呼び出される
- ConnectFunctionで作ったsubscriptionが呼び出される2
checkForUpdates
それではcheckForUpdate関数を見てみましょう。
connectAdvanced.js抜粋// We'll run this callback every time a store subscription update propagates to this component const checkForUpdates = () => { if (didUnsubscribe) { // Don't run stale listeners. // Redux doesn't guarantee unsubscriptions happen until next dispatch. return } const latestStoreState = store.getState() let newChildProps, error try { // Actually run the selector with the most recent store state and wrapper props // to determine what the child props should be newChildProps = childPropsSelector( latestStoreState, lastWrapperProps.current ) } catch (e) { error = e lastThrownError = e } if (!error) { lastThrownError = null } // If the child props haven't changed, nothing to do here - cascade the subscription update if (newChildProps === lastChildProps.current) { if (!renderIsScheduled.current) { notifyNestedSubs() } } else { // Save references to the new child props. Note that we track the "child props from store update" // as a ref instead of a useState/useReducer because we need a way to determine if that value has // been processed. If this went into useState/useReducer, we couldn't clear out the value without // forcing another re-render, which we don't want. lastChildProps.current = newChildProps childPropsFromStoreUpdate.current = newChildProps renderIsScheduled.current = true // If the child props _did_ change (or we caught an error), this wrapper component needs to re-render forceComponentUpdateDispatch({ type: 'STORE_UPDATED', payload: { error } }) } }ちょっと長いですが略すところがないので。2行にまとめると以下のようになります。
- StoreからStateを取得してSelectorを実行
- propsに変化があるようならforceComponentUpdateDispatchを実行
次の話題はforceComponentUpdateDispatch(とchildPropsFromStoreUpdateとか)とは何者なのかです。ここで飛ばした部分が出てきます。
三度ConnectFunction - useRefとuseReducer
先にchildPropsFromStoreUpdateから。ConnectFunctionに戻るとこれらは以下のように定義されています。
connectAdvanced.js抜粋// Set up refs to coordinate values between the subscription effect and the render logic const lastChildProps = useRef() const lastWrapperProps = useRef(wrapperProps) const childPropsFromStoreUpdate = useRef() const renderIsScheduled = useRef(false)useと言ったらReactフック、ということでuseRefもご多分に漏れずReactが提供する関数です。意味合いとしてはクラスにおけるインスタンス変数みたいな機能を提供するもののようです。
forceComponentUpdateDispatchはもう少し上で定義されています。
connectAdvanced.js抜粋// We need to force this wrapper component to re-render whenever a Redux store update // causes a change to the calculated child component props (or we caught an error in mapState) const [ [previousStateUpdateResult], forceComponentUpdateDispatch ] = useReducer(storeStateUpdatesReducer, EMPTY_ARRAY, initStateUpdates)useReducerは少し複雑です。ドキュメントにあるように動作としてはReduxのReducerと同じような感じです。
大事なのは、戻り値の二つ目で返されているdispatch(上のコードではforceComponentUpdateDispatchに代入されている)です。ドキュメントには明言されていませんが、dispatchを呼び出すことによりレンダリングのやり直しが行われるようになっています。diapatchの先については、いわゆる「本書の範囲を超える」内容、React内部の話となるのでreact-redux読解はこれにて終了となります。
更新時処理のまとめとあとがき
以上、更新時の処理を見てきました。Storeのsubscribeを使い、Reactのフックを駆使し、まさに「間をつなげる」にふさわしい処理が行われていました。プログラミング技術と言うか、「ReactのフックAPIはこう使え!」の見本みたいな感じでしたね。
ちなみに、Reactにフックが導入されたのは本文中にも書いたように16.8、2019/2/6です。当時Twitterで「クラス定義コンポーネントよさようなら」みたいなことを言ってる人を見た気がしてなんのこっちゃと思ってたのですが3こういうことだったんですね。まあでもフックは難しいので初心者はクラスから入るべきだと思います。
react-reduxもReactにフックが入ったことで書き直されたものがv7だということは更新時処理を本格的に眺め始めてから気づきました(ところでReact 16.8より前はどう実装されてたの?と)。いろいろな縁で(?)非常にJavaScriptらしい関数使いまくりなコードに巡り合えた気がします。
- 投稿日:2020-03-14T16:05:19+09:00
react入門 -JSXとstateについて-
始めに
モダンなフロントエンド開発において世界的に利用されているreact。
昨今、日本ではnuxtが人気を得ていますが、今後どちらを利用する上でもreactの思想はフロントエンドの知識として欠かせないものだと思います。 今回はreactを触ったことがない人を対象にreactの段階に分けて解説をしていきます。Reactとは
UIをレンダリングするためのJavaScriptフレームワークです。
Facebookが開発し、オープンソースで公開されています。どんな特徴があるのか
reactではJSXと呼ばれるHTMLとJSを組み合わせた言語拡張を用いてコードを書くことができます。
class ShoppingList extends React.Component { render() { return ( <div className="shopping-list"> <h1>Shopping List for {this.props.name}</h1> <ul> <li>Instagram</li> <li>WhatsApp</li> <li>Oculus</li> </ul> </div> ); } } // Example usage: <ShoppingList name="Mark" />以下、引用:https://ja.reactjs.org/tutorial/tutorial.html
これにはいくつかのメリットがあります。
- javascriptの中でHTMLを使うことができる。
- javascriptの機能を最大限利用できるのでコードの可読性が高い。
JSXで気をつけなければならないのは、一つの要素しか返さないことで。
複数の要素を利用する場合、それらをネストして一つの要素としてまとめて返却する必要があります。
上のコードでも最終的にdivでネストして一つの要素としてreturnしています。state
UIの書き換えに必要なComponentに値を記憶させるためのデータ。
React.Componentを継承したクラスのconstructorの中で定義します。
表示は
this.state.{定義したキー}
で行うことができます。class Square extends React.Component { constructor(props) { super(props); this.state = { value: null, }; } render() { return ( <button className="square" //JSでclassは予約語のため、class属性を利用するにはclassNameと書く必要がある。 onClick={() => this.setState({value: 'X'})} > {this.state.value} </button> ); } }値を書き換える時はstateを直接書き換えずに、setStateを呼び出して値を書き換えます。
this.setState({value: 'X'}setStateを呼び出すたびにrenderが呼ばれてUIが再描画されます。
- 投稿日:2020-03-14T15:58:24+09:00
gRPC-Web + React Hooks + Go でリアルタイムチャットをつくる
概要
分散システムを学ぶうちにgRPCに興味を持った。きくところによると、gRPC-Webというものもあるらしい。
この記事では、gRPC-Web + React Hooks + Goを用いてリアルタイムチャットを作りながら、実装の流れを書いてみようと思う。
コードだけ見たいという方は↓へ、
gRPC-Webってなんやねん?という方は↓へどうぞ!
全体像
サービスの全体像は以下のようになる。
タイトルのとおり、ReactクライアントからgRPC-WebでGoサーバーと通信するチャットサービスだ。
デモはこんな感じ↓
(リアルタイムですべてのクライアントにメッセージが配信される)
開発
Protocol Buffersの定義
まずはProtocol Buffersのインターフェイスを定義する。
前述のチャットサービスをつくるにあたって、以下のようなインターフェイスを作成する。
syntax = "proto3";

import "google/protobuf/empty.proto";

package messenger;

service Messenger {
  rpc GetMessages (google.protobuf.Empty) returns (stream MessageResponse) {}
  rpc CreateMessage (MessageRequest) returns (MessageResponse) {}
}

message MessageRequest {
  string message = 1;
}

message MessageResponse {
  string message = 1;
}
CreateMessageはメッセージの投稿で、リクエストとレスポンスの型を定義している。GetMessagesでメッセージの受信をする。returns (stream MessageResponse)とすることでストリームを返すコードを生成できる。gRPCのコードを自動生成
ここからgRPCのコードを生成する。
GoバックエンドとTypeScriptフロントエンドのコードを生成するために、
protocに加え、protoc-gen-go、protoc-gen-grpc-webをインストールする。もちろんローカル環境には入れたくないのでコンテナをつくっていく。
FROM golang:1.14.0 ENV DEBIAN_FRONTEND=noninteractive ARG PROTO_VERSION=3.11.4 ARG GRPCWEB_VERSION=1.0.7 WORKDIR /proto RUN apt-get -qq update && apt-get -qq install -y \ unzip RUN curl -sSL https://github.com/protocolbuffers/protobuf/releases/download/v${PROTO_VERSION}/\ protoc-${PROTO_VERSION}-linux-x86_64.zip -o protoc.zip && \ unzip -qq protoc.zip && \ cp ./bin/protoc /usr/local/bin/protoc && \ cp -r ./include /usr/local RUN curl -sSL https://github.com/grpc/grpc-web/releases/download/${GRPCWEB_VERSION}/\ protoc-gen-grpc-web-${GRPCWEB_VERSION}-linux-x86_64 -o /usr/local/bin/protoc-gen-grpc-web && \ chmod +x /usr/local/bin/protoc-gen-grpc-web RUN go get -u github.com/golang/protobuf/protoc-gen-godocker-compose.ymlversion: '3' services: proto: command: ./proto/scripts/protoc.sh build: context: . dockerfile: DockerfileProto volumes: - .:/protoprotoc.sh#!/bin/sh set -xe SERVER_OUTPUT_DIR=server/messenger CLIENT_OUTPUT_DIR=client/src/messenger protoc --version protoc --proto_path=proto messenger.proto \ --go_out=plugins="grpc:${SERVER_OUTPUT_DIR}" \ --js_out=import_style=commonjs:${CLIENT_OUTPUT_DIR} \ --grpc-web_out=import_style=typescript,mode=grpcwebtext:${CLIENT_OUTPUT_DIR}これで
docker-compose upするとコードが自動生成される。バックエンドの実装
バックエンドの実装をする。
ひとつ前のステップで、以下のようなインターフェイスが自動生成されているので、これを組み合わせて実装をしてゆく。
// MessengerServer is the server API for Messenger service.
type MessengerServer interface {
    GetMessages(*empty.Empty, Messenger_GetMessagesServer) error
    CreateMessage(context.Context, *MessageRequest) (*MessageResponse, error)
}
まずはサーバーの雛形を書いてみる。下記の
TODOを埋めていくような流れだ。package main import ( "context" "log" "net" "github.com/golang/protobuf/ptypes/empty" pb "github.com/okmttdhr/grpc-web-react-hooks/messenger" "google.golang.org/grpc" "google.golang.org/grpc/reflection" ) const ( port = ":9090" ) type server struct { pb.UnimplementedMessengerServer requests []*pb.MessageRequest } func (s *server) GetMessages(_ *empty.Empty, stream pb.Messenger_GetMessagesServer) error { // TODO: 実装 } func (s *server) CreateMessage(ctx context.Context, r *pb.MessageRequest) (*pb.MessageResponse, error) { // TODO: 実装 } func main() { lis, err := net.Listen("tcp", port) if err != nil { log.Fatalf("failed to listen: %v", err) } s := grpc.NewServer() pb.RegisterMessengerServer(s, &server{}) reflection.Register(s) if err := s.Serve(lis); err != nil { log.Fatalf("failed to serve: %v", err) } }まずはメッセージの投稿だが、シンプルに、配列に時刻付きのメッセージを詰め込んでゆく形にした。
func (s *server) CreateMessage(ctx context.Context, r *pb.MessageRequest) (*pb.MessageResponse, error) {
    log.Printf("Received: %v", r.GetMessage())
    newR := &pb.MessageRequest{Message: r.GetMessage() + ": " + time.Now().Format("2006-01-02 15:04:05")}
    s.requests = append(s.requests, newR)
    return &pb.MessageResponse{Message: r.GetMessage()}, nil
}
次にメッセージの取得だ。一度目のアクセスで保持しているメッセージを流し、それ以降は、新しいメッセージを検知したときのみデータを送るようにしている。
func (s *server) GetMessages(_ *empty.Empty, stream pb.Messenger_GetMessagesServer) error {
    for _, r := range s.requests {
        if err := stream.Send(&pb.MessageResponse{Message: r.GetMessage()}); err != nil {
            return err
        }
    }

    previousCount := len(s.requests)

    for {
        currentCount := len(s.requests)
        if previousCount < currentCount {
            r := s.requests[currentCount-1]
            log.Printf("Sent: %v", r.GetMessage())
            if err := stream.Send(&pb.MessageResponse{Message: r.GetMessage()}); err != nil {
                return err
            }
        }
        previousCount = currentCount
    }
}
これでバックエンドの実装ができた。
フロントエンドの実装
次に、Web側の実装を行う。
まずはgRPCと通信を行うためのクライアントをつくる。
MessengerClientが自動生成されているので、以下のように使うことができる。(messenger/*が自動生成)。import { MessengerClient } from "messenger/MessengerServiceClientPb"; export type GRPCClients = { messengerClient: MessengerClient; }; export const gRPCClients = { messengerClient: new MessengerClient(`http://localhost:8080`) };これを以下のように使うと、メッセージの受信ができる。
import { Empty } from "google-protobuf/google/protobuf/empty_pb";

const stream$ = client.getMessages(new Empty());
// イベントは`data`以外にも、`error`、`status`、`end`が生成される。
stream$.on("data", m => {
  console.log(m)
});
実際はhooksの中で使うので、以下のようなコードとなる。
import { Empty } from "google-protobuf/google/protobuf/empty_pb";
import { useState, useEffect } from "react";
import { MessengerClient } from "messenger/MessengerServiceClientPb";

export const useMessages = (client: MessengerClient) => {
  const [messages, setMessages] = useState<string[]>([]);

  useEffect(() => {
    const stream$ = client.getMessages(new Empty());
    stream$.on("data", m => {
      setMessages(state => [...state, m.getMessage()]);
    });
  }, [client]);

  return {
    messages
  };
};
messagesをstateとして持ち、ストリームからデータを受信するたびにmessagesを更新している。これを表示するコンポーネントは以下のようになる。
import React from "react";

type Props = {
  messages: string[];
};

export const Messages: React.FC<Props> = ({ messages }) => {
  return (
    <div>
      {messages.map(m => (
        <div key={m}>{m}</div>
      ))}
    </div>
  );
};
コンポーネントからは
messagesだけを見ることで、gRPCのロジックを切り離すことができる。(hooksを呼び出す箇所は後述)。メッセージの投稿は以下のようにgRPCのコードを利用できる。
import { MessageRequest } from "messenger/messenger_pb";

const req = new MessageRequest();
req.setMessage(message);
client.createMessage(req, null, res => console.log(res));
同じようにhooksで使ってゆく。
import { MessageRequest } from "messenger/messenger_pb";
import { useState, useCallback, SyntheticEvent } from "react";
import { MessengerClient } from "messenger/MessengerServiceClientPb";

export const useMessageForm = (client: MessengerClient) => {
  const [message, setMessage] = useState<string>("");

  // メッセージ入力欄
  const onChange = useCallback(
    (event: SyntheticEvent) => {
      const target = event.target as HTMLInputElement;
      setMessage(target.value);
    },
    [setMessage]
  );

  // メッセージ投稿
  const onSubmit = useCallback(
    (event: SyntheticEvent) => {
      event.preventDefault();
      const req = new MessageRequest();
      req.setMessage(message);
      client.createMessage(req, null, res => console.log(res));
      setMessage("");
    },
    [client, message]
  );

  return {
    message,
    onChange,
    onSubmit
  };
};
フォームのコンポーネント
import React from "react";
import { useMessageForm } from "containers/Messages/hooks/useMessageForm";

type Props = ReturnType<typeof useMessageForm>;

export const MessageForm: React.FC<Props> = ({
  message,
  onChange,
  onSubmit
}) => {
  return (
    <form onSubmit={onSubmit}>
      <input type="text" value={message} onChange={onChange} />
    </form>
  );
};
hooksを使う側は以下のようになる。
import React from "react";
import { Messages } from "components/Messages";
import { MessageForm } from "components/MessageForm";
import { GRPCClients } from "gRPCClients";
import { useMessages } from "./hooks/useMessages";
import { useMessageForm } from "./hooks/useMessageForm";

type Props = {
  clients: GRPCClients;
};

export const MessagesContainer: React.FC<Props> = ({ clients }) => {
  const messengerClient = clients.messengerClient;
  const messagesState = useMessages(messengerClient);
  const messageFormState = useMessageForm(messengerClient);
  return (
    <div>
      <MessageForm {...messageFormState} />
      <Messages {...messagesState} />
    </div>
  );
};
プロキシの設定
現時点でgRPC-Webを使うには、プロトコル間の微調整を行うためのプロキシが必要で、公式ではEnvoyを推奨していたりする。
Dockerイメージがいい感じに用意されているので、フロントエンドからはプロキシにリクエスト、プロキシコンテナはサーバーコンテナにlinkするだけである。
詳しく見たい方は以下へどうぞ。
これで一通りの実装が完了し、
docker-compose upでアプリケーションが起動できるようになった。コードの全貌はGitHubに。
おわりに
gRPC-Web + React Hooks + Goを用いてリアルタイムチャットを作成してみた。
まだ制限もあるが、少なくともRESTの置き換えとしては十分候補に入れてよいのではないだろうか。また、領域を問わずコンテナベースでの開発がスタンダードになっていることを改めて実感できた。
参考

- 投稿日:2020-03-14T15:18:39+09:00
3分で分かる。MERNスタックを簡単に説明してみる
MERNスタックの仕組みと、参考になるチュートリアルを提供する記事です。本当に重要な部分のみを扱いました。
MERNスタックとは
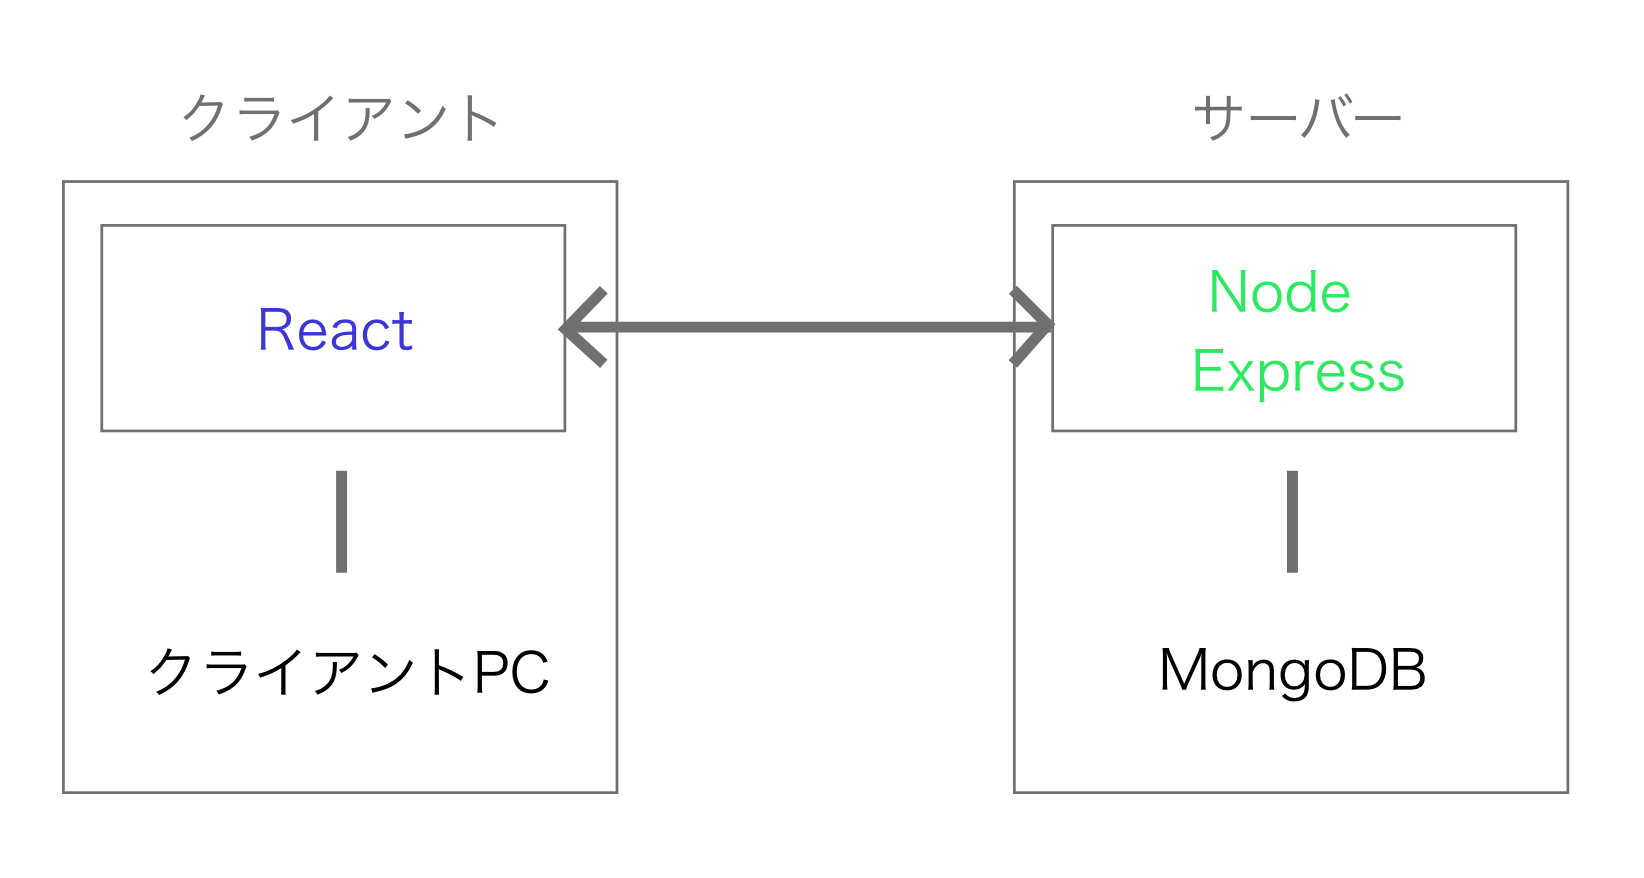
MongoDB, Express, React.js, Node.jsの4つを使ったソフトウェアハンドル。Webアプリ開発に用いられる。仮に、React.jsではなく、Angular.jsを使う場合、MEANスタックとなる。
MongoDB:ドキュメント志向のNo-SQLデータベース。データの保存などに使う。DBは、データベースの意。
ExpressJS:Node.jsのフレームワーク。Node.jsの機能と一緒に使う事で、バックエンドの構築が出来る。
ReactJS:単一ページWebアプリのUIを作成するUIコンポーネントを構築出来る。アプリケーションのView部分を担っている。
NodeJS:サーバーサイドでも動くjavascriptってカッコイイし楽だよね、と覚えておこう。何が良いのか
フルスタックエンジニアを名乗りたい人は、実はjavascriptが書ける時点で完結できてしまう。企業側から捉えると、サーバーサイドエンジニアの人手が足りなくても、開発案件がMERN構築で可能な場合、フロントエンドエンジニアをそのままサーバーサイドに。というアサインも可能かもしれない。
実際の中身
ユーザーは、アプリケーションのView(UI部分)と繋がっている。ReactとExpressはどちらもNode.jsで作成されている。この2つのコンポーネントは、RESTful APIを経由して通信している。
例)データを送信したいと思い、送信ボタンをクリックした場合:
クライアントPC
→ReactJSを経由
→NodeJSベースのExpressサーバーに送信
→MongoDBにいく。
例)データを取得したいと思い、ボタンをクリックした場合;
MongoDB
→NodeJSベースのExpressサーバーに送信
→ReactJSを経由
→クライアントPCにいく。
MERNスタックを構築してみたい、という方へ
実際にどんなTutorialがあるか調べてみました。
Learn the MERN Stack - Full Tutorial (MongoDB, Express, React, Node.js)
https://www.youtube.com/watch?v=7CqJlxBYj-M
英語だけど、一番簡単なMERNアプリを作っている気がします。The MERN Stack Tutorial – Building A React CRUD Application From Start To Finish
https://codingthesmartway.com/the-mern-stack-tutorial-building-a-react-crud-application-from-start-to-finish-part-1/
こちらも英語です。youtubeにも上がっているけど、ちょっと動画は・・・って方はこちらがイイかも。MERN Stack Front To Back: Full Stack React, Redux & Node.js
https://www.udemy.com/course/mern-stack-front-to-back/
英語です。有料のUdemyですが、こちらは実際に作ってみました。ReactもHooks使ったりとモダンに扱っていたため、筆者としてはオススメです。まとめ
実際に作成しようとなった場合、ドキュメントが少ない、そもそも日本語で書かれたMERNのチュートリアルが見つからない、と色々と不安な点はあると感じます。しかし、Javascriptのみで書けるという利点は大きいです。
最近のReactJSは、使用傾向が高いということ
Microsoft, Yahooなど、NodeJSの推薦会社が大きいことなどを踏まえると、一度自作のアプリケーションを作ってみてもイイかと思います。
参考にした資料
What is MERN Stack?
https://www.educative.io/edpresso/what-is-mern-stack
Node.jsのMVCフレームワーク「Express」の基礎知識とインストール (1/3)
https://www.atmarkit.co.jp/ait/articles/1503/04/news047.html#011
初心者向け!3分で理解するNode.jsとは何か?
https://eng-entrance.com/what-is-nodejs
- 投稿日:2020-03-14T14:29:10+09:00
Next.jsでfirebaseのinitializeAppを実行する方法
必要なモジュールをインストールする
firebaseとdotenvをインストールします。
npm i firebase dotenv-webpack.envファイルを作成し、firebaseの認証情報を入力
以下のような感じになります。
.envFIREBASE_API_KEY=************************************ FIREBASE_AUTH_DOMAIN=********************** FIREBASE_DATABASE_URL=********************************* FIREBASE_PROJECT_ID=***************** FIREBASE_STORAGE_BUCKET=************************* FIREBASE_MESSAGEING_SENDER_ID=*********** FIREBASE_APP_ID=***********************************************initializeApp実行処理を書く
libフォルダを作成し、その中にfirebaseInit.js(処理用ファイル)を作成すれば良いと思います。
firebaseInit.jsimport firebase from "firebase"; const firebaseConfig = { apiKey: process.env.FIREBASE_API_KEY, authDomain: process.env.FIREBASE_AUTH_DOMAIN, databaseURL: process.env.FIREBASE_DATABASE_URL, projectId: process.env.FIREBASE_PROJECT_ID, storageBucket: process.env.FIREBASE_STORAGE_BUCKET, messagingSenderId: process.env.FIREBASE_MESSAGEING_SENDER_ID, appId: process.env.FIREBASE_APP_ID }; if (!firebase.apps.length) { firebase.initializeApp(firebaseConfig); } else { firebase.app(); } export default firebase;使いたいファイルでインポートする
あとは、firebaseInit.jsをインポートしてくるだけです。
これでfirestoreなどの機能が使えます。index.jsimport firebase from "../lib/firebaseInit"; firebase .firestore() .collection("hogehoge") .get(); export default () => ( <div> <div>Hello World</div> </div> );
- 投稿日:2020-03-14T03:11:38+09:00
React の ErrorBoundary で非同期のエラーをキャッチする
React の ErrorBoundary は、ドキュメントにあるように非同期のエラーをキャッチできない。
async function getUser() {
  /* ... */
}
function Profile() {
  const [user, setUser] = useState(null);
  useEffect(() => {
    (async () => {
      try {
        const user = await getUser();
      } catch (error) {
        // このエラーは ErrorBoundary でキャッチできない
        throw error;
      }
      setUser();
    })();
  }, []);

  if (!user) return null;
  return <div>{user.name}</div>;
}
function App() {
  return (
    <ErrorBoundary>
      <Profile />
    </ErrorBoundary>
  );
}
Dan Abramov 曰く、こういうテクニックで想定どおりのキャッチができる。
const [, setState] = useState();setState(() => { new Error("Hi") });なので、さっきのコードでいうと
async function getUser() {
  /* ... */
}
function Profile() {
  const [user, setUser] = useState(null);
  const [, setState] = useState();
  useEffect(() => {
    (async () => {
      try {
        const user = await getUser();
      } catch (error) {
        // これは ErrorBoundary でキャッチできる
        setState(() => {
          throw error;
        });
      }
      setUser();
    })();
  }, []);

  if (!user) return null;
  return <div>{user.name}</div>;
}
function App() {
  return (
    <ErrorBoundary>
      <Profile />
    </ErrorBoundary>
  );
}
こうすれば ErrorBoundary でキャッチできる
- 投稿日:2020-03-14T01:45:15+09:00
【styled-components】styled(Component)でクラス名が付与されない
あまりにも何回もやってしまうのでメモ。
styled-componentsではstyled.divとする以外に、既存のコンポーネントにstyled(Component)とする方法がある。styled.divimport styled from "styled-components" export const Component = styled.div` display: flex align-items: center justify-content: center `styled()import styled from "styled-components" import { BaseComponent } from "../components" export const Component = styled(BaseComponent)` display: flex align-items: center justify-content: center `classNameを記述
React.FCコンポーネントを
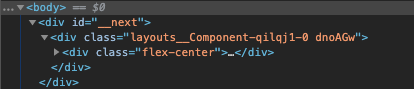
styled(Component)でスタイリングする場合、classNameを受け取れるようにしておく必要がある。OKimport React from 'react'; type Props = { className?: string; }; const BaseComponent: React.FC<Props> = props => { return ( <div className={props.className}> <div className="flex-center">{props.children}</div> </div> ); }; export const Component = styled(BaseComponent)` .flex-center { display: flex align-items: center justify-content: center } `;
- next.jsでの例。
クラス名が注入されていることがわかる。
 NGimport React from 'react'; const BaseComponent: React.FC= props => { return ( <div> <div className="flex-center">{props.children}</div> </div> ); }; export const Component = styled(BaseComponent)` .flex-center { display: flex align-items: center justify-content: center } `;
当たり前だが、コンポーネントがクラス名を受け取れないためクラス名が付与されない。


- 投稿日:2020-03-14T00:20:05+09:00
React Navigation v5 が推奨する認証フローの実装
はじめに
前回の記事に続いて、 React Navigation v5 に関する記事です。
Version 5.x では、公式ドキュメントで推奨の認証フローが紹介されています。
今回は、その認証フローの実装方法に関して記事にまとめました。下準備
認証フローを実装するにあたり、アプリ全体で状態を管理する必要があります。
この記事では、 Context API を利用して実装します。型定義
利用する型を定義します。
必要に応じて、Errorなどの状態・処理も追加してください。type State = | { status: 'Unauthenticated'; token: string } | { status: 'Loading';} | { status: 'Authenticated'; token: string }; type Action = | { type: 'START_LOGIN' } | { type: 'COMPLETE_LOGIN'; token: string } | { type: 'COMPLETE_LOGOUT' }; type Dispatch = (action: Action) => voidReducer
各アクションにおける取りうる状態を定義します。
const authReducer = (prevState: State, action: Action): State => {
  switch (action.type) {
    case 'START_LOGIN':
      return {
        ...prevState,
        status: 'Loading',
      };
    case 'COMPLETE_LOGIN':
      return {
        ...prevState,
        status: 'Authenticated',
        token: action.token,
      };
    case 'COMPLETE_LOGOUT':
      return {
        ...prevState,
        status: 'Unauthenticated',
        token: undefined,
      };
  }
};
コンテクスト
アプリの状態、ディスパッチャーそれぞれのコンテクストを定義します。
const AuthStateContext = createContext<State>({
  status: 'Unauthenticated',
  token: undefined,
});

const AuthDispatchContext = createContext<Dispatch | undefined>(undefined);
自作 Hooks
慣習に従い、
useXXXXの形で Hooks を定義します。export const useAuthState = () => { const context = React.useContext(AuthStateContext); return context; }; export const useAuthDispatch = () => { const context = React.useContext(AuthDispatchContext); return context; };プロバイダー
アプリ全体で状態を扱えるように、プロバイダーを定義し、値を伝播させます。
interface Props {
  readonly children: React.ReactNode;
}

const AuthProvider: React.FunctionComponent<Props> = ({ children }) => {
  const [state, dispatch] = useReducer(authReducer, {
    status: 'Unauthenticated',
    token: undefined,
  });

  return (
    <AuthStateContext.Provider value={state}>
      <AuthDispatchContext.Provider value={dispatch}>
        {children}
      </AuthDispatchContext.Provider>
    </AuthStateContext.Provider>
  );
};
定義したプロバイダーをアプリに適用します。
const App: React.FunctionComponent = () => {
  return (
    <AuthProvider>
      <NavigationContainer>
        ...
      </NavigationContainer>
    </AuthProvider>
  );
};
ここまでで状態管理をするためのプロバイダーが準備できました。
子コンポーネントでuseAuthStateとuseAuthDispatchが扱えるようになりました。これで準備は完了です。
認証状態による表示画面の出し分け
認証処理を実装します。
const Stack = createStackNavigator();
const StackNavigator = () => {
  const state = useAuthState();

  if (state.status === 'Loading') {
    return <LoadingScreen />;
  }

  return (
    <Stack.Navigator
      headerMode="none"
      screenOptions={{ animationEnabled: false }}
    >
      {state.status === 'Authenticated' ? (
        <Stack.Screen name="Home" component={HomeScreen} />
      ) : (
        <Stack.Screen name="SignIn" component={SignInScreen} />
      )}
    </Stack.Navigator>
  );
};
useAuthSateでアプリの状態を取得することができます。
上記の例では、状態を元に処理を分けています。状態が
Loadingの場合(データの取得中など)には、LoadingScreenを表示します。
それ以外の状態の時は、Stack.Navigatorを表示します。ナビゲーターを表示する際には、状態が
Autheticated(認証済)の場合はHomeScreenを、それ以外の場合はSignInScreenを表示するように処理しています。初期状態は
Unauthenticatedからスタートします。
そのため、SignInScreenに遷移します。では、それぞれの画面はどのようになっているのか、見ていきます。
各画面の実装
ログイン画面
const SignInScreen: React.FunctionComponent = () => {
  const dispatch = useAuthDispatch();
  return (
    <View style={{ flex: 1, alignItems: 'center', justifyContent: 'center' }}>
      <Button
        title="SignIn"
        onPress={() =>
          dispatch({ type: 'COMPLETE_LOGIN', token: 'dummy-token' })
        }
      />
    </View>
  );
};
ここではログインボタンだけを実装しています。
ログインボタンを押した際、アプリにCOMPLETE_LOGINの状態をディスパッチします。
※本来は認証チェックをすべてパスした場合に、状態をディスパッチすべきですが今回は省略します。これにより、状態は
Authenticatedへと変化します。新しい状態に変化すると、
stateが更新されて、再度レンダリングが行われます。
statusはAuthenticatedになっているため、今度はHomeScreenにナビゲーションされます。ホーム画面
const HomeScreen: React.FunctionComponent = () => {
  const dispatch = useAuthDispatch();
  return (
    <View style={{ flex: 1, alignItems: 'center', justifyContent: 'center' }}>
      <Button
        title="SignOut"
        onPress={() => dispatch({ type: 'COMPLETE_LOGOUT' })}
      />
    </View>
  );
};
ここではログアウトボタンだけを実装しています。
ボタンを押下すると、ログアウトした状態(COMPLETE_LOGOUT)がディスパッチされます。これにより、再びログインページへと遷移します。
おわりに
いかがだったでしょうか。
今回は複雑な処理は省略しましたが、状態でStack.Screenを制御することで許可されていないスクリーンに遷移することを防ぐことができます。また、サーバーとの通信中はローディング画面を表示する、など柔軟に表示内容を変更することができます。
React Navigation で認証ありのアプリを作成する場合、この認証処理も選択肢としてはありかもしれません。
もし記事に関して何かありましたら、ぜひコメントをよろしくお願いします。