- 投稿日:2020-02-22T23:48:42+09:00
Laravelで、フォームの入力内容をコントローラで取得する
流れ
入力フォームを含む"view"
→サーバ(自分自身)にPOST
→サーバがPOSTを受け、値を受け取るview
sample_form.blade.php<html> ... <form action='destination' method='post'> {{ csrf_field() }} <input id="hogehoge" name="sample_text"> <button type="submit">完了</button> </form> ... </html>form内のデータが連想配列としてPOSTされる。
inputのname属性がプロパティ名になる。route
web.php... Route::post('/destination', 'FugaController@testMethod'); ...POSTを受けるとControllerへ
Controller
FugaController.php<?php namespace App\Http\Controllers; use Illuminate\Http\Request; class FugaController extends Controller { public Function testMethod(Request $req) { /* $req = { sample_text: "入力内容" } */ $text = $req::get('sample_text'); // formのname属性で値を参照できる return view('welcome'); } }
- 投稿日:2020-02-22T22:21:42+09:00
laravelでどうしても404エラーになる人・・それモデルが原因では?
結論
モデルが違う
例えば
今はAモデルのデータを引っ張ってきて表示しています。
理由としてはeditはBモデルのデータを引っ張ってきていたからです。
※Bモデルのテーブルの中身はこの場合、空
Bモデルのテーブルに中身が入っていたらBモデルのデータが表示されますが、Aモデルを表示しておいてeditを押すとBモデルのデータが出てくるのわ意味が分からないから統一しましょう。パターン2
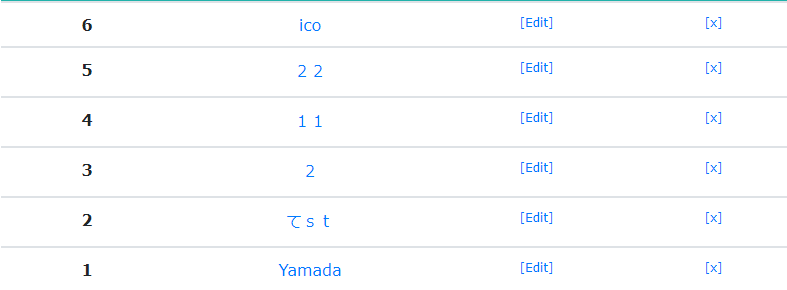
画像の"×"ボタンを押すと削除されるはずだが・・・
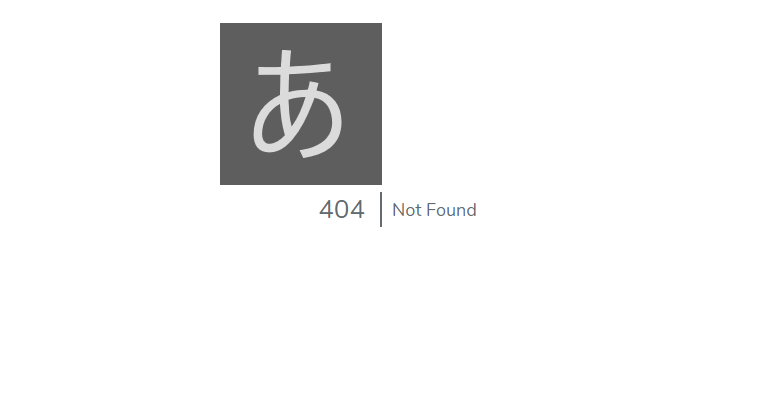
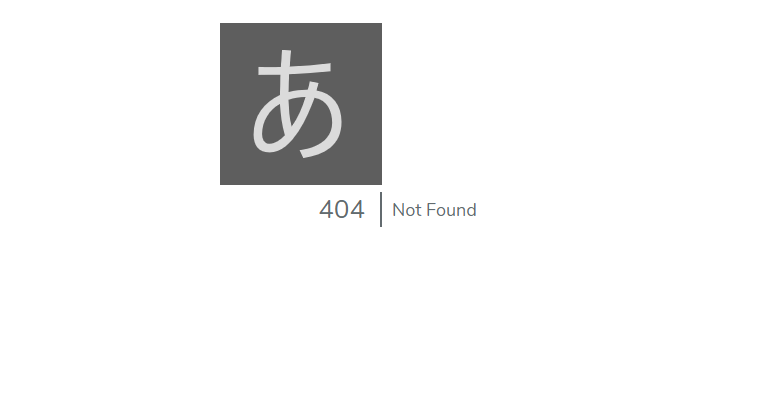
404エラーです。
これも同じく、Aモデルのデータを引っ張ってきているのに"×"を押した先はBモデルの削除が実行されているからです。
当方のDBにBモデルの中身は存在しません。よって404エラー※理由は上記と同じ
解消
web.php//変更前 Route::delete('/posts/{post}', 'PostsController@destroy'); //変更後 Route::delete('/posts/{ico}', 'PostsController@destroy');PostsController//変更前 public function destroy(Post $post) { $post->delete(); return redirect('/'); } //変更後 public function destroy(Ico $ico) { $ico->delete(); return redirect('/'); }
- 投稿日:2020-02-22T20:12:39+09:00
Laravel 多対多関係で使っている中間テーブルの created_at, updated_at などのカラムで並べ替える
前提
usersとpostsがfavoritesを中間テーブルとして多対多の関係になっています。TL;DR
public function favorite_posts()
{
    return $this
        ->belongsToMany(Post::class, 'favorites', 'user_id', 'post_id')
        ->withPivot(['created_at', 'updated_at', 'id'])
        ->orderBy('pivot_updated_at', 'desc')
        ->orderBy('pivot_created_at', 'desc')
        ->orderBy('pivot_id', 'desc');
}
簡単に説明
withPivot()を使用することで中間テーブルのカラムを参照できます。
withPivot()の引数にorderby()に使用したいカラムを配列形式で指定します。
orderBy()の第1引数には'pivot_' + カラム名の形式で指定します。確認
favorite_posts()の呼び出し元の前後に以下を追記し、実際に流れているSQLを確認します。
DB::enableQueryLog();
$user->favorite_posts;
dd(DB::getQueryLog());
array:1 [ 0 => array:3 [ "query" => "select `posts`.*, `favorites`.`user_id` as `pivot_user_id`, `favorites`.`post_id` as `pivot_post_id`, `favorites`.`created_at` as `pivot_created_at`, `favorites`.`updated_at` as `pivot_updated_at`, `favorites`.`id` as `pivot_id` from `posts` inner join `favorites` on `posts`.`id` = `favorites`.`post_id` where `favorites`.`user_id` = ? order by `pivot_updated_at` desc, `pivot_created_at` desc, `pivot_id` desc" "bindings" => array:1 [ 0 => 1 ] "time" => 0.37 ] ]中間テーブル
favoritesのupdated_at、created_at、idでorderbyされているのが確認できました参考
https://readouble.com/laravel/5.8/ja/eloquent-relationships.html
https://stackoverflow.com/questions/26551078/how-to-order-by-pivot-table-data-in-laravels-eloquent-orm/50767168
- 投稿日:2020-02-22T19:37:34+09:00
EC2上にLaravel6の環境を作ってみる
目的
Laravelのデプロイ
EC2とRDSを利用する
RDSはEC2からの通信のみ許可
WEBサーバ nginx
アプリケーションサーバ php-fpm
特に冗長化構成とかにはしないVPCの作成
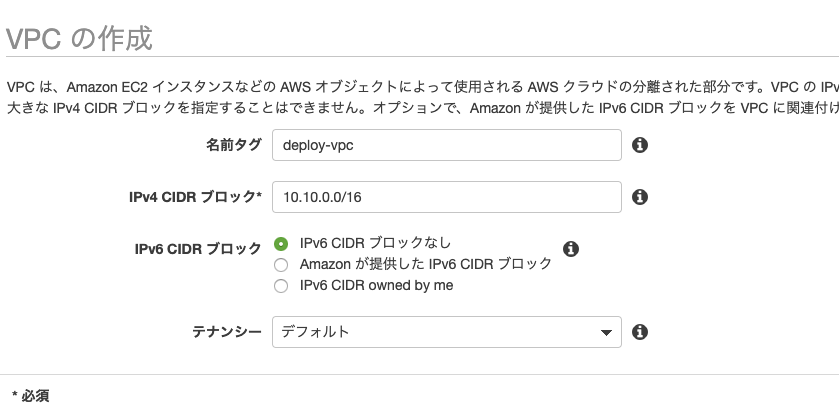
名前を「deploy-vpc」
IPv4 CIDR ブロック*を「10.10.0.0/16」に設定publicサブネットの作成
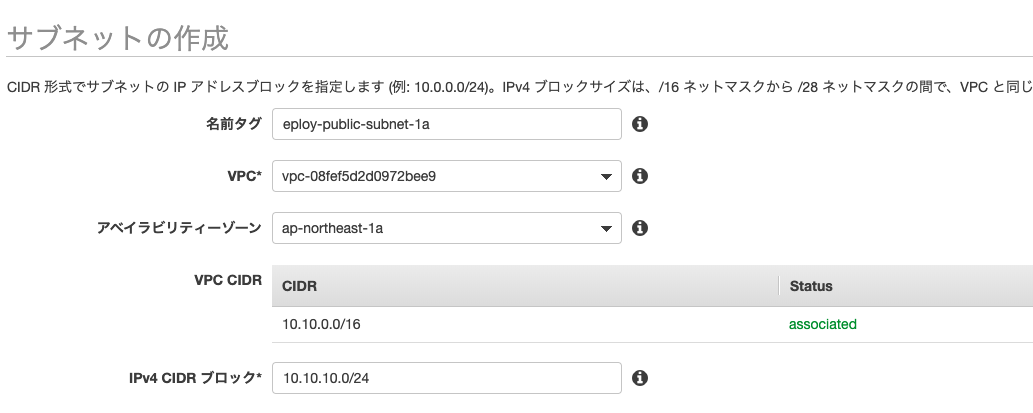
WEBサービスを公開するためのサブネットを作成したいので、サブネットをpublicで作成します。
こちらのサブネットにWEBサーバ用のEC2を紐付けて外部からアクセスできる状態を作ります。
名前を「deploy-public-subnet-1a」
VPCに先ほど作成作成した「deploy-vpc」を選択
アベイラビリティーゾーンを「ap-northeast-1a」
IPv4 CIDR ブロックを「10.10.10.0/24」privateサブネットの作成
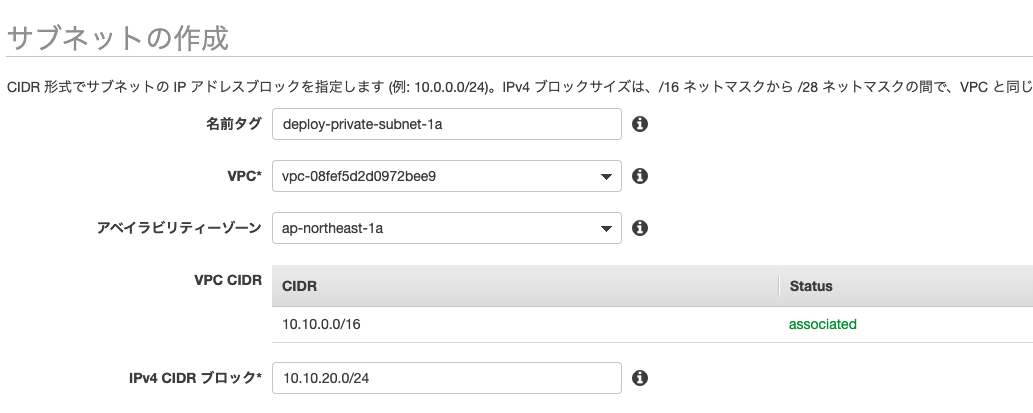
こちらはWEBサービス用のRDSを紐づけるためのサブネットです。
外部からアクセスされたくないためプライベート用のサブネットを用意します。
名前を「deploy-private-subnet-1a」
VPCに先ほど作成作成した「deploy-vpc」を選択
アベイラビリティーゾーンを「ap-northeast-1a」
IPv4 CIDR ブロックを「10.10.20.0/24」DB用のsubnetを作成するときに、複数のアベイラビリティーゾーンを指定する必要があるので同様にもう一つprivateサブネットを作成します。
名前を「deploy-private-subnet-1c」
VPCに先ほど作成作成した「deploy-vpc」を選択
アベイラビリティーゾーンを「ap-northeast-1c」
IPv4 CIDR ブロックを「10.10.21.0/24」インターネットゲートウェイの作成
名前を「deploy-igw」で作成
作成後、VPC「deploy-vpc」にアタッチしますルートテーブルの作成
VPCダッシュボードのルートテーブルを選択し、
名前「deploy-public-route」のルートテーブルを作成
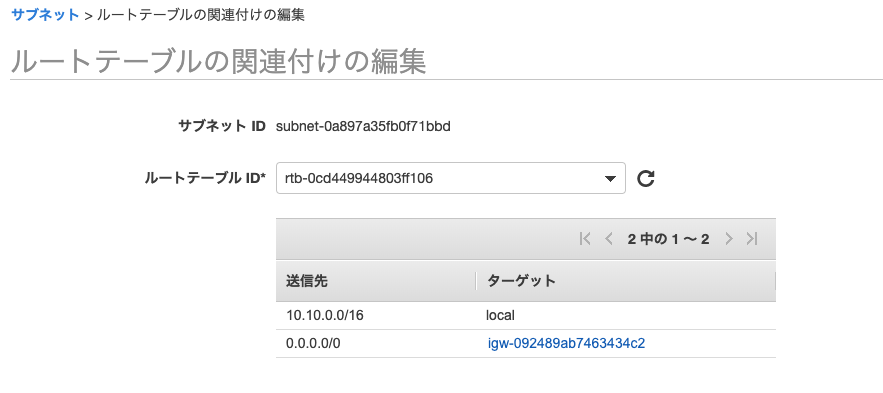
サブネット「deploy-public-subnet-1a」のsubnetの関連付けで「deploy-public-subnet」を関連付けます。
routeの編集で
送信先を「0.0.0.0/0」 ターゲットにインターネットゲートウェイ「deploy-igw」を選択します。WEBサーバ用のEC2を作成
1.AMIの選択
クイックスタートで「Amazon Linux 2 AMI (HVM), SSD Volume Type」を選択2.インスタンスタイプの選択
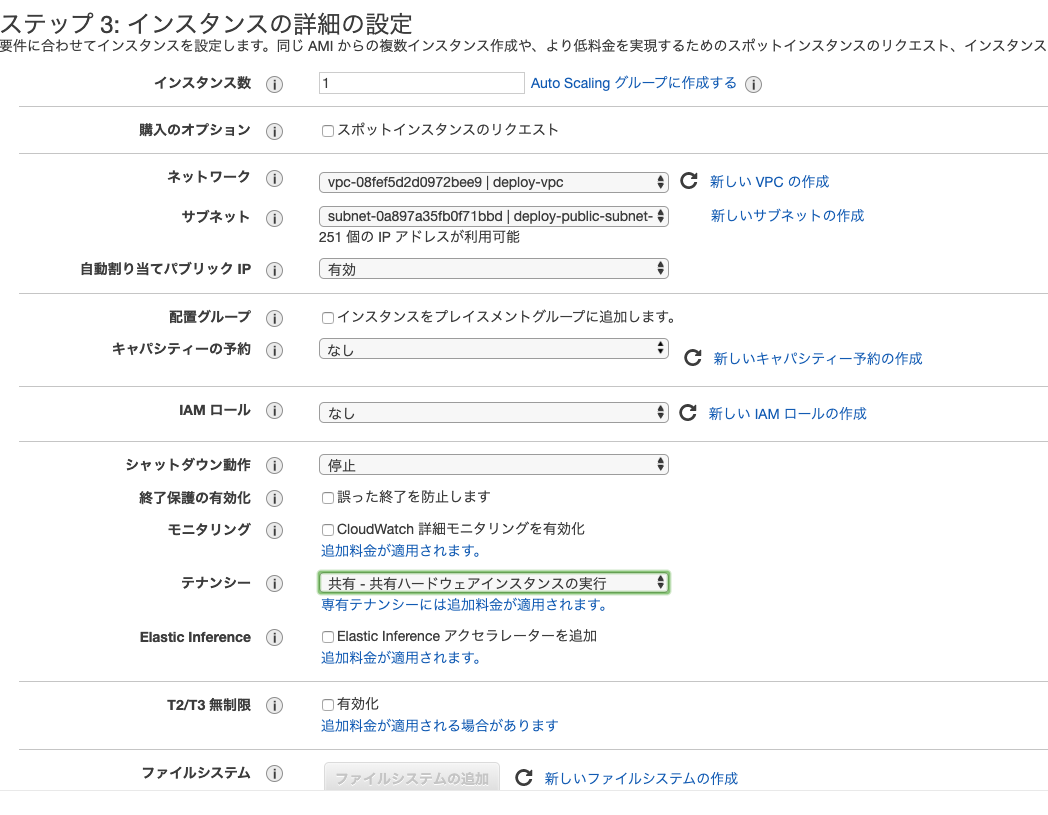
インスタンスタイプに「t2.micro」を選択3.インスタンスの詳細の設定
ネットワークに「deploy-vpc」を選択
サブネットに「deploy-public-subnet-1a」を選択
ネットワークインターフェースのIPに「10.0.10.10」を指定4.ストレージの追加
特に何もしなくてOK5.タグの追加
Nameに「deploy-ec2」を設定6.セキュリティグループの設定
新しいセキュリティーグループを作成する
グループ名を「deploy-ec2」
必要に応じてSSHのIPアドレスを絞ることも可能です。
webとして公開したいので下記の設定を追加してください。
SSH接続もできるようにしたいので以下を追加しましょう(自宅IPなどで絞った方が安全なので推奨です)
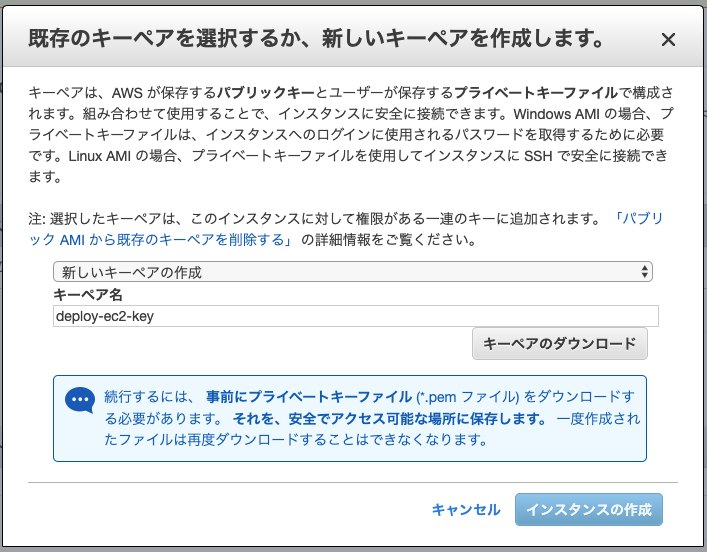
7.EC2に接続するためのキーペアを作成
ssh接続するために必要なkeyを作成し、ダウンロードしておきましょう。
以上の条件でインスタンスを作成します。WEBサーバにアクセスできるように設定
1.EC2のIPアドレスを確認
EC2のインスタンスの説明タブを開くと
IPv4 パブリック IP にEC2のIPが記載されているのでそちらをチェック
今回は「18.182.54.143」でやっていきます。2.sshの設定
$ mv ~/Downloads/deploy-ec2-key.pem ~/.aws/ #keyの移動
$ chmod 600 ~/.aws/deploy-ec2-key.pem # keyの権限を変更
.ssh/configを編集する
.ssh/configHost deploy-ec2 HostName 18.182.54.143 User ec2-user IdentityFile ~/.aws/deploy-ec2-key.pem Port 22接続確認
$ ssh deploy-ec2
The authenticity of host '18.182.54.143 (18.182.54.143)' can't be established.
ECDSA key fingerprint is SHA256:XUj6MKrad+8tZ4eAOsvNvb3fbaEgtwcgtuia7ZckxFM.
Are you sure you want to continue connecting (yes/no)? yes
Warning: Permanently added '18.182.54.143' (ECDSA) to the list of known hosts.

       __|  __|_  )
       _|  (     /   Amazon Linux 2 AMI
      ___|\___|___|

https://aws.amazon.com/amazon-linux-2/
[ec2-user@ip-10-10-10-10 ~]$
OK
RDSの設定
セキュリティーグループを作成
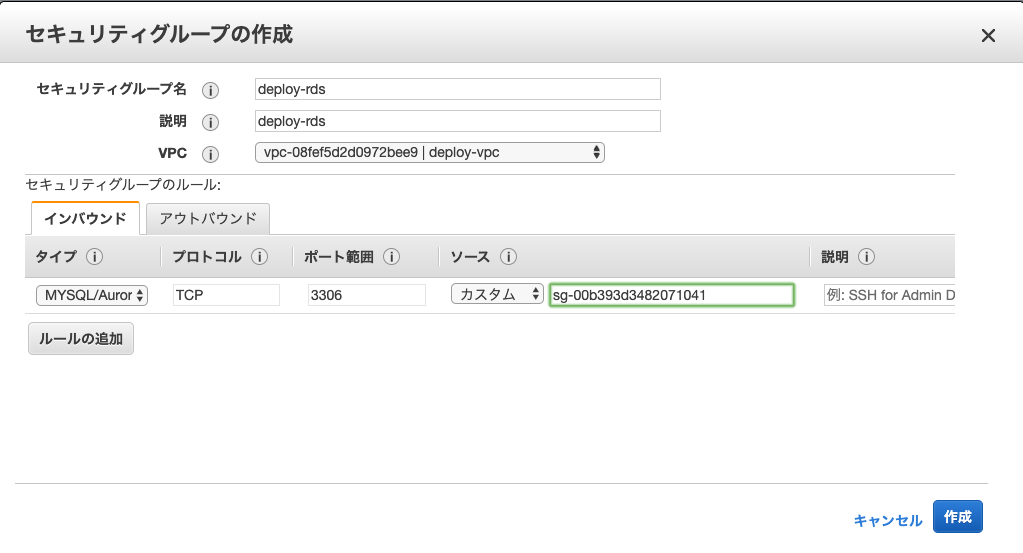
まず最初に、EC2からのみのアクセスを許可するようセキュリティーグループを作成します。
EC2ダッシュボードのセキュリティーグループから作成していきます。
セキュリティーグループ「deploy-rds」
インバウンドルールを
タイプ「MYSQL/Aurora」
プロトコル「TCP」
ポート「3306」
ソースで「deploy-ec2」のセキュリティーグループを選択
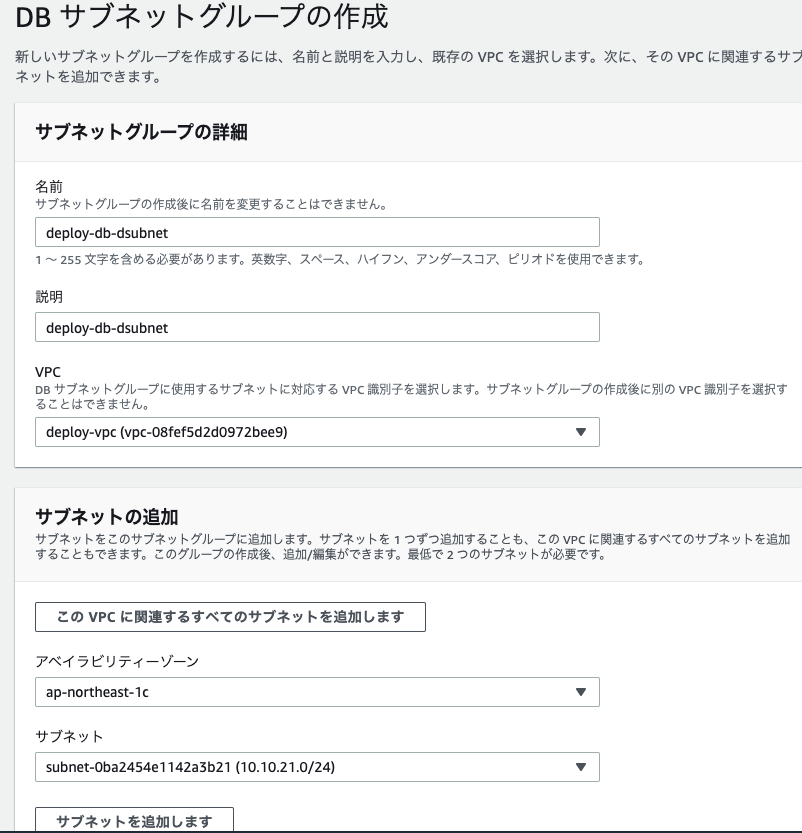
そのまま作成します。DBサブネットの作成
サブネットの追加で先ほど追加したprivateなsubnetを2つ追加し、作成します。
RDSの作成
標準作成でMySQLの最新バージョンを選択し、テンプレートを選択
特に今回は冗長化とかはしないので
ストレージの自動スケーリングは無効に
スタンバイインスタンスも作成しません。VPCに「deploy-vpc」を選択
サブネットグループに先ほど作成したdb-subnetを選択
VPC セキュリティグループに「deploy-rds」を選択上記設定でRDSを作成します。
これでいったんAWS側の設定は完了です。
Laravel 環境構築
nginxとphpをインストール
$ sudo amazon-linux-extras install nginx1.12
$ sudo amazon-linux-extras install php7.3
$ sudo service nginx start #nginxの起動
$ sudo service php-fpm start # php-fpmの起動
ここまで問題なくできると自身のEC2インスタンスのIPにアクセスするとnginxのページが表示されると思います!
composerインストール
Composerをインストールしたいのですが、t2.microだとメモリが足りないことがあるので、swapファイルを作成します。
sudo dd if=/dev/zero of=/swapfile1 bs=1M count=1024
sudo chmod 600 /swapfile1
mkswap /swapfile1
swapon /swapfile1
curl -sS https://getcomposer.org/installer | php
mv composer.phar /usr/bin/composer

sudo yum install --enablerepo=remi,remi-php73 php-pecl-zip php-devel php-mbstring php-pdo php-gd php-xml
mkdir /var/www/
cd /var/www/
composer create-project --prefer-dist laravel/laravel site
sudo chmod 777 /var/www/site
sudo chmod 777 /var/www/site/logs
sudo chmod 777 /var/www/site/logs/laravel.log
sudo chmod 777 /var/www/site/bootstrap/cache
sudo chmod 777 /var/www/site/storage/framework/sessions
sudo chmod 777 /var/www/site/storage/framework/views
composer update
sudo php artisan key:generate
途中権限がない箇所でプロジェクトを生成してしまったせいか、やたら権限なくて怒られてしまったので
横着してchmod 777で権限を付けています。
本来ならnginxかphp-fpmを実行するuserに権限を持たせるのが良いかと思います。nginx.confの設定をLaravel用に書き換える
/etc/nginx/nginx.conf# For more information on configuration, see: # * Official English Documentation: http://nginx.org/en/docs/ # * Official Russian Documentation: http://nginx.org/ru/docs/ user nginx; worker_processes auto; error_log /var/log/nginx/error.log; pid /run/nginx.pid; # Load dynamic modules. See /usr/share/nginx/README.dynamic. include /usr/share/nginx/modules/*.conf; events { worker_connections 1024; } http { log_format main '$remote_addr - $remote_user [$time_local] "$request" ' '$status $body_bytes_sent "$http_referer" ' '"$http_user_agent" "$http_x_forwarded_for"'; access_log /var/log/nginx/access.log main; sendfile on; tcp_nopush on; tcp_nodelay on; keepalive_timeout 65; types_hash_max_size 2048; include /etc/nginx/mime.types; default_type application/octet-stream; # Load modular configuration files from the /etc/nginx/conf.d directory. # See http://nginx.org/en/docs/ngx_core_module.html#include # for more information. include /etc/nginx/conf.d/*.conf; server { listen 80 default_server; listen [::]:80 default_server; server_name _; root /var/www/site/public; # Load configuration files for the default server block. include /etc/nginx/default.d/*.conf; location / { #index index.php index.html index.htm; try_files $uri $uri/ /index.php?$query_string; } location ~ \.php$ { fastcgi_pass unix:/run/php-fpm/www.sock; fastcgi_index index.php; fastcgi_param SCRIPT_FILENAME $document_root$fastcgi_script_name; include fastcgi_params; } } # Settings for a TLS enabled server. # # server { # listen 443 ssl http2 default_server; # listen [::]:443 ssl http2 default_server; # server_name _; # root /usr/share/nginx/html; # # ssl_certificate "/etc/pki/nginx/server.crt"; # ssl_certificate_key "/etc/pki/nginx/private/server.key"; # ssl_session_cache shared:SSL:1m; # ssl_session_timeout 10m; # ssl_ciphers HIGH:!aNULL:!MD5; # ssl_prefer_server_ciphers on; # # # Load configuration files for the default server block. # include /etc/nginx/default.d/*.conf; # # location / { # } # # error_page 404 /404.html; # location = /40x.html { # } # # error_page 500 502 503 504 /50x.html; # location = /50x.html { # } # } }php-fpmの設定を編集
/etc/php-fpm.d/www.conf@@ -21,9 +21,9 @@ ; Note: The user is mandatory. If the group is not set, the default user's group ; will be used. ; RPM: apache user chosen to provide access to the same directories as httpd +user = nginx -user = apache ; RPM: Keep a group allowed to write in log dir. +group = nginx -group = apache ; The address on which to accept FastCGI requests. ; Valid syntaxes are: @@ -35,8 +35,6 @@ group = nginx ; (IPv6 and IPv4-mapped) on a specific port; ; '/path/to/unix/socket' - to listen on a unix socket. ; Note: This value is mandatory. +listen.owner = nginx +listen.group = nginx listen = /run/php-fpm/www.sockphp-fpmとnginxの再起動
sudo service php-fpm restart
sudo service nginx restart
EC2のIPアドレスを確認
動作成功!?
RDSに接続できるよう.envの編集
.envDB_CONNECTION=mysql DB_HOST={RDSのエンドポイント} DB_PORT=3306 DB_DATABASE=hoge DB_USERNAME=root DB_PASSWORD=rootroot動作チェック
$ php artisan migrate
Migration table created successfully.
Migrating: 2014_10_12_000000_create_users_table
Migrated:  2014_10_12_000000_create_users_table (0.03 seconds)
Migrating: 2014_10_12_100000_create_password_resets_table
Migrated:  2014_10_12_100000_create_password_resets_table (0.03 seconds)
Migrating: 2019_08_19_000000_create_failed_jobs_table
Migrated:  2019_08_19_000000_create_failed_jobs_table (0.01 seconds)
こちらも動作成功!?
記載漏れやおかしい所ありましたら指摘お願いします!
- 投稿日:2020-02-22T17:08:14+09:00
Laravel環境構築
composerインストール
brew install composerPHPインストール
brew install php@7.4
echo 'export PATH="/usr/local/opt/php@7.4/bin:$PATH"' >> ~/.bash_profile
echo 'export PATH="/usr/local/opt/php@7.4/sbin:$PATH"' >> ~/.bash_profile
php -vでなぜか7.1が返ってきたのでバージョン切替brew unlink php && brew link php@7.4 php -i | grep php.ini php -vこれで無事7.4がインストールされた
Laravelインストール
composer global require "laravel/installer"
echo export PATH=\"$HOME/.composer/vendor/bin:\$PATH\" >> ~/.bash_profile
source ~/.bash_profile
プロジェクト作成
laravel new sampleLaravel起動
php artisan serve
- 投稿日:2020-02-22T15:09:28+09:00
[Laravel]データベース Eloquent-ORMの操作?
Laravelでデータベースを操作したい時のメモ
データを挿入する
route.phpRoute::get('/insert', function() { DB::insert('insert into posts(title, content) value(?, ?)', ['PHP with Laravel', 'Laravel is the best thing...']); });データを取り出す
route.phpRoute::get('/read', function() { $results = DB::select('select * from posts where id = ?', [1]); return $results; }データの更新
route.phpRoute::get('/update', function() { $update = DB::update('update posts set title = "update title" where id = ?', [1]); return $update; });データの削除
route.phpRoute::get('/delete', function() { $delete = DB::delete('delete from posts where id = ?', [1]); return $delete; }Eloquent ORMデータの操作
データベーステーブルを操作するめに関連するモデルを作成する
php artisan make:model モデル名(Post)
モデル作成時にデータベースマイグレーションも作成する場合には-mオプションをつける
php artisan make:model Post --migrationorphp artisan make:model Post --mPost.phpclass Post extends Model { protected $table = 'posts'; //テーブル名 //テーブルを指定しない場合はクラス名を複数形の「スネークケース」にしたものがテーブルとして使用される。 protected $primaryKey = 'post_id'; //テーブルのキーをオーバーライド。指定しない場合はidが想定される }Eloquentでデータを取得する
route.phpuse App\Post; Route::get('/read', function() { $posts = Post::all(); //全て取得 $post = Post::find(1)->get(); //id[1]を取得 }特定のデータを更新する
routs.phpRoute::get('basicinsert', function() { $post = Post::find(2); //id(2)を書き換え $post->title = "NEW 2" $post->content = "content 2" $post->save(); });データの作成
routes.phpRoute::get('/create', function() { Post::create([ 'title' => 'create title', 'content' => 'crate content' ]); }); //モデルで$fillabeでカラムを指定しないとエラーになるデータのアップデート
routes.phpRoute::get('/update', function(){ Post::where('id', 2)->where('is_admin', 0) ->update(['title' => 'update title', 'content' => 'update content' ]); });データの削除
route.phpRoute::get('/delete', function() { $post = Post::find(2); $post->delete();データの削除(2)
route.phpRoute::get('/delete', function() { Post::destroy(2); //直接idを指定して削除 Post::destroy([4, 5]); //複数id指定して削除データの削除(ソフトデリート/論理削除)
データ復元可能なゴミ箱に入ってる状態にするソフトデリート。この場合モデルからソフトデリートされてもデータベースのレコードからデータは削除されない。代わりにそのモデルにdeleted_at属性がセットされてデータベースへ書き戻される。
モデルの設定
Post.phpnamespace App; use Illuminate\Database\Eloquent\Model; use Illuminate\Database\Eloquent\SoftDeletes; //追加 class Post extends Model { use SoftDeletes; protected $dates = ['deleted_at']; //削除された日付をタイムスタンプとして扱う protected $fillable = [ 'title', 'contetn' ]; }カラムを追加したいテーブルを作成する
php artisan make:migration add_deleted_at_column_to_posts_tables --table=posts作成されたマイグレーションファイルの設定
public function up()
{
   Schema::table('posts', function (Blueprint $table) {
       $table->softDeletes();  //追加
    };
}

public function down()
{
   Schema::table('posts', function (Blueprint $table) {
       $table->dropColumn('deleted_at'); //ロールバックする場合に備えてドロップを設定
    };
}
テーブルにカラムを追加
php artisan migrateテーブルに
deleted_atカラムがnullで設定される
Post::find(1)->delete();
Postテーブルのid:1を削除
データはテーブルに残ったままだが、deleted_atカラムに削除された日時が入るソフトデリートされたデータの取得
ソフトデリートされた要素はクエリの結果から除外されます。しかし、ソフトデリートされた要素を含めたい場合は、クエリに
withTrashedメソッドを使用する。$post = Post::withTrashed()->where('id', 1)->get();ソフトデリートされた要素飲みを取得したいとき
   $post = Post::onlyTrashed()->where('vote', 0)->get();
   // ソフトデリートされたvoteカラムが0の要素を取得
ソフトデリートされた要素はゴミ箱に入った状態なので復元することもできる。
その場合は、restoreメソッドを使用する。$post = Post::withTrashed()->where('vote', 0)->restore(); // ソフトデリートされたvoteカラムが0の要素を復元ソフトデリートされた要素を完全に削除する。
この場合はテーブルから要素も完全に削除されます。$post = Post::withTrashed()->where('id', 1)->forceDelete(); // ソフトデリートされたid:1の要素を完全に削除する参考サイト
- 投稿日:2020-02-22T15:09:28+09:00
[Laravel]データベースを操作したい時のメモ?
Laravelでデータベースを操作したい時のメモ
データを挿入する
route.phpRoute::get('/insert', function() { DB::insert('insert into posts(title, content) value(?, ?)', ['PHP with Laravel', 'Laravel is the best thing...']); });データを取り出す
route.phpRoute::get('/read', function() { $results = DB::select('select * from posts where id = ?', [1]); return $results; }データの更新
route.phpRoute::get('/update', function() { $update = DB::update('update posts set title = "update title" where id = ?', [1]); return $update; });データの削除
route.phpRoute::get('/delete', function() { $delete = DB::delete('delete from posts where id = ?', [1]); return $delete; }Eloquent ORMデータの操作
データベーステーブルを操作するめに関連するモデルを作成する
php artisan make:model モデル名(Post)
モデル作成時にデータベースマイグレーションも作成する場合には-mオプションをつける
php artisan make:model Post --migrationorphp artisan make:model Post --mPost.phpclass Post extends Model { protected $table = 'posts'; //テーブル名 //テーブルを指定しない場合はクラス名を複数形の「スネークケース」にしたものがテーブルとして使用される。 protected $primaryKey = 'post_id'; //テーブルのキーをオーバーライド。指定しない場合はidが想定される }Eloquentでデータを取得する
route.phpuse App\Post; Route::get('/read', function() { $posts = Post::all(); //全て取得 $post = Post::find(1)->get(); //id[1]を取得 }特定のデータを更新する
routs.phpRoute::get('basicinsert', function() { $post = Post::find(2); //id(2)を書き換え $post->title = "NEW 2" $post->content = "content 2" $post->save(); });データの作成
routes.phpRoute::get('/create', function() { Post::create([ 'title' => 'create title', 'content' => 'crate content' ]); }); //モデルで$fillabeでカラムを指定しないとエラーになるデータのアップデート
routes.phpRoute::get('/update', function(){ Post::where('id', 2)->where('is_admin', 0) ->update(['title' => 'update title', 'content' => 'update content' ]); });データの削除
route.phpRoute::get('/delete', function() { $post = Post::find(2); $post->delete();データの削除(2)
route.phpRoute::get('/delete', function() { Post::destroy(2); //直接idを指定して削除 Post::destroy([4, 5]); //複数id指定して削除データの削除(ソフトデリート/論理削除)
データ復元可能なゴミ箱に入ってる状態にするソフトデリート。この場合モデルからソフトデリートされてもデータベースのレコードからデータは削除されない。代わりにそのモデルにdeleted_at属性がセットされてデータベースへ書き戻される。
モデルの設定
Post.phpnamespace App; use Illuminate\Database\Eloquent\Model; use Illuminate\Database\Eloquent\SoftDeletes; //追加 class Post extends Model { use SoftDeletes; protected $dates = ['deleted_at']; //削除された日付をタイムスタンプとして扱う protected $fillable = [ 'title', 'contetn' ]; }カラムを追加したいテーブルを作成する
php artisan make:migration add_deleted_at_column_to_posts_tables --table=posts作成されたマイグレーションファイルの設定
public function up()
{
   Schema::table('posts', function (Blueprint $table) {
       $table->softDeletes();  //追加
    };
}

public function down()
{
   Schema::table('posts', function (Blueprint $table) {
       $table->dropColumn('deleted_at'); //ロールバックする場合に備えてドロップを設定
    };
}
テーブルにカラムを追加
php artisan migrateテーブルに
deleted_atカラムがnullで設定される
Post::find(1)->delete();
Postテーブルのid:1を削除
データはテーブルに残ったままだが、deleted_atカラムに削除された日時が入るソフトデリートされたデータの取得
ソフトデリートされた要素はクエリの結果から除外されます。しかし、ソフトデリートされた要素を含めたい場合は、クエリに
withTrashedメソッドを使用する。$post = Post::withTrashed()->where('id', 1)->get();ソフトデリートされた要素飲みを取得したいとき
   $post = Post::onlyTrashed()->where('vote', 0)->get();
   // ソフトデリートされたvoteカラムが0の要素を取得
ソフトデリートされた要素はゴミ箱に入った状態なので復元することもできる。
その場合は、restoreメソッドを使用する。$post = Post::withTrashed()->where('vote', 0)->restore(); // ソフトデリートされたvoteカラムが0の要素を復元ソフトデリートされた要素を完全に削除する。
この場合はテーブルから要素も完全に削除されます。$post = Post::withTrashed()->where('id', 1)->forceDelete(); // ソフトデリートされたid:1の要素を完全に削除する参考サイト
- 投稿日:2020-02-22T13:36:19+09:00
【Laravel7リリース】Laravel 7 Release Notes 日本語訳
Laravel 7 Release Notes
Laravel Airlock
AirlockはSPAやモバイルアプリなどシンプル、トークンAPIを提供する機能的な認証システムです。Airlockはアプリケーションのユーザアカウントに複数のAPIトークンを生成することも可能にしました。これらのトークンはそれぞれの機能やスコップごとに機能します。
- 詳細はAirlockのドキュメントへ
Custom Eloquent Casts
Laravel自体は豊富なキャストタイプを持っていますが、あたなはよく自らのキャストタイプを定義したいこともあるでしょうか。Laravel 7は
CastsAttributesインターフェイスを実装するクラスを定義すれば、できるようになりました。このクラスは必ず
getとsetメソードを持ち、getはデータベースの生のデータをキャスト値に変換します。一方、setはキャスト値をデータベースの生のデータに変換します。例えば、jsonキャストタイプを作ってみましょう。class Json implements CastsAttributes { /** * Cast the given value. * * @param \Illuminate\Database\Eloquent\Model $model * @param string $key * @param mixed $value * @param array $attributes * @return array */ public function get($model, $key, $value, $attributes) { return json_decode($value, true); } /** * Prepare the given value for storage. * * @param \Illuminate\Database\Eloquent\Model $model * @param string $key * @param array $value * @param array $attributes * @return string */ public function set($model, $key, $value, $attributes) { return json_encode($value); } }カスタマイズキャストタイプを定義したら、モデルに使うことができます。
<?php

namespace App;

use App\Casts\Json;
use Illuminate\Database\Eloquent\Model;

class User extends Model
{
    /**
     * The attributes that should be cast to native types.
     *
     * @var array
     */
    protected $casts = [
        'options' => Json::class,
    ];
}
- 詳細はEloquentのドキュメント
Blade Component Tags & Improvements
簡単に言うと、Bladeコンポネートはそれに対応しているクラスを持ち、それぞれのデータを受け入れることが可能になりました。全ての定義されたパブリックプロパーティーとメソードのコンポネートクラスは自動的にコンポネートビューに利用できます。コンポネート中のHTMLの属性は
$attributeと言うattributeインスタンスが自動的に追加されます。
例えば、App\View\Components\Alertはこのように定義され<?php namespace App\View\Components; use Illuminate\View\Component; class Alert extends Component { /** * The alert type. * * @var string */ public $type; /** * Create the component instance. * * @param string $type * @return void */ public function __construct($type) { $this->type = $type; } /** * Get the class for the given alert type. * * @return string */ public function classForType() { return $this->type == 'danger' ? 'alert-danger' : 'alert-warning'; } /** * Get the view / contents that represent the component. * * @return \Illuminate\View\View|string */ public function render() { return view('components.alert'); } }次は、コンポネートのBladeテンプレートを定義し、
<!-- /resources/views/components/alert.blade.php -->

<div class="alert {{ $classForType() }}" {{ $attributes }}>
    {{ $heading }}

    {{ $slot }}
</div>
コンポネートタグを使い、下のBladeにレンダリングされます。
<x-alert type="error" class="mb-4">
    <x-slot name="heading">
        Alert content...
    </x-slot>

    Default slot content...
</x-alert>
この例はただBlade component機能の中の一部だけで、Laravel 7は他の匿名、インラインビューコンポーネントなどたくさんの機能を改造しました。
- 詳細はfull Blade component documentation のドキュメント
HTTP Client
今までLaravelは
Guzzle HTTP clientを使用し、HTTPリクエストなどのサービスを提供しています。Laravel 7はGuzzle一番よく使われる機能の部分を抜粋し、より使いやすいため、GuzzleのラッパーのHTTP clientを作りました。例えば、JSONデータのPostリクエストは以下のようにuse Illuminate\Support\Facades\Http; $response = Http::withHeaders([ 'X-First' => 'foo' 'X-Second' => 'bar' ])->post('http://test.com/users', [ 'name' => 'Taylor', ]); return $response['id'];更に、この
HTTP clientは素晴らしい、人間にわかりやすいテスト機能も搭載Http::fake([ // Stub a JSON response for GitHub endpoints... 'github.com/*' => Http::response(['foo' => 'bar'], 200, ['Headers']), // Stub a string response for Google endpoints... 'google.com/*' => Http::response('Hello World', 200, ['Headers']), // Stub a series of responses for Facebook endpoints... 'facebook.com/*' => Http::sequence() ->push('Hello World', 200) ->push(['foo' => 'bar'], 200) ->pushStatus(404), ]);
- 詳細はHTTP clientのドキュメント
Fluent String Operations
Laravelの
Illuminate\Support\Strクラスはもう馴染みな存在になっているでしょう。たくさんの文字列の操作に役に立つメソードがありますよね。Laravel 7はこれらのメソードに基づいて、オブジェクト指向、スムーズな文字列操作のライブラリを作成しました。Str::ofメソードを使って、Illuminate\Support\Stringableインスタンスを使用します。たくさんのメソードはメソードチェンで文字列を操作return (string) Str::of(' Laravel Framework 6.x ') ->trim() ->replace('6.x', '7.x') ->slug();
- 詳細はオブジェクト指向、スムーズな文字列操作のドキュメント
Route Model Binding Improvements
Key Customization
Eloquentモデルのデータは
id以外のコラムを使いたいことがあるでしょうか。Laravel 7はルートパラメータにコラムを指定することを可能にRoute::get('api/posts/{post:slug}', function (App\Post $post) { return $post; });Automatic Scoping
1つのルートに多数のEloquentモデルをバンドする時に、2つ目パラメータは1つ目のパラメータに属するスコップしたい時はあるでしょう。例えば、ある特定のユーザのブログポストの場合とか
use App\Post;
use App\User;

Route::get('api/users/{user}/posts/{post:slug}', function (User $user, Post $post) {
    return $post;
});
Laravel 7はこのようにparentモデル側に定義されるコラム名をネストパラメータとして分析します。上の例では、
Userモデルにpostsコラムが定義されると想定し、Postモデルデータの取得に利用します。
- 詳細はroute model bindingのドキュメント
Multiple Mail Drivers
Laravel 7は1つのアプリに多数の"mailers"ドライバをサポートすることも可能にしました。各mailerドライバは
optionやtransportを持つことや、特定のメールサービスで特定のメッセージを送信することが可能です。例えば、Postmarkにトランザクションのメールを、他の大部分のメールはAmazon SESに設定します。デフォルトは
mailerメソードを使えば特定のメールドライバを指定できます。Mail::mailer('postmark') ->to($request->user()) ->send(new OrderShipped($order));Route Caching Speed Improvements
Laravel 7は新たなメソードを利用し、
route:cacheコマンドでコンパイル済みのルートキャッシュのマーチングを行っています。大規模なアプリ(800ルート以上)にて"Hello World"のベンチマークは、毎秒2倍以上のリクエストスピードに改善されました。自らの対応はいりません。CORS Support
Laravel 7自体はBarry vd. HeuvelさんのCORSパッケージのCross-Origin Resource Sharing (CORS)
OPTIONSのリクエストとレスポンスをサポートします。新たなcors設定ファイルはLaravelアプリに存在するようになります。
- 詳細はCORSのドキュメント
Query Time Casts
テーブルから生のデータをセレクトするなど、クエリ実行時にキャストを使いたい時はあるでしょう。例えば、下のクエリ
use App\Post;
use App\User;

$users = User::select([
    'users.*',
    'last_posted_at' => Post::selectRaw('MAX(created_at)')
            ->whereColumn('user_id', 'users.id')
])->get();
last_posted_atの結果は文字列になります。もしクエリ実行時はdateキャストに変換できれば便利ですね。そのため、Laravel 7にwithCastsが誕生しました。$users = User::select([ 'users.*', 'last_posted_at' => Post::selectRaw('MAX(created_at)') ->whereColumn('user_id', 'users.id') ])->withCasts([ 'last_posted_at' => 'date' ])->get();MySQL 8+ Database Queue Improvements
前回のLaravelリリースにて、
databasequeueはdeadlocksにより、商用には不十分だと考えられます。Laravel 7はMYSQL8+を使用し、データベースバックエンドqueueを改善します。FOR UPDATE SKIP LOCKEDclauseと他のSQL改善を使い、database稼働のqueueは大負荷の商用にも対応できます。Artisan
testCommand
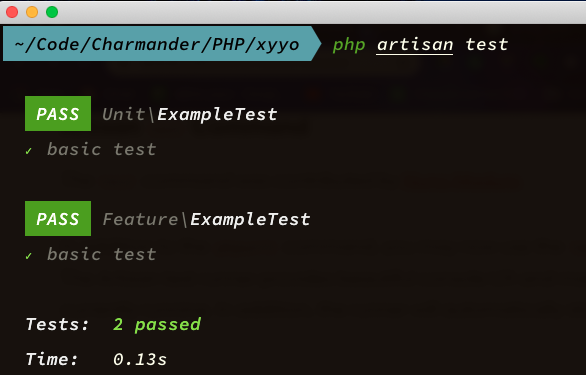
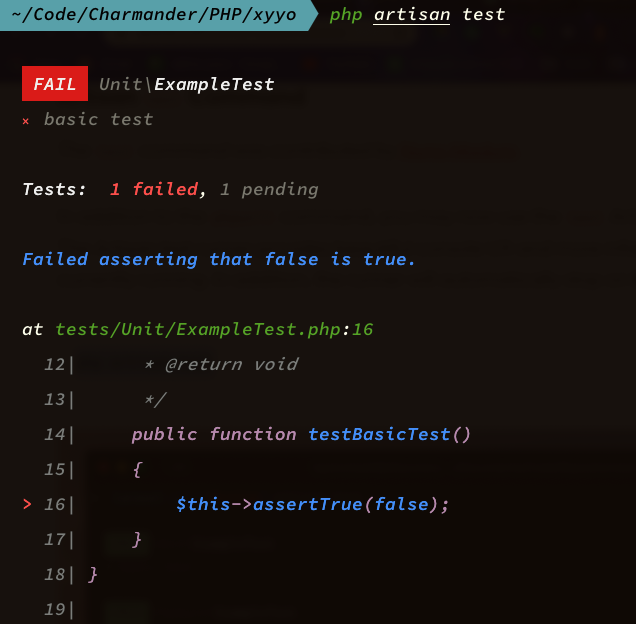
phpunitコマンドの追加として、testArtisan コマンドでもテスト実行できます。このコマンドにより、美しいコンソルUXや豊富なテスト情報が提供されます。更に、テストは初めての通らなかったテストに止まります。php artisan testちょいお試し!
vi tests/Unit/ExampleTest.php確かに
phpunitよりわかりやすくなってるけど??
大量なテストがあれば、どうなるだろうかな??元々
phpunitに渡せるパラメータはArtisantestコマンドにも渡せます。php artisan test --group=featureMarkdown Mail Template Improvements
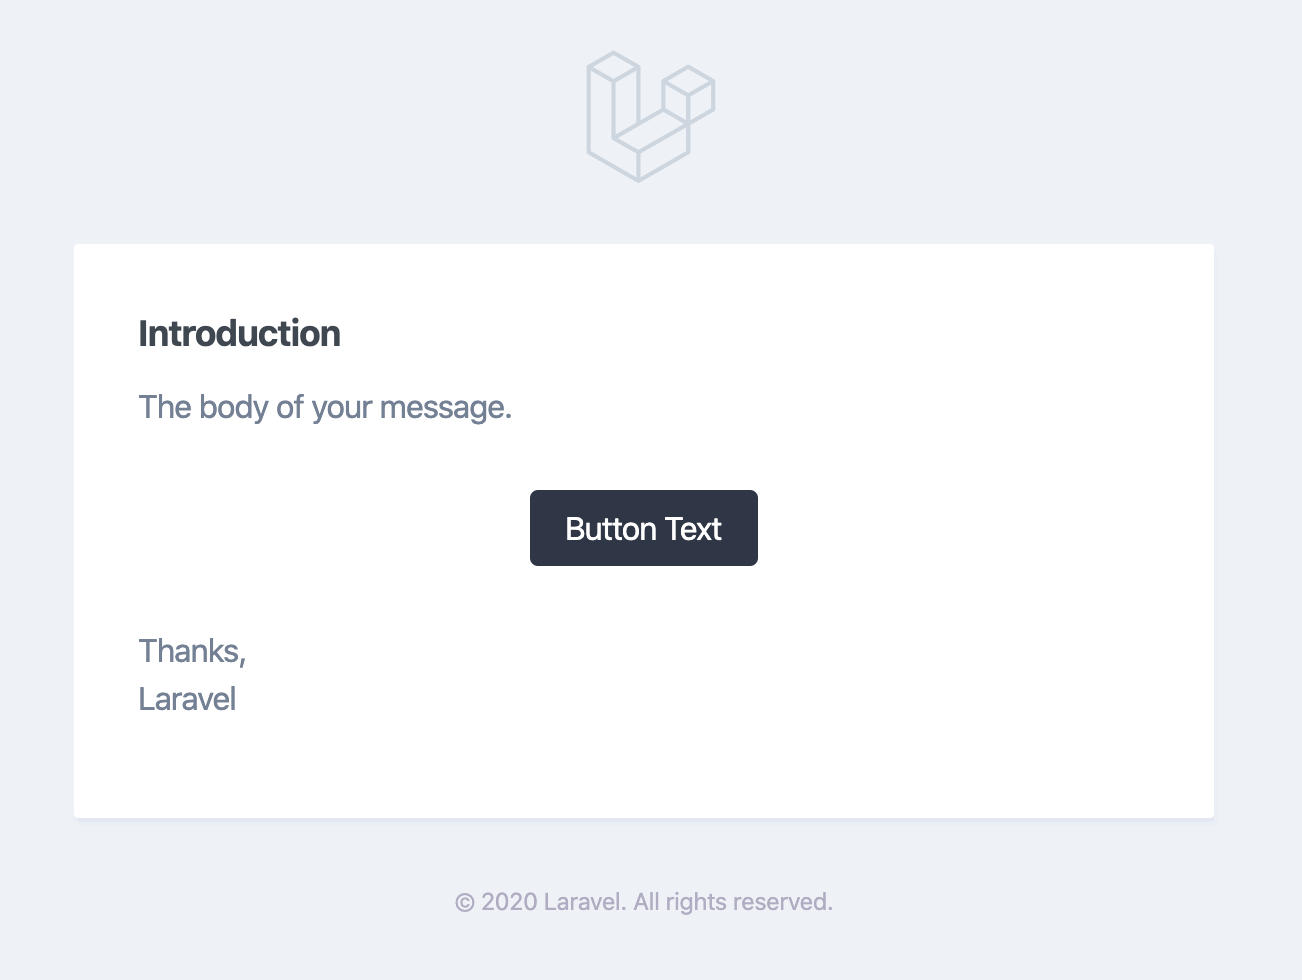
デフォルトのMarkdownメールテンプレートは、Tailwind CSS カラーパレットをベースにし、更にモダンなデザインにします。もちろん、このテンプレートは自由にカスタマイズするは可能です。
- 詳細は Markdown mailのドキュメント
Stub Customization
Artisan
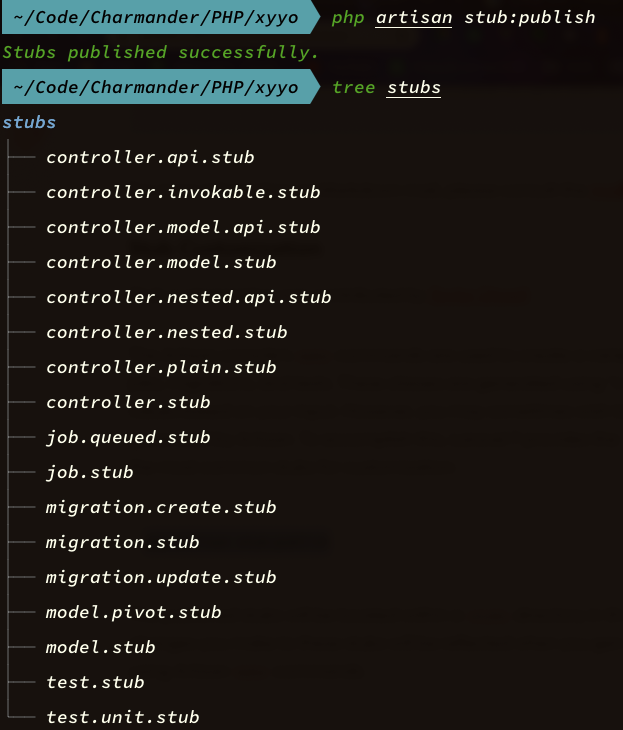
makeコマンドはcontrollers, jobs, migrations, testsなど様々なクラスを生成することに使われます。これらのクラスは'stub'ファイルを使用し、インプットの値を参照し、作られます。ただし、これらのクラスの構造を少し編集してmakeコマンドを使いたい事があるでしょう。Laravel 7はstub:publishを使用したら、よく使われるstubをカスタマイズすることも可能です。php artisan stub:publishpublished
stubsフォルダはLaravelのルーツフォルダに、これらのファイルの全ての編集はmakeコマンドに反映されます。
便利そうな機能いっぱい?
- 投稿日:2020-02-22T11:12:43+09:00
Laravelでミニブログを作ろう #2
前回:https://qiita.com/customaddone/items/87041975838b9e9c9b22
GitHub:https://github.com/customaddone/larablogdocker概要
コンテナとは
ホストOS上に論理的な区画(コンテナ)を設定し、その中でライブラリやアプリケーションを動作させるようにする技術。
dockerとは
コンテナ技術を使ってアプリケーションの実行環境を構築、運用するプラットフォーム。
サーバ仮想化技術のように環境立ち上げの度にOSをインストールせず、各環境はホストOSのカーネル(中核組織)を共有する。dockerのメリット
- Dockerfile(dockerの設定)を共有することで、どこでも誰でも同じ環境が作れる。
- 作成した環境を他人と共有しやすい。
- スクラップ&ビルドが容易にできる。
自分のPC(ホストOS)ではこのコマンドを使えるが、他の人のPCでは違うライブラリを入れているのでコマンドを使えない。といったことがあり得る。同じdocker環境内で作業することでこうした差異を減らすことができる。
→自分一人で開発してる場合よりチームで開発する場合の方がよりメリットを感じやすい(
と思う)Dockerfile
Dockerfile用のディレクトリを用意します
ターミナル$ mkdir docker $ cd docker # ディレクトリ作成 $ mkdir php nginx selenium # phpのDockerfileとその設定ファイルを作成 $ touch php/Dockerfile $ touch php/php.ini # nginxのDockerfileとその設定ファイルを作成 $ touch nginx/Dockerfile $ touch nginx/default.conf # mysqlのDockerfileとその設定ファイルを作成 $ touch mysql/Dockerfile $ touch mysql/my.conf # selenium(ブラウザテスト用)のDockerfileを作成 $ touch selenium/DockerfilephpのDockerfileを書いていきます
要件定義を元に必要なライブラリをphpコンテナ(とcomposer.json)に書いていきます
開発の過程で必要だと思った都度ライブラリをインストールしていくこともできますが、汎用性が高いDockerfileを目指すのであれば、Dockerfileで全て完結させるためにも要件定義の段階で必要なライブラリを洗い出すことが必要です前回行った要件定義より
・Scss, Vue.jsを使う → npmパッケージが必要
・Terraformを使う → pipを使いTerraformをインストールすることが必要 → 今回ECSを用いたデプロイを行い、その際phpコンテナを用いるので、phpコンテナはできるだけ軽量化した方が良い → Terraformはphpコンテナでインストールせず別にコンテナを立てるdocker/php/Dockerfile# 基本となるイメージを引っ張ってくる FROM php:7.3-fpm-alpine # docker内の作業用ディレクトリを設定 ENV WORKDIR=/var/www/html WORKDIR $WORKDIR # php.ini(phpの設定)をdocker内にコピーする COPY ./docker/php/php.ini /usr/local/etc/php # composerでインストールする内容一覧をdocker内にコピーする COPY composer.json composer.lock ${WORKDIR}/ # laravelのファイル一式をdocker内にコピーする COPY . . # apk alpineのパッケージマネジャー # とりあえずgitとnpmとvimが使えればいいかな # git openssh,openssh-keygen,vim,gitが必要 # npm nodejs, nodejs-npmが必要 # bash,curlコマンドも要 RUN set -x \ && apk update && \ apk add --update --no-cache --virtual=.build-dependencies \ autoconf \ gcc \ g++ \ make && \ apk add --update --no-cache \ curl-dev \ icu-dev \ libzip-dev \ openssl \ openssh \ openssh-keygen \ nodejs \ nodejs-npm \ bash \ vim \ git RUN docker-php-ext-install \ pdo_mysql \ zip # composerをインストール RUN curl -sS https://getcomposer.org/installer | php -- --install-dir=/usr/local/bin --filename=composer RUN set -x \ && composer update \ && composer install --no-autoloader --no-progress --no-dev # 適当にユーザーを作っとく ARG UID=991 ARG UNAME=www ARG GID=991 ARG GNAME=www # php artisan config:clear キャッシュクリアー # 3行目以下 ユーザーに権限付与 RUN set -x \ && composer install --no-progress --no-dev \ && php artisan config:clear \ && addgroup ${GNAME} -g ${GID} \ && adduser -D -G ${GNAME} -u ${UID} ${UNAME} \ && chown -R ${UNAME}:${GNAME} ${WORKDIR} \ && mv /root/.composer /home/${UNAME}/ \ && chown -R ${UNAME}:${GNAME} /home/${UNAME} # nginxからのアクセスの窓口 EXPOSE 9000composer.jsonに追加するライブラリを書き込みます
composer.json{ "name": "laravel/laravel", "type": "project", "description": "The Laravel Framework.", "keywords": [ "framework", "laravel" ], "license": "MIT", "require": { "php": "^7.2", "fideloper/proxy": "^4.0", "guzzlehttp/guzzle": "^6.5", # 追加 外部API使用用 "laravel/framework": "^6.2", "laravel/tinker": "^2.0" }, "require-dev": { "barryvdh/laravel-ide-helper": "^2.6", "facade/ignition": "^1.4", "fzaninotto/faker": "^1.4", "laravel/dusk": "^5.8", # 追加 ブラウザテスト用 "mockery/mockery": "^1.0", "nunomaduro/collision": "^3.0", "nunomaduro/larastan": "^0.5.1", # 追加 静的解析ツール用 "phpstan/phpstan": "^0.12.9", # 追加 静的解析ツール用 "phpunit/phpunit": "^8.0" }, "config": { "optimize-autoloader": true, "preferred-install": "dist", "sort-packages": true }, "extra": { "laravel": { "dont-discover": [] } }, "autoload": { "psr-4": { "App\\": "app/" }, "classmap": [ "database/seeds", "database/factories" ] }, "autoload-dev": { "psr-4": { "Tests\\": "tests/" } }, "minimum-stability": "dev", "prefer-stable": true, "scripts": { "post-autoload-dump": [ "Illuminate\\Foundation\\ComposerScripts::postAutoloadDump", "@php artisan package:discover --ansi" ], "post-root-package-install": [ "@php -r \"file_exists('.env') || copy('.env.example', '.env');\"" ], "post-create-project-cmd": [ "@php artisan key:generate --ansi" ] } }お好みのライブラリをcomposer.jsonに追加してコンテナ立ち上げ時に
composer update, composer installしますdocker/php/php.inidefault_charset = "UTF-8" max_execution_time = 30 memory_limit = 128M file_uploads = On upload_max_filesize = 5M post_max_size = 5M display_errors = Onnginx,mysql,seleniumのDockerfileを書いていきます
特に気をつけるところはありません
後は流れですdocker/nginx/DockerfileFROM nginx:1.15-alpine COPY public /var/www/html/public COPY docker/nginx/default.conf /etc/nginx/conf.d/default.conf.template ENV PHP_HOST=127.0.0.1 EXPOSE 80 CMD /bin/sh -c 'sed "s/\${PHP_HOST}/${PHP_HOST}/" /etc/nginx/conf.d/default.conf.template > /etc/nginx/conf.d/default.conf && nginx -g "daemon off;"'docker/nginx/default.confserver { listen 80; add_header X-Frame-Options "SAMEORIGIN"; add_header X-XSS-Protection "1; mode=block"; add_header X-Content-Type-Options "nosniff"; root /var/www/html/public/; charset utf-8; location = /favicon.ico { access_log off; log_not_found off; } location = /robots.txt { access_log off; log_not_found off; } location / { try_files $uri /index.php?$query_string; } location ~ [^/]\.php(/|$) { fastcgi_pass app:9000; fastcgi_split_path_info ^(.+?\.php)(/.*)$; fastcgi_index index.php; fastcgi_param SCRIPT_FILENAME $document_root$fastcgi_script_name; fastcgi_param PATH_INFO $fastcgi_path_info; fastcgi_param REQUEST_FILENAME $request_filename; include fastcgi_params; } }docker/mysql/DockerfileFROM mysql:5.7 EXPOSE 3306 COPY ./docker/mysql/my.cnf /etc/mysql/conf.d/my.cnf CMD ["mysqld"]docker/mysql/my.cnf# このUTF-8の設定をしないと文字化けします [mysqld] character-set-server=utf8 collation-server=utf8_general_ci [client] default-character-set=utf8mysqlコンテナを立ち上げるとmysqlディレクトリができますが、gitignoreに記入してgitの管理外になるようにしましょう
.gitignore/node_modules /public/hot /public/storage /storage/*.key /vendor /mysql # 追加 .env ...docker/selenium/DockerfileFROM selenium/standalone-chrome LABEL maintainer="Edmund Luong <edmundvmluong@gmail.com>" EXPOSE 4444最後にdocker-compose.yamlを作成し、中身を書いていきます
docker-compose.yamlversion: '3.7' services: nginx: build: context: . dockerfile: docker/nginx/Dockerfile volumes: - ./public:/var/www/html/public:ro ports: - 8888:80 environment: PHP_HOST: app depends_on: # phpコンテナとアクセスするため必要 - app app: build: context: . dockerfile: docker/php/Dockerfile depends_on: # mysqlコンテナと連携するため必要 - mysql env_file: - .env volumes: - .:/var/www/html:cached mysql: build: context: . dockerfile: docker/mysql/Dockerfile volumes: - ./mysql:/var/lib/mysql:delegated - ./docker/mysql/my.cnf:/etc/mysql/conf.d/my.cnf image: mysql command: mysqld --character-set-server=utf8mb4 --collation-server=utf8mb4_general_ci environment: MYSQL_DATABASE: larablog MYSQL_USER: root MYSQL_PASSWORD: secret MYSQL_ROOT_PASSWORD: secret ports: - "3306:3306" selenium: build: context: . dockerfile: docker/selenium/Dockerfile ports: - '4444:4444'あとはターミナルでdocker-compose up -dしてやると各コンテナが立ち上がります
docker-compose exec app shでappコンテナの中に入って作業ができます
gitなりnpmなりも使えるようになっています次回はTerraformのdockerfileを書いていきます
- 投稿日:2020-02-22T10:25:37+09:00
URLの引数をバリデーションに使いたい(Laravel)
結論
任意のRequestクラスに以下の関数を追加する。
    /**
     * 更新、削除時に渡されるルート引数を Request Parametersに含める。
     * ただし、すでにキーが存在している場合は上書きしない。
     * @return array
     */
    public function validationData()
    {
        $params = $this->all();
        $route_params = $this->route()->parameters();

        return $params + $route_params;
    }
なんで作ろうと思ったか?
APIを作っていて、更新処理を書いている時にふと思った。
    public function update(ProjectUpdateRequest $request, $id)
    {
        $project = Project::find($id);

        // もしデータが取得できなかったら 失敗のレスポンス
        if (empty($project)) return response()->json(['result' => 'failed']);

        $project->fill($request->all());
        $project->update();
        return response()->json($project);
    }
せっかくバリデーション専用のクラスあるのに、ここでパラメータをチェックするの違和感ある。
どうにかしてRequestクラスでできないだろうか。Requestクラス内でルートパラメータ取得
紆余曲折あったが、パラメータを取得する関数を発見したのでそれを使用。
$this->route()->parameters()/project/{id} だったら ['id' => xxx]の形で取得できる。
Rulesでバリデーションできるようにする
Requestクラスの rules()でチェックされるデータは validationData()で取得しているので、オーバーライドしてルートパラメーターを含めるようにする。
ただし、ルートパラメータと同じ値があったときに上書きするのは望ましくないので、array_mergeは使わずに配列をマージすることにした。$params = $this->all(); $route_params = $this->route()->parameters(); return $params + $route_params;結果
rules()で、ルートパラメータを使ってバリデーションを行えた。
とっても満足した。
効率や生産性、拡張性は見なかったことにする。

