- 投稿日:2020-01-12T23:43:58+09:00
Rspec, Factory_bot, Fakerを用いたモデル単体テスト
はじめに
- Rspec, Factory_bot, Fakerを用いたテストについてメモを残したいと思います。
- 今回はuserモデルでテストします。
- 開発環境
- ruby 2.5.1
- rails 5.2.4.1
gemの導入
Gemfilegroup :development, :test do gem 'rspec-rails' gem 'factory_bot_rails' end group :test do gem 'faker' endgemを追加したら、bundle installする。
Rspecの設定
terminal$ rails g rspec:install # Rspecの設定ファイルが作成される。 create .rspec create spec create spec/spec_helper.rb create spec/rails_helper.rb
- spec/spec_helper.rb ・・・Rails無しでRspecを利用するときに使う。
- spec/rails_helper.rb ・・・RailsでRspecを利用するときに使う。
.rspec# 以下を追加することで出力を見やすくできる。 --format documentationFactory_botの設定
- specディレクトリ下に「factories」ディレクトリを作成。
- その中に「users.rb」ファイルを作成。
- spec/factories/users.rbを以下のように編集する。
spec/factories/users.rbFactoryBot.define do factory :user do name {"abe"} sequence(:email) {Faker::Internet.email} phone_number {Faker::PhoneNumber.phone_number} end end
- fakerを使用し、ダミーデータを作成。他にもいろいろなfakerがあります。
Factory_botの記述の省略
spec/rails_helper.rb# 上記省略 RSpec.configure do |config| config.include FactoryBot::Syntax::Methods #追加する # 下記省略 end「config.include FactoryBot::Syntax::Methods」 を追加することで以下のように省略できる。
# 追加前
user = FactoryBot.build(:user)
# 追加後
user = build(:user)
モデルテストの記述
- app/models/user.rb にバリデーションを記述します。
app/models/user.rbclass User < ApplicationRecord validates :name, presence: true, length: { maximum: 6 } validates :email, presence: true, uniqueness: true validates :phone_number, presence: true end
- spec/models/users_spec.rbにバリデーションが正常に機能しているか確かめるコードを記述します。
spec/models/users_spec.rbrequire 'rails_helper' describe User do describe '#create' do it "name, email, phone_numberがあれば有効" do user = build(:user) expect(user).to be_valid end it "nameがないと無効" do user = build(:user, nickname: nil) user.valid? expect(user.errors[:nickname]).to include("can't be blank") end it "emailがないと無効" do user = build(:user, email: nil) user.valid? expect(user.errors[:email]).to include("can't be blank") end it "phone_numberがないと無効" do user = build(:user, phone_number: nil) user.valid? expect(user.errors[:phone_number]).to include("can't be blank") end it "emailが重複していたら無効" do user = create(:user) another_user = build(:user, email: user.email) another_user.valid? expect(another_user.errors[:email]).to include("has already been taken") end it "nameが7以上だったら無効" do user = build(:user, nickname: "a" * 7) user.valid? expect(user.errors[:nickname]).to include("is too long (maximum is 6 characters)") end it "nameが6以下だったら有効" do user = build(:user, nickname: "a" * 6) expect(user).to be_valid end end endちなみに、lengthのバリデーションについて忘れないようにメモ。
  validates :name, length: { maximum: 10 }  # 10以下、 最高で10文字まで
  validates :name, length: { minimum: 6 }  # 6以上、 最低でも6文字必要
  validates :name, length: { in: 6..10 }  # 6文字以上10以下
  validates :name, length: { is: 6 }  # 6文字のみ
Rspecを実行する
terminal# 特定のファイルを実行 $ bundle exec rspec spec/models/users_spec.rb # すべてのファイルを実行 $ bundle exec rspecまとめ
間違っていることやアドバイスなどご指摘いただければ助かります。
よろしくお願いいたします。
- 投稿日:2020-01-12T22:21:55+09:00
Action Text(Trix Editor)でdivタグをpタグに、H1をH2に変更する方法
/app/javascript/packs/application.jsなどを編集します。var Trix = require("trix") require("@rails/actiontext") //divなのをpタグに Trix.config.blockAttributes.default = { tagName: "p", breakOnReturn: true } //h1タグをh2タグに Trix.config.heading1.subHeading = { tagName: "h3" }本当は
breakOnReturn: trueで、文字を入力中にEnterを押すと新しい段落が始まるはずなのですが、私の環境ではそうなりません。わかる人がいれば教えていただきたいですそのほかのブロック要素については、trix/block_attributes.coffee at 3ec7bac3bcef51b134e284a2c0c79c9e9350e75b · basecamp/trixなどを見るとわかります。
- 投稿日:2020-01-12T22:03:13+09:00
【Rails入門】エラーと仲良くなれるかもしれない開発手法【読み物】
どんもー、@snskOgataです。
今回はみんな大好き、エラーとの付き合い方を書いていこうかなと思います。
まあ、ちょっとした読み物として楽しんでもらえたらと思います。
対象読者は以下の2つに当てはまる人です。
・エラーという存在が憎くて憎くてしょうがない
・Railsアプリを読み物を見ながら1, 2度作ってみたけど、実際に自分で何も見ずに作るとなったらどうやっていけばいいかわからない
エラーが出るとどうしても怒られているような感覚になってしまいますが、
そうじゃなくて本当は、エラーは正解への道筋を示してくれる相棒のようなものだということを感じてくれると嬉しいです。
実際やっていくこととしては、
エラーを吐かせながら、それに従ってアプリケーションを作っていくということをしていきます。
これによりひとつずつ着実に作業を進めることができます。
アプリの内容は、つぶやきを作成しその一覧を表示する簡単なアプリケーションです。
途中で大体もう流れがわかったら最後まで飛ばしてくれても大丈夫です(笑)1. Setup
まずはアプリケーションをビルドします。
Railsバージョンは5.2.3を使用します$ rails _5.2.3_ new dev-with-error $ cd dev-with-error $ bundle $ rails db:migrateやってることはRailsアプリケーションを立ち上げ、フォルダを移動して、gemファイルのインストール、DBの作成です。
ここまでやるとローカルサーバを立ち上げることができます。$ rails sWebブラウザで「localhost:3000」にアクセスすればお馴染みの画面が出てきます。
2.Tweet作成画面を作る
次にTweetの新規作成画面を作っていきたいと思います。
ここで通常であれば、ルーティングをして、コントローラとモデルを作って、適切なビューを作って...とやっていくと思いますが、
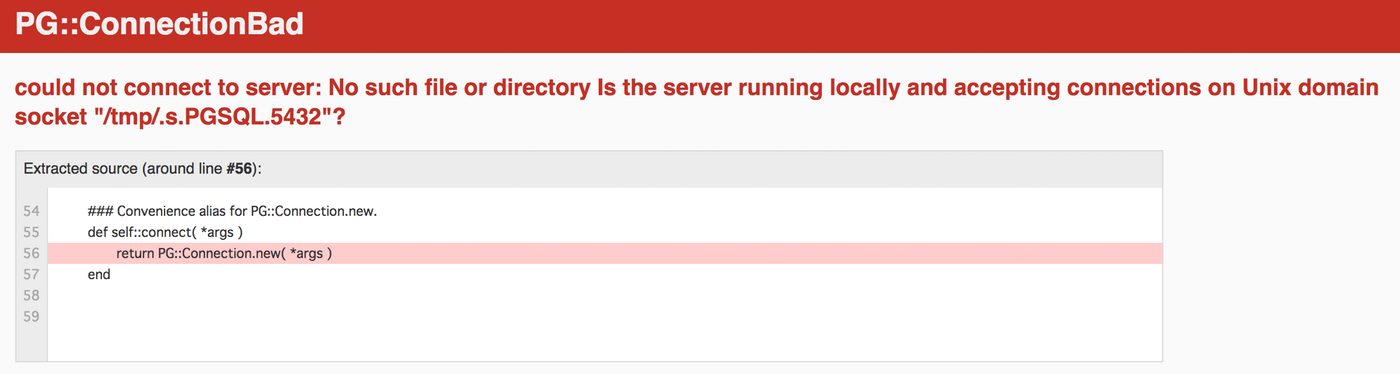
今回は冒頭でも書いたようにまずはエラーを吐かせてそれに従って作っていくというふうに作って行きます。実際にやることとしては、Tweetの新規作成画面ということで「localhost:3000/tweets/new」というアドレスにアクセスをします
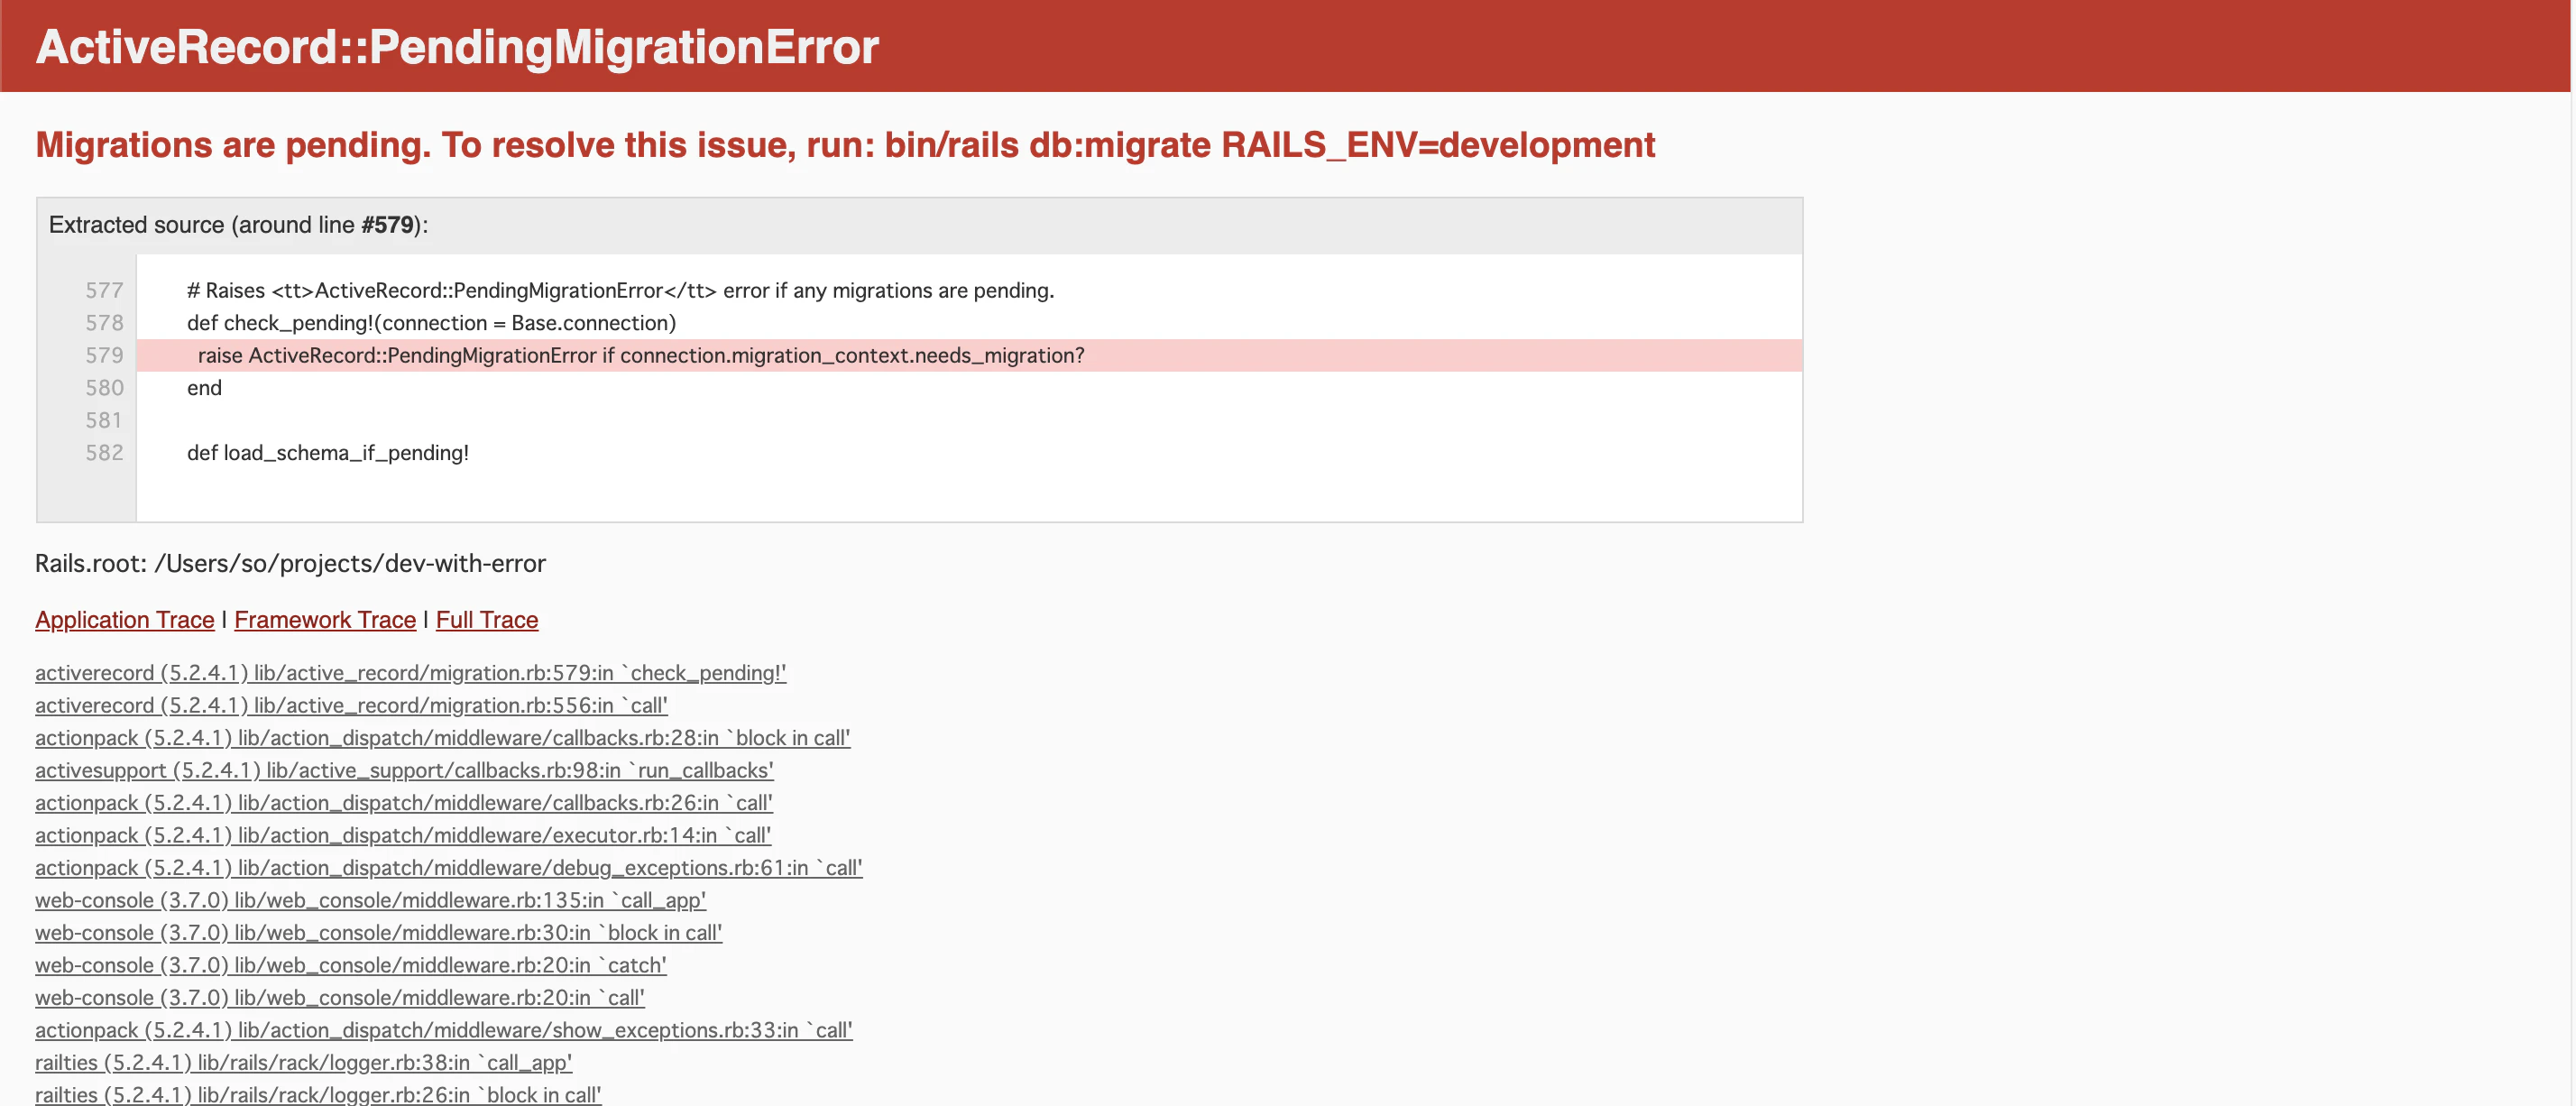
まだアプリケーション本体に何も書き込んでいないわけなので当然エラーを吐かれます。
エラーの内容を見てみると、ルーティングがされていないよ!とのエラーが出ているので、実際にルーティング部分を書き加えます。config/routes.rbRails.application.routes.draw do resources :tweets, only: :new endもう一度先ほどのURLにアクセスすると次はこのようなエラーが出ます。
今度はTweetsControllerがないのでそれを教えてくれます。
エラーに従ってコントローラを作成しましょう。$ rails g controller tweets
newアクションが見つからないということでTweetsControllerに追記します。
app/controllers/tweets_controller.rbclass TweetsController < ApplicationController def new end end保存をし再びページをリロードすると、
随分長いエラー文となっていますが、冒頭の「TweetsController#new is missing a template」から、newアクションに対応するビューのテンプレートがないというのがエラーの原因というのがわかります。
なので、Tweets#newに対応するように、「views/tweets/new.html.erb」を作成します。app/views/tweets/new.html.erbHello「localhost:3000/tweets/new」にアクセスすると、
おめでとう!これで新規作成画面の表示に成功しました!さて、新規投稿するためにインスタンス変数@tweetを用意しましょう。
app/controllers/tweets_controller.rbclass TweetsController < ApplicationController def new @tweet = Tweet.new end endここで再びページリロードをすると
Tweetというものがわからない!と言われるので、Tweetモデルを作成してあげます$ rails g model tweet content:string ...モデルが生成されましたが
問題を解決するには「rails db:migrate」して、と書かれています。
どうやらマイグレーションファイルをDBに適用していないのが問題みたいです。$ rails db:migrateこれで再びエラー無しの状態になりました!
次に、実際にビューに今回用意したインスタンス変数を使って、フォームを作成してみます。app/views/tweets/new.html.erb<%= form_with model: @tweet do |form| %> <%= form.text_field :content %> <%= form.submit %> <% end %>ここでのエラーはわかりづらいですが、form_withによってtweets_pathにポストがなされるのですが、そのメソッド(:create)が宣言されていないためにのエラーとなります。
ルーティングで「:create」を追加してあげましょう。config/routes.rbRails.application.routes.draw do resources :tweets, only: [:new, :create] end再びエラー無しに!
ただしcreateアクションを実際に実装していないため、フォームを入力しても何も変わりません。
なのでコントローラにcreateを追記してあげましょう。
ついでに新規投稿画面に、投稿された一覧を表示できるようにしましょう。app/controllers/tweets_controller.rbclass TweetsController < ApplicationController def new @tweet = Tweet.new @tweets = Tweet.all #追記:全投稿取得→表示に使用 end def create Tweet.create(tweet_params) # DBに保存 redirect_to new_tweet_path # 新規投稿画面に再び戻る end private # ストロングパラメータ def tweet_params params.require(:tweet).permit(:content) end endapp/views/tweets/new.html.erb<% # local: trueにすることで、送信後ページが更新される %> <%= form_with model: @tweet, local: true do |form| #local %> <%= form.text_field :content %> <%= form.submit %> <% end %> <p>Tweets</p> <% # Tweetの一覧表示 %> <%- @tweets.each do |tweet| %> <%= "#{tweet.content} <#{tweet.created_at}>" %> <br/> <% end %>無事、簡単なつぶやき投稿アプリができました!
同様にして編集ページや一覧表示ページ、あるいは新しいコントローラやモデルを作成していけば、ある程度のものであればエラーに従っていくだけで作れてしまうと思います!
3. 一気にRMVCを作ってしまう弊害
この手法だとエラーに従ってひとつずつパーツを揃えていくため、今コーディングしている部分が正しくなければ先に進むことができません。
すなわち、エラー部分が限定されて間違っている可能性がある部分というのがすごく限定的になります。Railsを始めたての人は、MVCを一度に実装してしまったために、エラーが発生したときに何処で起きているのかがわからなくなってしまう、という問題に遭遇してる人が多い様な気がします。
なので、こういうように着実に進められる方法もあるよ、エラーは怒ってるんじゃなくて導いてくれてるんだよ、ってのを少しでも実感してくれたら幸いです。4.テスト駆動開発
こういう開発手法を思いついたきっかけがテスト駆動開発(TDD)です。
この手法は、今回エラーを起こして進めて行ったような感じで、まずは通らないテストを書いて、それに通るように実装をしていくという手法です。
実際の現場でも使われている手法で1、一度は経験しておいて損はないかなと思います。
読みながらならある程度簡単なアプリなら作り方が理解できる方なら、Rails Tutorialという本が無料で公開されているので挑戦してみると良いかもしれません。(※Rails Tutorialはminitestというデフォルトのテストを用いているのでRSpecを使ってる方は違いには注意!)
Rails Tutorial:https://railstutorial.jp/chapters/beginning?version=5.1#cha-beginning加えてここではgem(deviseなど)を使わずにユーザ管理を実装するのですが、Deviseの作者も一度は自分の手でUserモデルを作成することを推奨しているので、その点でもオススメです。
追記:ついでにHerokuで簡単にデプロイする方法とか、自作ヘルパーメソッドの実装とかもすごくタメになります!
実際はコストの面との相談で使われなかったりする? テスト自体は非常に重要なことには変わりないですが! ↩


- 投稿日:2020-01-12T21:52:42+09:00
Ruby on Rails APIモードのCRUD実装 【初学者のReact✗Railsアプリ開発 第5回】
やったこと
- Ruby on RailsのAPIモードでCRUDを実装する(ただし、更新(U)はなし)
前回の記事
Reactのreduxを用いたログイン処理周りの実装【初学者のReact✗Railsアプリ開発第4回】
参考にさせていただいた記事
https://qiita.com/k-penguin-sato/items/adba7a1a1ecc3582a9c9
実装手順
モデルとコントローラーの作成
$ docker-compose run api rails g model post content:string
$ docker-compose run api rails g controller api/v1/posts
生成されたマイグレーションファイルを編集します。
db/migrate/XXX_create_posts.rbclass CreatePosts < ActiveRecord::Migration[5.2] def change create_table :posts do |t| t.string :content t.references :user, foreign_key: true t.timestamps end add_index :posts, [:user_id, :created_at] end end$ docker-compose run api rake db:migrateroute.rb
route.rbRails.application.routes.draw do namespace :api, defaults: { format: :json } do namespace :v1 do ##省略## resources :posts end end end
- resourcesで、GET, POSTなど複数のルーティングを一気に設定できる。resourceとの違いに注意。
posts_controller
posts_controllermodule Api module V1 class PostsController < ApplicationController before_action :set_post, only: [:index, :show, :update, :destroy] before_action :authenticate_api_v1_user! def index posts = Post.all render json: { status: 'SUCCESS', message: 'Loaded posts', data: posts} end def show @user = @post.user json_data = { 'post': @post, 'user': { 'name': @user.name, 'nickname': @user.nickname, 'image': @user.image } } render json: { status: 'SUCCESS', message: 'Loaded the post', data: json_data} end def create post = Post.new(post_params) if post.save render json: { status: 'SUCCESS', data: post} else render json: { status: 'ERROR', data: post.errors } end end def destroy @post.destroy render json: { status: 'SUCCESS', message: 'Delete the post', data: @post} end def update end private def set_post @post = Post.find(params[:id]) end def post_params params.require(:post).permit(:content, :user_id) end end end endmodels/post.rb
post.rbclass Post < ApplicationRecord belongs_to :user endPostmanを用いてAPIの動作確認をする
create
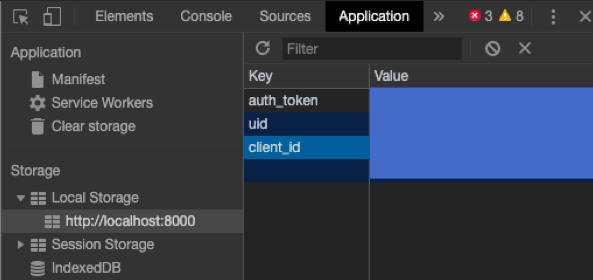
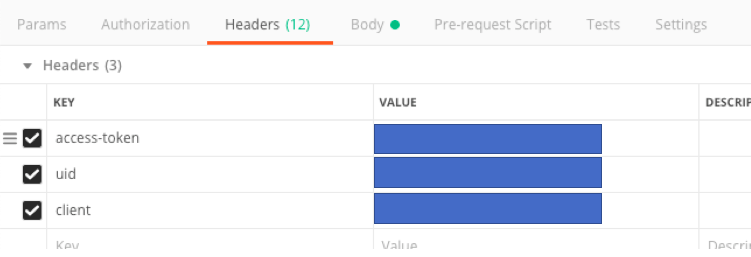
chromeのデベロッパーツール->Application->Local Storageからauth_tokenとかをコピーして、
Postmanに貼り付ける。
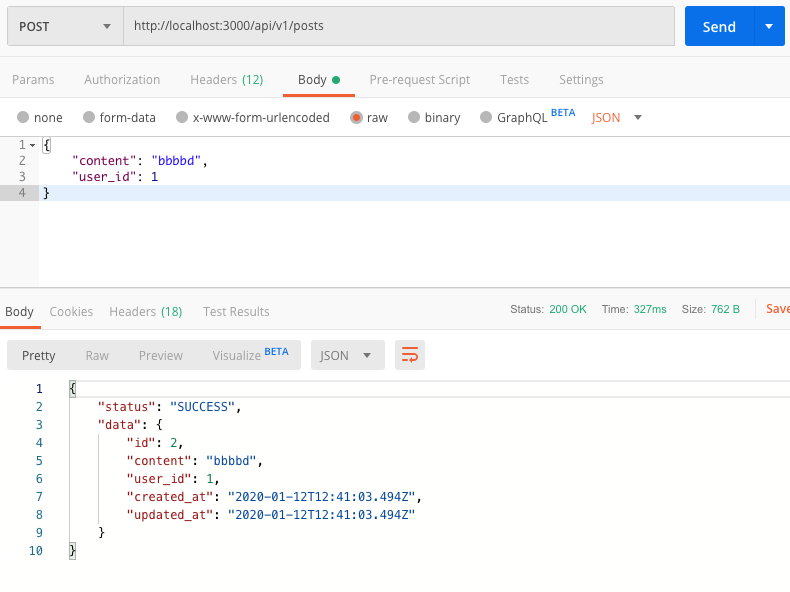
そしてlocalhost:3000/api/v1/postsにPOSTすると
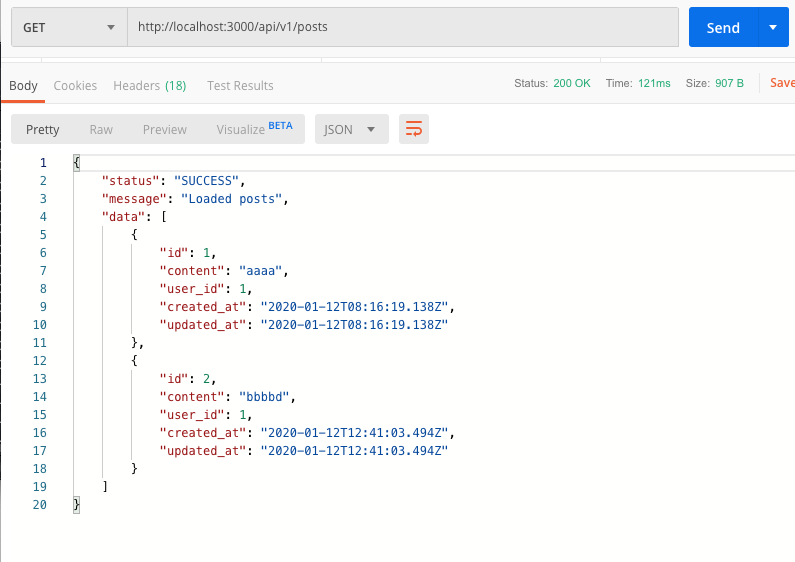
postが作成されたことが確認できます。index
localhost:3000/api/v1/postsにGETすると
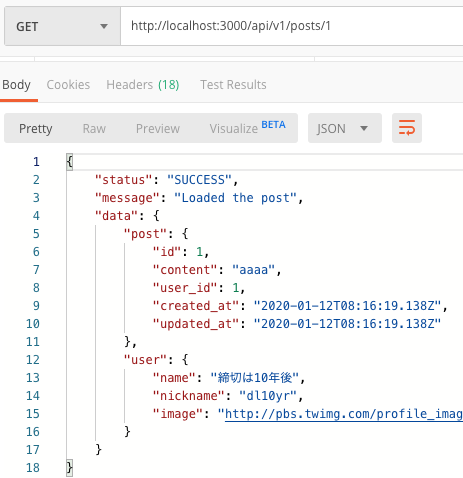
show
localhost:3000/api/v1/posts/1にGETすると、idが1のpostが返されます。
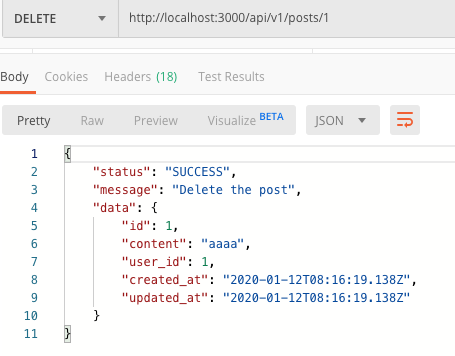
destroy
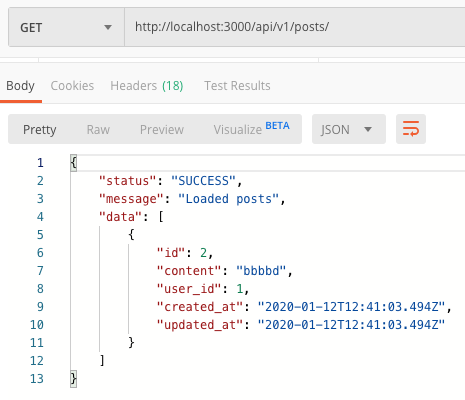
localhost:3000/api/v1/posts/1にDELETEすると、idが1のpostが消えます。
indexで確認すると、消えています。
- 投稿日:2020-01-12T21:03:51+09:00
Railsチュートリアルメモ - 第7章
第7章 ユーザー登録
7.1 ユーザーを表示する
ポイント
デバッグ
<%= debug(params) if Rails.env.development? %>で画面にデバッグ情報を表示できる。
if Rails.env.development?で開発環境のみに表示するよう制限している- コントローラー内にdebuggerを記載して画面を表示すると、rails serverを起動しているコンソールがコマンド待受け状態になり、debuggerが呼び出された状態のままでrails consoleの操作を実行できる
Sassのミックスイン
@mixin box_sizing {
  -moz-box-sizing:    border-box;
  -webkit-box-sizing: border-box;
  box-sizing:         border-box;
}
/* miscellaneous */
.debug_dump {
  clear: both;
  float: left;
  width: 100%;
  margin-top: 45px;
  @include box_sizing;
}
ルーティング
config/routes.rbにresourceを追加すると、名前付きルートが使用可能になり、RESTに従ったいくつかのURLが使用可能になるconfig/routes.rbRails.application.routes.draw do resources :users endGravatar
RailsというよりGravatarの使用方法の説明なので割愛
7.2 ユーザー登録フォーム
ポイント
form_forによるフォームの作成
.html.erb内でform_forを使用すると、フォームを生成してくれる
.html.erb
<%= form_for(@user) do |f| %>
...
<%= f.label :name %>
<%= f.text_field :name %>
...
<% end %>
↓
html<form action="/users" class="new_user" id="new_user" method="post"> ... <label for="user_name">Name</label> <input id="user_name" name="user[name]" type="text" /> ... </form>
- また、emailであれば、モバイル端末から入力フォームをタップすると、メールアドレスに最適化された特別なキーボードが表示される。passwordであれば、文字が隠蔽されて表示されるようにHTMLを生成してくれる。
- CSRF対策のトークンの生成も行ってくれる
paramsハッシュでの値の受け渡し
フォームで指定した値は
paramsというハッシュに保存されてコントローラーに渡されるルールになっている(チュートリアルでの説明があまりにさらっとしすぎていて、paramsがどこで定義されているのかわからず少し混乱した)7.3 ユーザー登録失敗
ポイント
Strong Parameters
マスアサインメント:
DB登録・更新で複数のカラムを一括で指定して登録すること。メソッドにハッシュを渡して更新カラムと値を指定する。
意図的に重要なカラムの値を書き換えられる危険性があるため、Strong Parametersというテクニックを使ってController層で対策することが推奨されている(かつてはModel層で対策していたらしい)params.require(:user).permit(:name, :email, :password, :password_confirmation)privateキーワード
クラス内で
privateと記載された後に記載された要素はprivate属性となる(外部クラスからは見えない)エラー表示
- Rails全般の慣習として、複数のビューで使われるパーシャルは専用のディレクトリ「shared」によく置かれる
- pluralizeメソッドによって、英語の単数系と複数形を良い感じに処理して表示してくれる
- e.g. 0 errors, 1 error, 2 errors
- Railsは、無効な内容の送信によって元のページに戻されると、CSSクラスfield_with_errorsを持ったdivタグでエラー箇所を自動的に囲んでくれる
- (エラー表示とは関係ないが、)
class form-controlを追加すると、BootstrapでフォームがきれいになるSassの@extend関数
@extendで特定の位置に属性を追加できる
.field_with_errors {
  @extend .has-error;
  .form-control {
    color: $state-danger-text;
  }
}
統合テスト
rails generate integration_test users_signupで統合テストの作成assert_no_difference, assert_difference
以下のように記載することで、ブロック内の実行前後で引き数が変化していないこと、変化していることを検証できる
assert_no_difference 'User.count' do

end
assert_difference 'User.count' do

end
assert_template
以下のように記載することで、意図どおりページが再描画されているかどうかを検証できる(エラーメッセージの表示によるDOMの差異は無視される?)
assert_template 'users/new'7.4 ユーザー登録成功
ポイント
redirect_to
コントローラーに以下のように記載すると、自動的に名前付きルート付きで解釈してくれる
    if @user.save
      redirect_to @user
    else
      render 'new'
    end
↓
    if @user.save
      redirect_to user_url(@user)
    else
      render 'new'
    end
flash変数
flash変数に代入したメッセージは、リダイレクトした直後のページでのみ表示できる(二回目は表示されない)
シンボル => 文字列の自動変換
Railsではシンボルをテンプレート(.html.erb)内に表示しようとすると、文字列に自動変換する
e.g. :success => "success"7.5 プロのデプロイ
ポイント
WebサーバPumaの導入
config/environments/production.rbのconfig.force_ssl = trueをコメントインすると、本番環境でのSSL化が有効になる- Rails4.2までは
config/puma.rbの手動作成が必要だったが、Rails5以降はデフォルトで作成済み- Procfileをプロジェクトルートに作成してherokuにgit pushすれば反映される
./Procfile
web: bundle exec puma -C config/puma.rb
- 投稿日:2020-01-12T20:05:05+09:00
【Rails】kaminariでページネーションを実装
基本
Gemfilegem 'kaminari'$ bundle installControllerdef hoge @users = User.page(params[:page]).per(10) endView<%= paginate @users %>日本語化
localeファイルを作り、以下を記述。
config/locales/kaminari_ja.ymlja: views: pagination: first: "« 最初" last: "最後 »" previous: "‹ 前" next: "次 ›" truncate: "..." helpers: page_entries_info: one_page: display_entries: zero: "" one: "<strong>1-1</strong>/1件中" other: "<strong>1-%{count}</strong>/%{count}件中" more_pages: display_entries: "<strong>%{first}-%{last}</strong>/%{total}件中"設定ファイルを作成
rails g kaminari:configconfig/initializer/kaminari_config.rbKaminari.configure do |config| config.default_per_page = 10 # config.max_per_page = nil # config.window = 4 # config.outer_window = 0 # config.left = 0 # config.right = 0 # config.page_method_name = :page # config.param_name = :page # config.params_on_first_page = false end
config.default_per_page = 10を設定することで、Controller内の.per(10)を省略できるようになります。(サーバーを再起動しないと反映されなかったので注意)
config/initializeやconfig/locales以下のファイルを変更した時は、再起動が必要見たいです。Controllerdef hoge @users = User.page(params[:page]) endその他のオプションに関してはこちらの記事を参照。
表示する項目を変更
rails g kaminari:views default
app/views/kaminari以下に7つのファイルが生成されます。
主となるファイルは_paginator.html.erbで、主にこのファイルを編集することになります。不要な項目を削除しましょう。API
@item.total_count #=> レコード総数
@item.offset_value #=> オフセット
@item.num_pages #=> 総ページ数
@item.per_page #=> 1ページごとのレコード数
@item.current_page #=> 現在のページ
@item.first_page? #=> 最初のページならtrue
@item.last_page? #=> 最後のページならtrue
◯位とかを表示したい
.each.with_indexと.offset_valueを組み合わせて実装。View<% @items.each.with_index(@items.offset_value + 1) do |value, index| %> <span><%= index %>位</span> <p><%= value.name %></p> <% end %>参考
- 投稿日:2020-01-12T19:09:34+09:00
おれ達のチートシート
- 投稿日:2020-01-12T19:09:34+09:00
おれらのチートシート
- 投稿日:2020-01-12T18:06:42+09:00
RailsのActiveStorageで画像が表示されずTypeError(no implicit conversion of nil into String)がでるようになった
状況
ローカルで開発していたアプリをDockerで構築し直していたらActiveStorageを使用して表示していた画像が表示されなくなった
ログを見ると以下のようにTypeError (no implicit conversion of nil into String)が発生してるStarted GET "/rails/active_storage ~ (省略)~ Processing by ActiveStorage::DiskController#show as PNG Parameters: {"content_type"=>"image/png", "disposition"=>"inline; ~(省略)~ Completed 500 Internal Server Error in 1ms (ActiveRecord: 0.0ms) TypeError (no implicit conversion of nil into String): rack (2.1.0) lib/rack/files.rb:25:in `expand_path' rack (2.1.0) lib/rack/files.rb:25:in `initialize'原因
最新版のRack(2.1.0)で変更された部分が原因
Rails “TypeError (no implicit conversion of nil into String)” when loading images using image_tag, activeStorage and “has_many_attached”
Rack 2.1.0 breaks ActiveStorage #1464解決策
次のマイナーアップデートで修正されるみたいですが取り急ぎはダウングレードすればよい
Gemfileを編集してGemfilegem 'rack', '~> 2.0.8'bundle updateで解決
- 投稿日:2020-01-12T16:48:06+09:00
デプロイする度にアップロードした画像が表示されなくなる問題への対処|Active Storage
Railsアプリケーションで、デプロイする度にアップロードした画像が表示されなくなる事象が発生したので、その時の解決策を残します。
Capistrano3で自動デプロイをしていて、画像のアップデートにはminimagickを使用。画像のアップロードに関することなので、Active Storageの設定を修正します。
共有フォルダに画像ファイルを保存し、デプロイ時にデータが上書きされないようにします。やることは2つだけです。
①Active Storageの画像の保存先を変更し、
②共有フォルダへシンボリックリンクを貼る。開発環境
・Rails 5.2.3
・Ruby 2.5.1
・ConoHa VPS
・CentOS 7.6
・Capistrano3
・Nginx
・Unicorn①Active Storageの画像保存先の変更
Active Storageの画像の保存先はstorage.ymlで設定します。
保存先がrootディレクトリ直下のstorageだったのを”public/storage”に変更します。
config/storage.ymllocal: service: Disk root: <%= Rails.root.join("public/storage") %> # 元は "storage"これでアップデート先が、/var/www/hoge_app/current/storageから、
/var/www/hoge_app/current/public/storageになりました。その結果、共有フォルダ(sharedフォルダ)にも画像ファイルが保存されます。
共有フォルダにファイルを入れておくことで、デプロイ時にファイルの上書きを避けることができます。②共有フォルダへシンボリックリンクを貼る
capistranoでデプロイをしているので、capistranoの設定を修正します。
画像ファイルが保存されている共有フォルダへ、デプロイ時にシンボリックリンクを貼る設定をします。
config/deproy.rbappend :linked_dirs, "log", "tmp/pids", "tmp/cache", "tmp/sockets", "vendor/bundle", "public/system", "public/storage" # “public/storage"を加えるこれでデプロイ時に/var/www/hoge_app/shared/public/storageへのシンボリックリンクが貼られます。
これで設定は完了です。
この設定にしてからアップロードした画像は、デプロイ後もきちんと表示されました。参考
https://railsguides.jp/active_storage_overview.html
https://lab.unicast.ne.jp/2015/07/02/capistrano3%E3%81%A7%E3%81%AFshared_children%E3%81%A7%E3%81%AF%E3%81%AA%E3%81%8Flinked_dir%E3%81%AB%E3%81%AA%E3%82%8A%E3%81%BE%E3%81%97%E3%81%9F%E3%80%82/
https://qiita.com/okjnag/items/ee55fd0f214466a4d3c8
https://qiita.com/hmmrjn/items/7cc5e5348755c517458a#active-storage-%E3%81%A8%E3%81%AF
- 投稿日:2020-01-12T15:25:41+09:00
Reactのreduxを用いたログイン処理周りの実装【初学者のReact✗Railsアプリ開発第4回】
やったこと
フロントエンド: React, バックエンド: Rails(APIモード)のアプリ開発における基本的なログイン処理周りの実装
- 未ログインなら、/loginにリダイレクト
- 確認中は「Loading」を表示させる
- Railsのログイン機能は、devise_auth_tokenを利用: 【Ruby on Rails】devise_token_authでTwitterログイン機能の実装
- ログイン中のユーザーの情報は、reduxを用いて状態管理する。
Rails
まずは、ログイン中のユーザーをjsonとして返すために、userコントローラーを作成します。
$ docker-compose run api rails g controller usersusers_controllermodule Api module V1 class UsersController < ApplicationController before_action :authenticate_api_v1_user! def currentuser @user = current_api_v1_user render json: { status: 'SUCCESS', message: 'Loaded the user', data: @user} end end end end
- current_userを使うと、簡単にログイン中のユーザーを返してくれる。ログインしてなかったら、エラーを返す。ルートのパスが/api/v1/user/なので、current_api_v1_userになる。
omniauth_callbacks_controllerdef render_data_or_redirect(message, data, user_data = {}) ##if Rails.env.production? コメントアウト! if ['inAppBrowser', 'newWindow'].include?(omniauth_window_type) render_data(message, user_data.merge(data)) # 通常、elsif内の処理が実行されるはず。 elsif auth_origin_url redirect_to DeviseTokenAuth::Url.generate(auth_origin_url, data.merge(blank: true)) else fallback_render data[:error] || 'An error occurred' end else # @resource.credentials = auth_hash["credentials"] ##render json: @resource, status: :ok コメントアウト! end end
- http://127.0.0.1:3000/api/v1/auth/twitter?auth_origin_url=localhost:8000 にアクセスすると、 「http://localhost:8000/?auth_token=XXX&blank=true&client_id=XXXX&config=&expiry=XXXX&uid=XXX 」にリダイレクトされるように処理が行われている。auth_tokenなどはreact側のAuth.js内でlocalstorageに保存される処理がされる。詳細は下に記載。
React
要約
- Routingでログインが必要なコンポーネントは、Authコンポーネントを経由させて出力させる。
- Authコンポネートで、未ログイン・ログイン済みを確認して、未ログインならリダイレクト、ログイン済みなら、パスのコンポーネントを表示させた上で、reduxのglobal stateにログイン中ユーザーの情報をセットする。
redux
なんで必要?
-> state管理(状態管理)を楽にするため。reduxが無いと、親から子、子から親などコンポーネント間のデータの受け渡しが必要であるが、reduxを使うと、一つの情報源に全てのコンポーネントが直接アクセスできる。今回はなぜ使った?
-> ログイン中ユーザーの情報はどのコンポーネントでも使いうるため、"Global State"として、全体で管理したかったから。App.js
App.jsimport React, { Component } from 'react'; import './App.css'; import Home from './containers/Home'; import Term from './containers/Term'; import Info from './containers/Info'; import Auth from './containers/Auth'; import Login from './containers/Login'; import { BrowserRouter, Route, Switch } from 'react-router-dom' class App extends Component { render() { return ( <div className="App"> <BrowserRouter> <Switch> <Route path="/login" component={Login} /> <Route path="/info" component={Info} /> <Route path="/term" component={Term} /> <Auth> <Route exact path="/" component={Home} /> </Auth> </Switch> </BrowserRouter> </div > ); } } export default App;Login.js
Login.jsimport React from 'react'; import PropTypes from 'prop-types'; import { withStyles } from '@material-ui/core/styles'; import Button from '@material-ui/core/Button'; const styles = theme => ({ }); class Login extends React.Component { loginTwitter() { window.location.href = process.env.REACT_APP_API127_URL + '/api/v1/auth/twitter?auth_origin_url=' + process.env.REACT_APP_BASE_URL; } render() { const { classes } = this.props; return ( <div className={classes.login}> <p>未ログイン</p> <Button variant="contained" color="secondary" onClick={this.loginTwitter}> Twitterで登録・ログイン </Button> </div> ) } } Login.propTypes = { classes: PropTypes.object.isRequired, }; export default withStyles(styles, { withTheme: true })(Login);
- ボタンをクリックすると、loginTwitter()が実行される。
- loginTwitter()では、以前、実装したように、http://127.0.0.1:3000/api/v1/auth/twitter?auth_origin_url=localhost:8000 にアクセスし、Rails側で処理され、ログイン処理後、localhost:8000/に戻ってくる。
Home.js
Home.jsimport React from 'react'; import PropTypes from 'prop-types'; import { withStyles } from '@material-ui/core/styles'; import Button from '@material-ui/core/Button'; const styles = theme => ({ home: { backgroundColor: "red", width: "50%" }, }); class Home extends React.Component { render() { const { classes } = this.props; return ( <div className={classes.home}> <p>ログイン済み</p> </div> ) } } Home.propTypes = { classes: PropTypes.object.isRequired, }; export default withStyles(styles, { withTheme: true })(Home);Auth.js
Auth.jsimport React from 'react'; import PropTypes from 'prop-types'; import { connect } from 'react-redux'; import { bindActionCreators } from 'redux'; import * as actions from '../actions'; import _ from 'lodash'; import { Redirect, Route } from 'react-router-dom' import "normalize.css"; import queryString from 'query-string'; import axios from 'axios'; const styles = theme => ({ }); class Auth extends React.Component { constructor(props) { super() this.state = { isLoading: true, } } componentDidMount() { let tokens = queryString.parse(_.get(this, "props.location.search")) if (!_.isEmpty(tokens.auth_token)) { localStorage.setItem('auth_token', tokens.auth_token) localStorage.setItem('client_id', tokens.client_id) localStorage.setItem('uid', tokens.uid) window.location.href = process.env.REACT_APP_BASE_URL } else { this.setState({ isLoading: true, }) const auth_token = localStorage.auth_token const client_id = localStorage.client_id const uid = localStorage.uid axios.get(process.env.REACT_APP_API_URL + '/api/v1/user/currentuser', { headers: { 'access-token': auth_token, 'client': client_id, 'uid': uid } }) .then((response) => { this.setState({ isLoading: false, isLoggedin: true, }); this.props.actions.setCurrentUserSuccess(response.data.data) }) .catch(() => { this.setState({ isLoading: false, isLoggedin: false, }); }); } } render() { const { CurrentUserReducer } = this.props; const isLoggedin = this.state.isLoggedin; const isLoading = this.state.isLoading; const { classes } = this.props; console.log(isLoading) if (isLoading) { return ( <div>loading</div> ) } else { if (isLoggedin) { return ( <Route children={this.props.children} /> ) } else { console.log(isLoading) return ( <Redirect to={'/login'} /> ) } } } } Auth.propTypes = { classes: PropTypes.object.isRequired, }; const mapState = (state, ownProps) => ({ CurrentUserReducer: state.CurrentUserReducer, }); function mapDispatch(dispatch) { return { actions: bindActionCreators(actions, dispatch), }; } export default connect(mapState, mapDispatch)(Auth);
- このコンポーネントのコードこそが、今回の記事のいちばん重要なポイント。
- componentDidmount()は、render後に実行される。初めのif文では、ログイン処理を行ってrails側から戻ってきているかどうかを判別。
- 先程、説明したように、rails側でログイン処理が終わると、devise_token_authでの認証に必要なtokenがクエリとしてURLに乗せられて、/に戻ってきます。if文ではqueryStringというモジュールで、URLの文字列を分析し、?auth_token="..."が存在しているかどうかを判定し、存在していたら、認証に必要なトークンなどをlocalstorageに保存しています。
- else内では、ログインしているかどうかを判定するために、rails側で先程実装したように、/api/v1/user/currentuserにアクセスして、ログインをしていたら、actionを発行して、reduxを使用して、global stateとして、CurrentUserReducerにログイン中のユーザー情報を保存するようにしています。
- localのstateとしては、isLoggedin(ログインしているかどうか)とisLoading(currentuserを確認中かどうか)を管理していて、これらを使って、Loadingを表示するか、そのままログイン済みユーザーのみ表示させたいコンポーネントへのアクセスを許可するか、/loginにリダイレクトするかを決めています。
- Reactのライフサイクルを理解しきっていないため、タイミングの調節が結構苦労しました。
redux
実装の概要
- index.jsでcreateStoreする、Providerで配る。
- reducers/rootReducer.jsで複数のreducerを管理している。
- actions/index.js内で、アクションの内容を記述している。(今回は、setCurrentUserSuccessしか使っていませんが...)
- reducers/CurrentUserReducer.js内でdispatchされたactionに対するstateの変更の記述をしている。
起こっていること
- Auth.js内のthis.props.actions.setCurrentUserSuccess(response.data.data)でactions/index.jsに対して、データが渡されて、actionのオブジェクトがcreateされる。
- createされたactionのオブジェクトはreducers/CurrentUserReducer.jsに渡されて、stateの変更が行われる。
index.js
index.jsimport React from 'react'; import ReactDOM from 'react-dom'; import './index.css'; import App from './App'; import { MuiThemeProvider } from '@material-ui/core/styles'; import { theme } from './materialui/theme' import { BrowserRouter as Router } from 'react-router-dom'; import createBrowserHistory from 'history/createBrowserHistory'; import { Provider } from 'react-redux'; import rootReducer from './reducers/rootReducer'; import thunk from 'redux-thunk' import logger from 'redux-logger' import { createStore, applyMiddleware, compose } from 'redux'; const history = createBrowserHistory(); const store = createStore( rootReducer, applyMiddleware(thunk, logger) ); ReactDOM.render( <Provider store={store}> <MuiThemeProvider theme={theme} > <Router> <App /> </Router> </MuiThemeProvider> </Provider > , document.getElementById('root'));actions/index.js
index.jsimport axios from 'axios' export const setCurrentUser = () => { return (dispatch) => { const auth_token = localStorage.auth_token const client_id = localStorage.client_id const uid = localStorage.uid return axios.get(process.env.REACT_APP_API_URL + '/api/v1/user/currentuser', { headers: { 'access-token': auth_token, 'client': client_id, 'uid': uid } }) .then(response => dispatch(setCurrentUserSuccess(response.data.data))) .catch(error => dispatch(setCurrentUserFailure(error))) }; } export const setCurrentUserRequest = () => ({ type: 'SET_CURRENTUSER_REQUEST', }) export const setCurrentUserSuccess = (json) => ({ type: 'SET_CURRENTUSER_SUCCESS', items: json, }) export const setCurrentUserFailure = (error) => ({ type: 'SET_CURRENTUSER_FAILURE', items: error, })reducers/CurrentUserReducer.js
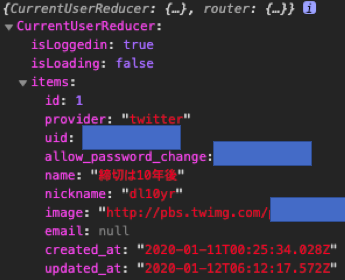
CurrentUserReducers.jsconst initialState = { isLoggedin: false, isLoading: false, items: [] }; const CurrentUserReducer = (state = initialState, action) => { switch (action.type) { case 'SET_CURRENTUSER_REQUEST': return { ...state, isLoggedin: false, isLoading: true, items: [], }; case 'SET_CURRENTUSER_SUCCESS': if (!action.items) { return { ...state, isLoggedin: false, isLoading: false, items: action.items, }; } else { return { ...state, isLoggedin: true, isLoading: false, items: action.items, }; } case 'SET_CURRENTUSER_FAILURE': return { ...state, isLoggedin: false, isLoading: false, error: action.error, }; default: return state; } }; export default CurrentUserReducer;reducers/rootReducer.js
rootReducer.jsimport { combineReducers } from 'redux' import { routerReducer } from 'react-router-redux' import CurrentUserReducer from './CurrentUserReducer' const rootReducer = combineReducers({ CurrentUserReducer, router: routerReducer, }) export default rootReducer

- 投稿日:2020-01-12T14:59:29+09:00
Railsチュートリアルメモ - 第6章
6.1 Userモデル
Active Recordの使用方法についての章。Active RecordはたぶんRailsの中で最も核となるライブラリ。
ポイント
- 以下コマンドでモデルを生成し、DBに反映できる
rails generate model User name:string email:stringrails db:migrate- Active Recordを使うことで、RailsからDBの詳細を隠蔽し、切り離すことができる。
- SQLについて学ばずにDBに対してCRUD操作を行える。
6.2 ユーザーを検証する
バリデーションの実装方法についての章。
ポイント
- テストクラスのsetupメソッド内に書かれた処理は、各テストが走る直前に実行される
- modelの検証でエラーになった内容は
user.errors.full_messagesで確認できる- %w[]で文字列の配列を作れる e.g.
%w[foo bar baz] => ["foo", "bar", "baz"]- callbackメソッド => ある特定の時点で呼び出されるメソッド
6.3 セキュアなパスワードを追加する
パスワードのハッシュ化保存の実装
ポイント
has_secure_passwordについて
- Railsでは
has_secure_passwordを記載するだけでパスワードのハッシュ化保存を実装できる(実際は別のライブラリを使うことが多いらしい)has_secure_passwordをモデルに記載するだけで実装できるが、使用するには以下2点を満たす必要がある
- モデルに
password_digest:stringを追加する必要がある- 'bcrypt'gemが必要なので、Gemfileに追記してbundle installしておく
has_secure_passwordを追加すると、authenticateメソッドが使えるようになるマイグレーション(カラムの追加)
rails generate migration add_password_digest_to_users password_digest:string
rails generate migrationで指定するマイグレーション名の最後に_to_usersを付与しておくと、usersテーブルへのカラム追加だと判断してファイルを作成してくれる。基本文法
- 多重代入 (Multiple Assignment)
- 次のような文法で2箇所に同時に同じ値を代入できる
@user.password = @user.password_confirmation = "a" * 5- モデルのvalidateの文法
validates :name, presence: true, length: { maximum: 50 }
- 投稿日:2020-01-12T14:39:15+09:00
Django Polymorphic Associations Tutorial
はじめに
私の記事Djangoが他のPolymorphicと挙動が異なる件
でDjangoのPolymorphicModelがいわゆるポリモーフィック関連と異なることを記事にしました。
今回は、「ではDjangoでポリモーフィック関連を実装するにはどうすのか」という点について解説します。環境
- Python 3.7.5
- Django 2.2.1
- SQLite
ゴール
RailsGuideのPolymorphicAssociationsの章では以下のようにポリモーフィック関連が実装されています。
class Picture < ApplicationRecord
  belongs_to :imageable, polymorphic: true
end

class Employee < ApplicationRecord
  has_many :pictures, as: :imageable
end

class Product < ApplicationRecord
  has_many :pictures, as: :imageable
end
これに以下のERのような属性を持たせたModelを実装することをゴールにします。
coontent_typeはどのテーブルと関連しているかを示し、object_idはどのレコードを関連しているかを示します。実装
モデル作成
from django.db import models
from django.contrib.contenttypes.models import ContentType


class Picture(models.Model):
    object_id = models.IntegerField(db_index=True)
    content_type = models.ForeignKey(ContentType, on_delete=models.CASCADE)
    file_name = models.CharField()


class Employee(models.Model):
    name = models.CharField()
    email = models.EmailField()


class Product(models.Model):
    name = models.CharField()
    price = models.IntegerField()
Imageableクラスの実装
from django.db import models
from django.contrib.contenttypes.fields import GenericRelation, GenericForeignKey
from django.contrib.contenttypes.models import ContentType


class Picture(models.Model):
    object_id = models.IntegerField(db_index=True)
    content_type = models.ForeignKey(ContentType, on_delete=models.CASCADE)
    file_name = models.CharField(max_length=256)
    content_object = GenericForeignKey('content_type', 'object_id')


class Imageable(models.Model):
    class Meta:
        abstract = True

    pictures = GenericRelation(Picture)


class Employee(Imageable):
    name = models.CharField(max_length=256)
    email = models.EmailField()


class Product(Imageable):
    name = models.CharField(max_length=256)
    price = models.IntegerField()
動作確認
# マイグレーション
$ python manage.py makemigrations polymorphic_associations
$ python manage.py migrate polymorphic_associations
$ python manage.py shell


# データ作成
>>> from polymorphic_associations.models import Employee, Product
>>>
>>> employee = Employee(name='John', email='test@example.com')
>>> employee.save()
>>> employee.pictures.create(file_name='employee.jpg')
<Picture: Picture object (1)>
>>>
>>> product = Product(name='Desk', price=1000)
>>> product.save()
>>> product.pictures.create(file_name='product.jpg')
<Picture: Picture object (2)>


# データ取得
>>> employee.pictures.all()
<QuerySet [<Picture: Picture object (1)>]>
>>> employee.pictures.first().file_name
'employee.jpg'
>>>
>>> product.pictures.all()
<QuerySet [<Picture: Picture object (2)>]>
>>> product.pictures.first().file_name
'product.jpg'


# SQL確認
>>> str(employee.pictures.all().query)
'SELECT
    "polymorphic_associations_picture"."id",
    "polymorphic_associations_picture"."object_id",
    "polymorphic_associations_picture"."content_type_id",
    "polymorphic_associations_picture"."file_name"
FROM
    "polymorphic_associations_picture"
WHERE
    (
        "polymorphic_associations_picture"."content_type_id" = 2
    AND "polymorphic_associations_picture"."object_id" = 1
    )'
>>>
>>> str(product.pictures.all().query)
'SELECT
    "polymorphic_associations_picture"."id",
    "polymorphic_associations_picture"."object_id",
    "polymorphic_associations_picture"."content_type_id",
    "polymorphic_associations_picture"."file_name"
FROM
    "polymorphic_associations_picture"
WHERE
    (
        "polymorphic_associations_picture"."content_type_id" = 3
    AND "polymorphic_associations_picture"."object_id" = 1
    )'
作成されたデータは、
content_type_id、object_idによってテーブル、レコードを特定できていることがわかります。
これによって画像をもつテーブルはすべてImageableを継承することで素早く実装することができます。また画像に関する処理をImageableに実装することで、ロジックが各モデルやサービスに分散することを防ぐことができます。
このソースコードはGitに上げてあります。参考

- 投稿日:2020-01-12T14:22:56+09:00
resourcesを多段階ネストさせた時のform_forメソッド
概要
resourcesを多段階ネストさせた時のform_forメソッドの使用方法に関する記事があまりなかったので、備忘録として纏めます。
スポット(Post)ごとに写真(Image)が投稿でき、写真ごとにコメント(Comment)が投稿できる旅行カタログアプリケーションを作成しております。
ビューはHamlで書いております。
作成途中のため、細かいところはご容赦くださいませ。
ルーティング
routes.rbresources :posts, only: [:index, :new, :create, :edit, :update] do resources :images, only: [:index, :new, :create, :show] do resources :comments, only: [:index, :create] end endコントローラ
1つ目のネストのimageは下記の通り。
images_controller.rbclass ImagesController < ApplicationController before_action :set_post def index @images = @post.images.includes(:user) end def new @image = Image.new end def create @image = @post.images.new(image_params) if @image.save redirect_to post_images_path(@post) else @images = @post.images.includes(:user) render :index end end private def image_params params.require(:image).permit(:text, :image).merge(user_id: current_user.id) end def set_post @post = Post.find(params[:post_id]) end end2つ目のネストのcommentは下記となる。
PostのIDを定義する必要があることに気付くのに時間がかかりました・・・comments_controller.rbclass CommentsController < ApplicationController before_action :set_image def index @post = Post.find(params[:post_id]) @comment = Comment.new @comments = @image.comments.includes(:user) end def create @post = Post.find(params[:post_id]) @comment = @image.comments.new(comment_params) if @comment.save redirect_to post_image_comments_path(@post, @image) else @comments = @image.comments.includes(:user) render :index end end private def comment_params params.require(:comment).permit(:content).merge(user_id: current_user.id) end def set_image @image = Image.find(params[:image_id]) end endモデル
image.rbclass Image < ApplicationRecord belongs_to :post belongs_to :user has_many :comments validates :image, presence: true endcomment.rbclass Comment < ApplicationRecord belongs_to :post belongs_to :user validates :content, presence: true endビュー
new-image.html.haml.new-image__form = form_for [@post, @image] do |f| = f.label :image, class: 'form__image' do = icon('fas', 'image', class: 'icon') = f.file_field :image, class: 'hidden' .new-image__form__mask = f.text_field :text, class: 'form__text', placeholder: 'type a caption' = f.submit 'Send', class: 'form__submit'new-comment.html.haml.comments__content__list__form = form_for [@post, @image, @comment ] do |f| .comments__content__list__form__new-comment .comments__content__list__form__new-comment__input-box = f.text_field :content, class: 'new-comment__input-box__text', placeholder: 'コメントを追加...', inputtype: "text", style:"border:none" = f.submit 'Send', class: 'new-comment__submit-btn'2段ネストした場合のform_forの引数は、親、子、孫の関係になるため、post, image, commentの3つを渡しています。
以上です
間違いあればご指摘お願いいたします!
- 投稿日:2020-01-12T14:13:07+09:00
#chat-space非同期通信の実装
chat-spaceというアプリを作成するときajaxを使用した非同期通信を実装したので復習も兼ねて初投稿します。
アプリの非同期通信の見本はこちら
chat-space非同期通信とは
サーバにHTML形式ではないリクエストを送信し、 HTMLのファイルを読み込まず(ページ遷移を行わず)に、サーバから取得したデータとJavascriptを用いることで、ページの一部分だけを更新することです。
今回はjQueryとRailsとjbuilderを用いたAjaxのコードで解説していきます。流れ
- chat-spaceでjQueryが使えるように設定し,jQuery を記述するためのファイルを作成する。
- フォームが送信されたら、イベントが発火するようにする。
- 非同期通信でメッセージを保存するようにする。
- respond_toを使用してHTMLとJSON形式で返す。
- jbuilderを使用して、作成したメッセージをJSON形式で返す。
- 返ってきたJSONをdoneメソッドで受け取り、HTMLを作成する。
- 6で作成したHTMLをメッセージ画面の一番下に追加する
- メッセージを送信したとき、メッセージ画面を最下部にスクロールする
- 連続で送信ボタンを押せるようにする
- エラー時の処理を行う。
1. chat-spaceでjQueryが使えるように設定し,jQuery を記述するためのファイルを作成します。
①gem 'jquery-rails'を導入し、bundle installして、chat-space上でjQueryを利用できるようにします。
・Gemfile から turbolinksの部分をコメントアウトし、bundle installを実行します。
turbolinksを停止させましょう

turbolinksとはgemとしてRailsアプリケーションに導入されている機能です。

具体的には、手作業でAjaxを導入しなくても、同じような機能を実現してくれる機能です。今回は開発の過程で手作業でAjaxを実装しているので、こちらのturbolinksは削除します。手作業で作成したAjaxとturbolinksが競合してしまい、うまく作動しない可能性があるためです。Gemfile# 省略 # Turbolinks makes navigating your web application faster. Read more: https://github.com/turbolinks/turbolinks # gem 'turbolinks', '~> 5' # コメントアウトする # 省略コメントアウトをしたら、bundle installを実行します。
②application.html.haml から turbolinks の関連部分を削除します。
application.html.haml!!! %html %head %meta{:content => "text/html; charset=UTF-8", "http-equiv" => "Content-Type"}/ %title ChatSpaceSample = csrf_meta_tags -# = stylesheet_link_tag 'application', media: 'all', 'data-turbolinks-track': 'reload' ← このオプションを消す -# = javascript_include_tag 'application', 'data-turbolinks-track': 'reload' ← このオプションを消す = stylesheet_link_tag 'application', media: 'all' = javascript_include_tag 'application' %body = render "layouts/notifications" = yield③ application.js から turbolinks の関連部分を削除します。
application.js// This is a manifest file that'll be compiled into application.js, which will include all the files // listed below. // // Any JavaScript/Coffee file within this directory, lib/assets/javascripts, vendor/assets/javascripts, // or any plugin's vendor/assets/javascripts directory can be referenced here using a relative path. // // It's not advisable to add code directly here, but if you do, it'll appear at the bottom of the // compiled file. JavaScript code in this file should be added after the last require_* statement. // // Read Sprockets README (https://github.com/rails/sprockets#sprockets-directives) for details // about supported directives. // //= require jquery //= require jquery_ujs //= require turbolinks ←この記述を消す //= require_tree .※上記だけでは、turbolinksを停止できない場合があります。
turbolinksの停止のさせ方は、今までの実装によって異なります。※turbolinksを削除する方法以外にも、jsファイルでtuborlinksを読み込むことで競合を避ける方法もあります。
④j Queryを記述するためのファイルを作成します。
Ruby on rails内では、JavaScriptファイルをassets/javascripts以下に作成します。app /assets / javascripts / message.js
2. フォームが送信されたら、イベントが発火するようにする。
message.js$(function(){ //from要素 //submitイベント $('#new_message').on('submit', function(e){ e.preventDefault() // console.logを用いてイベント発火しているか確認 }) }●解説
・フォームの要素を取得して、フォームが送信された時にon()メソッドを使ってイベントが動くようにします。フォームの要素を取得するには、メッセージ送信フォームのid属性をブラウザの検証ツールを使って調べます。・「on()」は、さまざまなイベント処理を記述するために使われるメソッドになります。一般的な構文としては以下の通りです。
対象要素.on(イベント名,セレクタ,データ,関数). event.preventDefauit();
preventDefalt()で送信ボタンによるフォーム送信処理をキャンセルします。
「イベント」とは、分かりやすい例で言うと、フォームのテキストエリアの入力やチェックボックスのチェック、リンクのクリックなどが挙げられます。
preventDefault()でイベントがキャンセルされると、テキストエリアの入力やチェックボックスのチェック、あるいはリンク先への遷移は行われません。console.logなどを用いて、フォームが送信されたときにイベントが発火しているかどうかを確認しておきましょう
3.非同期通信でメッセージを保存するようにする
フォームに入力されたデータを取得したら、必要なAjax関数のオプションを揃えて非同期通信を行います。
message.jsを以下のように編集します。message.js$(function(){ $('#new_message').on('submit', function(e) { e.preventDefault(); var formData = new FormData(this); //formDataを取得 var url = $(this).attr('action');//urlを取得 $.ajax({ url: url, //送信先のurl type: 'POST', //httpメソッド data: formData, //コントローラーへ送信するデータ dataType: 'json', //応答データの種類 processData: false, contentType: false, }) }) })●解説
var formData = new FormData(this);・formData
フォーム要素をjavaScriptのオブジェクトにしたもの。
input要素に入力した情報がjavaScriptのオブジェクトとしてキーとバリューとして表されます。
new FormData(フォーム要素)とすることでFormDataを作成できます。
今回FormDataオブジェクトの引数はthisとなっていますが、イベントで設定したfunction内でthisを利用した場合は、イベントが発生したノード要素を指します。今回の場合は、new_messageというIDがついたフォームの情報を取得しています。var url = $(this).attr('action');.attrメソッド
「attr()」は、HTML要素の属性を取得したり設定することができるメソッドになります。
述方法としては、【 対象要素.attr( 属性, (変更する値) ) 】のように引数へ任意の属性を指定します。また、属性を変更する場合のみ第2引数へ変更したい値を指定します。
今回はイベントが発生した要素のaction属性の値を取得しており、今回のaction属性にはフォームの送信先のurlの値が入っています。
これでリクエストを送信する先のURLを定義することができました。・processDataオプション
dataに指定したオブジェクトをクエリ文字列に変換するかどうかを設定します。初期値はtrueで、自動的に "application/x-www-form-urlencoded" 形式に変換します。DOMDocumentそのものなど、他の形式でデータを送るために自動変換を行いたくない場合はfalseを指定します。
・contentTypeオプション
サーバにデータのファイル形式を伝えるヘッダです。こちらはデフォルトでは「text/xml」でコンテンツタイプをXMLとして返してきます。
ajaxのリクエストがFormDataのときはどちらの値も適切な状態で送ることが可能なため、falseにすることで設定が上書きされることを防ぎます。FormDataをつかってフォームの情報を取得した時には必ずfalseにするという認識で構いません。Ajax関数のオプションの参考はこちら
4.メッセージを保存し、respond_toを使用してHTMLとJSONの場合で処理を分ける
messages_controller.rbdef create @message = @group.messages.new(message_params) if @message.save respond_to do |format| format.html {redirect_to group_messages_path, notice: 'メッセージを送信しました'} # HTMLリクエストの場合に呼ばれる format.json # JSONリクエストの場合に呼ばれる end # 一部省略.respond_to
respond_toを使うとリクエストに含まれているレスポンスのフォーマットを指定する記述を元に条件分岐ができます。
json形式で来たリクエストに対してjson形式のレスポンスを返すための記述を行います。この後、対応するcreate.json.jbuilderを作成することで、レスポンスをjson形式で返すことができます。5.builderを使用して、作成したメッセージをJSON形式で返すようにする。
. j builder
rails newコマンドでアプリケーションを作成した際にgemfileにデフォルトで記述されているgemで、入力データをJSON形式で出力するテンプレートエンジンです。
jbuilderは、viewと同じように該当するアクションと同じ名前にする必要があります。
messageのcreateアクションに対応するjbuilderのファイルになるので、views/messages以下にcreate.json.jbuilderファイルを作成しす。app /views / messages/ create.json.jbuilder
create.json.jbuilderのファイルを、決まった文法にそって記述します。JavaScriptで必要なmessageテーブルの情報を渡すようにしましょう。
create.json.jbuilder
json.カラム インスタンス変数.カラム

 json.カラム インスタンス変数.カラム

 ...
上記の文法で記述します。
app/views/messages/create.json.jbuilderjson.user_name @message.user.name json.created_at @message.created_at.strftime("%Y年%m月%d日 %H時%M分") json.content @message.content json.image @message.image_urlこれでjbuilderファイルが編集できました。
『リクエストの送信先が正しく設定できているか』と『送信したメッセージのテキストや画像がparamsとしてコントローラで受け取れているか』をbinding.pryで確認しましょう。
参考
.Pikawaka 【Rails】Pryについて徹底解説!
.pry-byebug 3.7.06. 返ってきたJSONをdoneメソッドで受け取り、HTMLを作成する。
非同期通信の結果として返ってくるデータは、
done(function(引数) { 処理 })の関数の引数で受け取ります。
この引数の値を元に、HTMLを組み立てます。message.jsfunction buildHTML(message) { //条件分岐 var image = message.image ?`<img src= "${message.image}">`:""; //messageのhtml var html = `<div class ="message" data-message-id="${message.id}"> <div class ="upper-message"> <div class ="upper-message__user-name"> ${message.user_name} </div> <div class ="upper-message__date"> ${message.date} </div> </div> <div class ="text-message"> <p class ="text-message__content"> ${content} </p> ${image} </div> </div>` return html; } $('#new_message').on('submit', function(e){ e.preventDefault(); var formData = new FormData(this); var url = $(this).attr('action') $.ajax({ url: url, type: "POST", data: formData, dataType: 'json', processData: false, contentType: false }) .done(function(data){ //返ってきたJSONを受け取る var html = buildHTML(data); }) }) });●解説
doneメソッドで受け取ったjsonのdataをそのままbuildHTMLメソッドに渡し、その返り値として完成したHTMLの塊を受け取っています。HTMLを組み立てる処理は以下のようなメソッドとして定義しましょう。条件(三項)演算子を使って画像がある場合とない場合で条件分岐して記述します。
JavaScriptの条件(三項)演算子は条件式? tureの処理 : falseの処理と記述します。【JavaScript入門】条件(三項)演算子の使い方と活用例まとめ!
また、追加したhtmlはテンプレートリテラル記法で記述します。
・テンプレートリテラル記法
ダブルクオートやシングルクオートの代わりにバックティック文字で囲むことで、複数行文字列や文字列内挿入機能を使用できます。
buildHTMLの引数として渡されたmessageはサーバから返されたデータであるjbuilderのデータであるため、ファイル内で定義したキーとバリューの形式で使用することができます。7. 6で作成したHTMLをメッセージ画面の一番下に追加する
message.js.done(function(data){ var html = buildHTML(data); $('.messages').append(html); //受け取ったHTMLを'.messages'クラスの一番最後に追加する $('form')[0].reset();//formを空にする })
.appendメゾット 対象の要素の末尾にテキストやHTML要素を追加するメソッド
受け取ったHTMLを、appendメソッドによって.messagesというクラスが適用されているdiv要素の子要素の一番最後に追加します。また、フォームを空にする処理も書きます。8.メッセージを送信したとき、メッセージ画面を最下部にスクロールする
メッセージが溜まってきて画面いっぱいになった時、メッセージが入っているdiv要素に
overflow: scroll;プロパティが指定できていれば、縦にスクロールできます。message.js$('.messages').animate({ scrollTop: $('.messages')[0].scrollHeight});// ページ先頭の位置に移動.animateメソッド
アニメーションを実装するためのメソッドで、オブジェクトの移動や、透過率などを変更することができます。
書き方は以下のようになります。$(function() { $(‘動かす要素名’).animate({ ‘動かすアニメーション名’: ‘動かす距離’ }); });.scrollTop
「scrollTop()」は、ブラウザの画面をスクロールした時の位置(スクロール量)を取得できるメソッドです。
()の中に座標を指定することで任意の場所に飛ぶことができます。.scrollHeight
overflowした画面上に表示されていないコンテンツを含む要素の内容の高さを表します。
どこの要素の高さを取得しているのかというと、$('.messages')[0]です。
メッセージクラスから生成されるjQueryオブジェクトは配列のように扱うことができるので、[0]と指定することで1番下の要素を取得します。9. 連続で送信ボタンを押せるようにする
message.jsにこちらの記述を追加します。
message.js$(".form__submit").prop("disabled", false);buttonタグなどのdisabled属性の切り替えを、jQueryのprop()によって切り替えます。
htmlの仕様でsubmitボタンを一度押したらdisabled属性というボタンが押せない属性が追加されます。
そのため、disabled属性をfalseにすることでdisabledが外れてボタンが有効になります。10. エラー時の処理を行う。
message.js.fail(function() { alert ('メッセージ送信に失敗しました'); });サーバーエラーの場合、failの関数が呼ばれます。
alert()メソッドとはアラートを出すメソッドです。
alert( 画面に表示させたい値 )
上記のように引数へ値を指定するだけで、任意の値をポップアップ表示させることができます。この値は、文字列や数値などさまざまな値を指定することが可能です。これで非同期通信の実装が完成しました。
最後に完成コードを載せます。
message.jsfunction buildHTML(message) { var image = message.image ?`<img src= "${message.image}">`:""; var html = `<div class ="message" data-message-id="${message.id}"> <div class ="upper-message"> <div class ="upper-message__user-name"> ${message.user_name} </div> <div class ="upper-message__date"> ${message.date} </div> </div> <div class ="text-message"> <p class ="text-message__content"> ${content} </p> ${image} </div> </div>` return html; } $('#new_message').on('submit', function(e){ e.preventDefault(); var formData = new FormData(this); var url = $(this).attr('action') $.ajax({ url: url, type: "POST", data: formData, dataType: 'json', processData: false, contentType: false }) .done(function(data){ var html = buildHTML(data); $('.messages').append(html); $("form")[0].reset(); $('input').prop('disabled', false); $('.messages').animate({scrollTop: $('.messages')[0].scrollHeight}); }) .fail(function() { alert("メッセージ送信に失敗しました"); }); });message_controller.rb# 一部省略 def create @message = @group.messages.new(message_params) if @message.save respond_to do |format| format.html { redirect_to group_messages_path(@group), notice: 'メッセージが送信されました' } format.json end else @messages = @group.messages.includes(:user) flash.now[:alert] = 'メッセージを入力してください。' render :index end end # 一部省略app/views/messages/create.json.jbuilderjson.user_name @message.user.name json.created_at @message.created_at.strftime("%Y年%m月%d日 %H時%M分") json.content @message.content json.image @message.image_url
- 投稿日:2020-01-12T13:45:02+09:00
mysql DB作成におけるメモ
ど忘れしていたので、個人的メモ。
rails db:createできない時は以下の4点を確認。
・mysql側にuserが作成されているか
・そのuserはpasswordがあるか
・database.ymlにusernameとpasswordの記載があるか
・そのuserは権限付与されているか
- 投稿日:2020-01-12T13:04:38+09:00
Rails超基本コマンドチートシート(モデル/ビュー/コントローラーの追加)
Ruby/Rails エンジニアとして働き始め2ヶ月ほど立ちますが、まだ Rails のコマンドを業務では使ったことがありませんのでほとんど忘れてしまっています。就職前に学習したので調べれば思い出せるとはいえ、この程度のコマンドならば、業務で必要になった時にわざわざ1つずつ調べるのは時間がかかりすぎます。
そこで、必要な時にサクッと思い出せるよう、チートシートとしてにまとめます。前提
各コマンドの意味や内容は割愛しますので、詳細は、 Rails ガイド(https://railsguides.jp/) などをお読みください。
モデル関連
モデル生成
モデルとマイグレーション生成する
$ rails generate model Name column_name:column_type例
$ rails generate model User name:string number:integerマイグレーション実行
マイグレーションを実行する
$ rails db:migrateカラム追加
$ rails generate migration AddColumunNameToModelName例
$ rails generate migration AddAccountIdToUsersコントローラー・ビュー関連
コントローラー生成
コントローラーとビューが生成する
$ rails generate controller Name action例
$ rails generate controllser Users index show new editStrongParameters
モデルのインスタンスにどのパラメーターを保存してよいかを指定する
1つのパラーメーターの場合
例
def create
  User.create(params[:name])
end
複数のパラメーターの場合
例
def create
  User.create(user_params)
end

private
def user_params
  params.permit(:name, :number)
end
ルーティング関連
テーブル名とアクション名を指定する
resource :table_name, only:[:action]
例
resources :users, only: [:index, :show, :new, :create, :edit, :update, :destroy]
まとめ
その他にも多用するコマンドがあれば、随時追加していきます
- 投稿日:2020-01-12T11:49:22+09:00
はじめてAWSでデプロイする方法⑥(EC2サーバーにAppをクローンしてアップロード)
前回までの記事
はじめてAWSでデプロイする方法①(インスタンスの作成)
はじめてAWSでデプロイする方法②(Elastic IPの作成と紐付け)
はじめてAWSでデプロイする方法③(AWSセキュリティグループの設定)
はじめてAWSでデプロイする方法④(EC2インスンタンスにSSHログイン)
はじめてAWSでデプロイする方法⑤(EC2の環境構築、Ruby, MySQL)EC2インスタンス(サーバー)を作成し、パブリックIPをElastic IPで固定。
一般ユーザーがアクセスできるように、セキュリティグループの設定を追加(入り口を作成)
IDとPWを使って、EC2にログインして、環境構築をしました。ざっくり説明すると、こんなところです。
今回はWEB AppをEC2インスタンスにアップロードしていきます。
WEB AppをEC2にクローンする
現段階
EC2サーバにアプリケーションのコードをクローンしようとしてもpermission deniedとエラーが出てしまいます。
原因
Githubから見てこの許可していないEC2インスタンスを拒否する
対策
EC2インスタンスのSSH公開鍵をGithubに登録する。
SSH鍵をGithubに登録すると、Githubはそれを認証してクローンを許可をだす
作業
EC2サーバのSSH鍵ペアを作成
- EC2にログイン
- キーペア作成のためコマンドを入力
[ec2-user@ip-172-31-23-189 ~]$ ssh-keygen -t rsa -b 40963.下記が表示されるので、エンターを押す
Enter file in which to save the key (/home/ec2-user/.ssh/id_rsa):4.さらにエンターを押す(2回)
Enter passphrase (empty for no passphrase):
Enter same passphrase again:
これで下記の表示ができれば、成功してます。
Your identification has been saved in /home/ec2-user/.ssh/id_rsa.
Your public key has been saved in /home/ec2-user/.ssh/id_rsa.pub.
The key fingerprint is:
3a:8c:1d:d1:a9:22:c7:6e:6b:43:22:31:0f:ca:63:fa ec2-user@ip-172-31-23-189
The key's randomart image is:
+--[ RSA 4096]----+
|    +            |
| . . =           |
|  = . o .        |
| * o . o         |
|= *     S        |
|.* +     .       |
|  * +            |
| .E+ .           |
| .o              |
+-----------------+
5.SSH公開鍵を表示し、値をコピーするため、下記コマンドを実装
[ec2-user@ip-172-31-23-189 ~]$ cat ~/.ssh/id_rsa.pub6.catで表示させた公開鍵(長いテキスト)をコピー
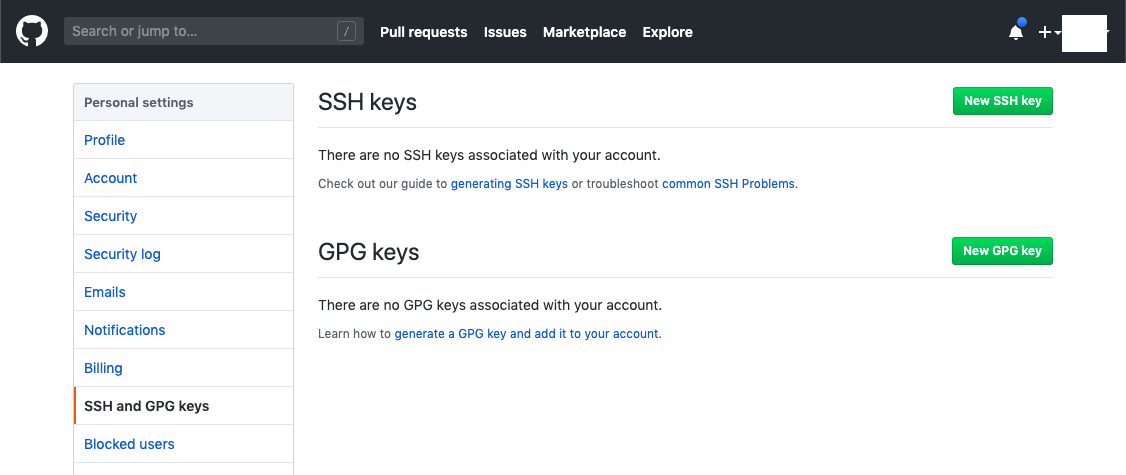
コピーした公開鍵をGithubにアクセスして登録する
2. 画面右上の緑色の『 NEW SSH KEY 』をクリック
3. タイトルを記入する(なんでも可能)
4. 公開鍵(ssh-rsaから)を貼り付け
エラー「Key is invalid. You must supply a key in OpenSSH public key format」が表示された場合、
貼り付けたコードに『 ssh-rsa 』が含まれているかご確認ください
5. 『 Add SSH KEY 』をクリックして保存。
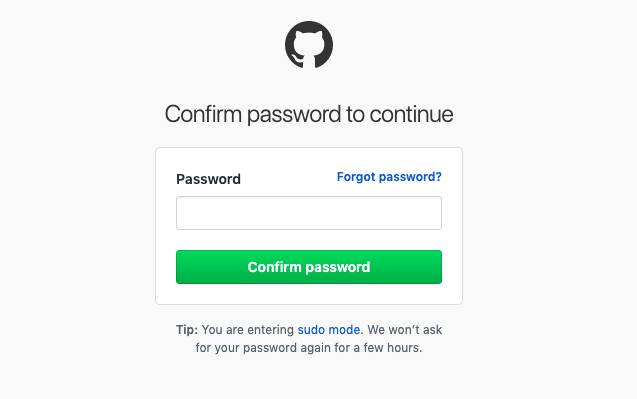
6. GithubのPWを入力
7. 完了
8. 登録できているか確認[ec2-user@ip-172-31-23-189 ~]$ ssh -T git@github.com下記の表示が出た場合: 『 yes 』を選択
The authenticity of host 'github.com (IP ADDRESS)' can't be established.
RSA key fingerprint is 16:27:ac:a5:76:28:2d:36:63:1b:56:4d:eb:df:a6:48.
Are you sure you want to continue connecting (yes/no)?
この際に
Warning: Permanently added the RSA host key for IP address '52.111.11.11' to the list of known hosts.と表示された場合は, EC2に入り直しましょう。更新されたのでエラーなく入れます。
成功すると、下記の表示になるはずです。または、下記が表示された場合: 『 yes 』を選択
The authenticity of host 'github.com (IP ADDRESS)' can't be established.
RSA key fingerprint is SHA256:nThbg6kXUpJWGl7E1IGOCspRomTxdCARLviKw6E5SY8.
Are you sure you want to continue connecting (yes/no)?
成功すると下記の表示が出る
[ec2-user@ip-172-31-23-189 ~]$ ssh -T git@github.com Hi <Githubユーザー名>! You've successfully authenticated, but GitHub does not provide shell access.App側でUnicornのインストール
EC2にGit クローンする前に、準備としてUnicornをインストールさせましょう
Gemfileにgem'unicorn'を追加Gemfile.group :production do gem 'unicorn', '5.4.1' endbundle installでインストール
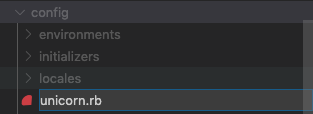
$ bundle installconfig/unicorn.rbを作成
追加したunicorn.rbに下記を記述unicorn.rbapp_path = File.expand_path('../../', __FILE__) #アプリケーションサーバの性能を決定する worker_processes 1 #アプリケーションの設置されているディレクトリを指定 working_directory app_path #Unicornの起動に必要なファイルの設置場所を指定 pid "#{app_path}/tmp/pids/unicorn.pid" #ポート番号を指定 listen 3000 #エラーのログを記録するファイルを指定 stderr_path "#{app_path}/log/unicorn.stderr.log" #通常のログを記録するファイルを指定 stdout_path "#{app_path}/log/unicorn.stdout.log" #Railsアプリケーションの応答を待つ上限時間を設定 timeout 60 #以下は応用的な設定なので説明は割愛 preload_app true GC.respond_to?(:copy_on_write_friendly=) && GC.copy_on_write_friendly = true check_client_connection false run_once = true before_fork do |server, worker| defined?(ActiveRecord::Base) && ActiveRecord::Base.connection.disconnect! if run_once run_once = false # prevent from firing again end old_pid = "#{server.config[:pid]}.oldbin" if File.exist?(old_pid) && server.pid != old_pid begin sig = (worker.nr + 1) >= server.worker_processes ? :QUIT : :TTOU Process.kill(sig, File.read(old_pid).to_i) rescue Errno::ENOENT, Errno::ESRCH => e logger.error e end end end after_fork do |_server, _worker| defined?(ActiveRecord::Base) && ActiveRecord::Base.establish_connection endproduction.rbを開き、下記の記述をコメントアウトする
config/environments/production.rbconfig.assets.js_compressor = :uglifierconfig/environments/production.rb#config.assets.js_compressor = :uglifierアプリケーションの保存先となるディレクトリを作成
ディレクトリの作成
#/var/wwwディレクトリを作成(後述するCapistranoの初期値がwwwなので、ディレクトリをwwwに設定しています)
[ec2-user@ip-172-31-23-189 ~]$ sudo mkdir /var/www/
作成したディレクトリをchownコマンドで権限設定
#作成したwwwディレクトリの権限をec2-userに変更
[ec2-user@ip-172-31-23-189 ~]$ sudo chown ec2-user /var/www/
作成したディレクトリに移行
[ec2-user@ip-172-31-23-189 ~]$ cd /var/www/git clone でAppをEC2にダウンロード
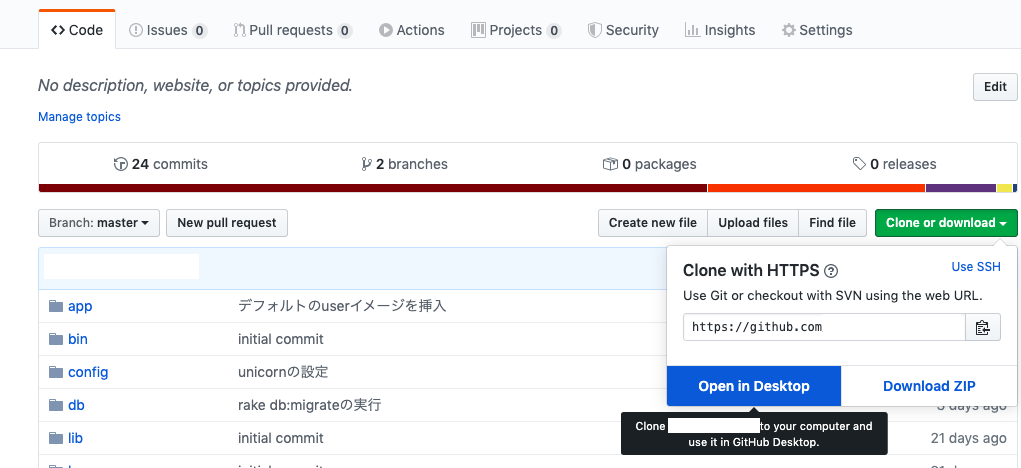
GithubからGit cloneするためのリポジトリURLを取得
git clone で作成したディレクトリにappをクローン
[ec2-user@ip-172-31-23-189 www]$ git clone リポジトリURLGithubのアカウント名とPWを入力し、
ダウロードが開始されるremote: Enumerating objects: 298, done. remote: Counting objects: 100% (298/298), done. remote: Compressing objects: 100% (190/190), done. remote: Total 298 (delta 109), reused 274 (delta 86), pack-reused 0 Receiving objects: 100% (298/298), 58.53 KiB | 365.00 KiB/s, done. Resolving deltas: 100% (109/109), done.完了
これで、EC2にAppがクローンされています。
次回はEC2にgemをインストールと設定の変更


- 投稿日:2020-01-12T08:53:16+09:00
Rspec の expect と with で ネストの深いハッシュや引数をゆるくテストする / #Ruby #Rspec #Rails
Complexed hash fuzzy match
  example 'complexed match' do
    expect(SomeClass).to receive(:call).with(
      'X',
      hash_including(
        y1: 'Y1',
        y2: (be_a String),
        y4: hash_including(
          y4_1: array_including(1, 3),
          y4_3: contain_exactly(9, 7, 8),
        )
      ),
      any_args
    )
    subject
  end
Example
# Doc
# https://relishapp.com/rspec/rspec-mocks/v/3-2/docs/setting-constraints/matching-arguments

class SomeClass
  def self.call(x, y, z)
  end
end

describe 'simple case' do
  subject do
    SomeClass.call('X','Y','Z')
  end

  it 'calls with exactly multiple args' do
    expect(SomeClass).to receive(:call).with('X', 'Y', 'Z')
    subject
  end
end

describe 'complexed case' do
  subject do
    SomeClass.call(
      'X',
      {
        y1: 'Y1',
        y2: 'Y2',
        y3: 'Y3',
      },
      'Z'
    )
  end

  example 'exactly match' do
    expect(SomeClass).to receive(:call).with(
      'X',
      {
        y1: 'Y1',
        y2: 'Y2',
        y3: 'Y3',
      },
      'Z'
    )
    subject
  end

  it 'partly match with hash in one arg' do
    expect(SomeClass).to receive(:call).with(
      'X',
      hash_including(
        y1: 'Y1',
        y2: 'Y2',
      ),
      'Z'
    )
    subject
  end
end

describe 'random value case' do
  subject do
    SomeClass.call(
      'X',
      {
        y1: 'Y1',
        y2: rand(999_999).to_s,
        y3: rand(999_999),
      },
      'Z'
    )
  end

  example 'fuzzy match on one arg' do
    expect(SomeClass).to receive(:call).with(
      'X',
      any_args,
      'Z'
    )
    subject
  end

  example 'exactly match and expect anything value' do
    expect(SomeClass).to receive(:call).with(
      'X',
      {
        y1: anything,
        y2: anything,
        y3: anything,
      },
      'Z'
    )
    subject
  end

  example 'exactly match and expect anything value' do
    expect(SomeClass).to receive(:call).with(
      'X',
      {
        y1: (be_a String),
        y2: (be_a String),
        y3: (be_a Integer),
      },
      'Z'
    )
    subject
  end

  example 'partly fuzzy match' do
    expect(SomeClass).to receive(:call).with(
      'X',
      hash_including(
        y1: 'Y1',
        y2: (be_a String),
      ),
      any_args
    )
    subject
  end
end

describe 'deep conplexed case' do
  subject do
    SomeClass.call(
      'X',
      {
        y1: 'Y1',
        y2: rand(999_999).to_s,
        y3: rand(999_999),
        y4: {
          y4_1: [1,2,3],
          y4_2: [4,5,6],
          y4_3: [7,8,9],
        }
      },
      'Z'
    )
  end

  example 'complexed match' do
    expect(SomeClass).to receive(:call).with(
      'X',
      hash_including(
        y1: 'Y1',
        y2: (be_a String),
        y4: hash_including(
          y4_1: array_including(1, 3),
          y4_3: contain_exactly(9, 7, 8),
        )
      ),
      any_args
    )
    subject
  end
end

# $ rspec -fd /Users/yumainaura/.ghq/github.com/YumaInaura/YumaInaura/rspec/with.rb

# simple case
#   calls with exactly multiple args

# complexed case
#   exactly match
#   partly match with hash in one arg

# random value case
#   fuzzy match on one arg
#   exactly match and expect anything value
#   exactly match and expect anything value
#   partly fuzzy match

# more conplexed case
#   complexed match

# Finished in 0.01357 seconds (files took 0.15283 seconds to load)
# 8 examples, 0 failures
Ref
Matching arguments - Setting constraints - RSpec Mocks - RSpec - Relish
https://relishapp.com/rspec/rspec-mocks/v/3-2/docs/setting-constraints/matching-arguments#basic-example
Ref
使えるRSpec入門・その2「使用頻度の高いマッチャを使いこなす」 - Qiita
https://qiita.com/jnchito/items/2e79a1abe7cd8214caa5Original by Github issue
