- 投稿日:2019-12-04T23:46:46+09:00
MacのTouch Barで部屋の電球の色をすま〜とに変える
デモです
— 青いエンジニア? (@itmono_sakuraya) December 4, 2019— 青いエンジニア? (@itmono_sakuraya) December 4, 2019Philips Hue
スマートライトというやつです。
フルカラーLEDのタイプは1600万色以上に制御できます。
通常のタイプは普通の白色、蛍光色のみです。
操作は専用のアプリから行えたり
スマートスピーカーと連携して声で操作したり、
APIも公開されているので自由にインテグレーションが可能です。APIを触ってみる
APIにはローカルとリモートの2種類があります。
基本的にhueはブリッジを通してプライベートIPでローカルLAN内からアクセスするようになっています。
ブリッジのIPアドレスはアプリまたはここにアクセスすると表示されます。IPアドレスがわかったら以下のコンソールからAPIを試すことができます。
http://x.x.x.x/debug/clip.html公式の Get Started にやり方は書いてあるので詳しくは書きませんが、こんな感じのノリです。
ライト1をonにする
curl -X PUT x.x.x.x/api/your_user_name/lights/1/state -d '{"on": true}'ライト2を赤にする
curl -X PUT x.x.x.x/api/your_user_name/lights/2/state -d '{"hue": 0}'ライト3を任意のHSVにする
curl -X PUT x.x.x.x/api/your_user_name/lights/2/state -d '{"hue": 12403, "bri": 200, "sat": 150}'アプリケーションの登録を行えば、LAN外からもリモートAPIとして接続することが可能です。
ただ導入のダイジェスト認証がちょっとややこしいので注意が必要。
そしてラグが体感3~5秒くらいあります。返ってこないこともしばしば。安定性は疑問です。今回のようなリアルタイム性が求められる場合はローカル一択です。
色味について
hueのパラメータ指定では、われわれになじみ深いRGBではなく、HSV色空間を使用します。
HSVモデル(英: HSV model)は色相(Hue)、彩度(Saturation・Chroma)、明度(Value・Brightness)の三つの成分からなる色空間。HSB色空間(Hue、Saturation、Brightness)とも言われる。HLS色空間(Hue、Saturation、Lightness)とよく似ている。
環状のHSV色空間
・色相 - 色の種類(例えば赤、青、黄色)。0 - 360の範囲(アプリケーションによっては0 - 100 % に正規化されることもある)。
・彩度 - 色の鮮やかさ。0 - 100 % の範囲。刺激純度と colorimetric purity の色彩的な量と比較して「純度」などともいう。色の彩度の低下につれて、灰色さが顕著になり、くすんだ色が現れる。また彩度の逆として「desaturation」を定義すると有益である。
・明度 - 色の明るさ。0 - 100 % の範囲。Wikipediaより
hueは0~65535(0, 65535が赤、25500が緑、46920が青)、
briとsatは0~254が有効な指定範囲となります。HSVの計算はちょっとややこしいです。
計算ツールがあったりするんですが(RGBとHSLの相互変換ツールと変換計算式)、
hue用に正規化しないといけないので一手間かかります。
すま〜とに色味を変える
普段の生活ではGoogle Home か Echo dot から操作することが多いです。
ベッドの上から「OK Google、電気消して」みたいな使い方は非常に快適です。
ちょっと目が疲れているときは「OK Google, ライト50%にして」と言って明度を落としたりしてます。ただ、これでもまだ すま〜と ではない気がします。
自分も一エンジニアとしてハックしてみたいという衝動に駆られました。そうだ、
Touch Barで操作しよう。
インターフェース
どうやってるの
TouchBarのカスタマイズはBetterTouchToolで行なっています。
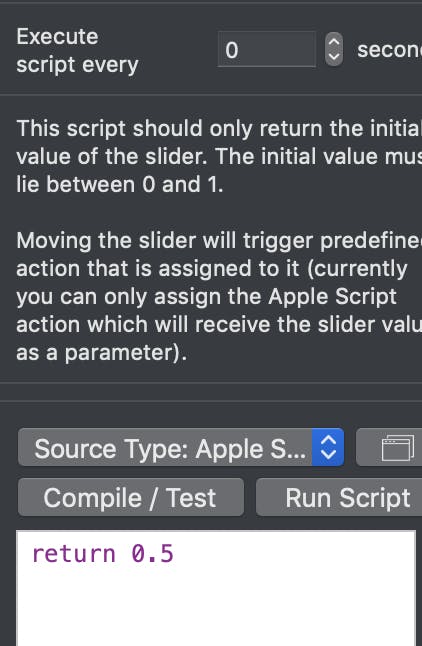
Custom Apple Script Slider というウィジェットがあり、そこから入力値を受け取って、Apple ScriptからAPIを叩いています。on bttWidgetSliderMoved(sliderValue) set hue to round(sliderValue * 65535) set body to "'{\"hue\":" & hue & "}'" do shell script "curl -X PUT 192.168.10.100/api/user_name/lights/1/state -d " & body return sliderValue end bttWidgetSliderMovedスクリプトはこんな感じ。
sliderValueは0~1の範囲なので正規化する。
do shell scriptを使ってcurl叩く。地味に苦労したこと
- 指定したスクリプトが実行されない
これは BetterTouchTool 側の問題っぽくて、アクションに指定するスクリプトを最初はscptファイルとしてアップロードしていたんですが、時折動作してない感がありました。また、直接記述するようにアクションを変更したものの、アップロードされたファイルの方が残り続けるみたいな謎現象にも遭遇し、最終的にウィジェットを削除して一からベタ書きするように修正しました
- sliderが勝手に0に戻る
動かした後に勝手に0に戻る事象が発生しました。
ウィジェットの方の return value を設定して、アクションの方でも最後にreturn sliderValueとすることで滑らかに動くようになりました。
余談
先日養老の滝ハッカソンでhueを使ったんですが、
こいつ、ブリッジ付きのやつは有線LANでWifiルーターと接続しなきゃいけないので、
クレードル付きのを新宿までレンタルしにいく羽目になりました。現在は Bluetooth 対応タイプが発売されています。
家で使う分にも絶対こっちの方がいいです。その時作ったやつです。
#yorohack 指ぱんっちんでオーダーww pic.twitter.com/cLQ4cYdGlJ
— 菅原のびすけ (@n0bisuke) October 27, 2019


- 投稿日:2019-12-04T15:13:49+09:00
xcodebuildコマンドのエラーまとめ
はじめに
私は今、iOSの個人アプリでCI/CD環境を構築している最中です。
xcodebuildコマンドをトライアンドエラーで実行しており、発生したエラーと解決策を備忘録として残します。環境
- OS:macOS Catalina 10.15.1
- Xcode:11.2.1
xcodebuildコマンドのエラー
Xcodeプロジェクトが存在しない
  xcodebuild -sdk iphonesimulator -configuration Debug build
  shell: /bin/bash -e {0}
Build settings from command line:
    SDKROOT = iphonesimulator13.1

xcodebuild: error: The directory {フォルダパス} does not contain an Xcode project.

##[error]Process completed with exit code 66.
原因
Xcodeプロジェクトが存在しないためです。解決策
Xcodeプロジェクトを作成します。テストアクションでスキームを指定していない
  xcodebuild -sdk iphonesimulator -configuration Debug clean test
  shell: /bin/bash -e {0}
Build settings from command line:
    SDKROOT = iphonesimulator13.1

xcodebuild: error: The test action requires that the name of a scheme in the project is provided using the "-scheme" option. The "-list" option can be used to find the names of the schemes in the project.
##[error]Process completed with exit code 65.
原因
スキームを指定していないためです。
テストアクションではスキームの指定が必須です。解決策
-scheme {スキーム名}オプションを追加します。デスティネーションを指定していない
  xcodebuild -scheme {スキーム名} -sdk iphonesimulator -configuration Debug clean test
  shell: /bin/bash -e {0}
Build settings from command line:
    SDKROOT = iphonesimulator13.1

note: Using new build system

** CLEAN SUCCEEDED **

xcodebuild: error: Failed to build project {プロジェクト名} with scheme {スキーム名}.
    Reason: A build only device cannot be used to run this target.
    Recovery suggestion: No supported devices are available running a compatible version of iOS Simulator. Connect a device with a newer version of iOS Simulator in order to run your application (or choose a simulated device as the destination).
##[error]Process completed with exit code 70.
原因
(おそらく)デスティネーションを指定していないためです。解決策
-destination '{プラットフォームなど}'オプションを追加します。
私は-destination 'platform=iOS Simulator'を指定しました。
※後述しますが、上記のデスティネーションは存在しないためエラーとなります。デスティネーションの指定に誤りがある
  xcodebuild -scheme {スキーム名} -sdk iphonesimulator -configuration Debug -destination 'platform=iOS Simulator' clean test
  shell: /bin/bash -e {0}
Build settings from command line:
    SDKROOT = iphonesimulator13.1

xcodebuild: error: Unable to find a destination matching the provided destination specifier:
        { platform:iOS Simulator }

    Missing required device specifier option.
    The device type “iOS Simulator” requires that either “name” or “id” be specified.
    Please supply either “name” or “id”.

    Available destinations for the "{スキーム名}" scheme:
        { platform:iOS Simulator, id:XXXXXXXX-XXXX-XXXX-XXXX-XXXXXXXXXXXX, OS:13.1, name:iPad Air (3rd generation) }
        { platform:iOS Simulator, id:XXXXXXXX-XXXX-XXXX-XXXX-XXXXXXXXXXXX, OS:13.1, name:iPad Pro (9.7-inch) }
        { platform:iOS Simulator, id:XXXXXXXX-XXXX-XXXX-XXXX-XXXXXXXXXXXX, OS:13.1, name:iPad Pro (11-inch) }
        { platform:iOS Simulator, id:XXXXXXXX-XXXX-XXXX-XXXX-XXXXXXXXXXXX, OS:13.1, name:iPad Pro (12.9-inch) (3rd generation) }
        { platform:iOS Simulator, id:XXXXXXXX-XXXX-XXXX-XXXX-XXXXXXXXXXXX, OS:13.1, name:iPhone 8 }
        { platform:iOS Simulator, id:XXXXXXXX-XXXX-XXXX-XXXX-XXXXXXXXXXXX, OS:13.1, name:iPhone 8 Plus }
        { platform:iOS Simulator, id:XXXXXXXX-XXXX-XXXX-XXXX-XXXXXXXXXXXX, OS:13.1, name:iPhone 11 }
        { platform:iOS Simulator, id:XXXXXXXX-XXXX-XXXX-XXXX-XXXXXXXXXXXX, OS:13.1, name:iPhone 11 Pro }
        { platform:iOS Simulator, id:XXXXXXXX-XXXX-XXXX-XXXX-XXXXXXXXXXXX, OS:13.1, name:iPhone 11 Pro Max }

    Ineligible destinations for the "{スキーム名}" scheme:
        { platform:iOS, id:dvtdevice-DVTiPhonePlaceholder-iphoneos:placeholder, name:Generic iOS Device }
        { platform:iOS Simulator, id:dvtdevice-DVTiOSDeviceSimulatorPlaceholder-iphonesimulator:placeholder, name:Generic iOS Simulator Device }
##[error]Process completed with exit code 70.
原因
指定したデスティネーションが存在しないためです。解決策
指定したスキームで使えるデスティネーションを指定します。
私は-destination 'platform=iOS Simulator, name:iPhone 11 Pro Max'を指定しました。
※後述しますが、デスティネーションのフォーマットに誤りがあるためエラーとなります。デスティネーションのフォーマットに誤りがある
  xcodebuild -scheme {スキーム名} -sdk iphonesimulator -configuration Debug -destination 'platform=iOS Simulator, name:iPhone 11 Pro Max' clean test
  shell: /bin/bash -e {0}
xcodebuild: error: unreadable input ' name:iPhone 11 Pro Max' at end of value for option 'Destination'

Usage: xcodebuild [-project <projectname>] [[-target <targetname>]...|-alltargets] [-configuration <configurationname>] [-arch <architecture>]... [-sdk [<sdkname>|<sdkpath>]] [-showBuildSettings [-json]] [<buildsetting>=<value>]... [<buildaction>]...
       xcodebuild [-project <projectname>] -scheme <schemeName> [-destination <destinationspecifier>]... [-configuration <configurationname>] [-arch <architecture>]... [-sdk [<sdkname>|<sdkpath>]] [-showBuildSettings [-json]] [-showdestinations] [<buildsetting>=<value>]... [<buildaction>]...
       xcodebuild -workspace <workspacename> -scheme <schemeName> [-destination <destinationspecifier>]... [-configuration <configurationname>] [-arch <architecture>]... [-sdk [<sdkname>|<sdkpath>]] [-showBuildSettings] [-showdestinations] [<buildsetting>=<value>]... [<buildaction>]...
       xcodebuild -version [-sdk [<sdkfullpath>|<sdkname>] [-json] [<infoitem>] ]
       xcodebuild -list [[-project <projectname>]|[-workspace <workspacename>]] [-json]
       xcodebuild -showsdks [-json]
       xcodebuild -exportArchive -archivePath <xcarchivepath> [-exportPath <destinationpath>] -exportOptionsPlist <plistpath>
       xcodebuild -exportNotarizedApp -archivePath <xcarchivepath> -exportPath <destinationpath>
       xcodebuild -exportLocalizations -localizationPath <path> -project <projectname> [-exportLanguage <targetlanguage>...[-includeScreenshots]]
       xcodebuild -importLocalizations -localizationPath <path> -project <projectname>
       xcodebuild -resolvePackageDependencies [-project <projectname>|-workspace <workspacename>] -clonedSourcePackagesDirPath <path>
       xcodebuild -create-xcframework [-help] [-framework <path>] [-library <path> [-headers <path>]] -output <path>

Options:
    -usage                                                   print brief usage
    -help                                                    print complete usage
    -verbose                                                 provide additional status output
    -license                                                 show the Xcode and SDK license agreements
    -checkFirstLaunchStatus                                  Check if any First Launch tasks need to be performed
    -runFirstLaunch                                          install packages and agree to the license
    -project NAME                                            build the project NAME
    -target NAME                                             build the target NAME
    -alltargets                                              build all targets
    -workspace NAME                                          build the workspace NAME
    -scheme NAME                                             build the scheme NAME
    -configuration NAME                                      use the build configuration NAME for building each target
    -xcconfig PATH                                           apply the build settings defined in the file at PATH as overrides
    -arch ARCH                                               build each target for the architecture ARCH; this will override architectures defined in the project
    -sdk SDK                                                 use SDK as the name or path of the base SDK when building the project
    -toolchain NAME                                          use the toolchain with identifier or name NAME
    -destination DESTINATIONSPECIFIER                        use the destination described by DESTINATIONSPECIFIER (a comma-separated set of key=value pairs describing the destination to use)
    -destination-timeout TIMEOUT                             wait for TIMEOUT seconds while searching for the destination device
    -parallelizeTargets                                      build independent targets in parallel
    -jobs NUMBER                                             specify the maximum number of concurrent build operations
    -maximum-concurrent-test-device-destinations NUMBER      the maximum number of device destinations to test on concurrently
    -maximum-concurrent-test-simulator-destinations NUMBER   the maximum number of simulator destinations to test on concurrently
    -parallel-testing-enabled YES|NO                         overrides the per-target setting in the scheme
    -parallel-testing-worker-count NUMBER                    the exact number of test runners that will be spawned during parallel testing
    -maximum-parallel-testing-workers NUMBER                 the maximum number of test runners that will be spawned during parallel testing
    -dry-run                                                 do everything except actually running the commands
    -quiet                                                   do not print any output except for warnings and errors
    -hideShellScriptEnvironment                              don't show shell script environment variables in build log
    -showsdks                                                display a compact list of the installed SDKs
    -showdestinations                                        display a list of destinations
    -showTestPlans                                           display a list of test plans
    -showBuildSettings                                       display a list of build settings and values
    -list                                                    lists the targets and configurations in a project, or the schemes in a workspace
    -find-executable NAME                                    display the full path to executable NAME in the provided SDK and toolchain
    -find-library NAME                                       display the full path to library NAME in the provided SDK and toolchain
    -version                                                 display the version of Xcode; with -sdk will display info about one or all installed SDKs
    -enableAddressSanitizer YES|NO                           turn the address sanitizer on or off
    -enableThreadSanitizer YES|NO                            turn the thread sanitizer on or off
    -enableUndefinedBehaviorSanitizer YES|NO                 turn the undefined behavior sanitizer on or off
    -resultBundlePath PATH                                   specifies the directory where a result bundle describing what occurred will be placed
    -resultStreamPath PATH                                   specifies the file where a result stream will be written to (the file must already exist)
    -resultBundleVersion 3 [default]                         specifies which result bundle version should be used
    -clonedSourcePackagesDirPath PATH                        specifies the directory to which remote source packages are fetch or expected to be found
    -derivedDataPath PATH                                    specifies the directory where build products and other derived data will go
    -archivePath PATH                                        specifies the directory where any created archives will be placed, or the archive that should be exported
    -exportArchive                                           specifies that an archive should be exported
    -exportNotarizedApp                                      export an archive that has been notarized by Apple
    -exportOptionsPlist PATH                                 specifies a path to a plist file that configures archive exporting
    -enableCodeCoverage YES|NO                               turn code coverage on or off when testing
    -exportPath PATH                                         specifies the destination for the product exported from an archive
    -skipUnavailableActions                                  specifies that scheme actions that cannot be performed should be skipped instead of causing a failure
    -exportLocalizations                                     exports completed and outstanding project localizations
    -importLocalizations                                     imports localizations for a project, assuming any necessary localized resources have been created in Xcode
    -localizationPath                                        specifies a path to XLIFF localization files
    -exportLanguage                                          specifies multiple optional ISO 639-1 languages included in a localization export
    -xctestrun                                               specifies a path to a test run specification
    -testPlan                                                specifies the name of the test plan associated with the scheme to use for testing
    -only-testing                                            constrains testing by specifying tests to include, and excluding other tests
    -only-testing:TEST-IDENTIFIER                            constrains testing by specifying tests to include, and excluding other tests
    -skip-testing                                            constrains testing by specifying tests to exclude, but including other tests
    -skip-testing:TEST-IDENTIFIER                            constrains testing by specifying tests to exclude, but including other tests
    -only-test-configuration                                 constrains testing by specifying test configurations to include, and excluding other test configurations
    -skip-test-configuration                                 constrains testing by specifying test configurations to exclude, but including other test configurations
    -testLanguage                                            constrains testing by specifying ISO 639-1 language in which to run the tests
    -testRegion                                              constrains testing by specifying ISO 3166-1 region in which to run the tests
    -resolvePackageDependencies                              resolves any Swift package dependencies referenced by the project or workspace
    -disableAutomaticPackageResolution                       prevents packages from automatically being resolved to versions other than those recorded in the `Package.resolved` file
    -json                                                    output as JSON (note: -json implies -quiet)
    -allowProvisioningUpdates                                Allow xcodebuild to communicate with the Apple Developer website. For automatically signed targets, xcodebuild will create and update profiles, app IDs, and certificates. For manually signed targets, xcodebuild will download missing or updated provisioning profiles. Requires a developer account to have been added in Xcode's Accounts preference pane.
    -allowProvisioningDeviceRegistration                     Allow xcodebuild to register your destination device on the developer portal if necessary. This flag only takes effect if -allowProvisioningUpdates is also passed.
    -showBuildTimingSummary                                  display a report of the timings of all the commands invoked during the build
    -create-xcframework                                      create an xcframework from prebuilt libraries; -help for more information.
##[error]Process completed with exit code 64.
原因
デスティネーションのフォーマットに誤りがあるためです。解決策
-destination 'キー1=値1,キー2=値2,…'のフォーマットでデスティネーションを指定します。
私は-destination 'platform=iOS Simulator,name=iPhone 11 Pro Max'を指定しました。テストケースが存在せず、テストに失敗する
  xcodebuild -scheme {スキーム名} -sdk iphonesimulator -configuration Debug -destination 'platform=iOS Simulator,name=iPhone 11 Pro Max' clean test
  shell: /bin/bash -e {0}
Build settings from command line:
    SDKROOT = iphonesimulator13.1

note: Using new build system

** CLEAN SUCCEEDED **

note: Using new build system
note: Planning build
note: Constructing build description

(省略)

Testing failed:

Test session results, code coverage, and logs:
    {.xcresultファイルパス}

    Build input file cannot be found: '{UIテストファイルパス}'
    Testing cancelled because the build failed.

** TEST FAILED **


The following build commands failed:
    CopySwiftLibs {.xctestファイルパス}
(1 failure)
##[error]Process completed with exit code 65.
原因
こちらの不具合はローカルのXcode上でも発生していました。
(おそらく)デフォルトのテストファイル({プロジェクト名}Tests.swift、{プロジェクト名}UITests.swift)を削除し、テストケースが0件になったためです。解決策
単体テストとUIテストのTARGETSを削除して追加し、デフォルトのテストファイルを生成し直します。おわりに
この記事で少しでも
xcodebuildコマンドにつまづく方が減ると嬉しいです。おまけ:xcpretty
xcodebuildコマンドのログは、デフォルトだと見づらいです。
xcprettyを噛ませることで、ログが整形されて見やすくなるのでオススメです。使い方は簡単で、
xcodebuildコマンドの標準出力をパイプで渡すのみです。$ xcodebuild -scheme {スキーム名} -sdk iphonesimulator -configuration Debug -destination 'platform=iOS Simulator,name=iPhone 11 Pro Max' clean test | xcpretty詳細な使い方は公式リポジトリをご参照ください。
https://github.com/xcpretty/xcpretty
- 投稿日:2019-12-04T11:38:10+09:00
PCで編集中のウェブサイトをスマホから確認する方法
はじめに
本記事は Mac + iPhone という環境を想定しています。
Win + Android も基本的なところは共通しています。確認事項
PCとスマホが同じネットワーク化にいることを確認する
WiFiの場合、 基本的には 同じSSIDで接続していれば同じネットワークです。
ファイアウォールの設定をOFFにする
[システム環境設定]>[セキュリティとプライバシー]>[ファイアウォール]
localhostを立ち上げる
コマンドラインから開発中のディレクトリでhttpサーバーを立ち上げます。
Python2の場合
$ python -m SimpleHTTPServerpython3の場合
$ python3 -m http.server実行例
$ python3 -m http.server
Serving HTTP on 0.0.0.0 port 8000 (http://0.0.0.0:8000/) ...
オプションでポート番号を指定しない場合は上のように8000番を使用します。
PCからの確認はブラウザでlocalhost:8000にアクセスするだけです。スマホからアクセスする
MacのIPアドレスを表示する
[システム環境設定]>[ネットワーク]>[詳細]>[TCP/IP]
IPv4アドレス: 192.168.11.43がローカルネットワークにおけるこの端末のアドレスになります。
通常ローカルのIPv4アドレスは192.168.XX.XXのような形をしています。
このアドレスは固定ではないため、ネットワークに繋ぐたびにその時のアドレスを確認するようにしてください。
または
ifconfigで確認する場合は$ ifconfig en0 inet en0: flags=8863<UP,BROADCAST,SMART,RUNNING,SIMPLEX,MULTICAST> mtu 1500 inet ⭐️192.168.11.43⭐️ netmask 0xffffff00 broadcast 192.168.11.255iPhoneのブラウザからアクセス
[ローカルIPアドレス] : [ポート番号]で表示することができます。
スマホの場合キャッシュのクリアが面倒なので、ブラウザーのプライベートモードで確認すると捗ります。
アクセスできない場合の確認事項
- httpサーバーを立ち上げるディレクトリは正しいですか?
- ファイアウォールはOFFになっていますか?
- PCとスマホは同じネットワーク下にいますか?
- MacのIPアドレスやポート番号は最新ですか?


- 投稿日:2019-12-04T11:16:50+09:00
【Mac】スライドのテーマに合わせて普段使っているアイコンをいい感じにするTip
使用ツール
Macとプレビューアプリのみ
なぜ?
普段は上記のようなアイコンを使用しているが、背景が透過されておらず白色のため黒っぽい背景のスライドに置くとめっちゃ浮く。
なので
- 背景を透過していい感じにしてみる
- 線と背景の黒と白を反転させていい感じにしてみる
の2つの画像を作ってみます。
背景を透過していい感じにしてみる
GOAL
めちゃめちゃいい感じ!!?????
- プレビューアプリで対処の画像を開き、マークアップツールバーを開くボタンを押す。
2. インスタントアルファで範囲指定(透過したい部分を適当にドラッグすると全体がいい感じに選択されます)
3. Command + X で指定範囲を切り取ります
4. 保存
適当に保存してください。ただしjpgとかの場合は透過に対応していないのでpngとかにして保存してください
※変化してないように見えますが変化してるはずです!
線と背景の黒と白を反転させていい感じにしてみる
GOAL
なんかおしゃれっぽいぞぉ!!?????
1. プレビューアプリで対処の画像を開き、マークアップツールバーを開くボタンを押す。
2. インスタントアルファで範囲指定(透過したい部分を適当にドラッグすると全体がいい感じに選択されます)
3. Command + X で指定範囲を切り取ります
4. 2, 3をひたすら繰り返し、すべての背景を透過します
(がんばった...あとすこしやでぇ
5. カラーを調整で色を反転!
カラーを調整ボタンをタップして
左右の赤丸のつまみの位置をそれぞれ逆にします(左のつまみを右に、右のつまみを左にします)
※一応つまみを逆にした画像です
そうすると...
できた!??????????
まとめ
並べるとこんな感じです?


- 投稿日:2019-12-04T10:23:30+09:00
[Mac] HomebrewでGitアップデートできないエラー => Error: The `brew link` step did not complete successfully The formula built, but is not symlinked
副題: HomebrewでGitのバージョンをアップグレードしたのに
git --versionで確認するとバージョンが変わらない件環境
- macOS 10.14.6
- git version 2.22.0
- Homebrew 2.2.0
(2019年12月3日時点)
結論
パスに問題がない場合、Homebrewで何らかのパッケージをインストール/アップデート/アップグレード時、シンボリックリンクが貼られなかったことが原因。以下のコマンドで解決。
ターミナル$ brew link --overwrite gitGit以外のパッケージのsymlinksを解決したいときは
gitの部分を適宜変更して実行。
そしてタイトルに「HomebrewでGitアップデートできないエラー」と書いたものの、厳密には「Gitのアップデートはできているがシンボリックリンクが適切に貼られないため、コマンドで呼び出すとアプデされていないように見える」が正しい。エラー発生までの流れと状況調査
そもそもはGitを最新版にアップグレードしたい!と思ったのが始まりでした。
現在のGitのバージョンを確認
ターミナル$ git --version git version 2.22.0 # 最新版は 2.24.0Homebrewでアップグレード
ターミナル$ brew upgrade gitこの後
git --versionでちゃんとバージョンアップできたか確認するも、
2.22.0からバージョンが変わらないという状況が発生。
Homebrewで管理できてなかった、パスが通ってなかった?などを調査。
whichで、 git コマンドがどこを参照しているか確認ターミナル$ which git /usr/local/bin/gitHomebrewでインストールした場所にあるようには見えるが・・・確実ではないので引き続き調査。
brew lsで、Homebrewからインストールしたパッケージを確認ターミナル$ brew ls autoconf glib libde265 little-cms2 openssl@1.1 x265 automake heroku libffi mysql pcre xz cmake heroku-node libheif node python yarn freetype icu4c libomp nodebrew readline gdbm ilmbase libpng openexr shared-mime-info gettext imagemagick libtiff openjpeg sqlite git jpeg libtool openssl webpやっぱりGitあるもよう。
インストール済みのパッケージが多すぎてリストが見づらい場合は、grepのコマンドで絞り込みも可能。ターミナル$ brew ls | grep git git
brew list gitで、Homebrewでのインストール先 = HomebrewでインストールしたGitの本体がある場所を確認ターミナル$ brew list git /usr/local/Cellar/git/2.18.0/.bottle/etc/gitconfig /usr/local/Cellar/git/2.18.0/bin/git /usr/local/Cellar/git/2.18.0/bin/git-cvsserver /usr/local/Cellar/git/2.18.0/bin/git-receive-pack /usr/local/Cellar/git/2.18.0/bin/git-shell /usr/local/Cellar/git/2.18.0/bin/git-upload-archive /usr/local/Cellar/git/2.18.0/bin/git-upload-pack /usr/local/Cellar/git/2.18.0/bin/gitk /usr/local/Cellar/git/2.18.0/etc/bash_completion.d/ (2 files) /usr/local/Cellar/git/2.18.0/libexec/git-core/ (196 files) /usr/local/Cellar/git/2.18.0/share/doc/ (847 files) /usr/local/Cellar/git/2.18.0/share/emacs/ (2 files) /usr/local/Cellar/git/2.18.0/share/git-core/ (158 files) /usr/local/Cellar/git/2.18.0/share/git-gui/ (61 files) /usr/local/Cellar/git/2.18.0/share/gitk/ (13 files) /usr/local/Cellar/git/2.18.0/share/gitweb/ (5 files) /usr/local/Cellar/git/2.18.0/share/man/ (171 files) /usr/local/Cellar/git/2.18.0/share/perl5/ (19 files) /usr/local/Cellar/git/2.18.0/share/zsh/ (2 files)やっぱりちゃんとあるやん! バージョン2.18.0・・・?雲行きが怪しくなってきた。
gitコマンドのショートカット(エイリアス)ではなくフルパスを指定して複数のGitのバージョンを確認
ターミナル$ /usr/bin/git --version git version 2.20.1 (Apple Git-117)ターミナル$ /usr/local/bin/git --version git version 2.22.0バージョンからしてもgitコマンドは
/usr/local/bin/gitを向いていることを再度確認。
brew upgrade gitしたときにエラーがなかったかもう一度確認ターミナル$ brew upgrade git ==> Upgrading 1 outdated package: git 2.18.0 -> 2.24.0_2 ==> Upgrading git ==> Installing dependencies for git: pcre2 ==> Installing git dependency: pcre2 ==> Downloading https://homebrew.bintray.com/bottles/pcre2-10.34.mojave.bottle.tar.gz ==> Downloading from https://akamai.bintray.com/9b/9bc0815c6c4c584ef16e93e5ecf37aa786303d88f9321274a29b4f60876d583f?__gda__=exp=1575368945~hmac=5a828a3607 ######################################################################## 100.0% ==> Pouring pcre2-10.34.mojave.bottle.tar.gz ? /usr/local/Cellar/pcre2/10.34: 230 files, 5.9MB ==> Installing git ==> Downloading https://homebrew.bintray.com/bottles/git-2.24.0_2.mojave.bottle.tar.gz ==> Downloading from https://akamai.bintray.com/34/343c1a0b842b84095aa0632ea7ca3f1717103fe4f393a6014c7f6165b079c849?__gda__=exp=1575368950~hmac=f533430d65 ######################################################################## 100.0% ==> Pouring git-2.24.0_2.mojave.bottle.tar.gz Error: The `brew link` step did not complete successfully The formula built, but is not symlinked into /usr/local Could not symlink bin/git Target /usr/local/bin/git already exists. You may want to remove it: rm '/usr/local/bin/git' To force the link and overwrite all conflicting files: brew link --overwrite git To list all files that would be deleted: brew link --overwrite --dry-run git Possible conflicting files are: /usr/local/bin/git -> /usr/local/git/bin/git (〜中略〜) /usr/local/share/man/man7/gitworkflows.7 -> /usr/local/git/share/man/man7/gitworkflows.7 ==> Caveats Bash completion has been installed to: /usr/local/etc/bash_completion.d zsh completions and functions have been installed to: /usr/local/share/zsh/site-functions Emacs Lisp files have been installed to: /usr/local/share/emacs/site-lisp/git ==> Summary ? /usr/local/Cellar/git/2.24.0_2: 1,547 files, 45.1MB Removing: /usr/local/Cellar/git/2.10.2... (1,445 files, 31.8MB) Removing: /usr/local/Cellar/git/2.18.0... (1,488 files, 35.5MB) ==> Checking for dependents of upgraded formulae... ==> No dependents found! ==> Caveats ==> git Bash completion has been installed to: /usr/local/etc/bash_completion.d zsh completions and functions have been installed to: /usr/local/share/zsh/site-functions Emacs Lisp files have been installed to: /usr/local/share/emacs/site-lisp/gitエラー内容書いてあったーーー!!
ターミナルError: The `brew link` step did not complete successfully The formula built, but is not symlinked into /usr/local Could not symlink bin/git Target /usr/local/bin/git already exists. You may want to remove it: rm '/usr/local/bin/git' To force the link and overwrite all conflicting files: brew link --overwrite git要するに、
/usr/local/bin/gitに対してgitコマンドのシンボリックリンク(ショートカットのようなもの)を作成しようとしたけど対象がすでに存在するため、エラーになってシンボリックリンク作れなかったよ、ということのようだ。
「対象ファイルを削除したいときはこうしてね」とrmリムーブのコマンドが親切に書かれているが、その次に書かれたbrew link --overwrite gitのコマンドでシンボリックリンクの上書きをすれば良さそうである。シンボリックリンクのオーバーライトを実施
ターミナル$ brew link --overwrite git Linking /usr/local/Cellar/git/2.24.0_2... 206 symlinks created $ git --version git version 2.24.0あらためて、無事にGitのバージョンアップができました!
まとめ
- ログとエラー内容はよく読む。
- GitなどのパッケージはひとつのPCに複数インストールされている可能性がある。
- いま自分がどこに保存したどのバージョンのどのパッケージを触っているのかを把握する。
- Error: The
brew linkstep did not complete successfully ... The formula built, but is not symlinked ... というエラーはシンボリックリンクのエラーなので、内容をよく読みながら対応する。以上!
参考URL
【Homebrew】インストールしたパッケージのシンボリックリンクが作成されない場合
今さらだけどHomebrewのコマンドをちゃんと理解して使おう
【 whereis 】コマンド――コマンド本体と関連ファイルを検索する
PATHを理解して、コマンドの在りかを探してみよう (1/3)
Homebrew使い方まとめ
homebrewインストール時にリンクが貼られない問題
HomebrewでGitをインストールする
brew install nmap で発生したインストール時のエラーをchownで解決
MacのGitのバージョンをアップデート!Homebrewでの管理に切り替える
Git のインストール 〜Git をMacにインストールしよう〜
- 投稿日:2019-12-04T10:23:30+09:00
[Mac] HomebrewでGitアップデートできないというか Error: The `brew link` step did not complete successfully The formula built, but is not symlinked
副題: HomebrewでGitのバージョンをアップグレードしたのに
git --versionで確認するとバージョンが変わらない件環境
- macOS 10.14.6
- git version 2.22.0
- Homebrew 2.2.0
(2019年12月3日時点)
結論
パスに問題がない場合、Homebrewで何らかのパッケージをインストール/アップデート/アップグレード時、シンボリックリンクが貼られなかったことが原因。以下のコマンドで解決。
ターミナル$ brew link --overwrite git(git以外のパッケージのsymlinksを解決したいときは
gitの部分を適宜変更して実行。)エラー発生までの流れと状況調査
そもそもはGitを最新版にアップグレードしたい!と思ったのが始まりでした。
現在のGitのバージョンを確認
ターミナル$ git --version git version 2.22.0 # 最新版は 2.24.0Homebrewでアップグレード
ターミナル$ brew upgrade gitこの後
git --versionでちゃんとバージョンアップできたか確認するも、
2.22.0からバージョンが変わらないという状況が発生。
Homebrewで管理できてなかった、パスが通ってなかった?などを調査。
whichで、 git コマンドがどこを参照しているか確認ターミナル$ which git /usr/local/bin/gitHomebrewでインストールした場所にあるようには見えるが・・・確実ではないので引き続き調査。
brew lsで、Homebrewからインストールしたパッケージを確認ターミナル$ brew ls autoconf glib libde265 little-cms2 openssl@1.1 x265 automake heroku libffi mysql pcre xz cmake heroku-node libheif node python yarn freetype icu4c libomp nodebrew readline gdbm ilmbase libpng openexr shared-mime-info gettext imagemagick libtiff openjpeg sqlite git jpeg libtool openssl webpやっぱりGitあるもよう。
インストール済みのパッケージが多すぎてリストが見づらい場合は、grepのコマンドで絞り込みも可能。ターミナル$ brew ls | grep git git
brew list gitで、Homebrewでのインストール先 = HomebrewでインストールしたGitの本体がある場所を確認ターミナル$ brew list git /usr/local/Cellar/git/2.18.0/.bottle/etc/gitconfig /usr/local/Cellar/git/2.18.0/bin/git /usr/local/Cellar/git/2.18.0/bin/git-cvsserver /usr/local/Cellar/git/2.18.0/bin/git-receive-pack /usr/local/Cellar/git/2.18.0/bin/git-shell /usr/local/Cellar/git/2.18.0/bin/git-upload-archive /usr/local/Cellar/git/2.18.0/bin/git-upload-pack /usr/local/Cellar/git/2.18.0/bin/gitk /usr/local/Cellar/git/2.18.0/etc/bash_completion.d/ (2 files) /usr/local/Cellar/git/2.18.0/libexec/git-core/ (196 files) /usr/local/Cellar/git/2.18.0/share/doc/ (847 files) /usr/local/Cellar/git/2.18.0/share/emacs/ (2 files) /usr/local/Cellar/git/2.18.0/share/git-core/ (158 files) /usr/local/Cellar/git/2.18.0/share/git-gui/ (61 files) /usr/local/Cellar/git/2.18.0/share/gitk/ (13 files) /usr/local/Cellar/git/2.18.0/share/gitweb/ (5 files) /usr/local/Cellar/git/2.18.0/share/man/ (171 files) /usr/local/Cellar/git/2.18.0/share/perl5/ (19 files) /usr/local/Cellar/git/2.18.0/share/zsh/ (2 files)やっぱりちゃんとあるやん! バージョン2.18.0・・・?雲行きが怪しくなってきた。
gitコマンドのショートカット(エイリアス)ではなくフルパスを指定して複数のGitのバージョンを確認
ターミナル$ /usr/bin/git --version git version 2.20.1 (Apple Git-117)ターミナル$ /usr/local/bin/git --version git version 2.22.0バージョンからしてもgitコマンドは
/usr/local/bin/gitを向いていることを再度確認。
brew upgrade gitしたときにエラーがなかったかもう一度確認ターミナル$ brew upgrade git ==> Upgrading 1 outdated package: git 2.18.0 -> 2.24.0_2 ==> Upgrading git ==> Installing dependencies for git: pcre2 ==> Installing git dependency: pcre2 ==> Downloading https://homebrew.bintray.com/bottles/pcre2-10.34.mojave.bottle.tar.gz ==> Downloading from https://akamai.bintray.com/9b/9bc0815c6c4c584ef16e93e5ecf37aa786303d88f9321274a29b4f60876d583f?__gda__=exp=1575368945~hmac=5a828a3607 ######################################################################## 100.0% ==> Pouring pcre2-10.34.mojave.bottle.tar.gz ? /usr/local/Cellar/pcre2/10.34: 230 files, 5.9MB ==> Installing git ==> Downloading https://homebrew.bintray.com/bottles/git-2.24.0_2.mojave.bottle.tar.gz ==> Downloading from https://akamai.bintray.com/34/343c1a0b842b84095aa0632ea7ca3f1717103fe4f393a6014c7f6165b079c849?__gda__=exp=1575368950~hmac=f533430d65 ######################################################################## 100.0% ==> Pouring git-2.24.0_2.mojave.bottle.tar.gz Error: The `brew link` step did not complete successfully The formula built, but is not symlinked into /usr/local Could not symlink bin/git Target /usr/local/bin/git already exists. You may want to remove it: rm '/usr/local/bin/git' To force the link and overwrite all conflicting files: brew link --overwrite git To list all files that would be deleted: brew link --overwrite --dry-run git Possible conflicting files are: /usr/local/bin/git -> /usr/local/git/bin/git (〜中略〜) /usr/local/share/man/man7/gitworkflows.7 -> /usr/local/git/share/man/man7/gitworkflows.7 ==> Caveats Bash completion has been installed to: /usr/local/etc/bash_completion.d zsh completions and functions have been installed to: /usr/local/share/zsh/site-functions Emacs Lisp files have been installed to: /usr/local/share/emacs/site-lisp/git ==> Summary ? /usr/local/Cellar/git/2.24.0_2: 1,547 files, 45.1MB Removing: /usr/local/Cellar/git/2.10.2... (1,445 files, 31.8MB) Removing: /usr/local/Cellar/git/2.18.0... (1,488 files, 35.5MB) ==> Checking for dependents of upgraded formulae... ==> No dependents found! ==> Caveats ==> git Bash completion has been installed to: /usr/local/etc/bash_completion.d zsh completions and functions have been installed to: /usr/local/share/zsh/site-functions Emacs Lisp files have been installed to: /usr/local/share/emacs/site-lisp/gitエラー内容書いてあったーーー!!
ターミナルError: The `brew link` step did not complete successfully The formula built, but is not symlinked into /usr/local Could not symlink bin/git Target /usr/local/bin/git already exists. You may want to remove it: rm '/usr/local/bin/git' To force the link and overwrite all conflicting files: brew link --overwrite git要するに、
/usr/local/bin/gitに対してgitコマンドのシンボリックリンク(ショートカットのようなもの)を作成しようとしたけど対象がすでに存在するため、エラーになってシンボリックリンク作れなかったよ、ということのようだ。
「対象ファイルを削除したいときはこうしてね」とrmリムーブのコマンドが親切に書かれているが、その次に書かれたbrew link --overwrite gitのコマンドでシンボリックリンクの上書きをすれば良さそうである。シンボリックリンクのオーバーライトを実施
ターミナル$ brew link --overwrite git Linking /usr/local/Cellar/git/2.24.0_2... 206 symlinks created $ git --version git version 2.24.0あらためて、無事にGitのバージョンアップができました!
まとめ
- ログとエラー内容はよく読む。
- GitなどのパッケージはひとつのPCに複数インストールされている可能性がある。
- いま自分がどこに保存したどのバージョンのどのパッケージを触っているのかを把握する。
- Error: The
brew linkstep did not complete successfully ... The formula built, but is not symlinked ... というエラーはシンボリックリンクのエラーなので、内容をよく読みながら対応する。以上!
参考URL
【Homebrew】インストールしたパッケージのシンボリックリンクが作成されない場合
今さらだけどHomebrewのコマンドをちゃんと理解して使おう
【 whereis 】コマンド――コマンド本体と関連ファイルを検索する
PATHを理解して、コマンドの在りかを探してみよう (1/3)
Homebrew使い方まとめ
homebrewインストール時にリンクが貼られない問題
HomebrewでGitをインストールする
brew install nmap で発生したインストール時のエラーをchownで解決
MacのGitのバージョンをアップデート!Homebrewでの管理に切り替える
- 投稿日:2019-12-04T10:11:48+09:00
com.automator.runner.xpc is not allowed to send keystrokes
In Mac Automator when you want to use keystrokes in AppleScript like:
on run {input, parameters}
    tell application "System Events" to keystroke input
end run
You may got an error said "com.automator.runner.xpc is not allowed to send keystrokes".
I found a lots of questions in stackoverflow and can't get an right answer.
In short:
You have to add the application which you want to run the script to
Accessibility.For example, if you want to run the script in Chrome, then add Chrome to your
Accessibility, even not need to add Automator.
- 投稿日:2019-12-04T09:00:17+09:00
MacでUnity ML-Agentsの環境を構築する(v0.11.0対応)
Unityで機械学習を利用するML-Agentsというライブラリがv0.11.0(beta)にバージョンアップしていたので試してみました。(2019/11/05時点)
v0.9.1からしばらく動作確認をサボっていたらだいぶと変更点があって戸惑いました。
Release ML-Agents Beta 0.11.0 · Unity-Technologies/ml-agents
https://github.com/Unity-Technologies/ml-agents/releases/tag/0.11.0Unity ML-Agentsについては下記が参考になります。
【Unity】Unityで機械学習する「ML-Agent」を色々と試して得た知見とか
http://tsubakit1.hateblo.jp/entry/2018/02/18/233000Unityをまだインストールしていないという方は下記をご参考ください。
Macでhomebrewを使ってUnityをインストールする(Unity Hub、日本語化対応)
https://qiita.com/kai_kou/items/445e614fb71f2204e033手順
基本的には公式にある下記ドキュメントに沿えばよい感じです。
ml-agents/Installation.md at master · Unity-Technologies/ml-agents
https://github.com/Unity-Technologies/ml-agents/blob/master/docs/Installation.mdml-agents/Basic-Guide.md at master · Unity-Technologies/ml-agents
https://github.com/Unity-Technologies/ml-agents/blob/master/docs/Basic-Guide.md#setting-up-ml-agents-within-unityPythonをインストールする
現在、Python 3.6.1以上での動作がサポートされています。3.5以前のバージョンはサポートされていないのでご注意ください。(2019/11/05現在)
ml-agents/Installation.md at master · Unity-Technologies/ml-agents
https://github.com/Unity-Technologies/ml-agents/blob/master/docs/Installation.mdIn order to use ML-Agents toolkit, you need Python 3.6.1 or higher. Download and install the latest version of Python if you do not already have it.
We do not currently support Python 3.5 or lower.
v0.10.0でようやく3.7以上に対応してくれたみたいです。
Release ML-Agents Beta 0.10.0 · Unity-Technologies/ml-agents
https://github.com/Unity-Technologies/ml-agents/releases/tag/0.10.0ML-Agents is now compatible with Python v3.7 and newer versions of Tensorflow up to 1.14.
お手元にPythonの環境がない方は下記をご参照ください。
MacでanyenvをつかってPython環境構築(bash、fish対応) - Qiita
https://qiita.com/kai_kou/items/f54931991a781b96bb9cML-Agentsリポジトリをダウンロード
適当なディレクトリにリポジトリをダウンロードします。
> mkdir 適当なディレクトリ
> cd 適当なディレクトリ
> git clone https://github.com/Unity-Technologies/ml-agents.git
必要なライブラリをインストールする
ML-Agentsのパッケージをpipを利用してPyPIからインストールします。
ここではPythonの仮想環境を作ってインストールします。仮想環境?なにそれ?な方は下記をご参照(再掲
https://qiita.com/kai_kou/items/f54931991a781b96bb9c> python --version Python 3.7.4 > python -m venv venv > . venv/bin/activate # fishな方はこちら > . venv/bin/activate.fish > pip install mlagentsはい。
Unityアプリからサンプルプロジェクトを開く
Unity Hubでアプリを立ち上げます。Unity Hubがインストールされていない場合は下記をご参考ください。
Macでhomebrewを使ってUnityをインストールする(Unity Hub、日本語化対応)
https://qiita.com/kai_kou/items/445e614fb71f2204e033ML-Agentsを利用するにはUnityのバージョン
2017.4以上が必要となります。今回は2019.2.10f1を利用しました。アプリが立ち上がったら「開く」ボタンから
任意のディレクトリ/ml-agents/UnitySDKフォルダを選択します。
Unityエディタのバージョンによっては、アップグレードするかの確認ダイアログが立ち上がります。
「確認」ボタンをクリックして進めます。アップグレード処理に少し時間がかかります。
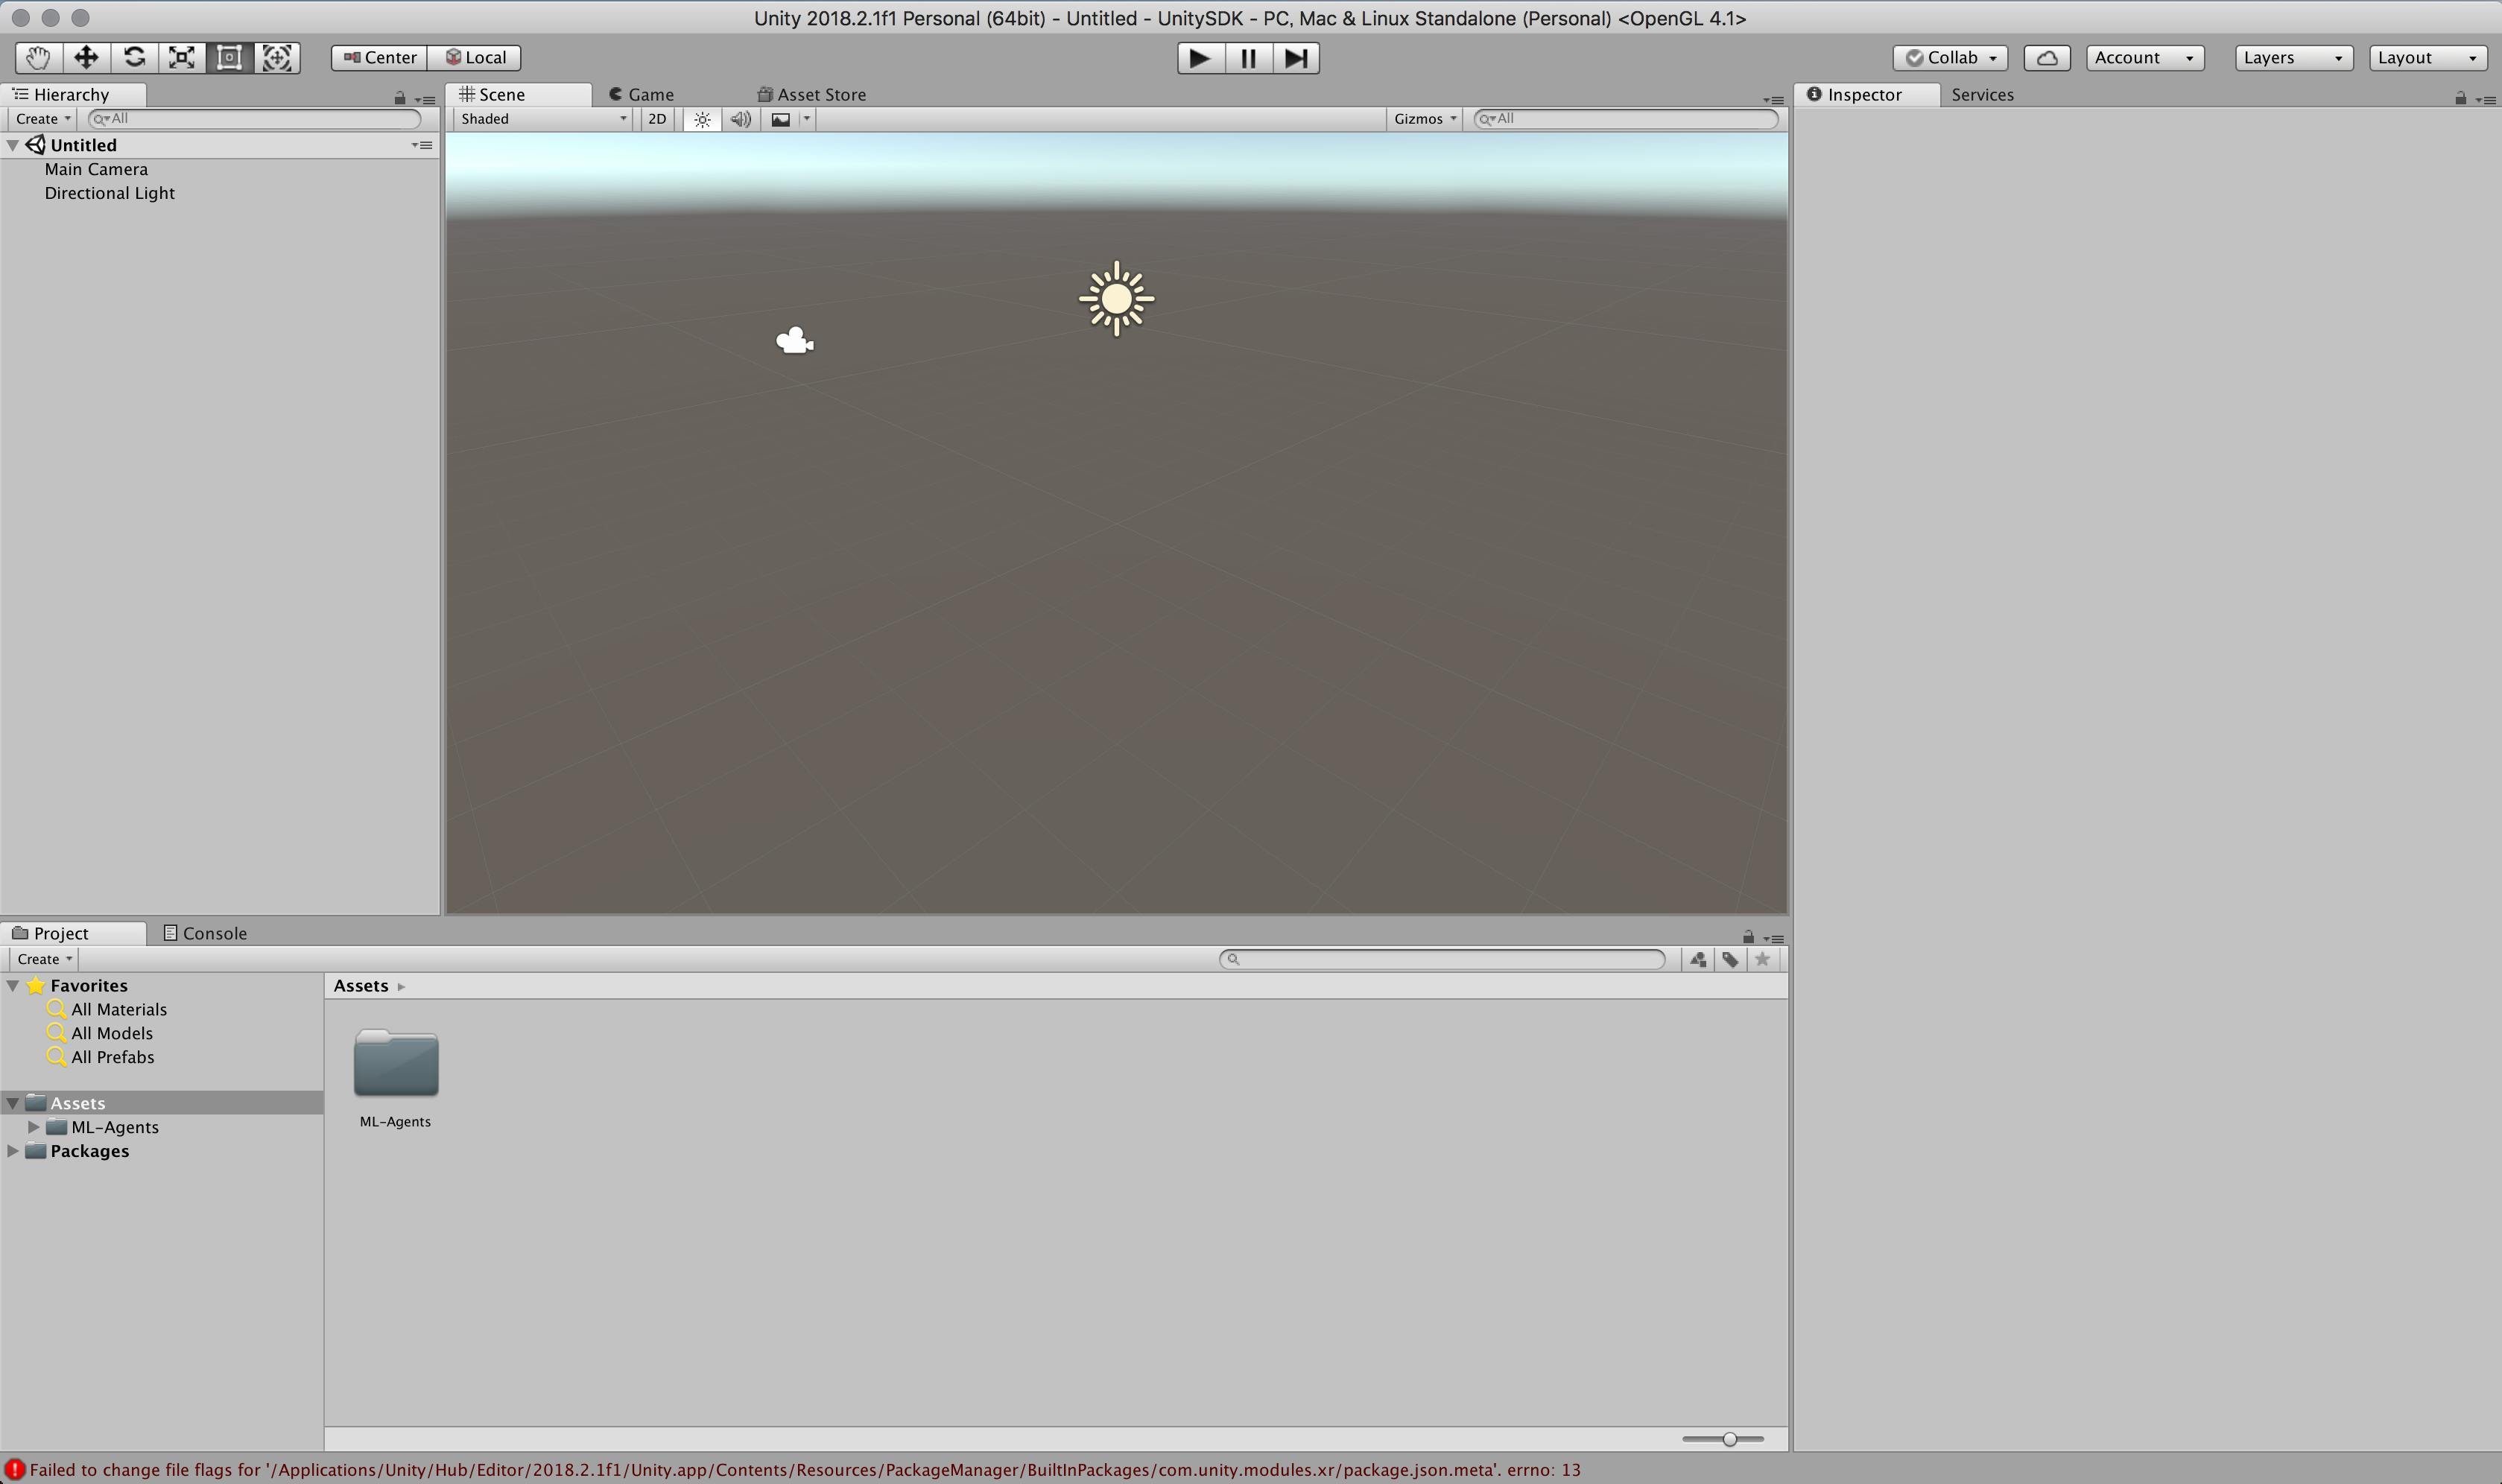
Scenes(シーン)が開くか確認する
サンプルが動作するか、Unityでプロジェクトを読み込み、動作させてみます。
- Unityアプリの下パネルにある[Project]タブから以下のフォルダまで開く
- [Assets] > [ML-Agents] > [Examples] > [3DBall] > [Scenes]
- 開いたら、[3DBall]ファイルがあるので、ダブルクリックして開く
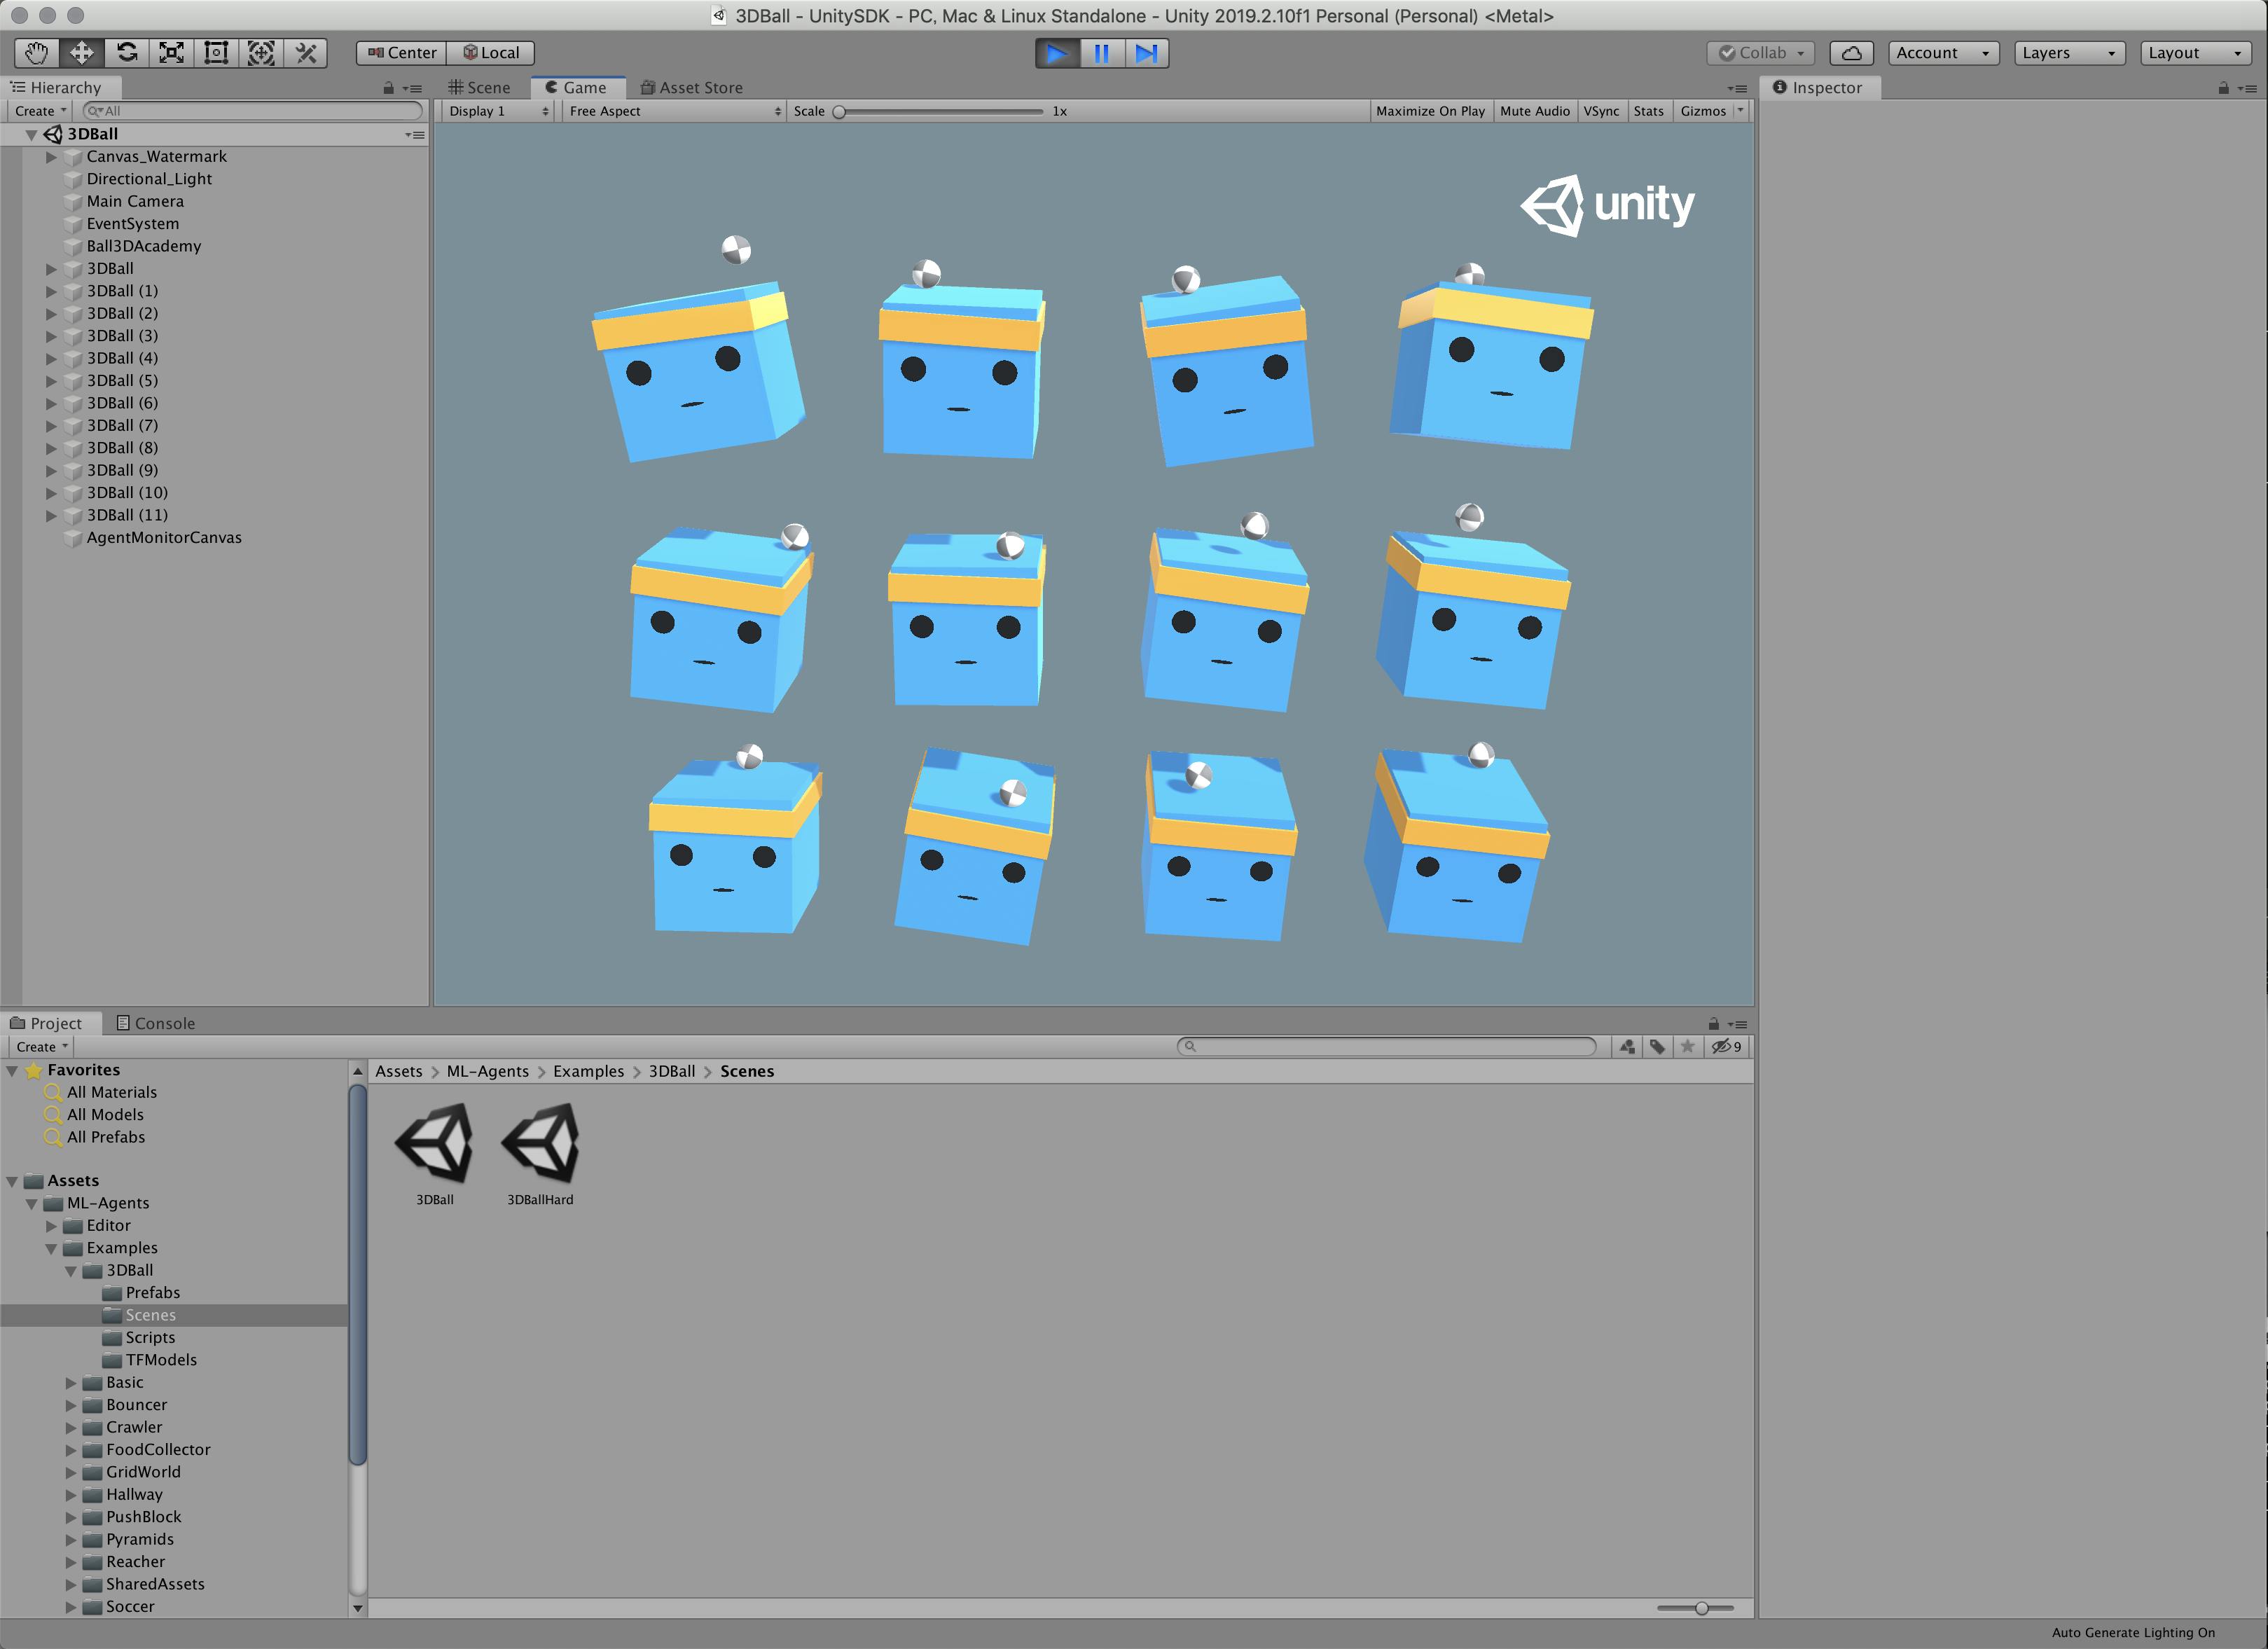
なんかでてきたー(感動Unityの上にある再生ボタンをクリックします。
なんかうごいたー(感動
そして、かわいくなってるwww読み込んだサンプルが動作することを確認できました。
現時点ではボールがボックス?からすぐに落ちてしまいます。これを機械学習で、落とさないようにさせるわけです。Scenes(シーン)の設定
ML-Agentsで学習させるための設定です。
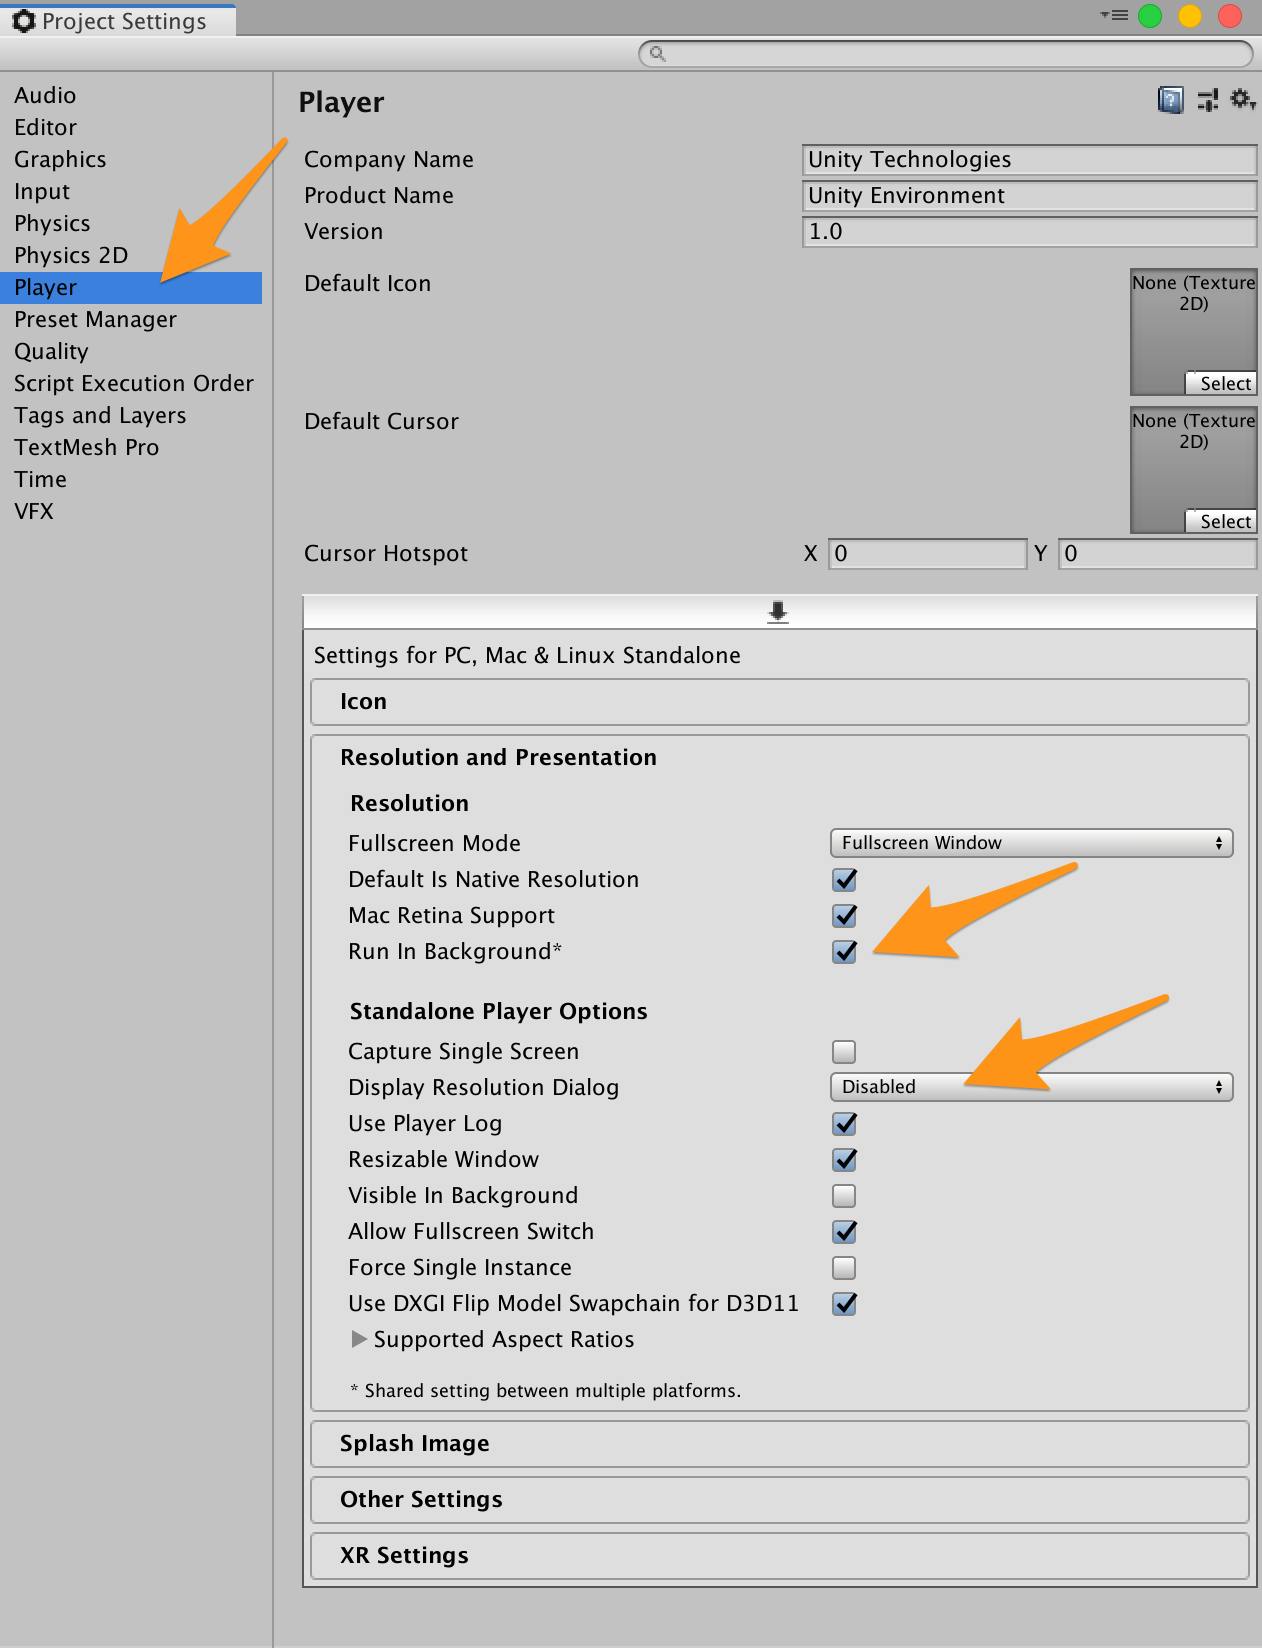
Unityアプリの[Edit]メニューから[Project Settings]を開く
[Inspector]パネルで以下の設定を確認する
- [Resolution and Presentation]の[Run In Background]がチェックされている
- [Display Resolution Dialog]がDisableになっている
学習させる
学習に必要な設定ができましたので、Unityアプリ上で学習させてみます。
コマンドの実行
コンソールに戻り、学習開始のコマンドを実行します。オプションは結構数がありますが、最低限を指定します。
> cd 適当なディレクトリ
> mlagents-learn ml-agents/config/trainer_config.yaml --train

WARNING:tensorflow:
The TensorFlow contrib module will not be included in TensorFlow 2.0.
For more information, please see:
  * https://github.com/tensorflow/community/blob/master/rfcs/20180907-contrib-sunset.md
  * https://github.com/tensorflow/addons
  * https://github.com/tensorflow/io (for I/O related ops)
If you depend on functionality not listed there, please file an issue.


                        ▄▄▄▓▓▓▓
                   ╓▓▓▓▓▓▓█▓▓▓▓▓
              ,▄▄▄m▀▀▀'  ,▓▓▓▀▓▓▄                           ▓▓▓  ▓▓▌
            ▄▓▓▓▀'      ▄▓▓▀  ▓▓▓      ▄▄     ▄▄ ,▄▄ ▄▄▄▄   ,▄▄ ▄▓▓▌▄ ▄▄▄    ,▄▄
          ▄▓▓▓▀        ▄▓▓▀   ▐▓▓▌     ▓▓▌   ▐▓▓ ▐▓▓▓▀▀▀▓▓▌ ▓▓▓ ▀▓▓▌▀ ^▓▓▌  ╒▓▓▌
        ▄▓▓▓▓▓▄▄▄▄▄▄▄▄▓▓▓      ▓▀      ▓▓▌   ▐▓▓ ▐▓▓    ▓▓▓ ▓▓▓  ▓▓▌   ▐▓▓▄ ▓▓▌
        ▀▓▓▓▓▀▀▀▀▀▀▀▀▀▀▓▓▄     ▓▓      ▓▓▌   ▐▓▓ ▐▓▓    ▓▓▓ ▓▓▓  ▓▓▌    ▐▓▓▐▓▓
          ^█▓▓▓        ▀▓▓▄   ▐▓▓▌     ▓▓▓▓▄▓▓▓▓ ▐▓▓    ▓▓▓ ▓▓▓  ▓▓▓▄    ▓▓▓▓`
            '▀▓▓▓▄      ^▓▓▓  ▓▓▓       └▀▀▀▀ ▀▀ ^▀▀    `▀▀ `▀▀   '▀▀    ▐▓▓▌
               ▀▀▀▀▓▄▄▄   ▓▓▓▓▓▓,                                      ▓▓▓▓▀
                   `▀█▓▓▓▓▓▓▓▓▓▌
                        ¬`▀▀▀█▓


INFO:mlagents.trainers:CommandLineOptions(debug=False, num_runs=1, seed=-1, env_path=None, run_id='ppo', load_model=False, train_model=True, save_freq=50000, keep_checkpoints=5, base_port=5005, num_envs=1, curriculum_folder=None, lesson=0, slow=False, no_graphics=False, multi_gpu=False, trainer_config_path='ml-agents/config/trainer_config.yaml', sampler_file_path=None, docker_target_name=None, env_args=None, cpu=False)
INFO:mlagents.envs:Start training by pressing the Play button in the Unity Editor.
INFO:mlagents.envs:Start training by pressing the Play button in the Unity Editor.と出力されたら、Unityアプリの上部にある[▶]ボタンをクリックします。初期設定だと50,000ステップ実行するので少々時間がかかります。
(略)
INFO:mlagents.trainers: ppo: 3DBall: Step: 2000. Time Elapsed: 22.201 s Mean Reward: 1.167. Std of Reward: 0.766. Training.
(略)
INFO:mlagents.trainers: ppo: 3DBall: Step: 10000. Time Elapsed: 113.151 s Mean Reward: 30.106. Std of Reward: 27.092. Training.
(略)
INFO:mlagents.trainers: ppo: 3DBall: Step: 49000. Time Elapsed: 542.744 s Mean Reward: 100.000. Std of Reward: 0.000. Training.
(略)
IGNORED: Cast unknown layer
IGNORED: StopGradient unknown layer
GLOBALS: 'is_continuous_control', 'version_number', 'memory_size', 'action_output_shape'
IN: 'vector_observation': [-1, 1, 1, 8] => 'sub_3'
IN: 'epsilon': [-1, 1, 1, 2] => 'mul_1'
OUT: 'action', 'action_probs'
DONE: wrote ./models/ppo-0/3DBall.nn file.
INFO:mlagents.trainers:Exported ./models/ppo-0/3DBall.nn file
Python 3.7.4で動作させているからか、TensorFlow 2.0だからなのか、
WARNINGが結構出力されますが、動作はしているので置いておきます。学習結果をアプリに組み込む
学習が完了すると学習結果が
models配下に*.nnファイルとして保存されます。
それをUnityアプリに組み込むことで学習結果をUnityアプリに反映できます。> tree models/ models/ └── ppo-0 ├── 3DBall │ ├── checkpoint │ ├── frozen_graph_def.pb │ ├── model-50000.cptk.data-00000-of-00001 │ ├── model-50000.cptk.index │ ├── model-50000.cptk.meta │ ├── model-50001.cptk.data-00000-of-00001 │ ├── model-50001.cptk.index │ ├── model-50001.cptk.meta │ └── raw_graph_def.pb └── 3DBall.nn 2 directories, 10 filesUnityアプリの設定
Playerの設定を行います。
- Unityアプリの[Edit]メニューから[Project Settings]を選択する
- [Inspector]ビューの[Other Settings]欄で以下を確認・設定する
- Scripting Backendが
Monoになっている- Api Conpatibility Levelが
.NET 4.xになっている
学習結果ファイルの取り込み
ターミナルかFinderで学習結果を以下フォルダにコピーします。
- 学習結果ファイル:
models/ppo-0/3DBall.nn- 保存先:
UnitySDK/Assets/ML-Agents/Examples/3DBall/TFModels/※すでに保存先に
3DBall.nnファイルが存在していますので、リネームします。> cp models/ppo-0/3DBall.nn ml-agents/UnitySDK/Assets/ML-Agents/Examples/3DBall/TFModels/3DBall_new.nn
- Unityアプリの下パネルにある[Project]タブから以下のフォルダまで開く
- [Assets] > [ML-Agents] > [Examples] > [3DBall] > [Scenes]
- 開いたら、[3DBall]ファイルがあるので、ダブルクリックして開く
- [Hierarchy]パネルから[Agent]を選択する
- Unityアプリの[Project]パネルで以下フォルダを選択する
- [Assets] > [ML-Agents] > [Examples] > [3DBall] > [TFModels]
Unityアプリの[Inspector]パネルにある[Model]という項目に[TFModels]フォルダ内の
3DBall_new.nnファイルをドラッグ&ドロップする
Unity上部にある[▶]ボタンをクリックする
これで、学習結果が組み込まれた状態でアプリが起動します。
50,000ステップ学習すると動きが穏やかでもはやプロです。なんのプロかはわかりませんが^^
サンプルは他にもあるので、いろいろとお試しあれ。
ML-Agentsはv0.5.0くらいから触っていますがだいぶと利用方法がかんたんになってきていますが、v0.11.0ではさらに設定箇所が減っていて良い感じになっています。参考
【Unity】Unityで機械学習する「ML-Agent」を色々と試して得た知見とか
http://tsubakit1.hateblo.jp/entry/2018/02/18/233000Macでhomebrewを使ってUnityをインストールする(Unity Hub、日本語化対応)
https://qiita.com/kai_kou/items/445e614fb71f2204e033ml-agents/Installation.md at master · Unity-Technologies/ml-agents
https://github.com/Unity-Technologies/ml-agents/blob/master/docs/Installation.mdml-agents/Basic-Guide.md at master · Unity-Technologies/ml-agents
https://github.com/Unity-Technologies/ml-agents/blob/master/docs/Basic-Guide.md#setting-up-ml-agents-within-unityRelease ML-Agents Beta 0.10.0 · Unity-Technologies/ml-agents
https://github.com/Unity-Technologies/ml-agents/releases/tag/0.10.0MacでanyenvをつかってPython環境構築(bash、fish対応) - Qiita
https://qiita.com/kai_kou/items/f54931991a781b96bb9cMacでhomebrewを使ってUnityをインストールする(Unity Hub、日本語化対応)
https://qiita.com/kai_kou/items/445e614fb71f2204e033


- 投稿日:2019-12-04T00:01:19+09:00
『30日でできる!OS自作入門』を macOS Catalina で実行する
『30日でできる!OS自作入門』を macOS 10.15 Catalinaで実行してみました。
→ソースコードは GitHubにあげています。
https://github.com/noanoa07/myHariboteOSA. 環境構築
著者作成の独自ツール(tolsetフォルダ内のツール)は、Windows用であり macOS Catalinaでは動作させることが困難なため、Linux用ツールを使用することにする。
(Catalinaでは、32bitアプリが動作しなくなったため、従来の macOS向けのブログ記事では動かなくなったものが多い。)1. バイナリエディタ HEX FRIEND
AppStore版 もある。
好みのものでいいが、0xED は不安定だった。
「Chapter 1-1:とにかくやるのだぁ(helloos0)」では、
バイナリエディタ Bz の代わりに使う。2. アセンブラ NASM
「Chapter 1-3:アセンブラ初体験(helloos1)」では、
著者作成のアセンブラ naskの代わりに NASMを使う。
# Homebrewでインストール
% brew install nasm

# バージョンを確認 (現時点でバージョンは 2.14.02)
% nasm -v

# NASMで helloos.nasをコンパイルして、helloos.imgを作る
% nasm helloos.nas -o helloos.img
※著者作成の nask と NASM の違い
nask NASM RESB 18 TIMES 18 DB 0 RESB 0x7dfe-$ TIMES 0x1fe-($-$$) DB 0 ALIGNB 16 ALIGN 16, DB 0 [FORMAT "WCOFF"] この行削除 [INSTRSET "i486p"] この行削除 [FILE "naskfunc.nas"] この行削除 [FORMAT "WCOFF"] この行削除 JMP entry(修正の必要なし?) JMP SHORT entry _io_hlt( _ の付くもの) io_hlt( _ を削除) 3. エミュレータ QEMU
macOS用の QEMUを使う。
# Homebrewでインストール
% brew install qemu

# バージョンを確認 (バージョン 4.1.1 以上でないと表示に不具合)
% qemu-system-i386 -version

# イメージファイル helloos.imgを QEMUで実行(なるべく警告の出ないコマンドラインオプション)
% qemu-system-i386 -drive file=helloos.img,format=raw,if=floppy -boot a

# マウスが消えてしまった時は、control + option + g でマウスをリリース
4. エディタ
「Chapter 2-1:まずはテキストエディタの紹介」では、
TeraPadの代わりに、macOS用の好みのテキストエディタを使う。
5. Mtools
「Chapter 2-3:ブートセレクタだけを作るように整理(helloos4)」では、
著者作成の edimg.exeの代わりに、ディスクイメージの作成に Mtoolsの mformat を使う。# Homebrewでインストール % brew install mtools # バージョンを確認 (現時点でバージョンは 4.0.23) % mtools --version #ディスクイメージ helloos.imgを作る % mformat -f 1440 -C -B ipl.bin -i helloos.img ::さらに、「Chapter 3-5:OS本体を書き始めてみる(harib00e)」では、
ディスクイメージの作成に Mtoolsの mformat と mcopyを使う。# ディスクイメージ haribote.imgを作る % mformat -f 1440 -C -B ipl.bin -i haribote.img :: % mcopy -i haribote.img haribote.sys ::6. Cコンパイラ i386-elf-gcc
「Chapter 3-9:ついにC言語導入へ(harib00i)」では、
著者作成のCコンパイラ cc1.exe等の代わりに、i386-elf-gccを使う。
その際、6. のリンカスクリプトを併せることでコンパイルする。(macOS標準の gccは、実は clangなので、リンカオプション -T が使えない)
# Homebrewでインストール
% brew install i386-elf-gcc

#バージョンの確認(現時点でバージョンは 9.2.0)
% i386-elf-gcc -v
7. リンカスクリプト
「Chapter 3-9:ついにC言語導入へ(harib00i)」では、
のページの「OS用リンカスクリプト」を使わせて頂いた。これを hrb.ldとして作成して、これを用いてコンパイルする。
# bootpack.cを、リンクスクリプト hrb.ldを利用してコンパイルし、bootpack.hrbを作る
% i386-elf-gcc -march=i486 -m32 -nostdlib -T hrb.ld bootpack.c -o bootpack.hrb
8. フォントファイル hankaku.txtを変換するためのプログラム
「Chapter 5-5:フォントを増やしたい(harib02e)」では、
著者作成の makefont.exeの代わりに、
「GDT(グローバルディスクリプタテーブル) - OS自作入門 5日目-1 【Linux】 - サラリーマンがハッカーを真剣に目指す」
のページの「フォントファイルのリンクについて」を使わせて頂いた。これを convHankakuTxt.cとして作成し、これを用いて hankaku.txtを変換する。
# convHankakuTxt.cは標準ライブラリが必要なので、macOS標準のgccを使う
% gcc convHankakuTxt.c -o convHankakuTxt
% ./convHankakuTxt

# 出来た hankaku.cファイルを他のファイルとリンクする
% i386-elf-gcc -march=i486 -m32 -nostdlib -T hrb.ld -g bootpack.c hankaku.c naskfunc.o -o bootpack.hrb
9. sprintf関数
「Chapter 5-7:変数の値の表示(harib02g)」では、
著者作成の GOコンパイラ付属の stdio の sprintfの代わりに、
「sprintfを実装する - OS自作入門 5日目-2 【Linux】 - サラリーマンがハッカーを真剣に目指す」
のページの sprintf関数を使わせて頂いた。これを mysprintf.cとして作成する。
なお、コンパイル時に警告が出たので;
second parameter of 'va_start' not last named argumentmysprintf.cを少し修正した。
mysprintf.c//va_start (list, 2); va_start (list, fmt);独自の sprintf関数を使うので、bootpack.cも修正する。
bootpack.c//#include <stdio.h> // mysprintf.cを独自に作成したので、この行削除Makefileも mysprintf.c に合わせる。
# 独自の mysprintf.cの sprintf関数ではコンパイル時に警告が出るので、-fno-builtinオプションを追加
% i386-elf-gcc -march=i486 -m32 -nostdlib -fno-builtin -T hrb.ld -g bootpack.c hankaku.c naskfunc.o mysprintf.c -o bootpack.hrb
※ 註)
この sprintfは ”%d” と ”%x” にしか対応させていません。
とのことなので、"%02X" は "%x" に、"%3d" は "%d" に書き換える必要がある。
B. 実行方法
1. このレポジトリを clone
% git clone git@github.com:noanoa07/myHariboteOS.git※うまくいかない時は、右上の「Clone or download」ボタンで
「Download ZIP」でダウンロードして、ZIPファイルを解凍する
のでも OK。2. 確認
% cd HariboteOS/01_day/helloos0
% make run
実行して、以下のようなウィンドウが表示されれば、成功!
3. 実行コマンド
# コンパイルして、実行
% make run

# イメージファイ ルharibote.img を作成
% make img

# デフォルトは make img
% make

# コンパイルしてできたファイルの内、haribote.img以外を削除
% make clean

# ソースファイル以外(haribote.imgも含め)をすべて削除
% make src_only

# ipl.nasをコンパイル (03_day/harib00dまで)
% make asm
※ 註)
フロッピーディスクに書き込む機能、コマンド(
make install)は省いた。C. 書籍のソースコード
マイナビ出版のサポートサイト より、HariboteOS.zip がダウンロードできる。
※註)
Windows用の エンコーディング/改行コード(ShiftJIS/C RLF)なので、macOSや Linux用の UTF8/ LFに変換した方が良い。エディタで変換するか、変換ツールがとしては nkfがある。
# Homebrewでインストール
% brew install nkf

# バージョンを確認 (現時点でバージョンは 2.1.5)
% nkf -v

# 例) .cファイルをUTF8/LFに変換
% nkf -wLu --overwrite *.c
参考
- 正誤表
- サポートページ
- Wiki 一覧 - os-wiki
- Wiki 目次 - hrb-wiki
- OSを作るときによく使うBIOSファンクション (AT互換機) - os-wiki
- AT互換機でのメモリマップ - os-wiki
- naskについてのページ - hrb-wiki
- VGA - ビデオDAコンバータ - os-wiki
- (PIC)8259A - os-wiki
- (AT)keyboard - os-wiki
- 『30日でできる!OS自作入門』のメモ
- 30日でできる!OS自作入門(記事一覧)[Ubuntu16.04/NASM] - pollenjp - Qiita
- 30日でできる!OS自作入門 まとめ - サラリーマンがハッカーを真剣に目指す
- 『30日でできる! OS自作入門』 for macOS - tatsumack -Qiita
- 『30日でできる! OS自作入門』 for macOS - sandai/30nichideosjisaku -GitHub
- 始める前に 30日でできる!OS自作入門 - ねこめもmkII(マークツー)
- OS自作入門1日目 - duloxetine - Qiita
- 『30日でできる!OS自作入門』をLinuxでやってみる 1日目 - Akitsushima Design
- Linuxで書くOS自作入門 1日目 - Tsurugidake's diary
- このリポジトリは「30日でできる!自作OS入門」の実践リポジトリです - Bo0km4n/os-practice - GitHub
- 30日でできる! OS自作入門 - yishibashi/hariboteOS - GitHub
- 『OS自作入門』を読んでみた。(その6) - いものやま。
- 自作OS入門の環境をOS Xで整える - SWEet
- macOSでi386-elf向けのGCCをインストールする - tatsumack - Qiita
- 8日目(マウスを動かすまで) - ねこめもmkII(マークツー)
※註)
macOSとはいえ、ほとんどLinuxと環境なので、検索キーワードに
Linuxを入れるとヒットすることがある。ただし、macOS の gccは、実態は clangなので、そこで苦労したりする。
謝意
・ リンカスクリプトの作者 ivan ivanov(ivan111)さん
・ フォントファイルのリンクについて、sprintf の作者 サラリーマンがハッカーを真剣に目指す さん
に感謝します。
