- 投稿日:2019-08-30T18:51:32+09:00
超簡単 Kerasで複数Input統合モデル
Kerasで複数の情報を入力して、途中で結合する方法を紹介します。
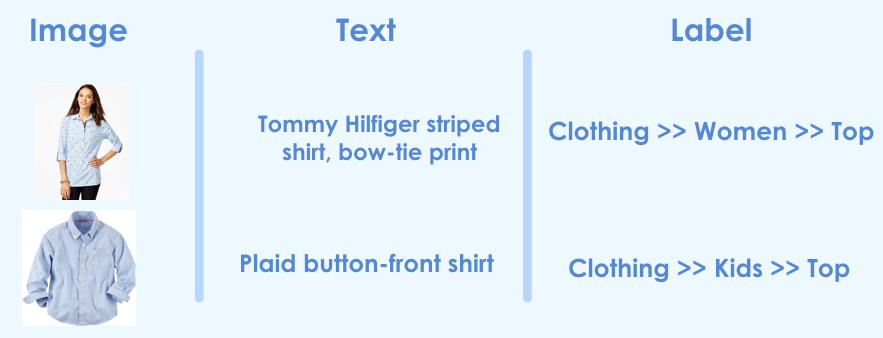
この方法は、例えば以下のように画像とテキストを使って予測モデルを作る場合などに有効です。リンク先参考。
ImageDataGeneratorを使いつつ統合する方法は、記事「KerasのImageDataGeneratorを使いつつ複数Input統合モデル」を参照ください。処理概要
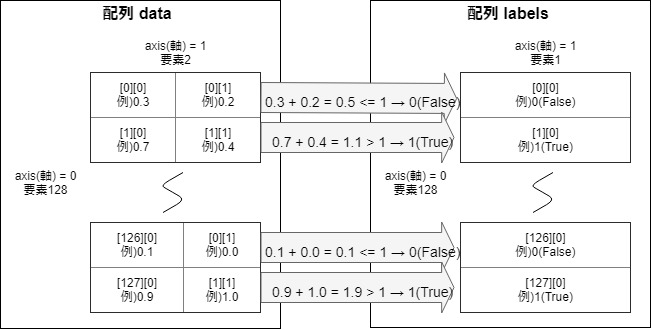
以前、記事「【Keras入門(1)】単純なディープラーニングモデル定義」で紹介した以下の図の配列dataを2つに分解して統合するモデルにしてみます。
処理プログラム
プログラム全体はGitHubを参照ください。
※なぜか直接GitHubで見られずに、nbviewerなら参照できました。nbviewerにhttps://github.com/YoheiFukuhara/keras-for-beginner/blob/master/Keras09_merge.ipynbを入力します。1. ライブラリインポート
今回はnumpyとtensorflowに統合されているkerasを使います。ピュアなkerasでも問題なく、インポート元を変えるだけです。
from random import random

import matplotlib.pyplot as plt
from tensorflow.keras.layers import Input, concatenate, Dense
from tensorflow.keras.models import Model
from tensorflow.python.keras.utils.vis_utils import plot_model
import numpy as np
2. 前処理
2.1. データ作成
入力1と入力2の和が1未満の場合は、正解ラベルを0に設定
入力1と入力2の和が1以上の場合は、正解ラベルを1に設定NUM_TRAIN = 256 x_train1 = np.empty((0, 1)) # 入力(説明変数)1 x_train2 = np.empty((0, 1)) # 入力(説明変数)2 y_train = np.empty((0, 1)) # 正解ラベル(目的変数) for i in range(NUM_TRAIN): x1 = np.array(random()) # 0から1までの乱数 x2 = np.array(random()) # 0から1までの乱数 if x1 + x2 < 1: y_train = np.append(y_train, np.zeros(1).reshape(1, 1), axis=0) else: y_train = np.append(y_train, np.ones(1).reshape(1, 1), axis=0) x_train1 = np.append(x_train1, x1.reshape(1, 1), axis=0) x_train2 = np.append(x_train2, x2.reshape(1, 1), axis=0)3. モデル定義
concatenateを使って2つの流れを統合します。concatenate以外も統合系の関数がありますが、多くの場合はconcatenateではないでしょうか。# 入力を定義 input1 = Input(shape=(1,)) input2 = Input(shape=(1,)) # 入力1から結合前まで x = Dense(1, activation="linear")(input1) x = Model(inputs=input1, outputs=x) # 入力2から結合前まで y = Dense(1, activation="linear")(input2) y = Model(inputs=input2, outputs=y) # 結合 combined = concatenate([x.output, y.output]) # 密結合 z = Dense(32, activation="tanh")(combined) z = Dense(1, activation="sigmoid")(z) # モデル定義とコンパイル model = Model(inputs=[x.input, y.input], outputs=z) model.compile(loss='binary_crossentropy', optimizer='adam', metrics=['acc']) model.summary()出力されるサマリは以下の通り。
Layer (type)                    Output Shape         Param #     Connected to
==================================================================================================
input_1 (InputLayer)            [(None, 1)]          0
__________________________________________________________________________________________________
input_2 (InputLayer)            [(None, 1)]          0
__________________________________________________________________________________________________
dense (Dense)                   (None, 1)            2           input_1[0][0]
__________________________________________________________________________________________________
dense_1 (Dense)                 (None, 1)            2           input_2[0][0]
__________________________________________________________________________________________________
concatenate (Concatenate)       (None, 2)            0           dense[0][0]
                                                                 dense_1[0][0]
__________________________________________________________________________________________________
dense_2 (Dense)                 (None, 32)           96          concatenate[0][0]
__________________________________________________________________________________________________
dense_3 (Dense)                 (None, 1)            33          dense_2[0][0]
==================================================================================================
Total params: 133
Trainable params: 133
Non-trainable params: 0
__________________________________________________________________________________________________
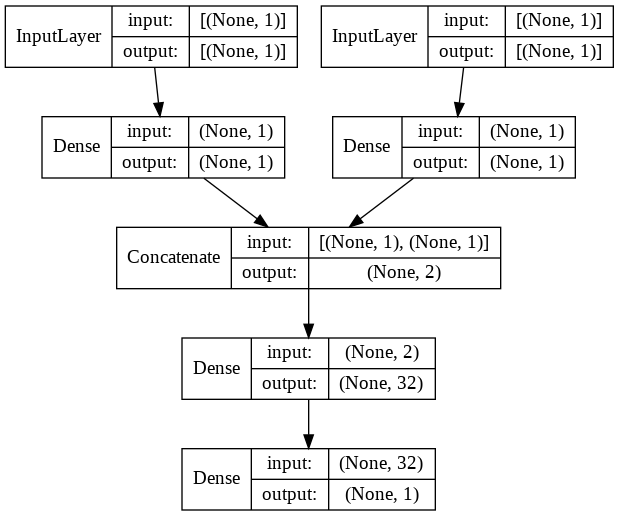
plot_modelを使って見やすくするとこんな感じです。plot_model(model, show_shapes=True, show_layer_names=False)4. 訓練実行
fit関数を使って訓練します。200epoch程度で精度が出ます。
history = model.fit([x_train1, x_train2], y_train, epochs=200)参考
記事「Kerasで複数の入力を統合/マージする方法」を参考にしました。
- 投稿日:2019-08-30T11:47:45+09:00
Logo detection in Images using SSDの超個人的メモ(未完)
注意 個人的メモなので、暇な方以外は読まないでください。
時間を無駄にしたくない人は、以下を呼んでください。
https://towardsdatascience.com/logo-detection-in-images-using-ssd-bcd3732e1776tensolflowのSSDとは
Single Shot Multibox Detector
の略だ
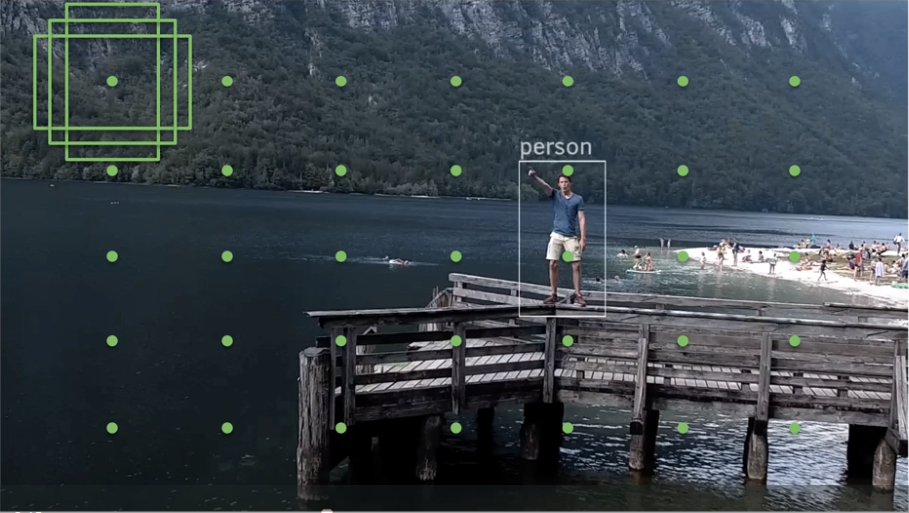
単一深層学習による物体検知だ物体検知と、ローカライゼーション、と分類をsingle forward pass of the network で行うことが出来る。
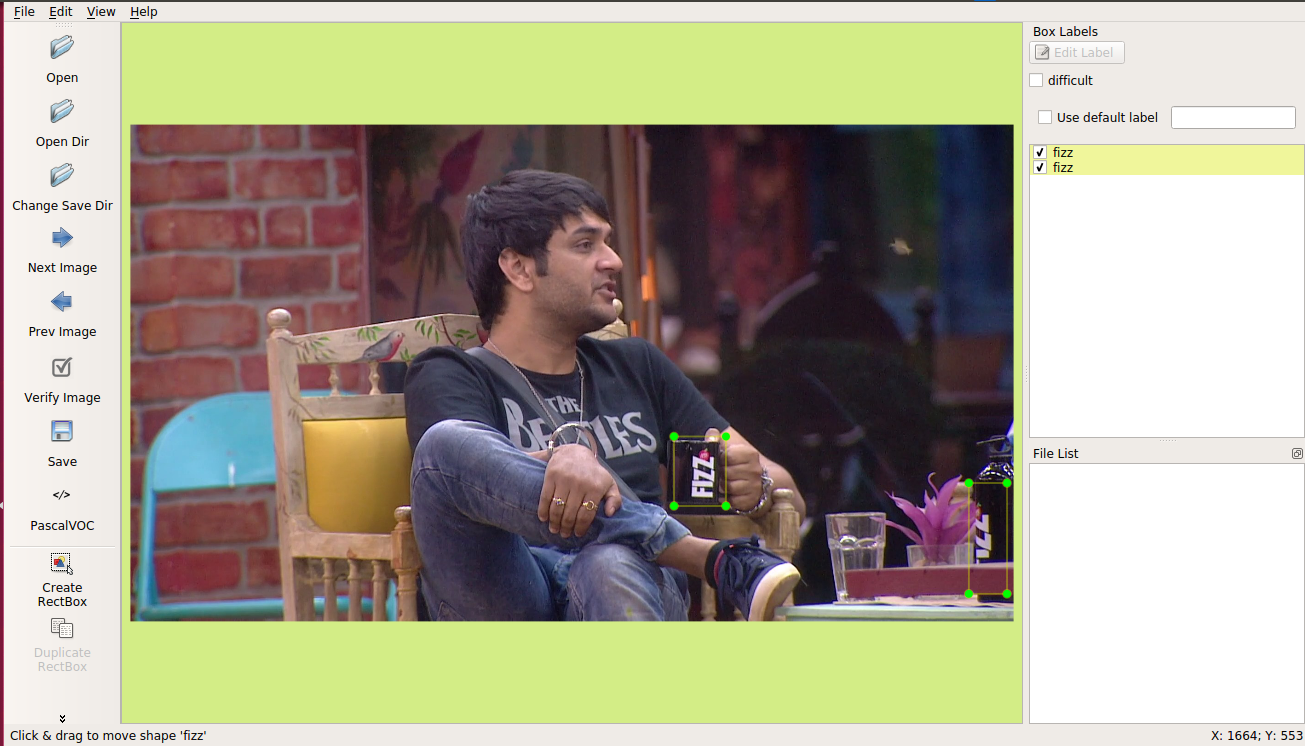
LabelImg
LabelImgは、画像のあのてーションを行うためのツールだ。
labelImgであのテーとした画像は、xml形式で保存される。
xmlより、バイナリでデータを扱った方が色々と便利だ。
ということで、XmlをTFRecordに変換する。
xmlをTFRecordに変換するには、まず、pythonスクリプトを使って、xmlをCSVに変換する必要がある。
import os
import glob
import pandas as pd
import xml.etree.ElementTree as ET


def xml_to_csv(path):
    xml_list = []
    for xml_file in glob.glob(path + '/*.xml'):
        tree = ET.parse(xml_file)
        root = tree.getroot()
        for member in root.findall('object'):
            value = (root.find('filename').text,
                     int(root.find('size')[0].text),
                     int(root.find('size')[1].text),
                     member[0].text,
                     int(member[2][0].text),
                     int(member[2][1].text),
                     int(member[2][2].text),
                     int(member[2][3].text)
                     )
            xml_list.append(value)
    column_name = ['filename', 'width', 'height', 'class', 'xmin', 'ymin', 'xmax', 'ymax']
    xml_df = pd.DataFrame(xml_list, columns=column_name)
    return xml_df


def main():
    for directory in ['train','test']:
        image_path = os.path.join(os.getcwd(), 'images/{}'.format(directory))
        xml_df = xml_to_csv(image_path)
        xml_df.to_csv('data/{}_labels.csv'.format(directory), index=None)
        print('Successfully converted xml to csv.')

main()
XMLファイルは、images/trainと、images/testに保存され、二つのcsvファイルへと変換される。
xmlファイルを、csvファルへと変換したら、次にTFRecordsにpythonスクリプトを使い変換する。
import os
import glob
import pandas as pd
import xml.etree.ElementTree as ET


def xml_to_csv(path):
    xml_list = []
    for xml_file in glob.glob(path + '/*.xml'):
        tree = ET.parse(xml_file)
        root = tree.getroot()
        for member in root.findall('object'):
            value = (root.find('filename').text,
                     int(root.find('size')[0].text),
                     int(root.find('size')[1].text),
                     member[0].text,
                     int(member[2][0].text),
                     int(member[2][1].text),
                     int(member[2][2].text),
                     int(member[2][3].text)
                     )
            xml_list.append(value)
    column_name = ['filename', 'width', 'height', 'class', 'xmin', 'ymin', 'xmax', 'ymax']
    xml_df = pd.DataFrame(xml_list, columns=column_name)
    return xml_df


def main():
    for directory in ['train','test']:
        image_path = os.path.join(os.getcwd(), 'images/{}'.format(directory))
        xml_df = xml_to_csv(image_path)
        xml_df.to_csv('data/{}_labels.csv'.format(directory), index=None)
        print('Successfully converted xml to csv.')

main()
下のコマンドを打つと、csvを、TFRecordに変換できる。
python generate_tfrecord.py — csv_input=data/train_labels.csv — output_path=data/train.recordブランドのロゴ検出器をトレーニングする。
ブランドロゴを検出するために、事前に用意されたモデルを元に、新しいロゴを検知するように、遷移のようなトレーニングをする。
このやり方は、スクラッチで、全く新しいモデルを作るより、素早くモデルを作成できる。Inceptionを使おう。
tensorflowには
公開済みのモデルのリストがあるので、必要なモデルをダウンロードし、設定ファイルを以下のように記述する。# SSD with Inception v2 configuration for MSCOCO Dataset. # Users should configure the fine_tune_checkpoint field in the train config as # well as the label_map_path and input_path fields in the train_input_reader and # eval_input_reader. Search for "PATH_TO_BE_CONFIGURED" to find the fields that # should be configured. model { ssd { num_classes: 6 box_coder { faster_rcnn_box_coder { y_scale: 10.0 x_scale: 10.0 height_scale: 5.0 width_scale: 5.0 } } matcher { argmax_matcher { matched_threshold: 0.5 unmatched_threshold: 0.5 ignore_thresholds: false negatives_lower_than_unmatched: true force_match_for_each_row: true } } similarity_calculator { iou_similarity { } } anchor_generator { ssd_anchor_generator { num_layers: 6 min_scale: 0.2 max_scale: 0.95 aspect_ratios: 1.0 aspect_ratios: 2.0 aspect_ratios: 0.5 aspect_ratios: 3.0 aspect_ratios: 0.3333 reduce_boxes_in_lowest_layer: true } } image_resizer { fixed_shape_resizer { height: 300 width: 300 } } box_predictor { convolutional_box_predictor { min_depth: 0 max_depth: 0 num_layers_before_predictor: 0 use_dropout: false dropout_keep_probability: 0.8 kernel_size: 3 box_code_size: 4 apply_sigmoid_to_scores: false conv_hyperparams { activation: RELU_6, regularizer { l2_regularizer { weight: 0.00004 } } initializer { truncated_normal_initializer { stddev: 0.03 mean: 0.0 } } } } } feature_extractor { type: 'ssd_inception_v2' min_depth: 16 depth_multiplier: 1.0 conv_hyperparams { activation: RELU_6, regularizer { l2_regularizer { weight: 0.00004 } } initializer { truncated_normal_initializer { stddev: 0.03 mean: 0.0 } } batch_norm { train: true, scale: true, center: true, decay: 0.9997, epsilon: 0.001, } } override_base_feature_extractor_hyperparams: true } loss { classification_loss { weighted_sigmoid { } } localization_loss { weighted_smooth_l1 { } } hard_example_miner { num_hard_examples: 3000 iou_threshold: 0.99 loss_type: CLASSIFICATION max_negatives_per_positive: 3 min_negatives_per_image: 0 } classification_weight: 1.0 localization_weight: 1.0 } normalize_loss_by_num_matches: true post_processing { batch_non_max_suppression { score_threshold: 1e-8 iou_threshold: 0.6 max_detections_per_class: 100 max_total_detections: 100 } score_converter: SIGMOID } } } train_config: { batch_size: 24 optimizer { rms_prop_optimizer: { learning_rate: { exponential_decay_learning_rate { initial_learning_rate: 0.004 decay_steps: 800720 decay_factor: 0.95 } } momentum_optimizer_value: 0.9 decay: 0.9 epsilon: 1.0 } } fine_tune_checkpoint: "ssd_inception_v2_coco_2017_11_17/model.ckpt" from_detection_checkpoint: true # Note: The below line limits the training process to 200K steps, which we # empirically found to be sufficient enough to train the pets dataset. This # effectively bypasses the learning rate schedule (the learning rate will # never decay). Remove the below line to train indefinitely. num_steps: 200000 data_augmentation_options { random_horizontal_flip { } } data_augmentation_options { ssd_random_crop { } } } train_input_reader: { tf_record_input_reader { input_path: "data/train.record" } label_map_path: "data/detection.pbtxt" } eval_config: { num_examples: 8000 # Note: The below line limits the evaluation process to 10 evaluations. # Remove the below line to evaluate indefinitely. max_evals: 10 } eval_input_reader: { tf_record_input_reader { input_path: "data/test.record" } label_map_path: "data/detection.pbtxt" shuffle: false num_readers: 1 }設定ファイルの中で、PATH_TO_BE_CONFIGURED
トレーニングを開始する前に、label mapを作る必要がある。
label mapは、基本的にはidとnameとclassを持つ辞書だ。item { id: 1 name: 'fizz' } item { id: 2 name: 'garnier' } item { id: 3 name: 'cpplus' } item { id: 4 name: 'oppo' } item { id: 5 name: 'faber' } item { id: 6 name: 'samsung' }ついにトレーニングを開始出来る。
続く、、、
