- 投稿日:2019-08-30T23:56:42+09:00
█║▌Software Defined to Spatial Defined Networking
While software defined networking has proven its value, SynchroKnot has taken software defined networking to a whole new dimension with Spatial Defined Networking.
Spatial Defined Networking is made up of SynchroKnot's core networking component called Satellite Tree Protocol, which is an enhancement to the IEEE standard [ 802.1D (1998|2004), 802.1W ] while keeping the core semantics in place.
This simplistically means, you can use any commodity X86_64 Desktop/Workstation/Server/Embedded device and connect them to eachother.
There is no need to purchase physical or virtual switches and routers or any of their licenses [Eg. Cisco, Juniper etc].
Satellite Tree Protocol is the core networking component of the SynchroKnot Cloud Computing and Data Center Decentralization software.
In brief, the SynchroKnot software transforms any server, workstation, desktop or embedded device into a decentralized cloud or data center [data decenter].
There are various demonstration videos depicting its workability, performance, security and scalability on synchroknot.tokyo
Here are some of the highlights of the SynchroKnot Satellite Tree Protocol:
■ Automatic - Mission-Critical - Resilient - Self-Sustaining - Self-Healing - Seamless Scaling Without Down-Time - High-Performance.
■ Nothing to configure or manage.
■ Enhancement to the IEEE standard [ 802.1D (1998|2004), 802.1W ] while keeping the core semantics in place.
Standard Layer 2 Ethernet remains pure, untouched and unmodified without frame encapsulation, additional headers or other forms of tinkering.
■ Improving upon and applying the globally accepted IEEE standard found in network switches onto Spatial Fabric Satellites. Network is no longer a separate complex component with separate hardware and licenses, but is now built right in with nothing extra that needs to be done.
■ Depending on your need and/or requirement, you now have a logical straight-forward option and ability to eliminate Top-of-the-Rack, Spine, Leaf, Edge, Aggregation and Core Switches & Routers, along with their respective licenses.
■ Large-Scale, High-Performance Layer 2 Environment with a single instance of Satellite Tree Protocol with support for single, double and triple stacked VLANS.
■ Does not cause a network-wide outage on failure of link(s) as experienced with regular Spanning Tree Protocol [ STP ] and Rapid Spanning Tree Protocol [ RSTP ].
■ Recovery from failure is, in most cases, in sub-milliseconds to about 1.5 seconds depending on the nature of failure [ single / multiple links ] and the distance from the point(s) of failure. Traffic that does not traverse the path where failure occured is generally not affected by the failure at all.
■ Intelligent Layer 2 Optimized Cost Multipath forwarding logic based on local intelligence chooses the best link with the shortest optimal path in normal operation, congestion and on link failure.
■ Multiple ANY-to-ANY Layer 2 routes allow you to add and remove hardware transparently without turning off whole or sections of the network, as experienced with switches and routers in networks today.
■ Zero Configuration.
How about never having to endure countless hours of pain configuring, managing and maintaining physical Ethernet ports, trunking and ACLs and other aspects? How about plugging one end of Ethernet cable into ANY physical port of a commodity hardware and connecting the other end to ANY physical port of another commodity hardware and that's it - nothing to do.
■ Get the best of cost, low latency, bandwidth and performance in multiple directions, not just East-West / North-South with the help of SynchroKnot Multi-Dimensional topology.
■ SynchroKnot Multi-Dimensional topology is a dynamic mix and integration of proven network topologies which are used as a primary backbone in High Performance Computing and Supercomputing. These include Ring, 2-D, 3-D and many other custom topologies optimized for cost, performance and simplified cabling.
■ Single-length cable for the entire cluster. No long haul cables. No expensive power-consuming optical cables.
■ Very low CPU usage.
Apart from all these features, there are multitude of extra security features to choose from on top of the Satellite Tree Protocol.
More information is available at:
■ synchroknot.tokyo
■ synchroknot.orgYou are encouraged to share your knowledge with others!

- 投稿日:2019-08-30T22:23:17+09:00
Cloud Computing Decentralization Software
We have heard of Cloud Computing, Data Centers, Edge computing and their numerous expansions and variations. However for the most part the architectures used underneath these infrastructures and the technologies governing them remain centralized in terms of location and disparate in terms of hardware + software used at that central location.
For example, you may have your cloud computing infrastructure located at a centralized data center. This cloud computing infrastructure is made of up disparate hardware, namely servers, redundant switches & routers, storage [SAN/NAS] and load balancers etc., and run the standard virtualization software like OpenStack, VMware, Hyper-V and so on.
So, in a sense, this standard and expensive business model has locked itself into a myriad of traps. Some of the most important traps are scalability, complexity, security, manageability, maintenance, vendor lock-ins, maintaining of multi-tiered separate teams, time-consuming fixes to problems, and much more.
One method out of this architectural quicksand is to look at the novel approach of the wonderful research done within the Blockchain and IoT industry and adapt it to the systems architecture in a way such that you should be able to use all kinds of systems from embedded devices to desktops, workstations and servers across both wired and wireless networks transparently.
In other words, building a decentralized, automatic cloud and data center which can be rapidly scaled globally within the budget and performance requirements of the end users. Plus, it must have the ability to be kept at locations other than just a data center. Some of the examples of locations are offices, cubicles, basements, apartments, closets, fiber optic hubs, 5G base stations, shops and much more.
This is where SynchroKnot software does it all and takes care of everything. SynchroKnot has made it easy with its software. It installs in minutes and does much more than what the centralized cloud computing and data center technologies put together can do today and what they aspire to be able to do in the future.
You can transform any server, workstation, desktop or embedded device into a decentralized cloud or data center and connect them to eachother in minutes!
Apart from just merely de-centralizing, with SynchroKnot, anyone can sell their full or under-utilized hardware resources using Bitcoin, and without involving centralized financial institutions/payment processors.
SynchroKnot also has multifarious real-world security measures built into the software, which are aimed at substantially improving the overall security of decentralized systems.
█║▌║▌║ Data Center & Cloud Computing Today - VS - SynchroKnot ║█
█║ Data Center & Cloud Computing Today
│
├──> Must Purchase Disparate Hardware - servers, redundant switches & routers, storage [SAN/NAS] and load balancers.
├──> Must Purchase Virtualization Software + Licenses - VMware, OpenStack, Hyper-V, RHEV, Xen, VDI etc.
├──> Must Purchase Storage Software + Licenses.
├──> Must Purchase Licenses for Switches, Routers & Load Balancers [above and beyond the hardware].
├──> Must Manage Separate Hardware & Software Through Different Management Panels, User Interfaces and APIs.
├──> Must Maintain Separate Multi-Tiered Teams and Departments To Manage Complex Operations.
└──> Must Have A Large Space To House Expensive Hardware With High-Cost Real Estate & Cooling.
█║ SynchroKnot Advantage: Decentralized Data Center and Cloud Computing
│
├──> SynchroKnot Software Does Everything.
├──> No Separate Hardware Needed - Use Any Commodity X86_64 Desktop/Workstation/Server/Embedded Device and Connect Them To Eachother.
├──> No Need To Purchase Separate Desktop & Server Virtualization Software OR Their Licenses [Eg. VMware, OpenStack, Hyper-V, RHEV, Xen, VDI etc].
├──> No Need To Purchase Physical OR Virtual Switches and Routers OR Any Of Their Licenses [Eg. Cisco, Juniper etc].
├──> No Need To Purchase SAN/NAS/Distributed Block & File Storage [Eg. Netapp, EMC, Gluster, Ceph etc].
├──> No Separate Teams And Departments Needed.
├──> No Large Space Needed. SynchroKnot Setup Is Very Flexible. You Can Utilize Cubicles, Offices, Apartments, Basements, Fibre Optic Hubs etc.
├──> Transparently Scale and De-Scale [locally/globally] Your SynchroKnot Infrastructure On-Demand Without Disruption/Interruption.
└──> Be Your Own Cloud Provider. Sell Full or Under-Utilized Hardware Resources With Bitcoin Internally/Externally [New Feature Coming Soon].
█║ SynchroKnot: Economic Advantages
│
├──> Exponential Reduction In Total Cost.
├──> Exponential Reduction In Complexity.
├──> Exponential Reduction In Manpower.
├──> Exponential Increase In Performance.
├──> Exponential Increase In Security.
├──> Exponential Increase In Scalability & Over-all Control & Responsiveness.
├──> Eliminate All Vendor and Multi-Vendor Lock-ins, Interdependencies & Traps.
├──> Comprises 10+ Year Production Seasoned Open-Source Components.
└──> Significantly Increase Your Organization's Micro and Macro Economic Dynamics and Manpower Efficiency.
More information is available at:
synchroknot.tokyo
synchroknot.org
Feel free to get in touch and share your knowledge with others!
SynchroKnot Architecture : Depictions :
- 投稿日:2019-08-30T19:42:24+09:00
ShellScript ls コマンド で 得られた ファイルとフォルダ の 個数 を 出力する
目的
- ShellScriptでlsコマンドの結果として得られたファイルとフォルダの個数を出力する方法を知る。
書き方の例
- 下記にShellScriptの処理を記載する。
変数=(`ls`)
echo ${#変数[*]}
より具体的な例
- フォルダ
/home/miriwo/work直下のフォルダとファイルの数を出力する。- 下記にShellScriptの処理を記載する。
# ディレクトリ数、ファイル数を知りたいディレクトリに移動
cd /home/miriwo/work

# lsコマンドの結果を変数ls_resultに格納
ls_result=(`ls`)

# 結果数を格納した内容を出力する
echo ${#ls_result[*]}
- 投稿日:2019-08-30T18:01:55+09:00
Red Hat系の入門資格をこれから取る方を救援する
もくじ
- はじめに
- 用意するもの
- ここ読めワンワン
- おわりに
はじめに
RH系の入門資格をこれから取ろうとしている画面の前の貴方へ。
これだけは言っておく。約6万円を棒に振らないためにも、貴方は本記事を読むべきだ。
正攻法で某社テキストを購入している方は、回れ右しても恐らく影響は無い。私のこの怒りが冷めやらぬうちに某社のシステム管理者のガイドより分かりやすく書き下しておく。
試験に臨む前にもっと調査すべきだった。私ってほんとバカス。~バカスは激怒した。必ず、かの邪智暴虐なベンダ資格の利潤を除かなければならぬと決意した。~
太宰治虫 (2019) 走れバカス Kawu出書房用意するもの
- CentOS 7、もしくは、RHEL7/8の仮想マシン
検証OSはCentOS 7 x86_64 7.6.1810- RH系の入門資格を取りたい気持ち
ここを読めワンワン
画面の前の貴方に本手順を覚えてもらうことで、
rootパスワードの変更方法が分からず試合開始・即帰宅を防ぐことこそ本記事の狙いであります。なお本手順は、某社のシステム管理者のガイドほぼそのままです。
そのうち手順25.7 rd.breakを使用したrootパスワードのリセット方法にスポットを当てて書き下している。
ただし、某資格の解答において不要と思われる説明は省いているので、公式の全手順が気になる方は元記事まで。
- ログイン可能な状態の仮想マシンを用意する
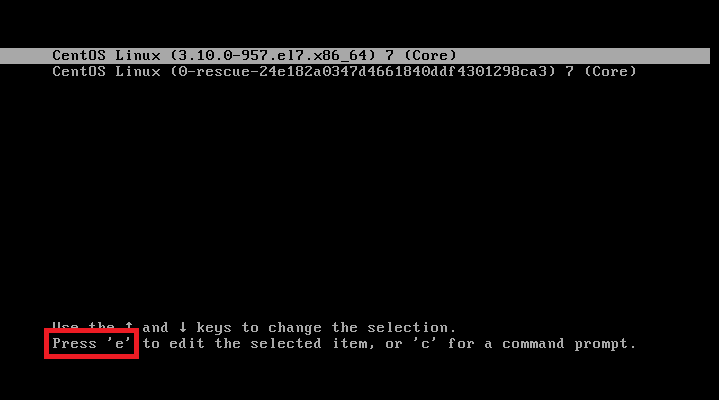
仮想マシンを起動し、GRUB2ブート画面で
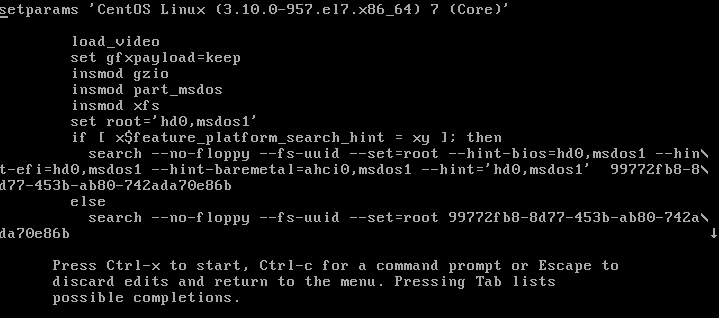
eキーを押して編集画面に入る。
重要
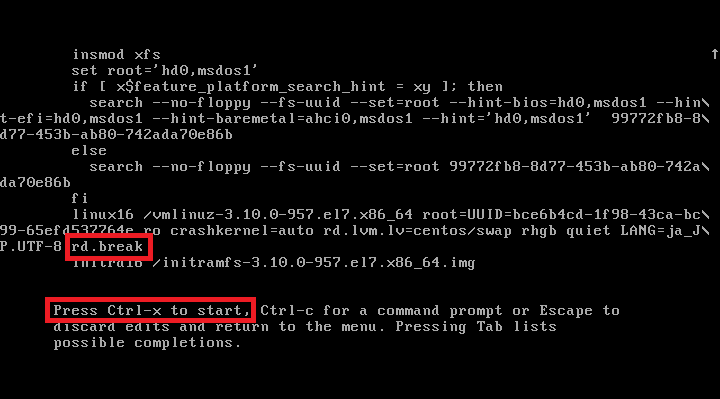
システムメッセージを有効にするには、rhgb パラメータと quiet のパラメータを削除(未検証、公式手順より)。x86-64 BIOSベースの場合は
linux16行、UEFIの場合はlinuxefi行の末尾にrd.breakパラメータを追加し、Ctrl+xで再起動。
ファイルシステムはReadOnlyな
/sysroot/がマウントされる。rootパスワードを変更するため、Writableで再マウント。
ファイルシステムの
rootを変更すると、プロンプトがBourne shell (/bin/sh)に変わる(骨じゃなかったんだ...)。
(余談)
export LC_ALL=Cでロケールを変更したら文字化けが解消できる。メッセージが無駄に長かったのは、password1なんて脆弱なパスワードにしていたため笑
CentOS/RHEL7はデフォルトEnforcingでSELinuxを利用するため、
passwdコマンドで新しく作成された/etc/shadowファイルのコンテキストを再ラベルする必要がある。次回ブート時にコンテキストを再ラベルするため、.autorelabelを作成。
ファイルシステムをReadOnlyで再マウント(未検証、公式手順より)。
公式で詳細な説明はなかったが、/sysroot/を手順4でWritableに再マウントした状態を元に戻すため、雑にファイルシステム全体をマウントし直しているように見える。ファイルシステムのアクセス権的に本手順はやっておいたほうが無難だと思われる。
ファイルシステムに詳しい方、お時間あれば本手順の必要性をご教示下さい。sh-4.2# mount -o remount,ro /
exitコマンドを2度実行して初期化プロセスが再開し、仮想マシンを再起動。
注記
二度目のexitコマン実行時に再起動が始まる。
ファイル数が多いほどSELinuxコンテキストの再ラベルには時間がかかる。
再ラベルが完了すると、システムは自動的に再起動する。+α. 下記コマンドにて、SELinuxポリシーの強制を再度有効化し、ポリシーの強制状態を確認するが吉(未検証、公式手順より)。
```
~]# setenforce 1
~]# getenforce
Enforcing
```
おわりに
公式ドキュメントとググリでの独学のみでは、某社の罠にかかる可能性があることが分かった。
また現場的に、周りでサクサク勧めている人は、殆ど本手順が書かれた?公式の入門書を持っていたからか、私のように即諦めている方は"あまり"いなかった。てか公式のドキュメントをいちから進めたら基本的にこんな手順に巡り合わないし、公式はインストールディスクによるパスワード変更を推奨してるにもかかわらずこんな手順から試験は始まるし、そもそもサーバに入れなくなるようなアホな管理者や引き継ぎをしない担当者はいないだろ、、、いないよな?!
ただ、管理者としては不慮の事故でサーバに入れなくなる時もあるだろうし、色んな方法は知っておくべきという学びは得られた。が、本音は***Hatをぶっ壊す党を作りたい気持ちでいっぱいです。
願わくば、本記事を読んだRH系の入門資格を取ろうと思っている方が一人でも多く救われれば幸いです。
何かお気づきの点があれば、ご指摘をお願いします。参考資料
- 投稿日:2019-08-30T17:38:27+09:00
Datadog Process Checks の exact_match とは何者か
これはなんですか
- Datadog Agent 設定でプロセス監視をするときにたまに使う
exact_matchキーについて調べたのでメモとして残しておく- これを読めば、どんなときに
exact_match: falseを設定すれば良いかが分かるようになるはず先に結論
exact_match: trueのときはプロセス名を検索するが、何かしらのプログラム上でデーモンとして動いている場合に検索がうまく効かないことがある- ruby だったり java だったりのデーモンとして動いているプロセスについては、
exact_match: falseを設定した上でマッチング文字列にプロセス起動時のコマンドの一部を指定する
- ex) td-agent は ruby のデーモンとして動作するので、コマンドを指定する必要がある
- プロセス起動時のコマンドは
ps -efで確認できる。また、各プロセスのプロセス名はps -ef cで確認できる背景
- Datadog で td-agent のプロセス監視をするとき、多くの場合は
exact_match: falseという項目が必要となる- なんでだろうと思って気になったので調べてみた。
前提: Datadog における Process Checks
https://docs.datadoghq.com/ja/integrations/process/
Datadog Agent の Config に Process Check を設定することで、特定プロセスの死活状況やプロセス数、プロセスのリソース使用状況が取得できるようになる。
exact_matchを調べてみたドキュメントを読む
Process Check では、いわゆるプロセス名をプロセス一覧から検索してPIDを取得し、各種メトリクスを収集する。
exact_matchはプロセス一覧の検索に関わるオプションで、ドキュメント内では次のように説明されている:By setting exact_match to False in your yaml file, the agent looks at the command used to launch your process and recognizes every process that contains your keywords.
つまり、
exact_match: falseとすることで、検索対象をプロセス名ではなくプロセス起動時のコマンドに変えることができる。Datadog Agent の コードを読む
実際にどんな処理が行われているかを知るため、Datadog Agent のコードを読んでみた。すると、次の様に
psutil.Process()を使ってプロセス名を検索していることがわかった。for proc in psutil.process_iter(): # Skip access denied processes if not refresh_ad_cache and proc.pid in self.ad_cache: continue found = False for string in search_string: try: # FIXME 8.x: All has been deprecated # from the doc, should be removed if string == 'All': found = True if exact_match: if os.name == 'nt': if proc.name().lower() == string.lower(): found = True else: if proc.name() == string: found = True else: cmdline = proc.cmdline() if os.name == 'nt': lstring = string.lower() if re.search(lstring, ' '.join(cmdline).lower()): found = True else: if re.search(string, ' '.join(cmdline)): found = Trueコードから、
exact_matchが True の場合はpsutil.Process().name()の値が、False の場合はpsutil.Process().cmdline()の値が使われていることがわかる。エージェントのプロセス名
当初の疑問に戻って、 td-agent のプロセス監視にはなぜ
exact_match: falseが必要なのかを考える。これまで調べたことから、td-agent のプロセス名 (
psutil.Process.name()の値) はおそらくtd-agentではないことが推測される。詳しく調べたところ、td-agentはRuby製のプログラムで、Rubyのデーモンとして起動するらしい。実際、ps-ef出力を見ると、rubyプログラムとして起動していた。(cオプションを渡すとよりわかりやすい。)$ ps -ef UID PID PPID C STIME TTY TIME CMD ... td-agent 15397 1 0 07:06 ? 00:00:00 /opt/td-agent/embedded/bin/ruby /usr/sbin/td-agent --log /var/log/td-agent/td-agent.log --use-v1-config --group td-agent --daemon /var/run/td-agent/td-agent.pid td-agent 15402 15397 0 07:06 ? 00:00:01 /opt/td-agent/embedded/bin/ruby -Eascii-8bit:ascii-8bit /usr/sbin/td-agent --log /var/log/td-agent/td-agent.log --use-v1-config --group td-agent --daemon /var/run/td-agent/td-agent.pid --under-supervisor ... $ ps -ef -c UID PID PPID C STIME TTY STAT TIME CMD ... td-agent 15397 1 0 07:06 ? Sl 0:00 ruby td-agent 15402 15397 0 07:06 ? Sl 0:01 ruby ...つまり、td-agentにおけるプロセス名は
rubyであるためexact_match: trueでは検索がうまくできず、結果としてexact_match: falseとして起動時のコマンドから検索する必要があったということになる。どんなときに
exact_match: falseを指定するか
exact_match: false指定は次の場合に必要となる:
- 検索対象のプロセスが ruby, java, python といったプログラムのデーモンとして動いていて、プロセス名からそのプロセスであることを特定できない場合
今回の td-agent が典型的な例である。他のパターンは知らないけど、自前でスクリプトをデーモン化した場合は気をつける必要がありそう。
- 投稿日:2019-08-30T13:40:11+09:00
多段sshを一発で
~.ssh/configを編集
Host host1
        hostname humidai1
        User root
        Port 443
Host host2
        hostname testdomain.com
        Port 8080
        User root
        ProxyCommand ssh -CW %h:%p host1
        localForward 13389 192.168.0.1:3389
host2を指定してssh
$ ssh host2
- 投稿日:2019-08-30T12:02:31+09:00
Ubuntu18.04にJuman++ V2をインストール
この記事の対象者
- AI Chatbotや自然言語処理に興味がある。
- MeCabだけでなく、Juman++が使用してみたい
- Jumanはインストールでできたが、Juman++のインストール方法がよくわからない
環境
- OS:Ubuntu-18.04
Juman++をインストール
今回は処理速度が大きく向上したJuman++のV2を使用していきます。
(あくまでV2は開発版なので、ご利用の際は自己責任でお願いいたします)
https://github.com/ku-nlp/jumanpp/releases※Juman++の1.0系はこちらからインストールできます
http://nlp.ist.i.kyoto-u.ac.jp/index.php?JUMAN++Juman++のソースをダウンロードして解凍
# jumanpp-2.0.0-rc3 download
wget https://github.com/ku-nlp/jumanpp/releases/download/v2.0.0-rc3/jumanpp-2.0.0-rc3.tar.xz
# unzip a file
tar xvf jumanpp-2.0.0-rc2.tar.xz
cmakeをインストール
sudo apt install cmakeコンパイル用のフォルダを作成
cd jumanpp-2.0.0-rc2/
mkdir build
juman++をコンパイル。
cd build/
cmake .. -DCMAKE_BUILD_TYPE=Release -DCMAKE_INSTALL_PREFIX=/usr/local
make
-DCMAKE_INSTALL_PREFIXには、make installした時のインストール先を設定できます。デフォルトは、UNIXでは/usr/local、WindowsではC://Program Filesです。
-DCMAKE_BUILD_TYPEについては、こちらの記事(項:ビルドの種類によってオプションを変える)が詳しいです。
参考:https://qiita.com/shohirose/items/637f4b712893764a7ec1#%E3%83%93%E3%83%AB%E3%83%89%E3%81%AE%E7%A8%AE%E9%A1%9E%E3%81%AB%E3%82%88%E3%81%A3%E3%81%A6%E3%82%AA%E3%83%97%E3%82%B7%E3%83%A7%E3%83%B3%E3%82%92%E5%A4%89%E3%81%88%E3%82%8Bコンパイルが完了したら、インストール開始
sudo make installJuman++がインストールできたか確認
文字列を品詞分解してみる。
echo すももももももももももも | jumanpp以下のように出力されれば、インストール成功です。
すもも すもも すもも 名詞 6 普通名詞 1 * 0 * 0 "自動獲得:テキスト"
@ すもも すもも すもも 名詞 6 普通名詞 1 * 0 * 0 "代表表記:酸桃/すもも 自動獲得:EN_Wiktionary"
も も も 助詞 9 副助詞 2 * 0 * 0 NIL
もも もも もも 名詞 6 普通名詞 1 * 0 * 0 "代表表記:桃/もも ドメイン:料理・食事 カテゴリ:植物;人工物-食べ物 漢字読み:訓"
@ もも もも もも 名詞 6 普通名詞 1 * 0 * 0 "代表表記:股/もも カテゴリ:動物-部位"
も も も 助詞 9 副助詞 2 * 0 * 0 NIL
もも もも もも 名詞 6 普通名詞 1 * 0 * 0 "代表表記:桃/もも ドメイン:料理・食事 カテゴリ:植物;人工物-食べ物 漢字読み:訓"
@ もも もも もも 名詞 6 普通名詞 1 * 0 * 0 "代表表記:股/もも カテゴリ:動物-部位"
も も も 助詞 9 副助詞 2 * 0 * 0 NIL
もも もも もも 名詞 6 普通名詞 1 * 0 * 0 "代表表記:桃/もも ドメイン:料理・食事 カテゴリ:植物;人工物-食べ物 漢字読み:訓"
@ もも もも もも 名詞 6 普通名詞 1 * 0 * 0 "代表表記:股/もも カテゴリ:動物-部位"
EOS
品詞分解したファイルを出力する場合は、こんな風に使います。
cat source.txt | jumanpp > sumomo.csv
cat sumomo.csv
まとめ
以下、上記コードをバッチ処理で実行できるソースです。
# jumanpp-2.0.0-rc3 download
wget https://github.com/ku-nlp/jumanpp/releases/download/v2.0.0-rc3/jumanpp-2.0.0-rc3.tar.xz
# unzip a file
tar xvf jumanpp-2.0.0-rc3.tar.xz
# cmake install
sudo apt install cmake -y
# build jumanpp
cd jumanpp-2.0.0-rc3/
mkdir build
cd build/
cmake .. -DCMAKE_BUILD_TYPE=Release -DCMAKE_INSTALL_PREFIX=/usr/local
make
# install jumanpp
sudo make install
以上
- 投稿日:2019-08-30T08:09:05+09:00
[Vim] Esc の遅延解消
Insert モードなどから抜ける際に Esc を押すと、実際に抜けるまで僅かながら遅れを感じることがあります。この記事はその改善方法です。Eliminating delays on ESC in vim and zsh を参考にしているので、ほぼ似た内容です
Vim
~/.vimrcにtimeoutlenとttimeoutlenを設定します。set timeoutlen=1000 ttimeoutlen=0これらは公式によれば以下のように説明されています。
The time in milliseconds that is waited for a key code or mapped key sequence to complete.
Vim documentation: options訳: キーコードとマッピングされたシーケンスの完了を待機する時間(ms)
これだけでは何のことかさっぱり理解できませんが、What is the difference between “mapped key sequences” and “key codes”?
にある statox氏の回答 はとても詳しく説明されているので勉強になります。Z shell
zsh は、複数文字シーケンスを使う時に、最初のシーケンスから次に追加のキーが入力されるまでどのくらい待機するかを、
KEYTIMEOUTという変数を参考にして決めます。値は 1/100 秒で指定します。# Shortest KEYTIMEOUT=1tmux
tmux もまた同様にしてエスケープシーケンスを待機します。その待機時間は
.tmux.confに以下を設定することで短縮できます。set -s escape-time 0


