- 投稿日:2019-08-19T23:37:19+09:00
ビジュアルデザインとアクセシビリティ
この記事はWWDC19のVisual Design and Accessibilityのセッション動画をまとめたものです。
※ここに貼っている画像は、上記動画をスクショしたものです。
概要
アクセシビリティを視覚的に向上させる3つの方法について
Dynamic Type
Dynamic Type はユーザがフォントサイズをカスタマイズできる機能。Dynamic Type を実装するときは、次の4点に気をつける必要がある。
- 拡張性を持たせ、テキストはできるだけ動的に
- 画面の幅を最大限に利用する
- テキストを切り捨てず、デフォルトと同じだけの量を表示する
- テキストだけでなくグリフのサイズも調整して、UI のバランスを取る
iOS では11種類のテキストスタイルで Dynamic Type を使うことができる。Dynamic Type を使う場合は次のように書く。
label.font = UIFont.preferredFont(forTextStyle: .body)
label.adjustsFontForContentSizeCategory = true
iOS 11 ではカスタムフォントでも利用しやすくなった。
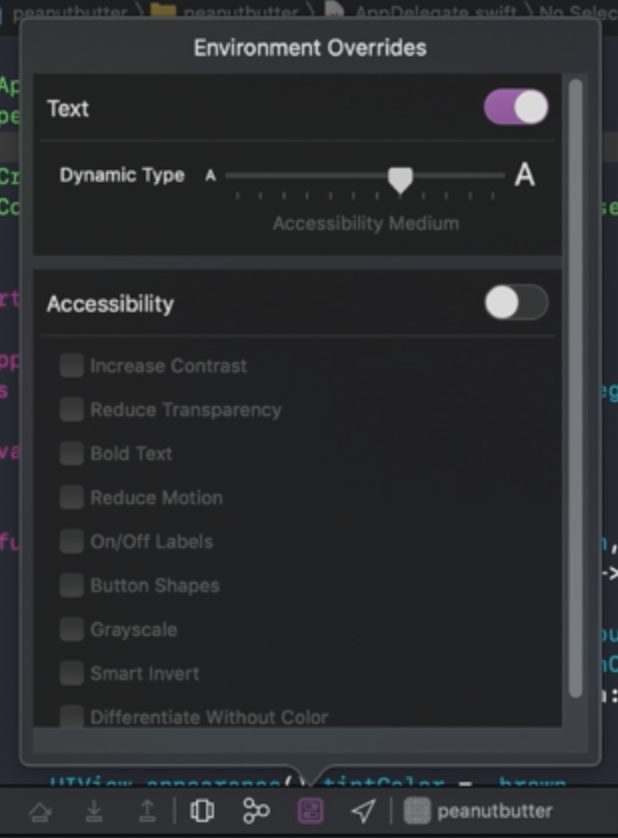
var fontDict: [UIFont.TextStyle : UIFont] = myCustomFontDict()
if let font = fontDict[style] {
  label.font = UIFontMetrics(forTextStyle: style).scaledFont(for: font)
} else {
  label.font = UIFont.preferredFont(forTextStyle: style)
}
さらに Xcode 11 では Dynamic Type のプレビューが簡単に見られるようになった。Environment Overrides ボタンをクリックするとこのポップアップが出てきて、スライダーでリアルタイムに文字の大きさを変えることができる。
視覚効果を減らす
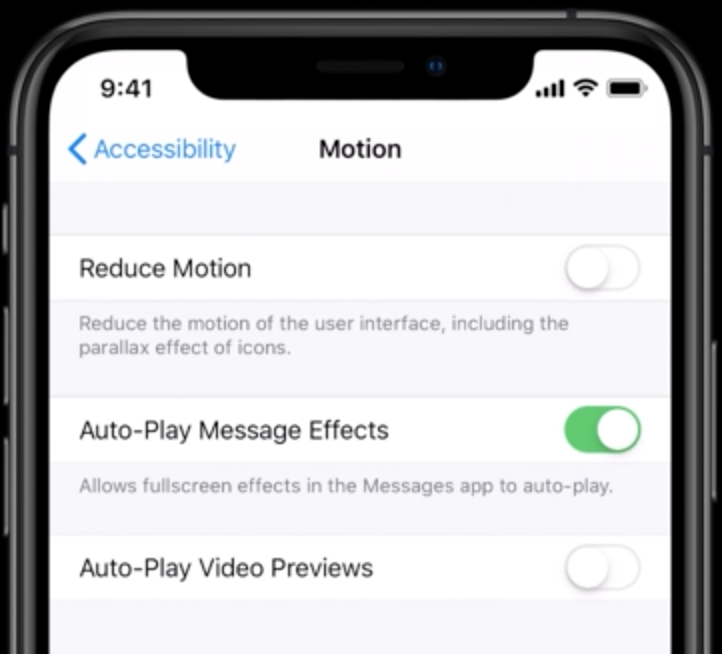
没入感を出すために視覚効果が使われることはあるが、これを望まないユーザもいる。3人に1人が動きに敏感で、車内で読書するのが苦手だったり、動きのある画面を見るのが苦手だったりする。iOSには動きを減らす設定がある。提供されているAPIは次の通り。
static var UIAccessibility.isReduceMotionEnabled: Bool { get }
static let UIAccessibility.reduceMotionStatusDidChangeNotification: NSNotification.Name
ビデオの自動再生の設定が iOS 13 から新しく追加されている。Auto-Play Video Previews の設定をオフにすれば動画が自動再生されなくなる。
この新しいAPIはパブリックで提供されている。アプリ内で設定を設けている場合は、グローバル設定とミラーリングするようにすればよい。
static var UIAccessibility.isVideoAutoplayEnabled: Bool { get }
static let UIAccessibility.videoAutoplayStatusDidChangeNotification: NSNotification.Name
画面切り替え時の視覚効果の設定もある。「クロスフェードトランジションを優先」という設定が新しくできており、この設定をオンにすると画面遷移アニメーションがディゾルブに変わる。
カラー以外で区別
2型2色覚の人には赤、緑、黄色が同じ色に見える。iOS 13 では設定のアクセシビリティの「画面表示とテキストサイズ」から「カラー以外で区別」という項目が使える。
開発者はこの新しいAPIを使って設定の監視と変更を行う。shouldDifferentiateWithoutColorがtrueなら色だけで情報を伝えているところには形や他のインジケータを追加するようにする。
public func UIAccessibility.shouldDifferentiateWithoutColor() -> Bool
public static let UIAccessibility.differentiateWithoutColorDidChangeNotification: NSNotification.Name
このようなAPIはあるとはいえ、色だけで意味づけを行うのはできるだけやめた方が良い。

- 投稿日:2019-08-19T22:40:15+09:00
UnityでBGMの容量を大きく削減できるかもしれない知識
Unityでシーケンス音源を使ってみよう
オーディオデータというものはそれなりに容量を食います。
pcや据え置きゲーム機などストレージ容量や回線速度に余裕がある場合は気にする必要はありませんが、スマホや携帯端末ではアプリやダウンロードデータの容量は少ないほうが喜ばれます。
しかし、oggやmp3などの圧縮を利用しても尺の長い曲などはかなりの容量を使ってしまいます。
曲のジャンルなどにもよりますが、シーケンス音源を使うと大きく容量削減ができるかもしれません。トラッカーモジュールの使い方
Unity公式マニュアル トラッカーモジュール
https://docs.unity3d.com/ja/2018.1/Manual/TrackerModules.html
Unityではトラッカーモジュールと呼ばれる形式をサポートしています。
トラッカーモジュールはmidiに似ていますが、音源をファイル内に内蔵でき、どのような環境でもほぼ同じ音で再生することができます。
Unityでは .it .s3m .xm .mod の四つの形式をサポートしていますが基本的には.it形式を使えば大丈夫です。トラッカーモジュールの作成方法
作成するソフトには様々なものがありますが、Openmptがおすすめです。
Openmpt公式
https://openmpt.org/
Windows専用ですが、Wineを公式にサポートしておりMacやLinuxでもがんばれば動きます。
詳しい使い方に関しては長くなってしまうのでここには書きませんが、別の記事で書くかもしれません。欠点
トラッカーモジュールはオーディオデータと違い、音の波形をそのまま記録するのではなく、楽譜のデータを内蔵された音源を利用して再生します。
そのため音質は内蔵された音源データに依存します。高品質のサンプリング音源を使ったオーケストラ曲などはオーディオデータより容量が増えてしまうかもしれません。
逆に、波形データが少なくて済むチップチューンなどには非常に向いています。
あと、波形データを記録しているわけではないのでエフェクトはUnity側でかける必要があります。どのぐらい容量が減るのか
矩形波の波形で2分間適当に演奏したデータで比べてみます。
tes.itがトラッカー、tes.opusがogg形式(44100hz)でオーディオ化したものです。
ーーー結果ーーー
tes.it 7kb
tes.opus 2.57mb大幅に容量が減りました。
おわり
うまく使えば容量削減できるのでぜひ使ってみてください。
- 投稿日:2019-08-19T21:27:19+09:00
[Flutter] Dribbbleデザイン、そのまま作ろう その7
こんにちは。
7回目の。。Flutterで作ってみたことを共有してみたいと思います。久しぶりです。
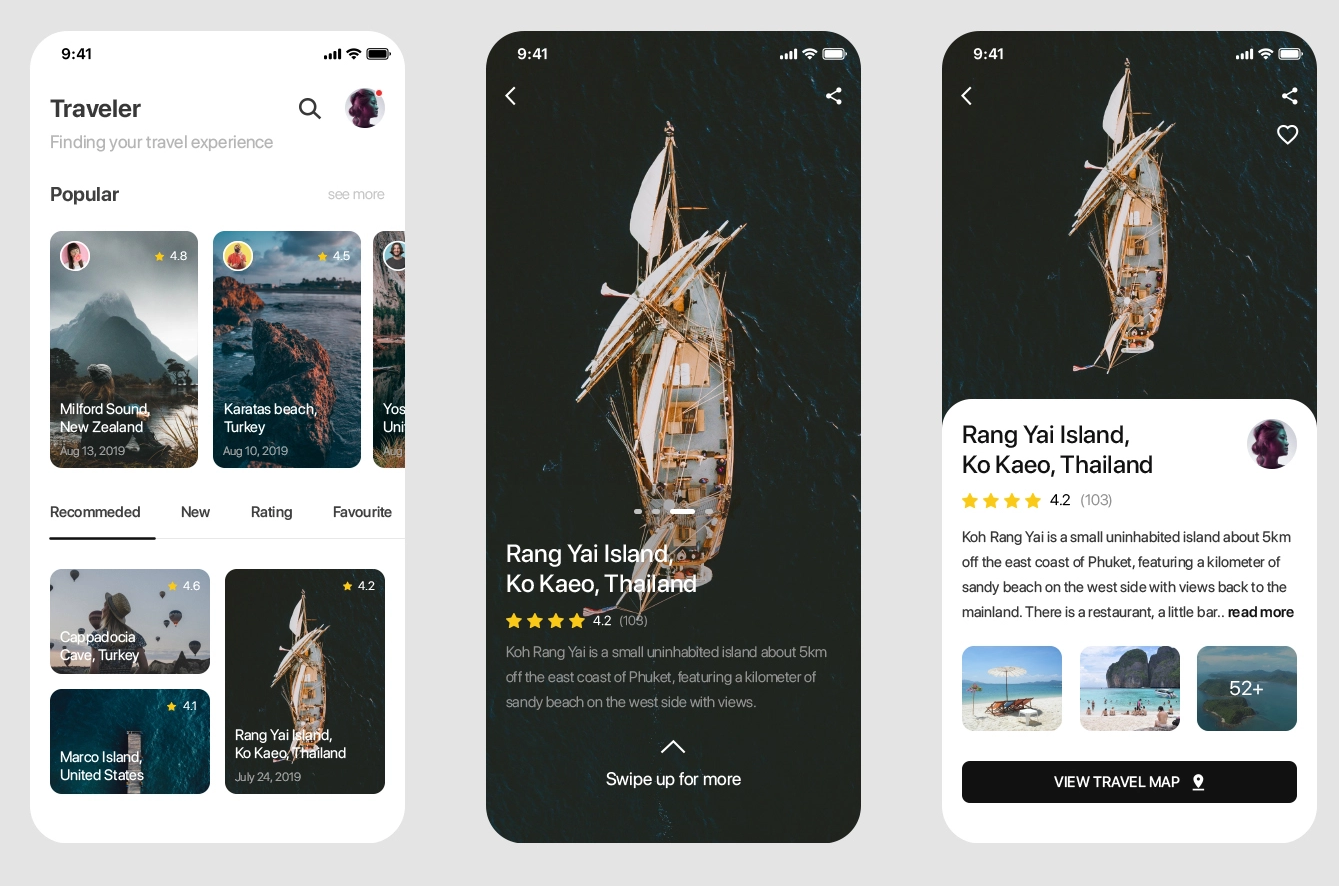
今回作ってみるデザイン
https://dribbble.com/shots/7007969-Traveler/attachments
作ってみた結果
全てのコード
main.dartimport 'package:flutter/material.dart'; import 'package:flutter_notebook_second_story/note_utils/note_image.dart'; class TravelerApp extends StatelessWidget { @override Widget build(BuildContext context) { return MaterialApp( home: MainPage(), ); } } class MainPage extends StatefulWidget { @override _MainPageState createState() => _MainPageState(); } class _MainPageState extends State<MainPage> with TickerProviderStateMixin { TabController _tabController; @override void initState() { // TODO: implement initState super.initState(); _tabController = TabController(length: 4, vsync: this); } @override Widget build(BuildContext context) { return Scaffold( body: Column( children: <Widget>[ //TODO Implementation App Bar Expanded( flex: 2, child: Padding( padding: const EdgeInsets.only(left: 16, right: 16, top: 48), child: Column( crossAxisAlignment: CrossAxisAlignment.start, children: <Widget>[ Row( children: <Widget>[ Text( "Traveler", style: TextStyle( fontWeight: FontWeight.bold, fontSize: 22), ), Spacer(), Icon(Icons.search), SizedBox( width: 16, ), CircleAvatar( backgroundImage: NetworkImage(dreamwalkerImg), ) ], ), Text( "Finding your travel experience", style: TextStyle(color: Colors.grey, fontSize: 16), ) ], ), ), ), //TODO Implementation Popular Expanded( flex: 4, child: Padding( padding: const EdgeInsets.only(left: 16), child: Column( crossAxisAlignment: CrossAxisAlignment.start, mainAxisSize: MainAxisSize.max, children: <Widget>[ Padding( padding: const EdgeInsets.only(right: 16), child: Row( children: <Widget>[ Text( "Polular", style: TextStyle( fontWeight: FontWeight.bold, fontSize: 20), ), Spacer(), Text( "see more", style: TextStyle(fontSize: 14, color: Colors.grey), ) ], ), ), Container( height: 270, child: ListView.builder( itemBuilder: (context, index) { return Container( width: 154, margin: EdgeInsets.only(right: 16, top: 8, bottom: 8), decoration: BoxDecoration( color: Colors.teal, borderRadius: BorderRadius.circular(16), image: DecorationImage( image: NetworkImage( "https://cdn.pixabay.com/photo/2019/05/31/14/22/sea-4242303__340.jpg"), colorFilter: ColorFilter.mode( Colors.black.withOpacity(0.2), BlendMode.darken), fit: BoxFit.cover)), child: Column( crossAxisAlignment: CrossAxisAlignment.start, children: <Widget>[ Padding( padding: const EdgeInsets.all(8.0), child: Row( children: <Widget>[ Container( height: 38, width: 38, decoration: BoxDecoration( border: Border.all(color: Colors.white), shape: BoxShape.circle, image: DecorationImage( image: NetworkImage(dreamwalkerImg), fit: BoxFit.cover)), ), Spacer(), Icon( Icons.star, color: Colors.yellow, size: 14, ), SizedBox( width: 8, ), Text( "4.8", style: TextStyle(color: Colors.white), ) ], ), ), Spacer(), Padding( padding: const EdgeInsets.all(8.0), child: Text( "Millford Sound,\nNew Zealand", style: TextStyle( color: Colors.white, fontWeight: FontWeight.w900), ), ), Padding( padding: const EdgeInsets.all(8.0), child: Text( "Aug 13, 2019", style: TextStyle( color: Colors.white.withOpacity(0.6)), ), ) ], ), ); }, itemCount: 5, shrinkWrap: true, scrollDirection: Axis.horizontal, ), ) ], ), ), ), //TODO Tabbar Expanded( flex: 1, child: TabBar( controller: _tabController, isScrollable: true, indicatorSize: TabBarIndicatorSize.tab, indicatorPadding: EdgeInsets.zero, labelColor: Colors.black, indicatorColor: Colors.black, tabs: [ Tab( text: "Recommended", ), Tab( text: "New", ), Tab( text: "Raing", ), Tab( text: "Favourite", ), ]), ), //TODO Tabbar View Expanded( flex: 3, child: TabBarView(controller: _tabController, children: [ Container( height: 240, child: Row( children: <Widget>[ Expanded( flex: 1, child: Column( children: <Widget>[ Expanded( flex: 1, child: Container( margin: EdgeInsets.only(left: 16, right: 16, top: 8, bottom: 8), decoration: BoxDecoration( borderRadius: BorderRadius.circular(16), color: Colors.black, image: DecorationImage(image: NetworkImage("https://cdn.pixabay.com/photo/2019/08/10/12/46/sheep-4396840__340.jpg"), fit: BoxFit.cover) ), child: Stack( children: <Widget>[ Positioned( right: 8, top: 16, child: Row( children: <Widget>[ Icon(Icons.star,color: Colors.yellow,size: 14,), SizedBox(width: 8,), Text('4.2', style: TextStyle( color: Colors.white ),) ], ), ), Positioned( bottom: 8, left: 8, right: 24, child:Column( crossAxisAlignment: CrossAxisAlignment.start, children: <Widget>[ Text("Rang Yai island," "Ko Kaeo, Thailand",style: TextStyle( color: Colors.white, fontWeight: FontWeight.bold, fontSize: 14 ),), ], ), ) ], ), ), ), Expanded( flex: 1, child: Container( margin: EdgeInsets.only(left: 16, right: 16, top: 8, bottom: 8), decoration: BoxDecoration( borderRadius: BorderRadius.circular(16), color: Colors.black, image: DecorationImage(image: NetworkImage("https://cdn.pixabay.com/photo/2019/08/14/13/46/condor-4405821__340.jpg"), fit: BoxFit.cover) ), child: Stack( children: <Widget>[ Positioned( right: 8, top: 16, child: Row( children: <Widget>[ Icon(Icons.star,color: Colors.yellow,size: 14,), SizedBox(width: 8,), Text('4.2', style: TextStyle( color: Colors.white ),) ], ), ), Positioned( bottom: 8, left: 8, right: 24, child:Column( crossAxisAlignment: CrossAxisAlignment.start, children: <Widget>[ Text("Rang Yai island," "Ko Kaeo, Thailand",style: TextStyle( color: Colors.white, fontWeight: FontWeight.bold, fontSize: 14 ),), ], ), ) ], ), ), ), ], ), ), Expanded( flex: 1, child: Container( margin: EdgeInsets.only(left: 2, right: 16, top: 8, bottom: 8), decoration: BoxDecoration( borderRadius: BorderRadius.circular(16), color: Colors.black, image: DecorationImage(image: NetworkImage("https://cdn.pixabay.com/photo/2019/08/14/10/37/greece-4405371__340.jpg"), fit: BoxFit.cover, colorFilter: ColorFilter.mode(Colors.black.withOpacity(0.2), BlendMode.darken)) ), child: Stack( children: <Widget>[ Positioned( right: 8, top: 16, child: Row( children: <Widget>[ Icon(Icons.star,color: Colors.yellow,size: 14,), SizedBox(width: 8,), Text('4.2', style: TextStyle( color: Colors.white ),) ], ), ), Positioned( bottom: 8, left: 8, right: 24, child:Column( crossAxisAlignment: CrossAxisAlignment.start, children: <Widget>[ Text("Rang Yai island," "Ko Kaeo, Thailand",style: TextStyle( color: Colors.white, fontWeight: FontWeight.bold, fontSize: 14 ),), SizedBox(height: 8,), Text("July 24, 2019", style: TextStyle( color: Colors.white.withOpacity(0.4) ),) ], ), ) ], ), ), ), ], ), ), Container( height: 240, child: Row( children: <Widget>[ Expanded( flex: 1, child: Column( children: <Widget>[ Expanded( flex: 1, child: Container( margin: EdgeInsets.only(left: 16, right: 16, top: 8, bottom: 8), decoration: BoxDecoration( borderRadius: BorderRadius.circular(16), color: Colors.black, image: DecorationImage(image: NetworkImage("https://cdn.pixabay.com/photo/2019/08/10/12/46/sheep-4396840__340.jpg"), fit: BoxFit.cover) ), child: Stack( children: <Widget>[ Positioned( right: 8, top: 16, child: Row( children: <Widget>[ Icon(Icons.star,color: Colors.yellow,size: 14,), SizedBox(width: 8,), Text('4.2', style: TextStyle( color: Colors.white ),) ], ), ), Positioned( bottom: 8, left: 8, right: 24, child:Column( crossAxisAlignment: CrossAxisAlignment.start, children: <Widget>[ Text("Rang Yai island," "Ko Kaeo, Thailand",style: TextStyle( color: Colors.white, fontWeight: FontWeight.bold, fontSize: 14 ),), ], ), ) ], ), ), ), Expanded( flex: 1, child: Container( margin: EdgeInsets.only(left: 16, right: 16, top: 8, bottom: 8), decoration: BoxDecoration( borderRadius: BorderRadius.circular(16), color: Colors.black, image: DecorationImage(image: NetworkImage("https://cdn.pixabay.com/photo/2019/08/14/13/46/condor-4405821__340.jpg"), fit: BoxFit.cover) ), child: Stack( children: <Widget>[ Positioned( right: 8, top: 16, child: Row( children: <Widget>[ Icon(Icons.star,color: Colors.yellow,size: 14,), SizedBox(width: 8,), Text('4.2', style: TextStyle( color: Colors.white ),) ], ), ), Positioned( bottom: 8, left: 8, right: 24, child:Column( crossAxisAlignment: CrossAxisAlignment.start, children: <Widget>[ Text("Rang Yai island," "Ko Kaeo, Thailand",style: TextStyle( color: Colors.white, fontWeight: FontWeight.bold, fontSize: 14 ),), ], ), ) ], ), ), ), ], ), ), Expanded( flex: 1, child: Container( margin: EdgeInsets.only(left: 2, right: 16, top: 8, bottom: 8), decoration: BoxDecoration( borderRadius: BorderRadius.circular(16), color: Colors.black, image: DecorationImage(image: NetworkImage("https://cdn.pixabay.com/photo/2019/08/14/10/37/greece-4405371__340.jpg"), fit: BoxFit.cover, colorFilter: ColorFilter.mode(Colors.black.withOpacity(0.2), BlendMode.darken)) ), child: Stack( children: <Widget>[ Positioned( right: 8, top: 16, child: Row( children: <Widget>[ Icon(Icons.star,color: Colors.yellow,size: 14,), SizedBox(width: 8,), Text('4.2', style: TextStyle( color: Colors.white ),) ], ), ), Positioned( bottom: 8, left: 8, right: 24, child:Column( crossAxisAlignment: CrossAxisAlignment.start, children: <Widget>[ Text("Rang Yai island," "Ko Kaeo, Thailand",style: TextStyle( color: Colors.white, fontWeight: FontWeight.bold, fontSize: 14 ),), SizedBox(height: 8,), Text("July 24, 2019", style: TextStyle( color: Colors.white.withOpacity(0.4) ),) ], ), ) ], ), ), ), ], ), ), Container( height: 240, child: Row( children: <Widget>[ Expanded( flex: 1, child: Column( children: <Widget>[ Expanded( flex: 1, child: Container( margin: EdgeInsets.only(left: 16, right: 16, top: 8, bottom: 8), decoration: BoxDecoration( borderRadius: BorderRadius.circular(16), color: Colors.black, image: DecorationImage(image: NetworkImage("https://cdn.pixabay.com/photo/2019/08/10/12/46/sheep-4396840__340.jpg"), fit: BoxFit.cover) ), child: Stack( children: <Widget>[ Positioned( right: 8, top: 16, child: Row( children: <Widget>[ Icon(Icons.star,color: Colors.yellow,size: 14,), SizedBox(width: 8,), Text('4.2', style: TextStyle( color: Colors.white ),) ], ), ), Positioned( bottom: 8, left: 8, right: 24, child:Column( crossAxisAlignment: CrossAxisAlignment.start, children: <Widget>[ Text("Rang Yai island," "Ko Kaeo, Thailand",style: TextStyle( color: Colors.white, fontWeight: FontWeight.bold, fontSize: 14 ),), ], ), ) ], ), ), ), Expanded( flex: 1, child: Container( margin: EdgeInsets.only(left: 16, right: 16, top: 8, bottom: 8), decoration: BoxDecoration( borderRadius: BorderRadius.circular(16), color: Colors.black, image: DecorationImage(image: NetworkImage("https://cdn.pixabay.com/photo/2019/08/14/13/46/condor-4405821__340.jpg"), fit: BoxFit.cover) ), child: Stack( children: <Widget>[ Positioned( right: 8, top: 16, child: Row( children: <Widget>[ Icon(Icons.star,color: Colors.yellow,size: 14,), SizedBox(width: 8,), Text('4.2', style: TextStyle( color: Colors.white ),) ], ), ), Positioned( bottom: 8, left: 8, right: 24, child:Column( crossAxisAlignment: CrossAxisAlignment.start, children: <Widget>[ Text("Rang Yai island," "Ko Kaeo, Thailand",style: TextStyle( color: Colors.white, fontWeight: FontWeight.bold, fontSize: 14 ),), ], ), ) ], ), ), ), ], ), ), Expanded( flex: 1, child: Container( margin: EdgeInsets.only(left: 2, right: 16, top: 8, bottom: 8), decoration: BoxDecoration( borderRadius: BorderRadius.circular(16), color: Colors.black, image: DecorationImage(image: NetworkImage("https://cdn.pixabay.com/photo/2019/08/14/10/37/greece-4405371__340.jpg"), fit: BoxFit.cover, colorFilter: ColorFilter.mode(Colors.black.withOpacity(0.2), BlendMode.darken)) ), child: Stack( children: <Widget>[ Positioned( right: 8, top: 16, child: Row( children: <Widget>[ Icon(Icons.star,color: Colors.yellow,size: 14,), SizedBox(width: 8,), Text('4.2', style: TextStyle( color: Colors.white ),) ], ), ), Positioned( bottom: 8, left: 8, right: 24, child:Column( crossAxisAlignment: CrossAxisAlignment.start, children: <Widget>[ Text("Rang Yai island," "Ko Kaeo, Thailand",style: TextStyle( color: Colors.white, fontWeight: FontWeight.bold, fontSize: 14 ),), SizedBox(height: 8,), Text("July 24, 2019", style: TextStyle( color: Colors.white.withOpacity(0.4) ),) ], ), ) ], ), ), ), ], ), ), Container( height: 240, child: Row( children: <Widget>[ Expanded( flex: 1, child: Column( children: <Widget>[ Expanded( flex: 1, child: Container( margin: EdgeInsets.only(left: 16, right: 16, top: 8, bottom: 8), decoration: BoxDecoration( borderRadius: BorderRadius.circular(16), color: Colors.black, image: DecorationImage(image: NetworkImage("https://cdn.pixabay.com/photo/2019/08/10/12/46/sheep-4396840__340.jpg"), fit: BoxFit.cover) ), child: Stack( children: <Widget>[ Positioned( right: 8, top: 16, child: Row( children: <Widget>[ Icon(Icons.star,color: Colors.yellow,size: 14,), SizedBox(width: 8,), Text('4.2', style: TextStyle( color: Colors.white ),) ], ), ), Positioned( bottom: 8, left: 8, right: 24, child:Column( crossAxisAlignment: CrossAxisAlignment.start, children: <Widget>[ Text("Rang Yai island," "Ko Kaeo, Thailand",style: TextStyle( color: Colors.white, fontWeight: FontWeight.bold, fontSize: 14 ),), ], ), ) ], ), ), ), Expanded( flex: 1, child: Container( margin: EdgeInsets.only(left: 16, right: 16, top: 8, bottom: 8), decoration: BoxDecoration( borderRadius: BorderRadius.circular(16), color: Colors.black, image: DecorationImage(image: NetworkImage("https://cdn.pixabay.com/photo/2019/08/14/13/46/condor-4405821__340.jpg"), fit: BoxFit.cover) ), child: Stack( children: <Widget>[ Positioned( right: 8, top: 16, child: Row( children: <Widget>[ Icon(Icons.star,color: Colors.yellow,size: 14,), SizedBox(width: 8,), Text('4.2', style: TextStyle( color: Colors.white ),) ], ), ), Positioned( bottom: 8, left: 8, right: 24, child:Column( crossAxisAlignment: CrossAxisAlignment.start, children: <Widget>[ Text("Rang Yai island," "Ko Kaeo, Thailand",style: TextStyle( color: Colors.white, fontWeight: FontWeight.bold, fontSize: 14 ),), ], ), ) ], ), ), ), ], ), ), Expanded( flex: 1, child: Container( margin: EdgeInsets.only(left: 2, right: 16, top: 8, bottom: 8), decoration: BoxDecoration( borderRadius: BorderRadius.circular(16), color: Colors.black, image: DecorationImage(image: NetworkImage("https://cdn.pixabay.com/photo/2019/08/14/10/37/greece-4405371__340.jpg"), fit: BoxFit.cover, colorFilter: ColorFilter.mode(Colors.black.withOpacity(0.2), BlendMode.darken)) ), child: Stack( children: <Widget>[ Positioned( right: 8, top: 16, child: Row( children: <Widget>[ Icon(Icons.star,color: Colors.yellow,size: 14,), SizedBox(width: 8,), Text('4.2', style: TextStyle( color: Colors.white ),) ], ), ), Positioned( bottom: 8, left: 8, right: 24, child:Column( crossAxisAlignment: CrossAxisAlignment.start, children: <Widget>[ Text("Rang Yai island," "Ko Kaeo, Thailand",style: TextStyle( color: Colors.white, fontWeight: FontWeight.bold, fontSize: 14 ),), SizedBox(height: 8,), Text("July 24, 2019", style: TextStyle( color: Colors.white.withOpacity(0.4) ),) ], ), ) ], ), ), ), ], ), ), ]), ) ], ), ); } }終わりに。
読んでいただきありがとうございます。
PositionedとExpandedをよく使うとすごいな?便利でした。

- 投稿日:2019-08-19T10:38:50+09:00
Swiftlintで警告を消す方法
Swiftlintを導入すると、いろいろとWarningを出してもらえるので便利な反面、
エラーが出すぎるとエディタの可視性が悪くなるので、警告を消す方法です。swiftlint: disable 警告名をswiftファイルのコメントに記載します。// swiftlint: disable type-body-length
- 投稿日:2019-08-19T03:08:14+09:00
Cocoapodsでmetalファイルを含めて配布する方法と、CoreImageで使う方法
cocoapodsでMetalファイルを含めて配布する場合は、podspecにmetalファイルを追加します。
LibraryName.podspecs.source_files = 'LibraryName/Classes/**/*.{swift,metal}'また、CoreImageのCIKernelとして呼ぶ場合は次のような設定を追加します。
LibraryName.podspecs.pod_target_xcconfig = { 'MTLLINKER_FLAGS' => '-cikernel', 'MTL_COMPILER_FLAGS' => '-fcikernel' }これでMetalファイルに含まれる関数がCoreImage用としてコンパイルされます。
CIKernelをライブラリ内で生成するには、自身のバンドルを指定します。
private final class BundleToken {}

let url = Bundle(for: BundleToken.self).url(forResource: "default", withExtension: "metallib")!
let data = try! Data(contentsOf: url)
let kernel = try! CIColorKernel(functionName: "filterName", fromMetalLibraryData: data)
- 投稿日:2019-08-19T02:42:28+09:00
AWS SDK for iOS Samples を試す
GitHub の awslabs/aws-sdk-ios-samples リポジトリには AWS SDK for iOS を利用した以下のサンプルプロジェクトが用意されています
- CognitoAuth-Sample
- CognitoYourUserPools-Sample
- IoT-Sample
- Lex-Sample
- Polly-Sample
- S3TransferUtility-Sample
以下、それぞれを実行し、関連するコードを眺めます
CognitoAuth-Sample(Swift)
UI を実装せずとも SDK が提供するウェブビューベースでのサインアップ・サインインコンポーネントを利用して、手早く iOS アプリにユーザー認証の機能を追加できるサンプルが提供されています
セットアップ方法
- リポジトリをクローンして、依存ライブラリをインストール
- Announcing Your User Pools in Amazon Cognito に従いCognito Identity Pool を作成
- アプリクライアントの設定を行う(詳細は README.md を参照)
- .xcworkspace を開く
- Info.plist を更新
- アプリを実行する
使ってみる
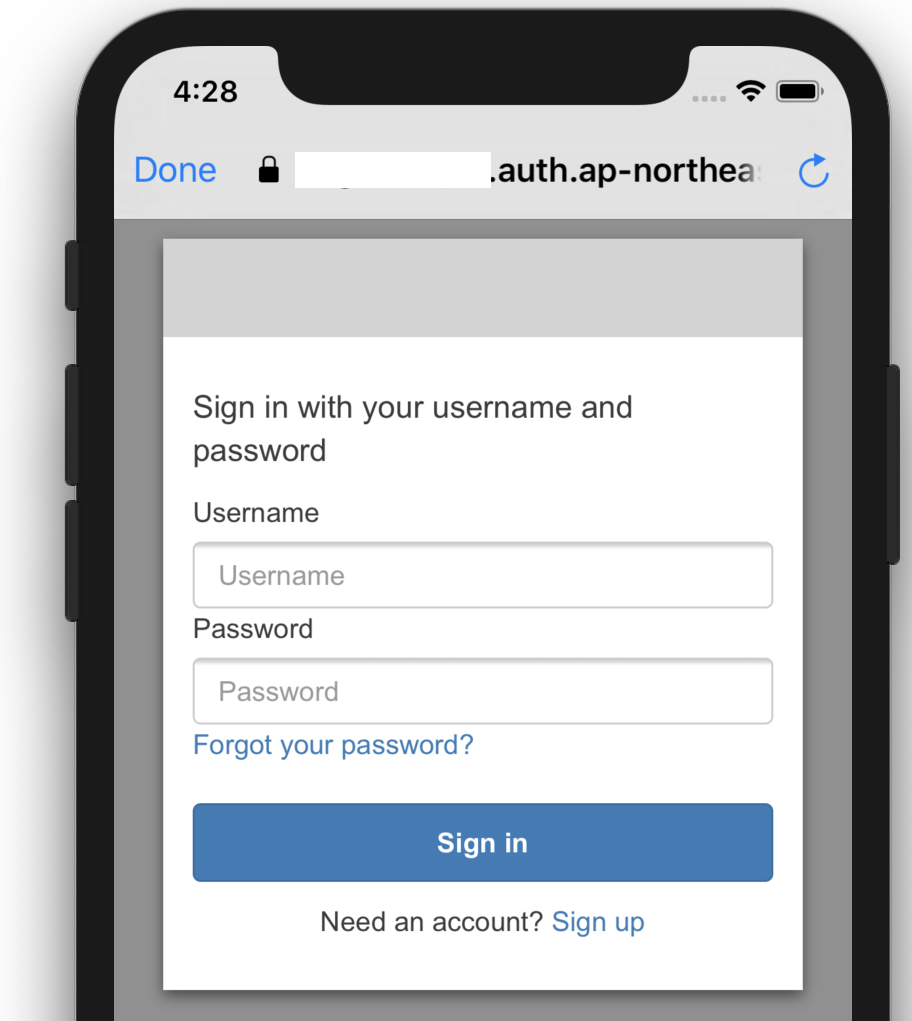
以下のように、起動するとまずログイン画面が表示されます
ユーザーが存在しないので、まずはサインアップを進めます。サインアップボタンを押し、ユーザー名、Eメールアドレス、パスワードを入力すると、確認コードの記載されたメールが届きますので、アプリ上でそれを入力し、サインアップを完了させます
サインアップが完了したアカウントを利用してログインするとメタデータが表示されます
実装を見てみる
ViewController的にはAWSCognitoAuthDelegateの実装が必要なようです。とはいっても通常は単に self を返却すれば大丈夫です。import UIKit import AWSCognitoAuth class ViewController: UITableViewController, AWSCognitoAuthDelegate { ... func getViewController() -> UIViewController { return self; } ...あとはサインイン、サインアウトなどのイベント発生時に対応する API を呼ぶだけ
    @IBAction func signInTapped(_ sender: Any) {
        self.auth.getSession  { (session:AWSCognitoAuthUserSession?, error:Error?) in
            if(error != nil) {
                self.session = nil
                self.alertWithTitle("Error", message: (error! as NSError).userInfo["error"] as? String)
            }else {
                self.session = session
            }
            self.refresh()
        }

...

    @IBAction func signOutTapped(_ sender: Any) {
        self.auth.signOut { (error:Error?) in
            if(error != nil){
                self.alertWithTitle("Error", message: (error! as NSError).userInfo["error"] as? String)
            }else {
                self.session = nil
                self.alertWithTitle("Info", message: "Session completed successfully")
            }
            self.refresh()
        }
    }
また、ざっくりと良き塩梅にログイン状態は保持されます。
CognitoYourUserPools-Sample(Swift)
独自で UI を作成した場合の Cognito のサンプルコードです。
セットアップ方法
- リポジトリをクローンして、依存ライブラリをインストール
- Announcing Your User Pools in Amazon Cognito に従いCognito Identity Pool を作成
- アプリクライアントの設定を行う(詳細は README.md を参照)
- .xcworkspace を開く
- Constants.swift を更新
- アプリを実行する
使ってみる
まずはサインアップの画面、そして検証コードの入力画面です。このようにしてユーザーを作成し、サインインの準備をします。

つづいて、作成したユーザーにてサインインを行うと、ユーザーのメタデータが表示されるサンプルとなっています。

実装を見てみる
- aws-sdk-ios-samples/CognitoYourUserPools-Sample/Swift/CognitoYourUserPoolsSample をみるとずらりと各
ViewControllerが並んでいます- 基本的に画面をせかせか実装 + Cognito の対応する Delegate をあらかじめ実装しておき、対応する API を呼び出すみたいな流れです
サインインの部分だけをピックアップしてみてみます
aws-sdk-ios-samples/SignInViewController.swift
あらかじめ Delegate を実装しつつも...
extension SignInViewController: AWSCognitoIdentityPasswordAuthentication {
    public func getDetails(_ authenticationInput: AWSCognitoIdentityPasswordAuthenticationInput, passwordAuthenticationCompletionSource: AWSTaskCompletionSource<AWSCognitoIdentityPasswordAuthenticationDetails>) {
        self.passwordAuthenticationCompletion = passwordAuthenticationCompletionSource
        DispatchQueue.main.async {
            if (self.usernameText == nil) {
                self.usernameText = authenticationInput.lastKnownUsername
            }
        }
    }

    public func didCompleteStepWithError(_ error: Error?) {
        DispatchQueue.main.async {
            if let error = error as NSError? {
                let alertController = UIAlertController(title: error.userInfo["__type"] as? String,
                                                        message: error.userInfo["message"] as? String,
                                                        preferredStyle: .alert)
                let retryAction = UIAlertAction(title: "Retry", style: .default, handler: nil)
                alertController.addAction(retryAction)

                self.present(alertController, animated: true, completion:  nil)
            } else {
                self.username.text = nil
                self.dismiss(animated: true, completion: nil)
            }
        }
    }
}
ボタンによるサインインイベントのフックは以下のような具合
    @IBAction func signInPressed(_ sender: AnyObject) {
        if (self.username.text != nil && self.password.text != nil) {
            let authDetails = AWSCognitoIdentityPasswordAuthenticationDetails(username: self.username.text!, password: self.password.text! )
            self.passwordAuthenticationCompletion?.set(result: authDetails)
        } else {
            let alertController = UIAlertController(title: "Missing information",
                                                    message: "Please enter a valid user name and password",
                                                    preferredStyle: .alert)
            let retryAction = UIAlertAction(title: "Retry", style: .default, handler: nil)
            alertController.addAction(retryAction)
        }
    }
IoT-Sample(Swift)
セットアップ方法
- リポジトリをクローンして、依存ライブラリをインストール
- Cognito Identity Pool を作成
- Unauth_Role に AmazonLexRunBotsOnly をアタッチ
- .xcworkspace を開く
- awsconfiguration.json を更新
- Constants.swift を更新
- アプリを実行する
使ってみる
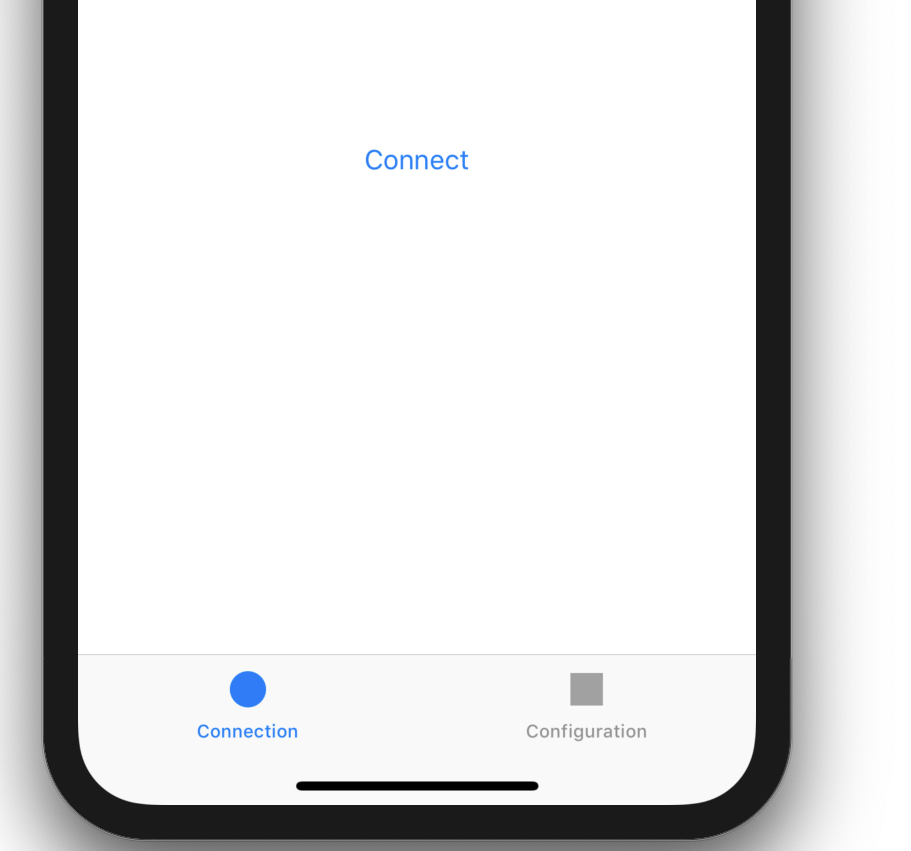
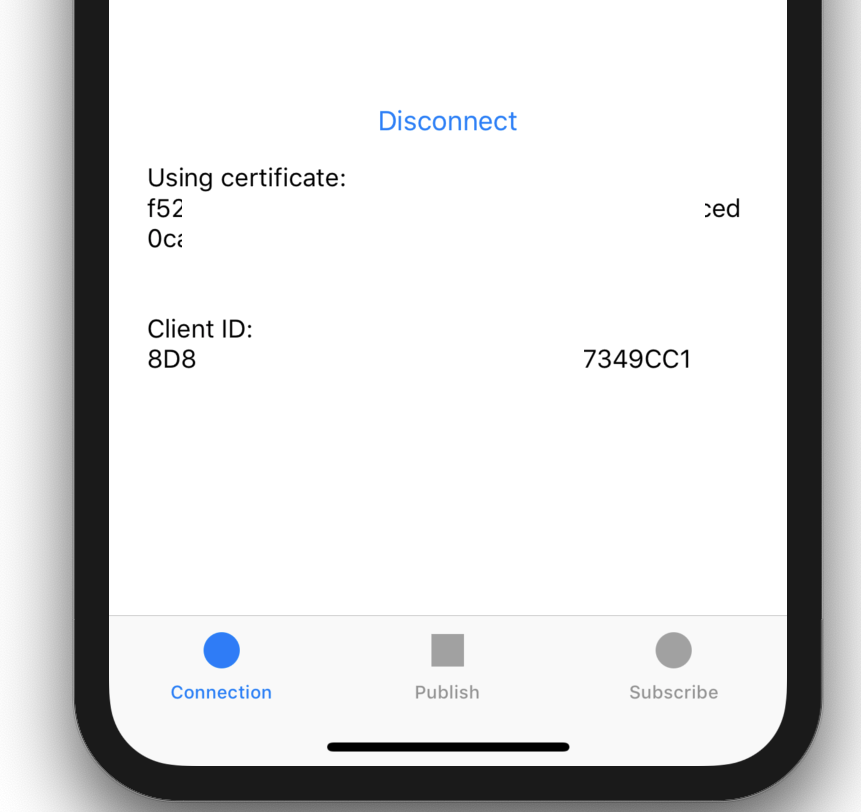
Connect ボタンを押すと必要な諸々の設定が始まり、接続が完了すると Disconnect ボタンが出現します(詳細はソースコード参照)

単体のシミュレータだとよくわからん状態になるので、動画をご覧ください。
https://static.53ningen.com/wp-content/uploads/2019/04/23013339/iot.m4v
Publish と Subscribe をタブで切り替えられます。Subscriber は Publisher からのメッセージを受信してスライドバーが連動する簡単なデモアプリケーションになっています。
実装を見てみる
ConnectionViewController.swift
基本的には
mqttEventCallbackとしてコールバック関数を定義して、iotDataManager.connect に渡すいうものになっています。複雑そうにみえますが、接続処理のフックと、各接続状態に応じた UI の制御を地味に書いていくような流れにみえます。PublishViewController.swift
Publish 側の ViewController は単に sliderValueChanged イベントをフックして iotDataManager.publishString を対象のトピックに対して行っているだけです。
class PublishViewController: UIViewController {

    @IBOutlet weak var publishSlider: UISlider!

    @IBAction func sliderValueChanged(_ sender: UISlider) {
        print("Publish slider value: " + "\(sender.value)")

        let iotDataManager = AWSIoTDataManager(forKey: ASWIoTDataManager)
        let tabBarViewController = tabBarController as! IoTSampleTabBarController

        iotDataManager.publishString("\(sender.value)", onTopic:tabBarViewController.topic, qoS:.messageDeliveryAttemptedAtMostOnce)
    }
}
SubscribeViewController.swift
Subscriber 側も Publisher 側とほぼ同様の考え方で実装可能です
class SubscribeViewController: UIViewController {

    @IBOutlet weak var subscribeSlider: UISlider!

    override func viewDidLoad() {
        super.viewDidLoad()

        // Do any additional setup after loading the view, typically from a nib.
        subscribeSlider.isEnabled = false
    }

    override func viewWillAppear(_ animated: Bool) {
        let iotDataManager = AWSIoTDataManager(forKey: ASWIoTDataManager)
        let tabBarViewController = tabBarController as! IoTSampleTabBarController

        iotDataManager.subscribe(toTopic: tabBarViewController.topic, qoS: .messageDeliveryAttemptedAtMostOnce, messageCallback: {
            (payload) ->Void in
            let stringValue = NSString(data: payload, encoding: String.Encoding.utf8.rawValue)!

            print("received: \(stringValue)")
            DispatchQueue.main.async {
                self.subscribeSlider.value = stringValue.floatValue
            }
        } )
    }

    override func viewWillDisappear(_ animated: Bool) {
        let iotDataManager = AWSIoTDataManager(forKey: ASWIoTDataManager)
        let tabBarViewController = tabBarController as! IoTSampleTabBarController
        iotDataManager.unsubscribeTopic(tabBarViewController.topic)
    }
}
Lex-Sample(Swift)
音声やテキストを使用して、対話型のインターフェイスを構築できるサービス Amazon Lex を iOS アプリに組み込むサンプルリポジトリ。以下のような手順で簡単に試せます。
セットアップ方法
- リポジトリをクローンして、依存ライブラリをインストール
- Cognito Identity Pool を作成
- Unauth_Role に AmazonLexRunBotsOnly をアタッチ
- .xcworkspace を開く
- awsconfiguration.json を更新
- Constants.swift を更新
- アプリを実行する
使ってみる
こんな感じでチャット風にやりとりできる画面と音声入力でやりとりできる画面が用意されている
実装を見てみる
AWSLexInteractionDelegateを実装すればよい形になっているので、何をすれば良いか自体は明確になっている// MARK: Interaction Kit extension ChatViewController: AWSLexInteractionDelegate { @objc public func interactionKitOnRecordingEnd(_ interactionKit: AWSLexInteractionKit, audioStream: Data, contentType: String) { DispatchQueue.main.async(execute: { let audioItem = JSQAudioMediaItem(data: audioStream) self.speechMessage = JSQMessage(senderId: ClientSenderId, displayName: "", media: audioItem) self.messages?[self.speechIndex] = self.speechMessage! self.finishSendingMessage(animated: true) }) } public func interactionKit(_ interactionKit: AWSLexInteractionKit, onError error: Error) { //do nothing for now. } public func interactionKit(_ interactionKit: AWSLexInteractionKit, switchModeInput: AWSLexSwitchModeInput, completionSource: AWSTaskCompletionSource<AWSLexSwitchModeResponse>?) { self.sessionAttributes = switchModeInput.sessionAttributes DispatchQueue.main.async(execute: { let message: JSQMessage if (switchModeInput.dialogState == AWSLexDialogState.readyForFulfillment) { if let slots = switchModeInput.slots { message = JSQMessage(senderId: ServerSenderId, senderDisplayName: "", date: Date(), text: "Slots:\n\(slots)") self.messages?.append(message) self.finishSendingMessage(animated: true) } } else { message = JSQMessage(senderId: ServerSenderId, senderDisplayName: "", date: Date(), text: switchModeInput.outputText!) self.messages?.append(message) self.finishSendingMessage(animated: true) } }) let switchModeResponse = AWSLexSwitchModeResponse() switchModeResponse.interactionMode = AWSLexInteractionMode.text switchModeResponse.sessionAttributes = switchModeInput.sessionAttributes completionSource?.set(result: switchModeResponse) } func interactionKitContinue(withText interactionKit: AWSLexInteractionKit, completionSource: AWSTaskCompletionSource<NSString>) { textModeSwitchingCompletion = completionSource } }Polly-Sample(Swift)
ディプラーニングを使用したリアルな音声の読み上げサービスを iOS アプリに組み込むサンプルリポジトリ。以下のような手順で簡単に試せます。
セットアップ方法
- リポジトリをクローンして、依存ライブラリをインストール
- Cognito Identity Pool を作成
- Unauth_Role に AmazonPollyFullAccess をアタッチ
- .xcworkspace を開く
- awsconfiguration.json を更新
- アプリを実行する
Cognito Identity Pool はマネジメントコンソールを触るのが面倒であれば amplify CLI を使って手軽に作成できます。
$ amplify init
$ amplify add auth
# 特定の選択肢に対しては下記のように選択し、Unauth ロールが生成されるようにする
# Do you want to use the default authentication and security configuration? Default configuration with Social Provider (Federation)
...
# Do you want to use the default authentication and security configuration? Manual configuration
...

$ amplify push
使ってみる
スクショのようにボイスと読み上げたいテキストを入力して、ボタンをおすと読み上げてくれる簡単なサンプルになっています
実装を見てみる
ざっくりと以下のような流れ
AWSPollySynthesizeSpeechURLBuilderRequestにて読み上げを行いたいテキストや取得するオーディオファイルのフォーマット、ボイスを選択する- getPreSignedURL にてオーディオファイルの署名付き URL を取得できるので
AVPlayerに投げて音声の再生を行う@IBAction func buttonClicked(_ sender: AnyObject) { let input = AWSPollySynthesizeSpeechURLBuilderRequest() if textField.text != "" { input.text = textField.text! } else { input.text = textField.placeholder! } input.outputFormat = AWSPollyOutputFormat.mp3 input.voiceId = selectedVoice let builder = AWSPollySynthesizeSpeechURLBuilder.default().getPreSignedURL(input) builder.continueOnSuccessWith { (awsTask: AWSTask<NSURL>) -> Any? in let url = awsTask.result! self.audioPlayer.replaceCurrentItem(with: AVPlayerItem(url: url as URL)) self.audioPlayer.play() return nil } }S3TransferUtility-Sample(Swift)
セットアップ方法
- リポジトリをクローンして、依存ライブラリをインストール
- amplify init
- amplify push
- amplify add storage
- amplify push
- .xcworkspace を開く
- アプリを実行する
使ってみる
画像のアップロード、およびダウンロードができます

実装を見てみる
DownloadViewController.swift
AWSS3TransferUtility.default().downloadDataによりダウンロードを行いつつ、プログレスの取り扱いも記述されたサンプルコードになっている@IBAction func start(_ sender: UIButton) { DispatchQueue.main.async(execute: { self.statusLabel.text = "" self.progressView.progress = 0 }) self.imageView.image = nil; let expression = AWSS3TransferUtilityDownloadExpression() expression.progressBlock = {(task, progress) in DispatchQueue.main.async(execute: { if (self.progressView.progress < Float(progress.fractionCompleted)) { self.progressView.progress = Float(progress.fractionCompleted) } }) } self.completionHandler = { (task, location, data, error) -> Void in DispatchQueue.main.async(execute: { if let error = error { NSLog("Failed with error: \(error)") self.statusLabel.text = "Failed" } else if(self.progressView.progress != 1.0) { self.statusLabel.text = "Failed" } else{ self.statusLabel.text = "Success" self.imageView.image = UIImage(data: data!) } }) } transferUtility.downloadData( forKey: S3DownloadKeyName, expression: expression, completionHandler: completionHandler).continueWith { (task) -> AnyObject? in if let error = task.error { NSLog("Error: %@",error.localizedDescription); DispatchQueue.main.async(execute: { self.statusLabel.text = "Failed" }) } if let _ = task.result { DispatchQueue.main.async(execute: { self.statusLabel.text = "Downloading..." }) NSLog("Download Starting!") // Do something with uploadTask. } return nil; } }UploadViewController.swift
AWSS3TransferUtility.default().uploadDataをたたいて、Download とおなじような形で Upload も扱える@objc func uploadImage(with data: Data) { let expression = AWSS3TransferUtilityUploadExpression() expression.progressBlock = progressBlock DispatchQueue.main.async(execute: { self.statusLabel.text = "" self.progressView.progress = 0 }) transferUtility.uploadData( data, key: S3UploadKeyName, contentType: "image/png", expression: expression, completionHandler: completionHandler).continueWith { (task) -> AnyObject? in if let error = task.error { print("Error: \(error.localizedDescription)") DispatchQueue.main.async { self.statusLabel.text = "Failed" } } if let _ = task.result { DispatchQueue.main.async { self.statusLabel.text = "Uploading..." print("Upload Starting!") } // Do something with uploadTask. } return nil; } }ライセンス表記
本記事中に登場するソースコードのライセンスは Apache License 2.0 です。
https://github.com/awslabs/aws-sdk-ios-samples/blob/master/LICENSE


- 投稿日:2019-08-19T01:21:13+09:00
イメージで理解するSwiftの高階関数(filter, map, reduce, compactMap, flatMap)
はじめに
本記事ではSwiftの初心者〜中級者向けにSwift Standard Libraryフレームワークで提供されている主な高階関数について説明します。以下のようにイメージを合わせて書くことで、イメージが掴みやすいようにしました。
高階関数とは、関数を引数や戻り値にとる関数のことです。Swift Standard Libraryでは主に配列などで利用でき、for文で配列の各要素を処理するよりも宣言的なプロラミングが可能です。
例題)1〜10の数字から2の倍数だけ取得して、それぞれ3倍したものの合計
// for文を用いた例(命令型プログラミング)
let array = [1, 2, 3, 4, 5, 6, 7, 8, 9, 10]
var result = 0
for element in array {
    guard element % 2 == 0 else { continue }
    result = result + (element * 3)
}

// 高階関数を用いた例(宣言型プログラミング)
let array = [1, 2, 3, 4, 5, 6, 7, 8, 9, 10]
let result = array
    .filter { $0 % 2 == 0 }
    .map { $0 * 3 }
    .reduce(0) { $0 + $1 }
具体的な処理を関数(クロージャー)として指定できるため、高階関数自体が汎用的で利用しやすいものとなっています。
本記事で説明する高階関数
大きくはSequenceプロトコルに準拠した型で利用できるものとOptionalプロトコルに準拠した型で利用できるものを説明します。
Sequence: filter, map, reduce, compactMap, flatMap
Sequenceの高階関数
filter
イメージ
「リストの要素からなにかの条件に合うものだけを返す」
利用例
// ?と?のリストから、?を取り除いたリストを取得する
let array = ["?", "?", "?", "?", "?", "?"]

// このとき、$0はリスト内のそれぞれの要素を意味する
let result = array.filter { $0 != "?" }

print(result) // ["?", "?", "?"]
map
イメージ
「リストの全ての要素に何か変換をして返す」
利用例
// ?のリストの要素を?に変換したリストを取得する
let array = ["?", "?", "?"]

// ここで利用したreplacingOccurrences関数は文字列を置き換える関数
let result = array.map { $0.replacingOccurrences(of: "?", with: "?") }

print(result) // ["?", "?", "?"]
reduce
イメージ
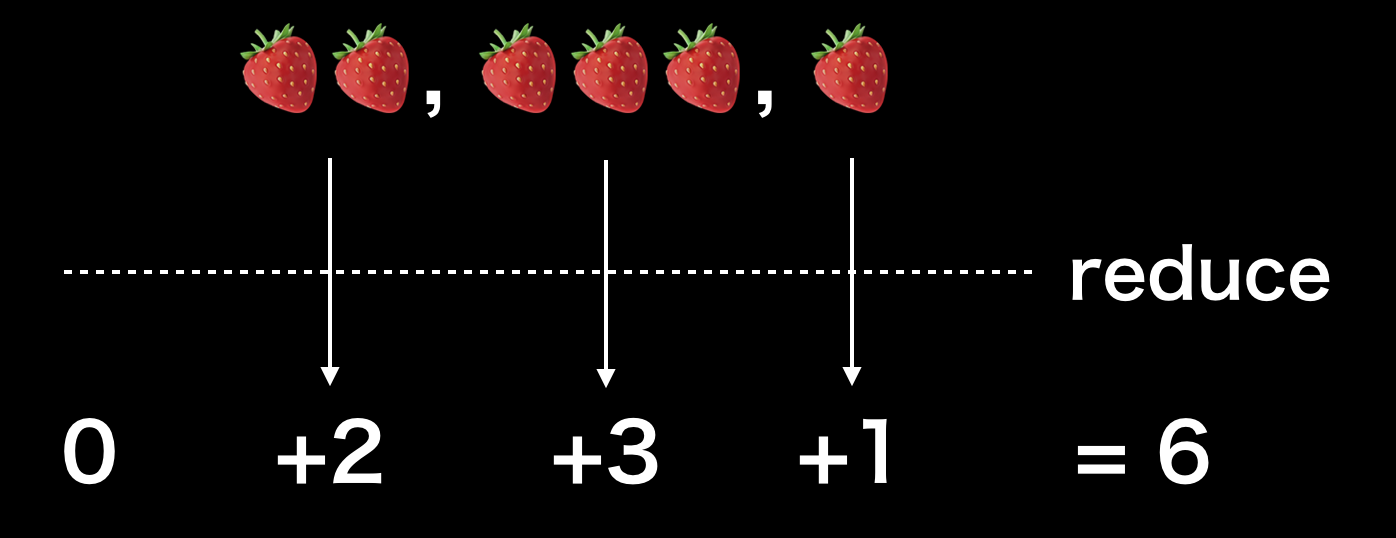
「全ての要素に何か変換をして1つの結果を得る」
利用例
// 複数の?を含むリストから合計のいちごの数を数える
let array = ["??", "???", "?"]

// このとき、$0は累積の結果、$1はリスト内のそれぞれの要素を意味する
// 第1引数の0は累積していく値の初期値
let result = array.reduce(0) { $0 + $1.count }

print(result) // 6
compactMap
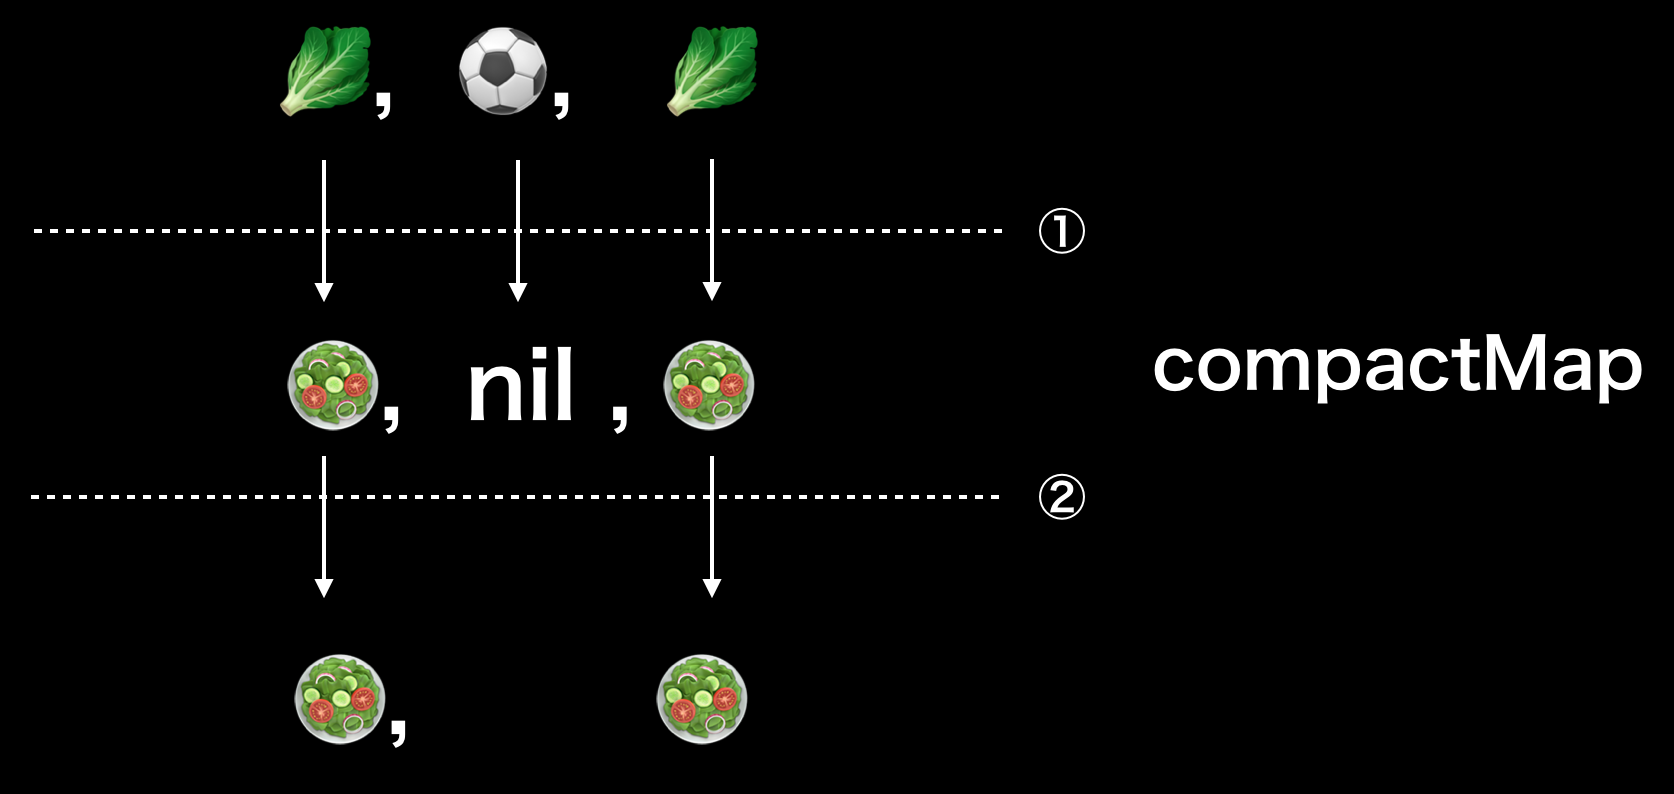
イメージ
「全ての要素に何か変換をして、nilになったものを取り除いて返す」
利用例
// ?の場合は?に変換し、それ以外の場合はnilを返す
// nilとなる要素はcompactMapで取り除く
let array = ["?", "⚽", "?"]

let result = array.compactMap { $0 == "?" ? "?" : nil }
print(result) // ["?", "?"]
※補足
上記と同様の処理をmapを利用して行った場合は、nilを含むOptional<String>型の配列となります。let array = ["?", "?", "?"] let result = array.map { $0 == "?" ? "?" : nil } print(result) // ["?", "?"] // [Optional("?"), nil, Optional("?")]"flatMap
イメージ
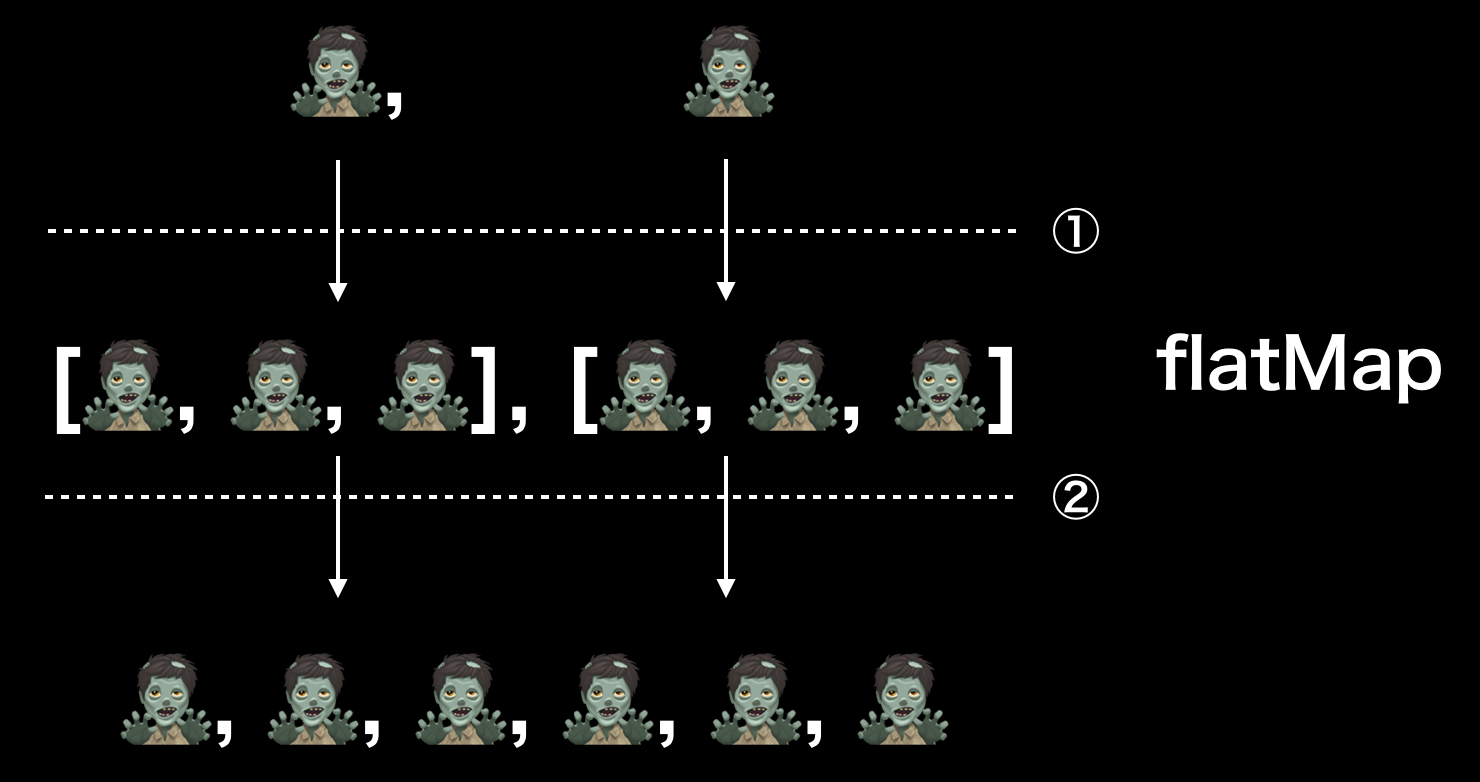
「全ての要素に何か変換をして、その結果の要素が配列であればそれをフラットにして返す」
利用例
// 要素の?を[?, ?, ?]に変換し、その多重配列をフラットにしたものを返す
let array = ["?", "?"]
let result = array.flatMap { Array(repeating: $0, count: 3) }
print(result) // ["?", "?", "?", "?", "?", "?"]
※補足
上記と同様の処理をmapを利用して行った場合は、[[String]]型の配列となります。let array = ["?", "?"] let result = array.map { Array(repeating: $0, count: 3) } print(result) // [["?", "?", "?"], ["?", "?", "?"]]Optionalの高階関数
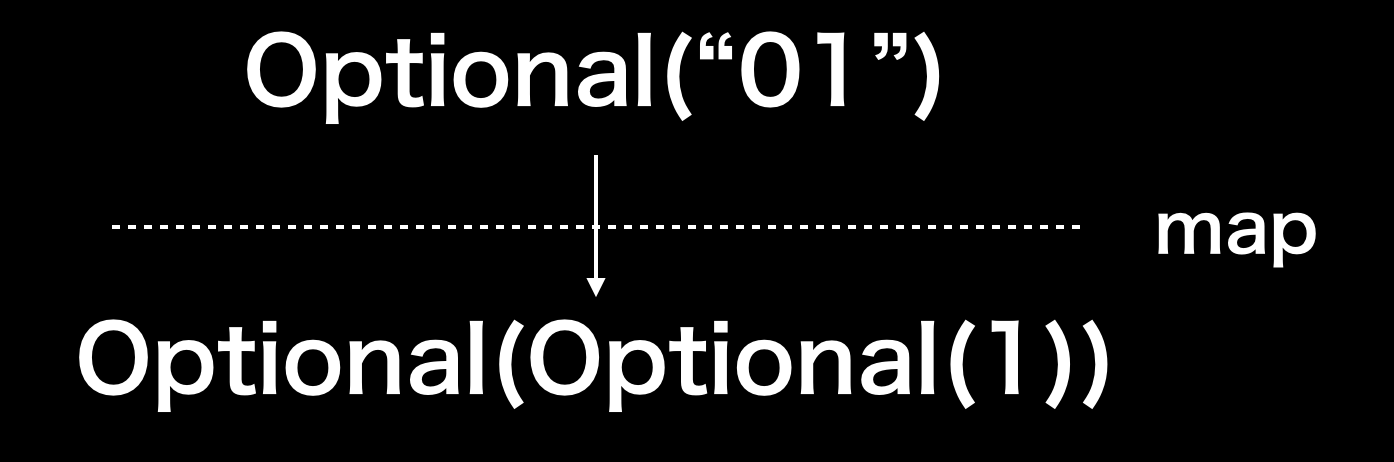
map
イメージ
「Optional型でラップされた型(中身)に対して何か変換を行う」
利用例
// Optional<String>型の変数をInt型に変換する
// init?(_ description: String)は失敗可能イニシャライザであるため、
// その結果はさらにOptional型となる
let number: String? = "01"
print(number.map { Int($0) })
flatMap
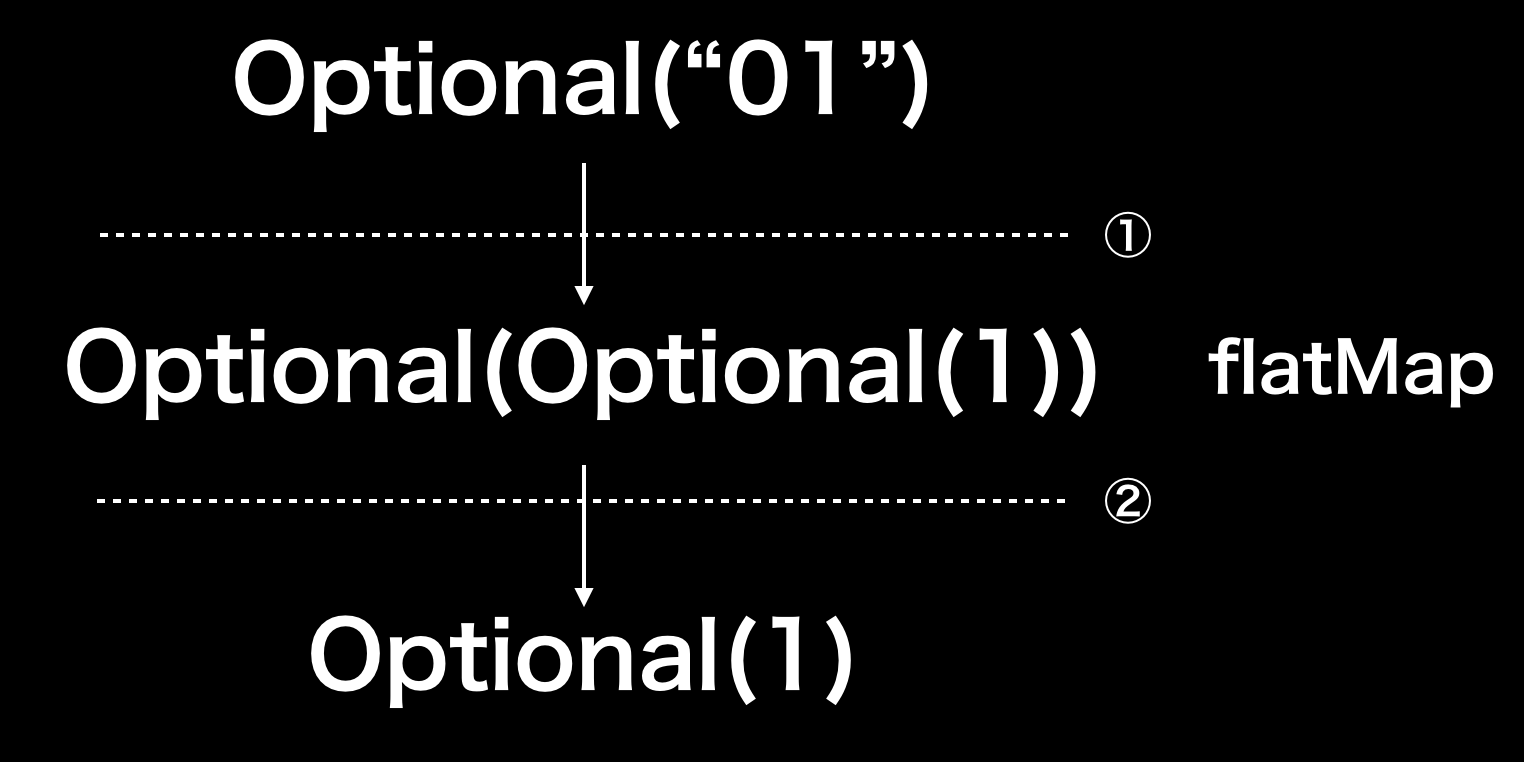
イメージ
「Optional型でラップされた型(中身)に対して何か変換を行い、その結果がOptional型であればアンラップする(多重のOptionalをフラットにする)」
利用例
// Optional<String>型の変数をInt型に変換する
// init?(_ description: String)は失敗可能イニシャライザであるため、
// その結果はさらにOptional型となるがflatMapによりアンラップされる
let number: String? = "01"
print(number.flatMap { Int($0) })
※失敗可能イニシャライザがわからない場合はこちらの記事で解説をしていますのでご覧ください。
その他の高階関数
Sequenceの高階関数の一覧です。Optionalは先述のmapとflatMapのみです。クリックすると公式ドキュメントに飛びます。
contains(where:)first(where:)min(by:)max(by:)sorted(by:)elementsEqual(_:by:)lexicographicallyPrecedes(_:by:)drop(while:)forEach(_:)prefix(while:)split(maxSplits:omittingEmptySubsequences:whereSeparator:)starts(with:by:)withContiguousStorageIfAvailable(_:)補足: 高階関数の構文について
上記の高階関数の説明では、Swiftの後置クロージャー(trailing closure)と簡易引数名(shorthand argument name)を利用しています。
後置クロージャー(trailing closure)は関数の最後の引数がクロージャーの場合に以下のように最後の引数ラベルを省略し、クロージャーを関数の後に置いて記述できるという文法です。例えばUIViewのanimate関数では、以下のように2つの書き方ができます。
// UIViewのanimate関数
class func animate(withDuration duration: TimeInterval, animations: @escaping () -> Void)
// 後置クロージャーを利用しない場合 UIView.animate(withDuration: 2.0, animations: { label.alpha = 0 }) // 後置クロージャーを利用する場合 UIView.animate(withDuration: 2.0) { label.alpha = 0 }また、クロージャーが引数を取る場合に、その引数名を省略できるという簡易引数名(shorthand argument name)の構文もあります。引数名を省略する場合は順に
$0,$1,$2...という名前で参照できます。// 簡易引数名を利用しない場合 let numbers = [1, 2, 3, 4, 5] let result = numbers.filter { number in number % 2 == 0 } // 簡易引数名を利用する場合 let numbers = [1, 2, 3, 4, 5] let result = numbers.filter { $0 % 2 == 0 }参考


- 投稿日:2019-08-19T01:05:31+09:00
Swifterを自分のアプリ組み込む方法
@k-boyさんの記事を参考にSwifterを自分のアプリに組み込んでみたのですが、色々とつまづいたので備忘のため手順を残しておきます。
1. 自分のアプリにCocoaPodでSwiterをインストールする
- 自分のアプリディレクトリに移動し、
$ pod initを実行する- Podfileが作成されるので
pod 'Swifter', :git => 'https://github.com/mattdonnelly/Swifter.git'を追記する$ pod installを実行する# Uncomment the next line to define a global platform for your project # platform :ios, '9.0' target 'MyTweetTool' do # Comment the next line if you don't want to use dynamic frameworks use_frameworks! # Pods for MyTweetTool pod 'Swifter', :git => 'https://github.com/mattdonnelly/Swifter.git' end2. Twitter Developersで自分のアプリを登録する
Twitter Developersに自分のアプリを登録します。
細かい手順は割愛しますが@tdknさんの記事が参考になります。登録が完了し、最終的に下記のように自分のConsumer API keysが確認できればOKです。
3. Custom URL Schemeを設定する
SwifterはOAuthにてAPIの認証を行うため、一時的にブラウザを開きます。
開いた先から自分のアプリに戻って来られるようにCustome URL Schemeを設定します。
- Info.plistに自分のCFBundleURLTypes定義を追加する
    <key>CFBundleURLTypes</key>
    <array>
        <dict>
            <key>CFBundleURLName</key>
            <string>$(PRODUCT_BUNDLE_IDENTIFIER)</string>
            <key>CFBundleURLSchemes</key>
            <array>
                <string>swifter-{Consumer API key}</string>
            </array>
        </dict>
    </array>
※CFBundleURLSchemesにswifter-{Consumer API key}とありますが、{Consumer API key}には先程のTwitter DevelopersのAPI keyを入力します
- AppDelegate.swiftでapplication:openURL:options:をオーバーライドする
func application(_ app: UIApplication, open url: URL, options: [UIApplication.OpenURLOptionsKey : Any] = [:]) -> Bool {
        return Swifter.handleOpenURL(url, callbackURL: URL(string: "swifter-{Consumer API key}://")!)
}
※Swifterのコードを呼び出すので
import SwifteriOSが必要です4. Swifterを使ってtweetを投稿する
自分が作成したのはテキスト入力と投稿ボタンだけのシンプルなUIのアプリで画面構成は下記のようになります。
説明よりも実際のコードを紹介します。
ViewController.swiftimport UIKit import SwifteriOS import SafariServices class ViewController: UIViewController, SFSafariViewControllerDelegate { @IBOutlet weak var tweetMsgArea: UITextView! private let appStatus = AppStatus() override func viewDidLoad() { super.viewDidLoad() // Do any additional setup after loading the view. } @IBAction func tweetPushed(_ sender: Any) { tweet() } func tweet() { let TWITTER_CONSUMER_KEY = "{Consumer API key}" let TWITTER_CONSUMER_SECRET = "{Consumer API secret key}" // load from UserDefaults let tokenKey = self.appStatus.twitterTokenKey let tokenSecret = self.appStatus.twitterTokenSecret if tokenKey == nil || tokenSecret == nil { let swifter = Swifter(consumerKey: TWITTER_CONSUMER_KEY, consumerSecret: TWITTER_CONSUMER_SECRET) swifter.authorize( withCallback: URL(string: "swifter-{Consumer API key}://")!, presentingFrom: self, success: { accessToken, response in print(response) guard let accessToken = accessToken else { return } self.appStatus.twitterTokenKey = accessToken.key self.appStatus.twitterTokenSecret = accessToken.secret self.tweet() }, failure: { error in print(error) }) } else { let swifter = Swifter(consumerKey: TWITTER_CONSUMER_KEY, consumerSecret: TWITTER_CONSUMER_SECRET, oauthToken: tokenKey!, oauthTokenSecret: tokenSecret!) swifter.postTweet(status: tweetMsgArea.text, success: { response in print(response) }, failure: { error in print(error) }) } } } class AppStatus { var userdefault = UserDefaults.init(suiteName: "app_status")! var twitterTokenKey : String? { get { if let token : String = userdefault["token_key"] { return token } else { return nil } } set { userdefault["token_key"] = newValue } } var twitterTokenSecret : String? { get { if let secret : String = userdefault["token_secret"] { return secret } else { return nil } } set { userdefault["token_secret"] = newValue } } } extension UserDefaults { subscript<T: Any>(key: String) -> T? { get { if let value = object(forKey: key) { return value as? T } else { return nil } } set(_newValue) { if let newValue = _newValue { set(newValue, forKey: key) } else { removeObject(forKey: key) } synchronize() } } }ポイントとしてはUserDefaultsからアクセストークンを取得し、取得できなかった場合は
Swifter.authorize()を呼び出してアクセストークンを取得します。
既に取得できていた場合はそのままSwifter.postTweet()で入力された内容をTweetします。5. トラブルシュート
dyld: Library not loaded: ... Reason: image not foundと出る場合
Embedded BinariesにSwifteriOSが設定されていないことが原因。
下記のように設定を行う。


